20 steps to successful transmission repair playing with ... · 20 steps to successful transmission...
TRANSCRIPT

24 GEARS August 2009
20 Steps to Successful Transmission Repair
There was a time when the dirti-est our hands ever got was when we were playing with
Tonka trucks in the mud. Before our parents knew it, we were playing with real trucks in the mud, and before weknew it, we were getting our hands dirty inside the engine compartments.
Do you remember the first toy you played with? The first bolt you loosened? Do you remember the first transmission you rebuilt without look-ing up any reference material or asking for help? Chances are you don’t. Before you knew it, you were just building transmissions with the know-how you
seemed to be born with. That’s the evo-lution of learning.
In this edition of Playing with Fire, we’re going for a shout out to the young rebuilders of our indus-try. Transmissions are getting tougher, we’re not getting any younger, and the new guys are our future.
I recently had a call on the HotLine from a veteran builder who was teach-ing his helper how to rebuild transmis-sions. He was looking for a bulletin that listed the 20 steps to a successful trans-mission repair; bulletin #079 written by Glenn Troub in November, 1991.
In this article, I’m going to cover each step, and edit a few things that have changed in
the 18 years since that bulletin was written. But what’s surprising is just how much hasn’t changed a bit in all those years.
Step 1: Before you start to work on a transmission, read the ATRA bulletins pertaining to that transmission. (If you do this every time, before you know it you’ll have them memorized.)
The new ATRA OnLine makes this step even easier by having a “Rebuild/Install” option under every transmission listed. These bulletins provide solutions for common problems or part numbers for upgrades. Keep in mind that manu-facturers sometimes release bulletins for internal upgrades or problems, so use your repair software to access the latest bulletins released by the factory.
Step 2: Clean the entire transmis-sion, including the valve body.
by Jon Rodriguez
SPEAKER
Figure 1 Figure 2
20 Steps 20 Steps toto SUCCESSFULSUCCESSFUL Transmission RepairTransmission Repair
PLAYING WITH FIRE
24jonbyellin.indd 2424jonbyellin.indd 24 7/20/09 11:12:23 AM7/20/09 11:12:23 AM

When Getting It Now Is A Must!Call the Used Parts Inventory SpecialistsCall the Used Parts Inventory Specialists
SE HABLA ESPANOLSE HABLA ESPANOL
EVT Specials • While Supplies Last
Filters Application Price604 88-03 (#72776) $ 2.50700 82-92 (#61710) $ 2.50
Bands (New)700 82-96 (#61700) $ 5.00C3/A4LD 74-up (#27320H) $ 4.00
Hard Parts (Used)RE4R01A Planet ass. 87-99 $50.00AODE Pump sta. 93-02 $20.00A518 Dir. Drum (3cl.) $10.005R55E O/D Planet 95-02 $20.00JR403E Pump Body $20.004T60E 2nd Cl. Housing $10.00
Toll Free: 866-388-7278Local: 323-758-1302
1155 N. McKinley Ave. Los Angeles, CA 90059 Tel: 866-EVT-Parts (388-7278) Fax: 323-758-9999
Don't Miss Our Special Pricing • Good While Supplies Last
We offer a wide variety of hard parts, soft parts, and converters to the automotive industry, attested by over 48 years of quality customer relations and service in the distribution of automatic transmission parts.
Established since 1959, we have proudly served the Southern California region, and now the whole United States of Americaand beyond.
Vince Hall Eloise Hall Walter Quintanilla Rosaura Gomez
Vince Hall Proprietor ATRA Member for over 35 years.
Hard Parts • Soft Parts • ConvertersWe Are The Real Transmission People!
Check
out
our
converter
prices!
1evt parts.indd 51evt parts.indd 5 11/18/08 8:42:45 AM11/18/08 8:42:45 AM

26 GEARS August 2009
20 Steps to Successful Transmission Repair
The founda-tion of a successful rebuild is cleanli-ness. In areas where clutch mate-rial or fine metal has accumulated, use solvent or brake clean to help loosen the material before placing the parts in the wash tank.
Never use a rag to dry parts; a little lint from a rag can pose a big problem later on when it makes its way into a small filter or solenoid. Always dry parts with filtered air, and if any contamina-tion shows up while blowing the part, wash it again. Blowing the contamina-tion away doesn’t work!
Always clean valve bodies with fresh solvent or brake clean only. Never put a valve body in a wash tank. Standard rebuild procedure dic-tates that you remove all valves and springs during valve body servicing. Trays are available to help keep springs and valves organized and in the correct order (figure 1).
Always lubricate the valves with clean ATF before checking for free movement. Use a pocket screwdriver and a dull, right-angle pick in combi-nation to make sure the valve has free movement throughout its bore.
Step 3: Check pumps, valve bod-ies, and cases for warping.
Use a 0.0015” feeler gauge and a straightedge to check for flatness (fig-ure 2).
Step 4: Flat file pumps, valve bod-ies, and cases; just a few strokes with the file to knock off high spots and handle burrs.
Flat filing is a great way to check for warping. Flat stones and files are equally effective. The stones are good for wet sanding, and quickly knock off any loose pieces of material, espe-cially around the bolt holes. The stones should only be used while cleaning in an EPA-approved solvent.
When dry, use a flat file, putting
light pressure on the file on the forward stroke only. The pattern should look similar to a light, “crayon-like” coloring pattern (figure 3). Make sure to clean off any excess fil-ings with brake clean and com-pressed air.
Step 5: Check all pump gear clearances.
There are three areas to check on pump gears or rotors:1. Ears or
slots used to mate with the torque converter. Replace when wear at the tabs or slots exceeds 0.050” or if a groove is worn on the inner diameter of the gear (figure 4).
2. All sides of the gear. Any sign of metal transfer on any side of the gears is unacceptable. Minor scratches can be hand buffed with Scotchbright, but if you can feel it when you run your fingernail
across the scratch, it’s a failed part.
3. Pump cavity clearance. 0.002” on the outside diameter between the pump cavity, and 0.004” between the crescent and inner pump gear are universal specifications for most pumps. Using a pump with any of the
above issues will cause reduced pump volume and a guaranteed comeback.
Figure 3
Figure 4
24jonbyellin.indd 2624jonbyellin.indd 26 7/20/09 11:13:58 AM7/20/09 11:13:58 AM

GEARS August 2009 27
Step 6: Check planet pinion endplay and side-to-side motion.
Check each planet as soon as you remove it during disassembly. Move the gears up and down for endplay checks and rock from top to bottom to test for pinion wear at the bearing or car-rier. Pay special attention to pinions that are welded into the carrier. Welds often crack and allow the pinion to rock (figure 5).
Step 7: Lubricate all planet assemblies.
Always wash planets, Torrington bearings, or any parts with enclosed bearings in EPA-approved solvents. Using water-based methods such as hot tanks dry the bearings and make it hard to judge a problem with bearing feel. Wash in solvent, blow dry, and squirt ATF on the planet during assembly.
Step 8: Soak all friction materi-als in the appropriate ATF for 15-30 minutes.
Step 9: Replace all steel plates or reuse them as is; never sand them.
Friction plates have evolved tre-mendously in the past 15 years. The trend toward smooth shifts has created clutch material that’s softer and more porous than earlier designs. The theory is to let the clutch absorb and discharge a higher volume of fluid to help dis-sipate heat.
With this softer material comes the need for smooth steels. Any imperfec-tions due to heat or sanding the steels will shorten clutch life. A little gloss on the steel is acceptable. As long as the steels and pressure plates are flat, they can be reused. Hot spots aren’t acceptable.
Step 10: Resurface all drums where a band rides.
Use a medium and then fine emery cloth to give the band surface a “brushed” look (figure 6). Never attempt to sand out grooves.
Before you even start sanding the drum, check for dishing with a straight-
edge. You can’t sand that out; the drum will have to be turned professionally or replaced.
Step 11: Replace all sealing rings.Step 12: Check all sealing rings
and rubber components in their bores for proper fit.
As you replace every sealing ring and rubber seal, immediately fit it into its respective bore. Try to build com-ponents in order, so that once you’ve fitted the seal into its groove, you can place it into its mating part. The more time the seal has in its bore, the lower your chances of cutting the seal during installation.
BEFORE AFTER
Figure 6
Figure 5

28 GEARS August 2009
20 Steps to Successful Transmission Repair
It’s a good idea to start rebuilds at the pump, so the adjacent drum’s sealing rings can begin sizing right away, and can easily be air checked.
Treat all aluminum sur-faces where a rubber seal rides with the maroon-col-ored Scotchbright pads. A light crosshatch will show in a few light strokes and prolong the life of the ring by holding more surface oil (figure 7).
Step 13: Replace all bushings.
Five steps to removing and installing a bushing:1. Look for the shortest
distance for removal and for any one-way lips that the bushing is sitting on. Some pumps have a lip on the rear of the bushing, and some have a lip on the front. Make sure to check your applica-tion before striking or you may damage the pump.
2. When using a hammer and bush-ing splitter, make the strike where the two ends of the bushing meet (figure 8). This usually breaks the bushing in half on the first strike.
3. Any burrs in the bore where the bushing is pressed in should be filed smooth. Any raised scuffs or burrs will cause a tight or uneven fit when you press the bushing in.
4. Use an arbor press to install bush-ings when possible. This provides
more placement control and less stress to the bushing, is easier on the part, and makes it harder to damage the bushing or part.
5. Finally, always place the freshly installed bushing over the support-ing part and check for drag.
Step 14: Pre-lubricate all bearings and thrust washers.
A simple squirt bottle filled with ATF works great. It’s worth it to get the industrial spray bottles because the ATF will kill the pumps on cheaper bottles. Squeeze bottles work fine. Be generous; squirt clean ATF between
every bearing, washer, and all over the planets.
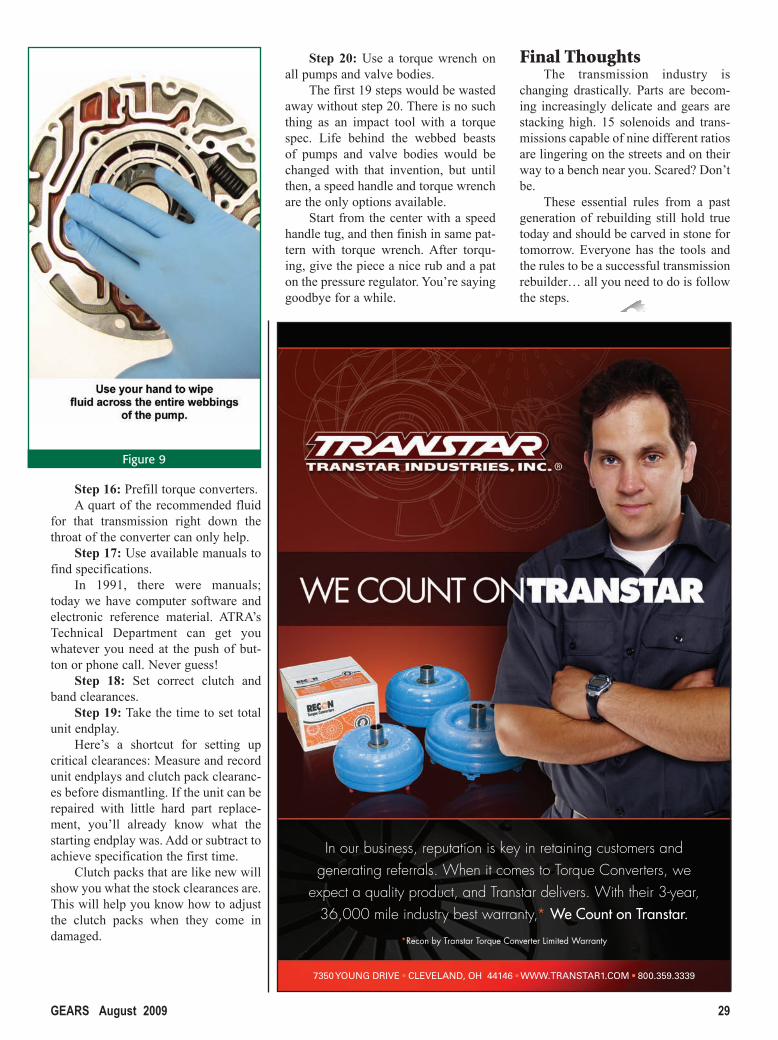
Step 15: Prelube the pump.Squirt ample amounts of ATF into
the pump cavity and on the pump halves’ webbing. Use your hand to smear an even layer of fluid across the surfaces to make an oil seal (figure 9). This technique guarantees immediate pump function and eliminates issues with delayed engagements or fluid burping on startup.
Torque every bolt associated with the pump in a star pattern.
Figure 8
Figure 7
24jonbyellin.indd 2824jonbyellin.indd 28 7/20/09 11:14:36 AM7/20/09 11:14:36 AM
GEARS August 2009 29
Step 16: Prefill torque converters.A quart of the recommended fluid
for that transmission right down the throat of the converter can only help.
Step 17: Use available manuals to find specifications.
In 1991, there were manuals; today we have computer software and electronic reference material. ATRA’s Technical Department can get you whatever you need at the push of but-ton or phone call. Never guess!
Step 18: Set correct clutch and band clearances.
Step 19: Take the time to set total unit endplay.
Here’s a shortcut for setting up critical clearances: Measure and record unit endplays and clutch pack clearanc-es before dismantling. If the unit can be repaired with little hard part replace-ment, you’ll already know what the starting endplay was. Add or subtract to achieve specification the first time.
Clutch packs that are like new will show you what the stock clearances are. This will help you know how to adjust the clutch packs when they come in damaged.
Step 20: Use a torque wrench on all pumps and valve bodies.
The first 19 steps would be wasted away without step 20. There is no such thing as an impact tool with a torque spec. Life behind the webbed beasts of pumps and valve bodies would be changed with that invention, but until then, a speed handle and torque wrench are the only options available.
Start from the center with a speed handle tug, and then finish in same pat-tern with torque wrench. After torqu-ing, give the piece a nice rub and a pat on the pressure regulator. You’re saying goodbye for a while.
Final ThoughtsThe transmission industry is
changing drastically. Parts are becom-ing increasingly delicate and gears are stacking high. 15 solenoids and trans-missions capable of nine different ratios are lingering on the streets and on their way to a bench near you. Scared? Don’t be.
These essential rules from a past generation of rebuilding still hold true today and should be carved in stone for tomorrow. Everyone has the tools and the rules to be a successful transmission rebuilder… all you need to do is follow the steps.
Figure 9
24jonbyellin.indd 2924jonbyellin.indd 29 7/20/09 11:50:49 AM7/20/09 11:50:49 AM