23.trial denture appointment
TRANSCRIPT

23. Trial Denture Appointment23. Trial Denture Appointment
John Beumer III, DDS, MSJohn Beumer III, DDS, MSandand
Robert Duell DDSRobert Duell DDSDivision of Advanced Division of Advanced
Prosthodontics, Biomaterials and Prosthodontics, Biomaterials and Hospital DentistryHospital Dentistry
UCLA School of DentistryUCLA School of DentistryThis program of instruction is protected by copyright ©. No portion of This program of instruction is protected by copyright ©. No portion of this program of instruction may be reproduced, recorded or transferred this program of instruction may be reproduced, recorded or transferred by any means electronic, digital, photographic, mechanical etc., or by by any means electronic, digital, photographic, mechanical etc., or by any information storage or retrieval system, without prior permission.any information storage or retrieval system, without prior permission.

Now you are ready for the wax try in!Now you are ready for the wax try in!
This setup is tentative. Changes are made at chairside This setup is tentative. Changes are made at chairside depending upon the the esthetic needs of the patient and the depending upon the the esthetic needs of the patient and the opinions of the dentist.opinions of the dentist.
Trial Denture AppointmentTrial Denture Appointment

Trial Denture Appointment*Trial Denture Appointment*
Check vertical dimension of occlusion and Check vertical dimension of occlusion and restrest
Prove centric relation recordProve centric relation record
Make protrusive recordMake protrusive record
Evaluate esthetics and phoneticsEvaluate esthetics and phonetics
Posterior palatal sealPosterior palatal seal
**These procedures must be performed in the sequence These procedures must be performed in the sequence listed abovelisted above.

Methods of Assessing the VDOMethods of Assessing the VDO
Physiologic rest position Physiologic rest position
Phonetics and estheticsPhonetics and esthetics
SwallowingSwallowing
Comparison with the old Comparison with the old denturedenture

Closest Speaking SpaceClosest Speaking Space
Closest speaking space is used for the final test to determine if the vertical dimension that we have chosen is correct
“s” soundsCount from 60-70

Prove the CR RecordProve the CR RecordMethod used to verify your mountingMethod used to verify your mounting-Observe any shift in the upper denture-Observe any shift in the upper denture-Look for even contact of the posterior teeth bilaterally-Look for even contact of the posterior teeth bilaterally
This patients centric relation is incorrectThis patients centric relation is incorrect

Soften the compound over the bunsen burnerPlace the compound onto the occlusal surfaces of the mandibular posterior teethTemper the compound in a water bath set at the proper temperature (110°) and smooth it with your wet gloved finger.
Proof of Mounting-CR RecordProof of Mounting-CR Record

Tips for making recordsTips for making recordsa)a) Recline the chair back, this will help retrude the mandible Recline the chair back, this will help retrude the mandible b) Stabilize mandibular base with your index fingers with the thumbs b) Stabilize mandibular base with your index fingers with the thumbs under the mandible (bimanual technique)under the mandible (bimanual technique)c) Rehearse closing with the patientc) Rehearse closing with the patientd) Have patient d) Have patient gentlygently close into the compound just short of tooth close into the compound just short of tooth contactcontact.
Verifying the CR RecordVerifying the CR Record

Remove and trim the record so that only the Remove and trim the record so that only the indentations from the cusp tips are presentindentations from the cusp tips are present
Centric Relation RecordCentric Relation Record

Proving the RecordProving the RecordPlace the new record onto the master Place the new record onto the master castscastsLoosen the centric locking screwLoosen the centric locking screwIf the maxillary teeth contact the If the maxillary teeth contact the indentations exactly as they did in the indentations exactly as they did in the mouth, you have proven that your mouth, you have proven that your original centric record was correct. original centric record was correct.
The articulator must The articulator must close in the hinge close in the hinge position without condylar position without condylar displacementdisplacement

Protrusive RecordProtrusive RecordClinical stepsClinical steps Practice the protrusive movement Practice the protrusive movement
with patient before making the with patient before making the recordrecord
Mandible must be brought forward Mandible must be brought forward 5-6 mm short of tooth contact while 5-6 mm short of tooth contact while maintaining the mandible in the maintaining the mandible in the midlinemidline

Setting the Condylar InclinationSetting the Condylar Inclination
Loosen the centric locking pinsObserve the space that develops between the condylar elements
when the casts are completely seated in the protrusive record

Setting the Condylar InclinationSetting the Condylar InclinationSelect a condylar inclination that best fits the spaceSelect a condylar inclination that best fits the space
Place the condylar inclination insert into positionPlace the condylar inclination insert into position
Orange insert 20° condylar inclination
Note space remaining

Setting the Condylar InclinationSetting the Condylar Inclination
Black InsertBlack Insert3030° condylar inclination° condylar inclination
Fits perfectly into positionFits perfectly into position& completely fills the space& completely fills the space

Esthetics and PhoneticsEsthetics and Phonetics

Facial support affected by:Facial support affected by:
Position of the incisal Position of the incisal edgeedgeThickness and contour Thickness and contour of the labial flangeof the labial flangeGingival contoursGingival contours

Facial support affected by:Facial support affected by:
Note the contour of the Note the contour of the vermillion border region.vermillion border region.
Without teeth With teeth

Phonetic EvaluationPhonetic Evaluation
“F” and “V” sounds
Fricative soundsFricative soundsPatient should be able to make Patient should be able to make a clear “f” and “v” a clear “f” and “v” sound with sound with the maxillary incisal edges the maxillary incisal edges against the lower lip. against the lower lip.

Phonetics - SibilantsPhonetics - Sibilants
During the production of the “s” or “z” sound:
a) The anterior and posterior teeth should not touch
b) There should be no hissing or air loss
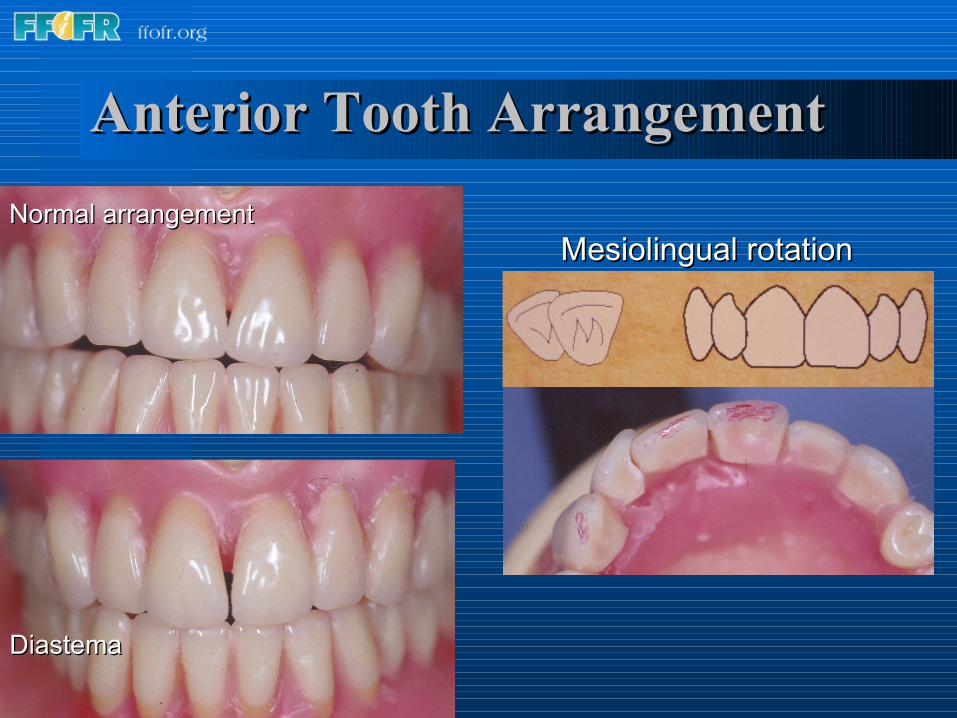
Anterior Tooth ArrangementAnterior Tooth Arrangement
Normal arrangementNormal arrangement
Mesiolingual rotationMesiolingual rotation
DiastemaDiastema

Hollow the lingual surface of the lateral incisor in Hollow the lingual surface of the lateral incisor in order to obtain a proper overlap.order to obtain a proper overlap.
Anterior CharacterizationAnterior Characterization
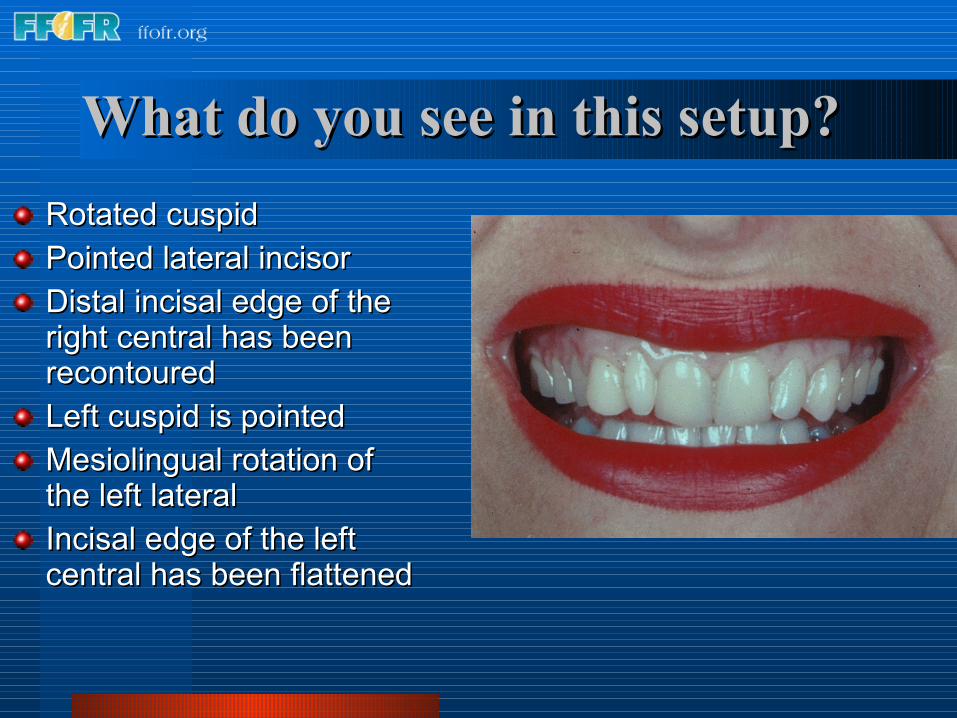
What do you see in this setup?What do you see in this setup?
Rotated cuspidRotated cuspid
Pointed lateral incisorPointed lateral incisor
Distal incisal edge of the Distal incisal edge of the right central has been right central has been recontouredrecontoured
Left cuspid is pointedLeft cuspid is pointed
Mesiolingual rotation of Mesiolingual rotation of the left lateralthe left lateral
Incisal edge of the left Incisal edge of the left central has been flattenedcentral has been flattened

Anterior setup follows Anterior setup follows the lip linethe lip linePointed caninesPointed caninesLarge incisal Large incisal embrasuresembrasures
All these characterizations provide the patient with a All these characterizations provide the patient with a youthful appearance.youthful appearance.
Denture EstheticsDenture Esthetics

Arrangement of mandibular anterior Arrangement of mandibular anterior teethteeth
Get patient approval when you characterize anterior teeth.

Posterior Palatal SealPosterior Palatal Seal
Posterior Nasal Spine
Velum
Glandular tissue
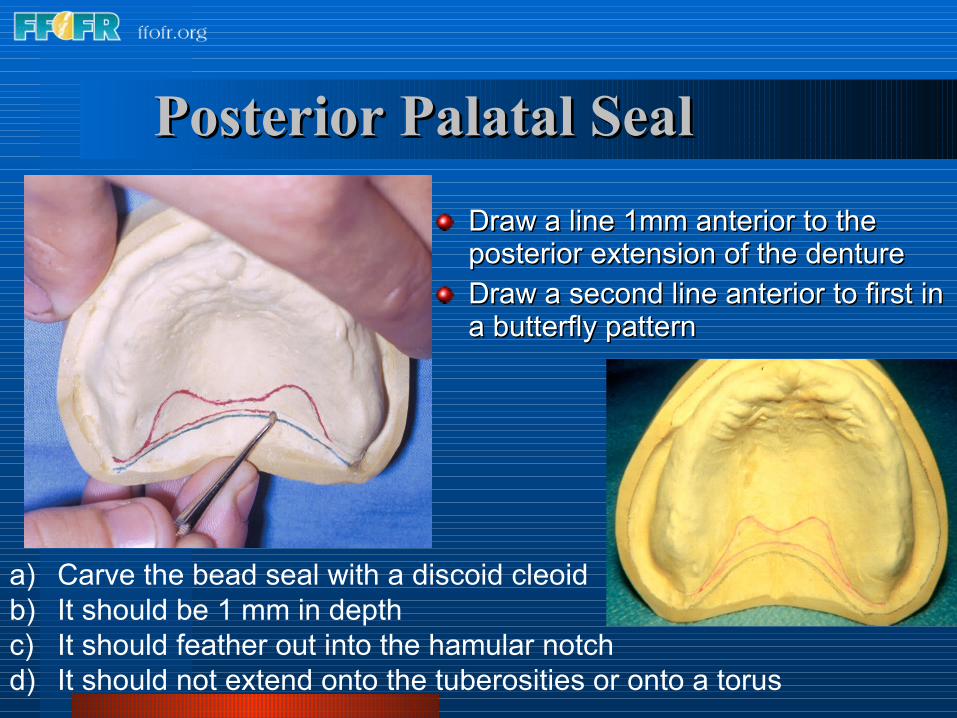
Posterior Palatal SealPosterior Palatal Seal
Draw a line 1mm anterior to the Draw a line 1mm anterior to the posterior extension of the dentureposterior extension of the denture
Draw a second line anterior to first in Draw a second line anterior to first in a butterfly patterna butterfly pattern
a) Carve the bead seal with a discoid cleoidb) It should be 1 mm in depthc) It should feather out into the hamular notchd) It should not extend onto the tuberosities or onto a torus