4-h motto - gov.pe.ca · things to know about flour ... it takes a lot of practice to become good...
TRANSCRIPT


4-H MOTTO Learn to do by doing.
4-H PLEDGE I pledge
My HEAD to clearer thinking,
My HEART to greater loyalty,
My HANDS to larger service,
My HEALTH to better living,
For my club, my community and my country.
4-H GRACE (Tune of Auld Lang Syne)
We thank thee, Lord, for blessings great
On this, our own fair land.
Teach us to serve thee joyfully,
With head, heart, health and hand.
This project was developed through funds provided by the Canadian Agricultural
Adaptation Program (CAAP). No portion of this manual may be reproduced
without written permission from the Saskatchewan 4-H Council, phone 306-933-
7727, email: [email protected]. Developed May 2013.
Writer: Pat Shier

Table of Contents
Introduction ..................................................................................................................................... 1
Overview of the Project ............................................................................................................. 3
Unit Two Requirements ....................................................................................................... 4
At Achievement Day .............................................................................................................. 4
A Note to the Leader ............................................................................................................ 5
Supplies You Will Need ............................................................................................................. 7
Before You Bake and Decorate .............................................................................................. 8
Kitchen Safety ........................................................................................................................... 8
Metric or Imperial? ................................................................................................................. 9
Baking Supplies .............................................................................................................................. 10
Baking Pan Sizes ..................................................................................................................... 10
Activity 1: Pan Capacity Refresher ................................................................................... 11
How Much Cake Batter? ...................................................................................................... 14
Preparing Baking Pans or Cake Tins .............................................................................. 14
A Few Reminders .................................................................................................................... 15
Read the Recipe ...................................................................................................................... 15
Collect Recipes ......................................................................................................................... 16
What about Allergies or Dietary Issues? ...................................................................... 16
Things to Know About Flour ............................................................................................. 16
Baking a Cake or Cupcakes ...................................................................................................... 17
Levelling a Cake ............................................................................................................................. 18
Making Buttercream Icing ......................................................................................................... 19
Buttercream Icing Recipe .................................................................................................... 19
Chocolate Buttercream Icing Recipe .............................................................................. 20

How much Icing will I Need? ............................................................................................. 20
Icing Consistency ..................................................................................................................... 20
Activity 2: Bake Two Cakes for Layering and
Make a Batch of Medium Consistency Icing .............................................................. 22
Making a Layer Cake ................................................................................................................... 23
Filling a Layer Cake ................................................................................................................. 24
Planning the Cake Design ......................................................................................................... 25
Look at the Whole Cake ...................................................................................................... 26
Repetition .................................................................................................................................... 26
Balance ......................................................................................................................................... 26
Colour ........................................................................................................................................... 27
Repeating a Pattern or Design .......................................................................................... 27
Evenly-spaced Designs .......................................................................................................... 27
Proportion ................................................................................................................................... 28
Number of Flowers ................................................................................................................. 28
Focal Point .................................................................................................................................. 28
Looking for Ideas ........................................................................................................................... 29
Activity 3: Finding Ideas for this Project ....................................................................... 30
Icing a Cake ..................................................................................................................................... 31
Crumb Coat ................................................................................................................................ 31
Final Icing Coat ......................................................................................................................... 31
Cake Boards ..................................................................................................................................... 33
How to Cover a Cake Board ............................................................................................... 34
Activity 4: Covering a Cake Board ................................................................................... 35
Cake Storage ................................................................................................................................... 37
Transporting your Cake .............................................................................................................. 38

Getting Ready to Pipe Icing ..................................................................................................... 39
Types of Icing Bags ................................................................................................................ 39
Attachments .............................................................................................................................. 39
Activity 5: Make a Parchment Paper Decorating Bag ............................................ 40
Let’s Do It! ........................................................................................................................................ 42
Decorating Steps ..................................................................................................................... 42
Activity 6: Make a Practice Board .................................................................................... 43
Preparing a New Icing Bag ................................................................................................. 44
Icing Tip Basics ............................................................................................................................... 45
Colour ................................................................................................................................................. 46
The Colour Wheel ................................................................................................................... 46
Colour Schemes ....................................................................................................................... 47
Activity 7: Colour Scheme Awareness ........................................................................... 49
Colour and Cake Decorating ................................................................................................... 51
Food Colourings ...................................................................................................................... 52
Colouring Icing ......................................................................................................................... 53
How Do I Make Different Colours? ................................................................................ 53
Two-tone Icing ......................................................................................................................... 53
Flower Petals with Coloured Tips .................................................................................... 54
Reference for Icing Tips and Techniques ........................................................................... 55
Round Tip Piping .................................................................................................................... 55
Round Tip Borders ................................................................................................................. 57
Drop String Border ................................................................................................................. 58
Activity 8: Round Tip Review ............................................................................................. 60
Star Tip Piping .......................................................................................................................... 62
Borders Using Star Tips ........................................................................................................ 63
Activity 9: Star Tip Review .................................................................................................. 65
Activity 10: Plan and Decorate a Layer Cake ............................................................. 67

Cupcakes ........................................................................................................................................... 70
Making Cupcakes .................................................................................................................... 70
Filling Cupcakes ....................................................................................................................... 70
Activity 11: Bake Cupcakes, Find or Make a Filling,
Make Medium Consistency Icing and Look for Decorating Ideas .................... 72
Activity 12: Discussion of Recipes and Cupcake Ideas and Fill Cupcakes ..... 74
Icing a Cupcake ........................................................................................................................ 76
Cupcake Ideas ........................................................................................................................... 77
Fur/Hair/Grass Tip #233 ....................................................................................................... 79
Closed Star or Drop Flower Tips ...................................................................................... 80
Leaf Tips ....................................................................................................................................... 81
Activity 13: Review of Grass/Fur, Drop Flower and Leaves .................................. 82
Activity 14: Decorating Cupcakes ..................................................................................... 84
Activity 15: Bake Two Dozen Cupcakes and
Make One Batch of Medium Consistency Icing ........................................................ 85
Petal or Ruffle Tips ................................................................................................................. 86
Activity 16: Review of Ruffles and Bows ....................................................................... 88
More Advanced Piping Techniques ...................................................................................... 90
Using a Flower Nail ................................................................................................................ 90
Daisy .............................................................................................................................................. 91
Activity 17: Daisy Practice .................................................................................................... 93
Apple Blossom (Five Petal Flower) .................................................................................. 95
Activity 18: Apple Blossom Practice ................................................................................ 97
Roses ............................................................................................................................................. 99
Fabric or Ribbon Rose ........................................................................................................... 100
Activity 19: Fabric or Ribbon Rose Practice ................................................................ 101
Classic or Traditional Rose .................................................................................................. 103
Adding Petals ............................................................................................................................ 103
Activity 20: Classic Rose and Rosebud Practice ........................................................ 105

Activity 21: Decorate Cupcakes with Piped Flowers ............................................... 107
Bachelor Button Flower ........................................................................................................ 109
Activity 22: Bachelor Button Practice ............................................................................. 110
Mum .............................................................................................................................................. 112
Activity 23: Mum Practice ................................................................................................... 113
Sunflowers .................................................................................................................................. 114
Activity 24: Sunflower Practice .......................................................................................... 115
Activity 25: Look up Directions to Make Carnations and
Chrysanthemums. Make Stiff Consistency Icing and Practice
Making Them at Home ........................................................................................................ 116
Activity 26: Sharing Chrysanthemum and Carnation Directions ....................... 118
Basket Weave ............................................................................................................................ 119
Activity 27: Basket Weave Practice ................................................................................. 121
Picture Transfers ............................................................................................................................ 122
Gel Transfer ............................................................................................................................... 122
Frozen Buttercream ................................................................................................................ 123
Activity 28: Bake Two Identical Cakes to Layer or One Tall Cake
to Cut and Layer. Icing needs to be made Thin Consistency. Plan
a Message for Your Cake and Print it in a Font and Size you want
to use on Your Cake ............................................................................................................. 126
Activity 29: Frozen Buttercream and Gel Picture Transfer ................................... 127
Using Shaped or 3-D Pans ....................................................................................................... 130
Baking in Bowls ........................................................................................................................ 131
Activity 30: Bake a Shaped or Three-dimensional Cake and Decorate it ..... 134
Other Ways to Decorate Cakes .............................................................................................. 135
Can I Decorate a Cake Without Using Tips and a Piping Bag? ........................ 135
Edible and Non-edible Decorations ............................................................................... 136
Activity 31: Brainstorm and Record as a Group:
Edible and Non-edible Decorations ............................................................................... 137

Edible Decorations .................................................................................................................. 138
Sculpting: Cutting a Cake into another Shape ................................................................ 139
Cutting a Cake Shape ............................................................................................................ 140
Activity 32: Creative Ideas, Baking and Finding Decorations.
Price Out Your Cake ............................................................................................................... 141
Activity 33: Creative Designs with Sharing .................................................................. 143
Activity 34: Cake and Cupcake Designs for Achievement Day ........................... 144
Activity 35: Optional Practice Cake and Cupcakes for Achievement Day ..... 146
Achievement Day Tips ................................................................................................................. 147
Other Types of Icing (Not Used at Achievement Day) ................................................ 148
Ganache ....................................................................................................................................... 148
Ganache Recipe ........................................................................................................................ 149
Activity 36: Demonstration or to be done as a Class ............................................. 150
Fondant or Sugar Paste ........................................................................................................ 151
Marshmallow Fondant Recipe ........................................................................................... 152
Activity 37: Demonstration and Fun with Fondant .................................................. 154
Cake Decorating Unit Three: Fun with Fondant .............................................................. 157

Cake Decorating Basics Reference and Activity Manual Unit Two 1
Introduction
Some of the cake and cupcake decorating shows on television have teams of
people who work together to make elaborate, huge cakes or hundreds of
cupcakes for weddings or events. Remember, all these people began like you,
and built their cake decorating skills over many years. They practiced their
skills and gradually learned enough to be experts.
This 4-H project helps you build on the basic cake decorating skills you
already have. You can create and decorate a cake for a special occasion. It
can look custom-made and professional, whimsical and fun, elegant and
romantic or dramatic and scary. It does not have to be only one layer, but
can be cut, sculpted and stacked or baked in a three dimensional baking pan
to give the effect you need. You will be able to make an entire garden of
flowers including roses, carnations, chrysanthemums and sweet peas. Family
and friends will be impressed by the two-tone flower petals and borders, the
fillings you hide in cupcakes and the delicious recipes you have collected.
As you gain confidence in your sense of cake design, your understanding and
ability to use buttercream icing will help you to make the designs you dream
up. You know that cake decorating can transform a plain, delicious cake into
a special dessert and by now you can do that. With more techniques and
skills, you will be able to create gorgeous cakes and ones with a lot of
character. You will be proud to decorate cakes or cupcakes for birthdays,
anniversaries, seasonal celebrations and you may even be ready to decorate
a wedding cake by the time you are done this year.
As you build on your cake decorating skills, you will be encouraged to
creatively use candies or other objects you have at home to personalize
cakes. You may find that little marshmallows make great lamb’s wool or that
wafer cookies or biscotti can be bodies of slumber party guests on your cake.
You may think it would be more fun to shape the entire cake into a pink

2 Cake Decorating Basics Reference and Activity Manual Unit Two
ukulele instead of drawing it on with icing. Use your imagination and have
fun adding character to your cake creations!
This year you will also be introduced to a few other types of icing. You will
dip cupcakes in chocolate ganache and pour it over a layer cake for a glossy,
smooth effect. Later you will be introduced to fondant icing, which is
becoming more and more popular. When you see a cake that looks draped
in fabric that is fondant. Fondant (also called sugarpaste or gum paste) is
drier and a bit more like using play dough for molding, cutting and rolling.
Fondant is often used in combination with other types of icing and details
can be piped on with buttercream icing.
If you have ever flipped through a magazine that has pictures of decorated
cupcakes, gingerbread houses or cakes, you may wonder how they decorated
them. If you look on the internet, you can find thousands of images of cakes
for almost any occasion. As part of your 4-H project, you will look at pictures
of cakes to try to figure out how the cake was decorated, what shape they
started with, the type of icing they probably used and how they made some
of the designs and patterns on it. That way, as your cake decorating skills
develop, you can learn to copy or adapt the cake designs that you see.
Towards the end of your 4-H project, you will make and colour fondant, roll
it out, cover a cake and experiment with molding some characters out of it.
You will also be introduced to royal icing. This will give you a “taste” of what
is to come if you continue learning by doing through 4-H cake decorating.
Cake decorating is a skill anyone can master. It is a fun and delicious art.
With the right ingredients, tools and practice, you are on your way to many
years of cake decorating.

Cake Decorating Basics Reference and Activity Manual Unit Two 3
Overview of the Project
This Cake Decorating Reference and Activity Manual has a quick review or
reminder section about the skills you learned in Unit One, but do not let that
discourage you. The skills you learned in Unit One are needed in Unit Two,
so additional practice with those will help you to find Unit Two easier and
less frustrating.
There is a lot of new information in this Manual and the activities will help
you learn new techniques and creative approaches to cake decorating. You
may find that it takes more than one year to master all the skills. You can
take Unit Two again if you want to strengthen these skills before working on
more advanced cake decorating. You can take each level for more than one
year. Once you have mastered most of the skills in a Unit, you can add more
advanced techniques, but do not need to use them on your Achievement
Day cake or cupcakes.
If you are excited to learn about and use fondant icing, then you will be
ready for Unit Three. Fondant techniques are very different from those using
buttercream icing and piping, so you may wonder why you can’t just skip
Unit Two. It takes a lot of practice to become good at the piping techniques
using buttercream icing and details are added to fondant cakes with the skills
you learn in Units One and Two. You will still find the Unit Two skills
extremely useful when you begin Unit Three.
As you get better, and can do more, you will see the potential to try things in
a new way, combine decorating techniques, different icings and let your
creativity and curiousity lead you to try more complicated things even now. It
all takes practice, so the more you bake and decorate, the more you will learn.
Your family will be glad to know that you will be making and decorating a
lot of cakes and cupcakes this year. They will be impressed with your special
desserts and creativity of how you use the things you learn. To challenge you

4 Cake Decorating Basics Reference and Activity Manual Unit Two
and help you see what possibilities you can experiment with at home, you
will be introduced to techniques in the next level, but not evaluated on it.
Unit Two Requirements
• Make and decorate five or
more cakes, which include
one sculpted shape, one
cake baked in a three-
dimensional pan and at
least two layer cakes,
including the one you
display at Achievement Day.
• Make and decorate at least 36
cupcakes, including the six you will
display at Achievement Day.
• Decorate a cake or cupcakes as a community service.
• Using icing tips 3 or 4, 1M, 12, 16, 47, 102 or 104, 131, 233 and 352 to
create a variety of patterns, flowers, borders and designs.
• Complete a journal of each cake or set of cupcakes made, which
includes photographs, a sketch or image showing the plan or
inspiration, list of icing tips, techniques, other decorations, colours and
recipes used. Comments about the decorating experience will be noted.
• Calculate the cost of one decorated cake or set of cupcakes.
• Collect cake and icing recipes and images of ideas for cakes and cupcakes.
• Complete a record book.
At Achievement Day
• Present a layer cake on a cake board. The cake must be made by you,
the member. The cake will be decorated with buttercream icing and
use at least two different tips and a minimum of four different
decorating techniques. The cake must have lettering (printed or
Heart cake

Cake Decorating Basics Reference and Activity Manual Unit Two 5
written) and use at least two techniques specific to Unit Two. Cake
design can incorporate other edible decorations. The cake will be
evaluated on smoothness of icing, quality and cleanliness of
workmanship, overall design (use of colour, balance, spacing) and skill
with decorating tips and techniques used.
• Present six cupcakes on a cake board. Cupcakes must be made by you,
the member and decorated with buttercream icing. Cupcakes will be
related in theme, but not identical, and use at least two different tips,
though this may not necessarily be on an individual cupcake. Cupcake
design can incorporate other edible decorations. Cupcakes will be
evaluated on quality and cleanliness of workmanship, overall design
(use of colour, balance, spacing) skill with decorating tips.
• Display a completed Record Book.
A Note to the Leader
Cake Decorating Unit Two is intended to be a project that members will take
in one year, though with the number of activities listed, you may wonder
about that. Some of the activities will be done by members at home.
Members can take Unit Two for more than one year if they would like. You
may have a variety of capabilities in your group, and should encourage those
who are ready for more advanced skills to challenge themselves and try
them. Skills develop with practice and they build on each other.
If you have a young group, they will need a more thorough review of some
of the Unit One techniques. Do not skip the review, as Unit Two skills build
on those learned in Unit One. Encourage members to evaluate pictures of
cakes to determine if they can copy them or how they would change the
cake design to be able to do it.
If the members do not have the ability to succeed at an advanced technique,
your, and their time would be better spent in strengthening their other skills.
(For instance, if members are struggling with the spacing of the basket

6 Cake Decorating Basics Reference and Activity Manual Unit Two
weave, still encourage their experimenting with the basket weave tip. They
could learn to make fences or mummies with the tip instead.)
At the end of this manual are two activities that introduce members to
ganache (to show them how easy it is!) and will pique their interest in
fondant. Fondant will be made ahead of time by the leader and the members
will use it to ice a cake and create characters. Fondant techniques are the
focus of Unit Three: Fun with Fondant.

Cake Decorating Basics Reference and Activity Manual Unit Two 7
Supplies You Will Need
• Icing Tip #s: Round 3 or 4 and 12, Star 1M and 16, Basket weave 47,
Petal or Ruffle 102 or 104, Closed Star 131, Grass and Fur 233, Leaf 352
• Two or more icing couplers
• Icing bags – three bags if featherweight, minimum 12 if disposable
• Practice board
• Flat spatula or offset spatula
• Parchment paper
• Cake turntable
• Flower nail
• Cake boards
• Food colouring (minimum three primary colours of red, yellow and blue)
• Toothpicks
• Ingredients to bake cakes and make icing at home
• Oven
• Cake pans
• Muffin tins
• Cupcake papers
• Electric mixer
• Large serrated knife
• Computer with internet access
• Printer
• Camera
• Pens, pencils and crayons
• Paper
• Tape
• Scissors
• Variety of candies

8 Cake Decorating Basics Reference and Activity Manual Unit Two
Before You Bake and Decorate
Kitchen Safety
You probably think you do not need to be told about safety in the kitchen.
Some of it will seem like common sense, but a few reminders are in order:
• Wash your hands with soap and water before you start.
• Make sure the counters are cleared off and clean so you have enough
space and a clean surface to work on.
• Check the recipe to learn where the oven racks should be before you
turn on the oven.
• When you plug in the mixer, the cord should not be hanging where it
can catch on anything while you work.
• Make sure all the necessary supplies and tools are clean.
• Read through the recipe and take everything out that you will need.
Do you have enough counter space?
• Never stick your fingers or scraper into the mixing bowl when the
beaters are still turning.
• Don’t double-dip.
• When opening the door of a hot oven, keep your face back.
• Wear oven mitts when you put things into and take them out of the oven.
• Place cooling racks on a clean counter top so they are ready before
you open the oven to take out something hot.
• If you are using a burner, choose one that is similar in size to the
bottom of the pot you are using. Turn pot handles to the inside so
they can’t catch on things or be bumped off the stove.
• Clean up the kitchen immediately after your creation.

Cake Decorating Basics Reference and Activity Manual Unit Two 9
• If you are sharing the kitchen with others, keep your part tidy and be
respectful of others’ space. Communicate with them if things are hot, if
you are walking behind them. Be especially vigilant when you are
carrying something hot or sharp.
Metric or Imperial?
Because most of the cookbooks and recipes online are in imperial, this
manual will use imperial measures only. A chart of imperial and metric
conversions you will need for cake decorating is at the back of your manual.
You can convert recipes from one measurement system to the other.

10 Cake Decorating Basics Reference and Activity Manual Unit Two
Baking Supplies
Try to use the correct word for the supplies you use. Check the glossary at
the back of your Reference and Activity Guide or online if you are not sure.
Baking Pan Sizes
Cooks refer to pans by their dimensions, such as 8”x 8”, or by their capacity,
which is what the pan holds. For instance, a regular loaf pan is approximately
9”x 5”x 3”, and it holds almost eight cups of water, which gives it an eight
cup capacity. If you are not sure of the pan capacity, before you start baking,
place it in a sink and fill a large measuring cup with water. Pour the water
into the pan and keep filling till it starts to overflow. How much water did it
take? That’s your baking pan capacity. If the pan is made from two pieces,
the water will leak out, so measure something dry like sugar or rice into the
pan instead.
The capacity does not mean how much batter you put into the pan. Like
cupcakes, you don’t want the pan to be over two-thirds full, unless it is a
very heavy recipe like fruitcake that does not rise much. Using parchment
paper around the edge of your pan and extending it above the pan will give
you a bit more capacity. You may need to adjust your recipe to fit a pan,
such as doubling it, or use more than one pan if the cake recipe is too large.

Cake Decorating Basics Reference and Activity Manual Unit Two 11
Activity 1: Pan Capacity Refresher (30 minutes)
Supplies needed
• A variety of different cake pans, bread pans, muffin tins, two-piece pans
• Access to water
• A liquid measuring cup (2 cups or larger)
• Several cups of dry, uncooked rice, macaroni or other small pasta
• Ruler or measuring tape
• Pencil
• Paper
• Calculator (optional)
Instructions
1. Gather everything you will need, including the chart you will fill in.
2. Wash your hands before you start.
3. For each pan, note what size it is called and measure its height, diameter
or length and width. (for instance, a bread or loaf pan measures…)
4. Use a measuring cup and count/add how many cups of water, rice or
macaroni it takes to fill that pan to its rim. If you are using water, put
the pan in the sink and try to level it so you can fill it to the rim.
5. Do not mix the wet and dry stuff together. Be sure to use dry
ingredients for any two-piece pan because the water will just leak out.
6. You can reuse the water and dry ingredients as you continue
measuring and filling pans.
7. Clean up includes rinsing any pans you used rice or macaroni in and
drying them all before you put them away.
8. Beside your calculations, list approximately how much cake batter
would be needed for each pan, assuming the pan should be about half
or two-thirds full of batter. Note both amounts in the chart.

12 Cake Decorating Basics Reference and Activity Manual Unit Two
Pan Capacity Chart
Name of pan Actual
measurements
Capacity
(total # of
cups it holds)
Approximate
# of cups of
batter needed

Cake Decorating Basics Reference and Activity Manual Unit Two 13
What pans do you think you would like to use this year when you make
cakes? What is their capacity? Keep that in mind when you are looking for
cake recipes to help decide if it is a single batch of batter you will need to fill
the pan.
Which baking pans does your family have at home? Ask if there are any
other baking pans that are used seldom which may be stored somewhere
else in your home and measure the capacity of those that are different sizes
than the ones you measured with your group. Record those on the chart.

14 Cake Decorating Basics Reference and Activity Manual Unit Two
How Much Cake Batter?
Different cake mixes and recipes make different amounts of batter, and they
do not all rise the same amount. With experience you will learn if a pan
needs to be half or two-thirds full to give you the height of cake you want.
Generally, a cake mix does not rise as high as some other cakes, so the pan
needs to be more than half full. Two-thirds full is often a better estimate
than half full.
This website has a chart telling you about the amount of batter you will need
in different sizes of pans. http://www.wilton.com/cakes/making-cakes/baking-
party-cake-2-inch-pans.cfm
Cake mixes come in different weights. A heavier mix will contain more flour
and will require more liquid in it, which means it also gives you more cake
batter to fill the pan. Even though the package says it can make two 8”x 8”
pans, it does not necessarily fill the pans half or two-thirds full and you will
find that with most cake mixes the cakes are very flat.
Preparing Baking Pans or Cake Tins
Just because a pan says it is non-stick, does not mean it is ready for your
cake batter. Pans need to be properly prepared for your cake to turn out
without sticking. There are a couple recommended ways to do this:
Parchment Paper
You can line just the bottom, but lining the sides may help it be less crumby
when you are icing it. If you are using parchment paper on the sides, will it
go under the bottom lining? If it will, cut the parchment paper strip wider
than your pan is tall. Snip the parchment paper at intervals to help it fit
around curves and into corners of your baking pan.
Lightly grease the pan to help hold the parchment paper when you pour in
the batter. Add the bottom piece of parchment over top to cover your
snipped edges.

Cake Decorating Basics Reference and Activity Manual Unit Two 15
Shortening and flour
You can use shortening or oil on your fingers or on a piece of wax paper. If
you are using a spray oil, be careful to spray the pan thoroughly. If the cake
pan has a fancy shape, you may find a pastry brush is helpful to get into all
the indented shapes. Sprinkle about two tablespoons of flour inside the
greased pan and gently shake the pan so that flour sticks to all the greased
surfaces. Turn the pan upside down and tap it lightly to remove the extra
flour. Shiny spots need more shortening and flour.
A Few Reminders
• Make sure you measure ingredients accurately.
• Use measuring cups and measuring spoons, not table
cutlery. Mug sizes and teaspoons for coffee may not
be anything like what the recipe calls for.
• Use liquid measures for liquids, and ones meant for
dry ingredients for dry stuff.
• Prepare cake pans before you start making the cake.
• Oven temperatures are not necessarily accurate.
• Is your oven level? If your cake has a sloped top, you will need help to
adjust the feet on the oven when the oven has cooled.
• Does the oven heat evenly? You may need to turn the pan partway
through baking to help it bake evenly or put a cookie sheet below the
cake pan, use parchment paper and move the oven racks to a higher
position than normal.
Read the Recipe
Lots of people rush to the fun part of putting ingredients together, but you
will be more successful if you read the whole recipe before you start. Then
refer to it as you bake.
Take all the ingredients out before you start, put them on the counter in the
order you will use them and move them aside as you are done with each item.
Measuring spoons

16 Cake Decorating Basics Reference and Activity Manual Unit Two
Collect Recipes
Collect recipes for cakes and icing. Most cooks are flattered to be asked for a
recipe. There are a variety of cake mixes and you may have a favourite
flavour. Note the size of pan a recipe fills, if it rises much or if it tends to
make flat cupcakes.
What about Allergies or Dietary Issues?
Read the list of ingredients on the box to be sure the item does not contain
any of the allergens you are avoiding. Surprisingly, a popular brand of cocoa
contains gluten, while the cheaper store brand does not, so it is the safe
choice for someone with celiac.
Things to Know About Flour
Can I substitute all-purpose flour for cake flour?
Yes, but the substitution is not one to one. The general rule of substitution is
1 cup of all-purpose flour minus 2 tablespoons is equivalent to 1 cup of cake
flour. Enriched flour is made from a different kind of wheat than cake flour is
made from, so some suggest using 1 cup of all-purpose flour minus 2
tablespoons plus 2 tbsp cornstarch as a substitute for cake flour. Try to use
what your recipe calls for, or see if using enriched flour makes a noticeable
difference to how tender your cake is.
Sifted flour is also less than nonsifted flour. If your cake recipe calls for sifted
flour, and you do not sift yours, you will actually be putting in more flour
than the recipe wants, which will make your cake heavier and drier than if
you followed the recipe more carefully.

Cake Decorating Basics Reference and Activity Manual Unit Two 17
Baking a Cake or Cupcakes
• Preheat the oven.
• Prepare the cake pan or cupcake tins.
• Follow the recipe carefully.
• Always begin checking your baking at the earlier doneness time
specified in the recipe.
• Test the cake or cupcakes for doneness.
• Use oven mitts to remove the cake from the oven.
• When it is done, cool the cake in the pan on a wire rack for 10 minutes
(note that this is different for differently shaped pans or 3D pans).
• Unmold the cake by sliding a knife around the edges if you used flour
and grease. If you have used a non-stick pan, do not use a metal knife
which can scratch the finish; use a nylon, silicon or wooden knife instead.
• Carefully turn the cake over using cooling racks and oven mitts. Set
the cake down (now upside down) on a cooling rack. Lift the pan off.
• Cool a cake at least one hour, till it is not warm to your touch before
you ice it.
• Level the cake.
• Brush off any loose crumbs before you start icing the cake.

18 Cake Decorating Basics Reference and Activity Manual Unit Two
Levelling a Cake
Cool the cake completely before you try to
level it.
Cakes crumble less if they have been put in
the refrigerator for even a short period of time.
Levelling a character or oddly shaped cake is
trickier, and should be done with the flat
side down on the surface, so you are cutting
almost at the bottom of the cake.
Tip:
If your cake is lopsided,
it probably means your
oven is not level. When
the oven is cool, place
a large cake pan of
water in it and look to
see which side of the
pan has deeper water.
Oven feet adjust by
spinning them. Deeper
water means the feet
at that corner or side
of the oven are shorter,
(that oven side is
lower). Adjust the feet
till the water sits level.
You may need to ask
for help to adjust the
oven feet.

Cake Decorating Basics Reference and Activity Manual Unit Two 19
Making Buttercream Icing
There are many recipes for icing (cream cheese, peanut butter, buttercream,
stabilized whipped cream, fondant, ganache, cooked caramel, royal…). As you
use different types of icings, you will learn which ones are suitable for piping,
and which ones are too goopy or hard to work with.
Cake decorating books and websites can provide information about the
suitability and uses of different types of icings. For instance, a comparison
chart can be found at http://www.wilton.com/decorating/icing/icing-chart.cfm.
A basic buttercream icing recipe is included in this Reference Manual. There
are a surprising number of buttercream icing recipes and you can use
whichever one, or ones, you like.
Buttercream Icing Recipe yields about 3 cups of stiff consistency icing
½ cup vegetable shortening
½ cup butter or margarine
1 tsp vanilla extract (or other flavouring)
4 cups sifted icing sugar
pinch of salt (add to the liquid)
2 tbsp milk or water
Use ingredients that are at room temperature.
Cream butter and shortening. Add flavouring. Gradually add icing
sugar, keeping mixer speed low to avoid a cloud of icing sugar spraying
all over. Scrape sides and bottom of bowl. When it is all blended,
gradually add milk and beat at medium speed till fluffy. This amount
of milk makes stiff icing. Gradually add more liquid to thin icing.
Cover with a damp cloth if you are using the icing soon.

20 Cake Decorating Basics Reference and Activity Manual Unit Two
Buttercream icing will last two weeks in an airtight container in refrigerator.
Rewhip before using if you have stored it. Buttercream icing can be kept in a
sealed container in the freezer for up to 3 months. Thaw it in the fridge the
day before you need it and beat it well just before you use it. Do not thaw it
in the microwave.
Chocolate Buttercream Icing Recipe
Add ¼ cup cocoa to the icing sugar and sift them together before
adding to the shortening/margarine mixture. Add 1–2 tbsp
additional liquid.
There are many different kinds of icing, and by experimenting, you will learn
which flavours you like with different cakes. A chocolate peanut butter icing
is delicious on chocolate cake! The more you bake and try new recipes for
cakes and icings, the better you will be at understanding which icings you
prefer to work with and combinations you want to try.
How much Icing will I Need?
This comes with practice and you can find estimates of icing required to
decorate a variety of cake sizes and shapes by looking at cake decorating
websites or in cake decorating books. A chart mentioned earlier about cake
batter also suggests the amount of icing it takes to ice a cake.
http://www.wilton.com/cakes/making-cakes/baking-party-cake-2-inch-pans.cfm
Icing Consistency
One of the most important things about icing a cake is icing consistency.
Consistency refers to how stiff (or thick) the icing is at room temperature.
• Stiff icing is used for roses and other shaped flowers whose petals
stand up.

Cake Decorating Basics Reference and Activity Manual Unit Two 21
• Medium icing is used for borders and things that lie flat on the cake
like stars and flowers whose petals don’t stand up. (Add about 1 tsp of
liquid to every cup of stiff icing.)
• Thin icing is used to ice a cake, for piped printing or writing and for
leaves. (Add about 2 tsp of liquid to every cup of stiff icing.)
Your hands will warm up a pastry bag, making the icing thinner as you
continue to work with it. If the icing was the correct consistency to start, but
becomes too thin from your hands on the piping bag, put it in the refrigerator.
Remember when you decorate cakes in summer that the sun beating
through a car window or the heat at an outdoor celebration can melt the
icing. What a disappointing mess.

22 Cake Decorating Basics Reference and Activity Manual Unit Two
Activity 2: Bake Two Cakes for Layering and Make a Batch of Medium Consistency Icing (60 minutes at home)
For your first 4-H cake, choose a recipe that you love to eat. You can choose
two recipes that you think will taste good together when they are stacked.
If you do not own two baking pans that are identical in shape and size,
consider buying one to match one you already have. Either measure the one
you own very carefully and take a measuring tape with you as you shop for
its partner or take your pan along to the store to match it.
Think about who you will make the cake for or the theme and colours you
will use as a review of some of your Unit One techniques. You will finalize
your plans for the cake after reviewing piping techniques at your next group
gathering.
Wrap and freeze the cakes if you make them more than one day in advance.
Wrap and refrigerate the cakes if you make them the night before.
To the next meeting remember to bring:
• Cakes to layer.
• One batch of medium consistency buttercream icing.
• Small, sealable containers or bowls.
• Two pastry bags, couplers and all your tips.
(Note: no cake board is expected, but the cake needs to be on a plate or
other flat surface.)

Cake Decorating Basics Reference and Activity Manual Unit Two 23
Tip:
If your alignment
toothpick is not at the
top, but in the middle
of the layer, you may
accidentally flip the top
layer over, which can
make your cake
lopsided, depending
how you cut the layers.
Making a Layer Cake
Ideally, your layers will be identical in height. If you are using two different cake
pans, you can measure the batter into each pan or use a kitchen scale to weigh
the pans. Cut the top off to level each cake. Your two layers do not have to be
the same kind of cake, but should be flavours that will taste good together.
If you are cutting a tall cake into layers, cut the
top off to level it before you begin. Then, measure
the total height with a ruler or measuring tape
and divide it by how many layers you want.
Tricks to lining up the layers in the exact same
placement vary from using toothpicks to cutting
a shallow diagonal line in your layers before you
lift the layers apart. Before you lift off the top
layer, poke a toothpick in each layer, one directly
above the other, at the top of the layer, so you
can reassemble it exactly.
To ice the cake, wipe off any loose crumbs and
pipe a wide ring of icing outlining the top surface of your bottom cake. You
do not have to do this, but it does help keep the crumbs down as you spread
the icing. Use thin consistency icing to ice the bottom cake right out to the
edges. Consider how thick you would like this layer of icing to be between the
cakes and adjust how much icing you use. Spread the icing an even thickness,
but it does not have to be smooth.
Set your next layer on top of the bottom cake
with its layer of icing. Line up toothpicks or any
other alignment marker you have used. Remove
the markers.
Piping around cake

24 Cake Decorating Basics Reference and Activity Manual Unit Two
Now look at your stacked cake. Are the layers lined up well? Adjust the top
layer. If the pan you used did not have completely vertical sides, but angled
out a bit, you may need to trim around the cake with a serrated knife to
make the side even.
Crumb coat your stacked cake.
Filling a Layer Cake
“Filling” a layer cake means putting something besides icing between the
layers. You can use another flavour of icing or a filling you would use in
cupcakes (see the cupcake section for the
Wilton link), but because you do not have to
pipe the filling through a tip, there are lots
of other things you can fill your layer cake
with. You cannot use something too wet
though, or it will soak into your bottom cake
instead of staying like a filling between
layers. Some pie fillings, like cherry, fresh
berries or whipped cream with fruit are
things you may like to try.
On the bottom layer of cake, you need to make a dam to keep the filling
from touching your crumb coat and icing. Pipe a thick rope of medium
consistency icing just inside the outer edge. To get a large rope of icing, use
an icing bag and your coupler (no tip) or a size 12
round tip.
Fill inside your dam with your chosen filling, but do
not fill up to the top of your icing rope. When you
set the next layer on, your icing rope will flatten a
bit and your filling could leak if you put too much
on the bottom cake with its layer of icing.
Tip:
Filled layer cakes need
to be kept in the
refrigerator because
they are so moist.
Filling a layer cake

Cake Decorating Basics Reference and Activity Manual Unit Two 25
Planning the Cake Design
Before you start to bake and decorate a cake there are several questions you
need to ask yourself. Some of the answers you may know immediately and
realize their impact on the size and design, while other questions may take
some extra thought and homework before you can answer them. Here are
some questions to think about before you begin baking:
• Is it for a special occasion?
• How many people will be eating the cake?
• What size of cake will be needed? Besides the number of people
eating it, consider if the cake is a layer cake or not, and the size of
pieces you think is appropriate. Remember it is better to have too
much cake than not enough. It is also better to cut pieces smaller and
those who want seconds can go back for it instead of having half-
eaten pieces thrown out.
• Websites and books suggest different answers, and you will need
to judge about how large you want the pieces to be. Here are
some websites that can help you with those calculations:
• http://www.ehow.com/how_5083348_determine-people-sheet
-cake-feed.html
• http://answers.yahoo.com/question/index?qid
=20110327095737AAiaPad
• http://wiki.answers.com/Q/How_many_guests_does_a_sheet_cake
_feed
• Does it matter if it is a cake or if it is cupcakes?
• Are there any allergies to consider when selecting recipes or decorations?
• What is the timing like? (how much time I have, if it needs to be done
ahead of time, etc.)
• Will the cake need transporting or storing?
• What supplies are available?

26 Cake Decorating Basics Reference and Activity Manual Unit Two
You may think those are all the things you need to consider, but there are a
few more considerations which relate directly to the appearance of the cake,
for instance:
• Theme or inspiration
• Colours
• Words
• Shape of cake
• The place you want people to focus their attention
• Techniques you want to use
Look at the Whole Cake
When you plan a cake, remember that there are sides and a top to plan. If
you use a border, consider whether you want it to stand out or to blend in,
and how that colour will be used somewhere else on the cake. A cake needs
to look good from all angles.
Repetition
When choosing colours, your cake will look like all the parts of it belong
together if a colour is repeated in more than one place. Repetition visually
links the side of the cake to the top of it. Not every colour has to be repeated.
Balance
Plan the design for visual balance, offsetting a few smaller decorations with a
larger one. The cake should not look crowded or have large areas empty of
any decoration. A cake can look the same from every angle if everything is
repeated at the same spacing or interval, all the way around, including on
the top of it (like a border or scallops) or with a decoration placed right in
the centre of the top. If you purposefully space different decorations that are
not identical, in places to add “weight”, you can make a pleasing design too.
For instance, “Happy Birthday” or a written name can be balanced by another
design on the other half of the top.

Cake Decorating Basics Reference and Activity Manual Unit Two 27
Colour
Colour adds weight. A colour that shows up more on your background icing
will seem “heavier”. It is really the contrast or difference in colour intensity
that your brain registers as weight. Consider this as you want the cake to
look balanced visually.
Repeating a Pattern or Design
This could be as simple as using a colour in more than one place, a drop
flower as part of the border and also on the cake top, or it could mean that
a design is repeated or placed equally all around the cake (like a seashell
border, scallops, swags or tiny rosebuds spaced out on the border).
Evenly-spaced Designs
It is noticeable if you tried to space something evenly and then did not
calculate well. You need to measure and mark the cake if you decide to make
or place a design evenly around a cake.
If the cake is small, you may be able to “eyeball it”, or use very basic
calculations for your spacing. For square or rectangular cakes, you need to
decide if the same length sides will be identical, and if the overall repeat will
be varied slightly to make it fit evenly on the sides, stopping at each corner,
or wrapping around the whole edge.
To evenly space decorations, you can use a measuring tape and a calculator
or this next way that does not require a lot of calculations. You still will need
scissors and a piece of paper.
1. Decide whether you want to divide the cake into four, six, eight or
more sections.
2. If you can, calculate it approximately by looking at it and dividing the
portions in half and half again or thirds, place a small dot of the
background icing (it is just a raised dot of the same colour as your
smooth surface) at each “x” of where the design will repeat. Poke a

28 Cake Decorating Basics Reference and Activity Manual Unit Two
toothpick mark at each dab of icing and see if it looks right or make
any adjustments you think would help. Draw on other guidelines you
need with a toothpick.
3. For a round cake, if it needs to be more exact or you cannot visualize
it, make a two-inch wide piece of paper that is longer than the outside
of your cake. Wrap it around the outside of your cake and cut it to the
exact length (the circumference). Take the paper off and fold it in half
and continue folding it in half or thirds (if you want it as six equal
sections, not eight, for instance) until you have as many sections as
you need. Unfold and place the long paper around the top of the side
of the cake and attach it with a toothpick or large pin. Mark the cake
at each fold. Draw any other toothpick guidelines you need before you
remove the paper.
4. You can use the same method for a square or rectangular cake, but
make a tape for the different length of sides, not one that goes all the
way around the circumference.
Proportion
Larger cakes need larger decorations or larger groupings of smaller decorations.
Number of flowers
Generally an odd number is more attractive than an even number of flowers.
(Use five roses together instead of four in a bouquet.)
Focal Point
What do you want people to notice on your cake? A focal point is a fancy
word to describe what you want them to look at longest. It could be the
words, a bouquet of your two-tone roses or the hairy spider you made with
icing and candy. The focus does not have to be at the centre of the cake.
Colour, size and location affect what people will look at.

Cake Decorating Basics Reference and Activity Manual Unit Two 29
Looking for Ideas
Through this 4-H project you will be asked to make several cakes and
batches of cupcakes. You can make cakes for whomever you want, for
whatever special or not-so-special occasion and in a great variety of styles as
you experiment and build your decorating skills.
Remember that as a community service, you will need to contact a group to
offer to make a cake for them. It does not matter which cake or set of
cupcakes you give away, but you should know ahead of time to properly
plan the size, recipe and design.

30 Cake Decorating Basics Reference and Activity Manual Unit Two
Activity 3: Finding Ideas for this Project (60 minutes including time online)
If you have a theme or idea in mind before you begin looking for ideas on
the internet, it will help you in your search for ideas. Start by filling in the
chart before you go online. Search by looking for images of that item
specifically. As an example, if the person is a big Saskatchewan Roughriders
fan, some images to search would be Saskatchewan Roughriders cakes,
football cakes, football helmet cakes or watermelon cakes. You probably
won’t have much luck looking for Gainer the Gopher cakes or even gopher
cakes, but could find an image and make one as a frozen transfer when you
learn that skill.
Remember that just because someone put the picture on the internet it does
not mean that it is a great design.
Use your pencil to note what you like or do not like about each design. Are they
funny? Beautiful? Creative? Great colours? Good balance? Are they ugly?
Do not expect to be a perfect cake decorator. Sometimes a cake may seem a
bit dry or your colour scheme may not be as attractive as you thought it
would be or the lettering looks squished. You will get better with every cake
you bake and decorate. Even people with lots of experience and who are
paid to decorate cakes can make mistakes.
Check out this website completely dedicated to showing professional cake
decorators and their poor cake designs: www.cakewrecks.com.

Cake Decorating Basics Reference and Activity Manual Unit Two 31
Icing a Cake
Some cakes are more crumbly than others. For any cake, putting it in the
refrigerator for several minutes makes it less crumbly when you ice it.
Crumb Coat
Use thin consistency icing to make a thin layer of icing, covering the entire
cake. You will still see the cake through the icing, but it will help seal in the
crumbs. Set the cake aside till it is dry to the touch.
Final Icing Coat
Placing the cake on a turntable will help you turn the cake without having to
lift off the spatula when you coat the sides.
Use a spatula dipped in water to smooth your final coating of icing or, once
it is dry to the touch, gently pet parchment paper or paper towels placed on
the surface. Any texture should be all over and even on the cake surface.
Serrated sides or top
Sometimes you will see a cake that has a ridged or combed side. This is easy
to do with a serrated knife or a bought serrated side-scraper or icing comb.
After you crumb coat your cake, ice it like you normally would, but be sure
to use a generous amount of icing on the sides.
Instead of using a spatula to make the buttercream perfectly smooth, hold
the serrated tool straight up and down, but at a very slight angle to the cake.
The lowest edge of your serrated tool should gently rub the cake board to
help you keep it level (not wavy) as you drag it across the icing. Apply
constant pressure against the cake as you go around it or from one corner to
another. Use a knife to trim or scrape off excess icing when you finish your

32 Cake Decorating Basics Reference and Activity Manual Unit Two
line or from the top edge of your cake. A border is used to cover the seams
or edges.
For a square or rectangular cake, comb the two opposite sides and chill it
before you do the final two sides.
A round cake needs to be set on a turntable before you start. Start your
combing at the back because where you stop and start the pattern will show
a bit. Try to go around the cake in one motion as you turn the turntable.
Wavy lines are harder because they look best when the waves are a constant
size. Spread a layer of icing on a practice board and depending if you are
practicing a flat cake top or the sides, tape the board to a vertical surface
before you comb it with your serrated tool.

Cake Decorating Basics Reference and Activity Manual Unit Two 33
Cake Boards
To display your cake at Achievement Day, or if you have a cake larger than
any plate, you will need a cake board. These help you transport the cake and
they are covered in aluminum foil or a decorative paper (either plasticized or
covered with plastic wrap).
You can make your own cake boards. What board you use depends on the
cake size and weight. For light cakes, you may use thick corrugated
cardboard, but for larger or layered cakes, a plywood or pressed hardboard
base is best, or you can glue two or three layers of corrugated cardboard
together. You can also cover sturdy cutting boards, which may be a cheaper
option if you find one the right size and don’t have wood lying around, or
someone to cut it for you.
Cake boards do not have to be the same shape as the cake, but they often
are. They need to be approximately four inches wider than your cake or cake
pan dimensions.
Following the instructions, or one of the how-to videos or websites, cover the
cake board with aluminum foil and glue it on to the cake board. Cover the
back of the cake board with foil too.
Use heavy duty aluminum foil because it is stronger and will not tear as
easily at the corners. Place the foil so that the dull side is up.

34 Cake Decorating Basics Reference and Activity Manual Unit Two
How to Cover a Cake Board
Directions for how to cover a cake board are given in the next activity.
Videos or how-to websites you may find helpful include:
• http://www.wilton.com/decorating/cake-decorating/covering-cake
-board-with-fanci-foil.cfm
• http://www.thatreallyfrostsme.com/2010/04/cake-boards.html
• http://www.youtube.com/watch?v=KVIC0mnlhVk
• http://www.ehow.com/how_5127100_make-cake-board.html

Cake Decorating Basics Reference and Activity Manual Unit Two 35
Activity 4: Covering a Cake Board (30 minutes at home)
*Adult supervision required if cutting cake board yourself
*(add 30 minutes)
Look at the cake pans you have at home and think about which one or ones
you will use the most often. If they are almost the same size and shape, you
may be able to use the same cake board for them, but if they are different
shapes such as round or rectangular, you will need more than one cake
board to present and transport your cakes.
Supplies
• Board made of sturdy material (1/4” or 3/8” plywood or thick
corrugated cardboard or a couple layers of corrugated cardboard)
approximately four inches wider than a cake you plan to decorate. Use
a cake pan you have as the basis.
• Utility knife and measuring tape if you are cutting the cardboard
• Heavy duty aluminum foil or paper wider than your cake board
• Glue stick or white glue
• Pencil
• Scissors
• Tape
Instructions
1. Measure and select a strong base for your cake board, making it
approximately four inches wider than your cake pan dimensions.
2. Place it upside down on the shiny side of the aluminum foil you plan
to use, and draw around it.
3. Then draw another outline about two inches around that.
4. Cut it out at the wider line.

36 Cake Decorating Basics Reference and Activity Manual Unit Two
5. For circles, cut the paper diagonally about every inch, to the inner
circle. For cake boards with corners, be careful because corners tear
easily. Fold the sides and corners in neatly and tape them down.
6. Put some glue on the top of the cake board, line it up with the inner
outline, and set it glue-side down.
7. Flip it all over and smooth out the air bubbles. Fold the edges over
and glue them down too.
8. Sometimes people will see the bottom of the cake board, so you can
cover over the bottom with another piece of paper, cut slightly smaller
than the cake board and glue it on. Covering the bottom will help to
keep the taped edges flat.
9. Cover the back of the cake board with foil too.
Something to think about
What problems did you run into as you covered your first cake board?
What worked well?
What would you do differently when you cover other cake boards? (materials,
adhesives, tricks you think will help next time)

Cake Decorating Basics Reference and Activity Manual Unit Two 37
Cake Storage
How should you store your cake? That depends on the type of cake and
icing you have used. Cakes with buttercream icing can be stored at room
temperature (on the counter) for two to three days, refrigerated for one week
or frozen for up to 2 months. The cakes need to be wrapped well in plastic
and foil or placed in airtight containers to prevent their drying out.
When a cake thaws it may “sweat” (little droplets of water form on the top as
it is thawing). You may find that bright icing colours weep (spread) when a
cake is thawed or that food colouring in the beads of water can be ultra-
pigmented and give the cake a freckled look. Do not freeze cakes with any
curd fillings, fruit, gelatin-thickened items or whipped cream. Buttercream
and cream cheese icings freeze very well.
Ice cream cakes should be kept frozen till shortly before they are used. If you
are decorating a plain ice cream cake, you will need to work quickly to keep
it from thawing, especially around the edges.
Cakes decorated with whipped cream or that contain fresh or canned fruit
will need to be kept in the refrigerator. The fruit adds extra moisture and
they can go bad at room temperature.
Sunlight is not a good thing for cakes. It can change colours and cause the
icing to soften, even to the point of it separating and dripping off your cake.
What a mess! Store the cake in a covered box out of direct sunlight, or put it
in a cooler or fridge if you have space. Make sure you find a box that does
not squash the cake top.
Humidity can soften royal and buttercream icing. When the humidity gets
high, prepare your royal icing using only pure cane confectioners’ sugar (not
beet sugar or dextrose), and add one teaspoon of meringue powder to the
recipe. Buttercream icing can be stabilized with one to two tablespoons of
meringue powder.

38 Cake Decorating Basics Reference and Activity Manual Unit Two
Transporting your Cake
You may think that someone in the car holding your cake on their lap is a
good idea, but there are other safer ways to get it to its next location. Put it
in a cake box, a clean, sturdy box that fits the cake board or plate. A box the
size of the cake board will keep the cake from shifting and squashing the
sides of the cake.
Put the box on carpet foam, a non-skid mat or a damp bath towel on the
floor of the car. Do not put it on the seat of
the car because a fast stop could send it
sailing forward either to tip onto the floor or
crash into the seat or dash in front of it. If it
is cool or cold outside, the cake box could
be put into the trunk, still on a mat of some
sort to keep it from sliding around.
Take along a utility knife to cut the side off
the box and slide the cake out when you get
to your destination. (It will be hard to wiggle
your fingers under the cake board or plate
and lift the cake out of the box without
wrecking some of the side decorations.)
Tip:
If you have found the
perfect cake box cut
the side with a blade
and reattach it with
duct tape or packing
tape. Then you can
reuse it.

Cake Decorating Basics Reference and Activity Manual Unit Two 39
Getting Ready to Pipe Icing
Most people prefer to use pastry or piping bags, but there are other options
you will see in stores and you can try them to see which you prefer. Icing
squeeze bottles, “pens” with a lever to squeeze the icing in the icing bag, or
gigantic syringes are other ways you can control the flow of icing as it passes
through the decorating tip.
Types of Icing Bags
• Featherweight bags
• Disposable icing bags
• Plastic freezer bags or sandwich bags
• Parchment paper bags
Attachments
• Coupler
• Tips or nozzles
Assembled icing bag

40 Cake Decorating Basics Reference and Activity Manual Unit Two
Activity 5: Make a Parchment Paper Bag (10 minutes)
You may not use parchment paper decorating bags often and could forget
how to make them if you do not make them often. This activity will lead you
step-by-step through the instructions on how to roll your own parchment
paper icing bag. After you make your first bag it is easy.
If the directions in the next activity seem difficult to understand or you want
a refresher before you make a parchment paper icing bag here are a couple
websites you may find helpful. There are other videos and diagrams if you
search it on the internet.
• http://www.youtube.com/watch?v=lHHv22G8ixo
• http://fantes.com/parchment-triangles.html
Supplies
• Parchment paper approximately 12 to 14 inches long
• Scissors
• Tape
Instructions
You can use a single piece of parchment to make two icing bags.
1. Fold one corner of your parchment paper diagonally across to the
other side of the paper, lining up the sides to make a right angle
triangle. Press along the fold to crease it well. Cut the excess paper
off so you have two identical triangles folded in a square of paper.
Carefully tear or cut along this fold and you will have two identical
triangles which can be used to make two parchment paper icing bags.
2. Place one triangle on a flat surface with the longest side away from
you. The centre of this long side will become the parchment paper
icing bag point. One point is facing you and the two narrowest points
are pointing at angles away from you.

Cake Decorating Basics Reference and Activity Manual Unit Two 41
3. It does not matter which of these two narrow points you use first. Take
one of those points and curl it over so the back of that corner is on top
of your parchment paper, forming something that looks like a surfing
wave. Bring that point to sit on top of the point that is facing you.
4. With one hand, hold these two points together to make one point.
5. Use your other hand to bring the final point over and around your
tunnel to join the back of these points. You have formed a cone.
6. Adjust your points to bring the top of the cone into a tight sharp point.
7. Where the corners are all held together in a point, fold this point over,
crease it, and fold it a couple more times to hold the cone together.
8. Tape a small strip along the lower outside seam near the point of the
cone to hold it together.
9. If you are using an icing tip in the bag, you will need to cut off between
½” to ¾” of the tip. You want just over half of the icing tip to poke out
of your cut opening. The parchment bag does not need a coupler
because the tip sits inside the bag and the icing will hold it in place.
10. Without an icing tip, the parchment paper bag itself can be snipped
off and used as a round icing tip. The amount of the parchment tip
you cut off will determine the size of your tip opening and the amount
of icing that comes out when you apply pressure to your filled bag.
11. Make two icing bags. Cut one to use with an icing tip.
Something to think about
If you think it would be helpful in the future, add diagrams beside the
activity directions to help you understand them when you want to make a
parchment paper bag in the future.
What would you change about the directions to make them easier to
understand?

42 Cake Decorating Basics Reference and Activity Manual Unit Two
Let’s Do It!
Your cake is made and now is the time to decorate it. Read over the steps to
understand the order you should work.
Decorating Steps
1. Plan your cake design.
2. Make icing in the consistency and colours you will need.
3. Set your cake board centred on your turntable.
4. Spread a tablespoon or two of icing on the centre of your cake board
where your cake will sit to glue the cake to it.
5. Carefully lift the cake and place it, centred, on the cake board.
6. Tuck small pieces of parchment paper under the cake edges to keep
your cake board clean as you ice the cake.
7. Crumb coat the cake and let it rest to set.
8. Stack any layers and ice the cake.
9. Use a toothpick to poke or draw any guidelines you need.
10. Think about the order you will decorate the cake. It may be better to
draw the leaves before or after attaching or drawing flowers,
depending on your design.
11. Practice piping on a piece of wax paper or practice board.
12. Lettering is done first to make sure you have enough room for it.
13. If you are attaching flowers or decorations made on parchment or wax
paper, put a little dab of glue on the cake just before you set the
decoration down, to help it stick.
14. Remove the parchment paper around your cake bottom.
15. Borders are usually done last.
16. Start borders at the back of the cake.

Cake Decorating Basics Reference and Activity Manual Unit Two 43
Activity 6: Make a Practice Board (5 minutes)
Purchased practice boards have limited designs, and there will be things you
want to try which are not preprinted on the cards from a manufacturer. Before
you try something on a cake, it is best to practice it to be sure your icing
consistency is good, you have the right size of tip opening to create the
pattern and you know how much pressure to use on the piping bag. A
practice board cut to the size of your cake top can also help you plan your
design and make sure the lettering fits with the other decorations and border.
It is easy to make yourself a disposable practice board. If you are planning a
border this disposable practice board (sheet) will give you enough space to
practice moving from one shape to the next a few times in a line. If the
practice is for lettering, you may want to use a piece of parchment paper cut
to the same size as the cake top or size of the area you will be lettering.
Supplies
• Paper 8.5”x11”
• Pencil or pencil crayons
• New clear plastic sheet protector
(office supplies to place in binders)
Instructions
1. Along the long side of the paper print
your full name in large letters to fill
most of the length of the paper.
2. Halfway down the page, sign your
name in cursive to fill most of the
length of the paper.
3. Slide your name and signature paper it
into your sheet protector, and you have your first “template” for
lettering two different styles with your practice board.
Tip:
As you make and
use templates, add
handwritten notes
about which tip you
have used, if that was
a good choice, what
icing tips you
recommend or have
tried or other helpful
information for yourself.

44 Cake Decorating Basics Reference and Activity Manual Unit Two
4. To make additional templates, you can draw them or find images on
the internet and enlarge them to the size you want and place them
inside your sheet protector.
5. When you are finished using your practice board, wipe if off with a
damp soapy cloth and wipe it again with a clean, damp cloth to
remove all the soap. Dry it with a cloth so it does not stick to other
things or become moldy.
If you would like to have a larger reusable practice board, a piece of flexible
clear plastic can be cut and kept with your cake decorating supplies. Shower
liners, tablecloth protectors, or clear laminate can be suitable.
Preparing a New Icing bag
Take the ring off the coupler base, and drop it pointy-end first into your
triangular icing bag. Push it down as far as it will go. On the outside of the
bag, use a pen or pencil to draw a line where the screw threads end closest
to the point. If you are unsure, cut it closer to the point. Slide the coupler
base back from this line and use sharp scissors to cut off the bag tip at your
line. Push the coupler base back down to your opening. You want only one
thread to show.
If you are using freezer bags, push the coupler into one corner, measure and
snip the end off, like you would for the cones.

Cake Decorating Basics Reference and Activity Manual Unit Two 45
Icing Tip Basics
Icing tips or decorating tips are divided into about six different categories
based on the shape of the opening:
• Round
• Star
• Petal or ruffle
• Drop flower
• Leaf
• Specialty tips
The same shape comes in a variety of sizes, and different sizes can be
substituted if they are the same shape. The smaller the number of that
particular shape, the smaller its design.

46 Cake Decorating Basics Reference and Activity Manual Unit Two
Colour
Colour is one way to personalize cakes.
If you decorate a cake with just white icing or only chocolate icing, the
designs use texture and shadows to add variety. Most often a decorated cake
has more than one colour of icing. Colour contrast helps the decorations
show up. It creates impact.
If anyone describes a colour to you and wants you to make a cake using it,
ask for pictures or samples. When they say red, it could be poppy red, fire
engine red or blood red. Their idea of red may be “warm” which has a bit of
yellow in it, or “cold” which means it has the tiniest amount of blue in it;
both are red. Your idea of periwinkle or olive green may not be the same as
theirs. Better to be safe than sorry.
The Colour Wheel
When choosing and making colours for your cake, understanding the colour
wheel will be important. It may seem like a school art class, but artists rely on
their understanding of colour to mix an infinite number of shades, and you
will too when you try to make a colour that you do not have as a bought
food colouring.
The colour wheel is a 12-colour circle based on the three primary colours, red,
blue and yellow, which cannot be made from other colours. Secondary colours
are made by equally mixing two primary colours together (making orange,
green and purple) and then six tertiary colours can be made by mixing a
primary colour with one of those (blue plus green makes blue green). Some
colour wheels are complicated and use art vocabulary that you don’t need to
worry about. Your concerns will be to recognize if the colour you want to
make needs others added to it to change its shade or brightness.

Cake Decorating Basics Reference and Activity Manual Unit Two 47
You will not use the bright, intense colours on
the colour wheel very often, but paler, mixed
colours mostly. To make paler icing, use less
colour (or more icing) and to make more intense
shades, add more colour; to darken it, add black.
To dull a colour, add a small amount of its
opposite or complement on the colour wheel.
You will use the colour wheel to create other,
subtle shades such as a periwinkle blue or a
mossy green. The colour wheel will be very
helpful to you.
Look at the colour wheel. What is the opposite colour or complement to red?
You would add it to make a duller red or rose colour.
What is the opposite or complementary colour to orange? You would add a
tiny amount of it to create a flesh tone.
Colour Schemes
There are no right or wrong combinations of colour. I takes time and
experience to understand which colours, shades and intensities go together.
These are a starting point for you to consider:
Monochromatic
You can decorate a cake with shades of one colour (for instance, a light blue
base with medium and dark blue accents). You need to make an obvious
contrast in shade for it to work.
Complementary
This colour scheme is when you use two colours opposite, or almost
opposite to each on the colour wheel, like orange and blue, or red and
green. The two colours balance each other out.
Tip:
Print a colour wheel for
yourself from the
internet, slide it in a
plastic sleeve to keep it
clean and keep it with
your cake decorating
supplies to refer to
when you tint icing.

48 Cake Decorating Basics Reference and Activity Manual Unit Two
Adjacent
There are a few different words for this colour scheme, but it is when you use
colours side-by-side on the colour wheel, such as yellow, green and blue. Use
the colours in different shades and as small touches or the cake will look gaudy.
Triad
Three colours equally spaced on the colour wheel are used for this scheme.
Green, purple and a yellowy orange would be an example of a triad, and you
may see this on a cake with purple flowers that have contrasting stamens
and green leaves.
Polychromatic
This means many colours are used together. Often this isn’t really a lot of
colours, but a small number of colours in a variety of shades (tints). Usually
this is only done with soft, pale colours.

Cake Decorating Basics Reference and Activity Manual Unit Two 49
Activity 7: Colour Scheme Awareness (10 minutes)
You may instinctively know some colour combinations that are appealing
or nice to look at. You may also see some colour combinations you think
are mismatches or colour intensities that seem oddly matched or do not
go together.
It is easier to visualize a colour scheme if you look at a colour wheel.
Supplies
• Colour wheel in your book
• The description of colour schemes listed before this activity
• The people and space around you
Instructions
Look at the clothes you are wearing. What colours are they or what
combination of colours make up the clothes? Find those colours on the
colour wheel and record the type of colour scheme that you are wearing.
Look all around you at the room you are in, a picture on the wall, out the
window, at the other people in the room to see if you can identify other
colour schemes. Refer to your colour wheel and list of colour schemes and try
to find each of the following colour schemes in your surroundings. For each
one you can identify, list the colours and what item or things were this colour.

50 Cake Decorating Basics Reference and Activity Manual Unit Two
• Monochromatic
• Complementary
• Adjacent
• Triad
• Polychromatic

Cake Decorating Basics Reference and Activity Manual Unit Two 51
Colour and Cake Decorating
Before you start colouring icing, have a plan for what the cake will look like:
• What will each colour be used for?
• What consistency of icing do you need to colour?
• How much will you need for each colour? (This comes with experience,
and you’d rather have too much than too little prepared; it is
frustrating and difficult to make the exact same colour again).
Keep in mind these points when you are tinting icing.
• It stains! Hands, clothes, counters, plastic bowls, wooden spoons….
(Magic Eraser works to remove it, as does bleach.)
• Make a batch of buttercream icing, and from it, take only the amount of
icing that you think you will need and put it in a different glass bowl.
• Add a small amount of food colouring at a time. Drop by drop. Mix
well before deciding if you need more.
• All colours are not created equal. Some colours are more powerful
than others. Red in particular, is a strong colour so add it slowly and
mix it in well before deciding if more is needed
• Colours darken after a few minutes. You may not need quite as much
food colouring as you thought, or discover that you made your colour
too dark. Leave the icing for at least five minutes to see if it is the
shade you want before you add more colour or use it.
• To lighten colours, add more white icing – that’s why you saved some
of it.
• Some colours fade in bright light (pinks, purples and blues).
• It may take a different “primary colour” to make another colour. For
instance, two different blues are needed to make purple or green.

52 Cake Decorating Basics Reference and Activity Manual Unit Two
Three bowls and icing paste bottles
• If you used yellow margarine, it is hard/impossible to make some
colours that do not contain yellow, such as purple. Use white
margarine or only shortening if you can’t make the colour you need.
• If you are making a dark colour, start with chocolate icing. Too much
food colouring can change the taste of your icing.
• Red and black cannot be made with liquid colouring. Buy red and
black pastes that are concentrated. For a deep red, you may find an
aftertaste from so much paste food colouring, and you should look for
no-taste red icing or gels. Or think of something you can use instead
like sprinkles, dark cookie crumbs, licorice, candies, etc.
Food Colourings
You can buy a variety of food colourings. They are all edible but can create
different effects. If you aren’t sure if something is really an edible food colouring,
look for a list of ingredients and a best before date, which will be on food.
Paste colours are concentrated and come in a little jar with a lid. They are
the most popular type of colouring used by
cake deccorators. Diluted with alcohol or clear
vanilla, they can be used as paint on your
cake. (The tiny amount of alcohol evaporates
and speeds up the drying. A paste colour
thinned with water can take days to dry.)
Liquid colours are less concentrated.
Powder colours are also called petal dusts or blossom tints. They can also be
mixed into icing or diluted with alcohol or clear vanilla, similar to paste
colurs, to use as paint.
Lustre colours are fancy! Need gold or silver?
Spray food colouring is fast and adds colour after the cake is decorated.

Cake Decorating Basics Reference and Activity Manual Unit Two 53
Colouring Icing
Add colour gradually, drop by drop. Mix the colour in thoroughly with a
spatula till there are no streaks of colour, being sure to scrape the sides of
the bowl. Check the colour. Colours darken a little bit after a few minutes.
If you are using pastes, dip a clean toothpick in the food colouring and then
dip it into your icing. Always use a fresh toothpick in the food colouring,
because icing in the food colouring can change its colour and make it un-
useable.
How Do I Make Different Colours?
This is where your understanding of the colour wheel comes in! Think about
what colours would be used to make your new colour before you start.
The most thorough and best description of tips about mixing colours can be
found at:
• http://www.sugarcraft.com/catalog/colouring/colourmixingchart.htm
These other websites have a lot of good food colouring information too:
• http://www.wilton.com/decorating/icing/icing-colour-chart.cfm
• http://www.candylandcrafts.com/colourchart.htm
Two-tone Icing
If you would like a design or border to come out as two colours, you can.
Mix two colours of icing and carefully scoop one colour into one side of your
clean icing bag, and the other colour into the other side.
If it needs to be more precise than that, you can first put each colour into its
own icing bag and then squirt these into your clean bag. This looks great on
cupcake swirls and borders. As the icing is pushed through your tip, it will
come out one side one colour and the other side a second colour. Note this
does not look striped if your tip is very small. It may look like a gradual shift
from one colour to another instead.

54 Cake Decorating Basics Reference and Activity Manual Unit Two
Flower Petals with Coloured Tips
For flowers with coloured petal tips, a
line of concentrated food colouring is
painted with a toothpick or thin paint
brush on the inside of your icing bag.
When the narrow part of petal tip is
lined up carefully with this colourful
line, just the petal tip is tinted. This
technique works best if the
concentrated colouring is the tint you
need. (You can mix the concentrates to create an intense colour but this can
be tricky.)
Look at your petal tip on the icing bag. You want the concentrated food
colouring to line up with the narrow end of the petal tip hole. As the icing is
squeezed out the tip, only the icing at this part of the petal will be stained
the darker colour. On the inside of your icing bag, draw a straight line right
from the thin petal tip part of the coupler out to about halfway up the icing
bag. (Only go up as far as the icing will go in the bag).
Carefully fill the icing bag with your main icing, trying not to smudge your
food colouring line. A thinner colour line will be more subtle than a wider
line of food colouring or a line made with more food colouring.
A video which summarizes these two techniques can be found at the Wilton
website: http://www.wilton.com/decorating/icing/coloring-icing.cfmIf
It will take a few petals for your icing to be striped, but quickly you will see
that the icing closest to the narrow tip end will become stained with your
food colouring and make every petal two-toned.
Icing bag painted colours

Cake Decorating Basics Reference and Activity Manual Unit Two 55
Tip 12 with icing circle
Reference for Icing Tips and Techniques
Round Tip Piping
To make a dot or ball, hold the piping bag straight up and down (90
degrees) just above the cake surface. Squeeze the icing bag and you will see
the icing start to form a circle larger than your tip.
Continue squeezing the icing bag and gradually
lift the tip a little as the icing dot grows, but keep
the tip in the icing, or you will end up with a
pointed top instead of a dot. Lift the tip off at an angle, so the tip actually
skims the top of your circle to remove the point that may form. If a little
peak still forms on the dot, use a clean finger to gently press the top of it
before it forms a crust or, if a crust has formed use a small wet paintbrush to
wipe off the point.
Want a larger dot? Continue applying pressure till the circle is the correct
size, making sure to keep the tip in the icing till you release your pressure.
To make an elongated shape, begin as if you were making a dot or ball, and as
you squeeze, slowly move the tip without lifting it any higher till you have the
shape you want. Stop squeezing and lift the tip at
an angle. A heart design can be made by squeezing
two beads or teardrop shapes side-by-side and
joining them at the bottom to form a point.
For lettering, outlines or swirls, use thin
consistency icing. Hold the icing bag at 45
degrees. Squeeze the icing bag, put the tip to
the cake surface to attach the icing to it and lift
it up slightly as you continue squeezing to form
Tip:
If your icing lines tend
to break as you work,
add a little bit of white
corn syrup or piping
gel to the icing, and
stir it well.

56 Cake Decorating Basics Reference and Activity Manual Unit Two
your line. Do not drag the tip on the icing; you want the icing to come out
freely. At the end of your line, stop squeezing and gently touch the tip to the
cake again to attach the end. There are a few tricks to this. You will need to
keep a steady pressure on the icing bag for the entire line to keep it the
same width all along. Your tip size will determine how wide your lines are;
your hand pressure and how quickly you move the icing tip along can only
make slight changes to that width. Wipe the tip clean before you start each
new line.
Writing or lettering on cakes is hard to do and takes a lot of practice to
make it look good and to get the spacing right so it isn’t sloppy or squished
when it runs out of room.
Let your buttercream crust over or put it in the fridge for a few minutes to
chill it before you start writing on it
Cut or tear a piece of wax or parchment
paper the same size as your cake. Write out
your message on a piece of paper and tuck
it under the wax or parchment paper.
Remember that icing is wider than your
pencil, so the letters need to be a little
further apart to fit in icing.
Practice exactly what you will write on the
piece of wax or parchment paper. Then refer to that paper as you letter on
the cake so that you do not make any spelling mistakes.
On the cake, use a toothpick or piece of dry spaghetti to mark the straight
line you want to print or write on.
Tip:
Lettering is always
done from left to right.
Left-handed people
need to do it left to
right too.

Cake Decorating Basics Reference and Activity Manual Unit Two 57
Two dot border
Round Tip Borders
Dot borders are just dots evenly spaced, touching each
other, in a line. It looks professional if the dots are all the
same size.
Snail trail or teardrop borders use round tips but this time you hold the
bag at 45 degrees. Hold the tip just above the surface and begin squeezing
the bag. With constant pressure, watch a ball form, and then release the
pressure and drag the icing tip to make a teardrop or trail. Stop moving the
tip and apply pressure to form another ball, release the pressure and form its
tail; continue for the rest of your border.
“C” borders are a connected series of scallops
that look like the letter “C” one below the
other. The “C” doubles back on itself where the
icing changes direction to form the next letter,
forming a scalloped edge. You may think it
looks more like waves of water.
Begin by holding the bag at a 45 degree angle and touch the icing tip to the
surface as you begin squeezing the bag to attach the icing. Hold the icing tip
just above the icing surface as you would if you were lettering. Continue to
squeeze the icing bag at a constant pressure to control the flow of icing as
you move the tip as if you were writing the letter “C” and continue on to
make another identical letter attached to the bottom of the first “C”. It takes
steady pressure and practice to make the loops or letters a consistent size
and spacing. If you make the loop larger and open, as in making a lowercase
handwritten letter “e” it is more difficult to keep the open loop size
consistent and it is a more difficult border to do well.
When you need to stop and then want to continue your border, finish the
“C” and gently touch your icing tip to the cake as you stop pressure. Begin at
the same place by starting to squeeze the icing bag as you touch the cake to
attach the icing line.
“e” looped border

58 Cake Decorating Basics Reference and Activity Manual Unit Two
Triple drop string
Drop String Border
The drop string border is a new technique for Unit Two. It is a series of
swags or arcs connected one to another, and you will most often see it as a
decoration on the sides of wedding cakes.
The Drop string Border is a series of icing arcs and you may think it is drawn a
lot like the “C”, but it is trickier than that. It is more difficult to perfect because
it takes a steady hand, attention to spacing and consistent pressure on the
icing bag as the arc is not drawn on but as you squeeze the icing bag, you
pull your hand away from the cake and let
the growing strand of icing drop freely
before reattaching it to the cake. If you are
using this design on a cake, you would
measure and mark around the cake where
each arc would be attached and may even
mark a guide for how low the arc will drop
on the cake side.
Because the drop string border is most often used on the side of a cake,
it would be best to practice this border by taping your practice board to
the fridge or some other vertical surface or prop it up as close to vertical
as possible.
Hold the icing bag at a 45 degree angle and touch your tip to the surface
so that the icing sticks to it. Pull your tip straight out away from the surface
towards yourself as you apply pressure to the icing bag and allow the icing
to drop into an arc. The secret is to let the
string drop to form an arc, and not move
your hand while the icing is coming out.
Pull the tip away from the cake the same
distance as it would be to your next
attachment point. Move your hand to the next
place you want to attach the arc and stop pressure.
Piping a drop string border

Cake Decorating Basics Reference and Activity Manual Unit Two 59
Touch the tip to the surface to reattach the icing before repeating the same
movement and icing pressure.
Repeat this arc to make a row of attached drop strings.
Some cakes will have double drop strings, with the arcs starting from the same
point, but one is shorter or shallower than the other. Always decorate the
longest string arc first and add shorter strings. After the first, longer arc, touch
the icing to the starting point, squeeze the icing bag and let the icing drop
into a slightly shorter arc than the first row. Begin at the first mark again,
squeeze the bag, let icing drop into a slightly shorter arc than the first row.
You can make each row of swags a different colour or keep them the same.

60 Cake Decorating Basics Reference and Activity Manual Unit Two
Activity 8: Round Tip Review (15 minutes)
Did you remember everything you could make with a round tip? You will
have the opportunity to experiment with the round tip to make lines, dots,
balls, hearts, write your name and create borders on your practice board.
Then focus your attention on making drop string borders.
Supplies
• Thin consistency icing for lines, lettering and arcs
• Medium consistency icing for dots, hearts and snail trail border
• Tip #4
• Icing bag with coupler
• Practice board (homemade)
• Tape
• Your name template made in Activity 7
• Paper
• Pencil or pen
Instructions
Fill an icing bag a third to half full of medium consistency icing. Use the round
tip to practice small dots, large dots, a dot border, tear drops, a heart of two
teardrops, a snail trail border and a straight line on your practice board.
Partly fill another icing bag with thin consistency icing to trace your name
template. Try the “C” border with both icing consistencies to understand how
the consistency affects your work.
Pipe a “C” border with flatter “C”s close together.
Pipe a “C” border with large “C”s far apart.

Cake Decorating Basics Reference and Activity Manual Unit Two 61
Measure or draw a series of identical arcs side by side to trace for drop arcs
and slip it inside your practice board. Tape your practice board to a vertical
surface that you can sit or stand in front of while you practice making drop
arcs. Remember you are not drawing the arcs but letting the icing drop or
drape as you pull your hand back from the practice board.
Try the drop string border several times.
Once you have drawn a pretty good single border, leave it on your practice
board and start another row of smaller arcs that begin at the top of the row
you finished.
Something to think about
How did you do? What did you find easy to do with the round tip? What do
you need more practice at?
Which borders did you like the look of?

62 Cake Decorating Basics Reference and Activity Manual Unit Two
Tip 13 with shells and star
Cupcake top rosette flower
Shell
Star Tip Piping
Open star tips are another of the more common tips for decorating cakes
because a variety of borders and decorations can be made with a single tip.
To make a star, hold the icing bag
straight up and down (90 degrees).
Unlike the round tip for a dot or ball, the
tip size matters, like it does for lines. If you try to use a smaller tip to make a
much larger star, the star points are not as crisp and it can look messy. Hold
the tip just above the surface and squeeze the icing bag until the star is the
size you want. Stop squeezing before you lift the icing bag.
To fill in large areas with stars, place them touching each other, fitting stars
between the others, making sure there are no gaps showing the background
colour. Using really large star tips may seem like a good idea to cover a large
area, but the less delicate stars make the design harder to see.
To make a Rosette, hold the icing bag straight up and down. With the tip just
above your surface, make a star the size you want, and then, still applying
pressure, lift the pastry bag slightly and go around the
star. Right-handed decorators usually start their circle at
the left side of the star (9:00 position) while left-handed
decorators start their circle on the right side of the star
(3:00 position). Wherever you start, go three quarters of
the way around the central star, then ease up on the
pressure and tuck the thinner icing tail in where you
began your circle. Always start and end your rosettes at the same place in
relation to the central star, and go around the star in the same direction.
To make a shell, hold the piping bag at a 45 degree
angle just above the surface and apply pressure and the
shell will widen with continued squeezing. When the
shell is the right width, release the pressure gradually and
drag the tip to make the shell as you lower it to the cake surface.

Cake Decorating Basics Reference and Activity Manual Unit Two 63
Swirly birthday cake
Fleur de lis
To make a Fleur de lis, a symbol of France, you are making a lily with your
star tip. Start by making one vertical shell and drag the tail to be a little
longer. Keeping the bag at a 45 degree angle, begin your
next shell to the left of the first shell, starting with your tip
about half way down the height of the shell. Pipe a
shell from the left to the centre and join the shell
tails. Do the same thing starting on the right-hand
side. Your two side shells should be the same size, but you
will see the fleur de lis looks best if the side shells are slightly smaller than
the central one.
Borders Using Star Tips
The size of your star tip will change how the
border looks. (Try all of these with an open
star tip and later you can try the same
thing with a closed or drop petal tip.)
• Star borders
• Rosette borders
• Shell borders
• Zigzag borders
• Loop, Question Mark and “C” borders
Reverse scroll border is a “C” followed by a
question mark, and continually alternating so
that each small loop faces the opposite
direction from the one before it.
Rope borders are new in Unit Two. They are harder to do than looped or
zigzag borders because you have to stop and start the icing. They are made
of small curves that are connected, not one or
two continuous lines. Hold the icing bag at 45
degrees, nearly touching the surface and shape Rope border
“C” or wave border

64 Cake Decorating Basics Reference and Activity Manual Unit Two
a “U” using steady pressure. Lift the tip. Put the tip into the hollow part of
the U curve you just made but do not let the tip drag on the U. Apply a
small amount of pressure to start the icing in the U and then move the tip
over the end of the first U and make a second U curve. Do this over and
over to make your rope border. You can change the look of your border by
making the twists looser or further apart, or more delicate or thicker
depending on how wide each “U” or “S” is.

Cake Decorating Basics Reference and Activity Manual Unit Two 65
Activity 9: Star Tip Review (15 minutes)
The star tip is one of the most widely used tips in cake decorating.
Experiment with it and use it instead of other tips to add variety to lettering
or ruffles.
Supplies
• Practice board
• Icing bags with couplers
• Star tip #12 or #16
Instructions
On your practice board, make stars, a star border,
a block of solid stars, zigzag border, rosette,
rosette border, shell, shell border and a loop or
“C” border.
Try making a head of wheat or barley with your
star tip. Start at the bottom of the head and
draw one seed angled out to the left, and then
its partner starting from the same point, angled
out to the right. Draw two more seeds touching
them, but directly above them and continue up
the head of wheat till you have five seed pairs.
Spend more time making fleur de lis, which are
new to Unit Two.
Try the rope border, and decide if you prefer to
make the “U” or a small hill (upside down “U”). It
does not matter which way you overlap your
lines as long as you keep it consistent.
Adding variety
to borders You can combine
borders in lots of ways.
Why not create a border
pattern that repeats a
star in one colour
followed by a shell of
a different colour. One
shape in a pattern of
colours could be used
too. Or add dots of
another colour in every
loop of your “C” border
or leaves every-so-often
beside your drop flower
border. Add edible
candies, sprinkles, etc.

66 Cake Decorating Basics Reference and Activity Manual Unit Two
Something to think about
How did you do? What did you find easy to do with the star tip? What do
you need more practice at?
Which shapes did you like when they were done individually?
Which borders did you like the look of?

Cake Decorating Basics Reference and Activity Manual Unit Two 67
Activity 10: Plan and Decorate a Layer Cake (40 minutes)
Supplies needed
• Cakes you brought from home
• Thin consistency icing
• Medium consistency icing
• Serrated knife
• Practice board
• Food colouring
• Toothpicks
• Small bowls
• Spoons
• Spatula
• Piping bags (a few) and couplers
• Tips – star and round
• Paper
• Pencil
• Pencil crayons (optional)
Instructions
1. Level your cakes.
2. Put some icing on the cake board or plate and set one cake on it.
3. Ice the top of that cake and set the other layer on top.
4. Crumb coat the layer cake using thin consistency icing and set it aside
while you plan your cake design.
5. Plan your cake and incorporate a couple different round or star tip
techniques you reviewed or learned today. Is there a theme or occasion
for which you are making this cake? Think about that when you plan
your design and how you will use the techniques you now know.

68 Cake Decorating Basics Reference and Activity Manual Unit Two
6. Sketch the cake on a piece of paper, drawing where the borders and
other designs are, noting which tip and technique you will use, and its
colour. Also note if it needs to be thin or medium consistency icing for
that part as a reminder to yourself about which colours you need to
make and if they are all the same or different icing consistencies. You
may find it helpful to use pencil crayons in your plans.
7. Colour only the amount of icing you will need. You can share or trade
colours with friends and you can experiment with two colours of icing
in the same icing bag.
8. Put a final coat of icing on your cake (thin consistency)
9. Decorate your cake using the round and star tip.
Freeze the rest of your medium consistency icing and bring it to the group
meeting.
Something to think about
Take a picture of your cake and fill in the Cake Journal about it. What colour
scheme did you use?
What techniques did you do well and which ones do you need to practice?

Cake Decorating Basics Reference and Activity Manual Unit Two 69
Were you happy with the design of your cake (balance, use of space and
repetition)? What worked and what did not work so well?

70 Cake Decorating Basics Reference and Activity Manual Unit Two
Filled cupcake
Cupcakes
Cupcakes are great for experimenting with flavours, piping techniques, colour
combinations and special effects. Decorating cupcakes is good practice and if
you mess up on one, there will be others that look good.
Making Cupcakes
How much batter should you put in a cupcake paper or cupcake liner? That
amount varies depending on the cake recipe – some hardly rise and others will
double in size. If your recipe does not say, fill the paper two-thirds full. If you
really want to be sure, bake a test cupcake before you fill the other papers.
Follow the cake recipe for temperature and cooking time. If you are not sure,
a standard would be 18-20 minutes at 350 degrees Fahrenheit, but check at
the earlier time. Muffin tins come in several sizes, and that affects how long
your cupcakes will take to bake. Mini cupcakes take about half the time, but
super large ones only take a bit longer than a regular muffin tin size.
As with cakes, let the cupcakes cool completely before you decorate them.
Filling Cupcakes
You do not have to fill cupcakes; but filling a cupcake adds a delicious
surprise! It will be easy to amaze your family and friends when they bite into
the cupcake and discover you put in extra
yummy effort. You may want to keep it a
secret that it is ridiculously easy to fill a
cupcake. A special icing tip, the Bismarck tip
#230, has been made to fill cupcakes.
Use the Bismarck filling (like jellied donuts).
The filling can be just about anything you can
think of like jelly, peanut butter, pudding, icing, whipped cream but chunky

Cake Decorating Basics Reference and Activity Manual Unit Two 71
jam does not work because the larger pieces will plug your tip. Experiment
with cupcake and filling flavour combinations. A good place to start looking
for filling recipes is http://www.wilton.com/recipes/browse.cfm?cat=Cupcakes
&cat2=Cupcake-Fillings
You should be able to find other recipes for different flavours online or in
books (you can puree fruit or make puddings to make your own).
Fill cupcakes before you ice them. Put the Bismarck tip into your icing bag
and fill the bag with filling. If you have a lot of cupcakes, you may have to
reload it as you work. Poke the Bismarck tip in the centre of a cupcake from
the top, and push it down most of the way into the bare cupcake. Be careful
not to push it out the bottom paper. Squeeze the bag of filling till the
cupcake top just starts to plump up. No more or it will be overfilled and the
filling will come out the top, making it much harder to decorate. Stop
squeezing and lift out your tip. Wipe off any filling that may be on your
cupcake top.

72 Cake Decorating Basics Reference and Activity Manual Unit Two
Activity 11: Bake Cupcakes, Find or Make a Filling, Make Medium Consistency Icing and Look for Decorating Ideas (75 minutes at home)
Try a new recipe to make your cupcakes. As you look for a cupcake recipe,
look for a filling that will taste good with it. The filling will not be seen once
the cupcakes are decorated so its colour is unimportant. Remember that the
filling has to fit in your #230 tip, so anything lumpy will plug it.
Supplies
• Ingredients to make cupcakes
• Cupcake papers
• Internet access
• Ingredients to make filling or use a prepared one
• Paper and printer
Bake two dozen cupcakes and put them in a container. (Freeze if made
ahead of time or refrigerate if made the day before your group meets.)
Go online to the Wilton website http://www.wilton.com/recipes/browse.cfm
?cat=Cupcakes&cat2=Cupcake-Fillings
Select a cupcake filling recipe. Print it and then make one batch to bring to
your next group meeting.
Bring the recipes to the next meeting.
Go online to search cupcake ideas/images, looking for cupcakes that use a
round tip for dots, lines and lettering, and a star tip for stars, zigzags, swirls
and rosettes. Can you find faces or animals? Are any of the cupcakes baked
in ice cream cones?

Cake Decorating Basics Reference and Activity Manual Unit Two 73
Copy five images and bring them to the next group meeting to share. You
can look for ideas in books and sketch them too.
Bring some items to sprinkle on your cupcakes (candy sprinkles, chopped
nuts, chocolate chips, etc.)

74 Cake Decorating Basics Reference and Activity Manual Unit Two
Activity 12: Discuss Recipes and Cupcake Ideas and Fill Cupcakes (30 minutes)
Supplies
• Your cupcake and filling recipes
• A few spoons
• Paper
• Printout of cupcake ideas
• Two dozen cupcakes
• Your cupcake filling
• Paper
• Pencil
• Icing bag, coupler
• Bismarck Tip #230
Instructions
1. Share your recipes with your group. Tell them how full you filled the
cupcake papers and if you were happy with how the cupcakes rose
when they were baked.
2. Share the recipe or tell the group how you decided on the filling you
brought that you plan to use today. It is okay if you brought jelly from
home and did not make the filling from scratch.
3. Cut up one cupcake for everyone to taste it. Placed a small dollop of
your filling on each cupcake piece to let everyone taste the flavour
combination you will be using. You may find that it works best to use
a second spoon to scrape the filling from the serving spoon onto the
cupcake pieces.
4. Be sure you try every cupcake with its filling unless you are allergic to
any of the ingredients. Make notes for yourself about recipes you

Cake Decorating Basics Reference and Activity Manual Unit Two 75
would like to try, how they rose when baked and who to ask for the
recipe. Note the cupcake and filling combinations and if you thought
the filling will tasted good with the cupcake.
5. When you are done tasting and making your notes, you will fill your
cupcakes.
6. Put the Bismarck tip into your icing bag and fill the bag with filling.
7. Poke the Bismarck tip in the centre of a cupcake from the top, and
push it down most of the way into the bare cupcake. Be careful not to
push it out the bottom paper.
8. Squeeze the bag of filling till the cupcake top just starts to plump up.
No more or it will be overfilled and the filling will come out the top,
making it much harder to decorate.
9. Stop squeezing and lift out your tip.
10. Wipe off any filling that may be on your cupcake top.

76 Cake Decorating Basics Reference and Activity Manual Unit Two
Swirl cupcake with tip
Icing a Cupcake
There are several different ways to ice a cupcake and each creates an entirely
different effect. Do you want a flat surface to work on or add decorations to,
or a cupcake that looks like it came from a bakery. They are all easy to do
with a little practice.
You do not need to crumb coat cupcakes.
With a Spatula
A flat icing background can be the basis for many great designs. For instance
it would be the best surface for any cupcake with lettering, a cupcake face or
the base for a piped flower and leaves.
Place a scoop of icing on the centre of your cupcake and hold it in one of
your hands. Use a flat spatula or knife to spread the icing. (A serrated or
zigzag knife will give you a textured surface.) As you spread the icing to the
edges, turn the cupcake in your hand. Scrape off the excess icing with your
spatula. To clean up the edges of your cupcake, hold the spatula at 45
degrees and scrape off the edge while you turn the cupcake.
A Professional Swirl
The classic cupcake swirl is super easy with a 1M large star
tip. It is so large that it is put straight into an icing bag
you already have cut. If you are cutting a new icing
bag for it, pop a coupler into the triangle bag and
measure and cut it just like you would normally.
Hold the bag straight up and down. If you want the
centre mounded up, that is where you start and
hold the tip just above the cupcake. Make a star in the centre and then
without lifting your tip, continue swirling around it from the centre to the
outside, making sure the rows of icing touch each other. Once you have made
a loop around the cupcake edge, start back towards the centre. The centre will
be your peaked swirl. Stop the pressure when you are at the middle of your

Cake Decorating Basics Reference and Activity Manual Unit Two 77
Plain swirl cupcake
little mountain and lift the tip off. This swirl also looks great with two-toned
icing (check out the food colouring section for how to do that).
Other Swirls
If you would rather not have such a mound of icing, use the 1M and hold
the icing tip just above the cupcake, with the icing bag straight up and
down. Start with the outside loop and work your way in to the centre. Stop
pressure and lift the tip.
If you start at the centre and make your swirls touching and stop at the
outside swirl, the cupcake top looks like a rose. Rose colours and a few
leaves add to the effect.
Another simple, yet plainer swirl is with a large round
icing tip (1A or 2A, which you were not asked to buy
for this 4-H project). Follow the same directions as for
the classic cupcake swirl with this tip. These are almost
the size of your coupler. If you put your coupler in the
icing bag and do not put a tip on it, as you squeeze the
icing out of your bag, it will make a large rope of icing for a cupcake swirl.
Either a flatter swirl or a smoothly iced cupcake (with a spatula) can be used
as the base for other decorations.
Cupcake Ideas
Edging Cupcakes
A quick way to jazz up plainly iced cupcakes is by edging them with chopped
nuts, coloured sugar, cookie crumbs or sprinkles. The colourful and textured
edge can hide imperfections and if you like, frame other decorations you
pipe or place on top of the cupcake.
Pour a large amount of sugar or other edging bits into a shallow bowl or
saucer. While the cupcake icing is still moist (not dry to the touch) hold the

78 Cake Decorating Basics Reference and Activity Manual Unit Two
Deer cupcake
Cupcake with rose
cupcake by its base and carefully roll the edge above the paper liner in the
sugar. Press the icing into the sugar to smooth out any imperfections.
The more evenly you ice this part of the cupcake, the easier it will be to
make an even edge on your cupcake. It will take a little practice to get the
edge framing your cupcake to be even.
You will find cupcake design ideas everywhere! Experiment with flavours,
piping techniques, colour combinations, special effects… there are countless
cupcake ideas if you search the internet. Pick a
theme and start looking.
A great website and set of books to check out for
amazing and fun cupcake designs is
http://www.hellocupcakebook.com. Their books
include pictures and directions to show you
cupcakes of spaghetti and meatballs, cute dogs, wild
animal faces, buttered popcorn and other foods. Their collection of zany
ideas grows larger every month.
If you search YouTube, for cupcake ideas, look for Karen Tack and Alan
Richardson who wrote the Hello, Cupcake book. They have a lot of how-to
videos you can watch to learn how to recreate their playful ideas at home.
You can make elegant cupcakes with flowers on top by
using a spatula to smooth a base colour, pipe a few
leaves around the edge and then pipe flowers directly
on top or transfer flowers you made on flower nails.
Or, you can cover the entire cupcake top with a huge
flower. You can turn the cupcake in your hand just like
you would a flower nail.
Be creative and have fun! Why not bake the cupcakes in flat-bottomed ice
cream cones set in your muffin tin? If you decorate the top with a large swirl,
it will look like ice cream.

Cake Decorating Basics Reference and Activity Manual Unit Two 79
Grass cupcake
multi-hole tip
Christmas tree cupcake
Cupcakes iced smooth with a spatula can be a base for all kinds of faces: add
a cut marshmallow nose or ears and cover them with icing to make an
animal or use skin-coloured icing as the base and pipe or use candies to be
facial features, hair or glasses and freckles. Use your leaf tip to make a series
of scales for a dinosaur head. Small white teardrop shapes of piped icing can
be its jagged teeth.
Everyone will impressed by three-dimensional cupcakes, which
can be easy to make if you bake two sizes of cupcakes,
but do not use papers for the smaller ones. Cut the large
cupcake top to be flat and set the smaller cupcake
upside down on top to be the head of a monster or
snowman. A pointed ice cream cone cut off and
turned upside down can be the form of a Christmas
tree piped with your star tip and points. Add some
round tip swags and dots for decorations. A yellow
candy on top can be the finishing touch.
Other cupcake websites you may like:
• http://www.cupcakeproject.com/2007/02/cupcake-baking-
tips.html#ixzz2Mh69OgeV
• http://www.cupcakeproject.com
• http://cookiescupcakesandcardio.com
Fur/Hair/Grass Tip #233
This tip has a lot of little holes and makes it easy
to create dogs, farmyards, hair for people or a
basis for jelly bean Easter eggs, all with the same
tip, depending on the colour of icing and the
angle you hold the icing bag. Start with the tip
touching the surface. If you want to make grass,

80 Cake Decorating Basics Reference and Activity Manual Unit Two
Tip 131, star and flower zigzags
hold the icing bag straight up and down, apply a burst of pressure and
maintain pressure as you lift; release pressure when the grass is the length
you want. Be sure the next set of grass is touching the first one so there are
no gaps.
For fur you will hold the bag at an angle (may not be 45 degrees depending
on the effect you want) and again start with a burst of pressure to attach the
fur to the cake. Apply pressure as you drag the tip, and release pressure
when the hair or fur is the length you want. It is best to start at the bottom
of the area that needs fur, and work your way up, being sure to overlap the
base of the earlier layer with the next one. Do not leave gaps in the fur.
Closed Star or Drop Flower Tips
A couple different types of flowers can be made with this same flower tip,
depending on your hand movement. You can make delicate flowers or large
ones depending on the tip you use. Tip 131 is common but you will notice
bakers use larger tips to fill in the top of a cake quickly.
Drop flower tips can be used to make simple
star flowers or swirl drop flowers. For each of
them, you start with the tip lightly touching the
surface, and hold your icing bag straight up and
down. For a simple drop flower, which has pointed petals,
apply pressure till the flower is the size you want, then
release pressure and lift the tip up. There will be a centre gap of
no icing.
Swirl flowers have rounded petals. For the swirl flower,
start with your wrist turned a quarter of the way forward
before you place the tip lightly on the surface. As you
squeeze the icing bag, slowly rotate your hand till it reaches the
natural, straight position. Stop squeezing and lift the tip up. It is important to
squeeze as you turn your wrist to make the individual petals distinct.

Cake Decorating Basics Reference and Activity Manual Unit Two 81
Tip 65 and leaves
You can leave the centres empty, but they look more finished if you add a
different colour centre using a round tip.
The closed star or dropped flower tip can be used to make borders.
Leaf Tips
Leaf tips come in a few different shapes and
sizes and, by varying the length of your leaf and
how you hold the icing bag, you can make
countless shapes and sizes of leaves. A leaf tip is also used
to make flowers that have pointed petals, such as
chrysanthemums, poinsettias and sunflowers.
Use thin consistency icing. Hold the icing bag at 45 degrees and touch one
of the tip points to the cake. Attach the leaf by giving a small burst of
pressure and continue pressure till the leaf is as wide as you want it.
Gradually decrease pressure as you drag or lift the tip. When the leaf is as
long as you need it to be, stop the pressure and lift the icing bag. To ruffle a
leaf, gently move the tip back and forth or up and down (depends on the
effect you want) while you apply pressure. For longer leaves, drag the leaf
out with constant pressure before lifting your tip. You can make long leaves
straight or curved, flat or ruffled.
Your leaf tip can be used to make scales for an animal if they are short and
round placed close together, or feathers if they are long and thin. Though
uncommon, you can use the leaf tip to make a border too, or in a
combination border with a flower.

82 Cake Decorating Basics Reference and Activity Manual Unit Two
Activity 13: Review Grass/Fur, Drop Flower and Leaves (30 minutes)
Supplies
• Tips 131, 233, 352 and 3
• Medium and thin consistency icing
• Icing bags and couplers
• Food colouring
• Rubber spatula or spoons
• Toothpicks
• Small resealable containers
• Practice board
Instructions
1. Put about ½ cup of medium consistency icing in a small bowl and
colour it any colour you like. Blend it well.
2. Take about a ½ cup of the white icing out, place it in another bowl
and make thin consistency for leaves and stems. Tint it green.
3. Use tip 131 and your practice board to make star flowers and drop
flowers (turning your hand). Add small flower centres in a contrasting
colour with a small round tip.
4. Use the practice board and 233 tip to make short grass that stands up
straight being careful not to leave any gaps as you cover a larger area.
Try some long, wavy hair. Try fur, overlapping the hair.
5. Use tip 352 to make leaves that are different lengths and widths to
understand the pressure and movement needed. Make some short fat
leaves. Then make some long thin leaves. Try different hand
movements to make ruffled leaves.

Cake Decorating Basics Reference and Activity Manual Unit Two 83
6. Use your round tip to make stems and draw leaves coming out of them.
7. Add drop flowers to the stems.
Something to think about
Which flower shape did you prefer?
How did you do with your leaf, stem and flower design? It takes practice to
make the flowers look natural in the stem.

84 Cake Decorating Basics Reference and Activity Manual Unit Two
Activity 14: Decorating Cupcakes (45 minutes)
Supplies
• Cupcake ideas printed from the internet, or sketched or copied from books
• Thin and medium consistency icing
• Round and star tips
• 1M tip
• #230 grass/hair/fur tip
• #131 closed star or drop flower tip
• #352 leaf tip
• Icing bags
• Food colouring
• Small bowls
• Spatula
• Toothpicks
• Sprinkle ingredients you brought from home
Instructions
1. Share the ideas you found on the internet, sketched or copied, and
talk about how they made those designs. What do you like about
them? What techniques are used? What other decorations, edible or
nonedible are included? What kind of faces could you find?
2. Plan some cupcake designs and experiment with the round tips, star
tips, including the 1M and open coupler and the multi-opening tip you
just tried. You can share or exchange icing with your friends to get the
variety of colours you need to decorate them. You can experiment with
two-toned swirls or borders by putting two colours of icing in your
icing bag.
3. Make a variety of designs.

Cake Decorating Basics Reference and Activity Manual Unit Two 85
Activity 15: Bake Two Dozen Cupcakes and Make One Batch of Medium Consistency Icing (60 minutes at home)
Instructions
1. Try a new cupcake recipe and if you would like you can also try
another filling. The filling is optional.
2. Bring your cupcakes, icing, ideas and all your tools to the next class.
3. Bring extra icing sugar to make stiff icing.

86 Cake Decorating Basics Reference and Activity Manual Unit Two
Tip 104 and ruffle border
Petal or Ruffle Tips
Petals
Petal Tips are used for many types of flowers and for making ruffles. They
come in a variety of shapes and sizes, and most of them have a slotted end,
with one side wider than the other. Tips 104 and
102 are some of the most versatile tips that are
used to make petals such as roses. The petal tip’s
larger end is always the base of the flower petal or
ruffle, while the thinner end makes the outer, more delicate, edge of the petal
or ruffled edge. Medium consistency icing is used for ruffles and bows. If your
icing is too stiff you will find the top edge of your ruffle looks jagged.
Ruffles
Ruffles can be used as a border, a curved swag or scalloped pattern around
a cake. To make a ruffle, start with the wide edge of the petal tip against the
cake and the narrow end lifted slightly off the cake at about a 45 degree
angle. Apply pressure as you make a small curve with just your wrist, and
bring the wide base back up beside where you started and to where you
want the ruffle line to be. It is quite a bit like a
zigzag, and can be made wide or close together
depending on how quickly you move your hand
back and forth.
Remember that the pressure stays constant, while your wrist movement and
tip are what makes this border. Continue this for the length of your ruffle. With
practice, you will be able to make even ruffles and have them evenly spaced.
Ruffles are not common as borders on cakes or around cupcakes, but you
will see that it can be a beautiful addition to your cake. Some people have
decorated entire cakes with the ruffle tip and you can find pictures by
searching ruffle cakes on the internet.
Two tone icing looks great on ruffles.
Ruffle

Cake Decorating Basics Reference and Activity Manual Unit Two 87
Bows
To make a bow, hold the icing bag at a 45
degree angle with the wider end of the tip
down, closest to the cake. AS you apply
pressure to the icing bag, make a figure
eight shape to be the loops of your bow,
keeping the open loops as similar in size
as possible. A knot or ribbon line over the
top of the narrow centre of your eight is
optional. Start at the narrow centre to draw on wiggly or curved ribbons.
(You can use other tips such as round and star tips to make bows.)
A bow piped with two colours of icing in your icing bag can have a dramatic
effect.
Bow

88 Cake Decorating Basics Reference and Activity Manual Unit Two
Activity 16: Review of Ruffles and Bows (10 minutes)
A ruffle can be a decoration or border on the cake or cover the entire cake
surface as ruffle columns over the crumb coat. Bows can be drawn to hold
together bunches of flowers or be decorations in their own right.
With practice you will become comfortable with this lop sided tip and what
you can do with it. Always be sure you have the larger, wider end of the tip
closest to the cake.
Supplies
• Tips 103 or 104
• Icing bag and coupler
• Medium consistency icing
• Practice board
Instructions
1. Use your practice board to make a series of ruffles.
2. For each border or line of ruffles, try to keep the ruffles consistently
spaced and the same size. When you begin a new row of ruffles, try a
different width and spacing for that entire line.
3. Vary the width and spacing of the ruffles.
4. Try to make an arch or semicircle of ruffles, as you would a scallop or
swag decoration.
5. Practice making bows in a variety of sizes. The loops do not have to
make a perfect figure eight, but can be floppy if both loops are similar
in size and droopiness. Big bows may need larger petal or ruffle tips to
look good. Make a large bow and see what you think of the balance
between its ribbon width and the bow size.
6. Try a variety of wavy lines to see what you prefer for the dangling ribbons.

Cake Decorating Basics Reference and Activity Manual Unit Two 89
Something to think about
How did your ruffles look? It takes practice to make the ruffles even.
What size bow would you say is the largest you think should be made with
the tip you used?

90 Cake Decorating Basics Reference and Activity Manual Unit Two
Two flower nails
Tip: Right-handed people
turn the flower nail
counter clockwise as
they make petals and
left-handed people
turn the flower nail
clockwise as they work.
More Advanced Piping Techniques
Using a Flower Nail
A flower nail is an important tool to help you
make freehand flowers. Flowers made with the
petal tip should be formed on a flower nail so
your hand motion can stay almost the same while the
flower nail rotates instead. As you pipe petals, you are
able to twist the flower base in your other hand and
keep your piping hand at the correct angle as you
work. This makes it much easier to use the same hand motion over and over
to make beautiful flowers.
Cut pieces of parchment paper into squares the same width as your flower
nail. The small square of parchment paper is glued to the flower nail top with
a dab of icing, and then you pipe a flower on top of it.
Once the flower is made, you will transfer it
to the cake or save it in the fridge till you are
ready for it and then use a flat spatula to
place it on the cake.
When it is time to place the flower on an
iced cake or cupcake, draw the leaves and
stems first. Place a dab of icing on the
surface where you want to set your flower. It
will act like glue to hold your flower in place.
You can also pipe flowers directly onto cupcakes if you are able to turn the
cupcake in one hand as you pipe with the other. Remember to pipe leaves
or other decorations first if they are meant to look like they are attached to
the flower.

Cake Decorating Basics Reference and Activity Manual Unit Two 91
Daisy
A daisy is the easiest freehand flower to make.
It uses either your leaf tip #352 or your petal
tip #104 and medium icing. (You may also find
other tips and directions in books and on the
internet.) Note that the directions are a bit
different depending on the tip you use. Try
both styles of daisy to see which one you like
the look of or, if one is easier for you to make.
Daisies come in many varieties with different numbers of petals and florists
dye them all sorts of colours. You can be creative! You can make this flower
on top of an iced cupcake or make it on a piece of parchment paper on a
flower nail and transfer it when it is cold.
This flower looks best if you use a thin round tip to draw a curved stem
before you pipe the flower petals, and then finish it off with a green leaf on
the stem.
Dab a small amount of icing on your flower nail
to stick the parchment paper on, and then make
a small dot in the middle of the parchment to
help you visualize where the centre of your
flower will be. Plan to have about 10 or 12 petals
to all start at this same spot. If you plan for 12,
you can imagine the petals at each number on a
clock. A flower template can be used that has the
circle divided into four quarters.
If you are using the leaf tip #352, hold your
piping bag at a 45 degree angle to the surface.
The tip needs to be the closed side up (like a
bird beak). Start squeezing the bag and touch
the icing to the centre dot to help it stick. As you
Daisy
Tip: Turn the flower nail as
you continue making
petals. If you are
always drawing the
petal from the centre
to the same point, for
instance, up to 12
o’clock, it is easier to
make the petal shape
and size consistent.

92 Cake Decorating Basics Reference and Activity Manual Unit Two
gently squeeze the bag at a constant pressure, pull the icing just above the
parchment, as a long petal. Stop squeezing and lift the icing bag. Continue
starting at the centre and draw petals out, either side by side or slightly
overlapping. Keep the motion as consistent as possible till you finish filling a
ring of petals.
If you are using petal tip #104, hold your piping bag at a 45 degree angle to
the surface, with its wide end down and the narrow end pointing out towards
the outer edge. Decide how long your petals will be and place your petal tip
lightly touching the surface at the outermost point of a petal. Squeeze the
icing bag and move your tip towards the central icing dot. Stop the pressure
at the centre and lift your tip. Continue with the next petal, making it to lie
either right beside the first one or slightly overlapping it. Keep the motion as
consistent as possible till you finish filling a ring of petals.
Daisy centres vary too and can be made a few different ways. Over the
centre, pipe three tiny green dots, one large yellow circle, add a candy or a
mini chocolate cookie.

Cake Decorating Basics Reference and Activity Manual Unit Two 93
Activity 17: Daisy Practice (15 minutes)
This will be your first experience using a flower nail. Remember to place a
small dot of icing on the top of your flower nail to help hold the square of
parchment paper on top of it. If you think it will be helpful, use a flower
pattern, either bought or homemade. It sits on your flower nail under your
parchment. With medium icing, try the two different tips and see which one
you prefer.
Supplies
• Flower nail
• Medium consistency icing
• Small squares of parchment paper cut to the size of the flower nail
• Tips 352, 104 and 4
• Icing bag and couplers
• Large plate
Instructions
1. Practice making daisies with the two different icing tips.
2. Before you start with each one, be sure you are holding the tip the
right way up and follow that particular tip’s directions.
3. Use your round tip to add a centre to your daisies. Set the parchment
paper squares with your daisies on a plate in the fridge when you have
finished them.
4. Try making a daisy with very short petals.
Something to think about
Which tip did you find easier to use?

94 Cake Decorating Basics Reference and Activity Manual Unit Two
Which tip made better-looking daisies?
What did you think of the daisy centres?
Add notes to the directions about what you learned.

Cake Decorating Basics Reference and Activity Manual Unit Two 95
Apple Blossom (Five Petal Flower)
An apple blossom does not mean you
only have to make pink or white flowers
with five petals. It really describes the
flower shape and you can use any colour
combination you like. It may look like a
wild rose to you, but books refer to it as
an apple blossom.
Use medium consistency icing and tip
#104. Hold the icing bag with the wide end of the tip at the centre of the
flower nail. The narrow end should be raised at a slight angle above the
parchment paper.
Slowly turn the nail as you squeeze the icing bag
and move the tip about 3/8” out, keeping the
wide tip end touching the paper. As you squeeze
and slowly turn the nail, gradually bring the wide
tip end back to where you started to give a small
3/8” teardrop petal. (Another way to think of it is
that you are turning the nail 1/5 turn as you move
your icing tip out toward edge of nail.) Curving
your icing tip slightly upward will create a cupped
shape. Stop squeezing as the wide end touches the centre of your flower nail
and lift the tip up. Start the next petal just under the last one you made so
that they overlap. Repeat this motion till you have five petals.
Use a round tip to make a contrasting centre of one or more dots. How
many stamens you draw and where they are drawn will help identify what
flower you have made.
By using different petal tips, and changing how long you make each petal,
you can make a variety of flowers, including a variation of daisies.
Making an apple blossom
Apple blossom on flower nail

96 Cake Decorating Basics Reference and Activity Manual Unit Two
A daffodil starts the same way, but has six petals; a round tip is used to build
an open spiral cone at the centre. On the rim of that cone, a little squiggly
line is piped, and then when the flower is starting to get crusty, each petal is
pinched to make it more pointed. If you look at pictures and experiment, you
will learn to make a garden of flowers.

Cake Decorating Basics Reference and Activity Manual Unit Two 97
Activity 18: Apple Blossom Practice (10 minutes)
Remember to place a small dot of icing on the top of your flower nail to
help hold the square of parchment paper on top of it. If you think it will be
helpful, put a small dot at the centre of your flower nail to mark your starting
point for each petal.
If your icing becomes too soft from your hand, put the icing bag in the
fridge for a few minutes.
Supplies
• Flower nail
• Medium consistency icing
• Small squares of parchment paper cut to the size of the flower nail
• Tips 104 and 4
• Icing bag and couplers
• Large plate
Instructions
1. Practice making apple blossoms.
2. Before you start with each one, be sure you are holding the tip the
right way up and follow that particular tip’s directions.
3. Use your round tip to add little dots at the centre of your apple
blossom. They do not have to be really close together. Set the
parchment paper squares with your apple blossoms on a plate in the
fridge when you have finished them.

98 Cake Decorating Basics Reference and Activity Manual Unit Two
Something to think about
How did you do?
Add notes to the directions about what you learned.

Cake Decorating Basics Reference and Activity Manual Unit Two 99
Rose base
on nail
Roses
Roses use petal tips and round tips. Tip #104 is common and a medium
round tip such as #12 will make a good rose base.
Roses are made with stiff icing to give them structure to stand up.
There are two kinds of roses. A classic rose has
individual petals and looks more realistic. The
fabric or ribbon rose is still made of icing but it
looks like a rose made from fabric or ribbon; it
does not have individual petals, but is formed
with concentric circles.
Both roses are built on a flower nail.
Rose base Both types of roses are built on a
cone base made with a round tip. The size of
base you make is determined by the size of rose
you want. Delicate roses use smaller tips. Hold
the icing bag straight up and down and hold the
parchment-covered flower nail in your other
hand. With the tip just above the centre of your
flower nail, squeeze the bag to make the wider circular base of the cone for
your flower. The tip will be in the icing as the base forms, and you need to
keep it that way as you gradually lift the tip and release
pressure. Stop squeezing and lift the bag up and
away. Ideally your rose base should be one and a
half times as tall as the petal tip you plan to use.
If the cone does not stand up straight, your icing
may be too thin and the cone will not be a good
base for your rose.
Tip: Do not try to make
a rose directly on your
cake. Use a flower nail
that is turned as you
form petals all around
the flower.
Only rosebuds that
lay flat can be made
directly on the cake.

100 Cake Decorating Basics Reference and Activity Manual Unit Two
Fabric or Ribbon Rose
Use a petal tip and stiff icing. Hold the rose base on its flower nail in one
hand and your icing bag in the other. Make sure the wider end of the tip is
down for the entire rose.
Hold the icing bag at approximately 45 degrees
to start the rose centre. Touch your petal tip
against the rose base, about halfway from the
top. Squeeze the icing bag as you turn the
flower nail and move the tip up till the strip of
icing overlaps itself at the top of the rose base.
The angle you hold your icing bag will make it
look like a rosebud. Move the tip down to the
bottom of the base, stop your pressure and pull the tip away.
The next row will start slightly below the first one and your tip angle will be a
little less to form a distinct circle around the other one. Squeeze the bag as
your turn the nail and complete the circle. Lift the tip off. Additional rows are
started just below, but touching the previous circle, and the tip angle is a
little less each time. A fabric rose usually has three or four rows after the
rosebud centre.
Fabric or ribbon rose

Cake Decorating Basics Reference and Activity Manual Unit Two 101
Activity 19: Fabric or Ribbon Rose Practice (10 minutes)
This is your first flower to use stiff consistency icing. If the icing is not stiff
enough, the rose base will not stand firmly; stop before you try to make a
rose and empty your icing bag back into a bowl and add more icing sugar
and check to see if it is stiff consistency before you start again.
If the icing is too stiff, the rose petals will have a jagged appearance instead
of a smooth line. If you need to make the icing a little less stiff, empty the
bag and add a couple drops of water to thin the icing. Stir it and check the
consistency before you begin again.
As your hand warms the icing, it will become softer. If your icing becomes
too soft from your hand, put the icing bag in the fridge for a few minutes.
If you would like to tint the icing, go ahead. If you would like to make rose
petals with two tones, review the section in food colouring that explains how
to do that.
Supplies
• Flower nail
• Stiff consistency icing
• Small squares of parchment paper cut to the size of your flower nail
• Tips 104 and 12
• Food colouring
• Spatula
• Small bowls
• Icing bag and couplers
• Large plate

102 Cake Decorating Basics Reference and Activity Manual Unit Two
Instructions
1. Use tip 12 to make your rose base. Check to be sure your icing is the
correct consistency.
2. Before you start the fabric rose’s swirling petals, be sure you are
holding tip 104 with the wide end down against the rose base.
3. Practice making fabric or ribbon roses.
4. Set the parchment paper squares with your roses on a plate in the
fridge when you have finished them.
Something to think about
How did you do?
How many layers of leaves do you think look best? What would be too many?

Cake Decorating Basics Reference and Activity Manual Unit Two 103
Rosebud
Rose
Classic or Traditional Rose
Use a petal tip and stiff icing. The most common tip
combination to use is tips 104 and 12.
Pipe a rose base using your round tip.
Hold the rose base on its flower nail in
one hand and your icing bag in the other.
Make sure the wider end of the tip is
down for all of the petals.
Hold the icing bag at approximately 45 degrees to start the rose centre.
Touch the wide end of your petal tip against the rose base, about halfway
from the top. The narrow tip should point up and angle slightly inward. The
wide end of your tip must touch the flower base to attach the petals as you
create them.
Squeeze the icing bag as you turn the flower nail and move the tip up so the
ribbon of icing overlaps, covering the top of your rose base. Continue to turn
the flower nail and apply pressure to the icing bag while you bring the wide
part of your tip back down to where you started.
Adding petals
A petal is made each time you gently push the wide end of
the petal tip into the cone base and form an arch as
you squeeze the icing bag and turn the flower nail. Both
ends of the arch are attached to the cone base. Each
row of petals is angled a little bit more outwards than
the row before it. Each row has an uneven number of petals.
The first row should have three petals with each petal started to overlap the
one you just finished. The petals should be similar in size and almost as tall
as the centre bud you made. (After you have added three petals you can use
this as a stand-up rosebud.) It takes practice to be able to make three petals
the same size as you turn the nail.
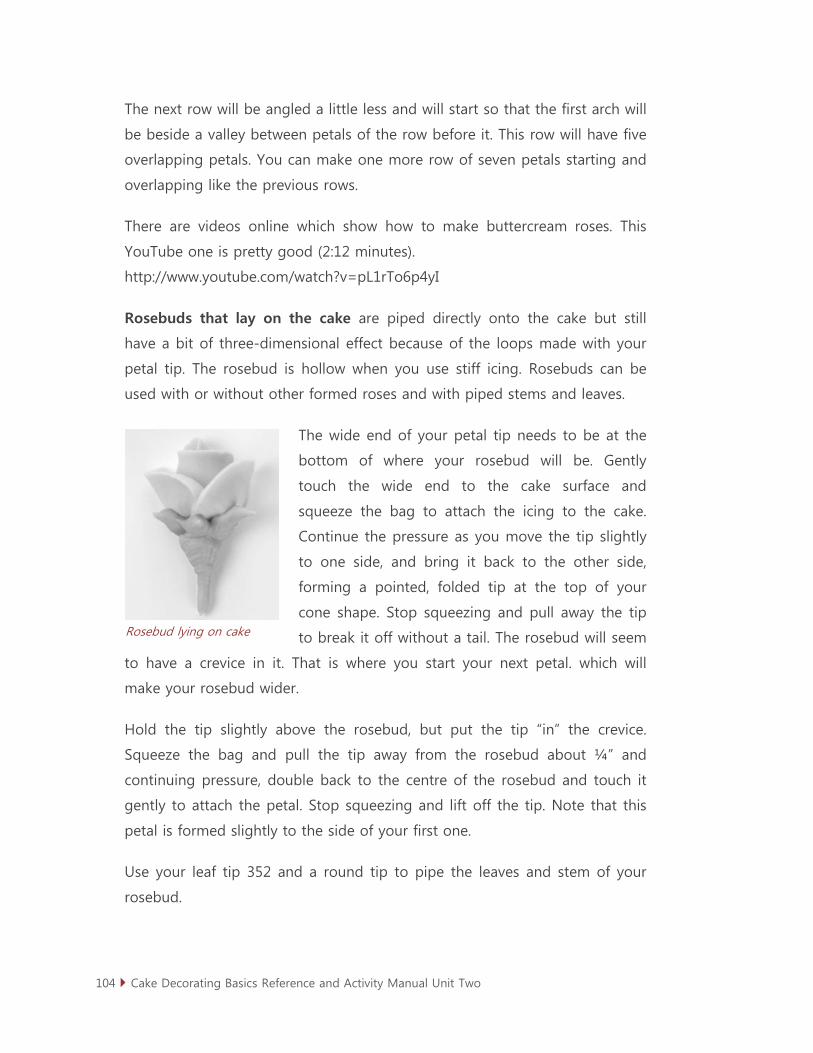
104 Cake Decorating Basics Reference and Activity Manual Unit Two
The next row will be angled a little less and will start so that the first arch will
be beside a valley between petals of the row before it. This row will have five
overlapping petals. You can make one more row of seven petals starting and
overlapping like the previous rows.
There are videos online which show how to make buttercream roses. This
YouTube one is pretty good (2:12 minutes).
http://www.youtube.com/watch?v=pL1rTo6p4yI
Rosebuds that lay on the cake are piped directly onto the cake but still
have a bit of three-dimensional effect because of the loops made with your
petal tip. The rosebud is hollow when you use stiff icing. Rosebuds can be
used with or without other formed roses and with piped stems and leaves.
The wide end of your petal tip needs to be at the
bottom of where your rosebud will be. Gently
touch the wide end to the cake surface and
squeeze the bag to attach the icing to the cake.
Continue the pressure as you move the tip slightly
to one side, and bring it back to the other side,
forming a pointed, folded tip at the top of your
cone shape. Stop squeezing and pull away the tip
to break it off without a tail. The rosebud will seem
to have a crevice in it. That is where you start your next petal. which will
make your rosebud wider.
Hold the tip slightly above the rosebud, but put the tip “in” the crevice.
Squeeze the bag and pull the tip away from the rosebud about ¼” and
continuing pressure, double back to the centre of the rosebud and touch it
gently to attach the petal. Stop squeezing and lift off the tip. Note that this
petal is formed slightly to the side of your first one.
Use your leaf tip 352 and a round tip to pipe the leaves and stem of your
rosebud.
Rosebud lying on cake

Cake Decorating Basics Reference and Activity Manual Unit Two 105
Activity 20: Classic Rose and Rosebud Practice (20 minutes)
It is important that your icing is the right consistency.
It takes practice to do three things at once – turning the flower nail,
squeezing the icing bag and moving the petal tip to create rose petals at the
spacing and angle you want.
As your hand warms the icing, it will become softer. If your icing becomes
too soft from your hand, put the icing bag in the fridge for a few minutes.
Supplies
• Flower nail
• Stiff consistency icing
• Small squares of parchment paper cut to the size of your flower nail
• Tips 104 and 12
• Icing bag and couplers
• Large plate
Instructions
1. Use tip 12 to make your rose base. Check to be sure your icing is the
correct consistency.
2. Before you start the rose bud, be sure you are holding tip 104 with the
wide end down against the rose base.
3. Practice making roses with three petals and ones with five petals. You
may make a rose as large as seven petals, but they should not be
made larger than that. If you want a larger rose, it would look better
to use a larger petal tip and only make five petals.
4. Set the parchment paper squares with your roses on a plate in the
fridge when you have finished them.

106 Cake Decorating Basics Reference and Activity Manual Unit Two
5. Pipe flat rose buds too. These can be used in combination with other
roses on a cake.
Something to think about
How did you do?
How many layers of petals do you think look best?

Cake Decorating Basics Reference and Activity Manual Unit Two 107
Activity 21: Decorate Cupcakes with Piped Flowers (15 minutes)
Were you wondering what you would be doing with all those flowers in the
fridge? They will become the centrepieces for your best flowers so you can
take them home to impress your family and friends, or give them away as a
community service.
What colour or colours were the flowers you made? If you made them plain
white, select some other colour, or colours, for your cupcake bases and thin
and tint enough icing to spread on your cupcakes.
Consider making a small amount of thin green icing to pipe leaves and stems.
Share coloured icing with friends.
Supplies
• 24 cupcakes made at home
• Food colouring
• Small bowls
• Spatula
• Icing tips
• Icing bag and couplers
Instructions
1. Use a spatula to ice your cupcakes.
2. Select your best flowers. Ones you do not use can be scraped off and
put with your other icing and used again later.
3. Consider if you will draw stems or leaves on the cupcakes as finishing
touches. They actually need to be piped on the cupcake before your
flower or flowers are added.

108 Cake Decorating Basics Reference and Activity Manual Unit Two
4. If you want to try making some flowers directly on cupcakes, you can.
(Roses are best if they are piped onto a flower nail first and then
placed on your cupcake.)
5. Put a dab of icing on your cupcake where you will set your cold
flower. The fresh icing helps to glue the flower to your cupcake.
6. Use a flat spatula to lift the cold flowers onto your cake.
Something to think about
What did you think of your cupcake collection?
Take a picture of your cupcake collection and fill in your cake journal.

Cake Decorating Basics Reference and Activity Manual Unit Two 109
Bachelor Button Flower
This flower uses a star tip in two different
sizes, with two shades of the same colour icing
to look more natural. Stiff consistency icing is
needed to keep the petals standing up.
Pulled stars are made by lifting the star tip as
you continue pressure until the star is as tall
or long as you want it. Stop squeezing and
the icing will naturally break off.
You can make this flower on top of a cupcake or make it on a piece of
parchment paper on a flower nail and transfer it when it is cold.
Dab a small amount of icing on your flower nail to stick the parchment paper
on. Use your large round tip 12 or the icing bag with no coupler in it to draw
a large dot in the centre of your flower nail parchment (about ½ inch across,
depending on how large you want your flower. The widest row of petals
comes out of this, so that should help you decide how big to make it).
Use a smaller star tip to pipe a cluster of pull out stars standing in the centre.
Use your next larger star and lighter colour icing to pipe a row of pull out stars
about 3/8” around the bottom of the base, lying flat on the parchment paper.
Make another row of pull-out stars above the others, placing them between
the other stars in your bottom row. Angle them up slightly.
Do another row, angled up even more, and placing your pull-out stars
between the petals of the row below it.
Bachelor button
110 Cake Decorating Basics Reference and Activity Manual Unit Two
Activity 22: Bachelor Button Practice (10 minutes)
You do not need to make two different colours of icing for practice, but on a
cake, a slightly darker shade in the centre makes them look more authentic.
If you do not have two different star tips, you can make them with only one
tip, being careful to make the centre pull-out stars shorter than the others.
Be sure you have stiff consistency icing before you start. As your hand warms
the icing, it will become softer. If your icing becomes too soft from your
hand, put the icing bag in the fridge for a few minutes.
Supplies
• Flower nail
• Stiff consistency icing
• Small squares of parchment paper cut to the size of your flower nail
• Star tips 16 and 18 and round tip 12
• Icing bag and couplers
• Large plate
Instructions
1. Use tip 12 to make your round base. Note that it is not a rose base,
but a relatively flat circle.
2. Practice making bachelor buttons.
3. Set the parchment paper squares with your flowers on a plate in the
fridge when you have finished them.

Cake Decorating Basics Reference and Activity Manual Unit Two 111
Something to think about
How did you do?
Write down your suggestions or pointers for how to make these flowers.

112 Cake Decorating Basics Reference and Activity Manual Unit Two
Mum
Mum
Have you ever seen a mum? It is a flower completely covered in delicate, thin
petals, and almost looks like a pompom. Some
are shaggy with longer petals. You can use
your grass tip #233 to make these flowers.
They are easiest to make on cupcakes
that you can turn in your hand, or on
flower nails. (Sometimes a
chrysanthemum is called a mum too, and
it has sturdier, wider petals. You will learn
about it in Activity 28.)
Use medium consistency icing. Stiffer icing will make them less shaggy.
This flower has no base under it. If you have difficulty making this flower
without a base, use your round tip 12 to make a low circle of the same
colour as your petals. You do not want the central circle to add much, if any,
height to the mum.
Decide how large your flower will be and experiment with petal lengths to
create the effect you want.
Start by making the outside ring of petals by piping petals towards the
outside of your flower. Hold the flower nail or cupcake still while you pipe
the petals, and then turn it slightly before you start the next petals. Complete
the outer circle. For the next row, make another circle of thin petals
overlapping the outer ring, and continue with another circle till you are
almost at the centre. Add one or two more squeezes of petals that stand in
the middle to completely fill your flower.

Cake Decorating Basics Reference and Activity Manual Unit Two 113
Activity 23: Mum Practice (10 minutes)
This flower has no base. This makes it more difficult to make the flower
round. You not only have to imagine a circle to leave empty as you start your
first row of petals, you also have to make the petals the same length all the
way around to keep it circular. If you have difficulty, use your round tip 12 to
pipe a low, flat circle as your guide. You do not want the guide to add much,
if any, height to the mum.
Stiffer icing helps the mums stand up better, so be sure to refrigerate your
icing if it gets too soft from your hand.
Supplies
• Flower nail
• Stiff consistency icing
• Small squares of parchment paper cut to the size of your flower nail
• Tip 233
• Icing bag and couplers
• Large plate
Instructions
1. Practice making mums.
2. Set the parchment paper squares with your flowers on a plate in the
fridge when you have finished them.
Something to think about
How did you do?
Write down your suggestions or pointers for how to make mums.

114 Cake Decorating Basics Reference and Activity Manual Unit Two
Sunflower with leaf petals
Sunflowers
Sunflowers have bright yellow petals and dark
centres, but their shapes and sizes vary
greatly. Because of this, you will find there
are also variations for how to make
sunflowers. They can be made on a flower
nail or directly on the top of a cupcake.
Use medium consistency icing to give the
petals greater definition. You may want to
experiment with thin icing to see what its effect is.
Two different tips will be highlighted here.
Use leaf tip 352 and round tip 12. Pipe a mounded circle with tip 12, its size
determining the centre of your sunflower. Depending on what you have
planned for the centre, this mound could be yellow or chocolate buttercream
icing. Around the base of your central circle, use tip 352 (make sure you are
holding it with the closed point on top), and hold it at a 45 degree angle as
you pipe yellow petals in a ring.
Pipe another row of petals on top of your first one, offsetting them and
making them slightly smaller than your bottom row.
Using your fur/grass tip # 233, you can make a sunflower with more delicate
petals. Consider how you will fill in the centre of your sunflower, for instance
with a candy chocolate mini cookie, chocolate sprinkles, etc. to help you
determine the inner starting circle for your petals. Make longer petals to
form a complete circle. You may want one or two rows of petals. Add the
dark centre to finish it off.

Cake Decorating Basics Reference and Activity Manual Unit Two 115
Activity 24: Sunflower Practice (15 minutes)
Try this flower with both tips. You may find it helpful to use round tip 12 to
pipe a low, flat circle as your guide for both the sunflower variations. You do
not want the guide to add much height.
Stiffer icing helps the petals stand up better, so be sure to refrigerate your
icing if it gets too soft from your hand.
Supplies
• Flower nail
• Medium consistency icing
• Small squares of parchment paper cut to the size of your flower nail
• Tips 12, 233 and 352
• Icing bag and couplers
• Large plate
Instructions
1. Practice making the sunflowers using the two different techniques.
2. Set the parchment paper squares with your flowers on a plate in the
fridge when you have finished them.
Something to think about
How did you do?
Write down your suggestions or pointers for how to make sunflowers. How did
your make the sunflower centre? What would you recommend as a centre?

116 Cake Decorating Basics Reference and Activity Manual Unit Two
Activity 25: Look up Directions to Make Carnations and Chrysanthemums. Make Stiff Consistency Icing and Practice Making Them at Home. (60 minutes)
There are many different flowers you can make with piped icing and it is
important that you know how find ideas for them and directions for how to
make them. Some of them will require different icing tips than you may own.
Try substituting others and see if you can make the flower, or purchase
additional tips to give you more flexibility.
You can use written step-by-step directions, images or videos you find online
or in cake decorating books. Search till you find directions that make sense
to you and that are easy to follow. You may find variations for making the
same type of flower.
Look at the back of your Reference Manual and Activity Guide for website ideas
and search for others. YouTube has plenty of cake decorating demonstrations.
Make a separate page for each of these flowers: carnation and
chrysanthemum. Include directions, images and websites you used as
resources and add those to your Activity Guide.
Bring the directions, your comments about your experience and if you can, a
frozen example or picture of the flowers you made.

Cake Decorating Basics Reference and Activity Manual Unit Two 117
Something to think about
From your experience of finding directions and trying them at home, what
did you learn about yourself? Would you rather look at a video or a series of
pictures? Is a combination better? Do you prefer to learn in a group?
Be ready to tell the other members about your experience.

118 Cake Decorating Basics Reference and Activity Manual Unit Two
Activity 26: Sharing Chrysanthemum and Carnation Directions (15 minutes)
Instructions
1. As a group, look at the resources that everyone found.
2. Were some of them the same?
3. Talk about members’ experiences, how they prefer to learn and how
they can continue to build their cake decorating skills outside of 4-H.

Cake Decorating Basics Reference and Activity Manual Unit Two 119
Basket weave tip
Tip: Look at your icing tip
and use it as a guide.
The lines you are
drawing and the gaps
you need to leave will
be the same width as
your tip.
Make straight up and
down guidelines in the
icing with a toothpick.
If you are going all the
way around a cake, use
a tape measure to
calculate spacing and a
toothpick to mark
guidelines. Start at the
back to help hide any
mismatched ending.
Basket Weave
The basket weave tip is ridged on one
side and flat on the other, or ridged on
both sides. The icing line is wide and flat
or wide and ridged, depending on which
tip side is up. The tip gets its name because it is most
often used to make a woven pattern, but you can use
it for other things. Imagine a mummy cupcake with eyes peeking out from
wide bands of icing fabric. You can use either side or even a combination to
make a fence or a basket weave pattern.
Basket weave step-by-step instructions
1. Use medium consistency icing.
2. For a basket to look more like a bird’s
nest of twigs, a large round tip or a
star tip can be used instead of a
basket weave tip, following the same
directions.
3. You will be using Tip #47 with either
the flat side or ridged side up.
4. Hold the icing bag straight up and
down. Pipe a vertical (straight up and
down) line of icing, the height of the
area you want to cover. Now comes
the tricky part that takes practice. Each
line has to be spaced just wide enough
apart to leave a gap for another line to
fit snugly between them.
5. There are two different ways to do a
basket weave cake. Draw all the vertical
lines first and then fill in the others. It is

120 Cake Decorating Basics Reference and Activity Manual Unit Two
Basket with berries
easiest if you work in a step pattern as you go, instead of trying to
remember if you need to go over or leave the strip blank.
6. Decide if you are going to work from left to right
or the other way, and continue to work
in the same direction to help your
icing to be even. Start your first
horizontal line at one of the
edges of a vertical line, and go
over the top of the next line. Just
below it, in the empty space, begin
your next horizontal line and carry it over
the next vertical line, continuing as though you are making stairs going
down. When you get to the bottom of the vertical strips, move back
up to the top and continue filling in your basket.
7. Continue this pattern to create a weave over the entire area.
Watch the basket weave video at www.marthastewart.com

Cake Decorating Basics Reference and Activity Manual Unit Two 121
Activity 27: Basket Weave Practice (20 minutes)
After you become familiar with the basket weave tip, you will work on filling
in a solid area with the weave. It takes practice to be comfortable with the
weave and its spacing. You will find that directions vary but the weave looks
the same when you have filled in an area completely.
Supplies
• Medium consistency icing
• Tip #47
• Practice board
• Paper
• Pencil
• Ruler
Instructions
1. Draw some vertical lines on your paper, evenly spaced about an inch
apart. Slip it inside your practice board and use it as guidelines for
your basket weave.
2. Practice making a wall of upright boards.
3. Make a fence with two cross boards.
4. Use the basket weave to cover an area about one-third the size of
your practice board.
Something to think about
How did you do?
Write down your suggestions or pointers for making the basket weave.

122 Cake Decorating Basics Reference and Activity Manual Unit Two
Picture Transfers
A gel transfer or frozen buttercream transfer are ways to perfectly trace a
picture onto your cake using icing or to copy letters or another pattern onto
your cake top.
• Here is a website with lots of colouring page images. http://www.ivyjoy
.com/colouring/search.html
• Wilton has a section of its website dedicated to finding patterns you can
print. http://www.wilton.com/decorating/patterns/patternlocator.cfm
Print the logo or cartoon the size you would like on your cake. If your printer
has this ability, print as a mirror image. Check to be sure it will fit after you add
a border or any other words or decorations that will be with it on the cake.
Gel Transfer
Even though this is called gel transfer, you
can use either piping gel or a very thin line of
buttercream icing (tip 1, 2 or 3) in the same
colour you would like use to outline the
picture (most cartoons, for instance would be
outlined in black or chocolate). If your picture
has any words, you will want to print its
mirror image from the internet (ask for help if
you do not know how to do this) to make the
letters backwards. If you are tracing the pattern yourself, use parchment
paper and a dark marker so you can just flip the picture over before you
start tracing.
Instructions
1. Tape your picture to the table.
2. Place your parchment or wax paper on top of it and tape it down too.
Rainbow cake

Cake Decorating Basics Reference and Activity Manual Unit Two 123
3. Use either a piping gel (they come in lots of colours) or buttercream
icing (very thin tip like a 1) and trace the pattern. It will be very hard
to see if you use the same colour icing as the background (only a
good idea for lettering guidelines).
4. Trace the outline completely. Lift it up to look at it and double check
that all the lines were traced.
5. A transfer goes onto an already smooth, final coat of icing on the
cake. It works best if the cake has already crusted over.
6. Line up the parchment paper with your cake and carefully place it on
top of the cake where you want it. You cannot jiggle it or move it or
your lines will all smudge. Use your finger or a small paint brush to
lightly trace all the lines.
Frozen Buttercream
Instead of printing only the outline and then icing the whole design directly
on the cake, this whole picture is made on parchment paper and frozen
before it is set on top of the cake. It gives a more precise and flat picture.
Instructions
1. Make thin consistency icing and colour smaller amounts of it to be all
the colours you will need for your picture. Do not forget about the
outline colour if it is a cartoon or picture that has an obvious outline.
Cartoons often have black or dark brown outlines.
2. Take out a baking sheet or flat plate that the image will fit on and that
will fit flat in your freezer. Make space in your freezer before you start.
3. Tape the photocopy or image onto the plate or baking sheet and
cover it with a sheet of wax paper. Tape the wax paper down over the
image. If your image has any letters or you need to have the image
facing the same way as your original, trace it with a pencil on the wax
paper. Then remove the original to refer to it later. Flip the traced wax
paper over, making sure you can still see the pencil lines. Slip a plain

124 Cake Decorating Basics Reference and Activity Manual Unit Two
piece of paper under it if you
can’t see the lines well and tape
the papers to the plate.
4. You will start with the outline
and need to choose a round tip
that will help you make the lines
the width you prefer. Hold the
icing bag at a 45 degree angle
and outline the picture. Off to the side, pipe another short line of icing
as a tester. After you have traced all the lines in that colour, freeze it
for at least five minutes. Check your tester line to see if it is completely
frozen. It may take up to 15 minutes for the icing to freeze solid
depending on the thickness of your lines.
5. This would be a good time to use parchment bags with small round
openings or sandwich bags with a corner snipped off because you
want a lot of colours and only plan to use a round tip for the icing.
6. Fill in the colours, using round tips. For larger areas, use larger tips.
Follow the outline and fill in the areas, being careful not to leave any
gaps. Think about the details. Do any parts seem to be layered on top
of others? These need to be piped first and frozen before the other
colour is added or they will blend.
7. Refreeze it for 15 minutes to be sure the larger areas are frozen solid.
Check to see if you left any gaps and use a small tip to pipe those in
so you do not make a big ridge on the icing. Continue filling in
colours and freezing till you are done. With a spatula, smooth any
large ridges that have formed. A smooth finish will help it lay flatter
and stick to the cake better. Use very little pressure and work quickly
because you do not want the transfer to melt.
8. Freeze the picture one last time till you are ready to transfer it to the
cake. Lift the wax paper and turn it upside down to place the transfer
on the cake where you want it. You have to do this part while the
Turtle cake

Cake Decorating Basics Reference and Activity Manual Unit Two 125
transfer is still frozen solid. Carefully peel off the wax paper from one
end to the other. It will sit high if you used a lot of icing. You can pipe
around the buttercream transfer if there is a gap below it.
Search the internet for how-to videos or descriptions with images. Here are a
couple:
• http://cakecentral.com/tutorial/how-to-create-a-frozen-buttercream
-transfer
• http://cake-decorating.wonderhowto.com/how-to/create-dog-shaped
-frozen-buttercream-transfer-386073/

126 Cake Decorating Basics Reference and Activity Manual Unit Two
Activity 28: Bake Two Identical Cakes to Layer or One Tall Cake to Cut and Layer. Icing needs to be made Thin Consistency. Plan a Message for Your Cake and Print it in a Font and Size you want to use on Your Cake.
Think about who you will make this cake for. If it going to be given as a
community service, check with the group first about allergies and to see if
they are interested in you baking a cake for them. Think about that group
and what theme or pictures could be good for their cake and search the
internet or colouring books for images of cartoons or clipart that do not
have many details. Copy and print one that will fit on the top of your cake.
Supplies
• Internet access
• Printer
• Paper
• Ingredients to make a cake
• Ingredients to make medium buttercream icing
Instructions
1. Think about if your cake will have anything other than this picture on
top. Plan some sort of message and create it using your computer in a
font that you like and enlarge it and bold it the size you need. You will
use a gel transfer to create it in icing.
2. Note that the cake will not be crumb coated at home. Bring the cakes,
icing, picture and message to the next meeting.
3. Bring parchment paper or wax paper to the next meeting, ensuring it
is large enough to cover the entire picture.

Cake Decorating Basics Reference and Activity Manual Unit Two 127
Activity 29: Frozen Buttercream and Gel Picture Transfer (75 minutes)
Supplies
• Picture (and message) to transfer
• Two cakes to layer
• Small bowls
• Spatula
• Food colouring
• Tips
• Icing bags
• Couplers
• Parchment paper
• Pen or pencil
Instructions
1. Make sure your spacing is well planned by using a piece of parchment
paper cut to your cake size. If you have not printed a message with
your computer but will add a message, write your message on it.
2. Look at your cake plan to determine how much icing you will need to
add borders and other decorations using medium consistency icing,
after your writing and picture are added to the cake. Set this aside.
3. Use water or milk to make the rest of your icing thin consistency.
4. Ice your layer cake (stack and crumb coat).
5. Copy your design onto parchment or wax paper, being sure to flip it
over if you need the mirror image for it (for lettering) and trace the
outline and first layer in icing.
6. Divide your thin icing into small bowls and mix the colours in the
approximate quantities you will need for your picture, being sure to

128 Cake Decorating Basics Reference and Activity Manual Unit Two
make enough of the colour you will use for letters and enough to
finish icing your cake. Make the other colours of icing you need to
complete your picture.
7. Ice the cake and make the surface smooth.
8. Start your frozen transfer.
9. While it is in the freezer, do your lettering as a gel transfer. Copy your
design onto parchment or wax paper, being sure to flip it over if you
need the mirror image for it (for lettering) and trace it in icing or
piping gel using a thin round tip. Transfer it onto the cake and pipe
your lettering.
10. Continue with the layers of your frozen transfer until it is finished.
11. If you are pressed for time, you can do the bottom cake border before
your frozen transfer is added to the cake.
12. Set the transfer on, peel wax paper and pipe around your transfer, if
you want. Add other details and borders.
Something to think about
Were you happy with how your message looked? What would have made it better?
What did you think of the final picture you froze and placed on your cake?

Cake Decorating Basics Reference and Activity Manual Unit Two 129
Add notes to the two transfer methods to help yourself next time you use
those techniques.
Take a picture of your cake.
Complete a cake journal.
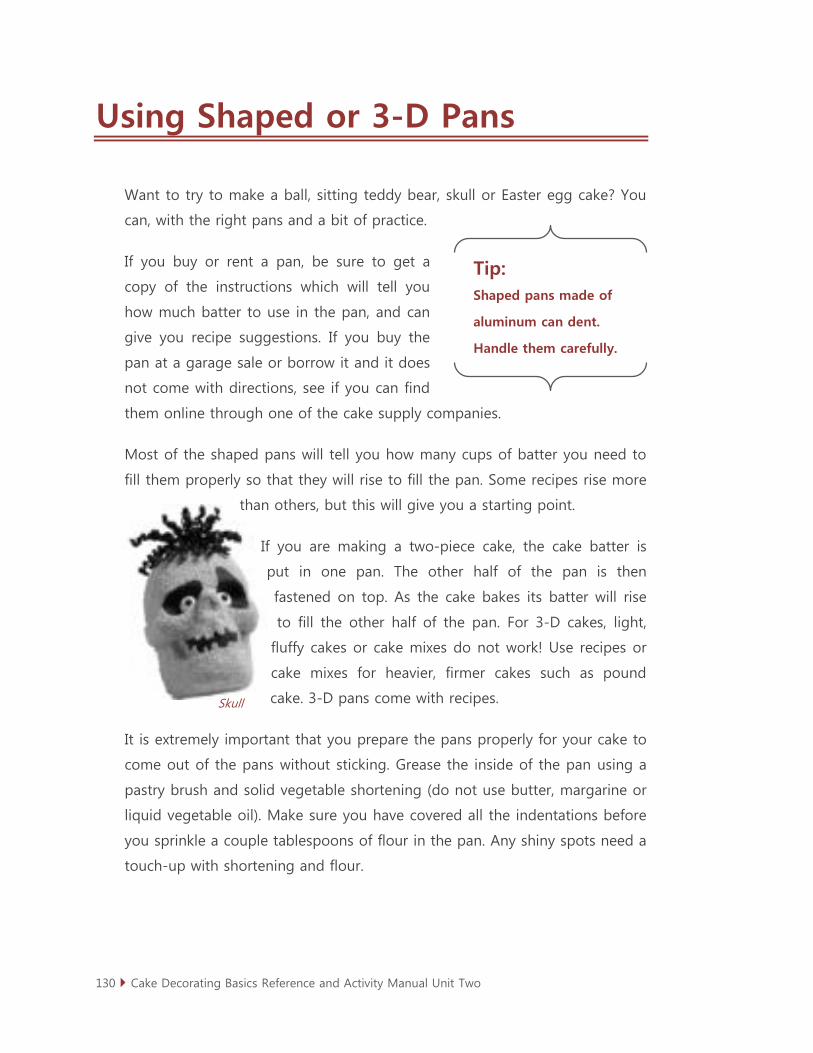
130 Cake Decorating Basics Reference and Activity Manual Unit Two
Skull
Using Shaped or 3-D Pans
Want to try to make a ball, sitting teddy bear, skull or Easter egg cake? You
can, with the right pans and a bit of practice.
If you buy or rent a pan, be sure to get a
copy of the instructions which will tell you
how much batter to use in the pan, and can
give you recipe suggestions. If you buy the
pan at a garage sale or borrow it and it does
not come with directions, see if you can find
them online through one of the cake supply companies.
Most of the shaped pans will tell you how many cups of batter you need to
fill them properly so that they will rise to fill the pan. Some recipes rise more
than others, but this will give you a starting point.
If you are making a two-piece cake, the cake batter is
put in one pan. The other half of the pan is then
fastened on top. As the cake bakes its batter will rise
to fill the other half of the pan. For 3-D cakes, light,
fluffy cakes or cake mixes do not work! Use recipes or
cake mixes for heavier, firmer cakes such as pound
cake. 3-D pans come with recipes.
It is extremely important that you prepare the pans properly for your cake to
come out of the pans without sticking. Grease the inside of the pan using a
pastry brush and solid vegetable shortening (do not use butter, margarine or
liquid vegetable oil). Make sure you have covered all the indentations before
you sprinkle a couple tablespoons of flour in the pan. Any shiny spots need a
touch-up with shortening and flour.
Tip: Shaped pans made of
aluminum can dent.
Handle them carefully.

Cake Decorating Basics Reference and Activity Manual Unit Two 131
Roller coaster cake
You will need a cookie sheet under the pans to keep any overflow from
making a horrible mess in your oven. It may be a bit tricky to get the pan to
sit level on the baking sheet.
If you are using a 3-D pan, batter is poured into one half of the pan and the
batter will come right to the rim, almost to the point of overflowing. Snap
the back half of the pan in place and tie the two pans tightly together in two
places with household string or wire, (not nylon string) to keep the rising
batter inside the top pan. You do not want the batter to force the pans apart
and leak out.
Follow the pan directions for the temperature and approximate cooking time.
Use a toothpick or skewer to test for doneness. 3-D pans will have a little
vent for steam to come out and that is where you poke your toothpick in. If
you need to remove the top half of a 3-D pan to check for doneness, do not
do this till the cake is almost completely cooked, so the batter is set in the
shape already. Tap it gently to release the cake. If it does not release easily,
do not force it and put it back in the oven. Set the top back on if it needs to
cook longer.
It is expensive to buy cake pans you will hardly ever use. If you live in, or
near, a city you may find a store that rents them. You may be able to borrow
some special character pans from friends. But if you are creative, you can
make cakes in countless shapes by using common sizes of cake pans or
bowls that you already own or will use countless times and a serrated knife.
Baking in Bowls
By using a glass bowl as your baking pan, you can add
a three-dimensional effect for a baseball, ladybug,
hill, skirt for a doll, or put two of them together
balanced on their sides to be a piggybank.
Check the bottom of the bowl to make sure
your bowl is safe for the oven. You are looking

132 Cake Decorating Basics Reference and Activity Manual Unit Two
for words molded into the bottom of the bowl that say it is safe to use in an
oven. If you are unsure, do not use your bowl for baking. Do not use a bowl
that has any cracks, chips or defects.
Filling and baking in bowls:
• When choosing smaller glass bowls for baking, be careful not to
overfill them.
• For deeper bowls or dense cake recipes, turn your oven temperature
25 degrees lower than the recommended baking temperature.
• Prepare the pan with shortening and flour, or use parchment paper cut
at one inch intervals to fit against the bowl sides and bottom. Bake the
cake as you normally would.
• Be sure to use a toothpick or skewer to test the centre for doneness.
The cake may take longer to cook than if baked in a flat pan. If the
cake is undercooked, it will be hard to remove from the glass bowl.
Cooling a 3-D cake is a little different. Let
it cool on a cooling rack for five minutes
before you take off the clamps and string.
Tap it gently to release the cake. If it does
not release easily, let it cool for a few
minutes longer. Then remove the top pan.
Once the pan is off, let it cool another five to
10 minutes longer, and then replace the top
pan without clamping it on. Carefully turn it
over holding the pans together as you slowly
flip it. Once it is turned over, lift off the pan
that is now on top, tapping it gently to help
release it, and leave it like this. The cake will
cool as it rests in the pan. Let it cool
completely (can take 4-5 hours).
Tip: With a little imagination,
some shaped pans can
be used for more than
one thing. A snowman
pan could make light
bulbs or air balloons.
A round pan could be a
soccer ball, apple for the
teacher or a pumpkin.

Cake Decorating Basics Reference and Activity Manual Unit Two 133
When you want to take the cake out of the pan, put it on the cake board or
plate, adding a bit of icing to help it stick. Move the pan to sit at the edge of
your cake board before you try to take the cake out of it. Remove cake from
the pan by placing one hand gently on the cake surface and tip the cake and
pan upright where you want it on the cake board/plate. Carefully slip the pan
away from the cake. If the cake does not stand level, trim its bottom while
you support the cake, or use a little icing under the cake to prop it up.

134 Cake Decorating Basics Reference and Activity Manual Unit Two
Activity 30: Bake a Shaped or Three-dimensional Cake and Decorate it (90 minutes at home)
Supplies
• Internet or books for ideas
• Ingredients for icing
• Ingredients for cake
• Different shape cake pan
• Food colouring, etc.
Find images you would like to use as inspiration, plan, bake and decorate a
cake using techniques you have learned.

Cake Decorating Basics Reference and Activity Manual Unit Two 135
Star cake with berries
Other Ways to Decorate Cakes
Can I Decorate a Cake Without Using Tips and a Piping Bag?
YES! By using coloured icing, edible or nonedible decorations or cutting the
cake into a shape, you can create unique cakes. For instance, a round cake
can turn into a fish when you use your spatula to shape coloured icing into
scales and add candies to be fins and an eye. Flip flops can be cut out of
rectangular cakes decorated with fruit leather or licorice straps.
Rice Krispies treats shaped into balls, ice cream cones for triangular pillars or
tree forms can be covered with icing. Carefully placed marshmallows on a
rectangular cake can be the base for your red building block cake.
Dollar store or kids’ meal toys, licorice, gummy candies cut into shapes,
chocolate chips, lifesavers, cookies you buy or make (cut out) and sprinkles
can be added to the cake.
Drag a toothpick at regular, marked intervals to create a diamond pattern or
lattice across the top of your cake.
This project focuses on decorating using icing, but cakes can look gorgeous
without any icing. A layer cake with strawberries and
whipped cream showing between the layers can
look delicious. Icing sugar and berries or
toasted nuts sprinkled on top looks
special, as would some edible flowers
plopped in the centre of a tube cake.
Cheesecakes do not have icing and they can
look good. How else might you decorate a
cake to make it showy?

136 Cake Decorating Basics Reference and Activity Manual Unit Two
Edible and Non-edible Decorations
Edible means you can eat it, such as peppermints, sticks of gum, strawberries,
nuts or chocolate shavings, fresh or canned fruit such as berries and peaches,
pieces of nuts, chocolate chips, sprinkles, candies, licorice, fruit leather and
cookies. At Achievement Day, you can use edible additions to your cake or
cupcakes if you would like to. You do not have to.
Nonedible decorations mean you can’t eat them. You also cannot use them
in your cake designs at Achievement Day, but it will be fun to experiment
with them for the next cakes and cupcakes you make.

Cake Decorating Basics Reference and Activity Manual Unit Two 137
Activity 31: Brainstorm and Record as a Group: Edible and Non-edible Decorations 20 minutes
Supplies
• Marker
• Large pieces of paper, bristle board or flip chart
• Paper
• Pens
Instructions
1. As a group, brainstorm ideas for decorations that are not made of
icing and that can be added to a cake or cupcake. Be creative and
write them all down, edible on one side and nonedible on the other.
Do not criticize any ideas, but stick to the topics.
2. Give the group time to copy the list down for themselves to put with
their images and ideas.

138 Cake Decorating Basics Reference and Activity Manual Unit Two
Edible decorations
Stencils are reusable plastic sheets with cutout patterns. To use a stencil,
press it against a cake with buttercream icing that is dry to the touch. You
can use a spatula to spread another colour of icing evenly over the stencil,
and scape off the excess. Carefully lift the stencil and the coloured design will
stay where the stencil holes were. Replace the stencil if you are repeating the
design or making a border. You can also use an airbrush or spray colouring
with stencils.
Edible, purchased borders, stickers and sugar sheets or sugar decorations
Coloured sugars and sprinkles – You can make sprinkles in colours for
which you have food colouring, by mixing the colour first and then stirring it
into a bowl of sugar. Stir it well to spread the colour evenly. You can buy all
shapes and colours of sprinkles.
Rice paper – Bakeries use sheets of rice paper and edible ink to copy
photographs to place on cakes.
Did you know that some fresh flowers are edible? Not all of them are safe to
put on a cake, so check that before you poke them into the icing. You
should also consider how long the flowers will be on the cake and if they
may wilt before the special event is over. Wilted flowers ruin the effect.
There are lots of websites with pictures and information about cake and
cupcake decorations. You can also just search images of cakes and find
pictures. http://cake-decorating.wonderhowto.com/how-to/

Cake Decorating Basics Reference and Activity Manual Unit Two 139
Barn and silo
3-D dog
Sculpting: Cutting a Cake into another Shape
Sculpting is creating or building a shaped cake by cutting one or two cakes
into the appropriate shapes and using icing, and possibly dowels if it is
gigantic or tiered, to attach them to one another. This method often gives
you a few unused, oddly-shaped pieces of cake you can eat or you can look
up a recipe for yummy mixtures to stick cake crumbs together to make
another cake.
You can sculpt cupcakes too. For instance, a second cupcake baked with no
paper and placed upside down on another cupcake could transform it into a
snowman. A slice of cake cut into the shape of a
shark head could emerge from a cupcake.
Start with a recipe that makes a firm cake.
Cake mixes or fluffy angel food cakes do
not work.
Plan your cake shape on paper before you
bake. Consider what shape or shapes of
cake would be good for you to use. Will you
be drawing or printing from the internet, or enlarging a picture to trace
forming the outline of your cake? Sometimes a sheet, or 9” by 13”, cake
would be better as a starting shape. Sometimes two smaller cakes that may
not necessarily be the same shape would work best to cut up and fit
together for the shape you want to make.
Think beyond squares, rectangles and circles.
Maybe it is a tube pan and a loaf pan
combination you need to make a “5”, two
tube pans to make a figure eight race track

140 Cake Decorating Basics Reference and Activity Manual Unit Two
for toy cars or a clean tin can to make a tower. Your math skills, scrap paper,
a pencil and scissors can be very helpful!
If you need two cakes to be identical in height, you will need to put equal
amounts of batter in the pans. If the pans are the same capacity, you can
weigh them or measure the batter you put in each. It is trickier when you are
using differently shaped pans. Dip the tip of a knife or spatula into the centre
of the batter in each pan to measure the depth before baking or, better yet,
use a clean ruler.
Bake the cake(s).
Once the cake is cool, trace the pattern on the cake and use cut off sections
to add a three-dimensional effect, make parts of the cake wider or longer,
using icing as your glue.
Cutting a Cake Shape
If two cakes, or parts of them, will be placed side-by-side, compare the cake
heights and level them to be the same height before you start. Icing can only
fill in some of the unevenness.
It is easier to cut a cake if it is partially frozen. It will crumble less, hold its
shape as you saw at it and is easier to move pieces.
A paper pattern pressed gently to the top of a cake will stay in place because
of the moisture in the cake while you saw around it with a serrated knife
held point-down.

Cake Decorating Basics Reference and Activity Manual Unit Two 141
Activity 32: Creative Ideas, Baking and Finding Decorations. Price Out Your Cake. (90 minutes at home)
Have some fun searching for creative ways to decorate cakes that use very
little piped icing. Cakes that use piping for small details are fine, but what you
really hope to find are some creative ways to decorate without much piping.
You will bake the cake(s) needed to make your design, make the icing and
purchase all the decorations you may need to decorate your cake at the next
group meeting. If you have not yet given a cake as a community service,
consider it for this cake.
Supplies
• Internet access
• Printer
• Paper
• Pencil
• Calculator
• Grocery bills or store flyers
Instructions
1. Find cake ideas on the internet, in books or magazines that can be
decorated without tips. Search images of simple cakes, or pick a theme
to look at. Search “sculpting cakes” or “cake sculpting” and you will
find lots of websites and how-to videos to help you. You do not have
to sculpt a cake, but you can for this activity.
2. You can pick a theme such as birthday, children’s, men’s or Halloween
cakes. You may also find some at http://www.wilton.com/ideas/
3. Sketch or copy and print at least three pictures of cakes you like which
can be made without using any tips or that the tips are used for small
details and list what could be used to create a similar effect. Find three

142 Cake Decorating Basics Reference and Activity Manual Unit Two
images of cupcakes or cakes that are sculpted somehow. It could be as
simple as making a heart from another shape of cake, or something
more elaborate. What would you substitute or use? How could you get
a similar effect without using a tip? Would you build the shaped cake
a different way? Use the cakes you see as inspiration and improvise
using your creativity.
4. Select one of the designs and find or purchase the items you will need
to decorate it at the next meeting.
5. Keep track of everything you spend on this cake and get your parents
to help you calculate how much the actual cake and icing cost to make.
6. Phone a bakery to see what a cake like this may cost to buy.
7. Make a cake at home from a recipe you like or would like to try, but
make sure it is the shape you will need. Freeze it, refrigerate it or make
it the day before your next meeting.
8. Bring to the next meeting the cake, ingredients to make and tint icing
and everything you will need to decorate it.

Cake Decorating Basics Reference and Activity Manual Unit Two 143
Activity 33: Creative Designs with Sharing (60 to 75 minutes)
Supplies
• Ideas from the internet and books
• Cake design and ingredients to make it
• List of expenses or cost to make the cake
Instructions
1. Share the ideas you found on the internet and in books or magazines.
Which ones surprised you? Which ones did you think were too hard to
do? How could you change them?
2. Show the group what ingredients you brought and indicate which
ones you can share with others.
3. Go over what this cake cost to make.
4. Decorate your cake at the meeting, sharing icing, candies, etc.

144 Cake Decorating Basics Reference and Activity Manual Unit Two
Activity 34: Cake and Cupcake Designs for Achievement Day (30 minutes)
Go back to the page that talks about your Achievement Day requirements. You
will see that you have to bake and decorate one layer cake and also six
cupcakes that have a theme. The cake and cupcakes do not have to go
together as one theme, just the six cupcakes. You must use buttercream icing.
For your layer cake you must plan a design that will use at least two different
icing tips and at least four different decorating techniques that are from Unit
Two. For instance, you could use some of the flower designs created with a
petal tip or another tip, or use drop string or a basket weave to decorate
your cake. Your cake must also have a message on it. You can use other
edible decorations too if you want to.
The cake will be evaluated on smoothness of icing, quality and cleanliness of
workmanship, overall design (use of colour, balance, spacing) and skill with
decorating tips and techniques used. The judges are looking at your
decorating skill, and even though they may enjoy your creativity, it is not
necessarily what the judges are looking for.
Your six cupcakes must be related in theme, but not identical, and use at
least two different tips, though this may not necessarily be on an individual
cupcake. You have more leeway with the cupcake decorating and planning
because you only need to use two different tips and it does not say how
many techniques you use. So if you wanted to cover cupcakes with a variety
of flowers with leaves or stems, you could. You can make faces, monsters,
dogs or a set of food based on some images you have seen. It is easy to use
a bunch of different tips if you are creative. If you plan to use orange as your
theme colour instead, how would you do that? Cupcake designs can also
include other edible decorations.

Cake Decorating Basics Reference and Activity Manual Unit Two 145
Cupcakes will be evaluated on quality and cleanliness of workmanship, overall
design (use of colour, balance, spacing) and skill with decorating tips.
Plan your Achievement Day cake and cupcakes. Start with the recipe(s) you
would like to use and think about the size and shape of cake you want to
bake and decorate.
Sketch the cake and cupcakes, noting the tips you will use, their sizes, the
different techniques, if there are any other edible decorations you will use
and how.
Share your cake and cupcake plans with your group and ask for feedback
about your ideas. Make changes if you think they will improve the design or
help you better meet the Achievement Day requirements.

146 Cake Decorating Basics Reference and Activity Manual Unit Two
Activity 35: Optional Practice Cake and Cupcakes for Achievement Day (90 minutes)
You may want to practice your cake and cupcakes before Achievement Day.
You do not have to, but if you are not sure of the design, cake recipe or
need extra practice with any of the techniques you plan to use, take this
opportunity to make these before your final cake and cupcakes for
Achievement Day.
Supplies
• Refer to your cake sketches and notes (Activity 24)
Instructions
1. Photograph your cake and cupcakes and prepare cake journals for
them.
2. Ask family or friends for feedback about the designs and themes.
3. Look for ways you can improve before Achievement Day. Use your
practice board to perfect the techniques you plan to use.

Cake Decorating Basics Reference and Activity Manual Unit Two 147
Achievement Day Tips
• Remember your Record Book needs to be complete. That means all
your cake journals must have photographs and your notes should be
filled out and detailed. Cake sketches can be in pencil but, you should
use pen in the rest of your Record Book.
• Include a page about your community involvement cake or cupcakes.
In your binder that has your record book, include recipes, websites and
images that you have collected over the project.
• If you are making your cake or cupcakes ahead of time, freeze them so
they do not spoil before Achievement Day.
• Be sure you have the correct size cake boards and cover them. Be sure
the cake boards are clean and tidy.
• Use your practice board before you start something on the cake or
cupcakes.
• For your cupcakes, make a dozen or more and decorate them all using
your theme. Select the six cupcakes you would think are best if you
were the judge. Use those.
• Keep your tips and tinted icing in case you need to do any touchups
after the cake and cupcakes are transported to Achievement Day.
• Carefully transport your cupcakes and cakes to Achievement Day.
Check to see if there were any accidents that need touch ups.

148 Cake Decorating Basics Reference and Activity Manual Unit Two
Cake with poured ganache
Other Types of Icing (Not Used at Achievement Day)
Ganache
Ganache is a chocolate glaze or poured sauce used on pastries and cakes or
to make truffles or for dipping fruit. It looks shiny and decadent, stays soft
and is richly flavoured, yet so easy to make and decorate with that you will
be amazed. You probably have seen it in books and thought it was difficult
to make. You will be delighted to learn that it is extremely easy to use.
Ganache is made by heating cream and adding
chopped white or darker chocolate to it. The
mixture is stirred until the chocolate
melts and liqueurs or extracts can be
added to change the flavour. More
expensive chocolate makes better
tasting ganache, but you can even use
chocolate chips if you are in a pinch.
Recipes for ganache vary depending on the kind of chocolate used, for what
purpose the ganache is intended and the temperature at which it will be
served. The ratio of chocolate to cream is what is important to give you the
desired consistency or thickness of your ganache.
To fill cakes or as a base for making chocolate truffles, two parts chocolate to
one part cream are used.
For a glaze, the chocolate and whipping cream amounts are equal.
Cooled ganache can be whipped to increase volume and spread to cover a
cake. (Some thicker recipes will be too thick to spread when they are cool,
but they may be piped as decorations.)

Cake Decorating Basics Reference and Activity Manual Unit Two 149
Ganache Makes 2 to 3 cups of icing
12 ounces of bittersweet chocolate (2 cups) (could also be white or
milk chocolate)
½ to 1 cup of heavy whipping cream if using as a poured glaze
(1/3 cup if using as a filling)
Chop your chocolate into small pieces. You can use a food processor.
Heat the whipping cream in a saucepan just to the boiling point. As
soon as it starts to boil, take it off the heat. Do not let it boil.
Add the chopped chocolate pieces and stir until they are all melted.
Adding a flavouring at this time is optional. The ganache will be
smooth and glossy.
Depending on what you are using the ganache for, you may need to set it
aside to cool. If it is to be a poured glaze on a cake or if you are dipping
cupcake tops in it, you may need to use it right away. If you plan to use the
ganache as a filling, let it cool to room
temperature. (It will have the consistency of
pudding, and may take 1 to 2 hours.)
Pour ganache glaze or icing on the centre of
your cake or cupcake using the saucepan or a
measuring cup. Cover the cupcake
completely, or use your coating as a glaze to
simply cover tops and drip over the sides.
Cooled, thick ganache can be piped with a parchment bag. Or, pipe candy or
icing from a cut decorating bag.
Extra ganache can rewarmed and used for a chocolate fondue or poured
over ice cream.
Pouring ganache on cupcake

150 Cake Decorating Basics Reference and Activity Manual Unit Two
Activity 36: Demonstration or to be done as a Class (20 minutes)
You can do this as a group and divide the activities up, or the leader can
bring in a tall, layer or bundt cake that is iced to pour ganache over. Use
your discretion if the cake is ice with buttercream or some other type of
icing. If you would like to combine this Activity with Activity 40 (introduction
to fondant), you can cover a cake with fondant and then prepare the
ganache to pour over it.
Supplies
• Baked cake covered with icing, on a plate or presentation board
• ½ cup whipping cream
• 1 cup good quality dark chocolate, shaved
• Saucepan
• Large spoon or rubber spatula
• Strawberries, nuts or other edible decorations (optional)
• Images printed from the internet or books with images of cakes,
cupcakes and strawberries covered with ganache
Instructions
1. After you discuss ganache, make it, let it cool slightly and pour it over
your prepared cake.
2. Be sure everyone gets to taste the ganache.

Cake Decorating Basics Reference and Activity Manual Unit Two 151
Fondant cake with farm animals
Fondant or Sugar Paste
Fondant is the same thing as sugar paste. Fondant is becoming more and
more popular for decorating cakes and you will notice that there are no seams
at the top of the cake when a rolled fondant covers it like a blanket. It creates
a smooth, polished surface for you to
decorate. It is not sticky, stays soft and
can be coloured and molded.
Fondant does not have much taste
other than sweet, so it usually has
flavouring added, similar to
buttercream icing. Remember
the flavouring can affect tinting
of fondant.
You will probably think it is kind of
like using an edible modelling clay or play dough as icing and decorations
on the cake. A grandma may say it is a bit like pastry too. There are lots of
different recipes, some that require your purchasing ingredients you likely do
not already have in your kitchen. A simple recipe from Wilton’s website uses
basic ingredients.

152 Cake Decorating Basics Reference and Activity Manual Unit Two
Marshmallow Fondant (Makes about 2 pounds of fondant)
1 – 16 ounce package (8 cups) white mini marshmallows (use a
good quality brand)
2-5 tablespoons water
2 pounds (about 8 cups) sifted icing sugar
½ cup vegetable shortening
Before you start, wash and dry a countertop to knead the fondant on.
Put the marshmallows and 2 tablespoons of water in a large
microwave-safe bowl. Microwave for 30 seconds on high; stir until
mixed well. Continue microwaving 30 seconds more; stir again.
Continue until the marshmallows are melted (about 2½ minutes).
Remember that microwave cooking time varies greatly.
Place three quarters of the icing sugar on top of the melted
marshmallow mixture and fold into your marshmallow mixture.
Flavouring can be added at this point if desired.
Place solid vegetable shortening in a bowl right beside the cleaned
surface so you can reach into it with your fingers as you are working.
Grease your hands and counter GENEROUSLY then turn the marshmallow
mixture onto the counter and start kneading like you would dough, using
your knuckles and bringing the outside edges over to the centre as you
work the dough. Continue kneading, adding additional confectioners' sugar
and re-greasing hands and counter so the fondant doesn’t stick.
If the marshmallow fondant is tearing easily, it is too dry; add water
(½ tablespoon at a time) kneading until fondant forms a firm, smooth
elastic ball that will stretch without tearing (about 8 minutes).
It's best to let your fondant to sit, double-wrapped, overnight. Prepare
it for storing by forming it into a ball, greasing with a thin layer of
solid vegetable shortening, wrapping in plastic wrap and placing it
in a resealable bag. Squeeze out as much air as possible.

Cake Decorating Basics Reference and Activity Manual Unit Two 153
Marshmallow fondant will keep well in the refrigerator for several weeks.
When you are not working with fondant, make sure to keep it covered with
plastic wrap or in a bag to prevent it from drying out. When you are ready to
use fondant, knead it until it is smooth and flexible.
To tint fondant, take the amount of fondant you need to colour and add a little
icing colouring to it. You may want to wear disposable plastic gloves to prevent
your hands from staining. Knead the colour into the fondant. For smaller
amounts of tinted fondant, add icing colour to portions of fondant as needed.

154 Cake Decorating Basics Reference and Activity Manual Unit Two
Activity 37: Demonstration and Fun with Fondant (60 minutes)
***(Leader preparation required: fondant made by leader at least one day
before, cake iced with buttercream icing and set on plate or cake board.)***
This activity can be combined with Activity 39 if you would like to pour
ganache over your cake after it is draped in fondant.
Review how to roll out, tint and cover a cake in fondant from books or
videos found online before your group meets so you can assist them and
demonstrate covering your cake. You do not have to be perfect at the
demonstration, but should be able to explain it to them and then show them
or have them work on it with you.
Supplies
• One recipe of uncoloured (white) marshmallow fondant made a day or
more before the group meets (see recipe in reference book for
ingredients and directions.)
• One tall square or round cake with a maximum size of 9”x9”. It can be
layered. Cake needs to be iced with buttercream icing.
• Rolling pin
• Icing sugar
• Sharp knife
• Disposable gloves (members and leaders all need them)
• Food colouring in a variety of colours
• Toothpicks
Instructions
1. Discuss fondant and let everyone taste it.
2. On a surface dusted with icing sugar, knead the fondant to show them
how to prepare it for rolling. They will need to understand kneading to
be able to follow the marshmallow fondant recipe directions.

Cake Decorating Basics Reference and Activity Manual Unit Two 155
3. Roll out the fondant 1/8 inch thick.
4. Drape the rolled fondant over your iced cake.
5. Smooth it.
6. Trim around the edges with a sharp knife.
7. Share the leftover fondant with the members and ask them to pick a
theme for the characters they will make using the fondant. For
instance will they make farm animals, people, shape flowers, faces, etc.
8. Divide the fondant and distribute the disposable gloves to keep hands
free from staining with food colouring. Encourage the group to
cooperate to determine who will dye their fondant which colour so
they can share fondant instead of each dyeing several different colours
of fondant.
9. Members will knead their food colouring into their fondant.
10. Encourage them to be creative as they experiment with rolling, carving,
pressing and molding the fondant.
11. Place the fondant figures on the cake and take a picture of it.
Something to think about
What did you like about fondant?
What was difficult to do?

156 Cake Decorating Basics Reference and Activity Manual Unit Two
You will have seen cakes decorated with fondant and figures, flowers and
borders made with it as you searched for cake ideas this year.
What are some techniques you are especially interested in learning how to
do with fondant?

Cake Decorating Basics Reference and Activity Manual Unit Two 157
Cake Decorating Unit Three: Fun with Fondant
This unit focuses on all kinds of fondant
techniques and uses royal icing and
buttercream icing for details. Use
fondant to decorate cakes.
Fondant cake topped with
flowers and drop strings on side


3830 Thatcher Avenue Saskatoon, Saskatchewan S7R 1A5
306-933-7727 • 306-933-7730 (fax) www.4-h.sk.ca • [email protected]