adobe® echosign - hawaii.govesign.hawaii.gov/wp-content/uploads/2015/09/adobe-echosign-admin...by...
TRANSCRIPT

ADOBE® ECHOSIGN©
Admin Guide
Copyright ©2014 Adobe Systems Incorporated. All Rights Reserved.
Contents Welcome to EchoSign! ................................................................................................................................................................................. 3
Account Setup .................................................................................................................................................................................................. 4
External Archive ......................................................................................................................................................................................... 4
How to set it up ..................................................................................................................................................................................... 4
Branding your account ............................................................................................................................................................................ 6
Upload your logo ................................................................................................................................................................................. 6
Add email header and footer images ......................................................................................................................................... 7
Company name and URL hostname ........................................................................................................................................... 8
Security Settings .......................................................................................................................................................................................10
User Security .........................................................................................................................................................................................10
Login Password Policy .....................................................................................................................................................................10
Transaction Security ..........................................................................................................................................................................12
Users and Groups .........................................................................................................................................................................................16
Users ..............................................................................................................................................................................................................16
How to Create a User .......................................................................................................................................................................16
How to Deactivate/Reactivate a user .......................................................................................................................................18
How to promote a user to admin ...............................................................................................................................................23
Groups ..........................................................................................................................................................................................................26
How to Create a Group ....................................................................................................................................................................26
How to Add Users to a Group ......................................................................................................................................................27
Group Settings .....................................................................................................................................................................................29
Agreement Settings .....................................................................................................................................................................................34
How users can attach or choose documents .............................................................................................................................34
Attaching Documents .......................................................................................................................................................................34
Setting message templates .................................................................................................................................................................35
Message Templates...........................................................................................................................................................................35
Setting default reminders ....................................................................................................................................................................36
Reminders ..............................................................................................................................................................................................37
Setting a default document expiration .........................................................................................................................................38
Document Expiration .......................................................................................................................................................................38
Library Documents/Templates ..............................................................................................................................................................39
Library Templates....................................................................................................................................................................................39
Copyright ©2014 Adobe Systems Incorporated. All Rights Reserved.

Creating a Reusable Document ...................................................................................................................................................39
Creating a Reusable Form Field Layer .....................................................................................................................................43
Changing Permissions ......................................................................................................................................................................46
Reports ...............................................................................................................................................................................................................49
Creating a new report............................................................................................................................................................................49
Report Parameters .............................................................................................................................................................................49
Report results .......................................................................................................................................................................................51
Copyright ©2014 Adobe Systems Incorporated. All Rights Reserved.

Welcome to EchoSign! Before you begin using your EchoSign account, we’ve got some suggested steps to getting your account setup and customized for your company’s use. The purpose of this guide is to get you up and running with branding, security settings, users and templates.
This guide is outlined in such a way that as you move through the “chapters”, you’ll cover all of the important features and settings. By the end, your account will be up and ready to go. Keep in mind, there are plenty of other options and settings to explore that aren’t covered in this guide. Our knowledge base is an excellent resource for getting information on the other settings that can be found in EchoSign.
Now sit back, login and let’s get you eSigning!
Copyright ©2014 Adobe Systems Incorporated. All Rights Reserved.

Account Setup This section will go over the suggested steps for initially setting up your account.
External Archive Like backing up your computer or phone, it’s a good idea to keep copies of your signed agreements. Instead of downloading the agreements one by one from the Manage page, the External Archive can send a copy of signed agreements to an alternate email address, an Evernote account or a Box account.
How to set it up As admin, go to the Account page and click on External Archive on the left hand side of the page.
To have copies of your account’s agreements send to an alternate email address, enter that email
address into the Send an extra copy… field and click the Save Changes button.
Copyright ©2014 Adobe Systems Incorporated. All Rights Reserved.

To have a copy sent to either Evernote or Box, click the corresponding click here link and specific instructions will pop-up in a new window.
Copyright ©2014 Adobe Systems Incorporated. All Rights Reserved.

Branding your account
Upload your logo Adding your company logo is the basic way to customize EchoSign for the users in your account, and your signers.
Logos can be set per group, however this setting is not exposed through the admin settings. As admin, visit https://www.echosign.adobe.com/en/support.html and open a ticket including the image and name of the group and the Support team can set it for you.
Go to the Account page and click on Account Settings then Logo Upload.
On the upload page, click the Choose File button and navigate to the image you want to use. Keep in mind, images of the stated dimensions (60 pixels tall and 200 pixels wide) work the best. Once
you’ve chosen an image click the Preview button.
Your logo will be shown as it will appear to your users and signers. If you like how it looks, click the
Perfect button.
Copyright ©2014 Adobe Systems Incorporated. All Rights Reserved.

Add email header and footer images Uploading custom header and footer images provide an additional level of customization. The images can provide additional information about your company or just help identify who the agreement is from.
Email header and footer images can be set per group, however this setting is not exposed through the admin settings. As admin, visit https://www.echosign.adobe.com/en/support.html and open a ticket including the images and name of the group and the Support team can set it for you.
To add or change these, go to the Account page and click on Email Settings then Header & Footer Images. By default, the EchoSign header image is in place.
Click on Upload a new image for either the header and/or footer, and navigate to the image on your system. The suggested dimensions (600 pixels in width and 200 pixels in height) work best.
Once you’ve chosen an image, click the Preview New Email Images button.
Copyright ©2014 Adobe Systems Incorporated. All Rights Reserved.

Your header and footer images will be shown as they will appear in email messages associated
with your account. If you like how they look, click the Perfect button.
Company name and URL hostname In this brief section you will set the company name for your account and a hostname. These may seem basic, but they will further you to personalize your account.
Go to the Account page and click on Account Settings then Account Setup.
Copyright ©2014 Adobe Systems Incorporated. All Rights Reserved.

The company name you enter into this field will be displayed in all email correspondence from EchoSign. This is also automatically populated into Company Name fields for your users when they need to sign a document.
Setting the hostname for your account changes the URL your users login to and the URL where agreements are hosted for your signers.
The result is a customized URL with your hostname.
Copyright ©2014 Adobe Systems Incorporated. All Rights Reserved.

Security Settings Account, user and document security is EchoSign’s number one concern. This is why we provide a number of security options at the account level. We suggest reviewing the settings in this section and decide which will work the best for your use case.
User Security Account – Account Settings - Security Settings
If your company has a federated login solution, EchoSign does provide SAML 2 options for user authentication. For more information, contact your Account Manager or the Support team.
Login Password Policy The options under Login Password Policy set whether users should be required to change their password after a number of months, whether a previous password can be used as their new password and how many login attempts can be made before their userID is locked.
Login Password Strength This setting allows you to adjust the strength or difficulty of the password set by users in your account.
Single Sign-on Settings You can either allow or deny users in your account to login using their credentials from other web services.
Copyright ©2014 Adobe Systems Incorporated. All Rights Reserved.
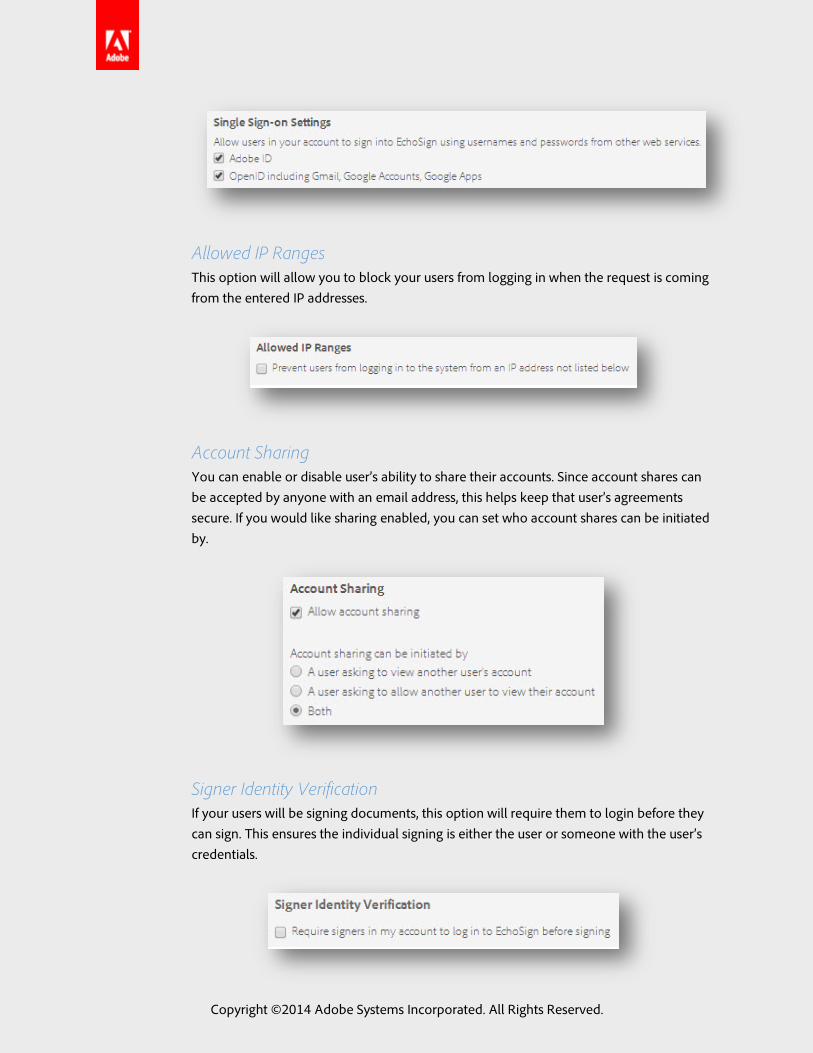
Allowed IP Ranges This option will allow you to block your users from logging in when the request is coming from the entered IP addresses.
Account Sharing You can enable or disable user’s ability to share their accounts. Since account shares can be accepted by anyone with an email address, this helps keep that user’s agreements secure. If you would like sharing enabled, you can set who account shares can be initiated by.
Signer Identity Verification If your users will be signing documents, this option will require them to login before they can sign. This ensures the individual signing is either the user or someone with the user’s credentials.
Copyright ©2014 Adobe Systems Incorporated. All Rights Reserved.
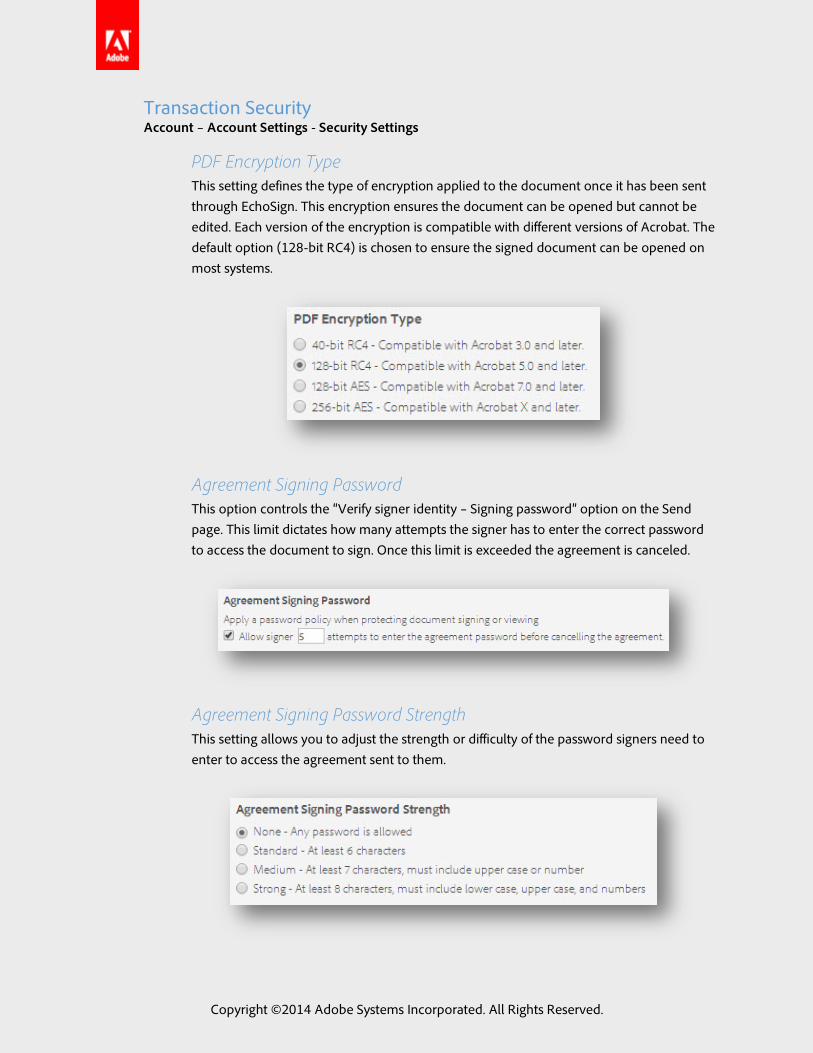
Transaction Security Account – Account Settings - Security Settings
PDF Encryption Type This setting defines the type of encryption applied to the document once it has been sent through EchoSign. This encryption ensures the document can be opened but cannot be edited. Each version of the encryption is compatible with different versions of Acrobat. The default option (128-bit RC4) is chosen to ensure the signed document can be opened on most systems.
Agreement Signing Password This option controls the “Verify signer identity – Signing password” option on the Send page. This limit dictates how many attempts the signer has to enter the correct password to access the document to sign. Once this limit is exceeded the agreement is canceled.
Agreement Signing Password Strength This setting allows you to adjust the strength or difficulty of the password signers need to enter to access the agreement sent to them.
Copyright ©2014 Adobe Systems Incorporated. All Rights Reserved.

Knowledge Based Authentication This option controls the “Verify signer identity – Knowledge based authentication” option on the Send page. This limit dictates how many attempts the signer has to pass the KBA to access the document to sign. Once the limit is exceeded the agreement is canceled. The difficulty of the KBA is also set here.
Account – Account Settings – Send Settings
Signed Document Password Protection This setting allows, forces or denies users the ability to set a signed document password on an agreement they send.
This layer of security requires a predetermined password to open the signed copy of an agreement. This password must be passed to the signer separate from the transaction and if this password is lost or forgotten, it cannot be recovered.
Signer Identity Verification Settings Various methods of signer verification can be enabled for your users, with this setting. These methods will be on the Send page under the “Verify signer identity” option.
• Signing password – Requires the signer to enter a predetermined password to sign the document. The password must be passed to the signer separate from the transaction. If this password is lost or forgotten, it cannot be recovered.
• Knowledge based authentication – Requires the signer to enter their Social Security Number and random identity questions will be generated by a third party provider.
• Web identity – Requires signer to authenticate with one of the following services: Facebook, LinkedIn, Google, Twitter, Yahoo!, or Windows Live ID.
Copyright ©2014 Adobe Systems Incorporated. All Rights Reserved.

By default, use the following signer identity verification method Choosing one of these methods will make it checked by default on the Send page. Only one of the options can be chosen.
Sender settings When choosing a default signer identity verification method, this option either allows or denies users to change the method chosen.
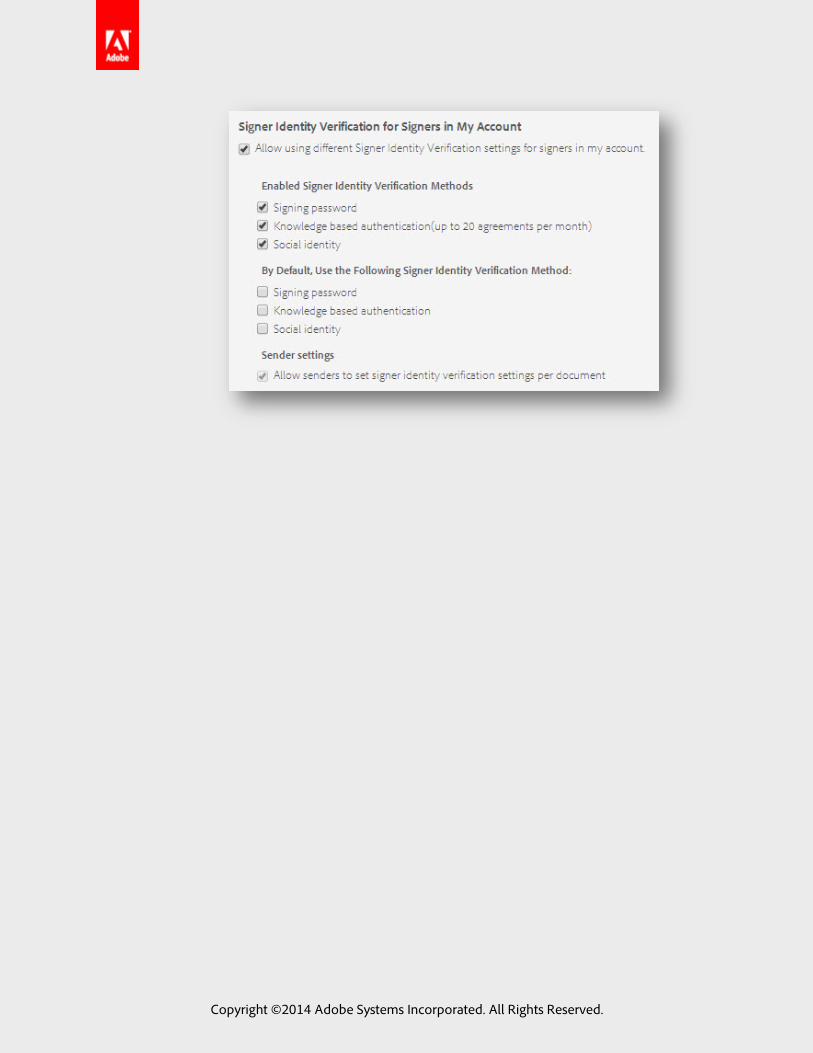
Signer Identity Verification for Signers in My Account Checking this setting allows users to set a different method of verification when sending agreements to signers that are in your account. The same methods for external signers are provided for signers in your account. A default method can be set, as well as the ability to allow or deny users to change this default method.
Copyright ©2014 Adobe Systems Incorporated. All Rights Reserved.
Copyright ©2014 Adobe Systems Incorporated. All Rights Reserved.

Users and Groups Users Users are generally added to an account because they will either be sending out agreements or be group or account level admins. Users that will be signing agreements do not need to be added, unless you want to control their ability to sign with account level settings.
How to Create a User To get started you need to go to the Account page and click on Users & Groups then View All Users.
The number active users verses the number of licenses you have available will be displayed at the
top of the page. To create a new user, click on the Create a new user link.
Copyright ©2014 Adobe Systems Incorporated. All Rights Reserved.

Enter the email address, first name and last name for the user you want to create. Make sure all of this information is correct, especially the email address. Once the user is created the email address cannot be changed until the email entered is verified. If there’s an error in the email, it can’t be verified.
Check the View Their Agreements option if you want to setup a share for this user to yours. This will give you visibility of all of this users agreements.
Once you’re done and all of the information is correct, click the Create User button.
You will be taken back to the user list with a message stating the user was sent an email to set their password. The user you just created may not be in the default list presented. If you don’t see the
user, uncheck the Show only active users option. This will refresh the page and display users in statuses other than ACTIVE.
Copyright ©2014 Adobe Systems Incorporated. All Rights Reserved.

Users can be in the following statuses:
PENDING – The user must register their account before logging in. They can register here:
https://secure.echosign.com/public/register
CREATED – The user has been sent an email to set the password for their login. They need to set their password via the link in the email sent before they can login.
ACTIVE – The user is active and able to login, send and sign agreements. This user does consume a license.
INACTIVE – The users is unable to login, send or sign documents. This user does not consume a license.
How to Deactivate/Reactivate a user Sometimes the need to deactivate a user may arise. The individual could have left the company and you want to keep that user and related documents secure. As mentioned above, making a user inactive keeps anyone from logging in, sending or signing documents with that userID. Even if someone has the login information.
Deactivating From the account page, click on Users & Groups and View All Users then click on the email address of the user you want to deactivate.
Copyright ©2014 Adobe Systems Incorporated. All Rights Reserved.

On the User Info page, click on the Deactivate User button.
This page doubles as a confirmation page and an opportunity to have the user’s documents shared to you. Checking the option on the page will create a view only share when the user is deactivated. Their agreements will show in the various categories on your Manage page.
Copyright ©2014 Adobe Systems Incorporated. All Rights Reserved.

Once you’ve confirmed and decided to have the account shared or not, click the Yes, Deactivate button.
You will return to the User Info page and see that the user now has an INACTIVE status.
Copyright ©2014 Adobe Systems Incorporated. All Rights Reserved.

Reactivating From the Account page, click on Users & Groups and View All Users. This will get you to your user list, but by default, the list only shows active users. To view all users for the
account, uncheck the Show only active users option and click on the email address of the user you want to reactivate.
Copyright ©2014 Adobe Systems Incorporated. All Rights Reserved.

You will be taken to the User Info page. Click the Reactivate User button to… reactivate the user.
The User Info page will refresh and you’ll see the user now has an ACTIVE status.
Copyright ©2014 Adobe Systems Incorporated. All Rights Reserved.

When a user is initially deactivated their password is automatically expired for security purposes. Once they are reactivated the system will automatically send a password reset email.
How to promote a user to admin Setting up an additional admin for your account is ideal. Not only does this create another user that has access to the various account settings, but if a problem arises and someone needs to contact support in your absence, this admin user will have rights to information standard users do not.
Start by going to the Account page and click on Users & Groups and View All Users. Then click on the email address of the user you want to promote.
Copyright ©2014 Adobe Systems Incorporated. All Rights Reserved.

Then check the options according to the type of admin you want to promote them to. You can
promote them to group admin, account admin or both. Once you’re done, click the Save Changes button.
You can also set whether or not this user has the right to sign and send documents. This may be ideal for departments or teams that should not be signing documents.
Copyright ©2014 Adobe Systems Incorporated. All Rights Reserved.

See the section on Delegation for more information.
Copyright ©2014 Adobe Systems Incorporated. All Rights Reserved.

Groups Groups allow you to set specific settings for the users inside that group. This means, for example, your sales team can use EchoSign differently than your accounting department.
How to Create a Group First go to the Account page and click on Users & Groups and then View Groups.
Enter a name for your group and click the Create button.
You will be taken to the summary page for the group. A confirmation message will be at the top of the page. Here you can adjust the group specific settings, create users in this group or start assigning existing users to this group.
Copyright ©2014 Adobe Systems Incorporated. All Rights Reserved.

How to Add Users to a Group If you’re not already on the group’s page, go to the Account page and click on Users & Groups,
View Groups and click on the name of the group you want to add users to.
On the group’s page, click the Assign Users to this Group link.
Copyright ©2014 Adobe Systems Incorporated. All Rights Reserved.

On the user list page, first uncheck the Show Only Active Users option. This will ensure you can
see all of the users in your account. Then check Assign for the users you want to add and click the
Assign Users button.
You will then return to the group page and a confirmation page will show the users have been added. These users will also now be listed in the group’s user list.
Copyright ©2014 Adobe Systems Incorporated. All Rights Reserved.

Group Settings Specific settings at the group level make it so each group can have different settings enabled or disabled, depending on their needs.
To get to the settings for a group, got to the Account page, then click on Users & Groups, View Groups and the name of the group.
Copyright ©2014 Adobe Systems Incorporated. All Rights Reserved.

Click on the Click here link to get to the settings page.
The following settings can be adjusted per group.
Require signers to provide their job title when eSigning Signers of all documents sent by the users in this group, will be required to enter their job title. This means all documents will require a Title field.
Require signers to provide their company name with eSigning Signers of all documents sent by the users in this group, will be required to enter their company name. This means all documents will require a Company field.
Allow signer to return a written signature by fax instead of eSigning This option allows signers to use the fax back option for their agreement.
Attach a CSV with form data to the sender’s signed agreement emails This setting will attach a CSV file with all of the form data for the signed document.
Copyright ©2014 Adobe Systems Incorporated. All Rights Reserved.

Certify copy of the documents for This feature certifies all PDF documents delivered or downloaded with an Adobe CDS
Certificate. A visible indicator on the PDF will show the document has not been tampered or altered.
Attach a PDF copy of the signed document in email sent to This option allows you to control who will receive a copy of the completed document in the “Signed and Filed” email.
Apply the eSignature stamp to (the bottom) of… This forces an eSignature stamp on the specified pages. Please note the stamp will cause the document to be scaled down in order to fit the stamp.
Attach audit report to completed documents This option sets whether an audit report is attached to the signed document. This is attached to the end of the document as the last page.
Copyright ©2014 Adobe Systems Incorporated. All Rights Reserved.

Merge multiple documents into one document after signing When sending multiple documents, enabling this setting will merge the documents together. Disabling this will keep them separate, discreet documents.
Send an extra copy of every signed agreement to these email addresses The email address you enter into this field will be automatically sent a copy of the “Signed and Field” email, for every transaction sent from a user in this group.
Twitter Integration This setting allows or denies users in this group, the ability to integrate with Twitter.
Delegation for users in my account This allows you to control users’ ability to delegate or pass on their signing to someone else.
Copyright ©2014 Adobe Systems Incorporated. All Rights Reserved.

Delegation for users outside my account Similar to the previous setting, this allows or denies signers outside of your account to delegate or pass on their ability to sign.
Authority to Sign This is a mass setting that affects all users in this group. This option either allows or denies signing authority for all users in this group. Each users’ signing authority can then be adjusted on an individual level.
Set a time zone to use for agreements created by users in this account This sets the time zone for documents sent from users in this account.
Copyright ©2014 Adobe Systems Incorporated. All Rights Reserved.
Agreement Settings Settings can be changed to affect the default options used when a user sends an agreement. These are used to control how your users use EchoSign. This chapter will be broken into sections related to their effect on a transaction.
All of these settings can be found by going to the Account page, then click on Account Settings and Send Settings.
How users can attach or choose documents Depending on your situation, you may only want users to send specific documents. This can be done by limiting the methods available for attaching documents.
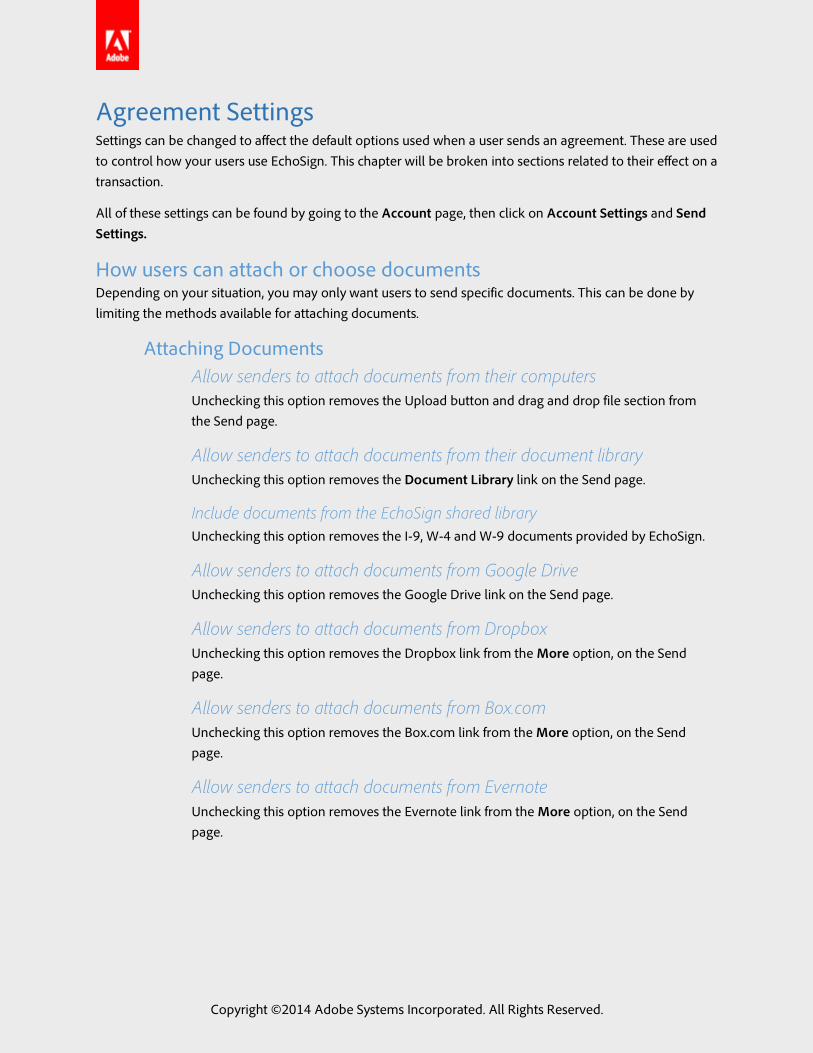
Attaching Documents Allow senders to attach documents from their computers Unchecking this option removes the Upload button and drag and drop file section from the Send page.
Allow senders to attach documents from their document library Unchecking this option removes the Document Library link on the Send page.
Include documents from the EchoSign shared library Unchecking this option removes the I-9, W-4 and W-9 documents provided by EchoSign.
Allow senders to attach documents from Google Drive Unchecking this option removes the Google Drive link on the Send page.
Allow senders to attach documents from Dropbox Unchecking this option removes the Dropbox link from the More option, on the Send page.
Allow senders to attach documents from Box.com Unchecking this option removes the Box.com link from the More option, on the Send page.
Allow senders to attach documents from Evernote Unchecking this option removes the Evernote link from the More option, on the Send page.
Copyright ©2014 Adobe Systems Incorporated. All Rights Reserved.
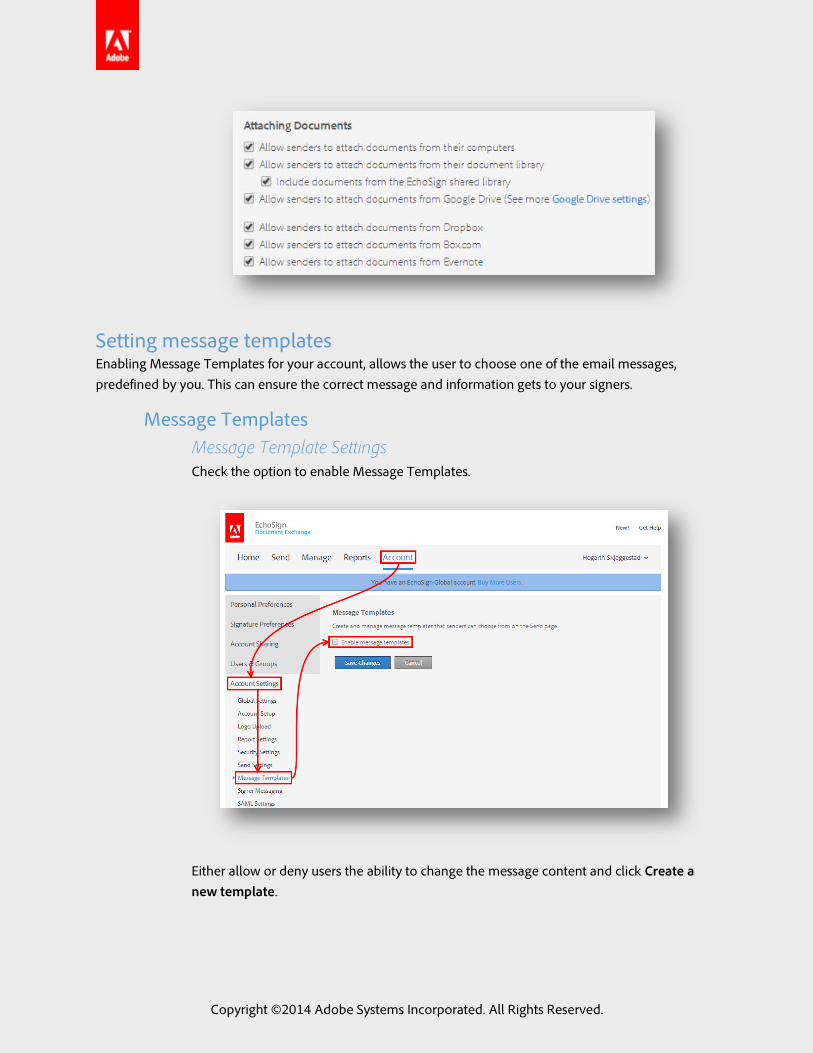
Setting message templates Enabling Message Templates for your account, allows the user to choose one of the email messages, predefined by you. This can ensure the correct message and information gets to your signers.
Message Templates Message Template Settings Check the option to enable Message Templates.
Either allow or deny users the ability to change the message content and click Create a new template.
Copyright ©2014 Adobe Systems Incorporated. All Rights Reserved.

The Template name will be the name visible to your users, when they choose a template to use. The Template message will be the message that shows in the email to the signers.
Once you’re done, click the Save Changes button.
Setting default reminders Reminders are emails sent to the signers of documents. After a specified amount of time, a reminder email is sent to the signer, letting them know the agreement is still waiting for them. These can be set by default for all agreements sent from users in your account.
Copyright ©2014 Adobe Systems Incorporated. All Rights Reserved.

Reminders Set a default reminder for agreements created by users in this account Check the option to set a default reminder.
Choose the frequency in which you would like the reminder email sent.
The note entered will show in the reminder email sent to the signers. Once you’re done,
make sure you click the Save Changes button.
Please note, users will still be able to set a reminder on the Send page. This will effectively double-up the reminder for the agreement and the signers will receive two reminder emails.
Copyright ©2014 Adobe Systems Incorporated. All Rights Reserved.

Setting a default document expiration In certain cases you may want to expire or cancel documents that aren’t signed after a certain number of days. This can be set at the account level and this expiration will be set for all agreements sent from users in your account. Once an agreement has expired, it cannot be restarted or retrieved and will show up under the Canceled/Declined section of the Manage page.
Document Expiration Enable document expiration Check the option to enable document expiration.
This will reveal the options you can set for document expiration.
Allow sender to set or modify expiration settings per document This opens the expiration option on the Send page, to all users in the account. Additionally, they can then adjust the default expiration set.
Allow modification of expiration settings after document is sent Checking this option will allow users to adjust, extend or remove an expiration for an agreement after it has been sent.
Limit number of days signers will have to sign documents to: This sets the number of days until the document expires.
Include internal signers when applying document expiration deadlines If users in your account will be signing or counter-signing agreements, this option will make the expiration apply to them as well as external signers.
Include expiration information in email sent to signers This adds the expiration date of the transaction in the email sent to the signers.
Copyright ©2014 Adobe Systems Incorporated. All Rights Reserved.

Library Documents/Templates If you and your users plan on sending out agreements that are the same document, uploading these documents as templates is ideal. Templates are reusable objects that any user can send, depending on who the template is shared to.
As a best practice, one user should upload and maintain these templates. By creating this document admin, there is no confusion as to what document to send, and the versions of these documents are better controlled.
We suggest using a distribution list or group email as the user. This allows you to control who has access to this user and related documents, internally. If one of your members leaves the organization, another person can easily be added to the distribution list and gain access to doc admin.
Library Templates
Creating a Reusable Document A reusable document is just that, a document your users can send over and over. This is especially helpful if you have identical documents that go out to each of your signers.
From the Home page, click on the Add Template to Library link under Additional Functions.
Enter a name for your template. This can be changed at a later time if necessary.
Copyright ©2014 Adobe Systems Incorporated. All Rights Reserved.

Click on the Choose File button and pick a document from your local system.
Then check the Create as reusable document option and choose who you want to share the
document to. Setting the permissions to Any user in my group will only share the document to the group you’re in.
Copyright ©2014 Adobe Systems Incorporated. All Rights Reserved.

If you’re creating the document with the doc admin, make sure to move them into the group you want to have the document available for. Once the documents have been created you can move the user to another group and the documents will stay shared with the initial group.
When you’re done setting up the initial information, click the Preview or Add Fields button.
You will be taken to the drag and drop authoring environment. Here you will place fields for the intended signers and participants and adjust properties for each field.
Once you’ve placed all of your fields, click the Save button.
Copyright ©2014 Adobe Systems Incorporated. All Rights Reserved.

This template will now show up under the Library Templates section of the Manage page, for all users you shared it to. Only the user that created the library template can edit it, as you can see by the first template listed in the image below.
This template was created by another user and shared to the entire account. I can send the agreement as often as I’d like, but the creator is the only one that has rights to edit it.
Please note, when a user sends a library template, they will have the opportunity to move or alter fields if they have the “Preview, position signatures or add form fields” option checked on the Send page.
Copyright ©2014 Adobe Systems Incorporated. All Rights Reserved.

Creating a Reusable Form Field Layer Form Field Layers are overlays of fields you can apply to any document you send. For example, one of your documents is revised and the content has changed, but the field placement has not. Using a Form Field Layer, you can place all of those fields on the new document without having to place them individually.
To create a Form Field Layer, click on the Add Template to Library link under the Additional Functions on the Home page.
Enter the name for your Form Field Layer. You can change this in the future if needed.
Copyright ©2014 Adobe Systems Incorporated. All Rights Reserved.

Click the Choose File button and pick a document from your local system. The content of the document you choose will not be included in the Form Field Layer. This is just to show where the fields should go.
Check the Create as reusable form field layer option and choose who you want to share the layer to. Setting the permissions to Any user in my group will only share the layer to the group you’re in.
Copyright ©2014 Adobe Systems Incorporated. All Rights Reserved.

If you’re creating the layer with the doc admin, make sure to move them into the group you want to have the layer available for. Once the layers have been created you can move the user to another group and the layers will stay shared with the initial group.
When you’re done setting up the initial information, click the Preview or Add Fields button.
You will be taken to the drag and drop authoring environment. Here you will place fields for the intended signers and participants and adjust properties for each field.
Copyright ©2014 Adobe Systems Incorporated. All Rights Reserved.
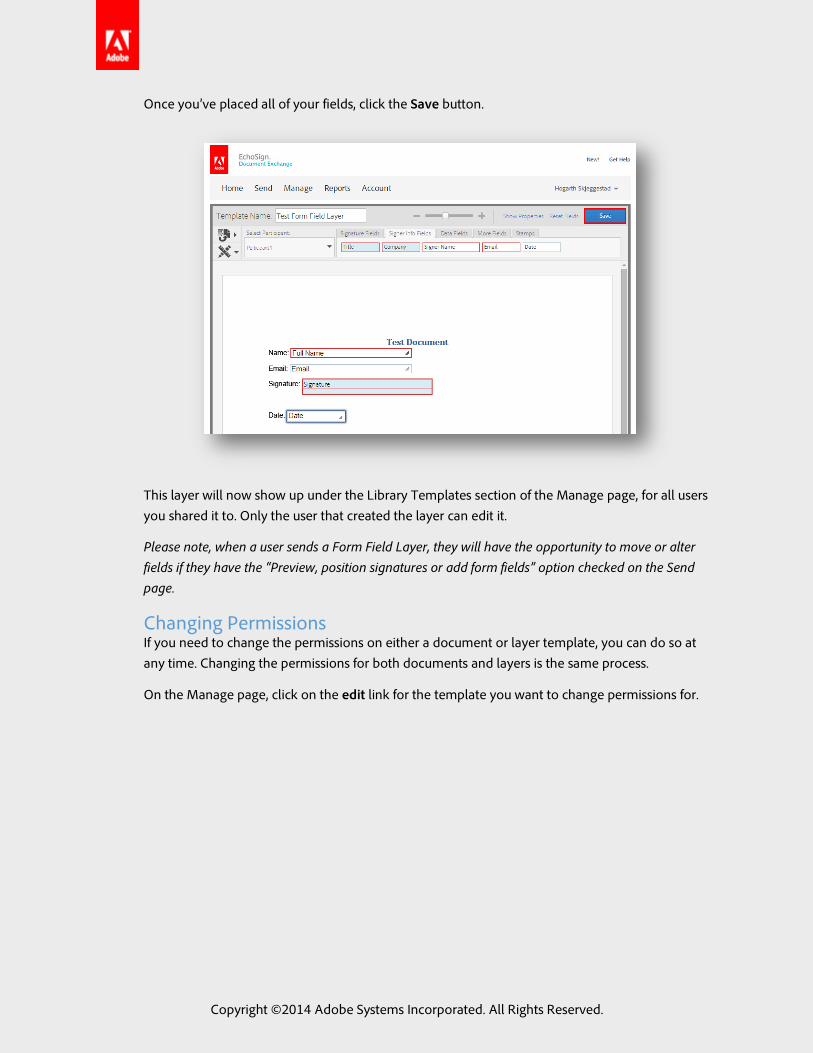
Once you’ve placed all of your fields, click the Save button.
This layer will now show up under the Library Templates section of the Manage page, for all users you shared it to. Only the user that created the layer can edit it.
Please note, when a user sends a Form Field Layer, they will have the opportunity to move or alter fields if they have the “Preview, position signatures or add form fields” option checked on the Send page.
Changing Permissions If you need to change the permissions on either a document or layer template, you can do so at any time. Changing the permissions for both documents and layers is the same process.
On the Manage page, click on the edit link for the template you want to change permissions for.
Copyright ©2014 Adobe Systems Incorporated. All Rights Reserved.

Click on the Show Properties link at the top of the page.
This will reveal the permissions options for the template. Change the permission to the desired
level and click the Save button. Copyright ©2014 Adobe Systems Incorporated. All Rights Reserved.

Copyright ©2014 Adobe Systems Incorporated. All Rights Reserved.

Reports The report feature lets you check on how your account is using EchoSign. Build your own reports and gain complete visibility into your document signing process, while seeing how individual groups or users are doing.
Creating a new report To create a new report, go to the Report page and click on the Create a new report link.
This will take you to the report parameters page, where you set what data your report will include.
Report Parameters When setting up a report, multiple parameters can be set to cater the results to the information you’re looking for. The below options are the various parameters.
Interval The interval is the time frame you want the report to encompass. This can be one of the four predetermined time frames (this week, last week, this month, last month) or enter a custom date range.
Users & Groups This parameter lets you run the report on specific users or groups. One or more can be chosen for either, or you can run the report against all users in the account.
Copyright ©2014 Adobe Systems Incorporated. All Rights Reserved.

Documents Specific documents can be chosen to include in the report with this option. The documents listed in this field are the library documents used throughout the account. Individual, one-off documents will not be listed here.
Document Name This parameter is used to include documents that have titles of the provided string. You can choose to include or not include the string entered.
Mega Sign Checking this option will include Mega Sign agreements in the resulting report.
Copyright ©2014 Adobe Systems Incorporated. All Rights Reserved.

Performance Goals This is where you can set your own performance goals. This will affect the gauges that are displayed on the report.
Benchmark By default, the benchmark parameter is disabled for reports. Click the report settings link to enable it.
Benchmarking provides an expanded method for keeping track of agreement progress and signing rates. More information can be found here: https://www.echosign.adobe.com/en/how-it-works/features-benefits/analytics-features.html
Graph Agreements By Each checked option will provide a different type of graph on the report.
Et Cetera The parameters in this section are for altering the graphics on the resulting report. Changing these from the defaults can speed up the report process.
Report results Once you click the Run Report button, the report will be generated based on your parameters. There are multiple actions you can take with your report.
Copyright ©2014 Adobe Systems Incorporated. All Rights Reserved.

Update Report with Current Data Clicking this link is similar to refreshing the page. The new report will include recent transactions and activity.
Save Report Saving the report allows you to run this report again in the future.
Share Report Sharing allows you to send the report results to someone else. You just need to enter their email address and a message.
Copyright ©2014 Adobe Systems Incorporated. All Rights Reserved.

Schedule Report Setting a schedule for this report will run it with the same parameters at the frequency you define.
Export Report Data Clicking this link will prompt you to open or save a .CSV file. CSV files can be opened in Excel and all transaction information for the agreements in the report, will categorized in the various columns.
Copyright ©2014 Adobe Systems Incorporated. All Rights Reserved.

Printer-Friendly Version Clicking this link will open a printer-friendly version of the report.
Copyright ©2014 Adobe Systems Incorporated. All Rights Reserved.