aesculap targon fn -...
TRANSCRIPT

Aesculap® Targon® FN Head Preserving Solution for Medial Femoral Neck Fractures
Aesculap Orthopaedics

Hans-Werner Stedtfeld, MD
University of Rostock,
Germany
Targon® FN
Martyn J. Parker, MD, FROS
Department of Orthopaedics
and Trauma,
Peterborough, United Kingdom
January, 2011
A fracture of the hip is the most common reason for an
elderly patient to be admitted to an acute orthopaedic
ward. Half of these fractures are intracapsular.
This particular fracture has been termed the ‘unsolved
fracture’, because of this continuing controversy between
preserving the femoral head using internal fi xation or
replacing the head with a prosthesis.
Internal fi xation is clearly indicated for all undisplaced
fractures and for those aged less than about 60-70 years
with a displaced intracapsular fracture in which preserva-
tion of the femoral head is desired.
Displacement of the fracture is the main complication
associated with fi xation of an intracapsular fracture. This
occurs in about 5 % of undisplaced fractures and up to
30 % of displaced fractures that have been treated by
reduction and fi xation.
This complication is essentially mechanical, with the tra-
ditional implants failing to hold the fracture in a stable
confi guration.
Multiple parallel screws have inadequate purchase on the
lateral femoral cortex so that the forces acting around
the hip cause the fracture to tilt into a varus position, and
the fi xation fails.
Further problems with this method of fi xation are that
the screws back out laterally as the fracture consolidates,
causing irritation of the local tissues.
The sliding hip screw may also be used to fi x this fracture.
Whilst this implant has good lateral fi xation and allows
the fracture to consolidate by collapsing along the line of
the femoral neck, it lacks rotational stability.
The Targon FN has been designed with these specifi c pro-
blems in mind. The TeleScrews allow a controlled collapse
of the fracture along the line of the femoral neck wit-
hout any backing out of the screws into the soft tissues.
Linking these distal and proximal screws with a
locking plate gives a much more stable construction with
superior rotational stability than would be found with
either method of fi xation.
Specifi c instruments have been designed to make the
procedure easier to undertake using minimally invasive
surgery.
The surgical technique allows the surgeon to achieve an
easy optimum fi xation whilst at the same time avoid po-
tential compli cations such a bending of the guide wires or
pushing of the guide wires into the pelvis.
Our initial positive experience with the Targon FN
suggests this implant may be a major advance in the
management of the intracapsular fracture and a possible
solution to the dilemma of the ‘unsolved fracture’.
2

Dynamic
Fixationwith
Stability
3

4
Targon® FN
The System
❚ Minimally invasive surgery
❚ Simple surgical technique
❚ Rotationally stable proximal fi xation
❚ Solid distal fi xation
❚ Early mobilisation
❚ Very promising fi rst clinical results 1, 2
Implant material:
Titanium alloy Ti6Al4V
TeleScrews
❚ 6.5 mm cancellous screws
❚ Sliding capacity within the screw
❚ 10 mm minimum sliding capacity
❚ Extension to maximum 20 mm slide
Femoral Neck Plate
❚ Anatomically shaped
❚ Angled locking side plate
❚ Up to 4 proximal screw sites for TeleScrews
❚ 130 degree angle for TeleScrews
❚ Two distal screw sites
Locking Screws
❚ 4.5 mm bicortical screws
❚ Self tapping
❚ Angle-stable locked into the side plate
4

❚ No lateral backing out because
of angle stable TeleScrew fi xation
to the plate.
❚ Controlled TeleScrew sliding
prevents cranial migration.
❚ 10 mm standard slide preset.
minimum
❚ Adjustable slide to maximum
20 mm.
maximum
1 Parker M. Internal fi xation for femoral
neck fractures – a new dynamic plate-
screw system. Jatros Orthopädie. 2008;
2: 46-48 (article in German)
2 Parker MJ, Stedtfeld HW. Internal fi xation
of intracapsular hip fractures with a
dynamic locking plate: initial experience
and results for 83 patients treated with a
new implant. Injury. 2010 Apr;41(4):348-51.
5

Targon® FN
Biomechanics
Comparison Targon FN vs. SHS
(Sliding Hip Screw)
Measurement of stability of fracture fi xation in a
simulated lateral femoral neck fracture (osteotomy).
Average of Total Movements
Trav
el in m
m, A
ngle
in °
0
2
4
6
8
10
12
14
16
Rotation Tilting
Targon FN
SHS
Results
❚ Targon FN showing superior rotational
stability than SHS3
❚ Targon FN with less tilting of the proximal
head fragment under cyclic load than SHS
3 Lustenberger A, Bekic J, Ganz R. Rotational instability
of trochanteric femoral fractures secured with the dynamic
hip screw. A radiologic analysis.
Unfallchirurg. 1995 Oct;95(10):514-7.
Set-up for biomechanical
Targon FN lab testing6

Finite element analysis of Targon FN
(prototype) in view of testing and im-
proving implant stability
stress peaks in plate
and sleeves
Fatigue strength of Targon FN in dynamic
biomechanical testing
Targon FN
Dynamic fatique strength
1.000.000100.000
number of cyles
10.000
0
10
20
30
40
50
60
ben
din
g m
om
ent
(Nm
)
Stress peaks
N_m2
1,69e + 009
1,48e + 009
1,26e + 009
1,04e + 009
8,21e + 008
6,03e + 008
3,85e + 008
1,67e + 008
-5,13e + 007
-2,69e + 008
-4,88e + 008
On Boundary
7

Targon® FN
Advantages of Targon FN Fixation
Dynamic Capacity
The proximal screws (TeleScrews) have a sliding
capacity to allow for up to 20 mm of slide to occur
within the screws. This allows for fracture consolidation
to occur along the line of the femoral neck as the frac-
ture heals. Because the sliding occurs within the screws
there is no backing out of the implant laterally which
would otherwise cause irritation of the soft tissues. The
TeleScrews are secured to the plate and there is no risk
of the screw migrating either medially or laterally.
Secure Distal Fixation
Two distal screws secure the side plate to the distal
femur. These utilise the locking plate concept to provide
additional strength in the fi xation.
Rotational Stability
The use of two, three or four proximal screws secured
laterally to the plate provides a fi rm fi xation on the
femoral head with rotational stability. The screw tips can
be inserted precisely within the femoral head to optimise
hold onto the proximal side of the fracture.
Minimally Invasive Operation
The alignment jig with the Targon FN enables fi xation to
be achieved with minimal exposure of the lateral femoral
cortex just below the greater trochanter.
The jig guides the drilling for both of the proximal Tele-
Screws and two distal screws.
8

Reduced Radiation Exposure
Once the alignment jig and plate are in the required
position, the drilling and insertion of both the proximal
TeleScrews and distal screws can be undertaken using
the jig and measuring devices with minimal radiographic
exposure.
Safe and Quick Operating Technique
The Kirschner guide wires are inserted through the jig.
Once the correct position of these is achieved the plate
can be secured to the femur. Drilling for the proximal
TeleScrews is done sequentially without the need to drill
over the guide wire, thereby avoiding any penetration of
the guide wires medially into the hip joint.
Early Mobilisation After Surgery
Because of the improved stability of the fi xation most
patients should be allowed to mobilise, as soon as able
after surgery, with no restriction on hip movements or
weight bearing. Routine removal of the implant is not
necessary.
MRI Compatible
The implant is constructed from titanium alloy and
should the later fracture healing complications of
fracture non-union or avascular necrosis be suspected,
a MRI scan can be undertaken without removal of the
implant.
9

Targon® FN
Operating Technique
AO 31 B1.3 AO 31 B1.1
Undisplaced intracapsular fractures:
❚ AO 31B1.1, 31B1.2 and 31B1.3
❚ Garden classifi cation grades 1 and 2
Indications for Targon FN
Undisplaced Intracapsular Fractures
All undisplaced (impacted) intracapsular fractures should
be considered for internal fi xation with the Targon FN.
Conservative treatment of these fractures carries a
high risk of fracture displacement and is generally not
recommended.
Replacement arthroplasty is a more extensive procedure
with a higher risk of complications than that of fi xation
and is therefore inappropriate for this fracture.
10
AO 31 B1.2

AO 31 B2.3
AO 31 B3.1 AO 31 B3.3 AO 31 B3.3
AO 31 B2.2
Displaced intracapsular fractures:
❚ AO 31B2.2, 31B2.3
❚ AO 31B3.1, 31B3.2, 31B3.3
❚ Garden classifi cation grades 3 and 4
❚ Pauwels classifi cation type 1-3
Displaced Intracapsular Fractures
Any displaced intracapsular fracture in which preser-
vation of the femoral head is felt desirable should be
considered for internal fi xation with the Targon FN. This
includes younger patients in which preservation of the
femoral head is advantageous and those patients in
which the more extensive procedure of arthroplasty
needs to be avoided. Individual surgeons may also
prefer to use the Targon FN for displaced intracapsular
fractures in the elderly as an acceptable alternative to
replacement arthroplasty.
11

❚ Patient Positioning
❚ Preoperative Planning
Positioning
Avoid sudden or excessive movements when positioning
the patient because this might cause a disruption of the
blood supply of the femoral head.
Fig. 2: Radiograph AP view
Fig. 3: Radiograph axial view
12
Targon® FN
Operating Technique

Fig. 1
Fig. 2
Aesculap Orthopaedics
Targon® FN – KT218
X-ray Analysis Template
Scale 1:1
Fracture Reduction
Undisplaced fractures and those fractures which are
impacted on the AP radiograph and undisplaced on the
lateral radiograph (Garden grade 1) require no reduction
(Fig. 1).
Displaced fractures (Fig. 2) are fi rst reduced by apply-
ing gently longitudinally traction with the fracture
table, whilst screening on the anterior-posterior (AP)
radiograph to reduce the fracture. The aim should be to
reduce the fracture to either an anatomical position or a
slight valgus position as determined by the alignment of
the trabeculae of the femoral head with the shaft of the
femur. (Fig. 3 reduced)
Then the fracture is reduced on the axial (lateral) view
by internal rotation of the limb (full internal rotation
may be necessary for fully displaced fractures). (Fig. 4
before reduction, Fig. 5 reduced)
Targon FN X-ray Template – KT218
The X-ray template shows the implant in the real size
and takes into consideration a magnifi cation of 10 %.
The X-rays should have the same magnifi cation to match
the templates.
Please verify all measurements determined by this
template intraoperatively to ensure a correct choice of
your implant. If needed, this X-ray template can also be
supplied in digital form.
Fig. 5 Fig. 4
Fig. 3
13

Approach
1 ❚ COBB Elevator – FK147R
C-arm view of the proximal femur in axial projection. The
incision line (5-6 cm) is marked on the skin in the central
femoral neck plane.
The incision and separation of the fasci lata follow; ap-
proach to the lateral femur at the dorsal margin of the M.
vastus lateralis, just below the tuberculum innominatum
and immediately in front of the femoral base of the M.
gluteus maximus at the gluteal tuberosity. The shape of
the plate anatomically adapts to this area.
Optional:
With the COBB elevator, space can be created
at the base of the gluteal muscle if necessary (Fig. 2).
M. gluteus maximus
Fascia lata M. vastus lateralis
14
1
2
Targon® FN
Operating Technique

Mounting the Aiming Jig
2 A – Fixing the Plate
❚ Targon FN plate – KO802T
❚ Targeting device – KT220P
❚ Holding screw – KT221R
❚ Screw driver SW3.5 – KT226R
The Targon FN plate is fastened to the targeting device by
means of the plate holding screw.
The plate holding screw occupies the central hole of the
targeting device.
1
2
15

1
2
3
B – Attaching the Handle
❚ Handle – KT219P
❚ Targeting device – KT220P
❚ Connection screw – KT228P
The connection screw is screwed into the handle (Fig. 1a).
Attach the handle to the targeting device so that the
connection screw engages (Fig. 1b).
Fasten the connection screw by a fi rm rotation(Fig. 1c).
For adipose patients, the handle can be mounted on the
opposite side of the targeting device (Fig. 2).
To dismante the handle, slightly unscrew the connection
screw and then pull it out (Fig. 3).
a
c
b
16
Targon® FN
Operating Technique
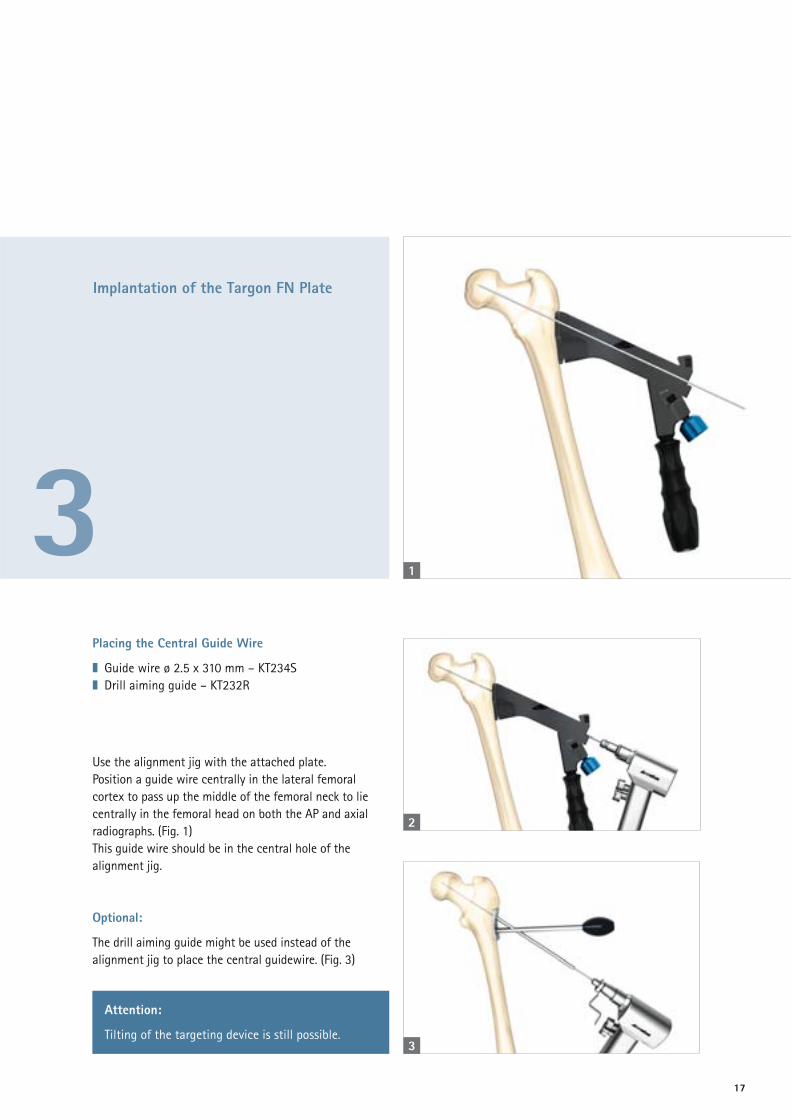
Implantation of the Targon FN Plate
3 Placing the Central Guide Wire
❚ Guide wire ø 2.5 x 310 mm – KT234S
❚ Drill aiming guide – KT232R
Use the alignment jig with the attached plate.
Position a guide wire centrally in the lateral femoral
cortex to pass up the middle of the femoral neck to lie
centrally in the femoral head on both the AP and axial
radiographs. (Fig. 1)
This guide wire should be in the central hole of the
alignment jig.
Optional:
The drill aiming guide might be used instead of the
alignment jig to place the central guidewire. (Fig. 3)
1
Attention:
Tilting of the targeting device is still possible.
2
3
17

18
Implantation of the Targon TeleScrews
4 A – Placing the Guide Wires
❚ Guide wire ø 2.5 x 310 mm – KT234S
❚ Drill sleeve – KT223R
The green drill sleeves are inserted into the alignment
jig up to the stop and slightly tightened by a turn.
A sharp guide wire is drilled into the cortex of the
femoral head.
Wires for up to four TeleScrews are inserted through
the guide sleeves. If three TeleScrews are used in an
L-confi guration, it is recommended to apply two screws
in lower positions. The third TeleScrew could fi nd best
anchoring at the position closest to the center of the
femoral head.
The position of these guide wires should be checked on
the AP and axial views and adjusted so the guide wire
tips are in the subchondral bone at the position where
the tips of the TeleScrews are to be placed. This should
be approximately 5 mm from the joint line.
The lower guide wires should lie just above the calcar on
the AP X-ray.
Deviation of the guide wires is without consequence for
the positioning of the TeleScrews, since they are inde-
pendently inserted directly through the targeting device.
Targon® FN
Operating Technique

19
B – Measuring the Length and Drilling the Bone
❚ Screw scale – KT230R
❚ Stepped drill – KT224R
❚ Depth stop for drill KT224R – KT235P
Measure the length of the guide wires with the measuring
scale by holding this against the drill sleeve. The total
length is measured up to the tip of the guide wire. (Fig. 1)
Attach the depth stop to the drill by turning it clockwise
and adjust it to the measured length (Fig. 2).
One of the guide wires as well as one of the drill sleeves
are removed now. These can be loosened either by hand
or with the help of screwdriver KT226R. With the stepped
drill, the screw channel is bored open to the measured
depth (Fig. 3).
Attention:
Take care to introduce the stepped
drill with depth stop only until the stop
reaches the aiming jig with-out any
additional force.
Choose the TeleScrew size that is the
same as or just smaller than the
distance measured on the scale. For
example, if the screw measures 94 mm,
choose a TeleScrew of 90 mm.
1
2
3

1
C – Inserting the TeleScrews
❚ Stepped screwdriver torque – KT225R (Fig. 1a)
only to be used to insert and fasten the TeleScrews
❚ Screwdriver ø 3.5 mm – KT226R (Fig. 1b)
to fi ne adjust the length of the TeleScrews
Push the socket of the support screw on the small
hexagon of the screwdriver KT225R.
Connect the support sleeve and the large hexagon.
Insert the TeleScrew of the selected length using the
green stepped screwdriver and tighten the screw to the
correct torque as marked (8 Nm) (Fig. 3).
Repeat this for the other TeleScrews to insert three or
four TeleScrews.
A black ring on the stepped screwdriver marks the
screwing distance in which the thread of the support
sleeve connects to its counterpart on the plate.
a
b
Attention:
The stepped screwdriver KT225R is torque indicating,
not limiting.
20
2
3
Targon® FN
Operating Technique

4
Extension when inserting the TeleScrew with the stepped torque screw driver
Completely extended TeleScrew sliding distance 20 mm
Length e.g. 90 mm
Total length e.g. 100 mm
(90 + 10 mm extension)
The TeleScrews may be extended by up to 10 mm using
the ø 3.5 mm green screwdriver KT226R.
Guided by the AP and axial X-ray, adjust each TeleScrew
length so the tip of the screw is lying in the subchondral
bone about 5 mm for the joint line.
The scale on the screwdriver indicates how much the
screw has been advanced.
Attention:
Do not extend the screw past a maximum extension
of 10 mm as this may reduce the strength of the
fi xation.
21

Insertion of Distal Screws
5Inserting the Distal Screws
❚ Yellow tissue protection sleeve – KT231R
❚ ø 4 mm yellow drill – KT229R
❚ Depth gauge – KH274R
❚ ø 4.5 mm yellow screw driver – KT236R
Insert the yellow tissue sleeve and drill the femur using
the ø 4 mm yellow drill KT229R (Fig. 1).
1
22
Targon® FN
Operating Technique

2
3
4
Once the drill has just penetrated the second cortex of
the femur, read the screw length off the scale on the
drill or measure the required screw length using the
depth gauge (Fig. 2+3).
Using the using ø 4.5 mm yellow screw driver, insert a
ø 4.5 mm distal screw of the appropiate length to just
penetrate the medial cortex of the femur.
The screw is passed through the tissue sleeve and tightened
into the plate (Fig. 4)
Repeat for the second distal screw.
23

Completion
6 ❚ ø 3.5 mm green screw driver – KT226R
The green screwdriver ø 3.5 mm is used to release the
plate holding screw and with it the targeting device
from the plate (Fig. 1).
1
24
Targon® FN
Operating Technique

Post-operative Care
7 Generally patients with an undisplaced intracapsular
fracture should be allowed to mobilise without any
restriction on weight bearing or hip movements.
For the displaced fracture that has been reduced and
fi xed, then some physicians may prefer a period of
protected weight bearing to reduce the risk of fracture
re-displacement.
25

Implant Removal
8 ❚ ø 3.5 mm green screw driver – KT226R
❚ ø 5 mm red screw driver – KT227R
❚ ø 4.5 mm yellow screw driver – KT236R
The red ø 5 mm extraction screwdriver and green
ø 3.5 mm screwdriver are joint and inserted into the
TeleScrew together to engage both the lag screw and
the hexagon socket of the outer sleeve together.
1
26
Targon® FN
Operating Technique

Now both components of the TeleScrew are carefully
released from bone and plate. This prevents applying ad-
ditional torque to overcome the bony ingrowth between
the TeleScrew components.
The yellow ø 4.5 mm screw driver is then used to extract
the distal screws. Care should be taken to ensure there is
complete insertion of the screwdriver into the hexagon
socket before turning the screw back.
Attention:
The stepped screwdriver KT225R should not be used
to remove the TeleScrews.
2
27

Targon® FN
Instrument Overview
Article no. Description
A KT220P Aiming attachment
B KT221R Holding screw for aiming attachment
C KT223R Drill sleeve (3x)
D KT219P Handle
E KT228P Connecting screw
F KT230R Screw length gauge
G KT235P Depth stop for drill KT224R
H KT224R Step drill
I KT225R Stepped screw driver, torque
J KT226R Screw driver, ø 3.5 mm
K KT231R Tissue protecting sleeve distal
L KT227R Screw driver, ø 5 mm
M KT236R Screw driver, ø 4.5 mm
N KT229R Locking drill, ø 4.1 mm
O KH274R Screw length gauge (optional)
P FK147R COBB elevator (optional)
Q KT232R Drill aiming guide (optional)
28
A
B
C
DE
F
G
H
I
J
K

Color Coding –
Organization of the Instrument Tray
Approach
TeleScrew
Distal Locking
General Instruments
Explantation
29
M
L
N
O
P
Q

Targon® FN – Ordering Information
Instruments
Article no. Description Pieces
KT218 X-ray template 1
KT219P Handle 1
KT220P Aiming attachment 1
KT221R Holding screw for aiming attachment 1
KT223R Drill sleeve 3
KT224R Step drill 1
KT225R Stepped screw driver, torque 1
KT226R Screw driver, ø 3.5 mm 1
KT227R Screw driver, ø 5 mm 1
KT228P Connecting screw 1
KT229R Locking drill, ø 4.1 mm 1
KT230R Screw length gauge 1
KT231R Tissue protec. sleeve, distal 1
KT234S Guide pin ø 2.5 x 310 mm sterile (4 pcs) 1
KT235P Depth stop for drill KT224R 1
KT236R Screw driver, ø 4.5 mm 1
TA012039 Instructions for use Targon instruments 1
KT241R Tray for instruments 1
TE914 Template for KT241R 1
JF217R Lid for KT241R 1
Article no. Description Quantity
KH274R Screw length gauge 1
FK147R COBB elevator 1
KT232R Drill aiming guide
Targon FN KT240 Instrument Set
Optional:
Article no. Description Quantity
KT234S Guide pin ø 2.5 x 310 mm sterile (4 pcs) 1
To be ordered separately:
Recommended container:
JK440 Container base 592 x 285 x 108 mm
JP001 Primeline lid 1/1 red
30

Article no. Description
KO802T Targon FN femoral plate 130°
Targon FN Femoral Plate
Article no. Description Total length
KO820T Targon FN TeleScrew 70 + 10 mm 80 mm
KO822T Targon FN TeleScrew 80 + 10 mm 90 mm
KO823T Targon FN TeleScrew 85 + 10 mm 95 mm
KO824T Targon FN TeleScrew 90 + 10 mm 100 mm
KO825T Targon FN TeleScrew 95 + 10 mm 105 mm
KO826T Targon FN TeleScrew 100 + 10 mm 110 mm
KO828T Targon FN TeleScrew 110 + 10 mm 120 mm
Targon FN TeleScrew
Targon® FN – Ordering Information
Implants (in Sterile Packaging)
Article no. Description
KB336TS Locking screw ø 4.5 x 36 mm
KB340TS Locking screw ø 4.5 x 40 mm
KB344TS Locking screw ø 4.5 x 44 mm
KB348TS Locking screw ø 4.5 x 48 mm
KB352TS Locking screw ø 4.5 x 52 mm
KB356TS Locking screw ø 4.5 x 56 mm
KB360TS Locking screw ø 4.5 x 60 mm
Locking screw ø 4.5 mm
ø 6.5 mmø 8 mm
total length
ø 4.5 mm
length
31

Subject to technical changes. All rights reserved.
This brochure may only be used for the exclusive
purpose of obtaining information about our
products. Reproduction in any form partial or
otherwise is not permitted.
Aesculap AG | Am Aesculap-Platz | 78532 Tuttlingen | Germany
Phone +49 7461 95-0 | Fax +49 7461 95-26 00 | www.aesculap.com
Aesculap – a B. Braun company Brochure No. O33902 0211/1.5/3
The main product mark ’Aesculap’ and the
product mark Targon are registered marks of
Aesculap AG.