appendix a: general os configurations...appendix a: general os configurations •...
TRANSCRIPT

Appendix A: General OS Configurations
• General OS Configurations for SL and CL Servers, page 1
• Required Services for Runlevel 3, page 2
• Services Switched Off on Runlevel 3, page 3
• Sudo Permissions, page 4
• Configure Nginx for NBI Authentication, page 4
General OS Configurations for SL and CL Servers
The following general configurations are in addition to the requirements described for the SL and CLservers in Installation Requirements and Preparing for the Prime Home Installation.
Note
Step 1 Configure users limitations:a) Open the /etc/security/limits.conf file for editing and add the following lines to the file:
panorama soft nofile 15360panorama hard nofile 20480panorama soft nproc 10240nginx soft nofile 15360nginx hard nofile 20480nginx soft nproc 10240
b) Save and close the file.
Step 2 Configure kernel parameters:a) Open the /etc/sysctl.conf file for editing, and add the following parameters:
# Increase TCP max buffer size setable using setsockopt ()net.core.rmem_default = 4194304net.core.rmem_max = 16777216net.core.wmem_default = 262144net.core.wmem_max = 16777216
Cisco Prime Home Installation Guide 6.4 1

# Increase local port rangenet.ipv4.ip_local_port_range = 9000 65500
# Increase Linux autotuning TCP buffer limits# Min, default, and max number of bytes to use# Set max to at least 4MB.net.ipv4.tcp_rmem = 4096 87380 16777216net.ipv4.tcp_wmem = 4096 65536 16777216
b) Save and close the file.c) Reboot the server so that the changes take effect.
Step 3 Configure the custom I/O scheduler by changing the Linux I/O scheduler to 'noop' from the default cfq scheduler. Thisimproves I/O when accessing the disk in a virtualized environment:a) Open the etc/grub.conf file for editing and add the kernel parameter 'elevator=noop' at the end of the kernel entry, as
shown in the following example:kernel /vmlinuz-2.6.18-274.el5 ro root=LABEL=/ elevator=noop
b) Save and close the file.
Required Services for Runlevel 3The following table explains the purpose of the services that should be enabled on startup for runlevel 3:
DescriptionService name
Listens and dispatches ACPI events from the kernelacpid
Linux Audit daemon, which collects security relatedevents in a dedicated audit log
auditd
Daemon to execute scheduled commandscrond
Collects and maintains information about hardwarefrom several sources
haldaemon
Distributes hardware interrupts across processors ona multiprocessor system in order to increaseperformance
irqbalance
Starts or halts network servicesnetwork
Network Time Protocol (NTP) daemon that maintainsthe system time in synchronization with time serversusing NTP
ntpd
Sets the local clock by polling NTP serversntpdate
Simple Network Management Protocol daemonsnmpd
Cisco Prime Home Installation Guide 6.42
Appendix A: General OS ConfigurationsRequired Services for Runlevel 3
DescriptionService name
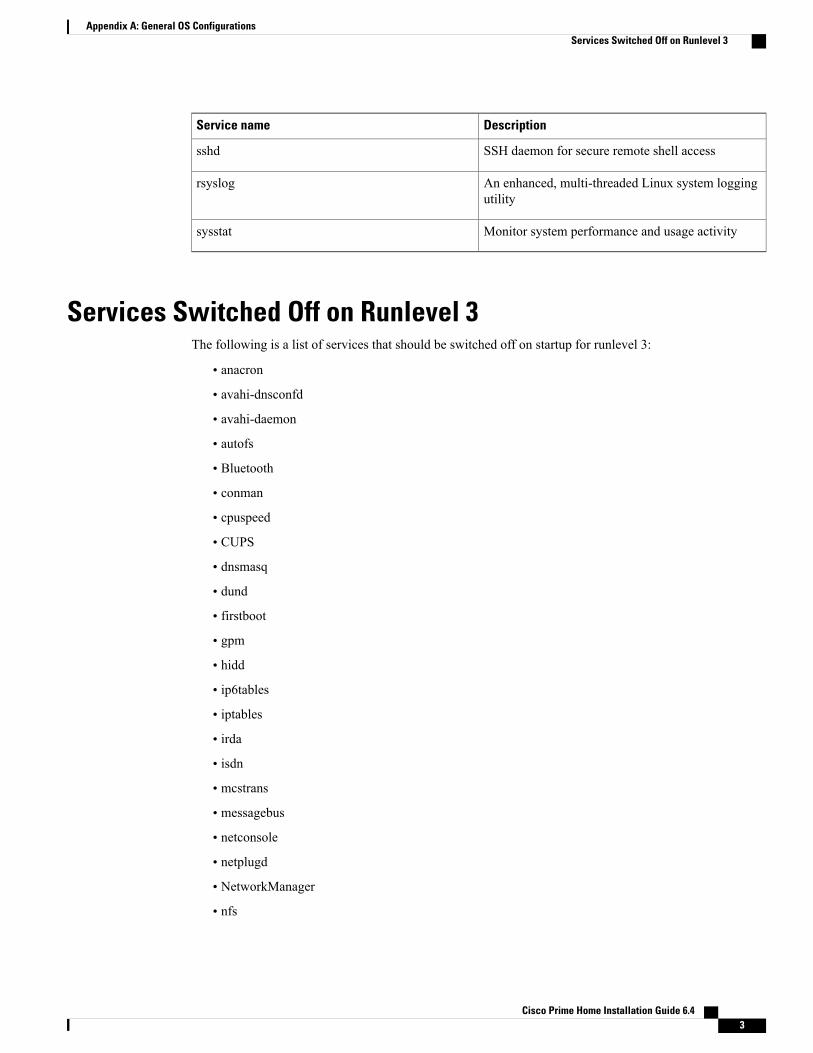
SSH daemon for secure remote shell accesssshd
An enhanced, multi-threaded Linux system loggingutility
rsyslog
Monitor system performance and usage activitysysstat
Services Switched Off on Runlevel 3The following is a list of services that should be switched off on startup for runlevel 3:
• anacron
• avahi-dnsconfd
• avahi-daemon
• autofs
• Bluetooth
• conman
• cpuspeed
• CUPS
• dnsmasq
• dund
• firstboot
• gpm
• hidd
• ip6tables
• iptables
• irda
• isdn
• mcstrans
• messagebus
• netconsole
• netplugd
• NetworkManager
• nfs
Cisco Prime Home Installation Guide 6.4 3
Appendix A: General OS ConfigurationsServices Switched Off on Runlevel 3

• nscd
• psacct
• pcscd
• restorecond
• rhnsd
• rhsmcertd
• saslauthd
• sendmail
• smartd
• snmptrapd
• wpa_supplicant
• ypbind
• yum-updatesd
Sudo PermissionsAdd Sudo permissions to both the SL and CL servers:
SL servers
Using VISUDO, add the following permissions to the SL servers:Cmnd_Alias PANORAMA_CMD = /sbin/service primehome*, /sbin/service tomcat*, /sbin/servicenginx*, /sbin/service activemq*, /bin/less /var/log/audit/audit.logpanorama ALL=(ALL) NOPASSWD: PANORAMA_CMD
CL servers
Using VISUDO, add the following permissions to the CL servers:Cmnd_Alias PANORAMA_CMD = /sbin/service primehome*, /sbin/service acs*, /sbin/service nginx*,/bin/less /var/log/audit/audit.logpanorama ALL=(ALL) NOPASSWD: PANORAMA_CMD
Configure Nginx for NBI AuthenticationThe following procedure enables username and password based authentication at Prime Home North BoundInterface (NBI).
Step 1 Take a backup of the Nginx configuration file.<PANORAMA_HOME>/etc/nginx/https_server.conf
Cisco Prime Home Installation Guide 6.44
Appendix A: General OS ConfigurationsSudo Permissions

Step 2 Edit the <PANORAMA_HOME >/etc/nginx/https_server.conf file by removing the comments from the italicized linesbelow:location /panorama-ui/nbi/ {
# auth_basic "Restricted";# auth_basic_user_file <PANORAMA_HOME>/nginx/users.passwd;;# proxy_pass http://localhost:9443/panorama-ui/nbi/;include proxy.conf;proxy_intercept_errors off;
}
Step 3 Replace <PANORAMA_HOME> with the path of Prime Home's home directory (e.g. /usr/local/panorama).Step 4 Restart Nginx service on the Service Layer.
All Prime Home NBI clients must use this username and password when communicating with the SL node overport 80.
Note
Cisco Prime Home Installation Guide 6.4 5
Appendix A: General OS ConfigurationsConfigure Nginx for NBI Authentication

Cisco Prime Home Installation Guide 6.46
Appendix A: General OS ConfigurationsConfigure Nginx for NBI Authentication