application brief administration j-mail · b1 banquet & catering statements ... these allow...
TRANSCRIPT
APPLICATION BRIEF ADMINISTRATION
J-MAIL
Copyright © 2008 Gary Jonas Computing Ltd.
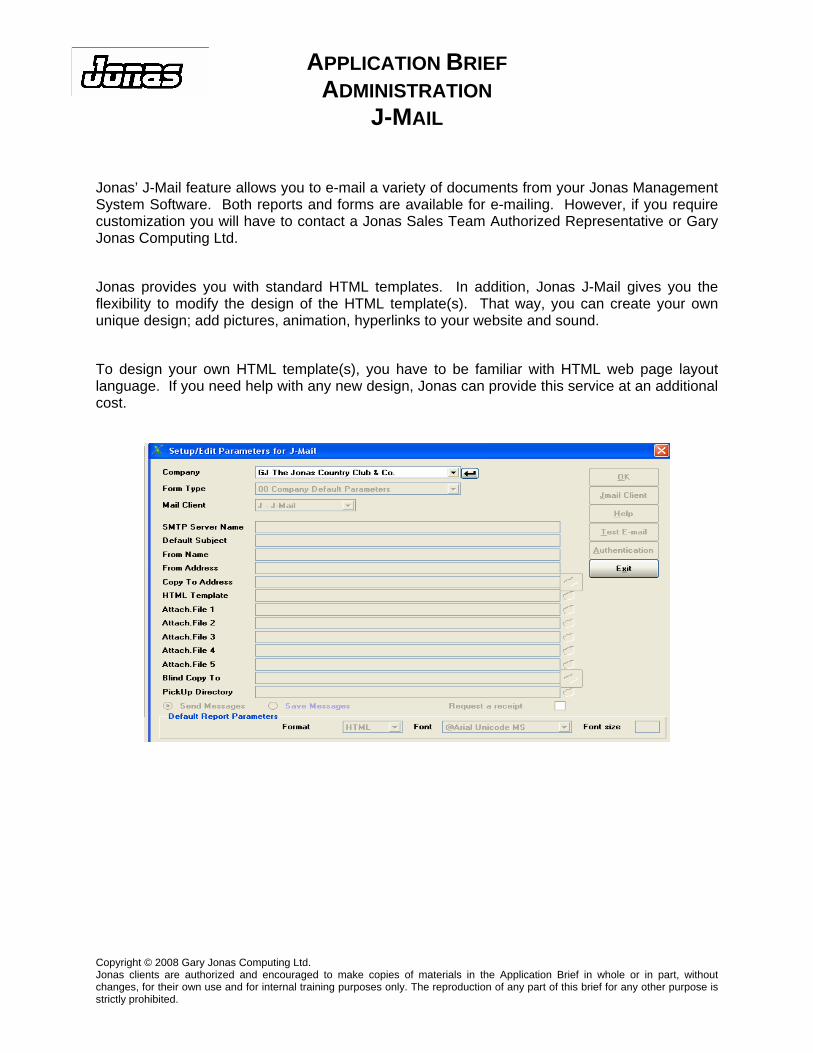
Jonas’ J-Mail feature allows you to e-mail a variety of documents from your Jonas Management System Software. Both reports and forms are available for e-mailing. However, if you require customization you will have to contact a Jonas Sales Team Authorized Representative or Gary Jonas Computing Ltd.
Jonas provides you with standard HTML templates. In addition, Jonas J-Mail gives you the flexibility to modify the design of the HTML template(s). That way, you can create your own unique design; add pictures, animation, hyperlinks to your website and sound.
To design your own HTML template(s), you have to be familiar with HTML web page layout language. If you need help with any new design, Jonas can provide this service at an additional cost.
Jonas clients are authorized and encouraged to make copies of materials in the Application Brief in whole or in part, without changes, for their own use and for internal training purposes only. The reproduction of any part of this brief for any other purpose is strictly prohibited.
ADMINISTRATION J-MAIL
TABLE OF CONTENTS
TOPIC PAGE
Introduction ...........................................................................................................1
Requirements ..................................................................................2
Jonas Setups ........................................................................................................3
Printer Style.....................................................................................3
Parameters for J-Mail ......................................................................4
Outlook and Outlook COM Clients ..................................................6
J-Mail Client.....................................................................................9
PVX EMail Client ...........................................................................14
Form Types – Their Setup & Use........................................................................18
Reports..........................................................................................18
A1 A/R Customer Statements .......................................................20
B1 Banquet & Catering Statements...............................................21
B2 Banquet & Catering Invoices....................................................22
C1 Club Statements ......................................................................23
D1 A/P Direct Deposit Audit ..........................................................25
HC Hotel Confirmation Letter ........................................................26
J1 A/R Job Invoices.......................................................................27
J2 Job Cost Manual T&M Invoices ................................................28
JS Job Scheduling.........................................................................28
PA Parts Invoices ..........................................................................29
PO Purchase Orders .....................................................................30
PL Personalized E-mail Letters .....................................................32
S1 Service Contract Invoices ........................................................39
S2 Subcontracts ............................................................................40
W1 Work Order Invoices ...............................................................41
W2 Work Order Tickets .................................................................42

ADMINISTRATION J-MAIL
TABLE OF CONTENTS
TOPIC PAGE
W3 Work Order Quotations ...........................................................43
WP Dispatch Paging......................................................................44
Z1 Canadian Payroll Earning Statements......................................47
Z2 US Payroll Earning Statements................................................48
J-MAIL
Introduction
J-Mail is the Jonas name for a tool that allows you to e-mail a variety of documents from your Jonas Management System software. Both reports and forms are available for e-mailing, however, your forms may need additional customization to enable them to be e-mailed. The module is available for purchase as a separate addition to your Jonas system. See your Jonas Sales Team Authorized Representative or Gary Jonas Computing Ltd. for pricing.
Mail Client Choice
You have a choice of four mail clients to work with Jonas. You can use the Jonas J-Mail client, the Microsoft Outlook client, the Microsoft Outlook COM client, or the PVX mail client. These allow Jonas to interact with your mail server.
Outlook and Outlook COM Mail Clients
If you choose to use either the Outlook client or Outlook COM client, and want to be able to browse your Outlook Address Book, then you will need to install the CDO.DLL Outlook Address Book control on each workstation that will be e-mailing (it’s found on your Outlook Installation CD – it’s not normally installed when Outlook is setup.)
When using the Outlook or Outlook COM mail clients, you may experience a warning message from Outlook that an application is trying to send e-mails. This message is caused by the installation of the Outlook E-mail Security Update – it thinks that a virus may be trying to send itself. A drop box is offered to set a time limit between message pop ups – choose the maximum amount of time offered (10 minutes). If 10 minutes is not enough time to send all the e-mails, then the message will appear again. The behaviour of the Outlook E-mail Security Update can be controlled through the use of Administrative Tools from Microsoft; Jonas has no control over this behaviour.
J-Mail Mail Client
If you choose to use the Jonas J-Mail client, you will require the installation of the J-Mail client components on each workstation that will be sending e-mail from Jonas. This J-Mail client installation routine is also found in the Jonas Setups section of this document.
Version 11 Administration – J-Mail - 1 -

Requirements
If you intend on using the J-Mail or PVX mail clients, you will need to be running Windows 95 or higher, and be using either your Internet Service Provider’s remote Simple Mail Transfer Protocol (SMTP) server or your own local SMTP server.
You cannot use the J-Mail mail client if either your ISP’s or your own SMTP server uses a protocol called “password authentication” to allow programs to send e-mail. If this is the case then you must use the PVX mail client or either of the Outlook mail clients.
If you intend on using the Outlook mail clients, you will need to be running Windows 98 or higher and running a US version of Outlook 98 or higher. You must have a working copy of Outlook installed on every workstation (or profile) that will be e-mailing.
You cannot use Outlook Express with either of the Outlook mail clients.
Jonas assumes that you have a properly configured mail server and firewall, and a normal account on the Internet with e-mail privileges. This document does not cover installation, setup and tuning of mail servers, or any firewall settings.
Version 11 Administration – J-Mail - 2 -

Jonas Setups
Printer Style
J-Mail Printer Style
To e-mail something out of Jonas, you must “print” it to a Printer Style. A Jonas Printer Style for J-Mail has already been created for you to use. This “J-MAIL” style is a “factory load” much like the way “LASER,” “LASERG,” or “MS-DOS” is already setup for you.
Ignore the Location ID and use the Restrict To/From fields if you wish to “hide” this Printer Style from certain terminals.
Version 11 Administration – J-Mail - 3 -
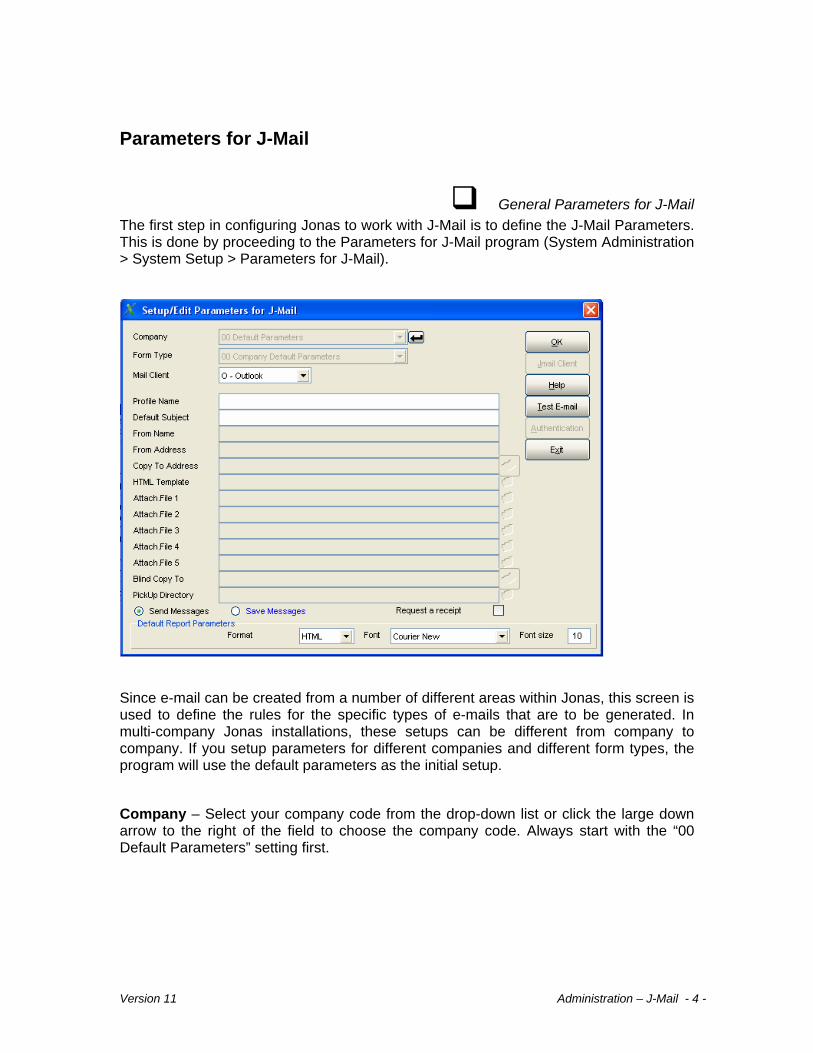
Parameters for J-Mail
General Parameters for J-Mail
The first step in configuring Jonas to work with J-Mail is to define the J-Mail Parameters. This is done by proceeding to the Parameters for J-Mail program (System Administration > System Setup > Parameters for J-Mail).
Since e-mail can be created from a number of different areas within Jonas, this screen is used to define the rules for the specific types of e-mails that are to be generated. In multi-company Jonas installations, these setups can be different from company to company. If you setup parameters for different companies and different form types, the program will use the default parameters as the initial setup.
Company – Select your company code from the drop-down list or click the large down arrow to the right of the field to choose the company code. Always start with the “00 Default Parameters” setting first.
Version 11 Administration – J-Mail - 4 -
Form Type – This field defines the various rules for each area of Jonas where e-mails can be created. Use the "00 Company Default Parameters" for general e-mails (reports). Currently, the list includes: A/R Customer Statements; Banquet & Catering CEOs and Invoices; Club Member Statements; A/P Direct Deposit Audits; Hotel Confirmation Letters; A/R Job Invoices; Job Cost T&M Invoices; Job Scheduling; Personalized E-mail Letters; Service Contract Invoices; Tee Time Confirmations; Work Order Invoices, Tickets, and Quotations; Dispatch Paging; Purchase Orders; Parts Invoices; Subcontracts; and Canadian and US Earnings Statements.
Mail Client – This is the field where you tell the system which method of e-mail client you intend on using to interact with Jonas. Your choices are Outlook, Outlook COM, J-Mail, or PVX Email. Since the screen changes slightly depending on which mail client you choose, let’s go through each choice explaining all the fields for each client method. Not every field is used with each Form Type, but the section on “Form Types – Their Setup & Use” will show the fields that are used.
Version 11 Administration – J-Mail - 5 -

Outlook and Outlook COM Clients
You will need to have Outlook installed on every workstation or profile that will be sending e-mails.
Profile Name – Your e-mail’s message properties (Mail From and Reply To) come from this field. It remains empty if you are using the default Outlook profile installed on your workstation. If you use more than one profile to log into Outlook (i.e. more than one person logs into your workstation and can send e-mail under their name), you need to type the name(s) of the profile(s) that you want to enable, in this field. If desired, you can create a separate profile to use specifically with Jonas e-mailing.
Default Subject – This field is used to define the default phrase that will be placed in the e-mail’s Subject line. Leaving it blank will create a clear Subject line for each e-mail you send from Jonas. Different types of forms may get different Default Subjects – for example, Club Member Statements might get something like “Your Monthly Member Statement,” whereas a Work Order Invoice might have something like “W/O Invoice for Work Performed.” You create the phrase.
Copy To Address – This field acts as a “Cc:” E-mails that are sent can also be echoed to this mailbox. If you’ve installed the Outlook CDO.DLL, you can use the button to the right of the field to browse your Outlook Address Book for valid mailbox addresses, or type it in. Having this field set up will slow down your system whenever it sends out e-mails, since it is duplicating each e-mail to both the sent location and this Copy To address.
Version 11 Administration – J-Mail - 6 -

HTML Template – The HTML (Hyper Text Markup Language) templates define what information is to be placed where on the e-mailed form. This field indicates the path to the template and sometimes the template design itself – by default, Jonas copies all the template designs into the \GJCWIN\HTML folder on the Jonas server. They all end with the “.htm” extension. Make sure that all users who will be using the design can access this location.
If you wish, you can modify the design of the HTML template. You should be familiar with HTML programming – if you wish to have Jonas modify a design for you, please contact your Jonas Sales Team Authorized Representative or Gary Jonas Computing Ltd. for a quotation. For example, you can change the text or background font, or you can add a background picture, or embedded graphics. Please leave the placeholders that look like:
%aaaaaaaa%
unchanged, otherwise you will get error messages or your form will be missing some necessary information. If you modify a template, Jonas will never override it if it resides in the \HTML folder.
Attach. File 1 to 5 – You can attach up to five files to each e-mail form you send from Jonas. If you wish to send some sort of promotional material at the same time you are sending a form, this is the path to the desired files. Click on the folder icon to the left of the field(s) to browse the path(s) and filename(s). The maximum length of the browsed path and filename can be no longer than 50 characters long. Make sure that all users who will be sending e-mail from Jonas can access this location.
Blind Copy To – This field acts as a “bcc:.” E-mails that are sent out can also be echoed to this mailbox without the original recipient knowing. If you’ve installed the Outlook CDO.DLL, you can use the button to the right of the field to browse your Outlook Address Book for valid mailbox addresses, or type it in. Having this field setup will slow down your system whenever it sends e-mails, since it is duplicating each e-mail to both the sent location and this Blind Copy To address.
Send / Save Messages – These radio buttons control whether or not your e-mails from Jonas will be sent immediately (Send) or if they will accumulate in Outlook’s Drafts folder (Save). If saved in the Drafts folder, Outlook currently only lets you send them out one at a time, not all at once.
Version 11 Administration – J-Mail - 7 -

Test E-mail (button)
Clicking on the Test E-mail button will check the settings and create a test e-mail something like the following:
Once you click “OK” on the Test Result window, you can fill in a valid recipient e-mail address to check the delivery of an e-mail created in Jonas. If the recipient doesn’t receive your test message, then you need to have your hardware/network professional check your mail server settings.
Version 11 Administration – J-Mail - 8 -

J-Mail Client
Installing J-Mail Client
The Company and Form Type fields are the same as before. However, you will need to install the J-Mail client on every workstation that will be sending e-mails.
Changing the Mail Client field to “J-Mail” – you will immediately get the following warning box:
Version 11 Administration – J-Mail - 9 -
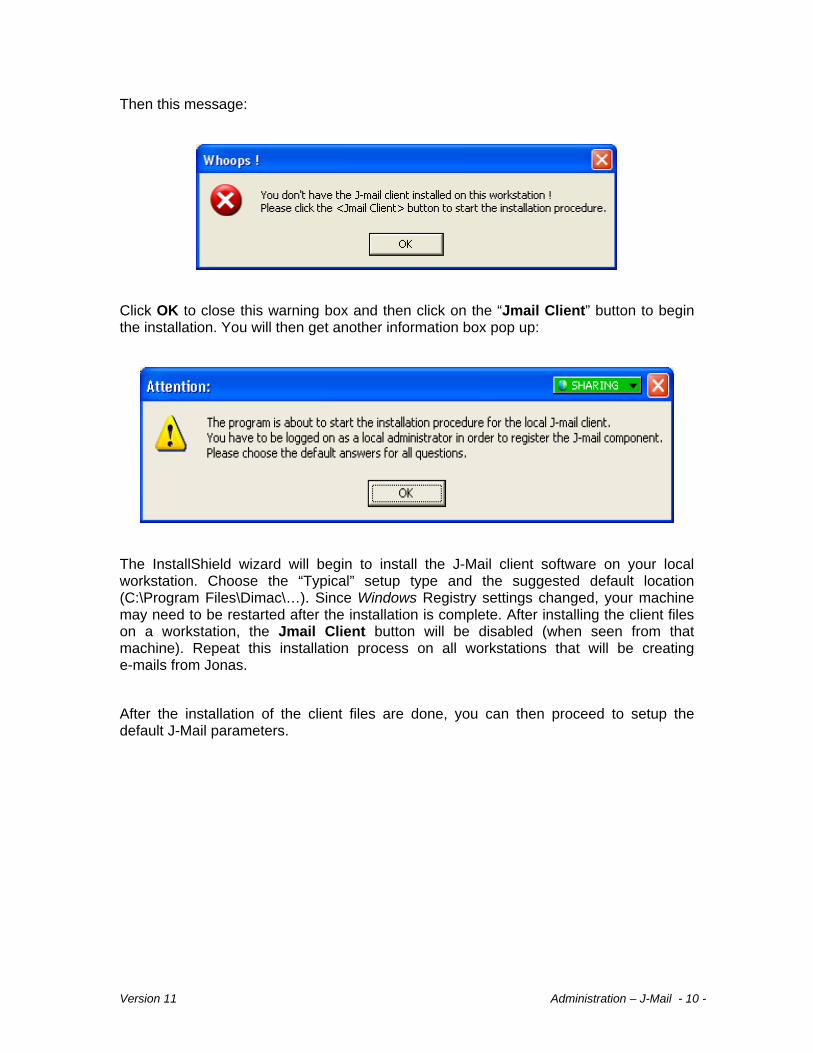
Then this message:
Click OK to close this warning box and then click on the “Jmail Client” button to begin the installation. You will then get another information box pop up:
The InstallShield wizard will begin to install the J-Mail client software on your local workstation. Choose the “Typical” setup type and the suggested default location (C:\Program Files\Dimac\…). Since Windows Registry settings changed, your machine may need to be restarted after the installation is complete. After installing the client files on a workstation, the Jmail Client button will be disabled (when seen from that machine). Repeat this installation process on all workstations that will be creating e-mails from Jonas.
After the installation of the client files are done, you can then proceed to setup the default J-Mail parameters.
Version 11 Administration – J-Mail - 10 -

SMTP Server Name – This field must be filled. It identifies the name or TCP/IP address of the SMTP server that will be handling your e-mails. If you are using the SMTP server of your Internet Service Provider (ISP), then they can provide you with this information. If you are hosting your own SMTP server, then your network techs can provide this address.
Default Subject – This field is used to define the default phrase that will be placed in each e-mail’s “Subject” line. Leaving it blank will create a clear Subject line for each e-mail you send from Jonas. Different types of forms may get different Default Subjects – for example, Club Member Statements might get something like “Your Monthly Member Statement,” whereas a Work Order Invoice might have something like “W/O Invoice for Work Performed.”
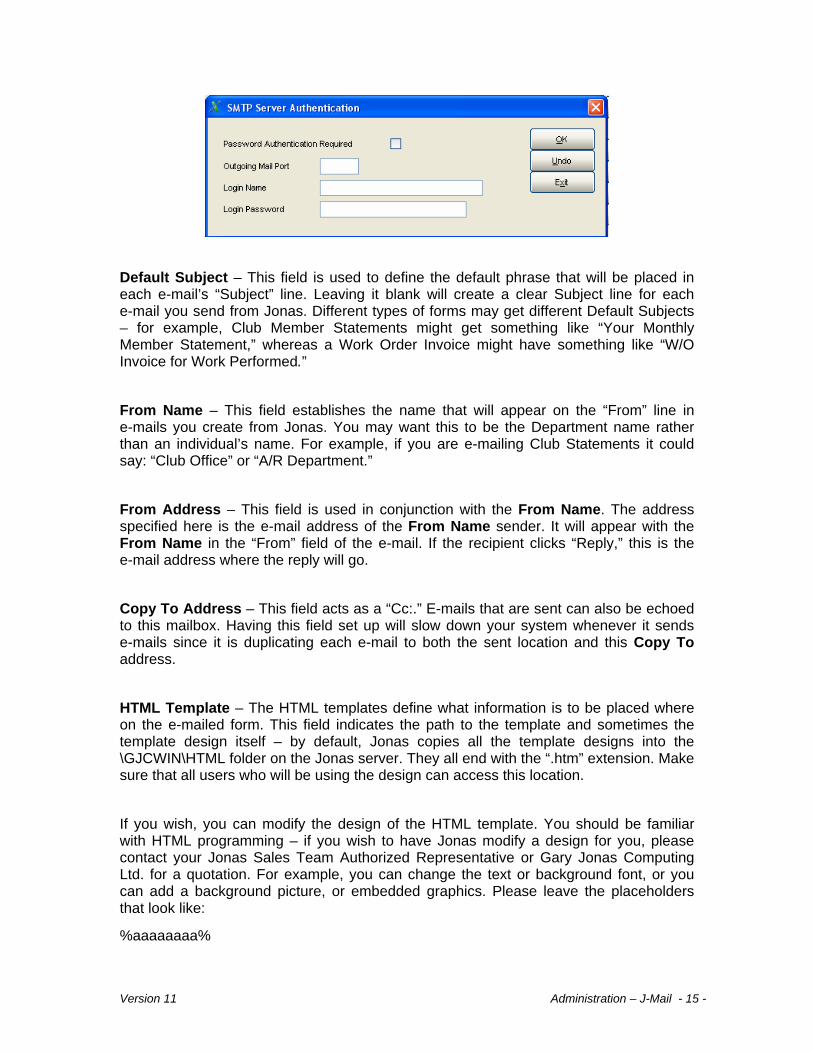
From Name – This field establishes the name that will appear on the “From” line in e-mails you create from Jonas. You may want this to be the Department name rather than an individual’s name. For example, if you are e-mailing Club Statements it could say: “Club Office” or “A/R Department.”
From Address – This field is used in conjunction with the From Name. The address specified here is the e-mail address of the From Name sender. It will appear with the From Name in the “From” field of the e-mail. If the recipient clicks “Reply,” this is the e-mail address where the reply will go.
Version 11 Administration – J-Mail - 11 -

Copy To Address – This field acts as a “Cc:.” E-mails that are sent can also be echoed to this mailbox. Having this field set up will slow down your system whenever it sends e-mails since it is duplicating each e-mail to both the sent location and this Copy To address.
HTML Template – The HTML templates define what information is to be placed where on the e-mailed form. This field indicates the path to the template and sometimes the template design itself – by default, Jonas copies all the template designs into the \GJCWIN\HTML folder on the Jonas server. They all end with the “.htm” extension. Make sure that all users who will be using the design can access this location.
If you wish, you can modify the design of the HTML template. You should be familiar with HTML programming – if you wish to have Jonas modify a design for you, please contact your Jonas Sales Team Authorized Representative or Gary Jonas Computing Ltd. for a quotation. For example, you can change the text or background font, or you can add a background picture, or embedded graphics. Please leave the placeholders that look like:
%aaaaaaaa%
unchanged, otherwise you will get error messages or your form will be missing some necessary information. If you modify a template, Jonas will never override it if it resides in the \HTML folder.
Attach. File 1 to 5 – You can attach up to five files to each e-mailed form you send from Jonas. If you wish to send some sort of promotional material at the same time you are sending forms, this is the path to the desired files. Click on the folder icon to the left of the field(s) to browse the path(s) and filename(s). The maximum length of the browsed path and filename can be no longer than 50 characters long. Make sure that all users who will be sending e-mail from Jonas can access this location.
Blind Copy To – This field acts as a “bcc:.” E-mails that are sent can also be echoed to this mailbox without the original recipient knowing. Having this field setup will slow down your system whenever it sends e-mails since it is duplicating each e-mail to both the sent location and this Blind Copy To address.
PickUp Directory – The PickUp directory location works with the Send / Save Messages radio buttons.
Send / Save Messages – These radio buttons control whether or not your e-mails from Jonas will be sent immediately (Send) or if they will accumulate in your PickUp Directory folder (Save).
Version 11 Administration – J-Mail - 12 -
Systems that have their SMTP servers located remotely should use the Send option. Systems that have their SMTP servers located in-house have the choice of whether they want e-mails to be sent immediately or stored for the SMTP server’s own scheduled e-mail release. Jonas has no control over this aspect of your mail system, so for more information concerning SMTP mail scheduling, consult your hardware/network professional, not Jonas Software. From a performance point of view, “batching” your e-mails can improve your system’s performance. You can preview saved e-mails by clicking on the saved e-mail files that end in the “.eml” extension.
Request a Receipt – This is purely a tracking option. Check this box if you want to request a “delivery receipt” (not a read receipt) from the recipient of your e-mail’s SMTP server. If their server supports this feature and your firewall allows you to get a delivery receipt back, the notification message will be sent to the address indicated in the From Address field.
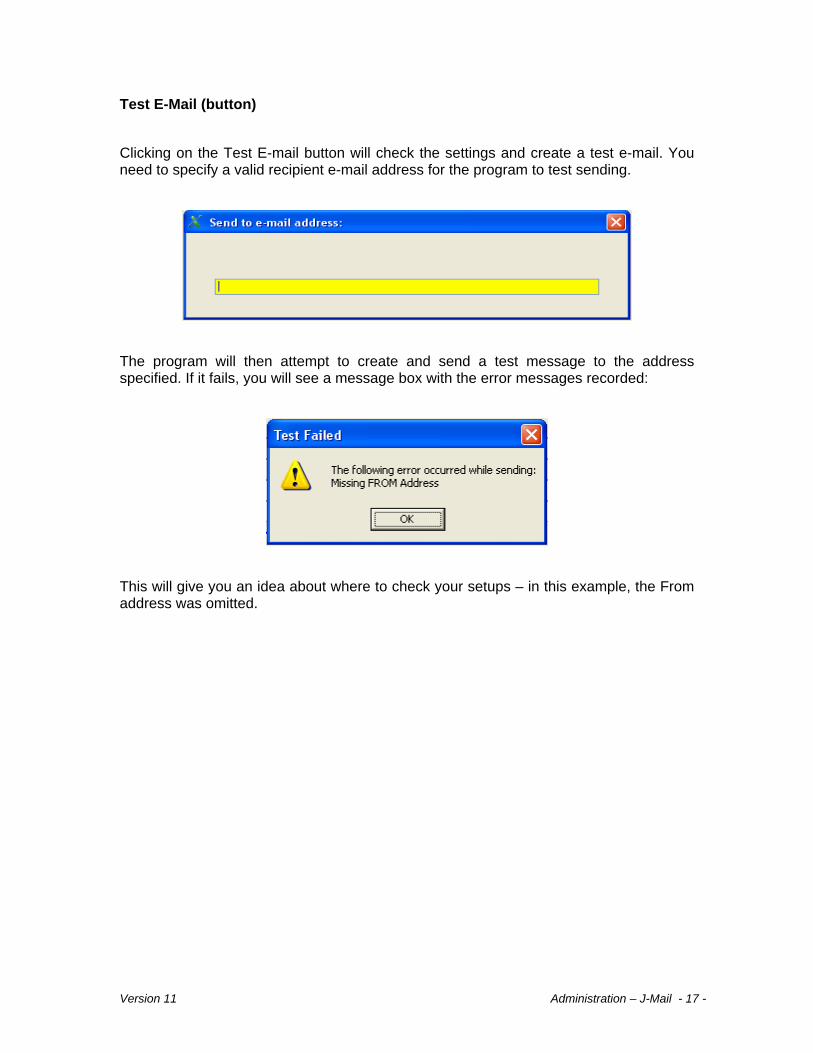
Test E-Mail (button)
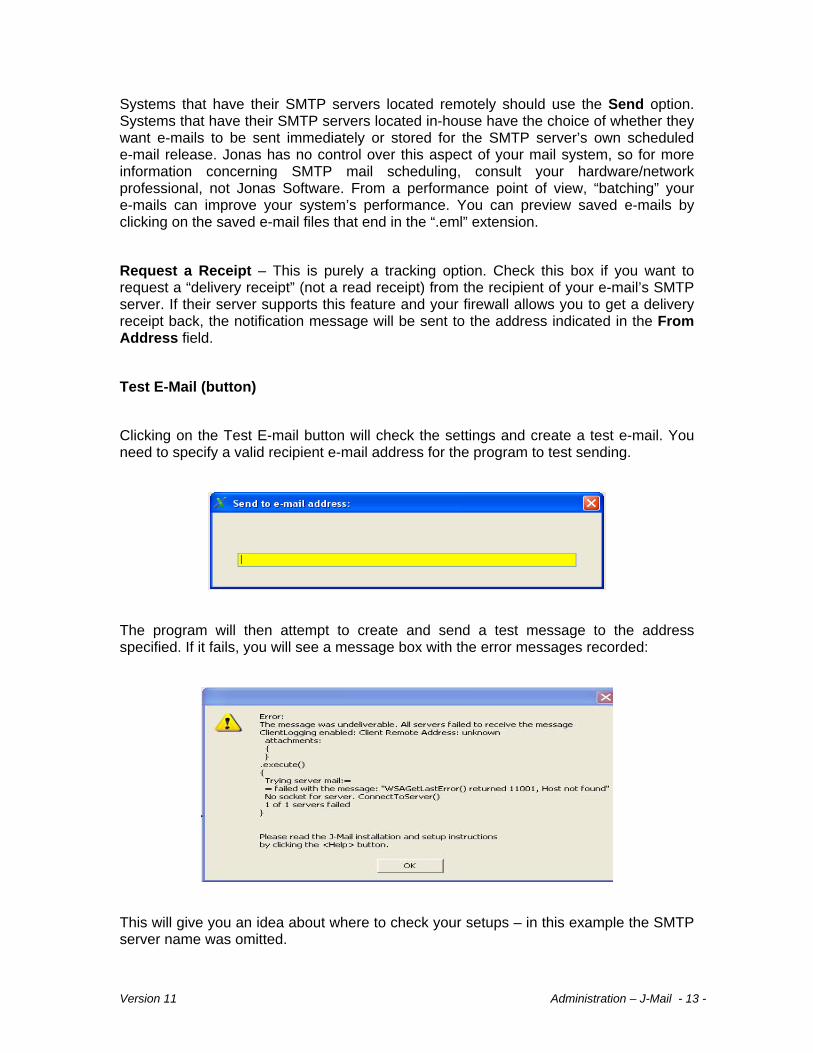
Clicking on the Test E-mail button will check the settings and create a test e-mail. You need to specify a valid recipient e-mail address for the program to test sending.
The program will then attempt to create and send a test message to the address specified. If it fails, you will see a message box with the error messages recorded:
This will give you an idea about where to check your setups – in this example the SMTP server name was omitted.
Version 11 Administration – J-Mail - 13 -
PVX EMail Client
PVX EMail Client
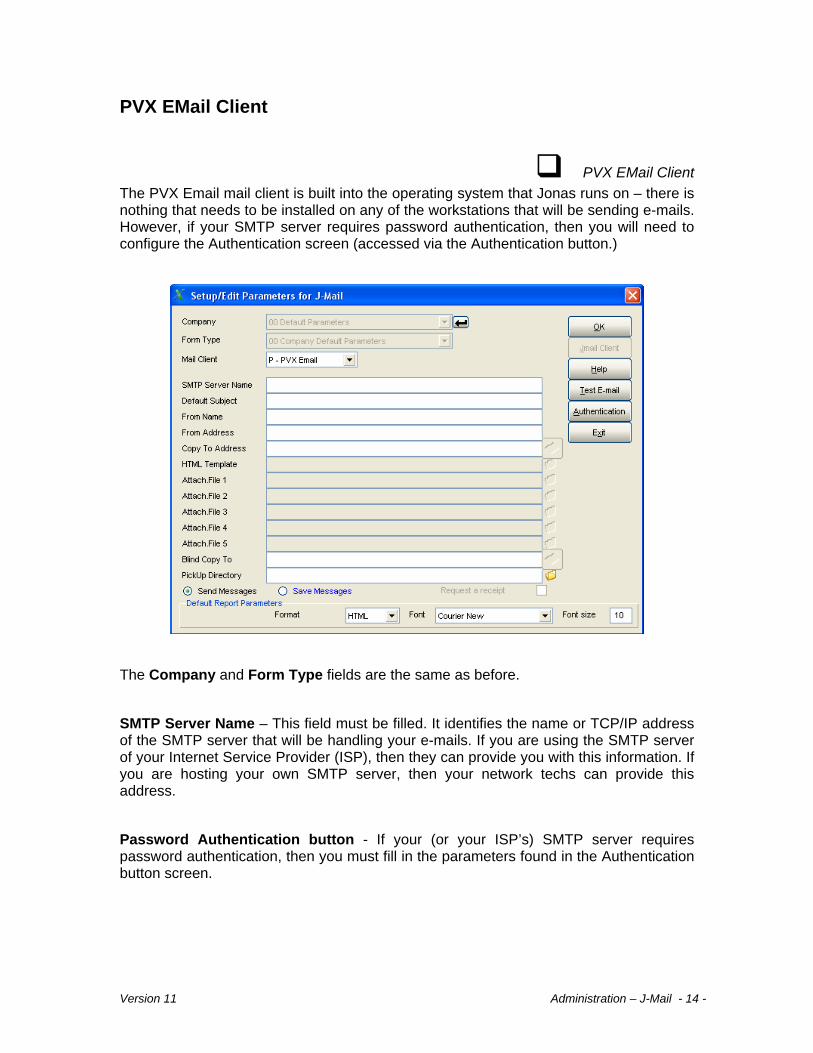
The PVX Email mail client is built into the operating system that Jonas runs on – there is nothing that needs to be installed on any of the workstations that will be sending e-mails. However, if your SMTP server requires password authentication, then you will need to configure the Authentication screen (accessed via the Authentication button.)
The Company and Form Type fields are the same as before.
SMTP Server Name – This field must be filled. It identifies the name or TCP/IP address of the SMTP server that will be handling your e-mails. If you are using the SMTP server of your Internet Service Provider (ISP), then they can provide you with this information. If you are hosting your own SMTP server, then your network techs can provide this address.
Password Authentication button - If your (or your ISP’s) SMTP server requires password authentication, then you must fill in the parameters found in the Authentication button screen.
Version 11 Administration – J-Mail - 14 -
Default Subject – This field is used to define the default phrase that will be placed in each e-mail’s “Subject” line. Leaving it blank will create a clear Subject line for each e-mail you send from Jonas. Different types of forms may get different Default Subjects – for example, Club Member Statements might get something like “Your Monthly Member Statement,” whereas a Work Order Invoice might have something like “W/O Invoice for Work Performed.”
From Name – This field establishes the name that will appear on the “From” line in e-mails you create from Jonas. You may want this to be the Department name rather than an individual’s name. For example, if you are e-mailing Club Statements it could say: “Club Office” or “A/R Department.”
From Address – This field is used in conjunction with the From Name. The address specified here is the e-mail address of the From Name sender. It will appear with the From Name in the “From” field of the e-mail. If the recipient clicks “Reply,” this is the e-mail address where the reply will go.
Copy To Address – This field acts as a “Cc:.” E-mails that are sent can also be echoed to this mailbox. Having this field set up will slow down your system whenever it sends e-mails since it is duplicating each e-mail to both the sent location and this Copy To address.
HTML Template – The HTML templates define what information is to be placed where on the e-mailed form. This field indicates the path to the template and sometimes the template design itself – by default, Jonas copies all the template designs into the \GJCWIN\HTML folder on the Jonas server. They all end with the “.htm” extension. Make sure that all users who will be using the design can access this location.
If you wish, you can modify the design of the HTML template. You should be familiar with HTML programming – if you wish to have Jonas modify a design for you, please contact your Jonas Sales Team Authorized Representative or Gary Jonas Computing Ltd. for a quotation. For example, you can change the text or background font, or you can add a background picture, or embedded graphics. Please leave the placeholders that look like:
%aaaaaaaa%
Version 11 Administration – J-Mail - 15 -

unchanged, otherwise you will get error messages or your form will be missing some necessary information. If you modify a template, Jonas will never override it if it resides in the \HTML folder.
Attach. File 1 to 5 – You can attach up to five files to each e-mailed form you send from Jonas. If you wish to send some sort of promotional material at the same time you are sending forms, this is the path to the desired files. Click on the folder icon to the left of the field(s) to browse the path(s) and filename(s). The maximum length of the browsed path and filename can be no longer than 50 characters long. Make sure that all users who will be sending e-mail from Jonas can access this location.
Blind Copy To – This field acts as a “bcc:.” E-mails that are sent can also be echoed to this mailbox without the original recipient knowing. Having this field setup will slow down your system whenever it sends e-mails since it is duplicating each e-mail to both the sent location and this Blind Copy To address.
PickUp Directory – The PickUp directory location works with the Send / Save Messages radio buttons.
Send / Save Messages – These radio buttons control whether or not your e-mails from Jonas will be sent immediately (Send) or if they will accumulate in your PickUp Directory folder (Save).
Systems that have their SMTP servers located remotely should use the Send option. Systems that have their SMTP servers located in-house have the choice of whether they want e-mails to be sent immediately or stored for the SMTP server’s own scheduled e-mail release. Jonas has no control over this aspect of your mail system, so for more information concerning SMTP mail scheduling, consult your hardware/network professional, not Jonas Software. From a performance point of view, “batching” your e-mails can improve your system’s performance. You can preview saved e-mails by clicking on the saved e-mail files that end in the “.eml” extension.
Request a Receipt – This is purely a tracking option. Check this box if you want to request a “delivery receipt” (not a read receipt) from the recipient of your e-mail’s SMTP server. If their server supports this feature and your firewall allows you to get a delivery receipt back, the notification message will be sent to the address indicated in the From Address field.
Version 11 Administration – J-Mail - 16 -
Test E-Mail (button)
Clicking on the Test E-mail button will check the settings and create a test e-mail. You need to specify a valid recipient e-mail address for the program to test sending.
The program will then attempt to create and send a test message to the address specified. If it fails, you will see a message box with the error messages recorded:
This will give you an idea about where to check your setups – in this example, the From address was omitted.
Version 11 Administration – J-Mail - 17 -
Form Types – Their Setup & Use
Reports
E-Mailing Reports
The "00 Company Default Parameters" settings are used for general e-mails (reports, inquiries, etc.) You can e-mail any report that you are able to see using the “View” button. Reports will be sent in the format you specified in the Default Report Parameters section:
Format, Font, Font size – These are fields that allow Jonas to control the formatting of reports that are e-mailed out of Jonas. Only reports are affected by these settings, other Form Types are hardcoded already. You can set the format to create the e-mail in either an HTML or Text manner (we recommend HTML), using whatever font and font size you specify. The list of fonts is dependent on the actual fonts loaded on the machine you are setting the Parameters up on. If another machine creating a report doesn’t have the font that you specified on your machine, Jonas will use its default Courier New font.
To e-mail a report you have to click on the J-Mail button and use the J-MAIL Printer Style in the “Where Would You Like It Printed?” window.
You will then see one of the Sending E-Mail windows shown below (depending on your choice of mail client.) Since this isn’t a form type where the program can obtain an e-mail address from a master file (like the Customer Master File, or Member Master File) you will need to enter the recipient's e-mail address. Depending on the type of report being “printed,” you may have to move the Cancel Print message box out of the way to access all the fields on the Sending E-Mail screen. Type in the desired Send To:, Copy To:, or Blind Copy To: addresses. After entering the recipient(s)'s valid e-mail address(es), click the Send button to e-mail the report. To cancel, click the Cancel All button.
Version 11 Administration – J-Mail - 18 -

Version 11 Administration – J-Mail - 19 -

A1 A/R Customer Statements
A/R Customer Statements
Using whatever choice of mail client, the setup for A/R Customer Statements is done in the same way. Your choice of standard e-mailable Customer Statement designs (set in Accounts Receivables > Files > Select A/R Form Designs) is limited to GJR44AA or GJR44AAA.
For this Form Type, the HTML Template field is just a path, not the actual .HTM template design. The standard HTML template used with e-mailing Customer Statements is GJR44AA.HTM when used with GJR44AA. If GJR44AAA is used, no .HTM template is used - it creates and sends the statement as a PDF attachment to the e-mail.
E-Mail addresses are setup in the Customer Master File (Accounts Receivables > Files > Setup/Edit/List Customers > Preferences screen.) Proceed to run your Customer statements as normal. Go to Accounts Receivables > Reports > Customer Statements and proceed to make your usual choices. When you go to choose the printer, click the J-Mail button.
The next window that will appear is the “Sending E-Mail” dialog box. Its appearance varies depending on the mail client you have chosen. You can make changes to who you are Sending To, Copying To, or Blind Copying To at this point. Click Send (or Send All) to send the Customer Statements as an e-mail. If you wish to skip a particular Customer, use the Skip button. Using the Cancel All button will stop the process of sending e-mails.
Version 11 Administration – J-Mail - 20 -

B1 Banquet & Catering Statements
Banquet & Catering CEO’s
Regardless of the mail client you use, the setup for e-mailing Banquet & Catering (B&C) Catering Event Orders (CEO’s) is the same. At one point only three standard CEO form designs could be e-mailed using the HTML Template (GJNR20A, B, and C.HTM) method, but that list has been expanded by the technique of sending the CEO as a PDF attachment to an e-mail. Either method can be used.
To use the HTML Template method, you must set the CEO design to be used in Banquet & Catering > Files > Select Forms & Form Options to either GJNR20A, GJNR20B or GJNR20C. In the Parameters for J-Mail screen, the HTML Template field must include the .HTM template design.
To use the PDF attachment method, you still have to setup the B1 Form Type screen, but it’s mainly used for the mail client choice and settings. Ignore the HTML Template field as it does not need an .HTM template to work. Next, in the Select Forms & Form Options screen (B&C > Files menu), select the Email CEO as PDF flag and optionally attach a Letter Designer module Document Code for the CEO. Using a Document Code allows you to have a body message on your e-mail with the actual CEO as a PDF attached to the e-mail.
You can print CEO’s in three ways: directly through the Booking screen (using the Print CEO button); through the Print Event Order program (Banquet & Catering > Reports); and when Invoices are printed (only if the ‘Print CEO with each invoice’ flag in the System Profile > Page 2 is turned on.) Each of the ways depends on the e-mail address on the main Booking Details screen.
The process remains the same whichever place you print CEO’s. When you go to choose the printer, click the J-Mail button and the J-MAIL Printer Style.
The next window that will appear is the “Sending E-Mail” dialog box. You can make changes to who you are Sending To, Copying To, or Blind Copying To. Click Send (or Send All) to send the CEO(s) as an e-mail.
Version 11 Administration – J-Mail - 21 -

B2 Banquet & Catering Invoices
Banquet & Catering Invoices
Regardless of the mail client you use, the setup for e-mailing Banquet & Catering (B&C) Invoices is the same. There are two standard Invoice designs that support e-mailing as a PDF attachment to an e-mail: GJNP30B and GJNP30C.
You still have to setup the B2 Form Type screen, but it’s mainly used for the mail client choice and settings. Ignore the HTML Template field as it does not need an .HTM template to work. Next, in the Select Forms & Form Options screen (B&C > Files menu), optionally attach a Letter Designer module Document Code for the Invoice. Using a Document Code allows you to have a body message on your e-mail with the actual B&C Invoice as a PDF attached to the e-mail.
The e-mail address of the Booking is found on the main Booking Details screen. You print Invoices through the Settlement/Billings program. When you go to choose the printer, click the J-Mail button and the J-MAIL Printer Style.
The next window that will appear is the “Sending E-Mail” dialog box. You can make changes to who you are Sending To, Copying To, or Blind Copying To. Click Send (or Send All) to send the CEO(s) as an e-mail.
Version 11 Administration – J-Mail - 22 -

C1 Club Statements
Club Statements
Although there are several standard Club Member Statement designs that support e-mailing using any mail client, there are two methods used to e-mail Member Statements: an older method that uses an HTML Template as the body of an e-mail; and a newer method that creates a PDF of the statement and attaches it to the e-mail. A Letter Designer module Free Form Document Code can be used as a personalized body message on the e-mail.
To use the HTML Template method, you must set the Club Statement design to be used in Club Management > Club Admin. > Select Club Forms Design. In the Parameters for J-Mail screen, the HTML Template field must include the .HTM template design. The standard GUI User Configurable Member Statement GJK25GU has a corresponding HTML Template called GJK25GU.HTM
To use the PDF attachment method, you still have to setup the C1 Form Type screen, but it’s only used for the mail client choice and attachment settings. Ignore the HTML Template field as it does not need an .HTM template to work. Next, in the Select Club Forms Design screen (Club Management > Club Admin menu), select the Email as PDF Attachment flag and optionally attach a Letter Designer module Club Free Form Letter code. If your club uses pre-printed Statement stock, you can (optionally) even have the PDF reproduce this by attaching an image file (JPG or BMP) to act as the background of your PDF statement.
Next, for both methods, ensure that all members who wish to receive their Statement by e-mail have a valid e-mail address indicated on the first screen of their Member Master File (Club Management > Member File > Setup/Edit Members). Using an invalid e-mail address will result in error messages being reported when sending. You must also indicate if they want their statement Printed, E-Mailed, or Both (printed & e-mailed), and which format the e-mailed statement should be sent in (HTML or Text). For maximum flexibility for the member’s e-mail reader, Jonas suggests that HTML format be used. If you use the PDF attachment method, copies of the e-mailed Statement can be sent to the 199 additional e-mail addresses setup on the Member Master File main screen.
Proceed to run your members’ statements as normal. Go to Club Management > Inquiries/Stmts > Print Statements and proceed to make your usual choices. When you go to choose the printer, click the J-Mail button and use the J-MAIL Printer Style.
The next window that will appear is the “Sending E-Mail” dialog box. You can make changes to who you are Sending To, Copying To, or Blind Copying To. Click Send (or Send All) to send the statement(s) as an e-mail.
Version 11 Administration – J-Mail - 23 -

If you encounter an error while sending your Club Statements, the member in question may have an invalid e-mail address in their file. You can sometimes see the member number of the statement currently being processed in the bottom left section of the screen. This can aid you in checking which member is having a problem with their e-mail address.
Version 11 Administration – J-Mail - 24 -

D1 A/P Direct Deposit Audit
AP Direct Deposit
Although there are several standard A/P Direct Deposit Audit designs that support e-mailing using any of the mail clients, there are two methods used: one that uses an HTML Template as the body of an e-mail; and another that creates a PDF of the audit and attaches it to the e-mail.
To use the HTML Template method, you need to select the standard GJP13A Direct Deposit Audit Form (in Accounts Payable > Files > Select Ck Design.) In the Parameters for J-Mail screen, you need to select the path to the GJP13A.HTM Template design in the HTML Template field.
To use the PDF attachment method, you need to be using either the standard GJP13AA or GJP13AB Direct Deposit Audit Form (in Accounts Payable > Files > Select Ck Design.) In the Parameters for J-Mail screen, you don’t need to select the path or an .HTM Template design since it is not used.
To send e-mails, both methods depend upon a valid e-mail address being present in the Supplier Master file main screen. Using an invalid e-mail address will result in error messages being reported when sending.
Proceed to the Accounts Payable > Processing > Print Direct Deposits Audit. Print your direct deposit audit as normal. The “Where Would You Like It Printed?” window will appear – choose the J-Mail button and use the J-MAIL Printer Style.
The next window that will appear is the “Sending E-Mail” dialog box. You can make changes to who you are Sending To, Copying To, or Blind Copying To. Click Send (or Send All) to send the direct deposit audit.
Version 11 Administration – J-Mail - 25 -

HC Hotel Confirmation Letter
Hotel Confirmation Letters
There is only one method for e-mailing Hotel Confirmation Letters using any of the mail clients: use a corresponding .HTM Template design as the body of the e-mail. In the Parameters for J-Mail screen, the HTML Template field needs to be filled with the path and .HTM Template name. The standard Hotel Confirmation Letter template design is HR050CL.HTM.
To automatically send e-mails, the system depends upon a valid e-mail address being present in the guest’s Reservation File, setup at the time of making the reservation. If it is not present, it can be added later at the time of printing, but this will interrupt the flow of sending e-mails. Using an invalid e-mail address will result in error messages being reported when sending.
Confirmation Letters can be e-mailed from three places: the Reservations screen when the Reservation is made, changed or cancelled (if configured); the Reports > Confirmation/Deposit/Reg Cards program; and from the Reports > Letter Designer Confirm. Letters program. Wherever you choose to print Confirmation Letters, choose the J-Mail button in the “Where Do You Want It Printed?” dialog box and select the J-MAIL Printer Style.
The next window that will appear is the “Sending E-Mail” dialog box. You can make changes to who you are Sending To, Copying To, or Blind Copying To. Click Send (or Send All) to send the letter(s) as an e-mail.
Version 11 Administration – J-Mail - 26 -

J1 A/R Job Invoices
Job Invoices
Although there are several standard A/R Job Invoice designs that support e-mailing using any of the mail clients, there is only one method used: one that creates a PDF of the Job Invoice and attaches it to the e-mail.
To use the PDF attachment method, you need to be using either the standard GJR08AA or GJR08AN Job Invoice designs (in Accounts Receivable > Files > Select A/R Form Designs.) In the Parameters for J-Mail screen, you don’t need to select the path or an .HTM Template design in the HTML Template field since it is not used.
Next, ensure that an e-mail address is specified within the Customer Master File > Preferences screen. This address will be the one used when e-mailing the invoice to the customer. Proceed to print your Job Invoices as normal. The “Where Would You Like It Printed?” window will appear – choose the J-Mail button and use the J-MAIL Printer Style.
The next window that will appear is the “Sending E-Mail” dialog box. You can make changes to who you are Sending To, Copying To, or Blind Copying To. Click Send (or Send All) to send the Invoice(s) as an e-mail.
Version 11 Administration – J-Mail - 27 -
J2 Job Cost Manual T&M Invoices
Job Cost T&M Invoices
There is only one standard Job Cost Manual T&M Invoice design GJJMI11G that can be e-mailed using any of the mail clients. It works by attaching the Invoice to the e-mail as a PDF.
First, ensure that GJJMI11G is setup as the design in Job Costing > Job Billing > Manual T&M Billing > Manual T&M Profile. In the Parameters for J-Mail screen, you don’t need to select the path or an .HTM Template design in the HTML Template field since it is not used.
Next, ensure that an e-mail address is specified within the Customer Master File > Preferences screen. This address will be the one used when e-mailing the invoice to the customer. Proceed to print your Manual T&M Invoices as normal. The “Where Would You Like It Printed?” window will appear – choose the J-Mail button and use the J-MAIL Printer Style.
The next window that will appear is the “Sending E-Mail” dialog box. You can make changes to who you are Sending To, Copying To, or Blind Copying To. Click Send (or Send All) to send the Invoice(s) as an e-mail
JS Job Scheduling
Job Cost Scheduling
To e-mail a Job Schedule, you only need to indicate the mail client. Any of the mail clients will work. The HTML Template field is not used.
Choose the Print button in the Schedule View screen (Job Costing > Job Scheduling menu) to launch the “Where Would You Like It Printed?” window – choose the J-Mail button and use the J-MAIL Printer Style. This in turn launches the “Sending E-Mail” dialog box. You can make changes to who you are Sending To, Copying To, or Blind Copying To. Click Send to send the screen as an e-mail
Version 11 Administration – J-Mail - 28 -
PA Parts Invoices
Parts Invoices
There is only one method used for e-mailing Parts Invoices: one that creates a PDF of the Invoice and attaches it to the e-mail.
To use the PDF attachment method, you need to be using the standard GJR03AA Parts Invoice design (in Accounts Receivable > Files > Select A/R Form Designs.) In the Parameters for J-Mail screen, you don’t need to select the path or an .HTM Template design in the HTML Template field since it is not used.
Next, ensure that an e-mail address is specified within the Customer Master File > Preferences screen. This address will be the one used when e-mailing the invoice to the customer. Proceed to print your Parts Invoices as normal. The “Where Would You Like It Printed?” window will appear – choose the J-Mail button and use the J-MAIL Printer Style.
The next window that will appear is the “Sending E-Mail” dialog box. You can make changes to who you are Sending To, Copying To, or Blind Copying To. Click Send (or Send All) to send the Invoice(s) as an e-mail.
Version 11 Administration – J-Mail - 29 -

PO Purchase Orders
Purchase Orders
Both Construction and Club Inventory Purchase Orders can be e-mailed using any of the mail clients. However, they differ in the methods that they use. The standard Construction P.O. designs attach the P.O. to the e-mail as a PDF. The standard Club Inventory P.O. design creates an e-mail with the P.O. making up the body of the e-mail. This difference has an effect on the use of the HTML Template field.
Construction P.O.s
For Construction P.O.s, first select one the standard designs that support e-mailing (Purchase Order > Files > P.O. System Profile). In the Parameters for J-Mail screen, you don’t need to select the path or an .HTM Template design in the HTML Template field since it is not used.
To send e-mails, a valid e-mail address must be present in the Supplier Master file main screen. Using an invalid e-mail address will result in error messages being reported when sending. Proceed to print your Purchase Orders as normal (from within Setup/Edit Purchase Orders or Print Purchase Orders.) The “Where Would You Like It Printed?” window will appear – choose the J-Mail button and use the J-MAIL Printer Style.
The next window that will appear is the “Sending E-Mail” dialog box. You can make changes to who you are Sending To, Copying To, or Blind Copying To. Click Send (or Send All) to send the P.O.(s) as an e-mail attachment.
Club Inventory P.O.s
For Club Inventory P.O.s, you need to select any of the standard P.O. designs (Club Inventory > Purchasing > Files > P.O. System Profile.) In the Parameters for J-Mail screen, the HTML Template field needs to be filled with the path and .HTM Template name. The standard Club Inventory P.O. template designs are GJYM20A.HTM and GJYM20UK.HTM.
To send e-mails, a valid e-mail address must be present in the Supplier Master file main screen. Using an invalid e-mail address will result in error messages being reported when sending. Proceed to print your Purchase Orders as normal (from within Setup/Edit Purchase Orders or Print Purchase Orders.) The “Where Would You Like It Printed?” window will appear – choose the J-Mail button and use the J-MAIL Printer Style.
Version 11 Administration – J-Mail - 30 -
The next window that will appear is the “Sending E-Mail” dialog box. You can make changes to who you are Sending To, Copying To, or Blind Copying To. Click Send (or Send All) to send the P.O.(s) as an e-mail attachment.
Version 11 Administration – J-Mail - 31 -

PL Personalized E-mail Letters
Personalized E-mail Letters (Bulk e-mail)
Personalized E-mail Letters is a Form Type that can be used in the Club Management Report Generator to perform a type of bulk e-mailing mail merge. It uses the results of a Report Generator report as the data source that is merged into an HTML template, which in turn is the basis for a mass e-mail to Club Members. You will need to setup the Personalized E-mail Letters Form Type in the Parameters for J-Mail, create a Bulk J-Mail Type Printer Style, create a report in the Club Report Generator, and create an HTML and Text version template.
Parameters for J-Mail:
You must use either of the Outlook mail clients with Personalized E-mail Letters.
Version 11 Administration – J-Mail - 32 -

Printer Style
Next, you will need to create a Printer Style for your Personalized E-mail Letters. Proceed to System Administration > System Setup > Printer Styles and add a new Printer Style. In this example we’ve called it “JMAILP”, but you can call it anything.
Device Type – Choose the radio button for the ‘BulkJM’ type.
Ignore the Location ID and Suppress Form Feed fields. Use the Restrict To/From fields if you wish to “hide” this printer style from certain terminals. Then press “OK” to finish.
Club Report Generator
Now you can proceed to the Club Report Generator (Club Management > Reports > Report Gen: Design) to create a report that will be the data source for your mass e-mail.
In this example we have created a report that will dump the Credit Book balances in each of the three Credit Books for all Members who have a positive balance in each of their Credit Books.
Version 11 Administration – J-Mail - 33 -

Be careful when designing your report – if a Member appears on more than one line (i.e. they meet more than one criterion) they will receive multiple e-mails.
Create An HTML & Text Template
You have to be familiar with HTML web page layout language to create the HTML template, or have a third-party program like Microsoft FrontPage to create the template.
Version 11 Administration – J-Mail - 34 -
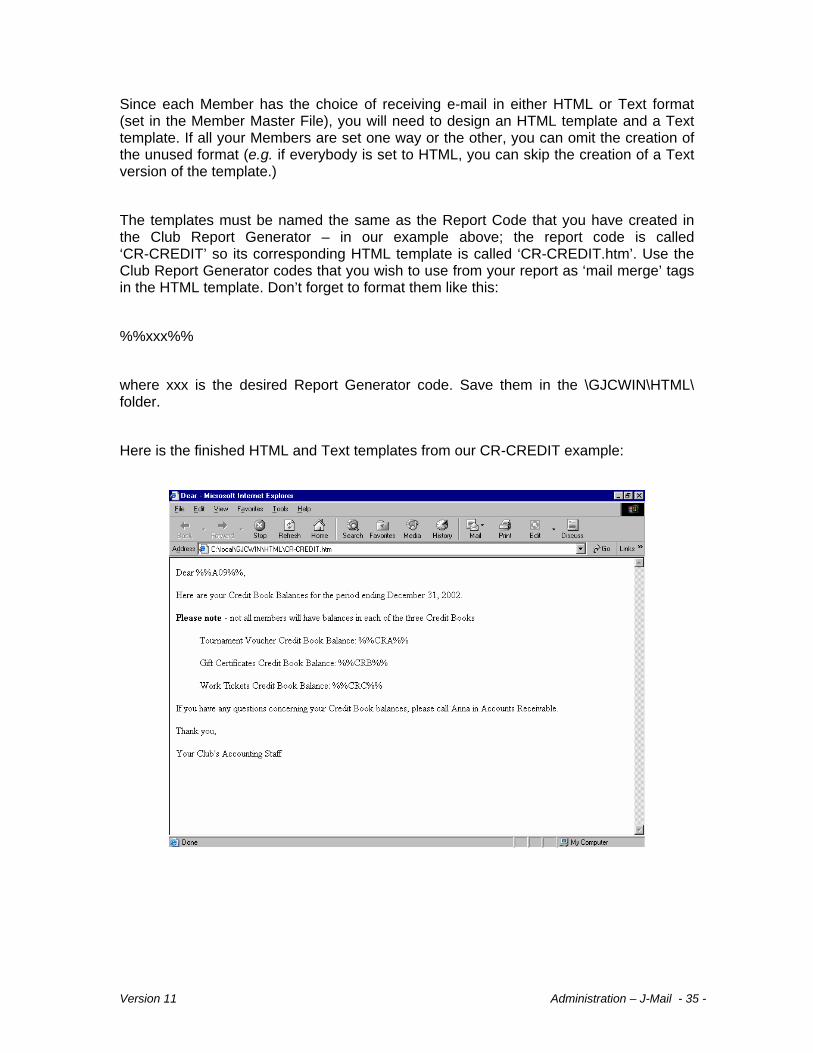
Since each Member has the choice of receiving e-mail in either HTML or Text format (set in the Member Master File), you will need to design an HTML template and a Text template. If all your Members are set one way or the other, you can omit the creation of the unused format (e.g. if everybody is set to HTML, you can skip the creation of a Text version of the template.)
The templates must be named the same as the Report Code that you have created in the Club Report Generator – in our example above; the report code is called ‘CR-CREDIT’ so its corresponding HTML template is called ‘CR-CREDIT.htm’. Use the Club Report Generator codes that you wish to use from your report as ‘mail merge’ tags in the HTML template. Don’t forget to format them like this:
%%xxx%%
where xxx is the desired Report Generator code. Save them in the \GJCWIN\HTML\ folder.
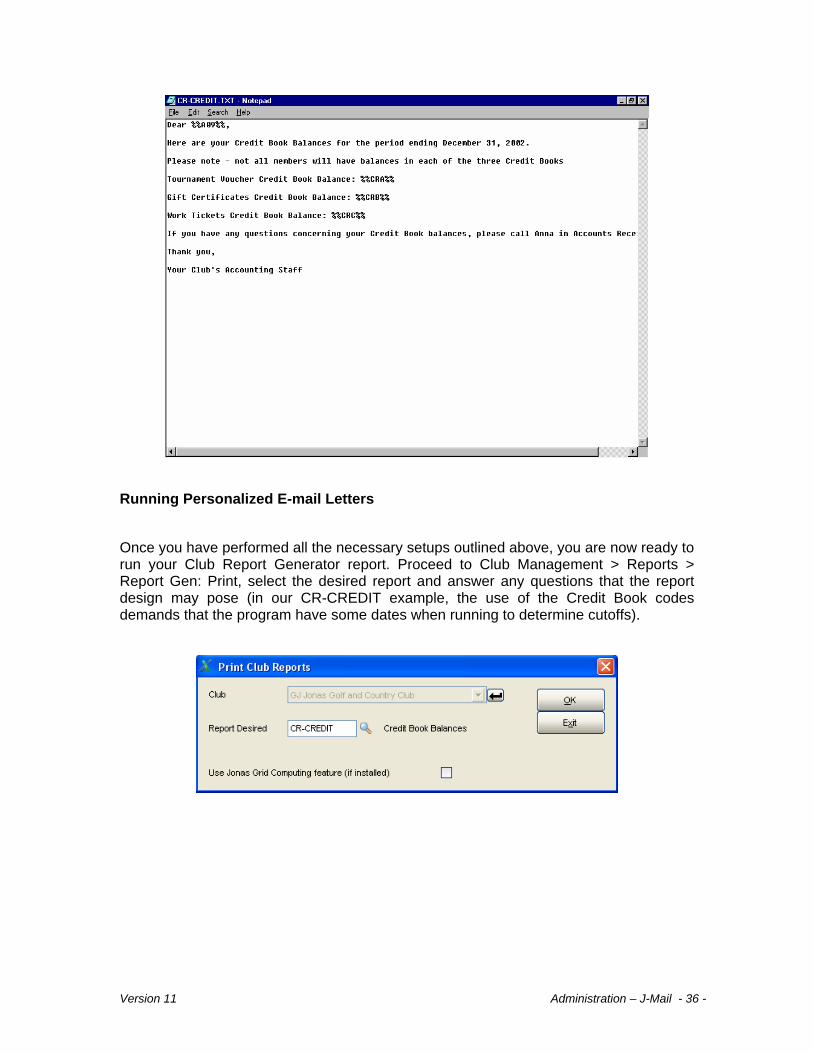
Here is the finished HTML and Text templates from our CR-CREDIT example:
Version 11 Administration – J-Mail - 35 -
Running Personalized E-mail Letters
Once you have performed all the necessary setups outlined above, you are now ready to run your Club Report Generator report. Proceed to Club Management > Reports > Report Gen: Print, select the desired report and answer any questions that the report design may pose (in our CR-CREDIT example, the use of the Credit Book codes demands that the program have some dates when running to determine cutoffs).
Version 11 Administration – J-Mail - 36 -

Once you click OK, the “Where Would You Like It Printed ?” screen appears – choose your Bulk J-Mail Printer Style that you setup above.
The Sending E-Mail screen will appear. You can choose to Send All, Skip, Cancel All, or Preview.
Version 11 Administration – J-Mail - 37 -

Choosing Preview will show you what the merged letter will look like when sent:
Version 11 Administration – J-Mail - 38 -

S1 Service Contract Invoices
Service Contract Invoices
Although there are several standard Service Contract Invoice designs that support e-mailing using any of the mail clients, there is only one method used: one that creates a PDF of the Service Contract Invoice and attaches it to the e-mail.
To use the PDF attachment method, you need to be using any of the standard Service Contract Invoice designs (in Service Billing > Service Contract > Service Contract Profile.) In the Parameters for J-Mail screen, you don’t need to select the path or an .HTM Template design in the HTML Template field since it is not used.
Next, ensure that an e-mail address is specified within the Customer Master File > Preferences screen. This address will be the one used when e-mailing the invoice to the customer. Proceed to print your Service Contract Invoices as normal. The “Where Would You Like It Printed?” window will appear – choose the J-Mail button and use the J-MAIL Printer Style.
The next window that will appear is the “Sending E-Mail” dialog box. You can make changes to who you are Sending To, Copying To, or Blind Copying To. Click Send (or Send All) to send the Invoice(s) as an e-mail.
Version 11 Administration – J-Mail - 39 -

S2 Subcontracts
Job Subcontracts
There is only one method used for e-mailing Subcontracts: one that creates a PDF of the Subcontract and attaches it to the e-mail.
To use the PDF attachment method, you need to be using the standard GJS30AA Subcontract design (in Subcontract Control > Subcontract Profile.) In the Parameters for J-Mail screen, you don’t need to select the path or an .HTM Template design in the HTML Template field since it is not used.
Next, ensure that an e-mail address is specified within the Supplier Master File on the main screen. This address will be the one used when e-mailing the Subcontract details to the Supplier. Proceed to print your Subcontracts as normal. The “Where Would You Like It Printed?” window will appear – choose the J-Mail button and use the J-MAIL Printer Style.
The next window that will appear is the “Sending E-Mail” dialog box. You can make changes to who you are Sending To, Copying To, or Blind Copying To. Click Send (or Send All) to send the Invoice(s) as an e-mail.
Version 11 Administration – J-Mail - 40 -

W1 Work Order Invoices
Work Order Invoices
Although there are several standard Work Order Invoice designs that support e-mailing using any of the mail clients, there is only one method used: one that creates a PDF of the Invoice and attaches it to the e-mail.
To use the PDF attachment method, you need to be using any of the standard Work Order Invoice designs that support e-mailing (in Service Billing > Files > Service System Profile.) In the Parameters for J-Mail screen, you don’t need to select the path or an .HTM Template design in the HTML Template field since it is not used.
Next, ensure that an e-mail address is specified within the Customer Master File > Preferences screen. This address will be the one used when e-mailing the invoice to the customer. Proceed to print Invoices and Register as normal. Go to Service Billing > Billings > Print Invoices and Register and proceed to make your usual choices. The “Where Would You Like It Printed?” window will appear – choose the J-Mail button and use the J-MAIL Printer Style.
The next window that will appear is the “Sending E-Mail” dialog box. You can make changes to who you are Sending To, Copying To, or Blind Copying To. Click Send (or Send All) to send the Invoice(s) as an e-mail.
Version 11 Administration – J-Mail - 41 -
W2 Work Order Tickets
Work Order Tickets
Although there are several standard Work Order Ticket designs that support e-mailing using any of the mail clients, there is only one method used: one that creates a PDF of the Ticket and attaches it to the e-mail.
To use the PDF attachment method, you need to be using the standard Work Order Ticket designs GJB14AAA or GJB14AAN (in Service Billing > Files > Service System Profile.) In the Parameters for J-Mail screen, you don’t need to select the path or an .HTM Template design in the HTML Template field since it is not used.
Next, ensure that an e-mail address is specified within the Customer Master File > Preferences screen. This address will be the one used when e-mailing the ticket to the customer.
Once you have created a Service Call for the customer, the “Where Would You Like It Printed?” window will appear (provided, of course you have specified “ASK”, or left blank, in the W/O Ticket Printer field of the Service System Profile). Choose the J-Mail button and use the J-MAIL Printer Style.
The next window that will appear is the “Sending E-Mail” dialog box. You can make changes to who you are Sending To, Copying To, or Blind Copying To. Click Send (or Send All) to send the ticket(s) as an e-mail.
Version 11 Administration – J-Mail - 42 -
W3 Work Order Quotations
Work Order Quotations
There are two standard Work Order Quotation designs that support e-mailing using any of the mail clients, and there are two methods used: one that uses an HTML Template as the body of an e-mail; and another that creates a PDF of the audit and attaches it to the e-mail.
To use the HTML Template method, you need to select the standard GJB12P Work Order Quotation design (in Service Billing > Files > Service System Profile.) In the Parameters for J-Mail screen, you need to select the path to the GJB12P.HTM Template design in the HTML Template field.
To use the PDF attachment method, you need to be using the standard GJB12AA Work Order Quotation design (in Service Billing > Files > Service System Profile.) In the Parameters for J-Mail screen, you don’t need to select the path or an .HTM Template design in the HTML Template field since it is not used.
To send e-mails, both methods depend upon a valid e-mail address being present in the Customer Master File > Preferences screen. Using an invalid e-mail address will result in error messages being reported when sending.
Quotations can be created and printed from two areas within the Service Billing System: within the Service Calls – Work Orders screen (using the PrepQuote button) or from the Prepare Quotations program (Service Billing > W/O’s & Dispatch menu.) It doesn’t matter which one you choose, they both run the same program. Prepare the quotation, and when finished, click the Print Quote button. The “Where Would You Like It Printed?” window will appear – choose the J-Mail button and use the J-MAIL Printer Style.
The next window that will appear is the “Sending E-Mail” dialog box. You can make changes to who you are Sending To, Copying To, or Blind Copying To. Click Send (or Send All) to send the quotation(s) out.
Version 11 Administration – J-Mail - 43 -

WP Dispatch Paging
Dispatch Paging
Dispatch Paging works on the basis of sending an e-mail to the Work Order Technician assigned to the Work Order. It can work with any of the mail clients. You must be using a paging service that supports e-mailed text messages. There is no HTML template required for Dispatch Paging since a page is only displayed as text and there is no need for an HTML layout.
However, you still need to tell the system that you are using J-Mail for Paging and to define what information you wish to send to your technician in the field. The former is done in the Pager Configuration (found in System Administration > System Setup > Pager Configuration).
Choose “J-Mail” as the Interface Type and indicate the maximum number of characters that your pager company can handle for one entire page. Also indicate the number of characters that can appear on a single screen of a page – the pager company will then split pages that are longer than this page limit into separate screens.
To define what information you wish to send the technician in the field, you need to setup the Pager Message View (found in System Administration > System Setup > Pager Message View).
Version 11 Administration – J-Mail - 44 -

This program allows you to define which information (and in what order) you wish to send the tech when they are paged. It will limit you to the maximum number of characters you specified in the pager Configuration screen. To clear your choices and start again, use the “99. Clear Choices” selection.
Each technician (and their pager) is linked to an e-mail address in the Setup/Edit Tech ID’s program (Service Billing > Files > Setup/Edit Tech ID’s.)
To page a technician, proceed to the Dispatch Board and select the desired ticket (W/O) on the board.
Version 11 Administration – J-Mail - 45 -
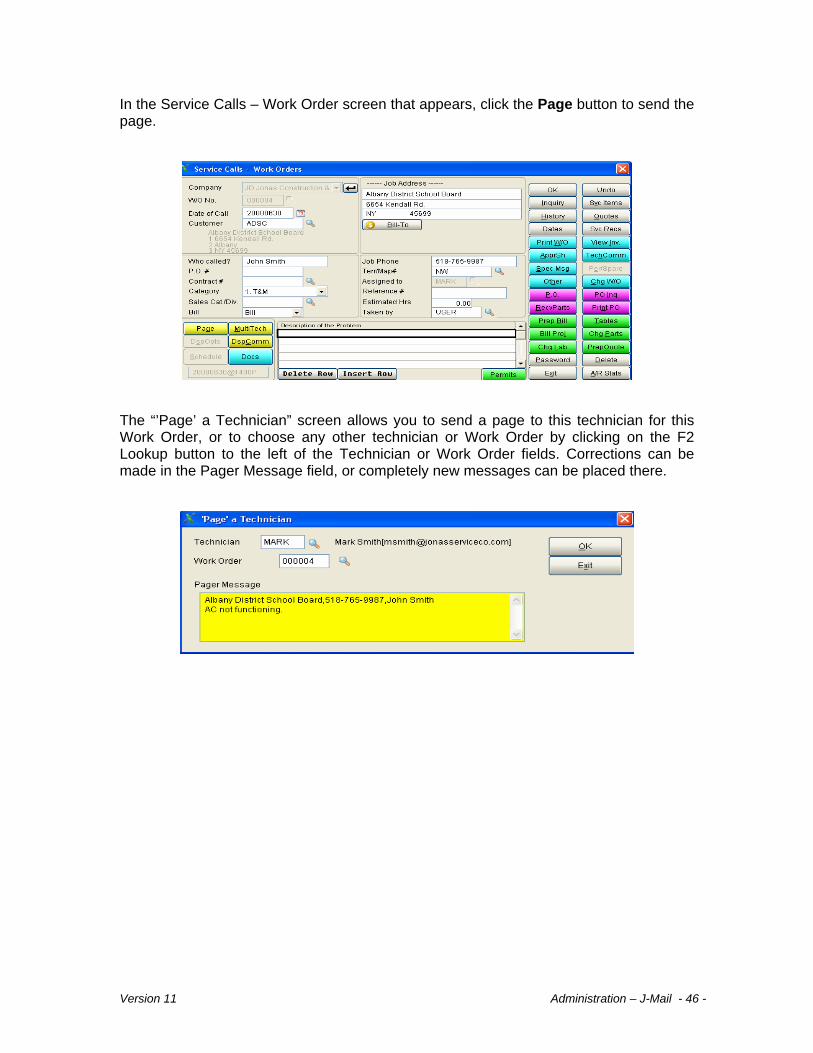
In the Service Calls – Work Order screen that appears, click the Page button to send the page.
The “’Page’ a Technician” screen allows you to send a page to this technician for this Work Order, or to choose any other technician or Work Order by clicking on the F2 Lookup button to the left of the Technician or Work Order fields. Corrections can be made in the Pager Message field, or completely new messages can be placed there.
Version 11 Administration – J-Mail - 46 -

Z1 Canadian Payroll Earning Statements
CDN Earning Statements
There is only one method used for e-mailing Canadian Payroll Earning Statements: one that creates a PDF of the earnings statement and attaches it to the e-mail.
To use the PDF attachment method, you need to be using the standard GJW23AA Canadian Payroll Earning Statement design (in Canadian Payroll > Payroll Config > Select Cheque Design.) In the Parameters for J-Mail screen, you don’t need to select the path or an .HTM Template design in the HTML Template field since it is not used.
Next, ensure that an e-mail address is specified within the Employee Master File > Misc Info screen. This address will be the one used when e-mailing the earning statement to the employee. Proceed to print your Earning Statements as normal. The “Where Would You Like It Printed?” window will appear – choose the J-Mail button and use the J-MAIL Printer Style.
The next window that will appear is the “Sending E-Mail” dialog box. You can make changes to who you are Sending To, Copying To, or Blind Copying To. Click Send (or Send All) to send the statements as an e-mail.
Version 11 Administration – J-Mail - 47 -

Z2 US Payroll Earning Statements
US Earning Statements
There is only one method used for e-mailing U.S. Payroll Earning Statements: one that creates a PDF of the earnings statement and attaches it to the e-mail.
To use the PDF attachment method, you need to be using the standard GJV23AA U.S. Payroll Earning Statement design (in U.S. Payroll > Payroll Config > Select Cheque Design.) In the Parameters for J-Mail screen, you don’t need to select the path or an .HTM Template design in the HTML Template field since it is not used.
Next, ensure that an e-mail address is specified within the Employee Master File > Misc Info screen. This address will be the one used when e-mailing the earning statement to the employee. Proceed to print your Earning Statements as normal. The “Where Would You Like It Printed?” window will appear – choose the J-Mail button and use the J-MAIL Printer Style.
The next window that will appear is the “Sending E-Mail” dialog box. You can make changes to who you are Sending To, Copying To, or Blind Copying To. Click Send (or Send All) to send the statements as an e-mail.
Version 11 Administration – J-Mail - 48 -

Version 11 Administration – J-Mail - 49 -
The author of this Application Brief is Jeff Coatsworth.

ADMINISTRATION J-MAIL
TRAINING GUIDE
Participant Date Initials
Administration – J-Mail - 1 -
Introduction ...........................................................................................................1
Mail Client Choice......................................................................................1 Outlook and Outlook COM Mail Clients.....................................................1 J-Mail Mail Client .......................................................................................1
Jonas Setups ........................................................................................................3
J-Mail Printer Style ....................................................................................3 General Parameters for J-Mail ..................................................................4 Installing J-Mail Client................................................................................9 PVX EMail Client .....................................................................................14
Form Types – Their Setup & Use........................................................................18
E-Mailing Reports ....................................................................................18 A/R Customer Statements.......................................................................20 Banquet & Catering CEO’s......................................................................21 Banquet & Catering Invoices ...................................................................22 Club Statements ......................................................................................23 AP Direct Deposit ....................................................................................25 Hotel Confirmation Letters.......................................................................26 Job Invoices.............................................................................................27 Job Cost T&M Invoices............................................................................28 Job Cost Scheduling................................................................................28 Parts Invoices ..........................................................................................29 Purchase Orders .....................................................................................30 Personalized E-mail Letters (Bulk e-mail) ...............................................32 Service Contract Invoices........................................................................39 Job Subcontracts.....................................................................................40 Work Order Invoices................................................................................41 Work Order Tickets..................................................................................42 Work Order Quotations............................................................................43 Dispatch Paging ......................................................................................44 CDN Earning Statements ........................................................................47 US Earning Statements ...........................................................................48

J-Mail – Notes:
Version 11 Administration – J-Mail - 2 -