“atlas.ti 101: a primer”
TRANSCRIPT

Page 1
“ATLAS.ti 101” November 30, 2011 Dr. Stuart Shuman – Qualitative Data Analysis Program ‐ University of Massachusetts Amherst
“ATLAS.ti 101: A Primer”
Dr. Stuart W. Shulman Director, QDAP‐UMass http://www.umass.edu/qdap
[email protected] Version: November 30, 2011
1. Some Key Terms, Advice, and Warnings
Hermeneutic Unit (HU) – A project file ending with the extension .hpr6.
o Codes, Quotations, Memos, Families, and everything else integral to your project, except
your Primary Documents (PDs), are all in the HU.
Copy Bundle – A compressed archive, similar to a .zip archive, which contains your HU as well as
your Primary Documents (PDs), ending with the extension .acb.
o A copy bundle is a single file used to move your entire project from computer to
computer.
WARNING #1: Never move an HU; always move Copy Bundles
LOK File – When you are viewing a project directory with an HU in that directory open, you will
see an .hpr6.lok file (see above). This disappears when the HU is closed. According to ATLAS:
“This file is the ‘gatekeeper’ that controls access to the data source. Every user on every ATLAS.ti
workstation accessing a data source is registered in this LOK file. It also registers the name of the
user, the name of the computer, and the time access was granted. None of this information is
stored forever; all user‐related information is removed when leaving the ATLAS.ti session.”

Page 2
“ATLAS.ti 101” November 30, 2011 Dr. Stuart Shuman – Qualitative Data Analysis Program ‐ University of Massachusetts Amherst
Primary Documents (PDs) – The data to be coded, usually in .txt, .rtf, .doc, or .pdf format, though
other formats can be handled by ATLAS.
o Careful preparation and naming of PDs is critical.
WARNING #2: Never alter or move a PD after assigning it to a HU. You can break
the document assignment links and make it hard to recover project integrity.
Families – Document level attributes. Documents can belong to 0, 1, 2, 3, j families.
o Families help you to create filters during your coding or analysis.
Codes – Sub‐document level attributes. Spans of text (“Quotations”), images, or other digital
objects can be tagged with 0, 1, 2, 3, j of the available codes.
o Codes are the intellectual, theoretical and conceptual core of your project.
Quotations – Passages of text coded by one or more project analysts as belonging to one or
more of the code categories.
o ATLAS is essentially an electronic filing cabinet; quotations are the text you are filing.
Memos – Analyst notes inside an HU, attached to a particular code, a quotation, or the HU itself.
o Memos can focus on the coding process, theory‐building and other important ‘ah‐hah’ or
decision moments in the life of a project.
ADVICE: Good memos are the key to reporting accurately and transparently on
your methods, assumptions, choices and strategies. Write lots of memos! See
Section 3 of this primer for more on the various types of memos.
2. Getting Started
Finalize your raw data and review it in hard copy format
o Warning #2 means that you should carefully review and finalize your PDs before assigning
them to your HU.
You do not want to be fixing errors in your data during the coding process.
o It is good qualitative practice to spend time with the data away from computers using
pen & paper.
We often use hard copies with a 2‐inch right margin for note taking.
o When you commence coding in ATLAS.ti, or with any software package, you rarely want
to be looking at the data for the first time.
There is a lot to be said for learning the landscape of your data in a native format.
Create an ATLAS.ti project folder
o I usually stay away from the locations in the ATLAS “Textbank” folder defaults.
Instead create my own project folder.
o It may make sense to have a Master Folder for all ATLAS.ti projects.
Then create a series of project and data sub‐folders.

Page 3
“ATLAS.ti 101” November 30, 2011 Dr. Stuart Shuman – Qualitative Data Analysis Program ‐ University of Massachusetts Amherst
o Warning #3: Always pay attention to where you save HUs and unbundle .acb copy bundle
files. Insufficient attention to this detail can be disastrous.
o Place all your PDs in one or more project sub‐folders
These should be copies of your master copy original files (which should be stored
and also backed‐up elsewhere)
Create an HU with the project name in the project folder
o It helps to use standard naming conventions as the folder directories can be cluttered
with many parts and sub‐parts over the life of a project. For example, at QDAP, we use:
<Project Name>_<Project Sub‐part>_<Coder ID>_<date>
E.g., Mercury_PT1_QDAP36_112611
o {ATLAS adds the .hpr6 extension}
Add _complete to file names when a sub‐part is done
E.g., Mercury_PT1_QDAP36_112611_complete
o {you add the _complete to the filename}
Assign Your PDs
o Click on “Documents” >> “Assign” >> [select all PDs] >> “Open”
o Save your HU after assigning the docs and regularly throughout the work
Warning #4: It is easy to get lost in the data and forget. Hit “Ctrl S” regularly.
Create and Assign Document Families
o Click on “Documents” >> “Edit Families” >> “Open Family Manager”
Inside the “Family Manager”
Click on “Families” >> “New Families” >> [enter one name]
{repeat for each Family}
o A tip for making family assignments easier:
Try to incorporate family attributes in the naming of PDs, where possible
Ex., WM1.txt, WM2.txt, WM3.txt = White Male 1, 2 & 3

Page 4
“ATLAS.ti 101” November 30, 2011 Dr. Stuart Shuman – Qualitative Data Analysis Program ‐ University of Massachusetts Amherst
1.0 Science
1.1 Study
1.2 Finding
1.3 Generic
2.0 Law
2.1 Proposal
2.2 Statute
2.3 Enforcement
Create Your Codes
o Click on “Codes” >> “Create Free Codes”
[enter all codes at once separated by |]
{‘pipe’ is the key above Enter with the Shift engaged}
Code names matter – Be sure to choose them carefully and rename them as needed. You may
also merge and split codes during a project.
Alphabetical listing is not always helpful; numeric prefixes can help you arrange your code list in
a hierarchical manner.
Key Function: The Code Manager
Use the Code Manager to create, edit, merge, spilt and
annotate your code categories. The Code Manager can be
positioned, adjusted and resized to suit your particular
project needs and coding style. Use the drop down menus
in the top half of the Code Manager to access a rich
selection of feature sets:
Single click any code to highlight it, then click once in the
bottom half of the Code Manager and begin typing the
memo that is linked to that code. This can be a verbatim
codebook definition, or it can be an original definition that
evolves over the life of the project.
Special Note: This is just one of several places you might
store running observations about the evolution of codes.

Page 5
“ATLAS.ti 101” November 30, 2011 Dr. Stuart Shuman – Qualitative Data Analysis Program ‐ University of Massachusetts Amherst
3. Experiment with the Coding Tools – Time to Blaze Away!
The best way to learn software is to just start using it. Experiment with the different options for
coding your data. Among the things you will want to try:
o Click‐Drag‐Release – to highlight a non‐standard span of text to be coded.
o Double double‐clicks – to highlight a sentence.
o Triple double‐clicks – to highlight a paragraph.
o Coding In‐Vivo – creates a quotation from the selected text AND uses the selected text
(trimmed to 30 characters) as the code name.
o Open Coding – assigns new codes with already existing or newly created quotations. You
can create one or more codes in a single step. o Code‐by‐List – offers a list of all current codes from which one or more code can be
selected and associated with the current data selection.
Reviewing Coding in Process – A “Constant Comparative Method”
o On Screen Review – Double‐click the yellow icon in the “Code Manager” next to code
category you wish to review. Click on the first item in the list that pops up and use your
arrow keys to browse all the quotations in that category so far.
o Hard Copy Review – Single‐click the yellow icon in the “Code Manager” next to code
category you wish to review. Select “Output” then “Quotations for Selected Code(s).
Select the output function from 1 of the 4 radio buttons.
Page 6
“ATLAS.ti 101” November 30, 2011 Dr. Stuart Shuman – Qualitative Data Analysis Program ‐ University of Massachusetts Amherst
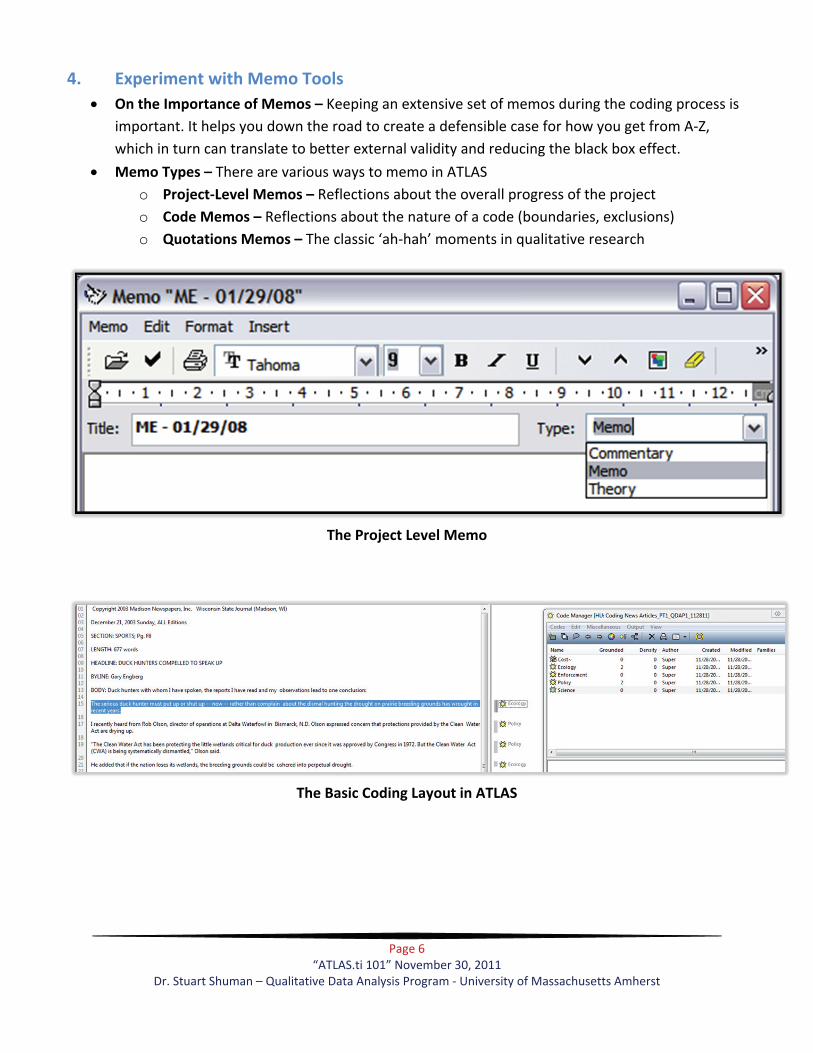
4. Experiment with Memo Tools
On the Importance of Memos – Keeping an extensive set of memos during the coding process is
important. It helps you down the road to create a defensible case for how you get from A‐Z,
which in turn can translate to better external validity and reducing the black box effect.
Memo Types – There are various ways to memo in ATLAS
o Project‐Level Memos – Reflections about the overall progress of the project
o Code Memos – Reflections about the nature of a code (boundaries, exclusions)
o Quotations Memos – The classic ‘ah‐hah’ moments in qualitative research
The Project Level Memo
The Basic Coding Layout in ATLAS

Page 7
“ATLAS.ti 101” November 30, 2011 Dr. Stuart Shuman – Qualitative Data Analysis Program ‐ University of Massachusetts Amherst
5. Moving and Sharing Your Work – The Copy Bundle (.acb)
Remember WARNING #1: Never move an HU; always move Copy Bundles (.acb files)
o WARNING #5: Never move the only copy of your work
Tip: Take a look at synchronization software for backing up and moving work.
I am a fan of LapLink products like “PCSync”
Email attachments as backups are also an option
Use cloud services to back up projects
Creating a Copy Bundle
Start by ensuring you have saved the HU using a naming strategy suitable for your project.
Click on “Tools” >> “Copy Bundle” >> “Create Bundle”
o The Copy Bundle Document Selection window opens
The salient element is the report indicating “all documents will be bundled” and hence it is
alright to click the Create Bundle button.
ATLAS will prompt you to select a location for the bundle.
o Remember Warning #3: Always pay attention to where you save HUs and unbundle .acb
copy bundle files. Insufficient attention to this detail can be disastrous.

Page 8
“ATLAS.ti 101” November 30, 2011 Dr. Stuart Shuman – Qualitative Data Analysis Program ‐ University of Massachusetts Amherst
Keep the Save as type set to Copy Bundle and hit the Save button. Make sure the folder directory
confirms this is the location is where you want to store your copy bundle. You may want a folder
that is just for .acb files.
It is the .acb file that you want to attach to emails, or save (and back‐up) onto a portable media,
like a thumb drive, for transport or sharing.
Opening a Copy Bundle
Click on “Tools” >> “Copy Bundle” >> “Install Bundle” and browse to your .acb file and then click
on the Open button. Special Note: You must be inside ATLAS.ti to open copy bundles.