axon body 3 - view xl standalone guide
TRANSCRIPT
Axon Body 3 Camera and View XL Standalone Mode Guide
Document Rev: D Release Date: November 2020
Axon Body 3 Camera and Axon View XL Standalone Mode Guide
Axon Enterprise, Inc. Page 2 of 24
Microsoft, and Windows are trademarks of Microsoft Corporation registered in the US and other countries.
, AXON, Axon, Axon Body 3, Axon Evidence, Axon Fleet, and Axon View XL are trademarks of Axon Enterprise, Inc., some of which are registered in the US and other countries. For more information, visit
www.axon.com/legal. All rights reserved. ©2020 Axon Enterprise, Inc.
Axon Body 3 Camera and Axon View XL Standalone Mode Guide
Axon Enterprise, Inc. Page 3 of 24
Table of Contents
Introduction................................................................................................................................................. 4
System Requirements ............................................................................................................................... 4
Downloading and installing View XL ........................................................................................................ 5
Signing In and Connecting an Axon Body 3 Camera ............................................................................... 8
View XL Tab Overview .............................................................................................................................. 10
Control Tab ................................................................................................................................................ 11
Review Tab ................................................................................................................................................. 12
View a Recording and Add Metadata .................................................................................................... 12
Upload Tab ................................................................................................................................................. 14
Prioritizing Video Uploads ....................................................................................................................... 15
De-prioritizing Video Uploads ................................................................................................................ 15
Disconnecting the Camera ...................................................................................................................... 16
Sign Out of Axon View XL ......................................................................................................................... 16
Settings Tab ............................................................................................................................................... 16
Changing Axon Body 3 Camera Settings with View XL ......................................................................... 17
Charging an Axon Body 3 Camera while Powered Off ......................................................................... 18
Assigning or Reassigning Axon Body 3 Cameras with View XL ............................................................ 19
Registering Axon Body 3 Cameras with View XL ................................................................................... 20
Updating Axon Body 3 Operating System with View XL ....................................................................... 21
View XL Updates ....................................................................................................................................... 24
Axon Body 3 Camera and Axon View XL Standalone Mode Guide
Axon Enterprise, Inc. Page 4 of 24
Introduction
The Axon Body 3 camera can be connected to a laptop or computer with Axon View XL operating in Standalone Mode to allow priority upload of videos from the camera to Axon Evidence. In Standalone Mode, Axon View XL lets users view recorded videos, add metadata to videos and upload camera videos to Axon Evidence.
Users with the appropriate permissions can also register, assign, and update the firmware on Axon Body 3 cameras.
Using Axon View XL in standalone mode is separate from using Axon View XL with Axon Fleet products.
The Axon Body 3 camera is connected to the laptop or computer with a USB A to USB C cable and uses the Axon View XL standalone mode. You can request a compatible cable from your Axon Representative.
System Requirements
The requirements for using Axon View XL in standalone mode are listed below.
Note: Using Axon View XL Standalone Mode does not require Axon Fleet. It can be used with Axon Fleet, but is different than pairing an Axon Body 3 camera with Axon View XL in an Axon Fleet installation.
Laptop/Computer:
• Windows Operating Systems: Windows 7 or Windows 10
Axon View XL is compatible with both 32-bit and 64-bit operating systems
• Available Disk Space: 25GB or greater
• RAM/Memory: Recommended 8GB or greater
• Available USB 2.0 or 3.0 Port
• Administrative rights and privileges for software installation (only when installing the View XL application)
Other:
• Internet access to the agency’s Axon Evidence account
• USB A to USB C cable (the cable can be requested directly from Axon)
Axon Body 3 Camera and Axon View XL Standalone Mode Guide
Axon Enterprise, Inc. Page 5 of 24
Downloading and installing View XL
Before installing Axon View XL you must download a copy of the Axon View XL installation file. If you already have a copy of the installation file, skip to step 4.
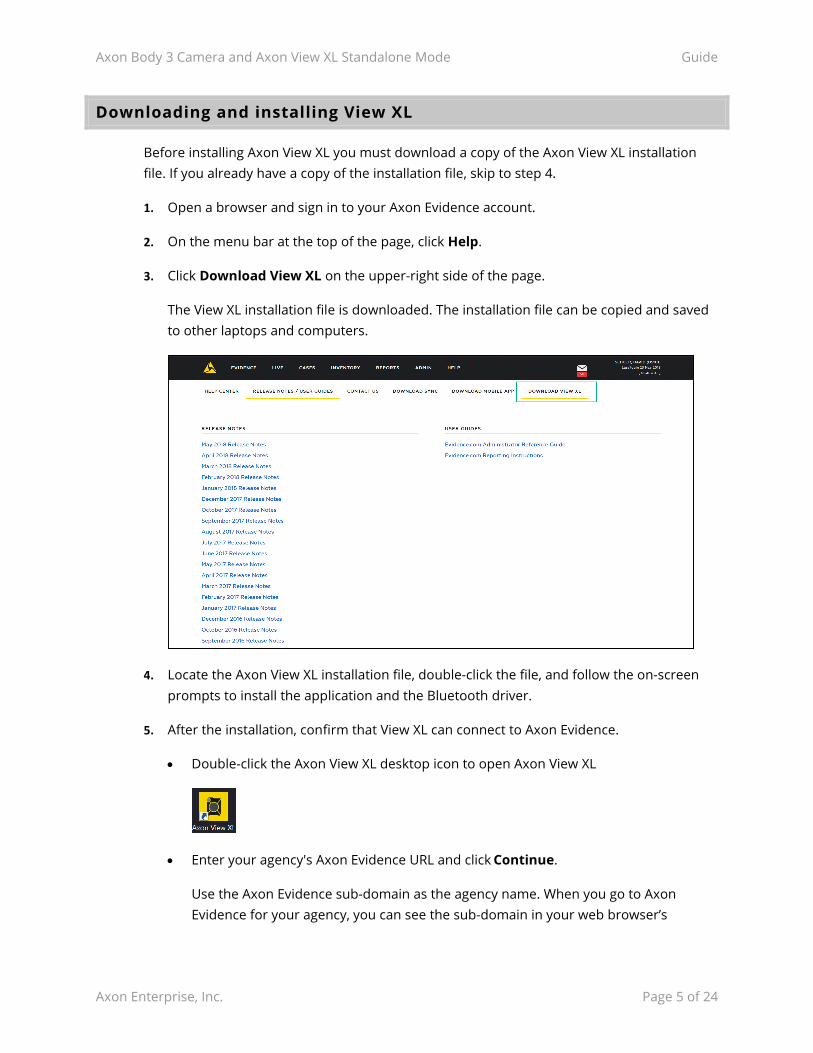
1. Open a browser and sign in to your Axon Evidence account.
2. On the menu bar at the top of the page, click Help.
3. Click Download View XL on the upper-right side of the page.
The View XL installation file is downloaded. The installation file can be copied and saved to other laptops and computers.
4. Locate the Axon View XL installation file, double-click the file, and follow the on-screen prompts to install the application and the Bluetooth driver.
5. After the installation, confirm that View XL can connect to Axon Evidence.
• Double-click the Axon View XL desktop icon to open Axon View XL
• Enter your agency's Axon Evidence URL and click Continue.
Use the Axon Evidence sub-domain as the agency name. When you go to Axon Evidence for your agency, you can see the sub-domain in your web browser’s
Axon Body 3 Camera and Axon View XL Standalone Mode Guide
Axon Enterprise, Inc. Page 6 of 24
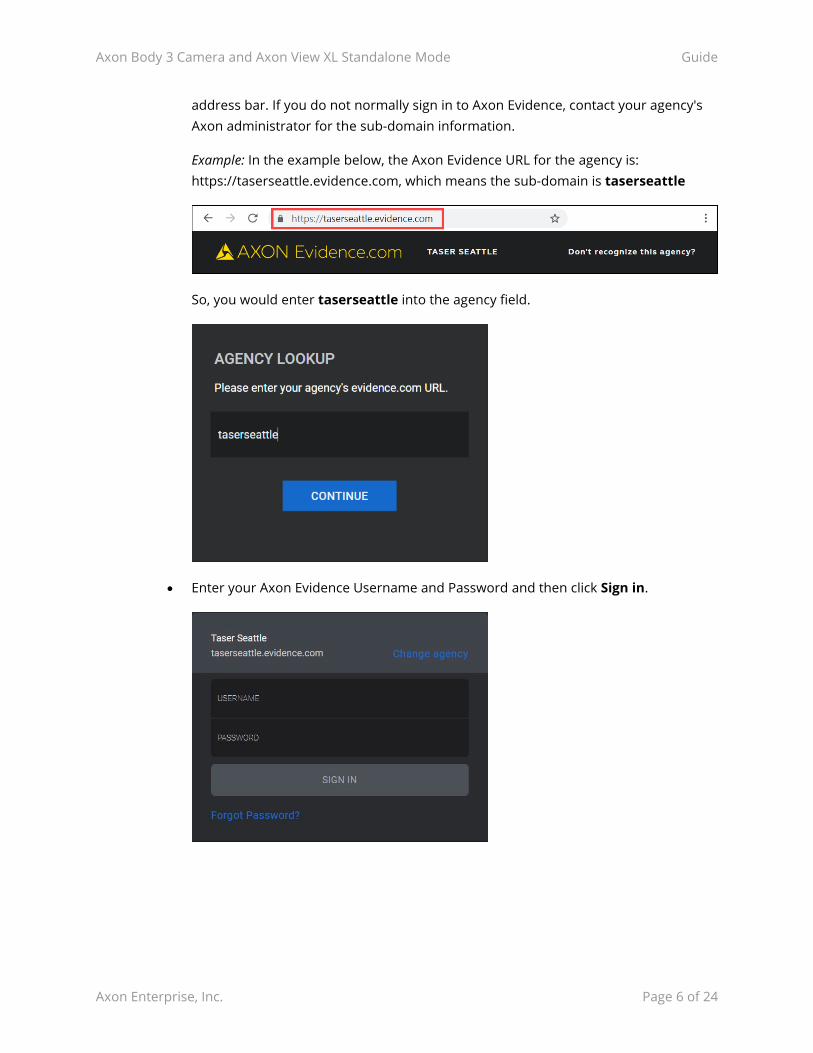
address bar. If you do not normally sign in to Axon Evidence, contact your agency's Axon administrator for the sub-domain information.
Example: In the example below, the Axon Evidence URL for the agency is: https://taserseattle.evidence.com, which means the sub-domain is taserseattle
So, you would enter taserseattle into the agency field.
• Enter your Axon Evidence Username and Password and then click Sign in.

Axon Body 3 Camera and Axon View XL Standalone Mode Guide
Axon Enterprise, Inc. Page 7 of 24
• Click Launch Standalone Mode.
• Click (the Settings icon) in the lower right of the screen. Under the Connectivity heading, there should be a green checkmark beside Evidence.com.
If you do not see a green checkmark, check to make sure you are connected to the Internet.
Axon Body 3 Camera and Axon View XL Standalone Mode Guide
Axon Enterprise, Inc. Page 8 of 24
Signing In and Connecting an Axon Body 3 Camera
Note: The Axon Body 3 camera must be powered on and have enough battery capacity to not automatically shut down.
1. Open Axon View XL.
If this is the first time you are signing in to Axon View XL, you will be asked to enter your agency's Evidence URL and click Continue.
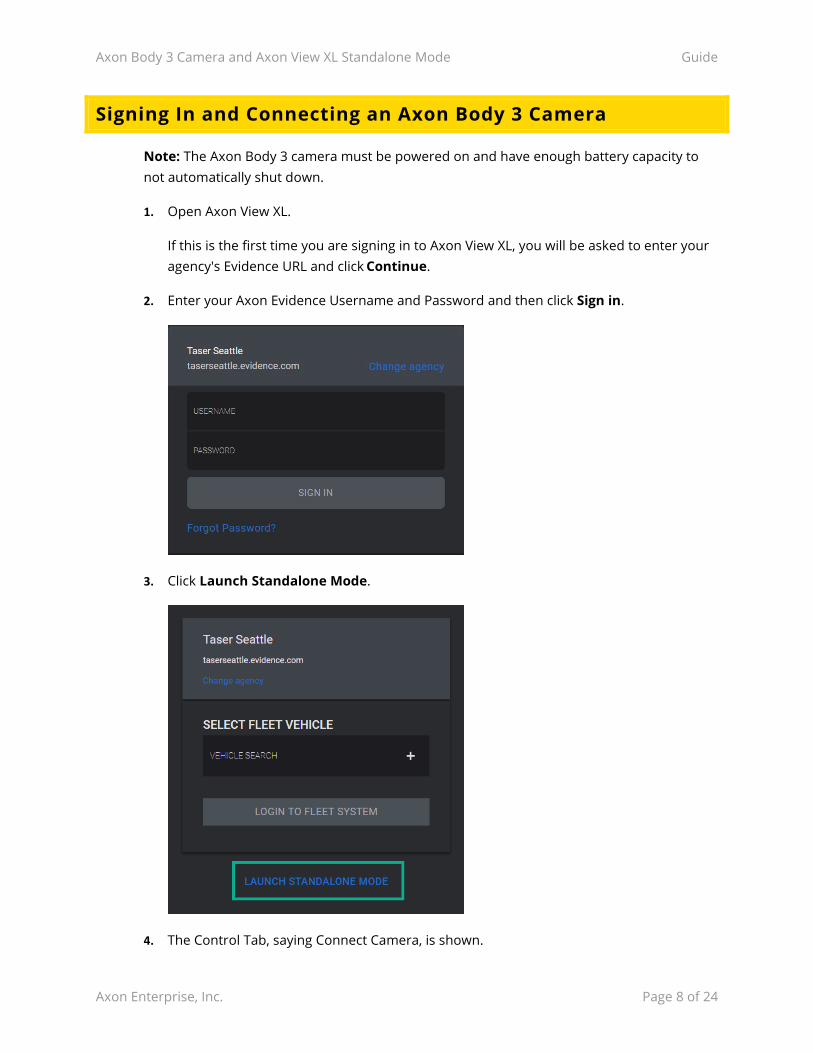
2. Enter your Axon Evidence Username and Password and then click Sign in.
3. Click Launch Standalone Mode.
4. The Control Tab, saying Connect Camera, is shown.
Axon Body 3 Camera and Axon View XL Standalone Mode Guide
Axon Enterprise, Inc. Page 9 of 24
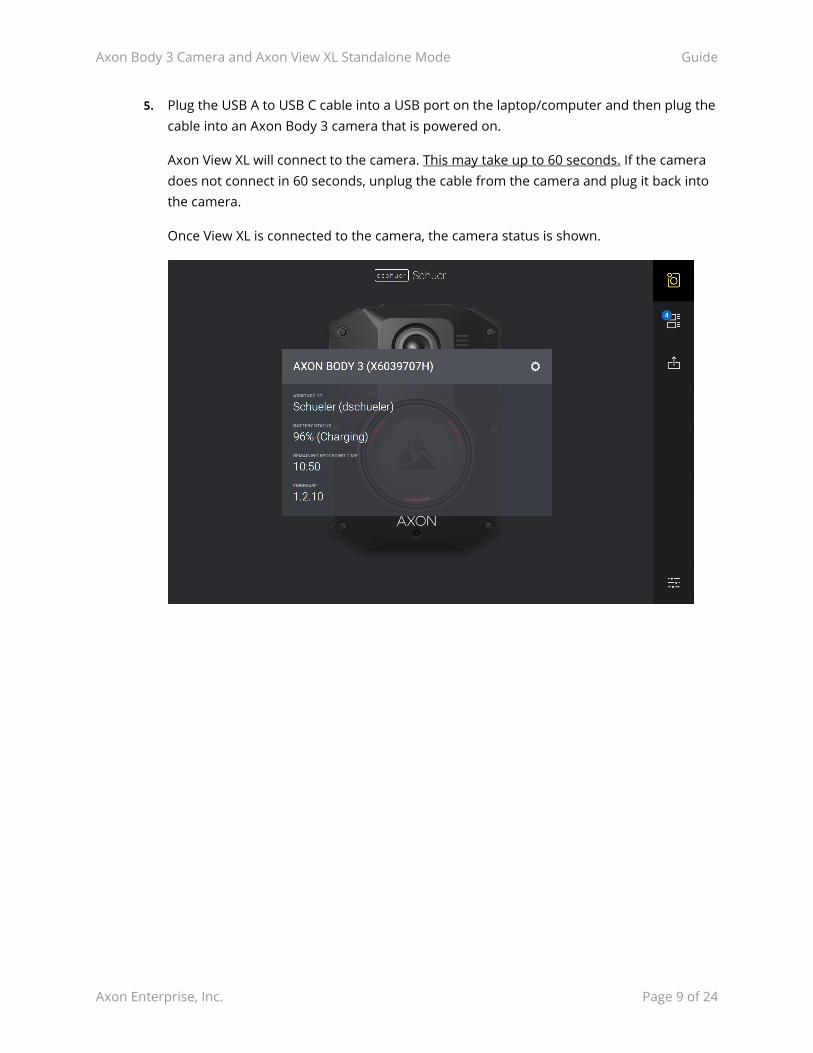
5. Plug the USB A to USB C cable into a USB port on the laptop/computer and then plug the cable into an Axon Body 3 camera that is powered on.
Axon View XL will connect to the camera. This may take up to 60 seconds. If the camera does not connect in 60 seconds, unplug the cable from the camera and plug it back into the camera.
Once View XL is connected to the camera, the camera status is shown.
Axon Body 3 Camera and Axon View XL Standalone Mode Guide
Axon Enterprise, Inc. Page 10 of 24
View XL Tab Overview
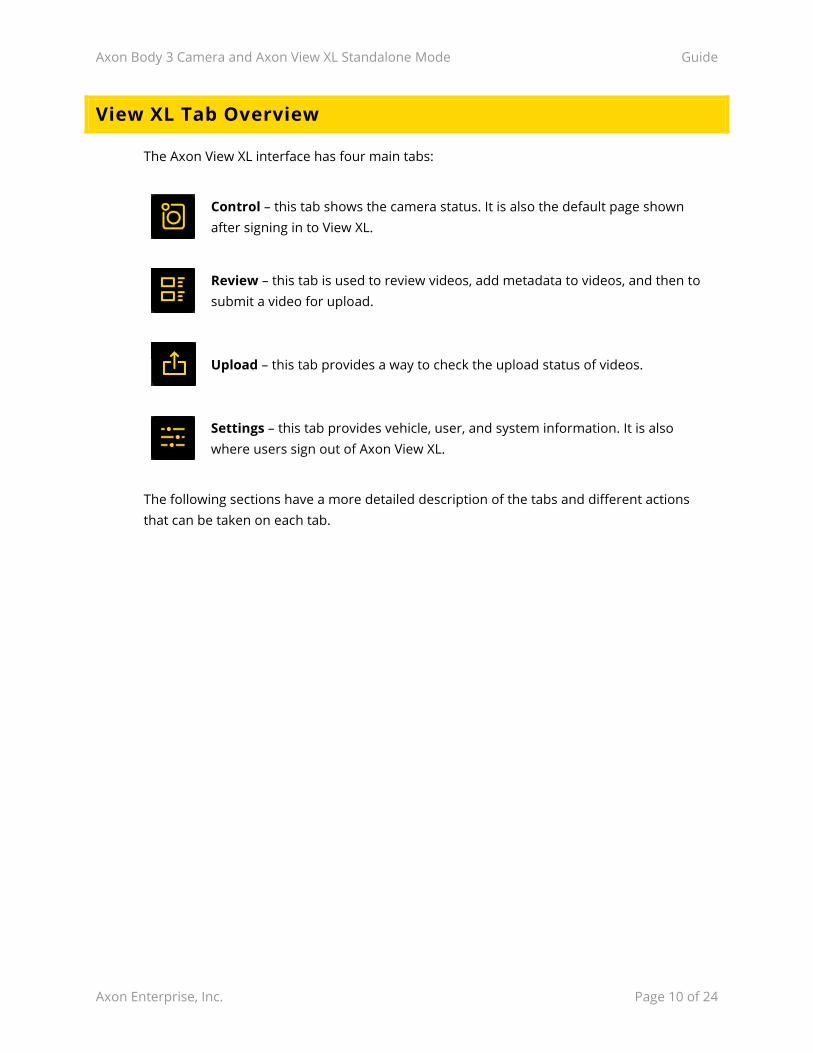
The Axon View XL interface has four main tabs:
Control – this tab shows the camera status. It is also the default page shown after signing in to View XL.
Review – this tab is used to review videos, add metadata to videos, and then to submit a video for upload.
Upload – this tab provides a way to check the upload status of videos.
Settings – this tab provides vehicle, user, and system information. It is also where users sign out of Axon View XL.
The following sections have a more detailed description of the tabs and different actions that can be taken on each tab.
Axon Body 3 Camera and Axon View XL Standalone Mode Guide
Axon Enterprise, Inc. Page 11 of 24
Control Tab
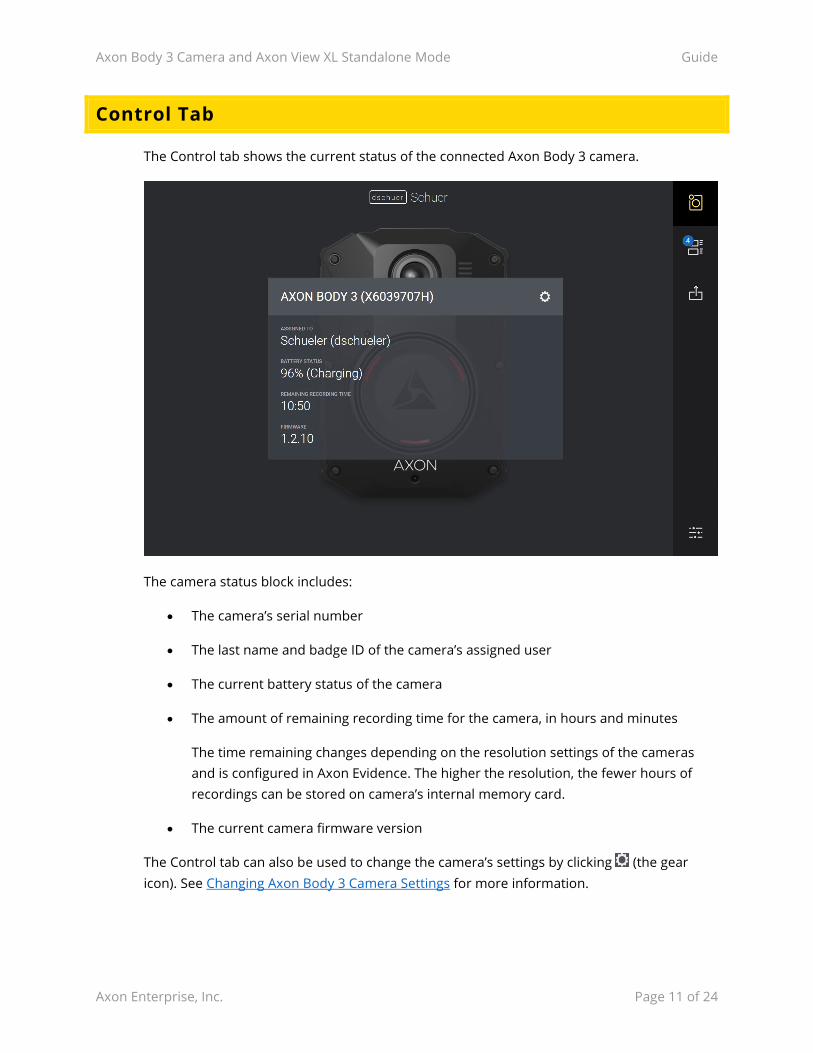
The Control tab shows the current status of the connected Axon Body 3 camera.
The camera status block includes:
• The camera’s serial number
• The last name and badge ID of the camera’s assigned user
• The current battery status of the camera
• The amount of remaining recording time for the camera, in hours and minutes
The time remaining changes depending on the resolution settings of the cameras and is configured in Axon Evidence. The higher the resolution, the fewer hours of recordings can be stored on camera’s internal memory card.
• The current camera firmware version
The Control tab can also be used to change the camera’s settings by clicking (the gear icon). See Changing Axon Body 3 Camera Settings for more information.
Axon Body 3 Camera and Axon View XL Standalone Mode Guide
Axon Enterprise, Inc. Page 12 of 24
Review Tab
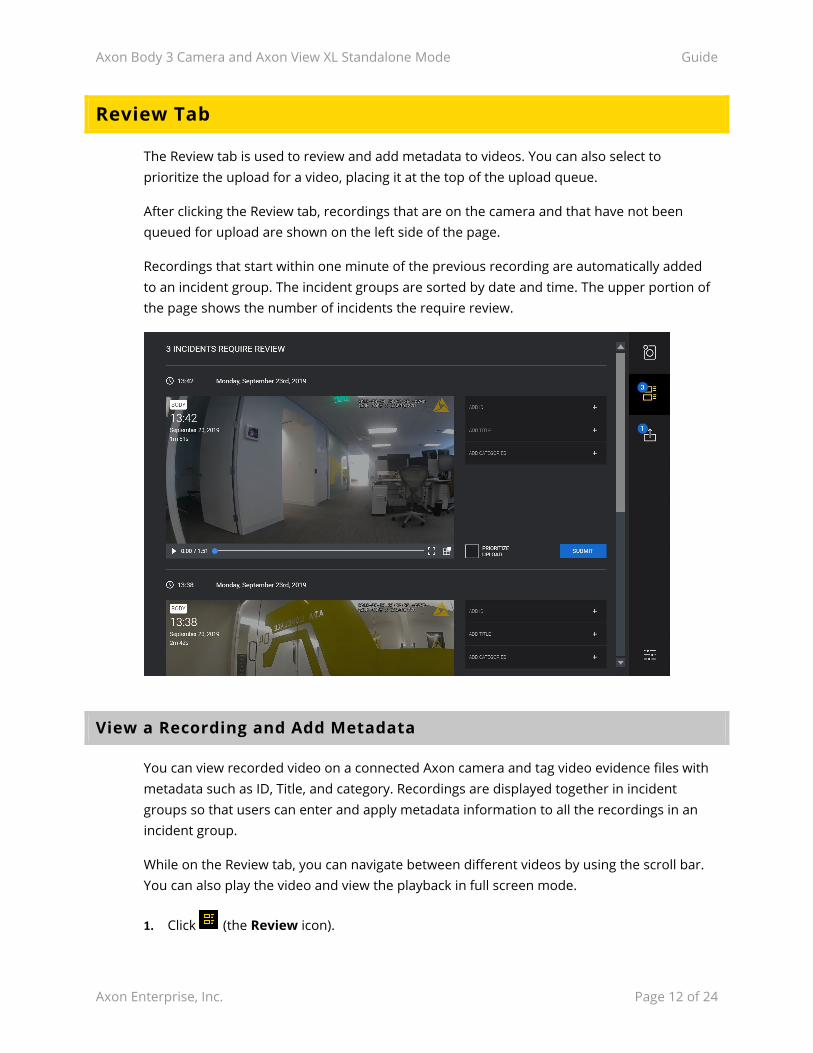
The Review tab is used to review and add metadata to videos. You can also select to prioritize the upload for a video, placing it at the top of the upload queue.
After clicking the Review tab, recordings that are on the camera and that have not been queued for upload are shown on the left side of the page.
Recordings that start within one minute of the previous recording are automatically added to an incident group. The incident groups are sorted by date and time. The upper portion of the page shows the number of incidents the require review.
View a Recording and Add Metadata
You can view recorded video on a connected Axon camera and tag video evidence files with metadata such as ID, Title, and category. Recordings are displayed together in incident groups so that users can enter and apply metadata information to all the recordings in an incident group.
While on the Review tab, you can navigate between different videos by using the scroll bar. You can also play the video and view the playback in full screen mode.
1. Click (the Review icon).
Axon Body 3 Camera and Axon View XL Standalone Mode Guide
Axon Enterprise, Inc. Page 13 of 24
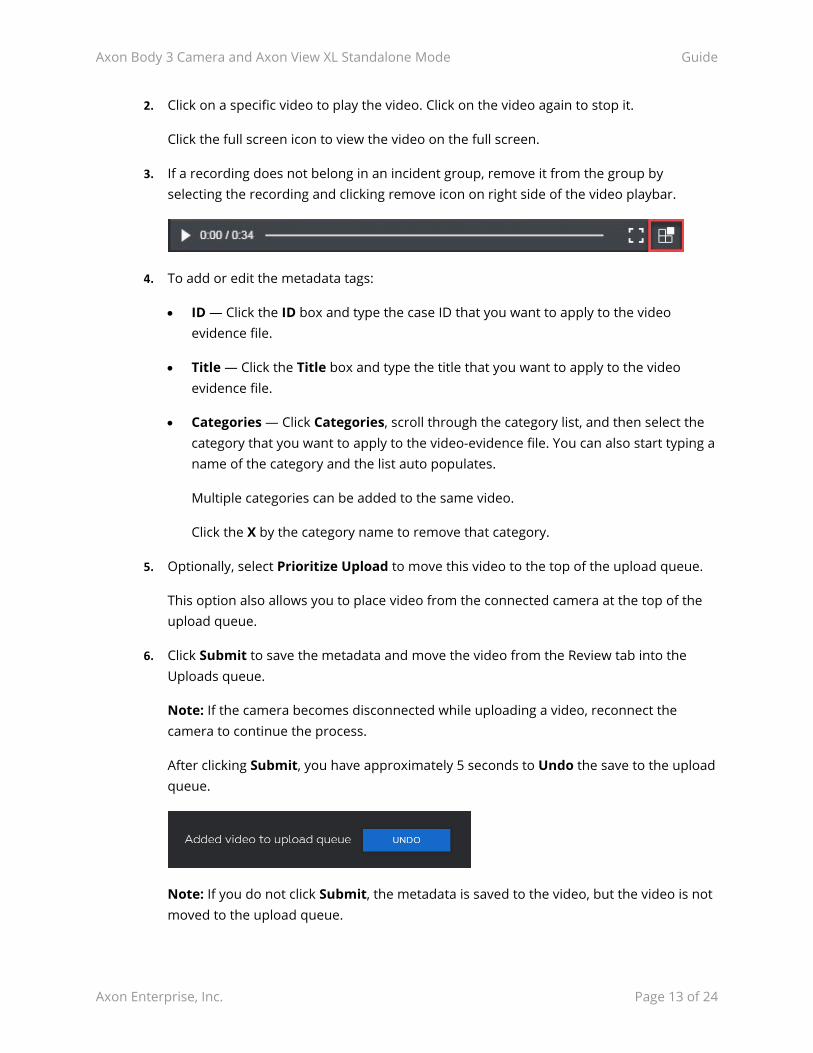
2. Click on a specific video to play the video. Click on the video again to stop it.
Click the full screen icon to view the video on the full screen.
3. If a recording does not belong in an incident group, remove it from the group by selecting the recording and clicking remove icon on right side of the video playbar.
4. To add or edit the metadata tags:
• ID — Click the ID box and type the case ID that you want to apply to the video evidence file.
• Title — Click the Title box and type the title that you want to apply to the video evidence file.
• Categories — Click Categories, scroll through the category list, and then select the category that you want to apply to the video-evidence file. You can also start typing a name of the category and the list auto populates.
Multiple categories can be added to the same video.
Click the X by the category name to remove that category.
5. Optionally, select Prioritize Upload to move this video to the top of the upload queue.
This option also allows you to place video from the connected camera at the top of the upload queue.
6. Click Submit to save the metadata and move the video from the Review tab into the Uploads queue.
Note: If the camera becomes disconnected while uploading a video, reconnect the camera to continue the process.
After clicking Submit, you have approximately 5 seconds to Undo the save to the upload queue.
Note: If you do not click Submit, the metadata is saved to the video, but the video is not moved to the upload queue.
Axon Body 3 Camera and Axon View XL Standalone Mode Guide
Axon Enterprise, Inc. Page 14 of 24
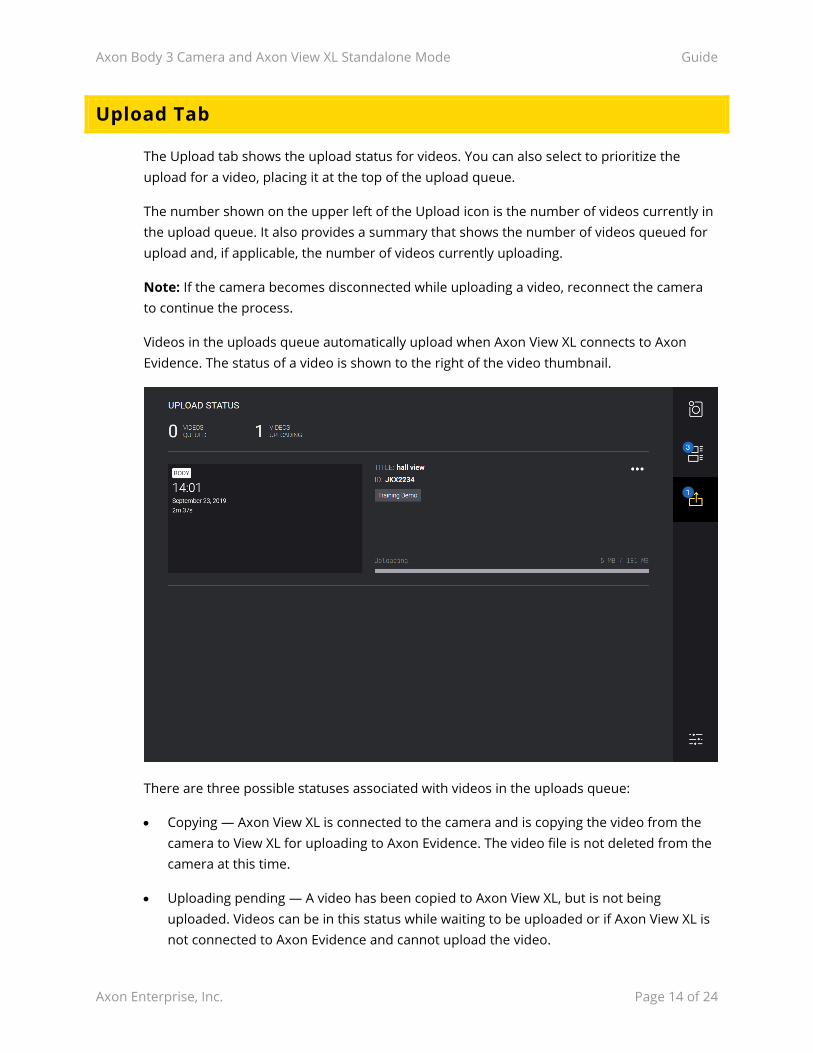
Upload Tab
The Upload tab shows the upload status for videos. You can also select to prioritize the upload for a video, placing it at the top of the upload queue.
The number shown on the upper left of the Upload icon is the number of videos currently in the upload queue. It also provides a summary that shows the number of videos queued for upload and, if applicable, the number of videos currently uploading.
Note: If the camera becomes disconnected while uploading a video, reconnect the camera to continue the process.
Videos in the uploads queue automatically upload when Axon View XL connects to Axon Evidence. The status of a video is shown to the right of the video thumbnail.
There are three possible statuses associated with videos in the uploads queue:
• Copying — Axon View XL is connected to the camera and is copying the video from the camera to View XL for uploading to Axon Evidence. The video file is not deleted from the camera at this time.
• Uploading pending — A video has been copied to Axon View XL, but is not being uploaded. Videos can be in this status while waiting to be uploaded or if Axon View XL is not connected to Axon Evidence and cannot upload the video.

Axon Body 3 Camera and Axon View XL Standalone Mode Guide
Axon Enterprise, Inc. Page 15 of 24
• Uploading — Axon View XL is connected to Axon Evidence and is uploading the video. When the upload is complete, a check is done to verify the upload is accurate and complete. If the check passes, then the video is deleted from the camera.
Prioritizing Video Uploads
In situations where you want a video to be uploaded before others, you can select to prioritize the upload.
Note: If you selected Prioritize Upload in the Review tab, the video is already prioritized and you do not have to select it again.
1. Find the appropriate video in the Upload tab list.
2. Click the icon and select Prioritize Upload.
The video is marked as prioritized and moved to the top of the upload queue.
De-prioritizing Video Uploads
Videos that are marked as prioritized can be de-prioritized from the Upload tab. De-prioritizing a video from a body worn camera removes it from the upload queue.
1. Find the appropriate video in the Upload tab list.
2. Click the icon and select De-prioritize Upload.
The prioritized marking is removed from the video and videos from body worn cameras are removed from the upload queue.
Axon Body 3 Camera and Axon View XL Standalone Mode Guide
Axon Enterprise, Inc. Page 16 of 24
Disconnecting the Camera
Note: If the camera becomes disconnected while uploading a video, reconnect the camera to continue the process.
After all the videos in the Upload queue have been uploaded, you can disconnect the camera by unplugging the cable from the camera.
Sign Out of Axon View XL
1. Click (the Settings icon).
2. Click Sign Out.
3. The Sign In screen appears.
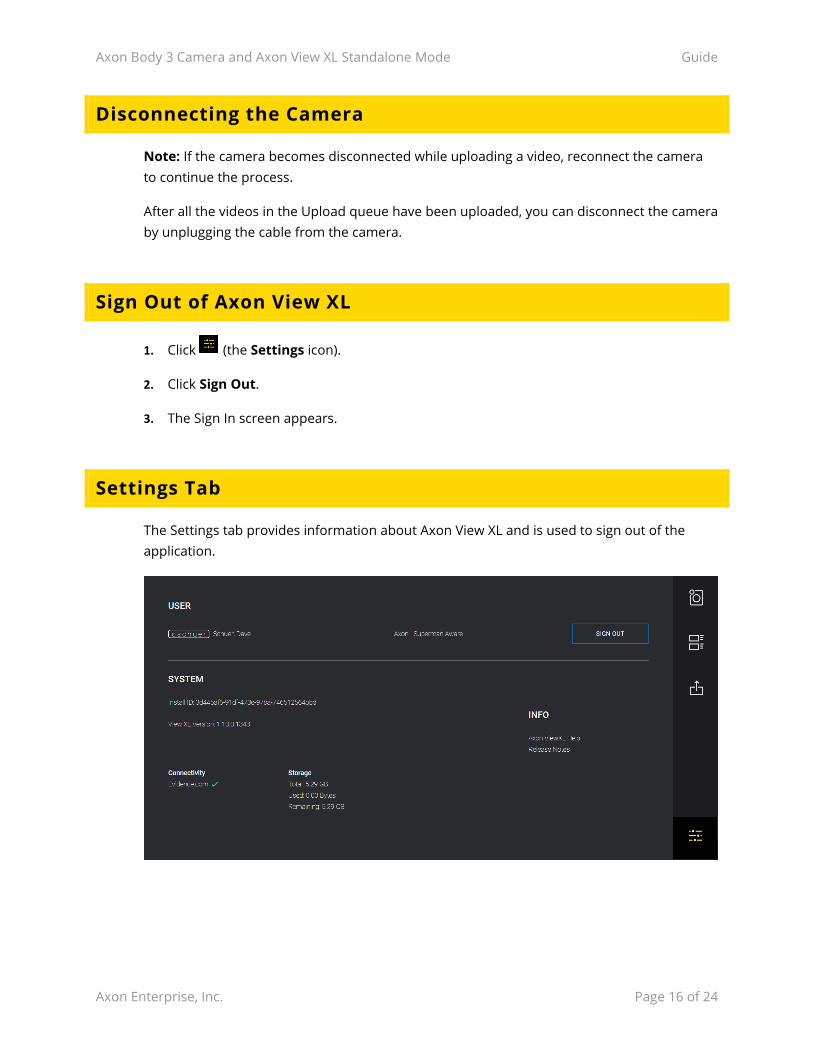
Settings Tab
The Settings tab provides information about Axon View XL and is used to sign out of the application.
Axon Body 3 Camera and Axon View XL Standalone Mode Guide
Axon Enterprise, Inc. Page 17 of 24
Changing Axon Body 3 Camera Settings with View XL
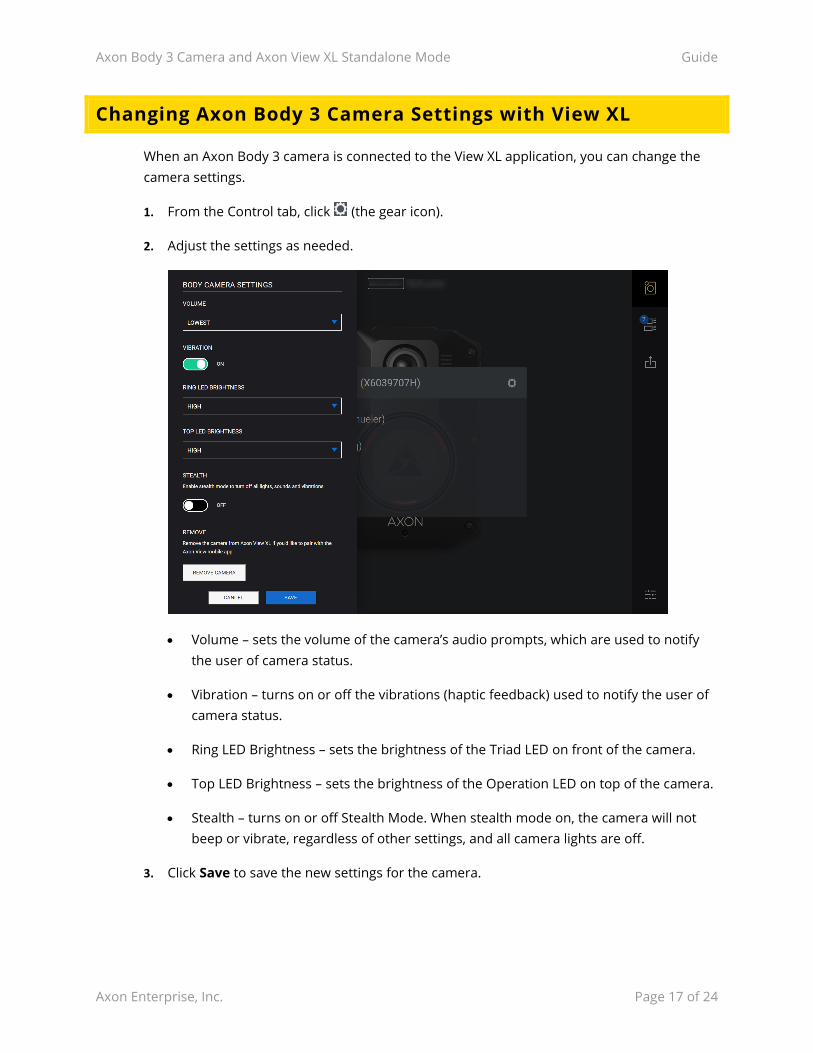
When an Axon Body 3 camera is connected to the View XL application, you can change the camera settings.
1. From the Control tab, click (the gear icon).
2. Adjust the settings as needed.
• Volume – sets the volume of the camera’s audio prompts, which are used to notify the user of camera status.
• Vibration – turns on or off the vibrations (haptic feedback) used to notify the user of camera status.
• Ring LED Brightness – sets the brightness of the Triad LED on front of the camera.
• Top LED Brightness – sets the brightness of the Operation LED on top of the camera.
• Stealth – turns on or off Stealth Mode. When stealth mode on, the camera will not beep or vibrate, regardless of other settings, and all camera lights are off.
3. Click Save to save the new settings for the camera.
Axon Body 3 Camera and Axon View XL Standalone Mode Guide
Axon Enterprise, Inc. Page 18 of 24
Charging an Axon Body 3 Camera while Powered Off
Note: Your Axon Body 3 camera must have Operating System (OS) v1.7 or later to charge the camera while powered off. Prior to Axon Body 3 camera OS v1.7, an Axon Body 3 camera that was powered off would automatically power on when connected to a USB-C cable to charge.
The Axon Body 3 camera can be charged by using a USB-C cable while the camera is off. This allows users to charge the Axon Body 3 camera battery when an Axon Body 3 Dock is not available. However, Axon recommends that you regularly place you Axon Body 3 camera in an Axon Body 3 Dock to ensure that the camera has the correct time synchronization and latest firmware updates.
If needed, you can request a USB A to USB C cable directly from Axon. Contact your Axon Representative or Axon Support for assistance.
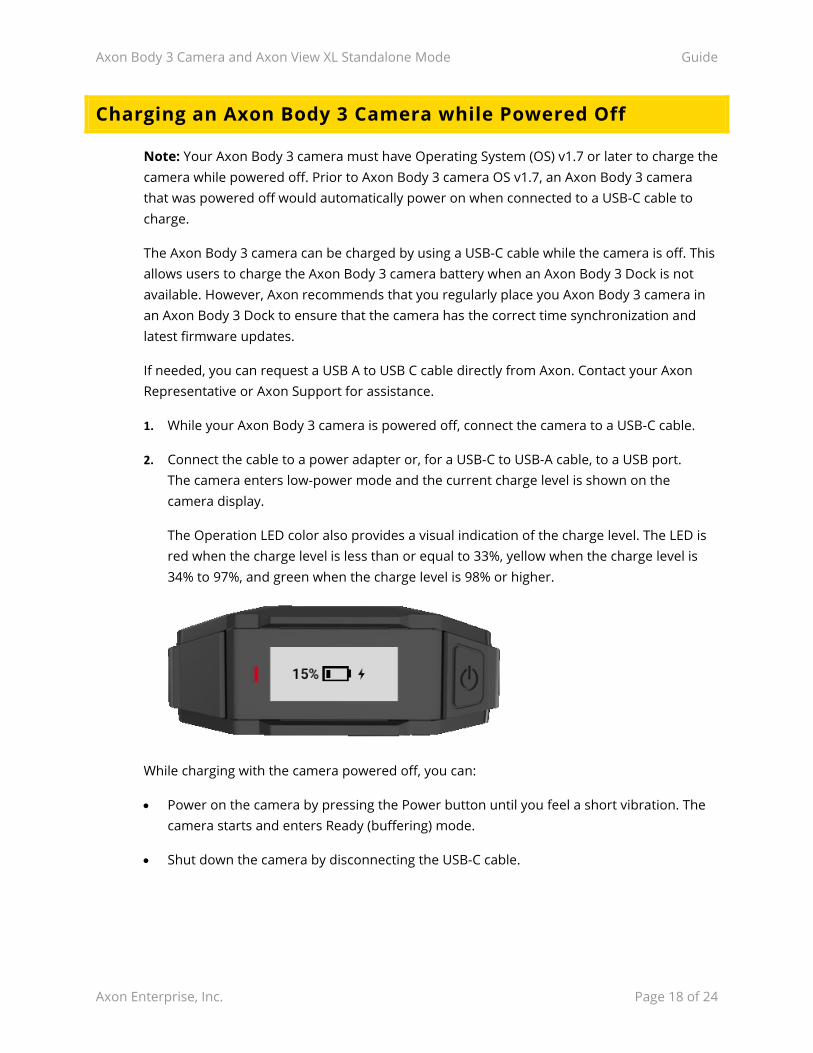
1. While your Axon Body 3 camera is powered off, connect the camera to a USB-C cable.
2. Connect the cable to a power adapter or, for a USB-C to USB-A cable, to a USB port. The camera enters low-power mode and the current charge level is shown on the camera display.
The Operation LED color also provides a visual indication of the charge level. The LED is red when the charge level is less than or equal to 33%, yellow when the charge level is 34% to 97%, and green when the charge level is 98% or higher.
While charging with the camera powered off, you can:
• Power on the camera by pressing the Power button until you feel a short vibration. The camera starts and enters Ready (buffering) mode.
• Shut down the camera by disconnecting the USB-C cable.

Axon Body 3 Camera and Axon View XL Standalone Mode Guide
Axon Enterprise, Inc. Page 19 of 24
Assigning or Reassigning Axon Body 3 Cameras with View XL
Note: Your Axon Evidence Role must have Device Administration
1. On your computer, sign in to View XL and launch Standalone mode.
2. Plug the USB A to USB C cable into a USB port on the laptop/computer and then plug the cable into an Axon Body 3 camera that is powered on.
3. The View XL screen will show two of the following three options:
• Reassign – This option is always shown and is used to reassign to the camera to another user.
• Assign to Me – Only shown if the camera is currently unassigned. Click this option to assign the connected camera to yourself.
• Unassign - Only shown if the camera is currently assigned to a user. Click this option to unassign a camera.
4. To reassign the camera, click Reassign.
5. Enter the name of the user you want to assign the camera to.
6. Click Save.
7. Disconnect the camera.
Axon Body 3 Camera and Axon View XL Standalone Mode Guide
Axon Enterprise, Inc. Page 20 of 24
Registering Axon Body 3 Cameras with View XL
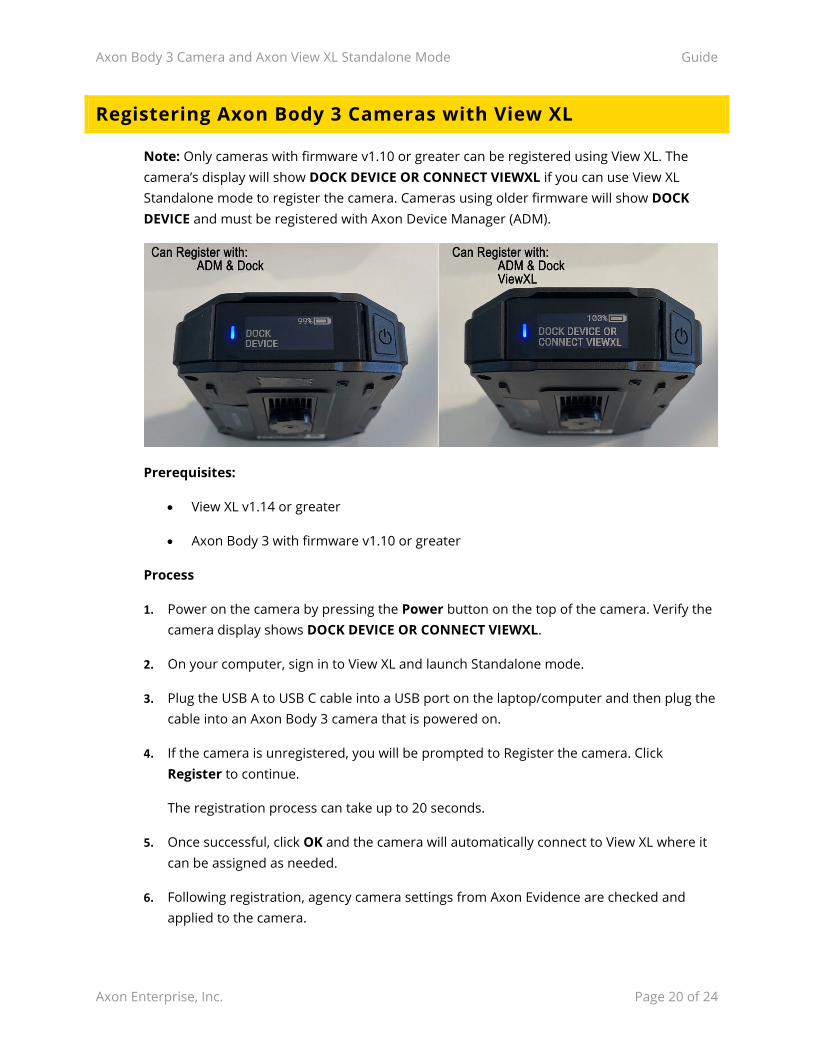
Note: Only cameras with firmware v1.10 or greater can be registered using View XL. The camera’s display will show DOCK DEVICE OR CONNECT VIEWXL if you can use View XL Standalone mode to register the camera. Cameras using older firmware will show DOCK DEVICE and must be registered with Axon Device Manager (ADM).
Prerequisites:
• View XL v1.14 or greater
• Axon Body 3 with firmware v1.10 or greater
Process
1. Power on the camera by pressing the Power button on the top of the camera. Verify the camera display shows DOCK DEVICE OR CONNECT VIEWXL.
2. On your computer, sign in to View XL and launch Standalone mode.
3. Plug the USB A to USB C cable into a USB port on the laptop/computer and then plug the cable into an Axon Body 3 camera that is powered on.
4. If the camera is unregistered, you will be prompted to Register the camera. Click Register to continue.
The registration process can take up to 20 seconds.
5. Once successful, click OK and the camera will automatically connect to View XL where it can be assigned as needed.
6. Following registration, agency camera settings from Axon Evidence are checked and applied to the camera.
Axon Body 3 Camera and Axon View XL Standalone Mode Guide
Axon Enterprise, Inc. Page 21 of 24
It is recommended that you power off and then power on the camera to allow any resolution configuration changes to apply.
Updating Axon Body 3 Operating System with View XL
Note: The terms Operating System and firmware are used interchangeably in this section and refer to the same thing.
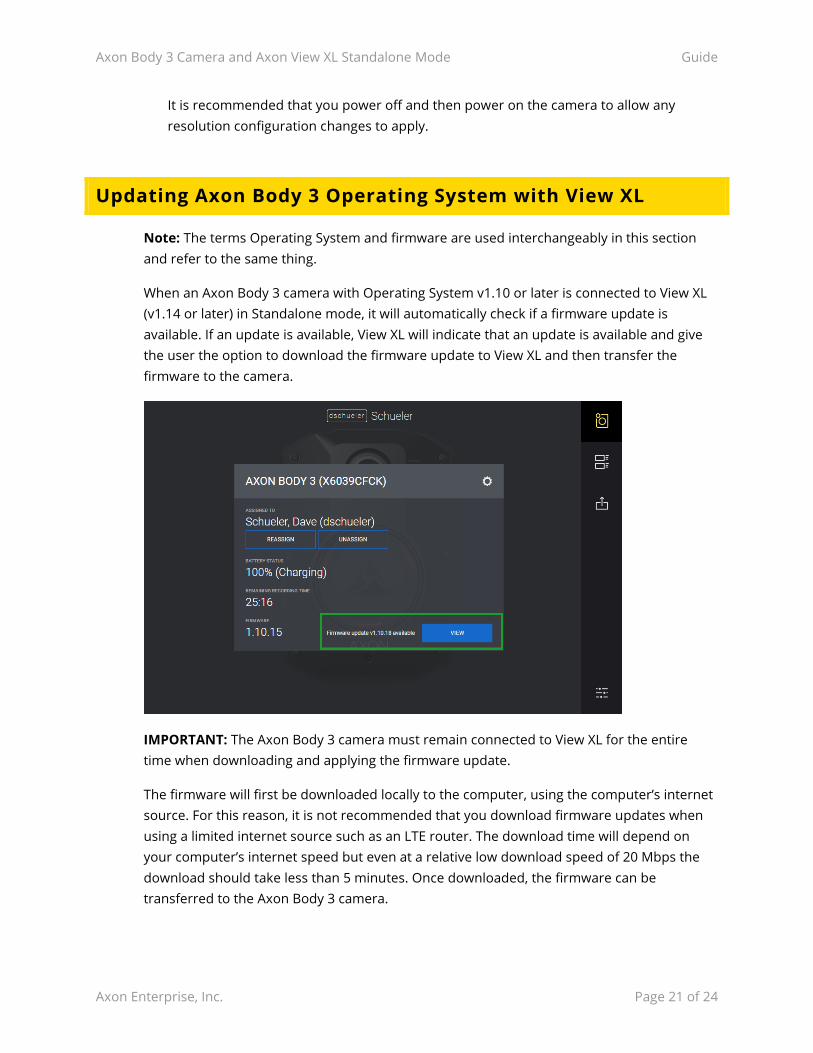
When an Axon Body 3 camera with Operating System v1.10 or later is connected to View XL (v1.14 or later) in Standalone mode, it will automatically check if a firmware update is available. If an update is available, View XL will indicate that an update is available and give the user the option to download the firmware update to View XL and then transfer the firmware to the camera.
IMPORTANT: The Axon Body 3 camera must remain connected to View XL for the entire time when downloading and applying the firmware update.
The firmware will first be downloaded locally to the computer, using the computer’s internet source. For this reason, it is not recommended that you download firmware updates when using a limited internet source such as an LTE router. The download time will depend on your computer’s internet speed but even at a relative low download speed of 20 Mbps the download should take less than 5 minutes. Once downloaded, the firmware can be transferred to the Axon Body 3 camera.
Axon Body 3 Camera and Axon View XL Standalone Mode Guide
Axon Enterprise, Inc. Page 22 of 24
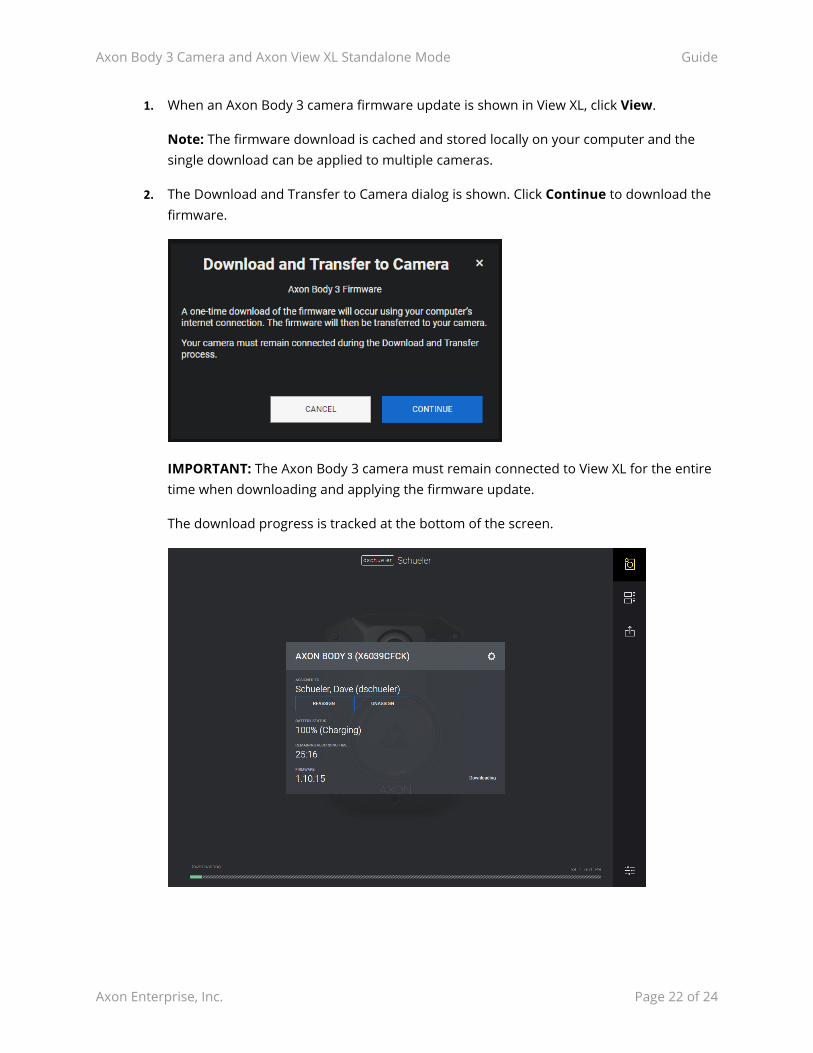
1. When an Axon Body 3 camera firmware update is shown in View XL, click View.
Note: The firmware download is cached and stored locally on your computer and the single download can be applied to multiple cameras.
2. The Download and Transfer to Camera dialog is shown. Click Continue to download the firmware.
IMPORTANT: The Axon Body 3 camera must remain connected to View XL for the entire time when downloading and applying the firmware update.
The download progress is tracked at the bottom of the screen.
Axon Body 3 Camera and Axon View XL Standalone Mode Guide
Axon Enterprise, Inc. Page 23 of 24
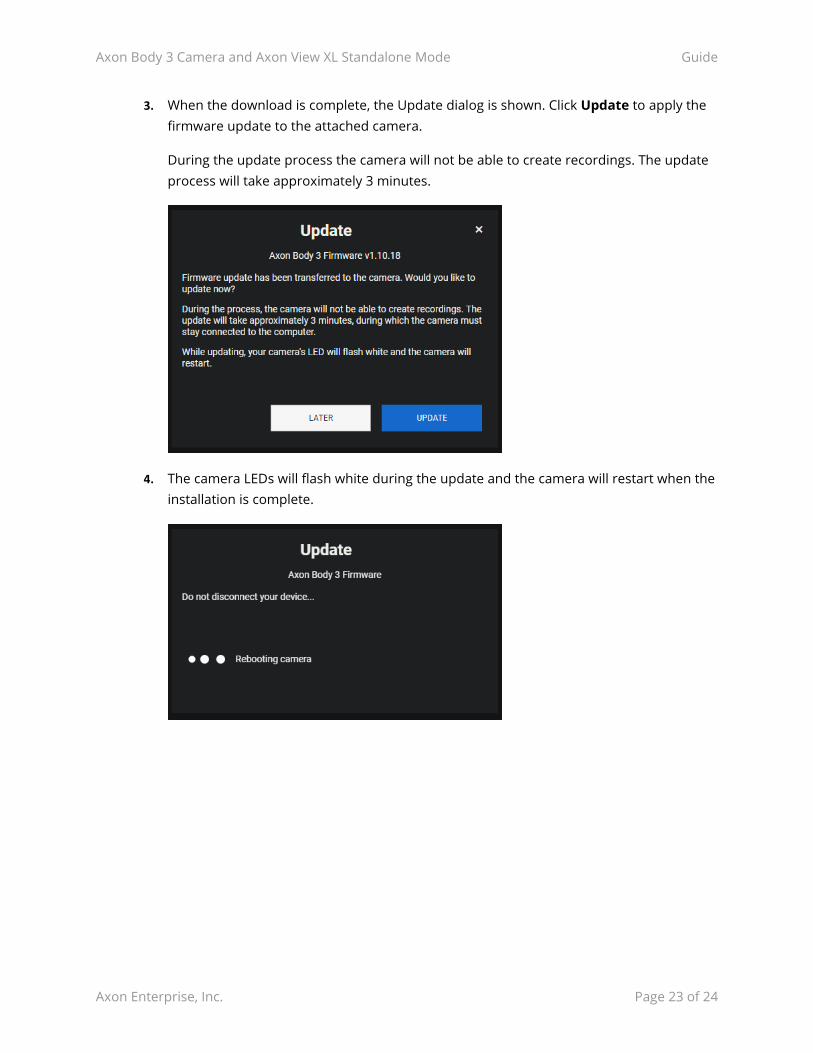
3. When the download is complete, the Update dialog is shown. Click Update to apply the firmware update to the attached camera.
During the update process the camera will not be able to create recordings. The update process will take approximately 3 minutes.
4. The camera LEDs will flash white during the update and the camera will restart when the installation is complete.
Axon Body 3 Camera and Axon View XL Standalone Mode Guide
Axon Enterprise, Inc. Page 24 of 24
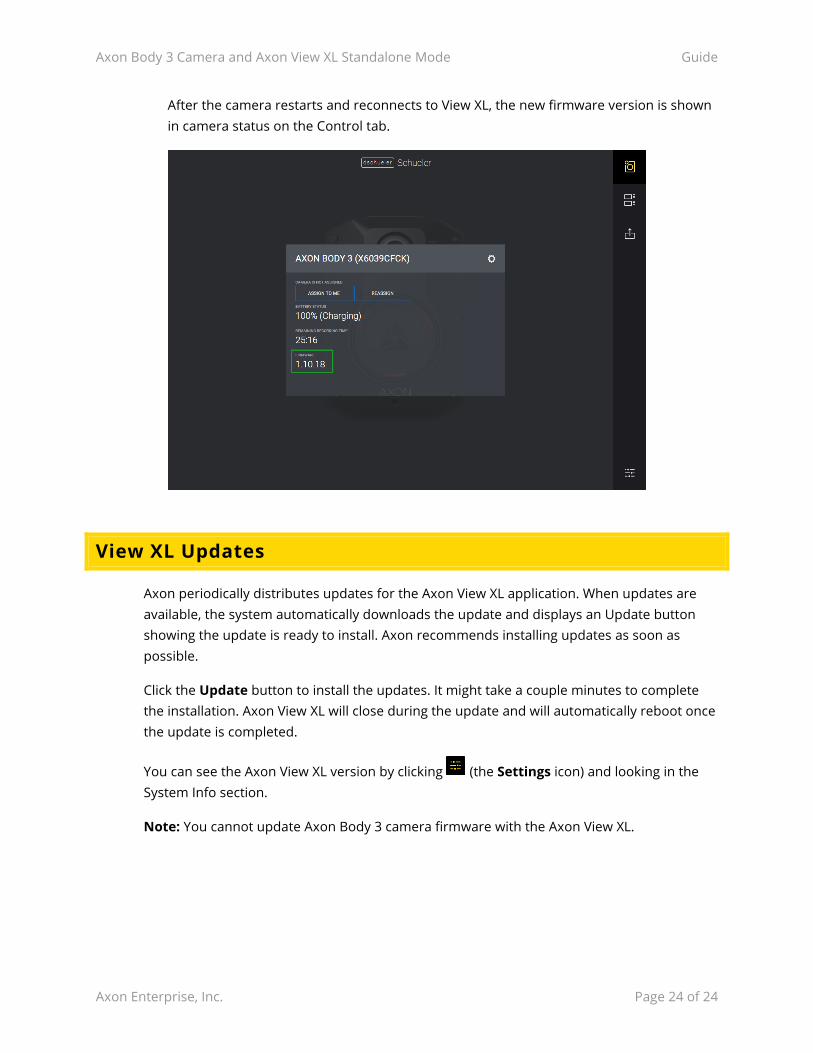
After the camera restarts and reconnects to View XL, the new firmware version is shown in camera status on the Control tab.
View XL Updates
Axon periodically distributes updates for the Axon View XL application. When updates are available, the system automatically downloads the update and displays an Update button showing the update is ready to install. Axon recommends installing updates as soon as possible.
Click the Update button to install the updates. It might take a couple minutes to complete the installation. Axon View XL will close during the update and will automatically reboot once the update is completed.
You can see the Axon View XL version by clicking (the Settings icon) and looking in the System Info section.
Note: You cannot update Axon Body 3 camera firmware with the Axon View XL.