bcls+aed instructor training course
TRANSCRIPT
BCLS+AED INSTRUCTOR TRAINING
COURSE
Handbook

Time (hour) Topics Session Leader
0800 - 0830 Welcome to NHCS Training Chief Instructor
0830 - 0900 Course Introduction Chief instructor
0900 - 0945 Principles of Teaching and Learning Chief Instructor
0945 to 1000 Tea Break
1000 to 1100 Principles of Evaluation - Graph Interpretation - Assessment Criteria
Chief Instructor
1100 - 1230
Demonstration of
BCLS & AED Modules
Manikin Maintenance
Graph Interpretation
Instructors
1230 - 1330 Lunch
1330 to 1400 Theory Test Chief Instructor
1400 to 1515
Practice - Presentation of Assigned Module
(5 mins per participant) - Interpretation of one-man CPR recording
Strip - Steps for Manikin Maintenance
Instructors
1515 to 1530 Tea Break
1530 to 1630
Practical Assessment - Presentation of Assigned Module
(5 mins per participant) - Interpretation of one-man CPR recording
Strip - Steps for Manikin Maintenance
Instructors
1630 - 1700 Result Debrief and Evaluation Chief Instructor

1
COURSE INTRODUCTION
This course is planned to make a good instructors of anyone who wish to teach the skills of
BCLS+AED. The prospective instructor should not just understand how to use the AED or how
to do basic life support, but the need to teach these skills well for best effect. At the end of
this course, we need to have a confident instructor.
Pre-requisites for attending a BCLS+AED Instructor Training Course
To participate in BCLS+AED Instructors’ Course, the candidate must have the following pre-
requisites:
1. Possess a valid SRFAC accredited BCLS+AED Provider certificate.
2. Read through the Instructors’ Training manual.
3. Understand the objectives of the Singapore Resuscitation and First Aid Council (SRFAC)
and the need for instructing in such a program.
Objectives of BCLS+AED Instructors’ Course
By the end of this course the trainee-instructor should be able to:
1. Exhibit the characteristics required of SRFAC accredited instructor and be a role model
in provision of the skill.
2. Plan, organize and conduct the BCLS+AED theory and practical training and
assessment in accordance with SRFAC guidelines.
3. Ensure the safety and well-being of learners (Trainee-Providers).
4. Monitor participants’ practice and provide corrective feedback and encouragement
that is consistent with the standards of performance expected.
5. Recognize that the theory and practical assessments are to test the provider’s
understanding of the key steps in the skill and ability to carry out the skills in
accordance with the standards laid down by SRFAC.
Certification as a BCLS+AED Instructor
Participant in BCLS+AED Instructors’ Course does not automatically qualify a person to be an
instructor. To be certified as an instructor, candidates must:
1. Successfully complete the pre-requisites course requirements.
2. Attend and actively participate in all portions of the Instructors’ Course.
3. Score at least 80% on the theory test.
4. Upon successful completion of the BCLS+AED Instructor Course, trainees:
a) are required to conduct two practice-teaching assignments at any SRFAC
accredited BCLS+AED Training program under the supervision of SRFAC accredited
BCLS+AED Chief Instructor within 6 months before being certified to be qualified
BCLS+AED Instructor.

2
b) BCLS+AED Instructor Certificate will be issued upon successful completion of the
two supervised teaching assessments. The trainee instructor has to submit / fax
the Trainee Assessment Form to:
Ms. Nazeera Binte Hamzah
Senior Associate Executive
Nursing Development Unit
National Heart Centre Singapore
5 Hospital Drive, Singapore 169609
Tel: 67042151 / Fax 68449058
The SAMPLE format of these two supervised assessment form is attached at the end
of this manual.
Certificate Issue and Validity Period
BCLS+AED Instructor Certificate can be issued by any SRFAC accredited training centre upon
the applicant demonstrating proof of having successfully attended the SRFAC accredited
BCLS+AED Instructors’ Course and successfully completed two supervised practice-teaching
assignment, within six months at any SRFAC accredited BCLS+AED Instructor Training Centre.
The validity period of the certificate is two (2) years.
A certified instructor should instruct at least two BCLS+AED provider courses per year for 2
years at any SRFAC accredited BCLS+AED Training Centre to be able to retain status as an
Instructor.
If lapsed within 12 months from expiry – to fulfil 2 BCLS+AED instructor attachments within
12 months from expiry (does not count towards yearly quota) New validity will start from the
date of last attachment.
If lapsed more than 12 months from expiry – restart the instructor course. BCLS+AED
Certificate renewal is issued by Training Centre.

3
Desired characteristics of trained CPR+AED Instructors
While the obvious aim is to produce instructors in the combined skills of BCLS and AED use,
the persons trained have to:
1. Demonstrate the ability to facilitate the learning of good quality CPR. This must be
through the use of good communication skills on the part of the instructor and the use
of the instructor as a facilitator of learning.
2. Understand the need for performance of good quality CPR and the characteristics of
what constitutes good quality of this life saving technique.
3. Be comfortable with integrating the skills of CPR and AED use and also in teaching
these to a third person.
4. Obtain a keen understanding, and be supportive of the efforts, of SRFAC in trying to
promote training in the skills of BCLS and AED amongst a wide segment of society.
Duties of Instructors and Chief Instructors:
a. It is preferred that all instructors be accredited under a national program. In Singapore,
the accreditation system is overseen by the SRFAC.
b. Instructors and Chief Instructors should arrive at the training centre about 30 minutes
before the start of the course. On arrival, the venue needs to be set up and training
manikins and training aids prepared.
c. The Chief Instructors needs to ensure that all manikins are functional and that there
are adequate numbers of manikin accessories, such as lungs, face shields and cleaning
aids and adequate sets of theory and practical test sheets.
d. The Chief Instructor also runs through the course program with the instructors to
address and emphasis the areas of standardization.
e. The Training Centre ensures that the instructors document their attendance in the
centre records and in their own handbook.
f. Any special roles for the individual instructor will be designated by the Chief Instructor
prior to the start of the course.
g. The Chief Instructor is not assigned to any skills station. He should be able to oversee
teaching being carried out at each station and provide positive strokes at any one or
more stations to enhance the teaching given by the various instructors.

4
Performance Criteria to be used by Instructors at BCLS+AED Provider Course
a. For BCLS portion, the instructor, if using an electronic manikin with a skill meter (such
as the Resusci Anne), must ensure that:
i) At least 80% of chest compressions and at least 50% of ventilations are adequate.
ii) The chest compression rate should be at 100 to 120 per minute
iii) The student is counting the compressions loudly.
iv) A total of five cycles of 30:2 CPR should be completed within 130 seconds
v) Chest compressions are at 4 to 6 cm depth with full chest recoil.
vi) Adequate ventilations refer to tidal volume of 400 to 600 ml.
b. For the AED portion, of the BCLS+AED course, the instructor must strive to ensure that:
i) Delays in chest compression while AED pads are being applied should not exceed
five seconds.
ii) Interruptions to chest compressions while the AED is analyzing the heart rhythm
should not exceed 10 seconds.
iii) Interruptions to chest compression while the AED is delivering a shock should not
exceed 5 seconds.
iv) That the student continues to provide chest compressions at a rate of 100 to 120
per minute and compression: ventilation ratio of 30:2 in between all the above
interruptions.

5
MODULE 1 : TEACHING AND LEARNING
1.1 INTRODUCTION
The Instructor course is designed to help the instructor with limited teaching experience
understand the instructional process and to help the provider make the transition to
instructor. The success of teaching depends on many factors, including, the objectives of the
course, the resources available to the instructor, the characteristics of the participants, the
learning environment and the instructor.
The primary objective of this course is to help the instructor develop skills in teaching and
learning.
1.2 THE CONCEPT OF TEACHING AND LEARNING
Every person is a learner. Learning is an on-going and life long process. People learn within
social and cultural contexts, independently and through interaction with others. What is
learned depends on the way it is learned and with whom it is learned. The vital aspects of
teaching include identifying the ways others learn best and extending the ways they learn,
creating learning opportunities, and evaluating outcomes. Teaching is a planned experience
that facilitates learning. Planned experiences that facilitate learning are the responsibility of
the instructor and instructor trainer.
The teaching and learning concept applies to all the life support programme in that
participants learn new skills as first responders in an emergency.
1.3 PRINCIPLES OF TEACHING AND LEARNING
Principles of effective learning and teaching provide the basis for on-going improvement of
learning and teaching practices. To further promote effective learning and teaching, eight
guiding principles have been formulated for the development and implementation of quality
learning programs. These principles acknowledge the complex and dynamic nature of the
learning-teaching process. They are based on the premise that to learn is to make meaning
from experience.
Principle 1: Learning is continuous
It is important to begin at the learner’s level of knowledge and to relate new learning
information the learner needs.
Principles 2: Learning is purposeful and must make sense to the learner
Progress in learning must be constantly appraised through feedback. The purpose of learning
the information and skills must be kept in sharp focus.
6
Principles 3: Learning involves as many senses as possible
The more stimulating a learning activity is to the senses, the longer the information will be
retained. Conservative figures indicate that 75% of what is heard is forgotten after 2 days. It
has been reported that learners remember
- 10% of what is said
- 20% of what is heard
- 30% of what is seen
- 50% of what is heard and seen
- 80% of what is heard, seen and done.
Principles 4: Learning activities must be appropriate for the situation
In learning all life support courses, the greatest proportion of class time should be spent in
manikin practice, using performance sheets as a learning tool or guide.
Principles 5: Learning must be stimulating
Instructors can motivate learners by helping them achieve higher levels of proficiency and
encouraging other levels of courses completion, such as instructor and instructor trainer. The
performance expected of learners, however, should be suited to their interests and abilities.
Principles 6: Learning must result in functional understanding
Memorization alone is insufficient. It must be reinforced with practical application in specific
situations. Repeated practice of memorized steps in a simulated situation will reinforce
learning.
Principles 7: Learning is affected by emotions
The instructor should strive to elicit positive emotions, such as a sense of accomplishment
and satisfaction in acquiring the skills. The instructor should also minimize unpleasant
emotions, such as frustration and fear of failure during practice and evaluation, through
positive and enthusiastic support of the learner. The intensity of feelings affects learning
differently in different persons. Some may approach the training with little emotion; others
may be reminded of unpleasant events and have difficulty. It may be useful for the instructor
to discuss, formally or informally, the many potential feelings related to the specific training
and the actual application of the skills in real situations.
Principles 8: Learning is affected by the physical and social environment
The physical environment should be conducive to both the kind of learning taking place and
activities used for learning. Details such as the comfortable arrangement of tables and chairs
and adequate space for practice enhance learning.
7
1.4 THREE DOMAINS OF LEARNING OBJECTIVES
Learning objectives should identify what the learner is to know or do, how well, and under
what conditions. Learning objectives help to clarify expectations for performance. To teach
properly, instructors must consider how learners may best achieve the objectives.
Learning objectives can be classified into three categories.
A. Cognitive
Tell what information the learner must know and describe how the knowledge will be
demonstrated. It can be taught effectively in variety of ways. Instructors may give reading
materials, hold lectures and discussions; and use films, videotapes, or other visual aids.
Cognitive objectives require that information be given to learners. Thus, any method that
streamlines delivery of information is acceptable. For most courses, didactic (teaching)
session accomplish this goal.
B. Psychomotor
Tell what physical skills the learner must be able to perform. They are best learned (and
most effectively taught) in practice sessions. The way to learn is to practice. Instructors
must provide sufficient time in courses for practice. The ability of the participants to
achieve psychomotor objectives is related to their agility, balance, flexibility rhythm,
timing, endurance, strength, and kinesthetic sense. Most learners can master the
psychomotor skills with proper instruction and adequate time.
C. Affective
They are the most difficult to teach. Perhaps the most important thing an instructor can
do is being sensitive to learners’ feelings, attitudes, and past experiences. A patient,
confident, friendly, and empathetic instructor can help learners feel comfortable and
confident. The instructor’s attitude and behaviour should encourage the learners to want
to learn. Impatience, aloofness, callousness, tactlessness, tastelessness, or negative
characteristics may “turn off” learners, making learning difficult. The instructor is the
strongest influence on learning during a course.
8
MODULE 2 : ADULTS AS LEARNER
Part of being an effective instructor involves understanding how adults learn best. Compared
to children and teens, adults have special needs and requirements as learners. Malcolm
Knowles’ identified the following characteristics of adult learners:
2.1 CHARACTERISTICS OF ADULTS LEARNERS
Adults are autonomous and self-directed
They need to be free to direct themselves. Instructor must actively involve adult participants
in the learning process and serve as facilitators for them. Specifically, they must get
participants’ perspectives about what topics to cover and let them work on projects that
reflect their interests. They should allow the participants to assume responsibility for
presentation and group leadership. They have to be sure to act as facilitators, guiding
participants to their own knowledge rather than supplying them with facts. Finally, they must
show participants how the class will help them reach their goals (e.g. via a personal goals
sheet).
Adults have accumulated a foundation of life experiences and knowledge.
These life experiences include work-related activities, family responsibilities, and previous
education. They need to connect learning to this knowledge/experience base. To help them
do so, they should draw out participants’ experience and knowledge which is relevant to the
topic. They must relate theories and concepts to the participants and recognize the value of
experience in learning.
Adults are motivated to Learn
While adult learners may respond to external motivators, internal priorities are more
important. Incentives such as increased job satisfaction, self-esteem and quality of life are
important in giving adults a reason to learn. If any of these can be related as part of
technology-based instruction adult s will respond more positively.
Problem-based learning
According to Driscoll (1998), adults learn through problem-solving. They are motivated to
learn as a response to the problems in their lives, thus organizing the content of training
programs by problem area, rather than by broad subject would be more significant for them.
For example, adults prefer a course on how to perform a specific skill rather than s general
course on how to perform the skill.

9
2.2 NEEDS OF ADULT LEARNERS
For successful training, the instructor must recognize the learners’ cognitive, psychomotor,
and affective needs.
Cognitive needs
Cognitive needs include the need for new information to make sense and be easy to
understand. The instructor needs to include opportunities for clarification as part of the
learning. Although written tests are most commonly used to measure this learning, many
learners respond better to positive acknowledgement of correct answers and guidance about
incorrect responses. This can be accomplished in class through the use of questions and
voluntary answers. Adults also learn cognitive information when given practical problem to
solve. All participants benefit when questions are asked through class discussion.
Psychomotor needs
Learners also have needs related to learning psychomotor skills. Instructors should recognize
that learners will initially demonstrate skills awkwardly and somewhat clumsily. This should
be readily tolerated by the instructor, who should provide positive feedback and
encouragement about skills well done and guidance about skills needing additional practice.
Learners will more likely repeat performances that are positively reinforced.
Motor learning is a gradual process of development. Learners begin by attempting to explore
and imitate the skill, and with practice they are able to perform with more prevision. Mastery
of skills, i.e. the ability to perform a skill consistently without any error, is rarely achieved
without continual practice. As learners proceed through the various levels of skill
development, from rescuer to instructor to instructor trainer, the psychomotor skills become
refined from basic motor skills to high-level skills and finally to near perfect motor skills.
Some participants may require a longer time than others to master skills but may retain skills
longer because of additional practice. They may have high expectations of themselves.
Instructors should be sensitive to these expectations. They may need to suggest rest periods
or modification of methods to maximize learners’ success. Some adults are embarrassed
about declining physical abilities. Instructors can ease uncomfortable feelings through
sensitive observation and recognition of problems. Learners need different amount of time
to acquire the psychomotor skills.
While acquiring the skills, learners need a physical environment that will make learning as
free from stress as possible. An ideal physical environment for psychomotor learning is a well-
ventilated, well-lighted room with adequate space for each group of participants, instructor
and manikin.

10
Affective needs
Participants also have affective learning needs. The behaviors and attitudes of the instructor
towards the learner can influence this area more than any technique, strategy, or
instructional method. All learners want to be treated with dignity and respect. The instructor
must protect the learners’ self-esteem so that mistake can be made and corrected without
diminishing the desire to learn. Some learners may have pride that will not allow them to
make mistakes or feel foolish. The sensitive instructor will recognize this trait and present
needed corrections positively, avoiding behavior that could be perceived as belittling the
learner.
All learners bring values and beliefs to the classroom. These values may affect a participant’s
ability to learn, depending on the subject matter. Adult will accept or reject information
depending on whether if fits with their value system. In addition, the reason the participant
is taking the course may affect the ability to learn. Finally, learners, particularly adults, fear
failure. This fear is directly proportional to a learner’s past experiences. Most adults will admit
to some anxiety about failure. These anxieties can be reduced through assurances by the
instructor that for the layperson there is no pass or fail and that “we are willing to work with
you and help you learn”.
In summary: learners bring many needs to the courses they attended. These include a need
for recognition of their motivation and past experience, a need to learn by doing and to
receive feedback about progress, a need for comfortable, informal learning environment, a
need to be accepted, and a need to be treated with dignity. Instructors sensitive to these
needs will be more successful and derive greater satisfaction from their teaching.
Teaching Strategies
The instructors provide importance guidance and support to the learning process. Learning
can be enhanced by the instructor who uses effective communication skills to help achieve
the learning objectives.
1. Lecture is didactic teaching strategy which the instructor is the ‘dispenser’ of information.
2. In a group discussion, the instructor takes the role of initiator, facilitator and has minimal
participation in the discussion. During the group discussion, the instructor initiates
interaction amongst learners and it is an effective teaching strategy in soliciting a large
amount of input from the learners.
3. Demonstration of skills is an effective teaching strategy in teaching BCLS. Position of the
instructor is very important when performing, so as to enable learners to view the steps.
The steps must be performed in the correct sequence so as not to confuse the learners.

11
MODULE 3 : PRINCIPLES OF EVALUATION
Evaluation teaches and measures the progress and effectiveness of the training program or activity. Evaluations are used to: a. Determine extent to which training objectives have been met b. Seek to improve the future planning and implementing of training c. Provide insights for adjusting, reviewing and revising goals, schedule and procedures According to Gronlund and Linn (1990), evaluation is a systematic process of determining the
extent to which the objectives are archived. It is a continuous process based upon the criteria
set and measures the performance of the learners, effectiveness of the instructors and the
quality of the training. Therefore, evaluation of teaching must begin with clear and
meaningful definition of the learning objectives. The Instructor must be familiar with the
criteria for evaluation that is the requirement for theory and practical assessments.
Non-Verbal Behavior
Instructors should be aware of their non-verbal behavior and use it to enhance and reinforce
what they say.
Verbal Behavior
Verbal behavior falls into 3 categories:
1. Giving information
The instructor must demonstrate personal commitment in giving information to the learner.
2. Asking questions
The instructor must be wary as to whether the question is closed-ended or open-ended and why it is important to ask questions.
3. Giving feedback
When giving feedback to learners, the instructor should remember that the feedback should be: Timely - so that the learner is able to recognize the connection between the feedback
statement and the recent performance
Private - so that the learner should not feel embarrassed or ridiculed
Direct - should be given to the person for whom it is intended
Clear - the learner should know what the instructor wants to say

12
Types of Evaluation
Evaluation is classified into 2 types:
Formative Evaluation
Summative Evaluation
Formative evaluation is intended to strengthen and improve the objective being evaluated. It
is usually conducted informally throughout learning process. Thus, formative evaluation
concentrates on ways of improving a project or a programme while it is on-going.
In contrast, summative evaluation is intended to examine the effects of outcomes of the
object being evaluated. It is undertaken after the project or a programme has been completed.
Purpose of Evaluation
To motivate the learner to learn.
To assess the effectiveness of a project.
To assess the outcomes of the project.
To reinforce knowledge and skill emphasized in the course.
3.1 THE RELATION OF LEARNING OBJECTIVES TO EVALUATION
Course evaluation should focus on how effective this goal has been achieved and provide
feedback to help correct deficiencies. Criteria for course completion must be identified and
shared with learners. The goal of the courses should be to impart knowledge and foster
learning.
Cognitive and skills evaluation sessions present a multitude of challenges to the instructor.
There may be concerns about the need for evaluation or about the objectivity, reliability,
validity or clinical usefulness of evaluation. Evaluation systems are often difficult to develop
and use. Add to these concerns emotion-laden testing circumstances and learners’ fear of
failure or worry about embarrassment, and evaluation is fraught with difficulties.
If learning objectives are specified, many problems in evaluation may be resolved. The most
effective method of measuring achievement of such psychomotor objective is to have the
learner demonstrate it. Thus, at some time in a course, the evaluation of psychomotor skills
will enable the learner to demonstrate achievement of those skills.
Cognitive objectives, on the other hand, may be demonstrated by asking a series of questions
to see if the learner knows the information. This and other cognitive objectives may be
measured by written questions.

13
3.2 GUIDELINES AND CRITERIA FOR EVALUATION
Manikin practice and evaluation are essential. During testing, the instructor should evaluate
the learner safe and effective management of the casualty.
To satisfactorily complete the course, the learner must perform skills according to the SRFAC
guidelines incorporated into the performance, or scoring sheets and satisfies the specific
criteria for each certification level.
The manikin must be checked prior to testing to ensure proper performance. Testing should
be uncoached and preferably, attended by only and the learner. The learner should be judged
for performance according to the performance sheet (checklist).
Guidelines are provided to assist the instructor in learner evaluation. Acknowledge that some
variation is acceptable and that some subjective evaluation must be made.
Proper sequencing and performing of the steps are the most important aspects of
evaluation. Some variation in performance is acceptable. Recommended margins of error are
presented in keeping with the philosophy that is better to accept a certain number of errors
from a provider candidate, allowing him/her to complete the course successfully, than to have
to fail the candidate because performance is not perfect.
Criteria for Successful Completion of BCLS+AED Course
Each learner must:
1. Score a passing grade (80%) on the written test; and
2. Demonstrate 100% competency in practical assessment, performing the BCLS+AED
steps. A skill performance checklist will be used to evaluate the learner’s performance.
Critical performance should be followed closely with no coaching. The instructor should
allocate a maximum testing time for each learner.
3. A total of 3 attempts are allowed on the same day for both theory and practical tests. A
certificate is issued to students who pass both the theory and practical tests.

14
3.3 Practical Assessment Guidelines and Criteria
Learner must demonstrate proficiency in manikin performance for all the BCLS and AED modules. Specific criteria for performance are presented in the following:
3.3.1 Adult One-Rescuer CPR
Performance Steps:
1. Check for Danger
2. Check for Responsiveness
Tap the casualty’s shoulder firmly
Ask loudly: “Hello! Hello! Are you okay? if no response
3. Activate EMS – Shout loudly “Help! Call ambulance 995
4. Get AED
5. Place the casualty in a supine position
6. Check for normal Breathing and Pulse (for trained Healthcare Providers)
Look for the rise & fall of the chest.
Gasping is NOT a normal breathing but a sign of cardiac arrest
Check for breathing and pulse not more than 10 seconds
7. Provide Continuous Chest Compressions
8. Perform 5 cycles of 30 compressions and 2 ventilations
9. Re-assess the victim for presence of pulse and breathing
10. If pulse is absent, continue CPR 30:2
11. If pulse present, but breathing absent, give rescue breathing one breath in every 5
seconds (total of 12 rescue breaths)
12. If pulse and breathing present, place the casualty in the recovery position
13. Continue to monitor casualty’s pulse and breathing every 2 minutes as this can stop
suddenly
Passing Criteria: Compression for Adult One-Rescuer CPR
Total compressions to be given : 150
Compressions errors allowed : 30
Compression depth : 4 to 6 cm
Compression rate : 100 to 120 per
Total duration for 5 cycles of CPR : Within 130 seconds
Complete chest recoil after each compression
Immediate failure for wrong landmark (landmark visibly outside of body sternum)

15
Passing Criteria: Ventilation for Adult One-Rescuer CPR
Total ventilations to be given : 10
Ventilation errors allowed : 5 (Less than 400 mls)
Ventilation volume : 400-600 mls
Ventilation duration : 1 second per breath
There must be exhalation between breaths
3.3.2 Adult Foreign Body Airway Obstruction (FBAO) Management
Conscious Adult FBAO Testing of the FBAO management sequence for the conscious adult may be done on a person provided that the thrusts are simulated. Performance Steps:
The Heimlich Manoeuvre (Abdominal Thrust) 1. Approach the casualty from his/her front and ask: ‘Are you choking?’
2. Reassure the casualty: ‘I can help’
3. Stand behind the casualty and position one foot between the casualty’s legs
4. Put your arm around the casualty’s abdomen.
5. Locate the navel.
6. Place 2 fingers above the navel and well below the tip of the xiphoid process.
7. Make a fist with the other hand with thumb in the palm.
8. Place the thumb side of the fist against the casualty’s abdomen, midline and above the 2 fingers’ spacing.
9. Lean the casualty forward with one hand, while maintaining the fist against the abdomen.
10. Grasp your fist with your other hand.
11. Give quick inward and upward abdominal thrusts in one motion into the casualty’s abdomen.
12. Deliver each thrust firmly and distinctly with the intent of relieving the obstruction until the foreign body is expelled or the casualty becomes unconscious.
Chest Thrust for obese or pregnant casualty 1. Approach the casualty from his/her front and ask: ‘Are you choking?’
2. Reassure the victim: ‘I can help’
3. Stand behind the casualty and position one foot between the casualty’s legs
4. Place your arms under the casualty’s armpits, encircling the chest.
5. Make a fist with one hand with thumb in the palm.

16
6. Place the thumb side of the fist on the middle of the casualty’s sternum (breastbone).
7. Grasp your fist with your other hand and bring yourself close to the casualty before giving quick backward thrusts
8. Deliver each backward thrust firmly and distinctly with the intent of relieving the obstruction until the foreign body is expelled or the casualty becomes unconscious.
Unconscious Adult FBAO (witnessed) 1. Support and position the casualty lying on his/her back on a firm flat surface.
2. Activate EMS. Shout “Help! Call ambulance 995, Get AED”
3. Locate the landmark and perform 30 chest compressions using the same location and techniques used for chest compressions in CPR
4. Perform head tilt-chin lift, to open the airway
5. While maintaining head tilt, open the mouth gently to check for visible foreign bodies
6. If foreign body is seen, maintain open airway with head-tilt, chin lift manoeuvre and insert the index finger of your other hand into the casualty’s mouth along the inside of the cheek
7. Remove the foreign body by finger sweep maneuver
8. Check for normal breathing. If there is no normal breathing, attempt one ventilation by performing mouth-to-mouth breathing (1st ventilation)
9. If there is no resistance, airway is clear. Check for normal breathing and pulse. If absent, start CPR.
10. If there is resistance (i.e. chest does not rise), the airway may be blocked. Reposition the casualty’s head with head tilt-chin lift. Re-attempt to ventilate (2nd ventilation)
11. If there is resistance (i.e. chest does not rise) again, perform another 30 chest compressions using the same techniques used in CPR
12. Perform head tilt, chin lift manoeuvre and check for the presence of any foreign body
13. Repeat Step 4 to 8 until airway is clear or the casualty starts breathing
14. Continue to monitor the casualty’s pulse and breathing every 2 minutes as this can stop suddenly
Performance Criteria
The learner will be evaluated on proper sequencing, ventilation, compression, correct hand position, technique of abdominal and chest thrusts
3.3.3 Child CPR
This module addresses children from 1 to 8 years of age. Children in this age group
rarely collapse owing to a primary heart problem. Cardiac arrest is usually secondary
to other events, such as major trauma or respiratory illness. Therefore, rescuers
must detect and promptly treat early signs of respiratory and circulatory failure to
prevent cardiac arrest.
If a child is below 8 years old but of a larger size or a child that is above 8 years of
age, perform chest compressions as in adult CPR.

17
Performance Steps:
1. Check for Danger
2. Check for Responsiveness
Tap the child on the shoulders firmly
Ask loudly: “Hello! Hello! Are you okay?
If the child does not respond, this may be due to:
o Airway obstructed (blocked)
o Breathing that has stopped
o The heart that has stopped beating
o Act quickly if the child is unconscious
3. Activate EMS – Shout loudly “Help! Call ambulance 995
4. Get AED
5. Place the casualty in a supine position
6. Check for normal Breathing and Pulse (for trained Healthcare Providers)
Look for the rise & fall of the chest.
Gasping is NOT a normal breathing but a sign of cardiac arrest
Check for breathing and pulse not more than 10 seconds
7. Provide Continuous Chest Compressions
depth of 4-5 cm (1/3 the anterior-posterior diameter)
compression rate of 100 to 120 per minute
allow complete chest recoil before starting next compressions
8. Perform 5 cycles of 30 compressions and 2 ventilations
9. Re-assess the child for presence of pulse and breathing
10. If pulse is absent, continue CPR 30:2
11. If pulse present, but breathing absent, give rescue breathing one breath in every 3
seconds (total of 20 rescue breaths)
12. If pulse and breathing present, place child in the recovery position
13. Continue to monitor pulse and breathing every 2 minutes as this can stop suddenly
Performance Criteria
The learner will be evaluated for proper sequencing, compression and ventilation.
The correct hand position is critical.

18
3.3.4 Child Foreign Body Airway Obstruction (FBAO)
Complete airway obstruction is an emergency that will result in death within minutes
if not treated immediately. The most common incidence of choking in children is
during eating or playing.
3.3.4.1 Relief of Conscious Child FBAO
The technique used to relieve foreign body airway obstruction is the Heimlich Manoeuvre (abdominal thrusts).
Performance Steps:
1. Approach the child from his/her front and ask: ‘Are you choking?’ 2. Tell the child ‘I can help’
If the child is able to cough, instruct the child to cough as hard as possible
If unable, perform Heimlich Manoeuvre
3. If child is standing, stand behind the child. If the child is sitting, the rescuer kneels and position herself behind the child
4. Put your arm around the child’s abdomen. 5. Locate the navel. 6. Place 2 fingers above the navel and well below the tip of the xiphoid process. 7. Make a fist with the other hand with thumb in the palm. 8. Place the thumb side of the fist against the casualty’s abdomen, midline and above the
2 fingers’ spacing. 9. Lean the casualty forward with one hand, while maintaining the fist against the
abdomen. 10. Grasp your fist with your other hand. 11. Give quick inward and upward abdominal thrusts in one motion into the child’s
abdomen. 12. Deliver each thrust firmly and distinctly with the intent of relieving the obstruction until
the foreign body is expelled or the child becomes unconscious.
3.3.4.2 Relief of unconscious child FBAO
If the child becomes unconscious, proceed with the following steps
Performance Steps:
1. Support and position the child lying on his/her back on a firm flat surface. 2. If the child is unresponsive, Shout loudly “Help! Call ambulance 995” and get AED if visible
3. Locate the landmark and perform 30 chest compressions using the same location and techniques used for chest compressions in CPR
4. Perform head tilt-chin lift, to open the airway
5. While maintaining head tilt, open the child’s mouth gently to check for visible foreign bodies

19
6. If foreign body is seen, maintain open airway with chin lift manoeuvre and insert the index finger of your other hand into the child’s mouth along the inside of the cheek.
7. Remove the foreign body by finger sweep maneuver
8. Check for normal breathing. If there is no normal breathing, attempt to ventilate by performing mouth-to-mouth breathing (1st ventilation)
9. If there is no resistance, airway is clear. Check for normal breathing and pulse, and if absent, start CPR
10. If there is resistance (chest does not rise), the airway may be blocked. Reposition the child’s head with head tilt-chin lift. Re-attempt to ventilate (2nd ventilation)
11. If there is resistance (chest does not rise) again, perform another 30 chest compressions using the same techniques and location used in CPR
12. Perform head tilt, chin lift manoeuvre and check for foreign body
13. Repeat Step 4 to 8 until airway is clear or child starts breathing
14. Check pulse and breathing. If both present, place child in recovery position
15. Continue to monitor child’s pulse and breathing as this can stop suddenly
Performance Criteria
The learner will be evaluated on proper sequencing, compression and ventilation.
Correct hand position on the landmark and technique of abdominal thrusts. 3.3.5 Infant CPR
This module addresses the care of infants up to one year of age
Infant rarely collapse due to primary heart problem. Cardiac arrest is usually secondary to other events, such as major trauma or respiratory illness. Therefore, rescuers must detect and promptly treat early signs of respiratory and circulatory failure to prevent cardiac arrest.
Performance Steps:
1. Check for Danger - Quickly assess the situation for danger, so that the rescuer operates
in a safe environment
2. Check for Responsiveness - tap the infant firmly on his/her shoulder, to elicit a response
3. If the infant does not respond, he/she is likely to be unconscious. This may be due to:
o An airway that is obstructed (blocked) by the tongue that has fallen backwards, food or secretions
o Breathing that has stopped o The heart that has stopped beating, usually because of a heart disease
4. If the infant is unresponsive, Shout loudly for help and immediately call “995” for an emergency ambulance
5. Get AED” if visible and nearby
6. Position the infant lying on his/her back on a firm flat surface
7. Check for normal Breathing: Look for the rise and fall of the chest
8. Locate for brachial pulse simultaneously
9. Check for normal breathing and pulse should not take more than 10 seconds
20
10. If infant has no pulse or if unsure about the presence of pulse and no normal breathing, commence CPR
11. Locate correct hand position for chest compressions
12. Provide Continuous Chest Compressions
13. Compress the infant’s chest to a depth of 3 – 4 cm, allow complete chest recoil before starting the next compression
14. Do not lift fingers off the chest between each chest compression
15. Keep head low throughout the CPR cycle (during upstroke and breathing)
16. Perform chest compressions at a rate of 100 – 120 per minute
17. Perform 5 cycles of 30 compressions and 2 breaths within 2 minutes
18. Check for normal breathing and pulse after every 5 cycles of CPR 30:2
19. If pulse is still absence or you are unsure about the presence of pulse, continue CPR 30:2
20. If pulse is present and the infant is not breathing, perform rescue breathing at 20 breaths per minute (one breath every 3 seconds)
21. If both breathing and pulse are present, turn the infant to lateral position
22. Continue to monitor infant’s breathing and pulse for every 2 minutes
Performance Criteria
The learner will be evaluated for proper sequencing, ventilation and compression.
The correct fingers position is critical.
3.3.6 Infant Foreign Body Airway Obstruction (FBAO) Management
Performance Steps:
Conscious Infant
1. Assess for signs of complete airway obstruction (choking)
2. If infant is choking, attempt to relieve the airway obstruction immediately
3. Support the infant’s head with your palm and back of infant’s body on your forearm.
4. “Sandwich” the infant with your other hand by:
4.1 Support the infant’s jaw with your thumb on one side and the rest of your fingers on the other side
4.2 Place your forearm on the infant’s chest
4.3 Support the infant’s head and body as a unit
4.4 Stride one leg forward, bending at a knee keeping your foot flat on the floor. Do not tip toe.
4.5 Place the infant’s head downwards with the forearm, which supporting the infant’s chest onto your thigh to support the infant
5. Deliver 5 back blows forcefully between the shoulder blades with head lower than the body
6. “Sandwich” the infant and turn the infant over with head lower than the body
7. Rest your forearm supporting the infant’s back onto your thigh (on the same side) to support the infant

21
8. Draw an imaginary line between the nipples with the ring finger to the centre of the sternum
9. Place your middle and index fingers next to your ring finger
10. Lift up your ring finger and deliver 5 chest thrusts over the lower half of the sternum using same technique as chest compressions in CPR
11. If foreign body is seen, place the infant on a firm flat surface and remove foreign body with your little finger
12. Repeat back blows and chest thrusts until foreign body is expelled or infant becomes unconscious
Performance Criteria
The learner will be evaluated for proper sequencing, technique of sandwich manoeuvre, technique of back blows and chest thrusts
The correct hand position is critical
Unconscious Infant (witnessed)
If the infant becomes unconscious
1. Support and position the infant lying on his /her back on a firm flat surface
2. Activate EMS. Shout “Help! Call ambulance 995, Get AED if visible or within 100 meters
3. Locate the landmark and perform 30 chest compressions using same location and techniques as in CPR
4. Perform head tilt-chin lift to open the airway
5. While maintaining head tilt, open the mouth gently to check for visible foreign bodies
6. If foreign body seen, maintain open airway with chin-lift and insert the little finger of your other hand into the infant’s mouth and remove the foreign body by finger sweep
7. Check for normal breathing. Look for the rise and fall of the chest
8. If there is no normal breathing, attempt to ventilate by performing mouth-to-mouth and nose breathing (1st ventilation)
9. If there is no resistance, airway is clear. Check for normal breathing and pulse, and if absent, start CPR
10. If there is resistance (chest does not rise), this indicates that the airway may be blocked. Re-position the infant’s head with head tilt-chin lift and re-attempt to ventilate (2nd ventilation)
11. If there is still resistance, perform 30 chest compressions using the same location and techniques used for chest compressions in CPR
12. Proceed back to head-tilt, chin-lift and check for foreign body
13. Repeat Step 4 to 7 until airway is clear or infant starts breathing
14. Turn infant in lateral position
15. Continue to monitor infant’s pulse and breathing every 2 minutes
Performance Criteria
The learner will be evaluated for proper sequencing, compression and ventilation.
The correct hand position is critical.
22
3.4 AED PERFORMANCE STEPS
AED KEY POINTS
1. FUNCTION OF AED
Define AED
Purpose of AED
2. INDICATION
Unconscious
No breathing
No pulse
3. SAFETY ISSUE
Exclude AED Danger (water, metal, gas)
Defibrillation Danger – ensure no one is touching the casualty before defibrillation
4. CHEST PREPARATION
Remove jewellery
Shave excessive chest hair
Check for any pacemaker or any implantable device
Remove medication patch
Wipe off sweat
Apply defibrillation pads
5. FEATURES OF AED
6. DOCUMENTATION
Time of collapse
Time AED put on
Time of each shock & Number of shocks
Time of ambulance arrival
Name of casualty, AED operator, bystander involved in the resuscitation
7. HOUSEKEEPING
Stock replenishment
Battery self-test
8. OPERATION STEPS (Refer to AED operation steps)

23
3.4.1 CPR OPERATION STEPS
D Danger
Check for danger & ensure scene is safe for you and the casualty
R Response
Assess responsiveness
S Shout
If no response, shout for help Call ambulance 995, follow dispatcher’s instruction
A Get AED
If there is another person around, ask him/her to get the AED If alone, only get AED if it is visible and nearby
B Breathing
Check for normal breathing – Look for the rise and fall of the chest. Not more than 10 seconds. It is important to recognize that gasping is NOT a normal breathing, it is a sign of cardiac arrest If no breathing, start CPR (for laypersons only)
C Circulation
Check pulse (for Healthcare providers only) If no breathing / no pulse – start CPR Combination of Pulse and Breathing checks should not take longer than 10 seconds Continue to do CPR until AED arrives
3.4.2 AED OPERATION STEPS
1. Arrival of AED
2. Exclude AED danger – water, metal, gas
3. Chest preparation
4. Operate AED – Push ON button follow the voice advise
5. AED Shock Protocol
a. Shockable Rhythm
Analyse Shock CPR (1-2 mins) Analyse Shock CPR (1- 2 mins)
Repeat the sequence if shock is advised
b. Non-Shockable Rhythm
Analyse No Shock Check breathing / pulse
Breathing / Pulse ABSENT CPR (1-2 mins) Analyse repeat the whole sequence
Breathing / Pulse PRESENT – put the casualty in recovery position. Continue to monitor the casualty till help arrives.

24
3.4.3 CPR (MTM) + AED Procedure
The correct sequencing is as follow:
A) Cardiopulmonary Resuscitation
1st Rescuer
1. Survey Scene & Check for Danger
2. Check Response – Call, tap on casualty’s shoulder firmly and ask loudly “Hello! Hello! Are
you ok? No respond,
3. Call ambulance 995
4. Get AED
5. Check breathing – Look for the rise and fall of the chest wall. It is important to recognize
that gasping is NOT a normal breathing; it is a sign of cardiac arrest.
6. LAYPERSON – If breathing is absent, start chest compressions immediately
7. HEALTHCARE PROVIDERS ONLY – Check Pulse. Combination of pulse and breathing
checks should not take longer than 10 seconds.
8. Perform CPR (30 compression & 2 ventilations)
Correct body and hand position
Demonstrate correct technique of compression
Compress vertically at 4 to 6 cm downwards with complete relaxation of chest
pressure after each compression at rate of 100 to 120 per minute
Say mnemonic (1&2&3&4&5& 1&2&3&4&10& 1&2&3&4&15 1&2&3&4&20
1&2&3&4&25 1&2&3&4&30)
Give cycles of 30 compressions followed by 2 ventilations
Perform CPR until ambulance / AED arrives.
25
B) AUTOMATED EXTERNAL DEFIBRILLATION (AED)
2ND Rescuer
1. Check for AED dangers (e.g. water, metal & flammable gases)
2. Chest preparation (e.g. hair, medication patches, pacemaker & jewellery)
3. Operate the AED :
Press ON button
Attach defibrillation pad
4. Observe AED safety measures
Ensure that no one is touching the patient when the defibrillator is analyzing heart
rhythm
Say “Stand Clear” and ensure that no one is touching the patient when the defibrillator
is delivering the “SHOCK”
Deliver the shock as advised by AED
Perform CPR for 1 minute
1st rescuer perform chest compression
2nd rescuer perform ventilation (i.e. maintain head tilt-chin lift and gives 2 breath after
every 30 compressions by the 1st rescuer)
5. If AED analysis indicate “No Shock Advised” and pulse / breathing present:
Maintain open airway with AED remains connected
Monitor patient every 2 minutes until handed over to medical personnel.
6. Report and documentation
Evaluation criteria
To complete the BCLS+AED course successfully, each participant must:
1. Score a passing grade (80%) on the theory assessment; and
2. For practical assessment, participant must demonstrate 100% competency in the
BCLS+AED steps. A skill checklist will be issued to evaluate the participant’s performance.
Performance in accordance with SRFSC standard guideline is required. Critical
performances should be followed closely with no coaching. The instructor should allocate
a maximum testing time per station per student.
3. A total of 3 attempts are allowed on the same day for both theory and practical
assessment. A certificate is issued to participants who pass both the theory and practical
assessment.

26
3.4.4 CHILD/INFANT AED Procedure
Use of AED for Child/Infant AEDs can be used safely for children aged one year or older. AEDs are capable of accurately identifying arrhythmias in children; they are very
unlikely to advise a shock inappropriately. Those aged between 1–8 years should preferably be defibrillated with paediatric pads
if available. If an AED with paediatric pads is not available, an AED with adult pads may be used. For casualties less than one year old, the incidence of shockable rhythms is very low
unless if they are suffering from cardiac disease. In these cases, the risk/benefit ratio may be favourable, and the use of an AED
(preferably with paediatric pads) should be considered.
Placement of Defibrillation Pads for Children/Infant
1. Anterior-anterior defibrillation pads placement is advised. Ensure that the pads are
not touching and are at least 1-2cm apart (see figure A1).
Figure A1 - Anterior- anterior AED electrode pads placement
2. If the pads are touching, apply front (right pad on central sternum) and back (left pad on the upper back between the shoulder blades). Attach the child defibrillation pads on front and back (anterior- posterior) as shown (see figure A2):
Figure A2

27
The following scenarios may be used by the instructor to depict possible situations which you may encounter due to the varied nature of an emergency. By practicing these scenarios, you can be more confident to assist a casualty in emergencies.
1) Shock – No Shock – No Shock 2) No Shock – Shock – No Shock 3) Shock – Shock – No Shock 4) No Shock – No Shock – Shock 5) No Shock – No Shock – No Shock

28
MODULE 4 : SAFETY DURING BCLS+AED TRAINING
Dos
Perform hand hygiene before and after contact with manikins
Disinfect manikin’s mouth and nose between each participant (use alcohol-based disinfectant)
Use disposable face shield when performing mouth-to-mouth ventilation
Simulate finger sweep when removing foreign body in an obstructed airway
● Female participants to:
o inform chief instructor if you are pregnant
o remove lipstick before training session
o tie-up or bun-up long hair
Participants must inform chief instructor on duty before the training begins if they :
o have weeping dermatologic lesions on their hands, or in oral or circumoral areas
o are known to be seropositive for HBs Ag
o have known medical problem
o have fever, chills or body ache in the previous three days
o had been advised by doctor not to exert themselves
Keep finger nails short to prevent leaving a puncture marks on the manikins
Handle all manikins and training equipment with care
Decontaminate all used manikin’s faces and change the disposable lungs after each training sessions
Don’ts
No eating or drinking during class to avoid contamination of manikins with food particles
Do not mark any area of the manikin
Do not open the manikin’s mouth beyond 2.5cm

29
Injury Control
Injury control is also another safety perspective all instructors need to be aware of. Person
attending BCLS+AED training, sometimes report pain in the hands, over the shoulders and low
back during and after the training session. Most of these aches and pains are temporary and can
be reduced or minimized with correct positioning and posture techniques. The following would
be recommended during BCLS+AED skills practice to minimize incidence of such aches and pains:
Correct placement of the heel of the palm on the lower half of the sternum, which is a
smoother surface than on the sterno-costal junctions which are irregular and causing
hand discomfort when pressed on.
In manikin with zipped or button shirt, ensure that the hands are not placed directly on
the button or zip structure. This would be an additional cause of hand pain during CPR.
Move the buttoned or zipped portion aside.
Teach all participants to lock their elbows and use body weight when doing chest
compressions. This will result in the participant not using upper arm and shoulder
strength thus preventing strain to the muscles and ligaments serving these structures.
Pain in the shoulders and upper arms that occur during CPR training is most often due to
use of elbow strength, frequent flexion and extension of the elbow during CPR. This can
be avoided simply by adopting correct chest compression techniques.
Occurrence of low back pain during performance of CPR can be avoided by teaching
participants to use their hips as the fulcrum when doing chest compressions rather than
their lower back. To achieve this, it is important to consciously keep their backs straight.
Instructors should guide participants to adopt correct posture and help to minimize
instances of aches, pain and strains during CPR training.

30
MODULE 5 : MANIKIN TROUBLESHOOTING & MAINTENANCE
5.1 COMMON FAULTS AND TROUBLESHOOTING IN CPR
The common faults that occurring during CPR are:
Procedure Fault Cause(s) Troubleshooting
Ventilation
Overinflation
Excessive ventilation volume and rapid flow rates
1. Provide short breaths only
until chest rise visibly. Exceeding this level of chest rise can result in Overinflation.
Underinflation
Improper opening of the airway
1. Perform the Head tilt-chin
lift maneuver correctly. 2. Maintaining a tight seal of
mouth and nose before ventilating.
3. 0.4 to 0.6 litres of air is required.
Mechanical Problems
Chest wall does not rise during inflation
Airway wrongly assembled
1. Check that airway assembly
is placed correctly.
Chest Compressions
Ineffective compression
1. Incorrect
placement of hands 2. Using hand
strength to compress
1. Check landmark prior to
compression 2. Use the body weight to
depress at 4-6 cm 3. Compression should be
smooth and uninterrupted.
Wrong hand position
1. Chest is depressed
with hands placed outside the correct area of compression.
1. Relocate hand placement
for chest compression. 2. Maintain hand position
throughout compression

31
5.2 MANIKIN DISINFECTION
Manikin disinfection is necessary during and after each training session to ensure proper hygiene
and minimize potential cross infection.
During Training
Action Manikin Disinfection Action
1.
Clean manikin’s mouth and nose with alcohol swab (spirit sachet) after each participant’s contact
2. Use handrub / wash hands before and after manikin contact
After Training
Action Manikin Disinfection Action
1. Detach the face mask from the manikin
2. Wash with soap and water
3.
Disinfect the face mask according to the individual training centre guidelines. Recommended disinfectant solutions are:
a. Sodium hypochlorite 0.5% b. Sodium dichloroisocyanurate (presept) c. Chlorhexidine 0.5% in spirit or methylated spirit (alcohol) 70% d. Biospot Effervescent Tablets – 1 Table (2.5 Gm) in 12 L of water.
Immerse reusable protective face shield in Biospot Effervescent Tablets solution for at least 30 minutes. Rinse and put to dry.
4. Replace disposable lung

32
5.3 USE OF MANIKIN FACE SHIELDS
Manikin Face Shields (Optional)
Proper disinfection of manikin’s face provides
proper hygienic conditions during training.
However, for aesthetic reasons students may feel
more comfortable having a clean barrier between
own lips and surfaces touched by another person’s lips.
The Manikin Face Shields are designed to allow
inexpensive barrier protection and to train the use of
Resusci Patient Face Shields made for use in real cases.
To use manikin face shield.
Disinfect as instructed above.
Pull a shield out of the roll and tear off at perforation.
Place shield over manikin’s face as illustrated.
Hold shield in place and airway open, as illustrated.
Place your lips over the ventilation opening, pinch the
nose and ventilate.
Discard shield after each practice session.

5.4.1 Steps for Changing face skin and Disposable Airways of Resusci Anne Manikin (Disassembling)
Step 1: Unfold Face Skin
Piece
Step 2: Flip two sides of Face Skin and remove it
Step 3: Unfold the skin of the jaw
Step 4: Remove the jaw piece
Step 5: Disconnect the mouth piece

33
Step 6: Loosen the chest plate
Step 7: Remove the chest plate
Step 9: Withdraw the exhaust piece
Step 8: Withdraw the mouth piece

34
Step 11: Discard the disposable airway Step 10: Connect opening of both mouth piece and exhaust piece

35
5.4.2 Steps for Changing face skin and Disposable Airways of Resusci Anne Manikin (Assembling)
Step 12: Obtain a new disposable airway Step 13: Fit the disposable airway to Inner chest cover
Step 14: Attach the disposable airway and secure it to the inner chest cover
36
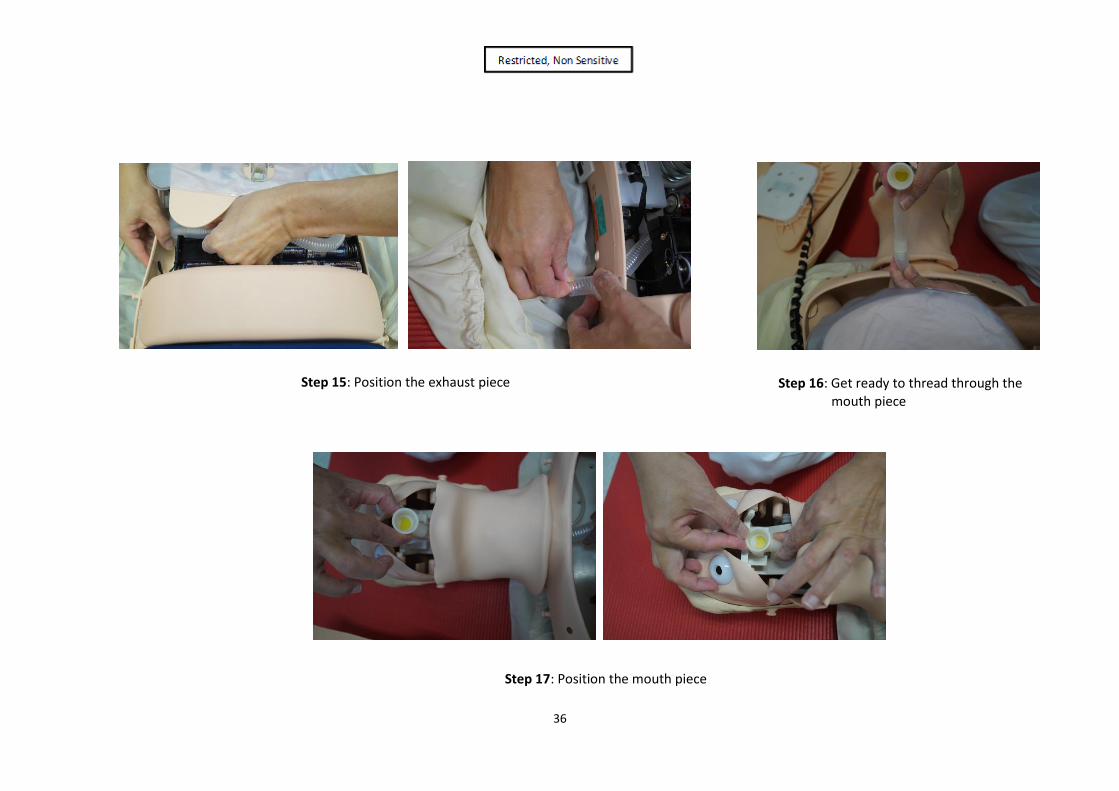
Step 16: Get ready to thread through the mouth piece
Step 15: Position the exhaust piece
Step 17: Position the mouth piece
37
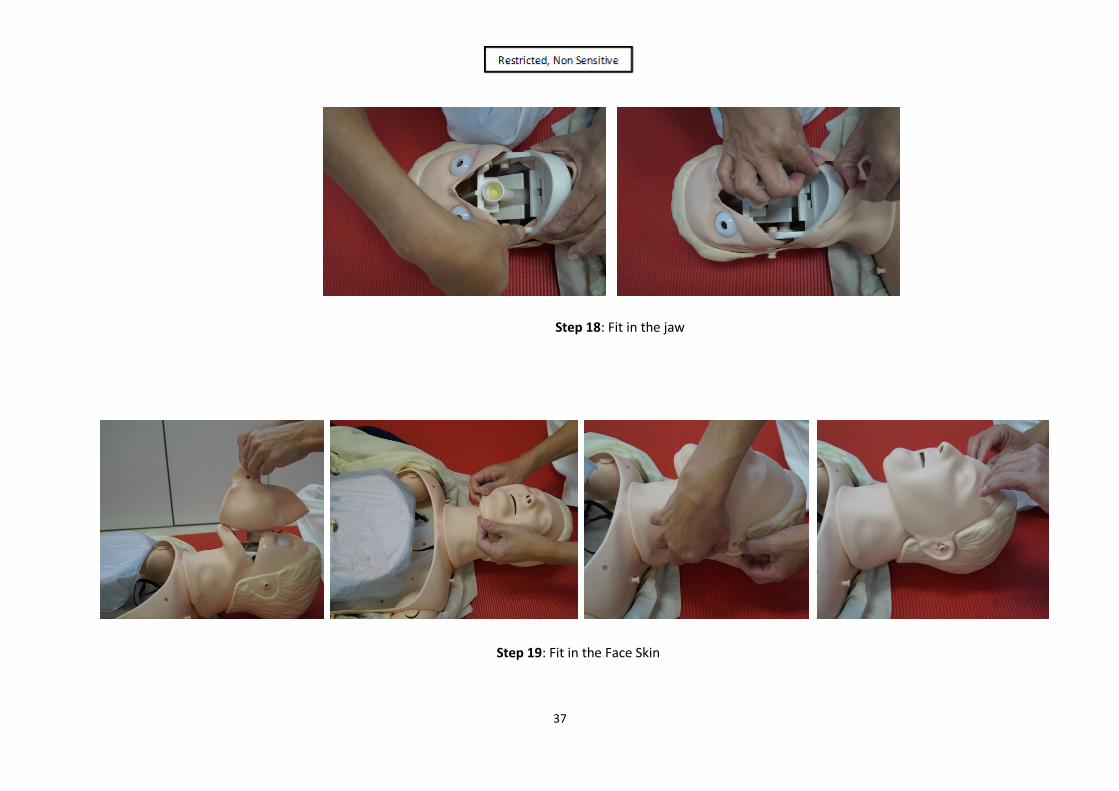
Step 18: Fit in the jaw
Step 19: Fit in the Face Skin

38
Step 20: Fit in the outer Chest Cover
Step 21: Bag and mask to test air entry

MODULE 6 : OPERATING PROCEDURES OF LIFEPAK 1000

40
INTRODUCTION TO LIFEPAK 1000
The Medtronic LIFEPAK 1000 Defibrillator is an Automated External Defibrillator (AED).
When the electrode pads are applied to the casualty’s ex0osed chest, the AED analyzes the
casualty’s heart rhythm. If a shockable rhythm is detected, the AED will direct the operator,
using both audio and visual guides, to deliver an intense pulse of electricity (shock) to the
heart muscle. The shock is delivered through the electrode pads on the chest. Delivery of
this pulse of electricity is called defibrillation.
Defibrillation is the recognized means of treating life-threatening irregularities of the heart beat,
such as ventricular fibrillation, that cause cardiac arrest. Cardiac arrest is usually caused by
a malfunction of the heart’s electrical system, which prevents the heart from pumping blood
throughout the body. This critical condition can cause death within minutes.
The LIFEPAK 1000 defibrillator is a semiautomatic model that can be operated in either of
three modes: AED mode, Manual mode, and ECG mode. The defibrillator uses the patented
Physio-Control Shock Advisory SystemTM (SAS) to analyze the patient’s electrocardiographic
(ECG) rhythm and prompts you when it detects a shockable rhythm and when it does not
detect a shockable rhythm. Responder interaction is required to provide therapy (defibrillation)
to the patient.
Defibrillator Features
Heart Rhythm Analysis The patented Physio-Control Shock Advisory System evaluates the patient’s heart rhythm.
ECG Display (optional) This feature allows display of the ECG using the 3-wire (Lead II) cable and when using the defibrillator in AED mode. This feature is also necessary to use the defibrillator in Manual Mode.
Defibrillation Waveform The defibrillation shock, using ADAPTIVTM Biphasic technology, is delivered in the form of a
biphasic truncated exponential (BTE) defibrillation waveform. LIFEPAK biphasic defibrillators
measure the patient’s transthoracic impedance and automatically adjust the defibrillation
waveform current, duration, and voltage to meet the needs of the individual patient. Patient
impedance is measured whenever defibrillation electrodes are in contact with the patient.

41
cprMAXTM Technology The cprMAX technology is designed to allow resuscitation protocols to maximize the amount
of CPR administered during the treatment using the LIFEPAK 1000 defibrillator.
When used with the factory default settings enabled, the defibrillator allows AED protocols to
be consistent with the 2010 American Heart Association Guidelines for Cardiopulmonary
Resuscitation and Emergency Cardiovascular Care and European Resuscitation Council
Guidelines for Resuscitation 2010.
Data Management The LIFEPAK 1000 defibrillator digitally records patient data, including ECG rhythm and
delivered shocks. Recorded data may be transferred from the defibrillator to a PC using an
infrared connection. The PC must have LIFENET products installed to collect and review the
recorded patient data.
Daily Self-Test The defibrillator performs a daily self-test every 24 hours and every time you turn on the
defibrillator. This feature tests the most important circuitry in the defibrillator to give the
responder a high degree of confidence that it is ready for use.
Readiness Display The LIFEPAK 1000 defibrillator includes a readiness display. The OK symbol appears in the
display if the daily self-tests is completed successfully. A battery symbol that approximates
the remaining state of charge is also visible. If the self-test detects that service is required,
the OK symbol disappears and the service symbol appears.
Battery The non-rechargeable battery never requires recharging. The approximate level of charge in
the battery is indicated by the fuel gauge on the battery, on the readiness display when the
defibrillator is off, or on the screen when the defibrillator is in use.
When optimally maintained, a new non-rechargeable battery pak can provide approximately
17 hours of “ON” time or 440 discharges at 200 joules.

42
CONTROLS AND INDICATORS
Battery compartment
Softkeys
IrDA Port
Screen
Electrode socket Readiness display
Speaker
ON/OFF button
SHOCK button
MENU button

43
BASIC STEPS FOR USING THE LIFEPAK 1000 DEFIBRILLATOR
Step 1 –Preparation
1. Establish that the patient is in cardiopulmonary arrest
(the patient must be unresponsive, not breathing normally and showing no signs of circulat ion).
Request others for help. Call 995 for emergency ambulance service.
Place the LIFEPAK 1000 next to the casualty, as soon as possible.
2. Press ON/OFF to turn on the defibrillator (the green LED illuminates). Voice prompts will sound, guiding you through the rescue process.
3. Prepare the patient for therapy electrode placement. • If possible, place the patient on a hard surface
away from standing water. • Remove clothing from the patient's upper torso. • Remove excessive hair from the electrode sites. If
shaving is necessary, avoid cutting the skin. • Clean the skin and dry it briskly with a towel or
gauze. • Do not apply alcohol, tincture of benzoin, or
antiperspirant to the skin.
4. Open the therapy electrode packet and remove the electrodes. Slowly peel back the protective liner on the electrodes, beginning with the cable connection end. Safely discard the liner to prevent slipping.

44
5. Connect the electrodes to the defibrillator (if they are not already connected).
6. Apply the therapy electrodes to the patient's chest. Starting from one end, press the electrodes firmly onto the patient's skin, as shown.

45
Step 2 – Analysis and Monitoring
7. As soon as the electrode is connected properly.
The LIFEPAK 1000 automatically begins analysing the casualty’s heart’s rhythm.
Listen to the voice prompts.
Do not touch the casualty unless instructed to do so.
If no shock is advised, the LIFEPAK 1000 will instruct you to
“Check for pulse”
“If no pulse, start CPR”
“Provide rescue breath and chest compression”
If shock is advised, the LIFEPAK 1000 will instruct you to
“Stand clear, push SHOCK button”
Everyone clear – make sure no none is touching the casualty, and
PRESS SHOCK BUTTON LIFEPAK 1000 will also emit a warning tone.

46
Step 3 – Shock Delivery
9.
If casualty starts moving or breathing, keep the electrode pads on the casualty and connect to LIFEPAK 1000.
Attend to casualty as instructed in your CPR training.
8.
Make sure no one is touching the casualty.
Press the red, flashing SHOCK button to deliver the shock.
The LIFEPAK 1000 will then tell you the shock was delivered and to begin providing chest compressions and rescue breaths.
After one minute of CPR, the LIFEPAK 1000 goes back to analysing to see of a shock is advised.
Follow the voice prompts.
Note
When the LIFEPAK 1000’s energy is fully-charged, If you do not press the SHOCK button within 15 seconds of being prompted, the LIFEPAK will disarm itself and re-evaluate the casualty’s heart rhythm.
Follow the voice prompts.

47
FEATURES OF LIFEPAK 1000
Feature
Description
1
Readiness display
The readiness display alerts you to the defibrillator’s readiness status.
Three symbols allow you to determine whether the defibrillator is ready for use or needs attention. The following defines what each symbol represents and when/where each appears.
The wrench indicator appears on the readiness display when a condition exists that prevents or could prevent normal defibrillator operation.
The OK symbol indicates that the defibrillator is ready for use. This symbol is visible only when the defibrillator is off.
The battery symbol appears on the readiness display when the defibrillator is off. When one bar is visible in the symbol, the battery is low. If the symbol is blank, the battery is extremely low and the OK symbol will not appear when the defibrillator is off.
2
Speaker
Provides audio voice prompts and tones.
3
ON/OFF button
Green ON/OFF button turns the power on or off. The button is lit whenever the defibrillator is on.
4
SHOCK button
Pressing the SHOCK button (when flashing) delivers a shock to the patient.

48
Feature Description
5 MENU button
Used to select operating modes (Manual or AED) and enter information in Setup mode.
6
Softkeys
Two softkeys work in conjunction with the screen, providing a way for you to make selections while using the defibrillator. The softkey functions vary, depending on the task you are performing at the time. Their function is identified by the label above them on the screen.
7
Display
Displays pertinent information for use during all modes of operation.
8
Electrode socket
For connecting defibrillation electrodes (black) and training ECG cables (Green).
49
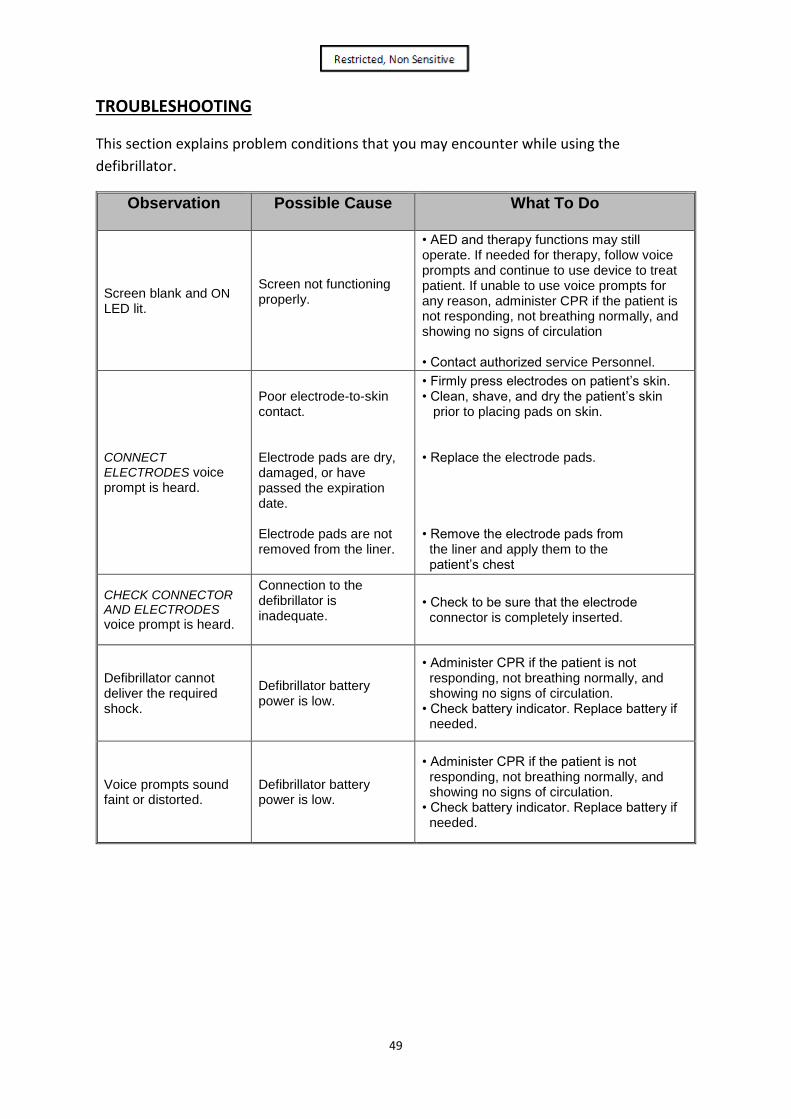
TROUBLESHOOTING
This section explains problem conditions that you may encounter while using the
defibrillator.
Observation Possible Cause What To Do
Screen blank and ON
LED lit.
Screen not functioning properly.
• AED and therapy functions may still operate. If needed for therapy, follow voice prompts and continue to use device to treat patient. If unable to use voice prompts for any reason, administer CPR if the patient is not responding, not breathing normally, and showing no signs of circulation • Contact authorized service Personnel.
CONNECT
ELECTRODES voice prompt is heard.
Poor electrode-to-skin contact. Electrode pads are dry, damaged, or have passed the expiration date. Electrode pads are not removed from the liner.
• Firmly press electrodes on patient’s skin. • Clean, shave, and dry the patient’s skin prior to placing pads on skin. • Replace the electrode pads. • Remove the electrode pads from the liner and apply them to the patient’s chest
CHECK CONNECTOR AND ELECTRODES
voice prompt is heard.
Connection to the defibrillator is inadequate.
• Check to be sure that the electrode connector is completely inserted.
Defibrillator cannot deliver the required shock.
Defibrillator battery power is low.
• Administer CPR if the patient is not responding, not breathing normally, and showing no signs of circulation. • Check battery indicator. Replace battery if needed.
Voice prompts sound faint or distorted.
Defibrillator battery power is low.
• Administer CPR if the patient is not responding, not breathing normally, and showing no signs of circulation. • Check battery indicator. Replace battery if needed.

50
Observation Possible Cause What To Do
MOTION DETECTED
and STOP MOTION
voice prompts are heard.
Patient movement because of location. Patient movement because of breathing.
CPR being performed during analysis. Vehicle motion. Electrical/radio frequency interference.
• Move patient to stable location, if possible. • Check patient for normal breathing. • Stop CPR during analysis. • Stop vehicle during analysis, if possible. • Move communication or other suspected devices away from the defibrillator when possible.
Defibrillator does not deliver voice prompts or beeping tones after you turn it on.
Speaker not functioning. Depleted battery.
• AED and therapy functions may still operate. If needed for therapy, follow screen prompts and continue to use device to treat patient. If unable to use screen prompts for any reason, administer CPR if the patient is not responding, not breathing normally, and showing no signs of circulation • Contact authorized service personnel. • Administer CPR if the patient is not responding, not breathing normally, and showing no signs of circulation • Check battery indicator. Replace battery if Needed • Contact authorized service personnel.
The readiness display is blank.
The defibrillator has been turned on. Operating temperature is too low. LCD not operating properly.
• Normal condition when the defibrillator is in use.
• Operate the defibrillator within the specified temperature range.
• Contact authorized service personnel.

1. One-Man CPR Strip Interpretation
Depth at 4cm to 6cm
400 to 600 mls
Within 130 sec
Passing Criteria: 1) Not more than 30 compression & 5 ventilation errors
2) Immediate failure for wrong landmark location for chest compression e.g. outside the lower half of sternum.
7.1 ONE-MAN CPR GRAPH INTERPRETATION

1
Depth At 4 to 6 cm
Ventilation 400 - 600 mls
Within 130 sec
Passing Criteria:
1) Not more than 30 compression & 5 ventilation errors
2) Immediate failure for wrong landmark location for chest compression e.g. outside the lower half of sternum.
Compression rate 100 to 120/min sec
7.2 ONE-MAN CPR GRAPH INTERPRETATION

2
AED testing will commence after the 2 minutes of one-man CPR. When testing CPR and AED, participants must do the actual compressions and ventilations as if they are doing the one–man CPR.
CPR(MTM) – 5 cycles of 30 compressions and 2 ventilations within 130 seconds
When to stop CPR? (Asked by instructor) – Paramedics take over,
AED Analysing heart rhythm or casualty wakes up
7.3 CPR(MTM) Strip Interpretation –Resusci Anne QCPR
Up to 5 errors allowed based on 10
ventilations (insufficient volume or
missing or extra ventilations) 5 cycles of
30 compressions and 2 ventilations
Duration from 1st compression to last
ventilations within 130 seconds
Up to 30 errors allowed based on 150 compressions (incomplete
chest recoil, incorrect hand placement and incorrect depth)

CPR Sequence Adult and Older
Child Child
(1-8 Years of Age)
Infant (Less than 1 Year of
Age)
Check Danger Establish Responsiveness
Tap on casualty’s shoulders firmly; Shout “Hello! Hello! Are you OK?”
Activate EMS Immediately
Shout Loudly: Call “995” for emergency ambulance
Get AED If there is another person around
If alone, only get AED if it is visible and nearby
Recognition of Cardiac Arrest Check for normal breathing
(gasping is not normal breathing)
Pulse Check (for Trained Healthcare Providers
Only) Carotid Brachial
Start Chest Compressions If breathing and pulse are absent or if you are unsure about its
presence, start chest compressions and perform 5 cycles of CPR (30 : 2)
Compression Landmarks Lower half of sternum Lower half of sternum (Just below intermammary line)
Compression Methods Heel of 1 hand, other on top 2 Fingers
Compression Depth 4 to 6 cm 4 - 5 cm 3 - 4 cm
Compression Rate 100 to 120 / minutes
Compression : Ventilation Ratio 30:2
Breathing 2 breaths at 1 second per breath. The two breaths should not take
more than 2 seconds.
SUMMARY: DIFFERENCE BETWEEN ADULT, CHILD AND INFANT-ONE-RESCUER CPR

1
Acknowledgement
Singapore Resuscitation and First Aid Council (SRFAC)
BCLS + AED (E-Book) Rev 1 / 2018 (SRFAC)
CPR+AED INSTRUCTORS’ TRAINING COURSE MANUAL (NRC) Rev 2 / 2013

BCLS+AED INSTRUCTOR TRAINEE ASSESSMENT FORM
Name of Trainee Instructor: ________________________________________________________
NRIC No: ______________________ Organisation/Department: __________________________
Date of BCLS Instructor Course Attended: ____________________________________________
To indicate the grading in the boxes: (P) Poor, (F) Fair, (G) Good, (E) Excellent
No Teaching Qualities 1st
Assessment
Date:
2nd Assessment
Date:
1. Overall Knowledge
2. Demonstration Skills
3. Questioning Skills
4. Communication Skills
5. Coaching Skills
6. Ability to handle questions
7. Practical Teaching
8. Practical Testing
9. Manikin Maintenance & Troubleshooting
10. Rapport with Trainees
11. Time Management
12. Graph Interpretation
Final Assessment (To Circle Pass or Fail) Pass / Fail Pass / Fail
Name of Assessor:
Assessor’s Signature:
Comments:
Assessment 1
_____________________________________________________________________________
_____________________________________________________________________________
Assessment 2
_____________________________________________________________________________
_____________________________________________________________________________
Trainee Attachment Completed at: _________________________________________________
Name of Coordinator & Contact Number of Training Centre: ____________________________ All forms submitted to NDU should be duly completed. Assessment form must be endorsed with the Training Centre stamp or accompanied
by an official cover letter from the Training Centre. All incomplete forms will be rejected