bread - to your health sprouted flour co. · ed whole wheat bread we have “reprinted” with...
TRANSCRIPT

BreadWINTER 2014

Issue 14 (Winter 2014)ISSN: 2341-7730
Copyright © 2014, Insanely Interested Publishing
http://bread.insanelyinterested.com/http://breadfeed.tumblr.com/
https://facebook.com/interested.bread/[email protected]


BREAD • Winter 2014 24
SPROUTED GRAIN BREAD
Words: JARKKO LAINEPhotos: ANN MARIE MICHAELS, LEO GONG and PAIGE GREEN
In the introduction of his maybe most popu-lar book, The Bread Baker’s Apprentice (pub-lished in 2001), Peter Reinhart wrote: “I want-ed to call one of my recent books The Bread Revolution, but that sounded too militant.”
Fast forward thirteen years and you’ll find that book: this October, he published a book with that very title — Bread Revolution: World-Class Baking with Sprouted and Whole Grains, Heirloom Flours, and Fresh Techniques. To me this is a clear sign that he considers the current developments in bread making as profound and even more important than those of earli-er years. After all, this is a man who has been following the growth of the home baking and artisan baking movement in the United States since the 1980s!
So, what is it that has gotten the baker and bread making teacher so excited?
First of all, as you’ll quickly see looking at his bibliography, Reinhart is an explorer.
“If you’ve followed me through my literary journey with bread, you know that I’m fascinat-ed by new frontiers and revolutionary turning points.” Reinhart writes in his new book. This time, the new frontier is flour made of sprout-
ed grain. And not just small portions of this flour, but breads made entirely of sprouted wheat flour!
When I read the book’s description for the first time, I had to go back and read it again. The first concept that comes to mind when we talk about sprouting is the falling number — and the idea that sprouted flour has already started breaking up and will lead to poor bak-ing properties. Reinhart had the same doubts when he first came across with the idea in 2009.
“Doesn’t sprouting the wheat compromise the gluten and damage the starch?” he asked the miller, Joe Lindley, who gave him his first batch of flour made with sprouted flour to ex-periment with.
But that’s not what’s happening here. In fact, it turns out that sprouted grain
flour, when produced correctly, not only can be used to make bread but can lead to great results with only a little effort. Reinhart writes: “what I especially love about it is that it can accomplish everything we strive to achieve through the use of pre-ferments and extend-ing fermentation time, and it does so before the grain is even turned into flour.”

BREAD • Winter 2014 25
Peter Reinhart himself is clearly excited. When I sent him a few questions about the new book and the idea of using sprouted wheat flour in bread making, he explained to me how we are living in an amazing time, “almost a Camelot time in the history of food and cooking” — a time where “science is helping us understand the why behind the how” and “there are finan-cial resources available to encourage such ex-perimentation.”
WHAT IS THIS ALL ABOUT? While sprouted flour probably won’t replace regular wheat flour varieties, Reinhart is con-vinced that it will become a big deal in the fu-ture: “Probably not a replacement, since the supply will always lag behind conventional versions, and the cost will be higher, but I do believe it will work as both a stand alone prod-uct but also as an add-in to other grain breads and cereals. Bakers have spent thousands of years learning how to coax great flavor from un-sprouted grain so I see no need in throw-ing all that away, but I think we’re just seeing the tip of the iceberg of what’s possible with sprouted flour.”
What is required is that a few key criteria are met. “Probably a couple of things: the sup-ply must increase, the price must decrease, and some influential chefs like Thomas Keller or Dan Barber starting to use it. All of these things are possible, by the way.” Reinhart says.
But what’s so great about this type of flour?First, there’s the taste. As Reinhart told me,
“If flavor isn’t the first reason then the concept will never fly with the public. Healthfulness can get you in the door but flavor always rules in the end. This is, hands down, the best tasting whole grain flour, most especially and impor-tantly, wheat, imaginable. The health and di-gestibility benefits are a huge bonus.”
Second, this flour is healthier than regular wholewheat flour, with nutrients in a more di-gestible form.
“If flavor isn’t the first reason then the concept will never fly with the public. Healthfulness can get you in the door but flavor always rules in the end. This is, hands down, the best tasting whole grain flour, most especially and importantly, wheat, imaginable.”

BREAD • Winter 2014 26
In the book, Reinhart writes: “Another ben-efit of using sprouted flour is that it means us-ing the whole kernel—the entire grain or seed. And by germinating grains and seeds we actu-ally enhance their nutritional benefits, allowing us receive the maximum nutritional benefit in-herent in the grain.”
Third, Reinhart says using sprouted flour simplifies the baking process: a lot of the ben-efits that regular bread gets from long fermen-tation, autolyse and other artisan bread mak-ing techniques have already taken place at the sprouting phase when the pre-digestion of the flour has started: “The hardest part is getting a hold of the flour; after that, the process is very simple, even easier than most artisan breads.” Reinhart says.
“The method of using sprouted flour actu-ally simplifies the process since there’s little or no need for preferments, so the biggest shift is a mental one, believing that sprouted flour, which in the past would be viewed as “dam-aged,” can actually work. After that, it pretty much sells itself.”
As a specific difference compared to more traditional flours, Reinhart mentions that sprouted flour “absorbs more water than reg-ular whole wheat flour, so be prepared to hy-drate generously and to perform a few stretch and folds along the way to strengthen the glu-ten network.”
TRY IT YOURSELFIf you got interested in the technique, you can start with the master formula for Sprout-ed Whole Wheat Bread we have “reprinted” with permission from the book’s publisher, Ten Speed Press on the next few pages.
It’s also the one Reinhart himself suggests as the first introduction to baking bread with sprouted flour: “The basic whole wheat bread is a great showcase, as is the buttermilk pancake recipe in my book. This one, simple as it is, makes the best pancakes I’ve ever tasted and is kind of deal closer for why to use sprouted
“The method of using sprouted flour
actually simplifies the process since there’s
little or no need for preferments, so
the biggest shift is a mental one”

BREAD • Winter 2014 27
QUESTIONS TO THE MILLERTo learn more about the flour and what is in-volved in making it, I asked Peggy Sutton from To Your Health Sprouted Flour some addition-al questions.
**Jarkko: Can you briefly describe the process of making sprouted grain flour?
Peggy: It is a 4-day process from raw grains to sprouted flour. The grains are washed, soaked, sprouted, dried, milled and packaged. All of these steps take 4 days to accomplish true sprouted flour.
Jarkko: The regular millers I’ve talked to are very interested in the falling number and how it affects the flour’s properties. I understand that you are doing quite the opposite? Why is it possible to bake bread with nothing but sprouted grain flour?
Peggy: True sprouted flour will have a falling number reduction of about 50% compared to the falling number of the un-sprouted grain. The falling number measures the degree of sproutedness in a grain.
The baking characteristics of sprouted flour are, in many instances, superior to un-sprout-ed flour. The enzymatic action that is pro-duced during sprouting and maintained by low-temperature drying and milling tend to form strong gluten bonds quickly without the need to knead breads for very long at all. Peter Reinhart uses a simple stretch and fold meth-od that produces beautiful breads. Sprouting also improves the taste of different grains re-markably well. It removes all bitterness and en-hances the individual tastes of grains (i.e. the sweetness of wheat, buttery flavor of kamut, nutty flavor of spelt).
Jarkko: Do you see sprouted flours becoming “the next big thing” in bread? What lies in the future?
Peggy: Sprouted flours have arrived! They ARE the next big thing. Although sprouting is an old time-honored tradition that for the most part fell by the wayside with the onset of the Industrial Revolution, it has been re-born over the last decade and today’s chefs and bakers are realizing the phenomenal taste and textures that sprouted flour produces in breads and other baked goods. To Your Health has experienced triple digit growth each year since we opened in 2006. We’re currently plan-ning our third expansion which will get under-way in early 2015.
Jarkko: What are some of the biggest rea-sons why a baker should start using sprouted flours like yours?
Peggy: Our sprouted flours are all 100% whole grain and are true sprouted flours (meaning not just soaked grains, but fully germinated). They are certified organic and non-GMO.
Taste, I believe, is the number one reason why a baker would want to work with sprout-ed flours, followed by baking characteristics, followed by the fact that sprouted breads are more easily digested and are nutrient-rich.
Jarkko: Do you have any other tips for bakers curious about your flours?
Peggy: We sprout 25 different grains and le-gumes. All of our sprouted products are avail-able as whole grains and flour. The possibilities are almost endless for mixing different sprout-ed flours and grains for great artisan breads. While our flours can be found on many differ-ent store shelves including Whole Foods Mar-ket, we still mill online orders fresh and pack-age just before shipping.

BREAD • Winter 2014 28
wheat. But the sprouted wholewheat master loaf also showcases the pure flavor without any help from other ingredients other than salt, yeast, and water. The less “other” ingredients, like fats, sugars, and dairy, the more obvious the flavor benefits.”
In the United States, you can get sprouted flour from a few specialty producers such as To Your Health Sprouted Flour, presented in the book, or even King Arthur Flour. In the UK, a small business called Breadlink sells many kinds of sprouted flour. In the rest of the world, the flour may be harder to find, which — along with a rather high price tag — has led some home bakers to experiment with milling their own.
“It’s easy to make, as instructed in the book, if you have a small mill to grind the dried sprouted grain into flour.” Reinhart says. That said, you have to be careful — a quick browse through The Fresh Loaf’s forums shows that while easy in principle, creating your own sprouted flour requires a close attention to de-tail so you won’t sprout the grains for too long.
“Sprouting is the first step to malting and so, yes, sprouted flour could also be called malted flour. The trick is to not let the sprouts get too big before drying them so that the integrity of the grain is still intact. That’s the job of the spouters and millers (or us, if we are making our own). As soon as the sprout splits off into a little antenna, that’s the time to dry it and then mill it.” Reinhart says.
I still haven’t found sprouted flour to experi-ment with, but as soon as I do — or get in-spired to try sprouting my own — I know I’ll go ahead and experiment with this idea.
As I don’t like the taste of regular whole wheat bread all that much, I’m curious to see if the sprouted flour bread is as tasty as Reinhart says it is — alone, or maybe mixed with 50% regular white flour… But I’m not going to give up my white sourdough.

BREAD • Winter 2014 30
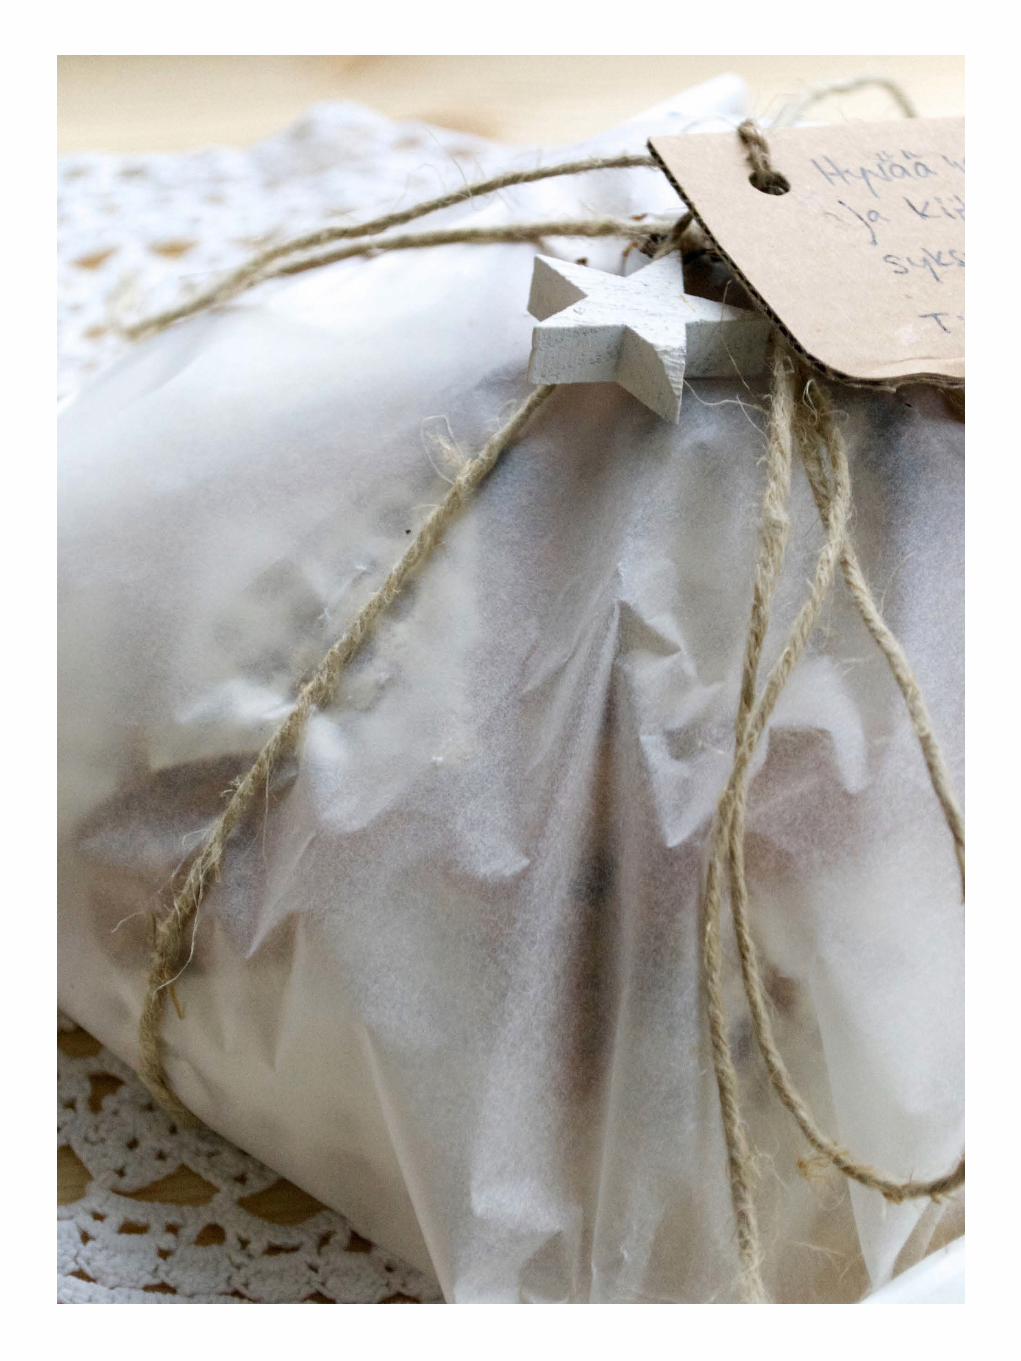
SPROUTED WHOLE WHEAT BREAD
Reprinted with permission from Bread Revolution by Peter Reinhart (Ten Speed Press, © 2014). Photo Credit: Paige Green.
This master dough can be used to make bread in any shape or size. It showcases the natural sweetness and tenderness of sprouted whole wheat flour without any added oil, fat, or other enrichments, such as milk, eggs, or sweeten-ers. Sprouting the wheat changes it so much that many of the “rules” for artisan breads, such as using pre-ferments and long, slow ris-ing times, are unnecessary. The aims of those techniques can be achieved in less time with sprouted flour because the sprouting phase has already accomplished what pre-ferments and long fermentation typically do.
I suggest that you make this bread before attempting any of the more elaborate recipes that follow. This will familiarize you with the flavors and performance of sprouted whole wheat flour. In fact, it may be the only reci-pe you need for everyday breads, as it works equally well as a loaf pan bread and a crusty hearth bread.
Makes 1 large loaf, 2 smaller loaves, or up to 15 rolls.
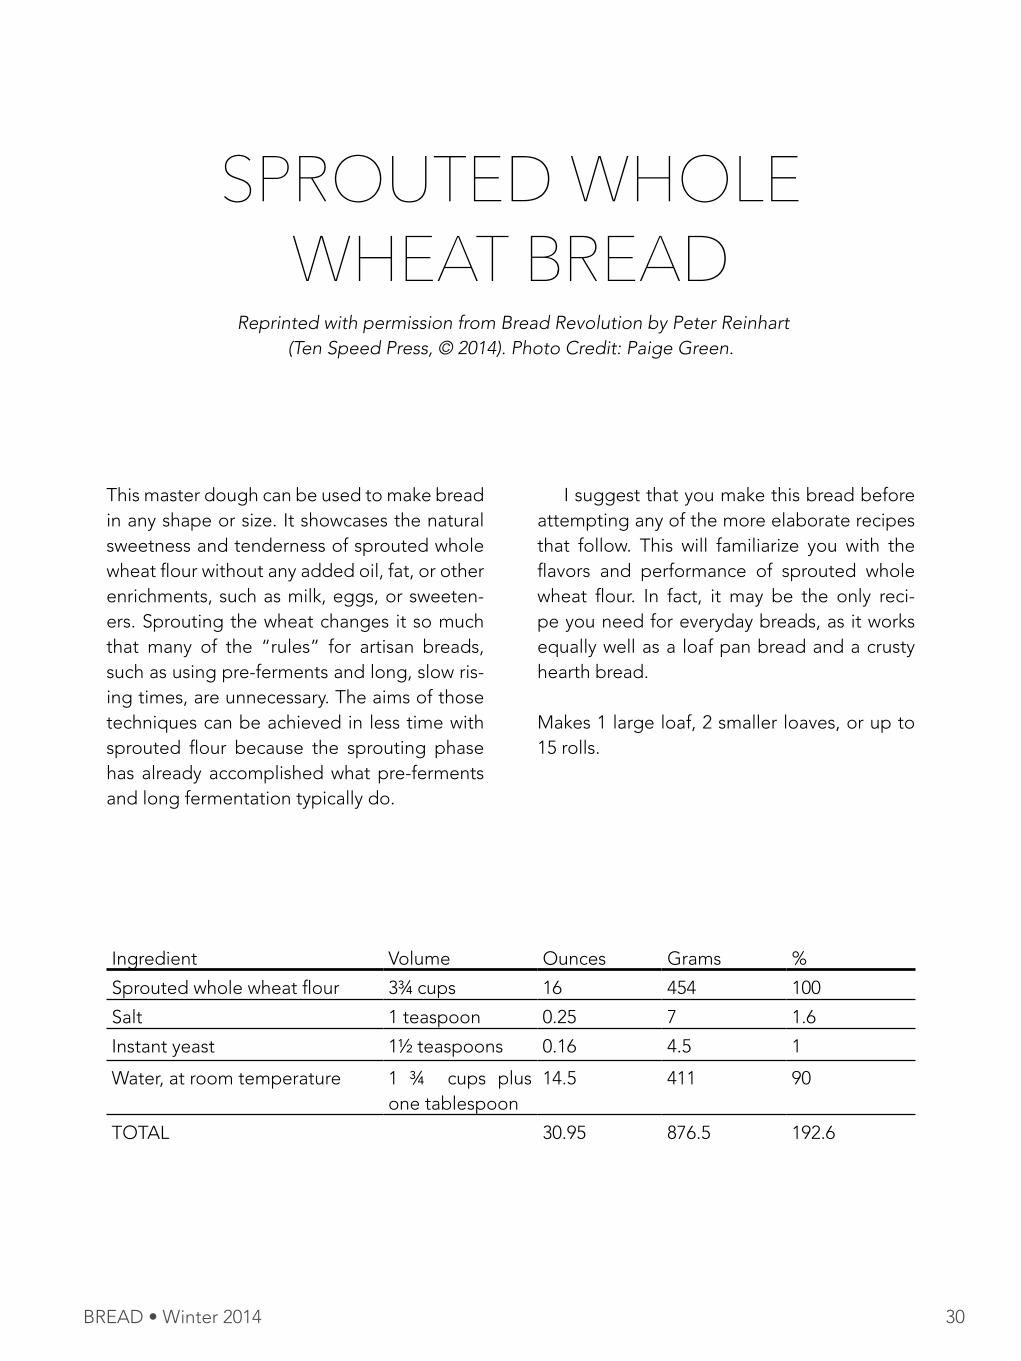
Ingredient Volume Ounces Grams %
Sprouted whole wheat flour 3¾ cups 16 454 100
Salt 1 teaspoon 0.25 7 1.6
Instant yeast 1½ teaspoons 0.16 4.5 1
Water, at room temperature 1 ¾ cups plus one tablespoon
14.5 411 90
TOTAL 30.95 876.5 192.6

BREAD • Winter 2014 31
1. In the bowl of a stand mixer fitted with the paddle attachment, or in a large bowl, stir together the flour, salt, and yeast (on low speed if using a stand mixer). Add the water and mix or stir until the flour is hydrated and a coarse, wet dough forms, about 1 minute. Don’t add more flour, as the dough will thicken while it rests.
2. Let the dough rest, uncovered, for 5 min-utes. Then switch to the dough hook or use a wet spoon or wet hands and mix for 1 minute, on medium-low speed if us-ing a stand mixer. The dough should be smooth but still very soft and sticky (simi-lar to ciabatta dough). Add flour or water only if necessary to achieve that texture; the dough will firm up as you continue to work it.
3. Spread about 1 teaspoon of vegetable oil or olive oil on a work surface. Using a wet or oiled bowl scraper or rubber spatula, transfer the dough to the oiled area. Lightly oil your hands, then stretch and fold the dough as shown on page 20, folding it over itself four times: once each from the top, bottom, and sides. The dough will firm up slightly but still be very soft and somewhat sticky. Cover the dough with the mixing bowl and then, at intervals of 5 minutes or up to 20 min-utes, perform three additional sequenc-es of stretching and folding. For each stretch and fold sequence, lightly oil your hands to prevent sticking. The dough will firm up a bit more with each stretch and fold. After the final fold it should be soft, supple, and tacky and have a springy or bouncy quality when patted.
4. Oil a large bowl and put the dough in the bowl. Mist the top of the dough with veg-etable spray oil and cover the bowl with a lid or plastic wrap; if using plastic wrap, stretch it tightly over the bowl rather than laying it directly on the dough. Ferment the dough at room temperature for 1½ to 2 hours, until double in size. (This time can be shortened by using a warm proof box set at about 90°F / 32°C.)
5. Oil the work surface again and use an oiled bowl scraper or rubber spatula to transfer the dough to the oiled area. For hearth loaves, prepare two bannetons or a couche as described on page 26. Di-vide the dough in half and shape each piece into a boule or bâtard as shown on page 21, then put the shaped loaves in the prepared proofing vessels. For pan loaves, mist two 4½ by 8-inch loaf pans with vegetable spray oil. Divide the dough in half and shape the pieces into sandwich loaves as shown on pages 23 and 24, then put the shaped loaves in the prepared pans. For rolls, line two sheet pans with parchment paper or silicone mats. Divide the dough into the desired number of pieces and shape as desired (see page 24). Put half of the rolls on each lined pan.
6. Mist the top of the dough with vegeta-ble spray oil, then cover it loosely with plastic wrap. Proof for 1 to 1½ hours at room temperature, until the dough in-creases in size by 1½ times. When poked with a finger, it should spring back within a few seconds; if it holds the dimple, it’s risen for too long. (Because the dough is so hydrated, it’s fragile and will fall if you proof it until double in size. It’s better to bake it while it’s still on the rise.)

BREAD • Winter 2014 32
7. To bake a hearth loaf, about 45 min-utes before you plan to bake, prepare the oven for hearth baking with a bak-ing stone and steam pan as shown on page 29, then preheat the oven to 450°F (232°C). Transfer the shaped loaf to a floured peel (or keep it on the sheet pan for baking). Score the top as desired (see page 29). Transfer the loaf onto the bak-ing stone (or put the sheet pan on the baking stone). Pour about 1 cup of hot water into the steam pan. Bake for 15 minutes, then rotate and bake for 15 to 20 minutes longer, until the loaf is gold-en brown on all sides and sounds hollow when thumped on the bottom. The inter-nal temperature should be about 200°F (93°C).Transfer to a wire rack and let cool for at least 30 minutes before slicing and serving.
8. To bake pan loaves, preheat the oven to 375°F (191°C); steam is optional. Bake for 25 minutes, then rotate and bake for 25 to 40 minutes longer, until the bread is golden brown all around, the side walls are firm and not squishy, and the loaf sounds hollow when thumped on the bottom. The internal temperature should be at least 190°F (88°C). Let cool in the pans for at least 10 minutes, then transfer to a wire rack and let cool for at least 20 to 30 minutes longer before slicing and serving.
9. To bake rolls, preheat the oven to 400°F (204°C); steam is optional. Bake for 12 minutes, then rotate and bake for about 10 to 15 minutes longer, until the rolls are golden brown and sound hollow when thumped on the bottom (they will soften as they cool). The internal temperature should be about 190°F (88°C). Transfer to a wire rack and let cool for at least 10 minutes before serving.
NOTE: If it is more convenient for you to use an overnight method, put the covered bowl of dough in the refriger-ator immediately after the final stretch and fold. The next day, remove it from the refrigerator 2½ hours before you plan to bake. Shape the cold dough and proof it at room temperature un-til it increases in size by 1½ times, then bake as directed.
**For more information about the book, visit Amazon.com or your local book seller.