building stone steps is different from building a wood- frame
TRANSCRIPT
B uilding a set of stone steps into a yard’s hard-to-traverse slope improves a home’s curb appeal, and it also makes walking through the yard much more enjoyable. With basic tools and materials, a little patience, and (let’s be
honest) no small amount of muscle, you can build them yourself. Stone steps can be built into any landscape in a relatively short amount of time. The steps featured here took four of us about six hours. Although the process is straightforward, you need to make some decisions and calculations before you start digging.
Choose your own stoneAs with any construction project, it’s important to have a budget before you begin, but be prepared: Stone isn’t as cheap as it used to be, unless it comes from your own property. Native, local stone is less costly than stone shipped over state borders, but be mindful of inflated
Stone Steps
Skip the mortar, and use packed quarry dust for a walkway that will last a lifetime
BY CODY MACFIE
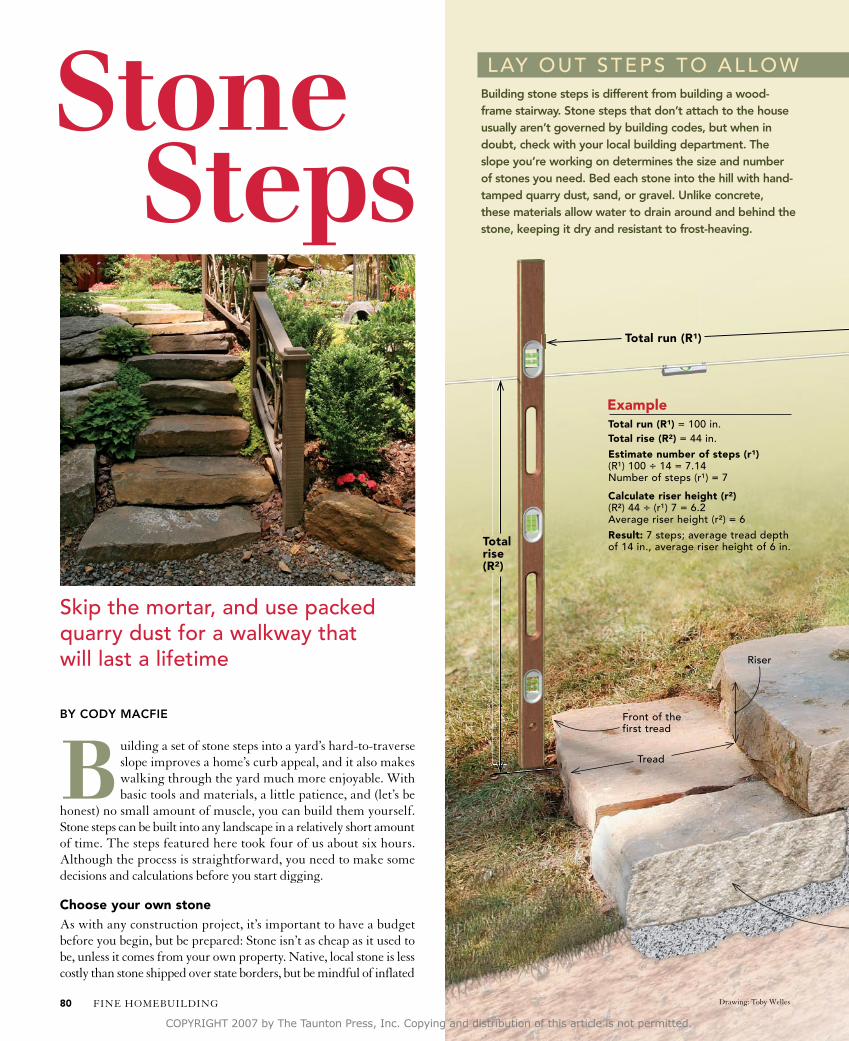
lay ouT STepS To alloW For a coMForTaBle STr IDeBuilding stone steps is different from building a wood-frame stairway. Stone steps that don’t attach to the house usually aren’t governed by building codes, but when in doubt, check with your local building department. The slope you’re working on determines the size and number of stones you need. Bed each stone into the hill with hand-tamped quarry dust, sand, or gravel. Unlike concrete, these materials allow water to drain around and behind the stone, keeping it dry and resistant to frost-heaving.
Tread
riser
Total rise (R²)
Total run (R¹)
Front of the first tread
Total
Total run (R¹)
Total run (R¹) = 100 in.Total rise (R²) = 44 in.
Estimate number of steps (r¹)(r¹) 100 ÷ 14 = 7.14number of steps (r¹) = 7
Calculate riser height (r²)(r²) 44 ÷ (r¹) 7 = 6.2average riser height (r²) = 6
Result: 7 steps; average tread depth of 14 in., average riser height of 6 in.
Example
FINE HOMEBUILDING80 Drawing: Toby Welles
COPYRIGHT 2007 by The Taunton Press, Inc. Copying and distribution of this article is not permitted.

lay ouT STepS To alloW For a coMForTaBle STr IDe
Indicate the step location with marking paint. When the paint dries, use a line level, a level, and a tape measure to determine the total rise and total run of the slope.
The tread depth, or run, should be from 12 in. to 18 in. deep.
Each riser should be from 5 in. to 8 in. tall.
Bed each stone into the hill on at least 2 in. of hand-tamped quarry dust, sand, or gravel.
Pack quarry dust, sand, or gravel behind and on the sides of each stone.
End the steps just below the crest of the slope.
Back of top tread
Start the first step on relatively level ground, just before the slope begins.
ALL THE TOOLS YOU NEED TO MOVE AND SHAPE STONE
A 4-ft. level, a stringline, a line level, and a tape are perfect for layout on short hills; hills taller than 6 ft. are easier to measure with a transit. Use a wheelbarrow and a hand cart to haul quarry dust, sod, and stones. A spade shovel is ideal for coping stone into the slope and for loosening sod from the ground. Spread quarry dust with a square-blade shovel and a heavy-duty bow rake. Use a brick hammer, a rock hammer, and sharp and blunt chisels to shape stones. Use a rubber mallet to tap the stones around as you fine-tune the fit.
Overlap each stone by at least 1 in.
Use small pieces of stone to shim the treads level.
To determine the number and size of stones, follow these general guidelines:
• Keep tread depth between 12 in. and 18 in.
• choose stones that are between 5 in. and 8 in. thick.
• Start with thicker stones at the bottom, gradually working up to thinner ones.
• Two stones can make one step. I often make the bottom step wider than the others, using two stones of the same thickness, as shown in the drawing below.
• estimate the number of steps first. Divide the total run (r¹) by an average tread depth
of 14 in. round to the nearest whole number to get the step estimate (r¹).
• calculate the average riser height. Divide the total rise (r²) by r¹ to get the average riser height (r²). If r² is less than 5 in., increase the run of each tread and recalculate. If r² is greater than 8 in., increase the total run (r¹) by adding an extra step.
• It doesn’t need to be exact. riser height won’t be uniform because stones aren’t identical in thickness.
How many steps?
www.finehomebuilding.com JUNE/JULy 2007 81
COPYRIGHT 2007 by The Taunton Press, Inc. Copying and distribution of this article is not permitted.

prices. Be prepared to shop around to ensure that you get the best price. Also, check with local stonema-sons; some of them have large amounts of stock or leftover stone that you can pick up at discount.
Most often, stone is sold by weight, but in some cases, good stepping stones are sold individually. If your stoneyard has bulk stone, dig around the pile to pick out your favorites. Some stoneyards call stepping stones slabs, or large-cut stone. Don’t let someone else pick out the stones for you and then deliver them without your approval. Good stepping stones are hard to find, and a lot of people want them. I have my stoneyard put aside good stones for me.
Size, color, texture, and cost all need to be considered when choosing stepping stones. Stones have either a natural surface or a cut one. I like the untouched, rugged quality of a natural surface, which allows me to create a one-of-a-kind set of steps. Building with them, how-ever, means that each step must be chosen carefully, positioned, and occasionally shaped by hand.
Sometimes cut stone is more suitable. On a recent job, a client needed steps for a formal Arts and Crafts-style home. To go with the
My crew and I like to have as little impact as possible on a mature lawn. Doing so makes homeowners happier, and it gives the impression that the stone steps have been part of the landscape for a long time. To this end, we place plastic on the lawn so that we have a place to lay quarry dust and sod. We also carve the steps into the hill one at a time, removing only as much sod as necessary to fit each stone. In the end, we pack the sod back in around the finished steps, pick up the plastic, and make a quick pass over the grass with a rake to lift it back up.
Keep water moving downhill. After we remove the sod and dig into the slope to accommodate the proper rise of each step, we lay down quarry dust to create a base for the stone. We build up the back of each step with dust to pitch it at least 1⁄4 in. per ft. If water ran back into the hill, it would freeze in the win-ter and cause the steps to heave.
Scribe adjacent stones for a clean fit. With the first stone set, we choose a neighboring stone with an identi-cal rise. With the front edges of both stones aligned, we scribe a line parallel to the first stone onto the second stone. A few shots with a chisel and a rock ham-mer make quick work of trimming the stone. Don’t get carried away, though. Fill the gap between stones with quarry dust.
home’s blocky style, he chose a relatively smooth, rectangular granite step with hand-pitched edges. Jagged, rustic steps would have looked out of place in this setting; despite my usual preference for a rustic look, I think he made the right choice.
To complement the stones and the style of the house on the project fea-tured here, I chose weathered Tennessee fieldstone steps with natural edges. Large pieces of flagstone also make good steps. Look in landscape- construction books or magazines for good step-design and layout ideas, and show the stone supplier what you like.
Order enough stone, and have enough helpersWhen you’re doing any kind of stonework, the most important preliminary task is gathering the correct materials and then getting
Move stones with a hand truck. Although moving large stones around a job site is eas-ier with heavy machin-ery, doing so can easily scratch them and dam-age the lawn. We move stones with a hand truck equipped with fat pneu-matic wheels that don’t leave ruts in the lawn.
Heavy STone STepS SHoulD TreaD lIgHTly on a MaTure lanDScape
visit our Web site to learn how cody Macfie uses a chisel and a hammer to shape stone properly.
FineHomebuilding.com
FINE HOMEBUILDING82
COPYRIGHT 2007 by The Taunton Press, Inc. Copying and distribution of this article is not permitted.

Leveling requires addition and subtrac-tion. Because we’re using rough stone, we sometimes need to add shims or to remove knots, or high spots, in the stones so that they rest soundly on each other. We use broken pieces of stone as shims to fill small gaps and knock down the knots with a chisel and a rock hammer.
Surgery with sod and stone. As we move up to the top step, we place each stone where we want it for the appropriate run and scribe the back of it into the hill with a shovel. We remove the sod and dirt within the shovel line, then add a pad of quarry dust to level the step as needed. Once the steps are in, we replace bits of sod around the steps.
them to the site. If the stones you’re going to be working with are heavy, rent a hand truck with pneumatic wheels to make moving the stones around the site easier. If the stones are too heavy for you to manage, you can ask your supplier to maneuver them on site with a piece of heavy equipment. If the supplier can’t, check with a land-scape contractor.
Have the stone delivered as close to the location of the steps as pos-sible. Ideally, the stones for a set of backyard steps should be dropped at the top of the hill so that you can roll them into position. Also, place tools and materials as close to the site as possible. Setting stepping stones is taxing work, so the less that you have to maneuver materials and tools, the better.
Plan to work with at least one helper. Getting a stone from the spot where it was delivered to its place on the stairs is only part of the process. The fit still needs to be fine-tuned, so even when the stone is in place, you have to adjust it a good bit. Two sets of hands on the stone at a time is ideal.
Start with a wide base, and overlap each step I like starting with a wide base because I think steps tend to look bet-ter with a little flare at the bottom, especially if there is a large area at the bottom of the hill. It’s also a good idea for the step below to be wider than the one on top for stability. Plus, larger steps simply look awkward on top of smaller steps.
Always think ahead when you’re setting each stone; just a bit of forethought makes setting the subsequent courses easier. Remem-ber to get the steps level from left to right, to pitch the stones 1⁄4 in. per ft. to the front, and to dig out the bank to accommodate each step.
Measure the depth of the next step to determine how far back into the slope you need to dig.
When you get to the top step, the last thing you want is for the tread of the top step to be above finished grade. I think it looks better for the step to be slightly lower than grade so that you can have a little slope down to the first step. It’s less abrupt. For this project, I could have used one additional step, but the riser would have been too small and awkward. Use your best judgment. When you end up at the top of the steps, do whatever feels comfortable. If a slight slope feels easier to walk on than a slightly above-grade step, eliminate the step. For stone steps, it’s all about comfort. □
Cody Macfie, a second-generation stonemason and freelance writer, owns Steep Creek Stoneworks in Brevard, N.C. Photos by Chris Ermides.
www.finehomebuilding.com JUNE/JULy 2007 83
COPYRIGHT 2007 by The Taunton Press, Inc. Copying and distribution of this article is not permitted.