caregiver - bluestep
TRANSCRIPT

Caregiver Guide
HQ Management System

Caregiver Guide
Tab/Subject Includes Module
Inbox My Office
Tasks My Office
Scheduling Calendar My Office
My Profile Digital Signature My Office
Timecard Office Module
Helps Office Module
Add Records Inquiry to Resident Marketing/Inquiry Database
New Resident Resident Database
Resident Notes Resident Database
Incident/Behavior Resident Database
Complaint Registry Resident Database
Resident Reports Shift Change Report Resident Database
Incident Report by Date Resident Database
Incident Report by Resident Resident Database
Complaint Registry Resident Database
Notes for All Residents Resident Database
Scheduled MARs Medication Module
PRNs OTC PRN Medication Module
Prescribed PRN
Medication Reports Meds Administered Today Medication Module
Meds Not Yet Administered Medication Module
C2 Inventory C2 Inventory Medication Module
C2 Count Medication Module

HQ Home
The first available screen in the HQ Management System is called HQ Home, as seen below. It contains the main navigation for all HQ modules and direct access points for the major queries and reports. Also available are the My Office selections and, for ease of use, a dynamic list of the Recent Records visited by the logged-in individual.
Accessing Modules – click on the module name, such as “Staff/Staff Database”, in either the main portion of the screen or the navigation bar. In most cases, the submenu screen will be displayed. Customized modules may retrieve other links specific to your facility. Accessing Reports/Queries/Wizards – click on the name of the item, such as “Add New Resident” on the main portion of the screen or on the drop-down from the navigation bar. These will be listed under the module name and the link will return the item selected. Accessing My Office – click the My Office link from the navigation menu to the left or on the navigation bar. Specific areas of My Office can be accessed from the links on the navigation menu or on the drop-down from the navigation bar. Accessing Recent Records – click on the underlined name of the record in the Recent Records list. This list is dynamically created when the logged-in individual visits a record in the system. It will hold up to twelve (12) of the most-recently visited record links. Each logged-in user will only see the records they have accessed and not those of other users.

My Office
My Office, as seen below, is an access point for several important processes that usually require review once each day or more often.
My Office contains modules for Relationships, IntraMail and external e-mail Inbox, Tasks, Today’s Schedule, Issues and My Profile. These may be accessed individually by clicking the header links on the main page or links on the navigation menu to the left.

My Office – Inbox
The My Office Inbox is an access point for both IntraMail and/or regular E-mail, as seen below. IntraMail is a secure mail system for electronic communication between users within the same organization. Since this mail does not go out onto the Web, it provides another layer of protection for your organization’s privileged communication and sensitive documents. Both IntraMail and regular e-mail require initial configuration by the Organization Administrator and the user before they become active.
Creating E-mail
1. Click the ‘Compose Secure IntraMail’ button or the ‘Compose Regular E-mail’ button. 2. Type in the text of the message in the editor box labeled ‘Body’.
3. To add individual recipients in the To, CC or BCC fields, click the single icon . To add a
group of people as recipients, click the group icon . 4. Recipients are available based upon queries within the system and the view-permission
of the sender. If the desired individual or group is not available for selection, contact your Organization Administrator.
5. Alternately, individual e-mail addresses may be typed into the fields. 6. Click the ‘Send’ button. Alternately, click ‘Save As Draft’ to postpone completion.
Adding Attachments
1. Click the ‘Attachments’ link. Any file contained in the Attachments file can be selected for addition to the e-mail
2. If the desired file is not shown, click the ‘Add File’ button. From the pop-up, the system can be browsed or the document can be scanned to the Attachment file.
Moving Mail
1. Click the checkboxes associated with each e-mail that needs to be moved. 2. To move the message(s) to a specific folder, select a folder from the drop-down. 3. Click the ‘Move’ button.

Deleting Mail 1. Click the checkboxes associated with each e-mail that needs to be removed. 2. Click the ‘Delete’ button.
Accessing Mail
1. Click on the underlined subject of the e-mail. 2. Any attachments can be accessed by clicking the underlined name of the attachment. 3. Also from the View Mail screen, deletions, replies and forwards can be initiated.

My Office – Tasks
Tasks are created and assigned through the ‘Active Tasks’ link in the Operations Module. For ease of use, however, tasks assigned to individual users appear on their My Office Task List, as shown below. From this interface, any task can be reviewed, edited and updated.
Accessing Tasks
1. Click the underlined task name. A task pop-up will appear (see below), displaying the basic task information.
2. From this pop-up, notes may be added, priority adjusted, due date moved and ‘Assigned To’ individuals changed.
3. Additionally, non-compliance may be selected to report to specified individuals.

Updating Status 1. Click on the ‘Task Status’ tab, which displays a status pop-up, seen below. 2. Click the ‘Update Status’ button and enter any comments, adjust the status through the
drop-down box and enter a number for the percentage completed.
Adding Attachments
1. Click the ‘Attachments’ tab. Any file contained in the Attachments file can be selected for addition to the task.
2. If the desired file is not shown, click the ‘Add Attachment’ button. From the pop-up, the system can be browsed or the document can be scanned to the Attachment file.

My Office – Schedule
The My Office Scheduling Calendar is a convenient place for each user to store appointment, event and meeting information. Events added to the HQ calendar will also be displayed on this view, if the specific user has been added to the event as an attendee.
Viewing/Editing an Event
1. To see information on a selected event, click the underlined name of the event. A pop-up will appear. When viewing is complete, click the ‘Close’ button on the pop-up.
2. The user who originally created the event entry may also see and/or edit the event by clicking on the edit icon .
3. The user who originally created the event entry may also delete the event by clicking the delete icon .
Adding a New Event
1. Click the ‘New Event’ button at the upper right. 2. On the New Event Screen (example shown below) type a title for the event in the Title
field. Enter a location and select an event type, if desired. 3. Enter any information about the meeting in the Event Details editor box.

4. Use the current date, type in a date or use the calendar icon to select a date for the event. Enter a time of day.
5. Verify that the Time Zone is set to the correct zone. 6. If the event is ‘all day’ or repeats on a set schedule, make the appropriate choices. 7. When all fields are set as desired, click the ‘Save’ button.
Changing Views
1. The calendar defaults to the current day. To navigate to past or future days, click the arrows on either side of the header date, as in the example below.

2. To move ahead or back by months, click one of the links or month calendars at the bottom of the current view. Alternately, enter a specific date in the search field and click the ‘Go’ button.
3. The calendar also defaults to the Day View. To see a full week, click the week icon at
the upper right. To see the full month, click on the month icon .
Setting Calendar Preferences
1. At the bottom of the screen, click the ‘Calendar Preferences’ button. 2. On the resulting page, click the Time Zone drop-down and select the applicable zone for
your facility.
3. Click the drop-down and select the desired starting view of the calendar, Day, Week or
Month. 4. Select starting hour and ending hour for the calendar display. If events are scheduled
outside these default hours, the view will expand to include them. 5. The Day View of the calendar may be set to increments of 10, 15, 20, 30 minutes or 1
hour. Click the drop-down and select the appropriate interval. 6. When completed, click the ‘Save’ button at the bottom of the screen.

My Office – My Profile
My Office contains a link to My Profile, the same destination as reached by the ‘My Profile’ link at the top of the screen. From this screen, a number of important areas can be accessed and edited or completed.
Updating Information
1. Click on the form name link or the header – Name and E-mail, Online Profile or Contact Information.
2. Make any appropriate entries or edits to the fields and click the ‘Save’ button. Clocking In and Out on the Timecard
1. Select the ‘Timecard’ link or header and click the ‘New Entry’ button. 2. Click the Signature checkbox and the ‘Save’ button. 3. To clock out (for a break or for the day), click the edit icon for the current day’s entry. Do
not click ‘New Entry’ when clocking out. 4. Click the appropriate Signature checkbox and the ‘Save’ button. 5. During any edit, notes or mileage may be added to the appropriate fields.
Applying for a Digital Signature*
1. Click the ‘Digital Signature’ link under the Special Settings section. 2. The four-step process is outlined on the first page, as follows:
a. Verify your name and contact information b. Enter a digital signature passphrase c. Print and complete the BlueStep Digital Signature agreement (Read, sign,
notarize and mail the agreement to BlueStep) d. Upon receiving the agreement, BlueStep will activate your BlueStep Digital
Signature account and you will be notified by e-mail

* Be sure to enter a secure, but easily-remembered passphrase. This passphrase cannot be provided if forgotten, as it is encrypted on the servers and irretrievable. * Some facilities elect to have each individual write his/her passphrase on paper, seal in separate, labeled envelopes and store in the facility safe. * If a passphrase cannot be remembered or retrieved, BlueStep should be notified. The Digital Signature will be disabled, allowing the individual to apply for a new passphrase and resubmit the documentation.

Office Module - Timecard
Clocking In on the Timecard
1. From the Office Module, select the ‘Enter Timecard’ link and click the ‘New Entry’ button. 2. On the Timecard page, as seen below, click the ‘Clock In’ signature checkbox. 3. If needed, enter any comments or notes, then click the ‘Save’ button at the bottom.
Entering Breaks on the Timecard
1. To clock out for a break, click the edit icon for the current day’s entry. Do not click the ‘New Entry’ button again.
2. Click the ‘Start Break’ signature checkbox, as seen below, and the ‘Save’ button. 3. The ‘Override’ fields are for the use of Organization Administrators and are auto-filled by
the system. Do not change the data displayed.
4. To clock in after a break, click the edit icon for the current day’s entry. Do not click the ‘New Entry’ button when clocking back in.
5. Click the ‘End Break’ signature checkbox, displayed below. 6. If needed, type in any notes or enter any mileage, then click the ‘Save’ button at the
bottom.
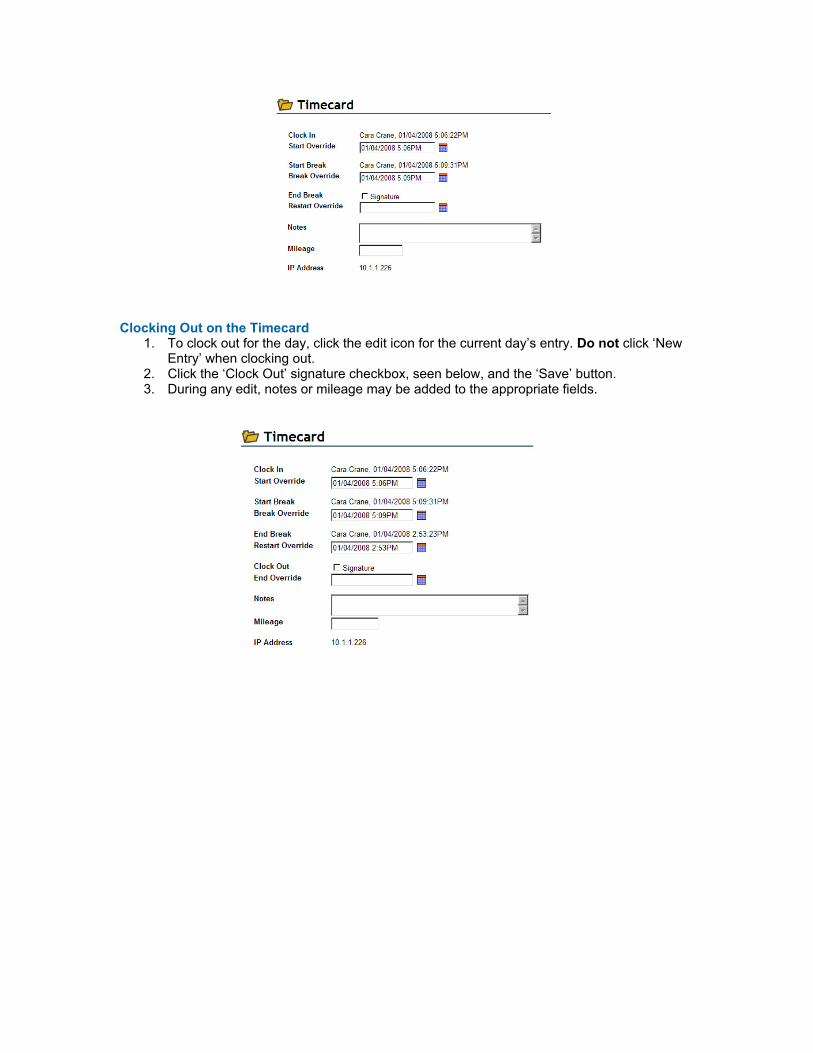
Clocking Out on the Timecard
1. To clock out for the day, click the edit icon for the current day’s entry. Do not click ‘New Entry’ when clocking out.
2. Click the ‘Clock Out’ signature checkbox, seen below, and the ‘Save’ button. 3. During any edit, notes or mileage may be added to the appropriate fields.

Office Module - Helps
HQ has two basic default helps shown on every home page, ‘BlueStep Help’ and ‘4Care Pharmacy Help’. These two are links to each company’s website and lead directly to the help pages on those sites. Accessing 4Care Pharmacy Online Help*
1. From the HQ Home page, click the ‘4Care Pharmacy Help’ link in the Office Module. 2. The 4Care website, seen below, will appear.
3. Listed on the page are a number of manuals and guides in both PDF and Microsoft Word versions.
4. The documents are organized into 4Care Pharmacy and HQ User Manuals. 5. Find the needed section and guide, then click on the preferred underlined selection,
either PDF or Word. * These documents may be printed, downloaded or e-mailed to those of your users or staff who may find them helpful. * New information is added to the 4Care website as new features and functions are created. Existing documents are also updated as needed.

Printing the 4Care Policies and Procedures Manual* * Most state licensing entities require that assisted living, skilled nursing and some other facilities have a print copy of the pharmacy policy and procedure manual on the premises. 1. Click the ‘4Care Pharmacy Help’ link on the HQ home page. 2. The 4Care Policies and Procedures manual is the fifth item in the 4Care Pharmacy
section; see pointer in the example below.
3. Click on either the PDF or Word underlined link. 4. Depending upon your selection and the configuration of the computer, there will be a print
icon or print link Print somewhere in the program header. Click this link and proceed with printing as normal.
5. When completed, exit or close the page. 6. Any other document may be printed in the same manner.
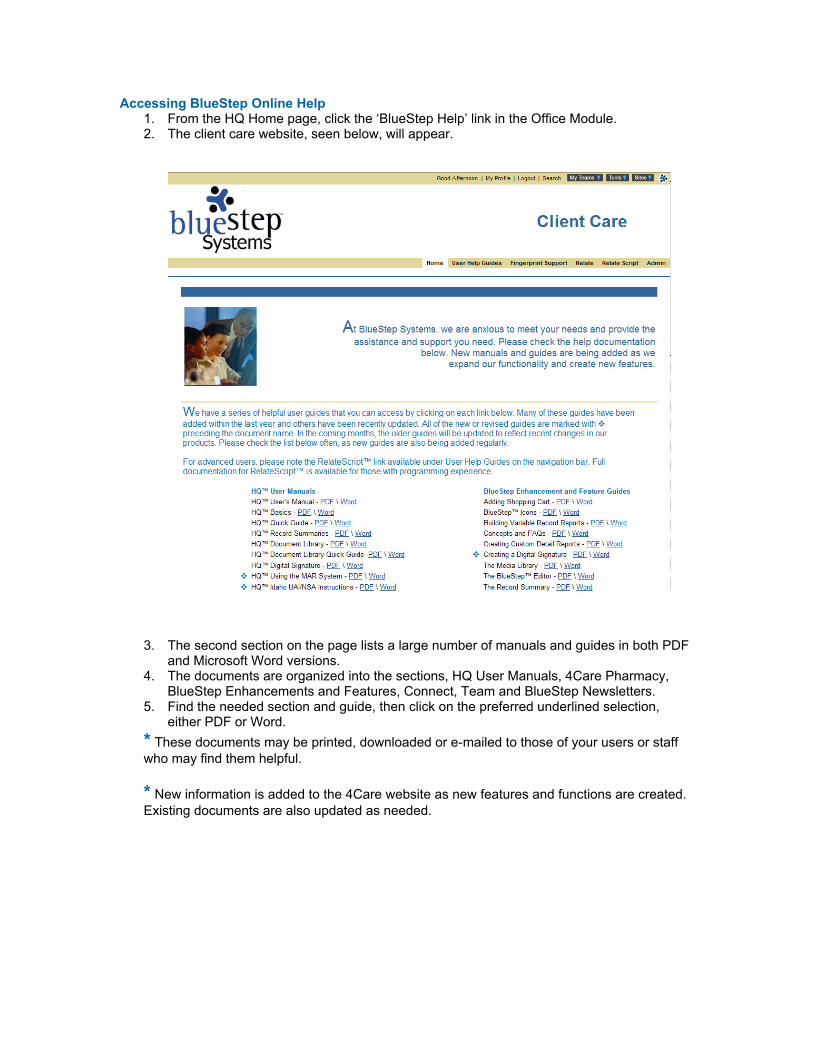
Accessing BlueStep Online Help 1. From the HQ Home page, click the ‘BlueStep Help’ link in the Office Module. 2. The client care website, seen below, will appear.
3. The second section on the page lists a large number of manuals and guides in both PDF
and Microsoft Word versions. 4. The documents are organized into the sections, HQ User Manuals, 4Care Pharmacy,
BlueStep Enhancements and Features, Connect, Team and BlueStep Newsletters. 5. Find the needed section and guide, then click on the preferred underlined selection,
either PDF or Word. * These documents may be printed, downloaded or e-mailed to those of your users or staff who may find them helpful. * New information is added to the 4Care website as new features and functions are created. Existing documents are also updated as needed.

Marketing/Inquiry Database – New Inquiry
Adding a New Inquiry*
1. When adding an inquiry, be sure that the record does not already exist in the system. Check for existing records by searching the ‘All Inquiries’ query (see link in the Marketing/Inquiry Database).
2. If the individual may already be a resident, also check the ‘Active Residents’ query and the ‘Pending Residents’ query (see links in the Resident Database).
3. If the individual may have been a former resident, check the ‘Discharged Residents’ query (see link in the Resident Database).
4. The ‘Add New Inquiry’ link takes the user to a wizard – a series of forms that collects important information about the prospective resident.
5. Click the ‘Add New Inquiry’ link in the Marketing/Inquiry Database. 6. On each of the five (5) forms in the wizard, fill out all fields for which information can be
obtained. In general, the first form will be the ‘Name and E-mail’ form, seen below.
7. Fields marked with an asterisk must be filled out before progressing to the next form. 8. When each form is complete, click the ‘Next’ button at the bottom of the screen. 9. On the final form of the wizard, click the ‘Save’ button and the system will display the
inquiry record just created. * Before an inquiry becomes fully active, the record must become part of the resident category in the system.
Changing an Inquiry to a Resident*
* Unit or Organization Administrators have the proper permissions to turn an inquiry record into a resident record. 1. Select either the ‘Select Active Inquiry’ or ‘All Inquiries’ link in the Marketing/Inquiry
Database. 2. Click on the Select next to the appropriate record. 3. In the left-side navigation menu, click ‘Change Record Category’. 4. On the resulting screen, mouse over the ‘Add Category’ button and click on the ‘Resident’
selection.

5. If the facility requires that additional forms be filled out (they will automatically appear), fill them out as completely as possible and click ‘Next’ or ‘Save’ at the bottom of each screen. When complete, the system will return you to the record just edited.
6. If the facility is part of a multi-state organization, it is necessary to also change the resident’s record category to include the state in which the facility is located.
7. Follow the same procedure as above by clicking the ‘Change Record Category’ link and selecting the appropriate state from the ‘Add Category’ drop-down.
* If a resident has not gone through the inquiry process, he/she may be added through the ‘Add New Resident’ link in the Resident Database.

Resident Database – New Resident
Adding a New Resident
1. When adding a resident, be sure that the record does not already exist in the system. Check for existing records by searching the ‘All Inquiries’ query (see link in the Marketing/Inquiry Database).
2. If the individual may already be a resident, also check the “Active Residents’ query and the ‘Pending Residents’ query (see links in the Resident Database).
3. If the individual may have been a former resident, check the ‘Discharged Residents’ query (see link in the Resident Database).
4. The ‘Add New Resident’ link takes the user to a wizard – a series of forms that collects important information about the prospective resident.
5. Click the ‘Add New Resident’ link in the Resident Database. 6. On each of the three (3) forms in the wizard, fill out all fields for which information can be
obtained. In general, the first form will be the ‘Name and E-mail’ form, example seen below.
7. Fields marked with an asterisk must be filled out before progressing to the next form. 8. When each form is complete, click the ‘Next’ button at the bottom of the screen. 9. On the final form of the wizard, click the ‘Save’ button and the system will display the
resident record just created.

Resident Database - Notes
Navigating a Record
1. Choose a resident from the ‘Active Residents’ query in the Resident Database by clicking the Select next to the resident’s name.
2. On the Navigation Menu, example seen right, all folders are closed, as shown by the expand icon next to them.
3. To open the folder click the expand icon until the menu expands and the links stored in the folder are displayed.
4. Select the form or report desired by clicking on the link.
Entering a Resident Note 1. In the ‘General Resident’ folder, click the ‘Notes’ link. 2. The resulting page will list all notes entered for the specific individual. Click the ‘New
Entry’ button. 3. As in the example below, the Notes form will auto-fill with the current date and time.
Change the date or time, if needed, by typing corrections into the field.
4. Select the note type by activating the drop-down and clicking on the appropriate
selection. Each organization has its own list of types, which may include such items as, General, Admissions, Dietitian, Frequent Observations, Group Therapy, Home Health, Individual Therapy, Nursing, Office, Recreational Therapy, Refusals, Services, etc.
5. Enter a name for the note that is easily distinguishable from other notes that may have been entered or will be entered.
6. Type in the note message, being as clear and specific as possible and giving all relevant details.
7. Click the signature checkbox.

8. If the note should be shown on the Family Connect website page, check the ‘Post to Family Connect’ box.
9. If you are an administrator with Connect decision-making privileges, you may also check the ‘Approved to Post’ box.
10. When complete, click the ‘Save’ button at the bottom.

Resident Database – Incident/Behavior
Navigating a Record
1. Choose a resident from the ‘Active Residents’ query in the Resident Database by clicking the Select next to the resident’s name.
2. On the Navigation Menu, example seen right, all folders are closed, as shown by the expand icon next to them.
3. To open the folder click the expand icon until the menu expands and the links stored in the folder are displayed.
4. Select the form or report desired by clicking on the link.
Entering an Incident Report* * Note that the Incident Report is a form customizable per organization and may not appear exactly as in the examples below.
1. In the ‘Daily Nursing Forms’ folder, click the ‘Incident Report’ link. 2. The resulting page will list all incidents entered for the specific individual. Click the ‘New
Entry’ button.
3. Fill in all fields with as much information as can be obtained. 4. On the date/time field, click the calendar icon . If needed, type in corrections to the date and time information.

5. Incident types are selected from a drop-down list that contains such items as Injury,
Runaway, Disruption, Medication Error, etc. Activate the list by clicking the down arrow on the field. Click the appropriate type on the list to make the selection. 6. When complete, check the signature box at the bottom and the ‘Save’ button.
Reviewing an Incident Report
1. In the ‘Daily Nursing Forms’ folder, click the ‘Incident Report’ link. 2. As in the example below, the resulting page will list all incidents entered for the specific individual.
3. Click the edit pencil icon associated with the incident in question. 4. Review and make additions or corrections as needed. 5. Click the review signature checkbox and the ‘Save’ button when completed.
Resident Database – Complaints
Navigating a Record
1. Choose a resident from the ‘Active Residents’ query in the Resident Database by clicking the Select next to the resident’s name.
2. On the Navigation Menu, example seen right, all folders are closed, as shown by the expand icon next to them.
3. To open the folder click the expand icon until the menu expands and the links stored in the folder are displayed.
4. Select the form or report desired by clicking on the link.
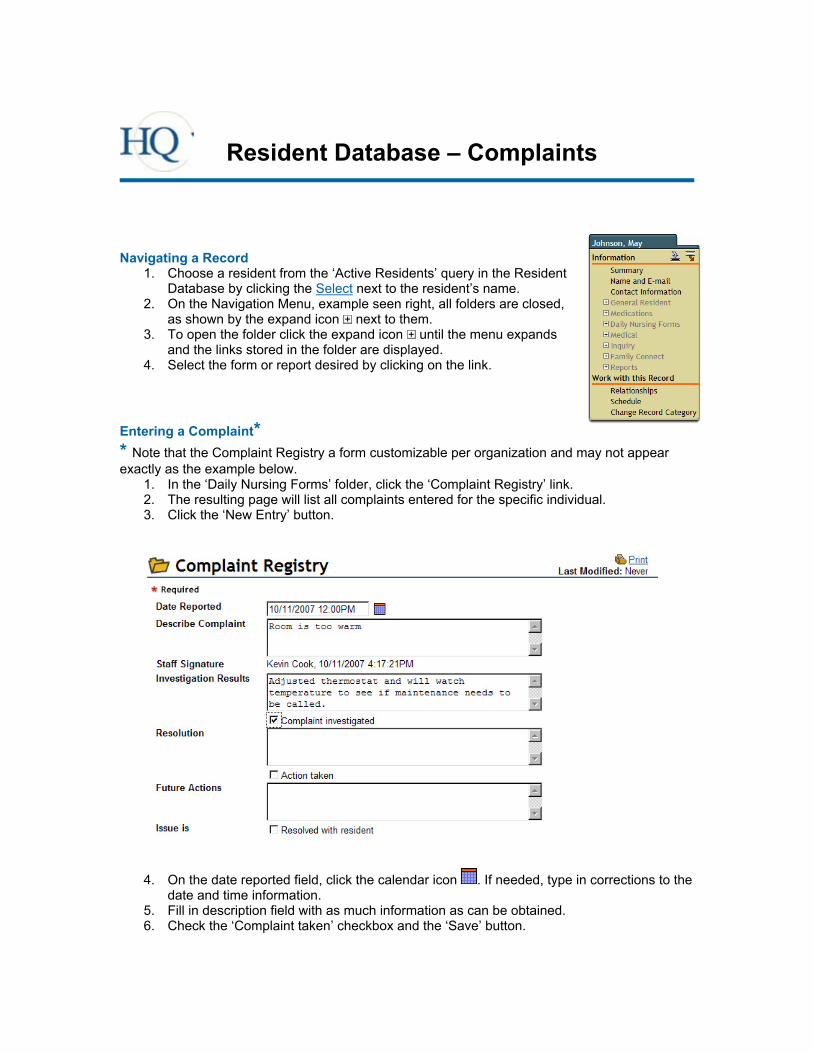
Entering a Complaint* * Note that the Complaint Registry a form customizable per organization and may not appear exactly as the example below.
1. In the ‘Daily Nursing Forms’ folder, click the ‘Complaint Registry’ link. 2. The resulting page will list all complaints entered for the specific individual. 3. Click the ‘New Entry’ button.
4. On the date reported field, click the calendar icon . If needed, type in corrections to the
date and time information. 5. Fill in description field with as much information as can be obtained. 6. Check the ‘Complaint taken’ checkbox and the ‘Save’ button.

Following up on a Complaint 1. In the ‘Daily Nursing Forms’ folder, click the ‘Complaint Registry’ link. 2. As in the example below, the resulting page will list all incidents entered for the specific
individual. Select the incident requiring attention by clicking the edit icon .
3. Enter the Investigation Results, the Resolution and/or Future Actions information, as needed.
4. Click the signature checkbox associated with each completed memo field and the ‘Save’ button when done.

Resident Database – Resident Reports
Using Resident Reports
1. Click the ‘Resident Reports’ link in the Resident Database or from the Resident drop-down on the navigation bar.
2. The submenu page, example below, will appear. It contains the names of all reports to which you have at least ‘Reader’ permissions.
3. Select the desired report by clicking on the report name.

Shift Change Report
Using the Shift Change Report
1. Click on the ‘Shift Change Report’ name on the Resident Reports menu 2. On the resulting page, example for one resident below, the reports for all residents for the
last three (3) days are displayed. 3. Included are:
a. Nursing Notes b. Resident Notes c. Discontinued Medications
Adding a Nursing Note*
1. Click the underlined Select link below the resident’s name. 2. Click the ‘New Entry’ button to the upper right 3. The current date will auto-populate. Select an end date or enter a number of days the
instructions are active.
4. Select a ‘Note Type’ by clicking the down-arrow and selecting the appropriate type from the list, which includes such items as General, Precautions, Resident Request, etc.
5. Type in the note message in the ‘Note’ field and indicate if there are associated doctor’s orders.
6. Click the ‘Staff Signature’ checkbox and the ‘Save’ button * Nursing Notes may also be added by navigating to the individual Resident Record and clicking the ‘Nursing Notes’ link in the ‘Daily Nursing Forms’ folder.

Editing a Nursing Note 1. In some rare instances, it may be necessary to edit an existing note. Begin by clicking the
underlined Select link below the resident’s name. 2. If your permissions allow editing, an edit icon will appear to the right of each note
listed on the resulting page. Click to access the note. 3. Make any appropriate changes. 4. Click the ‘Save’ button when done.
Adding a Resident Note*
1. Click the underlined Select link below the resident’s name. 2. In the ‘General Resident’ folder located on the navigation menu, click the ‘Notes’ link. 3. The resulting page will list all notes entered for the specific individual. 4. Click the ‘New Entry’ button. 5. As in the example below, the Notes form will auto-fill with the current date and time.
Change the date or time, if needed, by typing corrections into the field.
6. Select the note type by activating the drop-down and clicking on the appropriate selection. Each organization has its own list of types, which may include such items as, General, Admissions, Frequent Observations, Home Health, Individual Therapy, Office, Refusals, Services, etc.
7. Enter a name for the note that is easily distinguishable from other notes that may have been entered or will be entered.
8. Type in the note message, being as clear and specific as possible and giving all relevant details.
9. Click the signature checkbox. 10. If the note should be shown on the Family Connect website page, check the ‘Post to
Family Connect’ box. 11. If you are an administrator with Connect decision-making privileges, you may also check
the ‘Approved to Post’ box. 12. When complete, click the ‘Save’ button at the bottom. * Resident Notes may also be added by navigating to the individual Resident Record and clicking the ‘Notes’ link in the ‘General Resident’ folder.

Reviewing a Discontinued Medication* 1. If your responsibilities include reviewing discontinued medications and you want to
perform this function from this screen, start by clicking the underlined Select link below the resident’s name.
2. In the ‘Medication’ folder located on the navigation menu, click the ‘Discontinued Medication’ link.
3. The resulting page will list all discontinued medications (DC) for the specific individual. Click the edit icon associated with the medication needing review.
4. Locate the ‘Authorizations’ section about halfway down the page. As in the example below, the signature, date and time for the original DC is recorded and a checkbox is provided for the review.
5. Review the medication and, if satisfied, check the ‘DC Review’ box. 6. Scroll to the bottom and click the ‘Save’ button. * A ‘DC Medication Nursing Review’ report is available from the ‘Medication Reports’ link in the Medication Module. This report is a faster, simpler way of reviewing medications for more than one person and guaranteeing that no discontinued medication reviews are missed. * Single discontinued medications may also be easily reviewed by navigating directly to the individual Resident Record, clicking the ‘Medication-Prescribed’ link in the ‘Medications’ folder and editing the appropriate medication.

Incident Report by Date
Using the Incident Report by Date 1. Click on the ‘Incident Report by Date’ link on the Resident Reports menu 2. On the resulting page, example below, the incidents for all residents are displayed,
grouped by the day on which they occurred. This will alert you if circumstances within the facility on a particular day triggered multiple incidents or behaviors.
3. To view details of any specific incident, click the underlined Select link next to the resident’s name.
Adding a New Incident*
1. Click the Select link next to the resident name. 2. Click the Incident Report link on the navigation menu. A summary of all incidents for this
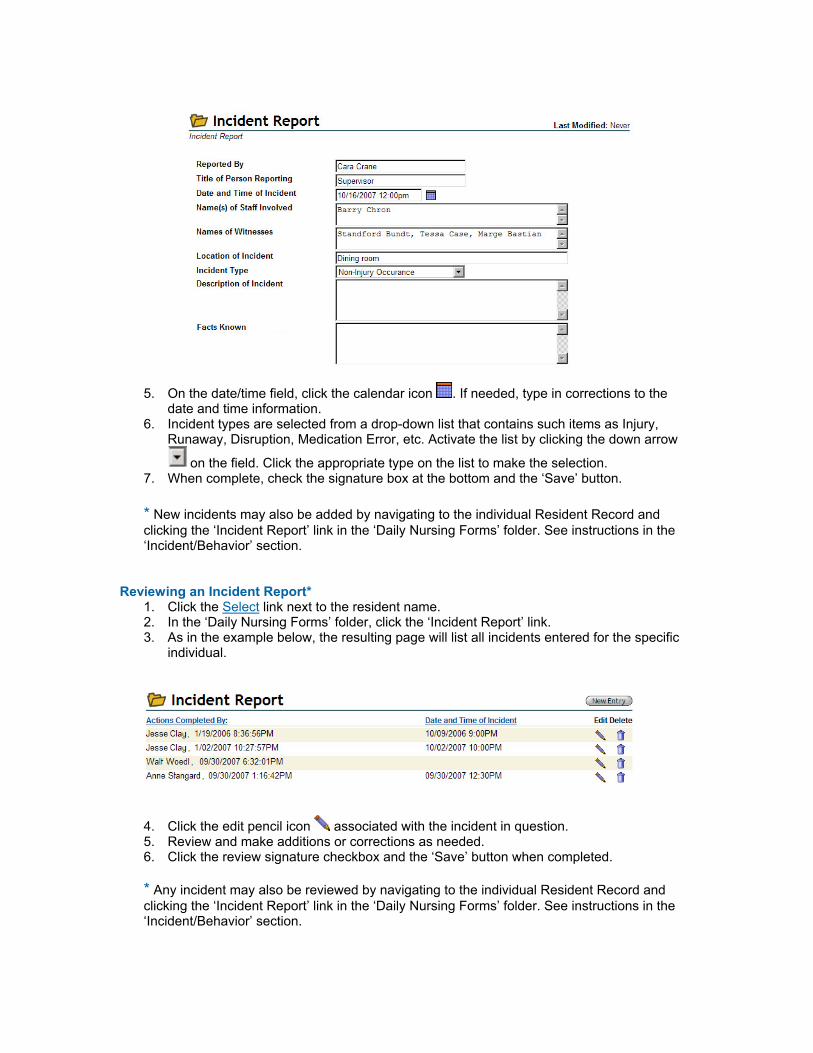
resident will appear. Click the ‘New Entry’ button at the upper right. 3. On the resulting form, example below, fill in all fields with as much information as can be
obtained.

4. On the date/time field, click the calendar icon . If needed, type in corrections to the date and time information.
5. Incident types are selected from a drop-down list that contains such items as Injury, Runaway, Disruption, Medication Error, etc. Activate the list by clicking the down arrow
on the field. Click the appropriate type on the list to make the selection. 6. When complete, check the signature box at the bottom and the ‘Save’ button. * New incidents may also be added by navigating to the Resident Record and clicking the ‘Incident Report’ link in the ‘Daily Nursing Forms’ folder. See instructions in the ‘Incident/Behavior’ section.
Reviewing an Incident Report 1. Click the Select link next to the resident name. 2. In the ‘Daily Nursing Forms’ folder, click the ‘Incident Report’ link. 3. As in the example below, the resulting page will list all incidents entered for the specific
individual. Click the edit pencil icon associated with the incident in question.
4. Review and make additions or corrections as needed. 5. Click the review signature checkbox and the ‘Save’ button when completed.

Incident Report by Resident
Using the Incident Report by Resident
1. Click on the ‘Incident Report by Resident’ link on the Resident Reports menu. 2. On the resulting page, example below, the incidents for all residents are displayed,
grouped by the resident’s name. This will alert you if a particular resident is experiencing multiple incidents or behaviors that span shifts or cluster around specific events.
3. To view details of any specific incident, click the underlined Select link below the resident’s name for the date you wish to view.
Adding a New Incident*
1. Click the Select link next to the resident name. 2. Click the Incident Report link in the Daily Nursing Forms folder on the navigation menu. A
summary of all incidents for this resident will appear. 3. Click the ‘New Entry’ button at the upper right. 4. On the resulting form, example below, fill in all fields with as much information as can be
obtained.
5. On the date/time field, click the calendar icon . If needed, type in corrections to the
date and time information. 6. Incident types are selected from a drop-down list that contains such items as Injury,
Runaway, Disruption, Medication Error, etc. Activate the list by clicking the down arrow
on the field. Click the appropriate type on the list to make the selection. 7. When complete, check the signature box at the bottom and the ‘Save’ button. * New incidents may also be added by navigating to the individual Resident Record and clicking the ‘Incident Report’ link in the ‘Daily Nursing Forms’ folder. See instructions in the ‘Incident/Behavior’ section.
Reviewing an Incident Report* 1. Click the Select link next to the resident name. 2. In the ‘Daily Nursing Forms’ folder, click the ‘Incident Report’ link. 3. As in the example below, the resulting page will list all incidents entered for the specific
individual.
4. Click the edit pencil icon associated with the incident in question. 5. Review and make additions or corrections as needed. 6. Click the review signature checkbox and the ‘Save’ button when completed.
* Any incident may also be reviewed by navigating to the individual Resident Record and clicking the ‘Incident Report’ link in the ‘Daily Nursing Forms’ folder. See instructions in the ‘Incident/Behavior’ section.

Complaint Registry
Using the Complaint Registry
1. Click on ‘Complaint Registry’ link on the Resident Reports menu. 2. On the resulting page, example below, the complaints for all residents are displayed. 3. To view details of any specific complaint, click the underlined Select link next to the
resident’s name.
Adding a Complaint*
1. Click the Select link next to the resident name. 2. Click the ‘Complaint Registry’ link in the Daily Nursing Forms folder on the navigation
menu. A summary of all complaints for this resident will appear. 3. Click the ‘New Entry’ button at the upper right. 4. On the resulting form, example below, the current date field will auto-fill with the current
date and time. Change the date or time, if needed, by typing corrections into the field.

5. Enter into the appropriate fields as much information as can be obtained. 6. Click the signature checkboxes below each section you have filled in. 7. Click the ‘Save’ button at the bottom
* New complaints may also be added by navigating to the individual Resident Record and clicking the ‘Complaint Registry’ link in the ‘Daily Nursing Forms’ folder.
Resolving a Complaint*
1. Click the Select link next to the complaint needing investigation, resolution or further action.
2. Review and make additions or corrections as needed, example below.
3. Click the signature checkbox associated with any new information and the ‘Save’ button
when completed. * Any complaint may also be reviewed or updated by navigating to the individual Resident Record and clicking the ‘Complaint Registry’ link in the ‘Daily Nursing Forms’ folder.
Notes for All Residents
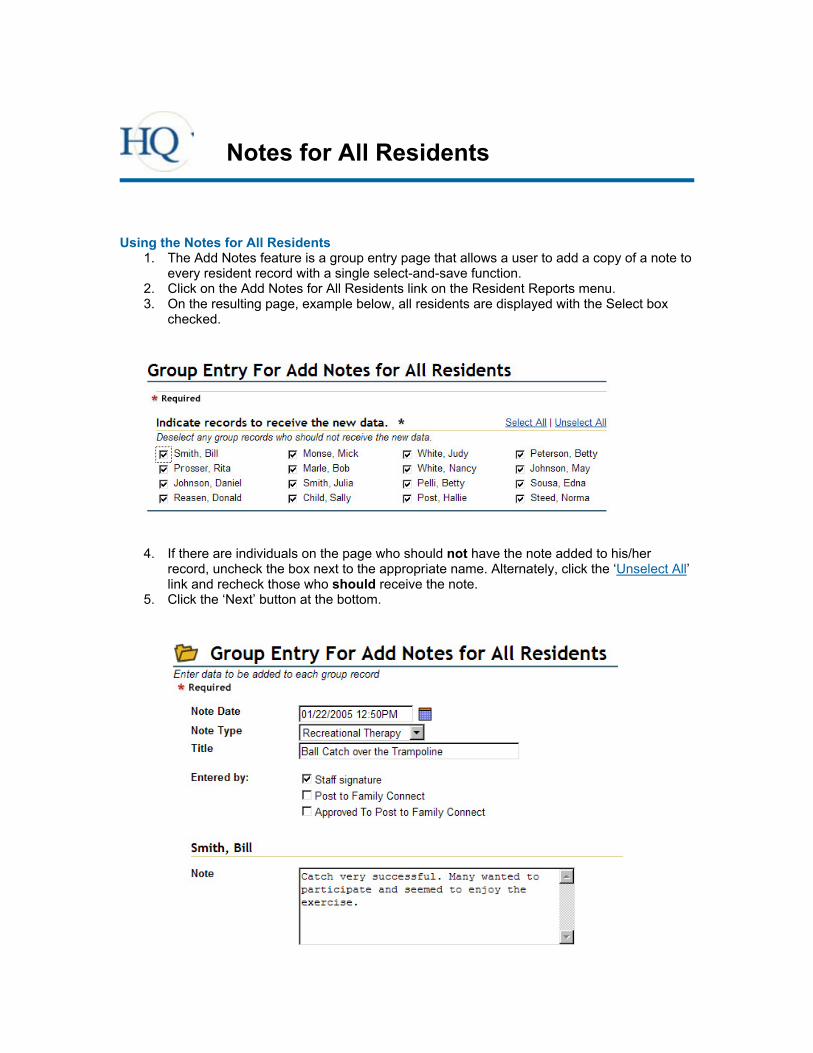
Using the Notes for All Residents
1. The Add Notes feature is a group entry page that allows a user to add a copy of a note to every resident record with a single select-and-save function.
2. Click on the Add Notes for All Residents link on the Resident Reports menu. 3. On the resulting page, example below, all residents are displayed with the Select box
checked.
4. If there are individuals on the page who should not have the note added to his/her
record, uncheck the box next to the appropriate name. Alternately, click the ‘Unselect All’ link and recheck those who should receive the note.
5. Click the ‘Next’ button at the bottom.

6. The resulting screen will appear in one of two formats, individualized or grouped, as configured by your organization. The example above is an abbreviated view of an individualized format.
a. The individualized format will list the form information followed by a ‘Notes’ field under a separate header for each resident selected. This allows customizable notes for each resident.
b. The grouped format will display the form information and include a single ‘Notes’ field. This configuration allows a single note to be copied directly to individual records without customization.
7. Enter a date or correct the date, as needed, in the ‘Note Date’ field.
8. Select a ‘Note Type’ by clicking the down-arrow and selecting the appropriate type from the list OR, depending upon the configuration, manually enter in a type.
9. Type in a message into the ‘Notes’ field. If individualized, you may enter a different note into the field for each resident. If grouped, enter the note exactly as you want it to appear in every selected record.
10. When complete, click the ‘Save’ button at the bottom.

Medication Module – Scheduled MARs
Using Scheduled MARs
1. To access the scheduled MARs for today, click the ‘Scheduled MARs’ link in the Medication Module.
2. All residents needing medications at any time during the day will be displayed on the list, example below, grouped by the time the medications are to be administered.

Recording a Medication Administration* 1. On the scheduled MARs (Daily Meds Report), find the scheduled administration time on
which you are working. In the example above, the choices are 6:00 AM, 8:00 AM, 4:00 PM, 6:00 PM and 9:00 PM.
2. Click on the appropriate resident’s name. (If there are multiple entries for the same person, select any one of them.)
3. On the resulting ‘Daily MAR Edit Report’ page, example below, all the selected person’s medications for the day are displayed.
4. Those needing to be administered are in the section labeled ‘Medications to be
Administered Today’ followed by the day and date. 5. Administer the appropriate medication(s) for the time. 6. Click the ‘Staff signature’ checkbox for each medication administered. 7. Click the ‘Save’ button at the bottom when complete. * For reference purposes, medications that have already been administered on the current day are in the section titled ‘Medications Previously Administered Today’. * Please note that the administration time recorded for this MAR is copied from the ‘Staff signature’ field at the time that ‘Save’ is clicked.
Medications Recorded After Administration Time*
* In rare instances, users may not be able to record the medication administration at the time it occurs. A date/time field is provided for this situation. 1. Administer the appropriate medication(s) for the time. 2. Click the ‘Staff signature’ checkbox. 3. Click the calendar icon and select today’s date. 4. Edit the field information to display the correct time of administration. 5. Click the ‘Save’ button. * Please note that the manually entered date and time overrides the time usually copied from the signature. See ‘Dihydromine’ entry in the illustration above.

Recording Administration Exceptions* * A medication may not be administered for a number of reasons. The ‘Exception’ field is provided for any time this situation occurs. 1. Attempt to administer the appropriate medication(s) for the time. 2. Click the ‘Staff signature’ checkbox. This signifies that the attempt to administer was
made. 3. Click the down-arrow on the ‘Exception’ field and select the appropriate exception
reason. 4. Click the ‘Save’ button.
Changes in Administered Dosage*
* It may happen that a smaller or larger dosage from that displayed on the MAR must be given the resident. The dosage field is editable for this purpose. 1. Administer the appropriate medication(s) for the time. 2. Click the ‘Staff signature’ checkbox. 3. Change the number/amount displayed in the ‘Dosage’ field. 4. Click the ‘Save’ button.
Items to Note
* Any needed manual entries to the MAR (the date/time field next to the calendar icon , the ‘Dosage’, ‘Exception’ and ‘Notes’ fields) should be made before saving, not in separate operations, because... * Once a MAR is saved, only Organization Administrators can make changes to the data, which will now be in ‘Medications Previously Administered Today’. * If there are any comments or notes concerning the administration of medication, these may be added in the ‘Notes’ field and will save in the resident’s MAR record. This field appears small, but will accept and save several hundred characters. * If the facility has loaded resident photographs into the system, they will appear on the MAR to help prevent administration of medication to the wrong individual. * Administration instructions for each drug are shown on the MAR to help prevent administration errors. * State law requires that a diagnosis appear with each medication for the purpose of verifying appropriateness of each drug. * Medications administered on days other than the day and date shown on the MAR cannot be recorded on this form.

Medication Module – OTC PRNs
Administering an OTC PRN
1. Click the ‘Administer OTC PRN’ link in the Medication Module 2. Access the appropriate resident by clicking the Select next to his/her name. 3. Click the ‘New Entry’ button. 4. On the resulting screen, example below, carefully read the ‘Contraindicated by Physician’
field. Any medications listed in this field MUST NOT BE GIVEN TO THE RESIDENT, so contact the supervisor.

5. Read the ‘Medication Instructions’ for the drug needed by the resident. 6. Following these instructions, administer the medication. 7. Click the radio button next to the name of the medication administered. 8. Click the ‘Save’ button.
OTC PRN Follow Up
1. When 30 minutes have elapsed, contact the resident. 2. Evaluate the effectiveness of the medication and enter the results in the ‘Effectiveness’
field. 3. Click the ‘Follow Up Signature’ checkbox. 4. Click the ‘Save’ button.

Medication Module – Prescribed PRNs
Administering a Prescribed PRN*
1. Click the ‘Administer Prescribed PRN’ link in the Medication Module. 2. All residents with prescribed PRNs will be displayed. Access the appropriate resident by
clicking the Select next to his/her name. 3. Click the ‘New Entry’ button. 4. On the resulting screen, example below, find the current day (Creation Date) and click
the edit icon of the PRN medication.
5. When the screen repaints, be sure that the ‘View Layout’ field (upper right) reads ‘Enhanced MAR Edit’ and displays similarly to the example below.

6. Check the ‘PRNs Previously Administered Today’ section to be sure that the medication has not already been taken or that it is not being given too soon after the last administration.
7. The desired PRN should be displayed in the ‘Medication’ field. If it is not, click the drop-down arrow and select from the list. If the medication is not on the list, it has not been entered into the system as a prescribed medication, so contact the supervisor.
8. If it is appropriate to give the drug, proceed as with any other medication administration: a. Administer the medication. b. Click the ‘Staff signature’ checkbox. c. Click the ‘Save’ button.
* As with other administration records, dosages may be changed, notes may be added or the date/time field may be edited prior to saving the record.

Meds Administered Today
Viewing Meds Administered Today
1. Click the ‘Medication Reports’ link in the Medication Module. 2. Click the ‘Meds Administered Today’ report link. 3. On the resulting screen, example below, every medication that has been administered on
the current date is listed, sorted by the assigned administration time. 4. Notice that the names of the residents are shown, as well as the medications, date/time
of administration, any exceptions noted and the dated signatures of the administering individual.

Meds Not Yet Administered
Viewing Meds Not Yet Administered
1. Click the ‘Medication Reports’ link in the Medication Module. 2. Click the ‘Meds Not Yet Administered’ report link. 3. On the resulting screen, example below, every medication that should still be
administered on the current day is listed (including the resident’s name) and is sorted by the assigned administration time.
4. Click the Select link next to a resident’s name for the individual MAR record, allowing the medication administration to be recorded.

C2 Medication Inventory
Viewing the C2 Medication Inventory 1. Select the ‘C2 Medication Inventory’ link from the ‘Medication Reports’ submenu. 2. This report, example below, covers the last 30 day’s inventory.
3. To print for internal audit, state reporting, etc., use the print link at the upper
right. 4. For a full inventory history on a specific person, click Select on the line under the
resident’s name.

C2 Medication Inventory Count
Conducting a C2 Medication Count* – First staff member
*Note that state and federal laws require that C2 medication counts are conducted by two (2) individuals. The first person logs in, counts and records all medications in the presence of the other person. When completed, the second individual logs in, counts and adds his/her signature to the count screen. 1. Click the ‘C2 Inventory Count Needed’ link on the Medication Reports page, example
below.
2. Access the medication by clicking the Select next to any of the medication names under a specific resident.
3. Verify that medication to be counted is the same name and dosage as shown on the screen, example below, then count.
4. Enter the number in the ‘Current Count’ field, as shown above. 5. Click the ‘Count By’ checkbox and the ‘Save’ button. 6. Alternately, if a single individual’s medications are being counted, click the ‘Save and
Refresh’ button so that the second staff member can login and finish the count.
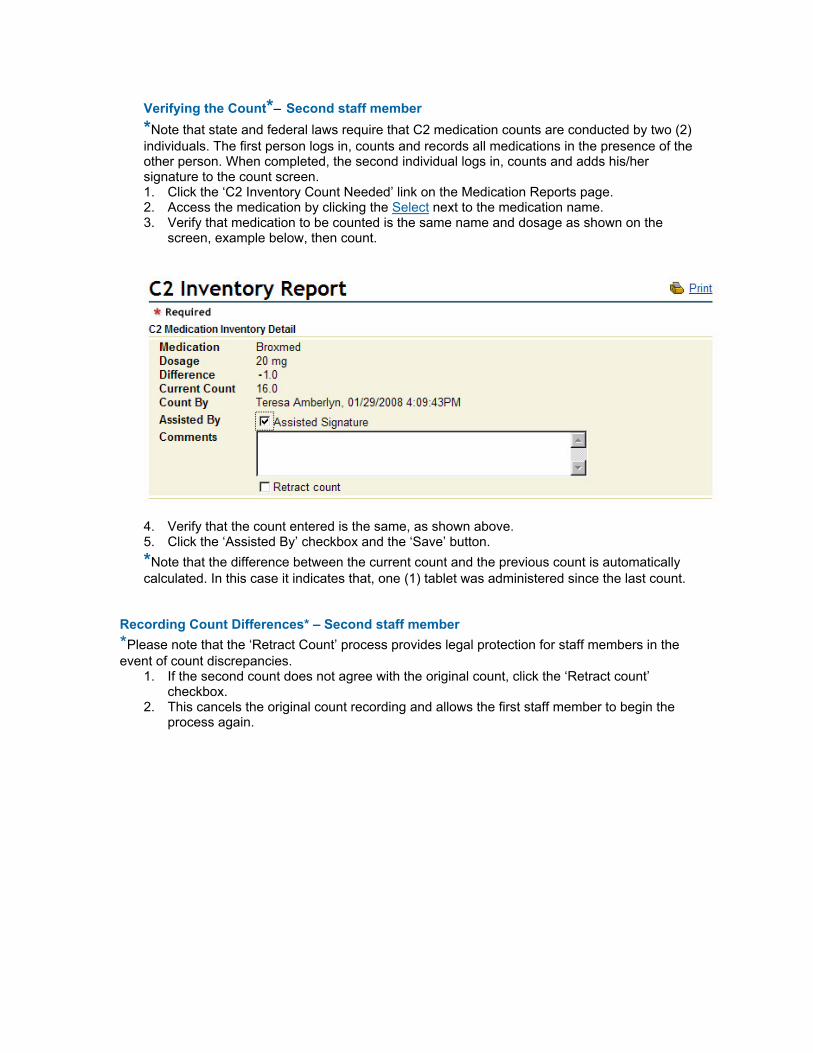
Verifying the Count*– Second staff member *Note that state and federal laws require that C2 medication counts are conducted by two (2) individuals. The first person logs in, counts and records all medications in the presence of the other person. When completed, the second individual logs in, counts and adds his/her signature to the count screen. 1. Click the ‘C2 Inventory Count Needed’ link on the Medication Reports page. 2. Access the medication by clicking the Select next to the medication name. 3. Verify that medication to be counted is the same name and dosage as shown on the
screen, example below, then count.
4. Verify that the count entered is the same, as shown above. 5. Click the ‘Assisted By’ checkbox and the ‘Save’ button. *Note that the difference between the current count and the previous count is automatically calculated. In this case it indicates that, one (1) tablet was administered since the last count.
Recording Count Differences* – Second staff member *Please note that the ‘Retract Count’ process provides legal protection for staff members in the event of count discrepancies.
1. If the second count does not agree with the original count, click the ‘Retract count’ checkbox.
2. This cancels the original count recording and allows the first staff member to begin the process again.