chapter 12 calc macros - apache openoffice wiki · pdf filecommons attribution license ( , ......
TRANSCRIPT

Calc Guide
Chapter 12 Calc Macros
Automating repetitive tasks

Copyright
This document is Copyright © 2005–2011 by its contributors as listed below. You may distribute it and/or modify it under the terms of either the GNU General Public License (http://www.gnu.org/licenses/gpl.html), version 3 or later, or the Creative Commons Attribution License (http://creativecommons.org/licenses/by/3.0/), version 3.0 or later.
All trademarks within this guide belong to their legitimate owners.
ContributorsAndrew PitonyakGary SchnablJean Hollis WeberClaire WoodMartin Fox
FeedbackMaintainer: Andrew Pitonyak [[email protected]]Please direct any comments or suggestions about this document to: [email protected]
Publication date and software versionPublished 10 March 2011. Based on OpenOffice.org 3.3.
Note for Mac users
Some keystrokes and menu items are different on a Mac from those used in Windows and Linux. The table below gives some common substitutions for the instructions in this chapter. For a more detailed list, see the application Help.
Windows/Linux Mac equivalent Effect
Tools > Options menu selection
OpenOffice.org > Preferences
Access setup options
Right-click Control+click Open context menu
Ctrl (Control) z (Command) Used with other keys
F5 Shift+z+F5 Open the Navigator
F11 z+T Open Styles & Formatting window
You can download an editable version of this document from
http://wiki.services.openoffice.org/wiki/Documentation/

Contents
Copyright....................................................................................................................... 2
Note for Mac users........................................................................................................2
Introduction...................................................................................................................4
Using the macro recorder..............................................................................................4
Write your own functions...............................................................................................8Using a macro as a function....................................................................................10Passing arguments to a macro.................................................................................13Arguments are passed as values..............................................................................14Writing macros that act like built-in functions........................................................14
Accessing cells directly................................................................................................15
Sorting......................................................................................................................... 16
Conclusion....................................................................................................................17
Calc Macros 3

Introduction
A macro is a saved sequence of commands or keystrokes that are stored for later use. An example of a simple macro is one that “types” your address. The OpenOffice.org (OOo) macro language is very flexible, allowing automation of both simple and complex tasks. Macros are especially useful to repeat a task the same way over and over again. This chapter briefly discusses common problems related to macro programming using Calc.
Using the macro recorder
Chapter 13 of the Getting Started guide (Getting Started with Macros) provides a basis for understanding the general macro capabilities in OpenOffice.org using the macro recorder. An example is shown here without the explanations in the Getting Started guide. The following steps create a macro that performs paste special with multiply.
1) Open a new spreadsheet.2) Enter numbers into a sheet.
Figure 1: Enter numbers
3) Select cell A3, which contains the number 3, and copy the value to the clipboard.
4) Select the range A1:C3.5) Use Tools > Macros > Record Macro to start the macro recorder. The
Record Macro dialog is displayed with a stop recording button.
Figure 2: Stop recording button
6) Use Edit > Paste Special to open the Paste Special dialog (Figure 3).7) Set the operation to Multiply and click OK. The cells are now multiplied by 3
(Figure 4).
8) Click Stop Recording to stop the macro recorder. The OpenOffice.org Basic Macros dialog (Figure 5) opens.
4 Calc Macros

Figure 3: Paste Special dialog
Figure 4: Cells multiplied by 3
9) Select the current document (see Figure 5). For this example, the current Calc document is Untitled 1. Existing documents show a library named Standard. This library is not created until the document is saved or the library is needed, so at this point your new document does not contain a library. You can create a new library to contain the macro, but this is not necessary.
Using the macro recorder 5

1 My Macros 5 Create new module in library
2 OpenOffice.org Macros 6 Macros in selected library
3 Open documents 7 Current document
4 Create new library 8 Expand/collapse list
Figure 5: Parts of the OpenOffice.org Basic Macros dialog
10) Click New Module. If no libraries exist, then the Standard library is automatically created and used. In the New Module dialog, type a name for the new module or leave the name as Module1.
11) Click OK to create a new module named Module1. Select the newly created Module1, type PasteMultiply in the Macro name box at the upper left, and click Save. (See Figure 6.)
6 Calc Macros

Figure 6: Select the module and name the macro
The created macro is saved in Module1 of the Standard library in the Untitled 1 document. Listing 1 shows the contents of the macro.
Listing 1. Paste special with multiply.
sub PasteMultiplyrem --------------------------------------------------------------rem define variablesdim document as objectdim dispatcher as objectrem --------------------------------------------------------------rem get access to the documentdocument = ThisComponent.CurrentController.Framedispatcher = createUnoService("com.sun.star.frame.DispatchHelper")
rem --------------------------------------------------------------dim args1(5) as new com.sun.star.beans.PropertyValueargs1(0).Name = "Flags"args1(0).Value = "A"args1(1).Name = "FormulaCommand"args1(1).Value = 3args1(2).Name = "SkipEmptyCells"args1(2).Value = falseargs1(3).Name = "Transpose"args1(3).Value = falseargs1(4).Name = "AsLink"args1(4).Value = falseargs1(5).Name = "MoveMode"args1(5).Value = 4
dispatcher.executeDispatch(document, ".uno:InsertContents", "", 0, args1())
end sub
Using the macro recorder 7
More detail on recording macros is provided in Chapter 13 (Getting Started with Macros) in the Getting Started guide; we recommend you read it if you have not already done so. More detail is also provided in the following sections, but not as related to recording macros.
Write your own functions
Calc can call macros as Calc functions. Use the following steps to create a simple macro:
1) Create a new Calc document named CalcTestMacros.ods.
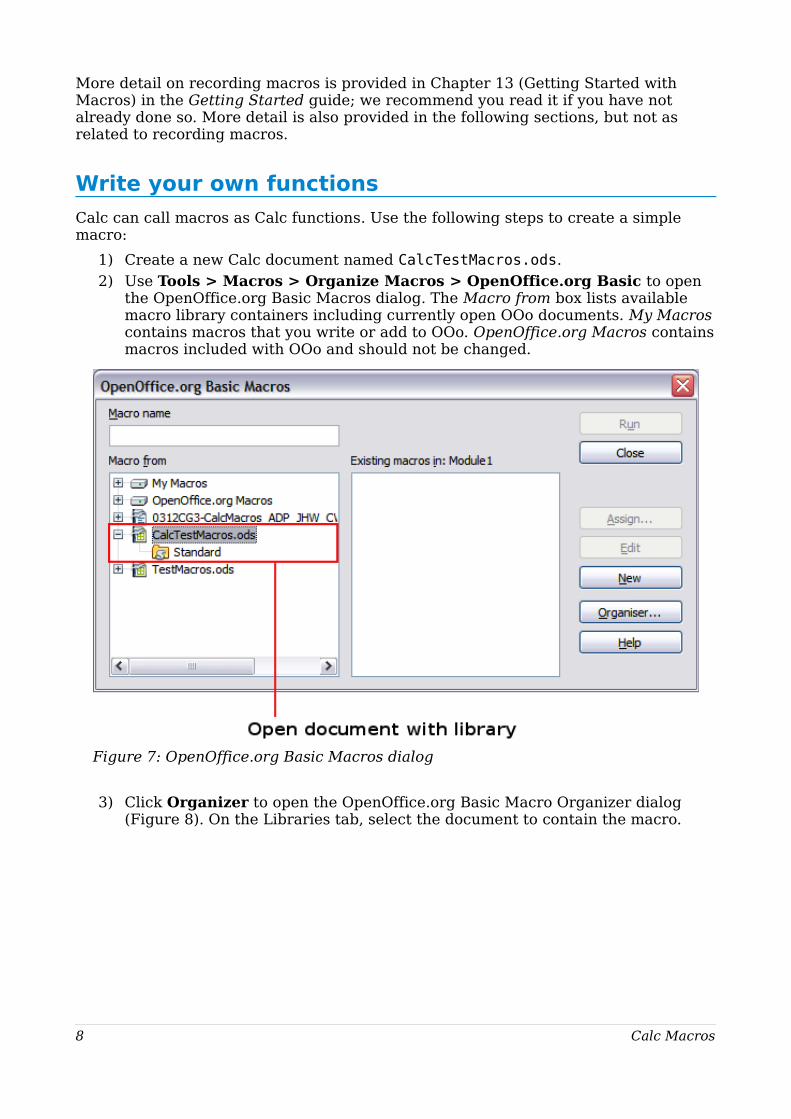
2) Use Tools > Macros > Organize Macros > OpenOffice.org Basic to open the OpenOffice.org Basic Macros dialog. The Macro from box lists available macro library containers including currently open OOo documents. My Macros contains macros that you write or add to OOo. OpenOffice.org Macros contains macros included with OOo and should not be changed.
Figure 7: OpenOffice.org Basic Macros dialog
3) Click Organizer to open the OpenOffice.org Basic Macro Organizer dialog (Figure 8). On the Libraries tab, select the document to contain the macro.
8 Calc Macros

Figure 8: OpenOffice.org Basic Macro Organizer
4) Click New to open the New Library dialog.
Figure 9: New Library dialog
5) Enter a descriptive library name (such as AuthorsCalcMacros) and click OK to create the library. The new library name is shown the library list, but the dialog may show only a portion of the name.
Figure 10: The library is shown in the organizer
6) Select AuthorsCalcMacros and click Edit to edit the library. Calc automatically creates a module named Module1 and a macro named Main.
Write your own functions 9
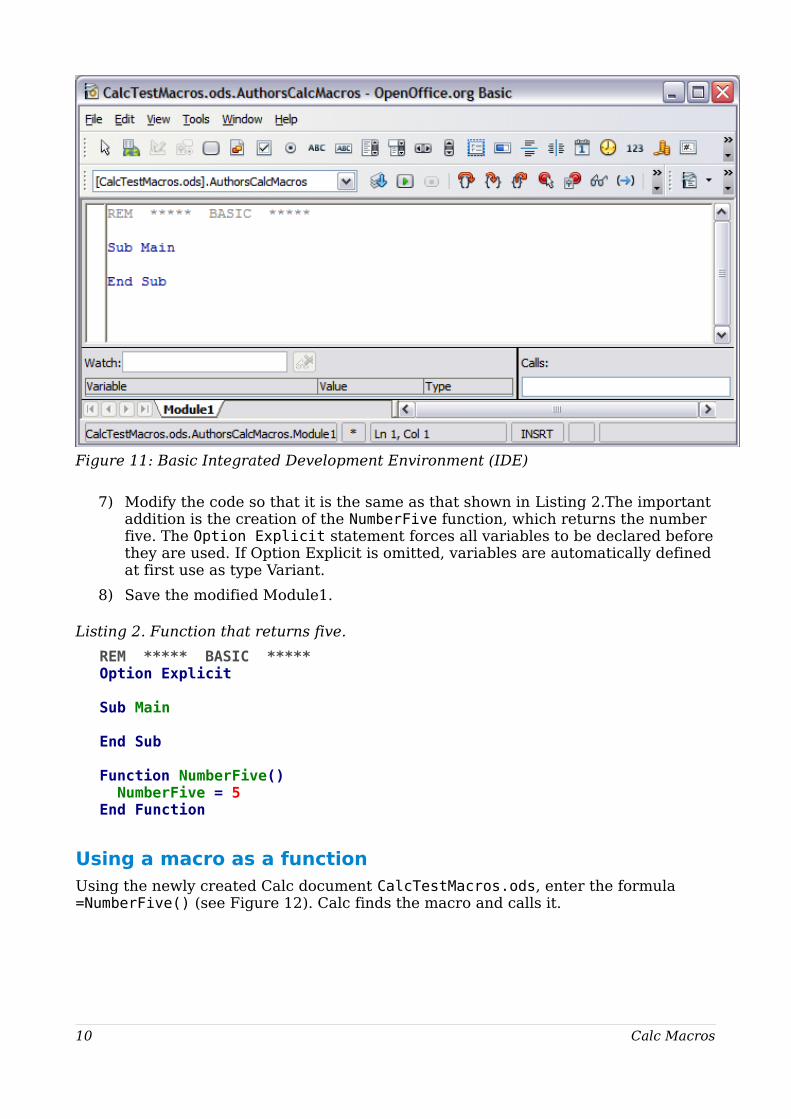
Figure 11: Basic Integrated Development Environment (IDE)
7) Modify the code so that it is the same as that shown in Listing 2.The important addition is the creation of the NumberFive function, which returns the number five. The Option Explicit statement forces all variables to be declared before they are used. If Option Explicit is omitted, variables are automatically defined at first use as type Variant.
8) Save the modified Module1.
Listing 2. Function that returns five.
REM ***** BASIC *****Option Explicit
Sub Main
End Sub
Function NumberFive() NumberFive = 5End Function
Using a macro as a functionUsing the newly created Calc document CalcTestMacros.ods, enter the formula =NumberFive() (see Figure 12). Calc finds the macro and calls it.
10 Calc Macros

Figure 12: Use the NumberFive() Macro as a Calc function
TipFunction names are not case sensitive. In Figure 12, you can enter =NumberFive() and Calc clearly shows =NUMBERFIVE().
Save the Calc document, close it, and open it again. Depending on your settings in Tools > Options > OpenOffice.org > Security > Macro Security, Calc will display the warning shown in Figure 13 or the one shown in Figure 14. You will need to click Enable Macros, or Calc will not allow any macros to be run inside the document. If you do not expect a document to contain a macro, it is safer to click Disable Macros in case the macro is a virus.
Figure 13: OOo warns you that a document contains macros
Figure 14: Warning if macros are disabled
Write your own functions 11

If you choose to disable macros, then when the document loads, Calc can no longer find the function.
Figure 15: The function is gone
When a document is created and saved, it automatically contains a library named Standard. The Standard library is automatically loaded when the document is opened. No other library is automatically loaded.
Calc does not contain a function named NumberFive(), so it checks all opened and visible macro libraries for the function. Libraries in OpenOffice.org Macros, My Macros, and the Calc document are checked for an appropriately named function (see Figure 7). The NumberFive() function is stored in the AuthorsCalcMacros library, which is not automatically loaded when the document is opened.
Use Tools > Macros > Organize Macros > OpenOffice.org Basic to open the OpenOffice.org Basic Macros dialog (see Figure 16). Expand CalcTestMacros and find AuthorsCalcMacros. The icon for a loaded library is a different color from the icon for a library that is not loaded.
Click the expansion symbol (usually a plus or a triangle) next to AuthorsCalcMacros to load the library. The icon changes color to indicate that the library is now loaded. Click Close to close the dialog.
Unfortunately, the cells containing =NumberFive() are in error. Calc does not recalculate cells in error unless you edit them or somehow change them. The usual solution is to store macros used as functions in the Standard library. If the macro is large or if there are many macros, a stub with the desired name is stored in the Standard library. The stub macro loads the library containing the implementation and then calls the implementation.
1) Use Tools > Macros > Organize Macros > OpenOffice.org Basic to open the OpenOffice.org Basic Macros dialog. Select the NumberFive macro and click Edit to open the macro for editing.
Figure 16: Select a macro and click Edit
12 Calc Macros

2) Change the name of NumberFive to NumberFive_Implementation (Listing 3).
Listing 3. Change the name of NumberFive to NumberFive_Implementation
Function NumberFive_Implementation() NumberFive_Implementation() = 5End Function
3) In the Basic IDE (see Figure 11), hover the mouse cursor over the toolbar buttons to display the tool tips. Click the Select Macro button to open the OpenOffice.org Basic Macros dialog (see Figure 16).
4) Select the Standard library in the CalcTestMacros document and click New to create a new module. Enter a meaningful name such as CalcFunctions and click OK. OOo automatically creates a macro named Main and opens the module for editing.
5) Create a macro in the Standard library that calls the implementation function (see Listing 4). The new macro loads the AuthorsCalcMacros library if it is not already loaded, and then calls the implementation function.
6) Save, close, and reopen the Calc document. This time, the NumberFive() function works.
Listing 4. Change the name of NumberFive to NumberFive_Implementation.
Function NumberFive() If NOT BasicLibraries.isLibraryLoaded("AuthorsCalcMacros") Then BasicLibraries.LoadLibrary("AuthorsCalcMacros") End If NumberFive = NumberFive_Implementation()End Function
Passing arguments to a macroTo illustrate a function that accepts arguments, we will write a macro that calculates the sum of its arguments that are positive —it will ignore arguments that are less than zero (see Listing 5).
Listing 5. PositiveSum calculates the sum of the positive arguments.
Function PositiveSum(Optional x) Dim TheSum As Double Dim iRow As Integer Dim iCol As Integer TheSum = 0.0 If NOT IsMissing(x) Then If NOT IsArray(x) Then If x > 0 Then TheSum = x Else For iRow = LBound(x, 1) To UBound(x, 1) For iCol = LBound(x, 2) To UBound(x, 2) If x(iRow, iCol) > 0 Then TheSum = TheSum + x(iRow, iCol) Next Next End If End If PositiveSum = TheSumEnd Function
Write your own functions 13
The macro in Listing 5 demonstrates some important techniques:
1) The argument x is optional. When an argument is not optional and the function is called without it, OOo prints a warning message every time the macro is called. If Calc calls the function many times, then the error is displayed many times.
2) IsMissing checks that an argument was passed before the argument is used.3) IsArray checks to see if the argument is a single value, or an array. For
example, =PositiveSum(7) or =PositiveSum(A4). In the first case, the number 7 is passed as an argument, and in the second case, the value of cell A4 is passed to the function.
4) If a range is passed to the function, it is passed as a two-dimensional array of values; for example, =PositiveSum(A2:B5). LBound and UBound are used to determine the array bounds that are used. Although the lower bound is one, it is considered safer to use LBound in case it changes in the future.
Tip
The macro in Listing 5 is careful and checks to see if the argument is an array or a single argument. The macro does not verify that each value is numeric. You may be as careful as you like. The more things you check, the more robust the macro is, and the slower it runs.
Passing one argument is as easy as passing two: add another argument to the function definition (see Listing 6). When calling a function with two arguments, separate the arguments with a semicolon; for example, =TestMax(3; -4).
Listing 6. TestMax accepts two arguments and returns the larger of the two.
Function TestMax(x, y) If x >= y Then TestMax = x Else TestMax = y End IfEnd Function
Arguments are passed as valuesArguments passed to a macro from Calc are always values. It is not possible to know what cells, if any, are used. For example, =PositiveSum(A3) passes the value of cell A3, and PositiveSum has no way of knowing that cell A3 was used. If you must know which cells are referenced rather than the values in the cells, pass the range as a string, parse the string, and obtain the values in the referenced cells.
Writing macros that act like built-in functionsAlthough Calc finds and calls macros as normal functions, they do not really behave as built-in functions. For example, macros do not appear in the function lists. It is possible to write functions that behave as regular functions by writing an Add-In. However, this is an advanced topic that is not covered here; see
http://wiki.services.openoffice.org/wiki/SimpleCalcAddIn
14 Calc Macros

Accessing cells directly
You can access the OOo internal objects directly to manipulate a Calc document. For example, the macro in Listing 7 adds the values in cell A2 from every sheet in the current document. ThisComponent is set by StarBasic when the macro starts to reference the current document. A Calc document contains sheets: ThisComponent.getSheets(). Use getCellByPosition(col, row) to return a cell at a specific row and column.
Listing 7. Add cell A2 in every sheet.
Function SumCellsAllSheets() Dim TheSum As Double Dim i As integer Dim oSheets Dim oSheet Dim oCell oSheets = ThisComponent.getSheets() For i = 0 To oSheets.getCount() - 1 oSheet = oSheets.getByIndex(i) oCell = oSheet.getCellByPosition(0, 1) ' GetCell A2 TheSum = TheSum + oCell.getValue() Next SumCellsAllSheets = TheSumEnd Function
Tip
A cell object supports the methods getValue(), getString(), and getFormula() to get the numerical value, the string value, or the formula used in a cell. Use the corresponding set functions to set appropriate values.
Use oSheet.getCellRangeByName("A2") to return a range of cells by name. If a single cell is referenced, then a cell object is returned. If a cell range is given, then an entire range of cells is returned (see Listing 8). Notice that a cell range returns data as an array of arrays, which is more cumbersome than treating it as an array with two dimensions as is done in Listing 5.
Listing 8. Add cell A2:C5 in every sheet
Function SumCellsAllSheets() Dim TheSum As Double Dim iRow As Integer, iCol As Integer, i As Integer Dim oSheets, oSheet, oCells Dim oRow(), oRows()
oSheets = ThisComponent.getSheets() For i = 0 To oSheets.getCount() - 1 oSheet = oSheets.getByIndex(i) oCells = oSheet.getCellRangeByName("A2:C5") REM getDataArray() returns the data as variant so strings REM are also returned. REM getData() returns data data as type Double, so only REM numbers are returned. oRows() = oCells.getData()
Accessing cells directly 15

For iRow = LBound(oRows()) To UBound(oRows()) oRow() = oRows(iRow) For iCol = LBound(oRow()) To UBound(oRow()) TheSum = TheSum + oRow(iCol) Next Next Next SumCellsAllSheets = TheSumEnd Function
TipWhen a macro is called as a Calc function, the macro cannot modify any value in the sheet from which the macro was called.
Sorting
Consider sorting the data in Figure 17. First, sort on column B descending and then column A ascending.
Figure 17: Sort column B descending and column A ascending
The example in Listing 9, however, demonstrates how to sort on two columns.
Listing 9. Sort cells A1:C5 on Sheet 1.
Sub SortRange Dim oSheet ' Calc sheet containing data to sort. Dim oCellRange ' Data range to sort.
REM An array of sort fields determines the columns that are REM sorted. This is an array with two elements, 0 and 1. REM To sort on only one column, use: REM Dim oSortFields(0) As New com.sun.star.util.SortField Dim oSortFields(1) As New com.sun.star.util.SortField
REM The sort descriptor is an array of properties. REM The primary property contains the sort fields. Dim oSortDesc(0) As New com.sun.star.beans.PropertyValue
REM Get the sheet named "Sheet1" oSheet = ThisComponent.Sheets.getByName("Sheet1")
REM Get the cell range to sort oCellRange = oSheet.getCellRangeByName("A1:C5")
16 Calc Macros

REM Select the range to sort. REM The only purpose would be to emphasize the sorted data. 'ThisComponent.getCurrentController.select(oCellRange)
REM The columns are numbered starting with 0, so REM column A is 0, column B is 1, etc. REM Sort column B (column 1) descending. oSortFields(0).Field = 1 oSortFields(0).SortAscending = FALSE
REM If column B has two cells with the same value, REM then use column A ascending to decide the order. oSortFields(1).Field = 0 oSortFields(1).SortAscending = True
REM Setup the sort descriptor. oSortDesc(0).Name = "SortFields" oSortDesc(0).Value = oSortFields()
REM Sort the range. oCellRange.Sort(oSortDesc())End Sub
As this macro is a subroutine, you execute it with Tools > Macros > Run Macro and then open CalcTestMacros > AuthorsCalcMacros > Module1. Click on the macro SortRange and then Run.
Conclusion
This chapter provides a brief overview on how to create libraries and modules, using the macro recorder, using macros as Calc functions, and writing your own macros without the macro recorder. Each topic deserves at least one chapter, and writing your own macros for Calc could easily fill an entire book. In other words, this is just the beginning of what you can learn!
Conclusion 17