chapter 13 rail car errail car eail car e photoview 360 render
TRANSCRIPT
SOLIDWORKS 11 PHOTOVIEW 360 RENDER RAIL CAR E PAGE 13-1
Chapter 13 Rail Car ERail Car ERail Car E
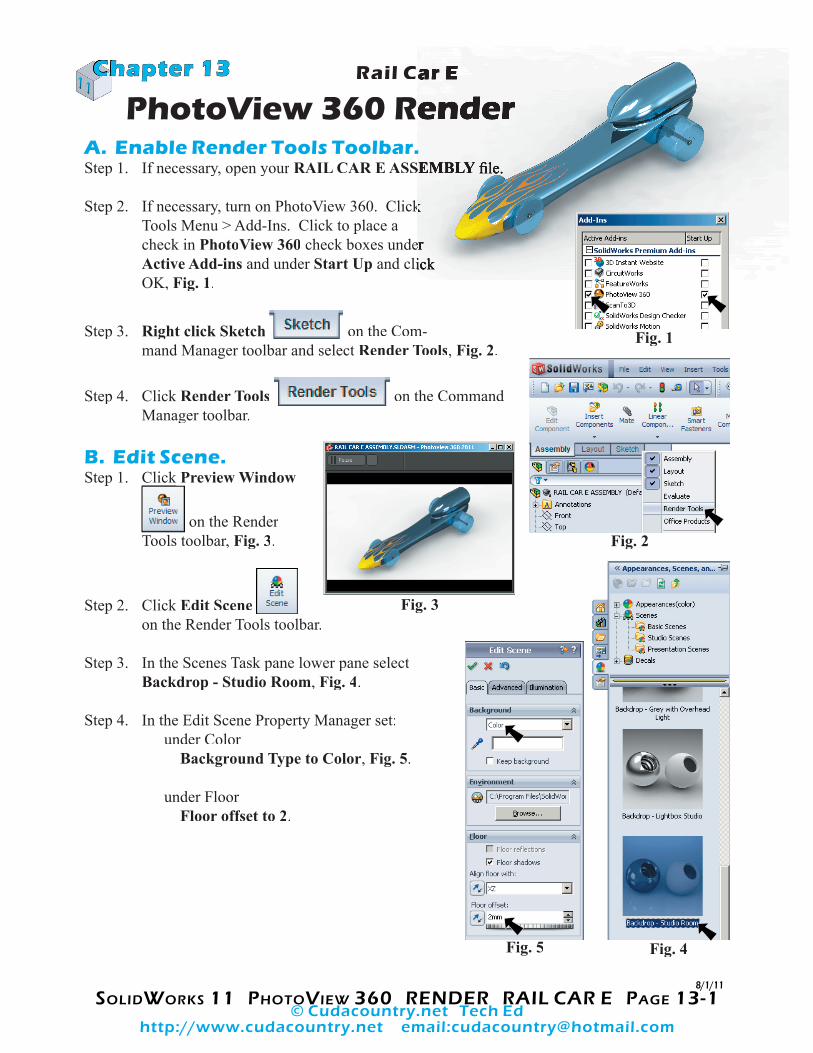
PhotoView 360 Render PhotoView 360 Render PhotoView 360 RenderA. Enable Render Tools Toolbar.Step 1. If necessary, open your RAIL CAR E ASSEMBLYCAR E ASSEMBLY fi le.
Step 2. If necessary, turn on PhotoView 360. Click Step 2. If necessary, turn on PhotoView 360. Click Tools Menu > Add-Ins. Click to place a check in PhotoView 360 check boxes under check boxes under Active Add-ins and under Start Up and click and click OK, Fig. 1.
Step 3. Right click Sketch on the Com-mand Manager toolbar and select Render Tools, Fig. 2.
Step 4. Click Render Tools on the Command Manager toolbar.
B. Edit Scene.Step 1. Click Preview WindowStep 1. Click
on the Render Tools toolbar, Fig. 3.
Step 2. Click Edit Sceneon the Render Tools toolbar.
Step 3. In the Scenes Task pane lower pane selectBackdrop - Studio Room, Fig. 4.
Step 4. In the Edit Scene Property Manager set: under Color Background Type to Color, Fig. 5.
under Floor Floor offset to 2Floor offset to 2Floor off .
8/1/11
Fig. 1
Fig. 2
Fig. 5 Fig. 4
Fig. 3
© Cudacountry.net Tech Edhttp://www.cudacountry.net email:[email protected]

SOLIDWORKS 11 PHOTOVIEW 360 RENDER RAIL CAR E PAGE 13-2
Fig. 6Fig. 7
Fig. 8
Fig. 9
Step 5. Click the Illumination tab at the top of the Property Man-ager and setScene refl ectivity to 2.5, Fig. 6 and Fig. 7.
click OK in the Property Manager.
Step 6. Click Options on the Render Tools toolbar.
Step 7. In the Options Property Manager set:
under Output Image Setting Output Image size to Use SolidWorks View, Fig. 8.
under Render Quality Preview render quality to Good
Preview render quality to Best
click OK in the Property Manager.

SOLIDWORKS 11 PHOTOVIEW 360 RENDER RAIL CAR E PAGE 13-3
Step 8. Close the Preview window.
Step 9. Click Integrated Preview on the Render Tools toolbar.
Step 10. Click Final Render on the Render Tools toolbar.
Step 11. The rendering might take several minutes depending on your computer. After rendering is completed, click Same Image and Close Window.
Step 12. Turn off Integrated Preview on the Render Tools toolbar.
Step 13. Save. Use Ctrl-S.
Fig. 10