cisco cmx configuration guide, release 10 •audience,onpageiii •conventions,onpageiii...
TRANSCRIPT

Cisco CMX Configuration Guide, Release 10.4First Published: 2017-03-31
Last Modified: 2018-04-05
Americas HeadquartersCisco Systems, Inc.170 West Tasman DriveSan Jose, CA 95134-1706USAhttp://www.cisco.comTel: 408 526-4000
800 553-NETS (6387)Fax: 408 527-0883

THE SPECIFICATIONS AND INFORMATION REGARDING THE PRODUCTS IN THIS MANUAL ARE SUBJECT TO CHANGE WITHOUT NOTICE. ALL STATEMENTS,INFORMATION, AND RECOMMENDATIONS IN THIS MANUAL ARE BELIEVED TO BE ACCURATE BUT ARE PRESENTED WITHOUT WARRANTY OF ANY KIND,EXPRESS OR IMPLIED. USERS MUST TAKE FULL RESPONSIBILITY FOR THEIR APPLICATION OF ANY PRODUCTS.
THE SOFTWARE LICENSE AND LIMITED WARRANTY FOR THE ACCOMPANYING PRODUCT ARE SET FORTH IN THE INFORMATION PACKET THAT SHIPPED WITHTHE PRODUCT AND ARE INCORPORATED HEREIN BY THIS REFERENCE. IF YOU ARE UNABLE TO LOCATE THE SOFTWARE LICENSE OR LIMITED WARRANTY,CONTACT YOUR CISCO REPRESENTATIVE FOR A COPY.
The Cisco implementation of TCP header compression is an adaptation of a program developed by the University of California, Berkeley (UCB) as part of UCB's public domain version ofthe UNIX operating system. All rights reserved. Copyright © 1981, Regents of the University of California.
NOTWITHSTANDING ANY OTHERWARRANTY HEREIN, ALL DOCUMENT FILES AND SOFTWARE OF THESE SUPPLIERS ARE PROVIDED “AS IS" WITH ALL FAULTS.CISCO AND THE ABOVE-NAMED SUPPLIERS DISCLAIM ALL WARRANTIES, EXPRESSED OR IMPLIED, INCLUDING, WITHOUT LIMITATION, THOSE OFMERCHANTABILITY, FITNESS FOR A PARTICULAR PURPOSE AND NONINFRINGEMENT OR ARISING FROM A COURSE OF DEALING, USAGE, OR TRADE PRACTICE.
IN NO EVENT SHALL CISCO OR ITS SUPPLIERS BE LIABLE FOR ANY INDIRECT, SPECIAL, CONSEQUENTIAL, OR INCIDENTAL DAMAGES, INCLUDING, WITHOUTLIMITATION, LOST PROFITS OR LOSS OR DAMAGE TO DATA ARISING OUT OF THE USE OR INABILITY TO USE THIS MANUAL, EVEN IF CISCO OR ITS SUPPLIERSHAVE BEEN ADVISED OF THE POSSIBILITY OF SUCH DAMAGES.
Any Internet Protocol (IP) addresses and phone numbers used in this document are not intended to be actual addresses and phone numbers. Any examples, command display output, networktopology diagrams, and other figures included in the document are shown for illustrative purposes only. Any use of actual IP addresses or phone numbers in illustrative content is unintentionaland coincidental.
Cisco and the Cisco logo are trademarks or registered trademarks of Cisco and/or its affiliates in the U.S. and other countries. To view a list of Cisco trademarks, go to this URL:https://www.cisco.com/go/trademarks. Third-party trademarks mentioned are the property of their respective owners. The use of the word partner does not imply a partnership relationshipbetween Cisco and any other company. (1721R)
© 2017 Cisco Systems, Inc. All rights reserved.

Preface
• Audience, on page iii• Conventions, on page iii• Related Documentation, on page iv• Obtaining Documentation and Submitting a Service Request, on page iv
AudienceThis document is for network administrators who configure Cisco Connected Mobile Experiences (CiscoCMX) services.
ConventionsThis document uses the following conventions:
Table 1: Conventions
IndicationConvention
Commands and keywords and user-entered text appear in bold font.bold font
Document titles, new or emphasized terms, and arguments for which you supplyvalues are in italic font.
italic font
Elements in square brackets are optional.[ ]
Required alternative keywords are grouped in braces and separated by verticalbars.
x | y | z
Optional alternative keywords are grouped in brackets and separated by verticalbars.
[ x | y | z ]
A nonquoted set of characters. Do not use quotation marks around the string.Otherwise, the string will include the quotation marks.
string
Terminal sessions and information the system displays appear in courier font.courier font
Nonprinting characters such as passwords are in angle brackets.<>
Default responses to system prompts are in square brackets.[]
Cisco CMX Configuration Guide, Release 10.4iii
IndicationConvention
An exclamation point (!) or a pound sign (#) at the beginning of a line of codeindicates a comment line.
!, #
Means reader take note. Notes contain helpful suggestions or references to material not covered in the manual.Note
Means the following information will help you solve a problem.Tip
Means reader be careful. In this situation, you might perform an action that could result in equipment damageor loss of data.
Caution
Related DocumentationFor more information on coding and specific assistance, see https://developer.cisco.com/site/cmx-mobility-services/
For more information about Cisco Mobility Services Engine and related products, see:
http://www.cisco.com/c/en/us/support/wireless/mobility-services-engine/tsd-products-support-series-home.html
For more information about Cisco Connected Mobile Experiences (Cisco CMX), see:
http://www.cisco.com/c/en/us/solutions/enterprise-networks/connected-mobile-experiences/index.html
For more information about Cisco CMX Cloud, see:
https://support.cmxcisco.com/hc/en-us
Obtaining Documentation and Submitting a Service RequestFor information on obtaining documentation, using the Cisco Bug Search Tool (BST), submitting a servicerequest, and gathering additional information, see What's New in Cisco Product Documentation.
To receive new and revised Cisco technical content directly to your desktop, you can subscribe to the . RSSfeeds are a free service.
Cisco CMX Configuration Guide, Release 10.4iv
PrefaceRelated Documentation

C O N T E N T S
Preface iiiP R E F A C E
Audience iii
Conventions iii
Related Documentation iv
Obtaining Documentation and Submitting a Service Request iv
Getting Started 1C H A P T E R 1
Introduction to Cisco Connected Mobile Experiences 1
Overview of Cisco CMX Services 1
Prerequisites for Configuring Cisco CMX 10.4 4
Importing Maps and Cisco Wireless Controllers 4
Exporting Cisco Prime Infrastructure Maps 4
Copying the Exported Maps 5
Importing Maps 5
Adding Cisco WLCs 5
Logging In to the Cisco CMX User Interface 6
Using the Evaluation License 6
Enabling or Disabling Cisco CMX Services 7
Importing Certificates 7
Installing Self-signed and Third Party SSL Certificate in Cisco CMX 8
Installing a self-signed certificate 9
Installing a Third Party Signed Certificate 10
Installing the Certificate 13
Instructions for CMX build 324: (10.2.2 beta) or 10.2.2 CCO and Later 13
Adding Users and Managing Roles 14
Using the Cisco CMX Setup Assistant 14
Cisco CMX Configuration Guide, Release 10.4v
Supporting Active Clients Version 3 API 14
Getting APIs 15
Changing Time Zones and NTP Server 15
The Cisco CMX Detect and Locate Service 17C H A P T E R 2
Overview of the Detect and Locate Service 17
Initial Configurations 17
Viewing or Tracking Devices 18
Viewing Device Details 21
Customizing Client Refresh Rates 22
Customizing Device Views Using Filters 22
Adding and Deleting Filters 23
Searching for a Device 23
Client Playback 24
Enabling Hyperlocation and FastLocate in Cisco CMX 24
Hyperlocation Mixed Mode Support 26
Running Hyperlocation Diagnostics 27
Configure Hyperlocation Groupings 33
Controlling the Probing Client Expiry Time 36
Supported Access Points for Cisco CMX 10.4 Location Features with Cisco WLC 8.6 37
Measuring Client Location Accuracy Using the Location Accuracy Test 38
Analyzing Location Accuracy Results 41
Understanding Client Diagnostics 42
Analyzing Location Accuracy Log Files 44
Location Accuracy for Hyperlocation Deployments 46
The Cisco CMX Analytics Service 49C H A P T E R 3
Overview of the Analytics Service 49
The Analytics Dashboard 49
Accessing the Analytics Dashboard 50
Filtering the Data Displayed in the Analytics Dashboard 50
Viewing a Device Count and Average Dwell Time Report 51
Analytics Reports 52
Creating and Managing Customized Reports 53
Cisco CMX Configuration Guide, Release 10.4vi
Contents
Create a Custom Report 53
Edit a Report 56
Create a Scheduled Custom Report 56
Configure Custom Time Ranges for an Analytics Report 57
Download a Customized Report 59
Delete a Customized Report 59
Creating an Analytics Report Based on Associated or Probing Only Devices 60
Viewing Global Alerts for Critical Services 60
Customized Widgets 61
The Visitors Widget 61
The Dwell Time Widget 62
The Correlation Widget 63
The Path Analysis Widget 64
The Wi-Fi Adoption Widget 64
The Dwell Time Breakdown Widget 65
Creating Customized Widgets 67
Create a Realtime Report 67
Performing Heatmap Analysis 68
Using the Schedule Manager 69
Verticalization 69
Set SSID Filter Parameters for Analytics Service 69
The Cisco CMX Connect Service 71C H A P T E R 4
Overview of the Connect Service 71
Comparison of Facebook Wi-Fi and Custom Portal 72
Preparatory Tasks 73
Adding a Connect or ConnectExperience User 73
User Role Summary 73
Connect Settings 74
Connect Settings 74
Changing the Portal Login Frequency 74
Using the CMX Connect Debugging Tools 75
Connect Experiences 75
Overview 75
Cisco CMX Configuration Guide, Release 10.4vii
Contents
Facebook Wi-Fi 75
Custom Portal 76
Setting Up a Facebook Wi-Fi Portal 76
Configuring Access Control Lists on Cisco Wireless Controller 76
Configuring WLAN for Web Passthrough Authentication 77
Creating a Facebook Page for Your Organization 78
Assigning a System Default Facebook Page 79
Assigning a Location-Specific Facebook Page 79
Setting Up a Custom Portal 79
Configuring Access Control Lists on Cisco Wireless Controller 81
Configuring WLAN for Web Passthrough Authentication 82
Creating a Default Custom Portal Page 83
Assigning Location-Specific Custom Portal Page 83
Enabling Multi-language Support in Custom Portals 84
Configuring Connect Portal Pages for Sites 84
Viewing Connect Clients with Sites 85
Offering an Opt-Out of Cisco CMX Services 85
Configuring the Opt-Out Option 86
Changing the Opt-Out Period 86
FlexConnect AP Support on Cisco CMX 86
Configuring FlexConnect ACLs 87
Setting Up a Controller with FlexConnect ACLs 89
Offering Portal Pages on HTTP from Cisco CMX Connect 89
Disabling HTTPS 89
Adjusting ACLs on Cisco WLC 90
SMS Authentication 90
The Connect Dashboard 91
Summary Information 92
Historical Information 92
Visitor Search 92
Additional Information 92
Using the Connect and Engage Library 93
Device-Browser Matrix 94
Device-Browser Matrix for Connect and Engage 94
Cisco CMX Configuration Guide, Release 10.4viii
Contents

Device-Browser Matrix for Facebook Wi-Fi 94
Configuring the Property Management System 95
Prerequisites for the Property Management System 96
PMS Policy Enforcement 96
Location Based and Site Based PMS Policy Enforcement 96
Configuring the FreeRADIUS on Cisco CMX 97
Customizing the FreeRADIUS Server 97
Using the FreeRADIUS Configuration Script 98
Cisco WLC Configurations 99
Creating an Access Control List 99
Configuring Authentication Server 99
Configuring WLAN 100
Configuring a PMS User's Account and Wi-Fi Plan 100
Configuring Connect Settings for PMS 101
Editing the PMS Connect Settings 101
Setting Up a Custom Portal for PMS 102
Assigning a PMS Portal to Sites or Locations 102
Using the Visitors Search to Find PMS Information 102
Customizing a Policy Plan 104
Configuring Elements for Custom Portal Navigation 105
Configuring URLs for Custom Portal Navigation 105
Configuring Connect Services in Cisco CMX High Availability 106
Authentication with Social Network Accounts 106
Configuring OAuth with Facebook 107
Facebook Data Collection 109
Configuring OAuth with Instagram 110
Configuring OAuth with Foursquare 110
The Cisco CMX Presence Analytics Service 111C H A P T E R 5
Overview of the Presence Analytics Service 111
Installing the Presence Analytics Service 112
Benefits of the Presence Analytics Service 112
Initial Configurations 112
Presence Analytics Dashboard 113
Cisco CMX Configuration Guide, Release 10.4ix
Contents
Adding Sites 114
Adding Sites Individually 114
Adding Sites in Bulk 115
Viewing Available Sites 116
Editing an Existing Site 116
Deleting an Existing Site 116
Searching for a Site 117
Adding APs 117
Adding an AP to a Site 117
Adding APs in Bulk 118
Deleting an AP 119
Viewing Site Details for a Specified Period 119
Viewing KPI Summary 120
Viewing Device Proximity, Count, and Distribution for a Specific Site 120
Emailing a Report 121
Printing a Report 121
Generating a PDF Report 121
Managing Reports 122
Specifying Filter Parameters 123
Enabling a Global Site 123
Creating a Site Group 123
Changing the Presence Analytics Theme 124
Managing Cisco CMX Configuration 125C H A P T E R 6
Overview of the Manage Service 125
Managing Perimeters and Zones on Location Maps 126
Viewing Campus, Building, Floor, and Zone Details 126
Managing Tags 126
Creating an Inclusion or Exclusion Region 127
Creating a Perimeter 127
Deleting a Perimeter 128
Editing a Perimeter 129
Creating a Zone 129
Deleting a Zone 130
Cisco CMX Configuration Guide, Release 10.4x
Contents
Editing a Zone 131
Managing Licenses 131
Add a License 133
Deleting a License 134
Managing Users 134
Adding a User 134
User Roles 134
Changing the Default Admin Password 135
Editing User Information 136
Deleting a User 136
Managing Notifications from Applications 136
Create a New Notification 137
Making Changes to Notifications 140
Enabling and Disabling a Notification 141
Editing a Notification 141
Viewing Northbound Notifications 141
Viewing Northbound Notification Attributes 141
Managing Proxy Settings for Notifications 143
Deleting a Notification 145
Managing Cisco CMX Cloud Apps 145
Managing Verticalization 146
Queue Analytics 148
Customizing Verticals 148
Configuring Basic CMX Settings 149
Root User Changes 149
Managing Cisco CMX System Settings 151C H A P T E R 7
Overview of the System Service 151
Viewing the Overall System Health 151
Understanding the Node Table 152
Understanding the Coverage Details Table 153
Understanding the Controllers Table 154
Managing Dashboard Settings 154
Setting Device Tracking Parameters 154
Cisco CMX Configuration Guide, Release 10.4xi
Contents
Setting Filtering Parameters 156
Setting Location Calculation Parameters 157
Configuring the Mail Server for Notifications 159
Importing Maps and Controllers into Cisco CMX 159
Importing Maps and Adding Controllers 160
Upgrading Cisco CMX 161
Enabling High Availability for Cisco CMX 162
Pre-requisites for HA 163
Enabling High Availability for Cisco CMX Using the Web UI 163
Enabling High Availability Using CLI 164
Viewing Live System Alerts 165
Viewing Patterns 165
Understanding the Metrics Tab 166
Viewing System Summary Metrics 166
Viewing System Summary Metrics Using the Dashboard 167
Viewing CMX Node Metrics 167
Viewing CMX Node Metrics Using the Dashboard 168
Viewing Database Metrics 168
Viewing Database Metrics Using the Dashboard 169
Viewing Cache Metrics 169
Viewing Cache Metrics Using the Dashboard 169
Viewing Location Metrics 170
Viewing Location Metrics Using the Dashboard 170
Viewing Analytics Notification Metrics 171
Viewing Analytics Notification Metrics Using the Dashbaord 171
Viewing Presence Metrics 172
Performing Administrative Tasks 173C H A P T E R 8
Cisco CMX User Accounts 173
Recovering Password 174
Using FTP Commands for Cisco CMX 174
Backing Up Data 175
Increasing the Hard Disk Space 177
Restoring Data 178
Cisco CMX Configuration Guide, Release 10.4xii
Contents
Troubleshooting Cisco CMX Server Shutdown Problems 180
Guidelines for Managing Zones in Cisco CMX 181A P P E N D I X A
Cisco CMX Alerts 185A P P E N D I X B
Cisco CMX Network Protocols and Port Matrix 197A P P E N D I X C
Cisco CMX Configuration Guide, Release 10.4xiii
Contents

Cisco CMX Configuration Guide, Release 10.4xiv
Contents

C H A P T E R 1Getting Started
• Introduction to Cisco Connected Mobile Experiences, on page 1• Overview of Cisco CMX Services, on page 1• Prerequisites for Configuring Cisco CMX 10.4, on page 4• Importing Maps and Cisco Wireless Controllers, on page 4• Logging In to the Cisco CMX User Interface, on page 6• Using the Evaluation License, on page 6• Enabling or Disabling Cisco CMX Services, on page 7• Importing Certificates, on page 7• Installing Self-signed and Third Party SSL Certificate in Cisco CMX, on page 8• Adding Users and Managing Roles, on page 14• Using the Cisco CMX Setup Assistant, on page 14• Supporting Active Clients Version 3 API, on page 14• Getting APIs, on page 15• Changing Time Zones and NTP Server, on page 15
Introduction to Cisco Connected Mobile ExperiencesCisco Mobility Services Engine (Cisco MSE) acts as a platform to deploy and run Cisco Connected MobileExperiences (Cisco CMX). Cisco MSE is delivered in two modes—the physical appliance (box) and thevirtual appliance (deployed using VMware vSphere Client) . Using your Cisco wireless network and locationintelligence from Cisco MSE, Cisco CMX helps you create personalized mobile experiences for end usersand gain operational efficiency with location-based services.
For more information about Cisco CMX features for this release, see the Release Notes for Cisco CMX, at:
http://www.cisco.com/c/en/us/support/wireless/mobility-services-engine/products-release-notes-list.html
Overview of Cisco CMX ServicesCisco CMX enables you to access the following services:
• DETECT&LOCATE—TheDetect & Locate service uses the data provided by CiscoWLCs to calculatethe X,Y location (based on 0,0 at the top left hand side of the map) of wireless devices that are detectedby the access points that support the wireless LAN (WLAN) to a high degree of precision (generally +/-5to 7M, 90% of the time with standard location technologies and +/-1 to 3M, 50% of the time with
Cisco CMX Configuration Guide, Release 10.41
Hyperlocation technologies). Given the proper physical environment with access points deployed inaccordance with Cisco best practices for a location ready environment. The CMX GUI will be able todisplay the physical location of:
• Associated Wireless Devices (shown as green dots in default view)
• Unassociated Wireless Devices (shown as red dots in default view)
• RF Interferers (Lightning icon)
• Access Points (Circles)
• Rogue Access Points
• Rogue Clients
• BLE Tags (Bluetooth Icon)
• Active Wi-fi RFID Tags (Tag icon)
The background map can display:
• Inclusion and Exclusion Zones imported from Cisco Prime Infrastructure
• Analytics Zones created in Cisco CMX
• Thick Walls
• GPS Markers
Additionally when passed to the CMX Analytics service, this location information provides visibilityinto customer movements and behavior throughout the venue and throughout the day. The Cisco CMXAnalytics service determines device parameters and can display this information as part of six differentunique widgets.
If you choose Location during installation, you will see the following services in Cisco CMX GUI.
• DETECT & LOCATE—Active for 120 day trial period unless either a CMX base or advancedlicense is added.
• ANALYTICS—Active for 120 day trial period unless a CMX advanced license is added.
• CONNECT & ENGAGE—Active for 120 day trial period unless either a CMX base or advancedlicense is added
• MANAGE
• SYSTEM
For more information, see Overview of the Detect and Locate Service, on page 17.
• ANALYTICS—This service provides a set of data analytic tools packaged for analyzing Wi-Fi devicelocations. It functions as a data visualization engine that helps organizations use their network as a datasource for business analysis to understand behavior patterns and trends, which can help them take decisionson how to improve visitor experience and boost customer service.
The ANALYTICS service allows for the creation of six different type of widgets.
• Device count
Cisco CMX Configuration Guide, Release 10.42
Getting StartedOverview of Cisco CMX Services

• Dwell time
• Dwell time breakdown
• Associated User Report
• Path
• Correlation
For more information, see The Cisco CMX Analytics Service, on page 49.
• CONNECT & ENGAGE—This service provides intuitive, simple, highly customizable, andlocation-aware guest services in the form of a captive portal that offers two types of guest on-boardingexperiences:
• Facebook Wi-Fi
• Custom Portal
For more information, see The Cisco CMX Connect Service, on page 71.
• PRESENCE ANALYTICS—Cisco Presence Analytics service is a new analytics engine that detectsthe presence of visitors via their mobile devices interactions with even a single network access point.The probe requests which are transmitted from the wireless devices provide information, which is usedto identify the general location of a client, in respect to the location of even a single access point whichhears the clients probing activity. The information available from even a single AP allows the PresenceAnalytics service to develop valuable business intelligence. Presence Analytics uses Received SignalStrength Indication (RSSI), along with the duration of high signal strength to determine whether a clientdevice is in the site or just passing by. Even if a device is not connected to the access point, its presenceis still detected if the device is within the signal range and the wireless is turned on. Giventhat Presence Analytics develops location information with respect to a given set of APs it has a simplermanagement overhead in that it does not require the importation or configuration of any maps into theCMX instance. By simply knowing the association of a given AP, or set of APs, to a physical location,Presence Analytics allows a business insight into the number of visitors to a location, whether these arefirst time or repeat visitors, the average amount of time each visitor spent in physical proximity to theAP, and the ability to ascertain whether a devise was just passing by a location or if they were actuallywithin the location serviced by the AP. For more information, see Overview of the Presence AnalyticsService, on page 111.
If you choose Presence during installation, you will see the following services in the Cisco CMX GUI.
• PRESENCE ANALYTICS
• CONNECT & ENGAGE
• MANAGE
• SYSTEM
• MANAGE--This service enables you to manage licenses, users, zones, beacons, and notifications. Formore information, see Managing Cisco CMX Configuration, on page 125.
• SYSTEM—This service enables you to verify the health of the system and view patterns and metrics.For more information, see Managing Cisco CMX System Settings, on page 151.
For a complete list of new features supported by Cisco CMX for this release, see the Release Notes for CiscoCMX, at:
Cisco CMX Configuration Guide, Release 10.43
Getting StartedOverview of Cisco CMX Services
http://www.cisco.com/c/en/us/support/wireless/mobility-services-engine/products-release-notes-list.html
The installation methods for Location and Presence are different. If you want to change the service, you mustperform a fresh installation.
Note
Prerequisites for Configuring Cisco CMX 10.4The following components are mandatory for you to configure Cisco CMX 10.4:
• Exported maps (in the form of files) from Cisco Prime Infrastructure 1.3, 1.4, 2.2, 3.0, or 3.1
Import maps from Cisco Prime Infrastructure only if you are using the CiscoCMX Location service. You do not have to import them if you are using thePresence Analytics service because this service does not require maps; allconfigurations are accomplished using the Presence Analytics Dashboard.
Note
• Cisco Wireless Controller (Cisco WLC) 7.6, 8.0, 8.1, 8.2, 8.3, 8.4, 8.5, or 8.6.
• Cisco CMX 10.4 License (Cisco CMX 10.4 ships with a fully functional 120-day evaluation license thatis activated after Cisco CMX is installed and started for the first time. For more information about licensemodels, see Managing Licenses, on page 131.
For information about adding permanent licenses, see Add a License, on page 133.)
Importing Maps and Cisco Wireless ControllersCisco CMX relies on incoming Network Mobility Service Protocol (NMSP) data from any of the CiscoWireless Controllers (CiscoWLCs) added to the system. The following sections describe the process to follow.
Exporting Cisco Prime Infrastructure MapsTo obtain maps for Cisco CMX, you have to export maps from Cisco Prime Infrastructure.
Procedure
Step 1 Log in to Cisco Prime Infrastructure.Step 2 Choose Site Maps from the Maps menu.Step 3 Choose Export Maps and click Go.Step 4 Select the map to be exported and click Export.
Cisco CMX Configuration Guide, Release 10.44
Getting StartedPrerequisites for Configuring Cisco CMX 10.4
The selected map is downloaded to a compressed tar file named ImportExport_xxxx .tar.gz, for example,ImportExport_4575dcc9014d3d88.tar.gz, in your browser’s download directory.
Copying the Exported MapsUse Secure Copy Protocol (SCP) to copy the exported maps to a directory of a server accessible by CiscoCMX.
Importing MapsYou can import maps from Cisco Prime Infrastructure into Cisco CMX using either GUI or CLI.
When you import maps, they are appended to the existing ones in Cisco CMX. When Cisco CMX finds thata campus whose name already exists in Cisco CMX has a different AesUID in the import map file, CiscoCMX performs a map sync operation under this campus if the override option is set to Yes.
To import maps using the CLI, use the cmxctl config maps import --type FILE --path path to .tar.gz filecommand.
For more information about Cisco CMX commands, see the Cisco Connected Mobile Experiences (CMX)Command Reference Guide, Release 10.4, at: https://www.cisco.com/c/en/us/support/wireless/connected-mobile-experiences/products-command-reference-list.html.
When importing the maps from Prime Infrastructure using CLI, you also can import the zones. To importzones, set the import zone option as Yes and import the maps. After importing maps from Cisco PrimeInfrastructure, you can update them in Cisco CMX by drawing new zones. However, these changes are notsynchronized back to Cisco Prime Infrastructure.
Note
Adding Cisco WLCsYou can add Cisco WLCs using CLI or the CMX user interface. If you add Cisco WLCs using PrimeInfrastructure, then the controller configuration will not work unless the NMSP connection is correct. However,the controller may be added successfully, but the connection may not work.
To add Cisco WLCs from the Cisco CMX CLI, run one of these commands:
• cmxctl config controllers add
• cmxctl config controllers import [PI/FILE]
For more information about Cisco CMX commands, see the Cisco Connected Mobile Experiences (CMX)Command Reference Guide, Release 10.4, at:
https://www.cisco.com/c/en/us/td/docs/wireless/mse/10-4/cmx_command/cmxcli104.html.
Cisco CMX Configuration Guide, Release 10.45
Getting StartedCopying the Exported Maps
After adding Cisco WLCs, you must verfiy if the controller status is up and running. Using the CLI, you canrun the command cmxctl config controllers show to display the list of controllers with the status. An Activestatus indicates a established connection.
To validate the controller status using user interface, you need to navigate to the System tab. The controllerslist is displayed in the tab and the new controller should appear in green.
Note
Logging In to the Cisco CMX User InterfaceProcedure
Step 1 Launch the Cisco CMX user interface using Google Chrome 50 or later.Step 2 In the browser’s address line, enter https://ipaddress , where ipaddress is the IP address of the server on which
you installed Cisco CMX.
The Cisco CMX user interface displays the Login window.
Step 3 Enter your username and password.
(The default username is admin and the default password is admin.)
Using the Evaluation LicenseCisco Connected Mobile Experiences (CMX) ships with a fully functional 120-day evaluation license, whichis activated after Cisco CMX is installed and started for the first time. The evaluation license is based on CiscoCMX usage, not calendar days (meaning, days when Cisco CMX is not used are not counted).
You must upload a permanent license to CMX before the evaluation license expires. Otherwise, you will notbe able to access the Cisco CMXGUI or APIs. Cisco CMXwill continue to run in the background and collectdata until you add a permanent license.
After the evaluation license expires, only users with admin privileges can log in to add additional licenses.
CMX provides multiple reminders that the evaluation license is about to expire:
• For two weeks before the evaluation license expires, a daily alert is displayed on the Cisco CMX System> Alerts window.
• An alert email is sent, if you have configured email settings.
• An alert is displayed when you log in to Cisco CMX.
To add a license, click Add new license from the alert. You can also add a license from the Cisco CMXManage > Licenses window. For information about adding permanent licenses, see Managing Licenses, onpage 131.
Cisco CMX Configuration Guide, Release 10.46
Getting StartedLogging In to the Cisco CMX User Interface
The license file has an .lic extension. Make sure it is the .lic file that you install on Cisco CMX. The .lic fileis available as part of your licensing package and is sent as an email attachment from licensing. Extract the.lic file to your system and upload to Cisco CMX when adding a new license.
Note
For details about procuring licenses, see the Cisco ConnectedMobile Experiences (CMX) Version 10 Orderingand Licensing Guide.
Enabling or Disabling Cisco CMX Services• To enable a Cisco CMX service using the CLI, run the following command:
cmxctl enable consul | qlesspyworker | cassandra | iodocs | cache_6382 | cache_6380 | cache_6381| cache_6383 | cache_6385 | influxdb | metrics | confd | cache_6379 | cache_6378 | haproxy | database| analytics | connect | location | configuration | matlabengine | hyperlocation | nmsplb | agent
• To disable a Cisco CMX service using the CLI, run the following command:
cmxctl disable consul | qlesspyworker | cassandra | iodocs | cache_6382 | cache_6380 | cache_6381| cache_6383 | cache_6385 | influxdb | metrics | confd | cache_6379 | cache_6378 | haproxy | database| analytics | connect | location | configuration | matlabengine | hyperlocation | nmsplb | agent
For detailed information about these commands, see theCisco ConnectedMobile Experiences (CMX) CommandReference Guide, Release 10.4, at:
https://www.cisco.com/c/en/us/td/docs/wireless/mse/10-4/cmx_command/cmxcli104.html.
Importing CertificatesCisco CMX requires certificates for serving the user interface over SSL. You can import self signed certificatesor certificate authority (CA) signed certificates to Cisco CMX. Before initiating the import process, ensurethat you have a self signed or a CA signed certificate and the key file. We recommend you to consult yourCA authority to generate certificate signing requests (CSR) and certificates.
The certificate should be in the PEM format (with .pem extension) as shown below:-----BEGIN RSA PRIVATE KEY-----(Your Private Key: your_domain_name.key)-----END RSA PRIVATE KEY----------BEGIN CERTIFICATE-----(Your Primary SSL certificate: your_domain_name.crt)-----END CERTIFICATE----------BEGIN CERTIFICATE-----(Your Intermediate certificate: DigiCertCA.crt)-----END CERTIFICATE----------BEGIN CERTIFICATE-----(Your Root certificate: TrustedRoot.crt)-----END CERTIFICATE-----
Cisco CMX Configuration Guide, Release 10.47
Getting StartedEnabling or Disabling Cisco CMX Services

Cisco CMX has multiple internal servers that work with SSL certificates. If these certificates use passphrase,after a Cisco CMX restart, the passphrase must be manually entered to use the certificates. As the internalservers within Cisco CMX do not directly interact with the user, there is no interface to input the requiredpassphrases. Hence, at this point, Cisco CMX cannot support certificate with passphrases.
To work around this issue, remove the passphrase from the certificates, by running the following command:openssl rsa -in <OriginalKeyfile> -out <NewKeyfileWithoutPassphrase>.
Note
Procedure
Step 1 Run the following scp command to copy the PEM certificate into Cisco CMX system.
scp cert.pem [email protected]:~/
Step 2 Run the following scp command to copy the key file into Cisco CMX system.
scp host.key [email protected]:~/
Step 3 Log in to Cisco Connected Mobile Experiences (Cisco CMX) as cmxadmin user.
The PEM certificate and the key file must be in the home directory of the cmxadmin user.
Step 4 Ensure that the certificate and key files have minimum global read permissions (0644).Step 5 Run the following command to verify whether the certificate is valid.
openssl verify -CAfile /home/cmxadmin/cert.pem /home/cmxadmin/cert.pem
A valid certificate returns an OK message.Step 6 To install the new certificate in Cisco CMX, run the following command:
cmxctl node sslmode enable --pem /home/cmxadmin/cert.pem --key /home/cmxadmin/host.key
Step 7 Run the following commands to restart the agent and haproxy services:
cmxctl restart agent
cmxctl restart haproxy
Step 8 Navigate to Cisco CMXURL in your web browser and then use the browser tools to confirm the new certificate.
Installing Self-signed and Third Party SSL Certificate in CiscoCMX
This section describes the installation of self-signed and 3rd party signed certificates in CMX.
Cisco CMX Configuration Guide, Release 10.48
Getting StartedInstalling Self-signed and Third Party SSL Certificate in Cisco CMX
Installing a self-signed certificate
Procedure
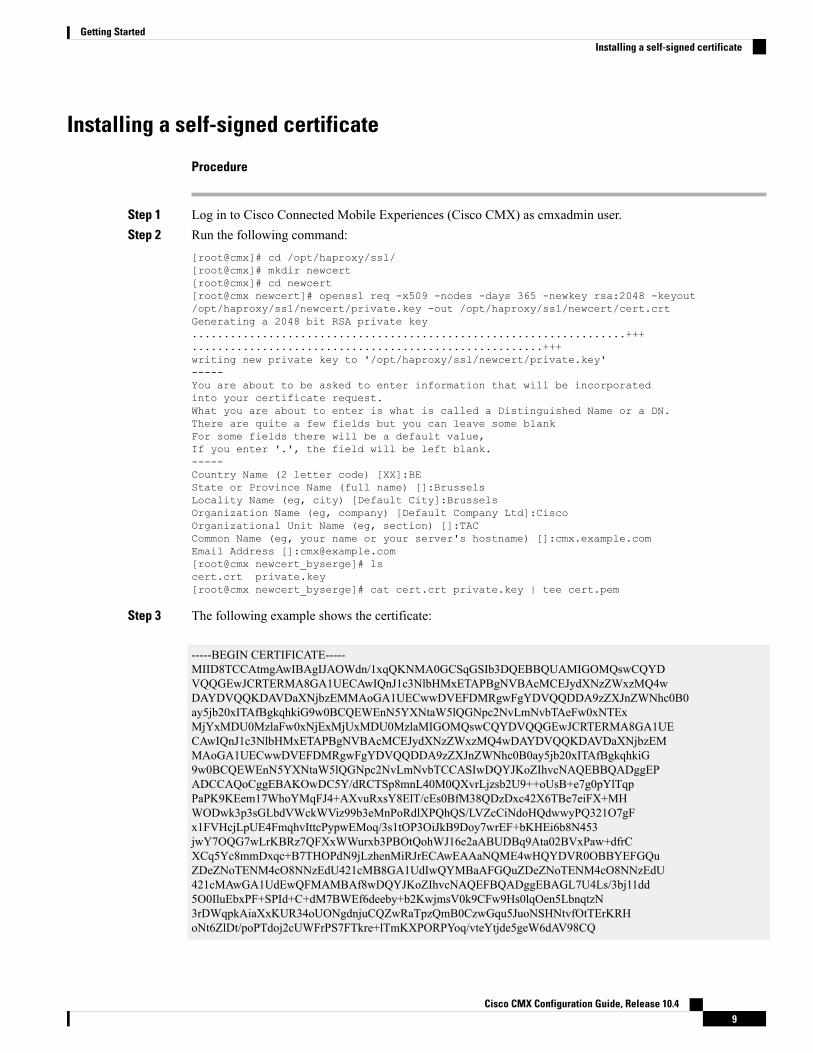
Step 1 Log in to Cisco Connected Mobile Experiences (Cisco CMX) as cmxadmin user.Step 2 Run the following command:
[root@cmx]# cd /opt/haproxy/ssl/[root@cmx]# mkdir newcert[root@cmx]# cd newcert[root@cmx newcert]# openssl req -x509 -nodes -days 365 -newkey rsa:2048 -keyout/opt/haproxy/ssl/newcert/private.key -out /opt/haproxy/ssl/newcert/cert.crtGenerating a 2048 bit RSA private key....................................................................+++.......................................................+++writing new private key to '/opt/haproxy/ssl/newcert/private.key'-----You are about to be asked to enter information that will be incorporatedinto your certificate request.What you are about to enter is what is called a Distinguished Name or a DN.There are quite a few fields but you can leave some blankFor some fields there will be a default value,If you enter '.', the field will be left blank.-----Country Name (2 letter code) [XX]:BEState or Province Name (full name) []:BrusselsLocality Name (eg, city) [Default City]:BrusselsOrganization Name (eg, company) [Default Company Ltd]:CiscoOrganizational Unit Name (eg, section) []:TACCommon Name (eg, your name or your server's hostname) []:cmx.example.comEmail Address []:[email protected][root@cmx newcert_byserge]# lscert.crt private.key[root@cmx newcert_byserge]# cat cert.crt private.key | tee cert.pem
Step 3 The following example shows the certificate:
-----BEGIN CERTIFICATE-----MIID8TCCAtmgAwIBAgIJAOWdn/1xqQKNMA0GCSqGSIb3DQEBBQUAMIGOMQswCQYDVQQGEwJCRTERMA8GA1UECAwIQnJ1c3NlbHMxETAPBgNVBAcMCEJydXNzZWxzMQ4wDAYDVQQKDAVDaXNjbzEMMAoGA1UECwwDVEFDMRgwFgYDVQQDDA9zZXJnZWNhc0B0ay5jb20xITAfBgkqhkiG9w0BCQEWEnN5YXNtaW5lQGNpc2NvLmNvbTAeFw0xNTExMjYxMDU0MzlaFw0xNjExMjUxMDU0MzlaMIGOMQswCQYDVQQGEwJCRTERMA8GA1UECAwIQnJ1c3NlbHMxETAPBgNVBAcMCEJydXNzZWxzMQ4wDAYDVQQKDAVDaXNjbzEMMAoGA1UECwwDVEFDMRgwFgYDVQQDDA9zZXJnZWNhc0B0ay5jb20xITAfBgkqhkiG9w0BCQEWEnN5YXNtaW5lQGNpc2NvLmNvbTCCASIwDQYJKoZIhvcNAQEBBQADggEPADCCAQoCggEBAKOwDC5Y/dRCTSp8mnL40M0QXvrLjzsb2U9++oUsB+e7g0pYlTqpPaPK9KEem17WhoYMqFJ4+AXvuRxsY8ElT/cEs0BfM38QDzDxc42X6TBe7eiFX+MHWODwk3p3sGLbdVWckWViz99b3eMnPoRdlXPQhQS/LVZcCiNdoHQdwwyPQ321O7gFx1FVHcjLpUE4FmqhvIttcPypwEMoq/3s1tOP3OiJkB9Doy7wrEF+bKHEi6b8N453jwY7OQG7wLrKBRz7QFXxWWurxb3PBOtQohWJ16e2aABUDBq9Ata02BVxPaw+dfrCXCq5Yc8mmDxqc+B7THOPdN9jLzhenMiRJrECAwEAAaNQME4wHQYDVR0OBBYEFGQuZDeZNoTENM4cO8NNzEdU421cMB8GA1UdIwQYMBaAFGQuZDeZNoTENM4cO8NNzEdU421cMAwGA1UdEwQFMAMBAf8wDQYJKoZIhvcNAQEFBQADggEBAGL7U4Ls/3bj11dd5O0IluEbxPF+SPId+C+dM7BWEf6deeby+b2KwjmsV0k9CFw9Hs0lqOen5LbnqtzN3rDWqpkAiaXxKUR34oUONgdnjuCQZwRaTpzQmB0CzwGqu5JuoNSHNtvfOtTErKRHoNt6ZlDt/poPTdoj2cUWFrPS7FTkre+lTmKXPORPYoq/vteYtjde5geW6dAV98CQ
Cisco CMX Configuration Guide, Release 10.49
Getting StartedInstalling a self-signed certificate
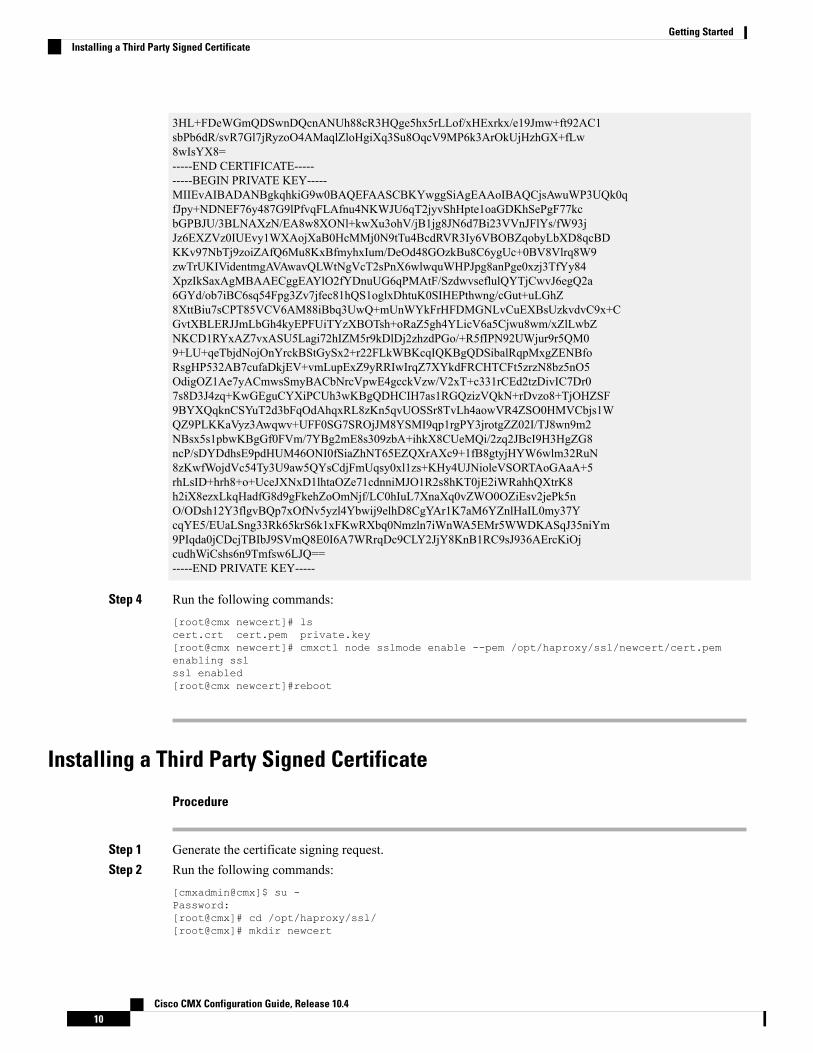
3HL+FDeWGmQDSwnDQcnANUh88cR3HQge5hx5rLLof/xHExrkx/e19Jmw+ft92AC1sbPb6dR/svR7Gl7jRyzoO4AMaqlZloHgiXq3Su8OqcV9MP6k3ArOkUjHzhGX+fLw8wIsYX8=-----END CERTIFICATE----------BEGIN PRIVATE KEY-----MIIEvAIBADANBgkqhkiG9w0BAQEFAASCBKYwggSiAgEAAoIBAQCjsAwuWP3UQk0qfJpy+NDNEF76y487G9lPfvqFLAfnu4NKWJU6qT2jyvShHpte1oaGDKhSePgF77kcbGPBJU/3BLNAXzN/EA8w8XONl+kwXu3ohV/jB1jg8JN6d7Bi23VVnJFlYs/fW93jJz6EXZVz0IUEvy1WXAojXaB0HcMMj0N9tTu4BcdRVR3Iy6VBOBZqobyLbXD8qcBDKKv97NbTj9zoiZAfQ6Mu8KxBfmyhxIum/DeOd48GOzkBu8C6ygUc+0BV8Vlrq8W9zwTrUKIVidentmgAVAwavQLWtNgVcT2sPnX6wlwquWHPJpg8anPge0xzj3TfYy84XpzIkSaxAgMBAAECggEAYlO2fYDnuUG6qPMAtF/SzdwvseflulQYTjCwvJ6egQ2a6GYd/ob7iBC6sq54Fpg3Zv7jfec81hQS1oglxDhtuK0SIHEPthwng/cGut+uLGhZ8XttBiu7sCPT85VCV6AM88iBbq3UwQ+mUnWYkFrHFDMGNLvCuEXBsUzkvdvC9x+CGvtXBLERJJmLbGh4kyEPFUiTYzXBOTsh+oRaZ5gh4YLicV6a5Cjwu8wm/xZlLwbZNKCD1RYxAZ7vxASU5Lagi72hIZM5r9kDlDj2zhzdPGo/+R5fIPN92UWjur9r5QM09+LU+qeTbjdNojOnYrckBStGySx2+r22FLkWBKcqIQKBgQDSibalRqpMxgZENBfoRsgHP532AB7cufaDkjEV+vmLupExZ9yRRIwIrqZ7XYkdFRCHTCFt5zrzN8bz5nO5OdigOZ1Ae7yACmwsSmyBACbNrcVpwE4gcckVzw/V2xT+c331rCEd2tzDivIC7Dr07s8D3J4zq+KwGEguCYXiPCUh3wKBgQDHCIH7as1RGQzizVQkN+rDvzo8+TjOHZSF9BYXQqknCSYuT2d3bFqOdAhqxRL8zKn5qvUOSSr8TvLh4aowVR4ZSO0HMVCbjs1WQZ9PLKKaVyz3Awqwv+UFF0SG7SROjJM8YSMI9qp1rgPY3jrotgZZ02I/TJ8wn9m2NBsx5s1pbwKBgGf0FVm/7YBg2mE8s309zbA+ihkX8CUeMQi/2zq2JBcI9H3HgZG8ncP/sDYDdhsE9pdHUM46ONI0fSiaZhNT65EZQXrAXc9+1fB8gtyjHYW6wlm32RuN8zKwfWojdVc54Ty3U9aw5QYsCdjFmUqsy0xl1zs+KHy4UJNioleVSORTAoGAaA+5rhLsID+hrh8+o+UceJXNxD1lhtaOZe71cdnniMJO1R2s8hKT0jE2iWRahhQXtrK8h2iX8ezxLkqHadfG8d9gFkehZoOmNjf/LC0hIuL7XnaXq0vZWO0OZiEsv2jePk5nO/ODsh12Y3flgvBQp7xOfNv5yzl4Ybwij9elhD8CgYAr1K7aM6YZnlHaIL0my37YcqYE5/EUaLSng33Rk65krS6k1xFKwRXbq0Nmzln7iWnWA5EMr5WWDKASqJ35niYm9PIqda0jCDcjTBIbJ9SVmQ8E0I6A7WRrqDc9CLY2JjY8KnB1RC9sJ936AErcKiOjcudhWiCshs6n9Tmfsw6LJQ==-----END PRIVATE KEY-----
Step 4 Run the following commands:[root@cmx newcert]# lscert.crt cert.pem private.key[root@cmx newcert]# cmxctl node sslmode enable --pem /opt/haproxy/ssl/newcert/cert.pemenabling sslssl enabled[root@cmx newcert]#reboot
Installing a Third Party Signed Certificate
Procedure
Step 1 Generate the certificate signing request.Step 2 Run the following commands:
[cmxadmin@cmx]$ su -Password:[root@cmx]# cd /opt/haproxy/ssl/[root@cmx]# mkdir newcert
Cisco CMX Configuration Guide, Release 10.410
Getting StartedInstalling a Third Party Signed Certificate
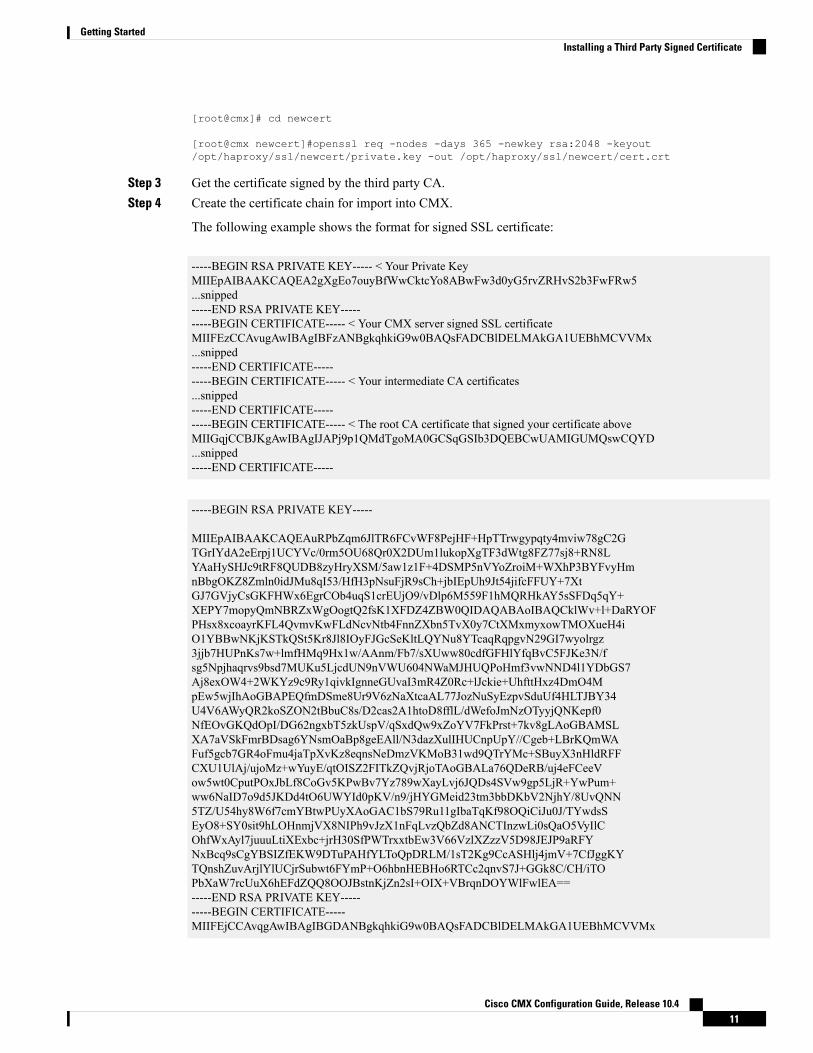
[root@cmx]# cd newcert
[root@cmx newcert]#openssl req -nodes -days 365 -newkey rsa:2048 -keyout/opt/haproxy/ssl/newcert/private.key -out /opt/haproxy/ssl/newcert/cert.crt
Step 3 Get the certificate signed by the third party CA.Step 4 Create the certificate chain for import into CMX.
The following example shows the format for signed SSL certificate:
-----BEGIN RSA PRIVATE KEY----- < Your Private KeyMIIEpAIBAAKCAQEA2gXgEo7ouyBfWwCktcYo8ABwFw3d0yG5rvZRHvS2b3FwFRw5...snipped-----END RSA PRIVATE KEY----------BEGIN CERTIFICATE----- < Your CMX server signed SSL certificateMIIFEzCCAvugAwIBAgIBFzANBgkqhkiG9w0BAQsFADCBlDELMAkGA1UEBhMCVVMx...snipped-----END CERTIFICATE----------BEGIN CERTIFICATE----- < Your intermediate CA certificates...snipped-----END CERTIFICATE----------BEGIN CERTIFICATE----- < The root CA certificate that signed your certificate aboveMIIGqjCCBJKgAwIBAgIJAPj9p1QMdTgoMA0GCSqGSIb3DQEBCwUAMIGUMQswCQYD...snipped-----END CERTIFICATE-----
-----BEGIN RSA PRIVATE KEY-----
MIIEpAIBAAKCAQEAuRPbZqm6JlTR6FCvWF8PejHF+HpTTrwgypqty4mviw78gC2GTGrIYdA2eErpj1UCYVc/0rm5OU68Qr0X2DUm1lukopXgTF3dWtg8FZ77sj8+RN8LYAaHySHJc9tRF8QUDB8zyHryXSM/5aw1z1F+4DSMP5nVYoZroiM+WXhP3BYFvyHmnBbgOKZ8Zmln0idJMu8qI53/HfH3pNsuFjR9sCh+jbIEpUh9Jt54jifcFFUY+7XtGJ7GVjyCsGKFHWx6EgrCOb4uqS1crEUjO9/vDlp6M559F1hMQRHkAY5sSFDq5qY+XEPY7mopyQmNBRZxWgOogtQ2fsK1XFDZ4ZBW0QIDAQABAoIBAQCklWv+l+DaRYOFPHsx8xcoayrKFL4QvmvKwFLdNcvNtb4FnnZXbn5TvX0y7CtXMxmyxowTMOXueH4iO1YBBwNKjKSTkQSt5Kr8Jl8IOyFJGcSeKltLQYNu8YTcaqRqpgvN29GI7wyolrgz3jjb7HUPnKs7w+lmfHMq9Hx1w/AAnm/Fb7/sXUww80cdfGFHlYfqBvC5FJKe3N/fsg5Npjhaqrvs9bsd7MUKu5LjcdUN9nVWU604NWaMJHUQPoHmf3vwNND4l1YDbGS7Aj8exOW4+2WKYz9c9Ry1qivkIgnneGUvaI3mR4Z0Rc+lJckie+UhfttHxz4DmO4MpEw5wjIhAoGBAPEQfmDSme8Ur9V6zNaXtcaAL77JozNuSyEzpvSduUf4HLTJBY34U4V6AWyQR2koSZON2tBbuC8s/D2cas2A1htoD8fflL/dWefoJmNzOTyyjQNKepf0NfEOvGKQdOpI/DG62ngxbT5zkUspV/qSxdQw9xZoYV7FkPrst+7kv8gLAoGBAMSLXA7aVSkFmrBDsag6YNsmOaBp8geEAll/N3dazXulIHUCnpUpY//Cgeb+LBrKQmWAFuf5gcb7GR4oFmu4jaTpXvKz8eqnsNeDmzVKMoB31wd9QTrYMc+SBuyX3nHldRFFCXU1UlAj/ujoMz+wYuyE/qtOISZ2FITkZQvjRjoTAoGBALa76QDeRB/uj4eFCeeVow5wt0CputPOxJbLf8CoGv5KPwBv7Yz789wXayLvj6JQDs4SVw9gp5LjR+YwPum+ww6NaID7o9d5JKDd4tO6UWYId0pKV/n9/jHYGMeid23tm3bbDKbV2NjhY/8UvQNN5TZ/U54hy8W6f7cmYBtwPUyXAoGAC1bS79Ru11gIbaTqKf98OQiCiJu0J/TYwdsSEyO8+SY0sit9hLOHnmjVX8NIPh9vJzX1nFqLvzQbZd8ANCTInzwLi0sQaO5VyIlCOhfWxAyl7juuuLtiXExbc+jrH30SfPWTrxxtbEw3V66VzlXZzzV5D98JEJP9aRFYNxBcq9sCgYBSIZfEKW9DTuPAHfYLToQpDRLM/1sT2Kg9CcASHlj4jmV+7CfJggKYTQnshZuvArjlYlUCjrSubwt6FYmP+O6hbnHEBHo6RTCc2qnvS7J+GGk8C/CH/iTOPbXaW7rcUuX6hEFdZQQ8OOJBstnKjZn2sI+OIX+VBrqnDOYWlFwlEA==-----END RSA PRIVATE KEY----------BEGIN CERTIFICATE-----MIIFEjCCAvqgAwIBAgIBGDANBgkqhkiG9w0BAQsFADCBlDELMAkGA1UEBhMCVVMx
Cisco CMX Configuration Guide, Release 10.411
Getting StartedInstalling a Third Party Signed Certificate
CzAJBgNVBAgTAk5DMQwwCgYDVQQHEwNSVFAxHDAaBgNVBAoTE0Npc2NvIFN5c3RlbXMsIEluYy4xDDAKBgNVBAsTA1RBQzEbMBkGA1UEAxMSbGludXhsYWIuY2lzY28uY29tMSEwHwYJKoZIhvcNAQkBFhJzc2NobWlkdEBjaXNjby5jb20wHhcNMTYwNTA1MTQ0MDAxWhcNMTcwNTA1MTQ0MDAxWjCBhjELMAkGA1UEBhMCVVMxCzAJBgNVBAgMAk5DMRwwGgYDVQQKDBNDaXNjbyBTeXN0ZW1zLCBJbmMuMQwwCgYDVQQLDANUQUMxGzAZBgNVBAMMEmxhdWdodGVyLmNpc2NvLmNvbTEhMB8GCSqGSIb3DQEJARYScmFta3JpczJAY2lzY28uY29tMIIBIjANBgkqhkiG9w0BAQEFAAOCAQ8AMIIBCgKCAQEAuRPbZqm6JlTR6FCvWF8PejHF+HpTTrwgypqty4mviw78gC2GTGrIYdA2eErpj1UCYVc/0rm5OU68Qr0X2DUm1lukopXgTF3dWtg8FZ77sj8+RN8LYAaHySHJc9tRF8QUDB8zyHryXSM/5aw1z1F+4DSMP5nVYoZroiM+WXhP3BYFvyHmnBbgOKZ8Zmln0idJMu8qI53/HfH3pNsuFjR9sCh+jbIEpUh9Jt54jifcFFUY+7XtGJ7GVjyCsGKFHWx6EgrCOb4uqS1crEUjO9/vDlp6M559F1hMQRHkAY5sSFDq5qY+XEPY7mopyQmNBRZxWgOogtQ2fsK1XFDZ4ZBW0QIDAQABo3sweTAJBgNVHRMEAjAAMCwGCWCGSAGG+EIBDQQfFh1PcGVuU1NMIEdlbmVyYXRlZCBDZXJ0aWZpY2F0ZTAdBgNVHQ4EFgQUeKxpACe19Jpz6QuXGALJik41DjcwHwYDVR0jBBgwFoAUUPGERegtBFb+1WJ+1ZLqRpWKG84wDQYJKoZIhvcNAQELBQADggIBAJzykVSWLvNuFk/Q1PRFU7pdX5z8g5KOaQjo4erSl48m1WoM7vJNXjqqHD6JdcOMINGeuxElI1Vd7prpARhE+Qj7xSMfDMilzSFymKVpTNQzT/9yHytAycVsvbGYJDh8R3jTpxJXWPBcvErE8OuaxkCbePNzQD56KqFCSjibw2GgwLJa8GaHZdL0lGQ9djDfsQwriqvphBX9Dkd9qeMPnxYCXVsE4SsbLUWCn0tasfJ4pcrgRqEi6OBw8zh3twcy6vEBJvp0tA3/z3yPdvG0sZ5x5WCTCCOmLvUEBswbZusCMQFCHg14wbEoNo/I3GDoqRHzw1j0hA887r4AWnMOeXjkHjA7YxtrSzJ4cQL5WEXj8di6UqwQA+dNBCLv488huLFEcEL8YjMLV4Z6nfaXzNF2FLJZByaD4/sPTcZ2BkKS53YKKE7LUaIbUH3ymdfejQuIVabtBnc/of5bw7WODlyBZIhd4MW3eFJKpuoXXxp0xqmS3/VMnefyaVqBz3eV4KXkg0Z6w6KbCXst9aTP+NtSGEBeXgM36TvR2SIVCwKH/RlDQp+vk1QykQdj6JSMJUrl6fdRAtpAZssMGIT2KsreRVnJ8ig7VAKp17ES4FZ/7rg87GoUYfmAl+AhvZCCu2SjJBdW6/IO1rHHkB+1UkU+yswY85Ccq7Wj+9TmdHX8-----END CERTIFICATE----------BEGIN CERTIFICATE-----MIIGqjCCBJKgAwIBAgIJAPj9p1QMdTgoMA0GCSqGSIb3DQEBCwUAMIGUMQswCQYDVQQGEwJVUzELMAkGA1UECBMCTkMxDDAKBgNVBAcTA1JUUDEcMBoGA1UEChMTQ2lzY28gU3lzdGVtcywgSW5jLjEMMAoGA1UECxMDVEFDMRswGQYDVQQDExJsaW51eGxhYi5jaXNjby5jb20xITAfBgkqhkiG9w0BCQEWEnNzY2htaWR0QGNpc2NvLmNvbTAeFw0xNjA1MDUxMzQ5MTlaFw0zNjA0MzAxMzQ5MTlaMIGUMQswCQYDVQQGEwJVUzELMAkGA1UECBMCTkMxDDAKBgNVBAcTA1JUUDEcMBoGA1UEChMTQ2lzY28gU3lzdGVtcywgSW5jLjEMMAoGA1UECxMDVEFDMRswGQYDVQQDExJsaW51eGxhYi5jaXNjby5jb20xITAfBgkqhkiG9w0BCQEWEnNzY2htaWR0QGNpc2NvLmNvbTCCAiIwDQYJKoZIhvcNAQEBBQADggIPADCCAgoCggIBALDXzffE4YyvCakwDop2gKcfOAOgn96hzbVCOvVGDNwYE/070u9Rh8Tf4yCX8tknrkN2QnqZVarWgUPYvc0zSVqXiT6bxWkuvGYLnO+PiXFKAFMlF+BjF0L8Fdm0B+ZowSUlrFwLCX7yOsemn62NfwVHo0MUImJoglF0JW+8pJrxrfoWG78AgRUsKFi5R4IuTPWV1PSWiD1nDEEkxn1JKNmwtnNC7iAUHWMsgKK64VBpoSTNWpiyHCD0B4Col2x+R9NNWOQ9X7NnMhtR16AYKm60ElkMYvP1ZjrlaZFfzkZXLmsxluxjbU9mv4lUhGzeJxbcBUPuvLbM6WoOYp6/lYoSdd5PtfX9Ixim7zO/uL7w2vyI4+kJYm7HHtFVHuhEcWEhyEdW0JcvT61L68F/iB79WezJd0VbPCelgFSJFhx5F2jhyYlZq2bbjOdzf0RC+U053W+xfqQUTt17BDnb6n+UvPSDfwDpnKMHRbZlis0nC7YfqscDnrpBETRPNvNfRsQznoBgqqPWrfJ/RVU+CnjxZB+SiEWhV2eiWla6P8iB+MmMBYoHXbk1pBf0BkZEXd2uGk74o7a3rj1MAlzdppoGYAW2hfvYYqNWkDGOgkHLf1KzawB9gaiWNHo6UujaHZNi/jKL6FQlor+HQ/EggWtflTLl1YBTz4cBiNlK3wQ7AgMBAAGjgfwwgfkwHQYDVR0OBBYEFFDxhEXoLQRW/tViftWS6kaVihvOMIHJBgNVHSMEgcEwgb6AFFDxhEXoLQRW/tViftWS6kaVihvOoYGapIGXMIGUMQswCQYDVQQGEwJVUzELMAkGA1UECBMCTkMxDDAKBgNVBAcTA1JUUDEcMBoGA1UEChMTQ2lzY28gU3lzdGVtcywgSW5jLjEMMAoGA1UECxMDVEFDMRswGQYDVQQDExJsaW51eGxhYi5jaXNjby5jb20xITAfBgkqhkiG9w0BCQEWEnNzY2htaWR0QGNpc2NvLmNvbYIJAPj9p1QMdTgoMAwGA1UdEwQFMAMBAf8wDQYJKoZIhvcNAQELBQADggIBAD0RCmpKKygd3oRip8NaRssHYndwm6t3Add4+BM/wZ5TbNi5POg5JZIDgV2qT6elJIuxdLTTCJcHaoeITWW/CTpYrve+Q3NAPTImmXTX2swN7zVX3GXNoBQWhIuZh4A9YMVbtAST3O7qCQq+6NU1LKBjTdnc6qw/VLe2WD9vvhDcq+i5HyHJWJqsTcO8iU8fyTGv
Cisco CMX Configuration Guide, Release 10.412
Getting StartedInstalling a Third Party Signed Certificate
Q1i8MFZ7VPgnr2RGaIki8yCsFG+bSKuiVQgylnQLMKSkqCtWww+eBj1bPr/MecgC1bO5OJ+id08UalM6KhlRQYY9o5q7lkRIFVgUvHyhsNdvmwSa15kpWLeKqsNrFt5AjipNPJW4Cf2HLutZZZGGIDNc9kQlD7XyPXlV41n/4uoYuKjea6RgcJYR/lFh0rTonUp3LbZkpRQksWrhKfO7BoFOif7s9Ko6YDuOu2o/dzU1XUf937ovNmGqvOPRPrV25cUrQKEXeTsGbuxvvxkEFv39BZsefc0tiSMRkpN84FOBoYUkc0zioiURQa8gs6Eow5CuB/DH65uxQ2yowV4KVktHA5az5j0ZUoayLX0vOktr54g+z3+li+QN2yfTiOOSzvz4k6Ylu4ySosg4BdWVmPXbLLkTpb+AEHpK+IZF6I6qMVPU5wz6VMAVKhilaEkNo1d/c05RYSTy8/SlROa4ms68xqCpQIdaWg10VIDQ-----END CERTIFICATE-----
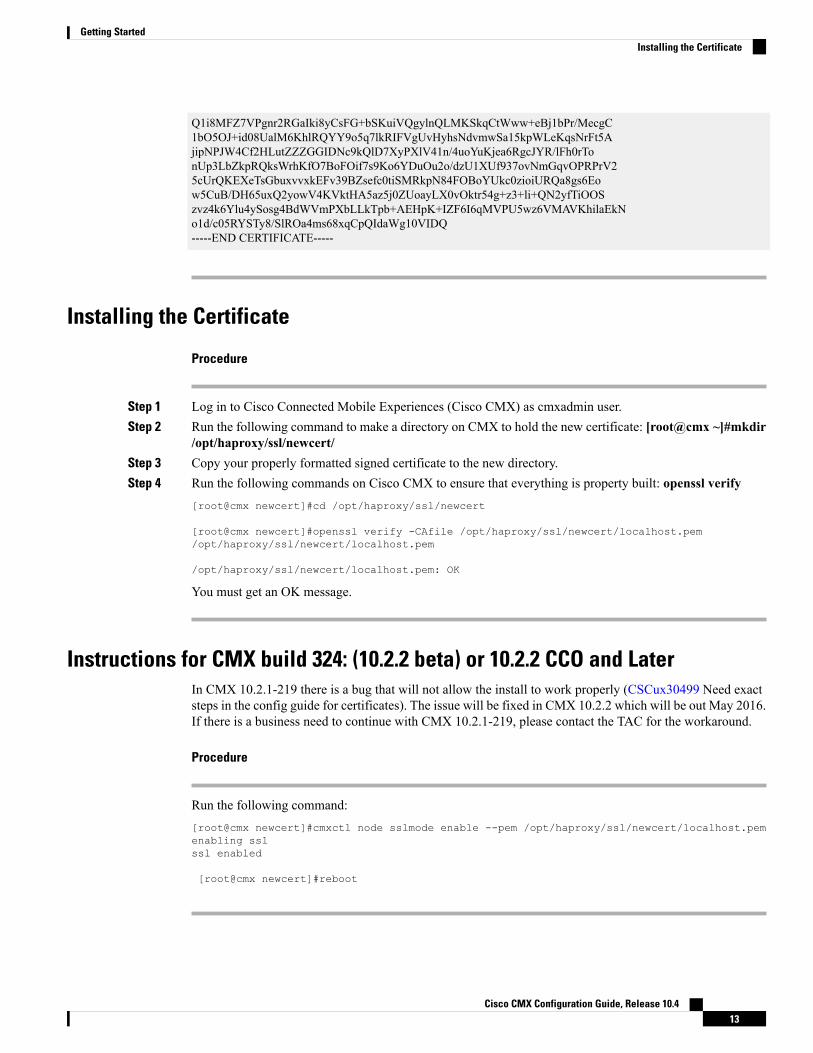
Installing the Certificate
Procedure
Step 1 Log in to Cisco Connected Mobile Experiences (Cisco CMX) as cmxadmin user.Step 2 Run the following command to make a directory on CMX to hold the new certificate: [root@cmx ~]#mkdir
/opt/haproxy/ssl/newcert/Step 3 Copy your properly formatted signed certificate to the new directory.Step 4 Run the following commands on Cisco CMX to ensure that everything is property built: openssl verify
[root@cmx newcert]#cd /opt/haproxy/ssl/newcert
[root@cmx newcert]#openssl verify -CAfile /opt/haproxy/ssl/newcert/localhost.pem/opt/haproxy/ssl/newcert/localhost.pem
/opt/haproxy/ssl/newcert/localhost.pem: OK
You must get an OK message.
Instructions for CMX build 324: (10.2.2 beta) or 10.2.2 CCO and LaterIn CMX 10.2.1-219 there is a bug that will not allow the install to work properly (CSCux30499 Need exactsteps in the config guide for certificates). The issue will be fixed in CMX 10.2.2 which will be out May 2016.If there is a business need to continue with CMX 10.2.1-219, please contact the TAC for the workaround.
Procedure
Run the following command:[root@cmx newcert]#cmxctl node sslmode enable --pem /opt/haproxy/ssl/newcert/localhost.pemenabling sslssl enabled
[root@cmx newcert]#reboot
Cisco CMX Configuration Guide, Release 10.413
Getting StartedInstalling the Certificate
Adding Users and Managing RolesUsing theMANAGE service in Cisco CMX, you can create new users and assign roles to them based on thetasks they have to perform, that is, enabling role-based access control.
The following list displays the types of users:
• Admin users—An admin user can access all the services and functionalities (based on the license type)of Cisco CMX.
• Others—An admin user can create other users and assign roles to them.
The following is a list of roles that can be assigned to users:
• System
• Manage
• Analytics
• Read Only
• Location
• Admin
• ConnectExperience
• Connect
For more information about the creation of users and assignment of roles, see Managing Users, on page 134.
Using the Cisco CMX Setup AssistantThe Cisco CMX Setup Assistant pop-up helps you through the basic steps before you start using your system.The Cisco CMX Setup Assistant is automatically displayed when you log in to Cisco CMX. To relaunch the
Cisco CMX Setup Assistant, click the Help ( )icon.
Supporting Active Clients Version 3 APICisco CMX release 10.4 supports new active clients version 3 API under Location RESTAPI. The newActiveClients v3 API allows frequent requests without impacting other services such as location service. The newNode.js processes API requests in the API v3.The location service sends tge local notifications to the APIserver and active clients are tracked in the API server memory.
The Active Clients v3 API has its own user ID and password for accessing the REST APIs. Use the cmxosapiserver command to define the unique user ID and password. The Cisco CMX web UI username andpasswords will not work for API v3.
Cisco CMX Configuration Guide, Release 10.414
Getting StartedAdding Users and Managing Roles
If you install 10.4 or upgrade from a previous release, the passowrd to access the Active Clients v3 API isgenerated in randommanner. Use this password to start the server and open the prompt. Set the new credentialsusing the cmxos apiserver command.
Active Clients v3 API under Location API documentation section includes includes better parameter testing.
Active Clients Version 2 API has been deprecated in Cisco CMX 10.4 release.
Note
Active Clients v3 API supports these additional parameters:
• mapHierarchy
• manufacturuer
• macAddressSearch
• associated/probing
The following log files are located in the directory /opt/cmx/var/log/apiserver for troubleshooting:
• cmxapiserver.pid—Processes ID file for the top process.
• server.log—Log file for messages and errors
• stdout.log—Standard output messages
Getting APIsTo obtain the following APIs, use the https://cmx-ip-address /apidocs/ URL:
• Configuration REST APIs for configuring different aspects of Cisco CMX.
• Location-based REST APIs for finding location-specific details about visitors.
• Analytics-based REST APIs for finding analytical data on visitors.
• Connect-based REST APIs for finding user session information.
• Presence-based REST APIs for finding presence data on visitors.
Changing Time Zones and NTP ServerAfter the initial CMX configuration, you can change the time, time zone, and NTP server details using theCLI. You can edit the ntp.conf file to change the NTP server. Ensure that you are logged in as root user tochange the NTP settings.
To change time zones and NTP server after initial configuration using CLI, perform the following task:
Before you begin
• Ensure that your server has a valid hostname before making any NTP changes. If not, some of the ntpcommands will fail, for example, ntpstat.
Cisco CMX Configuration Guide, Release 10.415
Getting StartedGetting APIs
• Ensure that incoming and outgoing UDP port 123 for NTP communication is open in your configurationsetup.
• Ensure to manually edit /etc/ntp.conf as admin user and appropriate time zone is selected using/opt/cmx/bin/tzselect before restarting ntpd using service ntpd restart.
Procedure
Step 1 To stop all the services on the CMX, run the cmxctl stop command.Step 2 To change the current user to admin root user, run the su command.Step 3 In the /opt/cmx/bin/tzselect path, run the time zone script.Step 4 To log out from the configuration setup, run the exit command.Step 5 Log in again and verify the time, time zone, and date settings.Step 6 To restart the services, run the following commands:
• cmxctl start agent
• cmxctl start
Cisco CMX Configuration Guide, Release 10.416
Getting StartedChanging Time Zones and NTP Server
C H A P T E R 2The Cisco CMX Detect and Locate Service
• Overview of the Detect and Locate Service, on page 17• Initial Configurations, on page 17• Viewing or Tracking Devices, on page 18• Viewing Device Details, on page 21• Customizing Client Refresh Rates, on page 22• Customizing Device Views Using Filters, on page 22• Adding and Deleting Filters, on page 23• Searching for a Device, on page 23• Client Playback, on page 24• Enabling Hyperlocation and FastLocate in Cisco CMX, on page 24• Controlling the Probing Client Expiry Time, on page 36• Supported Access Points for Cisco CMX 10.4 Location Features with Cisco WLC 8.6, on page 37• Measuring Client Location Accuracy Using the Location Accuracy Test, on page 38
Overview of the Detect and Locate ServiceThe Cisco Connected Mobile Experiences (Cisco CMX)DETECT&LOCATE service enables you to viewand track devices in your deployment.
Using the DETECT& LOCATE service, you can either view all the access points (APs) deployed in all thebuildings of a campus or view the APs deployed on the individual floors of each building. You can also locateWi-Fi tags, Wi-Fi interferers, and Bluetooth low energy (BLE) Tags.
Initial ConfigurationsIn order to use the DETECT& LOCATE service, the following initial configurations have to be performed:
• Import maps—For information about this, see Importing Maps and Cisco Wireless Controllers, on page4.
• Add controllers—For information about concept, see Adding Cisco WLCs, on page 5.
Cisco CMX Configuration Guide, Release 10.417
Viewing or Tracking DevicesProcedure
Step 1 Log in to Cisco Connected Mobile Experiences (Cisco CMX).Step 2 Click DETECT & LOCATE.Step 3 Using the left pane of the Activity Map window, navigate to the desired building and floor.
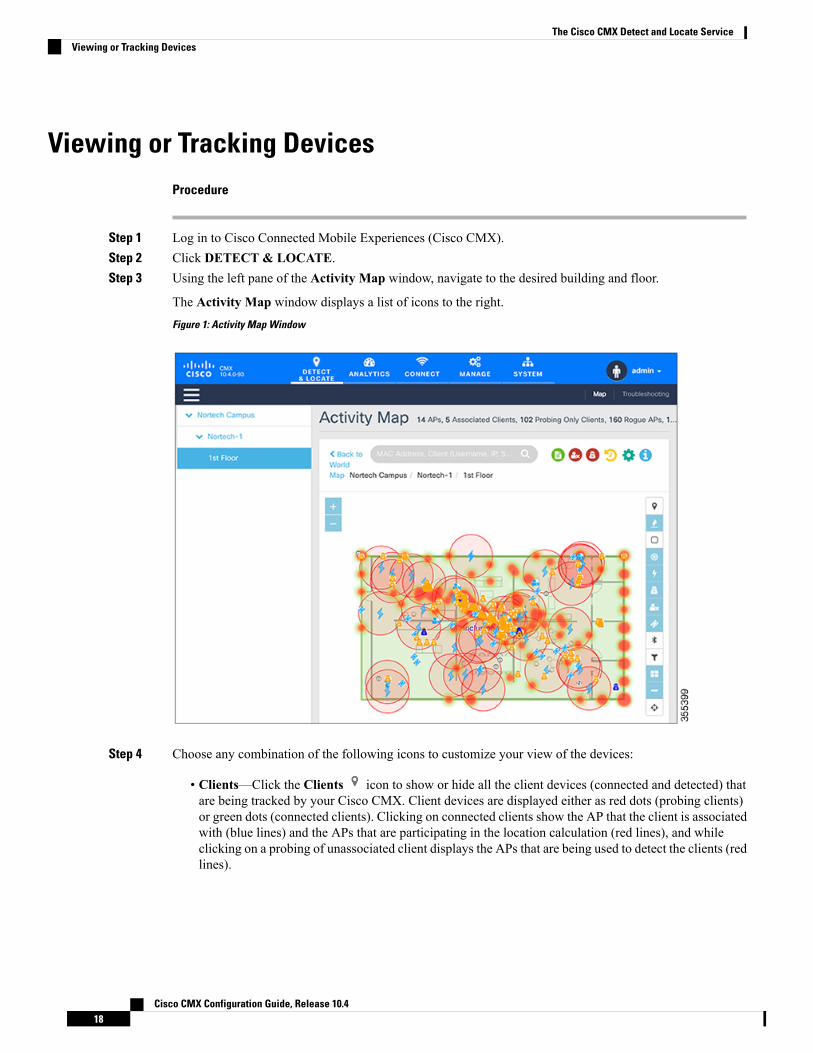
The Activity Map window displays a list of icons to the right.Figure 1: Activity Map Window
Step 4 Choose any combination of the following icons to customize your view of the devices:
• Clients—Click the Clients icon to show or hide all the client devices (connected and detected) thatare being tracked by your Cisco CMX. Client devices are displayed either as red dots (probing clients)or green dots (connected clients). Clicking on connected clients show the AP that the client is associatedwith (blue lines) and the APs that are participating in the location calculation (red lines), and whileclicking on a probing of unassociated client displays the APs that are being used to detect the clients (redlines).
Cisco CMX Configuration Guide, Release 10.418
The Cisco CMX Detect and Locate ServiceViewing or Tracking Devices
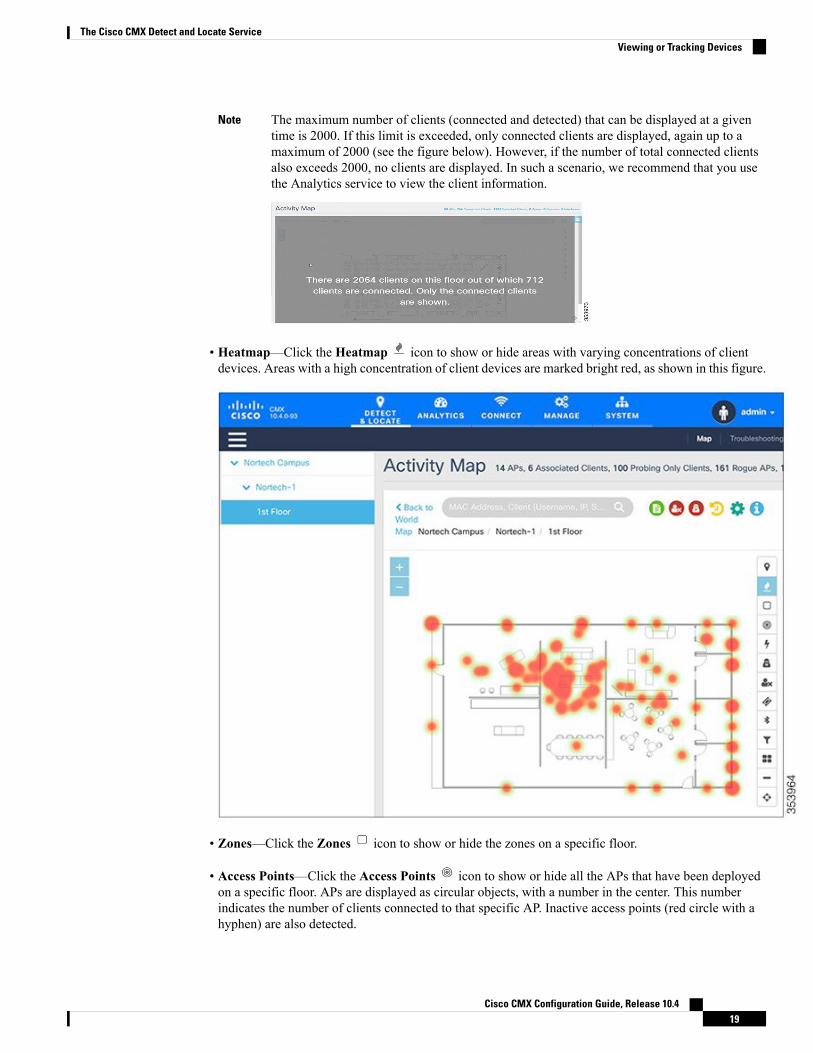
The maximum number of clients (connected and detected) that can be displayed at a giventime is 2000. If this limit is exceeded, only connected clients are displayed, again up to amaximum of 2000 (see the figure below). However, if the number of total connected clientsalso exceeds 2000, no clients are displayed. In such a scenario, we recommend that you usethe Analytics service to view the client information.
Note
• Heatmap—Click the Heatmap icon to show or hide areas with varying concentrations of clientdevices. Areas with a high concentration of client devices are marked bright red, as shown in this figure.
• Zones—Click the Zones icon to show or hide the zones on a specific floor.
• Access Points—Click the Access Points icon to show or hide all the APs that have been deployedon a specific floor. APs are displayed as circular objects, with a number in the center. This numberindicates the number of clients connected to that specific AP. Inactive access points (red circle with ahyphen) are also detected.
Cisco CMX Configuration Guide, Release 10.419
The Cisco CMX Detect and Locate ServiceViewing or Tracking Devices
Cisco CMX shares Access Points grouping information to Cisco WLC every time when a NMSPconnection is established. To get a list of APs connected to the Cisco WLC, Cisco CMX performs aSNMP get action on the Cisco WLC. Based on the list of APs recived from the Cisco WLC and the APson the map, identify the subset of APs and prepare a grouping request to send to the controller. You canstore the AP grouping information on the datastore.
• In Cisco CMX Release 10.2.1, when you select an access point icon from a floor mapdisplayed on theActivityMapwindow, the Access Point information area includes Anglesinformation.
• Clicking an AP shows the clients connected to it (blue lines), the probing clients that aredetected by the AP (red lines), and additional information such as height, orientation, andX,Y location of the AP.
• If you have a Cisco Hyperlocation module that is attached to the back of your CiscoAironet 3700 and 3600 Series APs, you can track the location of customers, visitors, orassets to about one meter in an ideal environment. Currently, the Hyperlocation solutionworks for the associated clients only.
Note
• Interferers—Click the Interferers icon to show or hide all the RF interferers that have been detectedby the wireless network, and their zone of impact.
In Cisco CMX release 10.4, the BLE Beacons management page is no longer available on theCisco CMX user interface. Beacon notifications are no longer provided. BLE beacons detectedby Cisco CleanAir are displayed on Cisco CMX as interferers. BLE-related information is nolonger available on the apidocs file.
Note
• Rogue APs—Click the Rogue APs icon to show or hide the rogue access points. Rogue accesspoints are those access points that are not part of the Cisco CMX infrastructure access points and notmanaged by Cisco CMX. They are classified as Unclassified, Malicious, Friendly, and Custom andindicated by different colors on the Activity Map.
• Rogue Clients—Click the Rogue Clients icon to show or hide rogue clients. Rogue clients areclients connected to rogue access points.
To track rogue access points and clients, enable the tracking parameters Rogue Access PointsandRogue Clients in theNetwork Location Servicewindow under the System tab. For moreinformation, see Setting Device Tracking Parameters, on page 154.
Note
• BLE Tags—Click the BLE Tags icon to show or hide BLE-transmitting devices that have beendetected by the wireless network.
Cisco CMX Configuration Guide, Release 10.420
The Cisco CMX Detect and Locate ServiceViewing or Tracking Devices
A beacon is detected as an interferer. A common problem faced in the context of beacons istracking not being enabled. In such a scenario, you can modify the tracking configurationsusing the System service. For more information, see the Viewing or Tracking Devices, on page18.
Click Beacons to view the beacon attributes related to the selected beacon profile.
• If the beacon is chirping with iBeacon profile, Cisco CMX displays the properties suchas UUID, Major and Minor number.
• If the beacon is chirping with Eddystone-UID profile, Cisco CMX displays the propertiessuch as Namespace and Instance-Id.
• If the beacon is chirping with Eddystone-URL profile, Cisco CMX displays the HTTPresource URL being broadcasted by that beacon.
Note
• Tags—Click the Tags icon to show or hide Wi-Fi tags. The vendor specific information related tothe tags are displayed in raw format.
• Filters—Click the Filters icon to filter the display of devices based on parameters such as ConnectionStatus, Manufacturer, and Service Set Identifier (SSID).
• Inclusion & Exclusion Regions—Click the Inclusion & Exclusion Regions icon to view theinclusion and exclusion regions on a floor. The inclusion and exclusion regions are created in CiscoPrime Infrastructure. In Cisco CMX, you can view these regions, but you cannot modify them. Theinclusion regions are shown in green, and the exclusion regions are shown in gray.
• Thick Walls—Click the Thick Walls icon to view any thick walls that have been created on primeinfrastructure and included on the floor. Thick wall improves location by modeling areas of high RFsignal attenuation with more accuracy.
• GPS Markers—Click the GPS Markers to view any GPS markers that are placed on the floor. Whenat least three GPS markers are placed on a floor, the system can use these to provide GPS co-ordinates,in additional to X, and Y co-ordinates in client location API requests.
Viewing Device DetailsProcedure
Step 1 Log in to Cisco Connected Mobile Experiences (Cisco CMX).Step 2 Click DETECT & LOCATE.Step 3 Using the left pane of the Activity Map window, navigate to the desired building and floor.
The Activity Map window displays a list of icons to the right.
Step 4 Click the corresponding icon to show the desired devices, for example, client devices, APs, beacons, and soon.
Cisco CMX Configuration Guide, Release 10.421
The Cisco CMX Detect and Locate ServiceViewing Device Details
Step 5 Click the corresponding device on the map.
A pane displaying details of the device, such as MAC address, IP address, status, and so on is displayed.
Customizing Client Refresh RatesThe DETECT & LOCATE service enables you to configure the refresh rate for clients’ position on a floormap. The refresh interval can be used to configure how frequently a client’s positions will be polled to determinetheir positions. The default refresh rate is five seconds. The refresh rate gets automatically reset when younavigate to another tab or log in again. The client refresh rates are temporary and is not stored in the CMX.
Procedure
Step 1 Log in to Cisco Connected Mobile Experiences (Cisco CMX) either as an admin user or a user with Locationrole.
Step 2 Click DETECT & LOCATE.Step 3 Using the left pane of the Activity Map window, navigate to the desired building and floor.
The Activity Map window displays a list of icons to the right.
Step 4 Click the Gear icon to configure the client refresh rate.A pane indicating the client refresh intervals is displayed.
Step 5 Use the + or - icon to increase or decrease the client refresh rates. The refresh rates are in seconds. The rangeis one to 30 seconds.
Step 6 Click OK.
The client, represented by dots on the map, will be refreshed with the new configured rate.
Customizing Device Views Using FiltersProcedure
Step 1 Log in to Cisco Connected Mobile Experiences (Cisco CMX) either as an admin user or a user with Locationrole.
Step 2 Click DETECT & LOCATE.Step 3 Using the left pane of the Activity Map window, navigate to the desired building and floor.
The Activity Map window displays a list of icons to the right.
Step 4 Click the corresponding icon to show the desired devices, for example, client devices, APs, beacons, and soon. The more icons you click, the more filtering options are enabled.
Cisco CMX Configuration Guide, Release 10.422
The Cisco CMX Detect and Locate ServiceCustomizing Client Refresh Rates
Adding and Deleting FiltersProcedure
Step 1 Log in to Cisco Connected Mobile Experiences (Cisco CMX).Step 2 Click DETECT & LOCATE.Step 3 Using the left pane of the Activity Map window, navigate to the desired building and floor.
The Activity Map window displays a list of icons to the right.
Step 4 Click the corresponding icon to show the desired devices, for example, client devices, APs, beacons, and soon. The more icons you click, the more filtering options are enabled.
Step 5 Click the Filter icon.Step 6 In the Filters dialog box that is displayed, you can add or remove client filters based on the following
parameters:
• Connection Status—Unassociated or Connected
• Device Manufacturer Type—Name of the device manufacturer, for example, Apple, Samsung, and soon
• SSID—Device’s SSID
Searching for a DeviceProcedure
Step 1 Log in to Cisco Connected Mobile Experiences (Cisco CMX).Step 2 Click DETECT & LOCATE.Step 3 Using the left pane of the Activity Map window, navigate to the desired building and floor.Step 4 In the Search field of the Activity Map window, enter any of the following parameters to search for or filter
a desired device:
• MAC Address—Enter the corresponding client’s MAC address in lowercase, colon delimited, forexample, 00:a0:22:bc:e2:00.
• Device IP Address—Enter the client’s IPv4 or IPv6 address in dotted format, for example, 10.22.12.212.
• SSID—Enter the client’s SSID in free-form text.
• Device Manufacturer—Enter specific manufacturer names, for example, Apple, Samsung, and so onin free-form text.
• Username—Enter the client's username in free-form text.
Cisco CMX Configuration Guide, Release 10.423
The Cisco CMX Detect and Locate ServiceAdding and Deleting Filters
When performing a device search based on MAC address, if a device is not located on the specificfloor that you are on, a dialog box is displayed that shows the floor in which the specific device iscurrently on. In addition, you can search based on MAC address for a specific date.
Note
Client PlaybackThe Client Playback feature enables you to locate and track the movement of clients in a venue. You can trackthe activity of one client at a time.
Procedure
Step 1 Log in to Cisco Connected Mobile Experiences (Cisco CMX).Step 2 Click DETECT & LOCATE.Step 3 Using the left pane of the Activity Map window, navigate to the desired building and floor.Step 4 Search the client you want to track using the its MAC ID.
For more information about how to search client devices, see Searching for a Device, on page 23.
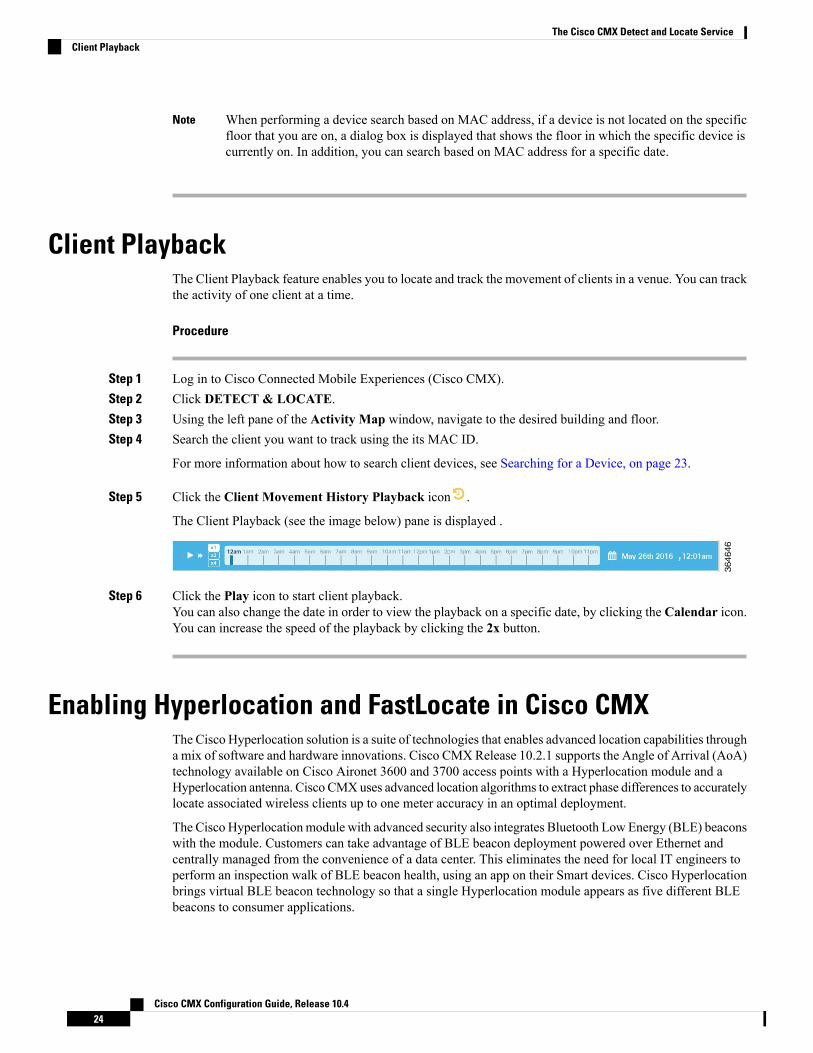
Step 5 Click the Client Movement History Playback icon .
The Client Playback (see the image below) pane is displayed .
Step 6 Click the Play icon to start client playback.You can also change the date in order to view the playback on a specific date, by clicking the Calendar icon.You can increase the speed of the playback by clicking the 2x button.
Enabling Hyperlocation and FastLocate in Cisco CMXThe Cisco Hyperlocation solution is a suite of technologies that enables advanced location capabilities througha mix of software and hardware innovations. Cisco CMXRelease 10.2.1 supports the Angle of Arrival (AoA)technology available on Cisco Aironet 3600 and 3700 access points with a Hyperlocation module and aHyperlocation antenna. Cisco CMXuses advanced location algorithms to extract phase differences to accuratelylocate associated wireless clients up to one meter accuracy in an optimal deployment.
The Cisco Hyperlocationmodule with advanced security also integrates Bluetooth Low Energy (BLE) beaconswith the module. Customers can take advantage of BLE beacon deployment powered over Ethernet andcentrally managed from the convenience of a data center. This eliminates the need for local IT engineers toperform an inspection walk of BLE beacon health, using an app on their Smart devices. Cisco Hyperlocationbrings virtual BLE beacon technology so that a single Hyperlocation module appears as five different BLEbeacons to consumer applications.
Cisco CMX Configuration Guide, Release 10.424
The Cisco CMX Detect and Locate ServiceClient Playback
Cisco CMX FastLocate technology enables quick location refresh for connected Wi-Fi clients. RSSI fromdata packets and probe frames, when available, are used for calculating a location. This technology is availablewith both centrally switchedWLANs and FlexConnect (locally switchedWLANs). Cisco Aironet 700, 1700,2600, 2700, 3600, and 3700APs support Cisco CMXFastLocate when usedwith CiscoWLCRelease 8.1.123.0or later.
The following are the recommended AP modes:
• Enhanced Local Mode—APs scan opportunistically on-current channel and off-channel with up to ~15percent performance impact to data-serving radios.
• Monitor Mode—APs scan on 2.4 and 5 GHz bands.
• Modular Mode—Cisco 3600 and 3700 APs with Hyperlocation Module or Wireless Security Module(WSM) scan on 2.4 and 5 GHz bands with no impact to data-serving radios.
• The FastLocate and Hyperlocation features are supported in Cisco CMX 10.2.1 and later.
• In Cisco CMX Release 10.4, FastLocate feature is supported on Cisco Aironet 2800/3800 access pointsrunning Cisco Release 8.6 or later.
• In Cisco CMX Release 10.3.1, the Hyperlocation feature supports 10,000 tracked devices—1000 Ciscoaccess points (APs) with up to 10 connected clients per AP—on Cisco 3365 Mobility Services Engine(MSE) and Cisco high-end MSE Virtual Appliances (v MSE) running Cisco CMX Release 10.3.1 andlater.
• The Hyperlocation and FastLocate features are supported in Cisco WLC 8.1.123.0 and later.
• Currently, a Hyperlocation-enabled Cisco WLC can support only one Hyperlocation-enabled CiscoCMX.
• The Hyperlocation feature is not supported on a virtual Cisco WLC.
Note
Procedure
Step 1 Log in to Cisco Connected Mobile Experiences (Cisco CMX).Step 2 Choose SYSTEM > Dashboard.Step 3 Click the Gear icon at the top-right corner of the window.
The SETTINGS window is displayed.Step 4 Click the Location Setup tab.Step 5 In the Location Calculation Parameters window, check the Enable Hyperlocation / FastLocate/ BLE
Management check box.Step 6 Add Cisco WLC to Cisco CMX.
Cisco CMX Configuration Guide, Release 10.425
The Cisco CMX Detect and Locate ServiceEnabling Hyperlocation and FastLocate in Cisco CMX

If hyperlocation is enabled and one controller is in active status, and no data is received for almost15 minutes an alert is generated with the following description "Hyperlocation is enabled on CMX,however no AOA data is received". The alert service type is Hyperlocation and alert type isService_Status.
As a work around, maintain a one to one mapping between controller and Cisco CMX. Only onecontroller can serve one Cisco CMX box with hyperlocation enabled. If two hyperlocation enabledCisco CMX boxes are using the same controller, disable hyperlocation service in one of the CiscoCMX box.
Note
Hyperlocation Mixed Mode SupportCisco CMX Release 10.4 now supports a mixed deployment of Cisco Hyperlocation access points (AP) andnon-Hyperlocation AP on the same floor map. If the client is associted to a regular access point but has ahyperlocation enabled access point near by, AoA computation is performed to provide an an acceptableaccuracy. All Cisco Hyperlocation APs must be within a contiguous area. Increased accuracy on the floor isonly within the convex hull of the Hyperlocation contiguous are
Hyperlocation groups are formed consisting both hyperlocation and regular access points. The floor mode isdecided when generating the hyperlocation group. There following are the three supported modes:
• RSSI mode-All access points on the floor are regular APs.
• Mixed mode: Few APs on the floor are Halo APs.
Cisco CMX Configuration Guide, Release 10.426
The Cisco CMX Detect and Locate ServiceHyperlocation Mixed Mode Support
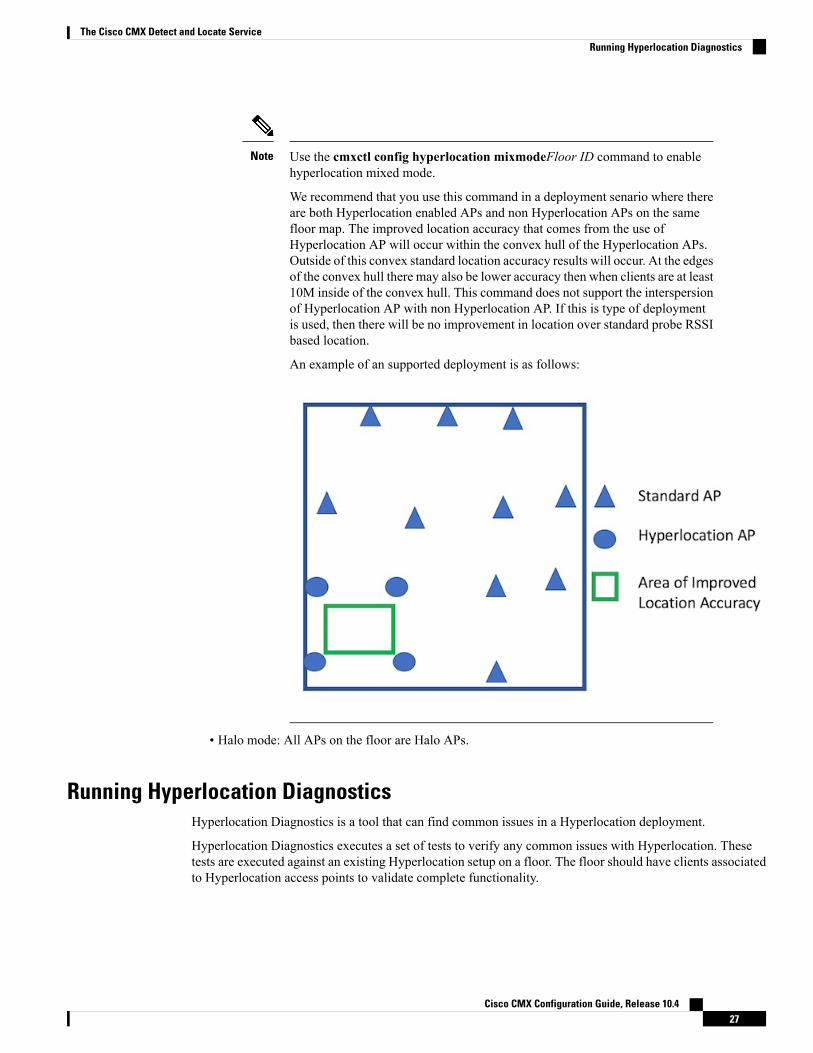
Use the cmxctl config hyperlocation mixmodeFloor ID command to enablehyperlocation mixed mode.
We recommend that you use this command in a deployment senario where thereare both Hyperlocation enabled APs and non Hyperlocation APs on the samefloor map. The improved location accuracy that comes from the use ofHyperlocation AP will occur within the convex hull of the Hyperlocation APs.Outside of this convex standard location accuracy results will occur. At the edgesof the convex hull there may also be lower accuracy then when clients are at least10M inside of the convex hull. This command does not support the interspersionof Hyperlocation AP with non Hyperlocation AP. If this is type of deploymentis used, then there will be no improvement in location over standard probe RSSIbased location.
An example of an supported deployment is as follows:
Note
• Halo mode: All APs on the floor are Halo APs.
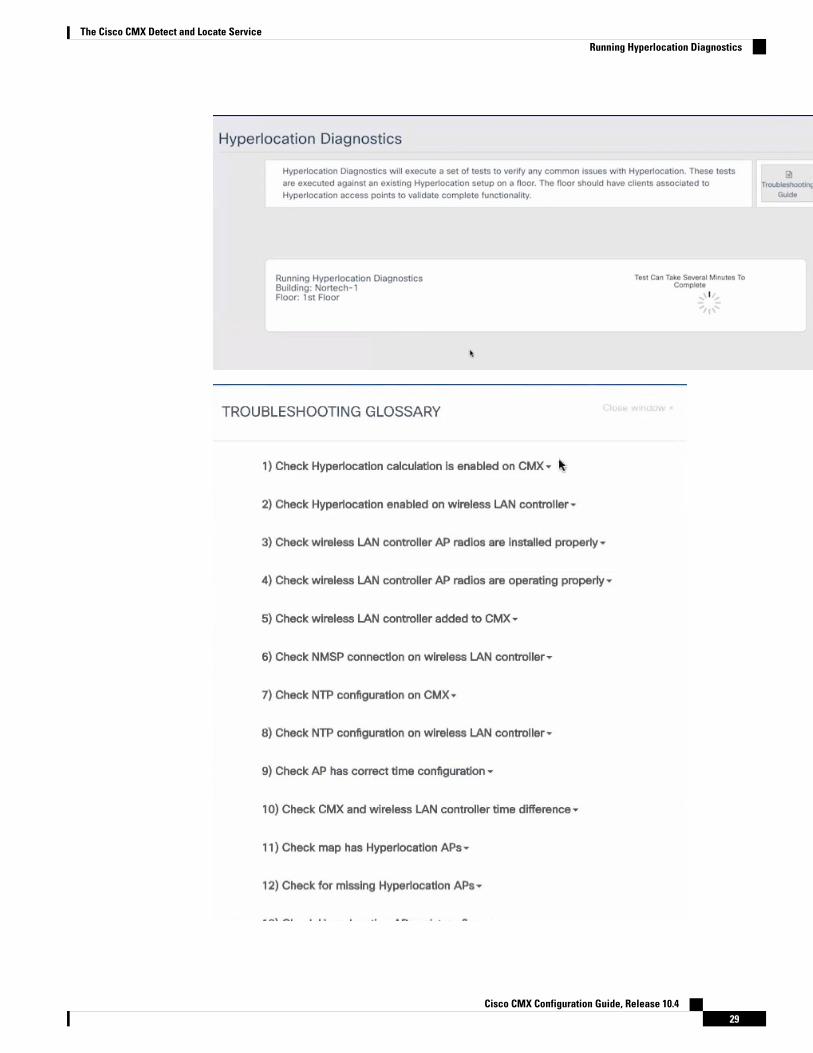
Running Hyperlocation DiagnosticsHyperlocation Diagnostics is a tool that can find common issues in a Hyperlocation deployment.
Hyperlocation Diagnostics executes a set of tests to verify any common issues with Hyperlocation. Thesetests are executed against an existing Hyperlocation setup on a floor. The floor should have clients associatedto Hyperlocation access points to validate complete functionality.
Cisco CMX Configuration Guide, Release 10.427
The Cisco CMX Detect and Locate ServiceRunning Hyperlocation Diagnostics
Procedure
Step 1 Log in to Cisco Connected Mobile Experiences (Cisco CMX) either as an admin user or a user with Locationrole.
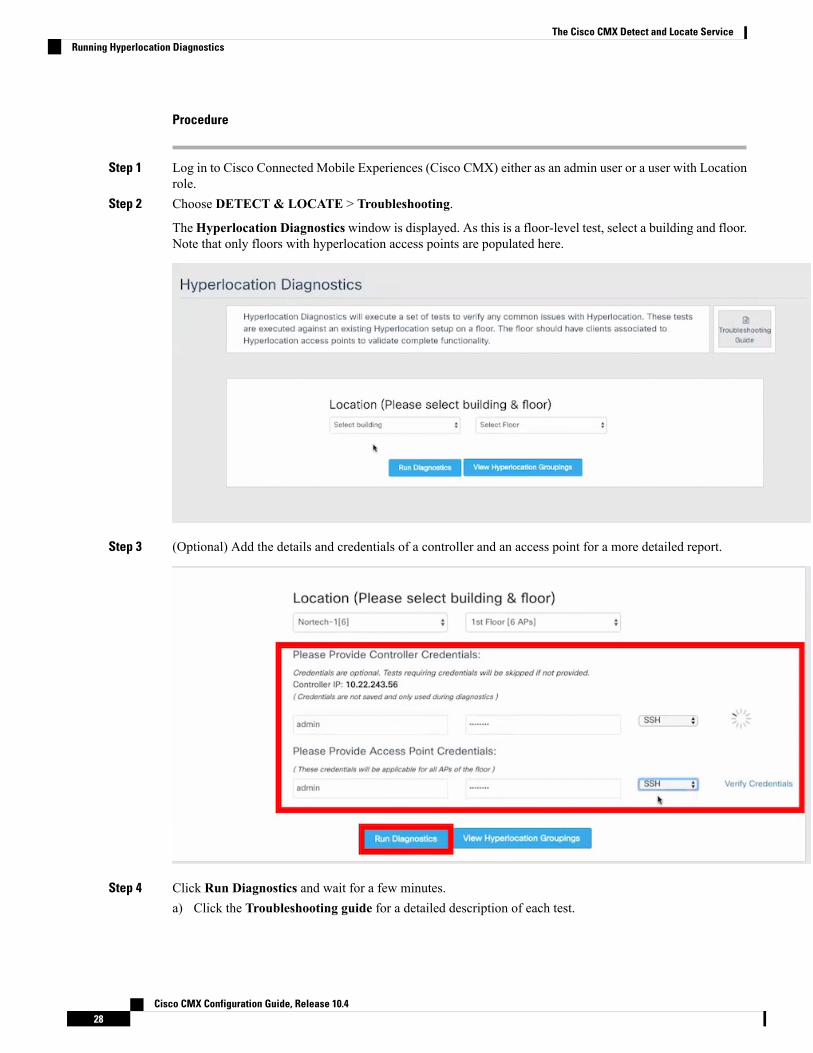
Step 2 Choose DETECT & LOCATE > Troubleshooting.
TheHyperlocation Diagnostics window is displayed. As this is a floor-level test, select a building and floor.Note that only floors with hyperlocation access points are populated here.
Step 3 (Optional) Add the details and credentials of a controller and an access point for a more detailed report.
Step 4 Click Run Diagnostics and wait for a few minutes.a) Click the Troubleshooting guide for a detailed description of each test.
Cisco CMX Configuration Guide, Release 10.428
The Cisco CMX Detect and Locate ServiceRunning Hyperlocation Diagnostics
Cisco CMX Configuration Guide, Release 10.429
The Cisco CMX Detect and Locate ServiceRunning Hyperlocation Diagnostics
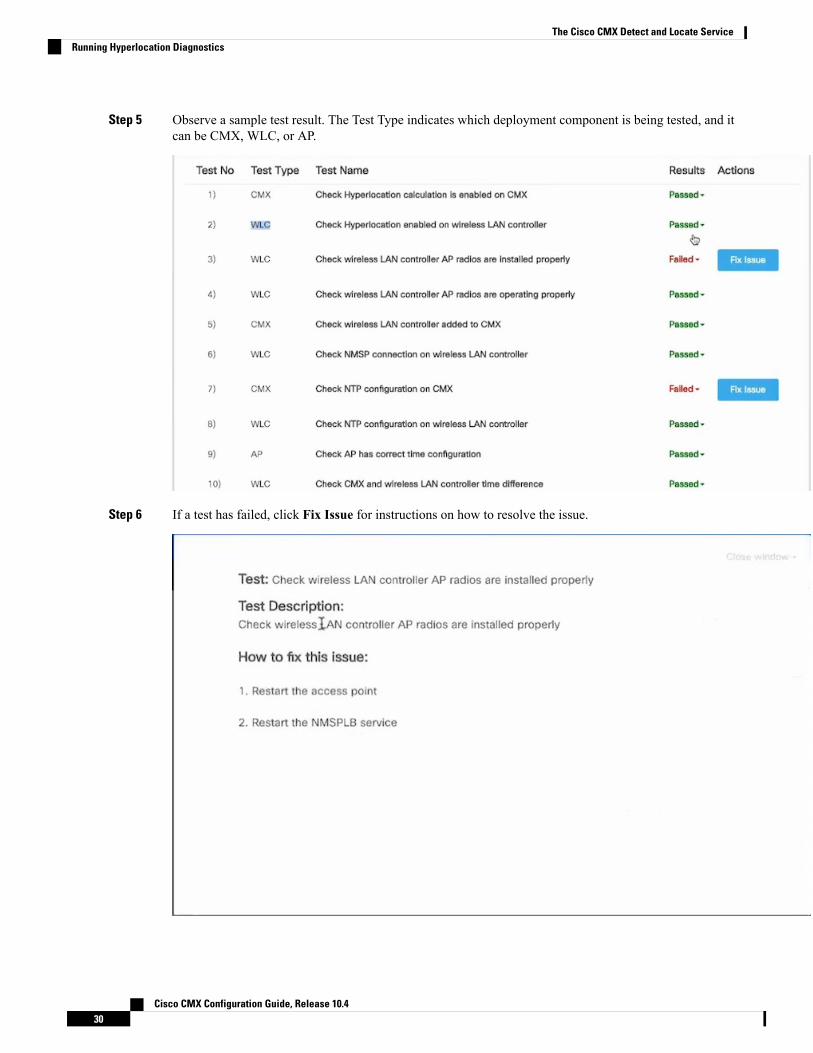
Step 5 Observe a sample test result. The Test Type indicates which deployment component is being tested, and itcan be CMX, WLC, or AP.
Step 6 If a test has failed, click Fix Issue for instructions on how to resolve the issue.
Cisco CMX Configuration Guide, Release 10.430
The Cisco CMX Detect and Locate ServiceRunning Hyperlocation Diagnostics
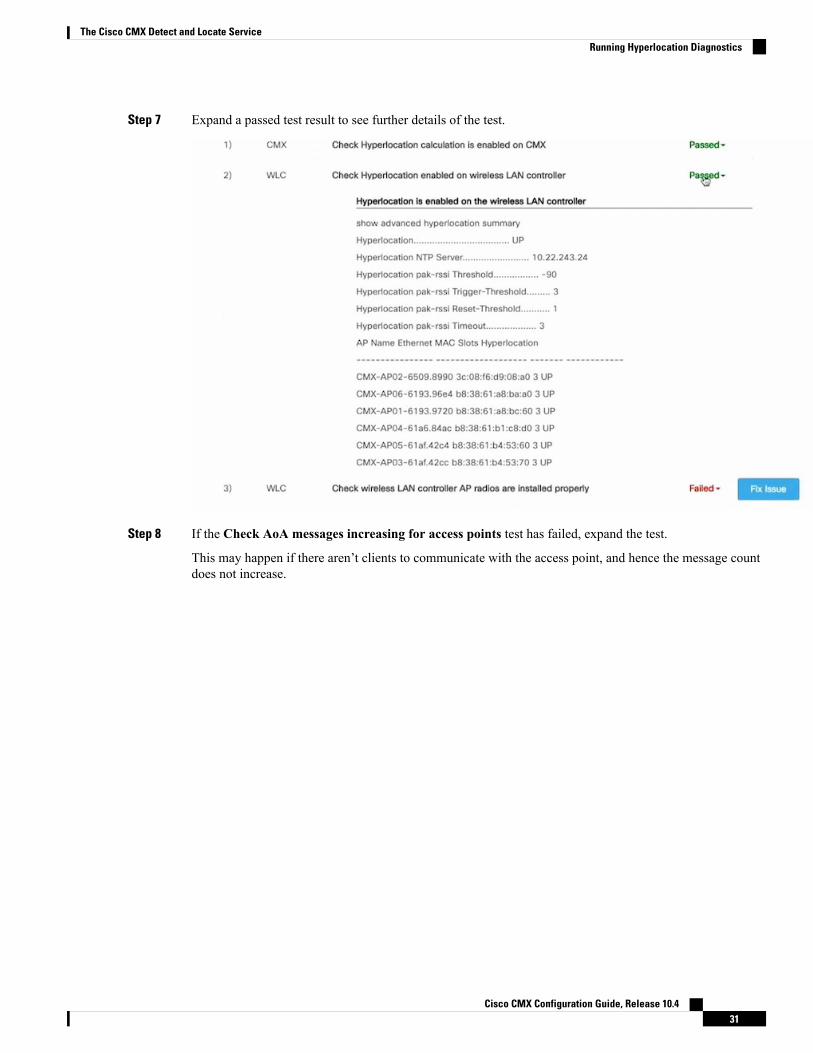
Step 7 Expand a passed test result to see further details of the test.
Step 8 If the Check AoA messages increasing for access points test has failed, expand the test.
This may happen if there aren’t clients to communicate with the access point, and hence the message countdoes not increase.
Cisco CMX Configuration Guide, Release 10.431
The Cisco CMX Detect and Locate ServiceRunning Hyperlocation Diagnostics
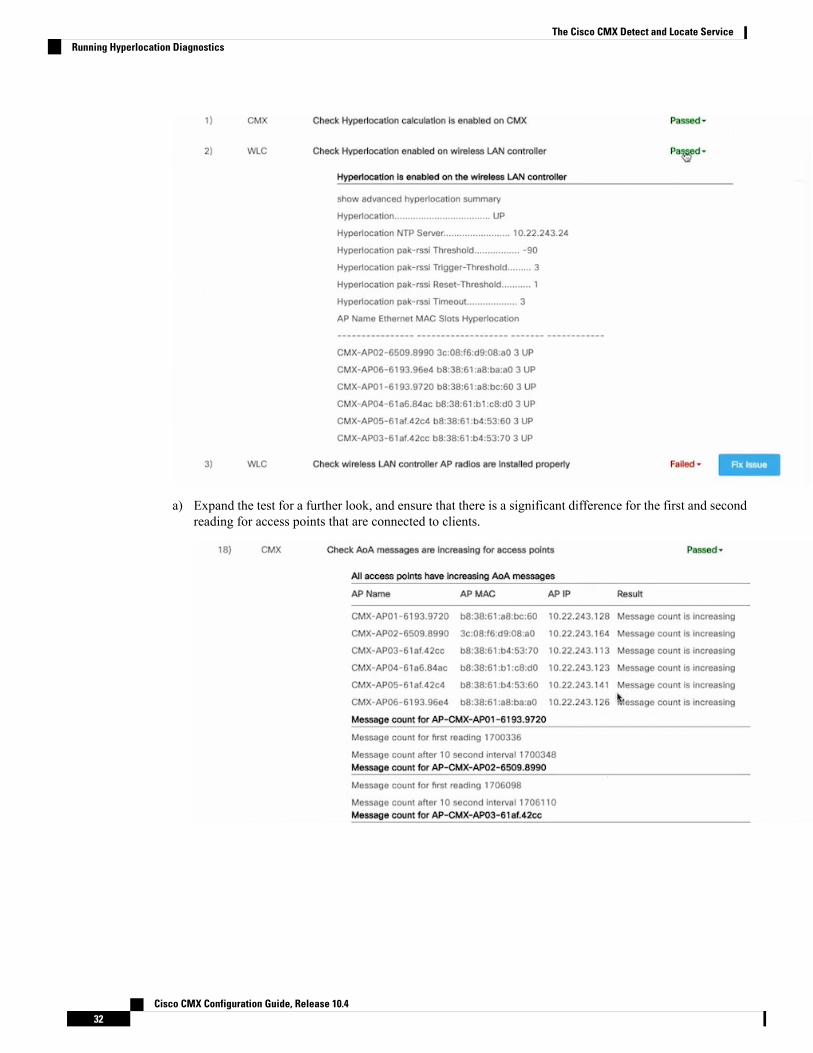
a) Expand the test for a further look, and ensure that there is a significant difference for the first and secondreading for access points that are connected to clients.
Cisco CMX Configuration Guide, Release 10.432
The Cisco CMX Detect and Locate ServiceRunning Hyperlocation Diagnostics
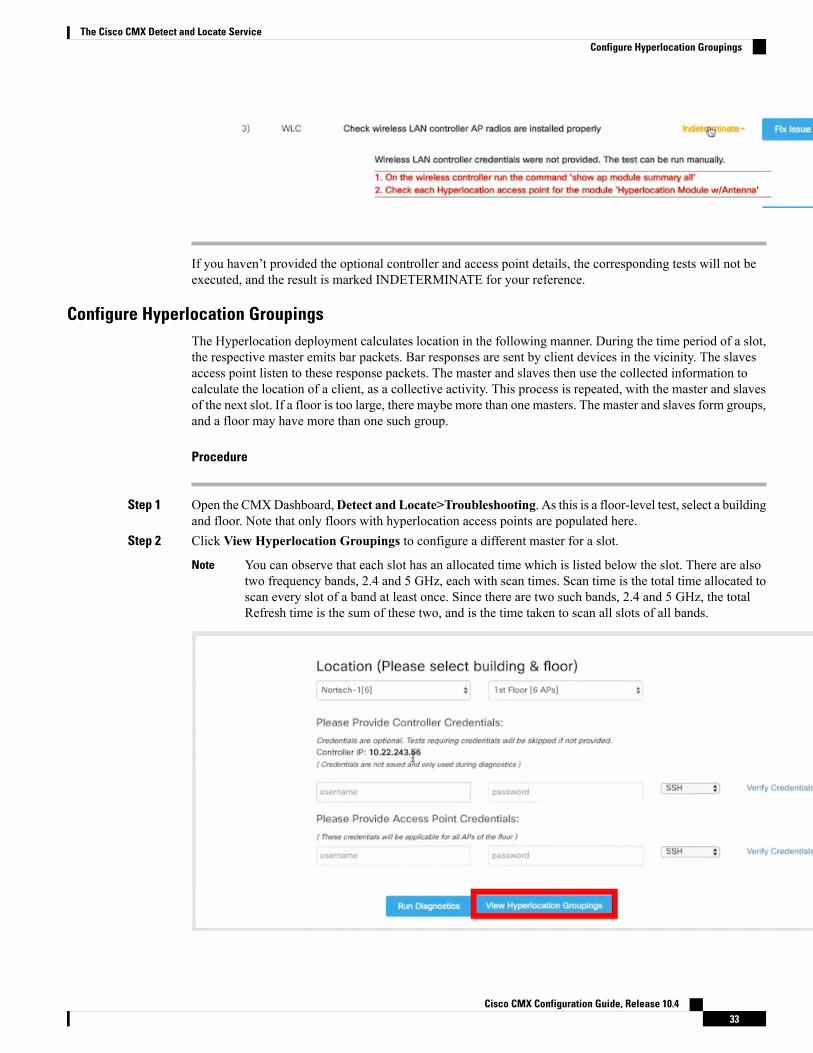
If you haven’t provided the optional controller and access point details, the corresponding tests will not beexecuted, and the result is marked INDETERMINATE for your reference.
Configure Hyperlocation GroupingsThe Hyperlocation deployment calculates location in the following manner. During the time period of a slot,the respective master emits bar packets. Bar responses are sent by client devices in the vicinity. The slavesaccess point listen to these response packets. The master and slaves then use the collected information tocalculate the location of a client, as a collective activity. This process is repeated, with the master and slavesof the next slot. If a floor is too large, there maybe more than one masters. The master and slaves form groups,and a floor may have more than one such group.
Procedure
Step 1 Open the CMXDashboard,Detect and Locate>Troubleshooting. As this is a floor-level test, select a buildingand floor. Note that only floors with hyperlocation access points are populated here.
Step 2 Click View Hyperlocation Groupings to configure a different master for a slot.
You can observe that each slot has an allocated time which is listed below the slot. There are alsotwo frequency bands, 2.4 and 5 GHz, each with scan times. Scan time is the total time allocated toscan every slot of a band at least once. Since there are two such bands, 2.4 and 5 GHz, the totalRefresh time is the sum of these two, and is the time taken to scan all slots of all bands.
Note
Cisco CMX Configuration Guide, Release 10.433
The Cisco CMX Detect and Locate ServiceConfigure Hyperlocation Groupings
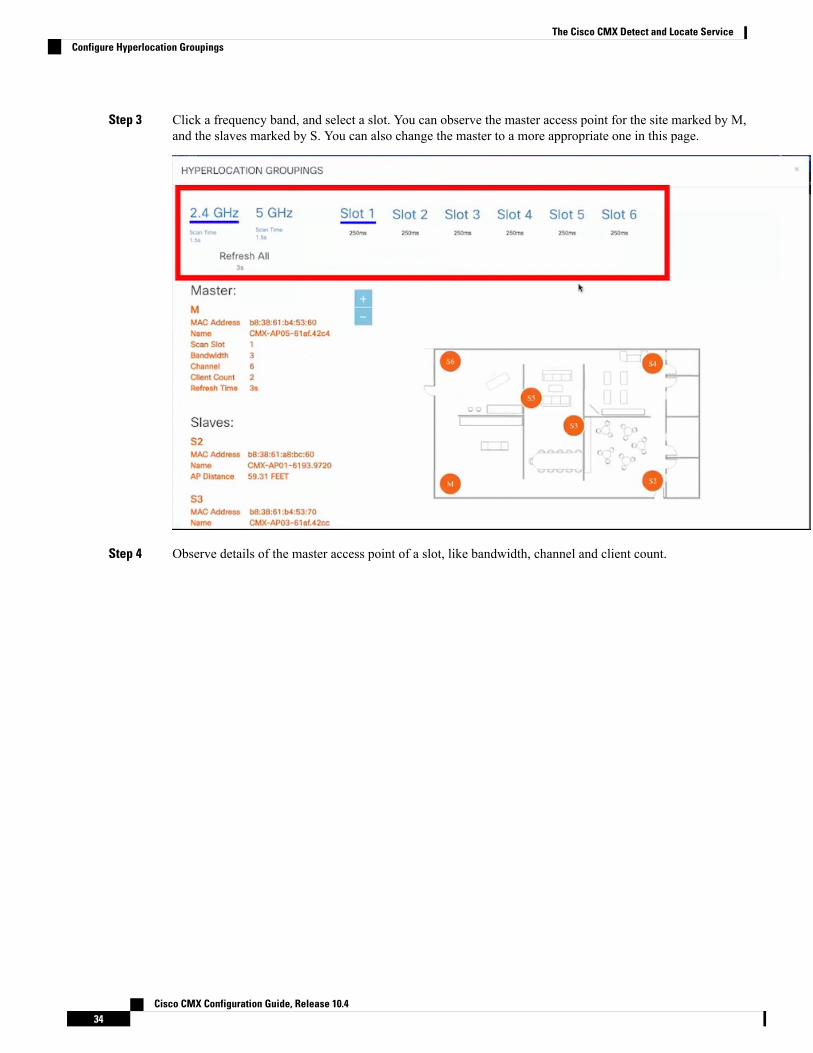
Step 3 Click a frequency band, and select a slot. You can observe the master access point for the site marked by M,and the slaves marked by S. You can also change the master to a more appropriate one in this page.
Step 4 Observe details of the master access point of a slot, like bandwidth, channel and client count.
Cisco CMX Configuration Guide, Release 10.434
The Cisco CMX Detect and Locate ServiceConfigure Hyperlocation Groupings
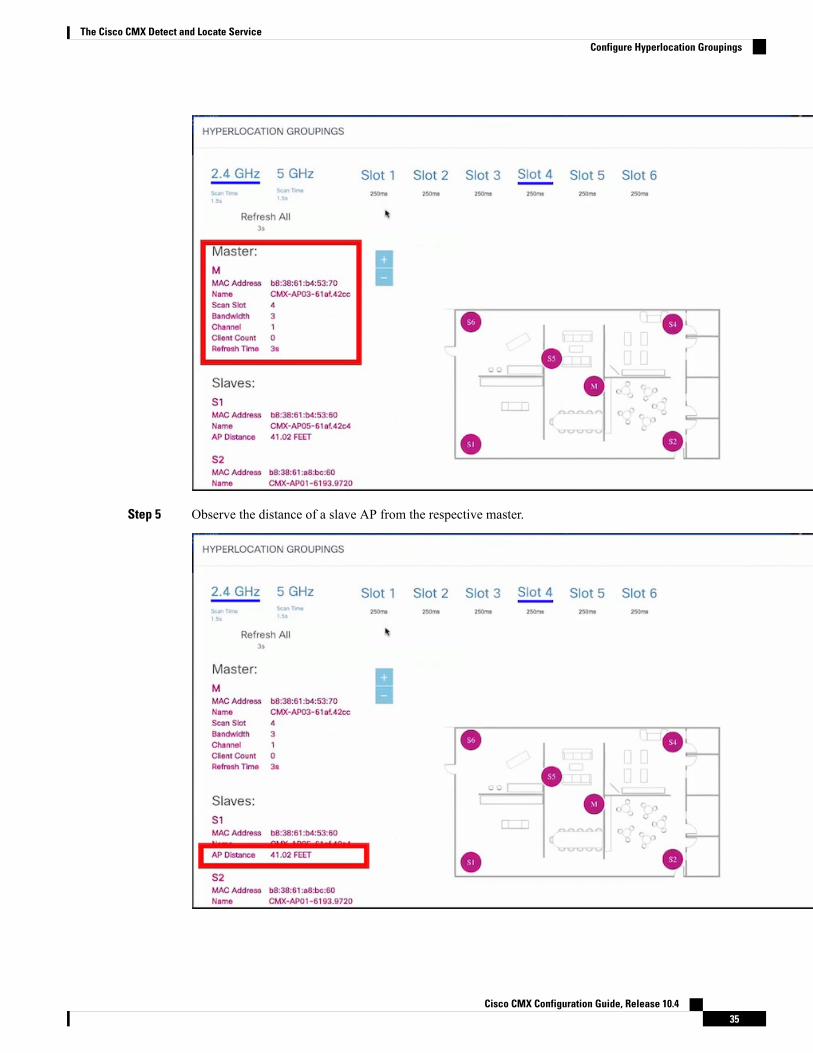
Step 5 Observe the distance of a slave AP from the respective master.
Cisco CMX Configuration Guide, Release 10.435
The Cisco CMX Detect and Locate ServiceConfigure Hyperlocation Groupings

Step 6 Observe that each slot has an allocated time which is listed below the slot. There are also two frequency bands,2.4 and 5 GHz, each with scan times. Scan time is the total time allocated to scan every slot of a band at leastonce. Since there are two such bands, 2.4 and 5 GHz, the total Refresh time is the sum of these two, and isthe time taken to scan all slots of all bands.
Controlling the Probing Client Expiry TimeProbing clients count is usually more visible on CMX than compared to Wireless LAN Controller (WLC).WLC tracks the clients until the client no longer probes for more than five minutes, whereas CMX maintainsthe probing client for 10 minutes.
Connected Clients do not have this behavior because, WLC notifies CMX when the clients are disconnectedfrom the network. You can perform additional configuration changes on CMX, if you want to minimize theprobing client count on CMX.
We do not recommend to set the value less than five minutes because some clients may not sent probe and inthat case CMX will lose such clients. This configuration change could also increase the Analytics serviceprocessing time.
Caution
Cisco CMX Configuration Guide, Release 10.436
The Cisco CMX Detect and Locate ServiceControlling the Probing Client Expiry Time

Procedure
Step 1 Log in to Cisco Connected Mobile Experiences (Cisco CMX).Step 2 Click DETECT & LOCATE.Step 3 Choose SYSTEM > Settings > Filtering.Step 4 Specify the RSSI Cutoff value as -75.
Setting the RSSI cutoff to -75 affects the probing clients only. This allows Cisco CMX to filter outweak probing clients in the initial stage.
Note
Step 5 Navigate to /opt/cmx/etc/ and open the node.conf file.Step 6 To set the expiry time, at the end of the Location Services section, add user_options=-Dredis_ttl=5.
Cisco CMX maintains the default age out for clients as 10 minutes and when the client leaves thenetwork, CMX usually takes 10 to 15 minutes to clean up the stale client details. If you set the ageout to five minutes, Cisco CMX will perform the clean up in five to 10 minutes. Together, the RSSIcutoff and age-out settings, help Cisco CMX to narrow down the probing client count with respectto the WLC count.
Note
Step 7 To restart the CMX agent, run the command:cmxctl agent restart.Step 8 To restart the Location Services, run the command cmxctl location restart.
Supported Access Points for Cisco CMX 10.4 Location Featureswith Cisco WLC 8.6
The following table lists the Cisco CMX 10.4 location features and the access points that supports thesefeatures:
Supported IOS Access Points (2700,3700,3600)
Supported Marvel Based CheetahAccess Points (Barbados Family)
Location Features
2700, 3700, 36002800, 3800FastLocate
3602E and 3702E with HALORadio Module 3010 (RM3010L)
Not supportedHyperlocation
HALO (3602E abd 3702EwithHALORadioModule 3010 - RM3010L)and non-HALO (all IOS)
Hyperlocation Mix mode
3602E, 3702ENot supportedTuna antenna support
Not supportedIntegrated BLE: 1800, 1810, 1815,AP1542 (Outdoor)
BLE
Cisco CMX Configuration Guide, Release 10.437
The Cisco CMX Detect and Locate ServiceSupported Access Points for Cisco CMX 10.4 Location Features with Cisco WLC 8.6
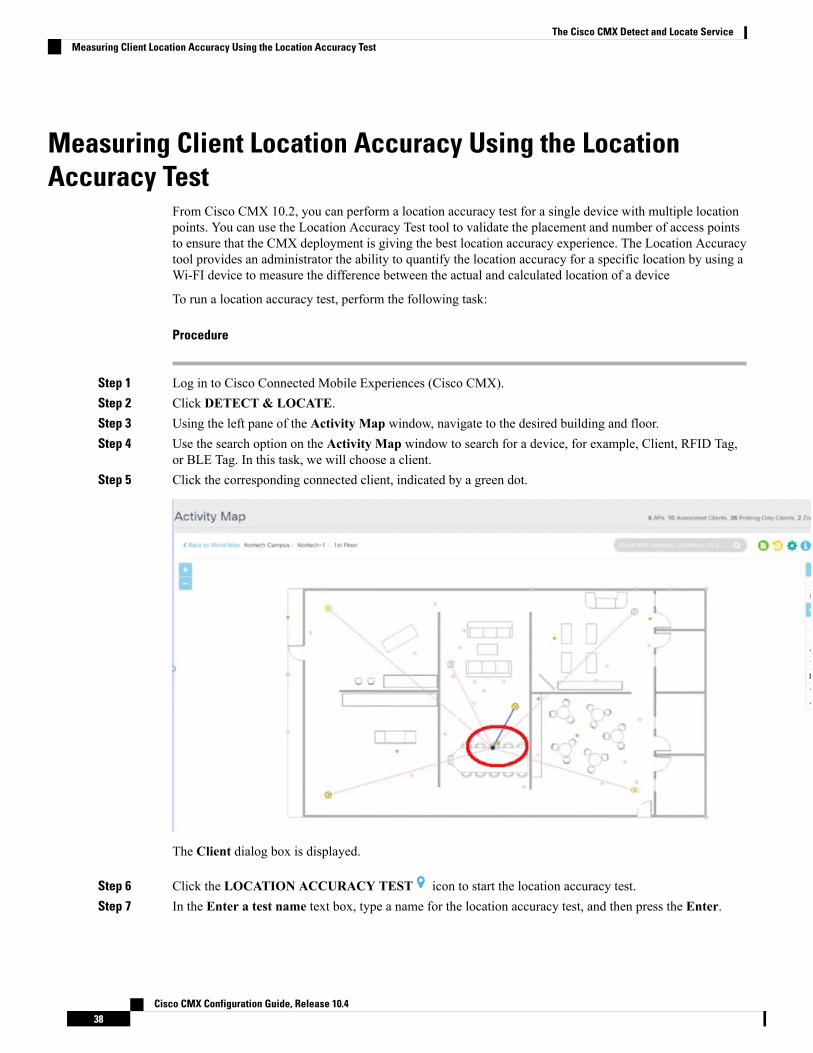
Measuring Client Location Accuracy Using the LocationAccuracy Test
From Cisco CMX 10.2, you can perform a location accuracy test for a single device with multiple locationpoints. You can use the Location Accuracy Test tool to validate the placement and number of access pointsto ensure that the CMX deployment is giving the best location accuracy experience. The Location Accuracytool provides an administrator the ability to quantify the location accuracy for a specific location by using aWi-FI device to measure the difference between the actual and calculated location of a device
To run a location accuracy test, perform the following task:
Procedure
Step 1 Log in to Cisco Connected Mobile Experiences (Cisco CMX).Step 2 Click DETECT & LOCATE.Step 3 Using the left pane of the Activity Map window, navigate to the desired building and floor.Step 4 Use the search option on the Activity Map window to search for a device, for example, Client, RFID Tag,
or BLE Tag. In this task, we will choose a client.Step 5 Click the corresponding connected client, indicated by a green dot.
The Client dialog box is displayed.
Step 6 Click the LOCATION ACCURACY TEST icon to start the location accuracy test.Step 7 In the Enter a test name text box, type a name for the location accuracy test, and then press the Enter.
Cisco CMX Configuration Guide, Release 10.438
The Cisco CMX Detect and Locate ServiceMeasuring Client Location Accuracy Using the Location Accuracy Test

A dialog box, asking you to place the marker at the client device's actual position on the map, is displayed.
Step 8 Drag the marker to the correct position.
Step 9 Click Run.Observe the increasing samples. This indicates the number of times the client is detected at the pin-pointedlocation. You can run the test for any required amount of time. The elapsed time of the test is displayed.
Step 10 Refresh your client frequently so that it exchanges information with the access points around it.Step 11 Click Pause when you finish testing of the current location.
You can move your device to another location and continue testing (repeat Step 8 through Step 10). Wait for30 seconds before resuming the test at a new spot, to eliminate any movement related discrepancies in thetest result. Try to collect at least twenty samples at each spot, running the test at a spot for around five minutes.
Step 12 After you complete testing all the location points, click Finished? View Result to fetch the test results.
A dialog box, showing 10 m accuracy and Average Error Distance is displayed.
Cisco CMX Configuration Guide, Release 10.439
The Cisco CMX Detect and Locate ServiceMeasuring Client Location Accuracy Using the Location Accuracy Test
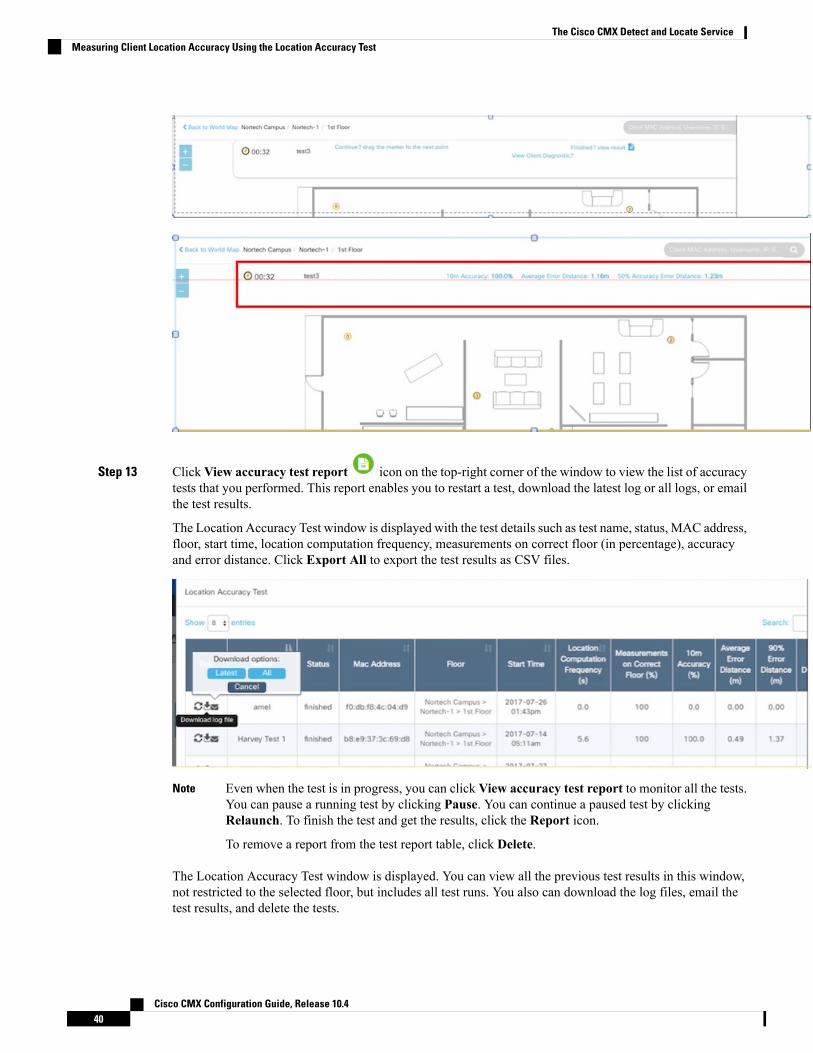
Step 13 ClickView accuracy test report icon on the top-right corner of the window to view the list of accuracytests that you performed. This report enables you to restart a test, download the latest log or all logs, or emailthe test results.
The Location Accuracy Test window is displayed with the test details such as test name, status, MAC address,floor, start time, location computation frequency, measurements on correct floor (in percentage), accuracyand error distance. Click Export All to export the test results as CSV files.
Even when the test is in progress, you can click View accuracy test report to monitor all the tests.You can pause a running test by clicking Pause. You can continue a paused test by clickingRelaunch. To finish the test and get the results, click the Report icon.
To remove a report from the test report table, click Delete.
Note
The Location Accuracy Test window is displayed. You can view all the previous test results in this window,not restricted to the selected floor, but includes all test runs. You also can download the log files, email thetest results, and delete the tests.
Cisco CMX Configuration Guide, Release 10.440
The Cisco CMX Detect and Locate ServiceMeasuring Client Location Accuracy Using the Location Accuracy Test
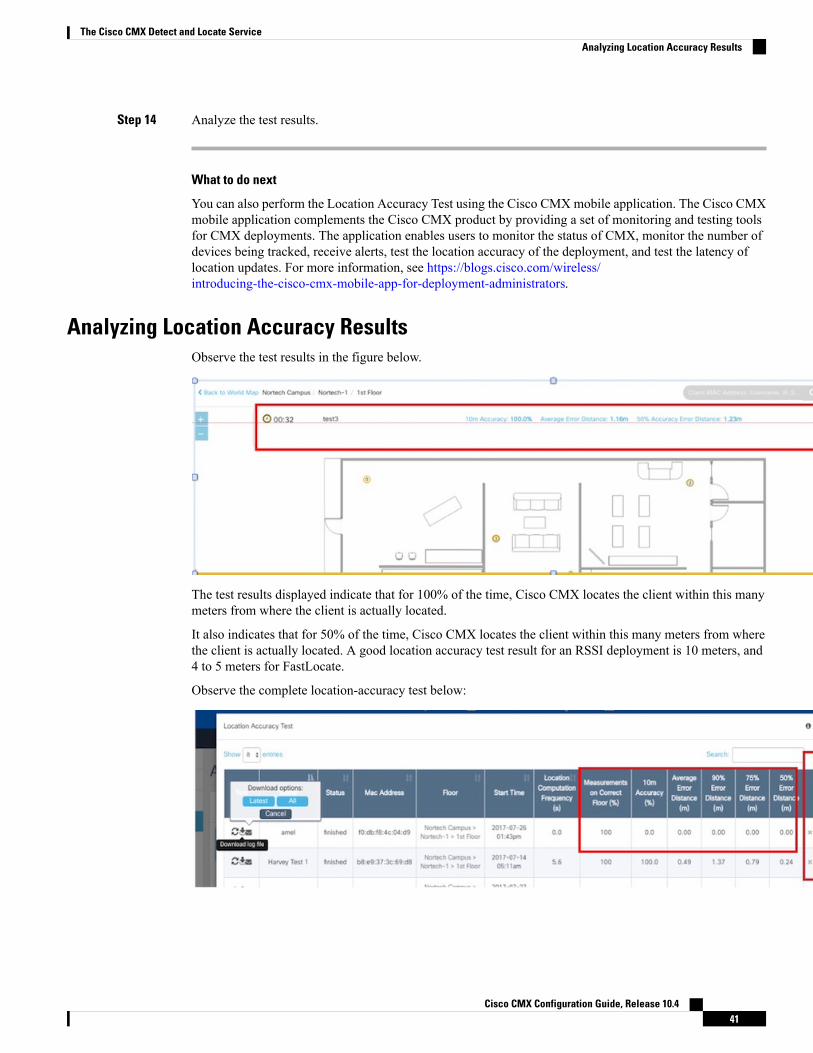
Step 14 Analyze the test results.
What to do next
You can also perform the Location Accuracy Test using the Cisco CMXmobile application. The Cisco CMXmobile application complements the Cisco CMX product by providing a set of monitoring and testing toolsfor CMX deployments. The application enables users to monitor the status of CMX, monitor the number ofdevices being tracked, receive alerts, test the location accuracy of the deployment, and test the latency oflocation updates. For more information, see https://blogs.cisco.com/wireless/introducing-the-cisco-cmx-mobile-app-for-deployment-administrators.
Analyzing Location Accuracy ResultsObserve the test results in the figure below.
The test results displayed indicate that for 100% of the time, Cisco CMX locates the client within this manymeters from where the client is actually located.
It also indicates that for 50% of the time, Cisco CMX locates the client within this many meters from wherethe client is actually located. A good location accuracy test result for an RSSI deployment is 10 meters, and4 to 5 meters for FastLocate.
Observe the complete location-accuracy test below:
Cisco CMX Configuration Guide, Release 10.441
The Cisco CMX Detect and Locate ServiceAnalyzing Location Accuracy Results
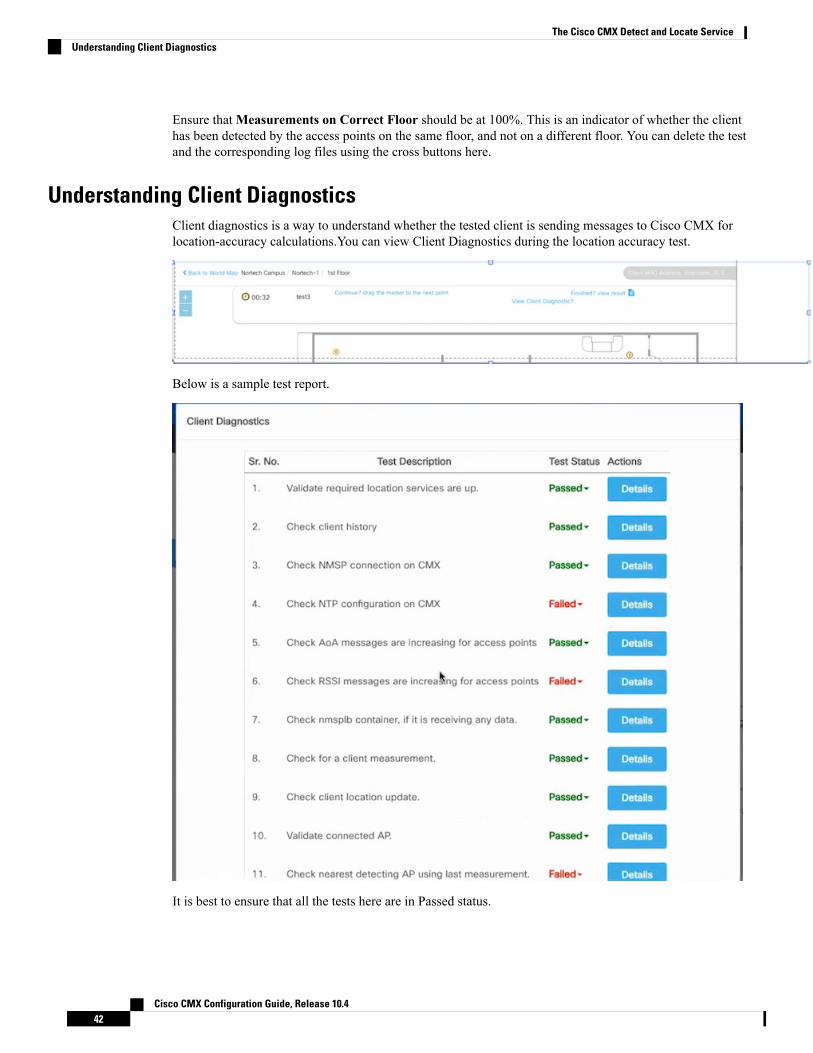
Ensure thatMeasurements on Correct Floor should be at 100%. This is an indicator of whether the clienthas been detected by the access points on the same floor, and not on a different floor. You can delete the testand the corresponding log files using the cross buttons here.
Understanding Client DiagnosticsClient diagnostics is a way to understand whether the tested client is sending messages to Cisco CMX forlocation-accuracy calculations.You can view Client Diagnostics during the location accuracy test.
Below is a sample test report.
It is best to ensure that all the tests here are in Passed status.
Cisco CMX Configuration Guide, Release 10.442
The Cisco CMX Detect and Locate ServiceUnderstanding Client Diagnostics
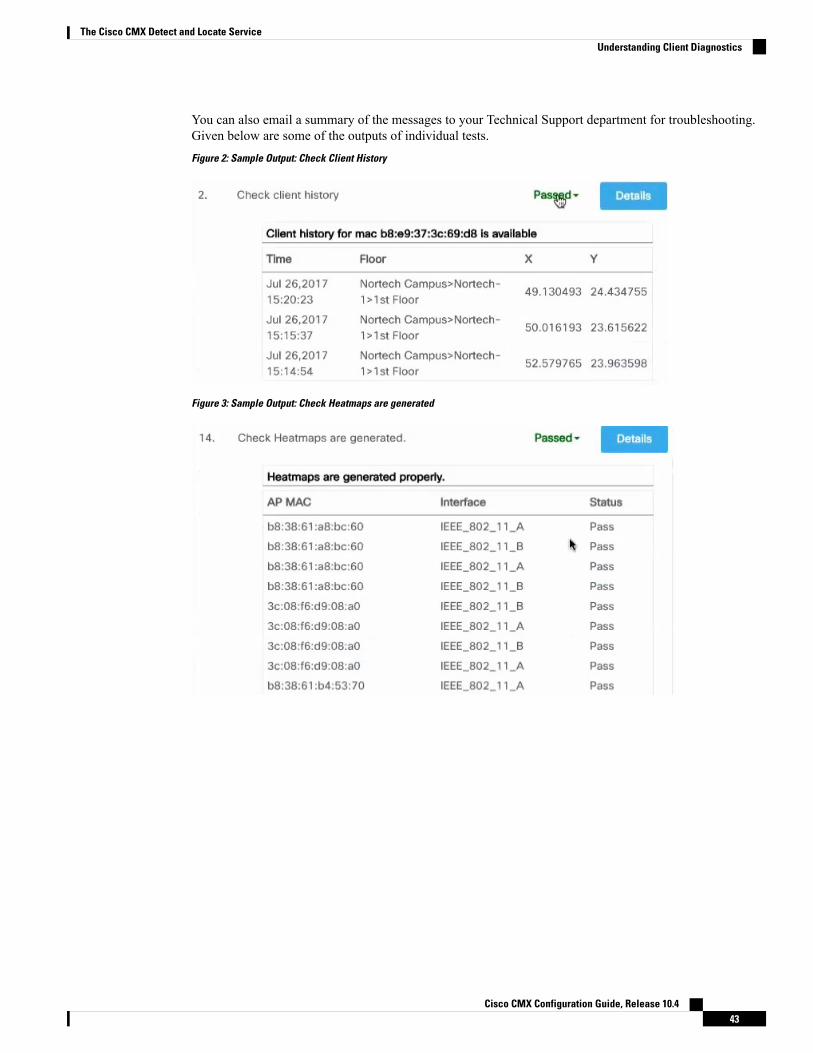
You can also email a summary of the messages to your Technical Support department for troubleshooting.Given below are some of the outputs of individual tests.Figure 2: Sample Output: Check Client History
Figure 3: Sample Output: Check Heatmaps are generated
Cisco CMX Configuration Guide, Release 10.443
The Cisco CMX Detect and Locate ServiceUnderstanding Client Diagnostics
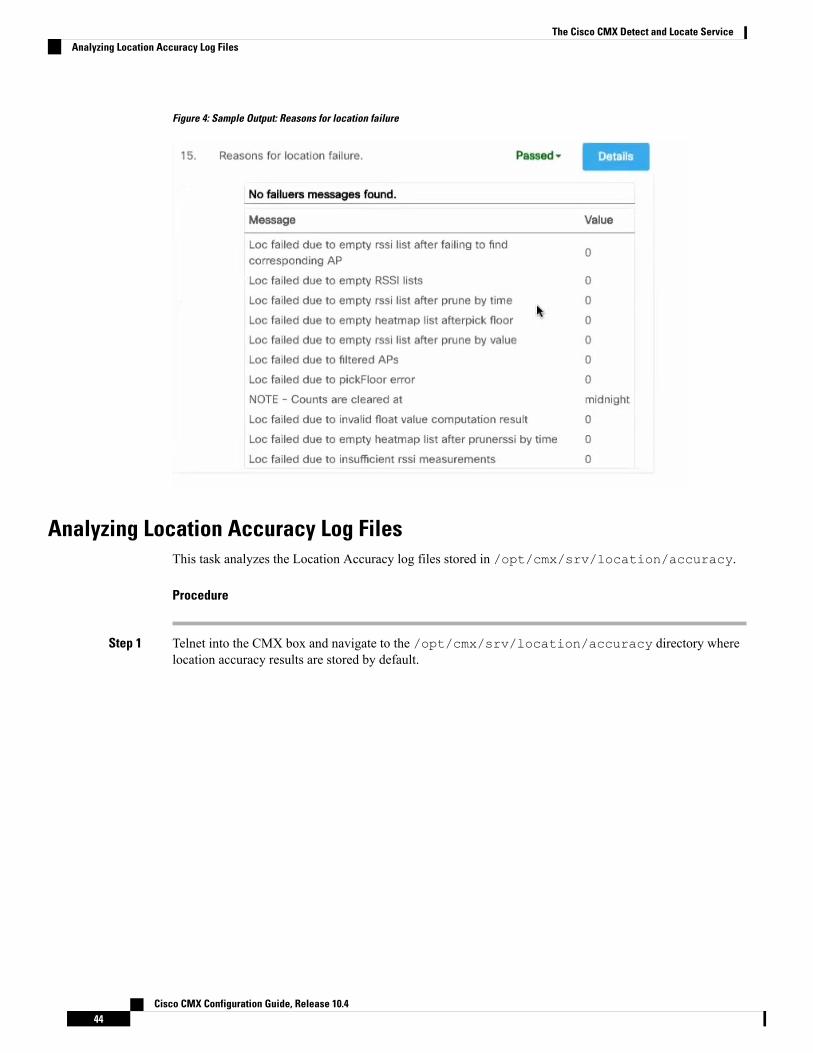
Figure 4: Sample Output: Reasons for location failure
Analyzing Location Accuracy Log FilesThis task analyzes the Location Accuracy log files stored in /opt/cmx/srv/location/accuracy.
Procedure
Step 1 Telnet into the CMX box and navigate to the /opt/cmx/srv/location/accuracy directory wherelocation accuracy results are stored by default.
Cisco CMX Configuration Guide, Release 10.444
The Cisco CMX Detect and Locate ServiceAnalyzing Location Accuracy Log Files
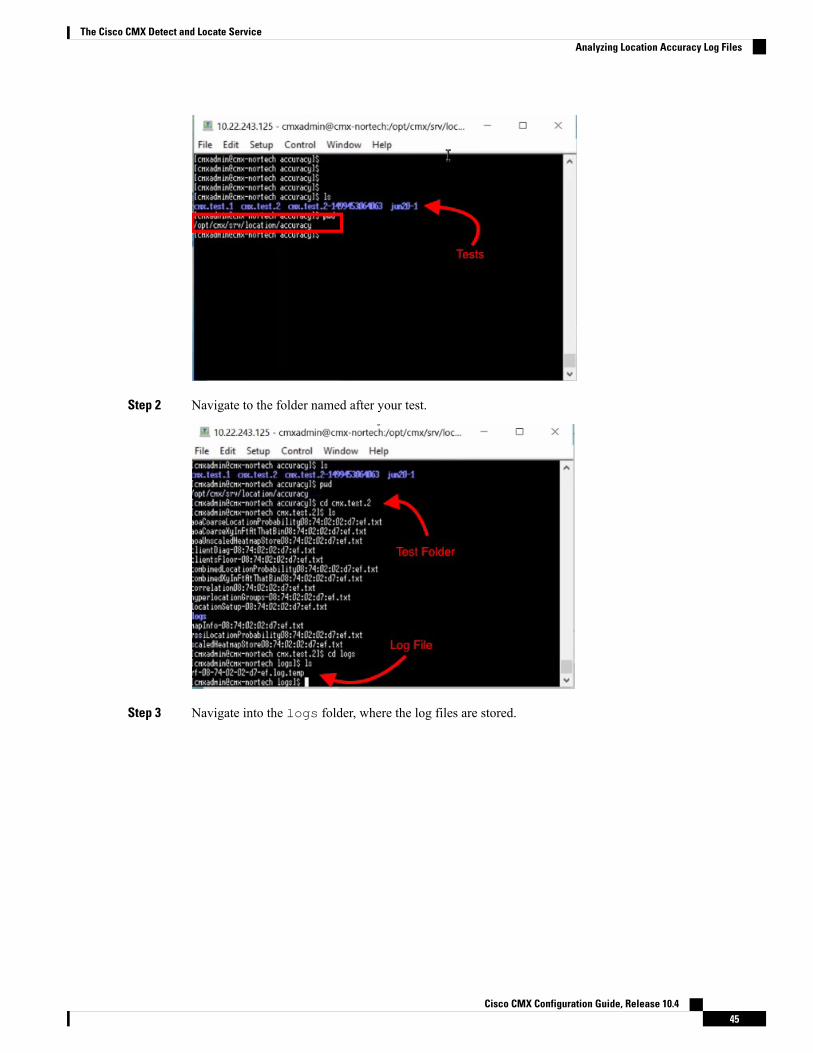
Step 2 Navigate to the folder named after your test.
Step 3 Navigate into the logs folder, where the log files are stored.
Cisco CMX Configuration Guide, Release 10.445
The Cisco CMX Detect and Locate ServiceAnalyzing Location Accuracy Log Files
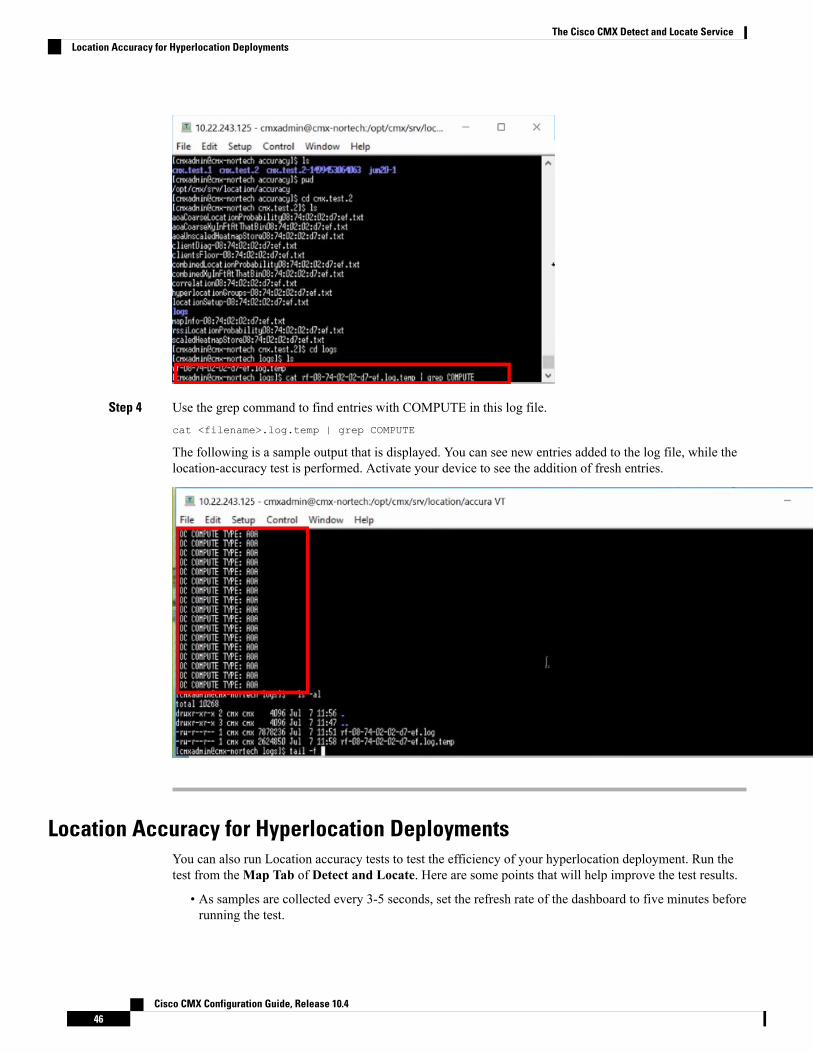
Step 4 Use the grep command to find entries with COMPUTE in this log file.cat <filename>.log.temp | grep COMPUTE
The following is a sample output that is displayed. You can see new entries added to the log file, while thelocation-accuracy test is performed. Activate your device to see the addition of fresh entries.
Location Accuracy for Hyperlocation DeploymentsYou can also run Location accuracy tests to test the efficiency of your hyperlocation deployment. Run thetest from theMap Tab of Detect and Locate. Here are some points that will help improve the test results.
• As samples are collected every 3-5 seconds, set the refresh rate of the dashboard to five minutes beforerunning the test.
Cisco CMX Configuration Guide, Release 10.446
The Cisco CMX Detect and Locate ServiceLocation Accuracy for Hyperlocation Deployments

• A good location accuracy result for a hyperlocation deployment has an Average Error Distance of aroundone meter.
• Convex hull is the perimeter formed by drawing lines connecting 3 or more APs in a AP group. Ensurethat a test client is within the convex hull of an AP group.
• Do not choose a client that is in a spot between AP groups, our outside the convex hull of AP groups.
• You can use the Location Accuracy test to calculate latency in a Hyperlocation deployment. This isespecially useful if you would like to know when clients visit your store in order to send personnel togreet them. You can find the latency by moving a test client, and observing how many seconds it takesfor your Cisco CMX location accuracy dashboard to update itself with the new client location. Usually,it takes around 2-3 seconds to update its location. Ideally, latency should not be more than 5 seconds fora hyperlocation deployment.
Cisco CMX Configuration Guide, Release 10.447
The Cisco CMX Detect and Locate ServiceLocation Accuracy for Hyperlocation Deployments
Cisco CMX Configuration Guide, Release 10.448
The Cisco CMX Detect and Locate ServiceLocation Accuracy for Hyperlocation Deployments
C H A P T E R 3The Cisco CMX Analytics Service
• Overview of the Analytics Service, on page 49• The Analytics Dashboard, on page 49• Customized Widgets, on page 61• Create a Realtime Report, on page 67• Performing Heatmap Analysis, on page 68• Using the Schedule Manager, on page 69• Verticalization, on page 69• Set SSID Filter Parameters for Analytics Service, on page 69
Overview of the Analytics ServiceThe Cisco ConnectedMobile Experiences (Cisco CMX) Analytics service provides a set of data analytic toolsfor analyzing Wi-Fi device locations. The Analytics service helps organizations use the network as a datasource to view visitors’ behavior patterns and trends, which will in turn help businesses improve visitorexperience and boost customer service.
The Analytics service enables you to:
• Analyze Wi-Fi device locations.
• Estimate the number of new visitors (visitors seen for the first time) and repeat visitors (recognized froman earlier visit), the amount of time they spend at a venue, and the frequency of their visits within a venue.
• Gain detailed insight into the behavior patterns of visitors moving and interacting within a venue.
• Analyze business performance by measuring the effect of in-venue marketing.
• Improve customer satisfaction through sufficient staffing during peak hours, proper signage, and makingchanges in underutilized areas.
The Analytics DashboardThe Analytics service’s Dashboard is designed to help you visualize and understand various parametersassociated with visitors’ movement within a given zone. You can use the Dashboard on a daily basis to examinecurrent trends or events. You can also customize the Dashboard with different widgets, as per your requirements.
Cisco CMX Configuration Guide, Release 10.449
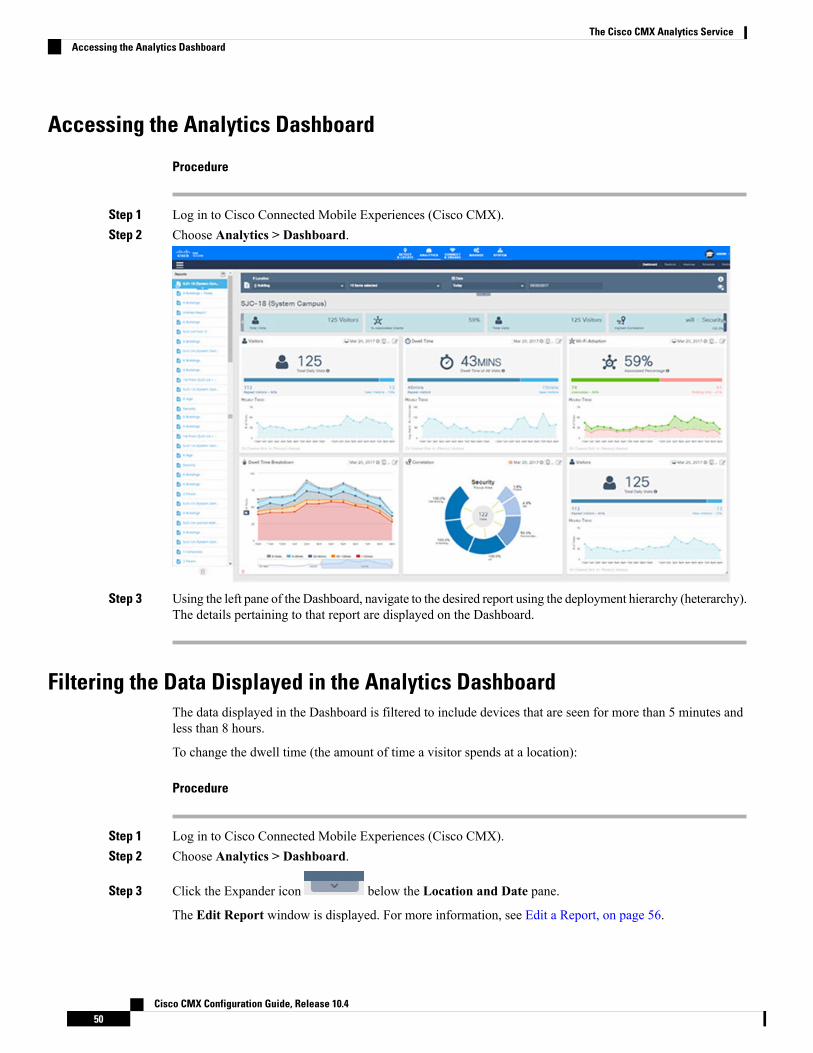
Accessing the Analytics Dashboard
Procedure
Step 1 Log in to Cisco Connected Mobile Experiences (Cisco CMX).Step 2 Choose Analytics > Dashboard.
Step 3 Using the left pane of the Dashboard, navigate to the desired report using the deployment hierarchy (heterarchy).The details pertaining to that report are displayed on the Dashboard.
Filtering the Data Displayed in the Analytics DashboardThe data displayed in the Dashboard is filtered to include devices that are seen for more than 5 minutes andless than 8 hours.
To change the dwell time (the amount of time a visitor spends at a location):
Procedure
Step 1 Log in to Cisco Connected Mobile Experiences (Cisco CMX).Step 2 Choose Analytics > Dashboard.
Step 3 Click the Expander icon below the Location and Date pane.
The Edit Report window is displayed. For more information, see Edit a Report, on page 56.
Cisco CMX Configuration Guide, Release 10.450
The Cisco CMX Analytics ServiceAccessing the Analytics Dashboard
Step 4 Specify the Dwell Threshold values.
Viewing a Device Count and Average Dwell Time Report
Procedure
Step 1 Log in to Cisco Connected Mobile Experiences (Cisco CMX).Step 2 Choose Analytics > Dashboard.Step 3 Click the location you want to analyze, Region, Building, Floor, Zone, or Tags.Step 4 From the Location and Date pane, choose the timeframe for the report. The available options are:
• Now—The number of active devices in the last 15 minutes.
In Cisco CMX Release 10.2.3, the Now option in the Date & Time Filters drop-down list isno longer available
Note
• Today—The report you specified is run for the current day and the generated results are displayed.
• Yesterday—The report you specified is run using the previous day's values and the generated resultsare displayed.
• This Week—The report you specified is run using the current week's values (Monday to Sunday) andthe generated results are displayed.
• Last Week—The report you specified is run using the previous week's values (Monday to Sunday) andthe generated results are displayed.
• Last 2 Weeks—The report you specified is run using past two weeks' values and the generated resultsare displayed.
• This Month—The report you specified is run using this month's values and the generated results aredisplayed.
• LastMonth—The report you specified is run using the previous month's values and the generated resultsare displayed.
• Last 3 Months—The report you specified is run using the past three months' values and the generatedresults are displayed.
• This Year—The report you specified is run using this year's values and the generated results are displayed.
• Last Year—The report you specified is run using the previous year's values and the generated resultsare displayed.
• CustomRange—The report you specified is run using the date values you specified in the Start and Enddate fields.
A report based on the chosen criteria is displayed in the Dashboard and contains the following widgets:
• Visitors widget
Cisco CMX Configuration Guide, Release 10.451
The Cisco CMX Analytics ServiceViewing a Device Count and Average Dwell Time Report

• In the Device Count report, information about the total number of visitors, along with percentageof repeat visitors and new visitors is displayed.
• In the Dwell Time report, the average dwell time of all the visitors, along with the dwell time ofrepeat and new visitors is displayed.
• Compared Data to widget—A comparative result of repeat visitors vs. new visitors is displayed. Theavailable options are:
• Previous
• Average—The average value is calculated by averaging the current period and the previous period.If you select ThisWeek in the Date pane, the previous to compared with is last week, and the averageis over last week and this week.
• A line chart with a summary view and a detailed view of the criteria selected—You can customize theX-axis and Y-axis by applying the following filter criteria:
• View Unique Devices or View Absolute Visits
• Locations—Campus, Building, Floor, Zone, Zone Tag
• Values—Ascending, Descending, Alphabetical
Analytics ReportsThe Analytics Dashboard provides reports to understand and monitor the behavior pattern of visitors withina particular venue.
The Analytics service’s report facility also provides a more regular and manager-oriented set of informationthrough parameterized templates to measure various trends and patterns that occur over a period of time in aparticular zone. You can create new reports as well as modify the existing reports. You can schedule a reportat a customized frequency, print the reports, and download the reports in PDF, Excel, or HTML formats. Youcan either choose to auto-generate or customize a report.
In Cisco CMX Release 10.2.2, the Unique Device widget is no longer available for analytics reportsNote
In Cisco CMX Release 10.2.2, reports where multiple zones and floors are selected can result in duplicatedevice counts when a device visits more than one zone or floor. So if a device visits zone 1 and zone 2, thedevice count is displayed as 2. However, this is not so in Cisco CMX Release 10.2. Hence a higher devicecount can be registered in a 10.2.2 report as opposed to 10.2.
A workaround for this is to tag multiple campus/building/floors/zone with the same TAG and create reportsat the TAG level.
Note
Cisco CMX Configuration Guide, Release 10.452
The Cisco CMX Analytics ServiceAnalytics Reports
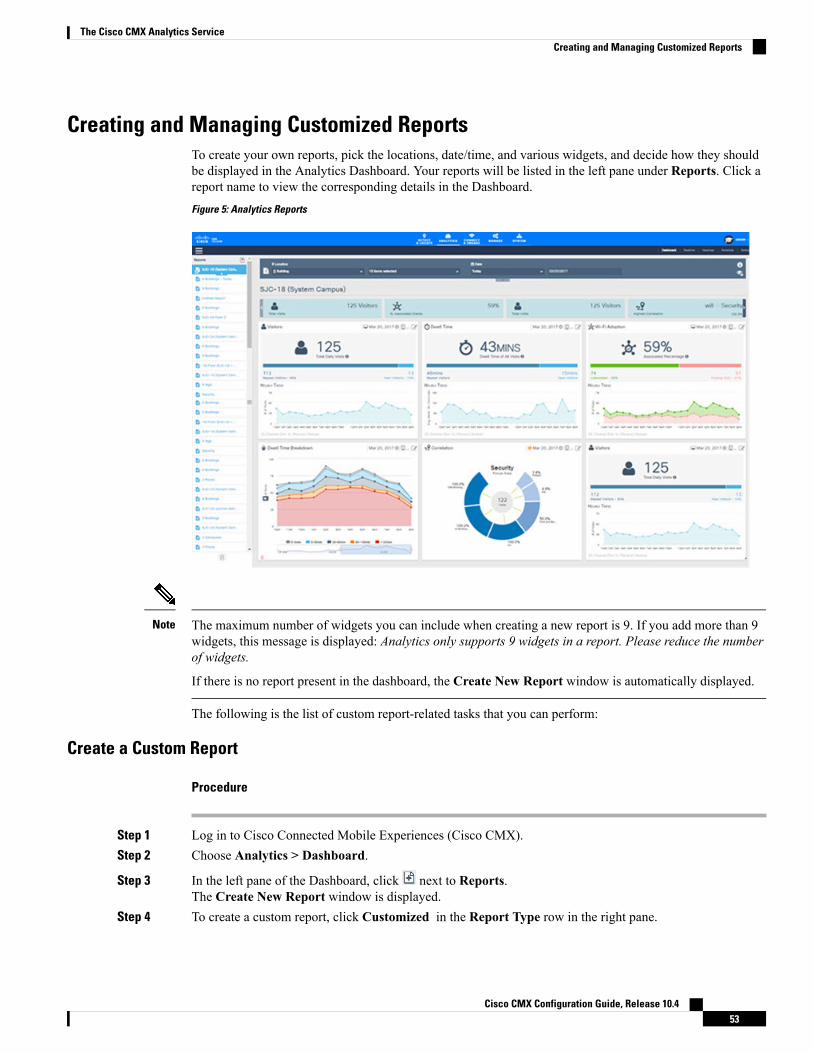
Creating and Managing Customized ReportsTo create your own reports, pick the locations, date/time, and various widgets, and decide how they shouldbe displayed in the Analytics Dashboard. Your reports will be listed in the left pane under Reports. Click areport name to view the corresponding details in the Dashboard.Figure 5: Analytics Reports
The maximum number of widgets you can include when creating a new report is 9. If you add more than 9widgets, this message is displayed: Analytics only supports 9 widgets in a report. Please reduce the numberof widgets.
If there is no report present in the dashboard, the Create New Report window is automatically displayed.
Note
The following is the list of custom report-related tasks that you can perform:
Create a Custom Report
Procedure
Step 1 Log in to Cisco Connected Mobile Experiences (Cisco CMX).Step 2 Choose Analytics > Dashboard.
Step 3 In the left pane of the Dashboard, click next to Reports.The Create New Report window is displayed.
Step 4 To create a custom report, click Customized in the Report Type row in the right pane.
Cisco CMX Configuration Guide, Release 10.453
The Cisco CMX Analytics ServiceCreating and Managing Customized Reports
Step 5 From the Focus Area Filter drop-down list, choose the locations that you want to analyze.
The location types are Building, Campus, Floor, and Zone.
Step 6 From the Date & Time filters drop-down list, choose the date and time range you want to run the report for.
Step 7 In the Add Widgets area, click Add Widget to Report + to include any of the following widgets to thereport:
• Visitors—Shows the number of visitors detected in the network.
• Average Dwell Time—Shows the amount of time visitors spent at a location.
• Correlation—Shows the relationship between devices and visits between locations.
• Path—Shows where visitors went before and after visiting a location.
•Wi-Fi Adoption—Shows how many devices are connected to the Wi-Fi network.
• Dwell Time Breakdown—Shows dwell-time distribution for selected areas, for example:
• 20 percent of the visitors stayed less than an hour
• 50 percent stayed for 1 to 2 hours
• 30 percent stayed for more than 2 hours
• The Add Widget is not available for the Auto-Generate report type.
• For each widget in the report, you can click Edit/View Options to edit the display options.The options available are Chart, Summary, and Table. By default, the Summary option isselected.
Note
Step 8 From the Advanced Widget Filter area, choose the devices that you want to filter in the report.Step 9 From the Associated/Probing Devices drop-down list, choose an option.Step 10 You can set a threshold for dwell time. This is the amount of time spent by a client device (visitor) at a given
location. Select the minimum and maximum time from the corresponding drop-down lists in the DwellThreshold area.a) From theMinutes To drop-down list, choose the minimum time, in minutes.b) From the Hours drop-down list, choose the maximum time, in hours.c) Click No Filters, if filtering is not to be applied while generating the report. When you click this option,
the dwell-time threshold values are automatically set in the range of 0 to 24.d) Check the Stationary Devices check box if you want to include stationary devices while filterting.
If stationary devices filtering must be included in the report, ensure that the dwell threshold maximumtime is 24 hours. Stationary device filtering is only available for widgets with a count, such as Visitorsand Average Dwell Time.
Step 11 Click Done.
Based on the Focus Area and Date filters that you specified, the report name is generated. The new reportname is listed in the left pane under Reports.
The following is a list of tasks that can be performed after a Custom report is created:
• Schedule a Report—To schedule a report:
Cisco CMX Configuration Guide, Release 10.454
The Cisco CMX Analytics ServiceCreate a Custom Report
1. Click the report for which you want to create a scheduled report.
2. Click the Expander icon that is displayed.
3. Click the Clock icon (Schedule) to schedule the report.
4. In the SELECT REPORT OPTION dialog box, choose HTML, PDF, or Excel and click Next.
• PDF Report—Enables you to schedule a report in PDF format. You can customize the PDFreport parameters.
• In the Header text box, specify a Header for the PDF report.
• Click Select a Logo to choose a logo for the PDF report. You can align the placement ofthe logo to left, center, or right.
• If you want to provide comments, enter your comments in the Add your comments herefield.
• In the Footer field, specify a footer for the PDF report.
• Enter the email address of the recipients to send the report to.
• Enter the start date and time from which the report has to be generated.
• Select the frequency of the report—One Time, Daily, orWeekly.
• Excel Report—Enables you to schedule a report in excel format.
• Enter the email address of the recipients to send the report to.
• Enter the start date and time from which the report has to be generated.
• Select the frequency of the report—One Time, Daily, orWeekly.
• HTML Report—Enables you to schedule a report in HTML format.
• Enter the email address of the recipients to send the report to.
• Enter the start date and time from which the report has to be generated.
• Select the frequency of the report—One Time, Daily, orWeekly.
5. Click Schedule.
• Print a Report—To print a report:
1. Click the report that you want to print.
2. Click the Expander icon that is displayed.
3. Click the Print icon to print the report.
4. Click Next.
• View Scheduled Report Manager—To view the scheduled reports, choose Analytics > Schedule. TheScheduled Report Manager page displays the following information:
• Report ID—Shows the report ID.
Cisco CMX Configuration Guide, Release 10.455
The Cisco CMX Analytics ServiceCreate a Custom Report
• Report Title—Shows the report title.
• Username—Shows the name of the user who created the scheduled report.
• Start From—Shows the date and time from which the report is scheduled to run.
• Recipients—Shows the email addresses of recipients.
• History—Displays the history of the scheduled report.
• Actions—Modifies or deletes the scheduled report.
Edit a ReportYou can use the Edit Report window to edit the report parameters and generate an updated report.
Procedure
Step 1 Log in to Cisco Connected Mobile Experiences (Cisco CMX).Step 2 Choose Analytics > Dashboard.
Step 3 Click the Expander icon below the Location and Date pane.
The window Edit Report window is displayed.
Step 4 Edit the report parameters and then click Done.
The Dashboard window is refreshed and the updated report is displayed.
Create a Scheduled Custom ReportBesides creating customized reports, you can add a logo, text, header, and footer to a report to align it withyour organization. The reports can be scheduled at a customized frequency for a targeted set of recipients.
Procedure
Step 1 Log in to Cisco Connected Mobile Experiences (Cisco CMX).Step 2 Choose Analytics > Dashboard.Step 3 In the left pane of the Dashboard, expand the report name, and click Schedule.
The Select Report Option dialog box is displayed. The following options are available:
• HTML Report
• PDF Report
Step 4 Click the radio button corresponding to the kind of report you require and click Next.
Cisco CMX Configuration Guide, Release 10.456
The Cisco CMX Analytics ServiceEdit a Report

If you select the PDF option, the following customization options are available:
• Header—Add a header to the report and provide a name. You can customize the position of the headertext by using the right, top, and left arrow keys.
• Logo—Add a logo to the report by clicking the Logo icon. A few default logos are available to choosefrom. You can also upload a logo by clicking Upload a Logo.
• Comments—Add comments about the report by entering the corresponding text in the Add yourcomments Here field. You can move the sections by clicking the Up or Down arrow keys on the leftside of the different components present in the sections in the report.
• Footer—Add footer text at the bottom of the report.
Step 5 Click Next.The Schedule Report widget is displayed.
Step 6 Enter the email addresses of the recipients to send the report to.Step 7 Enter the start date and time of the period for which the report has to be generated.Step 8 Select the frequency of the report, One Time, Daily, orWeekly.Step 9 Click Schedule.
Configure Custom Time Ranges for an Analytics ReportIn Cisco CMX Analytics, the Create New Report window includes the date and time range option to selecta specific period of time for creating Analytics reports. After creating or modifying these time ranges, youcan proceed to select the corresponding range from the Date and Time Filters drop-down list, for example,Early Morning (12am -3:59am).
You can also modify the existing ranges or define custom time ranges for generating Analytics reports. Youcan configure the custom time using either the Cisco CMX GUI or CLI.
Add a New Time Range Using the Cisco CMX GUI
Procedure
Step 1 Log in to Cisco Connected Mobile Experiences (Cisco CMX).Step 2 Choose Analytics > Settings.
The Analytics Settings window is displayed with a list of the available time ranges.
Step 3 To add a new custom time range, click Add.
Cisco CMX Configuration Guide, Release 10.457
The Cisco CMX Analytics ServiceConfigure Custom Time Ranges for an Analytics Report
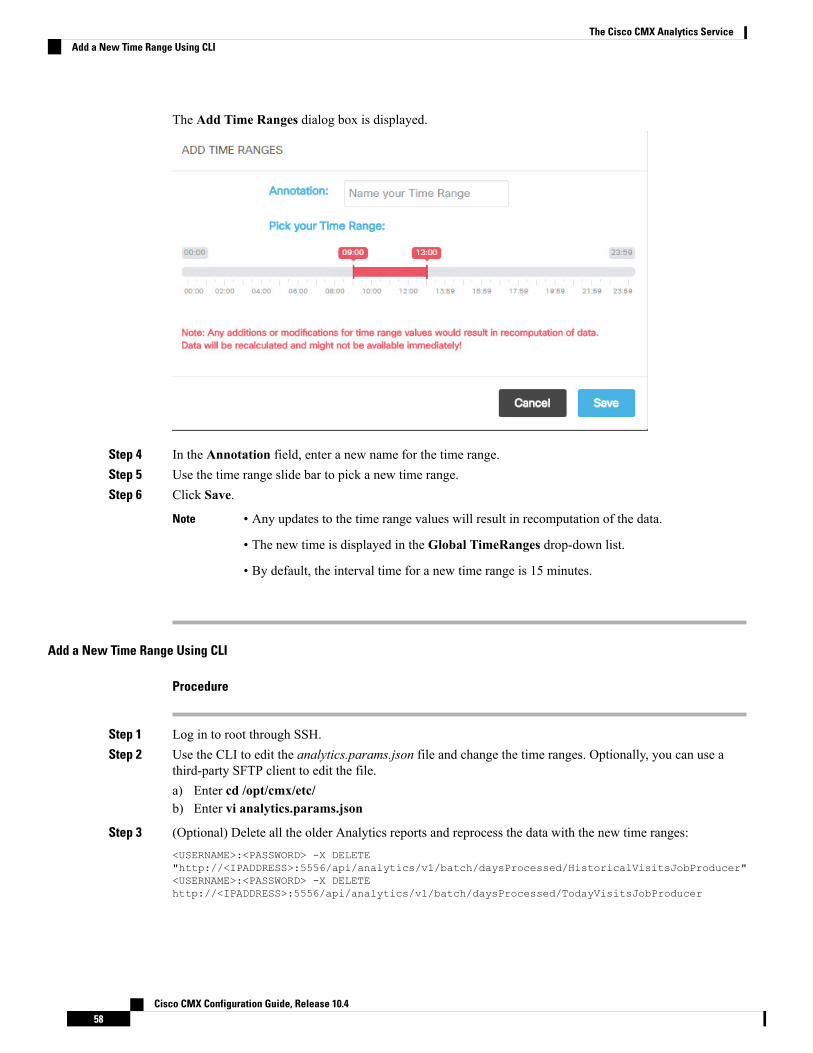
The Add Time Ranges dialog box is displayed.
Step 4 In the Annotation field, enter a new name for the time range.Step 5 Use the time range slide bar to pick a new time range.Step 6 Click Save.
• Any updates to the time range values will result in recomputation of the data.
• The new time is displayed in the Global TimeRanges drop-down list.
• By default, the interval time for a new time range is 15 minutes.
Note
Add a New Time Range Using CLI
Procedure
Step 1 Log in to root through SSH.Step 2 Use the CLI to edit the analytics.params.json file and change the time ranges. Optionally, you can use a
third-party SFTP client to edit the file.a) Enter cd /opt/cmx/etc/b) Enter vi analytics.params.json
Step 3 (Optional) Delete all the older Analytics reports and reprocess the data with the new time ranges:<USERNAME>:<PASSWORD> -X DELETE"http://<IPADDRESS>:5556/api/analytics/v1/batch/daysProcessed/HistoricalVisitsJobProducer"<USERNAME>:<PASSWORD> -X DELETEhttp://<IPADDRESS>:5556/api/analytics/v1/batch/daysProcessed/TodayVisitsJobProducer
Cisco CMX Configuration Guide, Release 10.458
The Cisco CMX Analytics ServiceAdd a New Time Range Using CLI
Step 4 To restart the Analytics services, use the cmxctl analytics restart command. This updates and displays allthe new time ranges in the CMXUI. All the historical data will also be reprocessed using the new time ranges.
If the Analytics services are not restarted, only the unmodified time ranges will be available.Note
Download a Customized ReportYou can use the Analytics service to download customized reports in PDF, Excel, or HTML formats.
Procedure
Step 1 Log in to Cisco Connected Mobile Experiences (Cisco CMX).Step 2 Choose Analytics > Dashboard.Step 3 In the left pane of the Dashboard, expand the corresponding report name, and click Download.
The Select Report Option dialog box is displayed. The following options are available:
• PDF Report
• Excel Report
• HTML Report
Step 4 Click the radio button corresponding to the format that you want the report to be downloaded in.
If you select the PDF option, the following customization options are available:
• Header—Add a header to the report and provide a name. You can customize the position of the headertext by using the right, top, and left arrow keys.
• Logo—Add a logo to the report by clicking the Select a Logo icon. A few default logos are available tochoose from. You can also upload a logo by clicking Upload a Logo.
• Comments—Add comments about the report by entering text in the Add your comments field. Youcanmove the sections by clicking theUp orDown arrow keys on the left side of the different componentspresent in the sections in the report.
• Footer—Add footer text at the bottom of the report.
If you select Excel Report, the data for all the Dashboard widgets will be exported as tables in the report. Ifyou want to download reports with filtering options, choose the Table report option from the Edit/ViewOptions for each widget.
Step 5 Click Next.The customized reports are downloaded in the selected format.
Delete a Customized ReportYou can delete any of the custom reports that you created.
Cisco CMX Configuration Guide, Release 10.459
The Cisco CMX Analytics ServiceDownload a Customized Report
Procedure
Step 1 Log in to Cisco Connected Mobile Experiences (Cisco CMX).Step 2 Choose Analytics > Dashboard.
Step 3 In the left pane of the Dashboard, hover the cursor over a report, and click the Delete icon.
Creating an Analytics Report Based on Associated or Probing Only DevicesYou can create filtered analytics reports based on all visitor devices associated to the network (regardless ofSSID) and on all visitor devices detected by the network. These are categorized as Associated and ProbingOnly devices. In addition, any devices filtered by the Location service is also excluded from analytics reports.
Procedure
Step 1 Log in to Cisco Connected Mobile Experiences (Cisco CMX).Step 2 Choose Analytics > Reports to display the Create New Report window.Step 3 From the Associated/Probing Only Devices widget, select Associated or Probing Only, or select both.
If both are selected, all associated and probing only devices will be displayed (meaning, no filtering) in theVisitor Count area on the Analytics Dashboard.
Step 4 Click Done.
The Visitor Count information on the Analytics Dashboard reflects the following:
• If the Associated option is selected, a green Wi-Fi icon appears next to the Visitor Count heading. Thevisitor count displayed is the number of devices associated to the SSID.
• If the Probing Only option is selected, a gray Wi-Fi icon appears next to the Visitor Count heading.The visitor count displayed is the number of devices probing only by the SSID.
• If both options are selected (meaning, no filtering), no icon appears.
Viewing Global Alerts for Critical ServicesThe Global Alerts window displays information for all Cisco CMX service. You can navigate to this windowfrom the respective Cisco CMX service window.
Procedure
Step 1 Log in to Cisco Connected Mobile Experiences (Cisco CMX).Step 2 Choose Analytics > Dashboard.
The Dashboard window is displayed.
Cisco CMX Configuration Guide, Release 10.460
The Cisco CMX Analytics ServiceCreating an Analytics Report Based on Associated or Probing Only Devices
Step 3 In the top-right corner of the window, click the Alerts icon.The Live Alerts window is displayed with the global alert details for critical and major alerts. For moreinformation about alerts, see Viewing Live System Alerts, on page 165.
For the Analytics service, Job Processor runs multiple jobs in the background . The Analyticsservice’s Dashboard displays success alerts when the job processor completes all the jobs.
Tip
Customized WidgetsCustomized widgets enable you to view and analyze specific activities to better suit the objective of youranalysis. For example, you can create a widget that focuses on visitor (client) activity in a zone of interest.The customized widget will gather and present only the data pertaining to visitor activity, and enable theanalysis and interpretation of this data. The information in the customizedwidgets enable you to takemeaningfuldecisions based on client activity.
Customized widgets can be generated only by Advanced users.Note
The Visitors WidgetThe Visitor widget provides a detailed summary of the visitor (client device) count in an area of focus.
The Visitor widget can be viewed in the following formats:
• Summary—This is the default view. This view consists of the Visitors, Compare Data to, andHourlyTrend charts. A breakup of new and repeat visitors is also provided. TheCompare Data to chart presentscomparative data for the current day and the previous day. You can also compare the current data withthe average visitor count per day. A breakup distribution of repeat and new visitors is also shown aspercentage. A graph shows the visitor count per hour from 12:00 a.m. to 12:00 p.m.
• Chart—A line chart with a summary view of the number of total visitors along the Y-axis and the activityat a given time of the day along the X-axis is displayed. You can configure the chart based on the followingviews:
• View Unique Devices or View Absolute Visits
• Locations—Campus, Building, Floor, Zone, By Hour
• Values—Ascending, Descending, Alphabetical
The Y-axis value provides alternate views of the number of visitors and percentage of total visitors.Hover your cursor at any point along the line to view the connected and probing data at that instance.
• Table—Visitor count attributes are presented in a tabular format.
The following trends are available for each view:
• View Unique Devices
Cisco CMX Configuration Guide, Release 10.461
The Cisco CMX Analytics ServiceCustomized Widgets
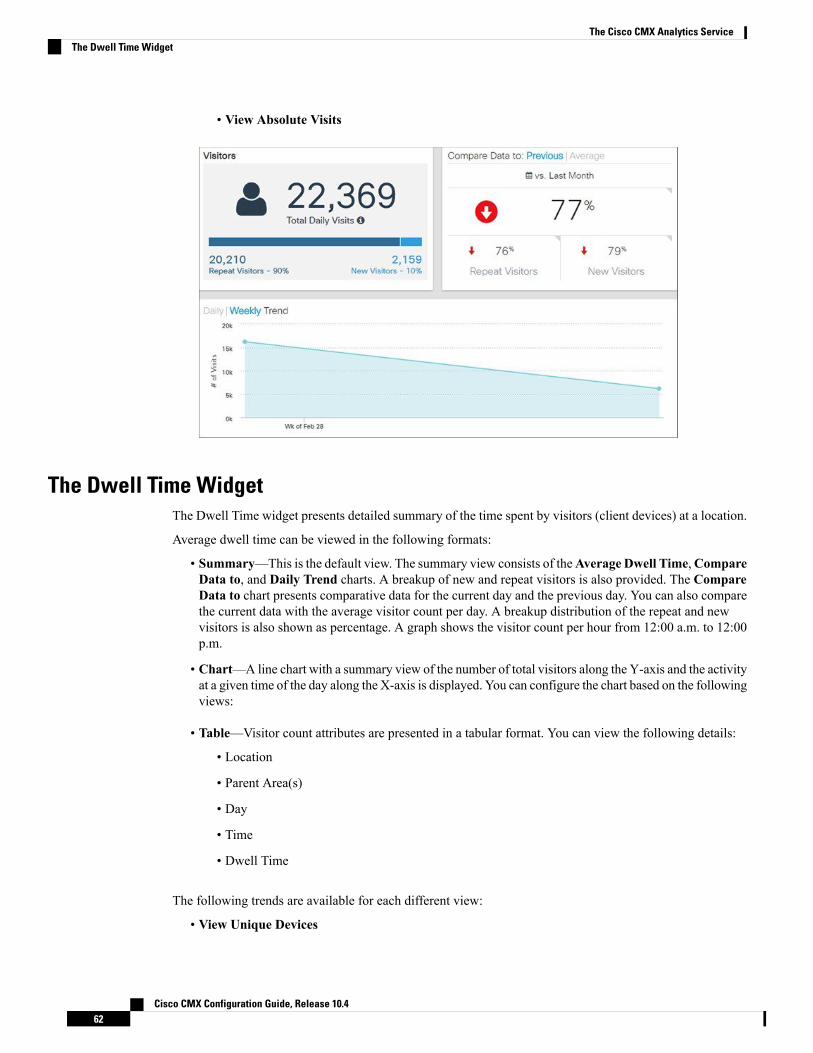
• View Absolute Visits
The Dwell Time WidgetThe Dwell Time widget presents detailed summary of the time spent by visitors (client devices) at a location.
Average dwell time can be viewed in the following formats:
• Summary—This is the default view. The summary view consists of theAverage Dwell Time,CompareData to, and Daily Trend charts. A breakup of new and repeat visitors is also provided. The CompareData to chart presents comparative data for the current day and the previous day. You can also comparethe current data with the average visitor count per day. A breakup distribution of the repeat and newvisitors is also shown as percentage. A graph shows the visitor count per hour from 12:00 a.m. to 12:00p.m.
• Chart—A line chart with a summary view of the number of total visitors along the Y-axis and the activityat a given time of the day along the X-axis is displayed. You can configure the chart based on the followingviews:
• Table—Visitor count attributes are presented in a tabular format. You can view the following details:
• Location
• Parent Area(s)
• Day
• Time
• Dwell Time
The following trends are available for each different view:
• View Unique Devices
Cisco CMX Configuration Guide, Release 10.462
The Cisco CMX Analytics ServiceThe Dwell Time Widget
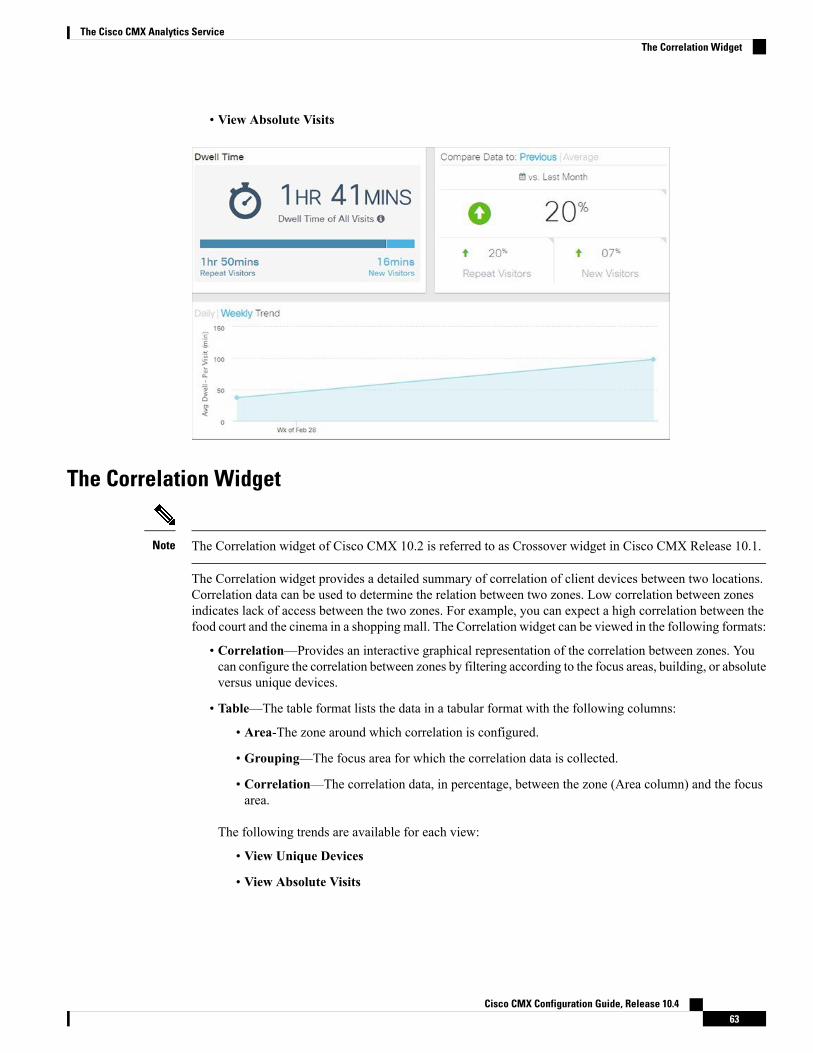
• View Absolute Visits
The Correlation Widget
The Correlation widget of Cisco CMX 10.2 is referred to as Crossover widget in Cisco CMX Release 10.1.Note
The Correlation widget provides a detailed summary of correlation of client devices between two locations.Correlation data can be used to determine the relation between two zones. Low correlation between zonesindicates lack of access between the two zones. For example, you can expect a high correlation between thefood court and the cinema in a shopping mall. The Correlation widget can be viewed in the following formats:
• Correlation—Provides an interactive graphical representation of the correlation between zones. Youcan configure the correlation between zones by filtering according to the focus areas, building, or absoluteversus unique devices.
• Table—The table format lists the data in a tabular format with the following columns:
• Area-The zone around which correlation is configured.
• Grouping—The focus area for which the correlation data is collected.
• Correlation—The correlation data, in percentage, between the zone (Area column) and the focusarea.
The following trends are available for each view:
• View Unique Devices
• View Absolute Visits
Cisco CMX Configuration Guide, Release 10.463
The Cisco CMX Analytics ServiceThe Correlation Widget
The Path Analysis WidgetThe Path Analysis widget analyses the paths taken by visitors (or client devices) before and after visiting afocus location, and provides a graphical representation of the paths.
• The green (left) side represents where a device is coming from, for example, immediately before enteringthe focus zone.
• The blue (right) side represents where a device goes to, for example, immediately after exiting the focuszone.
Hovering your cursor over the focus reveals a breakdown based on:
• Percentage of paths that either started or ended in the focus zone.
• Percentage of paths that either arrived or departed from the focus zone.
Hovering your cursor over a green section shows the number of paths that entered the focus zone originatedin this zone.
Hovering your cursor over a blue section shows the number of paths that originated in the focus zone endedin this zone.
All paths are calculated based on the overall data set defined, but only the top 15 (by percentage) paths canbe displayed in the widget due to space constraints.
In a generated report with Path Analysis widget, the Focus on drop-down displays the focus area with thecorrect floor level granularity.
The Edit Widget link allows you to define the heterarchy level from which the data pool is collected from,and then define the specific focus of this widget. That way, you can add more than one widget to the reportand perform side-by-side comparisons of one zone with another.
Note
The Wi-Fi Adoption WidgetYou can now view real-time analytics reports in the Cisco CMXGUI. This tab that shows you aWi-Fi adoptionwidget based off of the REAL TIME information. The NOW parameter for Analytics has been removed.
The Wi-Fi Adoption widget displays a detailed summary of the number of clients that are associated with anetwork, and the clients that are probing the network:
• Probing Only—Refers to the client devices that are detected by APs in the network when they areprobing the network.
• Associated—Refers to the client devices that have established a connection with an AP at least onceduring the time period selected in the report.
Associated status can be viewed in the following formats:
• Summary—This is the default view. The Summary view consists of the Associated Status, CompareData to, and Hourly Trend charts.
• Chart-A line chart with a summary of associated and probing clients. The view can toggle to showassociated clients in terms of percentage and total clients. The X-axis can be based either on location or
Cisco CMX Configuration Guide, Release 10.464
The Cisco CMX Analytics ServiceThe Path Analysis Widget
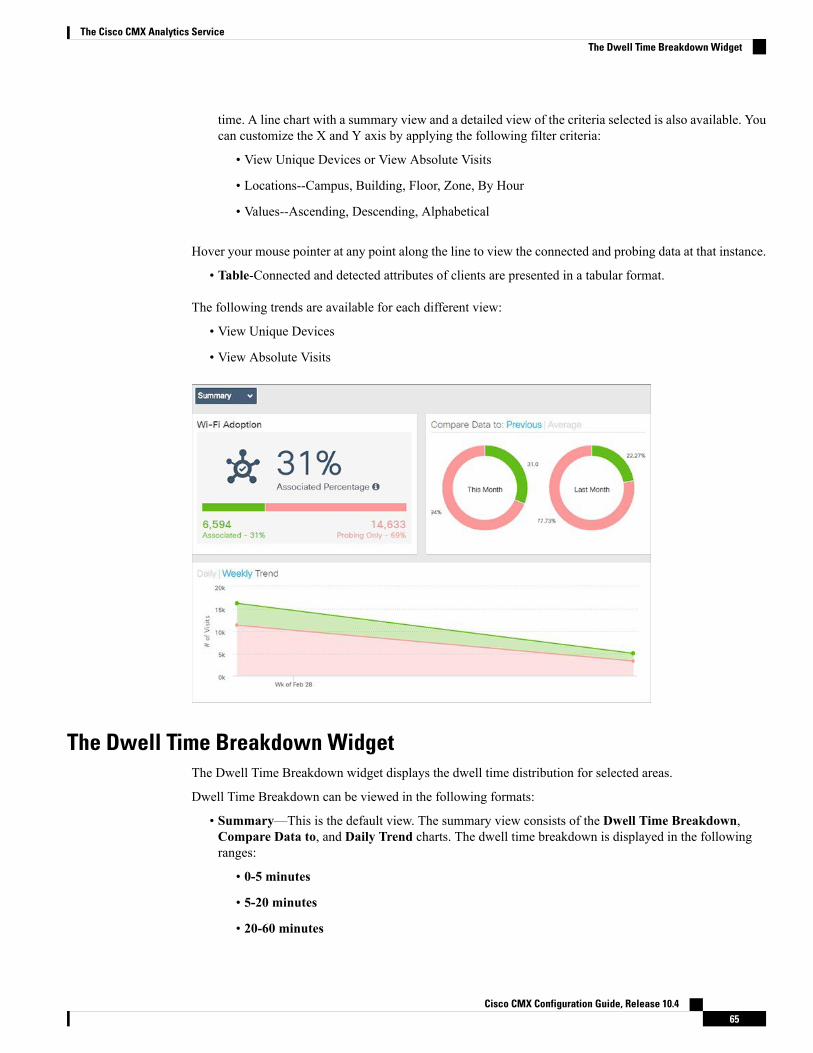
time. A line chart with a summary view and a detailed view of the criteria selected is also available. Youcan customize the X and Y axis by applying the following filter criteria:
• View Unique Devices or View Absolute Visits
• Locations--Campus, Building, Floor, Zone, By Hour
• Values--Ascending, Descending, Alphabetical
Hover your mouse pointer at any point along the line to view the connected and probing data at that instance.
• Table-Connected and detected attributes of clients are presented in a tabular format.
The following trends are available for each different view:
• View Unique Devices
• View Absolute Visits
The Dwell Time Breakdown WidgetThe Dwell Time Breakdown widget displays the dwell time distribution for selected areas.
Dwell Time Breakdown can be viewed in the following formats:
• Summary—This is the default view. The summary view consists of the Dwell Time Breakdown,Compare Data to, and Daily Trend charts. The dwell time breakdown is displayed in the followingranges:
• 0-5 minutes
• 5-20 minutes
• 20-60 minutes
Cisco CMX Configuration Guide, Release 10.465
The Cisco CMX Analytics ServiceThe Dwell Time Breakdown Widget
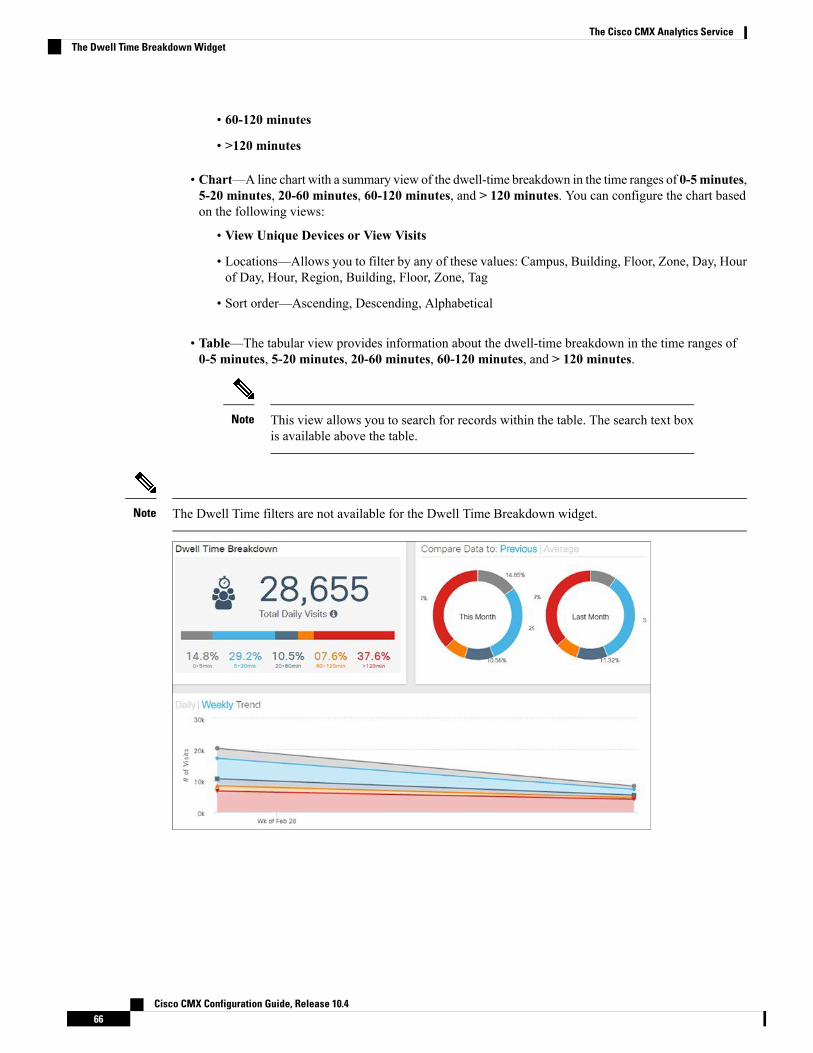
• 60-120 minutes
• >120 minutes
• Chart—A line chart with a summary view of the dwell-time breakdown in the time ranges of 0-5minutes,5-20 minutes, 20-60 minutes, 60-120 minutes, and > 120 minutes. You can configure the chart basedon the following views:
• View Unique Devices or View Visits
• Locations—Allows you to filter by any of these values: Campus, Building, Floor, Zone, Day, Hourof Day, Hour, Region, Building, Floor, Zone, Tag
• Sort order—Ascending, Descending, Alphabetical
• Table—The tabular view provides information about the dwell-time breakdown in the time ranges of0-5 minutes, 5-20 minutes, 20-60 minutes, 60-120 minutes, and > 120 minutes.
This view allows you to search for records within the table. The search text boxis available above the table.
Note
The Dwell Time filters are not available for the Dwell Time Breakdown widget.Note
Cisco CMX Configuration Guide, Release 10.466
The Cisco CMX Analytics ServiceThe Dwell Time Breakdown Widget
Creating Customized Widgets
Procedure
Step 1 Log in to Cisco Connected Mobile Experiences (Cisco CMX).Step 2 Choose Analytics > Dashboard.Step 3 In the left panel of the Dashboard, click the Addicon next to Custom Reports
The Create New Report window is displayed.
Step 4 Choose Customized from the Report Type widgets row in the right pane.Step 5 Choose the locations that you want to analyze from the Focus Area Filter drop-down list.
The location types are Building, Campus, Floor, Zone.
Step 6 Choose the date and time range you want to run the report for from the Date & Time filters drop-down list.
Click the dot at the bottom of theAddWidget area to scroll to the next set of options. You can select multiplewidgets to combine in one overall widget.
Step 7 In the Add Widgets area click theAdd+ icon to include any of the following widgets to the report:Click the dot at the bottom of the AddWidgetarea to scroll to the next set of options. You can select multiplewidgets to combine into one overall widget.
Step 8 You can set a threshold for dwell time. This is the amount of time spent by a client device(visitor) at a givenlocation. Select the minimum and maximum time from the drop-down options in the Advanced Widget
Filters area.Step 9 Click Done.
The widget is created.
Step 10 Click the report title to name to your report.Step 11 Click Save.
Create a Realtime ReportProcedure
Step 1 Log in to Cisco Connected Mobile Experiences (Cisco CMX).Step 2 Choose Analytics > Realtime.
Step 3 In the left pane of the Dashboard, click next to Now Reports.The Create New Report page is displayed.
Step 4 From the Focus Area Filter drop-down list, choose the floor that you want to analyze.
Cisco CMX Configuration Guide, Release 10.467
The Cisco CMX Analytics ServiceCreating Customized Widgets
Step 5 In the Add Widgets area, click the Add Widget to Report + to include any of the following widgets tothe report:
• Realtime Device Count—Shows the number of devices currently detected on the Wi-Fi network. Youcan add a maximum of three Realtime device Count widgets to generate the report.
Step 6 Click Done.Based on the Focus Area Filter filters that you specified, the report name is generated. The new report nameis listed in the left pane under Now Reports.
Performing Heatmap AnalysisA heatmap is a graphical representation of client movement, which shows areas having a large concentrationof devices in red, and those with less activity in blue.
If you have an exclusion area, the heatmap will not consider that area for analysis.Note
Procedure
Step 1 Log in to Cisco Connected Mobile Experiences (Cisco CMX).Step 2 Choose Analytics > Heatmap.Step 3 In the Activity Heatmap window, click the Date icon and select the date.Step 4 Click the Time icon to show or hide the display of time.Step 5 Choose from the following options:
• From the Campus drop-down list, select the campus on which you want to run the heatmap analysis.The drop-down list contains all the campuses that are synchronized with Cisco CMX.
• From the Building drop-down list, select the building on which you want to run this analysis. Thedrop-down list contains all the buildings that are synchronized with Cisco CMX.
• From the Floor drop-down list, select the floor on which you want to run the analysis.
Step 6 Click the Heatmap and Zone icons to display heatmap distribution and zones respectively.Step 7 Click the Zoom in (+) and Zoom out (-) buttons to increase or decrease the view of the map.Step 8 Click Realtime to view heatmap data.Step 9 Click Playback to play back the client movement for the selected date.
Cisco CMX Configuration Guide, Release 10.468
The Cisco CMX Analytics ServicePerforming Heatmap Analysis
Using the Schedule ManagerTo access the Schedule Manager window, log in to Cisco CMX, and choose Analytics > Schedule. TheSchedule Manager window is displayed with the following information:
• Report ID—Shows the report IDs of scheduled reports.
• Report Title—Shows the titles of reports.
• Username—Shows the user who created the scheduled report.
• Start From—Shows the date from which reports will be emailed to recipients.
• Recipients—Shows the email addresses of recipients.
• History—Shows the status of past reports.
• Action—Click Delete to delete a scheduled report.
VerticalizationVerticalization capabilities provide the ability to change the names associated with each level of the hierarchyused in report generation. Although you can change the names of the hierarchy levels, names of any existingelements cannot be changed once created. Renaming through this process is global and will affect all users.
For more information about managing verticalization, see Managing Verticalization, on page 146.
Set SSID Filter Parameters for Analytics ServiceIn the Analytics service, use the SSID Filter tab to exclude the SSIDs. You also can click the Refresh optionto get any updates to the SSIDs.
If you filter out an SSID in the Location service, it will be automatically filtered out in the Analytics servicetoo.
Note
Procedure
Step 1 Log in to Cisco Connected Mobile Experiences (Cisco CMX).Step 2 Choose Analytics > Settings.Step 3 Click the SSID Filter tab.
The SSID Filter window is displayed.
Cisco CMX Configuration Guide, Release 10.469
The Cisco CMX Analytics ServiceUsing the Schedule Manager
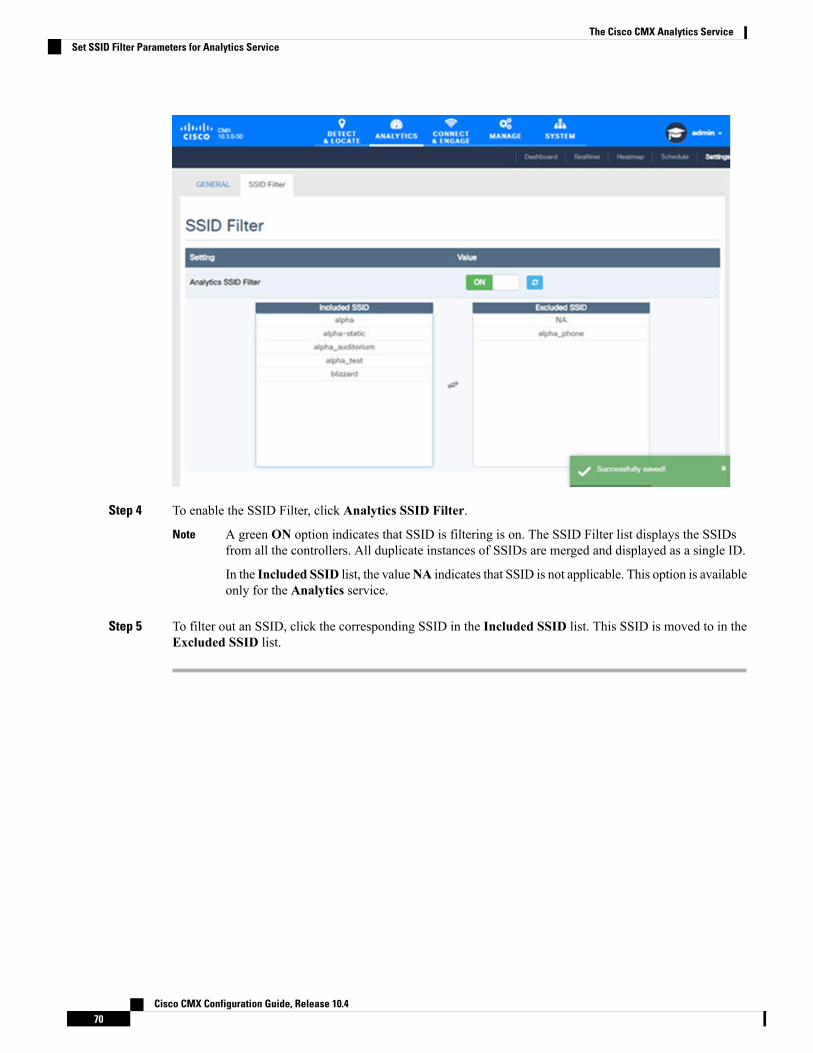
Step 4 To enable the SSID Filter, click Analytics SSID Filter.
A green ON option indicates that SSID is filtering is on. The SSID Filter list displays the SSIDsfrom all the controllers. All duplicate instances of SSIDs are merged and displayed as a single ID.
In the Included SSID list, the valueNA indicates that SSID is not applicable. This option is availableonly for the Analytics service.
Note
Step 5 To filter out an SSID, click the corresponding SSID in the Included SSID list. This SSID is moved to in theExcluded SSID list.
Cisco CMX Configuration Guide, Release 10.470
The Cisco CMX Analytics ServiceSet SSID Filter Parameters for Analytics Service
C H A P T E R 4The Cisco CMX Connect Service
• Overview of the Connect Service, on page 71• Preparatory Tasks, on page 73• Connect Settings, on page 74• Connect Experiences, on page 75• The Connect Dashboard, on page 91• Using the Connect and Engage Library, on page 93• Device-Browser Matrix, on page 94• Configuring the Property Management System, on page 95• Customizing a Policy Plan, on page 104• Configuring Elements for Custom Portal Navigation, on page 105• Configuring Connect Services in Cisco CMX High Availability, on page 106• Authentication with Social Network Accounts, on page 106
Overview of the Connect ServiceCONNECT is a customizable and location-aware guest captive service that enables you to create customized,intuitive on-boarding experiences for your visitors. It enables you to provide two types of on-boardingexperiences for your visitors:
• Facebook Wi-Fi:
• Allows the administrator of a facility to enable the facility's Facebook page as a free Wi-Fi hotspotfor visitors
• Allows visitors to access free Wi-Fi after accessing the facility’s Facebook page.
• Provides insight into a facility's customer base through demographic reports.
• Custom Portal:
• Enables the administrator of a facility to create and host a guest splash page with customized brandingand advertisements.
• Provides social network authentication with Facebook, Instagram, and Foursquare using OAuth2.0.
• Collects OAuth 2.0 user social information
Cisco CMX Configuration Guide, Release 10.471
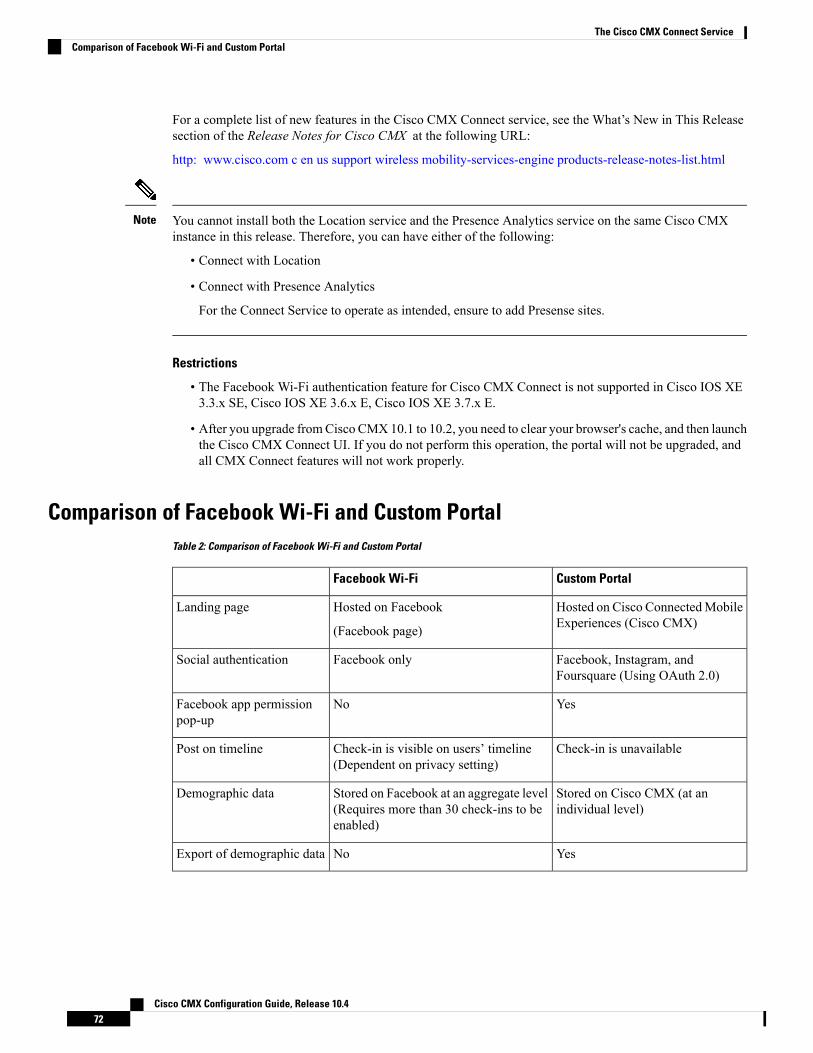
For a complete list of new features in the Cisco CMX Connect service, see the What’s New in This Releasesection of the Release Notes for Cisco CMX at the following URL:
http: www.cisco.com c en us support wireless mobility-services-engine products-release-notes-list.html
You cannot install both the Location service and the Presence Analytics service on the same Cisco CMXinstance in this release. Therefore, you can have either of the following:
• Connect with Location
• Connect with Presence Analytics
For the Connect Service to operate as intended, ensure to add Presense sites.
Note
Restrictions
• The Facebook Wi-Fi authentication feature for Cisco CMX Connect is not supported in Cisco IOS XE3.3.x SE, Cisco IOS XE 3.6.x E, Cisco IOS XE 3.7.x E.
• After you upgrade fromCisco CMX10.1 to 10.2, you need to clear your browser's cache, and then launchthe Cisco CMX Connect UI. If you do not perform this operation, the portal will not be upgraded, andall CMX Connect features will not work properly.
Comparison of Facebook Wi-Fi and Custom PortalTable 2: Comparison of Facebook Wi-Fi and Custom Portal
Custom PortalFacebook Wi-Fi
Hosted on Cisco ConnectedMobileExperiences (Cisco CMX)
Hosted on Facebook
(Facebook page)
Landing page
Facebook, Instagram, andFoursquare (Using OAuth 2.0)
Facebook onlySocial authentication
YesNoFacebook app permissionpop-up
Check-in is unavailableCheck-in is visible on users’ timeline(Dependent on privacy setting)
Post on timeline
Stored on Cisco CMX (at anindividual level)
Stored on Facebook at an aggregate level(Requires more than 30 check-ins to beenabled)
Demographic data
YesNoExport of demographic data
Cisco CMX Configuration Guide, Release 10.472
The Cisco CMX Connect ServiceComparison of Facebook Wi-Fi and Custom Portal
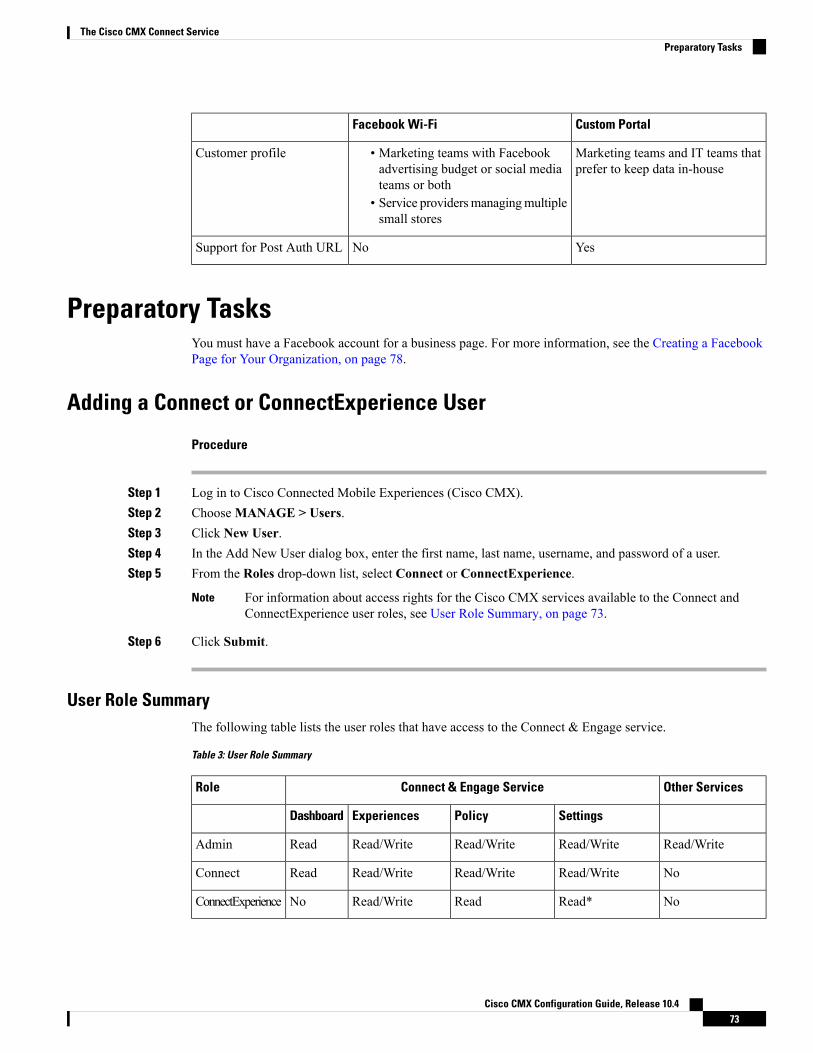
Custom PortalFacebook Wi-Fi
Marketing teams and IT teams thatprefer to keep data in-house
• Marketing teams with Facebookadvertising budget or social mediateams or both
• Service providersmanagingmultiplesmall stores
Customer profile
YesNoSupport for Post Auth URL
Preparatory TasksYou must have a Facebook account for a business page. For more information, see the Creating a FacebookPage for Your Organization, on page 78.
Adding a Connect or ConnectExperience User
Procedure
Step 1 Log in to Cisco Connected Mobile Experiences (Cisco CMX).Step 2 ChooseMANAGE > Users.Step 3 Click New User.Step 4 In the Add New User dialog box, enter the first name, last name, username, and password of a user.Step 5 From the Roles drop-down list, select Connect or ConnectExperience.
For information about access rights for the Cisco CMX services available to the Connect andConnectExperience user roles, see User Role Summary, on page 73.
Note
Step 6 Click Submit.
User Role SummaryThe following table lists the user roles that have access to the Connect & Engage service.
Table 3: User Role Summary
Other ServicesConnect & Engage ServiceRole
SettingsPolicyExperiencesDashboard
Read/WriteRead/WriteRead/WriteRead/WriteReadAdmin
NoRead/WriteRead/WriteRead/WriteReadConnect
NoRead*ReadRead/WriteNoConnectExperience
Cisco CMX Configuration Guide, Release 10.473
The Cisco CMX Connect ServicePreparatory Tasks
* Write permission for SMS, Number of Devices, and Time to Expire.
Connect SettingsTo view the Connect Settings window, log in to Cisco CMX as an admin user and choose CONNECT >Settings.
Connect SettingsThe following data retention settings available:
• User Retention Period—This value indicates how long a user entry is retained in data store if the userdoes not reconnect. The default user retention value is 180 days. The oldest entries are removed if thesystem has reached the capacity even if the value specified in the User Retention Period is not reached.This is to ensure that the system continues to serve new users.
• Statistics Retention Period—Statistics are calculated once every day for each location. The statisticsentries, which were caluclated before the value that you configured in this text box will be purged. Therange is 7 to 1000 days. The default retention value is 365 days.
• SMS: Number of Devices—This is the total number of devices that can use a single SMS code. Therange is 1 to 10 devices. The default value is three devices.
• SMS: Time to expire (in min)—This value indicates how long you want to keep the SMS code active.The range is 3 to 1440 minutes. The default retention value is 15 minutes.
Connect & Engage prunes users based on the user retention period. This task is run once every day at threeAM server time. If the maximum user capacity is exceeded, older users within the retention period are prunedto make room for new users. To avoid losing any user data, we recommend that you perform the followingtasks:
• Periodically export data from Cisco CMX.
• Adjust the retention period based on projected days for full capacity, which is calculated based on usagepatterns. The usage patterns are established after the system has been operational for a while.
Changing the Portal Login FrequencyYou can define how often your login page is displayed to a visitor each time their device associates with theSSID in your network. By default, a repeat visitor does not need to go through the portal login process for180 days from the day the visitor associated with the SSID.
Procedure
Step 1 Log in to Cisco Connected Mobile Experiences (Cisco CMX).Step 2 Choose Connect > Settings > General to display the Connect Settings windowStep 3 From the Connect Settings window, change the value in the Visitor: Portal Frequency field. The range is
0 to 1000 days. The default is 180 days.
Examples:
Cisco CMX Configuration Guide, Release 10.474
The Cisco CMX Connect ServiceConnect Settings
• If the login frequency is set to 0, the portal is displayed is each time the visitor’s device associates withthe SSID.
• If the login frequency is set to 1, the portal is displayed when the visitor’s device first associates withthe SSID and is not displayed again until after a 24-hour period. Within that 24-hour period, the portalis not displayed regardless of the number of times the visitor’s device disassociates and associate to theSSID.
Step 4 Click Save.
Using the CMX Connect Debugging ToolsThe CMX Connect debugging tool allows you to delete a client record based on its MAC address.
The debugging tools are meant for debugging purpose only.Note
Procedure
Step 1 Log in to Cisco Connected Mobile Experiences (Cisco CMX).Step 2 Choose CONNECT > Settings.Step 3 Click the Debugging Tools tab.Step 4 Under theDelete User Tool area, enter the user's MAC address to delete its record based on the MAC addressStep 5 Click Delete User.
Connect Experiences
OverviewUsing Connect Experiences, you can choose between two types of guest on-boarding experiences:
Facebook Wi-FiThe Facebook Wi-Fi feature provides organizations with a simple and fast guest access solution. With CiscoCMX for Facebook Wi-Fi, organizations can:
• Save time and effort on designing their own captive portal by directing guests to a facility's Facebookpage.
• View aggregate social data gathered from visitors connected to Wi-Fi with their Facebook logins fortailoring social media marketing strategy.
Facebook Wi-Fi is based on WLAN web passthrough authentication on Cisco Wireless Controllers (CiscoWLCs). CiscoWLC intercepts HTTP traffic and redirects the client browser to Cisco CMX. Cisco CMX finds
Cisco CMX Configuration Guide, Release 10.475
The Cisco CMX Connect ServiceUsing the CMX Connect Debugging Tools
the client location and redirects the client browser location to the configured location-specific Facebook page.After a successful Facebook sign-in and check-in, Cisco CMX redirects the client browser to the specificFacebook page. For FacebookWi-Fi feature, both the client and Cisco CMXuses HTTPS traffic to communicatewith Facebook.
Only http traffic will be redirected to Facebook. Facebook Wi-Fi/OAuth login is not useful for any httpstraffic.
Note
For information about setting up Facebook Wi-Fi, see the Setting Up a Facebook Wi-Fi Portal, on page 76.
Custom PortalCustom Portal enables you to perform the following tasks:
• Create location-specific splash pages• Enable branding consistency using splash pages• Own registration information from customer sign-in page, which turns the captive portal into a datasource for targeted marketing later via email marketing
For information about setting up a custom portal, see the .
Setting Up a Facebook Wi-Fi PortalSetting up a Facebook Wi-Fi portal involves the following tasks:
Configuring Access Control Lists on Cisco Wireless Controller
Procedure
Step 1 Log in to the web UI of a Cisco Wireless Controller (Cisco WLC) that is associated with Cisco CMX.Step 2 Choose SECURITY > Access Control Lists > Access Control Lists.Step 3 On the Access Control Lists window, click New to add an access control list (ACL).Step 4 On the Access Control Lists > Edit window, enter a name for the new ACL. You can enter up to 32
alphanumeric characters.Step 5 Choose the ACL type as either IPv4 or IPv6.Step 6 Click Apply.Step 7 On the Access Control Lists window, click the name of the new ACL.Step 8 On the Access Control Lists > Edit window, click Add New Rule.
The Access Control Lists > Rules > New window is displayed.
Step 9 Configure the following ACLs, as listed in the table below:
The following ACL table lists the rules for social login. If you use HTTPS as the authenticationmethod, use the rules one and two to access Facebook.com.
Note
Cisco CMX Configuration Guide, Release 10.476
The Cisco CMX Connect ServiceCustom Portal
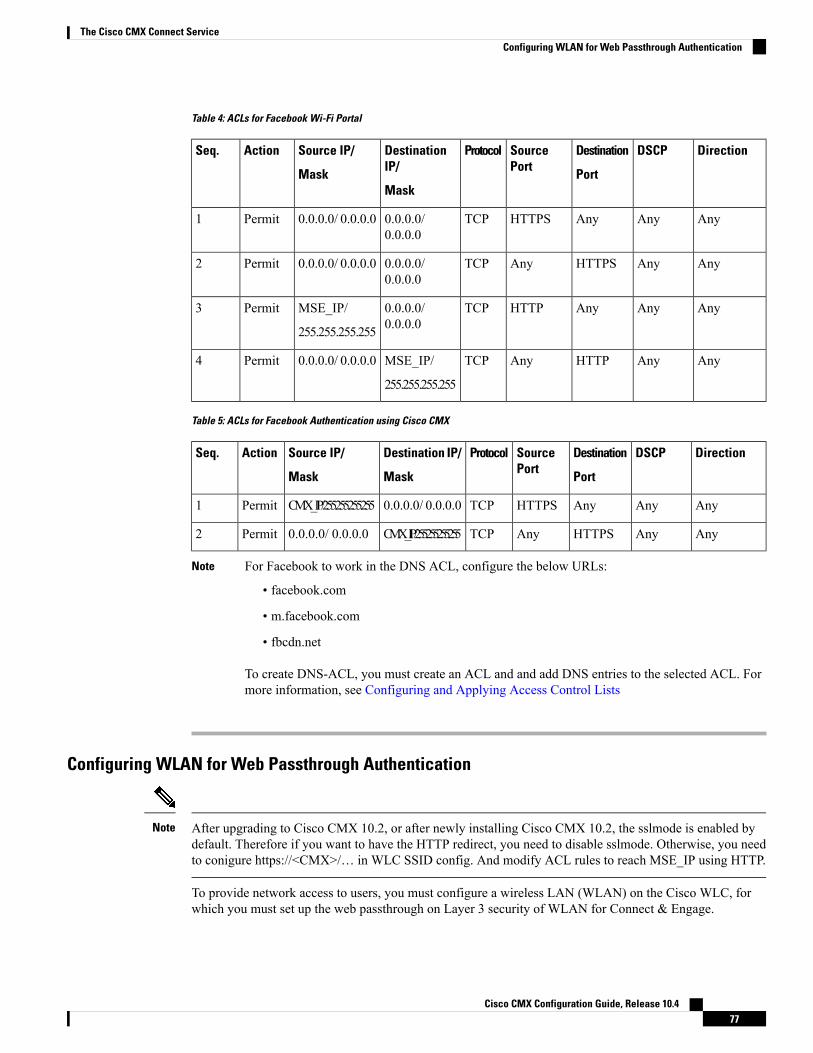
Table 4: ACLs for Facebook Wi-Fi Portal
DirectionDSCPDestination
Port
SourcePort
ProtocolDestinationIP/
Mask
Source IP/
Mask
ActionSeq.
AnyAnyAnyHTTPSTCP0.0.0.0/0.0.0.0
0.0.0.0/ 0.0.0.0Permit1
AnyAnyHTTPSAnyTCP0.0.0.0/0.0.0.0
0.0.0.0/ 0.0.0.0Permit2
AnyAnyAnyHTTPTCP0.0.0.0/0.0.0.0
MSE_IP/
255.255.255.255
Permit3
AnyAnyHTTPAnyTCPMSE_IP/
255.255.255.255
0.0.0.0/ 0.0.0.0Permit4
Table 5: ACLs for Facebook Authentication using Cisco CMX
DirectionDSCPDestination
Port
SourcePort
ProtocolDestination IP/
Mask
Source IP/
Mask
ActionSeq.
AnyAnyAnyHTTPSTCP0.0.0.0/ 0.0.0.0CMX_IP/255.255.255.255Permit1
AnyAnyHTTPSAnyTCPCMX_IP/255.255.255.2550.0.0.0/ 0.0.0.0Permit2
For Facebook to work in the DNS ACL, configure the below URLs:
• facebook.com
• m.facebook.com
• fbcdn.net
To create DNS-ACL, you must create an ACL and and add DNS entries to the selected ACL. Formore information, see Configuring and Applying Access Control Lists
Note
Configuring WLAN for Web Passthrough Authentication
After upgrading to Cisco CMX 10.2, or after newly installing Cisco CMX 10.2, the sslmode is enabled bydefault. Therefore if you want to have the HTTP redirect, you need to disable sslmode. Otherwise, you needto conigure https://<CMX>/… in WLC SSID config. And modify ACL rules to reach MSE_IP using HTTP.
Note
To provide network access to users, you must configure a wireless LAN (WLAN) on the Cisco WLC, forwhich you must set up the web passthrough on Layer 3 security of WLAN for Connect & Engage.
Cisco CMX Configuration Guide, Release 10.477
The Cisco CMX Connect ServiceConfiguring WLAN for Web Passthrough Authentication
Procedure
Step 1 From the web UI of Cisco WLC, clickWLANs.Step 2 On theWLANs window, click the corresponding WLAN ID.Step 3 On theWLANs > Edit window, choose Security > Layer 2.Step 4 From the Layer 2 Security drop-down list, choose None.Step 5 Click Apply.Step 6 Under the Layer 3 tab, from the Layer 3 Security drop-down list, chooseWeb Policy.Step 7 For web passthrough, choose Passthrough.Step 8 Choose the Preauthentication ACL defined using the procedure described in the Configuring Access Control
Lists on Cisco Wireless Controller, on page 76.Step 9 To override the global authentication and web authentication pages, check the Over-ride Global Config
check box.Step 10 To define the web authentication pages for wireless guest users, from theWeb Auth Type drop-down list,
choose External (Re-direct to external server).
This redirects clients to an external server for authentication.
Step 11 In the URL field, enter the Facebook Wi-Fi page URL. The external redirection URL should point to thecorresponding portal on Cisco CMX for Facebook Wi-Fi, for example:
Example:
https://<CMX>/fbwifi/forward
Step 12 Enable this Service Set Identifier (SSID).Step 13 Click Apply.Step 14 Click Save Configuration.
Connect & Engage redirection requires special configuration on Cisco WLC for Apple iOS devices. Enter the following commandusing the Cisco WLC CLI:config network web-auth captive-bypass enable. For more information, see:http://www.cisco.com/c/en/us/td/docs/wireless/controller/8-0/command-reference/b_cr80/b_cr80_chapter_010.html#wp2423541535.
Note
Creating a Facebook Page for Your OrganizationFollow the instructions provided in Facebook to create a Facebook page for your organization. To create aFacebook page, go to https://www.facebook.com/pages/create.php.
Currently, Facebook Wi-Fi does not support age and country restricted Facebook Pages. We recommend toremove any age and country restrictions from the Facebook Page in order to successfully pair FacebookWi-Fiwith Cisco CMX.
Note
Cisco CMX Configuration Guide, Release 10.478
The Cisco CMX Connect ServiceCreating a Facebook Page for Your Organization
Assigning a System Default Facebook Page
Procedure
Step 1 Log in to Cisco Connected Mobile Experiences (Cisco CMX).Step 2 Choose CONNECT > Connect Experiences .Step 3 In the Facebook Wi-Fi column, click Assign Default.
The Facebook Wi-Fi Configuration option opens in a new browser tab.
Step 4 Perform the following tasks:a) Select the page.b) Select the Bypass Mode.c) Select the Session Length.d) Click the optional Terms of Service if additional Terms of Service are required.e) Click Save Settings.
Step 5 After assigning Facebook Wifi Configuration, navigate to Connect Experience tab and click Click HereWhen Finished.
When on boarding guestWi-Fi using FabcebookWi-Fi, some guest client browsers displays "NetworkNot Found" error message. However, if you are using default Facebook WiFi settings for all thelocations, you will not encounter this issue. This issue occuers only if you have setup your FacebookWiFi configuration in a Parent-Child location hierarcy, for example, Campus>Bulding>Floor>Zone.
You can pair different facebook pages with different child nodes in the hieraracy, like Campus ispaired with Facebook page 1 and Building with Facebook page 2. In this scenarion, you can get thenetwork not found error message while using Facebook Wi-Fi. To resolve this issue, remove theFacebook pairing with all the child nodes to inherit the pairing from the parent.
Note
Assigning a Location-Specific Facebook PageAfter the system default page has been set, you can assign a location-specific Facebook page:
Procedure
Step 1 Select a specific campus, building, floor, or zone and click or hover over the Gear icon.Step 2 Click Assign New.
Setting Up a Custom PortalYou can create a custom portal page using the following four types of templates:
Cisco CMX Configuration Guide, Release 10.479
The Cisco CMX Connect ServiceAssigning a System Default Facebook Page
• Registration Form—This template contains the following elements:
• Logo or image• Registration form to specify name, email address, and phone number of a visitor• Terms and conditions• The Submit button
When you specify a phone number, select the SMS Auth check box to get notification throughSMS. For more information, see the Enabling Multi-language Support in Custom Portals, on page84.
• Social Login—This template contains the following elements:
• Logo or image• Social login element that includes three options: Facebook, Instagram, and Foursquare.
The Social login element enables on-boarding of visitors using social OAuth 2.0.
If you have the Terms and Conditions checkbox element in the live portal, allthe social login elements are enabled only when you select the Terms andConditions checkbox.
Note
• Social or Registration Login—This template contains both the Social Login element and the RegistrationForm element.
• SMS Form—This template enables you to create a portal for SMS authentication. Verify your portalhas a Registration Form element, or add one if required. All that this element requires is a phone numberfield, but you may include others if required. The Registration form allows you to receive the auth codeon a SMS capable device and still enter it on a non-SMS capable device.
• Custom—This template is empty and allows you to create your template from scratch.
The template choice does not limit the type of elements you can add. For example, if a Social Logintemplate is selected, you can always modify it to use the Registration Form elements instead.
The following options are available to design a custom portal:
• The left side of the window shows a preview of the custom portal and the right side of the windowshows the options to edit the portal and its elements.
• The CONTENT tab allows you to add or edit the portal elements. Click an element to preview anarea of the portal and edit the element’s settings.
• The BACKGROUND tab allows you to:
• Upload an image from the image library• Specify the background color and opacity for the portal.
• The THEMES tab allows you to specify a theme for the portal.• The LANGUAGES tab allows you to choose the language of your choice. To add a language,choose your desired language from the Select language drop-down list, and then click Add to list.
Cisco CMX Configuration Guide, Release 10.480
The Cisco CMX Connect ServiceSetting Up a Custom Portal

• You can get a preview of the custom portal for a mobile, PC, or tablet.
• For Registration Form element, you can add three input fields: Text,Drop-down, and Checkbox/Radio. If you choose to add a check box or aradio button, you must specify at least one field value. An error message isdisplayed when you try to save a portal with no input field values and Submitbutton added to the Registration Form element.
Note
• Engage—This template enables you to create a portal for engage services.
Configuring Access Control Lists on Cisco Wireless Controller
Procedure
Step 1 Log in to the web UI of a Cisco Wireless Controller (Cisco WLC) that is associated with Cisco CMX.Step 2 Choose SECURITY > Access Control Lists > Access Control Lists.Step 3 On the Access Control Lists window, click New to add an access control list (ACL).
The Access Control Lists > New window is displayed.
Step 4 Enter a name for the new ACL. You can enter up to 32 alphanumeric characters.Step 5 Choose the ACL type as either IPv4 or IPv6.Step 6 Click Apply.
The Access Control Lists page is displayed.
Step 7 Click the name of the new ACL.Step 8 Cick Add New Rule.
The Access Control Lists > Rules > New window is displayed.
Step 9 Configure the ACLs, as listed in either tables below:
Table 6: Configuring ACLs With Only Registration Fields (No Social Network Login)
DirectionDSCPDestination
Port
SourcePort
ProtocolDestinationIP/
Mask
Source IP/
Mask
ActionSeq.
AnyAnyAnyHTTPSTCP0.0.0.0/0.0.0.0
MSE_IP/
255.255.255.255
Permit1
AnyAnyHTTPSAnyTCPMSE_IP/
255.255.255.255
0.0.0.0/0.0.0.0
Permit2
OR
Cisco CMX Configuration Guide, Release 10.481
The Cisco CMX Connect ServiceConfiguring Access Control Lists on Cisco Wireless Controller

Table 7: Configuring ACLs With Social Network Login
DirectionDSCPDestination
Port
SourcePort
ProtocolDestinationIP/
Mask
Source IP/
Mask
ActionSeq.
AnyAnyAnyHTTPSTCP0.0.0.0/0.0.0.0
0.0.0.0/0.0.0.0
Permit1
AnyAnyHTTPSAnyTCP0.0.0.0/0.0.0.0
0.0.0.0/0.0.0.0
Permit2
AnyAnyAnyHTTPTCP0.0.0.0/0.0.0.0
MSE_IP/
255.255.255.255
Permit3
AnyAnyHTTPAnyTCPMSE_IP/
255.255.255.255
0.0.0.0/0.0.0.0
Permit4
Configuring WLAN for Web Passthrough Authentication
After upgrading to Cisco CMX 10.2, or after newly installing Cisco CMX 10.2, the sslmode is enabled bydefault. Therefore if you want to have the HTTP redirect, you need to disable sslmode. Otherwise, you needto conigure https://<CMX>/… in WLC SSID config. And modify ACL rules to reach MSE_IP using HTTP.
Note
To provide network access to users, you must configure a wireless LAN (WLAN) on the Cisco WLC, forwhich you must set up web passthrough on Layer 3 security of WLAN for the Connect & Engage service.
Procedure
Step 1 From the web UI of Cisco WLC, chooseWLANs.Step 2 On theWLANs window, click the corresponding WLAN ID.Step 3 On theWLANs > Edit window, choose Security > Layer 2.Step 4 From the Layer 2 Security drop-down list, choose None.Step 5 Click Apply.Step 6 Under the Layer 3 tab, from the Layer 3 Security drop-down list, chooseWeb Policy.Step 7 For web passthrough, click the Passthrough radio button.Step 8 Choose the Preauthentication ACL defined using the procedure described in the Configuring Access Control
Lists on Cisco Wireless Controller, on page 76.Step 9 To override the global authentication configuration web authentication pages, check the Over-ride Global
Config check box.Step 10 To define the web authentication pages for wireless guest users, from theWeb Auth Type drop-down list,
choose External (Re-direct to external server).
Cisco CMX Configuration Guide, Release 10.482
The Cisco CMX Connect ServiceConfiguring WLAN for Web Passthrough Authentication
This redirects clients to an external server for authentication.
Step 11 In theURL field, enter the custom portal URL. The external redirection URL should point to the correspondingportal on Cisco CMX for custom portal, for example:
Example:
https://<CMX>/visitor/login
Step 12 Enable this Service Set Identifier (SSID).Step 13 Click Apply.Step 14 Click Save Configuration.
Connect & Engage redirection requires special configuration on Cisco WLC for Apple iOS devices. Perform this by entering thefollowing command in the Cisco WLC CLI:config network web-auth captive-bypass enable For more information, seehttp://www.cisco.com/c/en/us/td/docs/wireless/controller/8-0/command-reference/b_cr80/b_cr80_chapter_010.html#wp2423541535.
Note
Creating a Default Custom Portal Page
Procedure
Step 1 Log in to Cisco CMX as an admin user.Step 2 Choose CONNECT > Connect Experiences.Step 3 Under Custom Cisco CMXs, click Create Default.Step 4 In the Portal Title field, enter the name of your custom portal.Step 5 Click the template that you want to use and click Next.Step 6 Design the template according to your requirements.Step 7 Click Save.
Assigning Location-Specific Custom Portal PageAfter the system default portal has been set, you can assign a location-specific custom portal page.
Procedure
Step 1 Select a specific campus, building, floor, or zone from the corresponding custom portal drop-down list.Step 2 Click Create New to create a new portal and assign it to that location. Alternatively, assign an existing portal
to that location.
Cisco CMX Configuration Guide, Release 10.483
The Cisco CMX Connect ServiceCreating a Default Custom Portal Page
Enabling Multi-language Support in Custom PortalsCisco CMX does not contain any language translation engine. Administrator must edit each language pageindividually and manually translate all text entries.
The portal page translations are not supported for right-to-left languages such as Hebrew and Arabic.Note
To support multiple pages by a portal page, each page must have the desired languages added to the pagebefore it can be enabled. Multi-language support can be added when the portal is created. The non-Englishlanguages can be disabled or re-enabled one at a time when translations are completed.
To enable multi-language support, the admin user should perform the following tasks:
• Create a portal.
• Add the languages that have to be supported.
• To add a language, click the Languages tab inside the portal editor. Select the language from thedrop-down, and clickAdd Language. Only the Enabled languages(languages that are selected) areused.
• Provide translations for each language that is enabled.
• Change which portal translation is currently being viewed by selecting different language from thedrop-down list above the preview area in the portal editor.
• Most elements' translations are portal specific, which means, translating a text element in one portaldoes not effect a text element in another portal.
• However, the registration fields' translations are shared across all portals. When a field is changedin one portal, the field is changed in every other portal.
• Confirm that translations are correct by using the Live View, switching between each language andverifying translation, and then saving the portal.
When the splash page is displayed to an end user, Cisco CMX uses the browser's settings to determine theend user's most preferred languages. It then selects the preferred language that is available and displays thatversion of the portal. An end user can manually select a different language by using the drop-down list on thetop-right corner of the splash page.
End-user devices will have a predefined language. This list of preferred languages is passed as part of theHTTP header. Cisco CMX analyzes the HTTP header and displays the closest available translation of a portal.
For example, if a user prefers languages such as English, Spanish, and French (in this order) and the portalonly has languages such as Russian, Spanish, Italian, German, then Spanish is displayed because it is the mostpreferred language from among the available languages.
To view a portal in a different language, a portal user can use the Language drop-down list to select from thelist of available translations.
Configuring Connect Portal Pages for SitesAfter you create a portal, you can assign it to a site by performing the following steps:
Cisco CMX Configuration Guide, Release 10.484
The Cisco CMX Connect ServiceEnabling Multi-language Support in Custom Portals
Procedure
Step 1 Choose Connect > Connect Experiences.Step 2 In the Custom Portal column, click Create Default for the site that you want to assign as default.
If portals are already existing, select the desired portal from the available list.Note
Step 3 In the Post Auth URL column, click Assign Default for the site that you want to assign to the portal.Step 4 In the Post Auth URL for <site name> dialog box, enter the post Auth URL, then click Set.
After a successful authentication, the clients will be redirected to the URL entered as the post AuthURL.
Note
Viewing Connect Clients with SitesTo view the Connect clients with sites, perform the following steps:
Procedure
Step 1 Choose Connect & Engage > Dashboard.Step 2 From the Location drop-down list, choose Sites.Step 3 From the Select a Location drop-down list, select a site.Step 4 From the Interval drop-down list select the interval.
Offering an Opt-Out of Cisco CMX ServicesYour login portal can include an opt-out option, which allows a client to opt-out from having their mobiledevice location history maintained and used by Cisco CMX.
The default is opt-in.
When the client opts-out, Cisco CMX stops detecting the client’s deviceMAC address and hence stops storinganalytics data for that device. The client either no longer appears on the maps or appears not to be moving(XY location data remains the same).
The default opt-out period is 180 days. When the opt-out period ends, the opt-out option reappears when theclient displays your login portal.
You can:
• Modify the opt-out period to be longer or shorter.
• Add the opt-out element to any template.
• Remove the opt-out element so that it does not appear on your portal.
Cisco CMX Configuration Guide, Release 10.485
The Cisco CMX Connect ServiceViewing Connect Clients with Sites
Configuring the Opt-Out Option
Procedure
Step 1 Log in to Cisco Connected Mobile Experiences (Cisco CMX).Step 2 Choose Connect > Library > Templates.Step 3 Click a portal template, such as the Registration Form template.
You can add the opt-out element to any template.
Step 4 Enter the name of the portal that you want to create, and then click OK.Step 5 Click the Content tab.Step 6 Click the Opt-out element.
Edit the text for your opt-out message.
If you do not want your portal to display the opt-out option, click Remove element.
Step 7 Click Save.
Changing the Opt-Out Period
Procedure
Step 1 Log in to Cisco Connected Mobile Experiences (Cisco CMX).Step 2 Choose Connect > Library > General to display the Connect Settings window.Step 3 From the Connect Settings window, change the value in the User Retention Period field.
The range is 1 to 1000 days. The default is 180 days.
Step 4 Click Save.
FlexConnect AP Support on Cisco CMXFlexConnect AP communicates through Cisco WLC for Authentication. FlexConnect AP is responsible forPolicy Plan enforcement such as ACL, Rate-limiting and session timeout. Enforcement message comes fromAAA to Cisco WLC, which the Cisco WLC pushes according to the per-user network policy to FlexConnectAP. FlexConnect Access Point cannot function when communication with CiscoWLC is down. CMXConnectrelies on Web Authentication which is handled by Cisco WLC. The supported FlexConnect modes are LocalSwitching and Central Switching.
The following Cisco CMX features are supported on a FlexConnect Access Point:
• Location
• Analytics
Cisco CMX Configuration Guide, Release 10.486
The Cisco CMX Connect ServiceConfiguring the Opt-Out Option

• Connect
Cisco CMX supports FlexConnect mode for both Facebook OAuth and Facebook Wi-Fi.Note
Configuring FlexConnect ACLsYou need to configure FlexConnect Access Control Lists (ACLs) only for Flex mode deployments. Toconfigure FlexConnect ACLs, follow these steps:
Procedure
Step 1 Choose Security > Access Control Lists > FlexConnect ACLs from the Controller UI.
The FlexConnect ACL page is displayed. This page lists all the FlexConnect ACLs configured on the controller.This page also shows the FlexConnect ACLs created on the corresponding controller. To remove an ACL,hover your mouse over the blue drop-down arrow adjacent to the corresponding ACL name and chooseRemove.
Step 2 Add a new ACL by clicking New.
The Access Control Lists > New page is displayed.
Step 3 In theAccess Control List Name text box, enter a name for the newACL. You can enter up to 32 alphanumericcharacters.
Step 4 Click Apply.Step 5 When the Access Control Lists page reappears, click the name of the new ACL.Step 6 When the Access Control Lists > Edit page appears, click Add New Rule.
The Access Control Lists > Rules > New page is displayed.
Step 7 Configure a rule for this ACL as follows:
The controller supports up to 64 rules for each ACL. These rules are listed in order from 1 to 64.In the Sequence text box, enter a value (between 1 and 64) to determine the order of this rule inrelation to any other rules defined for this ACL.
Note
If rules 1 through 4 are already defined and you add rule 29, it is added as rule 5. If you add or change asequence number of a rule, the sequence numbers of the other rules are automatically adjusted to maintain acontinuous sequence. For instance, if you change a rule’s sequence number from 7 to 5, the rules with sequencenumbers 5 and 6 are automatically reassigned as 6 and 7, respectively.
a) From the Source drop-down list, choose one of these options to specify the source of the packets to whichthis ACL is applicable:
• Any—Any source (This is the default value.)
• IP Address—A specific source. If you choose this option, enter the IP address and netmask of thesource in the corresponding text boxes.
Cisco CMX Configuration Guide, Release 10.487
The Cisco CMX Connect ServiceConfiguring FlexConnect ACLs
b) From theDestination drop-down list, choose one of these options to specify the destination of the packetsto which this ACL applies:
• Any—Any destination (This is the default value.)
• IP Address—A specific destination. If you choose this option, enter the IP address and netmask ofthe destination in the text boxes.
c) From the Protocol drop-down list, choose the protocol ID of the IP packets to be used for this ACL. Theprotocol options that you can use are the following:
• Any—Any protocol (This is the default value.)
• TCP
• UDP
• ICMP—Internet Control Message Protocol
• ESP—IP Encapsulating Security Payload
• AH—Authentication Header
• GRE—Generic Routing Encapsulation
• IP in IP—Permits or denies IP-in-IP packets
• Eth Over IP—Ethernet-over-Internet Protocol
• OSPF—Open Shortest Path First
• Other—Any other Internet-Assigned Numbers Authority (IANA) protocol
If you chooseOther, enter the number of the desired protocol in the Protocol text box. You canfind the list of available protocols in the INAI website.
Note
The controller can permit or deny only the IP packets in an ACL. Other types of packets (such as AddressResolution Protocol (ARP) packets) cannot be specified. If you chose TCP or UDP, two additionalparameters, Source Port and Destination Port, are displayed. These parameters enable you to choose aspecific source port and destination port or port range. The port options are used by applications that sendand receive data to and from the networking stack. Some ports are designated for certain applications,such as Telnet, SSH, HTTP, and so on.
d) From the DSCP drop-down list, choose one of these options to specify the differentiated services codepoint (DSCP) value of this ACL. DSCP is an IP header text box that can be used to define the quality ofservice across the Internet.
• Any—Any DSCP (This is the default value.)
• Specific—A specific DSCP from 0 to 63, which you enter in the DSCP text box
e) From theAction drop-down list, chooseDeny to cause this ACL to block packets, or Permit to cause thisACL to allow packets. The default value is Deny.
f) Click Apply.
The Access Control Lists > Edit page is displayed on which the rules for this ACL are shown.
g) Repeat this procedure to add additional rules, if any, for this ACL.
Cisco CMX Configuration Guide, Release 10.488
The Cisco CMX Connect ServiceConfiguring FlexConnect ACLs
Step 8 Click Save Configuration.
What to do next
For setting up WLC with FlexConnect ACL, see Setting Up a Controller with FlexConnect ACLs, on page89.
Setting Up a Controller with FlexConnect ACLsAfter configuring the FlexConnect ACLs, you must apply the FlexConnect ACLs to the SSID.
Procedure
Step 1 From the web UI of Cisco WLC, clickWLANs.TheWLANs window is displayed.
Step 2 Click the corresponding WLAN ID.TheWLANs > Edit window is displayed.
Step 3 Click Advanced tab.Step 4 To configure the WLAN for FlexConnect Local Switching, select the FlexConnect local Switching check
box in the FlexConnect section.Step 5 Click Security > Layer 3.Step 6 From theLayer 3 Security drop-down list, selectWeb Policy to configure the security policy for theWLAN.
To enable ExternalWeb Authentication, youmust configureWebPolicy as the security policy for theWLAN.
Step 7 From the Preauthentication ACL IPv4 and IPv6 drop-down list, select None.Step 8 To apply FlexConnect ACLs to the SSID, select FlexConnect ACL on SSID from theWebAuth FlexAcl
drop-down list.
Offering Portal Pages on HTTP from Cisco CMX Connect
Disabling HTTPS
Procedure
Step 1 In the Cisco MSE CLI, disable SSL mode by entering the cmxctl node sslmode disable command.Step 2 In Cisco WLC (WLANs > Security > Layer 3), use HTTP instead of HTTPS for URL. For example, enter
http://<IP address>/visitor/login instead of https:/<IP address>/visitor/login.Step 3 In Cisco WLC (Management > HTTP-HTTPS), set theWebAuth SecureWeb and HTTPS Redirection
options to Disable.
Cisco CMX Configuration Guide, Release 10.489
The Cisco CMX Connect ServiceSetting Up a Controller with FlexConnect ACLs

If theWebAuth SecureWeb option is enabled, you need to upload a proper certification to WLCto avoid certificate warning. We recommend to disable this option to avoid certificate warning onclient.
Note
Adjusting ACLs on Cisco WLC
Procedure
Step 1 Adjust the ACLs on the Cisco WLC to match HTTP.Step 2 In Cisco WLC, (WLANs > Security > Access Controller), use HTTPS instead of HTTP.
SMS AuthenticationTo provide a proof of the identity of the connected individual, Cisco CMX 10.2 offers the ability to add SMSbased authentication to a custom portal. Currently this feature only integrates with Twillio accounts for SMSauthentication. Youmust establish your own Twillio account (see https://www.twilio.com/user/account/settings).Also, this feature requires you to have an SMS capable device to gain access to the network.
Without an appropriately configured preauth ACL the wireless client will not be able use the link providedin the SMS message to return the auth code to Cisco CMX and will remain in the WebAuth required state.
To use this feature, either edit an existing portal or use a template to create a new portal to use SMS Auth.You can only have one Twillio account, but that account can have many phone numbers associated with it soyou can use the same account with multiple portals, but each portal can only have a single number associatedwith it. The Reset button is used to remove the association between the portal and the configured Twillioaccount.
The From Number that you configure in the Twillio Configuration area should be purchased from Twillio.You cannot use an existing number.
Procedure
Step 1 Ensure that your portal has a Registration Form element, or add one if requiredStep 2 Ensure that you specify a phone number field, but you may include other fields if desired.Step 3 In the Registration Form area, check the SMS Auth check box.
The Registration form allows you to receive the auth code on a SMS capable device and still enter it on anon-SMS capable device.
Step 4 Select the Edit icon (next to the SMS Auth check box) to enter the Twilio account information.Step 5 In the Twilio Configuration area (see the figure below), enter the following parameters:
Cisco CMX Configuration Guide, Release 10.490
The Cisco CMX Connect ServiceAdjusting ACLs on Cisco WLC
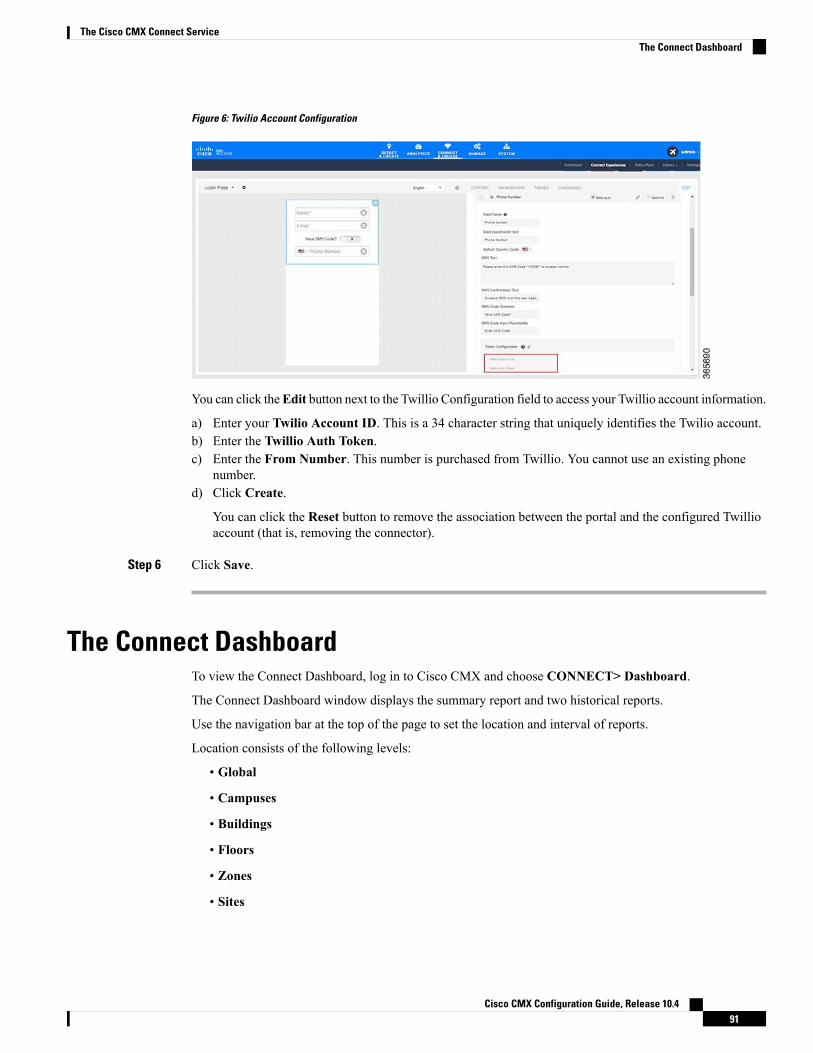
Figure 6: Twilio Account Configuration
You can click theEdit button next to the Twillio Configuration field to access your Twillio account information.
a) Enter your Twilio Account ID. This is a 34 character string that uniquely identifies the Twilio account.b) Enter the Twillio Auth Token.c) Enter the From Number. This number is purchased from Twillio. You cannot use an existing phone
number.d) Click Create.
You can click the Reset button to remove the association between the portal and the configured Twillioaccount (that is, removing the connector).
Step 6 Click Save.
The Connect DashboardTo view the Connect Dashboard, log in to Cisco CMX and choose CONNECT> Dashboard.
The Connect Dashboard window displays the summary report and two historical reports.
Use the navigation bar at the top of the page to set the location and interval of reports.
Location consists of the following levels:
• Global
• Campuses
• Buildings
• Floors
• Zones
• Sites
Cisco CMX Configuration Guide, Release 10.491
The Cisco CMX Connect ServiceThe Connect Dashboard

From the Interval drop-down list in the Connect & Engage Dashboard window, you can select the time framefor generating historical reports:
• Last 7 Days (default)
• Last 28 Days
• Last 365 Days
Summary InformationThe summary information presents users’ usage information for the present day. Note that the time used isserver time, and not web browser time.
Historical InformationThe Connect & Engage Dashboard displays historical information:
• New and Repeat Visitors—NewVisitors are the people seen for the first time. Repeat Visitors are thoserecognized from an earlier visit.
• Network Usage—Network Usage is the total amount of data uploaded and downloaded by all visitors.
• Pages Served vs Submitted—Pages Served is the number of times a portal page was displayed to thevisitors' devices. Pages Submitted is the number of times a portal page was submitted by the visitors.
• SMS Sent vs Authenticated—SMS Sent is the total number of texts sent. SMS Authenticated is thenumber of texts that were used to successfully authenticate visitors.
• Languages Used— Languages used is the count of visitors authenticated using each language.
In historical reports, you can choose the type of chart you want to be displayed in the reports:
• Area Chart• Line Chart• Column Chart
Visitor SearchThe Connect & Engage Dashboard provides a search option, where the following types of searches can beperformed:
• Advanced Search• Export All Visitors
To search for a visitor, enter a search term, for example, name or email address, in the Visitor Search field.
Additional Information• The Search table provides a preview of up to 100 clients per page.• The entire search result can be exported to a .CSV file.• The search time range is based on the Cisco CMX system time, and not on the web browser time.• Partial search is supported; however, wildcards (*) are not supported.
Cisco CMX Configuration Guide, Release 10.492
The Cisco CMX Connect ServiceSummary Information
• Advanced search can be performed based on the following parameters:
• All• MAC• Facebook Name• Facebook Gender• Facebook Locale• Facebook Timezone• Facebook Friends• Foursquare Name• Foursquare Email• Instagram Name• Instagram Email• Registration Form Email• Registration Form Gender• Registration Form Name• Registration Form Phone Number
Using the Connect and Engage LibraryTo view the Connect & Engage Library, log in to Cisco CMX and choose CONNECT & ENGAGE >Library.
• Portal Library—Lists the portals that you have created, both drafts and completed ones. In the PortalLibrary, you can:
• Edit—Edit a portal that is in progress.
• Copy—Allows you to copy or duplicate a portal.
• View—Allows you to view a portal.
• Delete—Allows you to delete a portal.
• Templates Library—Provides pre-defined templates that you can use to create your own portal. Thefollowing templates are available:
• Registration Form
• Social Login
• Social or Registration Login
• SMS Form
• Custom
• Engage
• PMS Auth Form—Available in the template library if a PMS server is configured.
Cisco CMX Configuration Guide, Release 10.493
The Cisco CMX Connect ServiceUsing the Connect and Engage Library
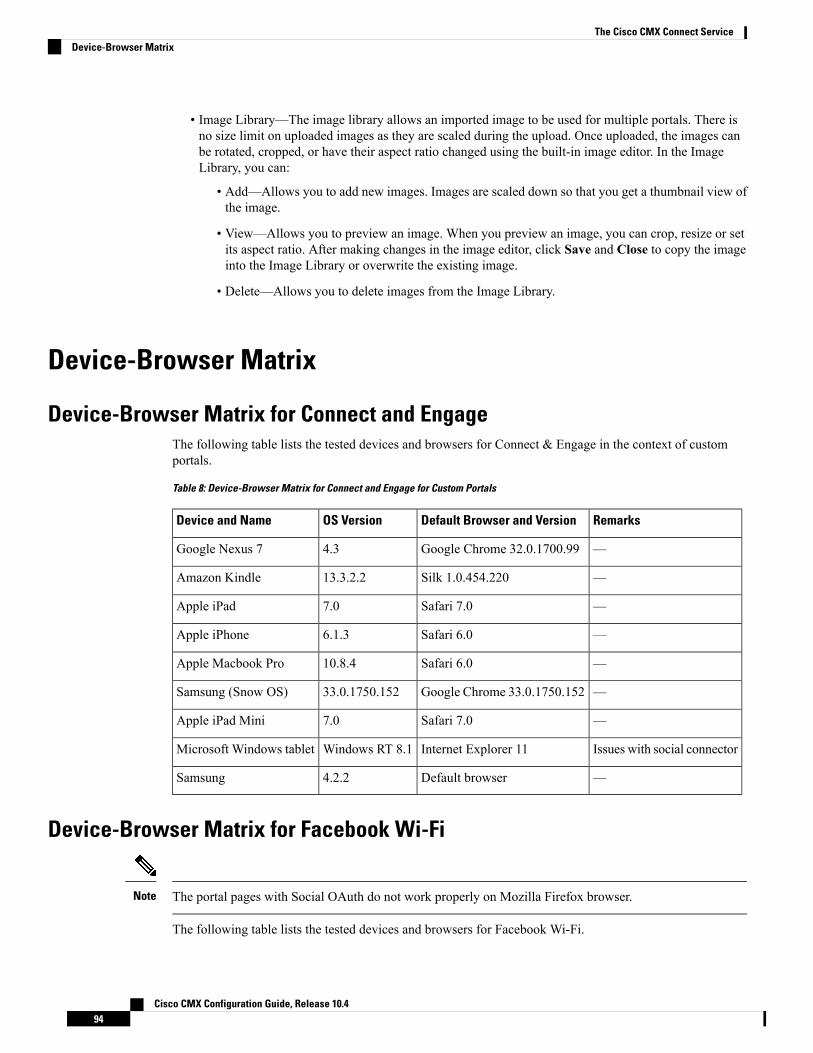
• Image Library—The image library allows an imported image to be used for multiple portals. There isno size limit on uploaded images as they are scaled during the upload. Once uploaded, the images canbe rotated, cropped, or have their aspect ratio changed using the built-in image editor. In the ImageLibrary, you can:
• Add—Allows you to add new images. Images are scaled down so that you get a thumbnail view ofthe image.
• View—Allows you to preview an image. When you preview an image, you can crop, resize or setits aspect ratio. After making changes in the image editor, click Save and Close to copy the imageinto the Image Library or overwrite the existing image.
• Delete—Allows you to delete images from the Image Library.
Device-Browser Matrix
Device-Browser Matrix for Connect and EngageThe following table lists the tested devices and browsers for Connect & Engage in the context of customportals.
Table 8: Device-Browser Matrix for Connect and Engage for Custom Portals
RemarksDefault Browser and VersionOS VersionDevice and Name
—Google Chrome 32.0.1700.994.3Google Nexus 7
—Silk 1.0.454.22013.3.2.2Amazon Kindle
—Safari 7.07.0Apple iPad
—Safari 6.06.1.3Apple iPhone
—Safari 6.010.8.4Apple Macbook Pro
—Google Chrome 33.0.1750.15233.0.1750.152Samsung (Snow OS)
—Safari 7.07.0Apple iPad Mini
Issues with social connectorInternet Explorer 11Windows RT 8.1Microsoft Windows tablet
—Default browser4.2.2Samsung
Device-Browser Matrix for Facebook Wi-Fi
The portal pages with Social OAuth do not work properly on Mozilla Firefox browser.Note
The following table lists the tested devices and browsers for Facebook Wi-Fi.
Cisco CMX Configuration Guide, Release 10.494
The Cisco CMX Connect ServiceDevice-Browser Matrix

Table 9: Device-Browser Matrix for Facebook Wi-Fi
Other Browser and VersionDefault Browser and VersionOS VersionDevice and Name
—Google Chrome 32.0.1700.994.3Google Nexus 7
—Silk 1.0.454.22013.3.2.2Amazon Kindle
—Safari 7.07.0Apple iPad
—Safari 6.06.1.3Apple iPhone
—Safari 6.010.8.4Apple Macbook Pro
—Google Chrome 33.0.1750.15233.0.1750.152Samsung (Snow OS)
Google Chrome 34.0.1874.114Safari 7.07.0Apple iPad Mini
—Internet Explorer 114.2.2Microsoft Windows tablet
—Default browser4.2.2Samsung
—Google Chrome5.0.1One+ phone
—Default browser5.6.2.1Amazon Reader
Configuring the Property Management SystemUse the Connect service in Cisco CMX 10.2.2, to integrate a Property Management System (PMS) solution(for example, a PMS solution used by a hospitality industry).
Currently, Cisco CMX Connect integrates only with Unlink Rest Management accounts. Unilink RestManagement is a paid service that customers subscribe to for getting access to the PMS console.
Note
The PMS solution provides customers with the following capabilities:
• Provides guest Wi-Fi portal at a hotel.
• Provides the flexibility to assign different Wi-Fi plans to different portals at different locations.
For example, a hotel can offer a click-through guest portal in common areas such as the lobby andrecreational spaces. However, in guest rooms, the portal may require guests to enter their Room Numberand Last Name, while the convention area may require guests to enter the Guest Code on the portal toaccess Wi-Fi. Besides these, guest rooms can also be charged for Wi-Fi usage.
The following are the components of the PMS:
Cisco CMX Configuration Guide, Release 10.495
The Cisco CMX Connect ServiceConfiguring the Property Management System
• Client—Client devices (connected and detected) that are being tracked by your Cisco CMX. The clientscan be classified as new clients and repeat clients.
• New Clients—Clients seen by Cisco CMX Connect for the first time.
• Repeat Clients—Clients that have been tracked by Cisco CMX Connect previously.
• Cisco WLC—Cisco Wireless Controller (Cisco WLC) is responsible for imposing policies.
• Cisco CMX—Cisco CMX helps you create personalized mobile experiences for end users and gainoperational efficiencywith location-based services. For example, by linking a hotel's propertymanagementservice with Cisco CMX, the hotel can seamlessly guide guests through the check-in and Wi-Fi loginprocess.
• Cisco CMX AAA Lite—Cisco CMX uses a customized AAA server (named AAA Lite), which enablesyou to control session duration and bandwidth throttling. CMXAAALite is based on the free, open-sourceFreeRADIUS. Cisco Connect uses FreeRADIUS to support PMS configuration. For example, a hotelmay provide differentWi-Fi plans to its customers. Based on the time that a customer is buying theWi-Fiplan, the AAA server controls the session duration and manages the upload or download speed.
• Nevotek—Cisco CMX uses the Nevotek gateway that helps hotels connect with guests. By linking thehotel's property management service with Cisco CMX, the hotel can seamlessly guide guests throughthe check-in andWi-Fi login process. Guests are seamlessly authenticated and provided the correct levelof access based on their reservation, preferences, and/or past loyalty history. Using the Nevotek gateway,Cisco CMX can even support differentWi-Fi access levels based on the location within the correspondinghotel, including guest rooms, conference rooms, and public spaces. Resulting charges, if any, areautomatically posted to the guests' accounts.
Prerequisites for the Property Management System
Before you begin
• Configure a fully-functional Cisco CMX solution
• Configure fully-functional Cisco WLCs
• Ensure that you have an account with Nevotek and the setup is fully-functional.
• Configure and run FreeRADIUS
• Ensure that you have configured FreeRADIUS on Cisco CMX before configuring PMS.
PMS Policy EnforcementWhen you add a PMS server into CMX, the policies defined in the PMS system are imported into CMX.
Location Based and Site Based PMS Policy EnforcementBased on a user's location or site, Cisco CMX can enforce a policy using AAA. For example, if a user entersa hotel and goes to the lobby area, specific policy can be enforced (the user might receive a certain amountof bandwidth). Similarly, if the user goes to a room, the user might get a different bandwidth because of adifferent policy that is enforced.
Cisco CMX Configuration Guide, Release 10.496
The Cisco CMX Connect ServicePrerequisites for the Property Management System
The policy enforcement features perform the following tasks:
• Managing session timeout—If a user has been connected for more than the specific duration within thesame day, the user will be disconnected. The session duration is within a day.
• Managing bandwidth—Cisco CMX Controller enforces the bandwidth limit sent from FreeRADIUSserver.
• Managing the number of clients— Limit the number of devices connected per account (room number,and last name or passcode).
Configuring the FreeRADIUS on Cisco CMX
Procedure
Step 1 Use Secure Shell (SSH) to connect to Cisco CMX.
You must have root access credentials to configure the FreeRADIUS in Cisco CMX.
Step 2 Run the su -l command and provide the root password.Step 3 Run the freeradius-conf command to execute the script to configure the FreeRADIUS in Cisco CMX.
Note that you can run this command from any directory in Cisco CMX. For more information about theFreeRADIUS configuration script, see Customizing the FreeRADIUS Server, on page 97.
Step 4 Press 1 to configure the FreeRADIUS.Step 5 Enter the Cisco CMX UI admin user name and password.Step 6 Enter the IP address of the Cisco WLC.Step 7 Enter the secret key.Step 8 Confirm the entered values.
Customizing the FreeRADIUS ServerTo support the AAA functionality, the Cisco CMX Connect service uses a customized version of theFreeRADIUS server. This acts as an agent between Cisco CMX and Cisco WLC by providing policyenforcement. The Cisco CMX Connect service uses the FreeRADIUS server to provide the followingfunctionalities:
• Session Duration Policy—A PMS policy with a 60 minute session duration can be enforced using theFreeRADIUS server. The server will disable the connection at the end of 60 minutes.
• Bandwidth Policy—A PMS policy with limited upload and download speed can be controlled by theFreeRADIUS server. The bandwidth can be throttled.
You can run the executable shell script to setup the FreeRADIUS.
Cisco CMX Configuration Guide, Release 10.497
The Cisco CMX Connect ServiceConfiguring the FreeRADIUS on Cisco CMX
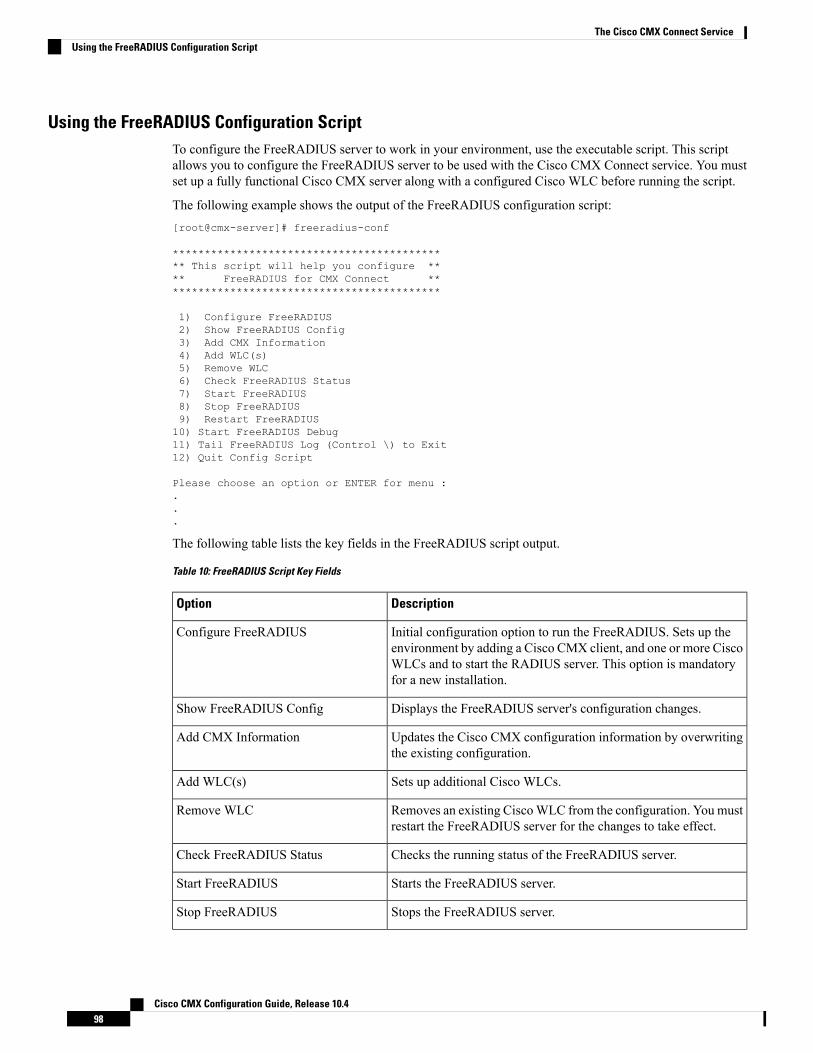
Using the FreeRADIUS Configuration ScriptTo configure the FreeRADIUS server to work in your environment, use the executable script. This scriptallows you to configure the FreeRADIUS server to be used with the Cisco CMX Connect service. You mustset up a fully functional Cisco CMX server along with a configured Cisco WLC before running the script.
The following example shows the output of the FreeRADIUS configuration script:[root@cmx-server]# freeradius-conf
******************************************** This script will help you configure **** FreeRADIUS for CMX Connect ********************************************
1) Configure FreeRADIUS2) Show FreeRADIUS Config3) Add CMX Information4) Add WLC(s)5) Remove WLC6) Check FreeRADIUS Status7) Start FreeRADIUS8) Stop FreeRADIUS9) Restart FreeRADIUS10) Start FreeRADIUS Debug11) Tail FreeRADIUS Log (Control \) to Exit12) Quit Config Script
Please choose an option or ENTER for menu :...
The following table lists the key fields in the FreeRADIUS script output.
Table 10: FreeRADIUS Script Key Fields
DescriptionOption
Initial configuration option to run the FreeRADIUS. Sets up theenvironment by adding a Cisco CMX client, and one or more CiscoWLCs and to start the RADIUS server. This option is mandatoryfor a new installation.
Configure FreeRADIUS
Displays the FreeRADIUS server's configuration changes.Show FreeRADIUS Config
Updates the Cisco CMX configuration information by overwritingthe existing configuration.
Add CMX Information
Sets up additional Cisco WLCs.Add WLC(s)
Removes an existing CiscoWLC from the configuration. You mustrestart the FreeRADIUS server for the changes to take effect.
Remove WLC
Checks the running status of the FreeRADIUS server.Check FreeRADIUS Status
Starts the FreeRADIUS server.Start FreeRADIUS
Stops the FreeRADIUS server.Stop FreeRADIUS
Cisco CMX Configuration Guide, Release 10.498
The Cisco CMX Connect ServiceUsing the FreeRADIUS Configuration Script

DescriptionOption
Restarts the FreeRADIUS server.Restart FreeRADIUS
Starts the FreeRADIUS server in debugging mode.Start FreeRADIUS Debug
Displays the running server log to inspect logged issues, if any.Tail FreeRADIUS Log (Control \) toExit
Quits the configuration script.Quit Config Script
Cisco WLC Configurations
Creating an Access Control List
Procedure
Step 1 Log in to the web UI of a Cisco Wireless Controller (Cisco WLC) that is associated with Cisco CMX.Step 2 Choose SECURITY > Access Control List > Access Control Lists.Step 3 In the Access Control Lists window, click New to add an access control list (ACL).Step 4 In the Access Access Control Lists > Edit window, enter a name for the new ACL.
You can enter up to 32 alphanumeric characters.
Step 5 Choose the ACL type as either IPv4 or IPv6.Step 6 Click Apply.Step 7 In the Access Control Lists window, click the name of the new ACL.Step 8 In the Acess Control Lists > Edit window, click Add New Rule.
Configuring Authentication Server
Procedure
Step 1 Log in to the web UI of a Cisco Wireless Controller (Cisco WLC) that is associated with Cisco CMX.Step 2 Choose SECURITY > AAA > RADIUS > Authentication.Step 3 Click New.Step 4 Enter the RADIUS server's IP address, shared secret key.
To view the added server, chooseWLANs > <WLAN ID> > Security > AAA Servers. In the AAA Serverswindow, the newly added server name is displayed in the Authentication Server drop-down list.
Step 5 Click Apply.
Cisco CMX Configuration Guide, Release 10.499
The Cisco CMX Connect ServiceCisco WLC Configurations
Configuring WLAN
Procedure
Step 1 Log in to the web UI of a Cisco Wireless Controller (Cisco WLC) that is associated with Cisco CMX.Step 2 ClickWLANs and then choose Create New from the drop-down list.Step 3 Click Go .
TheWLAN > New window is displayed.Step 4 Add profile name and SSID information.Step 5 Click Apply.Step 6 In theWLANs > Edit window, click the Security tab.Step 7 To configure the security settings:
a) To configure Layer 2 settings, check theMac Filtering check box.b) To configure Layer 3 settings, click the On MAC Filter Failure radio button so that if Layer 2 fails, a
redirection will be made to the server that you specified in the URL field and also specify the IP addressof Cisco CMX in the URL field.
c) To configure AAA servers settings, specify the IP address and port number of the AAA server that youwant to use for authentication.
Step 8 Choose the Advanced tab.a) Select the Allow AAA Override check box to enable AAA override.
Step 9 Click Apply.Step 10 Click Save Configuration.
Configuring a PMS User's Account and Wi-Fi Plan
Before you begin
You must have a user account (with a username and password) with Unilink Rest Management to access thePMS console.
Procedure
Step 1 Log in to the PMS console (that is, the Unilink Rest Management console).Step 2 Choose Configuration > Parameter Maintenance.Step 3 Configure the required parameters.Step 4 Choose Price > Price Plan.Step 5 Click Add new record.Step 6 Enter the required parameters for the price plan.
The Free field should not be left empty. Even if the price plan is free, price value should be entered as 0.00in the Free field.
Cisco CMX Configuration Guide, Release 10.4100
The Cisco CMX Connect ServiceConfiguring WLAN
Default price plans should be created according to Connection Types using the same page. WhenCisco CMX synchronizes with PMS, all price plans created on the PMS are populated on the portal.When configuring the PMS element, the price plans associated with the property are displayed andyou can select as per the customer requirement.
Note
Configuring Connect Settings for PMS
Procedure
Step 1 Log in to Cisco Connected Mobile Experiences (Cisco CMX).Step 2 Choose Connect > Settings.Step 3 Click PMS.Step 4 Click the PMS Account tab.Step 5 In the PMS Connect Account area, enter the following information pertaining to the REST credentials in
Nevotek:
• Server IP—Username that is used to access the PMS server.
• Username—Username that is used to access the PMS server.
• Password—Password that is used to access the PMS server.
Step 6 Click Create.
Click Refresh to enable the Wi-Fi plans that you configured in the PMS to be listed in the Plans area of theSettings window.
ClickDelete to delete the pairing between your PMS Connect account and Cisco CMXConnect. If you deletethe PMS server information from CMX, the PMS configurations in all the portals will be deleted.
Editing the PMS Connect SettingsYou can edit the pairing between your PMS Connect account and Cisco CMX Connect.
Procedure
Step 1 Log in to Cisco Connected Mobile Experiences (Cisco CMX).Step 2 Choose Connect > Settings.Step 3 Click PMS.Step 4 Click the PMS Account tab.Step 5 Click Edit.
A dialog box is displayed asking you to confirm the modifications.
Cisco CMX Configuration Guide, Release 10.4101
The Cisco CMX Connect ServiceConfiguring Connect Settings for PMS
Portals will be modified automatically if they offer the plans that are affected by this edit.Caution
Setting Up a Custom Portal for PMSYou can use a PMS template to create a custom portal page for PMS.
Procedure
Step 1 Log in to Cisco CMX.Step 2 Choose CONNECT > Library.Step 3 Click Templates.Step 4 Click the PMS Auth Form template.
All available templates will have the PMS element in active state . You can either select the PMSAuth Form template or the PMS element in any other template to configure PMS.
Note
all templates that are available will have the PMS element in active state
Step 5 Enter a name for the PMS portal.Step 6 Ensure that your portal has a Registration Form element, or add one from the Content elements.Step 7 Choose the required PMS Property from the Select a Property drop-down list.
The PMS plan types for the selected property is displayed in the PMS Properties section.Step 8 Select the required PMS Plan Types by checking the appropriate check boxes under PMS Properties.Step 9 Click Save.
Assigning a PMS Portal to Sites or LocationsAfter you create a PMS portal, you can assign it to a site or location by performing the following steps:
Procedure
Step 1 Choose Connect > Connect Experiences.Step 2 In the Custom Portal column, from the Click to assign portal drop-down list, choose the custom portal that
you want to assign to the site.Step 3 In the PMS Property column, from the Click to assign property drop-down list, choose the property to be
assigned to the site.
Using the Visitors Search to Find PMS InformationYou can view PMS-related information pertaining to a client when you perform a Visitors Search in the CiscoCMX Connect Service.
Cisco CMX Configuration Guide, Release 10.4102
The Cisco CMX Connect ServiceSetting Up a Custom Portal for PMS

Procedure
Step 1 Choose Connect > Dashboard.Step 2 In the Visitors Search area, click the Search icon.
The following information is displayed in the Visitors Search window:
• MAC Address—MAC address of the client device
• State—Client state, that is Active or Inactive
• First Login Time—Date and time when the client logged in to Cisco CMX for the first time.
• Last Login Time— Date and time when the client logged in to Cisco CMX for the last time.
• Last Accept Time
• Location/Site
• Portal
• Type—Type of the portal
• Auth Type—Type of the authentication
• Device
• Operating System
• Bytes Received
• Bytes Sent
• Social Facebook Name
• Social Facebook Gender
• Social Facebook Locale
• Social Facebook Timezone
• Social Facebook Friends
• Social Facebook Email
• Social Foursquare Name
• Social Foursquare Email
• Social Instagram Name
• Social Instagram Email
• Phone Number
• Gender
• Username
• Profile Downloaded
Cisco CMX Configuration Guide, Release 10.4103
The Cisco CMX Connect ServiceUsing the Visitors Search to Find PMS Information
• Profile Downloaded on
• Secure Login On
• PMS Property Name of the Hotel
• PMS Plan Type
• PMS Plan
• PMS Title
• PMS First Name
• PMS Last Name
• PMS Room Number
• PMS Guest Code
• PMS User Name
• PMS Check In Date
• PMS Check Out Date
Customizing a Policy PlanThe Cisco CMX Policy Plans feature gives you the option to provide your client with the highest availablebandwidth as the client moves from one location to the next. Use the CMX Policy Plans window to configurethis feature. Use this feature to offer specific Wi-Fi policies for each site or location and thereby enhance theguest Wi-Fi experience.
For example, the bandwidth provided to clients in a hotel room is higher than the bandwidth provided in ahotel lobby. If the CMX Policy Plans feature is active, the bandwidth to the client is automatically increasedwhen the client moves from the lobby to their hotel room. In addition, if theKeep Highest Bandwidth checkbox on the CMX Policy Plans window (Cisco CMX > Connect > Policy Plans) is selected, the client retainsthe higher bandwidth when returning to the lobby.
The CMX Policy Plans feature is not supported when you add a PMS server.Note
Before creating the policy plans, ensure that you have the configured FreeRADIUS andWireless Controllers.For more information, see Configuring the FreeRADIUS on Cisco CMX, on page 97 and Cisco WLCConfigurations, on page 99.
Procedure
Step 1 Log in to Cisco Connected Mobile Experiences (Cisco CMX).Step 2 Choose Connect > Policy Plans.
Cisco CMX Configuration Guide, Release 10.4104
The Cisco CMX Connect ServiceCustomizing a Policy Plan
Step 3 Click New Policy Plan.The CREATE POLICY PLAN window is displayed.
Step 4 Enter a name for the new policy plan.
Ensure to specify the name without spaces and special characters. For example, PolicyOne. The maximumcharacters allowed for a policy name is 20.
Step 5 Enter the bandwidth, in kbps.
The maximum bandwidth allowed is a 10 digit value.
Step 6 Click Create.
The new policy plan is displayed in the Policy drop-down list in theConnect Experiences (Connect> Connect Experiences) tab.
Note
Configuring Elements for Custom Portal Navigation
Configuring URLs for Custom Portal NavigationAfter you create a custom portal, use theContent tab in the Portalwindow to design and customize the portal.You can select the elements (such as, Social Auth, Image & Text, Image Slider, External Content) in the rightside of the window to edit the portal and the elements. You can configure website URLs for URL enableselements such as images and logo. The URL enabled elements are Image,Menu, and Image Slider.
If you configure a URL enabled element in the login page, configure DNS-ACL to white list URL domainon WLC which requires 8.3 version. If you configure a URL enabled element in the success page, you neednot perform any more configuration on WLC, because the client already has Wi-Fi access.
Note
To configure a URL, perform the following steps:
Procedure
Step 1 Log in to Cisco Connected Mobile Experiences (Cisco CMX) as an admin user.Step 2 Choose CONNECT > Library.Step 3 Create a portal. For more information about setting up a custom portal, see Creating a Default Custom Portal
Page, on page 83.Step 4 From the Content tab, click any of the following elements:
• Image Element• Menu• Image Slider
Step 5 In the Link field or Image URL field, enter the URL.
Cisco CMX Configuration Guide, Release 10.4105
The Cisco CMX Connect ServiceConfiguring Elements for Custom Portal Navigation
In the live view, you can click the image or logo to view the Website.
Check the Enable back button check box to display the Back to Portal option in the live view of the portalpage. Click Back to Portal to navigate back to the portal view. Not all the URLs are displayed within theframe view. Use the Live View option in the window to verify if the URL provided is displayed in the frameview. If the URL you configured is not compatible to be displayed within the same frame, the website isdisplayed as a separate web page in the browser window.
• If the Enable back button option is selected, links with HTTP response header “X-Frame-Options” willnot be rendered on the portal.
• If theEnable back button option is selected and SSL is enabled on CMX, use HTTPS links for the loginportal. However, if SSL is not enabled on CMX, use either HTTP or HTTPS links for login portals.
Configuring Connect Services in Cisco CMX High AvailabilityProcedure
Step 1 To create a WLAN for the connect portals, use a Virtual IP address (VIP), for example,https://<VIP/visitor/login> Or http://<VIP/visitor/login>.
Step 2 Allow HTTP and HTTPS traffic on the ACL for the VIP.Step 3 To configure the Facebook Wi-Fi WLAN, use the VIP, for example, https://<VIP>/fbwifi/forward.Step 4 To work with policy plan or Property Management System (PMS), create an authentication server for the VIP
in CiscoWLC. The "Configuring Authentication Server" section explains how to create authentication serverfor an IP address (Cisco CMXPrimary IP or Virtual IP). For more information, see CiscoWLCConfigurations,on page 99.
• During a failover or failback event, if new clients or existing clients in an unauthorized stateon Cisco WLC tries to connect to WLAN, they will not be redirected to the portal and will nothave access to the internet.
• If the VIP is down, all Virtual IP address will be replaced with the Cisco CMX IP address thatis in active state for all the redirect URLs in WLANs, and the authentication server must bechanged. The following error message is displayed on the clients if the IP address of CiscoCMX that is not in an active state is given in the redirect URLs of the WLANs:
503 Service Unavailable
No server is available to handle this request
Note
Authentication with Social Network AccountsTo configure OAuth for each social network platform (Facebook, Instagram or Foursquare), you need to firstregister your app/client with the Cisco CMXConnect service. If you want to remove a particular social networkconnection, uncheck the check box to the left of the social network name.
Cisco CMX Configuration Guide, Release 10.4106
The Cisco CMX Connect ServiceConfiguring Connect Services in Cisco CMX High Availability
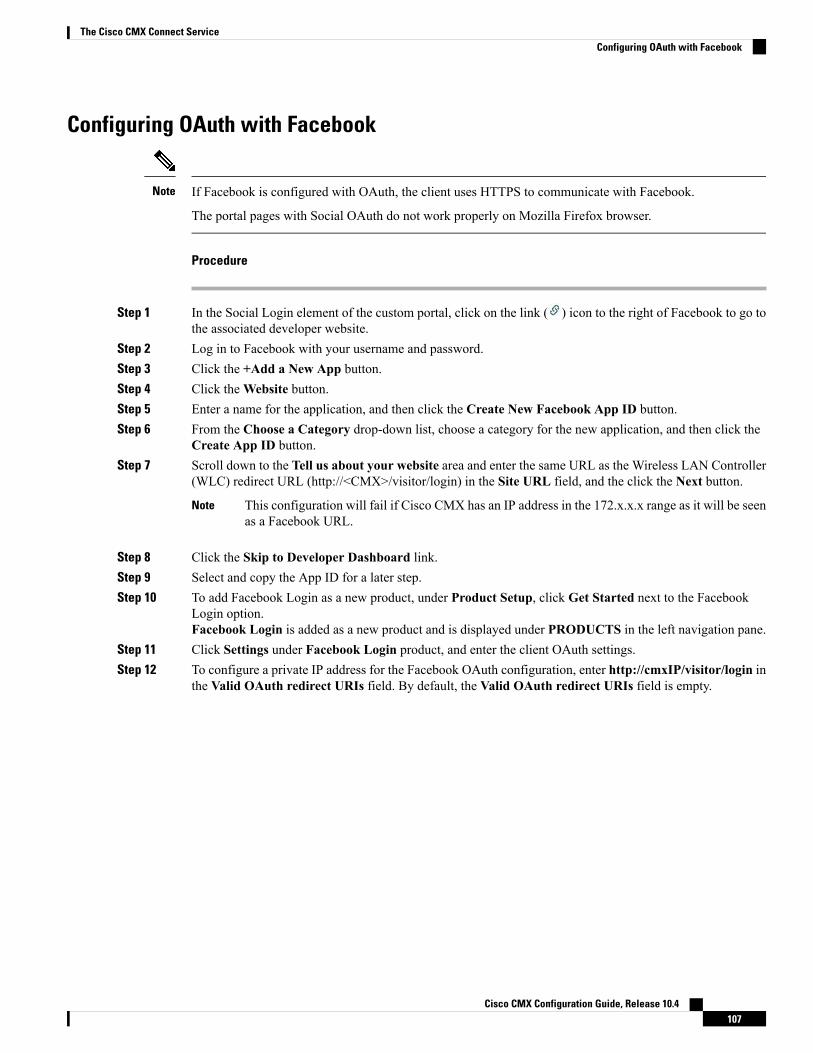
Configuring OAuth with Facebook
If Facebook is configured with OAuth, the client uses HTTPS to communicate with Facebook.
The portal pages with Social OAuth do not work properly on Mozilla Firefox browser.
Note
Procedure
Step 1 In the Social Login element of the custom portal, click on the link ( ) icon to the right of Facebook to go tothe associated developer website.
Step 2 Log in to Facebook with your username and password.Step 3 Click the +Add a New App button.Step 4 Click theWebsite button.Step 5 Enter a name for the application, and then click the Create New Facebook App ID button.Step 6 From the Choose a Category drop-down list, choose a category for the new application, and then click the
Create App ID button.Step 7 Scroll down to the Tell us about your website area and enter the same URL as the Wireless LAN Controller
(WLC) redirect URL (http://<CMX>/visitor/login) in the Site URL field, and the click the Next button.
This configuration will fail if Cisco CMX has an IP address in the 172.x.x.x range as it will be seenas a Facebook URL.
Note
Step 8 Click the Skip to Developer Dashboard link.Step 9 Select and copy the App ID for a later step.Step 10 To add Facebook Login as a new product, under Product Setup, click Get Started next to the Facebook
Login option.Facebook Login is added as a new product and is displayed under PRODUCTS in the left navigation pane.
Step 11 Click Settings under Facebook Login product, and enter the client OAuth settings.Step 12 To configure a private IP address for the Facebook OAuth configuration, enter http://cmxIP/visitor/login in
the Valid OAuth redirect URIs field. By default, the Valid OAuth redirect URIs field is empty.
Cisco CMX Configuration Guide, Release 10.4107
The Cisco CMX Connect ServiceConfiguring OAuth with Facebook
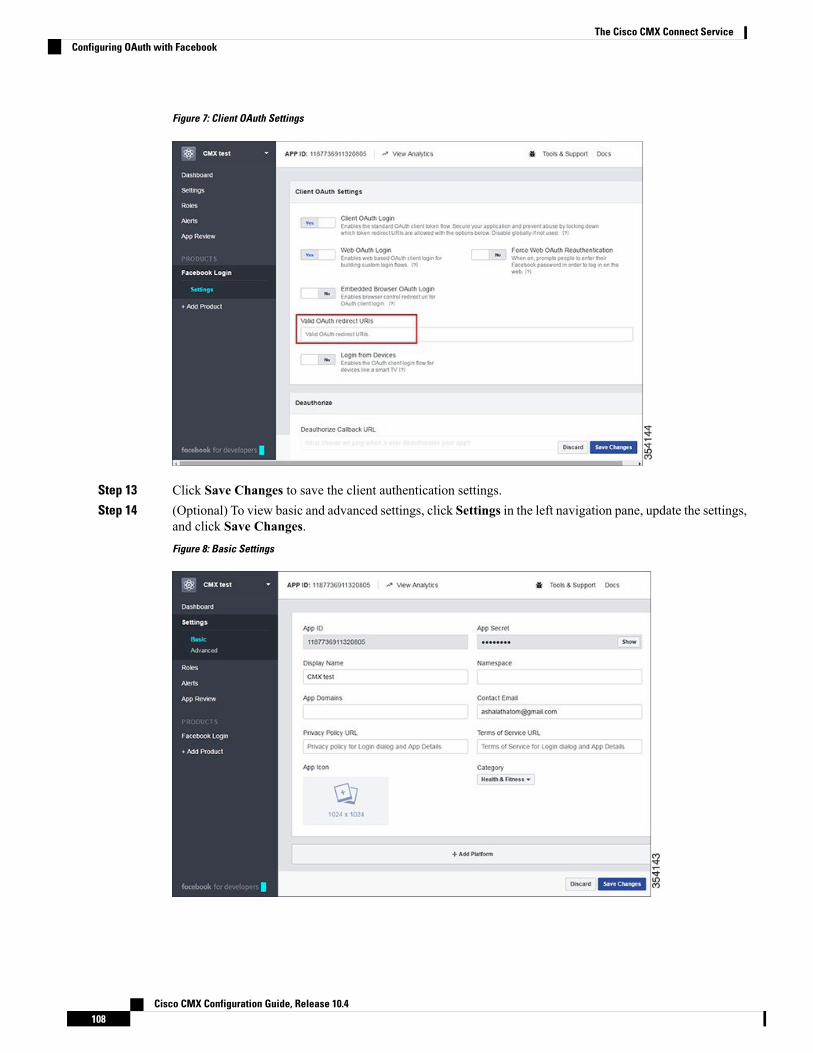
Figure 7: Client OAuth Settings
Step 13 Click Save Changes to save the client authentication settings.Step 14 (Optional) To view basic and advanced settings, click Settings in the left navigation pane, update the settings,
and click Save Changes.Figure 8: Basic Settings
Cisco CMX Configuration Guide, Release 10.4108
The Cisco CMX Connect ServiceConfiguring OAuth with Facebook
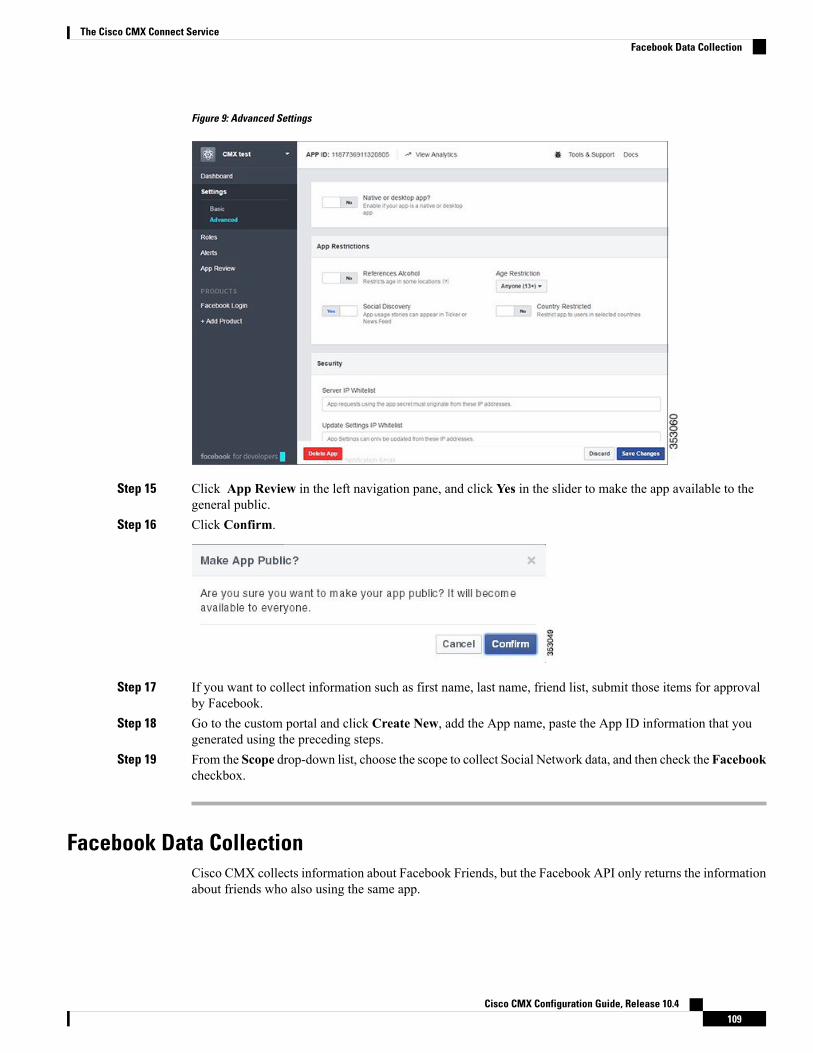
Figure 9: Advanced Settings
Step 15 Click App Review in the left navigation pane, and click Yes in the slider to make the app available to thegeneral public.
Step 16 Click Confirm.
Step 17 If you want to collect information such as first name, last name, friend list, submit those items for approvalby Facebook.
Step 18 Go to the custom portal and click Create New, add the App name, paste the App ID information that yougenerated using the preceding steps.
Step 19 From the Scope drop-down list, choose the scope to collect Social Network data, and then check the Facebookcheckbox.
Facebook Data CollectionCisco CMX collects information about Facebook Friends, but the Facebook API only returns the informationabout friends who also using the same app.
Cisco CMX Configuration Guide, Release 10.4109
The Cisco CMX Connect ServiceFacebook Data Collection
Configuring OAuth with Instagram
Procedure
Step 1 In the Social Login element of the custom portal, click on the link ( ) icon to the right of Instagram to go tothe associated developer website.
Step 2 To log in to Instagram, click Log In on the top right hand side, then enter username and password and clickLog in.
Step 3 In theManage Clients tab, click Register a New Client.Step 4 Enter the application name and the description.Step 5 Enter the same URL as the Wireless LAN Controller (WLC) redirect URL (http://<CMX>/visitor/login) in
the website field and in the OAuth redirect_url field. Check the Disable Implicit OAuth check box.Step 6 Enter the Captcha and click the Register button.Step 7 Select and copy the Client ID for the next step.Step 8 Go to the custom portal and click Create New, add the App name, paste the Client ID that you generated
using the preceding step.
Configuring OAuth with Foursquare
Procedure
Step 1 In the Social Login element of the custom portal, click on the link ( ) icon to the right of Foursquare to goto the associated developer website.
Step 2 Log in to Foursquare by clicking on the My Apps tab at the top right hand side.Step 3 Enter your email address and password and click the LOG IN button.Step 4 Click the CREATE A NEW APP button.Step 5 Enter the same URL as the Wireless LAN Controller (WLC) redirect URL (http://<CMX>/visitor/login) in
Download/welcome page url field, in the Your privacy policy url field, and in the Redirect URI(s) field.Step 6 Click SAVE CHANGES.Step 7 Select and copy the Client ID for the next step.Step 8 Go to the custom portal and click Create New, add the App name, paste the Client ID that you copied using
the preceding step.Step 9 From the Scope drop-down list, choose the scope to collect Social Network data, and then check the checkbox.
Cisco CMX Configuration Guide, Release 10.4110
The Cisco CMX Connect ServiceConfiguring OAuth with Instagram
C H A P T E R 5The Cisco CMX Presence Analytics Service
• Overview of the Presence Analytics Service, on page 111• Installing the Presence Analytics Service, on page 112• Benefits of the Presence Analytics Service, on page 112• Initial Configurations, on page 112• Presence Analytics Dashboard, on page 113• Adding Sites, on page 114• Viewing Available Sites, on page 116• Editing an Existing Site, on page 116• Deleting an Existing Site, on page 116• Searching for a Site, on page 117• Adding APs, on page 117• Deleting an AP, on page 119• Viewing Site Details for a Specified Period, on page 119• Viewing Device Proximity, Count, and Distribution for a Specific Site, on page 120• Emailing a Report, on page 121• Printing a Report, on page 121• Generating a PDF Report, on page 121• Managing Reports, on page 122• Specifying Filter Parameters , on page 123• Enabling a Global Site, on page 123• Creating a Site Group, on page 123• Changing the Presence Analytics Theme, on page 124
Overview of the Presence Analytics ServiceThe Cisco Connected Mobile Experiences (Cisco CMX) Presence Analytics service enables organizationswith small deployments, even those with only one or two access points (APs), to use the wireless technologyto study customer behavior.
The Cisco CMX Presence Analytics service is a comprehensive analytics and engagement platform that usesAPs to detect visitor presence based on their mobile devices’ Received Signal Strength Indication (RSSI).The AP detects these client mobile devices irrespective of the latter’s wireless association state as long asthey are within the specified signal range, and the wireless option is enabled on the mobile device (ability todetect devices wirelessly even if they are not connected to the network).
Cisco CMX Configuration Guide, Release 10.4111
You can use the PRESENCE ANALYTICS Dashboard to view the following key performance indicators(KPIs) of the various client mobile devices at a specific site:
• Visitors
• Average Dwell Time
• Peak Hour
• Passerby-to-visitor conversion rate
• Manufacturers of popular client mobile devices detected by AP
These KPIs can be viewed for any duration (day, week, month, or custom) not exceeding 180 days from thecurrent date. You can also customize the display to show data for a specific day, weekend, or even trends overa month.
Installing the Presence Analytics ServiceYou cannot run the Presence Analytics and the Location services on the same box. Therefore, you shouldchoose either the Location service or the Presence Analytics service during the initial installation.
Benefits of the Presence Analytics Service• Enables organizations with small deployments, even those with just one or two APs, to understandcustomer behavior.
• Enhances on-site customer experience through insights into their mobile behavior across locations.
• Measures customer engagement and loyalty across sites through location statistics.
• Compares visitor trends between sites to gauge the effect of marketing actions.
Initial ConfigurationsIn order to use the Cisco CMX Presence Analytics service, choose the Presence option when you installCisco MSE Virtual Appliance. For more information, see the “Installing a Cisco MSE Virtual Appliance”section in the Cisco MSE Virtual Appliance Installation Guide for this release at: http://www.cisco.com/c/en/us/support/wireless/mobility-services-engine/products-installation-and-configuration-guides-list.html. Afterinstallation, perform the following operations:
• Add Controllers.
• Add sites.
• Add APs.
Cisco CMX Configuration Guide, Release 10.4112
The Cisco CMX Presence Analytics ServiceInstalling the Presence Analytics Service
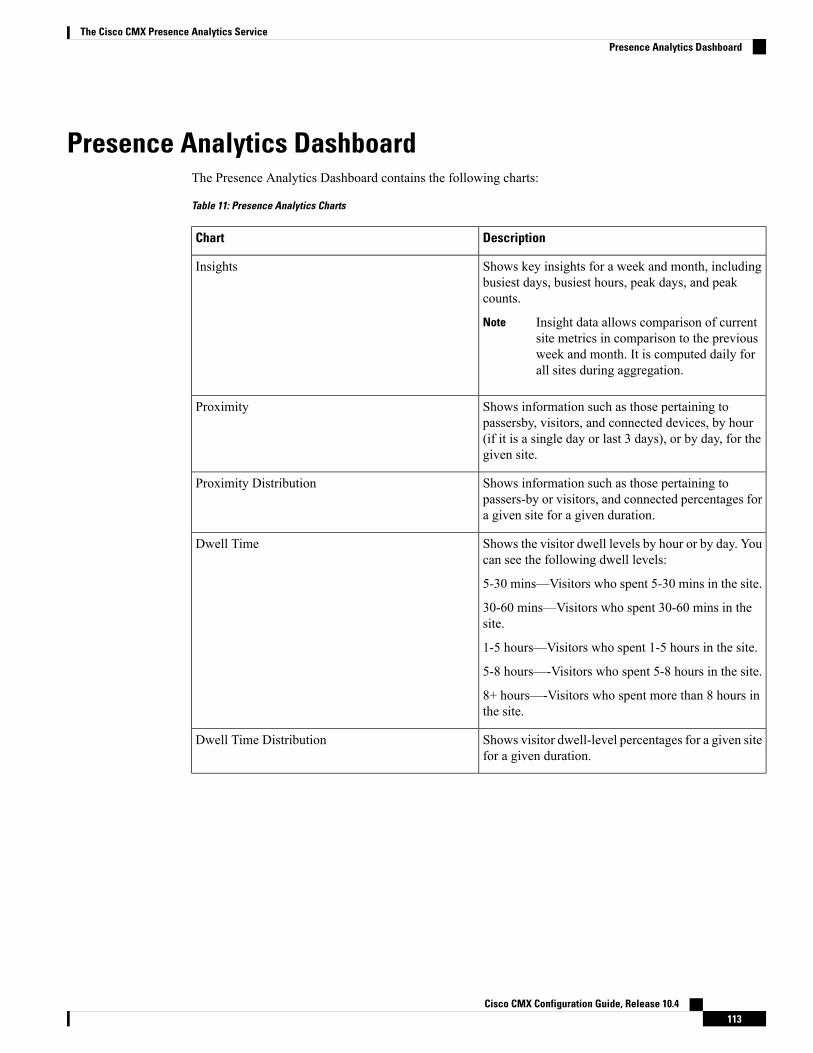
Presence Analytics DashboardThe Presence Analytics Dashboard contains the following charts:
Table 11: Presence Analytics Charts
DescriptionChart
Shows key insights for a week and month, includingbusiest days, busiest hours, peak days, and peakcounts.
Insight data allows comparison of currentsite metrics in comparison to the previousweek and month. It is computed daily forall sites during aggregation.
Note
Insights
Shows information such as those pertaining topassersby, visitors, and connected devices, by hour(if it is a single day or last 3 days), or by day, for thegiven site.
Proximity
Shows information such as those pertaining topassers-by or visitors, and connected percentages fora given site for a given duration.
Proximity Distribution
Shows the visitor dwell levels by hour or by day. Youcan see the following dwell levels:
5-30 mins—Visitors who spent 5-30 mins in the site.
30-60 mins—Visitors who spent 30-60 mins in thesite.
1-5 hours—Visitors who spent 1-5 hours in the site.
5-8 hours—-Visitors who spent 5-8 hours in the site.
8+ hours—-Visitors who spent more than 8 hours inthe site.
Dwell Time
Shows visitor dwell-level percentages for a given sitefor a given duration.
Dwell Time Distribution
Cisco CMX Configuration Guide, Release 10.4113
The Cisco CMX Presence Analytics ServicePresence Analytics Dashboard
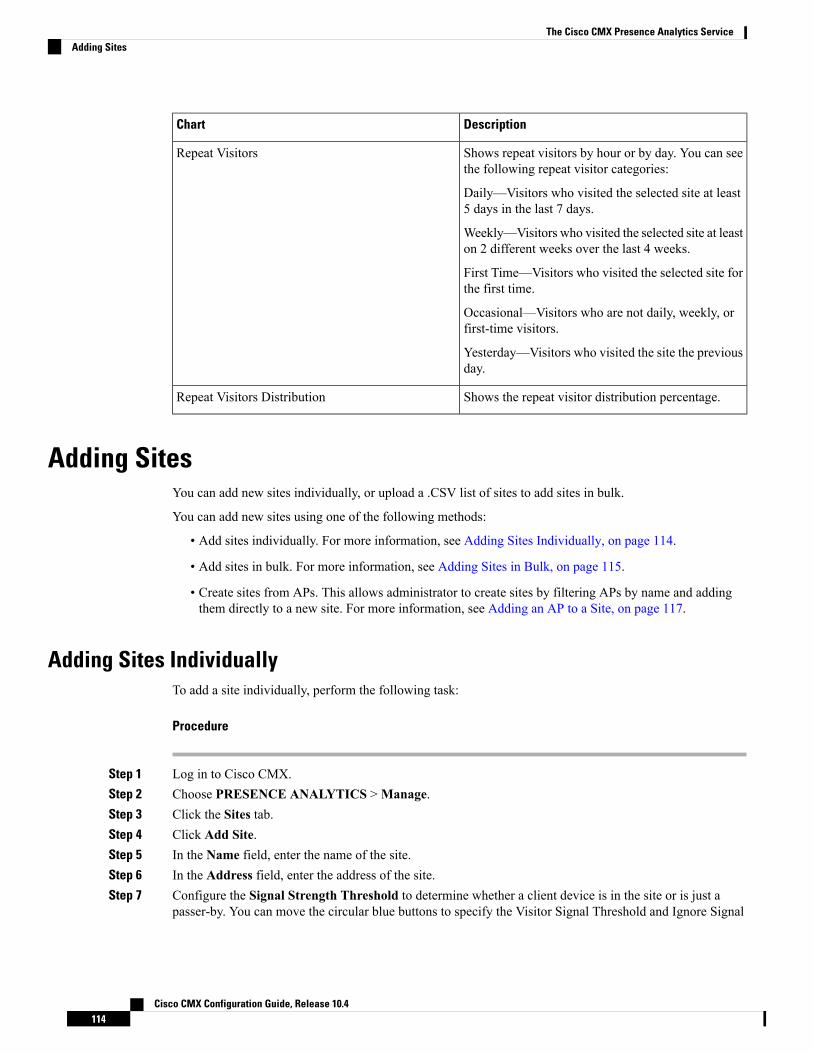
DescriptionChart
Shows repeat visitors by hour or by day. You can seethe following repeat visitor categories:
Daily—Visitors who visited the selected site at least5 days in the last 7 days.
Weekly—Visitors who visited the selected site at leaston 2 different weeks over the last 4 weeks.
First Time—Visitors who visited the selected site forthe first time.
Occasional—Visitors who are not daily, weekly, orfirst-time visitors.
Yesterday—Visitors who visited the site the previousday.
Repeat Visitors
Shows the repeat visitor distribution percentage.Repeat Visitors Distribution
Adding SitesYou can add new sites individually, or upload a .CSV list of sites to add sites in bulk.
You can add new sites using one of the following methods:
• Add sites individually. For more information, see Adding Sites Individually, on page 114.
• Add sites in bulk. For more information, see Adding Sites in Bulk, on page 115.
• Create sites from APs. This allows administrator to create sites by filtering APs by name and addingthem directly to a new site. For more information, see Adding an AP to a Site, on page 117.
Adding Sites IndividuallyTo add a site individually, perform the following task:
Procedure
Step 1 Log in to Cisco CMX.Step 2 Choose PRESENCE ANALYTICS >Manage.Step 3 Click the Sites tab.Step 4 Click Add Site.Step 5 In the Name field, enter the name of the site.Step 6 In the Address field, enter the address of the site.Step 7 Configure the Signal Strength Threshold to determine whether a client device is in the site or is just a
passer-by. You can move the circular blue buttons to specify the Visitor Signal Threshold and Ignore Signal
Cisco CMX Configuration Guide, Release 10.4114
The Cisco CMX Presence Analytics ServiceAdding Sites
Threshold values.There are two RSSI threshold values defined for a site, low (-95 dBm default) and high (65dBm default).
The lower RSSI threshold is bounded to -95 dBm to -45 dBm and the higher threshold is boundedto -90dBm to -40 dBm.
The difference between the two threshold must not be less than 5.
The minimum dwell time is bound to 0 to 20
Note
• Clients with RSSI below the low threshold (-95 dBm default) are discarded.
• Clients with RSSI above the low threshold are classified as “passer-by”. The RSSI threshold range forpasser-by clients is between -95dBm and -75 dBm.
• Clients with RSSI above high threshold over x minutes (default 5) in past 20 minutes are classified asvisitors.
• Clients associated with AP in a site are classified as connected clients at the site.
Step 8 In the Configure the Minimum Dwell Time For Visitor (minutes) field, specify the minimum dwell timefor visitors. The minimum dwell time for visitors is 20 minutes.
Step 9 Click Save.
Adding Sites in Bulk
Procedure
Step 1 Log in to Cisco Connected Mobile Experiences (Cisco CMX).Step 2 Choose PRESENCE ANALYTICS >Manage.Step 3 Click Import.Step 4 Under Sites, click Browse.
The File Upload dialog box is displayed.
The file that you upload for importing site information must be in .csv format.Note
Step 5 Navigate to the location of the CSV file that contains the list of sites you wish to upload, select the CSV file,and clickOpen. To import the site details correctly, store them in the following order and format: Site Name,Address, RSSI High Threshold, RSSI Low Threshold, Dwell Time in Minutes, Timezone. For example, TestSite,123 Main Street City CA US,-65,-95,5 US/Pacific.
Step 6 Click Import.
A set of new sites is created and added to the table of sites under PRESENCE ANALYTICS >Manage.
Cisco CMX Configuration Guide, Release 10.4115
The Cisco CMX Presence Analytics ServiceAdding Sites in Bulk
Viewing Available SitesProcedure
Step 1 Log in to Cisco CMX.Step 2 Choose PRESENCE ANALYTICS >Manage.Step 3 Under the Sites tab, you can view a list of available sites in a tabular format, sorted alphabetically by site
name. You can customize your view of the Sites table by sorting according to Location, Timezone, or APcount.
Editing an Existing SiteProcedure
Step 1 Log in to Cisco CMX.Step 2 Choose PRESENCE ANALYTICS >Manage.Step 3 Under Sites, click the name of the corresponding site listed in the table of available sites.
The dialog box is displayed.
Step 4 Edit the site Name, site Address, Signal Strength Threshold limits, or theMinimum Dwell Time forVisitor.
Step 5 Click Save.
Deleting an Existing SiteProcedure
Step 1 Log in to Cisco CMX.Step 2 Choose PRESENCE ANALYTICS >Manage.Step 3 Under Sites, check the check box of the site that you want to delete.Step 4 Click Delete.
You will receive a confirmation dialog box when you try to delete a site. Click OK to confirm the deleteaction.
Cisco CMX Configuration Guide, Release 10.4116
The Cisco CMX Presence Analytics ServiceViewing Available Sites
If you want to delete all available sites simultaneously, select the check box in the header row, andthen click Delete.
Note
Searching for a SiteProcedure
Step 1 Log in to Cisco CMX.Step 2 Choose PRESENCE ANALYTICS >Manage > Sites.Step 3 In the Search field on the top right-corner of the window, enter the site’s name, and press the Return key. If
the specified site has already been added to PRESENCE ANALYTICS, it is displayed in the search results.
Adding APsYou can add new APs individually or by uploading a .CSV list of APs to add them in bulk.
You can add new APs, with or without maps, using one of the following methods:
• Add APs individually—Add individual APs to specific sites. For more information, see Adding an APto a Site, on page 117.
• Add APs in bulk—Add multiple APs at one go by importing a list of APs in .CSV format. For moreinformation, see Adding APs in Bulk, on page 118.
Adding an AP to a Site
If you do not see the AP list, youshould update the community string of theWLC using the System > Settingswindow. The AP information is retrieved from the WLC using SNMP.
Note
Procedure
Step 1 Log in to Cisco CMX.Step 2 To add an AP to a site individually:
a) Choose PRESENCE ANALYTICS >Manage > Sites.b) In the table of available sites, click the name of the site to which you want to associate the new AP.c) Click the Details icon next to AP count.
A list of available APs is displayed in a tabular format.
Cisco CMX Configuration Guide, Release 10.4117
The Cisco CMX Presence Analytics ServiceSearching for a Site
d) Enter the MAC address of the AP you want to add and associate to the specified site.e) Click Add.
The specified AP is added and associated to the specified site.
Step 3 To add one or more APs to a site:a) Choose PRESENCE ANALYTICS >Manage > Access Points.b) From the APs by Controller drop-down list, select the APs that you want to add to a site.
You can use the Ctrl+a or Command+a keys to select all sites from drop-down list.
c) After selecting the APs, click Close.
The count of the APs you selected from the available APs is shown in the drop-down list, for example, 8of 160 selected.
d) Click Add to Site.e) Select the site to which you want to add the selected APs.f) Click Add.
The selected APs are added and associated to the specified site.
To create a site from this page, click Create Site.
Step 4 Under Controller AP list, click Download CSV to download the .CSV file, add the missing site names forAPs, and import the file again from the Import tab.
CSV Format: Radio MAC Address,Ethernet MAC Address,Name,Site Name,Site Address
Example: aa:bb:cc:dd:ee:ff,bb:cc:dd:ee:ff:11,AP-1,Site-1,123 Main St City CA US
Adding APs in BulkTo add APs to a site in bulk:
Procedure
Step 1 Log in to Cisco CMX.Step 2 Choose PRESENCE ANALYTICS >Manage > Import.Step 3 Under APs, click Browse.
The File Upload dialog box is displayed.
Step 4 Navigate to the location of the .CSV file that contains the list of APs you want to upload, select the .CSV file,and click Open.
To import the AP details correctly, store them in the following order and format:Radio MAC Address,EthernetMACAddress,Name,Site Name,Site Address, for example, aa:bb:cc:dd:ee:ff,bb:cc:dd:ee:ff:11,AP-1,Site-1,123Main St City CA US
Step 5 Click Import.
Cisco CMX Configuration Guide, Release 10.4118
The Cisco CMX Presence Analytics ServiceAdding APs in Bulk
A set of new APs is created and added.
Deleting an APProcedure
Step 1 Log in to Cisco CMX.Step 2 Choose PRESENCE ANALYTICS >Manage > Sites.Step 3 In the table of available sites, click the name of the site from which you want to delete and unassociate the
corresponding AP.
The dialog box is displayed.
Step 4 Click the Details icon next to AP count.
A list of available APs is displayed in a tabular format.
Step 5 Click the Delete icon next to the AP that you wish to delete.
Viewing Site Details for a Specified PeriodProcedure
Step 1 Log in to Cisco CMX.Step 2 Click PRESENCE ANALYTICS.Step 3 Select a site from the SITE drop-down list.Step 4 Select a duration from the DATE drop-down list. You can choose from the following options:
• Today
• Yesterday
• Last 3 Days
• Last 7 Days
• Last 30 Days
• This Month
• Last Month
• Custom—Specify a date range and clickChange. You can either manually enter the dates in the FROMand TO fields in yyyy-mm-dd format, or select the dates from the respective calendars. These calendars
Cisco CMX Configuration Guide, Release 10.4119
The Cisco CMX Presence Analytics ServiceDeleting an AP
are displayed when you select Custom or click the FROM or TO fields. The window is refreshed toshow the site KPIs based on your selection.
You can choose a single day by selecting the same date in both the FROM and the TO fields.Note
Viewing KPI SummaryYou can click any of the following KPI buttons that appear at the top of the window to view further detailsabout a visitor’s behavior at the site:
• Visitors—Clients associated with AP in a site are classified as visitors at the site.
• Average Dwell Time—Average dwell time or a wait time of all the visitors in a location.
• Peak Hour—The hour at which maximum number visitors are found in a location.
• Conversion Rate—Conversion rate is a percentage of passersby who are converted to visitors and iscomputed as visitors / (visitors + passersby) x 100.
• Top Device Maker—Manufacturer of popular client mobile devices detected by AP
Viewing Device Proximity, Count, and Distribution for a SpecificSite
Procedure
Step 1 Log in to Cisco CMX.Step 2 Click PRESENCE ANALYTICS.Step 3 Select a site from the SITE drop-down list.Step 4 Select or specify a duration from the DATE drop-down list.
The window is refreshed to show the site details based on your selection.
Step 5 Click the corresponding elements within theProximity orProximity Duration chart to view hourly breakdownof passersby, visitors, and connected devices for the selected site during the specified duration.
If the duration selected in Step 4 exceeds one day, clicking the elements in the Proximity chart willdisplay the details for the selected site for the specific date.
Note
Cisco CMX Configuration Guide, Release 10.4120
The Cisco CMX Presence Analytics ServiceViewing KPI Summary
Emailing a ReportProcedure
Step 1 Log in to Cisco CMX.Step 2 Click PRESENCE ANALYTICS.Step 3 Click the Email icon.Step 4 Enter the email address of a recipient.Step 5 Enter notes, if any.Step 6 Click Send.
If you want to send this email later, check the Schedule check box and enter Schedule parameters such asStart From (date and time) and Frequency (Daily orWeekly), and then click Schedule.
Printing a ReportProcedure
Step 1 Log in to Cisco CMX.Step 2 Click PRESENCE ANALYTICS.Step 3 Click the Printer icon.Step 4 Specify the printer settings.Step 5 Click OK.
Generating a PDF Report
You can customize the logo on the PDF reports. To view an archived report, choosePRESENCEANALYTICS> Manage > Reports.
Note
Procedure
Step 1 Log in to Cisco CMX.Step 2 Click PRESENCE ANALYTICS.
Cisco CMX Configuration Guide, Release 10.4121
The Cisco CMX Presence Analytics ServiceEmailing a Report
Step 3 Click the PDF Report icon.Step 4 Enter notes for the PDF report, if any.Step 5 Enter the email address (optional) of the recipient. If there are multiple recipients for the report, separate the
email addresses using a comma.Step 6 Click Submit.
If you want to schedule the PDF report to a future date, check the Schedule check box and enter the Scheduleparameters such as Start From (date and time) and Frequency (Daily orWeekly), and then click Schedule.
Managing ReportsThe Presence Analytics service enables you to manage the scheduled and generated reports. In addition, youcan customize the logo that appears on the generated PDF reports.
The Reports window contains the following areas:
• Report Logo—Enables you to upload an image file that you can use as a logo for your PDF report.
• Scheduled Reports—Enables you to modify or delete a report that is already scheduled (email or PDF).
• Generated PDF Reports—Enables you to download or delete a generated PDF report.
Procedure
• To upload a logo for your report, perform the following steps:a) Log in to Cisco CMX.b) Click PRESENCE ANALYTICS >Manage.c) Click Reports.d) In the Report Logo area, click Browse and then choose the image file that you want upload as the
report logo.e) Click Upload.
• To edit or delete a scheduled report, perform the following steps:a) Log in to Cisco CMX.b) Click PRESENCE ANALYTICS >Manage.c) Click Reports.d) In the Scheduled Reports area, under the Link column, click either Edit or Delete.
If you choose to edit a scheduled report, the existing schedule details are displayed in the EDITSCHEDULED REPORT window, where you can make the necessary changes.
• To download or delete a generated PDF report, perform the following steps:a) Log in to Cisco CMX.b) Click PRESENCE ANALYTICS >Manage.c) Click Reports.d) In the Generated Reports area, under the Link column, click either Download or Delete.
Cisco CMX Configuration Guide, Release 10.4122
The Cisco CMX Presence Analytics ServiceManaging Reports
Specifying Filter ParametersThe Filter Parameters tab allows you to exclude data from a specific SSID,MAC address, or defined duration.
Procedure
Step 1 Log in to Cisco CMX.Step 2 Choose PRESENCE ANALYTICS >Manage > Filters.Step 3 Check the Enable Exclusion Filters check box to exclude data.Step 4 Click Save.
Enabling a Global SiteEnabling a Global site combines all the existing data from all the individual sites into a single large site sothat you can view the data for all the sites at once. You must provide a time zone for the global site, whichwill override all individual site time zones. All the analysis will be in context of the time zone defined for theglobal site.
Procedure
Step 1 Log in to Cisco CMX.Step 2 Choose PRESENCE ANALYTICS >Manage > Global Sites.Step 3 Check the Enable Global Site check box.Step 4 Specify Site Name, Address, and Time Zone.Step 5 Click Save.
Creating a Site GroupSite groups allow you to combine information from multiple sites for analysis, for example, all the sites inthe same time zone.
Procedure
Step 1 Log in to Cisco CMX.Step 2 Choose PRESENCE ANALYTICS >Manage > Site Groups.Step 3 Click Create Group.Step 4 Specify Group Name, Address, Timezone, and Sites.
Cisco CMX Configuration Guide, Release 10.4123
The Cisco CMX Presence Analytics ServiceSpecifying Filter Parameters
Step 5 Click Save.
Changing the Presence Analytics ThemeProcedure
Step 1 Log in to Cisco CMX.Step 2 Click PRESENCE ANALYTICS.Step 3 Click the Themes icon.Step 4 Choose your desired theme.
Cisco CMX Configuration Guide, Release 10.4124
The Cisco CMX Presence Analytics ServiceChanging the Presence Analytics Theme
C H A P T E R 6Managing Cisco CMX Configuration
• Overview of the Manage Service, on page 125• Managing Perimeters and Zones on Location Maps, on page 126• Managing Licenses, on page 131• Managing Users, on page 134• Managing Notifications from Applications, on page 136• Managing Cisco CMX Cloud Apps, on page 145• Managing Verticalization, on page 146
Overview of the Manage ServiceThe Cisco Connected Mobile Experiences (Cisco CMX)MANAGE service comprises the following tabs,which help you perform a variety of tasks to effectively manage the Cisco CMX configuration, including, butnot restricted to those listed here:
• Locations—Enables you to manage and add location zones and tags. For more information, seeManagingPerimeters and Zones on Location Maps, on page 126.
• Licenses—Enables you to manage and add licenses. For more information, see Managing Licenses, onpage 131.
• Users—Enables you to manage and add users. For more information, see Managing Users, on page 134.
• Notifications—Enables you to manage and add email and HTTP notifications. For more information,see Managing Notifications from Applications, on page 136.
• Cloud Apps—Enables you to manage Cisco CMX Cloud service. For more information, see ManagingCisco CMX Cloud Apps, on page 145.
• Verticalization—Enables you to generate vertical specific reports. For more information, see ManagingVerticalization, on page 146.
All the Manage service tasks can be performed only by users with corresponding user roles. For informationon user roles, see User Roles, on page 134.
From Cisco CMX 10.4 release, you can manage BLE beacons only using the Cisco CMX Cloud service. Usethe CMX Beacon Center service to manage BLE beacons and devices within your network.
Note
Cisco CMX Configuration Guide, Release 10.4125
Managing Perimeters and Zones on Location MapsA perimeter is an all-inclusive zone where clients are always inside of this. The individual zones are insidethe perimeter.
In Cisco CMX Release 10.2.3, the ability to create and delete a perimeter on location maps is no longeravailable.
Note
Viewing Campus, Building, Floor, and Zone Details
Procedure
Step 1 Log in to Cisco Mobile Connected Experiences (Cisco CMX).Step 2 ChooseMANAGE > Locations.Step 3 In the left pane of the window that is displayed, click Campus, Building, Floor, or Zone depending on the
area you want to view.Items corresponding to the area selected are displayed as boxes.
Step 4 Click the curved arrow at the top-right corner of each item box to view details pertaining to that item.This opens the Zone Editor map view, displaying a floor map.
The curved arrow at the top-right corner of a floor box is called the Go to map view arrow. Thisarrow is available on the box of items at any level. For example, for a building, this opens the firstfloor. For a campus, this opens the first floor of the first building. You can then switch to otherbuildings and floors in that campus.
Note
Managing TagsYou can add tags to a campus, building, floor, or zone.
Procedure
Step 1 Log in to Cisco Mobile Connected Experiences (Cisco CMX).Step 2 ChooseMANAGE > Locations.Step 3 From the right panel, choose the item for which you want to add the tag.Step 4 Click the Tag icon at the top-right corner of the window.
The Location Tag Manager window is displayed with available tags.s
Step 5 In the Create New Tag field, enter a new name for the tag and press Enter.
Cisco CMX Configuration Guide, Release 10.4126
Managing Cisco CMX ConfigurationManaging Perimeters and Zones on Location Maps
Step 6 (Optionaly) Click on any existing tag to see all the geo items that are tagged against it.
Creating an Inclusion or Exclusion RegionThe Create Inclusion/Exclusion feature allows you to create inclusion and exclusion regions on a floor.
• Inclusion regions define areas within a floor where wireless devices will be either inside or snapped onthe boundary (due to weak coverage). There will be one inclusion region per floor only. When there isno inclusion region defined in the floor maps, Cisco CMX creates a default inclusion region that is thesame as the floor dimension. We recommend having one inclusion region on a floor to correctly boundthe clients on floor area.
• Exclusion regions define areas within a floor which are inside an inclusion region. In an exclusion region,wireless devices will be ignored. There could be multiple exclusion regions per floor.
Defining inclusion and exclusion regions can help you focus Cisco CMX processing to just those areas of themap where you want to manage your wireless devices, and ignore others.
Procedure
Step 1 Log in to Cisco Connected Mobile Experiences (Cisco CMX).Step 2 ChooseManage > Locations.Step 3 In the left pane, click Floor.Step 4 To go to the map view of the floor, click the arrow on the top right of the floor tile view. The Zone Editor
window is displayed with a list of icons to the right.Step 5 To add a new inclusion region:
a) Click the + icon to create an inclusion region on the map. If you already have an inclusion region, creatinga new inclusion region will overwrite the existing region.
b) Double-click to finish creating the inclusion area. The inclusion region is displayed in green.c) In the Create a Inclusion dialog box, click Add.
To add an exclusion region, click the – icon and draw the exclusion area on the inclusion area.
Creating a Perimeter
Procedure
Step 1 Log in to Cisco Mobile Connected Experiences (Cisco CMX).Step 2 ChooseMANAGE > Locations.Step 3 In the left pane of the window that is displayed, click Zone.
The zone is used for the analytics purpose.
The Zone Item boxes are displayed.
Cisco CMX Configuration Guide, Release 10.4127
Managing Cisco CMX ConfigurationCreating an Inclusion or Exclusion Region
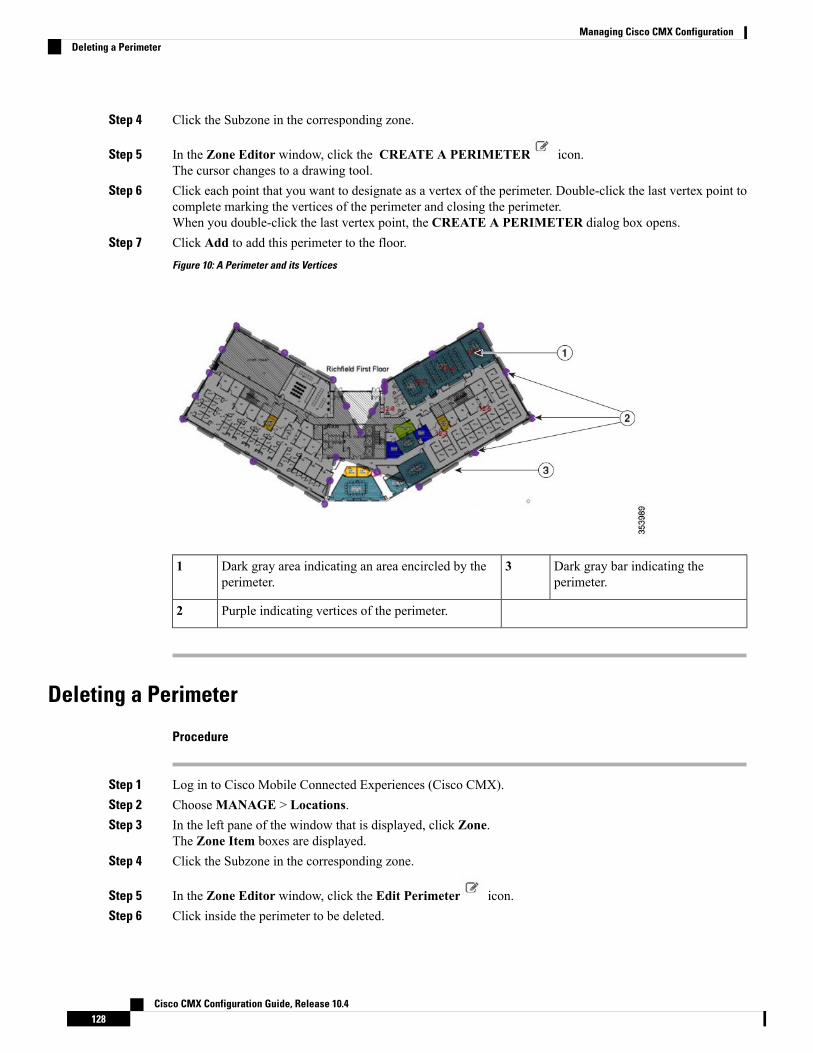
Step 4 Click the Subzone in the corresponding zone.
Step 5 In the Zone Editor window, click the CREATE A PERIMETER icon.The cursor changes to a drawing tool.
Step 6 Click each point that you want to designate as a vertex of the perimeter. Double-click the last vertex point tocomplete marking the vertices of the perimeter and closing the perimeter.When you double-click the last vertex point, the CREATE A PERIMETER dialog box opens.
Step 7 Click Add to add this perimeter to the floor.Figure 10: A Perimeter and its Vertices
Dark gray bar indicating theperimeter.
3Dark gray area indicating an area encircled by theperimeter.
1
Purple indicating vertices of the perimeter.2
Deleting a Perimeter
Procedure
Step 1 Log in to Cisco Mobile Connected Experiences (Cisco CMX).Step 2 ChooseMANAGE > Locations.Step 3 In the left pane of the window that is displayed, click Zone.
The Zone Item boxes are displayed.Step 4 Click the Subzone in the corresponding zone.
Step 5 In the Zone Editor window, click the Edit Perimeter icon.Step 6 Click inside the perimeter to be deleted.
Cisco CMX Configuration Guide, Release 10.4128
Managing Cisco CMX ConfigurationDeleting a Perimeter
The perimeter will be highlighted in gray.
Step 7 Click the Trash icon.Step 8 In the DELETE PERIMETER confirmation dialog box, click Confirm to delete the perimeter.
Editing a Perimeter
Procedure
Step 1 Log in to Cisco Mobile Connected Experiences (Cisco CMX).Step 2 ChooseMANAGE > Locations.Step 3 In the left pane of the window that is displayed, click Zone.
The Zone Item boxes are displayed.Step 4 Click the Subzone in the corresponding zone.
Step 5 In the Zone Editor window, click the Edit Perimeter icon.Step 6 Click inside the perimeter that is to be edited.
The perimeter will be highlighted in gray and the vertices in purple.Step 7 Drag the purple vertices to modify the shape of the perimeter.Step 8 After you have the required shape, click outside the perimeter. This saves the new shape.
Creating a Zone
Procedure
Step 1 Log in to Cisco Mobile Connected Experiences (Cisco CMX).Step 2 ChooseMANAGE > Locations.Step 3 In the left pane of the window that is displayed, click Zone.
The Zone Item boxes are displayed.Step 4 Click the Subzone in the corresponding zone.
Step 5 In the Zone Editor window, click the Draw Polygon Zone icon.The cursor will change to a drawing tool.
Step 6 Click each point that you want to designate as a vertex of the perimeter. Double-click the last vertex point tocomplete marking the vertices of the perimeter and for closing the perimeter see the figure below.When you double-click the last vertex point, the CREATE A NEW ZONE dialog box is displayed.
Step 7 Click Add to add this zone to the corresponding floor.An Item pane pertaining to this zone is displayed on the right side of the window. You can add existing tagsfrom the drop-down list, or add a new tag.
Cisco CMX Configuration Guide, Release 10.4129
Managing Cisco CMX ConfigurationEditing a Perimeter

Zones cannot be outside the floor map and they cannot overlap. Overlapping zones can be createdusing Cisco Prime Infrastructure.
Note
Figure 11: A Zone and its Vertices
Purple indicating vertices of the zone.3A zone named Lab.1
Other zones on the map.4Gray bar indicating the perimeter.2
Deleting a Zone
Procedure
Step 1 Log in to Cisco Mobile Connected Experiences (Cisco CMX).Step 2 ChooseMANAGE > Locations.Step 3 In the left pane of the window that is displayed, navigate to the zone that you want to delete.
Step 4 Click the Trash icon.The DELETE ZONE confirmation dialog box is displayed.
Step 5 Click Confirm.
Cisco CMX Configuration Guide, Release 10.4130
Managing Cisco CMX ConfigurationDeleting a Zone
Editing a Zone
Procedure
Step 1 Log in to Cisco Mobile Connected Experiences (Cisco CMX).Step 2 ChooseMANAGE > Locations.Step 3 In the left pane of the window that is displayed, click Zone.
The Zone Item boxes are displayed.Step 4 Click the Subzone in the corresponding zone.
Step 5 In the Zone Editor window, click the Gear icon to view the zone editing options.
Step 6 To change the shape of the zone, use the Pencil icon to reshape the zone by moving the vertices.The DELETE ZONE confirmation dialog box is displayed.
Step 7 To move the zone, use the drag tool, denoted by theHand icon, to drag the zone around. Click theHandicon, move the cursor to the center of the zone, where it will change to an Arrow icon. You can then drag thezone.
Step 8 Click outside the zone to save your changes.
Zones cannot be outside the floor map and they cannot overlap. Overlapping zones can be createdusing Cisco Prime Infrastructure.
Note
Managing LicensesTo view the list of licenses that your Cisco Connected Mobile Experiences (Cisco CMX) system has, log into Cisco CMX and chooseMANAGE > Licenses. The list of licenses is displayed in the Licenses window.
Cisco CMX Configuration Guide, Release 10.4131
Managing Cisco CMX ConfigurationEditing a Zone
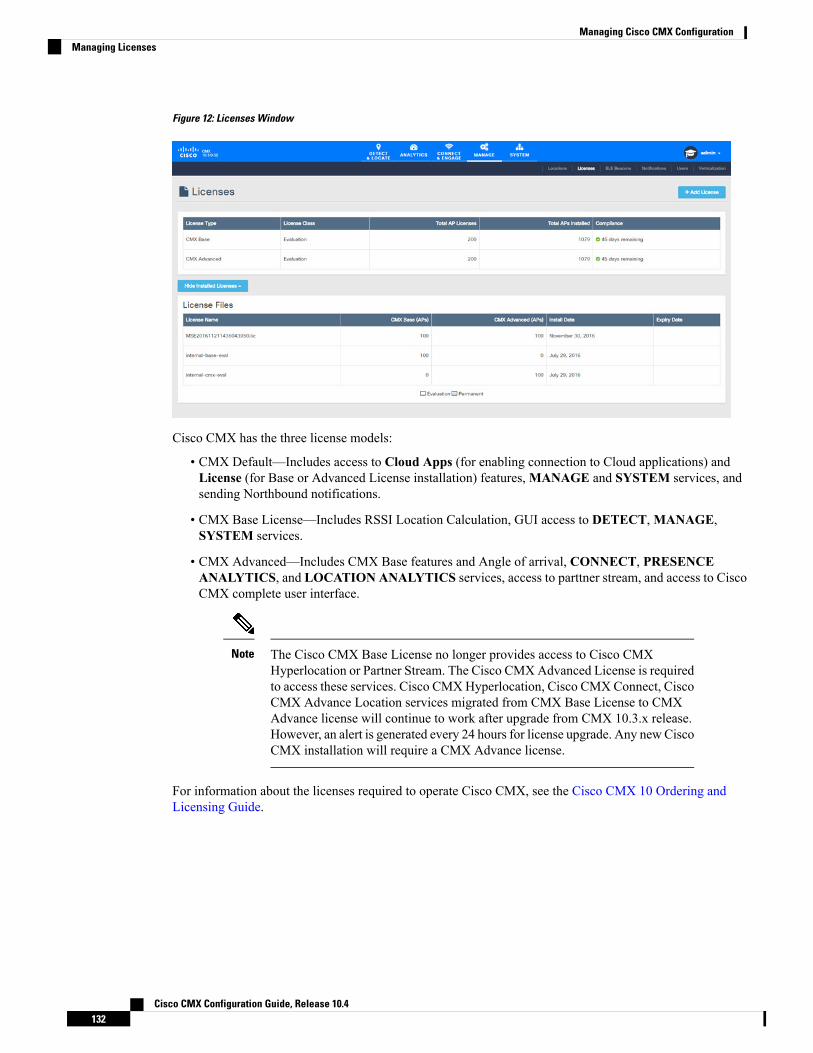
Figure 12: Licenses Window
Cisco CMX has the three license models:
• CMX Default—Includes access to Cloud Apps (for enabling connection to Cloud applications) andLicense (for Base or Advanced License installation) features,MANAGE and SYSTEM services, andsending Northbound notifications.
• CMX Base License—Includes RSSI Location Calculation, GUI access to DETECT,MANAGE,SYSTEM services.
• CMX Advanced—Includes CMX Base features and Angle of arrival, CONNECT, PRESENCEANALYTICS, and LOCATION ANALYTICS services, access to parttner stream, and access to CiscoCMX complete user interface.
The Cisco CMX Base License no longer provides access to Cisco CMXHyperlocation or Partner Stream. The Cisco CMXAdvanced License is requiredto access these services. Cisco CMXHyperlocation, Cisco CMXConnect, CiscoCMX Advance Location services migrated from CMX Base License to CMXAdvance license will continue to work after upgrade from CMX 10.3.x release.However, an alert is generated every 24 hours for license upgrade. Any newCiscoCMX installation will require a CMX Advance license.
Note
For information about the licenses required to operate Cisco CMX, see the Cisco CMX 10 Ordering andLicensing Guide.
Cisco CMX Configuration Guide, Release 10.4132
Managing Cisco CMX ConfigurationManaging Licenses

Cisco CMX comes with a 120-day full-functionality evaluation license. All the access points (APs) connectedto Cisco CMX must be licensed.
Cisco CMX Release 10.3 supports High Availability. For more information, see Enabling High Availabilityfor Cisco CMX, on page 162.
CMX Evaluation licenses are not synchronized between Cisco CMX High Availability (HA) pairs. Once theevaluation license expires on the primary server, Cisco CMX HA will not invoke failover to the secondaryserver. You must add a permanent license to make the HA setup functional.
Cisco CMX permanent licenses will be synchronized between the primary and secondary servers in the CMXHA pair. You need not upload the permanent licenses on the secondary server.
Note
Add a License
Procedure
Step 1 Log in to Cisco Mobile Connected Experiences (Cisco CMX).Step 2 ChooseMANAGE > Licenses.Step 3 Click Add License.
The TERMS AND CONDITIONS dialog box is dispalyed.Step 4 To accept the terms and conditions, enter your name, and then click Accept & Continue.
When you accept and proceed to install a certificate, a dialog box is displyed with the message indicating thatyou can use only the Analytics or Location features.
The UPLOAD LICENSE dialog box is displayed.Step 5 Click Browse to select the corresponding license file, and then click Upload. Ensure to select a license file
with the .LIC extension.
Cisco CMX uses a license file with .LIC extension. This file is obtained when an order is placedfor any of the Cisco CMX per Acess Point SKUs, for example, L-AD-LS-1AP-N - CMXAdvancedlicense for one access point.
The file is available as part of your licensing PAK and will be attached to an email from licensing.Extract the .LIC file to your system and upload to Cisco CMX when adding a new license.
Note
Step 6 In the Licenses window, click See Installed Licenses to view the list of installed licenses. You can view theLicense Name, CMX Base (APs), CMX Advanced (APs), Install Date, and Expiry Date for the insatlledlicenses.
Cisco CMX Configuration Guide, Release 10.4133
Managing Cisco CMX ConfigurationAdd a License

Deleting a License
Procedure
Step 1 Log in to Cisco Mobile Connected Experiences (Cisco CMX).Step 2 ChooseMANAGE > Licenses.Step 3 In the Licenses window, click See Installed Licenses to view the list of installed licenses.Step 4 In the Action column adjacent the license you want to delete, click Delete.
The DELETE LICENSE dialog box is displayed.Step 5 Click Delete License to proceed with the deletion.
Managing UsersCisco ConnectedMobile Experiences (Cisco CMX) is shipped with a default admin user account and password.An admin user can add, edit, and delete other users.
Adding a User
Procedure
Step 1 Log in to Cisco Mobile Connected Experiences (Cisco CMX).Step 2 ChooseMANAGE > Users.
The Users window, where all the current users are listed, is displayed.
Step 3 Click + New User at the bottom of the table.The ADD NEW USER dialog box is displayed.
Step 4 Enter the details and select one or more roles for the user from the Roles drop-down list.For information about the roles available for selection, see User Roles, on page 134.
The password for the new user must be mimimum of eight characters.Note
Step 5 Click Submit.
User RolesYour Cisco ConnectedMobile Experiences (Cisco CMX) system comes with the following services, dependingon whether or not you have the license for that service:
• SYSTEM service (included with Cisco CMX base license)
• MANAGE service (included with Cisco CMX base license)
Cisco CMX Configuration Guide, Release 10.4134
Managing Cisco CMX ConfigurationDeleting a License
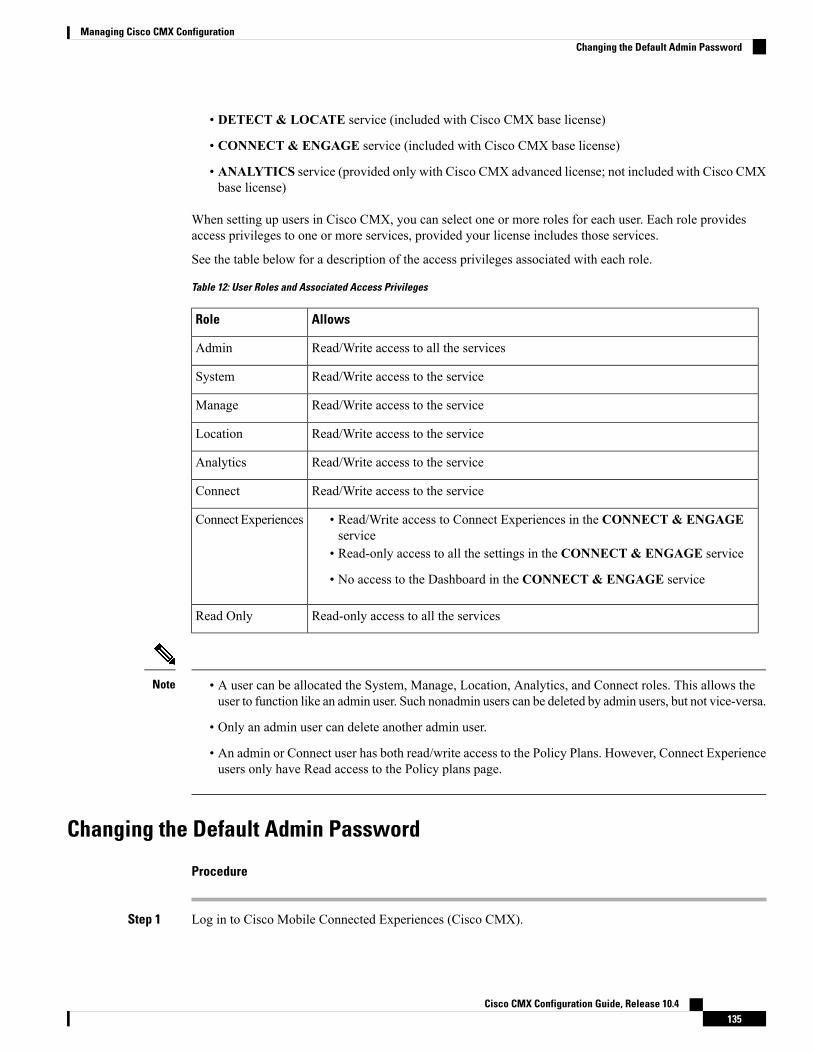
• DETECT & LOCATE service (included with Cisco CMX base license)
• CONNECT & ENGAGE service (included with Cisco CMX base license)
• ANALYTICS service (provided only with Cisco CMX advanced license; not included with Cisco CMXbase license)
When setting up users in Cisco CMX, you can select one or more roles for each user. Each role providesaccess privileges to one or more services, provided your license includes those services.
See the table below for a description of the access privileges associated with each role.
Table 12: User Roles and Associated Access Privileges
AllowsRole
Read/Write access to all the servicesAdmin
Read/Write access to the serviceSystem
Read/Write access to the serviceManage
Read/Write access to the serviceLocation
Read/Write access to the serviceAnalytics
Read/Write access to the serviceConnect
• Read/Write access to Connect Experiences in the CONNECT & ENGAGEservice
• Read-only access to all the settings in the CONNECT & ENGAGE service
• No access to the Dashboard in the CONNECT & ENGAGE service
Connect Experiences
Read-only access to all the servicesRead Only
• A user can be allocated the System, Manage, Location, Analytics, and Connect roles. This allows theuser to function like an admin user. Such nonadmin users can be deleted by admin users, but not vice-versa.
• Only an admin user can delete another admin user.
• An admin or Connect user has both read/write access to the Policy Plans. However, Connect Experienceusers only have Read access to the Policy plans page.
Note
Changing the Default Admin Password
Procedure
Step 1 Log in to Cisco Mobile Connected Experiences (Cisco CMX).
Cisco CMX Configuration Guide, Release 10.4135
Managing Cisco CMX ConfigurationChanging the Default Admin Password
Step 2 ChooseMANAGE > Users.The Users window, where new users can be added and the roles of existing users modified, is displayed.
Step 3 Click Edit in the Actions column adjacent the admin user.This opens the EDIT USER dialog box for that admin user.
Step 4 Change the default factory-shipped admin password.Step 5 Click Submit.
Editing User Information
Procedure
Step 1 Log in to Cisco Mobile Connected Experiences (Cisco CMX).Step 2 ChooseMANAGE > Users .
The Users window, where all the current users are listed, is displayed.Step 3 Click Edit in the Actions column adjacent the user whose details you want to edit.
The EDIT USER dialog box is displayed.Step 4 Edit the details of the user. Note that the username cannot be edited.
For information about user roles, see User Roles, on page 134.Step 5 Click Submit.
Deleting a User
Procedure
Step 1 Log in to Cisco Mobile Connected Experiences (Cisco CMX).Step 2 ChooseMANAGE > Users.Step 3 Click Delete in the Actions column adjacent the user whose details you want to delete.
The DELETE USER confirmation dialog box is displayed.Step 4 Click Delete User to proceed with the deletion.
Managing Notifications from ApplicationsYou can set up notifications for your own applications and for third-party applications. The Notificationsfeature supports the following:
• HTTP receiver
• MAC address scrambling, which is enabled by default
Cisco CMX Configuration Guide, Release 10.4136
Managing Cisco CMX ConfigurationEditing User Information
• Two message formats, JSON and XML
• Alerts
• Network configuration change notification
• REST notification over HTTPS
The following sections describe the notifications-related tasks that you can perform:
Create a New Notification
Procedure
Step 1 Log in to Cisco Mobile Connected Experiences (Cisco CMX).Step 2 ChooseMANAGE > Notifications.
The Notifications window is displayed.Step 3 Click New Notification.
The CREATE NEW NOTIFICATION dialog box is displayed.
Cisco CMX Configuration Guide, Release 10.4137
Managing Cisco CMX ConfigurationCreate a New Notification
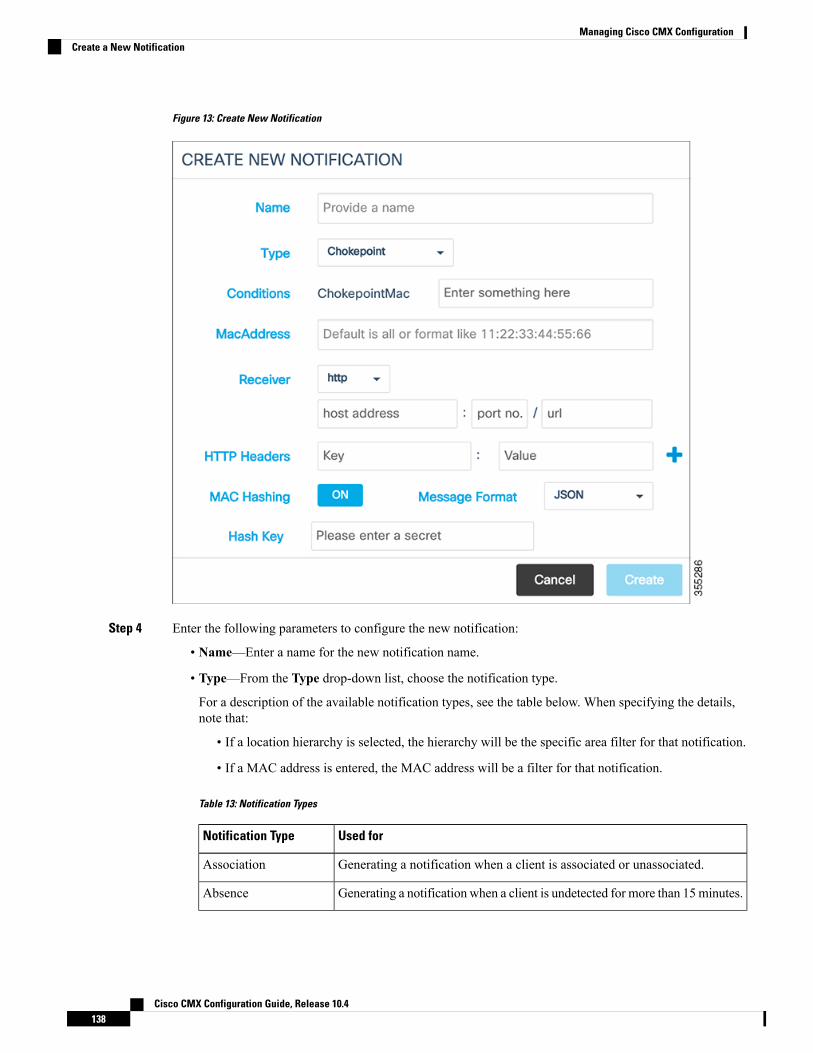
Figure 13: Create New Notification
Step 4 Enter the following parameters to configure the new notification:
• Name—Enter a name for the new notification name.
• Type—From the Type drop-down list, choose the notification type.
For a description of the available notification types, see the table below. When specifying the details,note that:
• If a location hierarchy is selected, the hierarchy will be the specific area filter for that notification.
• If a MAC address is entered, the MAC address will be a filter for that notification.
Table 13: Notification Types
Used forNotification Type
Generating a notification when a client is associated or unassociated.Association
Generating a notification when a client is undetected for more than 15minutes.Absence
Cisco CMX Configuration Guide, Release 10.4138
Managing Cisco CMX ConfigurationCreate a New Notification
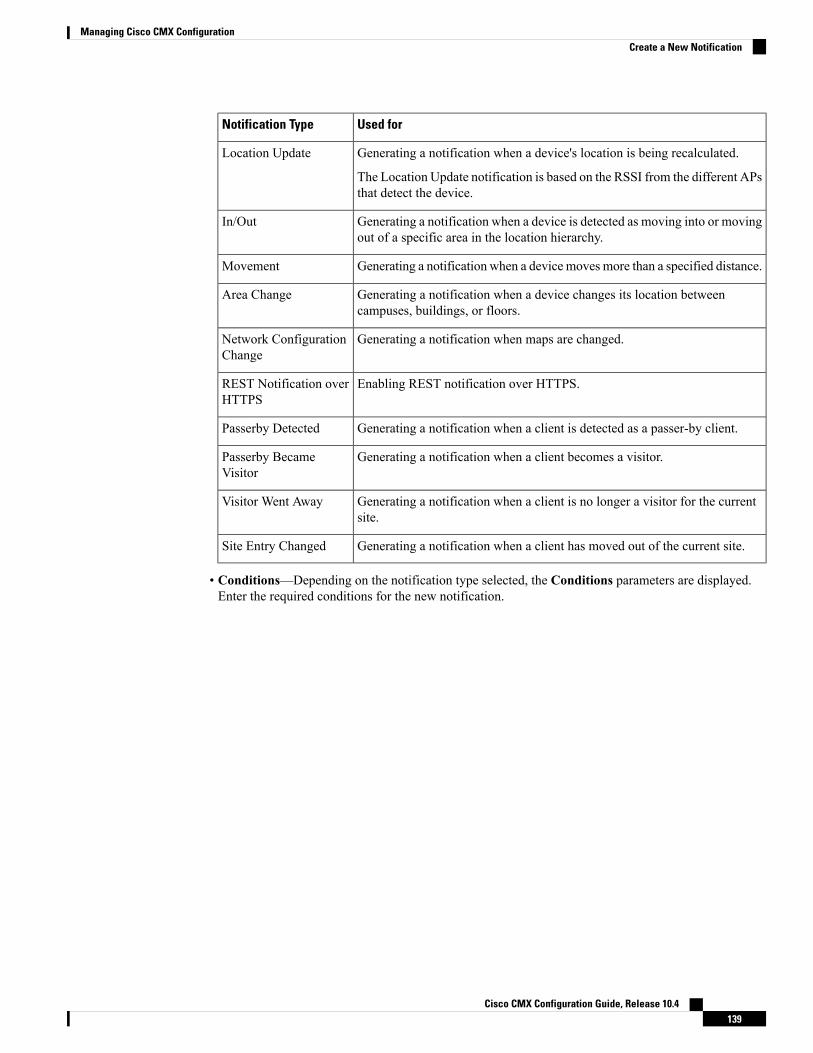
Used forNotification Type
Generating a notification when a device's location is being recalculated.
The Location Update notification is based on the RSSI from the different APsthat detect the device.
Location Update
Generating a notification when a device is detected as moving into or movingout of a specific area in the location hierarchy.
In/Out
Generating a notification when a device moves more than a specified distance.Movement
Generating a notification when a device changes its location betweencampuses, buildings, or floors.
Area Change
Generating a notification when maps are changed.Network ConfigurationChange
Enabling REST notification over HTTPS.REST Notification overHTTPS
Generating a notification when a client is detected as a passer-by client.Passerby Detected
Generating a notification when a client becomes a visitor.Passerby BecameVisitor
Generating a notification when a client is no longer a visitor for the currentsite.
Visitor Went Away
Generating a notification when a client has moved out of the current site.Site Entry Changed
• Conditions—Depending on the notification type selected, the Conditions parameters are displayed.Enter the required conditions for the new notification.
Cisco CMX Configuration Guide, Release 10.4139
Managing Cisco CMX ConfigurationCreate a New Notification

• For some notifications types such as Association, Absence, and so on, you must provideDevice Type as a condition parameter. The Device Type field on the Create NewNotification window provides these options: All, RFID Tag, Client, BLE Tag, andInterferer. For notification types Area Change, In/Out, Location Update, andMovement, theDevice Type condition has the following additional options:RogueClientand Rogue AP.
• For the In/Out notification type, if the In option is selected in the Condition field, thiswarning message is displayed: Please make sure to add 'Out' condition with sameHierarchy. Conversely, if the Out option is selected in the Condition field, this warningmessage is displayed: Please make sure to add 'In' condition with same Hierarchy.
• For the Location Update, In/Out, andMovement notification type, choose the devicestatus from the Status drop-down list. The association status for the client device areAll,ProbingOnly, andAssociated. This condition helps to filter the clients by their associationstatus and sends notifications only for the filtered subset of client devices.
• For the Location Update notification, Cisco CMX provides a new Status option for theClient device type. Use this option to filter notifications to either associated or probingdevices. If the Status option is not selected, the default option (All) is considered, andthen notifications are sent for both associated and probing clients.
• To view In/Out notification details for all locations, we recommend that you configureseperate In/Out notifictions for each hierarchy created in the Activity Map window.
Note
• MacAddress—Enter the MAC address. The defaul is all.
• Receiver—From the Receiver drop-down list, choose the receiver type as HTTP, HTTPS, or Email.For HTTP and HTTPS receiver, you must provide the host address, port number, and url.
• HTTP Headers—Enter the HTTP header inputs for Key and Value. Click the plus icon to add morecustom HTTP headers to the notification. You can add a maximum of three custom HTTP headers.
HTTP headers are manadatory for northbound notifications to connect to third party services.Note
• MAC Hashing—Click to disable the MAC hashing. By deafault, MAC hashing is enabled.
• Message Format—From theMessage Format drop-down list, choose the format as JASON or XML.
• Salt—Enter a secret hash key.
Step 5 Click Create. The new notification is created and displayed in the Notifications window.
Making Changes to Notifications
If you are a non-admin user, you can make changes to only those notifications that were created by you. Anon-admin user cannot make changes to notifications created by other users.
Note
The following are the changes that you can make to notifications:
Cisco CMX Configuration Guide, Release 10.4140
Managing Cisco CMX ConfigurationMaking Changes to Notifications
Enabling and Disabling a NotificationWhen a notification is created, it is enabled by default.
Procedure
• To disable a notification, in the NOTIFICATIONS window, under the Status column adjacent thenotification, click Enabled.The label changes to Disabled and the notification is disabled.
• To enable a notification, in the NOTIFICATIONS window, under the Status column adjacent thenotification, click Disabled.The label changes to Enabled and the notification is enabled.
Editing a Notification
Procedure
Step 1 To edit a notification, in theNOTIFICATIONSwindow, under theActions column adjacent the notification,click Edit.The EDIT NOTIFICATION dialog box is displayed.
Step 2 Edit the details of the notification, as required.
You cannot edit the name of the notification.Note
Viewing Northbound NotificationsYou can now view northbound notifications from the Cisco CMX UI and CLI. To view NorthboundNotifications:
Procedure
Step 1 Log in to Cisco Connected Mobile Experiences (Cisco CMX).Step 2 Choose Manage > Notifications.Step 3 Under the Actions column for an existing notification, click Details to view additional information about the
notification.
You can also view the northbound notification details in the Edit Notifications window. Optionally, from theCLI, use the cmxctl metrics notification command to view the northbound notifications.
Viewing Northbound Notification AttributesThe following table lists the Northbound Notification attributes:
Cisco CMX Configuration Guide, Release 10.4141
Managing Cisco CMX ConfigurationEnabling and Disabling a Notification
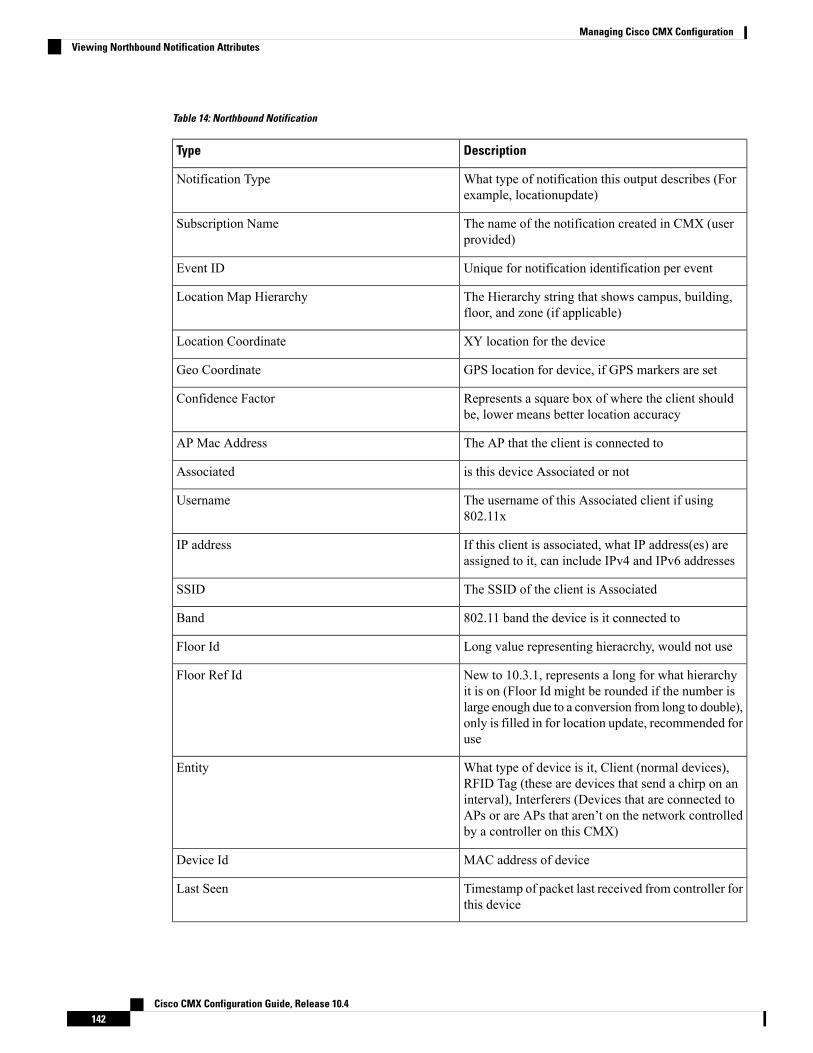
Table 14: Northbound Notification
DescriptionType
What type of notification this output describes (Forexample, locationupdate)
Notification Type
The name of the notification created in CMX (userprovided)
Subscription Name
Unique for notification identification per eventEvent ID
The Hierarchy string that shows campus, building,floor, and zone (if applicable)
Location Map Hierarchy
XY location for the deviceLocation Coordinate
GPS location for device, if GPS markers are setGeo Coordinate
Represents a square box of where the client shouldbe, lower means better location accuracy
Confidence Factor
The AP that the client is connected toAP Mac Address
is this device Associated or notAssociated
The username of this Associated client if using802.11x
Username
If this client is associated, what IP address(es) areassigned to it, can include IPv4 and IPv6 addresses
IP address
The SSID of the client is AssociatedSSID
802.11 band the device is it connected toBand
Long value representing hieracrchy, would not useFloor Id
New to 10.3.1, represents a long for what hierarchyit is on (Floor Id might be rounded if the number islarge enough due to a conversion from long to double),only is filled in for location update, recommended foruse
Floor Ref Id
What type of device is it, Client (normal devices),RFID Tag (these are devices that send a chirp on aninterval), Interferers (Devices that are connected toAPs or are APs that aren’t on the network controlledby a controller on this CMX)
Entity
MAC address of deviceDevice Id
Timestamp of packet last received from controller forthis device
Last Seen
Cisco CMX Configuration Guide, Release 10.4142
Managing Cisco CMX ConfigurationViewing Northbound Notification Attributes

DescriptionType
-Raw Location
-Area Global Id List
For RFID tags, information that was encoded inpackets we received like battery life or something likethat.
Tag Vendor Data
Based on the first half of the MAC address of thisdevice
Manufacturer
When the notification generatedTimestamp
Refers to what the status of the device is - IDLE(0),AAA_PENDING(1), AUTHENTICATED(2),
ASSOCIATED(3), POWERSAVE(4),DISASSOCIATED(5), TO_BE_DELETED(6),PROBING(7),
BLACK_LISTED(8),WAIT_AUTHENTICATED(256),WAIT_ASSOCIATED(257);
status
Managing Proxy Settings for NotificationsIn Cisco CMX, configure proxy settings for notifications that need to pass through specific proxy when sendingnotification to client devices. If proxy is set in Cisco CMX, you need to set the no_proxy variable for allnotification addresses that need not go through the proxy.
Procedure
Step 1 To verify the current proxy settings, run the cmxos sysproxy show command.The following is a sample output:[cmxadmin@cmx-nortech ~]$ cmxos sysproxy showUSE_PROXY=1HTTP_PROXY_URL=""HTTPS_PROXY_URL=http://proxy.esl.cisco.com:80FTP_PROXY_URL=""NO_PROXY_LIST=192.0.2.1
The proxy variable required for CMX notifications is the HTTPS_PROXY_URL.If this variable isset and you are not getting the notification, follow the below steps to configure the no_proxy variable.
Note
Step 2 To set the no_proxy variable, run the sysproxy no_proxy host name: port command, wherein the host nameis domain associated with your host machine IP address, for example, cmxos sysproxy no_proxy192.0.2.1:8000
To find out the domain name, run the host ip addresss command and identify the domain name pointer value.
If you have multiple domain values, enter all of them as comma seperated no_proxy values in the command,for example, cmxos sysproxy no_proxy no_proxy_value1, no_proxy_value2: port number.
Cisco CMX Configuration Guide, Release 10.4143
Managing Cisco CMX ConfigurationManaging Proxy Settings for Notifications
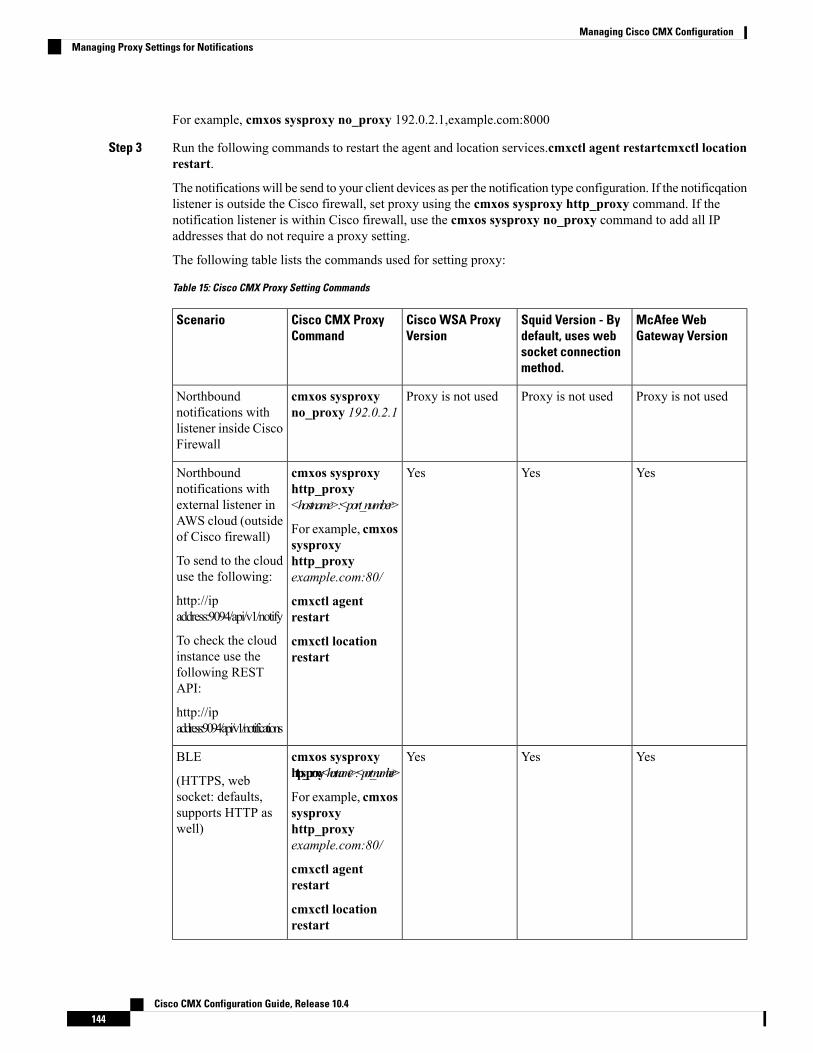
For example, cmxos sysproxy no_proxy 192.0.2.1,example.com:8000
Step 3 Run the following commands to restart the agent and location services.cmxctl agent restartcmxctl locationrestart.
The notifications will be send to your client devices as per the notification type configuration. If the notificqationlistener is outside the Cisco firewall, set proxy using the cmxos sysproxy http_proxy command. If thenotification listener is within Cisco firewall, use the cmxos sysproxy no_proxy command to add all IPaddresses that do not require a proxy setting.
The following table lists the commands used for setting proxy:
Table 15: Cisco CMX Proxy Setting Commands
McAfee WebGateway Version
Squid Version - Bydefault, uses websocket connectionmethod.
Cisco WSA ProxyVersion
Cisco CMX ProxyCommand
Scenario
Proxy is not usedProxy is not usedProxy is not usedcmxos sysproxyno_proxy 192.0.2.1
Northboundnotifications withlistener inside CiscoFirewall
YesYesYescmxos sysproxyhttp_proxy<hostname>:<port_number>
For example, cmxossysproxyhttp_proxyexample.com:80/
cmxctl agentrestart
cmxctl locationrestart
Northboundnotifications withexternal listener inAWS cloud (outsideof Cisco firewall)
To send to the clouduse the following:
http://ipaddress:9094/api/v1/notify
To check the cloudinstance use thefollowing RESTAPI:
http://ipaddress:9094/api/v1/notifications
YesYesYescmxos sysproxyhttps_proxy<hostname>:<port_number>
For example, cmxossysproxyhttp_proxyexample.com:80/
cmxctl agentrestart
cmxctl locationrestart
BLE
(HTTPS, websocket: defaults,supports HTTP aswell)
Cisco CMX Configuration Guide, Release 10.4144
Managing Cisco CMX ConfigurationManaging Proxy Settings for Notifications
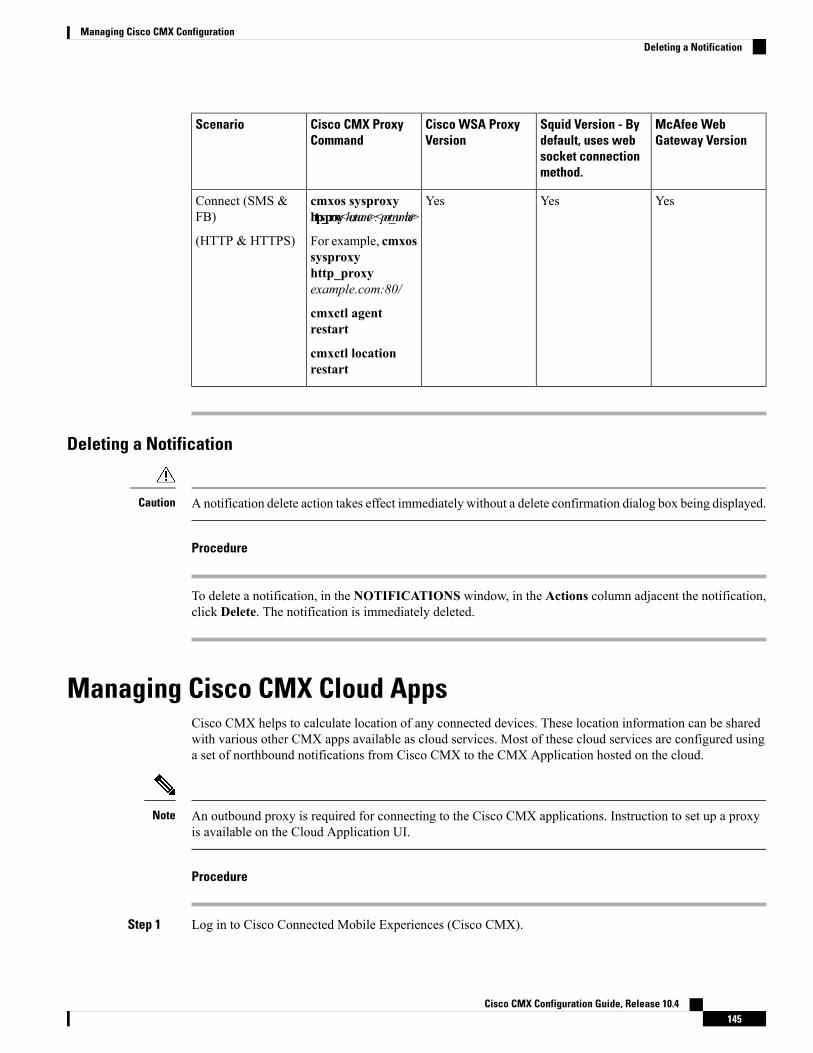
McAfee WebGateway Version
Squid Version - Bydefault, uses websocket connectionmethod.
Cisco WSA ProxyVersion
Cisco CMX ProxyCommand
Scenario
YesYesYescmxos sysproxyhttps_proxy<hostname>:<port_number>
For example, cmxossysproxyhttp_proxyexample.com:80/
cmxctl agentrestart
cmxctl locationrestart
Connect (SMS &FB)
(HTTP & HTTPS)
Deleting a Notification
A notification delete action takes effect immediately without a delete confirmation dialog box being displayed.Caution
Procedure
To delete a notification, in the NOTIFICATIONS window, in the Actions column adjacent the notification,click Delete. The notification is immediately deleted.
Managing Cisco CMX Cloud AppsCisco CMX helps to calculate location of any connected devices. These location information can be sharedwith various other CMX apps available as cloud services. Most of these cloud services are configured usinga set of northbound notifications from Cisco CMX to the CMX Application hosted on the cloud.
An outbound proxy is required for connecting to the Cisco CMX applications. Instruction to set up a proxyis available on the Cloud Application UI.
Note
Procedure
Step 1 Log in to Cisco Connected Mobile Experiences (Cisco CMX).
Cisco CMX Configuration Guide, Release 10.4145
Managing Cisco CMX ConfigurationDeleting a Notification
Step 2 ChooseMANAGE > Cloud Apps. The Cloud Application window is displayed.Step 3 View the following sections:
• Cloud Applications—Displays the cloud application name, description, documentation links, webinterface login links, and option to enable/disable the app. To enable the cloud app, click the Enableoption in the Actions column for the required cloud app.
• Notifications—Displays the notification name, receiver details, total number of notifications sent,acknowledged notification count, unacknowledged notification count, success percent, failure percent,latency. To reset a notification, click the Reset option in the Actions column againist each notification.
Managing VerticalizationCisco CMX Analytics comes packaged with a report generator that can automatically generate reports withthe most important metrics for specific businesses. By selecting a vertical, you can take advantage of predefinedreports that can help you make informed decisions based on the vertical your network is set up for. This featureis called verticalization.
Customizing your vertical enables you to quickly generate valuable reports specific to the requirements ofthat vertical. The customized verticals can also be configured with the correct tags suitable to your vertical.CMX Analytics’ verticalization feature enables you to customize the names of your entities such that theyare specific to a vertical. Depending on the vertical you choose, the CMX Analytics verticalization featurecan generate customized reports.
The following are some of the verticals supported by Cisco CMX, along with the reports they contain:
• Default—By default, Cisco CMX is packaged with Default vertical. If you want to configure anothervertical, you must choose a vertical.
• Retail
• Store Type Popularity
• Average Shopping Time
• Most Popular Entrance
• Most Popular Department
• Department Transition
• Footfall
• Mall
• Store Type Popularity
• Average Shopping Time
• Most Popular Entrance
• Most Popular Restaurant
• Department Transition
Cisco CMX Configuration Guide, Release 10.4146
Managing Cisco CMX ConfigurationManaging Verticalization
• Footfall
• Hospitality
• Most Popular Restaurant
• Connected Clients
• Most Used Amenity
• Local Correlation
• Longest Used Amenity
• Path Analysis
• Education
• Corridors vs Classroom
• Connected Clients
• Diners per Hall
• Local Correlation
• Library Time
• Path Analysis
• Healthcare
• Visitor Count
• Connected Clients
• Busiest Department
• Wait Times
• Diners per Cafeteria
• Path Analysis
• Airport
• Visitor Count
• Average Waiting Time
• Busiest Flights
• Wait Times
• Longest Used Amenity
• Path Analysis
Cisco CMX Configuration Guide, Release 10.4147
Managing Cisco CMX ConfigurationManaging Verticalization
Queue AnalyticsThe Queue Analytics feature provides a breakdown of the average time spent in a queue. This feature allowsyou to select a queue start area and one or more queue end areas, enabling the computation of the averagetime taken (15 minutes, hour, day, week, month, or year) for devices to move from the start area to an endarea.
Currently, the Queue Analytics feature is supported only for the Airport vertical.Note
Procedure
Step 1 Log in to Cisco Mobile Connected Experiences (Cisco CMX).Step 2 ChooseMANAGE > Verticalization.
The Verticalization window displays with a list of the supported verticals.Step 3 Select Airport vertical.
Depending on the selection, the Verticalization window is displayed with additional vertical information.
Step 4 Click Run Setup Wizard to start the verticalization process.Step 5 In the Location Tags window, select Security as queue time tag and click Continue.Step 6 In the Review Your Tag Selection window, verify the tag, and widgets, and click Save & Continue.Step 7 Tag Security queue time tag to a desired zone, and click Review.Step 8 Click Create a Report to create a report with the tag Security.
The Queue Time information is displayed in the report instead of Dwell Time.
Customizing VerticalsCustomizing a vertical means changing the names of the entities in your vertical based on your business. Youcan optimize your vertical by customizing it to meet your specific needs. Customizing includes naming thehierarchy of your vertical, association of icons, building a tag library, and specifying tag locations.
Procedure
Step 1 Log in to Cisco Mobile Connected Experiences (Cisco CMX).Step 2 ChooseMANAGE > Verticalization.
The Verticalization window is displayed with a list of the supported verticals.Step 3 Choose a vertical by clicking the icon corresponding to that vertical.
The customized widgets available for the chosen vertical are displayed.Step 4 Click Run Setup Wizard.
The setup wizard displays the steps required to optimize the vertical and complete the customization.Step 5 Click Get Started.
The Hierarchy Configuration window is displayed.
Cisco CMX Configuration Guide, Release 10.4148
Managing Cisco CMX ConfigurationQueue Analytics
Step 6 Configure the hierarchy levels of your vertical. Follow the instructions on the Hierarachy Configurationwindow to configure hierarchy levels for Campus, Building, Floor, and Zone and select an icon. If you approveof the default hierarchy name and the associated icon, click Skip Step.
Step 7 Click Continue.Step 8 Tags are used to categorize locations and devices. Click Continue to configure tagging.Step 9 Depending on the vertical you select, the tags specific to that vertical are listed. Select the tags you want to
create by clicking the button corresponding to that tag. The setup wizard creates the tags. Click Continue.Step 10 Location tags can be applied to specific locations based on your hierarchy. The setup wizard iterates through
the hierarchies in your vertical. Select the hierarchies that you want to tag by clicking the corresponding name.The right pane lists the Zone item name and a list of tags to choose from. Select the tags that are applicableto the Zone. Click Continue.
Step 11 Click Create a Report.The Analytics Reports window is displayed with the list of customized wizards for your vertical.
Configuring Basic CMX SettingsThe GUI allows you to set up maps, Cisco WLC, and mail server.
Procedure
Step 1 Log in to Cisco Mobile Connected Experiences (Cisco CMX).Step 2 Click SYSTEM.
The SETUP ASSISTANT window is displayed.Step 3 Click Next to set up the New UI Password.
TheMaps and Controllers window is displayed.Step 4 Choose either Default or the Advanced option.
• In theDefaultwindow, provide Cisco Prime Infrastructure credentials such as Username, Password,and IP Address, and click Import Controllers and Maps. This imports the Controllers and mapsfrom Cisco Prime Infrastructure.
• In the Advanced window, provide the map and Cisco WLC information, and click Next.
If the Override checkbox is checked, the import will override the existing entries.Note
Step 5 In theMail Server window that is displayed, enter the corresponding details.Step 6 Click Next to complete the configuration.
Root User ChangesIn releases prior to Cisco CMX 10.2, all the processes used the root user role. This has been changed in CiscoCMX 10.2 by introducing two new user roles: cmx and cmxadmin. The cmx user is a no-login user who ownsall the processes, except postgres. The cmxadmin is the primary user who performs all the administrativetasks.
Cisco CMX Configuration Guide, Release 10.4149
Managing Cisco CMX ConfigurationConfiguring Basic CMX Settings
The root user is not disabled; this user can still be used for installation and debugging. You cannot directlylog in to root through SSH or console. First you have log in as cmxadmin and then issue the su command togo to the root user level.
Do not use the root user account; unless explicitly directed to do so by the Cisco Technical Assistance Centerteam.
Caution
Cisco CMX Configuration Guide, Release 10.4150
Managing Cisco CMX ConfigurationRoot User Changes
C H A P T E R 7Managing Cisco CMX System Settings
• Overview of the System Service, on page 151• Viewing the Overall System Health, on page 151• Understanding the Node Table, on page 152• Understanding the Coverage Details Table, on page 153• Understanding the Controllers Table, on page 154• Managing Dashboard Settings, on page 154• Viewing Live System Alerts, on page 165• Viewing Patterns, on page 165• Understanding the Metrics Tab, on page 166
Overview of the System ServiceThe Cisco CMX System service comprises the following tabs, which help you perform a variety ofsystem-related tasks, including, but not restricted to, those listed here:
• Dashboard—Enables you to have an overall view of the system.• Alerts—Enables you to view live alerts.• Patterns—Enables you to detect patterns of various criteria, such as Client Count, CPU Usage, MemoryUsage, and so on.
• Metrics—Enables you to view system metrics.
Viewing the Overall System HealthProcedure
Step 1 Log in to Cisco Mobile Connected Experiences (Cisco CMX).Step 2 Choose System > Dashboard.
The System at a Glance window (see the image below) is displayed.
Cisco CMX Configuration Guide, Release 10.4151
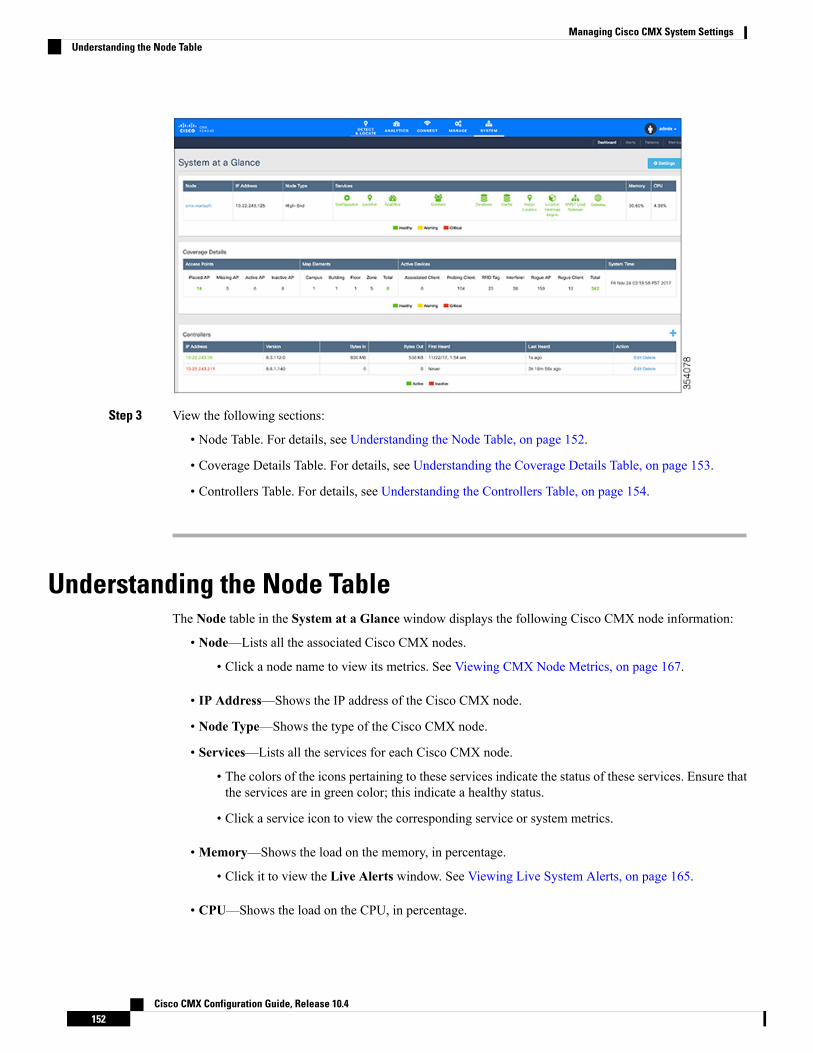
Step 3 View the following sections:
• Node Table. For details, see Understanding the Node Table, on page 152.
• Coverage Details Table. For details, see Understanding the Coverage Details Table, on page 153.
• Controllers Table. For details, see Understanding the Controllers Table, on page 154.
Understanding the Node TableThe Node table in the System at a Glance window displays the following Cisco CMX node information:
• Node—Lists all the associated Cisco CMX nodes.
• Click a node name to view its metrics. See Viewing CMX Node Metrics, on page 167.
• IP Address—Shows the IP address of the Cisco CMX node.
• Node Type—Shows the type of the Cisco CMX node.
• Services—Lists all the services for each Cisco CMX node.
• The colors of the icons pertaining to these services indicate the status of these services. Ensure thatthe services are in green color; this indicate a healthy status.
• Click a service icon to view the corresponding service or system metrics.
• Memory—Shows the load on the memory, in percentage.
• Click it to view the Live Alerts window. See Viewing Live System Alerts, on page 165.
• CPU—Shows the load on the CPU, in percentage.
Cisco CMX Configuration Guide, Release 10.4152
Managing Cisco CMX System SettingsUnderstanding the Node Table
Click it to view the Live Alerts window. See Viewing Live System Alerts, on page 165.•
Understanding the Coverage Details TableThe Coverage Details table in the System at a Glance window displays the following information:
• Access Points—Shows the number of access points placed on Cisco CMX map.
• Placed AP—Shows the total count of access points placed on Cisco CMX map.
• Missing AP—Shows the number of access point which has sent location details but not found onthe map. This could impact the accuracy of the location.
• Active AP—Shows the number of access point active for the last 24 hours. This helps to troubleshootand determine if there are access points that are not placed on Cisco CMX map.
• Inactive AP—Shows the number of inactive access points for the last 24 hours.
• Map Elements—Shows the number of elements available on Cisco CMX map.
• Campus—Shows the number of campuses in Cisco CMX.
• Building—Shows the total number of buildings in Cisco CMX.
• Floor—Shows the total number of floors in Cisco CMX.
• Zone—Shows the total number of zones in Cisco CMX.
• Total—Shows the summation of all the previous elements. This is the total elements in Cisco CMX.
• Active Devices—Shows the number of active devices available on Cisco CMX map.
• Associated Client—Shows the number of associated clients.
• Probing Client—Shows the number of probing clients.
• RFID Tag—Shows the number of active RFID tags.
• Interferer—Shows the number of interferers.
• Rogue AP—Shows the number of rogue access points.
• Rogue Client—Shows the number of rogue clients.
• BLE Tags—Shows the number of bluetooth devices.
• Total—Shows the summation of all the previous devices.
• System Time—Shows the current system time with the time zone set as on Cisco CMX system .
Cisco CMX Configuration Guide, Release 10.4153
Managing Cisco CMX System SettingsUnderstanding the Coverage Details Table
Understanding the Controllers TableThe Controllers table in the System at a Glance window lists the Cisco WLCs that are sending NetworkMobility Services Protocol (NMSP) data to Cisco CMX. The table displays the following details for eachCisco WLC:
• IP Address—The color of the table border to the left of each IP address indicates whether the CiscoWLC is active or not.
• Version—Cisco WLC software version.
• Bytes In and Bytes Out—Number of bytes received from and sent to the Cisco WLC.
• First Heard—Number of seconds since the first communication received from the Cisco WLC.
• Last Heard—Number of seconds since a communication was received from the Cisco WLC.
• Action—Allows you to modify the details of an existing controller or delete an existing controller. ClickEdit to edit the controller details in the Edit Controller window. Click the plus icon to view theControllersand Map Setup tab details in the Settings window.
The IP addresses of active contollers are shown in green. The IP addresees of inactive contorllers are shownin red.
Note
Managing Dashboard SettingsThe Settings option in the System at a Glance window enables you to manage the configurations and othersettings related to Cisco CMX System service.
Setting Device Tracking Parameters
Procedure
Step 1 Log in to Cisco Cisco Mobile Connected Experiences (Cisco CMX).Step 2 Choose System > Dashboard.
The System at a Glance window is displayed.Step 3 Click Settings at the top-right corner of the window. The SETTINGS window is displayed.
By default, the Tracking Parameters tab is displayed.
Step 4 In the Elements column, check the check box of each device that you want to select for tracking.
Cisco CMX Configuration Guide, Release 10.4154
Managing Cisco CMX System SettingsUnderstanding the Controllers Table

Figure 14: Tracking Parameters
Only the elements selected here will be tracked by the network location service and will appear on theActivityMap window.
The following elements are available for tracking:
• Wireless Clients
• Rogue Access Points
• Rogue Clients
• Interferers
• RFID Tags
• BLE Tags
BLE capable APs are discovered by Cisco Prime Infrastructure. Use Cisco Prime Infrastructure toplace the APs on the maps and export the maps. Cisco CMX will utilize the map file exported fromCisco Prime Infrastructure.
Bluetooth low energy (BLE) beacons are detected in two ways:
• Clean air over NMSP—To enable this trackingmethod, check Interferers option. You requirea Cisco WLC with software Release 8.0.115.0 or later for this method.
• Fast path over UDP—To enable this tracking method, check BLE Beacons option. Yourequire a Cisco WLC with software Release 8.6.1.146 or later for this method.
Note
Cisco CMX Configuration Guide, Release 10.4155
Managing Cisco CMX System SettingsSetting Device Tracking Parameters
Step 5 Click Save.
Setting Filtering Parameters
Procedure
Step 1 Log in to Cisco Mobile Connected Experiences (Cisco CMX).Step 2 Choose System > Dashboard.
The System at a Glance window is displayed.Step 3 Click Settings at the top-right corner of the window.Step 4 Click the Filtering tab.
Here, you can configure the following filtering parameters:
• Duty Cycle Cutoff (Interferer)—This is a percentage value. Interferers with a Duty Cycle that is lessthan the specified cutoff will not be tracked.
• RSSI Cutoff (Probing Only Clients)—This is the radio signal strength cutoff for filtering. The defaultis -85 dBm.
• Exclude Probing Only Clients—Check this check box to filter out clients that are only probing. Thisis the best effort to stop detecting probing clients. However, a small percentage of probing clients mayappear for short duration. So this should not be considered as complete probing client removal from thesystem. If you check this option, the Probing Client Filtering service is enabled on Cisco WLC andCisco CMX will not receive any probing client information.
• Enable Locally Administered MAC filtering—Check this check box to filter out self-assigned MACaddresses. This parameter is checked by default. This discards Apple iOS8 random MAC addresses.
• Enable Location MAC Filtering—Check this check box to filter out specific MAC addresses. Forexample, you can use this to filter out MAC addresses of employees’ devices. After checking this, youcan either specify a MAC address that you want to allow or disallow, or choose to allow, disallow, ordelete previously entered MAC addresses.
• Enable Location SSID Filtering—Check this check box so that the Location service excludes all visitordevices associated to a particular SSID.
1. Click Enable SSID Filtering.
2. Click Select SSID, and select a particular SSID. If no SSIDs appear in the list, make sure that a CiscoWLC is active, and then click Fetch SSIDs to refresh the list.
3. Click Filter SSID to add the selected SSID to the filter list.
Step 5 Click Save.
Cisco CMX Configuration Guide, Release 10.4156
Managing Cisco CMX System SettingsSetting Filtering Parameters
Setting Location Calculation Parameters
Procedure
Step 1 Log in to Cisco Mobile Connected Experiences (Cisco CMX).Step 2 Choose System > Dashboard.
The System at a Glance window is displayed.
Step 3 Click Settings at the top-right corner of the window.
The SETTINGS dialog box is displayed.
Step 4 Click the Location Setup tab.
Here, you can configure the following Location Calculation Parameters:
• Enable OW Location—Check this check box to enable the use of Outer Walls (obstacles) for locationcalculation. The Calibrationmodel includes information regarding theWalls. This setting controls whetherthe CMX should honor the walls while calculating the heatmaps or not.
• Enable Location Filtering—Check this check box if you want the system to use previous locationestimates for estimating the current location. This parameter will be applied only for client locationcalculation. Enabling this parameter reduces location jitter for stationary clients and improves locationtracking for mobile clients. This parameter is enabled by default.
• Use Default Heatmaps for Non Cisco Antennas—Check this check box to enable the usage of defaultheat maps for non-Cisco antennae during location calculation.
• Chokepoint Usage—Check this check box to enable the usage of chokepoint proximity to determinethe location of a device. This applies only to Cisco-compatible tags that are capable of reporting chokepointproximity. This parameter is enabled by default.
• Enable Hyperlocation/FastLocate/BLEManagement—Check this check box to enable hyperlocation,fastlocate, and BLE management in Cisco CMX. This parameter is disabled by default.
This option will not be displayed if the system is not a large OVA installation. Hyperlocationrequires a high end system to run and if run on lower system the option is hidden. For highend system (20 vCPU) and Bare metal (3365), Hyperlocation option is enabled by default anddisplayed in the GUI. For standard (16 vCPU) and low end system (8 vCPU), Hyperlocationoption is hidden.
Note
• Optimize Latency—Check this check box to enable latency optimization. If you enable this option,Cisco CMX enables faster location computation over less data affecting accuracy due to not using thefully available data for computation. By default, this option is not enbaled. If not enabled, Cisco CMXwill provide location updates at default intervals computed over full available data. If you check thisoption, the Relative discard RSSI time and Relative discard AoA time values will be changed to 30.You will not be able to edit these values. We recommend you to enable this option only if recommendedby Cisco.
• Use Chokepoints for Interfloor conflicts—Use this drop-down list to specify the frequency to determinethe correct floor during interfloor conflicts.
Cisco CMX Configuration Guide, Release 10.4157
Managing Cisco CMX System SettingsSetting Location Calculation Parameters
• Chokepoint Out of Range Timeout (secs)—After a Cisco-compatible tag leaves a chokepoint proximityrange, RSSI information will be used again to determine the location only after this timeout value isexceeded. Specify a timeout value, in seconds, accordingly.
• Relative discard RSSI time (secs)—Enter the time, in seconds, after which the RSSI measurementshould be considered obsolete and discarded from use in location calculations. This time is from the mostrecent RSSI sample, and not an absolute time. For example, if this value is set to 3 minutes, and twosamples are received at 10 minutes and 12 minutes, both the samples will be retained. However, anadditional sample received at 15 minutes will be discarded. We recommend that you do not modify thisparameter without the guidance of Cisco Technical Support.
• Relative discard AoA time—Enter the time, in secondsß, after which the AoA mesaurement should beconsidered as obsolete and discarded from use in location calculations. We recommend that you do notmodify this parameter without the guidance of Cisco Technical Support.
• Absolute discard RSSI time—Enter the time, in minutes, after which the RSSI measurement should beconsidered obsolete and discarded from use in location calculations regardless of the most recent sample.We recommend that you do not modify this parameter without the guidance of Cisco Technical Support.
• RSSI cutoff—Enter the RSSI cutoff value, in dBm, at which you want the server to discard APmeasurements. We recommend that you do not modify this parameter without the guidance of CiscoTechnical Support.
You can also set the followingMovement Detection Parameters:
• Individual RSSI change threshold—Enter a threshold, in dBm, beyond which you want individualRSSI movement recalculation to be triggered. We recommend that you do not modify this parameterwithout the guidance of Cisco Technical Support.
• Aggregated RSSI change threshold—Specify the Aggregated RSSI movement recalculation triggerthreshold.We recommend that you do not modify this parameter without the guidance of Cisco TechnicalSupport.
• Many new RSSI change percentage threshold—Specify the trigger threshold recalculation (as apercentage) for many new RSSI changes. We recommend that you do not modify this parameter withoutthe guidance of Cisco Technical Support. This parameter indicates the threshold for comparing againstthe aggregated APs value. This compariosn will help you to decide whether the location computation isrequired.
• Manymissing RSSI percentage threshold—Specify the trigger threshold recalculation (as a percentage)for many missing RSSI changes. We recommend that you do not modify this parameter without theguidance of Cisco Technical Support.
You can set the following History Storage Parameters:
• History Pruning Interval—Specify the number of days of client location history to be stored for thelocation maps.
Step 5 Click Save.
Cisco CMX Configuration Guide, Release 10.4158
Managing Cisco CMX System SettingsSetting Location Calculation Parameters
Configuring the Mail Server for Notifications
Procedure
Step 1 Log in to Cisco Mobile Connected Experiences (Cisco CMX).Step 2 Choose System > Dashboard.
The System at a Glance window is displayed.
Step 3 Click Settings at the top-right corner of the window.
The Settings dialog box is displayed.
Step 4 Click theMail Server tab.
Here, you can configure the following:
• From Email Address—Email address of the mail server host.
• To Email Address Address—Enter the email addresses to which the notifications should be sent. Youcan add multiple email addresses sepearted using the delimiters comma, semi-colon, and space.
• Server—Mail server URL.
• Port—Port number for the mails. The default is port 25.
• Authentication—Option to enable or disable email authentication.
• SSL—Option to enable or disable email security with Secure Sockets Layer (SSL) to prevent third partiesfrom potentially viewing your email messages.
• TLS—Option to enable or disable email secured with Transport Layer Security (TLS).
Step 5 To test your settings, click Save and Test Settings.Step 6 Enter the email address and then click Send e-mail.Step 7 Click Save to save your settings if the test is successful.
Importing Maps and Controllers into Cisco CMXTo import maps and controllers directly from Cisco Prime Infrastructure, do the following:
Before you begin
Ensure that while exporting maps from Prime, check the Include Calibration Information option. CiscoCMX will not be able to compute the location for network elements (Clients/ Interferers / Tags) for mapshaving no calibration information.
Import operation for map archive files will fail if Include Calibration Information option is not selected inthe Prime Infrastructure while importing maps. While importing maps, ,the upload utility validates if thecalibration model is available for each floor in the given maps archive file. If not available, map import willfail with an error message: 'Calibration model is missing in the uploaded map archive. Please select the option'Include Calibration Information' on Prime Infrastructure GUI while exporting maps archive.
Cisco CMX Configuration Guide, Release 10.4159
Managing Cisco CMX System SettingsConfiguring the Mail Server for Notifications

Procedure
Step 1 Log in to Cisco Mobile Connected Experiences (Cisco CMX).Step 2 Choose System > Dashboard.
The System at a Glance window is displayed.
Step 3 Click Settings at the top-right corner of the window.Step 4 Choose the Controllers and Maps Setup > Import tab, and enter the following parameters:
a) Username—Username of the Cisco Prime Infrastructure server.b) Password—Password of the Cisco Prime Infrastructure server.c) IP Address—IP address of the Cisco Prime Infrastructure server. Ensure that the SNMP community
string is properly configured in Cisco Prime Infrastructure.
• To save the Cisco Prime Infrastructure credentials, check the Save Cisco Prime Credentials check box.
• To override the existing maps that currently exist in Cisco CMX while importing, check the Delete &replace existing maps & analytics data check box.
• To override the existing zones that currently exist in Cisco CMX while importing, check the Delete &replace existing zones check box.
We recommend exporting updated maps only from Cisco Prime Infrastructure. In addition, whenimporting updated maps to Cisco CMX,make sure theDelete& replace existingmaps& analyticsdata check box and the Delete & replace existing zones check box are unchecked.
Note
Step 5 Click Import Controllers and Maps.Step 6 Click Save.
Importing Maps and Adding ControllersYou can manually import maps and add Cisco WLCs into Cisco CMX using the web interface.
Procedure
Step 1 Log in to Cisco Mobile Connected Experiences (Cisco CMX).Step 2 Choose System > Dashboard.
The System at a Glance window is displayed.
Step 3 Click Settings at the top-right corner of the window.Step 4 Choose the Conrollers and Maps Setup > Advanced tab.Step 5 To manually import a map, perform the following:
a) Under theMaps area, click Browse .
The File Upload dialog box is displayed.
Cisco CMX Configuration Guide, Release 10.4160
Managing Cisco CMX System SettingsImporting Maps and Adding Controllers
If you check the Delete & replace existing maps & analytics data check box , the mapsexisting in Cisco CMX will be replaced by the maps that you import from Cisco PrimeInfrastructure. Existing zones are also removed when you override the maps.
If you check the Delete & replace existing zones check box, the existing zones in Cisco CMXwill be replaced by zones that you import from Cisco Prime Infrastructure.
Note
Ensure that while exporting maps from Prime, check the Include Calibration Information option. CiscoCMX will not be able to compute the location for network elements (Clients/ Interferers / Tags) for mapshaving no calibration information.
b) Navigate to the location of the map file, select the map file, and then click Open.c) Click Upload.d) Click Save.
Step 6 To import a Cisco WLC, configure the following parameters under the Controllers area:a) Controller type—Choose from Cisco WLC or Unified WLC.b) IP address / Hostname—IP address or hostname of the Cisco WLC.c) Controller Version—(Optional) Software version of the Cisco WLC.d) Applicable Services—Check the CAS check box if Context Aware Service (CAS) is applicable.e) Controller SNMP version—Choose from v1, v2c, or v3.f) Controller SNMPWrite Community—Enter the controller SNMPwrite Community string. The default
is private.g) Click Add Controller.
Step 7 Click Save.
Upgrading Cisco CMXAfter you install Cisco CMX 10.2, future upgrades can be performed via the Cisco CMX GUI or by usingthe cmxos upgradeCLI command and the .cmx file, for example, cmxos upgrade <CISCO_CMX$$$.cmx>,while logged in as cmxadmin.
To upgrade Cisco CMX to a future release using the GUI, perform the following task:
Procedure
Step 1 Log in to Cisco Mobile Connected Experiences (Cisco CMX).Step 2 Choose System > Dashboard.
The System at a Glance window is displayed.
Step 3 Click Settings at the top-right corner of the window.Step 4 In the SETTINGS dialog box, click the Upgrade tab and then click Upgrade .Step 5 Either choose a local .cmx file or point to the URL of the .cmx file
Before selecting the local file option, ensure that the .cmx file is available on the machine from which accessto the web GUI is being made.
The upgrade process involves the following tasks:
Cisco CMX Configuration Guide, Release 10.4161
Managing Cisco CMX System SettingsUpgrading Cisco CMX

1. The .cmx file is copied to /opt/image/newimage
2. The cmxos upgrade command is executed in the background:
• Services are stopped
• New files are copied and configured
• Services are restarted
Enabling High Availability for Cisco CMXHigh Availability (HA) is a simple and reliable failover mechanism. It helps Cisco CMX host and supportmultiple mobility applications seamlessly without any interruption.
The definition of servers described in this section are as follows:
• Active Server—The Cisco CMX server that is actively serving traffic from the controllers. The virtualIP address (VIP) for the HA pair should point to the current active server. The VIP address is optional.
• Primary Server—The Cisco CMX server that will be initially active in the HA pair.
• Secondary Server—The CMX server that will be the backup or standby server in the HA pair.
Cisco CMX HA requires two servers. The primary server acts as the active Cisco CMX server. Cisco CMXserver can use virtual IP addresses too. The primary Cisco CMX server is installed by selecting the Locationor Presence node type. In an active HA deployment, data on the primary server will be continuouslysynchronized with the secondary server. If the primary server encounters any issues, the secondary serverwill take over the responsibility as the active server.
Install Cisco CMX Release 10.3.x on both the servers. From the web installer, choose either Presence orLocation as the node type. Both the servers should have the same node type. After installation completes,each server is considered a standalone server and has the primary HA role. HA requires both primary andsecondary servers, the role for one server needs to change. To change the HA role of a server from primaryto secondary, use the cmxha secondary convert command in cmxadmin mode.
The Cisco CMX HA Admin interface is hosted on Cisco CMX port 4242 and can be accessed usinghttp://cmx_ip_address:4242/. Log in to the web interface using cmxadmin as user ID and the passwordconfigured for cmxadmin during the primary and secondary server installation. This Cisco CMX HA Admininterface is different from the regular Cisco CMX interface that can be accessed at http://cmx_ip_address.Use the Cisco CMX HA Admin interface specifically monitoring and managing HA.
Every active Cisco CMX instance is backed by another (inactive) instance. The second CMX instance is notactive until the failover procedure is initiated, either manually or automatically.
You can enable HA by using either Cisco CMX web UI or CLI.
We recommend that you use the Cisco CMX web UI for HA configuration.Note
Cisco CMX Configuration Guide, Release 10.4162
Managing Cisco CMX System SettingsEnabling High Availability for Cisco CMX
Cisco CMXHigh Availability documentation is embedded in the product. From the Cisco CMX user interface,choose Documentation from the drop-down list on the top-right corner.
Tip
Pre-requisites for HA• Both the primary and the secondary server should be of the same size and the same type (VM or physicalappliance).
• Both the primary and the secondary server should have the same Cisco CMX version.
• Both the primary and the secondary server should be connected on the same subnet.
• Both the primary and the secondary server should be connected on the same subnet if Layer 2 HA isrequired.
• Both the primary and the secondary server should be IP connected with delay of less then 250ms if Layer3 HA is used.
Enabling High Availability for Cisco CMX Using the Web UI
Procedure
Step 1 Log in to Cisco Connected Mobile Experiences (Cisco CMX).Step 2 Choose System > Dashboard.
The System at a Glance window is displayed.
Step 3 Click Settings at the top-right corner of the window.
The Settings dialog box is displayed.
Step 4 Click the High Availability tab.Step 5 Configure the following parameters:
• Secondary IP Address—Enter the IP address of the secondary server. The primary server will becontinuously synchronized with the secondary server. If the primary server encounters any issues, thesecondary server will take over the responsibility as the active server.
• Secondary Password—Enter the password for the cmxadmin user on the secondary server.
• Use Virtual IP Address—By default, this option is checked. (If you do not check this option, theVirtualIP Address field is dimmed, and this address will not be used for HA configuration.)
If you decide to retain the default, enter the corresponding virtual IP address.
• Virtual IP Address—(Optional) Enter the virtual IP address for the HA pair if the Use Virtual IPAddress check box is checked. .
• Failover Type—From the Failover Type drop-down list, choose Auto orManual.
Cisco CMX Configuration Guide, Release 10.4163
Managing Cisco CMX System SettingsPre-requisites for HA

If you chooseAuto, Cisco CMX automatically fail over to the secondary server when a seriousissue is detected. If you chooseManual, manual intervention is required to initiate failoverfrom the web interface or command line. The failure will be reported via a notification, but noaction will be taken.
Note
• Notification Email Address— Enter the email address to which HA notifications are to be sent. Youcan add multiple email addresses.
Step 6 To enable HA, click Enable.
Cisco CMX will verify the HA settings and start enabling HA between the primary and secondary servers.
Step 7 Click Save.
The initial synchronization of the primary and the secondary server takes time and the System at a Glancewindow displays the state as Primary Syncing while the synchronization is in progress. After thesynchronization is complete, the primary server will be in the state Primary Active state. Also, aftersynchronization, an informational alert is generated in Cisco CMX and an email is sent to the addresses thathave been provided, indicating that HA is enabled and synchronized successfully.
Click theHelp link in the top-right corner of the Settings dialog box to launch the HA online help.For more information about the HA installation process, see http://cmx_server/docs/ha/.
Tip
Enabling High Availability Using CLI
Procedure
Step 1 To enable HA using CLI, run the cmxha config enable command.Step 2 Follow the command prompt and enter the HA parameters.
The HA options are similar to the ones available in Cisco CMXWeb UI:$ cmxha config enable
Are you sure you wish to enable high availability? [y/N]: yPlease enter secondary IP address: 192.0.2.250Please enter the cmxadmin user password for secondary:Do you wish to use a virtual IP address? [y/N]: yPlease enter the virtual IP address: 192.0.2.251Please enter failover type [manual|automatic]: automaticPlease enter an email address(es) for notifications (Use space, comma or semicolon toseparate): [email protected] to configure high availability with server: 192.0.2.250Configuring primary server for HAConfiguring secondary server for HA........................................................................Synchronizing Postgres data from primary to secondary.........Synchronizing Cassandra data from primary to secondary....................Syncing primary files to secondary
Cisco CMX Configuration Guide, Release 10.4164
Managing Cisco CMX System SettingsEnabling High Availability Using CLI
Successfully started high availability. Primary is syncing with secondary.
Viewing Live System AlertsProcedure
Step 1 Log in to Cisco Mobile Connected Experiences (Cisco CMX).Step 2 Choose System > Alerts.Step 3 In the Live Alerts window that is displayed, sort the alerts By Severity, By Node, or By Service, using the
drop-down list at the top-right corner.
To dismiss an alert, in the Actions column adjacent the corresponding node name, click the Dismiss icon.
Viewing PatternsThe Patterns window shows the pattern of a specific feature, such as client count, unique devices, and so onover the week for a selected time period. For example, if you select client count for the last 1 month, it showswhich days or times of the week had the most client counts in the last 1 month. The larger dots indicates alarger count for the specific feature. You can hover cursor over the dots to interpret the pattern details.
• Client Count—Displays the total devices seen at a given time.
• LocationCalculation Time—Displays the average amount of time, inmilliseconds, taken by the Locationalgorithm, to calculate a client's location.
• CPU Usage—Displays the percentage of used CPU on a per-node basis.
• Memory Usage—Displays the percentage of used memory on a per-node basis.
• Redis Connections Received—Displays the total number of connections received by the cache service.
• Locally Administered MAC count—Displays the total number of iOS devices.
In Cisco CMX Release 10.2.3:
• The following pattern details are no longer available: Incoming Rate, Dropped Notifications, and NMSPLB Read Operations.
• In the Select Criteria drop-down list, the iOS8 Devices option is renamed to Locally AdministeredMAC count.
Note
To view patterns:
Cisco CMX Configuration Guide, Release 10.4165
Managing Cisco CMX System SettingsViewing Live System Alerts
Procedure
Step 1 Log in to Cisco Mobile Connected Experiences (Cisco CMX).Step 2 Choose SYSTEM > Patterns.
The Patterns window is displayed.
Step 3 From the Select Criteria drop-down list, choose the criteria for which you want to view pattern data.Step 4 From the Select Date Range drop-down list, choose the time frame for the criteria pattern.
By default, the pattern data is displayed for the last one week for all the nodes in the cluster. Youcan view the average for the days from Monday to Sunday at all times for the selected time frame.
Note
Step 5 Optionally, from the Select Server drop-down list, choose the Cisco CMX node for which you want patterndata to be displayed. By default, the pattern data for all the Cisco CMX nodes in a cluster is displayed.
Understanding the Metrics TabTheMetrics tab in the Cisco CMX System service enables you to view system metrics, database metrics,cache metrics, location metrics, and analytics notification mertics. Metrics information related to the followingcriterias are displayed:
• System Summary
• Node Mertics
• Database Metrics
• Cache Mertics
• Location Metrics
• Analytics Notification Metrics
Viewing System Summary MetricsThe System Summary Metrics window displays the following information:
• Number of Active Clients
• Number of NMSP messages processed by the system per second, in the last one minute
• Overall CPU usage metrics
• Overall memory usage metrics
• Overall disk usage metrics
Cisco CMX Configuration Guide, Release 10.4166
Managing Cisco CMX System SettingsUnderstanding the Metrics Tab
Procedure
Step 1 Log in to Cisco Mobile Connected Experiences (Cisco CMX).Step 2 Choose SYSTEM > Metrics.
The System Summary tab in the left pane is selected by default, and the corresponding details are displayed.
Viewing System Summary Metrics Using the DashboardAlternatively, to view the System Summary metrics from the Dashboard:
Procedure
Step 1 Log in to Cisco Mobile Connected Experiences (Cisco CMX).Step 2 Choose SYSTEM > Dashboard.
The System at a Glance window is displayed.
Step 3 In the Services column, click the Configuration, Location Heatmap Engine, NMSP Load Balancer, orProxy icon to view the corresponding System Summary metrics.
Hover your cursor over the metrics and graphs for descriptions and details.Note
Viewing CMX Node MetricsThe CMX Node Metrics window for a Cisco CMX node displays the following information:
• Number of active clients
• Location latency time
• Number of incoming and outgoing NMSP messages
• Number of Controllers
• CPU uesage metrics for each service
• Memory usage metrics for each service
• Disk IO metrics
• Disk usage metrics
• redis-iops
• jdbc-iops
• redis-errors
• jdbc-errors
Cisco CMX Configuration Guide, Release 10.4167
Managing Cisco CMX System SettingsViewing System Summary Metrics Using the Dashboard

To view the Node metrics for a Cisco CMX node:
Procedure
Step 1 Log in to Cisco Mobile Connected Experiences (Cisco CMX).Step 2 Choose SYSTEM > Metrics.Step 3 In the left pane, click a Cisco CMX node name to view the metrics for that node.
Viewing CMX Node Metrics Using the DashboardAlternatively, to view the node metrics from the Dashboard:
Procedure
Step 1 Log in to Cisco Mobile Connected Experiences (Cisco CMX).Step 2 Choose SYSTEM > Dashboard.
The System at a Glance window is displayed.
Step 3 In the Node column, click a Cisco CMX node name to view the metric details for that node.
Hover your cursor over the metrics and graphs for descriptions and details.Note
Viewing Database MetricsThe Database Metrics window displays the following metrics:
• Databse Size—Shows the active memory used by the Cassandra and Postgres database.
To view the Database metrics:
Procedure
Step 1 Log in to Cisco Mobile Connected Experiences (Cisco CMX).Step 2 Choose SYSTEM > Metrics.Step 3 In the left pane, click Database Metrics.
Hover your cursor over the Databasemetrics graph for descriptions and details regarding the databaseusage.
Note
Cisco CMX Configuration Guide, Release 10.4168
Managing Cisco CMX System SettingsViewing CMX Node Metrics Using the Dashboard
Viewing Database Metrics Using the DashboardAlternatively, to view the database metrics from the Dashboard:
Procedure
Step 1 Log in to Cisco Mobile Connected Experiences (Cisco CMX).Step 2 Choose SYSTEM > Dashboard.
The System at a Glance window is displayed.
Step 3 In the Services column, click the Database icon.
Hover your cursor over the metrics and graphs for descriptions and details.Note
Viewing Cache MetricsThe Cache Metrics window displays the following metrics:
• Blocked connections—Shows the number of clients pending on a blocking call to finish.
• Connected clients—Shows the number of client connections in use.
• Used memory—Shows the total number of bytes allocated by Redis using its allocator .
• Evicted keys—Shows the number of evicted keys due to maxmemory limit.
To view the Cache metrics:
Procedure
Step 1 Log in to Cisco Mobile Connected Experiences (Cisco CMX).Step 2 Choose SYSTEM > Metrics.Step 3 In the left menu, click Cache Metrics.
Viewing Cache Metrics Using the DashboardAlternatively, to view the Cache metrics from the Dashboard:
Procedure
Step 1 Log in to Cisco Mobile Connected Experiences (Cisco CMX).Step 2 Choose SYSTEM > Dashboard.
The System at a Glance window is displayed.
Cisco CMX Configuration Guide, Release 10.4169
Managing Cisco CMX System SettingsViewing Database Metrics Using the Dashboard
Step 3 In the Services column, click the Cache icon.
Hover your cursor over the metrics and graphs for descriptions and details.Note
Viewing Location MetricsThe Location Metrics window displays the following metrics for each Cisco CMX node:
• Location Counts—The total computations done per second.
• Location Times—The location calculation time includes the mathematical portion of the locationcomputation, and in most cases, is about 10 to 20 milliseconds. The location latency is the total time oflatency computation from when the message comes from NMSPLB, to location, aggregation, creatingcache, and calculation.
• Location andNmsplb Location andNmsplb—The rate of NetworkMobility Service Protocol (NMSP)messages coming in to the NMSPLB.
• Hyperlocation Rates—The rate of incoming hyperlocation messages.
• Location Computation—The chart for location computation.
To view the Location metrics:
Procedure
Step 1 Log in to Cisco Mobile Connected Experiences (Cisco CMX).Step 2 Choose SYSTEM > Metrics.Step 3 In the left pane, click Location Metrics.
Viewing Location Metrics Using the DashboardAlternatively, to view the Location metrics from the Dashboard:
Procedure
Step 1 Log in to Cisco Mobile Connected Experiences (Cisco CMX).Step 2 Choose SYSTEM > Dashboard.
The System at a Glance window is displayed.
Step 3 In the Services column, click the Location icon.
Hover your cursor over the metrics and graphs for descriptions and details.Note
Cisco CMX Configuration Guide, Release 10.4170
Managing Cisco CMX System SettingsViewing Location Metrics
Viewing Analytics Notification MetricsThe Analytics Notification Metrics window shows the most important performance indicators relating tothe Analytics service. A notification is sent from the Location service to the Analytics service when significantmovement is detected from a device. Each notification contains an update on the location of a single device.
The Analytics Notification Metrics window displays the following metrics for each Cisco CMX node:
• Notification processing time—The average time taken to process an incoming notification. This timewill depend on a number of factors, but most notably, the size of the network, that is, the number ofbuildings, floors, zones, tags, and so on. This metric is relatively stable although you can expect peakswhen the system is starting up.
• Notification queue size—The size of the queue for incoming notifications, which are queued beforebeing processed. Depending on the system load, the Location service will send the notifications in batches.Therefore, you can always expect a queue of size greater than 0. This mechanism may also result in avery irregular graph at some zoom levels, that is, one with many ups and downs. This is the expectedbehavior. The queue size is expected to rise when the incoming rate increases. If it continues to grow,you will begin to see dropped notifications in the Notification dropped rate metric
• Notification dropped rate—The size of the queue for incoming notifications is limited. Hence, if thequeue gets too big, notifications will be rejected. TheNotification dropped rate graph shows howmanynotifications are rejected per second. Ideally, you require this chart to show a flat line of 0. If it does notshow 0, you should consider adding another server to the cluster for running the Analytics service. Thiswill distribute the load over the two servers.
• Notification incoming rate—This is the number of notifications received by the Analytics service persecond. This trend should roughly equal the client count, that is, the more clients are detected by theLocation service, the more notifications are expected. However, the trend is also influenced by the clients'movement rates because notifications are only sent when the location of a device changes.
To view the Analytics Notification metrics:
Procedure
Step 1 Log in to Cisco Mobile Connected Experiences (Cisco CMX).Step 2 Choose SYSTEM > Metrics.Step 3 In the left pane, click Analytics Notification Metrics.
Viewing Analytics Notification Metrics Using the DashbaordAlternatively, to view the Analytics Notification metrics from the Dashboard:
Procedure
Step 1 Log in to Cisco Mobile Connected Experiences (Cisco CMX).Step 2 Choose SYSTEM > Dashboard .
The System at a Glance window is displayed.
Cisco CMX Configuration Guide, Release 10.4171
Managing Cisco CMX System SettingsViewing Analytics Notification Metrics
Step 3 In the Services column, click the Analytics icon.
Hover your cursor over the metrics and graphs for descriptions and details.Note
Viewing Presence MetricsThe Presence Metrics window displays the following metrics:
• Presence Counts
• Presence Rates
To view the Presence metrics:
Procedure
Step 1 Log in to Cisco Mobile Connected Experiences (Cisco CMX).Step 2 Choose SYSTEM > Metrics.Step 3 In the left pane, click Presence Metrics.
Cisco CMX Configuration Guide, Release 10.4172
Managing Cisco CMX System SettingsViewing Presence Metrics
C H A P T E R 8Performing Administrative Tasks
This chapter describes how to perform administrative tasks using Cisco CMX. Users who are assignedadministration privileges can perform administrative tasks.
• Cisco CMX User Accounts, on page 173• Recovering Password, on page 174• Using FTP Commands for Cisco CMX, on page 174• Backing Up Data, on page 175• Restoring Data, on page 178• Troubleshooting Cisco CMX Server Shutdown Problems, on page 180
Cisco CMX User AccountsPrior to Cisco CMX 10.2 all Cisco CMX processes ran under the Linux root user account. Cisco CMX 10.2introduces two new user accounts (cmx and cmxadmin) to prevent any potential risks and secure the system.
• root—Root user account. Users should not use this account.
The password of the root account is now being set and maintained by the systemowners, and no longer has a default password configured. This way, the accountis still available for special-case installation and tackling debugging issues, andthe root user will be owned by the end-user. Password recovery is accomplishedthrough the use of the single user login process. For more information seeRecovering Password, on page 174.
Note
• cmx—A no login account that now owns all the CMX processes with the exception of postgress.
• cmxadmin—Primary account used for the performance of all administrative tasks using CLI. User willsudo from this account to perform tasks requiring root-level access. This account is used to upgradeCisco CMX 10.2 to a future release using GUI.
• admin—Admin user account for configuring maps, and Cisco WLCs, and restart services using CiscoCMXWeb UI.
• normal user accounts—User-defined accounts.
Cisco CMX Configuration Guide, Release 10.4173
Recovering PasswordCisco CMX Release 10.2 uses a single user mode to reset the root and cmxadmin user passwords.
To enter into the single user mode you require:
• A (non-SSH) console connection to the Cisco Mobility Services Engine (Cisco MSE).
• A power-cycle of the Cisco MSE appliance
The GUI admin user password can be reset to the default of admin from the CiscoMSECLI using the followingcommand:
cmxctl users passwd username
You should know the cmxadmin user password for CLI access.
To reset the root or cmxadmin password, perform the following tasks:
Procedure
Step 1 Establish console access.Step 2 Power on the Cisco MSE.Step 3 Press the Up arrow key within 6 seconds of the first text appearing on screen.Step 4 When the GRUB menu is displayed:
a) Verify if the first entry is highlighted.b) Press the e key to edit.
Step 5 Use the Down arrow key to highlight the entry that begins with the word kernel.a) Press the e key to edit the entry.b) Press the space bar, type the word single, and then press Enter.c) Press the b key to boot the selected entry.
Step 6 After the system boots and you are at the # prompt:a) Enter passwd <username> and press Enter.b) When prompted, enter the new password for the user (root/cmxadmin) and press Enter.c) Re-enter the password to verify.
Step 7 Type reload and press Enter to reboot the system and load the Cisco CMX services.
Using FTP Commands for Cisco CMXYou can use File Transfer Protocol (FTP) commands for backing up and restoring data on Cisco CMX 10.x.We recommend you to follow the below best practice for data backup automation:
Cisco CMX Configuration Guide, Release 10.4174
Performing Administrative TasksRecovering Password
Procedure
Step 1 Setup a NAS Storage andmount it to your Cisco CMX box, for example, mount the storage to a local directorysuch as /mnt/nas.
Step 2 Write a script to execute the CMX backup program.
A sample backup script is as mentioned below:#!/bin/shcd /mnt/nas/backupsls -1tr cmx_backup* | head -n -3 | xargs -d '\n' rm -f --cmxos backup --all --path /mnt/nas/backups --online
Step 3 Place the script at /home/cmxadmin/backup-cmx.sh.
We recommend you to remove previous backups to prevent running out of disk space on the NASstorage.
Note
Step 4 Run the cmxos backup --all --path /mnt/nas/backups --online command.Step 5 Add a cron entry to the cmxadmin user to execute the backup script, for example, run everyday at 1:05am, 5
1 * * * * /home/cmxadmin/backup-cmx.sh.
Backing Up DataAfter you install and run Cisco CMX successfully, you can take a backup to avoid losing any data.
You may lose data on your CMX server, if:
• The hard disk in your CMX server fails
• The data on your CMX server is corrupted while upgrading
Therefore, backing up your data enables you to restore it to the original state.
If Cisco CMX contains huge amount of saved data, the backup operation will take up extra disk space. In thatcase, you can consider the following:
• Back up to an external drive if there is not enough space on the Cisco CMX server. You can performthis operation by plugging in a removable hard disk or a mounted hard disk.
• After the backup operation, move the backup file (using scp) to a different server and remove it from theCisco CMX server.
You can backup data such as location history, current client location, floor maps, and licenses. The followingcomponents are included in the backup:
• Database
• Cache
• Cassandra
• Influxdb
Cisco CMX Configuration Guide, Release 10.4175
Performing Administrative TasksBacking Up Data
• Consul
• Floormaps
• Licenses
• Setup
• Conf
Procedure
To perform a backup operation, run the cmxos backup command using the cmxadmin (non-root user) account.
You can include the -i (for example, cmxos backup -i database) parameter with the backup so that you canchoose the components that you want to include in the backup.
The other backup options available are:
• --all—Include influxdb in the backup. The default is without influxdb and only includes postgres andCassandra data.
• --path—Specify a location for the backup file. The default location is /tmp.
• --online—Perform the backup without stopping cmx services.
• --offline—Stop cmx services first and then perform the backup.
• The destination directory for backup file requires rwx permission. When you specify a backupdirectory other than /tmp, ensure that the directory has "r/w/x" permission by user:cmx.
• If High Availability is enbaled on Cisco CMX, online backup is supported only on primaryand not secondary.if High Availability is disabled, online and offline backups are supportedon both primary and secondary.
Note
The following is a sample output from the cmxos backup command:[cmxadmin@test ~]$ cmxos backupPlease enter the path for backup file [/tmp]: /tmp[17:01:30] Preparing for backup...Data size 287388806Available disk space 139165282304Pre-backup took: 0.0118758678436 seconds['database', 'cache', 'cassandra', 'influxdb', 'consul', 'floormaps', 'licenses' , 'setup','conf'][17:01:30] Backup Database...Backup database took: 1.15777993202 seconds[17:01:32] Backup Cache...Backup cache took: 0.383176088333 seconds[17:01:32] Backup Cassandra...Backup Cassandra DB took: 2.99715185165 seconds[17:01:35] Backup InfluxDb...Backup Influx DB took: 0.0846002101898 seconds[17:01:35] Backup Consul...Backup Consul took: 0.0185141563416 seconds[17:01:35] Backup Floormaps...Backup floor maps took: 0.000938892364502 seconds[17:01:35] Backup licenses...
Cisco CMX Configuration Guide, Release 10.4176
Performing Administrative TasksBacking Up Data

Backup licenses took: 0.000122785568237 seconds[17:01:35] Backup setup...Backup setup took: 0.000464200973511 seconds[17:01:35] Backup node configuration...Backup configuration took: 0.476609945297 seconds[17:01:35] Creating tar file..Post backup took: 16.3115179539 seconds[17:01:52] Done Backup. Created backup file/tmp/cmx_backup_test.cisco.com_2015_07_28_17_01.tar.gz[cmxadmin@test ~]$
What to do next
You can automate the backing up process. For more information, see Using FTP Commands for Cisco CMX,on page 174.
Increasing the Hard Disk SpaceYou can increase the hard disk space if your Virtual Machine that runs Cisco CMX is run out of disk spacefor backup.
Procedure
Step 1 Stop all the Cisco CMX services by entering the following commands:
cmxctl stop
cmxctl stop -a
Step 2 Shutdown the virtual machine by entering the following command:
Shutdown –h now
Step 3 Edit the virtual machine settings and increase the hard disk space.
You cannot increase the hard disk space if the virtual machine was ever restored from snapshot.Note
Cisco CMX Configuration Guide, Release 10.4177
Performing Administrative TasksIncreasing the Hard Disk Space
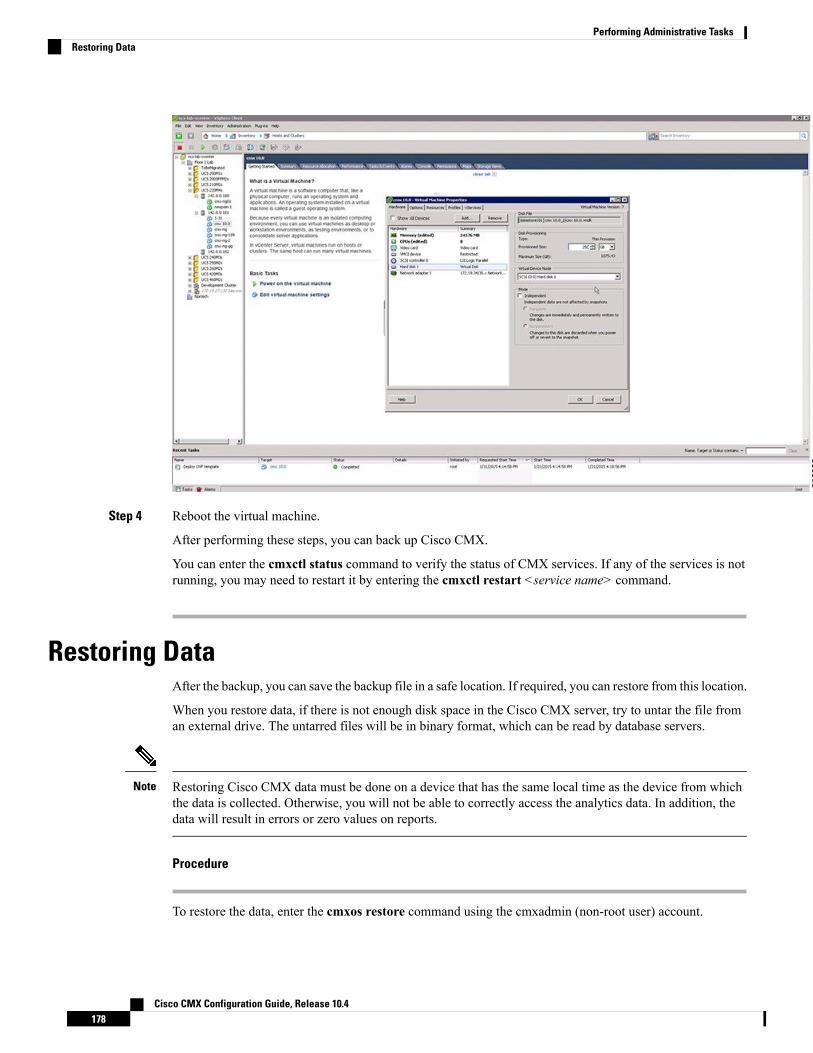
Step 4 Reboot the virtual machine.
After performing these steps, you can back up Cisco CMX.
You can enter the cmxctl status command to verify the status of CMX services. If any of the services is notrunning, you may need to restart it by entering the cmxctl restart <service name> command.
Restoring DataAfter the backup, you can save the backup file in a safe location. If required, you can restore from this location.
When you restore data, if there is not enough disk space in the Cisco CMX server, try to untar the file froman external drive. The untarred files will be in binary format, which can be read by database servers.
Restoring Cisco CMX data must be done on a device that has the same local time as the device from whichthe data is collected. Otherwise, you will not be able to correctly access the analytics data. In addition, thedata will result in errors or zero values on reports.
Note
Procedure
To restore the data, enter the cmxos restore command using the cmxadmin (non-root user) account.
Cisco CMX Configuration Guide, Release 10.4178
Performing Administrative TasksRestoring Data
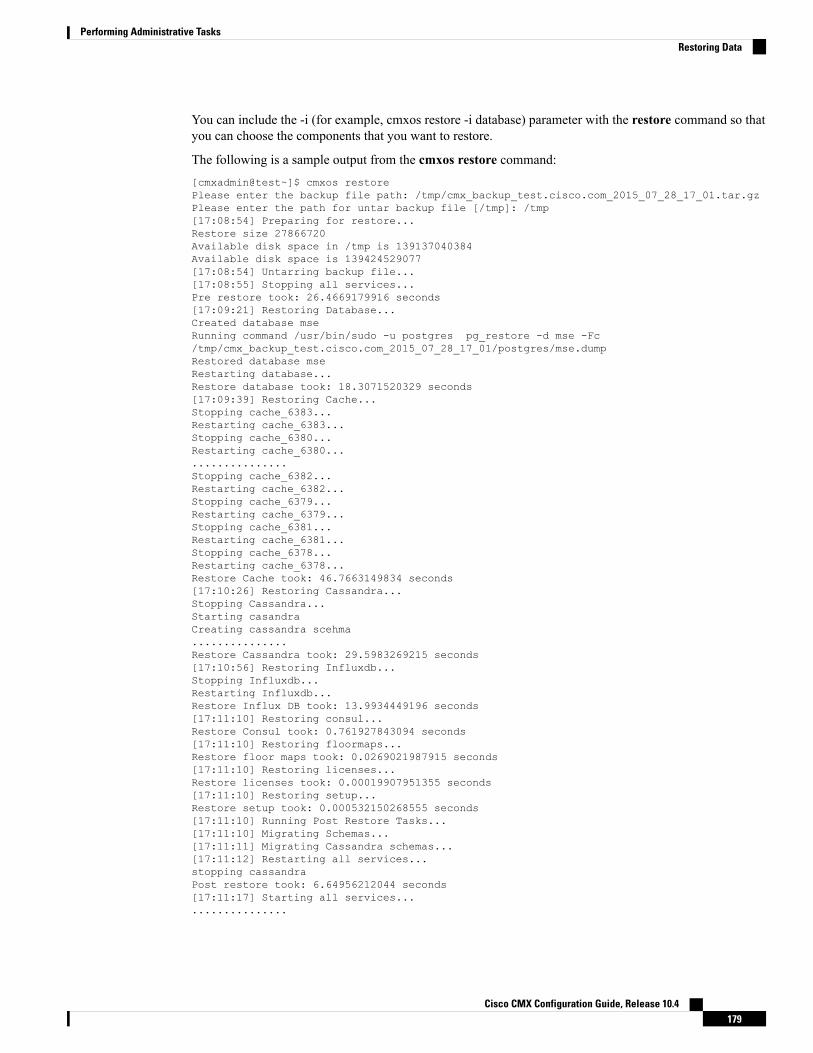
You can include the -i (for example, cmxos restore -i database) parameter with the restore command so thatyou can choose the components that you want to restore.
The following is a sample output from the cmxos restore command:[cmxadmin@test~]$ cmxos restorePlease enter the backup file path: /tmp/cmx_backup_test.cisco.com_2015_07_28_17_01.tar.gzPlease enter the path for untar backup file [/tmp]: /tmp[17:08:54] Preparing for restore...Restore size 27866720Available disk space in /tmp is 139137040384Available disk space is 139424529077[17:08:54] Untarring backup file...[17:08:55] Stopping all services...Pre restore took: 26.4669179916 seconds[17:09:21] Restoring Database...Created database mseRunning command /usr/bin/sudo -u postgres pg_restore -d mse -Fc/tmp/cmx_backup_test.cisco.com_2015_07_28_17_01/postgres/mse.dumpRestored database mseRestarting database...Restore database took: 18.3071520329 seconds[17:09:39] Restoring Cache...Stopping cache_6383...Restarting cache_6383...Stopping cache_6380...Restarting cache_6380..................Stopping cache_6382...Restarting cache_6382...Stopping cache_6379...Restarting cache_6379...Stopping cache_6381...Restarting cache_6381...Stopping cache_6378...Restarting cache_6378...Restore Cache took: 46.7663149834 seconds[17:10:26] Restoring Cassandra...Stopping Cassandra...Starting casandraCreating cassandra scehma...............Restore Cassandra took: 29.5983269215 seconds[17:10:56] Restoring Influxdb...Stopping Influxdb...Restarting Influxdb...Restore Influx DB took: 13.9934449196 seconds[17:11:10] Restoring consul...Restore Consul took: 0.761927843094 seconds[17:11:10] Restoring floormaps...Restore floor maps took: 0.0269021987915 seconds[17:11:10] Restoring licenses...Restore licenses took: 0.00019907951355 seconds[17:11:10] Restoring setup...Restore setup took: 0.000532150268555 seconds[17:11:10] Running Post Restore Tasks...[17:11:10] Migrating Schemas...[17:11:11] Migrating Cassandra schemas...[17:11:12] Restarting all services...stopping cassandraPost restore took: 6.64956212044 seconds[17:11:17] Starting all services..................
Cisco CMX Configuration Guide, Release 10.4179
Performing Administrative TasksRestoring Data
[17:12:45] Done$
Troubleshooting Cisco CMX Server Shutdown ProblemsThe Cisco CMX server shuts down all the services when disk space usage reaches 85 percent. If you encounterthis issue, create additional disk space on your Cisco CMX server by deleting unnecessary files, if any, fromthe server. After you have sufficient space, restart your Cisco CMX server by running the cmxctl start –acommand.
Cisco CMX Configuration Guide, Release 10.4180
Performing Administrative TasksTroubleshooting Cisco CMX Server Shutdown Problems
A P P E N D I X AGuidelines for Managing Zones in Cisco CMX
For more information about managing zones, seeManaging Perimeters and Zones on LocationMaps, on page126.
Common issues related to map import:
Case 1: Clients not detected, Heatmap generation failed
Initial Observations
A customer is using the 10.3.0-19 build and CMX is not detecting Clients / Tags. After debugging it wasfound that there are no heatmaps generated on CMX and the location computations are failing. Matlab-enginelogs show a message 'No floors present in model info, heatmaps will not be computed'.
What went wrong?
While exporting maps from Prime Infrastructure, Calibration model information was not included in theexported map file.
How to fix it?
Calibration model information is a vital piece of data linked to a floor-map on CMX. Client detection, Locationcomputation and heatmap generation depends on Calibration model information.
When we export Maps from Cisco Prime Infrastructure, there is an option Include Calibration Informationwhich is selected by default. While exporting maps, We want to make sure that this option is checked all thetime.
Cisco CMX Configuration Guide, Release 10.4181

Cisco CMX Configuration Guide, Release 10.4182
Guidelines for Managing Zones in Cisco CMXGuidelines for Managing Zones in Cisco CMX
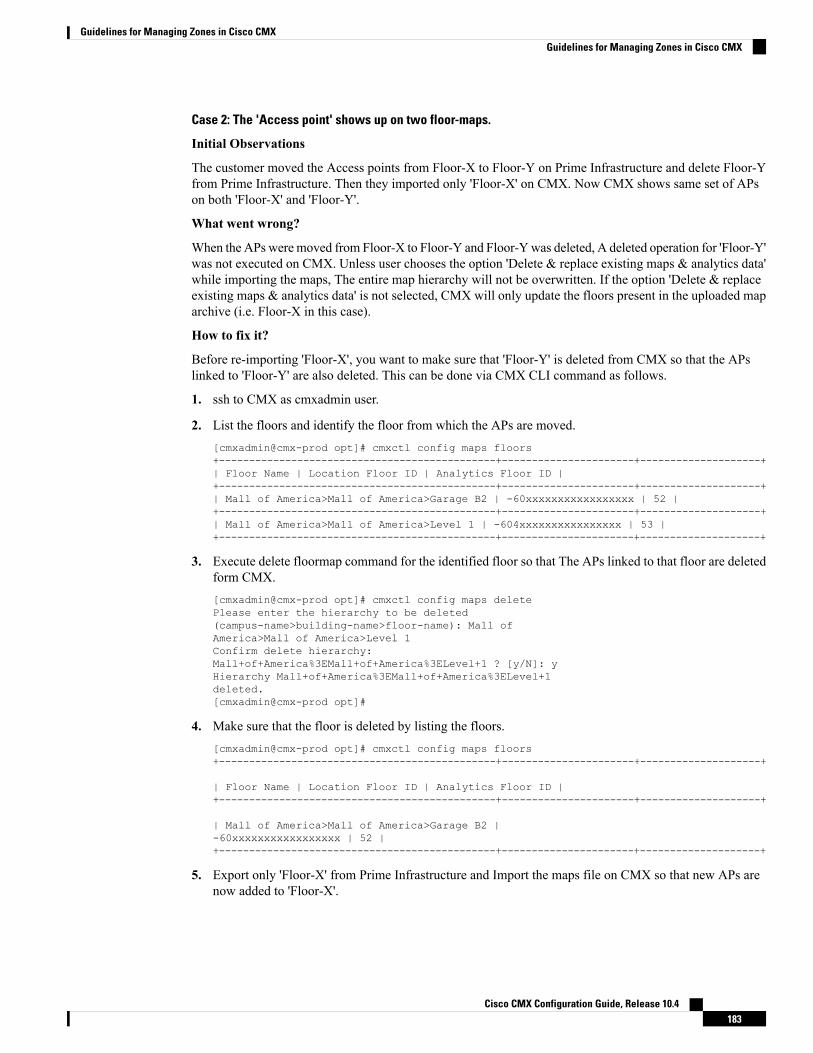
Case 2: The 'Access point' shows up on two floor-maps.
Initial Observations
The customer moved the Access points from Floor-X to Floor-Y on Prime Infrastructure and delete Floor-Yfrom Prime Infrastructure. Then they imported only 'Floor-X' on CMX. Now CMX shows same set of APson both 'Floor-X' and 'Floor-Y'.
What went wrong?
When the APs were moved from Floor-X to Floor-Y and Floor-Ywas deleted, A deleted operation for 'Floor-Y'was not executed on CMX. Unless user chooses the option 'Delete & replace existing maps & analytics data'while importing the maps, The entire map hierarchy will not be overwritten. If the option 'Delete & replaceexisting maps & analytics data' is not selected, CMX will only update the floors present in the uploaded maparchive (i.e. Floor-X in this case).
How to fix it?
Before re-importing 'Floor-X', you want to make sure that 'Floor-Y' is deleted from CMX so that the APslinked to 'Floor-Y' are also deleted. This can be done via CMX CLI command as follows.
1. ssh to CMX as cmxadmin user.
2. List the floors and identify the floor from which the APs are moved.[cmxadmin@cmx-prod opt]# cmxctl config maps floors+----------------------------------------------+----------------------+--------------------+| Floor Name | Location Floor ID | Analytics Floor ID |+----------------------------------------------+----------------------+--------------------+| Mall of America>Mall of America>Garage B2 | -60xxxxxxxxxxxxxxxxx | 52 |+----------------------------------------------+----------------------+--------------------+| Mall of America>Mall of America>Level 1 | -604xxxxxxxxxxxxxxxx | 53 |+----------------------------------------------+----------------------+--------------------+
3. Execute delete floormap command for the identified floor so that The APs linked to that floor are deletedform CMX.[cmxadmin@cmx-prod opt]# cmxctl config maps deletePlease enter the hierarchy to be deleted(campus-name>building-name>floor-name): Mall ofAmerica>Mall of America>Level 1Confirm delete hierarchy:Mall+of+America%3EMall+of+America%3ELevel+1 ? [y/N]: yHierarchy Mall+of+America%3EMall+of+America%3ELevel+1deleted.[cmxadmin@cmx-prod opt]#
4. Make sure that the floor is deleted by listing the floors.[cmxadmin@cmx-prod opt]# cmxctl config maps floors+----------------------------------------------+----------------------+--------------------+
| Floor Name | Location Floor ID | Analytics Floor ID |+----------------------------------------------+----------------------+--------------------+
| Mall of America>Mall of America>Garage B2 |-60xxxxxxxxxxxxxxxxx | 52 |+----------------------------------------------+----------------------+--------------------+
5. Export only 'Floor-X' from Prime Infrastructure and Import the maps file on CMX so that new APs arenow added to 'Floor-X'.
Cisco CMX Configuration Guide, Release 10.4183
Guidelines for Managing Zones in Cisco CMXGuidelines for Managing Zones in Cisco CMX
6. Go to CMX GUI on 'Detect and Locate' page and observe the floor-maps. 'Floor-X' should have the newset of APs on it.
Cisco CMX Configuration Guide, Release 10.4184
Guidelines for Managing Zones in Cisco CMXGuidelines for Managing Zones in Cisco CMX
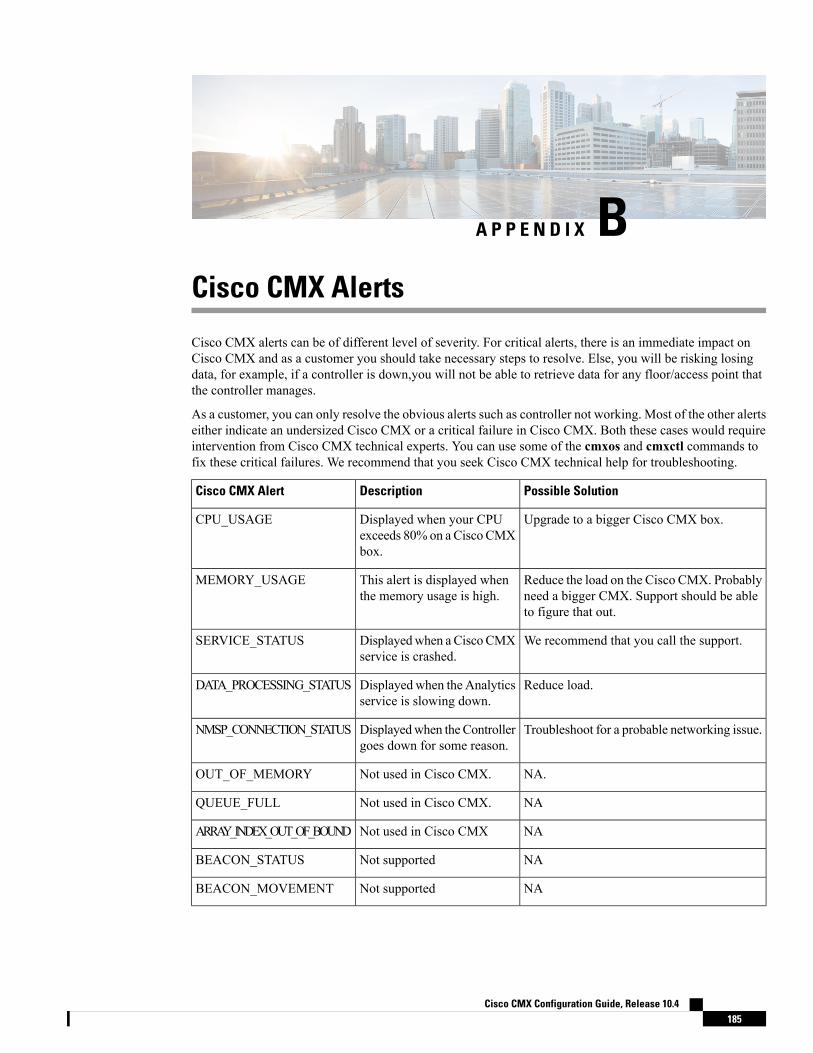
A P P E N D I X BCisco CMX Alerts
Cisco CMX alerts can be of different level of severity. For critical alerts, there is an immediate impact onCisco CMX and as a customer you should take necessary steps to resolve. Else, you will be risking losingdata, for example, if a controller is down,you will not be able to retrieve data for any floor/access point thatthe controller manages.
As a customer, you can only resolve the obvious alerts such as controller not working. Most of the other alertseither indicate an undersized Cisco CMX or a critical failure in Cisco CMX. Both these cases would requireintervention from Cisco CMX technical experts. You can use some of the cmxos and cmxctl commands tofix these critical failures. We recommend that you seek Cisco CMX technical help for troubleshooting.
Possible SolutionDescriptionCisco CMX Alert
Upgrade to a bigger Cisco CMX box.Displayed when your CPUexceeds 80%on aCisco CMXbox.
CPU_USAGE
Reduce the load on the Cisco CMX. Probablyneed a bigger CMX. Support should be ableto figure that out.
This alert is displayed whenthe memory usage is high.
MEMORY_USAGE
We recommend that you call the support.Displayedwhen aCiscoCMXservice is crashed.
SERVICE_STATUS
Reduce load.Displayed when the Analyticsservice is slowing down.
DATA_PROCESSING_STATUS
Troubleshoot for a probable networking issue.Displayedwhen theControllergoes down for some reason.
NMSP_CONNECTION_STATUS
NA.Not used in Cisco CMX.OUT_OF_MEMORY
NANot used in Cisco CMX.QUEUE_FULL
NANot used in Cisco CMXARRAY_INDEX_OUT_OF_BOUND
NANot supportedBEACON_STATUS
NANot supportedBEACON_MOVEMENT
Cisco CMX Configuration Guide, Release 10.4185
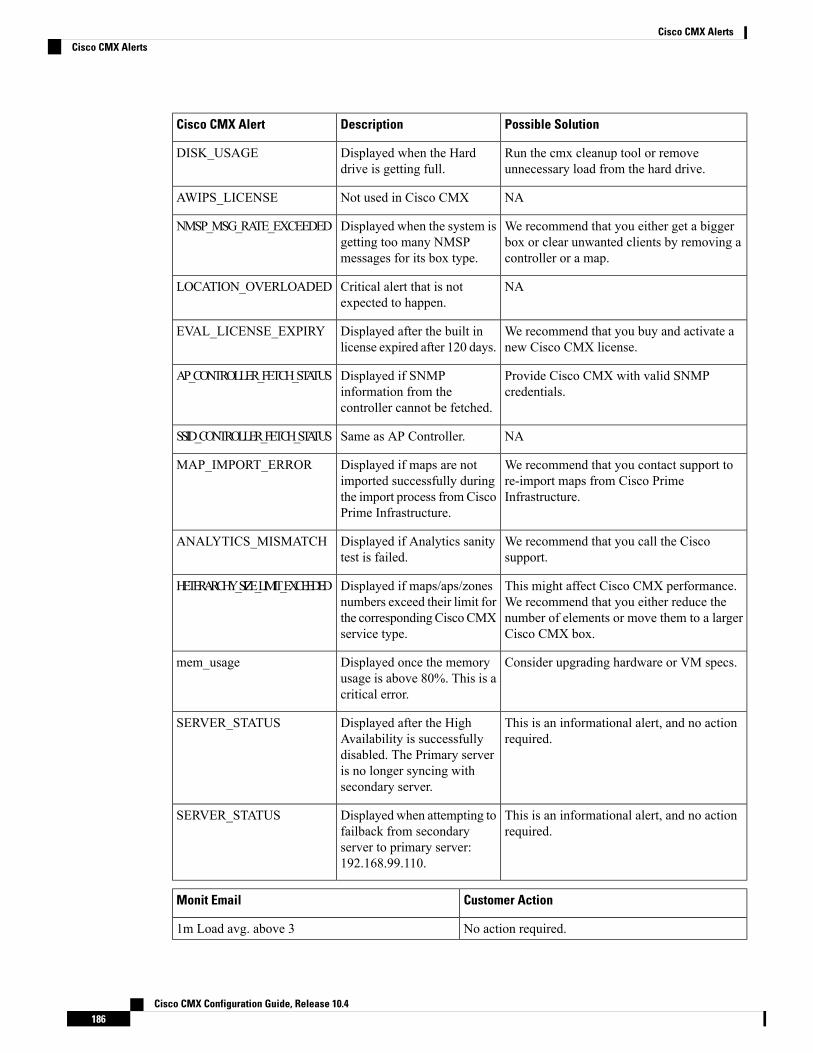
Possible SolutionDescriptionCisco CMX Alert
Run the cmx cleanup tool or removeunnecessary load from the hard drive.
Displayed when the Harddrive is getting full.
DISK_USAGE
NANot used in Cisco CMXAWIPS_LICENSE
We recommend that you either get a biggerbox or clear unwanted clients by removing acontroller or a map.
Displayed when the system isgetting too many NMSPmessages for its box type.
NMSP_MSG_RATE_EXCEEDED
NACritical alert that is notexpected to happen.
LOCATION_OVERLOADED
We recommend that you buy and activate anew Cisco CMX license.
Displayed after the built inlicense expired after 120 days.
EVAL_LICENSE_EXPIRY
Provide Cisco CMX with valid SNMPcredentials.
Displayed if SNMPinformation from thecontroller cannot be fetched.
AP_CONTROLLER_FETCH_STATUS
NASame as AP Controller.SSID_CONTROLLER_FETCH_STATUS
We recommend that you contact support tore-import maps from Cisco PrimeInfrastructure.
Displayed if maps are notimported successfully duringthe import process fromCiscoPrime Infrastructure.
MAP_IMPORT_ERROR
We recommend that you call the Ciscosupport.
Displayed if Analytics sanitytest is failed.
ANALYTICS_MISMATCH
This might affect Cisco CMX performance.We recommend that you either reduce thenumber of elements or move them to a largerCisco CMX box.
Displayed if maps/aps/zonesnumbers exceed their limit forthe correspondingCiscoCMXservice type.
HETERARCHY_SIZE_LIMIT_EXCEEDED
Consider upgrading hardware or VM specs.Displayed once the memoryusage is above 80%. This is acritical error.
mem_usage
This is an informational alert, and no actionrequired.
Displayed after the HighAvailability is successfullydisabled. The Primary serveris no longer syncing withsecondary server.
SERVER_STATUS
This is an informational alert, and no actionrequired.
Displayed when attempting tofailback from secondaryserver to primary server:192.168.99.110.
SERVER_STATUS
Customer ActionMonit Email
No action required.1m Load avg. above 3
Cisco CMX Configuration Guide, Release 10.4186
Cisco CMX AlertsCisco CMX Alerts
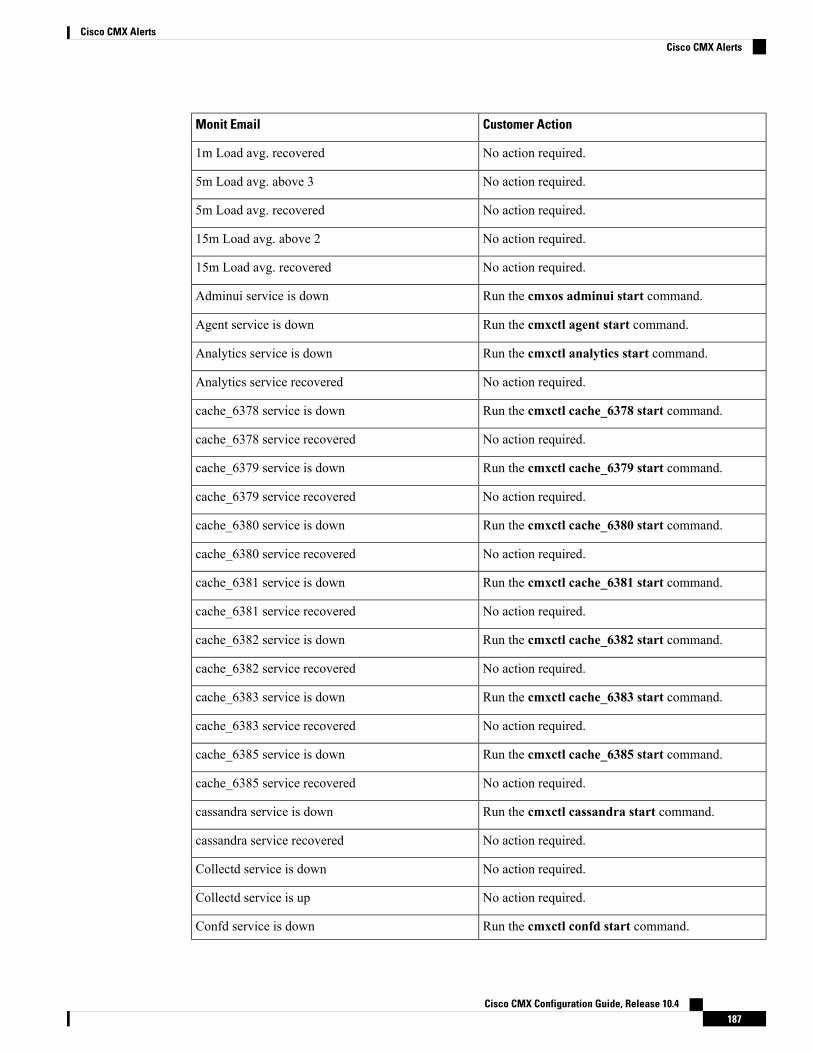
Customer ActionMonit Email
No action required.1m Load avg. recovered
No action required.5m Load avg. above 3
No action required.5m Load avg. recovered
No action required.15m Load avg. above 2
No action required.15m Load avg. recovered
Run the cmxos adminui start command.Adminui service is down
Run the cmxctl agent start command.Agent service is down
Run the cmxctl analytics start command.Analytics service is down
No action required.Analytics service recovered
Run the cmxctl cache_6378 start command.cache_6378 service is down
No action required.cache_6378 service recovered
Run the cmxctl cache_6379 start command.cache_6379 service is down
No action required.cache_6379 service recovered
Run the cmxctl cache_6380 start command.cache_6380 service is down
No action required.cache_6380 service recovered
Run the cmxctl cache_6381 start command.cache_6381 service is down
No action required.cache_6381 service recovered
Run the cmxctl cache_6382 start command.cache_6382 service is down
No action required.cache_6382 service recovered
Run the cmxctl cache_6383 start command.cache_6383 service is down
No action required.cache_6383 service recovered
Run the cmxctl cache_6385 start command.cache_6385 service is down
No action required.cache_6385 service recovered
Run the cmxctl cassandra start command.cassandra service is down
No action required.cassandra service recovered
No action required.Collectd service is down
No action required.Collectd service is up
Run the cmxctl confd start command.Confd service is down
Cisco CMX Configuration Guide, Release 10.4187
Cisco CMX AlertsCisco CMX Alerts
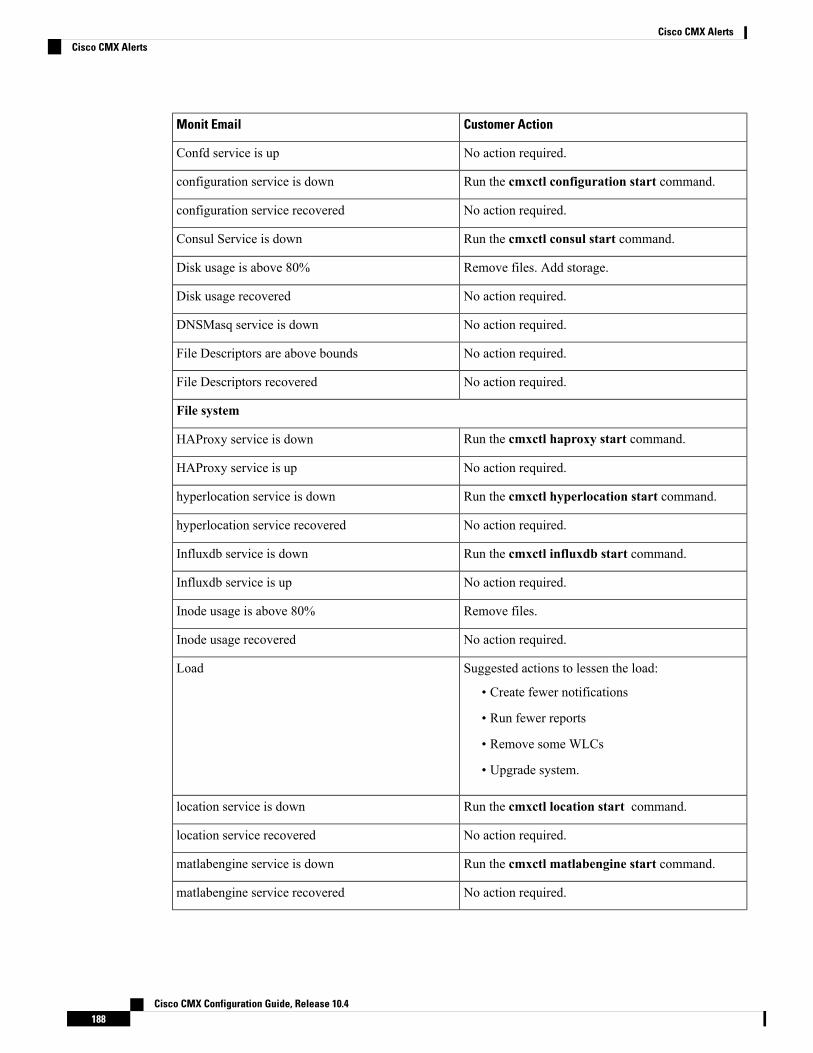
Customer ActionMonit Email
No action required.Confd service is up
Run the cmxctl configuration start command.configuration service is down
No action required.configuration service recovered
Run the cmxctl consul start command.Consul Service is down
Remove files. Add storage.Disk usage is above 80%
No action required.Disk usage recovered
No action required.DNSMasq service is down
No action required.File Descriptors are above bounds
No action required.File Descriptors recovered
File system
Run the cmxctl haproxy start command.HAProxy service is down
No action required.HAProxy service is up
Run the cmxctl hyperlocation start command.hyperlocation service is down
No action required.hyperlocation service recovered
Run the cmxctl influxdb start command.Influxdb service is down
No action required.Influxdb service is up
Remove files.Inode usage is above 80%
No action required.Inode usage recovered
Suggested actions to lessen the load:
• Create fewer notifications
• Run fewer reports
• Remove some WLCs
• Upgrade system.
Load
Run the cmxctl location start command.location service is down
No action required.location service recovered
Run the cmxctl matlabengine start command.matlabengine service is down
No action required.matlabengine service recovered
Cisco CMX Configuration Guide, Release 10.4188
Cisco CMX AlertsCisco CMX Alerts
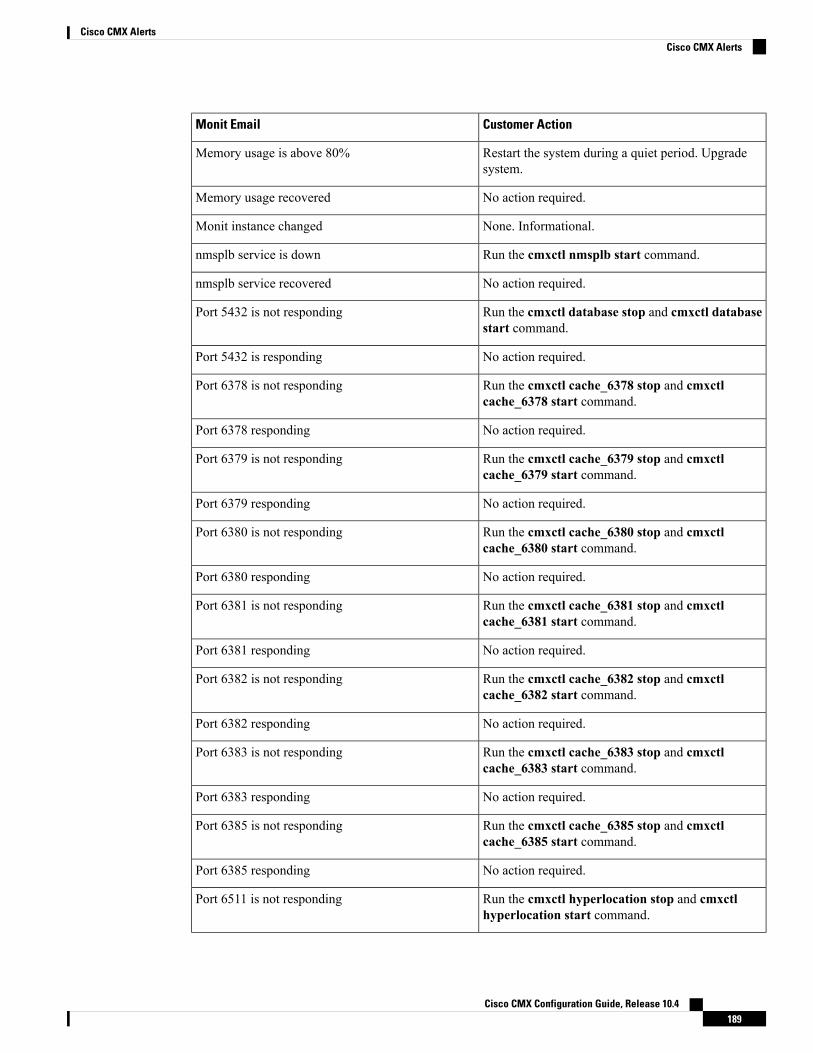
Customer ActionMonit Email
Restart the system during a quiet period. Upgradesystem.
Memory usage is above 80%
No action required.Memory usage recovered
None. Informational.Monit instance changed
Run the cmxctl nmsplb start command.nmsplb service is down
No action required.nmsplb service recovered
Run the cmxctl database stop and cmxctl databasestart command.
Port 5432 is not responding
No action required.Port 5432 is responding
Run the cmxctl cache_6378 stop and cmxctlcache_6378 start command.
Port 6378 is not responding
No action required.Port 6378 responding
Run the cmxctl cache_6379 stop and cmxctlcache_6379 start command.
Port 6379 is not responding
No action required.Port 6379 responding
Run the cmxctl cache_6380 stop and cmxctlcache_6380 start command.
Port 6380 is not responding
No action required.Port 6380 responding
Run the cmxctl cache_6381 stop and cmxctlcache_6381 start command.
Port 6381 is not responding
No action required.Port 6381 responding
Run the cmxctl cache_6382 stop and cmxctlcache_6382 start command.
Port 6382 is not responding
No action required.Port 6382 responding
Run the cmxctl cache_6383 stop and cmxctlcache_6383 start command.
Port 6383 is not responding
No action required.Port 6383 responding
Run the cmxctl cache_6385 stop and cmxctlcache_6385 start command.
Port 6385 is not responding
No action required.Port 6385 responding
Run the cmxctl hyperlocation stop and cmxctlhyperlocation start command.
Port 6511 is not responding
Cisco CMX Configuration Guide, Release 10.4189
Cisco CMX AlertsCisco CMX Alerts
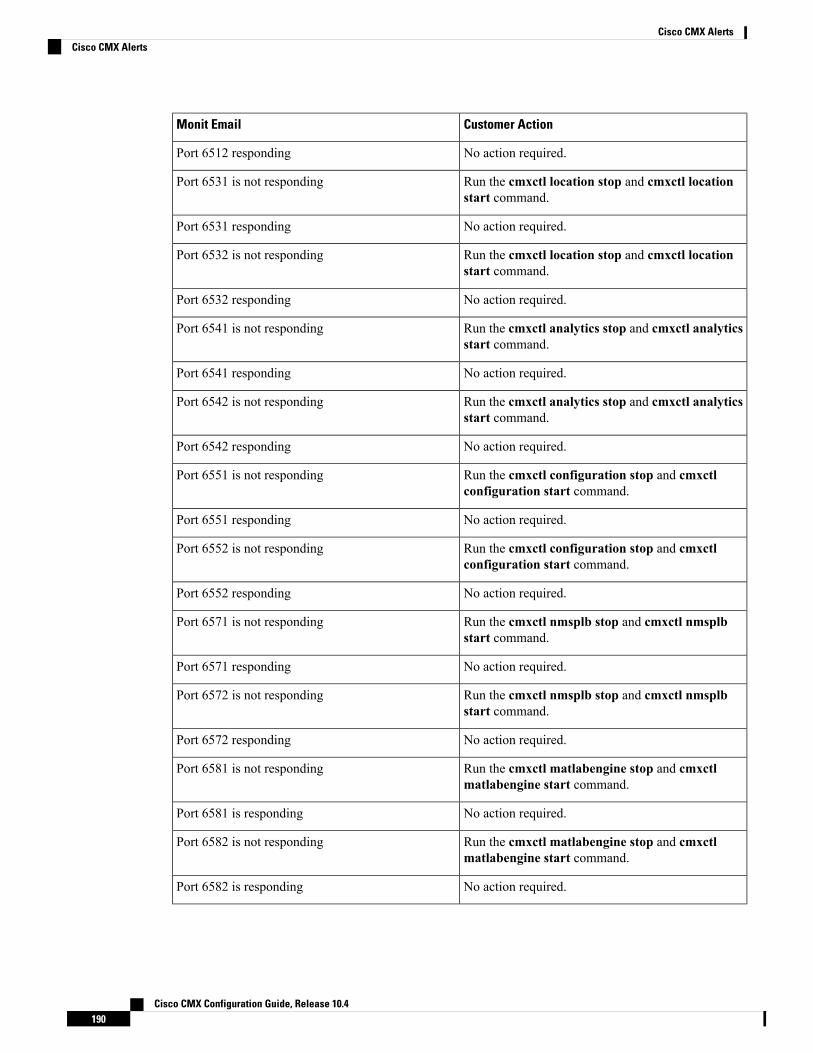
Customer ActionMonit Email
No action required.Port 6512 responding
Run the cmxctl location stop and cmxctl locationstart command.
Port 6531 is not responding
No action required.Port 6531 responding
Run the cmxctl location stop and cmxctl locationstart command.
Port 6532 is not responding
No action required.Port 6532 responding
Run the cmxctl analytics stop and cmxctl analyticsstart command.
Port 6541 is not responding
No action required.Port 6541 responding
Run the cmxctl analytics stop and cmxctl analyticsstart command.
Port 6542 is not responding
No action required.Port 6542 responding
Run the cmxctl configuration stop and cmxctlconfiguration start command.
Port 6551 is not responding
No action required.Port 6551 responding
Run the cmxctl configuration stop and cmxctlconfiguration start command.
Port 6552 is not responding
No action required.Port 6552 responding
Run the cmxctl nmsplb stop and cmxctl nmsplbstart command.
Port 6571 is not responding
No action required.Port 6571 responding
Run the cmxctl nmsplb stop and cmxctl nmsplbstart command.
Port 6572 is not responding
No action required.Port 6572 responding
Run the cmxctl matlabengine stop and cmxctlmatlabengine start command.
Port 6581 is not responding
No action required.Port 6581 is responding
Run the cmxctl matlabengine stop and cmxctlmatlabengine start command.
Port 6582 is not responding
No action required.Port 6582 is responding
Cisco CMX Configuration Guide, Release 10.4190
Cisco CMX AlertsCisco CMX Alerts
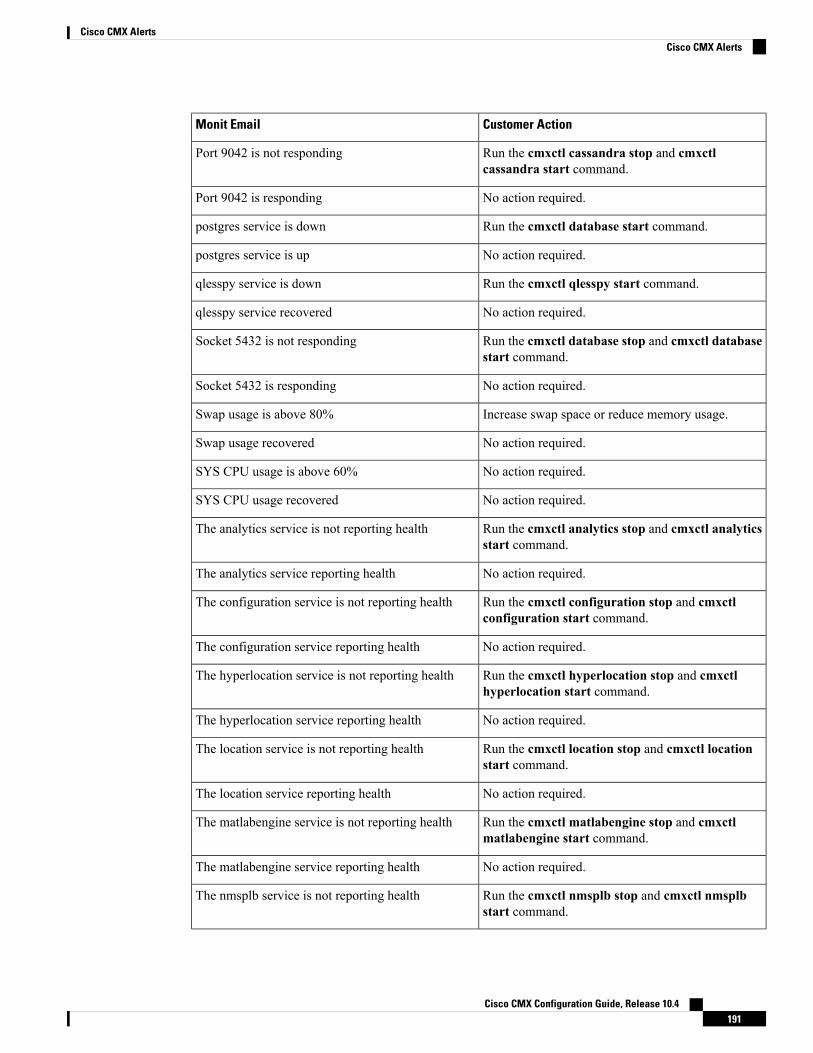
Customer ActionMonit Email
Run the cmxctl cassandra stop and cmxctlcassandra start command.
Port 9042 is not responding
No action required.Port 9042 is responding
Run the cmxctl database start command.postgres service is down
No action required.postgres service is up
Run the cmxctl qlesspy start command.qlesspy service is down
No action required.qlesspy service recovered
Run the cmxctl database stop and cmxctl databasestart command.
Socket 5432 is not responding
No action required.Socket 5432 is responding
Increase swap space or reduce memory usage.Swap usage is above 80%
No action required.Swap usage recovered
No action required.SYS CPU usage is above 60%
No action required.SYS CPU usage recovered
Run the cmxctl analytics stop and cmxctl analyticsstart command.
The analytics service is not reporting health
No action required.The analytics service reporting health
Run the cmxctl configuration stop and cmxctlconfiguration start command.
The configuration service is not reporting health
No action required.The configuration service reporting health
Run the cmxctl hyperlocation stop and cmxctlhyperlocation start command.
The hyperlocation service is not reporting health
No action required.The hyperlocation service reporting health
Run the cmxctl location stop and cmxctl locationstart command.
The location service is not reporting health
No action required.The location service reporting health
Run the cmxctl matlabengine stop and cmxctlmatlabengine start command.
The matlabengine service is not reporting health
No action required.The matlabengine service reporting health
Run the cmxctl nmsplb stop and cmxctl nmsplbstart command.
The nmsplb service is not reporting health
Cisco CMX Configuration Guide, Release 10.4191
Cisco CMX AlertsCisco CMX Alerts

Customer ActionMonit Email
No action required.The nmsplb service reporting health
No action required.USR CPU usage is above 80%
No action required.USR CPU usage recovered
No action required.WAIT CPU usage is above 60%
No action required.WAIT CPU usage recovered
Restart the system during a quiet period.
Upgrade system.
Memory usage is above 80%
No action required.Memory usage recovered
Increase swap space or reduce memory usage.Swap usage is above 80%
File system
Remove files.
Add storage.
Disk usage is above 80%
No action required.Disk usage recovered
Remove files.Inode usage is above 80%
No action required.Inode usage recovered
Restart the system.File Descriptors are above bounds
No action required.File Descriptors recovered
Run the cmxctl location start command.ocation service is down
No action required.location service recovered
Run the cmxctl location stop and cmxctl locationstart command.
Port 6531 is not responding
No action required.Port 6531 responding
Run the cmxctl location stop and cmxctl locationstart command.
Port 6532 is not responding
No action required.Port 6532 responding
Run the cmxctl location stop and cmxctl locationstart command.
The location service is not reporting health
No action required.The location service reporting health
Run the cmxctl matlabengine start command.matlabengine service is down
Cisco CMX Configuration Guide, Release 10.4192
Cisco CMX AlertsCisco CMX Alerts
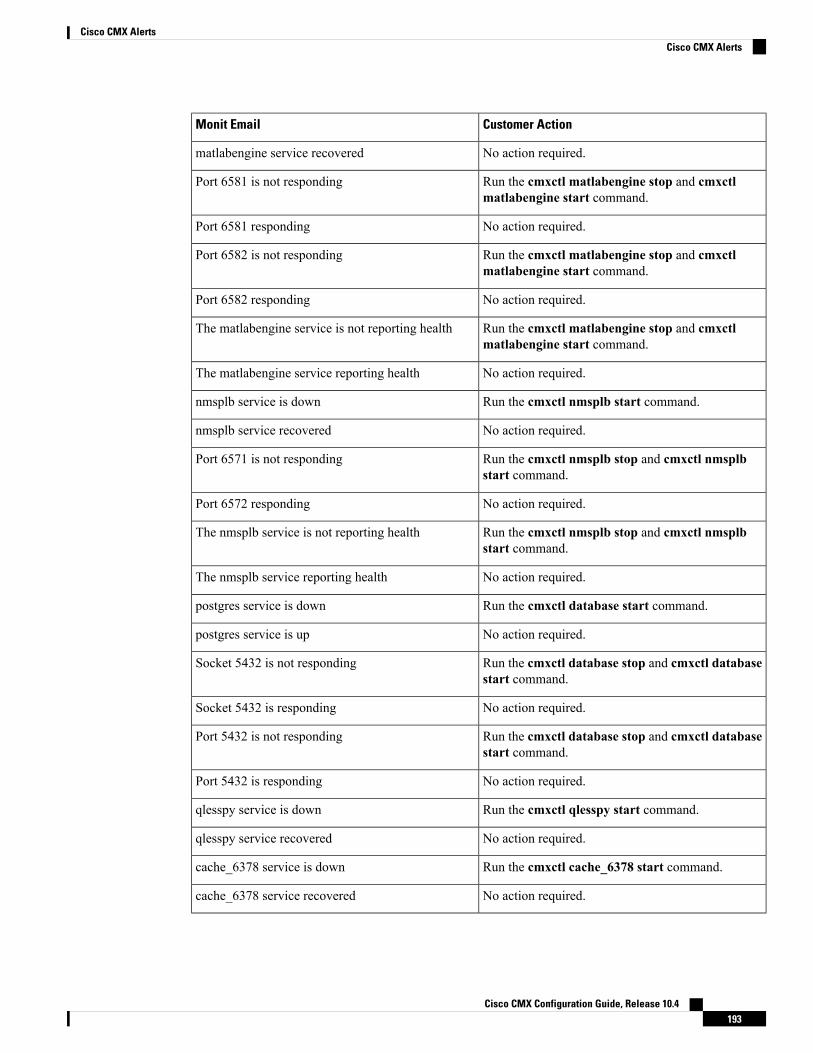
Customer ActionMonit Email
No action required.matlabengine service recovered
Run the cmxctl matlabengine stop and cmxctlmatlabengine start command.
Port 6581 is not responding
No action required.Port 6581 responding
Run the cmxctl matlabengine stop and cmxctlmatlabengine start command.
Port 6582 is not responding
No action required.Port 6582 responding
Run the cmxctl matlabengine stop and cmxctlmatlabengine start command.
The matlabengine service is not reporting health
No action required.The matlabengine service reporting health
Run the cmxctl nmsplb start command.nmsplb service is down
No action required.nmsplb service recovered
Run the cmxctl nmsplb stop and cmxctl nmsplbstart command.
Port 6571 is not responding
No action required.Port 6572 responding
Run the cmxctl nmsplb stop and cmxctl nmsplbstart command.
The nmsplb service is not reporting health
No action required.The nmsplb service reporting health
Run the cmxctl database start command.postgres service is down
No action required.postgres service is up
Run the cmxctl database stop and cmxctl databasestart command.
Socket 5432 is not responding
No action required.Socket 5432 is responding
Run the cmxctl database stop and cmxctl databasestart command.
Port 5432 is not responding
No action required.Port 5432 is responding
Run the cmxctl qlesspy start command.qlesspy service is down
No action required.qlesspy service recovered
Run the cmxctl cache_6378 start command.cache_6378 service is down
No action required.cache_6378 service recovered
Cisco CMX Configuration Guide, Release 10.4193
Cisco CMX AlertsCisco CMX Alerts
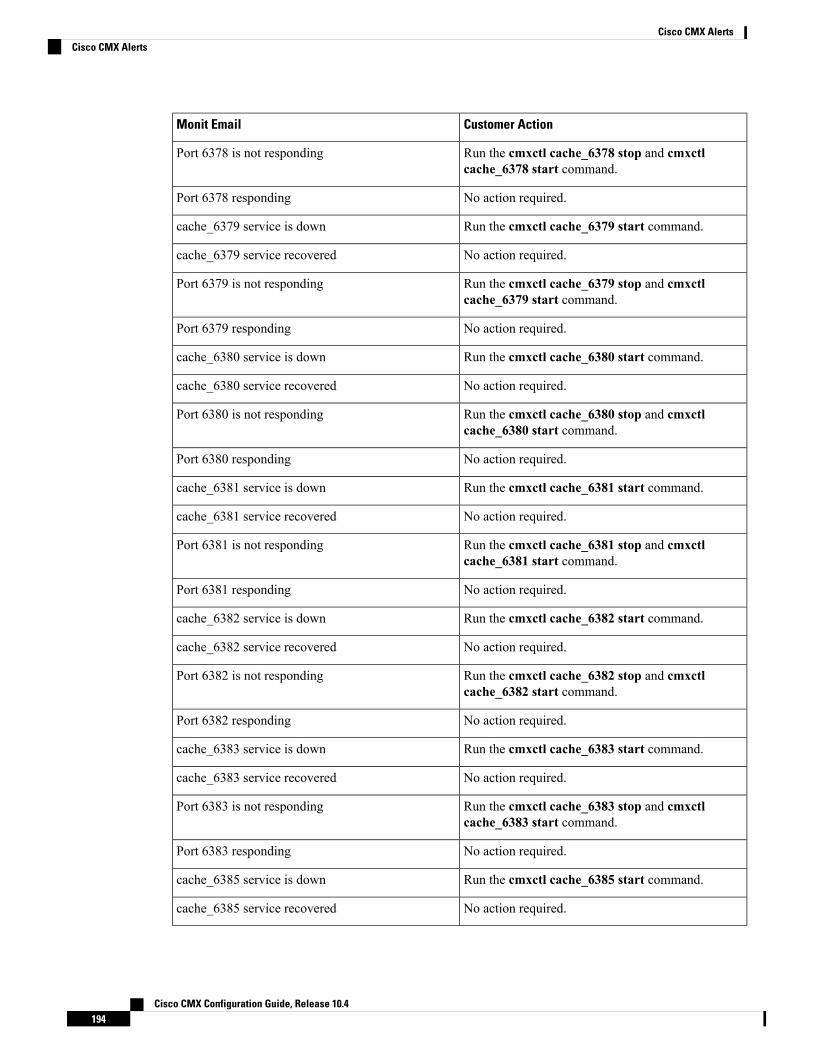
Customer ActionMonit Email
Run the cmxctl cache_6378 stop and cmxctlcache_6378 start command.
Port 6378 is not responding
No action required.Port 6378 responding
Run the cmxctl cache_6379 start command.cache_6379 service is down
No action required.cache_6379 service recovered
Run the cmxctl cache_6379 stop and cmxctlcache_6379 start command.
Port 6379 is not responding
No action required.Port 6379 responding
Run the cmxctl cache_6380 start command.cache_6380 service is down
No action required.cache_6380 service recovered
Run the cmxctl cache_6380 stop and cmxctlcache_6380 start command.
Port 6380 is not responding
No action required.Port 6380 responding
Run the cmxctl cache_6381 start command.cache_6381 service is down
No action required.cache_6381 service recovered
Run the cmxctl cache_6381 stop and cmxctlcache_6381 start command.
Port 6381 is not responding
No action required.Port 6381 responding
Run the cmxctl cache_6382 start command.cache_6382 service is down
No action required.cache_6382 service recovered
Run the cmxctl cache_6382 stop and cmxctlcache_6382 start command.
Port 6382 is not responding
No action required.Port 6382 responding
Run the cmxctl cache_6383 start command.cache_6383 service is down
No action required.cache_6383 service recovered
Run the cmxctl cache_6383 stop and cmxctlcache_6383 start command.
Port 6383 is not responding
No action required.Port 6383 responding
Run the cmxctl cache_6385 start command.cache_6385 service is down
No action required.cache_6385 service recovered
Cisco CMX Configuration Guide, Release 10.4194
Cisco CMX AlertsCisco CMX Alerts
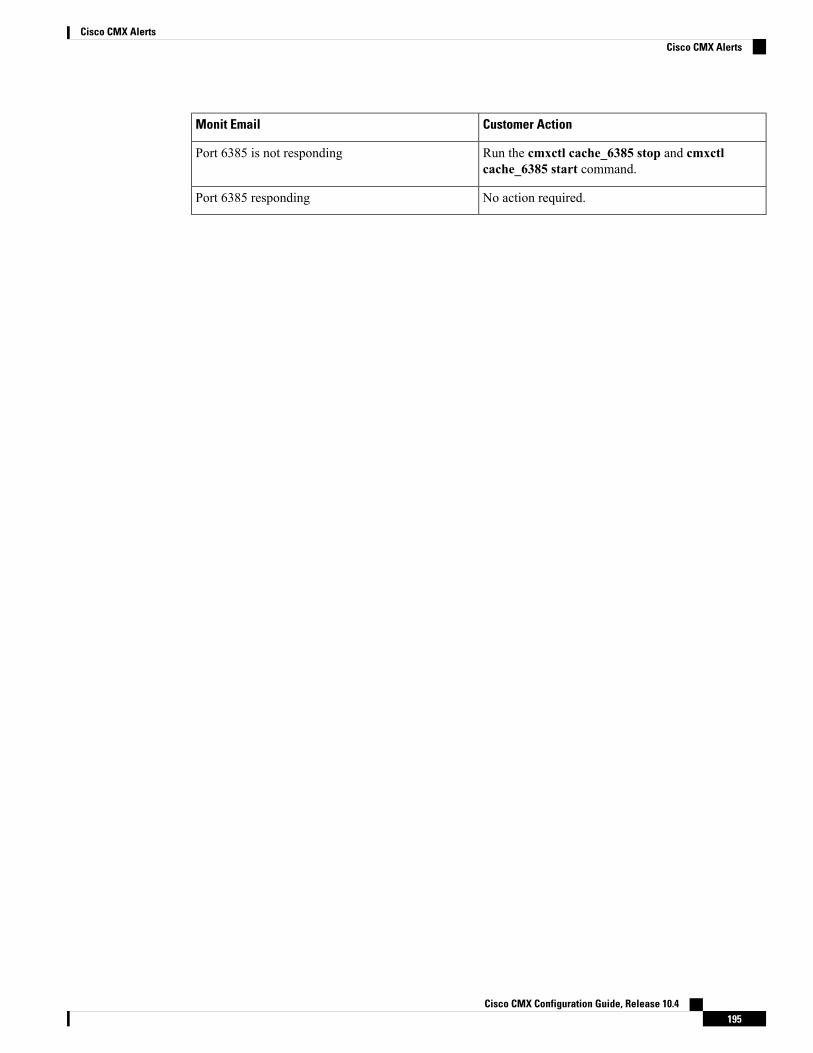
Customer ActionMonit Email
Run the cmxctl cache_6385 stop and cmxctlcache_6385 start command.
Port 6385 is not responding
No action required.Port 6385 responding
Cisco CMX Configuration Guide, Release 10.4195
Cisco CMX AlertsCisco CMX Alerts

Cisco CMX Configuration Guide, Release 10.4196
Cisco CMX AlertsCisco CMX Alerts
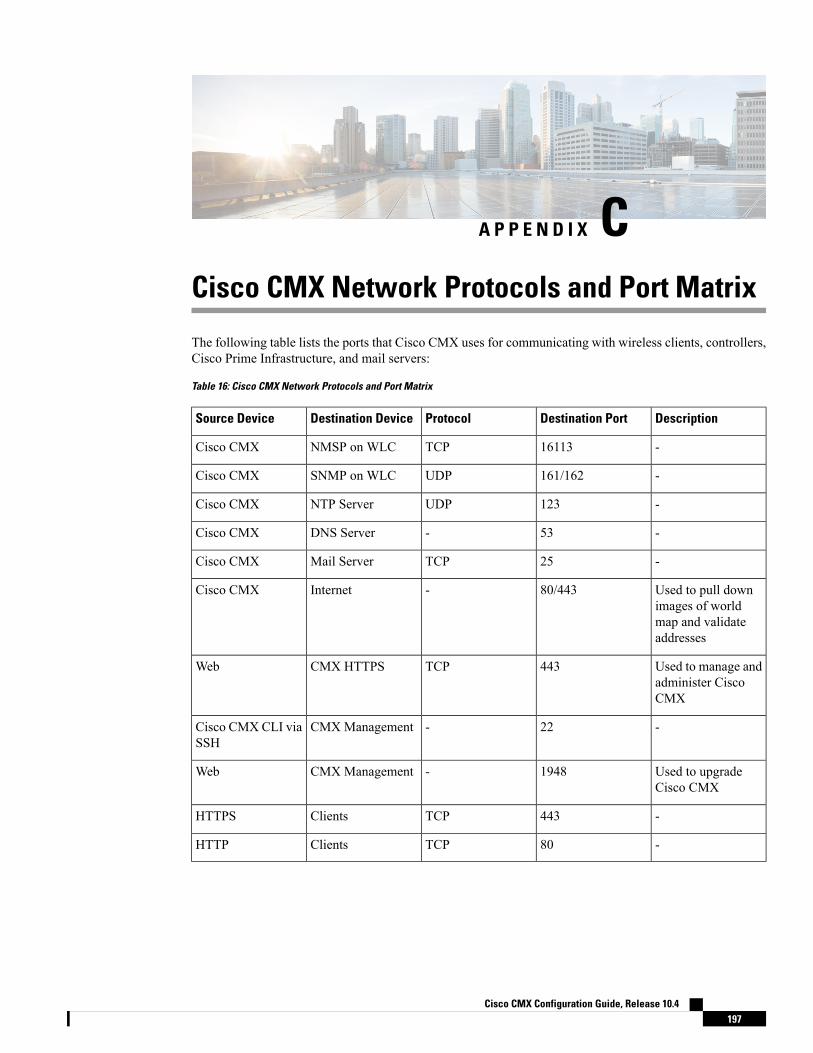
A P P E N D I X CCisco CMX Network Protocols and Port Matrix
The following table lists the ports that Cisco CMX uses for communicating with wireless clients, controllers,Cisco Prime Infrastructure, and mail servers:
Table 16: Cisco CMX Network Protocols and Port Matrix
DescriptionDestination PortProtocolDestination DeviceSource Device
-16113TCPNMSP on WLCCisco CMX
-161/162UDPSNMP on WLCCisco CMX
-123UDPNTP ServerCisco CMX
-53-DNS ServerCisco CMX
-25TCPMail ServerCisco CMX
Used to pull downimages of worldmap and validateaddresses
80/443-InternetCisco CMX
Used to manage andadminister CiscoCMX
443TCPCMX HTTPSWeb
-22-CMX ManagementCisco CMX CLI viaSSH
Used to upgradeCisco CMX
1948-CMX ManagementWeb
-443TCPClientsHTTPS
-80TCPClientsHTTP
Cisco CMX Configuration Guide, Release 10.4197
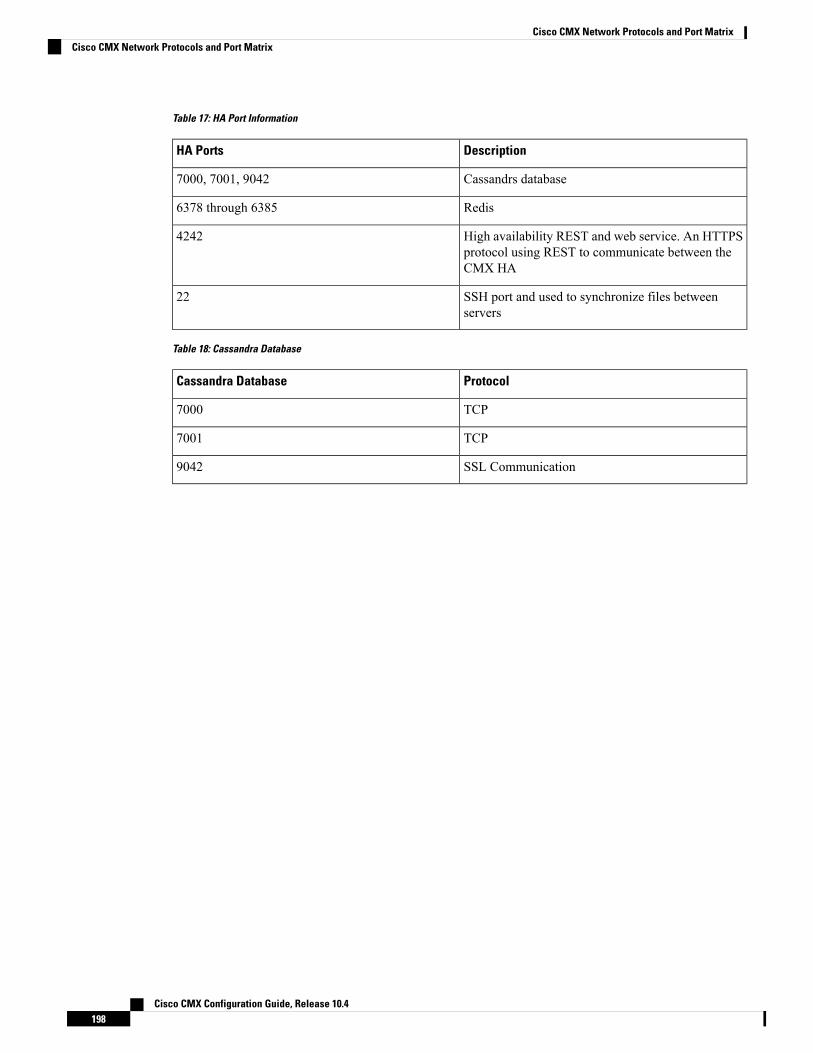
Table 17: HA Port Information
DescriptionHA Ports
Cassandrs database7000, 7001, 9042
Redis6378 through 6385
High availability REST and web service. An HTTPSprotocol using REST to communicate between theCMX HA
4242
SSH port and used to synchronize files betweenservers
22
Table 18: Cassandra Database
ProtocolCassandra Database
TCP7000
TCP7001
SSL Communication9042
Cisco CMX Configuration Guide, Release 10.4198
Cisco CMX Network Protocols and Port MatrixCisco CMX Network Protocols and Port Matrix