cluck wagontm mobile chicken coop - tractor … · 1 cluck wagontm mobile chicken coop assembly...
TRANSCRIPT

1
CLUCK WAGONTM Mobile Chicken Coop
Assembly Instructions
Congratulations on purchasing your new FREE RANGETM Mobile Chicken Coop.
Before assembly, we recommend that you read the instructions thoroughly.
We recommend that you assemble you Mobil Chicken Coop on a level surface.
This will make it easier you.
Step 1: Check all parts against the parts list.
Step 2: Join wheels to side panels.
Step 3: Join rear panel.
Step 4: Join rear panels and side panels.
Step 5: Join side panel.
Step 6: Join door frame.
Step 7: Join front frame.
Step 8: Join Roof Supports.
Step 9: Fit Roof Sheets.
Step 10: Fit Doors.

2
Tools that may be needed:
Adjustable Wrench

3
Step 1:Check all parts against the component list
Before you commence assembling this unit, open carton(s) and lay all parts on
a clear floor space and check all parts against the parts list. This will ensure
that you become familiar with each part and make assembling faster.
Qty checking date:
Qty checking personal badge number:
Signature:
In the unlikely event that you find you are missing a part, please contact Harris
Farms, LLC at 1(800) 745-9906 or [email protected] and we will send
the missing part directly to your address.

4
Cluck Wagon Overview

5
Step 2: Join wheels to side rear panels no.3 and no.4 using fittings provided as
per the diagram.

6
Step 3: Join rear panels no.1 and no.2 using fittings provided as per the
diagram.
Step 4: Join panels no.1, no.2, no.3, and no.4 using fittings provided as per
the diagram.

7
Step 5: Join side panels no.5 and no.6 using fittings provided as per the
diagram.

8
Step 6: Join Door frame no.8 using fittings provided as per the diagram.
Step 7: Join front frame no.7 using fittings provided as per the diagram.
9
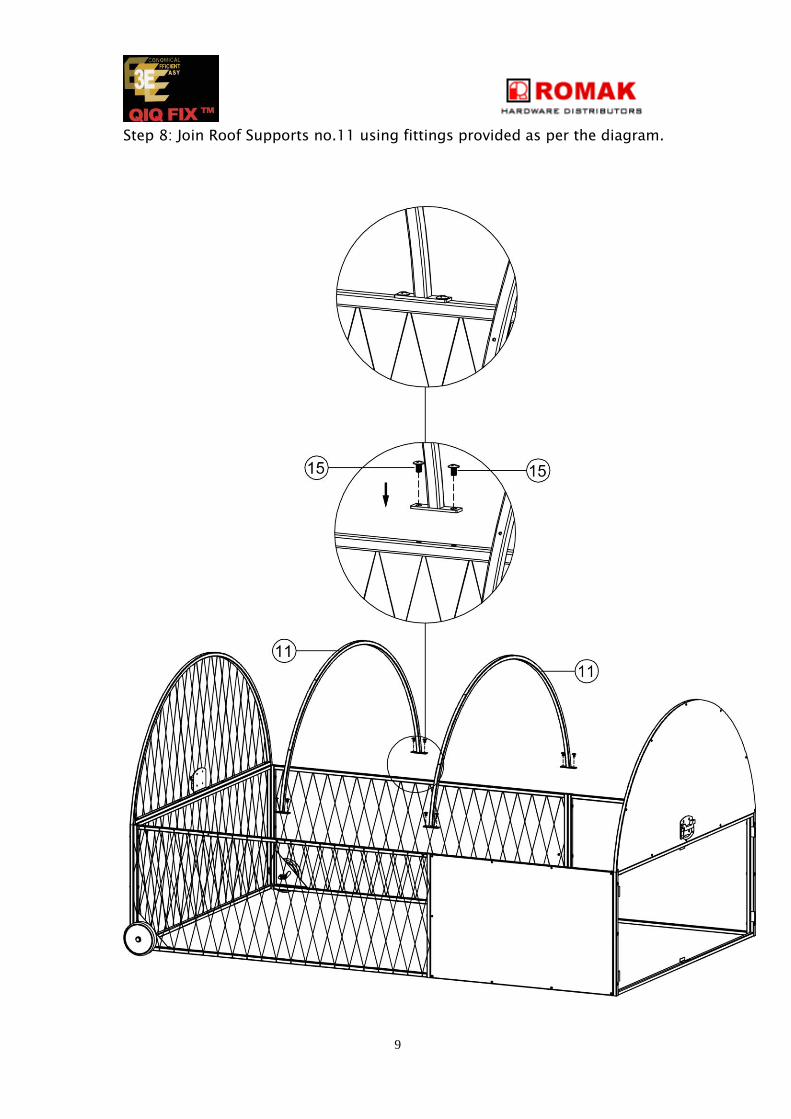
Step 8: Join Roof Supports no.11 using fittings provided as per the diagram.

10
Step 9: Fit Roof sheets no.12 and no.13 using fittings provided as per the
diagram.
、

11
Step 10: Fit Doors no.9 and no.10 using fittings provided as per the diagram.
Your Mobile chicken coop is now ready to use.

12
This Warranty against defects is given by:
Harris Farms, LLC
7227 Haley Industrial Drive,
Suite 200
Nolensville, TN 37135
Ph: (615)776-3993
Fax: (615)776-2335
Email: [email protected]
Details of Manufacturer’s Warranty
This Product comes with a 10 year limited Structural Warranty (“the Warranty
Period”) from the date of purchase. This Warranty also applies where there are
missing or damaged parts identified in the parts list referred to in the
instruction kit within the product packaging.
Please ensure that you keep this warranty form in a safe place along with your
proof of purchase.
Product…………………………………………………………
Place of Purchase ……………………………………………
City and State…………………………………………………
Date of Purchase……../………../………
Process of claiming Warranty
To make a claim under the Warranty within the Warranty Period, you will need
to contact The Manufacturer directly by phone or email:
Claims Department contact number: 1(800)745-9906
Claims Department email: [email protected]
You will be required to produce a Proof of Purchase (or may need to be
presented upon at The Manufacturer’s discretion) at the time of claim.
The Manufacturer bears the cost of replacing the products or spare parts or
repairing the products and reasonable direct expenses of claiming under this
warranty:
– Where replacement of parts, the Manufacture will bear the cost of sending
the spare part and will endeavour to deliver to the customer’s nearest reseller
within 10 working days for the customer to pick up. At such time the customer
may be required to return the alleged faulty parts.

13
– Where assessment is required in case of replacing or repairing The
Product, The Manufacturer will appoint an assessor within 10 working days to
identify should there be alleged defect. The Manufacturer will bear the costs
of repairing by appointing a local tradesman. The Manufacturer may choose to
replace The Product if the repair or the cost of repair is not feasible The
Replacement Product will be available at the retailer within 10 working days.
The Customer will bear the cost of assembly The Product if The Product is
replaced.
IMPORTANT
1. Manufacturer’s Disclosure:
This Warranty against defects shall not apply in the following situations:
a) Where The Product is not assembled in accordance with the
instructions provided in the product kit.
b) Where The Product is used to store corrosive materials such as
fertilizer, chlorine and etc.;
c) Where the damage to The Product is caused by storms.
2. Notes:
This Product is weatherproof to a certain extent; however driving windy rain
may cause The Product to leak. Condensation may also occur in some weather
conditions such as extreme heat or cold.
We strongly recommend using a waterproof sealant in any required area of
The Product in order to minimize the risk of water entering.
3. Major Defects
Upon The Manufacturer being satisfied that the defect is a major defect, the
purchase price may be refunded in lieu of providing a replacement product or
repairing the product.