compact disc player - sony · 2018. 11. 16. · 2000 sony corporation cdp-cx450 operating...
TRANSCRIPT

4-229-367-12 (1)
2000 Sony Corporation
CDP-CX450
Operating Instructions
Compact DiscPlayer

2
WARNING
To prevent fire or shockhazard, do not exposethe unit to rain ormoisture.To avoid electrical shock,do not open the cabinet.Refer servicing toqualified personnel only.
– Reorient or relocate the receivingantenna.
– Increase the separation between theequipment and receiver.
– Connect the equipment into an outleton a circuit different from that towhich the receiver is connected.
– Consult the dealer or an experiencedradio/TV technician for help.
CAUTIONYou are cautioned that any changes ormodifications not expressly approved inthis manual could void your authority tooperate this equipment.
Owner’s RecordThe model and serial numbers arelocated at the rear of the unit.Record the serial number in the spaceprovided below. Refer to them wheneveryou call upon your Sony dealerregarding this product.
Model No. CDP-CX450
Serial No. _________________________
for the customers in North America
(Except for customers in the UnitedStates)This appliance is classified as a CLASS 1LASER product.The CLASS 1 LASER PRODUCTMARKING is located on the rearexterior.
This symbol is intended to alertthe user to the presence ofuninsulated “dangerous voltage”within the product’s enclosurethat may be of sufficientmagnitude to constitute a risk ofelectric shock to persons.
This symbol is intended to alertthe user to the presence ofimportant operating andmaintenance (servicing)instructions in the literatureaccompanying the appliance.
INFORMATIONThis equipment has been tested andfound to comply with the limits for aClass B digital device, pursuant to Part15 of the FCC Rules. These limits aredesigned to provide reasonableprotection against harmful interferencein a residential installation. Thisequipment generates, uses, and canradiate radio frequency energy and, ifnot installed and used in accordancewith the instructions, may cause harmfulinterference to radio communications.However, there is no guarantee thatinterference will not occur in a particularinstallation. If this equipment does causeharmful interference to radio ortelevision reception, which can bedetermined by turning the equipment offand on, the user is encouraged to try tocorrect the interference by one or more ofthe following measures:
Welcome!Thank you for purchasing this SonyCompact Disc Player. Before operatingthe unit, please read this manualthoroughly and retain it for futurereference.
About This ManualThe instructions in this manual are formodel CDP-CX450.
Conventions• Instructions in this manual describe
the controls on the player.You can also use the controls on theremote if they have the same orsimilar names as those on the player.
• The following icons are used in thismanual:
Z Indicates that you can do thetask using the remote.
z Indicates hints and tips formaking the task easier.
For the customers in the United States
ENERGY STAR® is a U.S.registered mark.As ENERGY STAR® Partner,Sony Corporation hasdetermined that this productmeets the ENERGY STAR®
guidelines for energyefficiency.

3
TABLE OF CONTENTS
Getting StartedUnpacking ............................................................................................................................. 4Hooking Up the System ...................................................................................................... 4Connecting Another CD Player ......................................................................................... 6Setting Up the Remote ........................................................................................................ 7Inserting CDs ...................................................................................................................... 10
Playing CDsPlaying a CD ....................................................................................................................... 13Using the Display .............................................................................................................. 14Locating a Specific Disc .................................................................................................... 16Specifying the Next Disc to Play ..................................................................................... 18Playing the Disc Just Inserted (Easy Play) ..................................................................... 19Playing Discs in Various Modes (Repeat/Shuffle Play) .............................................. 19Creating Your Own Program (Program Play) ............................................................... 21Using the Timer ................................................................................................................. 26Fading In or Out ................................................................................................................. 26
Storing Information About CDs (Custom Files)What You Can Do With the Custom Files ..................................................................... 27Labeling Discs (Disc Name) ............................................................................................. 27Loading the Custom Files into the Remote .................................................................... 30Storing Custom File Information Using a Keyboard .................................................... 32Storing Specific Tracks (Delete Bank) ........................................................................... 32Grouping Discs (Group File) ............................................................................................ 33Classifying Discs According to Artist Name (Artist File) ............................................ 36Storing Your Favorite Tracks (Hit List) .......................................................................... 39
Using the Player with Another ComponentControlling Another CD Player (Advanced Mega Control) ....................................... 41Playing Alternately (No-Delay Play/X-Fade Play) ...................................................... 42Controlling the Player by Another Unit ......................................................................... 43
Additional InformationPrecautions ......................................................................................................................... 44Notes on CDs ...................................................................................................................... 44Troubleshooting ................................................................................................................. 45Specifications ...................................................................................................................... 45
IndexIndex .................................................................................................................................... 46

Getting Started
4
UnpackingCheck that you received the following items:• Audio cord (1)• Video cord (1)• Remote commander (remote) (1)• Size AA (LR6) batteries (3)
Inserting batteries into the remote
You can control the player using the supplied remote.Insert three size AA (LR6) batteries (supplied) bymatching the + and – ends on the batteries to thediagram inside the battery compartment.Insert the negative (–) end first, then push in and downuntil the positive (+) end clicks into position.When using the remote, point it at the remote sensor
on the player.
Hooking Up the System
Overview
This section describes how to hook up the CD player toan amplifier. Be sure to turn off the power of eachcomponent before making the connections.
White(L)
Red(R)
White(L)
Red(R)
What cords will I need?Audio cord (supplied) (1)
z When to replace batteriesIf E flashes in the remote’s display, replace all thebatteries with new alkaline batteries. Use of battery typesother than alkaline batteries, such as manganesebatteries, may not last longer than the alkaline batteries.The loaded memory in the remote will be retained for afew minutes while you replace the batteries.
Notes• Do not leave the remote near an extremely hot or humid
place.• Do not drop any foreign object into the remote casing,
particularly when replacing the batteries.• Do not expose the remote sensor to direct sunlight or leave
too near lighting apparatuses. Doing so may cause amalfunction.
• If you do not use the remote for an extended period of time,remove the batteries to avoid possible damage from batteryleakage and corrosion.
Getting Started
CD player
DIGITAL OUT(OPTICAL)
Amplifier
To line output (L) To line output (R)
To an AC outlet: Signal flow
To audio input
To an AC outlet
CONTROL A1 MONITOR OUT

Getting StartedGetting Started
5
Hookups
When connecting an audio cord, be sure to match thecolor-coded cord to the appropriate jacks on thecomponents: Red (right) to Red and White (left) toWhite. Be sure to connect firmly to avoid hum andnoise.
• If you have a digital component such as a digitalamplifier, D/A converter, DAT, or MDConnect the component via the DIGITAL OUT (OPTICAL)connector using an optical cable (not supplied). Take off thecap and plug in the optical cable.Note that you cannot use fading in or out (page 26) andTime Fade (page 26) functions when making thisconnection.
z If you have a Sony component with the CONTROL A1(or CONTROL A1) jackConnect the component via the CONTROL A1 (orCONTROL A1) jack. You can simplify the operations ofaudio systems composed of separate Sony components.For details, refer to the supplementary “CONTROL A1Control System” instructions.
AmplifierCD player
Optical cable (not supplied)
NoteWhen you connect via the DIGITAL OUT (OPTICAL)connector, noise may occur when you play CD software otherthan music, such as a CD-ROM.
z You can check the disc information by observing theTV screen when you connect the player and your TVwith the video cable.
CD player Digital component
Connecting the AC power cord
Connect the AC power cord to a wall outlet.
Note on placement of the player
Be sure to place the player in a flat, horizontal place.If the player is left in a slanted position, it may cause amalfunction or damage the player.
INPUT
CD
L
RIN OUT
L
R
L
R
2ND CD ANALOG
DIGITALINPUT
OPTICAL
DIGITAL
OPTICALOUT
Video cord (supplied)
INPUT
VIDEO
OUT
MONITOR
CD player TV

Getting Started
6
What cords will I need?• Audio cord (1) (Use the cord supplied with the player to be
connected.)• Monaural (2P) mini-plug cord (1) (not supplied)
1 Connect the players with an audio cord (see also“Hookups” on page 5).
2 Connect the players with a monaural (2P) mini-plug cord.
Connecting Another CD PlayerIf you have a Sony CD player in which 5, 50, 200, 300,or 400 discs can be inserted and which is equippedwith the CONTROL A1 (or CONTROL A1) jack andthe command mode of that player can be set to CD 3,you can control that player as the second player withthis player. After connecting this player and anamplifier, follow the procedure below.Be sure to turn off the power of each player beforemaking this connection.
CDP-CX235, etc.
CDP-CX450
To 2ND CD IN
CDP-CX235, etc.
To an AC outlet
To an AC outlet: Signal flow
To audio input
To audio output
To ANALOG OUT
Amplifier
CDP-CX450
For details on this connection, refer to thesupplementary “CONTROL A1 Control System”instructions.
3 Set the command mode of this player to CD1(factory setting) or CD2, and set that of the secondplayer to CD3.Check the display for the current command modeof this player, if the mode is CD3, change the modeas described on the next page.
For details on how to operate the second player,see “Controlling Another CD Player” on page 41and “Playing Alternately” on page 42.
4 Connect the AC power cord of both players to anAC outlet.
5 Perform “Player check” by following the steps in“Storing player data in the remote” on page 9.
To an AC outlet
ToCONTROL A1
Current command mode
LINE
OUT
L
RIN OUT
L
R
L
R
2ND CD ANALOG
CONTROL A1
CONTROL A1
CDP-CX235, etc.CDP-CX450
1
SECSTEPMINART.GROUPTRACKHITART.NEXT2nd
CD2 CD3
1 GROUP
NO DELAYTEXTCDMULTIPROGRAM 1 2 3 X-FADE DELETE
REPEATSHUFFLE
DISC
* D I S C - 1 * ** * * *
CD1
ALL DISCS

Getting StartedGetting Started
7
Notes• Do not connect any player other than the one used as the
second player to the 2ND CD IN jacks of this player.• When connecting a second CD player, do not connect the
DIGITAL OUT (OPTICAL) connector of this player to theamplifier.
Changing the command mode of the player
1 Press MENU/NO.
2 Turn the JOG dial until “Command Mode?”appears in the display.
3 Push the JOG dial.The current command mode appears.
4 Turn the JOG dial to select CD1 or CD2, then pushthe JOG dial again.
MENU/NO
SECSTEPMINART.GROUPTRACKHITART.NEXT2nd DISC
1 GROUP
NO DELAYTEXTCDMULTIPROGRAM 1 2 3 X-FADE DELETE
CD3
REPEATSHUFFLE1
CD1 CD2
ALL SDISC
* C D 1 [ C D ] C2 D 3 *
Current command mode
I / 1
JOG
Setting Up the Remote
Understanding the 2-way remote system
The supplied remote operates under a 2-way remotesystem. While you use the remote and the remote’sdisplay is on, the component responds to signals sentfrom the remote by sending signals back to the remote.
During remote operations, point the remote toward theplayer at all times.To avoid unintentional operations, turn off the 2-wayremote system of this or connected player when:• you connect via CONTROL A1/CONTROL A1 two
or more components supplied with a remote with the mark (for example, when you connect this
player to another set of this player or certainreceiver/amplifier). In this case, you need to turn offthe 2-way remote system of the components exceptthe one you want to use as a main unit for thesystem. When you use the remote, make sure to turnon the main unit.
• you connect this player to a receiver/amplifiersupplied with the RM-TP501, RM-TP501E, or RM-LJ301 remote control. In this case, you need to turnoff this player’s 2-way remote system.
To turn off this player’s 2-way remote system, see “Toturn off the 2-way remote system” on page 8.
Component

Getting Started
8
To turn off the 2-way remote system
You may need to turn off the player’s 2-way remotesystem depending on which components you connectto this player. See “Understanding the 2-way remotesystem” on page 7 to see if you need to do so.
Even though you turn off the player’s 2-way remotesystem, you can use the remote supplied with theplayer by pointing the remote toward the unit such asa receiver that the 2-way remote system is turned on.In this case, position the player in the proximity of theunit that the 2-way remote system is turned on.
1 Press MENU/NO.
2 Turning the JOG dial until “2WAY OFF ?” appearsin the display window.
3 Press YES.
To return to normal settingAfter following steps 1 and 2, and “2WAY ON ?” isdisplayed, then press YES.If you connect to the Sony CD player CDP-CX260 orCDP-CX88ES, press OPERATE on the transmitter/receiver to turn it off, and set the 2-way remote systemof the player to on.
NoteIf you use this player with a receiver/amplifier, turn thereceiver/amplifier on when using this player.
MENU/NO YES
How to use the remote
Press ?/1 on the player to turn on the player.If the following message appears in the remote’sdisplay while setting up the remote, point the remoteat the main player.
a n ' t r e c e i v eelP a s e t u r n
t o a ma i n u n i th i
C
t s REMOT E
You can select an item shown in the remote’s displayby moving the cursor (B). To move the cursor down,push the Easy scroll key downward. To move thecursor up, push the Easy scroll key upward.
30°
?/1
CONTINUE
PROGRAM
NAME SCAN
MENU
PUSH ENTER
TRACK
PLAYER SELECT
BACK
DISCSKIP
SHUFFLE
REPEAT
SCROLL
MENU
Easy scrollkey
Note that the displayed message disappearsautomatically if you don’t proceed for more than a fewmoments.
JOG
I / 1
BACK
When you press BACK, the remote’s display returns tothe previous display.

Getting StartedGetting Started
9
Storing player data in the remote
The remote checks and stores the player data such asthe command mode sent from the player(s) so that youcan use the remote to control the player(s).Turn on the player before operation.
1 Press MENU.
Note the V mark indicates that the menucontinues.Press the Easy scroll key downward to see the nextitems.
2 Move the cursor (B) to “Set up” by using the Easyscroll key, then press the Easy scroll key.
3 Move the cursor to “Player check,” then press theEasy scroll key.The display shows the disc data in the player after“Now player checking...” appears.
When you connect another CD player, the discdata in the second CD player also appears.
NoteWhen you change the command mode of the player orconnect a 2nd player, be sure to perform “Player check.”
N ame s e a r c hP r o g r am p l a yP r o g r am i n p u tA r t i s s e l e c tt
CD1
P l a y e r c h e c kB a c k l i g h t mo d e
Memo r y c l e a rC o n t r a s t a d j u s t
CD1
a s t e r p l a y e r= CD 1 / 4 0 0 d i s c s
M
CD1
Adjusting the display contrast of theremote
1 Press MENU.
2 Move the cursor (B) to “Set up” by using the Easyscroll key, then press the Easy scroll key.
3 Move the cursor to “Contrast adjust,” then pressthe Easy scroll key.
4 Adjust the contrast by pressing the Easy scroll keyup or down and holding until the desired level ofcontrast is attained.
5 Press the Easy scroll key.
a s t e r p l a y e r= CD 1 / 4 0 0 d i s c s
= CD 3 / 5 1 d i s c sn d
M
2 p l a y e r
CD1
N ame s e a r c hP r o g r am p l a yP r o g r am i n p u tA r t i s s e l e c tt
CD1
P l a y e r c h e c kB a c k l i g h t mo d e
Memo r y c l e a rC o n t r a s t a d j u s t
CD1
ONTRAS TAD J US T
a d j u so n
C
c t r a s tt
CD1

Getting Started
10
Inserting CDsYou can insert up to 400 discs into this player.
1 Press ?/1 to turn on the player.
2 Open the front cover by pressing OPEN/CLOSE.
3 Turn the JOG dial until you find the disc slotwhere you want to insert a disc, while checking thedisc number (written beside every slot and alsoindicated in the small display).
I / 1
Rotary table
Loading position
Playing position
OPEN/CLOSE JOG?/1
Top view of the disc slot
I / 1
Disc slot at the loading position
Disc number
Turning off the LCD back light
You can conserve the remote’s batteries by turning offthe LCD (Liquid Crystal Display) backlight.
1 Press MENU.
2 Move the cursor (B) to “Set up” by using the Easyscroll key, then press the Easy scroll key.
3 Move the cursor (B) to “Back light mode” by usingthe Easy scroll key, then press the Easy scroll key.
4 Move the cursor to “OFF,” then press the Easyscroll key.
NoteIf you erase all the data stored in the remote (page 31), followthe procedure above to turn the backlight off again.
N ame s e a r c hP r o g r am p l a yP r o g r am i n p u tA r t i s s e l e c tt
CD1
CD B a c k l i g h t
OF FON
L
CD1
P l a y e r c h e c kB a c k l i g h t mo d e
Memo r y c l e a rC o n t r a s t a d j u s t
CD1
Smalldisplay

Getting StartedGetting Started
11
The disc number at the loading position appears inthe display. If the disc has a Disc Name (see page27), the Disc Name appears instead of the discnumber. As you turn the JOG dial, the disc numberor the Disc Name changes.
You can classify discs by using the Group Filefunction or Artist Name function. This feature letsyou easily find the disc you want to play. Fordetails, see “Grouping discs (Group File)” on page33 and “Classifying discs according to Artist Name(Artist File)” on page 36.
4 Insert a disc with the label side facing right.
After inserting the disc, you can enter the originaldisc title to replace the disc numbers (see“Labeling discs (Disc Name)” on page 27) so youcan locate it easily whenever you want to play it.
5 Repeat steps 3 and 4 to insert more discs.
6 Close the front cover by pressing OPEN/CLOSE.
The rotary table turns and the disc slot at theloading position is set to the playing position.Always keep the front cover closed except wheninserting or removing discs.
1
CD2
GROUP
NO DELAYTEXTCDMULTIPROGRAM 1 2 3 X-FADE DELETE
CD3
REPEATSHUFFLE 1
SECSTEPMINART.GROUPTRACKHITART.NEXT2nd
ALL SDISC
DISC
* D I S C - 2 * *0 * * *
CD1
Disc number or the Disc Name
With the label sidefacing right
CAUTION
• Do not insert an 8 cm (3-inch) CD adaptor.The player cannot play an 8 cm CD. Do not insert an8 cm (3-inch) CD or an 8 cm (3-inch) CD adaptor(CSA-8). It may damage the player and disc.
• Do not move the player after inserting discs.• Be sure to place the player in a flat, horizontal
position. Do not place the player in a slantedposition.
• Do not move the player and avoid any physicalshock after inserting discs.
• When transporting the player, remove all discsfrom the player.
• Make sure to insert the disc at a right angle to therotary table.
If the disc is not inserted into the slot completely (ex.when you press A), reinsert the disc at a right angleto the rotary table.
• Do not attach seals or stickers, etc. to CDs.If seals or stickers, etc. are attached to a CD, theplayer may not operate properly and the player orthe disc may be damaged.
Notes• If you drop a disc into the player and/or the CD does
not go into the slot correctly, consult your nearest Sonydealer.
• Make sure the rotary table comes to a complete stopbefore inserting or removing discs.
• The front panel closes automatically when you pressH. Be careful not to put your hand into the playerafter pressing H, otherwise your hand may be caughtin the front panel.
Disc that is not fully inserted
CD TEXT
1
CD2
GROUP
NO DELAYMULTIPROGRAM 1 2 3 X-FADE DELETE
CD3
REPEATSHUFFLE 1
SECSTEPMINART.GROUPTRACKHITART.NEXT2nd
ALL SDISC
DISC
S O N Y H I T * *S * * *
CD1

Getting Started
12
Removing CDs
After following steps 1 to 3 of “Inserting CDs” on page10, remove the discs. Then close the front cover.
z To remove discs easilyAfter following steps 1 to 3 of “Inserting CDs” on page10, press A (DISC EJECT). The disc in the selected slotmoves up and you can remove the disc easily. When youpress A again, the disc returns to the loaded position. Ifthe disc does not return to the loaded position, reinsertthe disc.

Playing CDs
13
Playing CDsPlaying CDs
Playing a CDYou can play all the tracks on a disc in the originalorder (Continuous Play). You can also play up to 400discs consecutively. Make sure you have inserted thediscs correctly as indicated on pages 10 and 11.
1 Turn on the amplifier and select the CD playingposition.
2 Press ?/1 to turn on the player.
3 Press CONTINUE to select ALL DISCS or 1 DISCContinuous Play mode.Each time you press CONTINUE, “ALL DISCS” or“1 DISC” appears alternately in the display.
4 Turn the JOG dial until the desired disc number orDisc Name (see page 27) appears in the display toselect the first disc (ALL DISCS) or the disc youwant (1 DISC).
5 Push the JOG dial to start playing and adjust thevolume on the amplifier.The selected disc is set to the playing position, andthe player plays all the discs from the selected one(ALL DISCS) or all the tracks once (1 DISC).
I / 1
CONTINUE JOG?/1 H
1
CD2
GROUP
NO DELAYTEXTCDMULTIPROGRAM 1 2 3 X-FADE DELETE
CD3
REPEATSHUFFLE 1
SECSTEPMINART.GROUPTRACKHITART.NEXT2nd
ALL SDISC
DISC
* D I S C - 2 * *0 * * *
CD1
When you select
ALL DISCS
1 DISC
The player plays
All discs in the player consecutivelyin the order of disc number. Emptydisc slots are skipped.
Only the one disc you have selected.
To
Stop playback
Pause
Resume playing afterpause
Go to the next disc Z
Go back to thepreceding disc Z
Go to a specific trackdirectly Z
Go to a point in atrack while monitoringthe sound Z
Go to a point in a trackby observingthe display Z
Go to the next track
Go back to thepreceding track
Stop playing andremove the disc
Do this
Press x.
Press X.
Press X or H.
Press DISC SKIP + once.Hold down the button to skip otherdiscs.
Press DISC SKIP – once.Hold down the button to skip otherdiscs.
Press the number button of the trackon the remote. When you directlylocate a track numbered over 10,press >10 first, then thecorresponding number buttons.
Press m (backward)/M(forward) on the remote and holddown until you find the point.
Press m (backward)/M(forward) on the remote and holddown until you find the pointduring pause. You will not hear thesound during the operation.
Turn the . AMS > dialclockwise by one click.
Turn the . AMS > dialcounterclockwise by one click.
Press OPEN/CLOSE.
Operations you way want to do during play
z When you turn off the playerThe player remembers the last playing disc and the playmode: Continuous (on page 13), Shuffle (on page 20), orProgram (on page 21). When you turn on the playeragain, the player plays the same disc in the same playmode.
NoteIf “ ” appears in the large display, the disc has reached theend while you were pressing M. Turn the . AMS >dial counterclockwise or press m to go back.

Playing CDs
14
Using the DisplayYou can check stored disc information, such as the DiscNames (see page 27) or Artist Names (see page 36), byusing the display.Unlike a normal CD, a CD TEXT disc includesinformation such as the disc title or artist name. Thedisplay shows the CD TEXT information so that youcan check the current disc title, artist name, and tracktitle. When the player detects a CD TEXT disc, “CDTEXT” appears in the display. If your CD TEXT dischas multi-language capacity, “MULTI CD TEXT”appears in the display. If you want to check theinformation in another language, refer to “Selecting thelanguage of the CD TEXT information” on page 15.
Display information of the normal discs
Display information in stop modeThe display shows the current disc number, totalnumber of tracks, and total playing time of the disc.
Locating a specific track or a point in atrack while observing the remote display
CONTINUE
PROGRAM
NAME SCAN
MENU
PUSH ENTER
TRACK
PLAYER SELECT
BACK
DISCSKIP
SHUFFLE
REPEAT
SCROLL
./>
m/M
Easy scrollkey
TRACK
H
1 During stop mode, press TRACK.
2 Move the cursor (B) to the desired track by usingthe Easy scroll key.
3 Press the Easy scroll key.To return to the previous display, press BACK.
NoteWhen you select a CD TEXT disc, track titles appear in step 2instead of the track numbers.
D i s c 1 2 3*D I SC - 1 2 3 *
2 . ( TRACK 2 )1 . ( TRACK 1 )
CD1
3 . ( TRACK 3 )4 . ( TRACK 4 )
6 . ( TRACK 6 )5 . ( TRACK 5 )
CD1
JOGSCROLL MENU/NO
I / 1
1
CD2
GROUP
NO DELAYTEXTCDMULTIPROGRAM 1 2 3 X-FADE DELETE
CD3
REPEATSHUFFLE 1
SECSTEPMINART.GROUPTRACKHITART.NEXT2nd
ALL SDISC
DISC
* D I S C - 2 * *0 * * *
CD1
NEXT DISC
2nd PLAYER
DISC
Total playing time
Current disc number or Disc Name etc.
Total number of tracks
Current disc number
BACK

Playing CDs
15
Playing CDs
The information is displayed as follows:• When the Artist Name is assigned to the current
discDisc title of CD TEXT/ Assigned Artist Name
• When no Artist Name is assigned to the currentdiscDisc title of CD TEXT/Artist name of CD TEXT
Selecting the language of the CD TEXTinformation
You can select the language used to display the CDTEXT information when you select a CD TEXT discwith multi-language information.Once you select the language, the display shows theinformation in the selected language until you turn offthe player. If the player cannot read the languagememorized in a CD TEXT disc, “other lang.” appears.
1 Press MENU/NO in stop mode.“Select lang.?” flashes.
2 Push the JOG dial.The current operating language flashes.
3 Turn the JOG dial until the language you wantappears in the display.
4 Push the JOG dial to select the language.“Reading text” appears momentarily, then thedisplay shows the information in the selectedlanguage.
z You can check the current language1 Press MENU/NO while playing a CD TEXT disc.
“Show lang.?” flashes.2 Push the JOG dial.
The current language appears momentarily.You can also check the current language while selecting aCD TEXT disc without multi-language information.
NoteIf you select a CD TEXT disc that does not contain theinformation of the selected language, the display shows theinformation in another language according to the disc’spriority.
Display information of the playing discWhile playing a disc, the display shows the currentdisc number, track number, playing time of the track,and the next disc number.
The large display shows up to 13 characters of theinformation. When you press SCROLL, all theinformation scrolls in the display.
The information is displayed as follows:• When the Artist Name is assigned to the current
discDisc Name/ Assigned Artist Name
• When no Artist Name is assigned to the currentdiscDisc Name
Display information of CD TEXT discs
Display information in stop modeThe display shows the disc title. When you pressSCROLL, the disc title scrolls in the display. When youassign the artist Name (see page 36), the artist namealso appears and scrolls in the display.
Display information while playing a discThe display shows the disc and track title alternately.When you press SCROLL, the disc title and track titlescroll in the display.
The display shows up to 13 characters of theinformation. When you press SCROLL, all theinformation scrolls in the display.
DISC
1
CD2
GROUP
NO DELAYPROGRAM 1 2 3 X-FADE DELETE
CD3
REPEATSHUFFLE 1
SECSTEPMINART.GROUPTRACKHITART.NEXT2nd
ALL SDISC
S e l e c t * a nl g . ?
CD1TEXTCDMULTI
DISC
1
CD2
GROUP
NO DELAYPROGRAM 1 2 3 X-FADE DELETE
CD3
REPEATSHUFFLE 1
SECSTEPMINART.GROUPTRACKHITART.NEXT2nd
ALL SDISC
* * * E n g l s hi * * ?
CD1TEXTCDMULTI
1
CD2
GROUP
NO DELAYMULTIPROGRAM 1 2 3 X-FADE DELETE
CD3
REPEATSHUFFLE 1
SECSTEPMINART.GROUPTRACKHITART.NEXT2nd
ALL SDISC
DISC
S O N Y H I T / HS i t e
CD1CD TEXT
Playing time of thetrack
Current disc number or Disc Name etc.
Current track number
Current disc number
1
CD2
GROUP
NO DELAYTEXTCDMULTIPROGRAM 1 2 3 X-FADE DELETE
CD3
REPEATSHUFFLE 1
SECSTEPMINART.GROUPTRACKHITART.NEXT2nd
ALL SDISC
DISC
* D I S C - 2 * *0 * * *
CD1
2nd PLAYER
NEXT
DISC
DISC
Next disc number

Playing CDs
16
Notes• When searching for input characters, blanks and
symbols before the first character in the Disc Name areignored.
• When searching for input characters, upper and lowercases cannot be differentiated.
3 Push the JOG dial to select the disc.In Program Play mode, the disc will be added tothe end of the program.
To cancel Name SearchPress NAME SEARCH again.
NoteThe Name Search function on the player does not workduring ALL DISCS shuffle play.
Locating a disc while observing the TVscreen
When you connect the player and your TV (see page 5),you can select the disc while observing the TV screen.
GROUPSPACE
ENTER X-FADE
CUSORENTER
NAME INPUT
NO DELAY
ARTISTMODE
HITLIST
CHECK
–– MEGA ––
CLEAR
DISCDEL
SCROLLCAPS
3
DEF
6
MNO
9
WXYZ
2
ABC&!?
5
JKL
8
TUV
10/010
1
4
GHI
7
PQRS
CURSORM/m/</,
1 Set your TV to the connected input of the playerThe disc information display appears on the TVscreen.
331 America
ARTIST NAME
Europe
Orchest
Poland
Italy o
David
Richard
Steve
Michael
Mike
Beethoven:Symphony N
DISC NAME
ALL DISCS CONTINUE
EMOTIONS
REPEAT GROUP 1 TRACK 1
Mozart:Piano concert
SONYHITS
Chopin:The piano wor
Vivaldy:Four seasons
World jazz hits 2000
World dance music No
Greatest popular hit
Greatest jazz titles
Super mega hits 2000
No.
332
333
334
335
336
337
338
339
340
CURSORENTER
Disc numberDisc Name*
Assigned Artist Name*
Track title (appears when the current disc isCD-TEXT disc)
* Each time you press SCROLL, the Disc Name andArtist Name interchange.
Locating a Specific Disc
Locating a disc on the player
Turn the JOG dial until the desired disc number orDisc Name (see page 27) appears in the display. Pushthe JOG dial to start play.
To skip discs quicklyPress +100. Each time you press +100, the player skips100 discs.
Locating a disc by searching for a specificDisc Name (Name Search)
You can search for and locate a desired disc by the firstcharacter of the Disc Name (see page 27). The NameSearch function can display the Disc Name inalphabetical order.
1 Press NAME SEARCH.“NAME SEARCH” appears in the display.
2 Turn the JOG dial to find the desired disc.As you turn the JOG dial, the Disc Names startingwith the input character appear in the display.
The following characters are displayed as the firstcharacter.
A B C D E F G H I J K L M N O P Q R S T U V W XY Z 0 1 2 3 4 5 6 7 8 9
If “NOT FOUND” appears in the display whileinputting the first character with the JOG dial, nodisc has been labeled using the input character.
I / 1
JOGNAME SEARCH +100
DISC
CD TEXT
1
CD2
GROUP
NO DELAYMULTIPROGRAM 1 2 3 X-FADE DELETE
CD3
REPEATSHUFFLE 1
SECSTEPMINART.GROUPTRACKHITART.NEXT2nd
ALL SDISC
S O N Y H I T * *S * * *
CD1
First character

Playing CDs
17
Playing CDs
GROUPSPACE
ENTER X-FADE
CUSORENTER
NAME INPUT
NO DELAY
ARTISTMODE
HITLIST
CHECK
–– MEGA ––
CLEAR
DISCDEL
SCROLLCAPS
3
DEF
6
MNO
9
WXYZ
2
ABC&!?
5
JKL
8
TUV
10/010
1
4
GHI
7
PQRS
CONTINUE
PROGRAM
NAME SCAN
MENU
PUSH ENTER
TRACK
PLAYER SELECT
BACK
DISCSKIP
SHUFFLE
REPEAT
SCROLL
TRACK
H
Easy scrollkey
NAME SCAN
Numberbuttons
DISC
ENTER
To locate a disc directly Z
1 Press DISC.
2 Press the number button of the disc.Example: To enter number 35
Press 3, then 5.
0 5 : *D I SC - 5 *
0 6 : *D I SC - 6 *
0 7 : *D I SC - 7 *
0 8 : *D I SC - 8 *
CD1
2 Move the cursor to a desired disc by usingCURSOR M/m/</,.When you press CURSOR M/m, the cursor movesby one.When you press CURSOR </,, the cursormoves by ten.
3 Press CURSOR ENTER.
NoteArtist names of CD TEXT disc are not displayed. Only theassigned Artist Names are displayed.
Locating a disc using the remote
You can locate a disc using the remote. If you havestored the Disc Names (see page 27), you can use themto locate a disc.Before following the procedure below, be sure to loadthe Disc Name data into the remote’s memory byfollowing the procedure in “Loading the Custom Filesinto the remote” on page 30.
3 Press ENTER to start play.
To locate a disc directly while observing the remote’sdisplay Z
1 Move the cursor (B) to the desired disc by usingthe Easy scroll key.
2 Press the Easy scroll key.If the player has no disc in the slot you selected,“NO DISC!!!” appears.
z When you operate the 2nd playerFollow the procedure on page 41 so that “2nd player”appears in the remote’s display, then operate from thestep 1.
Notes• The Shuffle (on page 20) and Program (on page 21) Play
modes are canceled when you locate a disc using theremote.
• If the MEGA CONTROL button or the HIT LIST button islit, you cannot locate a disc by observing the remote’sdisplay.
To locate a disc by scanning each Disc Name(Name Scan) ZYou can locate a desired disc quickly by scanning theDisc Names (see page 27) in the display.Note that you cannot use this function in the ALLDISCS Shuffle Play mode.
1 Press NAME SCAN.“NAME SCAN” appears in the display, and theDisc Names scroll in the display.
2 Press H when the Disc Name of the desired discappears.The disc is set to the playing position, and theplayer starts playing.
In Program Play mode, the disc is added to the endof the program if you press ENTER instead of H.
NoteIf “NO ENTRY” appears in the display, no disc has beenlabeled with the Disc Name. Try the Name Scan functionagain after labeling the discs.

Playing CDs
18
Specifying the Next Disc toPlayYou can specify the next disc to play while playing adisc in Continuous or 1 DISC Shuffle Play mode.
While playing a disc, turn the JOG dial. “NEXT DISC”flashes in the display and the disc number or DiscName (see page 27) changes as you turn the JOG dial.When the desired disc number or Disc Name appearsin the display, stop turning the JOG dial.
After the current disc is played, the next disc you havespecified starts playing.If you want to skip to the next disc right away, pushthe JOG dial while playing the current disc.
To cancel the disc you have specifiedPress CONTINUE twice.
2nd PLAYER
NEXT
DISC
DISC
CD TEXT
1
CD2
GROUP
NO DELAYMULTIPROGRAM 1 2 3 X-FADE DELETE
CD3
REPEATSHUFFLE 1
SECSTEPMINART.GROUPTRACKHITART.2nd
ALL SDISC
DISC
* D I S C - 3 * *8 * * *
CD1
NEXT
Next disc number or the Disc Name
Current disc number
To locate a disc using the Disc Name data onthe remote ZYou can search for and locate a desired disc by usingthe Disc Name data on the remote.Before following the procedure below, be sure to loadthe Disc Name data into the remote’s memory (seepage 30).
1 Press MENU.
2 Move the cursor (B) to “Name search” by usingthe Easy scroll key, then press the Easy scroll key.
3 Push the Easy scroll key up or down until the firstcharacter in the Disc Name of the CD you wantappears.
Each time you push the Easy scroll key up ordown, the characters appear in the followingorder.
A B C D E F G H I J K L M N O P Q R S T U V W XY Z 0 1 2 3 4 5 6 7 8 9
4 Press the Easy scroll key to input the character youwant.The display shows the Disc Names starting withthe input character. The second CD player’s discnumbers are displayed in reverse contrast.
If “not found” appears after inputting the firstcharacter, no disc has been labeled using the inputcharacter.
5 Move the cursor to the disc number you want toplay, then press the Easy scroll key.
Notes• Shuffle Play (on page 20) and Program Play (on page 21)
are canceled when you use this function on the remote.• The Disc Names of the 2nd player do not appear when the
player is in Artist Play (on page 36) or Group Play (on page33) mode.
e a r c h l e t t e rA
S
CD1
1 3 : H i t e c h B l u e s
- e n d -0 6 : H e l l o
CD1

Playing CDs
19
Playing CDs
Playing the Disc Just Inserted(Easy Play)You can play the disc that was just inserted in slot 1 bypressing only one button.
1 Open the front cover by pressing OPEN/CLOSE.
2 Press EASY PLAY.Slot 1 moves into loading position.
3 Insert the disc in slot 1.
4 Press EASY PLAY.The EASY PLAY button is lit and the player startsplaying the disc in slot 1.
NoteThe Easy Play function can play only the disc in slot 1.
To cancel the Easy Play functionPress x.
I / 1
OPEN/CLOSE EASY PLAY
Playing Discs in Various Modes(Repeat/Shuffle Play)You can play discs or tracks repeatedly (Repeat Play)in any play mode.You can also have the player “shuffle” the tracks andplay in random order (Shuffle Play). The playershuffles all the tracks on all discs or on the disc youspecify.
REPEAT
I / 1
SHUFFLE JOGH
GROUPSPACE
ENTER X-FADE
CUSORENTER
NAME INPUT
NO DELAY
ARTISTMODE
HITLIST
CHECK
–– MEGA ––
CLEAR
DISCDEL
SCROLLCAPS
3
DEF
6
MNO
9
WXYZ
2
ABC&!?
5
JKL
8
TUV
10/010
1
4
GHI
7
PQRS
MENU
PUSH ENTER
TRACK
PLAYER SELECT
BACK
Numberbuttons
DISC
ENTER

Playing CDs
20
Playing all tracks on a specified disc inrandom order
1 Press SHUFFLE repeatedly until “1 DISC” and“SHUFFLE” appear in the display.
2 Turn the JOG dial until the desired disc numberappears in the display.When using the remote, first press DISC, thenpress the number button of the disc.
3 Press H.1 DISC Shuffle Play starts.“ ” appears in the display while the player isshuffling the tracks.
To cancel Shuffle PlayPress CONTINUE.
z You can start Shuffle Play while playingPress SHUFFLE, and Shuffle Play starts from the currenttrack.
z You can go to the next disc during 1 DISC ShufflePlay ZPress DISC SKIP +.
z You can specify the next disc to play during 1 DISCShuffle PlayTurn the JOG dial to specify the next disc. After all thetracks on the current disc are played in random order,the next disc starts playing. If you want to skip to thenext disc right away, push the JOG dial while playing thecurrent disc.
Notes• You cannot specify the next disc to play during ALL DISCS
Shuffle Play.• Even if you press x or turn off the player during ALL
DISCS Shuffle Play, the player remembers which discs ortracks were played and which were not. Therefore, if youwant to start ALL DISCS Shuffle Play again from thebeginning, be sure to repeat the procedure from step 1.
To cancel Repeat PlayPress REPEAT twice.
To repeat the current trackWhile the track you want is being played, pressREPEAT one or more times until “REPEAT 1” appearsin the display.
To cancel Repeat 1 PlayPress REPEAT.
Playing all tracks on all discs in randomorder
1 Press SHUFFLE repeatedly until “ALL DISCS” and“SHUFFLE” appear in the display.
2 Press H.ALL DISCS Shuffle Play starts.“ ” appears in the display while the player isshuffling the discs or the tracks.
Playing repeatedly (Repeat Play)
Press REPEAT while playing a disc.“REPEAT” appears in the display. The player repeatsthe discs/tracks as follows:
When the disc is played in
ALL DISCS ContinuousPlay (page 13)
1 DISC Continuous Play(page 13)
ALL DISCS Shuffle Play(page 20)
1 DISC Shuffle Play(page 20)
Program Play (page 21)
The player repeats
All tracks on all discs
All tracks on the current disc
All tracks on all discs inrandom order
All tracks on the current discin random order
The same program

Playing CDs
21
Playing CDs
Creating Your Own Program(Program Play)You can arrange the order of the tracks and/or discs tocreate three different programs that are storedautomatically. A program can contain up to 32 “step.”One “step” may contain a track or a whole disc.You can make programs using the controls on theremote or on the player. However, the programmingprocedures are different.
Creating a program on the player
1 Press PROGRAM until the desired programnumber (PROGRAM 1, 2, or 3) appears in thedisplay.If a program is already stored in the selectedprogram number, the last step of the programappears in the display. When you want to erase thewhole program, hold down CLEAR until“CLEAR” appears in the display (see page 22).
2 Turn the JOG dial until the desired disc numberappears in the display.
3 To program a whole disc, skip this step.Turn the . AMS > dial until the desiredtrack number appears in the display.
I / 1
CHECKPROGRAM JOG
H
CLEAR
. AMS >
SDISCALL
NEXT
CD TEXT
1
CD2
GROUP
NO DELAYMULTI2 3 X-FADE DELETE
CD3
REPEATSHUFFLE 1
SECSTEPMINART.GROUPTRACKHITART.2nd DISC
* D I S C - 2 * *0 * * *
CD1PROGRAM 1
SDISCALL
NEXT
CD TEXT
1
CD2
GROUP
NO DELAYMULTI2 3 X-FADE DELETE
CD3
REPEATSHUFFLE 1
SECSTEPMINART.GROUPTRACKHITART.2nd DISC
* D I S C - 2 * *0 * * *
CD1PROGRAM 1
Track number
4 Push the JOG dial.
5 To program other discs/tracks, do the following:
To program
All tracks of another disc(s)
Other tracks on the same disc
Other tracks on other discs
6 Press H to start Program Play.
To cancel Program PlayPress CONTINUE.
z The programs remain even after Program Play endsWhen you Press H in Program Play mode, you can playthe same program again.
z When you press PROGRAM to select Program Playduring Continuous or Shuffle PlayThe program is played after the current track.
z The program remains until erasedEven if you replace discs, the programmed disc and tracknumbers remain. Therefore, the player will play the newdisc and track numbers. However, the programmed discand track numbers that are not found in the player or onthe disc are deleted from the program, and the rest of theprogram is played in the programmed order.
z You can select the program number (PROGRAM 1,2,or 3) by using the remote ZPress PROGRAM on the remote repeatedly until thedesired program number appears in the display.
NoteIf you select Group Play mode (on page 33), Artist Play mode(on page 36), or Hit List (on page 39), Program Play will becanceled.
The trackbeing programmed
SDISCALL
NEXT
CD TEXT
1
CD2
GROUP
NO DELAYMULTI2 3 X-FADE DELETE
CD3
REPEATSHUFFLE 1
SECSTEPMINART.GROUPTRACKHITART.2nd DISC
* D I S C - 2 * *0 * * *
CD1PROGRAM 1
The disc beingprogrammed
Repeat Step(s)
2 and 4
3 and 4
2 to 4
Playing order

Playing CDs
22
Creating a program using the remote Z
GROUPSPACE
ENTER X-FADE
CUSORENTER
NAME INPUT
NO DELAY
ARTISTMODE
HITLIST
CHECK
–– MEGA ––
CLEAR
DISCDEL
SCROLLCAPS
3
DEF
6
MNO
9
WXYZ
2
ABC&!?
5
JKL
8
TUV
10/010
1
4
GHI
7
PQRS
CONTINUE
PROGRAM
NAME SCAN
MENU
PUSH ENTER
TRACK
PLAYER SELECT
BACK
DISCSKIP
SHUFFLE
REPEAT
SCROLL
ENTER
CLEAR
>10
DISCDEL
PROGRAM
Numberbuttons
MENU
Easy scrollkey
H
1 Press PROGRAM until the program number youwant (PROGRAM 1, 2, or 3) appears in the display.
2 Press DISC.
3 Press the number button of the disc.
4 To program a whole disc, press ENTER and go tostep 6.
DISC
SDISCALL
NEXT
CD TEXT
1
CD2
GROUP
NO DELAYMULTI2 3 X-FADE DELETE
CD3
REPEATSHUFFLE 1
SECSTEPMINART.GROUPTRACKHITART.2nd
* * D I S C - * *[ _ ] *
CD1PROGRAM 1
DISC
SDISCALL
NEXT
CD TEXT
1
CD2
GROUP
NO DELAYMULTI2 3 X-FADE DELETE
CD3
REPEATSHUFFLE 1
SECSTEPMINART.GROUPTRACKHITART.2nd
* * D I S C - * 2[ 0 ] *
CD1PROGRAM 1
DISC
SDISCALL
NEXT
CD TEXT
1
CD2
GROUP
NO DELAYMULTI2 3 X-FADE DELETE
CD3
REPEATSHUFFLE 1
SECSTEPMINART.GROUPTRACKHITART.2nd
* D I S C - 2 * *0 * * *
CD1PROGRAM 1
>
CAPS
SPACE
Checking the programmed order
You can check your program before or after you startplaying.
Press CHECK.Each time you press this button, the display shows thedisc and track number of each step in the programmedorder. (When a whole disc is programmed as one step,“AL” appears instead of the track number.) After thelast step in the program, the display shows “– END –”and returns to the original display.
Changing the programmed order
You can change your program before you start playing.
To
Erase a track or disc
Erase the last track or disc inthe program
Add tracks or discs to the endof the program
Erase the whole programcompletely
You need to
Press CHECK until the trackor disc you don’t wantappears in the display, thenpress CLEAR.
Press CLEAR. Each time youpress the button, the lastprogrammed track or discwill be cleared.
Follow the programmingprocedure.
Hold down CLEAR until“CLEAR” appears in thedisplay to erase the wholeprogram, then create a newprogram following theprogramming procedure.
Erasing the program stored in memory
1 Press PROGRAM repeatedly in stop mode untilthe program number (PROGRAM 1, 2, or 3) youwant to erase appears in the display.
2 Press and hold CLEAR until “CLEAR” appears inthe display.

Playing CDs
23
Playing CDs
5 First press >10 then press the number button of thetrack.When you select the track number less than 10,press 10/0 first, and then press the correspondingnumber to enter a track number from 1 to 9.
6 To program other discs/tracks, do the following:
To program
All tracks of another disc(s)
Other tracks on the same disc
Other tracks on other discs
7 Press ENTER or H to start Program Play.
To cancel Program PlayPress CONTINUE.
z You can check or change the program by pressing theCHECK or CLEAR button on the remote ZSee page 22.
Creating a program while observing theremote’s display Z
You can create up to eight programs in the remote’smemory by using the remote’s display. Each programcan contain up to 32 steps.
1 Press MENU.
2 Move the cursor (B) to “Program input” by usingthe Easy scroll key, then press the Easy scroll key.
Repeat Step(s)
2 to 4
5
2 to 5
The trackbeing programmed
SDISCALL
NEXT
CD TEXT
1
CD2
GROUP
NO DELAYMULTI2 3 X-FADE DELETE
CD3
REPEATSHUFFLE 1
SECSTEPMINART.GROUPTRACKHITART.2nd DISC
* D I S C - 2 * *0 * * *
CD1PROGRAM 1
Playing orderThe disc beingprogrammed
N ame s e a r c hP r o g r am p l a yP r o g r am i n p u tA r t i s s e l e c tt
CD1
:A P r o g r am AB : P r o g r am BC : P r o g r am CD : P r o g r am D
CD1
3 Move the cursor to the program you want tocreate, then press the Easy scroll key.
4 Press the Easy scroll key.
5 Select the desired disc by pushing the Easy scrollkey up or down.To program a whole disc, press the Easy scroll keyagain.To program a certain track of the disc, select thedesired track by pushing the Easy scroll key up ordown, then press the Easy scroll key.
6 Repeat steps 4 and 5 to program more tracks ordiscs.
To finish creating the program, press MENU. To playthe program, see “Playing the program you createusing the remote’s display” on page 25.
To erase a track or disc, move the cursor to the stepyou want to erase in step 3, then press CLEAR.To change a disc or track you programmed, move thecursor to the step you want to change in step 3, thenpress the Easy scroll key. Select the new disc or trackfollowing steps 4 and 5.
Notes• You cannot program the second player’s discs and tracks by
using the remote.• The programmed disc and track numbers that are not
found in the player or on the disc are deleted from theprogram, and the rest of the program is played in theprogrammed order.
[ P r o g r am A ]1 :2 :3 :
CD1
[ P r o g r am A ]S t e p 1
D i s c 5 6 TRK - A L L*D I SC - 5 6 *
CD1
[ P r o g r am A ]S t e p 1
D i s c 5 6 TRK - 5*D I SC - 5 6 *
CD1

Playing CDs
24
Charactersassigned toeach numberbutton
6 To input a letter, press the number buttoncorresponding to the desired letter (indicatedbeside each number button).The cursor disappears and the first space for theDisc Name flashes.Each time you press the button, the letter changescyclically among the ones indicated beside thebutton.
To input symbols, press the number button 1repeatedly until the desired symbol appears in thedisplay.
Press 3. Press 3.
Press 3.
Example: To select the letter EPress the number button 3 twice.
To insert a space, press SPACE once.To input a number, press CAPS twice to changethe letter type, then press the desired numberbutton.
7 Press another number button or > to go to thenext space, then repeat steps 4 to 6 to input morecharacters.
8 Press ENTER when you finish inputtingcharacters.
t D t E t F
Labeling the program Z
1 Press MENU.
2 Move the cursor (B) to “Program input” by usingthe Easy scroll key, then press the Easy scroll key.
3 Move the cursor to the program you want to label,then press the Easy scroll key.
4 Push the Easy scroll key up to move the cursor tothe program name, then push the Easy scroll key.The flashing cursor (b) appears.
5 Press CAPS to find the desired letter type.Each time you press the button, the letter typechanges cyclically among capital letters (AB), smallletters (ab), and numbers (12). To select a symbol,select the capital or small letter type.
N ame s e a r c hP r o g r am p l a yP r o g r am i n p u tA r t i s s e l e c tt
CD1
:A P r o g r am AB : P r o g r am BC : P r o g r am CD : P r o g r am D
CD1
[ P r o g r am A ]1 :2 :3 :
CD1
orP g N ame W r i
[ ]
etP r o g r am A : ( AB )
CD1
orP g N ame W r i
[ ]
etP r o g r am A : ( AB )
CD1
Letter type
GROUPSPACE
ENTER–– MEGA ––
X-FADE
CURSORENTER
NAME INPUT
NO DELAY
ARTISTMODE
HITLIST
CHECK CLEAR
DISCDEL
SCROLLCAPS
3
DEF
6
MNO
9
WXYZ
2
ABC&!?
5
JKL
8
TUV
10/010
1
4
GHI
7
PQRS
PUSH ENTER

Playing CDs
25
Playing CDs
z You can label by using the Easy scroll keySelect a character by using the Easy scroll key in step 5.
z If you make a mistake while inputting thecharacter(s)
To correct a single character that was input1 Press > until the cursor moves next to the incorrect
character.
2 Press DEL to delete the incorrect character.
3 Input the correct character.
To correct the character currently being input1 Press DEL to delete the incorrect character.2 Input the correct character.
To insert a character(s) between the input charactersPress > until the cursor moves next to the point youwant to insert, and enter the character(s).
orP g N ame W r i
[ ]
etP r o g r am A : ( AB )
SONY B
CD1
orP g N ame W r i
[ ]
etP r o g r am A : ( AB )
SONY
CD1
Playing the program you create using theremote’s display
1 Press MENU.
2 Move the cursor (B) to “Program play” by usingthe Easy scroll key, then press the Easy scroll key.
3 Select the desired program by pressing the Easyscroll key up or down, then press the Easy scrollkey.Keep the remote point toward the player for fewseconds until the program data is completelytransmitted.
Program Play starts when the player finishesloading the program data from the remote.If the player fails in loading, the following messageappears. Press the Easy scroll key again.
NoteThe program you create using the remote is stored in theplayer as PROGRAM 1. If you had previously created aPROGRAM 1, it is automatically erased.
N ame s e a r c hP r o g r am p l a yP r o g r am i n p u tA r t i s s e l e c tt
CD1
:A P r o g r am AB : P r o g r am BC : P r o g r am CD : P r o g r am D
CD1
D i s c 4*D I SC 4 *
T r a c k 1( TRACK 1 )
P r o g r am
d a t a t r a n s f e r
CD1
CD1
f a i l u r e !d a t a t r a n s f e r
T r y a g a i n !

Playing CDs
26
Fading In or OutYou can manually fade the sound in or out to preventtracks from starting or ending abruptly.Note that you cannot use this effect when you use theDIGITAL OUT (OPTICAL) connector.
To
Start play fading in
End play fading out
NoteFading lasts for about 5 seconds.
FADER
I / 1
Press FADER
During pause. “FADE” flashes and“FADE IN” appears in the display.The play fades in.
When you want to start fading out.“FADE” flashes and “FADE OUT”appears in the display. The playfades out and the player pauses.
Using the TimerYou can start playing a disc at any given time byconnecting a timer (not supplied). Refer also to theinstructions for the timer if you need help.
1 Press one of the play mode buttons to select thedesired play mode.
2 Set TIMER on the player to PLAY.
3 Set the timer to the desired time.The player turns off. When the set time comes, theplayer turns on and starts playing.
4 After you have used the timer, set TIMER on theplayer to OFF.
Play mode buttonsTIMER
I / 1

27
Storing Information About CDs (Custom Files)Storing Information About CDs (Custom Files)Storing Information About CDs (Custom Files)
What You Can Do With theCustom FilesThe player can store four types of information called“Custom Files” for each disc. Once you have storedCustom Files for a disc, the player automatically recallswhat you have stored whenever you select the disc.Note that Custom Files are erased if you do not use theplayer for about one month.
You can store this information:
When you use
Disc Name (page 27)
Delete Bank (page 32)
Group File (page 33)
Artist File (page 36)
Where are Custom Files stored?
Custom Files are stored not on the disc, but in theplayer’s memory. Therefore you cannot use CustomFiles when you play the disc on other players.
If you replace discs with Custom Files
The Custom File information you have stored remains,since the Custom File information is assigned to eachslot. Erase all the Custom Files (Disc Name, DeleteBank, Group File, and Artist File) of the old disc, andthen file the new disc information in the Custom Files.
Erasing all Custom Files of all discs
1 Press MENU/NO.
2 Turn the JOG dial until “ALL ERASE ?” appears.
3 Push the JOG dial.“ALL ERASE ??” flashes.
4 Push the JOG dial.“ALL ERASE” appears in the display, and allCustom Files are erased.
NoteWhen you perform the operation as described above, all ofyour own settings are deleted and the original factory settingsare restored.
You can
Label discs using up to 20characters
Delete unwanted tracks and storeonly the tracks you want
Group discs in up to eight groups,to locate them easily
Classify discs according to anartist name
Labeling Discs (Disc Name)You can label discs using up to 20 characters and havethe player display the Disc Name each time you selectthe disc. The Disc Name can be anything you like, suchas a title, musician’s name, category, or date ofpurchase. You can also label the discs in the secondplayer.
z When you select a CD TEXT discThe disc title is automatically stored as the Disc Name.If the disc title has more than 20 characters, only the first20 characters of the disc title are stored (see page 15).When you replace a disc with a CD TEXT disc, the disctitle of the CD TEXT disc is also stored automatically.Note that you cannot change the Disc Name of aCD TEXT disc.
z You can label discs while the front cover is open
Labeling discs on the player
1 Turn the JOG dial until the disc number to whichyou want to assign a Disc Name appears in thedisplay.When you label a disc with the front cover closed,the disc number of the disc at the playing positionappears.When you label a disc with the front cover open,the disc number at the loading position appears.
2 Press MENU/NO.“NAME IN ?” flashes.
3 Push the JOG dial.The flashing cursor ( ) appears.
MENU/NO
CLEAR . AMS >
I / 1
YES JOG
(continued)

Storing Information About CDs (Custom Files)
28
4 Turn the JOG dial until the desired characterappears in the display.The cursor disappears and the first space for theDisc Name flashes.As you turn the JOG dial clockwise, the charactersappear in the following order. Turn the JOG dialcounterclockwise to go in reverse order.
(space) A B C D E F G H I J K L M N O P Q R S T UV W X Y Z a b c d e f g h i j k l m n o p q r s t u v wx y z 0 1 2 3 4 5 6 7 8 9 ! " # $ % & ' ( ) * + , – . / : ; <= > ? @ _
5 Push the JOG dial to select the character.The selected character lights up, and the flashingcursor appears at the next space to be input.
To make a correctionPress CLEAR and begin again by inputting the correctcharacters.
6 Repeat steps 4 and 5 to input more characters.
7 Press YES to store the Disc Name.The display shows the Disc Name.
Repeat steps 1 to 7 to assign Disc Names to otherdiscs.
z To change the character type quickly while inputtingcharactersPress SCROLL in step 4 above. The character on thecursor changes to the first character of each charactertype. Each time you press SCROLL, the character typechanges as follows:
TEXTCD
1
CD2
GROUP
NO DELAYMULTIPROGRAM 1 2 3 X-FADE DELETE
CD3
REPEATSHUFFLE 1
SECSTEPMINART.GROUPTRACKHITART.NEXT2nd
ALL SDISC
DISC
S * * * * * * * ** * * *
CD1
TEXTCD
1
CD2
GROUP
NO DELAYMULTIPROGRAM 1 2 3 X-FADE DELETE
CD3
REPEATSHUFFLE 1
SECSTEPMINART.GROUPTRACKHITART.NEXT2nd
ALL SDISC
DISC
S * * * * * * * ** * * *
CD1
CD TEXT
1
CD2
GROUP
NO DELAYMULTIPROGRAM 1 2 3 X-FADE DELETE
CD3
REPEATSHUFFLE 1
SECSTEPMINART.GROUPTRACKHITART.NEXT2nd
ALL SDISC
DISC
S O N Y H I T * *S * * *
CD1
Changing the Disc Name
1 Follow steps 1 to 3 in “Labeling discs on theplayer” on page 27 to select the Disc Name youwant to change.
2 Turn the . AMS > dial to move the cursor tothe position you want to change.When the cursor position is on a character, thecharacter flashes but when the cursor position ison a blank space, the cursor ( ) appears in thedisplay.
To change charactersTurn the JOG dial until the desired characterappears in the display.
To add charactersPush the JOG dial. The new blank space appearsnext to the selected character, then turn the JOGdial until the desired character appears in thedisplay.
To erase charactersPress CLEAR. The selected character disappears.
To erase all characters for the current Disc NameTurn the . AMS > dial to move the cursor tothe first character, then press and hold CLEARuntil all the characters are erased.
3 Repeat step 2 to change more characters.
4 Press YES to store the Disc Name.
Erasing the Disc Name
1 Follow steps 1 to 3 in “Labeling discs on theplayer” on page 27 to select the Disc Name youwant to erase.
2 Turn the . AMS > dial to move the cursor tothe first character, then press and hold CLEARuntil all the characters are erased.
3 Press YES.The Disc Name disappears.
t A t a t 0 t ! t (space)

29
Storing Information About CDs (Custom Files)Storing Information About CDs (Custom Files)
1 Press DISC.
2 Press the number button of the disc you want tolabel, then press ENTER.
3 Press NAME INPUT.The flashing cursor ( ) appears.
4 Press CAPS to find the desired letter type.Each time you press the button, the letter typechanges cyclically among capital letters (A), smallletters (a), and numbers (1). To select a symbol,select the capital or small letter type. The selectedletter type appears in the display.
Labeling discs using the remote Z
Charactersassigned toeach numberbutton
To input symbols, press the number button 1repeatedly until the desired symbol appears in thedisplay.
GROUPSPACE
ENTER X-FADE
CUSORENTER
NAME INPUT
NO DELAY
ARTISTMODE
HITLIST
CHECK
–– MEGA ––
CLEAR
DISCDEL
SCROLLCAPS
3
DEF
6
MNO
9
WXYZ
2
ABC&!?
5
JKL
8
TUV
10/010
1
4
GHI
7
PQRS
MENU
PUSH ENTER
TRACK
PLAYER SELECT
BACK
Example: To select the letter EPress the number button 3 twice.
To insert a space, press SPACE once.To input a number, press CAPS twice to changethe letter type, then press the desired numberbutton.
6 Press > to select the character.The selected character lights up, and the flashingcursor appears at the next space to be input.You can also go to the next space by pressing othernumber buttons.
7 Repeat Steps 4 through 6 to input more characters.
8 Press ENTER to store the Disc Name.The Disc Name lights up in the display.
Repeat Steps 1 through 8 to assign Disc Names toother discs.
ENTER
CLEAR
NAME INPUT
DISCDEL
Numberbuttons
CAPS
SPACE
TEXTCD
1
CD2
GROUP
NO DELAYMULTIPROGRAM 1 2 3 X-FADE DELETE
CD3
REPEATSHUFFLE 1
SECSTEPMINART.GROUPTRACKHITART.NEXT2nd
ALL SDISC
DISC
* * * * * * * * ** * * *
CD1
Letter type
./>
5 To input a letter, press the number buttoncorresponding to the desired letter (indicatedbeside each number button).The cursor disappears and the first space for theDisc Name flashes.Each time you press the button, the letter changescyclically among the ones indicated beside thebutton.
CD TEXT
1
CD2
GROUP
NO DELAYMULTIPROGRAM 1 2 3 X-FADE DELETE
CD3
REPEATSHUFFLE 1
SECSTEPMINART.GROUPTRACKHITART.NEXT2nd
ALL SDISC
DISC
S O N Y H I T * *S * * *
CD1
Press 3. Press 3.
Press 3.
t D t E t F
GROUPSPACE
ENTER–– MEGA ––
X-FADE
CURSORENTER
NAME INPUT
NO DELAY
ARTISTMODE
HITLIST
CHECK CLEAR
DISCDEL
SCROLLCAPS
3
DEF
6
MNO
9
WXYZ
2
ABC&!?
5
JKL
8
TUV
10/010
1
4
GHI
7
PQRS
PUSH ENTER

Storing Information About CDs (Custom Files)
30
z If you make a mistake while inputting thecharacter(s)
To correct a character that was input1 Press . or > until the cursor moves to the
incorrect character.
2 Press DEL to delete the incorrect character.
3 Input the correct character.
To correct the character currently being input1 Press DEL to delete the incorrect character.2 Input the correct character.
To insert a character(s) between the input charactersPress . or > until the cursor moves next to thepoint you want to insert, and enter the character(s).
NoteYou cannot input characters during “2nd PLAYER” appearsin the remote’s display. In this case, press PLAYER SELECTso that “2nd PLAYER” disappears from the remote’s display.
Loading the Custom Files intothe Remote ZBy loading the player’s stored Custom Files into theremote, you can also see the Custom Files in theremote’s display. Only the first 13 characters of eachDisc Name, Group File, and Artist File can be loadedinto the remote. When the Disc Name (Disc Memo) ofthe 2nd player is loaded to the player, you can load theDisc Name (Disc Memo) of the 2nd player into theremote.
MENU
Easy scrollkey
GROUPSPACE
ENTER X-FADE
CUSORENTER
NAME INPUT
NO DELAY
ARTISTMODE
HITLIST
CHECK
–– MEGA ––
CLEAR
DISCDEL
SCROLLCAPS
3
DEF
6
MNO
9
WXYZ
2
ABC&!?
5
JKL
8
TUV
10/010
1
4
GHI
7
PQRS
MENU
PUSH ENTER
TRACK
PLAYER SELECT
BACK
1 Press MENU.
2 Move the cursor (B) to “DATA loading” by usingthe Easy scroll key, then press the Easy scroll key.
N ame s e a r c hP r o g r am p l a yP r o g r am i n p u tA r t i s s e l e c tt
CD1
A l l d a t aD i s c N ame
G r o u p F i l eA r t i s t F i l e
CD1
CD TEXT
1
CD2
GROUP
NO DELAYMULTIPROGRAM 1 2 3 X-FADE DELETE
CD3
REPEATSHUFFLE 1
SECSTEPMINART.GROUPTRACKHITART.NEXT2nd
ALL SDISC
DISC
S O N Y H E T * *S * * *
CD1
CD TEXT
1
CD2
GROUP
NO DELAYMULTIPROGRAM 1 2 3 X-FADE DELETE
CD3
REPEATSHUFFLE 1
SECSTEPMINART.GROUPTRACKHITART.NEXT2nd
ALL SDISC
DISC
S O N Y H T S * ** * * *
CD1
CD TEXT
1
CD2
GROUP
NO DELAYMULTIPROGRAM 1 2 3 X-FADE DELETE
CD3
REPEATSHUFFLE 1
SECSTEPMINART.GROUPTRACKHITART.NEXT2nd
ALL SDISC
DISC
S O N Y H I T * *S * * *
CD1

31
Storing Information About CDs (Custom Files)Storing Information About CDs (Custom Files)
3 Move the cursor (B) to the desired Custom File byusing the Easy scroll key, then press the Easy scrollkey. When you want to load all Custom file, movethe cursor to “All data,” then press the Easy scrollkey.
The remote starts reading Custom File data. Theloading time may take a few minutes. Point theremote at the player while loading the data.
Keep the remote 1 – 2 m away from the playerwhile loading the data.
4 When the remote finishes reading the data, “Dataloading complete!” appears in the remote’sdisplay.
NoteIf you add Disc Names on the player, select “Disc Name” toload them into the remote in Step 3 above.
Erasing all data stored in the remote
1 Press MENU.
2 Move the cursor (B) to “Set up” by using the Easyscroll key, then press the Easy scroll key.
s t e r p l a y e rD i s c N ame l o a d
S
Ma
D I C 1 4 0
CD1
N ame s e a r c hP r o g r am p l a yP r o g r am i n p u tA r t i s s e l e c tt
CD1
P l a y e r c h e c kB a c k l i g h t mo d e
Memo r y c l e a rC o n t r a s t a d j u s t
CD1
3 Move the cursor to “Memory clear,” then press theEasy scroll key.
4 If you want to erase all stored data, move thecursor to “yes,” then press the Easy scroll key.
5 “All memory clear!” appears in the display whenall the data is erased.
A l l memo r yc l e a r OK ?
y e sn o
CD1
A l l memo r yc l e a r OK ?
y e sn o
CD1

Storing Information About CDs (Custom Files)
32
Storing Specific Tracks(Delete Bank)You can delete unwanted tracks and store only thetracks you want. When you select the disc containing aDelete Bank, the player will play only the remainingtracks.
1 Press CONTINUE or SHUFFLE before you startplaying.
2 Turn the JOG dial to select the disc.
3 Press CHECK repeatedly until the track you wantto delete appears in the display.
4 Press CLEAR.“DELETE” and “OFF” appear in the display.
If you want to recover the track, press CLEARagain.
5 Repeat steps 3 and 4 to delete more tracks.
z You can recover all the tracks you have deletedHold down CLEAR until “ALL ON” appears in thedisplay.
NoteThe deleted tracks are skipped even in Shuffle or ProgramPlay modes (when the whole disc containing a Delete Bank isprogrammed as one step).
CONTINUE SHUFFLE CLEAR
Storing Custom FileInformation Using a KeyboardYou can store the Disc Name for each disc, one by one,using an IBM-compatible PC keyboard* (not supplied).
* The keyboard’s power consumption must be 120 mA orless.
1 Connect a keyboard to the keyboard jack on thefront panel of the player.
2 After selecting the desired disc on the player, pressthe Enter key.
3 Input the desired characters, then press the Enterkey to store the information.
z You can delete all characters of a selected itemWhile holding down the Shift key, press the Delete key.
Notes• If the cursor keys do not work correctly and you cannot
complete the task using the keyboard, disconnect thekeyboard then reconnect it to the player and try again.
• If the keyboard is not a USA model (shown below), thecharacters may be input differently from those on the keys.
I / 1
Keyboard jack
I / 1
'
~=+
1!
2@
3#
4$
5%
6^
7&
8 9(
0)
--
]}W E R T Y U I O PQ
[{
S D F G H J K LACaps LockEnter
X C V B N M < >ZShift
?Shift
Ctrl Alt Alt Ctrl
I / 1
CHECK JOG
1PROGRAM
NEXT
CD TEXT
1
CD2
GROUP
NO DELAYMULTI2 3 X-FADE DELETE
CD3
REPEATSHUFFLE 1
SECSTEPMINART.GROUPTRACKHITART.2nd
* D I S C - 2 * *0 * * *
CD1
SDISCALL
DISC
1PROGRAM
NEXT
CD TEXT
1
CD2
GROUP
NO DELAYMULTI2 3 X-FADE
CD3
REPEATSHUFFLE 1
SECSTEPMINART.GROUPTRACKHITART.2nd
* D I S C - 2 * *0 * * *
CD1
SDISCALL
DISC
DELETE

33
Storing Information About CDs (Custom Files)Storing Information About CDs (Custom Files)
Grouping Discs (Group File)You might find that too many discs make it hard tofind the disc you want. This player has a feature thatlets you classify discs into eight groups. Each disc canbe put into only one group.Once you classify discs, you can enjoy Continuous,Shuffle, or Repeat Play within a certain group (GroupPlay).
Assigning discs to groups
1 Press CONTINUE or SHUFFLE before you startplaying.
2 Turn the JOG dial to select the disc you want toassign to a group.
3 Press GROUP FILE.“Select G1-G8” appears in the display.
4 Press one of the GROUP1-8 buttons to which youwant to assign the disc.“GROUP FILE” and the group number appear inthe display and the disc is assigned to that group.
Deleting discs from a group
• To delete a disc from a group1 Turn the JOG dial until the disc number you
want to delete from the group appears in thedisplay.
2 Press GROUP FILE.“Select G1-G8” appears in the display.
3 Press CLEAR.“GROUP ERASE” appears in the display.
• To delete all discs from a group, press CLEAR whileholding down whichever GROUP1-8 button youwant to clear.
CONTINUE SHUFFLE CLEARCHECK JOGMENU/NO
I / 1
GROUP1-8 GROUP FILE H . AMS >
Labeling groups (Group Name)
You can label the preset group number anything youlike, such as a category, using up to 13 characters.Note that you cannot store the Group Name if youhave not assigned any disc to the group.
1 Press MENU/NO.“NAME IN ?” flashes.
2 Turn the JOG dial until the group number youwant to label appears in the display, and then pushthe JOG dial.The flashing cursor ( ) appears.
3 Turn the JOG dial until the desired characterappears in the display.The cursor disappears and the first space for theGroup Name flashes.As you turn the JOG dial clockwise, the charactersappear in the following order. Turn the JOG dialcounterclockwise to go in reverse order.
(space) A B C D E F G H I J K L M N O P Q R S T UV W X Y Z a b c d e f g h i j k l m n o p q r s t u v wx y z 0 1 2 3 4 5 6 7 8 9 ! " # $ % & ' ( ) * + , – . / : ; <= > ? @ _
4 Push the JOG dial to select the character.The selected character lights up, and the flashingcursor appears at the next space to be input.
To make a correctionPress CLEAR and begin again by inputting the correctcharacters.
5 Repeat steps 3 and 4 to input more characters.See also “Labeling discs on the player” on page 27for details.
6 Press YES to store the Group Name.

Storing Information About CDs (Custom Files)
34
Changing the Group Name
1 Follow steps 1 and 2 in “Labeling groups (GroupName)” on page 33 to select the Group Name youwant to change.
2 Turn the . AMS > dial to move the cursor tothe position you want to change.When the cursor position is on the character, thecharacter flashes, and when the cursor position ison a blank space, the cursor ( ) appears in thedisplay.
To change charactersTurn the JOG dial until the desired character appears inthe display.
To add charactersPush the JOG dial. The new blank space appears next tothe selected character, then turn the JOG dial until thedesired character appears in the display.
To erase charactersPress CLEAR. The selected character disappears.
3 Repeat step 2 to change more characters.
4 Press YES to store the Group Name.
Erasing a Group Name
1 Follow steps 1 and 2 in “Labeling groups (GroupName)” on page 33 to select the Group Name youwant to erase.
2 Press and hold CLEAR until all the characters areerased.
3 Press YES.The Group Name is erased.
The player plays
All tracks on all discs in the groupconsecutively
All tracks on the specified disc inthe group consecutively
All tracks on all discs in the groupin random order
All tracks on the specified disc inthe group in random order
Playing discs in a group on the player(Group Play)
You can enjoy Continuous or Shuffle Play within agroup.
1 Select the desired play mode before you startplaying.
When you select
ALL DISCSContinuous Play
1 DISC ContinuousPlay
ALL DISCS ShufflePlay
1 DISC ShufflePlay
2 Press one of the GROUP1-8 buttons to select thegroup and press H.Group Play starts from the disc with the lowestnumber and located closest to the playing position.If the disc at the playing position is put into theselected group, the play starts from that disc.
To cancel Group PlayPress the GROUP1-8 button that was selected.“GROUP OFF” appears in the display.
z During Group Play, you can locate a desired discwithin a group by scanning or searching for DiscNamesSee “Locating a disc by searching for a specific DiscName (Name Search)” on page 16, or “To locate a discby scanning each Disc Name (Name Scan)” on page 17.
z You can specify the disc to play when starting GroupPlayAfter selecting the group, turn the JOG dial to select thedisc, then push the JOG dial.
NoteIf “NO ENTRY” appears in the display, no disc has been putinto the selected group.

35
Storing Information About CDs (Custom Files)Storing Information About CDs (Custom Files)
Starting Group Play while observing theremote’s display Z
Before following the procedure below, be sure to loadthe Group File data into the remote’s memory byfollowing the procedure in “Loading the Custom Filesinto the remote” on page 30.
GROUP
MENU
Easy scrollkey
H
GROUPSPACE
ENTER X-FADE
CUSORENTER
NAME INPUT
NO DELAY
ARTISTMODE
HITLIST
CHECK
–– MEGA ––
CLEAR
DISCDEL
SCROLLCAPS
3
DEF
6
MNO
9
WXYZ
2
ABC&!?
5
JKL
8
TUV
10/010
1
4
GHI
7
PQRS
CONTINUE
PROGRAM
NAME SCAN
MENU
PUSH ENTER
TRACK
PLAYER SELECT
BACK
DISCSKIP
SHUFFLE
REPEAT
SCROLL
1 Before you start playing, press MENU.
2 Move the cursor (B) to “Group select” by using theEasy scroll key, then press the Easy scroll key.
N ame s e a r c hP r o g r am p l a yP r o g r am i n p u tA r t i s s e l e c tt
CD1
G1 : G r o u p 1G2 : H I T SONGSG3 : P I ANO SONA T A
CD1
3 Move the cursor to the desired group, then pressthe Easy scroll key.The GROUP button of the player lights up.
4 Move the cursor (B) to select the desired disc byusing the Easy scroll key, then press the Easy scrollkey to start playing.
To cancel Group PlayMove the cursor to “Group OFF,” then press the Easy scrollkey. You can also cancel Group Play by pressing the GROUPbutton.
z When the player is in the Shuffle play modePlayback starts by pressing H in step 3.
z You can specify the disc by pressing the DISC SKIP +/– button
Notes• When you control another CD player using the remote’s
display (see page 41), you may not be able to start GroupPlay, depending on the player. In this case, first pressGROUP during “2nd PLAYER” appears in the remote’sdisplay, then press the desired number button (1-8) andpress ENTER.
• When you add a Group File on the player, load the GroupFile to the remote also by following the procedure in“Loading the Custom Files into the remote” on page 30.
G2 : H I T SONGS8 0 :*D i s c - 8 0*1 6 :*D i s c - 1 6 0*2 4
00 :*D i s c - 2 4 0*
CD1

Storing Information About CDs (Custom Files)
36
Classifying Discs According toArtist Name (Artist File)You can classify discs by storing Artist Names into theplayer and assigning them to each disc. Each ArtistName can use up to 20 characters. Once you assign anArtist Name to a disc, you can enjoy Continuous,Shuffle, or Repeat Play within discs assigned sameArtist Name and you can search for the desired disceasily. You can also store a category name instead of anArtist Name. Up to 200 Artist Names can be stored.
Storing the Artist Name
1 Press MENU/NO.
2 Turn the JOG dial until “ART.NAME IN?” appearsin the display.
3 Push the JOG dial.“New Artist” flashes.
4 Push the JOG dial.The flashing cursor ( ) appears.
5 Turn the JOG dial until the desired characterappears in the display.The cursor disappears and the first space for theArtist Name flashes.As you turn the JOG dial clockwise, the charactersappear in the following order. Turn the JOG dialcounterclockwise to go in reverse order.
(space) A B C D E F G H I J K L M N O P Q R S T UV W X Y Z a b c d e f g h i j k l m n o p q r s t u v wx y z 0 1 2 3 4 5 6 7 8 9 ! " # $ % & ' ( ) * + , – . / : ; <= > ? @ _
6 Push the JOG dial to select the character.The selected character lights up, and the flashingcursor appears at the next space to be input.
To make a correctionPress CLEAR and begin again by inputting the correctcharacters.
7 Repeat steps 5 and 6 to input more characters.See also “Labeling discs on the player” on page 27for details.
8 Press YES to store the Artist Name.
Changing the Artist Name
1 Follow steps 1 to 3 in “Storing the Artist Name” onpage 36.
2 Turn the JOG dial until the artist name you want tochange appears in the display, then push the JOGdial.
3 Turn the . AMS > dial to move the cursor tothe position you want to change.When the cursor position is on the character, thecharacter flashes, and when the cursor position ison a blank space, the cursor ( ) appears in thedisplay.
To change charactersTurn the JOG dial until the desired character appears inthe display.
To add charactersPush the JOG dial. The new blank space appears next tothe selected character, then turn the JOG dial until thedesired character appears in the display.
To erase charactersPress CLEAR. The selected character disappears.
4 Repeat step 3 to change more characters.
5 Press YES to store the Artist Name.
z You can also erase the Artist Name while assigningthe Artist Name1 In step 2 above, turn the JOG dial until the Artist
Name you want to erase appears in the display, thenpush the JOG dial.
2 Press and hold CLEAR until the Artist Name is erased.3 Press YES.
The Artist Name and “ARTIST ERASE?” appearsalternately in the display.
4 Press YES.The Artist Name is erased.
CONTINUE SHUFFLE CLEARCHECK MENU/NO
ARTIST MODE H . AMS >
I / 1
JOG
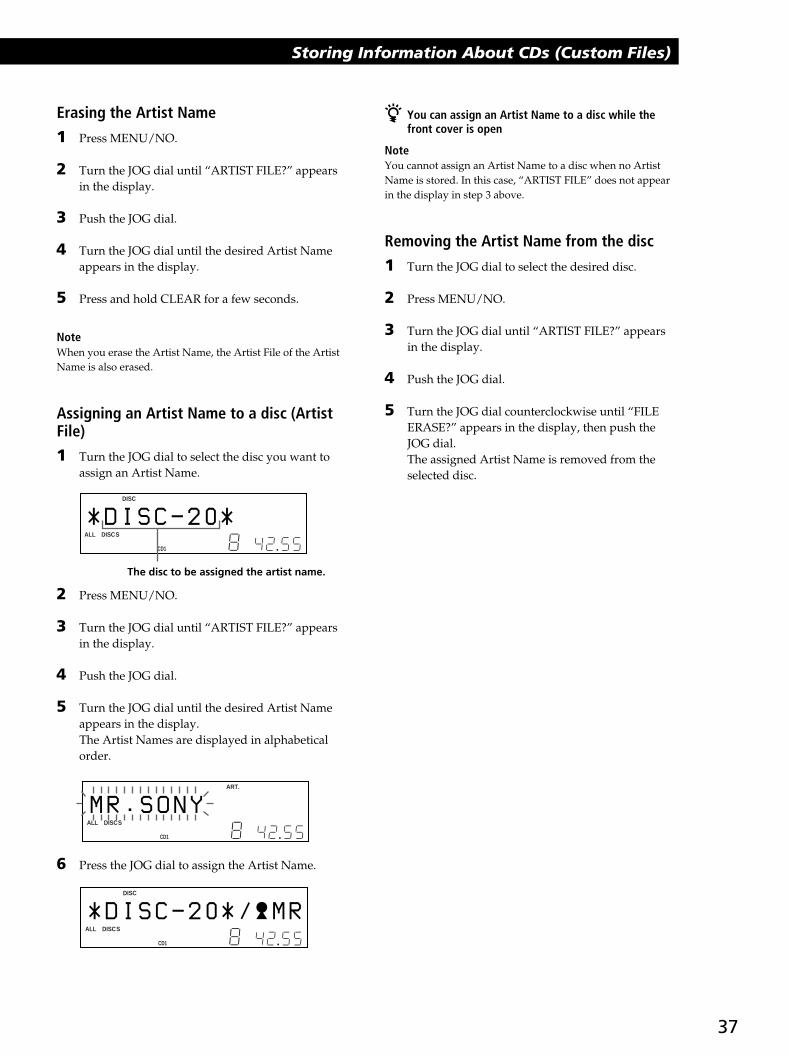
37
Storing Information About CDs (Custom Files)Storing Information About CDs (Custom Files)
The disc to be assigned the artist name.
Erasing the Artist Name
1 Press MENU/NO.
2 Turn the JOG dial until “ARTIST FILE?” appearsin the display.
3 Push the JOG dial.
4 Turn the JOG dial until the desired Artist Nameappears in the display.
5 Press and hold CLEAR for a few seconds.
NoteWhen you erase the Artist Name, the Artist File of the ArtistName is also erased.
Assigning an Artist Name to a disc (ArtistFile)
1 Turn the JOG dial to select the disc you want toassign an Artist Name.
2 Press MENU/NO.
3 Turn the JOG dial until “ARTIST FILE?” appearsin the display.
4 Push the JOG dial.
5 Turn the JOG dial until the desired Artist Nameappears in the display.The Artist Names are displayed in alphabeticalorder.
6 Press the JOG dial to assign the Artist Name.
z You can assign an Artist Name to a disc while thefront cover is open
NoteYou cannot assign an Artist Name to a disc when no ArtistName is stored. In this case, “ARTIST FILE” does not appearin the display in step 3 above.
Removing the Artist Name from the disc
1 Turn the JOG dial to select the desired disc.
2 Press MENU/NO.
3 Turn the JOG dial until “ARTIST FILE?” appearsin the display.
4 Push the JOG dial.
5 Turn the JOG dial counterclockwise until “FILEERASE?” appears in the display, then push theJOG dial.The assigned Artist Name is removed from theselected disc.
1
CD2
GROUP
NO DELAYTEXTCDMULTIPROGRAM 1 2 3 X-FADE DELETE
CD3
REPEATSHUFFLE 1
SECSTEPMINART.GROUPTRACKHITART.NEXT2nd
ALL SDISC
DISC
* D I S C - 2 * *0 * * *
CD1
DISC
1
CD2
GROUP
NO DELAYTEXTCDMULTIPROGRAM 1 2 3 X-FADE DELETE
CD3
REPEATSHUFFLE 1
SECSTEPMINGROUPTRACKHITART.NEXT2nd
ALL SDISC
M R . S O N Y * ** * * *
CD1
ART.
1
CD2
GROUP
NO DELAYTEXTCDMULTIPROGRAM 1 2 3 X-FADE DELETE
CD3
REPEATSHUFFLE 1
SECSTEPMINART.GROUPTRACKHITART.NEXT2nd
ALL SDISC
DISC
* D I S C - 2 * /0 * M R
CD1

Storing Information About CDs (Custom Files)
38
Playing a specific disc while observing theArtist Name in the remote’s display Z
Once you assign the Artist Name, you can select thedisc by selecting the Artist Name displayed in theremote display.Before following the procedure below, be sure to loadthe Artist File data into the remote’s memory byfollowing the procedure in “Loading the Custom Filesinto the remote” on page 30.
GROUPSPACE
ENTER X-FADE
CUSORENTER
NAME INPUT
NO DELAY
ARTISTMODE
HITLIST
CHECK
–– MEGA ––
CLEAR
DISCDEL
SCROLLCAPS
3
DEF
6
MNO
9
WXYZ
2
ABC&!?
5
JKL
8
TUV
10/010
1
4
GHI
7
PQRS
MENU
PUSH ENTER
TRACK
PLAYER SELECT
BACK
MENU
Easy scrollkey
1 Press MENU.
2 Move the cursor (B) to “Artist select” by using theEasy scroll key, then press the Easy scroll key.
N ame s e a r c hP r o g r am p l a yP r o g r am i n p u tA r t i s s e l e c tt
CD1
Playing discs assigned the same ArtistName (Artist Play)
You can enjoy Continuous or Shuffle Play within discsthat are assigned the same Artist Name.
1 Select the desired play mode before you startplaying.
When you select
ALL DISCSContinuous Play
1 DISC ContinuousPlay
ALL DISCS ShufflePlay
1 DISC ShufflePlay
2 Press ARTIST MODE.ARTIST MODE flashes.
3 Turn the JOG dial to select the desired ArtistName.
4 Push the JOG dial.ARTIST MODE lights up.
5 Turn the JOG dial to select the desired disc, thenpush the JOG dial.Artist play starts.
To cancel Artist PlayPress ARTIST MODE so that ARTIST MODE goes off.
z You can specify the disc to play when starting ArtistPlayAfter selecting the Artist Name, turn the JOG dial toselect the disc, then push the JOG dial.
NoteYou cannot select an Artist Name if no discs are assigned tothat Artist Name.
The player plays
All tracks on all discs assignedsame artist name consecutively
All tracks on the specified discassigned same artist nameconsecutively
All tracks on all discs assignedsame artist name in random order
All tracks on the specified discassigned same artist name inrandom order
( A r t i s t OF F )
MR . SONYDE FABC
CD1

39
Storing Information About CDs (Custom Files)Storing Information About CDs (Custom Files)
Storing Your Favorite Tracks(Hit List)You can store the tracks you play frequently and selectthose tracks by checking the track numbers or titles(see page 40) in the Hit List.You can put up to 32 tracks in the Hit List.
HIT LIST CLEAR MENU/NO
H . AMS >
JOG
I / 1
HIT LIST
ENTER
CLEAR
GROUPSPACE
ENTER X-FADE
CUSORENTER
NAME INPUT
NO DELAY
ARTISTMODE
HITLIST
CHECK
–– MEGA ––
CLEAR
DISCDEL
SCROLLCAPS
3
DEF
6
MNO
9
WXYZ
2
ABC&!?
5
JKL
8
TUV
10/010
1
4
GHI
7
PQRS
MENU
PUSH ENTER
TRACK
PLAYER SELECT
BACK
Putting tracks into the Hit List
Press HIT LIST while playing your favorite track.The “HIT” indication and “List in” appear in thedisplay.
Notes• When you input the 33rd track into the Hit List, the 32nd
track will be replaced.• You cannot store tracks from the second CD player.
3 Move the cursor (B) to the desired Artist Name byusing the Easy scroll key, then press the Easy scrollkey.
4 Move the cursor (B) to the desired disc by usingthe Easy scroll key, then press the Easy scroll key.The player starts playback.
z When the player is in the Shuffle play modePlayback starts by pressing H in step 3.
NoteWhen you add an Artist File or Artist Name on the player,load the Artist File to the remote also by following theprocedure in “Loading the Custom Files into the remote” onpage 30.
: MR . SONY2 6 : SONY 11 8 9 : SONY 2
- e d -n
CD1

Storing Information About CDs (Custom Files)
40
3 Turn the JOG dial until the desired characterappears in the display.The selected character for the Hit Title flashes.As you turn the JOG dial clockwise, the charactersappear in the following order. Turn the JOG dialcounterclockwise to go in reverse order.
(space) A B C D E F G H I J K L M N O P Q R S T UV W X Y Z a b c d e f g h i j k l m n o p q r s t u v wx y z 0 1 2 3 4 5 6 7 8 9 ! " # $ % & ' ( ) * + , – . / : ; <= > ? @ _
4 Push the JOG dial to select the character.The selected character lights up, and the flashingcursor appears at the next space to be input.
To make a correctionPress CLEAR and begin again by inputting the correctcharacters.
5 Repeat steps 3 and 4 to input more characters.See also “Labeling discs on the player” on page 27for details.
6 Press YES to store the Hit Title.
To label tracks while in stop mode1 While the HIT LIST button is lit, select the track
you want to label by turning the JOG dial or the. AMS > dial.
2 Press MENU/NO.The flashing cursor ( ) appears in the display.
3 Follow steps 3 to 6 in “To label tracks while in playmode” to input the characters.
z You can store a CD TEXT disc’s track titles in the HitListThe CD TEXT disc’s track title is stored as a Hit Titleautomatically when the track is put into the Hit List.
Playing tracks in the Hit List
1 Press HIT LIST before you start playing.The HIT LIST button lights up and “HIT LIST”appears in the display.
2 Turn the JOG dial or the . AMS > dial untilthe desired track appears in the front paneldisplay.
3 Push the JOG dial or press H to start playing.When using the remote, press ENTER.
z The Hit List remains until erasedEven if you replace discs, the Hit List you create remains.Therefore, the player will substitute the new tracks intothe Hit List.
Notes• The track you select in step 2 will be listed as the first track
in the Hit List, and you cannot arrange the order of thetracks in the Hit List.
• When you play tracks in the Hit List, the Group, Artist, orProgram play is canceled.
Deleting tracks from the Hit List
1 Follow steps 1 and 2 in “Playing tracks in the HitList” on page 40.
2 Press CLEAR.The selected track is deleted from the Hit list.
To delete all the tracks of the Hit ListWhen the HIT LIST button lights up, press and hold CLEARwhile in stop mode until “CLEAR” appears.
Labeling tracks in the Hit List (Hit Title)
You can label tracks in the Hit List in either of the twomethods described below.
To label tracks while in play mode1 Press MENU/NO while playing a track in the Hit
List.“HIT NAME ?” appears in the display.
2 Push the JOG dial.The flashing cursor ( ) appears in the display.

41
Storing Information About CDs (Custom Files)Storing Information About CDs (Custom Files)Using the Player with Another Component
Controlling Another CD Player(Advanced Mega Control)This unit can control a second CD player (see“Connecting another CD player” on page 6). Evenwhen a second CD player is connected, the controls onboth of the units will function. When you press theplay button on either unit, the operating player stopsand the idle player starts. Make sure that “2ndDETECTED” appears in this player’s display afterturning on both players. Note that, depending on theplayer, you may not be able to operate all the functionsof the second CD player.The controls indicated in the illustration below areeffective while the MEGA CONTROL button is lit.To operate the master player, press MEGA CONTROLso that the MEGA CONTROL button goes off, and tooperate the second player, press MEGA CONTROL sothat the MEGA CONTROL button lights up.
Using the Player with Another Component
1 Press MEGA CONTROL on this player.The MEGA CONTROL button and “2nd” in thedisplay light up. The display shows the currentdisc number or Disc Name of the second player.
2 Select the desired play mode.To program tracks, use the controls on the secondplayer.
3 Press H on this player to start playing.The play starts and the display shows the currentdisc, track numbers, and the playing time of thetrack.While the MEGA CONTROL button is lit, you cancontrol the second player with the controls on thisplayer.
To control the master player againPress MEGA CONTROL. The MEGA CONTROL button goesoff and you can control the master player.To control the master player again by using the remote, youhave to reselect the master player by pressing PLAYERSELECT on the remote.
To control the second player directly using the suppliedremote ZWhile the MEGA CONTROL button is off, press PLAYERSELECT repeatedly until “2nd player” appears in the remote’sdisplay.
To start playback, move the cursor to select the disc, thenpress the Easy scroll key.
I / 1
Play mode buttons(CONTINUE/SHUFFLE/PROGRAM/REPEAT)
MEGACONTROL MENU/NO
H . AMS >
JOG
xX
CONTINUE
PROGRAM
NAME SCAN
MENU
PUSH ENTER
TRACK
PLAYER SELECT
BACK
DISCSKIP
SHUFFLE
REPEAT
SCROLL
H
x
X
PLAYERSELECT
./>
m/M
CD2
GROUP
HI LIGHTTEXTCDMULTIPROGRAM 1 2 3 DELETE FILE FADE
CD3
REPEATSHUFFLE1
SECSTEPMINAT.GROUPTRACKHITAT.NEXT
ALL SDISC
DISC
* D I S C - 4 * ** * * *
CD1
2nd
Current disc number or the Disc Name
CD 3 / 3 0 0 d i s c s
2 n d p l a y e r
2nd PLAYER CD3

Using the Player with Another Component
42
Playing Alternately (No-DelayPlay/X-Fade Play)When you connect a second player, you can play tracksin this player and those from the second playeralternately from any play mode (see “Connectinganother CD player” on page 6).Select one of the following methods:• No-Delay Play: The current player changes at each
track. Each time the current player changes to theother player, the other player starts play without abreak in sound immediately after the current playerends play. The other player skips the lead-in portionand starts playing from where the sound actuallybegins.
• X-Fade Play: The current player changes at eachtrack or at the specified interval. You can select theinterval, 30, 60, or 90 seconds. Each time the currentplayer changes to the other player, the sound fromboth players is mixed. The current player ends playby fading out, and the other player starts play byfading in.
1 Select the desired disc and play mode for eachplayer.
2 When you select No-Delay PlayPress NO DELAY.“NO DELAY” appears in the display.
When you select X-Fade PlayPress X-FADE.“X-FADE” appears in the display.Each time you press the X-FADE button, theindication appears as follows:
To change the current player each time a wholetrack is finished, select “at track end.”To change the current player at the specifiedinterval, press X-FADE repeatedly until theinterval you want appears in the display.
Loading the Disc Names of the second CDplayer
If the second CD player has the Disc Name function(see page 27), you can load the Disc Names of thesecond CD player into this player’s memory anddisplay them on this player.
1 Press MENU/NO.
2 Turn the JOG dial until “LOAD 2ndNAME?”flashes in the display.
3 Push the JOG dial.This player starts loading. (Loading takes aboutone minute.)
Labeling discs of the second CD player
You can label discs of the second CD player or changethe Disc Names loaded from the second CD player.
1 Press MEGA CONTROL.The MEGA CONTROL button lights up.
2 Turn the JOG dial to select the disc you want toassign a Disc Name to.If the disc slot you select does not contain a disc,“NO DISC” appears in the display and you cannotassign a Disc Name.
3 Press MENU/NO.“NAME IN?” appears.
4 Push the JOG dial.
5 Input the new Disc Name following the procedurein “Labeling discs (Disc Name)” on page 27.
NoteThe new Disc Names are stored on this player’s memory, soyou cannot display them on the second CD player.
ART.DISC
1
CD2
GROUP
NO DELAYTEXTCDMULTIPROGRAM 1 2 3 X-FADE DELETE
CD3
REPEATSHUFFLE 1
SECSTEPMINGROUPTRACKHITART.NEXT2nd
ALL SDISC
L O A D * 2 n N Ad M E ?
CD1
I / 1
H
X-FADE NO DELAY
tX-FADE off t at track end t after 30 sec
after 90 sec T after 60 sec T

43
Storing Information About CDs (Custom Files)Storing Information About CDs (Custom Files)Using the Player with Another Component
3 Press H to start playing.The MEGA CONTROL button lights up when atrack in the second player is selected.
To cancel No-Delay/X-Fade PlayPress the corresponding button repeatedly until “NODELAY” or “X-FADE” disappears from the display. Thecurrent player continues playing.
z You can change the method (No-Delay or X-Fade)during playPress the corresponding button (NO DELAY or X-FADE)following the procedure in step 2.
z You can start X-Fade at any point of the trackPress FADER during X-Fade Play.Even after you have set the X-Fade mode and startedX-Fade play, you can start X-Fade manually at any pointyou like. Note that you cannot do this operation whilethe sound from both players is mixed.
Notes• Play starts from the second player if you start play while
the MEGA CONTROL button is lit.• When one player has played all the discs or tracks in the
player ahead of the other player, play stops.• Do not use the controls on the second player during
No-Delay/X-Fade Play. They may not work correctly.
Controlling the Player byAnother UnitControlling the player by another unitWhen you connect the player to a Sony MD deckcompatible with the Mega Control function, or operatea Sony MD deck by using computer software such as“MD Editor,” you must set the player as shown below:
1 Press MENU/NO.
2 Turn the JOG dial until “CONTROL A1 ?” appearsin the display window.
3 Press YES.
To return to normal settingAfter following steps 1 and 2, and “CONTROL A1 ?” isdisplayed, then press YES.
Notes• You can perform the operation above correctly only when
you operate Disc 1 to Disc 200.• You cannot operate this player correctly from another
player that does not have the CONTROL A1 jack. In thiscase, operate the other player from this player.
MENU/NO YES JOG
I / 1

Additional Information
44
Additional Information
Notes on CDs
On handling CDs• To keep the disc clean, handle the disc carefully.• Do not stick paper or tape on the disc.
• Do not expose the disc to direct sunlight or heat sourcessuch as hot air ducts, nor leave it in a car parked in directsunlight as there can be considerable rise in temperatureinside the car.
• After removing a disc from the disc slot, store the disc in itscase.
On cleaning• Before playing, clean the disc with a cleaning cloth. Wipe
the disc from the center out.
• Do not use solvents such as benzine, thinner, commerciallyavailable cleaners or anti-static spray intended for vinylLPs.
Precautions
On safety• Caution — The use of optical instruments with this product
will increase eye hazard.• Should any solid object or liquid fall into the cabinet,
unplug the player and have it checked by qualifiedpersonnel before operating it any further.
On power sources• Before operating the player, check that the operating
voltage of the player is identical with your local powersupply. The operating voltage is indicated on the nameplateat the rear of the player.
• The player is not disconnected from the AC power source(mains) as long as it is connected to the wall outlet, even ifthe player itself has been turned off.
• If you are not going to use the player for a long time, besure to disconnect the player from the wall outlet. Todisconnect the AC power cord (mains lead), grasp the plugitself; never pull the cord.
• The AC power cord must be changed only at a qualifiedservice shop.
On placement• Place the player in a location with adequate ventilation to
prevent heat build-up in the player.• Do not place the player on a soft surface such as a rug that
might block the ventilation holes on the bottom.• Do not place the player in a location near heat sources, or in
a place subject to direct sunlight, excessive dust ormechanical shock.
On operation• If the player is brought directly from a cold to a warm
location, or is placed in a very damp room, moisture maycondense on the lenses inside the player. Should this occur,the player may not operate properly. In this case, leave theplayer turned on for about an hour until the moistureevaporates.
On adjusting volume• Do not turn up the volume while listening to a portion with
very low level inputs or no audio signals. If you do, thespeakers may be damaged when a peak level portion isplayed.
On cleaning• Clean the cabinet, panel and controls with a soft cloth
slightly moistened with a mild detergent solution. Do notuse any type of abrasive pad, scouring powder or solventsuch as alcohol or benzine.
On transportation• When transporting the player, open the front cover then
remove all the discs from the player and turn the power off.
If you have any questions or problems concerning yourplayer, please consult your nearest Sony dealer.

45
Additional Information
SpecificationsCompact disc player
Laser Semiconductor laser (λ = 780 nm)Emission duration: continuous
Laser output Max 44.6 µW** This output is the value measured at
a distance of 200 mm from theobjective lens surface on the OpticalPick-up block with 7 mm aperture.
Frequency response 2 Hz to 20 kHz ±0.5 dB
Dynamic range More than 93 dB
Harmonic distortion Less than 0.0045%
Output
TroubleshootingIf you experience any of the following difficulties whileusing the player, use this troubleshooting guide to helpyou remedy the problem. Should any problem persist,consult your nearest Sony dealer.
There’s no sound., Check that the player is connected securely., Make sure you operate the amplifier correctly.
The CD does not play., There’s no CD inside the player (“–NO DISC–”
appears). Insert a CD., Insert the CD with the label side facing right., Clean the CD (see page 44)., Moisture has condensed inside the player.
Remove the disc and leave the player turned onfor about an hour (see page 44).
The remote does not function., Remove obstacles in the path of the remote and
the player., Point the remote at the remote sensor on
the player., Be sure to set up the remote correctly., Replace all the batteries in the remote with new
ones if E appears in the remote’s display., Set the command mode of the remote according
to the command mode of the player.
The player functions incorrectly., The microcomputer chips may be operating
incorrectly. Disconnect the AC power cord, thenconnect it back to the wall outlet to reset theplayer.
LINE OUT
DIGITAL OUT(OPTICAL)
MONITOROUT
Jacktype
Phonojacks
Opticaloutputconnector
Phonojacks
Maximumoutputlevel
2 V(at 50 kilohms)
–18 dBm
1 Vp-p
Loadimpedance
Over 10 kilohms
Wave length: 660 nm
75 ohms, unbalancedsync negative
General
Power requirements
Where purchased
USA
Australia
Power consumption 18 W
Dimensions (approx.) 430 × 189 × 537 mm(w/h/d) (17 × 7 1/2 × 21 1/4 in.) incl. projecting
parts
Mass (approx.) 8.8 kg (19 lbs 7 oz.)
Supplied accessoriesSee page 4.
Design and specifications are subject to change without notice.
Power requirements
120 V AC, 60 Hz
240 V AC, 50/60 Hz

46
Index
A, BAdvanced Mega Control 41AMS 13Artist name 36Automatic Music Sensor. See
AMS
CCD TEXT 15Changing
Artist Name 36Disc Name 28Group Name 34
Connecting 4another CD player 6
Continuous Play 13Controlling another CD
player 41Custom Files
Artist File 36Delete Bank 32Disc Name 27Group File 33Hit List 39what you can do with 27
DDelete Bank 32Disc Name 27
EEasy Play 19Erasing
Artist Name 37Custom Files 27Delete Bank 32Disc Name 28Group Name 34Hit List 40
FFading 26
GGrouping Discs 33
HHandling CDs 44Hit List 39Hookups 4
overview 4
IInserting CDs 10
J, KJOG dial 10
Names of controls
ButtonsARTIST MODE 38BACK 8, 14CAPS 24, 29CHECK 22CLEAR 21CONTINUE 13CURSOR ENTER 16CURSOR M/m/</, 16DEL 25, 30DISC 17DISC SKIP +/– 13EASY PLAY 19ENTER 17FADER 26GROUP 35GROUP 1 – 8 33GROUP FILE 33HIT LIST 39MEGA CONTROL 41MENU 9MENU/NO 7, 15, 27, 37NAME SCAN 17NAME SEARCH 16NO DELAY 42Number 17OPEN/CLOSE 10PLAYER SELECT 41PROGRAM 21REPEAT 20SHUFFLE 20SCROLL 15SPACE 24, 29X-FADE 42YES 8, 28, 43H 13X 13x 13A 13m/M 13./> 13> 10 13+100 16
ControlEasy scroll key 8JOG dial 7. AMS > 13
SwitchesTIMER 26?/1 10
JacksCONTROL A1 5DIGITAL OUT (OPTICAL) 52ND CD IN 6
OthersDisc slots 10Display 14Front cover 10Remote’s display 8Rotary table 10
4, 7
Index
LLabeling a disc 27Loading the Custom Files 30Locating
by monitoring 13by observing the display 14by scanning 13by observing the TV
screen 16directly 17using AMS 13
M, N, OName Scan 17Name Search 16No-Delay Play 42
P, QPlayback
Artist Name Play 36Continuous Play 13Easy Play 19Group Play 33Playing alternately 42Program Play 21Repeat Play 20Shuffle Play 20X-Fade Play 42
Program 21changing 22checking 22erasing 22
RRemote control 4Repeating 20Rotary table 10
SSearching. See LocatingSelecting the language 15Shuffle Play 20Specifying the next disc 18Storing
information about CDs 27specific tracks 32
TTimer play 26Troubleshooting 45
U, V, WUnpacking 4
X, Y, ZX-Fade Play 42

47

Sony Corporation Printed in Malaysia