compliance tool suite transaction tool help file compliance tool suite – transaction tool help...
TRANSCRIPT
Compliance Tool Suite – Transaction Tool Help File
6/30/2017 Page 1 of 13
Using the EBTS Transaction Tool
The EBTS Transaction Tool accepts either traditional or XML-encoded EBTS transactions and provides
users with the ability to validate these transactions (determine if they conform to the EBTS
requirements for that transaction). The result of an unsuccessful validation is a display of the missing
and/or incorrect fields for invalid files. The result of a successful validation is a display of the validation
status and the ability to convert the validated transaction(s) to another encoding. In either case, the
results can be exported. For more information regarding EBTS, refer to the EBTS specification at
www.fbibiospecs.cjis.gov/EBTS/Approved.
Please note:
1. The Transaction Tool currently supports only computers with the Windows operating system.
2. Java Webstart is used to download and execute the application locally and exclusively on the
user’s computer. No Personally Identifiable Information (PII) or other information is
transmitted, stored, or processed by other computers.
a. If you do not have Java installed on your computer, please use to the following link to
install it: www.java.com/en/download/help/windows_manual_download.xml.
3. The application executes a setup function that creates resources for the Transaction Tool the
first time a transaction is validated. The setup function will add to the time it takes to complete
the first validation. Subsequent validations will perform normally.

Compliance Tool Suite – Transaction Tool Help File
6/30/2017 Page 2 of 13
How do EBTS Transactions work?
To communicate biometrics data with the FBI, a user must submit transactions as defined in the
EBTS specification. There are a variety of transactions, each identified by a unique code in a field
named “Type of Transaction” (TOT), which defines the purpose of the transaction. For example,
if you wanted to conduct a search of a fingerprint image without any markup, you would create
a transaction using an LFIS (Latent Fingerprint Image Search) TOT and submit it to the FBI.
Each transaction is composed of various combinations of data records, each of which has a Record
Type. Each valid record of a given Record Type has a list of defined fields which must conform to a set
of requirements (e.g., character length, occurrence count, mandatory or optional, etc.). If a created
transaction is not valid (does not conform to EBTS requirements) it cannot be processed by the FBI’s
biometric system.
Contents
Step 1: Launch the Tool .............................................................................................................................. 3
Step 2: Choose the EBTS Version ................................................................................................................ 5
Step 3: Upload Files..................................................................................................................................... 6
Step 4: View Results .................................................................................................................................... 7
Step 5: Convert XML Transactions to Traditional ....................................................................................... 8
Step 6: Export Results ............................................................................................................................... 10
Troubleshooting ........................................................................................................................................ 13

Compliance Tool Suite – Transaction Tool Help File
6/30/2017 Page 3 of 13
Step 1: Launch the Tool
1. To start the tool, click on the “EBTS Transaction Tool” button located at
www.fbibiospecs.cjis.gov/EBTS/Approved under “EBTS Compliance Tool Suite”.
a. When running the ECTS applications, users will see several security notifications. The user
must accept these notifications to run the application. These security notifications are a
result of the technology used to start the application and provide information for users
that describe the security implications for these types of applications.
i. When opening the batch file to start the application, the user will receive an
“Open File – Security Warning” from the file system. To avoid seeing this dialog,
the user can uncheck the “always ask before opening this file”.
ii. Next there is a security notification asking the user whether to access an
untrusted website. This is the website that is hosting the application. To avoid
seeing the dialog, the user could add the website to its list of trusted web sites.
2. Most browsers will require you to download the tool and then run the download. See your
browser’s help file to determine how best to navigate Internet downloads.
a. If using Internet Explorer (IE), you will see an option to Save the tool (Figure 1). Select Save
or Save As.
b. Select Run to start the tool or open “Windows”/“File Explorer” (Windows or File Explorer is
the file management application in Windows). See Figure 2 below.
i. Following the access and download of the application files, the user will be asked
whether to run the application. To avoid seeing this dialog, check the “do not
show again...” checkbox before clicking run.
3. Navigate to the download location of the batch file and double click on it to run the Transaction
Tool (Figure 3).
a. Windows/File Explorer can be found by clicking on the windows start button and typing
“Windows Explorer” or “File Explorer” in the Search Programs and Files text box.
Figure 1. Download Transaction Tool via IE
Figure 2. Open Transaction Tool via IE
Compliance Tool Suite – Transaction Tool Help File
6/30/2017 Page 4 of 13
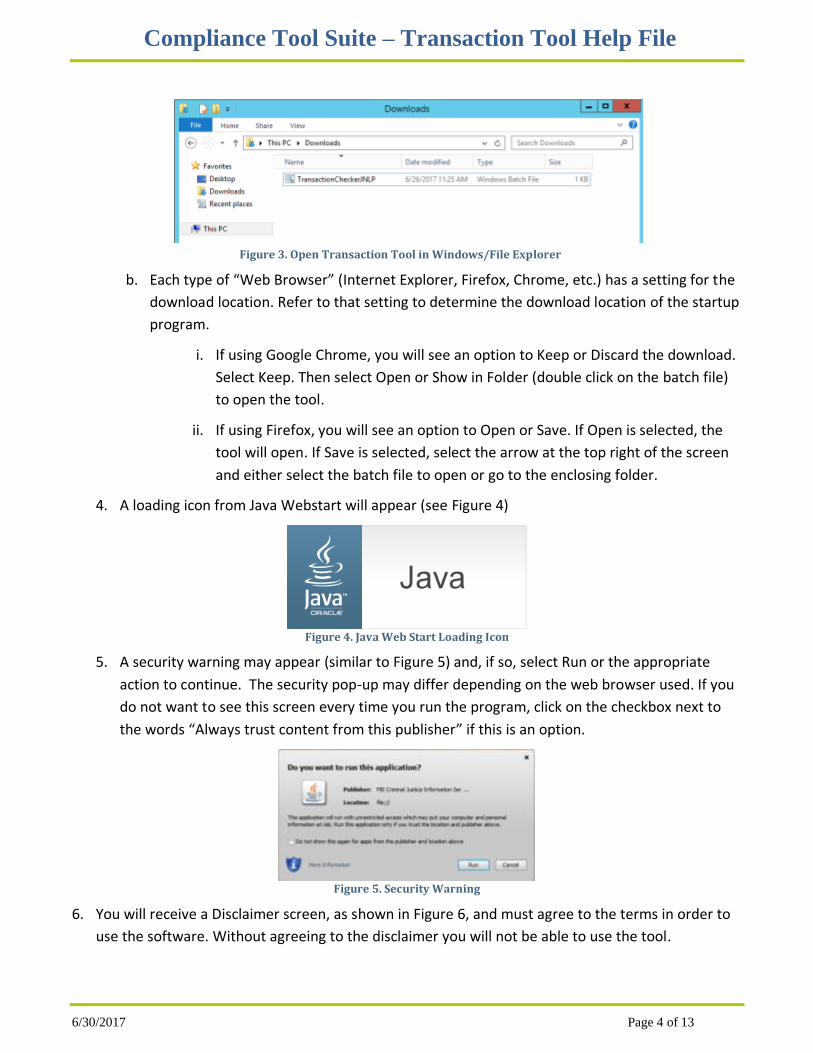
b. Each type of “Web Browser” (Internet Explorer, Firefox, Chrome, etc.) has a setting for the
download location. Refer to that setting to determine the download location of the startup
program.
i. If using Google Chrome, you will see an option to Keep or Discard the download.
Select Keep. Then select Open or Show in Folder (double click on the batch file)
to open the tool.
ii. If using Firefox, you will see an option to Open or Save. If Open is selected, the
tool will open. If Save is selected, select the arrow at the top right of the screen
and either select the batch file to open or go to the enclosing folder.
4. A loading icon from Java Webstart will appear (see Figure 4)
Figure 4. Java Web Start Loading Icon
5. A security warning may appear (similar to Figure 5) and, if so, select Run or the appropriate
action to continue. The security pop-up may differ depending on the web browser used. If you
do not want to see this screen every time you run the program, click on the checkbox next to
the words “Always trust content from this publisher” if this is an option.
Figure 5. Security Warning
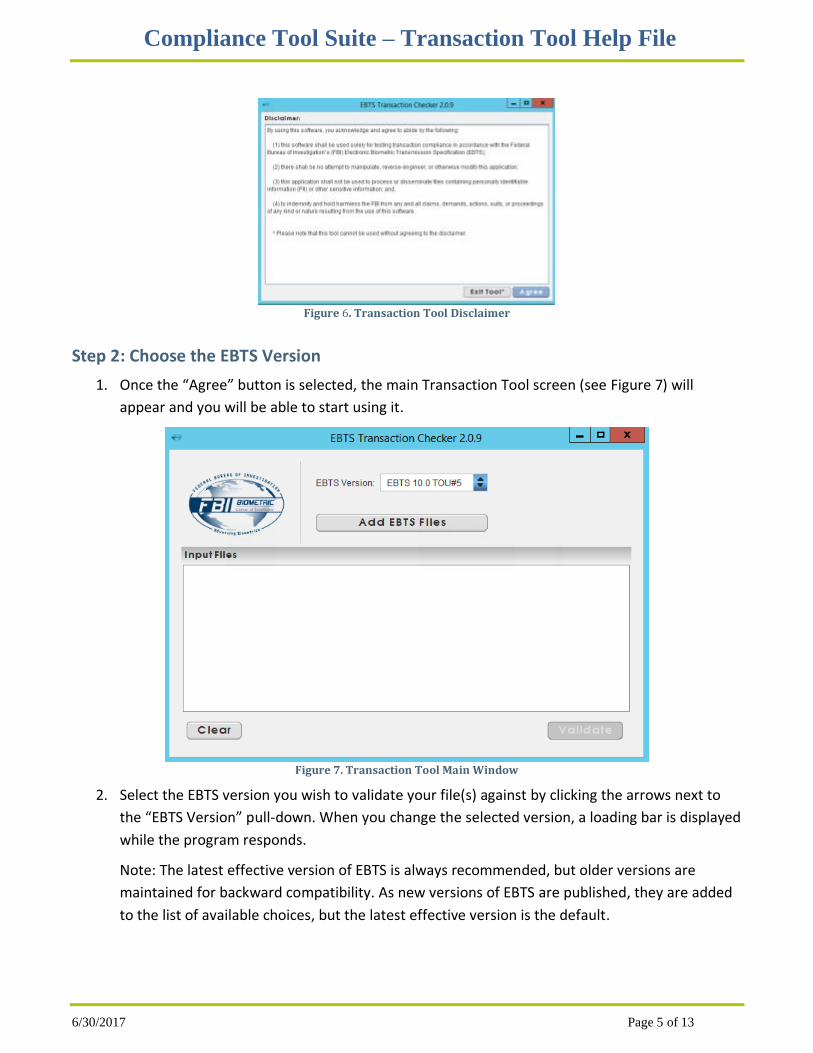
6. You will receive a Disclaimer screen, as shown in Figure 6, and must agree to the terms in order to
use the software. Without agreeing to the disclaimer you will not be able to use the tool.
Figure 3. Open Transaction Tool in Windows/File Explorer
Compliance Tool Suite – Transaction Tool Help File
6/30/2017 Page 5 of 13
Figure 6. Transaction Tool Disclaimer
Step 2: Choose the EBTS Version
1. Once the “Agree” button is selected, the main Transaction Tool screen (see Figure 7) will
appear and you will be able to start using it.
Figure 7. Transaction Tool Main Window
2. Select the EBTS version you wish to validate your file(s) against by clicking the arrows next to
the “EBTS Version” pull-down. When you change the selected version, a loading bar is displayed
while the program responds.
Note: The latest effective version of EBTS is always recommended, but older versions are
maintained for backward compatibility. As new versions of EBTS are published, they are added
to the list of available choices, but the latest effective version is the default.

Compliance Tool Suite – Transaction Tool Help File
6/30/2017 Page 6 of 13
Step 3: Upload Files
1. Click on the “Add EBTS Files” button and the Open screen in Figure 8 appears. This screen will
allow you to select the file(s) you wish to validate. You can view the folder structure by
selecting the arrows next to the “Look In” box.
Figure 8. Open Files Window
The screen contains the following selections:
Up One Level: Allows you to navigate to a parent folder
Desktop: Brings you to the files and folders on your desktop
New Folder: Creates a new folder in the current location
List: Sets the current view as a list of folders and files
Details: Sets the current view to Include the size, item type, and date
modified of each folder/file in the list
2. Select the file(s) you wish to validate (all selected files will appear in the File Name line).
Note: You can select multiple transactions to look up simultaneously by holding Shift or Ctrl and
clicking on the desired transactions. Conversely, you can unselect a transaction by holding Shift
or Ctrl and clicking on the highlighted transaction. Please note that Shift selects or unselects all
items between the two items selected, whereas Ctrl selects or unselects only the two items.
3. Click “Open” when all files you wish to validate are selected. The file(s) will show up on the
Transaction Tool main page under “Input Files”. You have two options, as show in Figure 9:
a. Select “Clear”: Removes files listed under Input Files

Compliance Tool Suite – Transaction Tool Help File
6/30/2017 Page 7 of 13
b. Select “Validate”: Starts the file validation process
Figure 9. Main Page with Input Files
Step 4: View Results
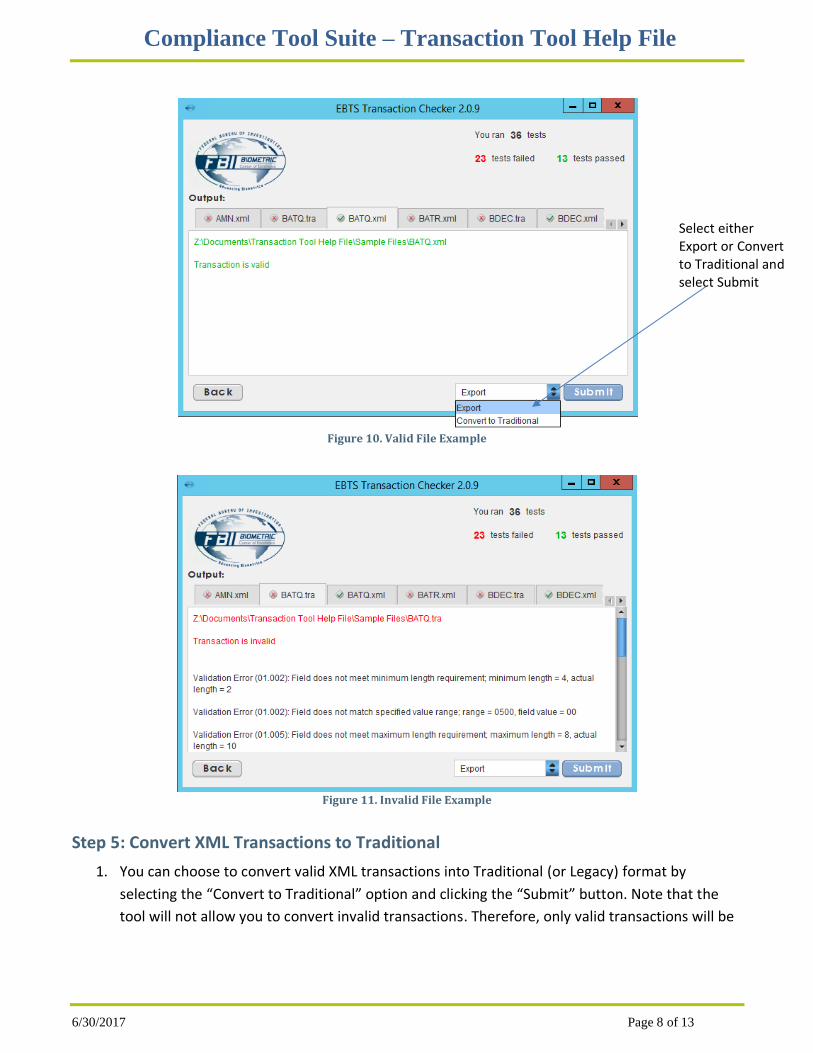
1. Once you click “Validate”, the tool will display a loading bar on the top right of the main screen
until the Results screen is displayed (see Figure 10 and Figure 11).
2. The top right displays the number of input files and how many of them have passed and failed
the validation.
3. Tabs on the window represent each input file. A green checkmark indicates that a file is valid
(conforms to EBTS), and a red “x” indicates that the file is invalid and needs to be fixed. Invalid
files will display the fields which are missing and/or incorrect.
4. The bottom right gives two actions: “Export” or “Convert to Traditional”. In the near future, a
“Convert to XML” functionality will be available to the user.
a. “Export”: Choosing this feature will allow you to export the validation results in text
format. See Step 6: Export for more information.
b. “Convert to Traditional”: Choosing this feature will allow you to convert EBTS v9.3 or
v10.0 XML transactions into traditional format. See Step 5: Convert XML Transactions to
Traditional for more information.
5. Select the “Back” button at the bottom of the screen to go back to the Transaction Tool main
screen (see Figure 10).
Compliance Tool Suite – Transaction Tool Help File
6/30/2017 Page 8 of 13
Figure 10. Valid File Example
Figure 11. Invalid File Example
Step 5: Convert XML Transactions to Traditional
1. You can choose to convert valid XML transactions into Traditional (or Legacy) format by
selecting the “Convert to Traditional” option and clicking the “Submit” button. Note that the
tool will not allow you to convert invalid transactions. Therefore, only valid transactions will be
Select either Export or Convert to Traditional and select Submit
Compliance Tool Suite – Transaction Tool Help File
6/30/2017 Page 9 of 13
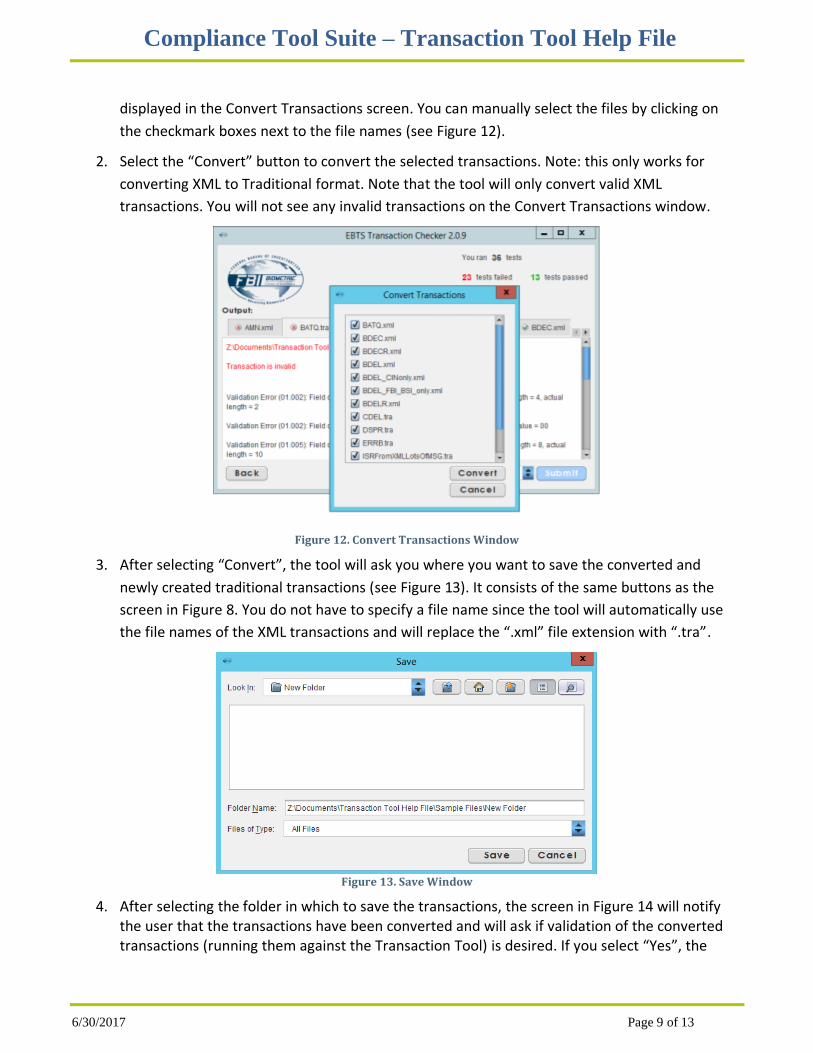
displayed in the Convert Transactions screen. You can manually select the files by clicking on
the checkmark boxes next to the file names (see Figure 12).
2. Select the “Convert” button to convert the selected transactions. Note: this only works for
converting XML to Traditional format. Note that the tool will only convert valid XML
transactions. You will not see any invalid transactions on the Convert Transactions window.
Figure 12. Convert Transactions Window
3. After selecting “Convert”, the tool will ask you where you want to save the converted and
newly created traditional transactions (see Figure 13). It consists of the same buttons as the
screen in Figure 8. You do not have to specify a file name since the tool will automatically use
the file names of the XML transactions and will replace the “.xml” file extension with “.tra”.
Figure 13. Save Window
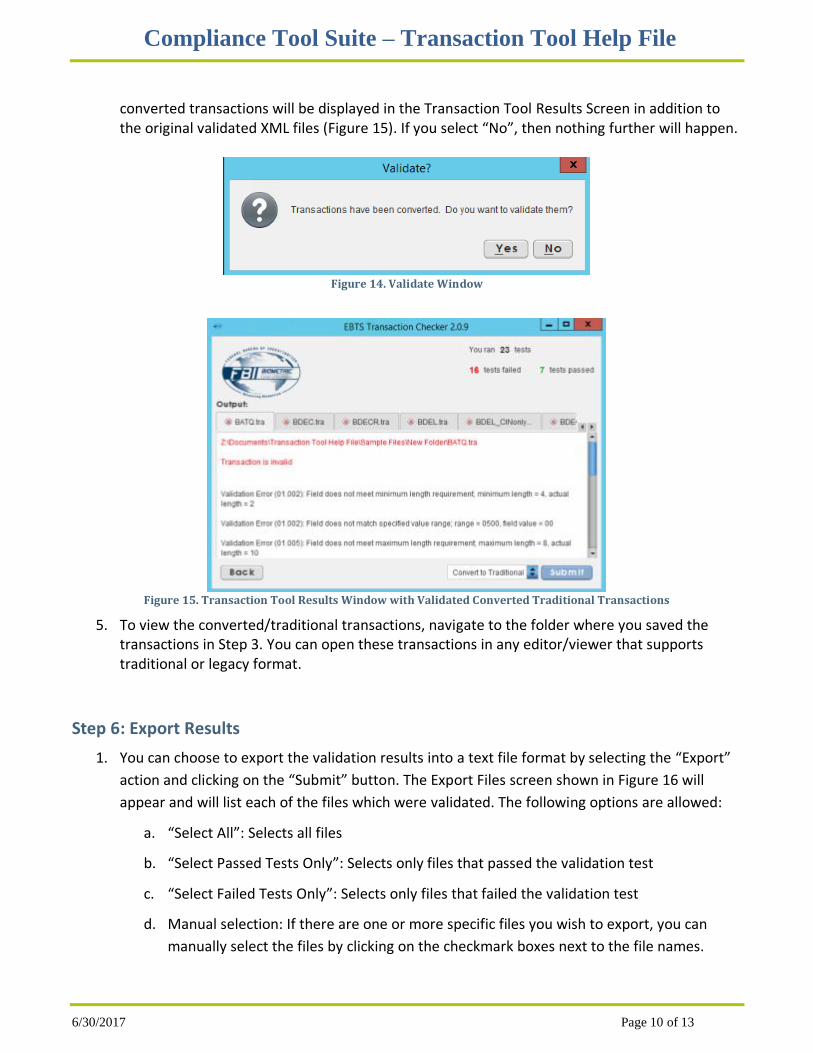
4. After selecting the folder in which to save the transactions, the screen in Figure 14 will notify the user that the transactions have been converted and will ask if validation of the converted transactions (running them against the Transaction Tool) is desired. If you select “Yes”, the
Compliance Tool Suite – Transaction Tool Help File
6/30/2017 Page 10 of 13
converted transactions will be displayed in the Transaction Tool Results Screen in addition to the original validated XML files (Figure 15). If you select “No”, then nothing further will happen.
Figure 14. Validate Window
Figure 15. Transaction Tool Results Window with Validated Converted Traditional Transactions
5. To view the converted/traditional transactions, navigate to the folder where you saved the transactions in Step 3. You can open these transactions in any editor/viewer that supports traditional or legacy format.
Step 6: Export Results
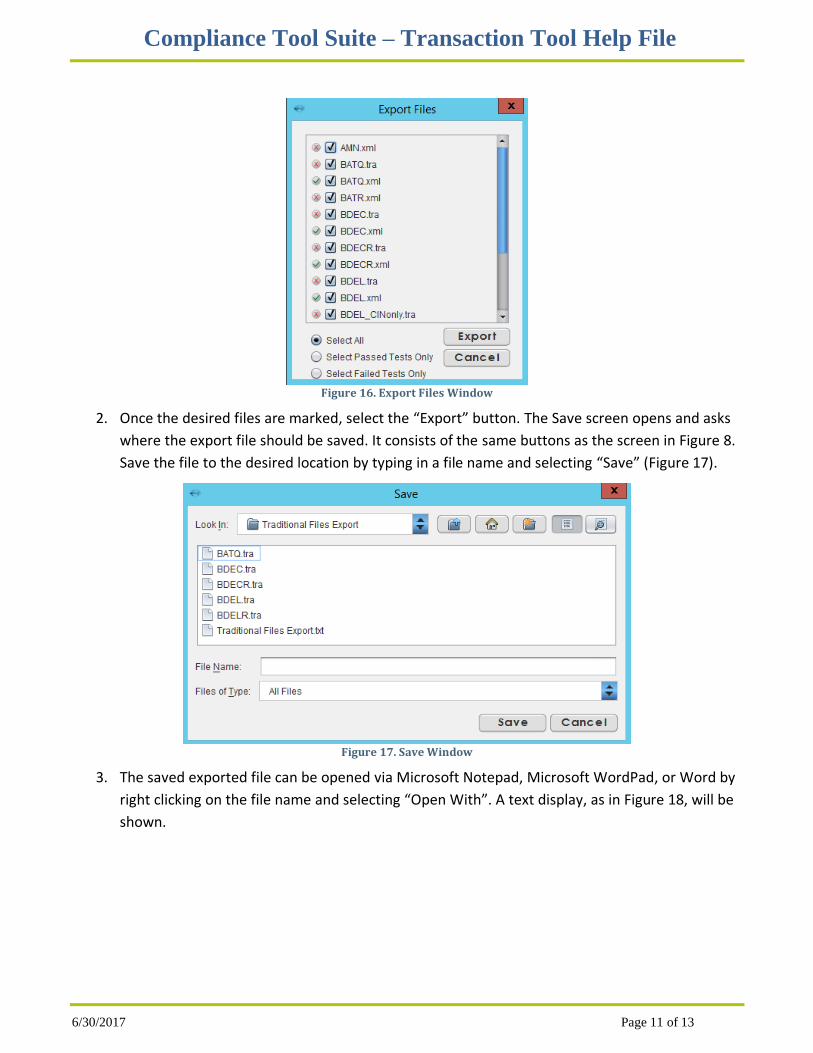
1. You can choose to export the validation results into a text file format by selecting the “Export”
action and clicking on the “Submit” button. The Export Files screen shown in Figure 16 will
appear and will list each of the files which were validated. The following options are allowed:
a. “Select All”: Selects all files
b. “Select Passed Tests Only”: Selects only files that passed the validation test
c. “Select Failed Tests Only”: Selects only files that failed the validation test
d. Manual selection: If there are one or more specific files you wish to export, you can
manually select the files by clicking on the checkmark boxes next to the file names.
Compliance Tool Suite – Transaction Tool Help File
6/30/2017 Page 11 of 13
Figure 16. Export Files Window
2. Once the desired files are marked, select the “Export” button. The Save screen opens and asks
where the export file should be saved. It consists of the same buttons as the screen in Figure 8.
Save the file to the desired location by typing in a file name and selecting “Save” (Figure 17).
Figure 17. Save Window
3. The saved exported file can be opened via Microsoft Notepad, Microsoft WordPad, or Word by
right clicking on the file name and selecting “Open With”. A text display, as in Figure 18, will be
shown.

Compliance Tool Suite – Transaction Tool Help File
6/30/2017 Page 12 of 13
Figure 18. Exported File Example
Compliance Tool Suite – Transaction Tool Help File
6/30/2017 Page 13 of 13
Troubleshooting
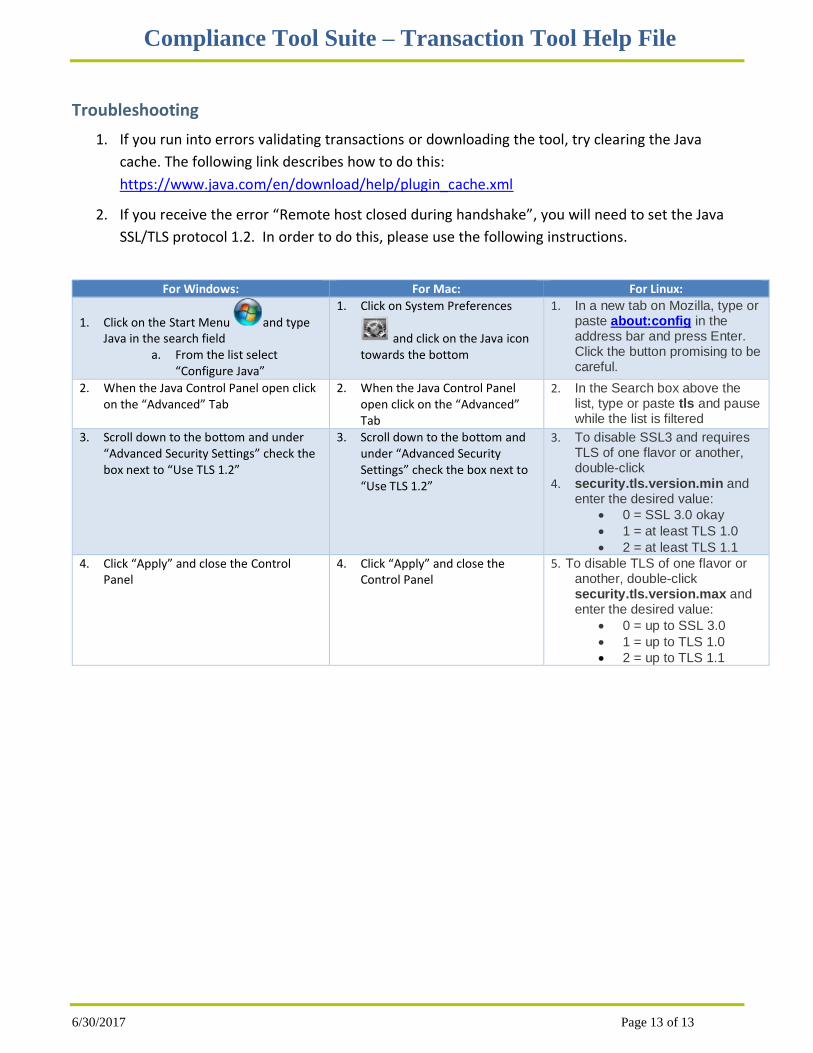
1. If you run into errors validating transactions or downloading the tool, try clearing the Java
cache. The following link describes how to do this:
https://www.java.com/en/download/help/plugin_cache.xml
2. If you receive the error “Remote host closed during handshake”, you will need to set the Java
SSL/TLS protocol 1.2. In order to do this, please use the following instructions.
For Windows: For Mac: For Linux:
1. Click on the Start Menu and type Java in the search field
a. From the list select “Configure Java”
1. Click on System Preferences
and click on the Java icon towards the bottom
1. In a new tab on Mozilla, type or paste about:config in the address bar and press Enter. Click the button promising to be careful.
2. When the Java Control Panel open click on the “Advanced” Tab
2. When the Java Control Panel open click on the “Advanced” Tab
2. In the Search box above the list, type or paste tls and pause while the list is filtered
3. Scroll down to the bottom and under “Advanced Security Settings” check the box next to “Use TLS 1.2”
3. Scroll down to the bottom and under “Advanced Security Settings” check the box next to “Use TLS 1.2”
3. To disable SSL3 and requires TLS of one flavor or another, double-click
4. security.tls.version.min and enter the desired value:
• 0 = SSL 3.0 okay
• 1 = at least TLS 1.0
• 2 = at least TLS 1.1
4. Click “Apply” and close the Control Panel
4. Click “Apply” and close the Control Panel
5. To disable TLS of one flavor or another, double-click security.tls.version.max and enter the desired value:
• 0 = up to SSL 3.0
• 1 = up to TLS 1.0
• 2 = up to TLS 1.1