computer sewing machine …€¦ · computer sewing machine machineacoudreelectronique...
TRANSCRIPT

COMPUTER SEWING MACHINEMACHINEACOUDRE ELECTRONIQUEMAQUINA DE COSER ELECTRONICACOMPUTER NAAIMACHINE
INSTRUCTION MANUALMANUEL D’INSTRUCTIONSMANUAL DE INSTRUCCIONESGEBRUIKSAANWIJZING
HZL-E80


“IMPORTANT SAFETY INSTRUCTIONS”“When using an electrical appliance, basic safety precautions should always be followed, including the following:”“Read all instructions before using this sewing machine.”
“DANGER_____To reduce the risk of electric shock:”1. “An appliance should never be left unattended when plugged in. Always unplug this appliance from the electric outlet immediately after using and before cleaning.”2. “Always unplug before relamping. Replace bulb with same type rated 15 Watts.”
“WARNING_____To reduce the risk of burns, fire, electric shock, or injury to persons:”1. “Do not allow to be used as a toy. Close attention is necessary when this appliance is used by or near children.”
2. “Use this appliance only for its intended use as described in this manual. Use only attachments recommended by the manufacturer as contained in this manual.”3. “Never operate this appliance if it has a damaged cord or plug, if it is not working properly, if it has been dropped
or damaged, or dropped into water. Return the appliance to the nearest authorized dealer or service center for examination, repair, electrical or mechanical adjustment.” 4. “Never operate the appliance with any air openings blocked. Keep ventilation openings of the sewing machine and foot controller free from the accumulation of lint, dust and loose cloth.”5. “Keep fingers away from all moving parts. Special care is required around the sewing machine needle.”6. “Always use the proper needle plate. The wrong plate can cause the needle to break.”7. “Do not use bent needles.”8. “Do not pull or push fabric while stitching. It may deflect the needle causing it to break.”9. “Switch the sewing machine off ("O") when making any adjustments in the needle area, such as threading
needle, changing needle, threading bobbin, or changing presser foot and the like.”10. “Always unplug sewing machine from the electrical outlet when removing covers, lubricating, or when making
any other user servicing adjustments mentioned in the instruction manual.”11. “Never drop or insert any object into any opening.”12. “Do not use outdoors.”13. “Do not operate where aerosol (spray) products are being used or where oxygen is being administered.”14. “To disconnect, turn all controls to the off (“O”) position, then remove plug from outlet.”15. “Do not unplug by pulling on cord. To unplug, grasp the plug, not the cord.”
“SAVE THESE INSTRUCTIONS”“This sewing machine is intended for household use only.”Use only foot controller YC-485 with your HZL-E80.
Be sure to turn power switch OFF and disconnectthe plug from the wall outlet before replacing thesewing machine needle or lubricating the machine.
When not in use, be sure to turn power switchOFF and unplug the machine.
Do not use thinner or other similar solvents to cleanthe machine.
Do not expose the machine to direct sunlight orhumid atmosphere.
1

“NOTES DE SECURITE IMPORTANTES”“Lorsque vous utilisez un appareil électrique, des précautions élémentaires doivent toujours être suivies, comme celles-ci.”“Lisez attentivement ces instructions avant d’utiliser cette machine à coudre.”
“DANGER_____Pour réduire le risque d’électrocution.”1. “Un appareil ne doit jamais être laissé sans surveillance lorsqu’il est branché. Toujours débrancher cet appareil du secteur immédiatement après utilisation et avant de le nettoyer.”2. “Toujours débrancher avant de changer l’ampoule. Remplacer l’ampoule par une du même type (15watts).”
“ATTENTION_____Pour les risques de brûlure, électrocutions et de blessures.”1. “Ne pas utiliser cet appareil comme un jouet. Porter une attention particulière lorsque cet appareil est utilisé per des
enfants.”2. “N’utiliser cet appareil que dans le cadre de ses fonctions, mentionnées dans le présent manuel. N’utiliser que lespiéces
fournies ou recommandées par le fabricant dans ce manuel.”3. “Ne pas utiliser cet appareil si une de ses prises ou cordons est endommagé, ou s’il ne fonctionne pas correctement.
S’il est tombé, a été endommagé, tombé dans l’eau, retourner l’appareil auprès de votre revendeur le plus proche pour un réparation, ou une vérification technique ou électrique.”4. “Ne jamais utiliser cet appareil dans un lieu dépourvu d’aération. Maintenez une ventilation suffisante autours de la
machine et du rhéostat et éviter la poussière et les chutes de tissus aux alentours des sources d’aération de la machine.”5. “Eloigner vos doigts des pièces mobiles de la machine. Faites particulièrement aux mouvements de l’aiguille.”6. “Toujours utiliser la plaque aiguille appropriée. Un plaque non appropriée peut faire casser l’aiguille.”7. “Ne pas utiliser d’aiguilles courbes.”8. “Ne pas tirer ou pousser le tissu lorsque vous cousez., cela pourrait abîmer, voire casser l’aiguille.”9. “Mettre l’interrupteur de la machine en position <OFF> losrque vous manipulez l’aiguille, ou l’enfilez. De même lorsque
vous changez le pied presseur.”10. “Débranchez toujours votre machine lorsque vous ôtez le capot, lorsque vous la nettoyez, ou pour tout autre manipulation
mentionnée dans le manuel d’instruction.”11. “Ne jamais laisser d’objet entrer dans les ouvertures de la machine.”12. “Ne pas utiliser à l’extérieur.”13. “Ne pas utiliser lorsqu’un aérosol a été pulvérisé, ou lorsque de l’oxygène a été administré.”14. “Avant de débrancher la machine, mettre l’interrupteur en position éteint <OFF>.”15. “Ne pas débrancher en tirant sur le cordon. Pour débrancher, tenir la prise, pas le cordon.”
“RETENEZ CES INSTRUCTIONS”“Cette machine à coudre est destinée à une utilisation domestique uniquement.”
Assurez-vous d’avoir débranchér la machine dela prise murale avant de remplacer l’aiguille ou denettoyer la machine.
Lorsqu’elle n’est pas utilisée, débranchez toujoursvotre machine.
Ne pas utiliser de détergents ou alcool pournettoyer la machine.
Ne pas exposer la machine directement au soleilou dans une atmosphère humide.
2

“NORMAS DE SEGURIDAD”Cuando utilice la máquina deberá observar todas las normas de seguridad, especialmente las que se detallan a continuación.Antes de utilizar la máquina, lea las instrucciones.
PELIGRO____Para reducir el riesgo de descarga eléctrica.1. Nunca deje desatendida la máquina cuando esté enchufada. Desconéctela de la red eléctrica cuando haya finalizado su trabajo.2. Desenchufe la máquina siempre que deba realizar cualquier manipulación con ella. Cuando cambie la bombilla, sustitúyala por otra del mismo voltaje.
ADVERTENCIA____Para reducir el riesgo de quemaduras, fuego, descarga eléctrica o cualquier otro daño.1. Esta máquina no es ningún juguete. Tenga mucho cuidado cuando esté usándose por niños o cerca de ellos.2. Use esta máquina para los fines descritos en esta guía. Utilice exclusivamente los accesorios recomendados por el fabricante.3. No trabaje con la máquina si el cable o el enchufe están dañados, si la máquina no funciona bien o está estropeada, si
la máquina ha sufrido algún golpe, se ha caído o se ha mojado. En todos estos casos, lleve inmediatamente la máquina al servicio técnico de su distribuidor para su reparación4. No bloquee las aperturas de refrigeración de la máquina mientras la esté usando. Mantenga estas aperturas abiertas
y limpias de suciedad y de residuos. También mantenga en óptimas condiciones el pedal.5. No acerque nunca los dedos a las partes móviles, sobretodo a la aguja de la máquina cuando esté enchufada.6. Use siempre el placa agujas original, un placa agujas no adecuado puede romper la aguja.7. No use agujas torcidas.8. Cuando esté cosiendo, no tire de la ropa ni la empuje, sino la aguja acabará rompiéndose.9. Desenchufe la máquina (“O”) siempre que vaya a realizar ajustes en el área de la aguja, como son el enhebrado de la
aguja y de la canilla, o el cambio del prensatelas, etc.10. Antes de realizar los trabajos de mantenimiento descritos en esta guía, se debe desconectar la máquina de la red eléctrica.11. No introducir ningún objeto en las aperturas de las máquinas.12. No use la máquina al aire libre.13. No utilice la máquina en lugares donde se han utilizado productos con gas propelente (sprays) u oxígeno.14. Para desconectar la máquina, apague el interruptor de encendido (“O”) y desconecte el enchufe de la máquina de la red eléctrica.15. Desenchufe de la red tirando del enchufe y no del cable.
“SIGA ESTAS INSTRUCCIONES”Esta máquina está diseñada para su uso doméstico.
Desconecte la máquina de la red eléctrica antesde cambiar la aguja o de lubricar la máquina.
Cuando no esté usando la máquina, manténgaladesconectada.
No utilice disolventes para limpiar la máquina. No exponga la máquina directamente a la luz delsol ni tampoco la mantenga en lugares húmedos.
3

4
BELANGRIJKE VEILIGHEIDSINSTRUCTIESAls u een elektrisch apparaat gebruikt, moet u altijd de basis veiligheidseisen in het oog houden, inclusief deze: Lees alle instructies voordat u deze naaimachine gaat gebruiken.
GEVAAR! Voorkom een elektrische schok. 1. Laat het apparaat nooit allen met de stekker in het stopcontact. 2. Haal de stekker van het apparaat altijd uit het stopcontact na gebruik en voor reiniging. 3. Haal de stekker van het apparaat altijd uit het stopcontact voordat u het lampje (max 15 W) verwisselt.
WAARSCHUWING! Voorkom brand, een elektrische schok of andere verwondingen. 1. Laat dit apparaat niet als speelgoed gebruiken. Let goed op als u dit apparaat in de buurt van kinderen gebruikt. 2. Gebruik het apparaat alleen voor de doelen waarvoor het gemaakt is, zoals beschreven in deze gebruiksaanwijzing. Gebruik alleen toebehoren aanbevolen door de fabrikant en beschreven in deze gebruiksaanwijzing. 3. Gebruik dit apparaat nooit als de snoeren of de stekker beschadigd zijn, het niet goed functioneert, is gevallen of beschadigd of nat geworden is. Laat het apparaat nakijken bij de dichtstbijzijnde dealer of service punt voor onderzoek en reparatie. 4. Gebruik het apparaat nooit met geblokkeerde luchtopeningen. Houd de ventilatieopeningen van de machine en de voetpedaal vrij van stof, kleding en afval. 5. Houdt uw vingers weg bij bewegende delen. U moet vooral opletten in de buurt van de naald. 6. Gebruik altijd de juiste steekplaat. Een verkeerde steekplaat kan naaldbreuk veroorzaken. 7. Gebruik geen verbogen naalden. 8. Duw of trek niet aan de stof terwijl u naait. Hierdoor kan de naald verbuigen en breken. 9. Schakel de machine uit “O” als u aanpassingen uitvoert in de buurt van de naald, zoals naald verwisselen of draad inrijgen van de naald, of bij het verwisselen van de naaivoet en dergelijke. 10. Haal de stekker van het apparaat altijd uit het stopcontact bij het openen van de machine, bij het smeren, of andere onderhoudswerkzaamheden beschreven in deze gebruiksaanwijzing. 11. Stop niets in welke opening dan ook. 12. Gebruik de machine niet buiten. 13. Gebruik de machine niet terwijl er spuitbussen of zuurstof gebruikt worden. 14. Bij het uitschakelen zet u eerst de hoofdschakelaar op “O” en vervolgens trekt u de stekker uit het stopcontact. 15. Trek aan de stekker, niet aan het snoer. 16. Als er olie in uw ogen komt, spoel dan meteen met water. Als u olie naar binnen krijgt, consulteer direct uw huisarts.
ONDERHOUD VAN DUBBEL GEÏSOLEERDE PRODUCTENIn een dubbel geïsoleerd product zijn er twee isolatie systemen geïnstalleerd in plaats van de gewone aarde. Er is geen gewoon aardingsysteem aangebracht en hoeft niet aangebracht te worden. Onderhoud op een dubbel geïsoleerd product moet zeer zorgvuldig en met verstand van zaken worden gepleegd. Gebruik alleen identieke vervangingsonderdelen. Een dubbel geïsoleerd product is gemerkt met de woorden Double insulation of Double insulated.
Het symbool bevindt zich meestal op het betreffende apparaat.
BEWAAR DEZE INSTRUCTIESDeze naaimachine is alleen bedoeld voor huishoudelijk gebruik.
1. Haal de stekker van het apparaat altijd uit het stopcontact bij het smeren, of het verwisselen van de naald.
2. Als de machine niet gebruikt wordt, hoort de stekker niet in het stopcontact.
3. Gebruik geen thinner of soortgelijke oplosmiddelen om uw machine te reinigen.
4. Stel uw machine niet bloot aan direct zonlicht of aan een vochtige omgeving.

5
CONTENTS / TABLE DES MATIERES
Important safety instructions ...................................... 1Principal parts ............................................................. 7,8Accessories ................................................................. 9Major functions .................................................... 10-14Winding bobbin .................................................... 15-17 Placing bobbin in the caseThreading the machine ....................................... 18-20 Automatic needle threader Pulling up the bobbin threadChanging the presser foot ......................................... 21Attaching the needle .................................................. 22Types of feet and their application ........................... 23How to adjust thread tension .................................... 24Fabric, thread and needle table ................................ 25How to adjust stitch length (manually) ................ 27,28Straight stitch ...................................................... 29,30 Straight stitch on strechy fabricAutomatic lock stitch ........................................... 31-34 Manual lock stitch and sewing start on heavy fabricZigzag stitch ................................................................ 35
How to adjust stitch width (manually) ..................... 36,37Overcasting ................................................................. 38Reinforced stretch stitch ............................................ 39Automatic buttonholes ......................................... 40-43Bartacking .............................................................. 44,45Darning stitch .............................................................. 46Quilting stitch .............................................................. 47Patch work .................................................................. 48Inserting zippers .................................................. 49-52 Lapped insertion Centered insertionBlind stitch .............................................................. 53,54Quilting attachment ..................................................... 55Optional parts ...................................................... 56-63 Invisible zipper foot / Manual buttonhole foot
Rolled hemming foot / Even feed foot Smooth footReplacing lamp ........................................................... 64Maintenance (cleaning) .............................................. 65Performance checklist ............................................. 66Specification table ...................................................... 66
CONTENTS
TABLE DES MATIERESNotes de securite importantes ................................... 2Principaux éléments ................................................... 7,8Accessoires ................................................................. 9Fonctions principales ........................................... 10-14Embobinage ......................................................... 15-17 Placer la canette dans le boîtierEnfilage ................................................................ 18-20 Enfileur automatique de láiguille Remonter le fil de canetteChangement de pied presseur .................................. 21Mise en place de l’aiguille ......................................... 22Types de pieds et spplications ................................. 23Réglage de la tension de fil ...................................... 24Tableau des tissus, fils et aiguilles ........................... 25Réglage de la longueur du point (manuel) ............. 27,28Point droit ................................................................ 29,30 Point droit sur tissu extensiblePoint d’arrêt automatique .................................... 31-34 Point d’arrêt manuel et départ de la couture sur les tissu épaisPoint zig-zag ............................................................... 35
Comment régler la largeur des points (manuellement) .................................................. 36,37Surfilage ...................................................................... 38Point extensible de renfort ........................................ 39Boutonnières automatiques ................................. 40-43Couture d’arrêt ....................................................... 44,45Point de reprise .......................................................... 46Point de courtepointe ................................................. 47Patchwork ................................................................... 48Insertion de fermeture à glissière ....................... 49-52 Insertion latérale Insertion centraleOurlet invisible ........................................................ 53,54Ensemble pour quilting .............................................. 55Pièces optionnelles .............................................. 56-63 Pied fermeture invisible
Pied boutonnière manuelle Pied ourlet roulé / Pied double entraînement Pied à semelle lisseRemplacement de l’ampoule ..................................... 64Maintenance (nettoyage) ............................................ 65Problèmes éventuels et remèdes simples ................. 67Tableau de caractéristiques ........................................ 67

6
ÍNDICENormas de seguridad ................................................ 3Principales piezas ...................................................... 7,8Accesorios ................................................................... 9Funciones principales .......................................... 10-14Hacer canilla ........................................................ 15-17 Colocar la canilla en el canilleroEnhebrar la máquina ........................................... 18-20 Enhebrado automático de la aguja Subir el hilo de la canillaCambio del prensatelas ............................................. 21Colocar la aguja ......................................................... 22Tipos de prensatelas y sus aplicaciones ................. 23Ajuste de la tensión del hilo ..................................... 24Tabla de tejido, hilo y aguja ...................................... 26Ajuste de la longitud de puntada (manual) ............. 27,28Pespunte recto ....................................................... 29,30 Pespunte recto en tejido tipo puntoPuntada automática de seguridad ..................... 31-34 Puntada de seguridad manual e inicio de costura en tejidos gruesosPuntada zig zag ......................................................... 35
Modo de ajustar la anchura de puntada (manualmente) ...................................................36,37Sobrehilado ................................................................. 38Puntada de refuerzo en tejido tipo punto ................. 39Ojales automáticos .............................................. 40-43Presillado ................................................................ 44,45Punto para zurcido ..................................................... 46Puntada acolchada ..................................................... 47Patch work .................................................................. 48Colocación de cremalleras ................................. 49-52 Inserción lateral Inserción centradaPuntada invisible .................................................... 53,54Mecanismo para el acolchar ..................................... 55Piezas opcionales ................................................ 56-63 Prensatelas de puntada invisible Prensatelas de ojales manual
Prensatelas de dobladillo de caracolillo Prensatelas para alimentar el tejido de forma uniforme Pata deslizanteCambiar la bombilla ................................................... 64Mantenimiento (limpieza) ........................................... 65Lista de problemas y soluciones .............................. 68Tabla de características ............................................. 68
ÍNDICE / INHOUD
Belangrijke veiligheidsinstructies ....................................................4Voornaamste delen ......................................................................7-8Accessoires ......................................................................................9Voornaamste functies ..............................................................10-14Opspoelen ................................................................................15-17Plaats de spoelInrijgen van de machine ..........................................................18-20 De automatische naaldinrijger Ophalen van de onderdraadVerwisselen van de naaivoet ........................................................21Verwisselen van de naald .............................................................22Naaivoeten en hun toepassing ....................................................23Aanpassen van de draadspanning..............................................24Stof, garen en naalden tabel...................................................25-26Steeklengte aanpassen (handmatig) ....................................27-28Rechte steek .............................................................................29-30 Rechte steek op rekbare stofAutomatische locksteek ..........................................................31-34 Handmatige locksteek, afwerksteek (retoursteek) Naaistart met zware stofZig zag steek ..................................................................................35Steekbreedte aanpassen (handmatig) ..................................36-37
Overlocksteek .................................................................................38Versterkte stretchsteek ..................................................................39Automatische knoopsgaten ....................................................40-43Cordonsteek .............................................................................44-45Stopsteek ........................................................................................46Quiltsteek ........................................................................................47Patchwork .......................................................................................48Ritsen inzetten ..........................................................................49-52 Overlapte rits Gecentreerde ritsBlindsteek .................................................................................53-54Quiltvoet ..........................................................................................55Optionele voeten ............................................................................56 Blinde ritsvoetHandmatige knoopsgatvoet ...................................................59-60Rolzoomvoet ..................................................................................61Boventransportvoet .......................................................................62Voet voor gladde stoffen (Tefl onvoet) ..........................................63Lamp verwisselen ..........................................................................64Onderhoud (Schoonmaken) ........................................................65Verhelpen van storingen ...............................................................69Specifi caties....................................................................................69

Principal Parts / Principaux éléments /Principales piezas / Onderdelen van de machine
1. Spool pin2. Bobbin thread guide3. Thread tension dial4. Thread spool cap5. Bobbin winding regulator6. Bobbin winder7. Face cover8. Speed controller9. Reverse stitch button
10. Start / Stop button11. Auxiliary bed
1. Porte-bobine2. Guide-fil de canette3. Bouton de tension du fil4. Chapeau de bobine5. Arrêt du dévidoir de
canette6. Dévidoir de canette7. Capot frontal8. Curseur de vitesse9. Bouton de marche arrière
10. Bouton start/stop11. Rallonge de bras
1. Pivote del portaconos2. Guía-hilo de la canilla3. Tensor del hilo4. Tapa de la bobina del hilo5. Regulador del bobinador
de la canilla6. Bobinador de la canilla7. Tapa frontal8. Regulador de velocidad9. Botón de costura inversa
10. Botón de marcha / paro11. Base auxiliar
12. Griffe de transport13. Botón de puntada automática de seguridad14. Panel de selección de
puntadas15. Volante16. Interruptor de encendido / Luz17. Enchufe para el cable18. Enchufe para el pedal19. Asa20. Palanca del prensatelas
12. Palanca de los dientes de arrastre13. Bouton de point d’arrêt auto14. Panneau de sélection du point15. Volant manuel16. Interrupteur de courant17. Prise du cordon d’alimentation18. Prise du rhéostat19. Poignée20. Levier du pied presseur
12. Drop feed lever13. Automatic lock stitch button14. Stitch selection panel15. Handwheel16. Light / Power switch17. Power cord receptacle18. Speed controller receptacle19. Handle20. Presser foot lever
7
6
1
3
5
4
2
8
14
7
11
10
139
12
20
1716
15
19
18
1. Garenpen 2. Garenwinderdraadgeleider 3. Draadspanningsknop 4. Garenklostegenhouder 5. Garenwinder aftaster 6. Garenwinder 7. Voorkap 8. Snelheidsregelaar 9. Retoursteekknop 10. Start-stopknop 11. Vrije arm aanschuiftafel 12. Transporteurverzinkknop
13. Automatische locksteekknop 14. Steekkeuze paneel 15. Handwiel 16. Licht- en stroomschakelaar 17. Stekkeringang 18. Voetpedaal- stekkeringang 19. Handgreep 20. Naaivoethefboom

8
Foot speed controllerRhéostatPedal
Electric power cordCordon électriqueCable eléctrico
1. Cortahilos2. Enhebrador de la aguja3. Palanca de ojales4. Palanca que afloja el
prensatelas5. Caña del prensatelas6. Dientes7. Placa aguja
8. Canillero9. Clamp de la aguja
10. Aguja11. Prensatelas12. Botón que afloja la tapa
del garfio13. Tapa del garfio14. Canilla
1. Coupe-fil2. Enfile-aiguille3. Levier de boutonnière4. Releveur de pied
presseur5. Montage du pied
presseur6. Griffes d’entraînement7. Plaque aiguille
8. Boîtier à canette9. Montage du pied
10. Aiguille11. Pied presseur12. Bouton d’ouverture du capot13. Capot de la canette14. Canette
1. Thread Cutter2. Needle threader3. Buttonholing lever4. Presser foot release
lever5. Presser foot shank6. Feed dog7. Needle plate
8. Bobbin case9. Needle clamp
10. Needle11. Presser foot12. Hook cover release button13. Hook cover14. Bobbin
1
6
3
4
2
5
7
8
9
10
1112
13
14
1. Draadafsnijder 2. Draadinrijger 3. Knoopsgatvoetaftaster 4. Naaivoethendel 5. Naaivoethouder 6. Transporteur 7. Steekplaat
8. Spoelhuls 9. Naaldklem 10. Naald 11. Naaivoet 12. Ontgrendelingsknop 13. Klapplaatje 14. Spoeltje
Voetpedaal
Elektrisch snoer

9
* Standard presser foot (A) is equipped with machine.* Le pied standard (A) est monté sur la machine.* El prensatelas estándar (A) está incluido con la máquina.
Accessories /AccessoiresAccesorios /Accessoires
T-shape screw-driverTournevis en TDestornillador en forma de T
Blindstitch presser foot (D)Pied pour surfilage (D)Prensatelas de puntada invisible (D)
Seam ripperDécoud-viteDescosedor
Zipper foot (B)Pied fermeture à glissière (B)Prensatelas de cremallera (B)
Overcasting foot (C)Pied ourlet invisible (C)Prensatelas de sobrehilar (C)
Bobbins (3)Canettes (3)Canillas (3)
Small spool cap (2)Petit chapeau de bobine (2)Tapa para la bobina de hilo (2)
Standard presser foot (A)Pied presseur standard (A)Prensatelas standard (A)
Buttonhole foot (E)Pied boutonnière (E)Prensatelas de ojales (E)
· You can keep instruction manual at hard case.· Vous pouvez ranger votre manuel d’instructions dans le capot rigide.· Le sugerimos guardar el manual de instrucciones en la maleta rígida.
Spool pinBroche porte-bobineEje de carrete
Quilt guideGuide ouateurGuía de colcha
Quilting attachmentEnsemble pour quiltingMecanismo para acolchar
Needle pack HAx1 No.11 2P No.14 1PPaquet d’aiguilles (130-705H)Paquete de agujas HA x 1 Nº 11x2
Nº 14x1
( )( )
Auxiliary BedPlateau de travailBase auxiliar
- U kunt de handleiding bewaren in de beschermkap van de machine.
Standaard naaivoet (A)Knoopsgatvoet (D) Ritsvoet (B)
Aanschuiftafel
Blindzoomvoet (D) Overlockvoet (C)
Quiltvoet
Garenpen Quilt geleider Spoeltjes
Naalden
TornmesT-vorm schroevendraaier Garenklostegenhouders
* Standaard Naaivoet (A) is gemonteerd op de machine.

Type of Stitch patterns and operation (Operation/indication panel)Types de point et sélection (touches de sélection)Tipos de puntada y funciones (panel indicativo / operativo) Steeksoorten en werkwijze (Steekkeuze paneel)
Stitch length manual adjustment buttonTouche de réglage manuel de la longueur du pointBotón de ajuste manual de la longitud de puntadaDruktoets steeklengte regeling
Stitch length adjusting leverCurseur de réglage de la longueur du pointPalanca de ajuste de la longitud de puntadaSteeklengte schuifregelaar
Zigzag width manual adjustment buttonTouche de réglage manuel de largeurBotón de ajuste manual de anchuraDruktoets steekbreedte regeling
Zigzag width adjusting leverLevier de réglage de largeurPalanca de ajuste de anchuraSteekbreedte schuifregelaar
Pattern No. selection buttonLeft side for number of tens.Right side for number of units.Touche de sélection de n° de confi gurationLe côté gauche comporte 10 chiffres.Le côté droit comporte 1 chiffre.Botón selector de No. de patrónEl lado izquierdo es de 10 dígitos.El lado derecho es de 1 dígito.Steeknummer-selectieknopLinks per per 10.Rechts per eenhied
Pattern No. / Stitch length / Zigzag width indicatorN° de confi guration / Longueur des points / Indicateur de largeur de zigzagNo. de patrón / Longitud de puntada /Indicador de anchura de zigzagSteeknummer / steeklengte /zigzagbreedte indicatie
Automatic lock stitch buttonTouche de point de programmationdu point d’arrêtBotón de puntada automática de seguridadAutomatische retoursteek knop
Memory key / Touche de mémorisationTecla de memoria / Geheugen knop
Clear key / Touche d’effacementTecla de despeje / Geheugen wissen knop
Shift key / Touche de motionTecla de desplazamiento / Selectie knop
Major Functions / Fonctions principales Funciones principales / Voornaamste functies
Pattern No. / N° de confi gurationNo. de Patrón / Steeknummer
Pattern / Confi guration / Patrón / Steek
Symbol of presser foot / Symbole de presseurSímbolo de prensador / Naaivoet symbool
Memory key: Press this key when storing the selected letters or patterns (30 to 99) in to memory.Letters and patterns can be stored in to memory up to 40.Touche de mémorisation: Appuyer sur cette touche pour mémoriser les lettres ou confi gurations sélectionnées (30 à 99). Jusqu’à 40 lettres et confi gurations peuvent être mémorisées.Tecla de memoria: Pulse esta tecla cuando almacene en la memoria las letras o patrones(30 a 99) seleccionados. Las letras y patrones se pueden almacenar en la memoria hasta 40.Geheugen knop: Druk op deze wanneer u de geselecteerde letter of steek wilt bewaren.U kunt maximaal 40 letters of steken in het geheugen bewaren.
How to use Memory key / Clear key / Shift keyComment régler la Touche de mémorisation / Touche d’effacement / Touche de motionAjuste de las Tecla de memoria / Tecla de borrado / Tecla de desplazamientoHet gebruik van de Geheugen knop / Wis knop / Selectie knop
Clear key: Letters and patterns stored in memory can be deleted from the rear part of them.When holding pressing the button, all stored memory can be deleted.Touche d’effacement: Appuyer brièvement sur cette touche pour effacer les dernières lettres et confi gurations mémorisées. Appuyer continuellement sur cette touche pour effacer tout le contenu de la mémoire.Tecla de borrado: Cuando usted pulse esta tecla, las letras y los patrones almacenados en la memoria se pueden borrar desde el último dato. Cuando se está manteniendo presionado el botón, se puedeborrar todo el contenido almacenado en la memoria.Geheugen wissen knop: Gebruik deze knop om opgeslagen letters of steken uit het geheugen te verwijderen. Houd de knop ingedrukt om het complete geheugen te wissen.
Shift key: Press this key when you want to choose the lower patterns from pattern Nos.30 to 78. (The lamp will light up.)Touche de motion: Appuyer sur cette touche pour choisir la confi guration inférieure parmi la confi guration supérieure et la confi guration inférieure des numéros de confi guration 30 à 78. (Le témoin s’allume.)Tecla de desplazamiento: Pulse esta tecla cuando usted quiera elegir los patrones inferiores de entre las dos clases de patrones superior e inferior de No. de patrón de 30 a 78. (Se iluminara la lámpara).Selectie knop: Gebuik deze knop om de onderste steken of letters no. 30 t/m 78 te selecteren.(Het lampje zal gaan branden.)
10

11
* When turning on the machine, straight stitch “00” (left needle position) will be automatically chosen. * Choose the pattern No. you want to sew by pushing the pattern No. selection button.
Example: When you want to choose (No.23) 1. Press twice of left side (number of tens).
2. Press three times of right side (number of units).
* Lorsque l’on allume la machine, le point droit “00” (aiguille à gauche) est automatiquement sélectionné. * Choisir le n° de confi guration que l’on désire exécuter à l’aide de la touche de sélection de n° de confi guration.
Exemple: si vous voulez choisir (No.23) 1. Appuyer deux fois sur le côté gauche de (10 chiffres).
2. Appuyer trois fois sur le côté droit de (1 chiffre).
* Cuando encienda la máquina, por defecto, la máquina tendrá escogida la opción de pespunte recto “00” (posición izquierda de la aguja). * Elija el No. de patrón que usted quiera coser el patrón con el botón selector de No. de patrón.
Ejemplo: se desea escoger (No.23) 1. Pulse dos veces del lado izquierdo (10 dígitos).
2. Pulse tres veces del lado derecho (1 dígito). * Wanneer u de machine aanzet wordt automatisch steek “00” (linker naald positie) gekozen. * Kies het steeknummer welke u wilt naaien door op de steeknummer selectieknoppen te drukken.
Bijvoorbeeld: Wanneer u wilt kiezen (No.23) 1. Druk twee keer de linkerknop per 10.
2. Druk 3 keer de rechterknop per 1.
This sewing machine has stitchpatterns for stretchy fabric suchas knitted fabric, jersey and soon.
Cette machine possède desprogrammes spéciaux pour lesmatières extensibles comme lesmailles, tricots, jerseys, etc.
La máquina tiene tipos depuntada para diferentes tejidoscomo el punto, jersey, etc.
Stitch patterns for stretchy fabricsProgrammes pour matières extensiblesTipos de puntada para tejidos tipo punto
Straight stitch for elasticPoint droit pour mailles finesPespunte recto para tejido elástico
Stretch reinforcing stitchPoint droit triple extensiblePuntada de refuerzo para tejidotipo punto
3-step zigzag stitchZig-zag piqué à 3 pointsZig zag de tres pasos
Blind stitch for elasticOurlet invisible extensiblePuntada invisible para tejidoelástico
Deze machine heeft steken voor rekbare stoffen zoals gebreide stof, jersey en dergelijke.
Steken voor rekbare stoffen
Elastische rechte steek
Versterkte stretchsteek
3-staps zig zag steek
Elastische blindzoomsteek
Example: When you want to choose the lower pattern of the pattern No. 43. Exemple: Pour choisir la confi guration inférieure du numéro de confi guration 43. Ejemplo: Cuando usted quiera elegir el patrón inferior del patrón No. 43. Voorbeeld: Wanneer u steek 43 wilt kiezen van het onderste steken paneel.

12
Speed controllerPush speed controller pluginto lower receptacle at rightend of machine.During use of foot control-ler, Start / Stop Button isnonusable.
RhéostatInsérez la prise ’jack’ durhéostat dans son logementà l’arrière de la machine.Le rhéostat branché, le bou-ton “marche/arrêt“ nefonctionne plus.
Power cordPush power cord plug [1]into upper receptacle atright end of machine.Plug [2] into electric outlet.
Cordon électriqueInsérez la prise du cordon(1) dans son logement àl’arrière de la machine.Branchez (2) dans la prisede courant.
CableConecte el enchufe [1] enel receptáculo que hay enla parte inferior derecha dela máquina.Conecte el enchufe [2] a lared eléctrica.
To run the machine, pressfoot speed controller. Theharder you press, the fastermachine will sew. To stopmachine, remove foot fromcontroller.
Pour actionner la machine,appuyez sur le rhéostat.Puls on appuie, plus lavitesse est élevée (enrapport avec la position ducurseur de vitesse). Onarrête la machine en retirantle pied.
Pise el pedal para que lam á q u i n a e m p i e c e afuncionar. Cuanto másfuerte sea la presión queejerce con el pie, másrápida irá la máquina. Paraparar, simplemente deberáde dejar de pisar el pedal.
[1]
[2]
Major functions / Fonctions principalesFunciones principales / De voornaamste functies
Light / Power switch
Interrupteur de courant
Interruptor deencendido / Luz
ON
OFF
PedalConecte el cable del pedal en el enchufe que hay en laparte inferior derecha de la máquina. Durante el uso delpedal,los botones de inicio y paro no funcionan.
VoetpedaalSteek de stekker van het voetpedaal in de onderste stekker-ingang aan de rechterkant van de machine. Als u het voet-pedaal gebruikt, kunt u de start-stopknop niet gebruiken.
Om de machine te laten lopen drukt u het voetpedaal in. Hoe dieper u indrukt, hoe harder de machine gaat. Om de machine te stoppen, haalt u uw voet van het pedaal.
Elektrisch snoerSteek de machinestekker in de bovenste stekkeringang aan de rechterkant van de machine(1).Steek vervolgens de stekker in het stopcontact (2).
Licht- en elektra schakelaar.

Reverse stitch buttonPush it manually to securethe stitches at sewing-startand end of seam. If youpush this button at sewing-end, needle will stop at itshighest position.
Touche de couturearrièreUtilisez cette touche pourarrêter vos coutures audépart et à la fin. Si vousl’actionnez la machinearrêtée, l’aiguille remonteraen position haute.
Speed controllerYou can adjust Maximumsewing speed.
Curseur de vitesseVous pouvez régler la vitessemaximale de couture avec cecurseur électronique.
Regulador de velocidadSe puede a jus ta r lavelocidad máxima.
FasterRapideMás rápido
SlowerLentMás lento
Start / Stop buttonPress the button for start.Push it again to stop sew-ing. Needle will stop at itslowest position.
Touche marche/arrêtPressez cette touche pourdémarrer ou pour arrêter lamachine. L’aiguille s’arrêteen position basse.Cette touche n’est activeque le rhéostat débranché.
Botón de marcha/paroApriete dicho botón paraempezar a coser.Apriételo una segunda vezpara parar la máquina. Laaguja parará en su posiciónmás baja.
Botón de puntada inversaApriétela manualmente para atacar en el inicio y final decostura. Si aprieta dicho botón al final de la costura, laaguja parará en su posición más alta.
13
Presser foot lever(a) Presser foot goes up.(b) Presser foot comes
down.
Levier du pied presseur(a) Le pied remonte.(b) Le pied descend.
Palanca del prensatelas(a) Prensatelas sube(b) Prensatelas baja
(a)
(b)
Start-stopknopDruk op de knop om met naaien te beginnen. Als u opnieuw op de knop drukt, stopt de naald in de laagste positie.
Naaivoet hefboom (a) Naaivoet omhoog (b) Naaivoet omlaag
Langzaam Snel
SnelheidsregelaarOm de snelheid handmatig te regelen.
RetoursteekknopDruk op deze knop voor een retoursteek om uw naad veilig te stellen aan het begin en einde van de naad. Als u de knop heeft ingedrukt, stopt de naald in de hoogste positie.

14
Thread tension dial(a) To increase the needle thread tension.(b) To decrease the needle thread tension.
Bouton de tension du fil(a) Pour augmenter la
tension du fil d’aiguille.(b) Pour diminuer la tension.
Tensor del hilo(a) Para aumentar la tensión del hilo de la aguja.(b) Para disminuir la tensión
del hilo de la aguja.
(a)
(b)
Stitch length adjustmentIn order to change stitchlength of each stitch pattern:Push manual button (lightwill be on) and move the le-ver to the desired position.
Touche de réglage de lalongueur du pointAfin de régler manuellementla longueur de chaque point.Actionnez d’abord la touche(le voyant s’allume) puisdéplacez le curseur deréglage vers la positionvoulue.
Ajuste de la longitud depuntadaPara cambiar la longitud depuntada de cada tipo depuntada: Apriete el botónmanual (e l indicat ivoluminoso se encenderá) ymueva la palanca hacia laposición que desee.
* Stitch length will be auto-matically set according tothe selected stitch pattern.* Refer to page 19, 20 forstitch patterns which stitchlength can be adjusted.
* La longueur du point esttoujours prérégléé pourchaque point.* Référez-vous à la page19,20 pour les pointspouvant être réglés enlongueur.
* La longitud de puntada seajusta automáticamente altipo de puntadaseleccionada.* Consultar página 19, 20para ver los tipos de puntadadonde se puede variar lalongitud de puntada.
Manual buttonCurseur de réglageBotón manual
Adjusting leverTouche manuellePalanca de ajuste
Free armDraw the auxiliary bed to theleft side.
Bras-libreRetirez la tablette-rallongevers la gauche.
Brazo libreTire hacia la izquierda de labase auxiliar.
Drop feed dogThe feed dog should belowered for special sewingtechniques, such as freemotion embroidery.The feed dog must be al-ways up for normal sewing.Locate the feed dog leveron the front of the free arm.Slide the lever either to theright (down) [1] or the left(up) [2]. To bring up the feeddog, turn the handwheelafter sliding lever to the left.
[1]
[2]
Griffe d’entraînement par griffeLa griffe d’entraînement doit être placée en position bassepour certaines techniques de couture spéciales telles quela broderie libre. La griffe d’entraînement doit toujoursêtre en position haute pour la couture normale. Localiserle levier de griffe d’entraînement à l’avant du bras libre.Déplacer le levier vers la droite (position basse) [1] ou lagauche [2] (position haute). Pour ramener la griffed’entraînement, en position haute, tourner le volant aprèsavoir déplacé le levier vers la gauche.
Baje el dentado de transporteEl dentado de transporte s deberá bajar de posición paratécnicas de cosidos especiales, como para bordados demovimiento libre. Par cosido normal, el dentado detransporte deberá estar siempre arriba. Coloque lapalanca del dentado de transporte en la parte frontal delbrazo libre. Deslice la palanca ya sea hacia la derecha(abajo) [1] o hacia la izquierda arriba [2]. Para elevar eldentado de transporte, gire el volante hacia la izquierdadespués de deslizar la palanca.
Druktoets
Schuifregelaar
* De steeklengte wordtautomatisch aangepastaan de steek die u kiest.*Zie bladzijde 19 en 20voor de steken waarvande steeklengte kanworden aangepast.
Steeklengte aanpassenOm de steeklengte van dedoor u gekozen steek aante passen drukt u op de toets(Licht gaat aan) en schuift ude regelaar naar degewenste positie.
Draadspanningsknop(a) Verhoog de
draadspanning.(b) Verlaag de
draadspanning.
Vrije armTrek de aanschuiftafel naar links.
Uitschakelen TransporteurDetransporteurkanuitgeschakeldomspecialenaaitechniekentoe te passen, zoals borduren uit de vrije hand en stoppen.Om gewoon te naaien moet de transporteur altijd in de hogestand staan. De instelknop van de transporteur bevindt zichaan de voorkant van de vrije arm. Schuif de knop naar rechts[1]omdetransporteuruit teschakelenofnaar links [2]omhemin te schakelen. Draai het handwiel naar u toe om detransporteur naar boven te laten komen nadat u hemingeschakeld heeft.

Winding Bobbin / Bobinage de la canetteHacer Canilla /Opspoelen van de spoel
Winding a bobbinEnfilage pour le remplissage de canetteEnhebrar para hacer canilla
* When you turn on the power to the machine underthe bobbin winding state, the machine will peep.
* Lorsque vous allumez la machine en mode de remplissage de canette, eile émet un bip sonore.* Cuando encienda la máquina bajo el estado dehacer canilla, sonará un pitido.
Opspoelen van de spoel
* Als u de machine inschakelt in de spoelwindermodus, piept de machine.
Bobbin thread guideGuide-fil de canetteGuía-hilo de la canilla
Bobbin winderDévidoirBobinador
Bobbin winding regulatorArrêt de canetteRegulador del bobinador
Spoelwinderdraadgeleider Spoelwinder
Spoelwinder schakelaar
Take out the bobbin.
Retirez la canette vide.
Saque la canilla.
Open the hook cover.Caution:Turn off the machine beforeopening the hook cover.
Ouvrez le capot.Attention:Débranchez la machineauparavant.
Abra la tapa del garfio.Precaución:Antes de abrir la tapa delgarfio apague la máquina.
1 2
Open het spoelbeschermklepje:
Voorzichtig:Zet de machine uit voor u het
klepje opent!
Neem de spoel uit de spoelhuls.
During the bobbin wind-ing, the display windowindicates the blink turns.
Pendant le bobinage,l’affichage clignote surl’afficheur.
Cuando la bobina estábobinando, lavisualización en lapantalla pasa al estadode parpadeo.
Tijdens het spoelen gaat de verlichting van de display draaien
15

16
Thread the bobbinthread guide.Put the thread with bothhands around the threadguide so that it winds clock-wise.
Enfilez le fil per le guide.Insérez le fil avec les deuxmains sous le ressort duguide pour qu’il se dérouledans le sens d’une montre.
Enhebrar el guía-hilo dela canilla.Coloque el hilo manualmentealrededor del guía-hilo deforma que se enrolle en ladirección de las agujas delreloj.
Thread spool cap (Small)Petite bobineTapa de la bobina (pequeña)
Small spoolPetite coiffeBobina de hilo
Thread spool cap (Large)Grande bobineTapa de la bobina (grande)
Large spoolGrande coiffeBobina de hilo
3
4
Set the bobbin on thebobbin winder.Press the bobbin against thebobbin winding regulator.
Placez la canette surl’axe du dévidoir.Poussez la canette contrel’arrêt de canette.
Coloque la canilla en elbobinador.Apriete la canilla contra elregulador del bobinador.
Push the bobbin back tothe left.Cut an excess thread andtake out the bobbin.
Poussez la canette versla gauche.Coupez l’excédent de fil etretirez la canette.
Empuje la canilla haciaatrás y hacia la izquierda.Corte el exceso de hilo ysaque la canilla.
Start winding the bobbin.Upon completion of windingthe bobbin, press the start/stop button again.
Embobinez la canette.Une fois la canette remplie,arrêtez la machine.
Empiece a hacer canilla.Tras haber completado lacanilla, apriete otra vez elbotón de marcha/paro.
Bobbin windingregulator
Arrêt de canette
Reguladordel bobinador
Bobbinwinder
Dévidoir
Bobinador
5
6
7
Place the thread spool and cap onto the spool pin.Select the spool cap that matches the circumference ofthe thread spool to be used.
Placez la bobine de fil et la coiffe sur le porte-bobine.Sélectionnez le type de coiffe de taille appropriée à labobine.
Coloque la bobina de hilo con su tapa en el pivotedel portaconos.Escoja la tapa adecuada al diámetro de la bobina delhilo.
Garenklos-tegenhouder(klein)
Kleine klos
Garenklos-tegenhouder(groot)
Grote klos
Plaats de garenklos en –tegenhouder op de klospen. Kies de tegenhouder die het best past bij uw klos.
Inrijgen van de spoeldraadgeleider. Doe de draad met beide handen om de geleider met de klok mee.
Spoelwinder Spoelwinder-schakelaar Plaats de spoel op
de winder.Klik de spoel tegen de
schakelaar.
Begin het opspoelen. Als u klaar bent met spoelen drukt u nogmaals op de start/stopknop.
Druk de spoel terug naar links. Knip de draad af en neem de spoel van de winder.

17
Thread the bobbin case.Put the thread [1], placethread on groove [2] anddraw the thread to rear ofmachine.
Enfilez le boîtier àcanette.Passez le fil dans la fente(1), puis ressortez-le par lafente (2) et place versl’arrière de la machine.
Enhebrado del canillero.Coloque el hilo por el [1],páselo por la ranura [2] yllévelo hacia la parte poste-rior de la máquina.
Put the bobbin in thebobbin case.Place the bobbin so thatthread winds counterclock-wise.
Placez la canette dansson boîtier.Elle doit tourner dans lesens inverse des aiguillesd’une montre.
Coloque la canilla en elcanillero.Coloque la canilla de formaque el hilo salga en ladirección contraria a lasagujas del reloj.
Close the hook cover.
Refermez le capot.
Cierre la tapa del garfio.
Adjusting the bobbin thread guideRéglage du guide-fil de canetteAjuste del guía-hilo de la canilla
In the case where the bobbin is unevenlywound with thread according to the type ofthread, the bobbin thread guide has to be ad-justed.
Dans le cas où la canette serait mal remplie,selon le type de fil, il convient de régler le guide.
En el caso de que la canilla esté mal bobinada,se deberá ajustar el guía-hilo de la canilla.
Move the bobbin thread guide up ordown to adjust so that the bobbin isevenly wound with thread.
Déplacez le guide-fil en hauteur pourle rég le r a f in que le f i l so i trégulièrement enroulé sur la canette.
Mueva el guía-hilo de la canilla arribao abajo de forma que el bobinado dela canilla sea uniforme.
•~•›
[1][2]
8 9
10
•~
Plaats de spoel in de spoelhuls. Plaats de spoel zodanig dat het garen tegen de klok in afwikkelt.
De spoelhuls bedraden. Doe de draad langs de inkeping [1] en geleidt de draad naar links door de groef [2] en trek de draad naar de achterkant van de machine.
Doe de klep weer op de steekplaat.
Afstellen van de spoelwinderdraadgeleider
Als de spoel niet correct wordt opgewonden, moet u de draadgeleider als aangegeven bijstellen.
Stel de schroef zodanig dat de spoel correct wordt opgewonden.

18
[2]
[3]
[4]
[7][8]
Threading The Machine / Enfilage de la machineEnhebrado de la máquina / Inrijgen van de machine
Thread the thread guide.
Enfilez le guide-fil.
Guía-hilos.
Raise the presser footlever.
Relevez le pied presseur.
Levante el prensatelas.
Draw the thread throughthe groove and pull itdownward.
Passez le fil dans la fenteet tirez-le vers le bas.
Pase el hilo por la ranuray tire de él hacia atrás.
Pass the thread around[3], then pull it upward.
Passez le fil autour [3]puis tirez-le vers le haut.
Pase el hilo alrededordel punto [3] y tire de élhacia arriba.
[3]
[2]
[1]
* Be sure to raise the presser foot before threading the machine head.
* Le pied presseur doit toujours être relevé pour enfiler la machine.
* Asegúrese de subir el prensatelas antes de enhebrar la máquina.
1
[2]2
3
4
Be sure to turn off the machine beforethreading.
CAUTION:
ATTENTION:
PRECAUCIÓN: Apague la máquina antes deenhebrar la máquina.
Assurez-vous d’avoir éteint lamachine avant l’enfilage.
Take-upLevier tendeurTira-hilos
VOORZICHTIG: Zet de machine uit voordat u gaat inrijgen.
* Doe de naaivoethefboom omhoog voor u met inrijgen begint.
Draad-hefboom
Doe de naaivoethefboom omhoog.
Doe de draad door de geleider.
Doe de draad door de gleuf naar beneden [2].
Passeer de ronding en dan naar boven [3].

19
Thread the hook.Push threading lever all theway down and a hook will gothrough eye of needle.Pass thread in front ofneedle and below hook.
Enfilez le crochet.Abaisser le levier de l’ enfile-aiguille, afin que le crochetpasse à travers le chas.Présentez le fil devantl’enfileur; relacher le levier.
Enhebrar el garfio.Empuje hacia abajo lapalanca enhebradora delhilo, el garfio se colocara enel ojo de la aguja.Pase el hilo delante de laaguja y por debajo del garfio.
Lower the presser foot.Lower the needle threader.Raise the needle. Then,lower the needle threaderand thread (A).
Abaissezlepiedpresseur.Abaissez l’enfile-aiguille.Relevez l’aiguille. Puis,decendez l’enfileur et le fil(A).
Baje el prensatelas.Baje el enhebrador de laaguja.S u b a l a a g u j a . Acont inuación, baje elenhebrador de la aguja yenhebre (A).
Raise the needlethreader.Release the lever, and theneedle will be threaded.
Relevez le levier del’enfileur.En relâchant le levier,l’aiguilles sera enfilée.
Levante la palanca delenhebrador.Afloje la palanca y la agujase enhebrará.
Draw out thread.Draw out thread throughneedle eyelet by approxi-mately 10 cm.
Tirez le fil.Tirez la boucle du fil depuisle chas d’aiguille sur 10 cm.
Pase el hilo.Deje que sobresalga uncabo de hilo de unos 10 cmpor detrás de la aguja.
* Check to be sure that the needle is in its highest position.* Contrôlez que l’aiguille est bien en position la plus haute.* Asegúrese de que la aguja esté en su punto más alto.
Automatic Needle ThreaderEnfilage automatique de l’aiguilleEnhebrado automático del aguja
(A)
1
4
3
2HookCrochetgarfio
Thread the thread totake-up [4], then pull itdownward.
Enfilez le leviertendeur de fil [4], puisredescendez.
Enhebre el tira-hilos [4]y tire del hilo hacia abajo.
Draw the thread behind[5] from the right.
Glissez le fil dessous [5]depuis la droite.
Desde la derecha, paseel hilo por detrás delpunto [5].
[5]
Take-upLevier tendeurTira-hilos
[4]
6
5
Draadhefboom
Doe de draad door de draadhefboom [4] en dan naar beneden.
Doe de draad vanaf rechts achter de naald- klem-draadgeleider [5].
Automatische draadinrijger
* Draai het handwiel naar u toe tot de naald in de hoogste stand staat.
Doe de naaivoet naar beneden. Zorg dat de naald in de hoogste stand staat en druk de draadinrijger naar beneden met de draad aan de haak als aangegeven. (A).
De draad door de naald. Doe de inrijger nu helemaal naar beneden. Er verschijnt nu een haakje door het naaldoog. Geleidt de draad nu voor de naald onder langs het haakje.
Haakje
De draadinrijger omhoog. Laat de draadinrijger los en de draad zal door het naaldoog zijn getrokken.
Draad doorvoeren. Trek de draad ongeveer 10 cm door het naaldoog.

20
Pulling Up The Bobbin ThreadFaire remonter le fil de canetteSubir el hilo de la canilla
Turn the handwheeltoward you.The needle moves up anddown to draw up the bobbinthread from the bobbin.
Tournez le volant versvous.L’aiguille remontera avec lefil inférieur.
Gire hacia usted elvolante de la máquina.La aguja se moverá arribay abajo para subir el hilo dela canilla.
Lightly hold the needlethread with fingers.
Tenez légèrement le filavec les doigts.
Sostenga ligeramente elhilo con los dedos.
Pull both the needle andbobbin threads out by 10cm.Pass them under presser foottoward back of machine.
Tirez les deux fils sur 10cm.Passez-les sous le pied etvers l’arrière de la machine.
Deje que el hilo de agujay el de la canillasobresalgan 10 cm.Páselos por debajo delprensatelas y llévelos haciala parte posterior de lamáquina.
1
2
3
Ophalen van de onderdraad
Hou de bovendraad losjes tussen de vingers.
Draai het handwiel naar u toe. De naald gaat op en neer en haalt de onderdraad op.
Trek de boven en onderdraad ongeveer 10 cm naar achteren. Geleidt de draden onder de naaivoet door naar achteren.

21
Changing The Presser Foot / Changement du pied presseurCambio del prensatelas / Verwisselen van de naaivoet
Remove the presserfoot.Press the presser foot re-lease lever in the directionof the arrow.
Retirez le pied.Appuyez sur le levierd’enclenchement de piedpour le relâcher.
Quite el prensatelas.Empuje la palanca delprensatelas en la direcciónque indica la flecha.
Raise the presser foot.
Relevez le piedpresseur.
Levante el prensatelas.
1
2
4
PushAppuyerEmpuje
Lower the presser foot.Lower the presser foot lever,and the presser foot will besnapped in place.
Abaissezlepiedpresseur.A ce moment, le pied seraenc lenché dans sonlogement.
Bajar el prensatelas.Ba je la pa lanca de lprensatelas y éste seencajará en su sitio.
Make sure to disconnect the plug from the wall outlet before changing the presser foot.CAUTION:
ATTENTION:
Antes de cambiar el prensatelas, asegúrese de desconectar la máquina de la red eléctrica.PRECAUCIÓN:
Assurez-vous d’avoir débranché la machine avant de changer le pied.
Align the presser footpin with the marker lineon the throat plate.
Alignez l’attache du piedavec la ligne repère dela plaque aiguille.
línea marcada en el placaagujas.
Marker lineLigne repèreLínea marcada
PinTigePivote
3
VOORZICHTIG: Verwijder de stekker uit het stopcontact voor u de naaivoet verwisselt.
Doe de naaivoet omhoog.
Druk
Verwijder de naaivoet. Druk de naaivoet loslaathevel naar u toe.
Pin
Hou het asje van de naai- voet gelijk met de markeer- lijn op de steekplaat.
Doe de naaivoethefboom naar beneden. Doe de naaivoethefboom naar beneden en de voet klikt in de voethouder.
Markeerlijn

22
Attaching The Needle / Pose de l’aiguilleColocación de la Aguja / Bevestigen van de naald
Removing the needle.(1) Turn the handwheel toward you until the needle bar reaches its highest position.(2) Loosen the needle clamp screw.
Retirez l’aiguille.(1) Tournez le volant vers
vous jusqu’à ce que l’aiguille soit en haut.(2) Dévissez la vis du serre- aiguille.
Securely tighten the needleclamp screw, using thescrewdriver furnished withthe machine.
Revissez fermement la visdu serre- aiguille avec letournevis fourni.
Fije el tornillo de la agujautilizando el destornilladorque viene con la máquina.
The flat part should face awayfrom you.Côté plat vers l’arrièreLa parte plana deber mirarhacia el lado contrario a usted.
Stopper pinArrêt d’aiguilleTope
Attaching the needle.(The needle cannot beinserted unless it is cor-rectly positioned.)Hold the needle with its flatpart facing away from you,and insert it fully until ittouches the stopper pin.
Placez l’aiguille.(L’aiguille ne peut pasêtre insérée à l’envers).Soutenez l’aiguille avec lecôté plat vers l’arrière etinsérez-la à fond jusqu’àl’arrêt d’aiguille.
Make sure to disconnect plug from wall outlet before inserting needle.
1
2
3
Colocar la aguja(la aguja no puede insertarse a menos que esté biencolocada).Sostenga la aguja con su lado plano mirando hacia ellado contrario a usted e insértela hasta que haga tope.
ScrewdriverTournevisDestornillador
CAUTION:
ATTENTION:
PRECAUCIÓN:Asegúrese de desconectar el enchufe de la red eléctrica antes de colocar la aguja.
Assurez-vous d’avoir débranché Vis serre-aiguille.
Needle clampscrew
Vis serre-aiguille
Tornillo del clampde la aguja
Needle to be purchasedAiguilles à utiliserAgujas
Checking the needleVérification de l’aiguilleCompruebe que la aguja
* Check the needle for itsstraightness occasionally. Anybent needle would cause stitchskipping, thread breakage ordamage to materials.* Vérifiez la bonne qualité del’aiguille régulièrement. Touteaiguille épointée ou tordue peutendommager votre tissu etcauser des défauts de coutureimportants.* Compruebe que la aguja noesté torcida, ya que las agujasdobladas puede ocasionarsaltos de puntada, rotura de hiloo daño a los tejidos.
When purchasing spare needles, specifyHAx1 (130/705H) for household sewingmachine or HAx1SP (needle for knits).
Lorsque vous rachetez des aiguilles,spécifiez le type 130/705H (standard)pour machine à coudre ou HAx1SP (pourjerseys).
Las agujas que necesita son del sistemaHax1 (130/705h) para uso doméstico oHAx1SP (aguja para punto)
The larger the number,the thicker the needle.
Plus le tissu est épais,plus la taille d’aiguilleest grosse.
Cuanto más alto sea elnúmero, más gruesaserá la aguja.
Needle sizeTaille de l’aiguilleTamaño de la aguja
Quite la aguja.(1) Gire el volante hacia usted hasta que el barra agujas alcance su punto más alto.(2) Afloje el tornillo del clamp de la aguja.
Flat part of needleCôté plat de l’aiguillePare plana de la aguja
Flat platePièce plateParte plana
ParallelParallèleParalelo
VOORZICHTIG: Verwijder de stekker uit het stopcontact voor u de naald verwisselt.
Naaldklemschroef
Verwisselen van de naald.(1) Draai het handwiel naar u toe tot de naald op de hoogste
positie is.(2) Draai de naaldschroef los.
Naaldstop
Platte kant naar achteren.
Inbrengen van de naald.(De naald past alleen met de platte kant naarachteren).Duw de naald naar boven tot u de naaldstop bereikt.
Schroevendraaier
Draai de naaldklemschroef zorgvuldig vast met de bijgeleverde schroevendraaier.
Te gebruiken naalden
Gebruik alleen 130R/705H (Hax1) huishoud-naalden of Hax1SP voor stretchstoffen.
Parallel
Vlakke plaatPlatte kant van de naald
Controleer de naald
Naalddikte
Hoe hoger het getal,hoe dikker de naald.
* Controleer de naald zo nuen dan of deze niet krom is.Kromme naalden veroorzakenhet overslaan van steken,draadbreuk en beschadigingvan de stof.

2323
Standard presser foot (A)Pied presseur standard (A)Prensatelas standard (A)Standaard naaivoet (A)
Stitch patternProgramme
Tipo de costuraSteek Toepassingen
Typical applicationsApplications types
Aplicaciones
Straight stitchPoint droitPespunte rectoRechte steek
Straight stitch for elastic
Rechte stretchsteek
Point droit pour jerseysPespunte recto paraelástico
Stretch reinforcing stitchPoint triplePuntada de seguridaden tejido tipo puntoVersterkte zig zag steekOvercasting 3-stepZig zag stitchZig-zag piqué 3 pointsPuntada de sobrehilar de zig
Overlock 3-staps zigzagsteekzag de tres pasos
Scallop stitchFestonPuntada escalopeSchulpzoomsteek
Pattern stitchAssemblageMontajeSiersteken
Zipper foot (B)Pied fermeture glissière (B)Prensatelas de cremallera (B)Ritsvoet (B)
Setting zipperInsertion glissièresColocación de cremallerasInzetten van ritsen
Overcasting (Overlocking)Surfilage (overlock)Sobrehilado (overlock)Overlocken
Blinde steek
BlindstitchPoint invisiblePuntada invisible
Blindstitch for elastic fabricPoint invisible (pour tissu stretch)Puntada invisible para tejido tipo puntoBlinde steek voor elastische stoffen
ButtonholingBoutonnièreOjalesKnoopsgaten
Overcasting foot (C)Pied surfilage (C)Prensatelas de sobrehilar (C)Overlock voet (C)
Blindstitch presser foot (D)Pied ourlet invisible (D)Prensatelas depuntada invisible (D)Blindsteekvoet (D)
Buttonhole foot (E)Pied boutonnière (E)Prensatelas de ojales (E)Knoopsgatvoet (E)
Alphabet / Points-lettres / Alfabeto / Alfabet
Darning stitchPoint de reprisePunto para zurcir
BartackPoints déxtrémité renforcentPresillas
Stopsteek Cordonsteek
Zigzag stitchPoint zigzagPuntada zig zagZig zag steek
Quiltsteek
Quilt stitchMATELASSUREACOLCHADO
Patchworksteek
Patchwork, etc.Patchwork, etc.Patchwork
AppliqueApplicationsApliquesApplicatiesteek
Types of feet and their application / Types de pieds et leurs applicationsTipos de prensatelas y sus aplicaciones / Verschillende naaivoeten en hun toepassing

24
How To Adjust Thread TensionComment régler la tension du filAjuste de las tensiones del hiloAanpassen van de draadspanning
* Adjust the thread tension as described below when special type of fabric is usedor the thread tension has changed from the adequate setting.
* Les réglages de tension ci-dessous sont utiles lorsque l’on coud une matièrespéciale ou que les réglages initiaux ont été changés.
* Cuando se utilice un tejido especial o cuando sea necesario ajustar la tensión delhilo siga las instrucciones que se describen a continuación.
The upper thread tension is too low.La tension supérieure est trop faible.La tensión del hilo superior es muy baja.
The upper thread tension is too high.La tension supérieure est trop forte.La tensión del hilo superior es muy alta.
Upper thread (Needle thread)Fil supérieur (fil d’aiguille)Hilo superior (hilo de la aguja)
Bobbin threadFil de canetteHilo de la canilla
Middle of fabric thicknessMilieu des tissusMitad del tejido
Upper thread (Needle thread)Fil supérieur (fil d’aiguille)Hilo superior (hilo de la aguja)
Bobbin threadFil de canetteHilo de la canilla
To decrease upper thread tension.
Pour diminuer la tension supérieure.
Para disminuir la tensión del hilosuperior.
To increase upper thread tension.
Pour augmenter la tensionsupérieure.
Para aumentar la tensión del hilosuperior.
Bobbin threadFil de canetteHilo de la canilla
Upper thread (Needle thread)Fil supérieur (fil d’aiguille)Hilo superior (hilo de la aguja)
Fabric (right side)Tissu (dessus)Derecho del tejido
Fabric (wrong side)Tissu (dessous)Revés del tejido
Normally, well-tensed seam is obtainedwhen the needle thread and bobbinthread interlace with each other at themiddle of the fabric thickness.
Normalement, une bonne tension estobtenue quand les deux fils s’entrecroisentau centre de l’épaisseur du tissu (d’où lanécessité de toujours faire vos essais surdeux épaisseurs de tissu).
Tenemos una tensión correcta cuando elhilo de la aguja y el hilo de la canilla seentrelazan en el mitad del tejido.Normalerwijs verkrijgt u een goed gevormde steek als de boven en onderdraad elkaar in het midden van de stof verknopen.
* Pas de draadspanning aan zoals aangegeven als u een bijzondere stofsoort gebruikt of als de spanning niet goed ingesteld is.
Bovendraad (naalddraad)
Midden van de stofdikte
Onderdraad
Textiel(Verkeerde zijde)
Textiel (juiste zijde)
De bovenspanning is te laag.
Bovendraad (naalddraad)
Onderdraad
De bovenspanning verhogen.
De bovenspanning is te hoog.
Bovendraad (naalddraad)
Onderdraad
De bovenspanning verlagen.

Fabric, Thread And Needle Table
Tissus, Fils etAiguilles
* The knitting needles (HAx1sp) effectively prevent from stitch skipping, and ideal for sewing stretchy fabrics.
Fabric
Light-weight 001~08#nwaL (No.9)
Thread Needles
HA x 1 (130/705H)
Tricot
Georgette
Wool and synthetic fiber cloth SilkSynthetic
Synthetic
Synthetic thread/Fine thread No.11
Medium-weight
Heavy-weight
# 90, 100
Silk
Knitting needle No.11# 60~100
# 80# 60~100 No.11
No.11~14General cotton and synthetic cloth
Light-weight jersey
CottonSynthetic
# 50~80# 50~60
General wool and synthetic cloth
SilkSynthetic
# 50# 50~60
Knitting needle No.11
No.11~14
No.11~14
Knitting needle No.11
No.14~16Denim
Jersey
Coating
CottonSynthetic
SilkSynthetic
Silk
# 30~50# 30~50
# 50# 50~60
# 50
* Les aiguilles jersey (HAx1sp) évitent de sauter le point et sont idéales pour les tissus stretch.
Tissu
Tissu fin )9.oN(001~08#niI
selliugiAliF
HA x 1 (130/705H)
Tricot
Crépe
Laine et vêtements en fibresynthétique
SoieSynthétique
Synthétique
Fil synthétique /Fil fin No.11
Tissu moyen
Tissu épais
# 90, 100
Fil coton
Aiguille jersey No.11# 60~100
# 80# 60~100 No.11
No.11~14Coton
Jerseys fins
CotonSynthétique
# 50~80# 50~60
Laine et synthétiques
SoieSynthétique
# 50# 50~60
Aiguille jersey No.11
No.11~14
No.11~14
Aiguille jersey No.11
No.14~16Jean
Jersey
Côtes
CotonSynthétique
SoieSynthétique
Soie
# 30~50# 30~50
# 50# 50~60
# 50
25

26
Stof, garen naald tabel
*Naalden systeem HAx1SP, speciaal voor stretchstoffen, helpen zeer effectief tegen het overslaan van steken.
Stof
Dun 001~08#Batist
Garen Naalden
HA x 1 (130/705H)
Tricot
Georgette
Wol en synthetisch ZijdeSynthetisch
Synthetisch
Synthetisch of gesponnen garen
Midden
Zwaar
# 90, 100
Zijde
# 60~100
# 80# 60~100
Katoen en synthetisch
Lichte jersey
KatoenSynthetisch
# 50~80# 50~60
Wol en synthetisch
ZijdeSynthetisch
# 50# 50~60
Denim
Jersey
Mantelstof
KatoenSynthetisch
ZijdeSynthetisch
Zijde
# 30~50# 30~50
# 50# 30~60
# 50
Tabla de Tejidos, Hilo y Agujas
* Las agujas para punto (HAx1sp) evitan los saltos de puntada y son ideales para coser tejidos como el punto.
Tejido
Fino Lino # 80~100 (No.9)
Hilo Agujas
HA x 1 (130/705H)
Malla tricot
Crespón
Lana y fibra sintética SedaSintético
Sintético
Hilo sintético /Hilo fino No.11
Medio
Grueso
# 90, 100
Hilo de algodón
Agujas para punto No.11# 60~100
# 80# 60~100 No.11
No.11~14Algodón y fibra sintética
Punto fino
AlgodónSintético
# 50~80# 50~60
Lana y fibra sintética
SedaSintético
# 50# 50~60
Agujas para punto No.11
No.11~14
No.11~14
Agujas para punto No.11
No.14~16Tejano
Punto
Abrigo
AlgodónSintético
SedaSintético
Seda
# 30~50# 30~50
# 50# 50~60
# 50
60 (9)
70 (11)
70 (11) HAx1SP
70 (11)
70 (11) ~90 (14)
70 (11) HAx1SP
70 (11) ~ 90 (14)
90 (14) ~ 100 (16)
70 (11) HAx1SP
70 (11) ~ 90 (14)

Stitch patternProgrammeTipo de puntadaSteekkeuze
Steekkeuze
2.4
0 ~ 4 1.2~2.6 - -
1.22.4 2.0 1.82.0 2.0 2.6
0.4~4.0
1.2~4.0 0~4 1.2
~2.60.4~4.0
0.2~2.0
1.0
0.2 ~ 1.0
0.4 0.5 0.6
Stitch patternProgrammeTipo de puntada
Automatic (mm)Automatique (mm)Automático (mm)
- -Manual (mm)Manuel (mm)Manual (mm)
0.7
0.2~1.0
2.6 0.8
1.2~2.6
0.4~4.0
- - 2.6
1.2 ~ 2.6
0.5
0.0 ~ 1.0
1.4
1.0~1.8
2.0
1.6~2.4
Automatic (mm)Automatique (mm)Automático (mm)Automatisch (mm)
Automatisch (mm)
Manual (mm)Manuel (mm)Manual (mm)Handinstelling (mm)
Handinstelling (mm)
Aanpassen van de steeklengte (handmatig)
* Als u de machine aanzet of u kiest (opnieuw) een steek, staat de steeklengte automatisch op de door de fabriek voorgeprogrammeerde steeklengte. * Om de steek in te stellen op de door u gewenste lengte, drukt u op de toets (de toets licht op). Om de wijzigingsmodus te beëindigen drukt u nogmaals op de toets of kiest u een andere steek.
Oplichtende indicatielamp voor handmatige steeklengte
Druktoets Schuifregelaar
How to adjust stitch length (manually)Réglage de la longueur du point (manuel)Ajuste de la longitud de puntada (manual)
* When machine is turned on again or a pattern is re-selected, the stitch length will be automatically set to a preset one.* To adjust the stitch length to a desired one, press the manual button (the lamp will light up) (To cancel the manual adjustment mode, select a pattern or press the manual button again.)
* Lorsque la machine est rallumée ou qu’un autre point a été sélectionné, la longueur de point a automatiquement été préréglée.* Pour régler la longueur des points, appuyer sur la touche manuelle (le témoin s’allume). (Pour annuler le réglage manuel, sélectionnez un point ou rappuyez sur la touche).
* Cuando la máquina se enciende o se vuelve a seleccionar untipo de costura, la longitud de la puntada se ajusta
automáticamente a aquella longitud preestablecida.* Para ajustar la longitud de puntada a la longitud deseada, pulse el botón manual (se ilumina la lámpara) Para salir del modo manual, seleccione un tipo de costura o apriete otra vez el botón manual.
Manual buttonTouche manuelleBotón manualTasto manuale
Adjusting leverCurseur de réglagePalanca de ajuste
Stitch length manual override indicator lampIndicateur de modification manuelle de longueur de pointIndicador luminoso de longitud de puntada manual
27

28
Examples of automatically/manually determined straight stitch lengthsExemples de longueur de point automatique/manuelleEjemplos de longitudes de pespunte recto determinadas automáticamente/manualmente
Automatic /Automatique /Automático /Automatisch
Manual / Manuelle / Manual / Handmatig
For automatically-determined stitch length:The best-suited stitch length for selected pattern is automatically established regard-less of the position of the adjusting lever.
Pour une longueur de point automatiquement sélectionnée:La longueur de point idéale est automatiquement établie quelque soit la position ducurseur.
Para una longitud de puntada determinada automáticamente:La máquina establece la longitud de puntada más adecuada para llevar a cabo eltipo de puntada seleccionada, independientemente de la posición del regulador.
When the manual button is pressed andadjusting lever is moved to the right be-yond the point at which the manual buttonflashes on and off:
Si l’onappuiesur leboutonmanueletdéplacele levier de réglage vers la droite au-delà dupoint auquel le bouton manuel clignote:
Cuando se aprieta el botón manual y semueve la palanca de ajuste hacia laderecha más allá del punto en el cual elbotón manual destella intermitentemente.
When the adjusting lever is moved to theleft beyond the point at which the manualbutton flashes on and off.
Si l’on déplace le levier de réglage vers lagauche au-delà du point auquel le boutonmanuel clignote.
Cuando se mueve la palanca de ajuste haciala izquierda más allá del punto en el cual elbotón manual destella intermitentemente.
* The machine will peep when the adjusting lever is moved. Set the adjusting lever at a desired position.* Even in the case where the stitch length is manually adjusted, the manual button will flash on and off when theautomatically-determined stitch length position is reached.
* La machine émet un bip sonore quand le curseur est bougé. Réglez- le sur la position requise.* Le bouton manuel clignote lorsque la longueur des points déterminée automatiquement est atteinte même si l’on aréglé la longueur des points manuellement.
* La máquina pitará cuando se mueve el botón del regulador. Coloque dicho botón en la posición que desee.* Incluso en el caso de una longitud de puntada ajustada manualmente, el botón manual destellará intermitentementecuando se alcance la posición de longitud de puntada determinada automáticamente.
Voorbeelden van automatische en handgekozen rechtstik steeklengtes
Automatisch ingestelde steeklengtes (fabrieksinstelling)De meest ideale steeklengte is voorgeprogrammeerd, ongeacht de positie vande schuifregelaar.
* De machine geeft een pieptoon als u de schuifregelaar verstelt. Stel de gewenste lengte in.* Zolang de machine ingesteld staat op de handmatige lengte, zal het lampje blijven branden.
Als het lampje knippert, staat de regelaar op de voorgeprogrammeerde lengte.
Als de druktoets is aangeraakt en deschuifregelaar naar rechts bewogen voorbijde voorgeprogrammeerde lengte, wordt desteek langer.
Als de druktoets is aangeraakt en deschuifregelaar naar links bewogen voorbijde voorgeprogrammeerde lengte, wordt desteek korter.

29
Straight Stitch / Point droitPespunte Recto / Rechte steek
The straight stitch is the basic stitch.Le point droit est le point de base.El pespunte recto es el tipo de puntada más básica.De rechte steek is de basissteek.
Begin sewing.
Commencez à coudre.
Empiece a coser.
Select a stitch pattern.
Sélectionnez leprogramme.
Seleccione el tipo depuntada.
Make sure that thepresser foot is correct.
Vérifiez d’utiliser le bonpied presseur.
Asegúrese de que elprensatelas sea elcorrecto.
Left needleposition
Aiguille àgauche
Posiciónizquierda dela aguja
Center needleposition
Aiguille aucentre
Posición central de laaguja
1
4
2
Standard presser foot (A)Pied standard (A)Prensatelas estándar (A)
CAUTION: Turn off the machine before changingthe presser foot.
ATTENTION:
PRECAUCIÓN: Apague la máquina antes decambiar el prensatelas.
Eteignez la machine avant changerle pied presseur.
Set the fabric and lowerthe presser foot.Place the fabric under thepresser foot so the needlewill enter the sewing startpoint of the fabric. Pull boththe needle and bobbinthreads to the rear of themachine and lower thepresser foot.
3
Placez le tissu et abaissez le pied.Mettez le tissu ou le pied afin que l’aiguille pénètre au pointde départ voulu.Tirez les deux fils vers l’arrière et abaissezle pied presseur.
Coloque el tejido y baje el prensatelas.Coloque el tejido bajo el prensatelas de forma que la agujaempiece a coser allí donde desee. Tire de los hilos de lacanilla y de la aguja hacia atrás de la máquina y baje elprensatelas.
VOORZICHTIG: Verwijder de stekker uit het stop- contact voor u de voet verwisselt.
Standaard naaivoet (A)
Kies de juiste voet
Linker naald-positie
Centrale naaldpositie
Kies een steek
Plaats de stof en doe de naaivoet omlaag. Plaats de stof zo onder de voet dat de naald bij uw beginpunt is. Doe de boven en onderdraad naar achteren en doe dan de naaivoet omlaag.
Begin te naaien.
00 01

30
Knot the threads on thewrong side of the fabric.Pull out the remainingthreads on the wrong sideof the fabric, knot thethreads and cut them at theedge of the knot.
Nouez les fils à l’enversdu tissu.Retirez les fils restant àl’envers du tissu, nouez-les etcoupez-les au bord du nœud.
10
Straight stitch for elastic fabricFinished seams are elastic. This stitch systemcan be used for producing straight stitches onelastic fabrics such as knits and jersey.
Point droit pour tissus élastiques.Les coutures sont extensibles. Ce pointproduit des points droits très souples surles jerseys fins et les mailles.
Pespunte recto en tejido elástico.Los finales de las costuras son elásticos.Este sistema de puntada puede usarsepara coser pespunte recto en tejidoselásticos como el punto o el jersey.
Lift the presser foot andtake out the fabric.Wait until the needle totallystops. Push the reversestitch button to raise theneedle and then raise thepresser foot lever.
Relevez le pied et retirezle tissu.Attendez que l’aiguille soitbien arrêtée.Appuyez sur latouche couture arrière pourremonter l’aiguille puisrelevez le pied.
8
Stop sewing.
Arrêtez de coudre.
Pare de coser.
7Anude los hilos por el revés del tejido.Tire de los hilos por el revés del tejido, anúdelos y córtelos.
Levante el prensatelas y saque el tejido.Espere hasta que la aguja esté totalmente parada.Empuje el botón de puntada inversa para subir la aguja ya continuación, suba la palanca del prensatelas.
Trim the threads.Pull out the needle and bob-bin threads by approximately10 cm and cut them with the“thread cutter” mounted onthe face plate cover.[A] =Thread cutter
Coupez les fils.Tirez les deux fils sur env.10cm et coupez-les aveccoupe-fils situé sur l’avantdu capot frontal.[A] = coupe-fils
[A]
9
Corte de los hilos.Deje que sobresalgan unos cabos de hilos de unos 10 cm ycórtelosconel “cortahilos”queestámontadoen la tapa frontal.[A] = cortahilos
Adjust the sewingspeed.
Ajustez la vitesse.
Ajuste la velocidad decostura.
6
Lightly hold the fabricwith your hands.Be careful not to apply ex-cessive pulling force to thefabric while sewing.
Guidez légèrement letissu avec vos mains.Faites attention de ne pastirer ou retenir le tissu pen-dant la couture.
5
Sostenga ligeramente el tejido con sus manos.Evite tirar o empujar del tejido mientras esté cosiendo.
Houdt de stof losjes vast met de handen. Trek niet aan de stof.
Kies uw snelheid.
Stop de machine.
Doe de naaivoet omhoog en neem de stof weg. Wacht tot de machine volledig gestopt is. Druk op de retourknop om de naald in de hoogste stand te zetten en doe dan de naaivoet omhoog.
Snijdt de draad af. Trek uw werkstuk zo’n 10 cm naar achteren en snijdt dan de boven en onderdraad af met de draadafsnijder op de lichtkap [A].
Werk de draden af aan de onderkant van de stof. Verknoop de draden aan de achterkant van de stof en knip ze kort af.
Rechte steek voor elastische stoffen. Deze steek wordt gebruikt bij rekbare stoffen. De zoom is elastisch.
05

Automatic lock stitchPoints d’arrêt programmablesPuntada de seguridad automática
To prevent stitches from coming apart:Select a pattern to be sewn, then press button.Then, the indicator lamp will light up and the machine willperform lock stitch by three stitches both at the beginningand end of sewing.
Permet d’éviter que les coutures ne se défassent au départet à la fin. Sélectionnez le programme de couture voulu, puispressez la touche .La diode lumineuse s’allume et la machine effectuera troispoints d’arrêt à la fois au départ et à la fin du programme decouture.
Seleccione el tipo de costura a coser y apriete elbotónEl indicador luminoso se encenderá y la máquina coserápuntadas de seguridad dando tres puntadas al inicio y trespuntadas al final de la costura.
To cancel the automatic back tacking, follow one of the threedifferent procedures described below:
Pour annuler cette fonction, suivez une des trois procéduresproposées ci-dessous:
Para anular el atacado final automático, siga cualquiera delos tres procedimientos que se describen a continuación:
(1) Press button again.(2) Select another pattern.(3) Turn on the power to the machine once again.
(1) Pressez à nouveau la touche(2) Sélectionnez un autre programme.(3) Rallumez de nouveau la machine.
(1) Apriete otra vez el botón(2) Seleccione otro tipo de costura.(3) Encienda otra vez la máquina.
Automatische afwerksteek
31
Voorkom het uiteenvallen van steken:Kies de door u gewenste steek en druk dan op de toets zodat deze oplicht.De machine zal nu aan het begin en einde van uw naad een afwerksteek maken.
Om de afwerksteek weer uit te schakelen doet u een van de drie dingen als hieronder beschreven. (1) Druk nogmaals op de toets.
(2) Kies een andere steek. (3) Druk op de aan/uit knop.

32
1Press the reverse stitchbutton.Press the reverse stitch but-ton at the predetermined po-sition, and the machine willperform lock stitches andstop at the predeterminedposition. (The machine willstop with its needle up.)* The machine will performlock stitches by pressing thereverse stitch button afterpressing the stop button.
Select first stitch patternto be sewn.Press button.
The machine produces lockstitches and automaticallystarts sewing from the start-ing position.
Sélectionnez d’abord leprogramme à coudre.Pressezla touche .La machine effectue depoints d’arrêt puis démarrela couture à l’endroit initial.
Seleccioneprimeroel tipodecosturaquevaacoser.Apriete elbotón .La máquina dará laspuntadas de seguridad yautomáticamenteempezaráa coser desde el inicio dela costura.
2
Utilisez la touche “couture arrière”.Appuyer sur le bouton d’exécution de points arrière sur laposition prédéterminée. La machine exécute alors despoints noués et s’arrête sur la position prédéterminée.(La machine s’arrête avec l’aiguille en position haute.)* La machine exécute des points noués lorsqu’on appuiesur le bouton d’exécution de points arrière après avoirappuyé sur le bouton d’arrêt.
Apriete el botón de costura inversa.Apriete el botón de costura inversa.Apriete el botón de costura inversa en la posiciónpreestablecida y la máquina coserá puntadas de seguridady parará en la posición preestablecida.(La máquina parará con la aguja arriba).* Tres haber apretado el botón de paro, apretando elbotón de costura inversa, la máquina coserá las puntadasde seguridad.
Kies eerst uw steek.Druk op de toets
Demachinemaaktdeafwerk-steek en vertrekt vanaf uwbeginpunt.
Druk op de retourkop.Druk op de retourknop waar u wilt stoppen met naaien en demachine maakt afwerksteken aan het einde van uw naad. Demachine stopt met de naald omhoog.
* De machine maakt de afwerksteken ook als u eerst gewoongestopt bent en daarna op de retourknop drukt.
Example:Straight stitch
Exemple:Point droit
Ejemplo:Pespunte recto
Voorbeeld:Rechte steek
[2]
FabricTissuTejido
[1]
Stof
.

33
Lock stitch (Reverse stitch)Couture arrièrePuntada de seguridad (Puntada inversa)Afwerksteek (retoursteek)
Use this function to produce lock stitches of more than three stitches.Utilisez cette fonction pour faire plus de trois points en couture arrière.Utilice esta función para obtener más de tres puntadas de seguridad.Gebruik deze functie voor afwerksteken van meer dan drie steken.
Press the reverse stitchbutton.The machine performs re-verse stitching as long asthe reverse stitch button isheld pressed.
Pressez la touche“arrière”.La machine effectue la cou-ture en arrière tant que latouche est pressée.
Apriete el botón decostura inversa.L a m á q u i n a c o s e r ápuntadas inversas mientrasse tenga apretado el botónde puntada inversa.
1
2
* The machine will perform reverse stitching as long as the reverse stitch button is held pressed.* The machine performs reverse stitching at low speed.
* La machine coud en arrière tant que la touche est pressée.* La machine ne coud en arrière qu’à vitesse électroniquement réduite.
* La máquina coserá puntadas inversas mientras se tenga apretado el botón de puntada inversa.* La máquina coserá puntadas inversas a baja velocidad.
Press the reverse stitchbutton.(The machine will stop withits needle up.)
Pressez la touche“arrière”.(La machine s’arrête avecl’aiguille en haut).
Apriete el botón decostura inversa.(La máquina parará con laaguja arriba.)
3
Sew the seam.
Effectuez votre couture.
Cosa la costura.
FabricTissuTejido
[1]
[2]
[3]Stof
* De machine maakt retoursteken zolang u de retourknop ingedrukt houdt.* De machine maakt de retoursteken op lage snelheid.
Druk op de retourknop. De machine maakt retour- steken zolang u de retourknop ingedrukt houdt.
Naai de zoom.
Druk op de retourknop. De machine stopt met de naald omhoog.
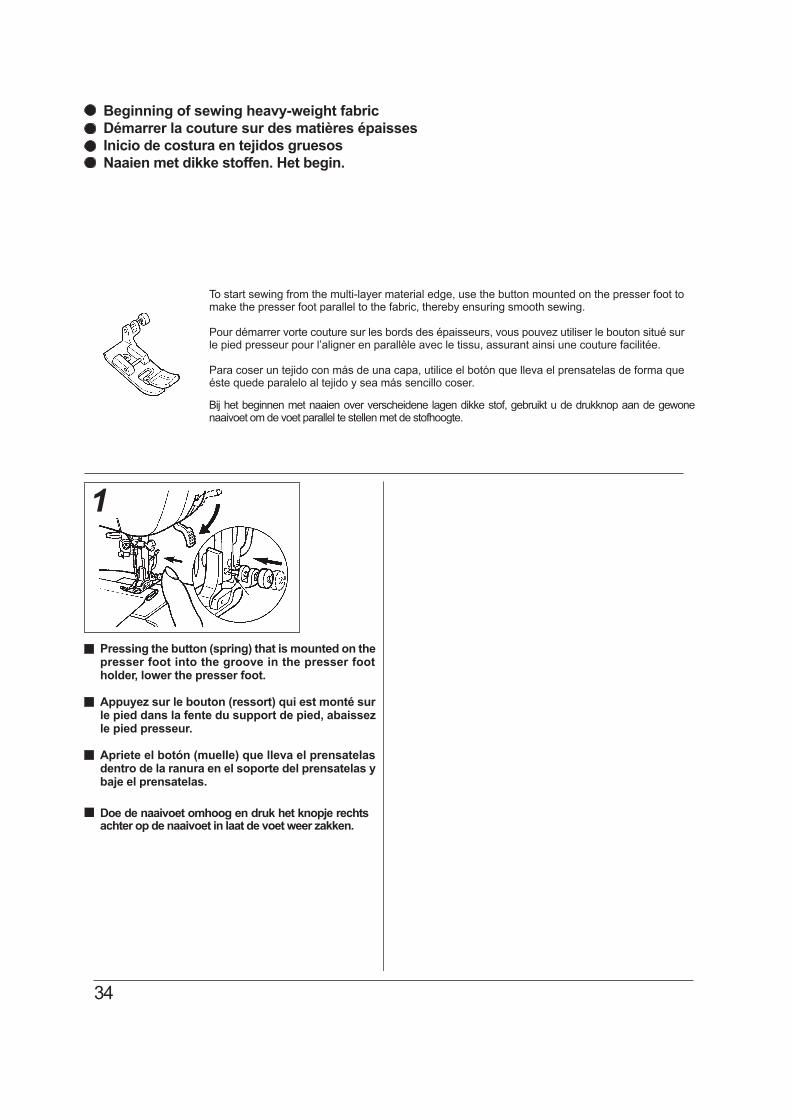
34
To start sewing from the multi-layer material edge, use the button mounted on the presser foot tomake the presser foot parallel to the fabric, thereby ensuring smooth sewing.
Pour démarrer vorte couture sur les bords des épaisseurs, vous pouvez utiliser le bouton situé surle pied presseur pour l’aligner en parallèle avec le tissu, assurant ainsi une couture facilitée.
Para coser un tejido con más de una capa, utilice el botón que lleva el prensatelas de forma queéste quede paralelo al tejido y sea más sencillo coser.
Beginning of sewing heavy-weight fabricDémarrer la couture sur des matières épaissesInicio de costura en tejidos gruesosNaaien met dikke stoffen. Het begin.
Pressing the button (spring) that is mounted on thepresser foot into the groove in the presser footholder, lower the presser foot.
Appuyez sur le bouton (ressort) qui est monté surle pied dans la fente du support de pied, abaissezle pied presseur.
Apriete el botón (muelle) que lleva el prensatelasdentro de la ranura en el soporte del prensatelas ybaje el prensatelas.
1
Bij het beginnen met naaien over verscheidene lagen dikke stof, gebruikt u de drukknop aan de gewone naaivoet om de voet parallel te stellen met de stofhoogte.
Doe de naaivoet omhoog en druk het knopje rechts achter op de naaivoet in laat de voet weer zakken.

35
Zigzag Stitch / Point zig zagPuntada zig zag / Zig zag steek
The machine sews lock stitches first, and continuouslysews the fabric in the normal direction.When the predetermined seam end is reached, press thereverse stitch button. Then, the machine will perform lockstitches, stop at the predetermined position.
La machine exécute d’abord des points noués, puis coudcontinuellement le tissu dans le sens normal. A la fin de lacouture prédéterminée, appuyer sur le bouton d’exécutionde points arrière. La machine exécute alors des pointsnoués et s’arrête sur la position prédéterminée.
La máquina coserá puntadas de seguridad en el inicio ya continuación coserá hacia delante.Cuando se alcance el fin de costura preestablecido, aprieteel botón de costura inversa. La máquina coserá las puntadasde seguridad y parará en el punto preestablecido.
Automatic lock stitchPoint d’arrêt automatiquePuntada de seguridad automáticaAutomatische afwerksteek
Select a stitch pattern to be sewn and press the button.Place the fabric at the sewing- start position and startthe machine.
Sélectionnez le programme voulu puis pressez latouche .Placez le tissu à la position initiale et cousez.
Seleccione el tipo de costura deseado y apriete elbotón .Coloque el tejido en el lugar donde desea empezar acoser y cosa.
Select the zigzag stitchpattern.(Automatic)Zigzag width: 7.0 mmStitch length: 2.0 mm
Sélectionnez le pointzig-zag.(Automatique)Largeur du point: 7.0 mmRéglagede longueur:2.0mm
Seleccione el tipo decostura zig zag.(Automática)Anchura punto: 7.0 mmLongitud punto: 2.0 mm
Make sure that thepresser foot is correct.
Vérifiez d’avoir le bonpied presseur.
Asegúrese de que elprensatelas es elcorrecto.
CAUTION: Make sure to turn off the machinebefore changing the presser foot.
ATTENTION:
1
2
PRECAUCIÓN:Asegúrese de apagar la máquina an-tes de cambiar el prensatelas.
Assurez-vous d’éteindre la machineavant de changer le pied presseur.
2.0Stitch lengthLongueur du pointLongitud de puntada
Stitch widthRapport de largeurAnchura de longitud
7.0
Standard presser foot (A)Pied standard (A)Prensatelas estándar (A)
VOORZICHTIG: Verwijder de stekker uit het stop-contact voor u de voet verwisselt.
Standaard naaivoet (A)
Kies de juiste voet.
Steekbreedte
Steeklengte
Kies de zig zag steek.(voorgeprogrammeerd)Zig zag breedte: 7 mmSteeklengte: 2 mm
Kies uw steek en druk op de toets.
Plaats de stof op uw startpunt en begin te naaien.
De machine maakt eerst wat afwerksteken en naait danuw steek in de normale richting. Als u op uw eindpunt bentgekomen, drukt u op de retourknop, de machine maakt weerde afwerksteken en stopt op uw eindpunt.
02

36
Stitch width vs. stitch lengthRapport de Largeur / longueur du pointAnchura de longitud / Longitud de puntada
How to adjust stitch width (manually)Comment régler la largeur des points (manuellement)Modo de ajustar la anchura de puntada (manualmente)
* To adjust the stitch width, press the manual button (manual buttonwill light up) and move the adjusting lever to left or right.
* To cancel the manual adjustment mode, select a pattern or pressthe manual button again.
* Pour régler la largeur des points, appuyer sur la touche manuelle(le touche manuelle s’allume) et déplacer le bouton de réglage àgauche ou à droite.
* Pour désactiver le mode de réglage manuel, sélectionner uneconfiguration ou appuyer à nouveau sur la touche manuelle.
* Para ajustar la anchura de puntada, pulse el botón manual (seilumina la botón manual) y mueva la perilla de ajuste hacia laizquierda o hacia la derecha.
* Para cancelar l modalidad de ajuste manual, seleccione un patróno pulse otra ve el botón manual.
Stitch width manual override indicator lampTémoin de correction manuelle de largeur des pointsLámpara indicadora de solapamiento manual deanchura de puntada
Manual buttonTouche manuelleBotón manual
Adjusting leverCurseur de réglagePalanca de ajuste
Stitch width (mm)Rapport de Largeur (mm)Anchura de longitud (mm)
AutomaticAutomatiqueAutomático
ManualManuelManual
2.0
0.5 ~ 4
~
2.0 2.0 2.0
~ ~ ~
0.5 ~ 4 0.5 ~ 4 0.5 ~ 4
Stitch length (mm)longueur du point (mm)Longitud de puntada (mm)
Steekbreedte kiezen
Oplichtende indicatielamp voor handmatige steekbreedte
Druktoets Schuifregelaar
* Om de steekbreedte handmatig in te stellen, drukt u op de druktoets, zodat deze gaat branden en beweegt u de schuifregelaar naar links of naar rechts. Om de handmatige modus weer te beëindigen, drukt u nogmaals op de toets.
Steekbreedte en steeklengte
Steekbreedte (mm)
Steeklengte (mm)
Automatisch
Handmatig

37
Steken waarbij het mogelijk is de breedte aan te passen
Stitch patterns which are possible to adjust stitch widthConfigurations de points dont la largeur des points peut être régléePatrones de puntada que se pueden ajustar a anchura de puntada
7.0
2.5 ~ 7.0
Stitch patternProgrammeTipo de puntadaSteek
Steek
Automatic (mm)Automatique (mm)Automático (mm)Automatisch (mm)
Automatisch (mm)
Manual (mm)Manuel (mm)Manual (mm)Handmatig (mm)
Handmatig (mm)
6.3
3.3~6.3
2.0~4.5
2.5~7.0
3.3~6.3
3.0~5.5
5.0~7.0 3.0 ~ 5.0
7.0 7.03.0 6.3 4.0
3.0~7.0
5.0 7.0
5.0 ~ 7.0 3.0 ~ 5.0
5.0
3.5
Stitch patternProgrammeTipo de puntada
Automatic (mm)Automatique (mm)Automático (mm)
Manual (mm)Manuel (mm)Manual (mm) 0.7~5.20.7~0.4
7.0

38
OvercastingSurfilargeSobrehiladoOverlockThis stitch style is used to prevent the cut edge of fabric fromfraying.
Ce point est utilisé pour éviter que les bords ne s’effilochentpar frottement.
Este tipo de costura se utiliza para evitar que el tejido sedeshilache.
Deze steek voorkomt de geknipte kant van de stof te rafelen.
1 2 When the overcastingfoot is used.Perform sewing with the fab-ric edge pressed towardsthe guide.
Lorsque vous utilisez lepied surfilage.Positionnez le bord du tissucontre le guide du pied.
Cuando se utiliza elprensatelas desobrehilar.Cosa con el borde del tejidoapretado contra la guía.
GuideGuideGuía
Overcasting foot (C)Pied surfilage (C)Prensatelas para sobrehilar (C)
Change the presser foot with the one that matchesthe pattern to be sewn.
For or patterns, be sure to use the standardpresser foot (A).
Vérifiez que le pied soit adapté à ce programme.
Pour les programmes ou vérifiez d’utiliser le piedstandard (A).
Cambie el prensatelas por aquel adecuado al tipode costura que se vaya a hacer.
Para los tipos de costura ó se utilizará elprensatelas estándar (A).
Standard presser foot (A)Pied standard (A)Prensatelas estándar (A)
CAUTION: Make sure to turn off the machinebefore changing the presser foot.
ATTENTION:
PRECAUCIÓN: Asegúrese de apagar la máquinaantes de cambiar el prensatelas.
Assurez-vous d’éteindre la machineavant de changer le pied presseur.
VOORZICHTIG: Verwijder de stekker uit het stop-contact voor u de voet verwisselt.
Standaard naaivoet (A)
Overlockvoet (C)
Kies de voet die bij uw steek hoort.
Voor de of steek gebruikt u de standaard naaivoet (A).
Als de Overlockvoet wordt gebruikt.Naai met de stofrand tegen de geleider aan.
Geleider
02 07
03 08

39
2
Reinforcing stretch (elastic) stitchPoint triple élastiquePuntada de refuerzo elásticaVersterkte rechte stretchsteekThe reinforcing stretch stitch helps reinforce seams whenused for sewing of elastic fabric or the force-exerted part offabric that is likely to fray.
Le point triple élastique aide à renforcer les coutures pourles matières extensibles ou demandant un renfort dans lesens d’élongation.
La puntada de refuerzo refuerza las costuras en los tejidoselásticos o en los que tienen tendencia a deshacerse.
Change the presserfoot with theappropriate one.
Vérifiez que le pied soitadapté à ce programme.
Cambie el prensatelaspor el adecuado.
Select the pattern.
Sélectionnez leprogramme.
Seleccione el tipo decostura.
* Example of use* Exemple d’utilisation* Ejemplo:
Sleeve attachingMontage des manchesUnión de mangas
Back bodyDosParte trasera
Pocket sewing is frequently sewn withreinforcing stretch stitches.Couture de poche renforcée avec ces points.Cosido de bolsillos
Attaching handles to bagsMontage des poignées de sacCosido de asas a bolsos
Reinforcing stitchPoints renforcésPuntada de refuerzo
SideCôtéLateral
Patch pocketApplication de la pocheBolsilo
CAUTION: Make sure to turn off the machinebefore changing the presser foot.
ATTENTION:
PRECAUCIÓN: Asegúrese de apagar la máquinaantes de cambiar el prensatelas.
Assurez-vous d’éteindre la machineavant de changer le pied presseur.
1Standard presser foot (A)Pied standard (A)Prensatelas estándar (A)
De versterkte rechte stretchsteek helpt uw zoom te versterken bij rekbare stoffen en het rafelen op plekken waar kracht op wordt uitgeoefend tegen te gaan.
VOORZICHTIG: Verwijder de stekker uit het stop- contact voor u de voet verwisselt.
Standaard naaivoet (A)
Kies de juiste voet.
Kies uw steek.
* Voorbeeld:
Een zak wordt vaak met de versterkte stretchsteek genaaid.
Opgenaaide zak Aangenaaide mouw
Lijf
Zijkant
Versterkte steek
Bevestigen van hengsels aan een tas
06

40
Automatic buttonholesBoutonnières automatiques en 1 tempsOjales aut omáticosAutomatisch knoopsgat
Install buttonhole foot (E).Pass the needle thread through under the presser foot, and then draw the thread tothe side of the presser foot.
Placez le pied boutonnière (E).Placez le fil d’aiguille sous le pied à travers celui-ci, et dégagez le fil vers le côté du pied.
Instale el prensatelas de ojales (E).Pase el hilo de la aguja por debajo del prensatelas y llévelo hacia un lado.
Select a buttonhole that matches your purpose.Sélectionnez le programme voulu.Seleccione el ojal más indicado para lo que desea hacer.
Select a pattern according to type of fabric and size of buttonto be used.
Sélectionner une configuration en fonction du type de tissuet de la taille des boutons à utiliser.
Seleccione el tipo de costura adecuado al tipo de tejido y altamaño del botón que se vaya a utilizar.
1 Buttonhole foot (E)Pied boutonnière (E)Prensatelas de ojales (E)
2
CAUTION: Make sure to turn off the machinebefore changing the presser foot.
ATTENTION:
PRECAUCIÓN: Asegúrese de apagar la máquinaantes de cambiar el prensatelas.
Assurez-vous d’éteindre la machineavant de changer le pied presseur.
Kies een knoopsgat dat bij de grootte van uw knoop en uw stof hoort.
VOORZICHTIG: Verwijder de stekker uit het stop- contact voor u de voet verwisselt.
Knoopsgatvoet (E)
Plaats de knoopsgatvoet (E). Haal de bovendraad door de knoopsgatvoet en vervolgens naar links.
Kies uw knoopsgat
For sewing small buttonholes in shirts,blouses, children’s clothing, etc.Petites boutonnières pour chemises,vêtements d’enfants, etc.Para coser ojales pequeños en camisas,blusas, ropa de niños, etc.Voor kleine knoopsgaten in shirts, blouses,Kinderkleding enz.
PatternProgramme
TipoKnoopsgat
Typical applicationApplication type
AplicaciónToepassing
Stitch widthRapport de largeurAnchura de longitudSteekbreedte
5.0 ~ 7.0
For sewing small buttonholes on light tomedium weight fabric.Pour la couture de boutonnières moyennesdans des tissus légers ou moyens.Para coser ojales medianos en tejidos depeso ligoto a medianos.Voor kleine knoopsgaten in lichte en medium stoffen.
Stitch widthRapport de largeurAnchura de longitudSteekbreedte
3.0 ~ 4.0
11
11

41
Lower thebuttonhole footonce to place a button onit.The buttonhole length is au-tomatically determined onlyby placing a button on thebuttonhole foot. (If a buttoncannot fit in the buttonholefoot, the buttonhole lengthwill be “buttonhole diameter+ button thickness.”)
Abaissez le pied aprèsavoir placé un boutondessus.La longueurde laboutonnièresera automatiquementdéterminée par la taille dubouton adapté à celle-ci. (Siun bouton ne peut pas êtreplacé dans le pied, lalongueur de la boutonnièresera “diamètre du bouton +épaisseur du bouton”.)
After placing a button on thebuttonhole foot, press the slid-ing part to determine the but-tonhole length.
Après avoir placé un bouton surle pied, refermez la glissièrepour déterminer la longueur dela boutonnière.
Tras haber colocado un botónen el prensatelas, ajuste lapieza corredera paradeterminar la longitud del ojal.
Remove the button.Once the buttonhole length isdetermined, remove the but-ton from the buttonhole foot.
Retirez le bouton.Une fois la longueur de laboutonnière définie, retirezle bouton du pied.
Quite el botón.Una vez determinada lalongitud del ojal, quite elbotón del prensatelas.
Sliding partPartie glissièrePieza corredera3
4
Baje el prensatelas de ojales para colocar el botón.La longitud del ojal se establece automáticamente consolo colocar el botón dentro del prensatelas de ojales. (Sihay algún botón que no quepa en el prensatelas de ojales,la longitud del ojal será el diámetro del ojal + el grosor delbotón”).
PatternProgramme
Tipo
Typical applicationApplication type
Aplicación
For sewing large buttonholes in thick orheavy weight fabrics.
Pour la couture de grandes boutonnièresdans du tissu épais ou lourd.
Para coser botones qrandes en tejidosqruesos de peso pesado.
For sewing large buttonholes on mediumto heavy weight fabric.
Pour la couture de grandes boutonnièresdans du tissu moyen ou lourd.
Para coser botones qrandes en tejidos depeso medio a pesados.
For knit fabrics such as double knit.
Pour des tissus tricotés comme le tricotdouble.
Para tejidos de punto tales como los depunto doble.
For stretch fabrics such as cotton jersey.
Pour des tissus élastiques comme lejersey.
Para tejidos elásticos tales como losjerseys dealqodón.
Knoopsgat
Voor grote knoopsgaten in medium en zware stoffen.
Voor grote knoopsgaten in dikke of zware stoffen.
Voor gebreide stoffen.
Voor stretchstoffen.
Verstelbaargedeelte
Toepassing
Na de knoop te hebben geplaatst drukt u het verstelbare gedeelte aan om de diameter van de knoop vast te stellen.
Doe de knoopsgatvoet omlaag om de knoop er in te stoppen.De grootte van de knoop wordt automatisch vastgesteld door de knoop in de voet te plaatsen. Als de knoop niet in de voet kan: De lengte van het knoopsgat = Diameter+Dikte van de knoop..
Verwijder de knoopAls de lengte van het knoopsgat is vastgesteld, kan de knoop uit de voet worden verwijderd.

42
8 Begin sewing.
Commencez à coudre.
Empiece a coser.
7Lower the buttonholinglever.Lower the lever until it willgo no further.* If you start the sewing ma-chine without lower the le-ver, the machine will blip.
Abaissez le levier deboutonnière.Abaissez le levier au maxi-mum.* Si vous commencez àcoudre sans abaisser lelevier, la machine émet unbip sonore d’avertissement.
Baje la palanca delsoporte del prensatelasde ojales.Baje la palanca hasta elmáximo.* Si se empieza a coser sinhaber bajado la palanca almáximo, la máquina pitará.
Mark the buttonholepositions.Draw marker lines on the fab-ric at the buttonhole positionswith an assistant marker.
Marquez les positionsde la boutonnière.Marquez les lignes derepère sur le tissu avec unmarqueur textile.
Marque la posición delojal.Marque con una línea el ojalen el tejido.
MarkMarqueMarca
5
Lower thebuttonhole footat the marked position.Lower the buttonhole foot sothat the marked position isat the center of needle en-try hole in the foot.
Abaissez le piedboutonnière à laposition marquée.Abaissez le pied boutonnièreafin que la position marquéesoit un centre du point depénétration de l’aiguille dansle pied boutonnière.
Baje el prensatelas deojales a la posiciónmarcada.Baje el prensatelas deojales de forma que laposición marcada quede enel centro del agujero delprensatelas por donde entrala aguja.
6
Marked positionPosition marquéePosición marcada
Buttonholing leverLevier de boutonnièrePalanca del soportedel prensatelas de ojales.
Merkteken
Markeer de posities van de knoopsgaten.Markeer de posities van de knoopsgaten op de stof.
Knoopsgathevel
Merkteken
Doe de knoopsgat voet omlaag op het merkteken.Doe de voet zo omlaag dat het merkteken zich in het centrum van het naaldgat van de voet bevindt.
Doe de knoopsgathevel naar beneden.Doe de knoopsgathevel naar beneden tot hij niet verder kan.* Als u wilt gaan naaien zonder de hevel naarbeneden gedaan te hebben geeft de machine een pieptoon.
Begin te naaien.

43
10Open the buttonhole using a seam ripper.It is recommended to use a straight pin to prevent from excessive cutting of buttonhole.
Ouvrez la boutonnière avec le découd-vite.Il est recommandé d’utiliser une épingle droite pour éviter de coupe les extrémités de laboutonnière en l’ouvrant.
Abrir el ojal utilizando un descosedor.Se recomienda utilizar un alfiler para evitar cortar en exceso.
Stopper pinEpingle d’arrêtAlfiler que hacede tope
Adjusting the stitch length / Réglez la longueur du pointAjuste de la longitud de puntada /
To decrease stitch length:Pour diminuer la longueur du point:Para disminuir la longitud de puntada:
To increase stitch length:Pour augmenter la longueur du point:Para aumentar la longitud de puntada:
* To sew buttonholes on heavy-weightmaterials such as denim with thickthread, set the stitch length larger thanthe automatically-determined one.
* Pour coudre les boutonnières sur lestissus épais comme le jeans ou avecun gros fil, réglez la longueur du pointplus longue que celle d’origine.
* Para coser ojales en tejidos gruesoscomo el tejano y con hilo grueso, ajustela longitud de puntada a una mayor a laquevieneestablecidaautomáticamente.
Sewing sequenceCycle de coutureSecuencia de costura
After the completion of sewing, trim the threads.* From the second buttonhole and beyond, lower the buttonhole foot at the next marker line on the fabric forsewing buttonholes.
Après avoir fini le cycle, coupez les fils.* Depuis la seconde boutonnière et plus, abaissez le pied sur la marque suivante sur le tissu.
Tras completar toda la costura, corte los hilos.* Desde el segundo ojal en adelante, para coser los ojales baje el prensatelas en cada marca de ojal que hayamarcada en el tejido.
The machine will automatically stop sewing after producing back tack stitches.The machine will stop with its needle up.
La machine s’arrête automatiquement après avoir effectué les points d’arrêt.Elle stoppe l’aiguille en haut.
La máquina parará automáticamente de coser tras hacer las atacados finales.La máquina parará con la aguja arriba.
91 2 3 4 5 6
[1][2]
[1][2]
Opeenvolging van steken
De machine stopt automatisch na het produceren van de laatste steken.De machine stopt met de naald in de hoogste stand.
Na voltooiing van het knoopsgat knipt u de overtollige draden weg.*Vanaf het tweede knoopsgat en verder, doet u de knoopsgatvoet naar beneden op het merkteken op de stof.
Snij het knoopsgat open met een tornmes.Gebruik een speld om te voorkomen dat het tornmes uitschiet en te ver snijdt.
Stopper speld
* Als u knoopsgaten maakt op zware stof zoals denim met dik garen, stel de steeklengte dan wat groter in dan voorgeprogrammeerd.
Aanpassen van de steeklengte
Verkort de steeklengte: Vergroot de steeklengte:

44
1 2
Bartacking / Couture d’arrêtPresillado /Cordon steek
Bartacking is used to reinforce part of seam that is likely toravel.
La couture d’arrêt permet de renforcer une partie de la cou-ture susceptible de s’effilocher.
El presellado se usa para reforzar la parte de la costura quees susceptible de destejerse.
Select the pattern.
Sélectionnez leprogramme.
Seleccione el tipo decostura.
Install buttonhole foot(E).Pass the needle threadthrough under the presserfoot, and then draw thethread to the side of thepresser foot.
Placez le piedboutonnière (E).Placez le fil d’aiguille sousle pied à travers celui-ci, etdégagez le fil vers le côtédu pied.
Instale el prensatelas deojales (E).Pase el hilo de la aguja pordebajo del prensatelas yllévelo hacia un lado.
Buttonhole foot (E)Pied boutonnière (E)Prensatelas de ojales (E)
3 Start machine withbut tonhol ing leverraised.
Commencez à coudre.Remarque: le levier deboutonnière resta enplace.
Empiece a coser.Nota: la palanca del ojalp e r m a n e c e e n s ureserva.
Buttonholing leverLevier de boutonnièrePalanca del soportedel prensatelas de ojales.
CAUTION: Make sure to turn off the machinebefore changing the presser foot.
ATTENTION:
PRECAUCIÓN: Asegúrese de apagar la máquinaantes de cambiar el prensatelas.
Assurez-vous d’éteindre la machineavant de changer le pied presseur.
De cordonsteek wordt gebruikt om naden te versterken die gemakkelijk gaan rafelen.
VOORZICHTIG: Verwijder de stekker uit het stop- contact voor u de voet verwisselt.
Knoopsgatvoet (E)
Plaats de knoopsgat- voet (E). Haal de bovendraad door de knoopsgatvoet en vervolgens naar links.
Kies uw steek.
KnoopsgathevelBegin te naaien met de
knoopsgathevel omhoog.
19

45
*Application examples* Exemples d’application* Ejemplo de aplicaciones
Trousers and skirtsPantalons et jupesPantalones y faldas
PocketsPochesBolsillos
BagsSacsBolsos
To continuously sew bartacks of the same length two or moretimes, follow the procedure described below:
Pour coudre des points d’extrémité de longueur identiques 2fois ou plus, suivez la pracédure décrite ci-dessous:
Para coser continuamente presillas de la misma lonquitud,dos o màs veces, siga el proceso descrito màs abajo:
StartMarcheComienzo
Automatically returnsRetours automatiquesRetosno automatico
Automatically U-turnRetours automatiquesen URetorno automatico-V
Press the reverse stitchingbutton to stop the machine.Appuyez sur le bouton demarche arrière pour arrèter lamachine.Presione el boton de puntoreversible para parar la máquina.
* To change the sewing length stored in memory, reselectthe pattern number and follow steps 1 through 5.* Pour modifier la longueur de couture stookée en mémoire,sélectionnez de nouveau le numéro du motif et parcourezles étapes de 1 à 5.* Para combiar la lonqitud del punto almacenada, vuelua aseleccionar el número de diseño y siqa los pasos 1 a 5.
4Press the reverse stitchbutton at predeterminedposition [A].Once the needle returns tothe start position, the ma-chine automatically startszigzag stitching.
Appuyez sur le boutonde marche arrières à laposition déterminée àl’avance.Une fois que l’aiguille revienten position de départ, lam a c h i n e c o m m e n c sautomatiquement la coutureen points zigzag.
Presione el boton depunto reversible en laposiciónpredeterminada[A].Una vez que la aquja vuelvea su posicion de comienzola maquina empieza a coseren zigzag automaticamente.
5 Upon completion ofstitching [B], press thereverse stitching buttonto stop the machine.
Les points terminés,appuyez sur le boutonde marche arrière pourarrótar la machine.
Al termino de la costura[B], presionar el botónde punto reversible paraparar la máquina.
[A]
[B]
Druk op de retourknop op uw vooraf uitgekozen punt [A]. De machine naait nu terug naar uw beginpunt en begint vervolgens te zig zaggen.
Weer op uitgekozen eind- punt [B] aangekomen, drukt u weer op de retourknop om de machine te stoppen.
Teneinde meer cordons van de zelfde lengte te naaien, volgt u de volgende procedure.
Begin Automatische terugkomst
Automatische U-bocht
Druk de retourknop in om het naaien te stoppen.
*Om de cordonlengte, opgeslagen in het geheugen, te wijzigen, drukt u opnieuw de cordonsteekknop in op het steekkeuze paneel en doet u opnieuw de stappen (1) tot en met (5) als hierboven beschreven.
* Voorbeelden
Tassen
Broeken en rokkenZakken

46
Darning stitch / Point de reprisePunto para zurcido / Stopsteek
3Set the darning stitchlength.Push the slide to set thelength.
Réglez la longueur dupoint de reprise.
Coloque la tonqitud delpunto de zurcido.Empuje el cusor paracolocar la lonqitud.
Lower the buttonholinglever.
Abaissez le levier deboutonnière.
Baje la palanca delsoporte del prensatelasde ojales.
5Begin sewing.The machine will stopautomatically when the sewingof one pattern is complete.
Commencez à coudre.La machine s’arrêteautomatiquement lorsque lacouture d’un motif est terminée.
Emplece a coser.La máquina parará automáticamente cuando se haya cosidoun diseño completamente.
Sliding partPartie glissièrePieza corredera
CAUTION: Make sure to turn off the machinebefore changing the presser foot.
ATTENTION:
PRECAUCIÓN: Asegúrese de apagar la máquinaantes de cambiar el prensatelas.
Assurez-vous d’éteindre la machineavant de changer le pied presseur.
1Buttonhole foot (E)Pied boutonnière (E)Prensatelas de ojales (E)
Install buttonhole foot(E).Pass the needle threadthrough under the presserfoot, and then draw thethread to the side of thepresser foot.
Placez le piedboutonnière (E).Placez le fil d’aiguille sousle pied à travers celui-ci, etdégagez le fil vers le côtédu pied.
Instale el prensatelas deojales (E).Pase el hilo de la aguja pordebajo del prensatelas yllévelo hacia un lado.
2Select the pattern.
Sélectionnez leprogramme.
Seleccione el tipo decostura.
4
VOORZICHTIG: Verwijder de stekker uit het stop- contact voor u de voet verwisselt.
Knoopsgatvoet (E)
Plaats de knoopsgatvoet (E).Haal de bovendraad door de knoopsgatvoet en vervolgens naar links.
Kies uw steek.
Stel de lengte van de stopsteek in.Verschuif het verstelbare gedeelte om de lengte in de stellen.
Verstelbaar deel
Doe de knoopsgatvoet-hevel naar beneden.
Begin te naaien.De machine stopt automatisch wanneer één patroon klaar is.

47
Change the presser footwith the appropriate one.
Vérifiez que le pied soitadapté à ce programme.
Cambie el prensatelaspor el adecuado.
2
The works of quilting and patch work can be finished asthough they were hand-sewn by using inconspicuous bob-bin thread.
Les travaux de courtepointe et de patchwork peuvent avoirune finition “cousu main” en utilisant un fil de canette discret.
Los trabajos de acolchado y de colocar retazos se puedenacabar como si fueran hechos a mano usando hilo de bobinaindiscernible.
Select the pattern.
Sélectionnez leprogramme.
Seleccione el tipo decostura.
3
Quilting stitch / Point de courtepointePuntada acolchada / Quiltsteek
Lower the presser footlifting lever and startsewing.
Abaisser le levier relève-presseur et commencerla couture.
Baje la palancaelevadora del prensatelay comience el cosido.
CAUTION: Make sure to turn off the machinebefore changing the presser foot.
ATTENTION:
PRECAUCIÓN: Asegúrese de apagar la máquinaantes de cambiar el prensatelas.
Assurez-vous d’éteindre la machineavant de changer le pied presseur.
1Standard presser foot (A)Pied standard (A)Prensatelas estándar (A)
Quilt en patchwork kan uitgevoerd worden alsof het handgenaaid is met gebruik van onzichtbaar ondergaren.
VOORZICHTIG: Verwijder de stekker uit het stop- contact voor u de voet verwisselt.
Standaard naaivoet (A)
Kies de juiste naaivoet.
Kies uw steek
Doe de naaivoet omlaag en begin te naaien.
20

Patch Work / PatchworkPatchwork / Patchwork
Runstitch the fabric.Runstitch two pieces of fabric.
Surpiquez le tissu.Surpiquez les deux morceaux de tissu.
Cosa el tejido.Cosa dos piezas de tejido.
RunstitchSurpiqûreCostura
1 cm
Seam allowanceTolérance de coutureMargen de la costura
Select stitch pattern.
Sélectionnez leprogramme.
Seleccione el tipo depuntada.
Make sure that thepresser foot is correct.
Vérifiez que le piedpresseur es le bon.
Asegúrese de colocar elprensatelas adecuado.
2
1 3
* Sew patterns so that they extend over both pieces of fabric.* Cousez les points afin qu’ils s’étendent au-delà des deux morceaux de tissu.* Cosa de forma que las puntadas caigan en las dos piezas
de ropa.
Overlapping patchPatch recouvertUnión sobrepuesta
Open patchPatch ouvertUnión abierta
Fabric(right side)Tissu(dessus)Tejido(del derecho)
Fabric(right side)Tissu(dessus)Tejido(del derecho)
Fabric (wrong side)Tissu (dessous)Tejido (del revés)
Standard presser foot (A)Pied standard (A)Prensatelas estándar (A)
Stiksteek
Stof (achterkant)Zoom overlap
Stiksteek de stof. 2 delen stof aan elkaar bevestigen d.m.v. de stiksteek
Standaard naaivoet (A)
Kies de juiste naaivoet.
Kies uw steek.
Overlappende patch
Stof (voorkant)
Open patch
Stof (voorkant)
*Naai deze steek zodanig dat hij zich uitstrekt over beide stukken stof.
48
23
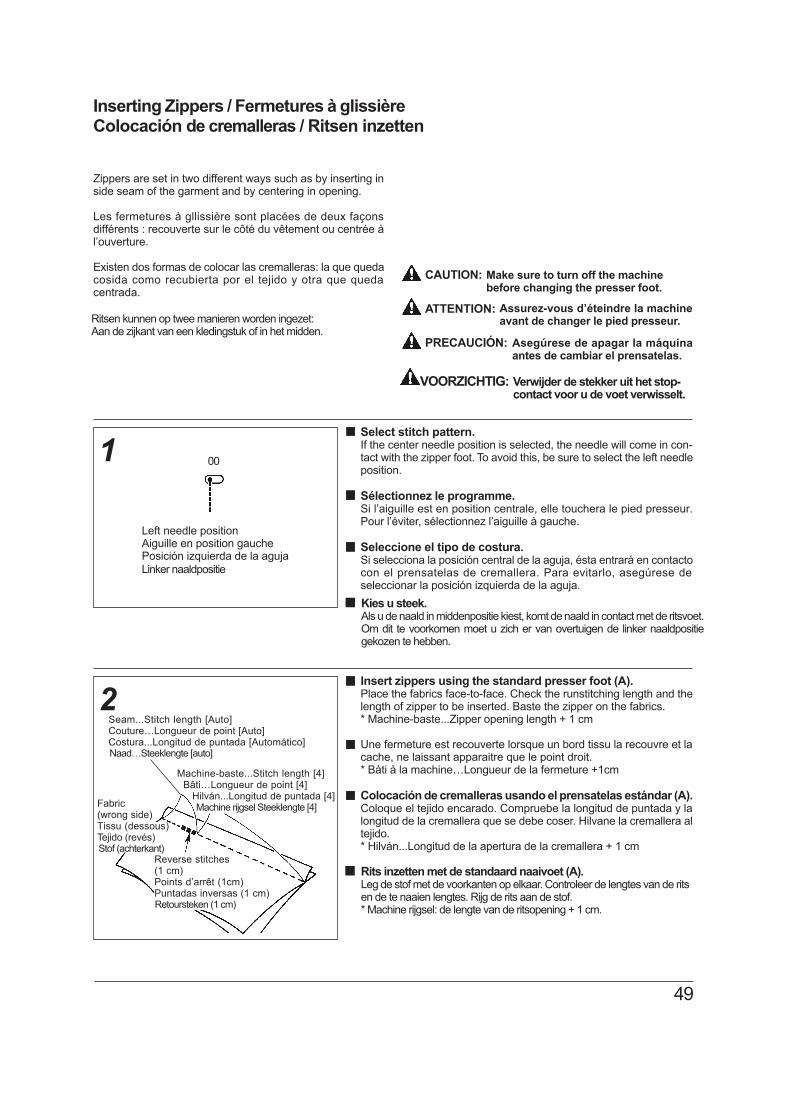
49
Inserting Zippers / Fermetures à glissièreColocación de cremalleras / Ritsen inzetten
Zippers are set in two different ways such as by inserting inside seam of the garment and by centering in opening.
Les fermetures à gllissière sont placées de deux façonsdifférents : recouverte sur le côté du vêtement ou centrée àl’ouverture.
Existen dos formas de colocar las cremalleras: la que quedacosida como recubierta por el tejido y otra que quedacentrada.
Select stitch pattern.If the center needle position is selected, the needle will come in con-tact with the zipper foot. To avoid this, be sure to select the left needleposition.
Sélectionnez le programme.Si l’aiguille est en position centrale, elle touchera le pied presseur.Pour l’éviter, sélectionnez l’aiguille à gauche.
Seleccione el tipo de costura.Si selecciona la posición central de la aguja, ésta entrará en contactocon el prensatelas de cremallera. Para evitarlo, asegúrese deseleccionar la posición izquierda de la aguja.
Left needle positionAiguille en position gauchePosición izquierda de la aguja
1
Insert zippers using the standard presser foot (A).Place the fabrics face-to-face. Check the runstitching length and thelength of zipper to be inserted. Baste the zipper on the fabrics.* Machine-baste...Zipper opening length + 1 cm
Une fermeture est recouverte lorsque un bord tissu la recouvre et lacache, ne laissant apparaitre que le point droit.* Bàti à la machine…Longueur de la fermeture +1cm
Colocación de cremalleras usando el prensatelas estándar (A).Coloque el tejido encarado. Compruebe la longitud de puntada y lalongitud de la cremallera que se debe coser. Hilvane la cremallera altejido.* Hilván...Longitud de la apertura de la cremallera + 1 cm
Machine-baste...Stitch length [4] Bâti…Longueur de point [4] Hilván...Longitud de puntada [4]
Seam...Stitch length [Auto]Couture…Longueur de point [Auto]Costura...Longitud de puntada [Automático]
2
Fabric(wrong side)Tissu (dessous)Tejido (revés)
Reverse stitches(1 cm)Points d’arrêt (1cm)Puntadas inversas (1 cm)
CAUTION: Make sure to turn off the machinebefore changing the presser foot.
ATTENTION:
PRECAUCIÓN: Asegúrese de apagar la máquinaantes de cambiar el prensatelas.
Assurez-vous d’éteindre la machineavant de changer le pied presseur.Ritsen kunnen op twee manieren worden ingezet:
Aan de zijkant van een kledingstuk of in het midden.
VOORZICHTIG: Verwijder de stekker uit het stop- contact voor u de voet verwisselt.
Linker naaldpositie
Kies u steek. Als u de naald in middenpositie kiest, komt de naald in contact met de ritsvoet. Om dit te voorkomen moet u zich er van overtuigen de linker naaldpositie gekozen te hebben.
Naad…Steeklengte [auto]
Machine rijgsel Steeklengte [4]
Stof (achterkant)
Retoursteken (1 cm)
Rits inzetten met de standaard naaivoet (A). Leg de stof met de voorkanten op elkaar. Controleer de lengtes van de rits en de te naaien lengtes. Rijg de rits aan de stof. * Machine rijgsel: de lengte van de ritsopening + 1 cm.
00

50
3Attach the zipper foot (B) to the machine.To sew the left part of the zipper, place the zipper under the rightportion of the zipper foot. To sew the right part of the zipper, place thezipper under the left portion of the foot.
Si la fermeture est à gauche de l’aiguille, la partie gauche du pied irasur le zip. Si la fermeture est à droite de l’aiguille, la partie droite dupied ira sur le zip.
Coloque el prensatelas de cremallera (B).Para coser la parte izquierda de la cremallera, coloque la cremallerabajo la parte derecha del prensatelas. Para coser la parte derechade la cremallera, coloque ésta bajo la parte izquierda del prensatelas.
Zipper foot (B)Pied fermeture éclair (B)Prensatelas cremallera (B)
(Left)(Gauche)(Izquierda)
(Right)(Dessus)(Derecha)
lapped insertion / Fermetures recouvertesInserción recubierta / Overlapte rits
Open the seam allowance.Neatly open the seam allowance. Adjust the back seam allowance sothat it projects 3 mm from the seam. Press with an iron to make acrease. Fit the crease at the edge of teeth.
Recouvertes: Les fermetures sont insérées dans la couturedu vètement.Le bord des dents suit la couture.Coudre la fermeture du bas vers le haut au bord de la partie à rabattre.
Margen de apertura de la costura.Debe existir un margen limpio. Establezca el margen de la costuratrasera de forma que quede a 3 mm de la costura.Aplique una planchapara crear la doblez. Ajuste el dobladillo al extremo de los dientes.
Fabric(wrong side)Tissu(dessous)Tejido (revés)
Zipperopening size
Mesured’ouverture dela fermeture
Tamaño de laapertura de lacremallera
TeethDentsDientes
SliderGlisseur
3mm
1
Carro
Ritsvoet (B)
Links RechtsDoe de ritsvoet (B) aan de machine.
Als u de linkerkant van de rits aan de stof naait, plaatst u de rits aan de rechterkant van de voet. Als u de rechterkant van de rits aan de stof naait, plaatst u de rits aan de linkerkant van de voet.
Stof (achterkant)
Tanden
Trekker
RitsOpeningslengte
Sla de zoom overlap open. Sla de zoom overlap zorgvuldig open. Stel de achterste zoom overlap op 3 mm van de zoom. Creëer met een strijkijzer een vouw. Leg de vouw tegen de tanden van de rits.

51
Put the top cloth over the zipper. Baste the zipper and set iton the fabric.Move the slider to the top of zipper. Put the top cloth over the zipperand perform basting. Stitch the zipper, as illustrated, with reversestitches produced at the opening end. At the slider section, undo thebasting stitch seam, lower the slider and sew the remaining part.
Epinglez ou bâtissez la fermeture au vêtement depuis ledessous à travers la bande de la fermeture, la bande à rabattreet le dessus du vêtement.Dégager le dessus du vêtement. Cousez à travers le bout le plus basde la fermeture jusqu’à la taille. Utiliser les points de bàti comme guide.Décousez le bàti.
Coloque el tejido por encima de la cremallera. Hilvane lacremallera y colóquela en el tejido.Mueva el carro hacia la parte superior de la cremallera. Coloque eltejido superior por encima de la cremallera y hilvánela. Cosa lacremallera, tal y como se indica en el dibujo, con puntadas inversasen los finales abiertos. En la parte del carro, deshaga el hilván, bajeel carro y cosa la parte que quede.
Stitch length [Auto]Longueur de point [Auto]Longitud de puntada [Automática]
Attach the left sideAttachez le côté gaucheColoque el lado izquierdo
3
Machine-basteBâti machineHilvánOpening end
(reverse stitch)Extrémité d’ouverture(point arrière)Final abierto (puntadainversa)
Sew the zipper tape on the seam allowance from bottom to top.Fitting the edge of the zipper foot at the edge of the zipper teeth, sewthe zipper tape on the seam allowance. At the slider part of the zipper,stop the machine at a position about 5 cm before the slider, move theslide to the far side of the presser foot, then sew the zipper until its topend is reached.
Plaquer le tissu à rabattre au bout de la fermeture.Coudre la fermeture du bas vers le hant comme indiqué en suivant lebord.
Cosa la cremallera en el margen de la costura de arriba a abajo.Haga coincidir el extremo del prensatelas con el extremo de los dientesde la cremallera y cosa la cremallera en el margen de la costura.Pare la máquina cuando esté a unos 5 cm del carro de la cremallera,a continuación, mueva dicho carro hacia la parte más alejada delprensatelas y siga cosiendo la cremallera hasta que llegue a suextremo más superior.
Attach the right sideAttachez le côté gaucheColoque el lado derecho
SliderGlisseurCarro
Stitch length [Auto]Longueur de point [Auto]Longitud de puntada [Automática]
Fabric(wrong side)Tissu (dessous)Tejido (revés)
2Bevestig de voet aan de rechterkant
Stof (achterkant)
Trekker
Steeklengte [auto]
Naai het ritsenband aan de zoom overlap van onder naar boven. Geleidt de rand van de ritsvoet langs de tanden van de rits en naai het band vast aan de overlap. Stop 5 cm voor u de trekker bereikt heeft. Doe de trekker nu naar achteren en naai nu tot het eind van de rits.
Bevestig de voet aan de linkerkant
Machine rijgsel
Einde van de rits (Retourstiksel)
Steeklengte [auto]
Vouw de stof over de rits. Rijg de rits op de stof. Sluit de rits en bedek hem met de stof en rijg op zijn plaats. Stik de rits vervolgens als in de afbeelding met retoursteken bij het ritseinde. Verwijder het rijgsel, doe de rits open en stik de rest.

52
1
3
2
Centered Insertion / Fermetures centréesCoIocación centrada / Rits in het midden
Baste zipper and garment body.Open the seam allowance. Fitting the teeth of zipper at the end of theseam line, perform basting.
Centrées: La fermeture est centrée dans l’ouverture etconvient pour presque tous les tissus.Bâtissez à la machine l’ouverture de la fermeture à l’endroit à la lignede couture et maintenez ouvert la partie à coudre.
Hilvane la cremallera a la prenda.Margen de apertura de la costura. Haga coincidir los dientes de lacremallera con el final de la línea de costura y hilvánela.
SeamlineCoutureLínea de la costura
Sew the left part of the zipper on the seam allowance frombottom of opening to top.
Bâtissez à travers la bande de la fermeture. Cousez le tissude l’extérieur.Tournez la partie gauche du vêtement vers le haut et cousez à traversla fermeture en cousant toules les épaisseurs.
Cosa la parte izquierda de la cremallera al margen de la costurade arriba a abajo.
Sew the right part of zipper.After the completion of sewing, undo the basting stitch seam.
Cousez dessus à travers toutes les épaisseurs.Décousez les coutures de bâti.
Cosa la parte derecha de la cremallera.Tras haber acabado de coser, quite el hilván.
TeethDentsDientes
SliderGlisseurCarro
BasteBâtiHilván
Fabric (wrong side)Tissu (dessous)Tejido (del revés)
Fabric (wrong side)Tissu (dessous)Tejido (del revés)
Zipper (wrong side)Fermeture (dessous)Cremallera(del revés)
Attach the right sideAttachez le côté gaucheColoque la parte derecha
Opening end(reverse stitch)Extrémitéd’ouverture (point arrière)Apertura final(puntada inversa)
Stitch length [Auto]Longueur de point [Auto]Longitud de puntada [Automática]
Fabric (right side)Tissu (dessus)Tejido (del derecho)
Stitch length [Auto]Longueur de point [Auto]Longitud de puntada [Automática]
Attach the left sideAttachez le côté gaucheColoque la parte izquierda
BasteBâti machineHilván
Fabric (right side)Tissu (dessus)Tejido (del derecho)
Zoomlijn Trekker
Tanden
Rijgsel
Rits (achterkant)
Stof (achterkant) Stof (achterkant)
Rijg de rits aan het kledingstuk Open de zoomoverlappingen, plaats de rits zorgvuldig en rijg hem aan het kledingstuk.
Bevestig de voet aan de rechterkant
Einde van de rits(Retourstiksel)
Rijgsel
Stof (voorkant)
Steeklengte [auto]
Naai de linkerkant aan de zoomoverlap van beneden naar boven.
Bevestig de voet aan de linkerkant
Stof (voorkant)
Steeklengte [auto]
Naai de rechterkant van de rits. Na het naaien verwijdert u het rijgsel.

53
Blindstitch / Point invisiblePuntada invisible / Blindzomen
Overcast the fabric, and fold the edge.Refer to page 36 for overcasting.
Surfilez le tissu et pliez le bord.Référez vous à la page 36 pour le surfilage.
Sobrehíle el tejido y haga el dobladillo.Consultar las instrucciones referentes al sobrehilado.
Change the presserfoot.
Changez le piedpresseur.
Cambie el prensatelas.
Blindstitch presser foot (D)Pied ourlet invisible (D)Prensatelas de puntadainvisible (D)
Select the blindhemstitch pattern.
Sélectionnez leprogramme approprié.
Seleccione el tipo decostura de puntadainvisible.
Finished hemOurlet finiHilván
0.5~0.6 cm
BastingBâtiDobladillo acabado
1. Fold the fabric and then baste it.1. Pliez le tissu et bâtissez-le.1. Doble el tejido e hilvánelo.
2. Fold the fabric at the basting stitch seam.2. Repliez le tissu et bâtissez-le.2. Doble el tejido e hilvane la costura. 3
For elasticfabric
Pour tissuextensible
Para tejidoelástico
Blindstitching provides a durable way to finish a hem and ispresented as an instantly selectable pattern as a convenience.It needs practice, so a test sewing is suggested.
L’ourlet invisible procure une finition durable pour les ourletset est facilité par son programme instantanément sélectionné.Il nécessite un peu de pratique, aussi faîtes quelques essaisauparavant.
Con la puntada invisible se puede obtener un acabadoduradero de los dobladillos. Es un tipo de costura que sepuede seleccionar.Para obtener unos resultados óptimos, se necesita práctica,es por ello, que se recomienda hacer pruebas hastaconseguir lo que se desea.
Fabric (wrong side)Tissu (dessous)Tejido (del revés)
Fabric (wrong side)Tissu (dessous)Tejido (del revés)
Fabric (wrong side)Tissu (dessous)Tejido (del revés)
3.
21
CAUTION: Make sure to turn off the machinebefore changing the presser foot.
ATTENTION:
PRECAUCIÓN: Asegúrese de apagar la máquinaantes de cambiar el prensatelas.
Assurez-vous d’éteindre la machineavant de changer le pied presseur.
De blindzoom verschaft u een duurzame zoom die u zo opuw dashboard kunt kiezen. Het vereist enige oefening, maakeventueel eerst een proeflap.
VOORZICHTIG: Verwijder de stekker uit het stop-contact voor u de voet verwisselt.
1. Vouw de stof en rijg deze.
Rijgsel
Stof (achterkant)
2. Vouw de stof langs de rijgsteek.
Stof (achterkant)
Stof (achterkant)
Blindzoom
Overlock de stof en vouw de rand.Zie bladzijde 36 voor de overlocksteek.
Blindzoomvoet (D)
Kies de juiste voet.
Voorstretchstoffen
Kies de juiste blind-zoomsteek.

54
Turn the fabric over.After sewing the seam, turn the fabric over.
Retournez le tissu.Après la couture, retournez le tissu.
Gire el tejido.Tras haber hecho la costura, dé la vuelta al tejido.
Position the folded edgeagainst the guide.Place the folded edgeagainst the presser footguide, and sew the fabric.
Positionnez le bord pliéle long du guide.Placez le bord contre leguide et cousez.
Coloque el dobladillocontra la guía.Coloque el dobladillo contrala guía del prensatelas ycosa.
Finished hemOurlet finiDobladillo acabado
5 Fabric(wrong side)Tissu(dessous)Tejido(del revés)
Fabric(right side)Tissu(dessus)Tejido(del derecho)
4
Plaats de gevouwen rand tegen de geleider.Plaatsdegevouwenrandtegendegeleidervandeblindzoom-voet en naai de blindzoom.
Stof(achterkant)
Stofvoorkant)
Blindzoom
Draai de stof om.Als u klaar bent met naaien, draait u de stof om.
GuideGuideGuía
Fabric(wrong side)Tissu(dessous)Tejido(del revés)
rStof(achterkant) Geleider
If the stitches fail to reach the folded edge:Si les points n’atteignent pas lebord du pli:Si las puntadas no se dan en el extremo del dobladillo:Als de blindzoomsteek de gevouwen rand niet overlapt:
How to adjust the guide of the blindstitch presser foot.Comment régler le guide du pied ourlet invisible.Ajuste de la guía del prensatelas de puntada invisible.De geleiderstand van de blindzoomvoet aanpassen.
GuideGuideGuíaGeleider
Turn the screw toward you, and the guide will shift to the right.Tournez la vis vers vous et le guide glisse vers la droite.Gire el tornillo hacia usted y la guía se moverá hacia la derecha.Draai de schroef naar u toe om de geleider naar rechts in te stellen.
If the stitches reach too far beyond the folded edge:Si les points sont trop à l’intérieur du bord plié:Si las puntadas se dan demasiado lejos del extremo del dobladillo:Als de blindzoomsteek de gevouwen rand te veel overlapt:Turn the screw away from you, and the guide will shift to the left.Tournez la vis vers l’arrière et le guide glisse vers la gauche.Gire el tornillo hacia el lado contrario a usted y la guía se moveráhacia la izquierda.Draai de schroef van u af om de geleider naar links in te stellen.
GuideGuideGuíaGeleider

55
Quilting attachment /Ensemble pour quiltingMecanismo para acolchar / Quiltvoet
21
Two piles of fabric are stitched together with batting placed between them to produce quilt withyour original design.
Deux surfaces de tissu sont cousues ensemble avec un bâti placé entre elles pour produire unquilt avec votre dessin original.
Consiste en coser dos capas de tejido con relleno en medio.
Presser barBarre du piedBarra del prensatelas
Presser foot clamp screwVis de supportTornillo del prensatelas
Remove presser footholder.Lift presser bar, removepresser foot clamp screwand presser foot holder.
Retirez la vis dusupport.Releves la barre du pied,retirez le puis la vis du sup-port et celui-ci.
Quite el soporte delprensatelas.S u b a l a b a r r a d e lprensatelas, quite el tornilloy saque el soporte.
Set the drop-feed knobto “NOT FEED”.
Placer le boutond’entraînement par griffesur “NOT FEED”.
Fije la perilla de bajadade transporte a “NOTFEED”.
3 Install the quilting foot.
Installez le pied quilting.
Instale el prensatelaspara acolchar.
Pattern to be usedProgrammeTipo de costura a utilizar
CAUTION: Make sure to turn off the machinebefore changing the presser foot.
ATTENTION:
PRECAUCIÓN: Asegúrese de apagar la máquinaantes de cambiar el prensatelas.
Assurez-vous d’éteindre la machineavant de changer le pied presseur.
Te gebruiken steken
VOORZICHTIG: Verwijder de stekker uit het stop- contact voor u de voet verwisselt.
Twee lagen stof worden op elkaar genaaid met een voering ertussen om een Quilt te maken van uw eigen ontwerp.
Persvoetstang
Naaivoethouderschroef
Verwijder de naaivoethouder. Doe de naaivoethefboom omhoog, draai de naaivoet- houderschroef los en verwijderde houder.
Stel de transporteurknop op niet transporteren.
Plaats de quiltvoet.
00 01

56
Optional parts /Accessoires optionnelsPiezas opcionales / Optionele accessoiresInvisible zipper footPied fermeture invisiblePrensatelas de puntada invisible
Since a seam does not appear on the right side of fabric, openingcan be finished with fabric edges neatly butted.
A fin qu’aucune couture apparaisse sur le devant du tissu, l’ouverturedoit être finie avec les bords du tissu rentrés à l’intérieur.
Como la costura no aparece en el lado derecho, la apertura puedeacabarse con los extremos del tejido remetidos.
Check the zipper opening size. Install the standard presserfoot (A).Place two pieces of fabric face to face. Baste the fabric from the edgeof fabric to the opening end. At the opening end, change the stitchlength to [2.0] and sew reverse stitches by 1 cm and sew until thepredetermined position is reached. Neatly open the seam allowance.
Vérifiez la taille de l’ouverture du zip. Installez le pied standard(A).Placez les deux morceaux de tissu face à face. Bâtissez depuis lebord du tissu jusqu’à l’extrémité de l’ouverture. Arrivé à celle-ci, réglezla longueur du point à (2) et cousez en arrière sur 1 cm et cousezjusqu’à la position prédéterminée. Ouvrez sur la tolérance de cou-ture.
Comprobar el tamaño de la cremallera. Instalación delprensatelas (A).Coloque dos piezas de tejido encaradas. Hilvane el tejido desde suextremo hasta su apertura final. En dicha apertura, cambie la longitudde puntada a 2.0 y cosa con puntadas inversas durante 1 cm. Acontinuación, siga cosiendo hasta que alcance la posición que desea.Respete el margen de apertura de la costura.
Fabric (wrong side)Tissu (envers)Tejido (del revés)
BastingBâtiHilvanar
RunstitchSurpiqûrePespunte
Reverse stitch (1 cm)Couture arrière (1cm)Puntada inversa (1 cm)
1
2.5 cm
a: Apertura finalb: Tamaño aperturac: Tamaño cremallera
a: Opening endb: Opening sizec: Zipper size
a: Extrémité d’ouvertureb: Taille d’ouverturec: Taille du zip
ab
CAUTION: Make sure to turn off the machinebefore changing the presser foot.
ATTENTION:
PRECAUCIÓN: Asegúrese de apagar la máquinaantes de cambiar el prensatelas.
Assurez-vous d’éteindre la machineavant de changer le pied presseur.
Pattern to be usedProgrammeTipo de costura a utilizar
c
Onzichtbare rits-voet
Te gebruiken steek
VOORZICHTIG: Verwijder de stekker uit het stop- contact voor u de voet verwisselt.
Omdat er geen naad verschijnt aan de bovenkant van de stof, kan de opening afgewerkt worden met de stof die aan de binnenkant blijft.
Rijgsel
Stof (achterkant)
Stiksel
Retour steken (1 cm)
a: Openingseinde van de ritsb: Lengte van de openingc: Ritslengte
Controleer de openingslengte van de rits. Plaats de standaard naaivoet (A). Leg twee stukken stof met de voorkant op elkaar. Rijg de stukken aan elkaar van de rand van de stof tot het openingseinde van de rits. Bij dit openingseinde verandert u de steeklengte naar 2,0 en doet u over 1 cm retoursteken en naait u vervolgens weer naar het einde. Open de zoomoverlap zorgvuldig.
00

57
Undo the basting stitch seam to the bottom of opening as shownin the sketch given in step 1. Then, open the zipper.
Depuis le point de bâti du fond de l’ouverture, suivez les étapes.1. puis, ouvrez la fermeture.
Quite el hilván de abajo a arriba tal y como explica el punto 1. Acontinuación, abra al cremallera.
Aligning the teeth of either zipper tape with the groove on thezipper foot, sew the zipper at the very edge of the teeth from theend of opening while raising the teeth with fingers.
Alignez les dents avec la bande de la fermeture avec la fentecontre le pied, cousez au plus près des dents.
Alinee los dientes de la cremallera con el hendidura delprensatelas de cremallera. Cosa la cremallera lo máximo al bordede los dientes de la misma, desde el final de la apertura mientrassube los dientes con los dedos.
TapeBandeCinta de lacremallera
TeethDentsDientes
SeamCoutureCostura
FabricTissuTejido
Invisible zipper footPied fermeture invisiblePrensatelas de cremallera invisible
3
4
Put the invisible zipper on the fabric so that its center meets theseam line. Place a cardboard between the seam allowance andfront fabric.Manually baste both sides of seam allowances and zipper tapes.Upon completion of basting, remove the cardboard.
Mettez la fermeture invisible sur le tissu afin que son centrerencontre la ligne de couture. Placez du carton de renfort entre labande de tolérance et le dessus du tissu.Bâtissez manuellement chacun des côtés de la bande de toléranceet celle du zip.Une fois terminé, retirez le renfort.
Coloque la cremallera invisible en el tejido de forma que el centrocoincida con la línea de costura. Coloque un cartón entre elmargen de la costura y el delantero del tejido.Hilvane manualmente los dos lados de los márgenes de costurade la cremallera.Tras acabar de hilvanar, quite el cartón.
Invisible zipper(wrong side)Fermeture invisible(envers)Cremallera invisible(del revés)
a
CardboardCarton renfortCartón
2BastingBâtiHilvanar Fabric (wrong side)
Tissu (envers)Tejido (del revés)
a: Basting (only zipper tape and seam allowance)a: Bâti (bande du zip et tolérance seulement)a: Hilvanar (solo la cremallera y el margen de la costura)
Rijgsel
Karton
Stof (achterkant)
Onzichtbare rits (achterkant)
a: Rijgsel (alleen ritsband en zoomoverlap)
Leg de onzichtbare rits op de stof met het midden op zoomlijn. Leg een stukje karton tussen de zoomoverlap en de stof. Rijg beide zoomoverlappen aan het ritsband. Verwijder vervolgens het karton.
Verwijder het rijgsel naar het ondereinde van de rits zoals in de tekening bij (1) aangegeven. Vervolgens opent u de rits.
Onzichtbare rits-voet
Band
ZoomTanden
Stof
Geleidt de tanden van de ritsband door de ene groef van de voet en naai de rits vlak langs de tanden van onder naar boven terwijl u de tanden voorzichtig met de hand begeleidt.

58
Take out the slider and pull it out to appear on the right side of thefabric.
Sortez la glissière et tirez-la sur l’endroit du tissu.
Saque el carro de forma que aparezca en el derecho del tejido.
SliderGlissièreCarro
6
5Sew the remaining zipper tape on the other side of seam allow-ance in the same procedure.(The lower portion of zipper tape located below the bottom of theopening will remain loose without sewn on the seam allowance.)
Cousez en maintenant la bande de la fermeture de l’autre côtéde la tolérance de couture, de la même manière que le fond del’ouverture restera lâche sans couture sur la tolérance de cou-ture).
Cosa el otro lado de la cremallera en el otro margen de la costurasiguiendo el mismo procedimiento.(La parte inferior de la cremallera que queda por debajo de laapertura inferior quedará suelta sin coserse a la costura).
TeethDentsDientes
SeamCoutureCostura
FabricTissuTejido
Invisible zipper footPied fermeture invisiblePrensatelas decremallera invisible
TapeBandeCinta de lacremalleraOnzichtbare rits-voetBand
TandenZoom
Stof
Geleidt de tanden van de ritsband door de andere groef van de voet en naai de rits vlak langs de tanden van onder naar boven terwijl u de tanden voorzichtig met de hand begeleidt. (De onderkant van de rits voorbij het openingseinde blijft los als het niet aan zoomoverlap wordt genaaid).
Trekker
Neem de trekker uit om hem aan de buitenzijde van de stof te laten verschijnen.

59
Manual buttonhole footPied boutonnière manuellePrensatelas de ojales manual
Use this foot for buttonholing heavy-weight placket or collar band.
Utilisez ce pied pour des boutonnières sur des issus épais et spongieux.
Utilice este prensatelas para hacer los ojales en los rellenos de cuellos o puños.
1
3
2Mark fabric to indicate but-tonhole placement.Lower buttonhole foot sothat mark is at center ofneedle entry hole in foot.
Marquez le tissu àl’emplacement requis.Abaissez le pied afin de lamarque soit alignée avec lecentre du trou d’entrée del’aiguille dans le pied.
Marque el tej ido paraindicar el lugar que ocuparáel ojal.Baje el prensatelas deojales de forma que lamarca quede en el centrodel agujero del prensatelaspor donde pasa la aguja.
Lower buttonholing lever.
Abaissez le levierboutonnière.
Baje la palanca del soportedel prensatelas de ojales.
MarkMarqueMarca
Buttonholing leverLevier boutonnièreSoporte delprensatelas de ojales
End of markMarque de finFinal de la marca
When needle reaches endof marker line, slightly pressbuttonholing lever towardsrear of machine.
Quand l’aiguille arrive à lafin de la marque, appuyezfranchement sur le levierboutonnière en direction del’arrière de la machine.
Cuando la aguja alcance elfinal de la línea marcada,empuje suavemente haciaatrás la palanca del soportedel prensatelas.
CAUTION: Make sure to turn off the machinebefore changing the presser foot.
ATTENTION:
PRECAUCIÓN: Asegúrese de apagar la máquina
Assurez-vous d’éteindre la machineavant de changer le pied presseur.
Pattern to be usedProgrammeTipo de costura a utilizar
Handmatig knoopsgat-voet
Te gebruiken steken
VOORZICHTIG: Verwijder de stekker uit het stop- contact voor u de voet verwisselt.
Gebruik deze voet voor knoopsgaten in zware, dikke stof.
Merkteken
Doe de knoopsgat voet om- laag op het merkteken. Doe de voet zo omlaag dat het merkteken zich in het centrum van het naaldgat van de voet bevindt.
Knoopsgathevel
Doe de knoopsgathevel om- laag, druk voorzichtig naar voren en begin te naaien.
Einde van markering
Als de naald het einde van uw markering bereikt, drukt u voorzichtig de knoopsgat- hevel naar achteren.
11

60
5
4 When needle reaches be-ginning of mark, slightly pulllever towards front of ma-chine.* Machine starts straightstitching on right-hand par-allel section of buttonhole.
Quand l’aiguille arrive à lafin de la marque appuyezfranchement sur le levierboutonnière vers l’arrière.* La machine commenceune point zigzag sur la droitede la boutonnière.
Cuando la aguja llegue alinicio de la marca, empujesuavemente hacia delantela palanca.* La máquina coserápespunte recto en el ladoderecho del ojal.
When needle reaches endof mark, slightly press but-tonhole lever towards rearof machine.* Machine starts zigzagstitching on right-hand par-allel section of buttonhole.
Quand l’aiguille arrive audébut de la marque tirezfranchement le levierboutonnière vers vous.* La machine commencepar une couture à droite dela boutonnière.
Cuando la aguja alcance elfinal de la marca, aprietesuavemente la palanca delsoporte de ojales haciaatrás.* La máquina coserá zig zagen el lado derecho del ojal.
MarkMarqueMarca
End of markMarque de finFinal de la marca
6 When needle reaches be-ginning of mark, slightly pulllever towards front of ma-chine and sewing machinewill start bartacking,performfastening stitching and stop.
Quand l’aiguille arrive audébut de la marque tirezfranchement le levierboutonnière vers vous et lamachine coud la bride puisles points d’arret et s’arrête.
Cuando la aguja alcance elinicio de la marca, aprietesuavemente hacia delantela palanca. La máquinaempezará a atacar yparará.
Stop the machineArrêt de la machineParo de la máquina
Caution1. Take care not to allow fabric to come in contact with buttonholing lever. If buttonholing lever is pressed by mistake, operation mode will be changed to bartacking.2. If sewing machine does not operate as described above, stop machine and re-press stitch selection button. It will start buttonholing from the beginning.
ATTENTION:1. Faîtes attention que le tissu ne gêne pas course du levier boutonnière. Si celui-ci est appuyé par erreur, le cycle des points sera modifié.2. Si la machine n’effectue pas le travail comme décrit ci-avant, arrêtez la machine et re-sélectionnez le programme. La fonction boutonnière automatique sera reprise depuis le début.
Precaución1. Asegúrese de que el tejido no entre en contacto con la
palanca del soporte. Si se apretase por error dicha palanca, la máquina empezaría a hacer atacados.2. Si la máquina no funciona tal y como se ha descrito, pare y apriete de nuevo el botón de selección de tipo de costura. La máquina empezará a hacer ojales desde el inicio.
Merkteken
Wanneer u terug bent op het begin van uw merkteken, doet u de hevel voorzichtig naar voren. * De machine rechtstikt nu de rechterkant van het knoops- gat.
Einde van merkteken
Als de naald het eind bereikt, drukt u de knoopsgathevel naar achteren. * De machine zigzagt nu de rechterkant van het knoops- gat.
Stop de machine
Als u weer terug bent op het beginpunt, doet u de hevel naar voren.
* De machine maakt nu de afwerksteken.
Voorzichtig1. Zorg ervoor dat de stof niet in contact komt met de
knoopsgathevel. Als de hevel per ongeluk aangeraakt wordt, begint de machine terstond aan de volgende bewerking.
2. Als de machine niet doet zoals boven beschreven, stopt u en drukt u nogmaals op de steekkeuzeknop en begint u opnieuw.

61
Rolled hemming footPied ourlet rouléPrensatelas de dobladillo de caracolillo
2
1
Drawing ends of needle and bobbin threads, turn handwheel 3 or 4 turns byhand to guide fabric to hemmer foot.
En maintenant les bouts des fils d’aiguille et de canette, tournez manuellementle volant 3 ou 4 tours pour guider le tissu dans le pied. Cousez.
Sosteniendo los cabos de hilo de la aguja y de la canilla, gire manualmenteel volante 3 ó 4 vueltas para guiar el tejido hacia el prensatelas.
Cut away a corner of fabric in order to make work easier.Insert fabric into spiral groove in hemmer foot until needle position is reached.
Coupez un coin du tissu afin de pouvoir travailler facilement.Insérez le tissu dans la spirale formée par le pied jusqu’à l’aiguille.
Para facilitar el trabajo, corte la esquina del tejido.Coloque el tejido en la ranura en forma de espiral del prensatelas hasta quese alcance la posición de agua.
10cm
0.5cm
0.8cmFabricTissuTejido
Fabric edge is hemmed while rolling it under.Used for finishing bottom of shirts and blouses and edges of frills and handkerchiefs.
Le bord du tissu est ainsi roulé en dessous.Permet de finir les bas de robes chemisiers et les bord des mouchoirs légers.
Se hace el dobladillo mientras se va enrollando.Este tipo de dobladillo se utiliza a menudo en camisas y blusas.
CAUTION: Make sure to turn off the machinebefore changing the presser foot.
ATTENTION:
PRECAUCIÓN: Asegúrese de apagar la máquinaantes de cambiar el prensatelas.
Assurez-vous d’éteindre la machineavant de changer le pied presseur.
Pattern to be usedProgrammeTipo de costura a utilizar
GrooveFenteRanura
Rolzoomvoet
Kies de juiste steek
VOORZICHTIG: Verwijder de stekker uit het stop- contact voor u de voet verwisselt.
Stofrand gezoomd met een rol.Gebruikt voor het afwerken van stofranden van onderkanten van overhemden en blouses, zakdoeken enzovoorts.
Rol
Stof
Knip een hoekje van de stof af om gemakkelijker te werken. Doe de stof in de rol van de zoomvoet tot aan het naaldgat.
Trek de boven en onderdraad zachtjes naar achteren en draai het handwiel 3 tot 4 slagen naar u toe en geleidt de stof door de voet. Begin met naaien.
00

62
This even feed foot is generally used for fabrics (such as knits, jersey, vinyl cloth, artificial leather and leather) that are difficultto be fed by sewing machine. It ensures smooth feed of fabric while preventing fabric slippage to achieve neatly finishedseams.
Ce pied est généralement employé pour les matières (comme les tricots, jersey, vinyl, cuir artificiel et cuir) qui sont difficiles àentraîner sous le pied normal. Il assure un entraînement progressif et souple qui évite les fronces ou les défauts de point.
Este prensatelas se utiliza para tejidos, como punto, jersey, vinilo, piel artificial y piel auténtica, que son difíciles de alimentar.Este prensatelas garantiza una alimentación uniforme y un acabado óptimo de las costuras.
CAUTION: Make sure to turn off the machinebefore changing the presser foot.
ATTENTION:
PRECAUCIÓN: Asegúrese de apagar la máquinaantes de cambiar el prensatelas.
Assurez-vous d’éteindre la machineavant de changer le pied presseur.
Pattern to be usedProgrammeTipo de costura a utilizar
Even feed footPied double entraînementPrensatelas para alimentar el tejido de forma uniforme
1Presser barBarre du piedBarra del prensatelas
Presser foot clamp screwVis de supportTornillo del prensatelas
Remove presser foot holder.Lift presser bar, remove presser foot clamp screw and presser foot holder.
Retirez le support du pied.Relevez la barre du pied, retirez le pied et sa vis de support pour retirer celui-ci.
Quite el soporte del prensatelas.Suba la barra del prensatelas, quite el tornillo y saque el soporte.
Attach even feed foot to machine.Put forked section of actuating lever around needle clamp, attach to presserbar and securely tighten presser foot clamp screw.
Mettez le pied double entraînement sur la machine.Mettez la partie fourchue du levier en mouvement du pied sur la vis du serre-aiguille, mettez le pied en place et vissez fortement la vis du support.
Coloque el prensatelas para la alimentación uniforme del tejido.Coloque la horquilla de la palanca alrededor del clamp de la aguja, coloquela barra del prensatelas y apriete el tornillo.
* Sewing speed should be set at low to medium.* La vitesse de couture doit être comprise entre lent et moyen.* La velocidad debe ajustarse de forma que esté entre la mínima y la media.
2
Needle clamp screwVis serre-aiguilleTornillo de la aguja
Actuating leverLevier en mouvementPalanca
Presser foot clamp screwVis du supportTornillo delprensatelas
Boventransportvoet
Kies de juiste steek
VOORZICHTIG: Verwijder de stekker uit het stop- contact voor u de voet verwisselt.
De boventransportvoet wordt over het algemeen gebruikt bij stoffen (gebreide stoffen, jersey, vinyl,kunstleer of leer) die moeilijk worden getransporteerd door de machine. Deze voet verzekerd een correct stoftransport en voorkomt het wegglijden van de stof.
Persvoetstang
Naaivoethouderschroef
Verwijder de naaivoethouder. Doe de naaivoethefboom omhoog, draai de naaivoethouder- schroef los en verwijder de houder.
Boventransportvoethevel
Naaivoethouder-schroef
Naaldklemschroef
Bevestig de boventransportvoet aan de machine. Doe de vorkhevel van de voet om de naaldklem en bevestig de voet aan de persvoetstang en maak de persvoetschroef zorgvuldig vast.
* Stel de naaisnelheid in op langzaam tot gemiddeld.
01

63
Smooth footPied à semelle lissePata deslizante
This foot provides smoothsurface.Smooth foot is suitable forhard-to-feed fabrics (jersey,vinyl cloth or leather).
Ce pied a une semelle lisse.Il est particulièrementrecommandé pour les tissusdifficiles à entrainer (jersey,vinyl, tissu ou cuir).
Esta pata posee unasuperficie deslizante.Se aconseja su uso entejidos dificiles de alimentar(jerseys, vinilo, ropa o piel).
CAUTION: Make sure to turn off the machinebefore changing the presser foot.
ATTENTION:
PRECAUCIÓN: Asegúrese de apagar la máquinaantes de cambiar el prensatelas.
Assurez-vous d’éteindre la machineavant de changer le pied presseur.
Teflonvoet
VOORZICHTIG: Verwijder de stekker uit het stop- contact voor u de voet verwisselt.
De teflon voet heeft een extra gladde zool en is speciaal geschikt voor moeilijk te transporteren stoffen als jersey, vinyl en leer.

64
Turn lamp bulb to remove it. Install a new lamp bulb in place.
Pour retirer l’ampoule de lampe, la tourner. Poser une ampoule de lampeneuve.
Para sacar la bombilla, gírela. Coloque una nueva.
Replacing lamp (How To Remove Face Cover)Comment remplacer l’ampouleCambio de la bombilla (Cómo quitar la tapa frontal)Verwisselen van de lamp
Loosen setscrew located on rear face of machine.Slide cover straight in a lateral direction until it comes off.
Utilisez le tournevis, ôtez la vis de maintien du capot et retirezle.
Afloje el tornillo que está en la parte posterior de la máquina.Corra la tapa hasta que salga.
* Power consumption of lamp bulb is 15 W.* Purchase correct lamp bulb from JUKI distributor in your area from which you have bought your machine.
* La puissance de l’ampoule est de 15 watts.* Se procurer l’ampoule de lampe correcte auprès du distributeur JUKI local chez qui la machine a été achetée.
* El consumo de la bombilla es de 15 W.* Asegúrese de comprar la bombilla adecuada contactando con su distribuidor.
SetscrewVisTornillo
Lamp bulbAmpoule de lampeBombilla
CAUTION:Be sure to disconnect the plug from the wall outlet before replacing light bulb.Contact the dealer in your area for the correct light bulb replacement.Light bulb is hot after usage of the machine.
ATTENTION:
1
2
Rear of sewing machineDos de la machine à coudreParte trasera de la máquina
PRECAUCIÓN:Antes de cambiar la bombilla, asegúrese de desconectar la máquina de la red eléctrica.Contacte con su distribuidor para saber que tipo de bombilla es la adecuada.Tenga en cuenta, que la bombilla, tras haber estado en funcionamiento, estará caliente.
Avant de remplacer l’ampoule de lampe, débrancher la fiche de la prise murale.Contactez vorte revendeur le plus proche pour un remplacement adapté.L’ampoule de lampe est chaude après l’utilisation de la machine.
VOORZICHTIG:• Verwijder de stekker uit het stop contact voor u de voet verwisselt.
• Bij het vervangen van het lampje neemt u contact op met uw leverancier voor het juiste type lamp.
• Het lampje is heet na gebruik van de machine.
Achterkant van de machine
Schroef
Draai de schroef los aan de achterkant van de machine. Haal de beschermkap horizontaal naar links van de machine.
Lamp
Draai de lamp uit de fitting en plaats de nieuwe lamp.
* Gebruik een 15 Watt lampje. Vraag het juiste lampje aan uw leverancier.
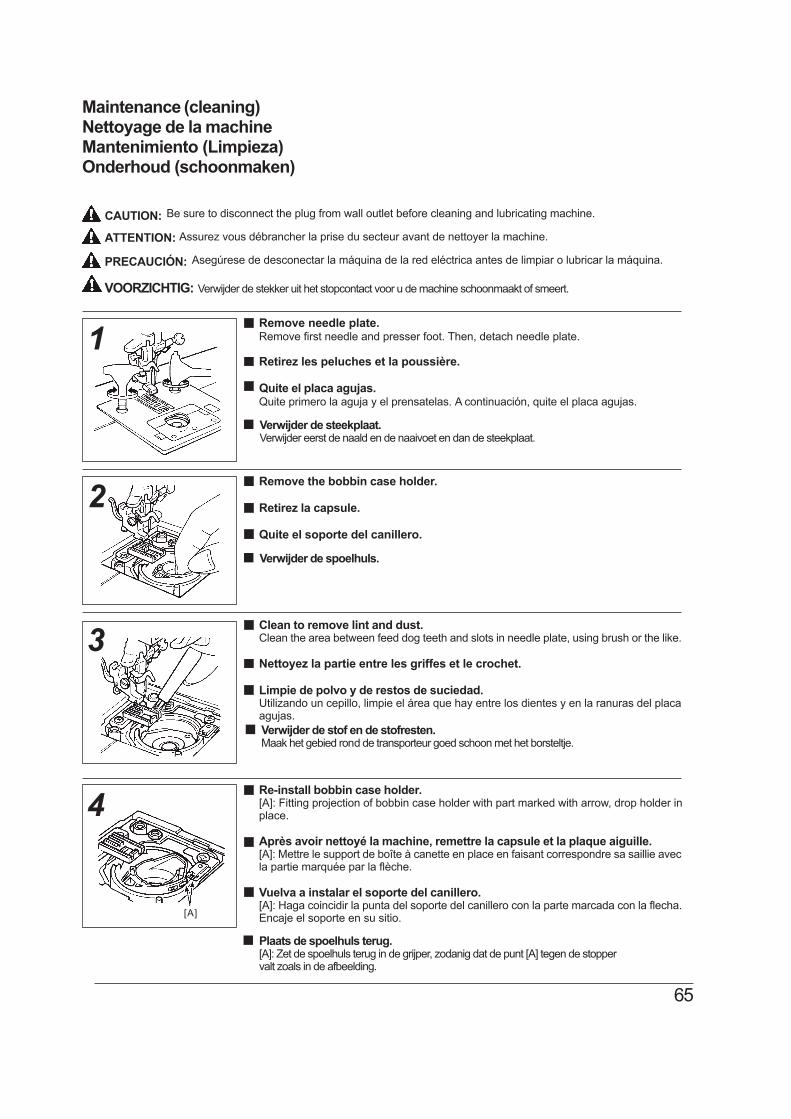
65
Maintenance (cleaning)Nettoyage de la machineMantenimiento (Limpieza)Onderhoud (schoonmaken)
Remove needle plate.Remove first needle and presser foot. Then, detach needle plate.
Retirez les peluches et la poussière.
Quite el placa agujas.Quite primero la aguja y el prensatelas. A continuación, quite el placa agujas.
Remove the bobbin case holder.
Retirez la capsule.
Quite el soporte del canillero.
Re-install bobbin case holder.[A]: Fitting projection of bobbin case holder with part marked with arrow, drop holder inplace.
Après avoir nettoyé la machine, remettre la capsule et la plaque aiguille.[A]: Mettre le support de boîte à canette en place en faisant correspondre sa saillie avecla partie marquée par la flèche.
Vuelva a instalar el soporte del canillero.[A]: Haga coincidir la punta del soporte del canillero con la parte marcada con la flecha.Encaje el soporte en su sitio.
1
3
CAUTION: Be sure to disconnect the plug from wall outlet before cleaning and lubricating machine.
ATTENTION:
Clean to remove lint and dust.Clean the area between feed dog teeth and slots in needle plate, using brush or the like.
Nettoyez la partie entre les griffes et le crochet.
Limpie de polvo y de restos de suciedad.Utilizando un cepillo, limpie el área que hay entre los dientes y en la ranuras del placaagujas.
PRECAUCIÓN: Asegúrese de desconectar la máquina de la red eléctrica antes de limpiar o lubricar la máquina.
Assurez vous débrancher la prise du secteur avant de nettoyer la machine.
2
4
[A]
VOORZICHTIG: Verwijder de stekker uit het stopcontact voor u de machine schoonmaakt of smeert.
Verwijder de steekplaat. Verwijder eerst de naald en de naaivoet en dan de steekplaat.
Verwijder de spoelhuls.
Verwijder de stof en de stofresten. Maak het gebied rond de transporteur goed schoon met het borsteltje.
Plaats de spoelhuls terug. [A]: Zet de spoelhuls terug in de grijper, zodanig dat de punt [A] tegen de stopper valt zoals in de afbeelding.

Performance checklistIf sewing difficulties occur, make sure the instructions are correctly followed.If a problem still exists, the reminders below may help solve it.
Specification table
Needle breaks.
Machine fails tofeed fabric.
* Machine runs idle.* Stitch length is set at left position of manualmode.
* Drop feed is engaged.
* Return bobbin winder to the left.* Set stitch length at auto mode or rightposition of manual mode.
* Disengage drop feed.* Needle is bent. Needle is not correctly installed.* Presser foot does not match pattern selected.* Relation among needle, thread and fabric is not appropriate.
* Change needle with a new one and install itcorrectly.
* Use presser foot that matches the pattern selected.* Use needle and thread that match fabric.
Page
Thread breaks.
Bobbin threadbreaks.Skipped stitches.
15-1727,28
14
* Machine head is incorrectly threaded.* Thread is caught in a part that is not to bethreaded.
* Needle thread tension is too high.* Needle is bent.
* Re-thread machine head correctly.* Check spool pin and thread guide for threadtangling.
* Adjust thread tension adequately.* Replace needle with a new one.
* Needle is not installed correctly.* Needle is bent.* Machine head is not correctly threaded.
* Correctly attach needle.* Replace needle with a new one.* Re-thread machine head correctly.
22
23
25
Puckering occurs.
Thread tangles onwrong side of fabric.
Loud noise, heavyto turn the handwheel.
Sewing machine willnot sew when startbutton is pressed.
Needle cannot bethreaded.
* Thread tension is too high.* Needle and thread do not match fabric.
* Adjust thread tension adequately.* Use needle and thread that correctly matchfabric.
* Machine head is not correctly threaded. * Re-thread machine head correctly.
* Lint or dust has accumulated in hook. * Clean up hook.
* Bobbin winder is set in bobbin winding position.* Controller is connected to machine.
* Return bobbin winder to the left.
* Start machine with controller or remove connector from machine.
* Needle is not raised to its highest position.* Needle is not installed by fully insertinginto needle clamp.
* Sewing machine is rotated by mistake withneedle threading lever lowered (duringneedle threading).
* Turn handwheel to raise needle to its highest position.* Correctly install needle.
* Turn handwheel slightly away from you (in direction opposite to normal direction ofrotation in which handwheel turns to performsewing).
18-20-
2422
2222
18-20
2425
18-20
65
15-17
12
19
22
-
nekatebotnoitcA)nosaeR(esuaCmelborP
noitacificepSmetIDimensions 410 (W) x 300 (H) x 180 (D) mm
7.3kg (when attached with case: 8.4kg)
120V / 1.0A 60Hz (USA and Canada only)220-230V / 100W 50 / 60Hz
120V / 15W (USA and Canada only)240V / 15W
440 (W) x 305 (H) x 215 (D) mm
Weight
Dimensions when attachedwith case
Rated voltage/ Power con-sumption
Power consumption of lamp
66

Problèmes éventuels et remèdes simplesSi vous recontrez des difficultés,vérifiez d’abord que vous avez bien suivi les instructions.L’expérience démontre que la plupart des problèmes sont dus à des détails d’utilisation.Sinon, essayez de résoudre vorte problème à l’aide du tableau ci-dessous.En cas de persistance, ramenez la machine auprès de votre vendeur spécialisé.
Tableau de caractéristiques
Casse d’aiguilles.
La machinen’entraîne pas letissu.
* La machine tourne dans le vide.* La longueur du point est réglée en positiongauche du mode manuel.
* Placer l’entraînement par griffe en positionbasse.
* Remettre le dévidoir de canette à gauche.* Sélectionnez la longueur du point en modeauto ou en position droite du mode manuel.
* Placer l’entraînement par griffe en position haute.
* L’aiguille est tordue. Elle n’est pascorrectement mise.
* Le pied presseur n’est pas adapté auprogramme sélectionné.
* La relation aiguille/fil/tissu est inappropriée.
* Changer l’aiguille avec une nouvelle etl’installer correctement.
* Mettre un pied presseur adapté.
* Utiliser une aiguille et un fil appropriés.
Page
Cassa de fils.
Le fil de canettecasse.Points manqués.
15-1727,28
14
* La machine est mal enfilée.* Le fil est entré dans un endroit non prévu.
* La tension supérieure est trop forte.* L’aiguille est épointée.
* Renfiler la machine correctement.* Vérifier depuis le porte-bobine et les guide-fils.
* Régler correctement la tension.* Remplacer l’aiguille.
* L’aiguille est mal mise.* L’aiguille est épointée.* La machine est mal enfilée.
* Remettre correctement l’aiguille.* Remplacer l’aiguille.* Refaire l’enfilage.
22
23
25
Fronçes
Boucles au-dessous du tissu.
Machine dure etbruyante.
La machine ne coudpas quand onactionne la toucheStart.
L’aiguille ne peutêtre enfilée.
* La tension du fil est trop forte.* L’aiguille ou le fil ne correspond pas autissu.
* Réduire la tension.* Utiliser une aiguille ou un fil adéquat.
* La machine est mal enfilée. * Refaire l’enfilage.
* Poussière et débris accumulés dans lecrochet.
* Nettoyer le crochet.
* Le dévidoir de canette est en position remplissage.* Le rhéostat est branché.
* Remettre le dévidoir à gauche.
* Démarrer la machine avec le rhéostat ou ledébrancher.
* L’aiguille n’est pas relevée à fond.
* L’aiguille est pas bien insérée dans le serre-aiguille.* La machine est actionnée par erreur avec l’enfileur abaissé.
* Tourner manuellement le volant pour la remonter.* Installer correctement l’aiguille.
* Tourner le volant à l’envers (vers l’arrière).
18-20-
2422
2222
18-20
2425
18-20
65
15-17
12
19
22
-
esuaCemélborP A faire
120V / 1.0A 60Hz (USA et Canada)220-230V / 100W 50 / 60Hz
euqitsirétcaraCtejuSDimensions 410 (L) x 300 (H) x 180 (P)
7.3 kg (avec mallette : 8.4 kg)
120V / 15W (USA et Canada)240V / 15W
440 (L) x 305 (H) x 215 (P)
Poids
Dimensions avec la mallette
Courant absorbé/consommation
Courant absorbé ampoule
67

Lista de problemas y solucionesSi tiene problemas con el funcionamiento de la máquina compruebe que ha seguido las instrucciones detalladasen este manual. Si tiene algún problema, consulte esta tabla para intentar solucionarlo.
Tabla de características
Se rompen lasagujas.
La máquina noalimenta bien eltejido.
* La máquina no funciona bien* La longitud de la puntada está establecidaen la posición izquierda del modo manual.
* Bajar la perilla de transporte.
* Gira el bobinador a la izquierda.* Establezca la longitud en el modo automáticoo en la posición derecha del modo manual.
* Subir la perilla de transporte.
* La aguja está doblada o no está bieninstalada.
* El prensatelas no es el adecuado para el tipo de costura seleccionada.* La relación entre la aguja, el hilo y el tejidono es correcta.
* Cambie la aguja por una nueva y/o instálelacorrectamente.
* Utilice el prensatelas adecuado al tipo decostura.
* Utilice la aguja y el hilo correcto para el tejido.
PAG.
El hilo se rompe.
El hilo de la canillase rompe.Se producen saltosde puntadas.
15-1727,28
14
* La máquina está mal enhebrada.* El hilo se ha enganchado.
* La tensión del hilo es demasiado alta.* La aguja está doblada.
* Vuelva a enhebrar la máquina.* Compruebe el pivote del portaconos y el guíahilos.
* Ajuste la tensión del hilo.* Cambie la aguja.
* La aguja no está bien instalada.* La aguja está torcida.* La máquina no está bien enhebrada.
* Instale bien la aguja.* Cambie la aguja.* Vuelva a enhebrar la máquina.
22
23
26
El tejido se ondula.
El hilo se enreda enel revés del tejido.
La máquina hace unruido raro y cuestagirar el volante.
Al apretar el botónde inicio, lamáquina no cose.
La aguja no sepuede enhebrar.
* La tensión del hilo es muy alta.* El hilo y la aguja no son los adecuadospara el tejido.
* Ajuste la tensión del hilo.* Utilice la aguja y el hilo adecuados al tejido.
* La máquina no está bien enhebrada. * Vuelva a enhebrar la máquina.
* Se ha acumulado suciedad en el garfio. * Limpie el garfio.
* El bobinador está colocado en la posiciónpara bobinar.
* El pedal está conectado a la máquina.
* Empuje el bobinador a la izquierda.
* Cosa con el pedal o desconéctelo de lamáquina.
* La aguja no está en su posición más alta.
* La aguja no está encajada del todo.* La máquina se ha puesto en marcha porerror con la palanca de enhebrar bajada(durante el enhebrado de la aguja.)
* Gire el volante para que la aguja alcance su punto más alto.* Instale bien la aguja.* Gire suavemente el volante en la direccióncontraria a usted (en la dirección contraria ala dirección de giro del funcionamiento normalde la máquina).
18-20-
2422
2222
18-20
2426
18-20
65
15-17
12
19
22-
NÓICULOS)NÓZAR(ASUACAMELBORP
CaracterísticasDimensiones 410 x 300 x 180 mm
7,3 kg (con maleta 8,4 kg)
120V / 1,0A 60Hz (Estados Unidos de América y Canadá)220-230V / 100W 50 / 60Hz
120V / 15W (Estados Unidos de América y Canadá)240V / 15W
440 x 305 x 215 mm
Peso
Dimensiones con caja
Voltaje y consumo eléctrico
Consumo eléctrico de labombilla
68

Verhelpen van storingenAls er zich problemen voordoen tijdens het naaien, kijk dan of u de instrucies van deze handleiding correct uitvoert.Als uw probleem blijft bestaan, kan onderstaande tabel u helpen met uw probleem.
Specificaties
PROBLEEM OORZAAK OPLOSSING BLZ.
Geen stoftransport.
*De machine draait loos.*Steeklengte staat in de linker positie van de handmatige modus.*De transporteur is verzonken.
*Doe de garenwinder naar links.*Zet de steeklengte in automodus of doe de regelaar naar links.*Doe de verzinkknop naar links
15-1727,28
14
Naald breekt.*De naald is krom of niet juist bevestigd.*De naaivoet is niet geschikt voor uw steek,*De relatie naald, garen en stof is niet juist.
*Plaats een nieuwe naald op de juiste wijze.*Kies de juiste voet.*Gebruik naald en garen dat bij de stof hoort.
222326
Draadbreuk.
*De machine is niet goed ingeregen.
*De draad zit ergens waar hij niet hoort.*De draadspanning is te hoog.*De naald is krom.
*Rijg de machine opnieuw in. Controleer het ingeregen pad.
*Corrigeer de draadspanning.*Plaats een nieuwe naald.
18-20-
2422
De onderdraad breekt.Steken overslaan.
*De naald is niet goed geplaatst.*De naald is krom.*De machine is niet goed ingeregen,
*Plaats de naald op de juiste wijze.*Plaats een nieuwe naald.*Rijg de machine opnieuw in.
22
2218-20
De stof rimpelt. *De spanning is te hoog.Naald en draad zij niet afgestemd op de stof.
*Corrigeer de spanning.
* Gebruik naald en garen dat bij de stof hoort.
24
26
De onderdraad verwart aan de onderkant van de stof.
*De machine is niet goed ingeregen. *Rijg de machine opnieuw in. 18-20
De machine loopt moeizaam. *Stof of stofresten in de grijper. *Maak de grijper schoon. 65
De machine doet niets als u op de startknop drukt.
*De garenwinder staat op winden.*De voetpedaal is aangesloten op de machine.
*Doe de garenwinder naar links.*Naai met de voetpedaal of haal depedaalstekker uit de machine.
15-17
12
De naaldinrijger doet het niet goed.
*De naald is niet in hoogste positie.*De naald is niet hoog genoeg ingestoken.
*De machine is verdraaid tijdens het inrijgen.
*Draai het handwiel tot de hoogste positie is bereikt.*Plaats de naald op de juiste wijze.
*Draai het handwiel een beetje tot de juiste positie weer is bereikt.
19
22
Onderwerp Specificatie
Afmetingen 410 (B) x 300 (H) x 180 (D) mm
Afmetingen in kap 440 (B) x 305 (H) x 215 (D) mm
Gewicht 7,3 kg, (In kap 8,4 kg)
Voltage 120V / 1,0A 60Hz (USA en Canada)220-230V / 100W 50/60 Hz
Verbruik Lampje 120V / 15W (USA en Canada)240V / 15W
69

Copyright © 2005 JUKI CORPORATION.All rights reserved throughout the world.
000105 (T)A9250E71Z00
8-2-1, KOKURYO-CHO,CHOFU-SHI, TOKYO 182-8655, JAPANPHONE : 03(3480)5034FAX : 03(3480)5037http : //www.juki.co.jpE-mail : [email protected]
AJE800S0B0A