control panels operation manual - grass valleygrassvalley.jp/pdf/encorecontrolpanelmanual.pdfcontrol...
TRANSCRIPT
EncoreCONTROL SYSTEM
Control Panels Operation Manual
SOFTWARE VERSION 1.7.3
071805303NOVEMBER 2007

Affiliate with the N.V. KEMA in The Netherlands
CERTIFICATECertificate Number: 510040.001
The Quality System of:
Grass Valley, Inc. 400 Providence Mine Road Nevada City, CA 95945 United States
15655 SW Greystone Ct. Beaverton, OR 97006 United States
10 Presidential Way 3rd Floor, Suite 300 Woburn, MA 01801 United States
Nederland B.V. 4800 RP BREDA The Netherlands
Weiterstadt, Germany Brunnenweg 9 D-64331 Weiterstadt Germany
Rennes, France Rue du Clos Courtel Cesson-Sevigne, Cedex France
Technopole Brest Iroise CS 73808 29238 Brest Cedex 3 France
17 rue du Petit Albi-BP 8244 95801 Cergy Pontoise Cergy, France
2300 South Decker Lake Blvd. Salt Lake City, UT 84119 United States
7140 Baymeadows Way Suite 101 Jacksonville, FL 32256 United States
Including its implementation, meets the requirements of the standard:
ISO 9001:2000 Scope:The design, manufacture and support of video hardware and software products and related systems.
This Certificate is valid until: June 14, 2009 This Certificate is valid as of: August 30, 2006 Certified for the first time: June 14, 2000
H. Pierre Sallé President KEMA-Registered Quality
The method of operation for quality certification is defined in the KEMA General Terms And Conditions For Quality And Environmental Management Systems Certifications. Integral publication of this certificate is allowed.
KEMA-Registered Quality, Inc.4377 County Line Road Chalfont, PA 18914 Ph: (215)997-4519 Fax: (215)997-3809 CRT 001 073004
Accredited By:ANAB

EncoreCONTROL SYSTEM
Control Panels Operation Manual
SOFTWARE VERSION 1.7.3
071805303NOVEMBER 2007

4 Encore — Control Panels Operation Manual
Contacting Grass ValleyInternational
Support CentersFrance24 x 7
+800 8080 2020 or +33 1 48 25 20 20+800 8080 2020 or +33 1 48 25 20 20
United States/Canada24 x 7 +1 800 547 8949 or +1 530 478 4148
Local Support Centers
(available during normal
business hours)
AsiaHong Kong, Taiwan, Korea, Macau: +852 2531 3058 Indian Subcontinent: +91 22 24933476Southeast Asia/Malaysia: +603 7805 3884 Southeast Asia/Singapore: +65 6379 1313China: +861 0660 159 450 Japan: +81 3 5484 6868
Australia and New Zealand: +61 1300 721 495 Central/South America: +55 11 5509 3443
Middle East: +971 4 299 64 40 Near East and Africa: +800 8080 2020 or +33 1 48 25 20 20
Europe
Belarus, Russia, Tadzikistan, Ukraine, Uzbekistan: +7 095 2580924 225 Switzerland: +41 1 487 80 02S. Europe/Italy-Roma: +39 06 87 20 35 28 -Milan: +39 02 48 41 46 58 S. Europe/Spain: +34 91 512 03 50Benelux/Belgium: +32 (0) 2 334 90 30 Benelux/Netherlands: +31 (0) 35 62 38 42 1 N. Europe: +45 45 96 88 70Germany, Austria, Eastern Europe: +49 6150 104 444 UK, Ireland, Israel: +44 118 923 0499
Copyright © Grass Valley. All rights reserved.This product may be covered by one or more U.S. and foreign patents.
Grass Valley Web Site The www.thomsongrassvalley.com web site offers the following:
Online User Documentation — Current versions of product catalogs, brochures, data sheets, ordering guides, planning guides, manuals, and release notes in .pdf format can be downloaded.
FAQ Database — Solutions to problems and troubleshooting efforts can be found by searching our Frequently Asked Questions (FAQ) database.
Software Downloads — Download software updates, drivers, and patches.

ContentsPreface. . . . . . . . . . . . . . . . . . . . . . . . . . . . . . . . . . . . . . . . . . . . . . . . . . . . . . . . . . . . . . . . . . . . . 9
About This Manual . . . . . . . . . . . . . . . . . . . . . . . . . . . . . . . . . . . . . . . . . . . . . . . . . . . . . 9Documentation Set . . . . . . . . . . . . . . . . . . . . . . . . . . . . . . . . . . . . . . . . . . . . . . . . . . . 9Additional Documentation . . . . . . . . . . . . . . . . . . . . . . . . . . . . . . . . . . . . . . . . . . . 10
Section 1 — Encore System Overview . . . . . . . . . . . . . . . . . . . . . . . . . . . . . . . . . 11Introduction . . . . . . . . . . . . . . . . . . . . . . . . . . . . . . . . . . . . . . . . . . . . . . . . . . . . . . . . . . 11
Controlled Hardware . . . . . . . . . . . . . . . . . . . . . . . . . . . . . . . . . . . . . . . . . . . . . . . . 12Encore System Controller Frame. . . . . . . . . . . . . . . . . . . . . . . . . . . . . . . . . . . . . . . 12Control Panels . . . . . . . . . . . . . . . . . . . . . . . . . . . . . . . . . . . . . . . . . . . . . . . . . . . . . . 14Encore System Control Fundamentals . . . . . . . . . . . . . . . . . . . . . . . . . . . . . . . . . . 15
Distributed Control System . . . . . . . . . . . . . . . . . . . . . . . . . . . . . . . . . . . . . . . . . 15Encore Database . . . . . . . . . . . . . . . . . . . . . . . . . . . . . . . . . . . . . . . . . . . . . . . . . . . 15Sharer Application . . . . . . . . . . . . . . . . . . . . . . . . . . . . . . . . . . . . . . . . . . . . . . . . . 15Configuration PC . . . . . . . . . . . . . . . . . . . . . . . . . . . . . . . . . . . . . . . . . . . . . . . . . . 15Sharer PC. . . . . . . . . . . . . . . . . . . . . . . . . . . . . . . . . . . . . . . . . . . . . . . . . . . . . . . . . 15
Routing Basics . . . . . . . . . . . . . . . . . . . . . . . . . . . . . . . . . . . . . . . . . . . . . . . . . . . . . . . . 16Terminology . . . . . . . . . . . . . . . . . . . . . . . . . . . . . . . . . . . . . . . . . . . . . . . . . . . . . . . . 16Matrix Crosspoints and Levels Description . . . . . . . . . . . . . . . . . . . . . . . . . . . . . 17Sources and Destinations Description . . . . . . . . . . . . . . . . . . . . . . . . . . . . . . . . . . 18Multi-Level Switching Description. . . . . . . . . . . . . . . . . . . . . . . . . . . . . . . . . . . . . 18
All Level Take. . . . . . . . . . . . . . . . . . . . . . . . . . . . . . . . . . . . . . . . . . . . . . . . . . . . . 18Breakaway Take . . . . . . . . . . . . . . . . . . . . . . . . . . . . . . . . . . . . . . . . . . . . . . . . . . . 19
Tie-Line Description . . . . . . . . . . . . . . . . . . . . . . . . . . . . . . . . . . . . . . . . . . . . . . . . . 19
Section 2 — Control Panels Overview . . . . . . . . . . . . . . . . . . . . . . . . . . . . . . . . . 21Control Panel Hardware Types . . . . . . . . . . . . . . . . . . . . . . . . . . . . . . . . . . . . . . . . . 21
Encore Control Panels. . . . . . . . . . . . . . . . . . . . . . . . . . . . . . . . . . . . . . . . . . . . . . . . 21SMS 7000 Control Panels . . . . . . . . . . . . . . . . . . . . . . . . . . . . . . . . . . . . . . . . . . . . . 21Kalypso Remote Aux Panels . . . . . . . . . . . . . . . . . . . . . . . . . . . . . . . . . . . . . . . . . . 21Acappella Control Panels . . . . . . . . . . . . . . . . . . . . . . . . . . . . . . . . . . . . . . . . . . . . . 21
Soft Panels . . . . . . . . . . . . . . . . . . . . . . . . . . . . . . . . . . . . . . . . . . . . . . . . . . . . . . . . . . . 22Control Panel Communications Interfaces . . . . . . . . . . . . . . . . . . . . . . . . . . . . . . . . 22Control Panel Software. . . . . . . . . . . . . . . . . . . . . . . . . . . . . . . . . . . . . . . . . . . . . . . . . 22Control Panel Configuration . . . . . . . . . . . . . . . . . . . . . . . . . . . . . . . . . . . . . . . . . . . . 23
Control Panel Defaults (Factory and Facility) . . . . . . . . . . . . . . . . . . . . . . . . . . . . 23Factory Default Templates and Areas . . . . . . . . . . . . . . . . . . . . . . . . . . . . . . . . . . 23
Control Panel Basic Functions. . . . . . . . . . . . . . . . . . . . . . . . . . . . . . . . . . . . . . . . . . . 24Protect and Lock . . . . . . . . . . . . . . . . . . . . . . . . . . . . . . . . . . . . . . . . . . . . . . . . . . . . 24Salvos Excluded . . . . . . . . . . . . . . . . . . . . . . . . . . . . . . . . . . . . . . . . . . . . . . . . . . . . . 24Chop Inactive . . . . . . . . . . . . . . . . . . . . . . . . . . . . . . . . . . . . . . . . . . . . . . . . . . . . . . . 24
Encore — Control Panels Operation Manual 5
Contents
Section 3 — Encore Control Panels . . . . . . . . . . . . . . . . . . . . . . . . . . . . . . . . . . . . 25
Introduction. . . . . . . . . . . . . . . . . . . . . . . . . . . . . . . . . . . . . . . . . . . . . . . . . . . . . . . . . . 25Key Features . . . . . . . . . . . . . . . . . . . . . . . . . . . . . . . . . . . . . . . . . . . . . . . . . . . . . . . 25Panel ID . . . . . . . . . . . . . . . . . . . . . . . . . . . . . . . . . . . . . . . . . . . . . . . . . . . . . . . . . . . 25
PMB Panel . . . . . . . . . . . . . . . . . . . . . . . . . . . . . . . . . . . . . . . . . . . . . . . . . . . . . . . . . . . 26PMB Panel Features . . . . . . . . . . . . . . . . . . . . . . . . . . . . . . . . . . . . . . . . . . . . . . . . . 26PMB Panel Description . . . . . . . . . . . . . . . . . . . . . . . . . . . . . . . . . . . . . . . . . . . . . . 26PMB Panel Default Button Assignments. . . . . . . . . . . . . . . . . . . . . . . . . . . . . . . . 26Taking a Source to a Destination (PMB Panel). . . . . . . . . . . . . . . . . . . . . . . . . . . 27Breakaway Take (PMB Panel). . . . . . . . . . . . . . . . . . . . . . . . . . . . . . . . . . . . . . . . . 28Level Tally (PMB Panel) . . . . . . . . . . . . . . . . . . . . . . . . . . . . . . . . . . . . . . . . . . . . . 29Protect (PMB Panel) . . . . . . . . . . . . . . . . . . . . . . . . . . . . . . . . . . . . . . . . . . . . . . . . . 29
To Protect a Destination . . . . . . . . . . . . . . . . . . . . . . . . . . . . . . . . . . . . . . . . . . . . 30To Unprotect a Destination . . . . . . . . . . . . . . . . . . . . . . . . . . . . . . . . . . . . . . . . . 30
Salvo (PMB Panel) . . . . . . . . . . . . . . . . . . . . . . . . . . . . . . . . . . . . . . . . . . . . . . . . . . 30XY Panel. . . . . . . . . . . . . . . . . . . . . . . . . . . . . . . . . . . . . . . . . . . . . . . . . . . . . . . . . . . . . 31
XY Panel Features . . . . . . . . . . . . . . . . . . . . . . . . . . . . . . . . . . . . . . . . . . . . . . . . . . . 31XY Panel Description . . . . . . . . . . . . . . . . . . . . . . . . . . . . . . . . . . . . . . . . . . . . . . . . 31XY Panel Default Button Assignments . . . . . . . . . . . . . . . . . . . . . . . . . . . . . . . . . 31Status Display Reporting of Source and Destination . . . . . . . . . . . . . . . . . . . . . 32Taking a Source to a Destination (XY Panel) . . . . . . . . . . . . . . . . . . . . . . . . . . . . 32
Using Dedicated Destination and Source Buttons . . . . . . . . . . . . . . . . . . . . . . 32Switching Non-Dedicated Sources to Destinations . . . . . . . . . . . . . . . . . . . . . 32
Breakaway Take (XY Panel) . . . . . . . . . . . . . . . . . . . . . . . . . . . . . . . . . . . . . . . . . . 33Protect (XY Panel) . . . . . . . . . . . . . . . . . . . . . . . . . . . . . . . . . . . . . . . . . . . . . . . . . . . 34Salvo (XY Panel) . . . . . . . . . . . . . . . . . . . . . . . . . . . . . . . . . . . . . . . . . . . . . . . . . . . . 34
BPS Panel . . . . . . . . . . . . . . . . . . . . . . . . . . . . . . . . . . . . . . . . . . . . . . . . . . . . . . . . . . . . 35BPS Panel Features . . . . . . . . . . . . . . . . . . . . . . . . . . . . . . . . . . . . . . . . . . . . . . . . . . 35BPS Panel Description . . . . . . . . . . . . . . . . . . . . . . . . . . . . . . . . . . . . . . . . . . . . . . . 35BPS Panel Default Button Assignments . . . . . . . . . . . . . . . . . . . . . . . . . . . . . . . . 35Default BPS Single Destination Operation . . . . . . . . . . . . . . . . . . . . . . . . . . . . . . 35Taking a Source to a Destination (BPS Panel) . . . . . . . . . . . . . . . . . . . . . . . . . . . 36Breakaway Take (BPS Panel). . . . . . . . . . . . . . . . . . . . . . . . . . . . . . . . . . . . . . . . . . 36Protect (BPS Panel) . . . . . . . . . . . . . . . . . . . . . . . . . . . . . . . . . . . . . . . . . . . . . . . . . . 36Salvo (BPS Panel) . . . . . . . . . . . . . . . . . . . . . . . . . . . . . . . . . . . . . . . . . . . . . . . . . . . 37Self Configuration (BPS Panel) . . . . . . . . . . . . . . . . . . . . . . . . . . . . . . . . . . . . . . . . 37
Source Self Configuration . . . . . . . . . . . . . . . . . . . . . . . . . . . . . . . . . . . . . . . . . . 37Level Self Configuration . . . . . . . . . . . . . . . . . . . . . . . . . . . . . . . . . . . . . . . . . . . 37Salvo Self Configuration . . . . . . . . . . . . . . . . . . . . . . . . . . . . . . . . . . . . . . . . . . . 38
48B Panel . . . . . . . . . . . . . . . . . . . . . . . . . . . . . . . . . . . . . . . . . . . . . . . . . . . . . . . . . . . . 3848B Panel Features . . . . . . . . . . . . . . . . . . . . . . . . . . . . . . . . . . . . . . . . . . . . . . . . . . 3848B Panel Description . . . . . . . . . . . . . . . . . . . . . . . . . . . . . . . . . . . . . . . . . . . . . . . 3848B Panel Default Button Assignments. . . . . . . . . . . . . . . . . . . . . . . . . . . . . . . . . 38Taking a Source to a Destination (48B Panel) . . . . . . . . . . . . . . . . . . . . . . . . . . . . 39Breakaway Take (48B Panel) . . . . . . . . . . . . . . . . . . . . . . . . . . . . . . . . . . . . . . . . . . 39Auto Tally and the Tally Level Button . . . . . . . . . . . . . . . . . . . . . . . . . . . . . . . . . 39
Tally Level Button . . . . . . . . . . . . . . . . . . . . . . . . . . . . . . . . . . . . . . . . . . . . . . . . . 40Protect (48B Panel) . . . . . . . . . . . . . . . . . . . . . . . . . . . . . . . . . . . . . . . . . . . . . . . . . . 40Salvo (48B Panel). . . . . . . . . . . . . . . . . . . . . . . . . . . . . . . . . . . . . . . . . . . . . . . . . . . . 40
Universal Control Panel (ENC-UCP) . . . . . . . . . . . . . . . . . . . . . . . . . . . . . . . . . . . . 41ENC-UCP Panel Features . . . . . . . . . . . . . . . . . . . . . . . . . . . . . . . . . . . . . . . . . . . . 41ENC-UCP Panel Description. . . . . . . . . . . . . . . . . . . . . . . . . . . . . . . . . . . . . . . . . . 41ENC-UPC Panel Default Button Assignments . . . . . . . . . . . . . . . . . . . . . . . . . . . 41
6 Encore — Control Panels Operation Manual
Contents
ENC-UCP Operation. . . . . . . . . . . . . . . . . . . . . . . . . . . . . . . . . . . . . . . . . . . . . . . . . 42
Section 4 — SMS7000 GSC Control Panels. . . . . . . . . . . . . . . . . . . . . . . . . . . . 43Introduction . . . . . . . . . . . . . . . . . . . . . . . . . . . . . . . . . . . . . . . . . . . . . . . . . . . . . . . . . . 43UCP Panel . . . . . . . . . . . . . . . . . . . . . . . . . . . . . . . . . . . . . . . . . . . . . . . . . . . . . . . . . . . 44
UCP Panel Features. . . . . . . . . . . . . . . . . . . . . . . . . . . . . . . . . . . . . . . . . . . . . . . . . . 44UCP Panel Description . . . . . . . . . . . . . . . . . . . . . . . . . . . . . . . . . . . . . . . . . . . . . . . 44UCP Panel Default Button Assignments . . . . . . . . . . . . . . . . . . . . . . . . . . . . . . . . 44Taking a Source to a Destination (UCP Panel) . . . . . . . . . . . . . . . . . . . . . . . . . . . 45Breakaway Take (UCP Panel) . . . . . . . . . . . . . . . . . . . . . . . . . . . . . . . . . . . . . . . . . 45Protect (UCP Panel). . . . . . . . . . . . . . . . . . . . . . . . . . . . . . . . . . . . . . . . . . . . . . . . . . 46Salvo (UCP Panel) . . . . . . . . . . . . . . . . . . . . . . . . . . . . . . . . . . . . . . . . . . . . . . . . . . . 46
P32 Panel . . . . . . . . . . . . . . . . . . . . . . . . . . . . . . . . . . . . . . . . . . . . . . . . . . . . . . . . . . . . 47P32 Panel Features. . . . . . . . . . . . . . . . . . . . . . . . . . . . . . . . . . . . . . . . . . . . . . . . . . . 47P32 Panel Description . . . . . . . . . . . . . . . . . . . . . . . . . . . . . . . . . . . . . . . . . . . . . . . . 47P32 Panel Default Button Assignments . . . . . . . . . . . . . . . . . . . . . . . . . . . . . . . . . 47Taking a Source to a Destination (P32 Panel) . . . . . . . . . . . . . . . . . . . . . . . . . . . . 48Breakaway Take (P32 Panel) . . . . . . . . . . . . . . . . . . . . . . . . . . . . . . . . . . . . . . . . . . 48Protect (P32 Panel). . . . . . . . . . . . . . . . . . . . . . . . . . . . . . . . . . . . . . . . . . . . . . . . . . . 48
MB8 Panel. . . . . . . . . . . . . . . . . . . . . . . . . . . . . . . . . . . . . . . . . . . . . . . . . . . . . . . . . . . . 49Default Button Configuration (MB8 Panel) . . . . . . . . . . . . . . . . . . . . . . . . . . . . . . 49MB8 Panel Operation . . . . . . . . . . . . . . . . . . . . . . . . . . . . . . . . . . . . . . . . . . . . . . . . 50
EDP Panel . . . . . . . . . . . . . . . . . . . . . . . . . . . . . . . . . . . . . . . . . . . . . . . . . . . . . . . . . . . . 50EDP Panel Operation . . . . . . . . . . . . . . . . . . . . . . . . . . . . . . . . . . . . . . . . . . . . . . . . 50Default Button Configuration (EDP Panel) . . . . . . . . . . . . . . . . . . . . . . . . . . . . . . 50
P48 Panel . . . . . . . . . . . . . . . . . . . . . . . . . . . . . . . . . . . . . . . . . . . . . . . . . . . . . . . . . . . . 51P48 Panel Operation . . . . . . . . . . . . . . . . . . . . . . . . . . . . . . . . . . . . . . . . . . . . . . . . . 51Default Button Configuration (P48 Panel) . . . . . . . . . . . . . . . . . . . . . . . . . . . . . . . 51
Section 5 — Kalypso Remote Aux Panels . . . . . . . . . . . . . . . . . . . . . . . . . . . . . 53Introduction . . . . . . . . . . . . . . . . . . . . . . . . . . . . . . . . . . . . . . . . . . . . . . . . . . . . . . . . . . 53
Key Features . . . . . . . . . . . . . . . . . . . . . . . . . . . . . . . . . . . . . . . . . . . . . . . . . . . . . . . . 53Remote Aux Panel Model Types . . . . . . . . . . . . . . . . . . . . . . . . . . . . . . . . . . . . . . . 54
KMD Panel . . . . . . . . . . . . . . . . . . . . . . . . . . . . . . . . . . . . . . . . . . . . . . . . . . . . . . . . . . . 54KMD Panel ID . . . . . . . . . . . . . . . . . . . . . . . . . . . . . . . . . . . . . . . . . . . . . . . . . . . . . . 55Default Button Configuration (KMD) . . . . . . . . . . . . . . . . . . . . . . . . . . . . . . . . . . 55KMD Panel Operation . . . . . . . . . . . . . . . . . . . . . . . . . . . . . . . . . . . . . . . . . . . . . . . 55
KSD Panel. . . . . . . . . . . . . . . . . . . . . . . . . . . . . . . . . . . . . . . . . . . . . . . . . . . . . . . . . . . . 56Default Button Configuration (KSD) . . . . . . . . . . . . . . . . . . . . . . . . . . . . . . . . . . . 56KSD Panel Operation . . . . . . . . . . . . . . . . . . . . . . . . . . . . . . . . . . . . . . . . . . . . . . . . 56
Section 6 — Acappella Control Panels . . . . . . . . . . . . . . . . . . . . . . . . . . . . . . . . . 57Introduction . . . . . . . . . . . . . . . . . . . . . . . . . . . . . . . . . . . . . . . . . . . . . . . . . . . . . . . . . . 57
Key Features . . . . . . . . . . . . . . . . . . . . . . . . . . . . . . . . . . . . . . . . . . . . . . . . . . . . . . . . 57Acappella Remote Panel Types . . . . . . . . . . . . . . . . . . . . . . . . . . . . . . . . . . . . . . . . 57Acappella Local Panels . . . . . . . . . . . . . . . . . . . . . . . . . . . . . . . . . . . . . . . . . . . . . . . 58
Default Button Configuration (Acappella Remote Panel) . . . . . . . . . . . . . . . . . . . 59Acappella Remote Panel Operation . . . . . . . . . . . . . . . . . . . . . . . . . . . . . . . . . . . . . . 59
Encore — Control Panels Operation Manual 7
Contents
Section 7 — Panel Operation Variations . . . . . . . . . . . . . . . . . . . . . . . . . . . . . . 61
Introduction. . . . . . . . . . . . . . . . . . . . . . . . . . . . . . . . . . . . . . . . . . . . . . . . . . . . . . . . . . 61Button Functions and Selections . . . . . . . . . . . . . . . . . . . . . . . . . . . . . . . . . . . . . . . . 61Exclusion Sets . . . . . . . . . . . . . . . . . . . . . . . . . . . . . . . . . . . . . . . . . . . . . . . . . . . . . . 61Keypad Sets . . . . . . . . . . . . . . . . . . . . . . . . . . . . . . . . . . . . . . . . . . . . . . . . . . . . . . . . 62Page Sets. . . . . . . . . . . . . . . . . . . . . . . . . . . . . . . . . . . . . . . . . . . . . . . . . . . . . . . . . . . 62
Attributes and Flags. . . . . . . . . . . . . . . . . . . . . . . . . . . . . . . . . . . . . . . . . . . . . . . . . . . 62General Settings . . . . . . . . . . . . . . . . . . . . . . . . . . . . . . . . . . . . . . . . . . . . . . . . . . . . 62
Auto Tally. . . . . . . . . . . . . . . . . . . . . . . . . . . . . . . . . . . . . . . . . . . . . . . . . . . . . . . . 62Auto Level Latching . . . . . . . . . . . . . . . . . . . . . . . . . . . . . . . . . . . . . . . . . . . . . . . 62Default Tally Level . . . . . . . . . . . . . . . . . . . . . . . . . . . . . . . . . . . . . . . . . . . . . . . . 63Display Alias Names . . . . . . . . . . . . . . . . . . . . . . . . . . . . . . . . . . . . . . . . . . . . . . 63Dst Change Lock . . . . . . . . . . . . . . . . . . . . . . . . . . . . . . . . . . . . . . . . . . . . . . . . . . 63Level Change Lock . . . . . . . . . . . . . . . . . . . . . . . . . . . . . . . . . . . . . . . . . . . . . . . . 63
Protect and Lock Settings . . . . . . . . . . . . . . . . . . . . . . . . . . . . . . . . . . . . . . . . . . . . 63Protect . . . . . . . . . . . . . . . . . . . . . . . . . . . . . . . . . . . . . . . . . . . . . . . . . . . . . . . . . . . 63Hard Lock. . . . . . . . . . . . . . . . . . . . . . . . . . . . . . . . . . . . . . . . . . . . . . . . . . . . . . . . 63Soft Lock . . . . . . . . . . . . . . . . . . . . . . . . . . . . . . . . . . . . . . . . . . . . . . . . . . . . . . . . . 64Lock/Protect Override . . . . . . . . . . . . . . . . . . . . . . . . . . . . . . . . . . . . . . . . . . . . . 64Force Unlock/Protect . . . . . . . . . . . . . . . . . . . . . . . . . . . . . . . . . . . . . . . . . . . . . . 64Salvo Editor Lock/Protect . . . . . . . . . . . . . . . . . . . . . . . . . . . . . . . . . . . . . . . . . . 64
Control Panel Grouping. . . . . . . . . . . . . . . . . . . . . . . . . . . . . . . . . . . . . . . . . . . . . . 64Joystick Override . . . . . . . . . . . . . . . . . . . . . . . . . . . . . . . . . . . . . . . . . . . . . . . . . . . 64
Joystick Override Configuration. . . . . . . . . . . . . . . . . . . . . . . . . . . . . . . . . . . . . 65Joystick Override Operation . . . . . . . . . . . . . . . . . . . . . . . . . . . . . . . . . . . . . . . . 65
Index . . . . . . . . . . . . . . . . . . . . . . . . . . . . . . . . . . . . . . . . . . . . . . . . . . . . . . . . . . . . . . . . . . . . . . 67
8 Encore — Control Panels Operation Manual

Preface
About This ManualThis Encore Control Panels Operation Manual is designed for operators of a Grass Valley Encore control system who are not involved in Encore system configuration or servicing.
Documentation SetThe basic Encore documentation set consists of:
• Installation and Service Manual,
• Configuration Manual,
• Control Panels Operation Manual, and
• Release Notes.
The Installation and Service Manual contains information about installing Encore system hardware, maintaining Encore system components, and configuring network communications used by the system.
The Configuration Manual contains information about configuring an Encore system to meet the needs of your facility. Background information about Encore system design is included, and a description of the Encore Operator User Interface (OUI); which is used to configure, test, and operate the system; is also provided.
The Control Panels Operation Manual provides operating information for the control panels used with the Encore Control System.
The Release Notes contain information about new features and system enhancements for a specific software version. Software installation proce-dures are also provided. Always review the Release Notes for your current system software before you begin working with your Encore system.
Encore — Control Panels Operation Manual 9

Preface
Additional DocumentationDocumentation for various Encore system options is also available:
• Encore Soft Panels Instruction Manual, and
• Encore Salvo Editor Instruction Manual.
Software engineering documentation, intended for third-party developers and in-house software engineers, is also available:
• Routing Products Protocols Manual.
10 Encore — Control Panels Operation Manual

Section 1Encore System Overview
Note This same Overview section is included in several Encore manuals. If you are familiar with this material you can skip to the next section.
IntroductionThe Encore system is an open, scalable platform for full router and facility control. Featuring tight integration with Grass Valley router matrices, third-party routers, automation systems, and other equipment, the Encore system can consolidate media assets under a single, unified control system.
Figure 1. Encore Facility Control System
Encore SystemController(s)
EncoreSerial Controller
VTRs
Profile VDRs
Acts AsGatewayBetweenEN 1 and
EN 2
Encore OperatorWorkstation(s)
Notification viaPager, E-mail
or Phone
Trinix Digital VideoRouting Matrix
Apex Digital AudioRouting Matrix
AcappellaRemote Panels
AcappellaRouting Matrices
Encore EthernetControl Panels
PMB
48BEDP
P32
UCP
MB8
P48
XY
BPS
Series 7000Routing Matrices
SMS 7000Control System
ConcertoMulti-Format
Routing Matrix
7500 WB Digital Video Routing Matrix
7500 NB Digital AudioRouting Matrix
NetCentralSNMP Manager
Distributed Applications:
Serial Interface Options:
• System Manager• Router Control• Panel Servers• Tie-Line Manager
Encore EngineeringWorkstation
Windows GUI Applications:
Windows GUI Applications:
• Configuration• Local Router Panel• Local Machine Control Panel• Router Status
• Local Router Panel• Local Machine Control Panel
• Automation• ES Switch/Jupiter• 3rd Party Matrix/Tally• Horizon Matrix
RS-4
22
Cros
spoi
nt B
us
8053
_00r
0
Encore Controllerwith GSC Option
Encore Controller withRS-422 Serial Option
75 Ω
Coa
x Series 7000Control Panels
EN 1 Ethernet (Facility LAN) EN 2 Ethernet (Panel/Matrix LAN)
RS-4
22
Encore — Control Panels Operation Manual 11

Section 1 — Encore System Overview
The Encore system modular design lets broadcasters and other high-
quality content creators select just the level of control they need. At its most basic, the Encore system can configure and control the crosspoints of a single routing matrix, but it can be expanded to control multiple matrices.Controlled HardwareEncore can control a wide range of Grass Valley routers including Trinix, Apex, Concerto, Acappella, 7500 WB, and 7500 NB using Ethernet. Legacy 7000 Series and Horizon routers can be serially controlled. In addition, Encore can control the popular Grass Valley Venus routers with a serial interface to a VM-3000 protocol translator. A wide range of third party routers can also be controlled through a number of supported serial inter-faces. Users can also add tally and machine control via Ethernet or serial interfaces.
Encore System Controller FrameThe two rack-unit Encore System Controller Frame supports up to two System Controller Board (SCB) modules and two power supply modules for redundancy. A standard Encore System Controller Frame is equipped with one SCB and one power supply. All modules are front removable and hot pluggable. Cooling is built into the frame so no external cooling units are required.
Figure 2. Encore System Controller Frame
8053_09r0
12 Encore — Control Panels Operation Manual

Introduction
The System Controller Frame has two slots for SCBs and two slots for
Power Supply modules, located behind the front cover/air filter. Status indicator LEDs and a reset button are located on each SCB (Figure 3).Figure 3. System Controller and Power Supply Modules
Power Supply Modules
Reset Buttons
System Controller Modules
8053
_36r
0
Slot 1Slot 2
Slot 1Slot 2
Cabling and power connectors are located on the rear of the System Con-troller Frame (Figure 4).
Figure 4. System Controller Frame Rear View
8053_37_r0
J31USB J19J20J21J29J30
GPIIN
GPIOUT J5J6J7
GSC 4 GSC 3 GSC 2 GSC 1 REF OUT SYNC 2 SYNC 1
CONSOLECONSOLE
J1J2J3J4
J16
J35
J51
COM1
COM2
J52J53
EN1
EN2
J54
J36J37J38J39SIO 45678 3 2 1
J40J41J42J43J44J45J46J47J48J49J50
J17J18 J15J26J27J28J32J33
GPIIN
GPIOUT J12J13J14
GSC 4 GSC 3 GSC 2 GSC 1 REF OUT SYNC 2 SYNC 1
J8J9J10J11
J23J24J25 J22J34USBPS1
PS2
COL LNKLNK COL COL LNKLNK COL
J55
+
J56
COM1
COM2
J57J58
EN1
EN2
J59
SIO 45678 3 2 1
30-60V130W; 3.7A
Serial In/OutConnectors (8)
Com 1Console Port
EN1Ethernet Port
EN2Ethernet Port
SCB Slot 2 Connectors
DCPower
GPI In/OutConnectors (2)
GSC BNCs (8) Sync BNCs (4)
Com 2Port
SCB Slot 1 Connectors
GPI In/OutConnectors (2)
GSC BNCs (8) Sync BNCs (4)
Serial In/OutConnectors (8)
Com 1Console Port
EN1Ethernet Port
EN2Ethernet PortAC
Power
Com 2Port
Multiple Encore System Controller Frames can be used to support large systems and to increase throughput by dividing tasks among the control-lers. SCBs in the same frame can be configured to control different hard-ware or to operate redundantly. An SCB in one frame can even operate redundantly with an SCB in a different frame.
Encore — Control Panels Operation Manual 13
Section 1 — Encore System Overview
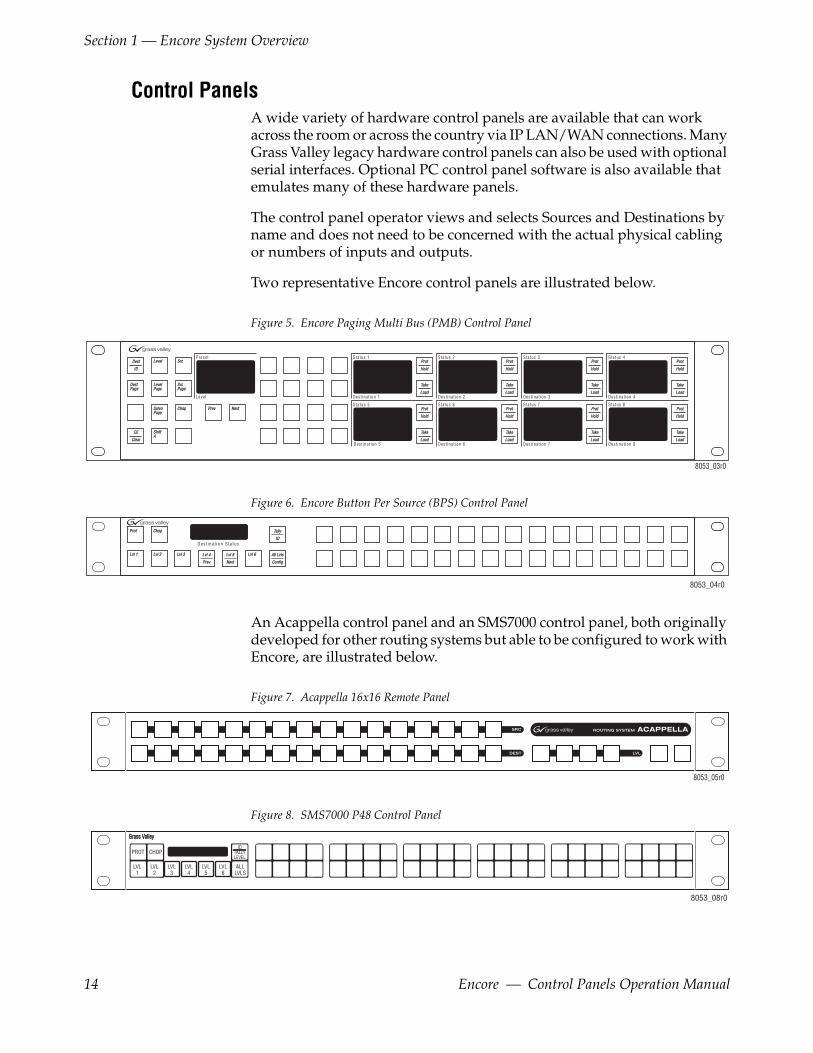
Control PanelsA wide variety of hardware control panels are available that can work across the room or across the country via IP LAN/WAN connections. Many Grass Valley legacy hardware control panels can also be used with optional serial interfaces. Optional PC control panel software is also available that emulates many of these hardware panels.
The control panel operator views and selects Sources and Destinations by name and does not need to be concerned with the actual physical cabling or numbers of inputs and outputs.
Two representative Encore control panels are illustrated below.
Figure 5. Encore Paging Multi Bus (PMB) Control Panel
S ta tus 1
Des t inat ion 1
P reset
Leve l
S ta tus 2
Des t inat ion 2
S ta tus 3
Des t inat ion 3
S ta tus 4
Des t inat ion 4
S ta tus 5
Des t inat ion 5
S ta tus 6
Des t inat ion 6
S ta tus 7
Des t inat ion 7
S ta tus 8
Des t inat ion 8
DestDest
IDID
LevelLevel SrcSrc
DestDestPagePage
LevelLevelPagePage
SrcSrcPagePage
SalvoSalvoPagePage
ChopChop
CECE
ClearClear
ShiftShiftA
PrevPrev NextNext
ProtProt
HoldHold
TakeTake
LoadLoad
ProtProt
HoldHold
TakeTake
LoadLoad
ProtProt
HoldHold
TakeTake
LoadLoad
ProtProt
HoldHold
TakeTake
LoadLoad
ProtProt
HoldHold
TakeTake
LoadLoad
ProtProt
HoldHold
TakeTake
LoadLoad
ProtProt
HoldHold
TakeTake
LoadLoad
ProtProt
HoldHold
TakeTake
LoadLoad
8053_03r0
Figure 6. Encore Button Per Source (BPS) Control Panel
Des t inat ion S ta tus
ProtProt
Lvl 1Lvl 1
ChopChop
Lvl 2Lvl 2 Lvl 3Lvl 3 Lvl 5Lvl 5
NextNext
Lvl 6Lvl 6Lvl 4Lvl 4
PrevPrev
All LvlsAll Lvls
ConfigConfig
TallyTally
IDID
8053_04r0
An Acappella control panel and an SMS7000 control panel, both originally developed for other routing systems but able to be configured to work with Encore, are illustrated below.
Figure 7. Acappella 16x16 Remote Panel
8053_05r0
Figure 8. SMS7000 P48 Control Panel
Grass ValleyGrass Valley
PROT CHOPID
TALLYLEVEL
ALLLVLS
LVL1
LVL2
LVL3
LVL4
LVL6
LVL5
8053_08r0
14 Encore — Control Panels Operation Manual
Introduction
Encore System Control FundamentalsDistributed Control SystemThe Encore system uses a distributed control networked architecture. Various Encore software components are installed on different hardware locations to perform different tasks. This design provides extraordinary system power and flexibility. Configuration files are downloaded over the network to target devices, permitting rapid configuration changes while the Encore system remains operational. User-specific system-wide access privileges can also be established to restrict system control as appropriate.
Encore DatabaseInformation vital to Encore system operation resides in a collection of data files, collectively called the Encore database. These files model the routing matrix hardware being controlled, name input Sources and output Destina-tions, determine matrix Levels, and specify the operational capabilities of the control panels. The Encore database is created when the system is com-missioned and is typically maintained by facility engineering staff. The Encore database resides on the same PC as the Sharer.
Sharer ApplicationThe Sharer application automatically downloads configuration informa-tion to Encore system components when they are power up or reboot. The Sharer application runs on a PC, and must be running when the Encore system is configured. The Sharer does not need to be running to sustain control panel operation. However, we recommend the Sharer application run at all times, as this makes it easier to resume configuration procedures.
CAUTION An Encore system can have only one Sharer application running on the network at any time. This is important to remember during software installa-tion, or if a notebook PC with the Sharer is moved to different locations.
Configuration PCAn Encore system is configured using a standard PC installed with the appropriate Encore software. Once configured, Encore control panels will be able to switch crosspoints on routing matrices even if the configuration PC is turned off or disconnected from the network. Typically the configu-ration PC also has the Encore Sharer application installed, but this applica-tion can reside on any PC on the network.
Sharer PCThe Sharer PC is the PC on which the Sharer is installed. Typically the con-figuration PC and Sharer PC are the same, but separate PCs can be used.
Encore — Control Panels Operation Manual 15
Section 1 — Encore System Overview
Routing Basics
TerminologyArea - An Area is a defined group of Sources and Destinations. Takes are restricted to connecting Sources and Destinations within the same Area (unless Tie-Lines are used). Defining multiple Areas makes it possible to assign the same easily identifiable Source and Destination names (like VTR_1, VTR_2) for use by different devices at different locations in the facility.
Breakaway - A Take operation that switches a Source on at least one Level that is different from the Sources selected on the other Levels.
Channel - The communication path used to control the crosspoint group by the Router Control Engine over a selected protocol such as Serial or Ethernet paths.
Chop - A variation of a Take command that alternately connects each of two different Sources to a single Destination (flip-flopping) at a designated switching rate (the chop rate).
Crosspoint - An electronic switch that allows a signal to pass from an input to an output when the switch is closed.
Destination - The location to which Source signals are routed. A Destination may include one or more outputs across multiple Levels.
Exclusion Set - User-determined set of items excluded from control by a par-ticular control panel. Exclusion sets can be created for Areas, Destinations, Levels, or Salvos. An exclusion set may be shared by more than one panel.
Flag - A parameter that can be set in a control panel template to control how a panel operates.
Level - A grouping of signals of a particular type, such as digital video, audio right, audio left, Red, Green, or Blue, etc. This grouping becomes an independently controllable stratum of signals within a routing system.
Matrix - A configuration of potentially intersecting inputs and outputs. In routing switchers, a matrix is signal switching hardware configured such that any input may be switched to any output.
Preset - Selecting an item (for example a Source or Destination) in prepara-tion for an action.
Protect - A control function that prevents control panels or devices from changing the current Source selection for the specified Destination.
Salvo - A named, system-wide preset which, when executed, can change crosspoints on multiple Destinations at the same time.
16 Encore — Control Panels Operation Manual
Routing Basics
Source - An input signal or collection of input signals generally associated
with a particular device (like a VTR or DDR). A Source may contain signals from multiple Levels.Take - The direct, immediate switching of a different Source to a Destination. The Take occurs during the vertical interval for a clean transition.
Template - A set of parameters that can be applied to a control panel’s con-figuration. The same template can be applied to multiple panels.
Tally - A status acknowledgment returned to a control panel or terminal that an operation has been executed. Typically this will light up a button, but a Tally may report text (for example a Source name).
Tie-Line - A system tie-line is a physical connection used to give a Destina-tion connected to the output of one matrix access to Sources connected to the input of another matrix. A signal which passes through two or more matrices; more specifically the path (consisting of one or more Tie Wires) which links a Destination of one matrix to a Source of another matrix. A local tie-line is a special type that has Sources and Destinations in the same matrix, usually sending the signal out of the matrix for external processing.
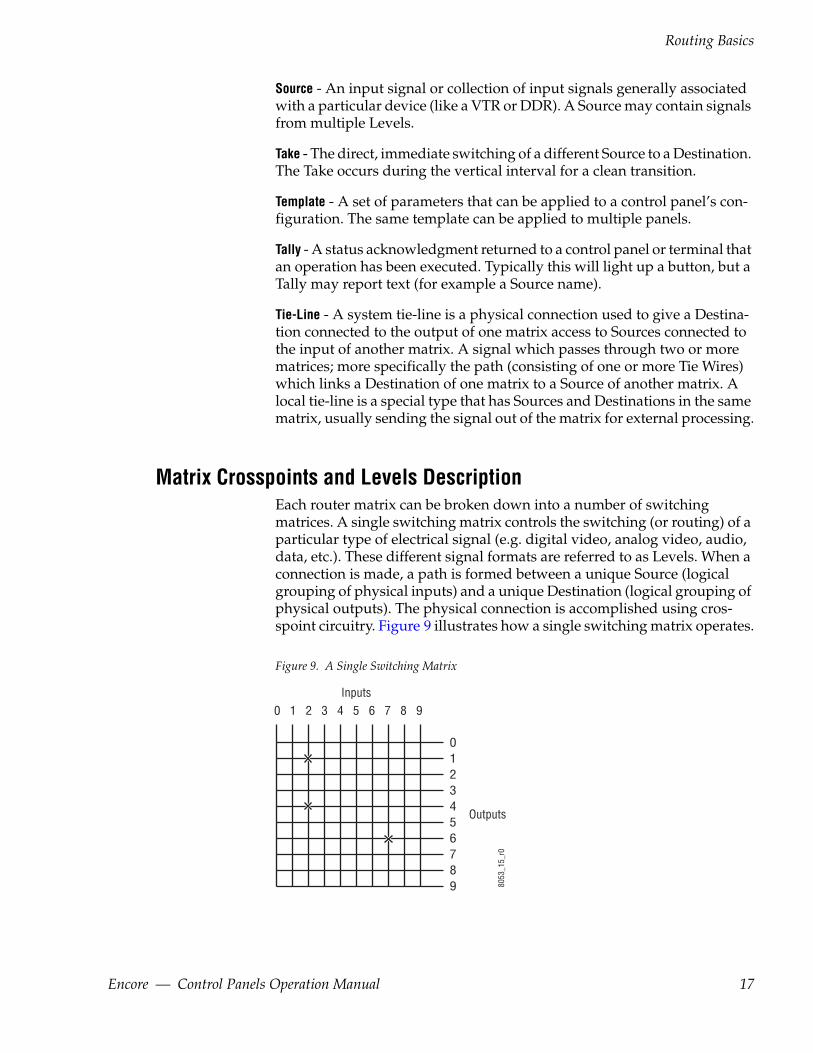
Matrix Crosspoints and Levels DescriptionEach router matrix can be broken down into a number of switching matrices. A single switching matrix controls the switching (or routing) of a particular type of electrical signal (e.g. digital video, analog video, audio, data, etc.). These different signal formats are referred to as Levels. When a connection is made, a path is formed between a unique Source (logical grouping of physical inputs) and a unique Destination (logical grouping of physical outputs). The physical connection is accomplished using cros-spoint circuitry. Figure 9 illustrates how a single switching matrix operates.
Figure 9. A Single Switching Matrix
Outputs
8053
_15_
r0
Inputs0 1 2 3 4 5 6 7 8 9
0123456789
Encore — Control Panels Operation Manual 17

Section 1 — Encore System Overview
Any of the 10 inputs (numbered 0 to 9) can be routed to any of the 10
outputs (numbered 0 to 9). One input can also be routed to more than one output. All the possible routes are represented by the intersections of the horizontal and vertical lines in the illustration. The points where the lines meet (crosspoints) can be thought of as switches that allow the inputs to be connected to the outputs. In this example, three crosspoints are on (as indi-cated by the X symbols), and the following routes are made:• Input 2 is routed to Output 1 and Output 4.
• Input 7 is routed to Output 6.
Sources and Destinations DescriptionSources consist of input signals to the router, and Destinations are output signals from the router. An individual Source or Destination may contain more than one signal. For example, a Source may consist of a video and a key signal; be separate Red, Green, and Blue video signals; or have a video signal and several associated audio signals. Each signal type is considered a Level. In general, a Source and Destination need to be configured with same number and type of Levels in order for Takes connecting them to be successful.
Multi-Level Switching Description
All Level TakeAn all Level Take switches the same input number on all Levels, to the con-trolled Destination, as shown in Figure 10.
Figure 10. Traditional All Level Take
Video Source A (VSA)
Audio Left Source A (ALSA)
Audio Right Source A (ARSA)
DVTR 1Source Devices Routing Matrix
Destination Device
Video Source B (VSB)
Audio Left Source B (ALSB)
Audio Right Source B (ARSB)
DVTR 2
Video Destination
Audio Left Destination
Audio Right Destination
DVTR 3
Audio Level
Video Level
VSA
ALSA
ARSA
VSB
ALSB
ARSB
VSA
ALSA
ARSA
8053
_06_
r0
18 Encore — Control Panels Operation Manual

Routing Basics
Breakaway TakeA Breakaway Take is performed by selecting a Source different from the others (on at least one Level) to the controlled Destination. Breakaways allow a Destination to use different Sources (Figure 11).
Figure 11. Breakaway Take
Video Source A (VSA)
Audio Left Source A (ALSA)
Audio Right Source A (ARSA)
DVTR 1
Video Source B (VSB)
Audio Left Source B (ALSB)
Audio Right Source B (ARSB)
DVTR 2
Video Destination
Audio Left Destination
Audio Right Destination
DVTR 3
Audio Level
Video Level
VSA
ALSA
ARSA
VSB
ALSB
ARSB
VSA
ALSB
ARSB
8053
_07_
r0
Source Devices Routing Matrix
Destination Device
Tie-Line DescriptionTie-lines can be used to link different matrices, allowing Sources in one matrix to be routed to Destinations in another matrix. Each tie-line has a Source Name and a Destination Name that defines the signal path. A tie-line Source is actually a Destination of the first matrix, and the tie-line Des-tination is a Source of the second matrix. Routes that employ more than one tie-line are called multi-hop tie-lines (Figure 12).
Figure 12. Tie-Lines
Matrix 1Sources
8053
_42_
r0
Routing Matrix 1 Matrix 1Destinations
Tie-Line
Tie-Line
Tie-Line Source Name
Tie-LineSourceName
Tie-Line Source NameTie-Line Destination Name
Tie-Line Destination Name
Tie-LineDestinationName
Matrix 2Sources
(One Hop)
(Second Hop)(First Hop)Tie-Line
Routing Matrix 2 Matrix 2Destinations
Matrix 3Sources
Routing Matrix 3 Matrix 3Destinations
Encore — Control Panels Operation Manual 19

Section 1 — Encore System Overview
Once configured on an Encore system, actual tie-line operation is trans-
parent to the operator. The Tie-Line Manager application automatically creates and releases tie-line paths as needed.20 Encore — Control Panels Operation Manual

Section 2Control Panels Overview
Control Panel Hardware TypesAn Encore system supports many types of hardware control panels, several of which were originally developed for other routing systems.
Encore Control Panels• Paging Multi-Bus (PMB)
• Forty-Eight Button (48B)
• Button-Per-Source (BPS)
• XY Panel (XY)
SMS 7000 Control Panels• Eight Destination Paging (EDP)
• 48 Button-Per-Source (P48)
• Universal (UCP)
• Programmable Multibus 8 (MB8)
• 32 Button-Per-Source (P32)
Kalypso Remote Aux Panels• KAL-32AUX1
• KAL-32AUX2
Acappella Control Panels• Several different hardware models, ranging from 16x16 to 8x1
Encore — Control Panels Operation Manual 21

Section 2 — Control Panels Overview
Soft PanelsBesides hardware control panels, software emulations of control panels are also available. Soft Panels are virtual versions of physical control panels that can run on PCs connected to an Encore network. Soft Panels feature a Graphical User Interface (GUI) that represents the various specific panel types supported. Once configured, each Soft Panel type operates the same as the corresponding hardware panel. Soft Panels are sold separately from the Encore system and are individually licensed.
See the separate Encore Soft Panels Instruction Manual for more information.
Control Panel Communications InterfacesEncore, Acappella, and Kalypso panels use Ethernet and require the use of Ethernet switches and Cat 5 Ethernet cabling.
SMS 7000 control panels use Global Serial Channel (GSC) communications, and require installation of a GSC mezzanine in the Encore System Con-troller and 75 Ohm coaxial cabling for operation.
Refer to the separate Encore Installation and Service Manual for more infor-mation.
Control Panel SoftwareEncore control panels ship from the factory with Encore software installed and will be ready for network and operational configuration. You may need to update Encore control panel software to the latest version, how-ever, particularly if you use previously purchased Encore panels with your Encore system.
Control panels developed for other systems will need to have their soft-ware updated for use with Encore. These panels can then be configured using the Encore system OUI.
This manual, intended for operators, assumes the control panels being used have already been updated with the correct software and configured for operation. Software installation and upgrade procedures for specific Encore software releases are covered in the separate Encore Release Notes. Control panel configuration procedures are covered in the separate Encore Configuration Manual.
22 Encore — Control Panels Operation Manual

Control Panel Configuration
Control Panel ConfigurationThe configuration of a particular control panel defines how that panel behaves. For example, the panel configuration determines which Destina-tions and Levels a panel can control, which buttons perform which func-tions, and how the control panel accomplishes other operations.
Template files are available that can be used as a starting point for panel configuration. When a new control panel is added to an Encore system, it automatically receives configuration information from a default template for that type of panel. This configuration can then be saved with the name of that panel, and be modified to change the behavior of that panel. That configuration is then used by that control panel, unless it is modified or a different template file is loaded to that panel.
Some operations described in this manual may be limited by system or panel configuration constraints. Refer to the Encore Configuration Manual for system and control panel configuration instructions.
Control Panel Defaults (Factory and Facility)Encore systems ship with factory default control panel templates. This allows a control panel to be taken out of its box and used immediately.
Encore systems support different control panel default templates. The factory defaults cannot be edited by the user. Custom templates can be created for each type of panel, and you can specify these defaults are to be used when a new panel of that type is added to the Encore system.
Note Different Encore software versions may have factory panel default files with different settings, resulting in different behavior for new panels added to a system, depending on the version of Encore software being run.
Factory Default Templates and AreasControl panel factory defaults are based upon the default Area (Area 1) configuration. Areas create hierarchies within the Encore Control System which makes it easier to group Sources and Destinations in a large system. The default Area is where control panels find their defaults. If Area 1 has been configured with Sources, Destinations, and Levels, then the control panels will operate using the Area 1 defaults. Once an Area is defined, an Area prefix is automatically assigned to each Source and Destination in the Area by the router engine. The Area prefix is part of the system name and can be displayed on certain panels. Typically, in most installations, a single Area is used.
If multiple Areas are used at a facility, some or all of the control panels may need to be re-configured before they can be used.
Encore — Control Panels Operation Manual 23

Section 2 — Control Panels Overview
Control Panel Basic Functions
Protect and LockIn general, the Protect function (enabled/disabled during panel configura-tion) locks the Source selections for all the levels of a Destination. When a Destination has been Protected by a panel, other panels in the facility will not be able to change that Destination’s Source selections (unless that other panel has been configured with a Protect Override). The panel which initi-ated the Protect can still be used to change Sources for a Destination that panel has protected, and that panel can also remove the protection from that Destination.
There are actually several different Protect and related Lock parameters that provide different capabilities that interact with each other. These include Hard Lock, Soft Lock, and Lock/Protect Override. The actual behavior of a specific panel depends on the setting of these parameters.
Refer to Section 7-Panel Operation Variations and the separate Encore Config-uration Manual for more information.
Salvos ExcludedSalvos can switch multiple Sources to multiple Destinations with a single button press. Default Encore panel configurations exclude all Salvos, to prevent accidentally changing multiple crosspoints on an existing Encore system when a new panel is installed.
The default setting for Encore control system panels excludes all Salvos. To use Salvos with a control panel, its configuration must be edited and re-loaded to that panel. Refer to the separate Encore Configuration Manual for specific instructions.
CAUTION Be sure you understand what a Salvo will do before you use it, and only fire a Salvo when it is appropriate to do so. Changing multiple Destinations with a Salvo can have far-reaching consequences, including possibly disrupting on-air operations.
Chop InactiveThe Chop feature allows rapid switching between two sources (typically used for timing purposes or picture quality comparisons).
The default setting for Encore control system panels has Chop deactivated. Panels will need to be reconfigured to use the Chop feature.
24 Encore — Control Panels Operation Manual

Section 3Encore Control Panels
Introduction
Key Features• Web browser-based setup,
• 10/100Base-T Ethernet RJ-45 control interface, includes active and col-lision indication,
• Internal auto-ranging AC mains power supply,
• Back-lit buttons for use in low-light conditions with display intensity adjustments, and
• Simple name-based identification.
Panel IDEncore panels equipped with alphanumeric displays can report the fol-lowing information for that panel (as appropriate).
• Panel IP Address
• Panel Name
• Controlled Destination Area Name
• Controlled Destination Name
• Name of the Current Active Level
• Protect Override, if set
• Tieline Name, if used
With default panel configurations, pressing the Dest/ID button on PMB and XY panels when these buttons are already illuminated, or holding down the TallyLvl/ID button on BPS panels, will activate the panel ID mode. On PMB and XY panels, pressing the Src button when it is illuminated reports additional information in the various displays on the panel.
Encore — Control Panels Operation Manual 25
Section 3 — Encore Control Panels
You can interrupt the ID display sequence at any time by pressing a dif-
ferent mode button. It is not necessary to let the identification routine finish. Pressing a button during the ID display does not execute that button’s function, but instead cancels the ID reporting.PMB Panel
PMB Panel Features• 2RU rack mount,
• Multi bus display of both Source and Destination,
• Individual protects per Destination,
• Paging mode offers the ability to scroll through pages of Sources, Des-tinations, Levels, and Salvos,
• Previous / Next scrolling within prefix group,
• 12 user-defined programmable buttons, and
• 16 button user-defined prefix /suffix keypad, with shift capability to support up to 32 prefixes and suffixes.
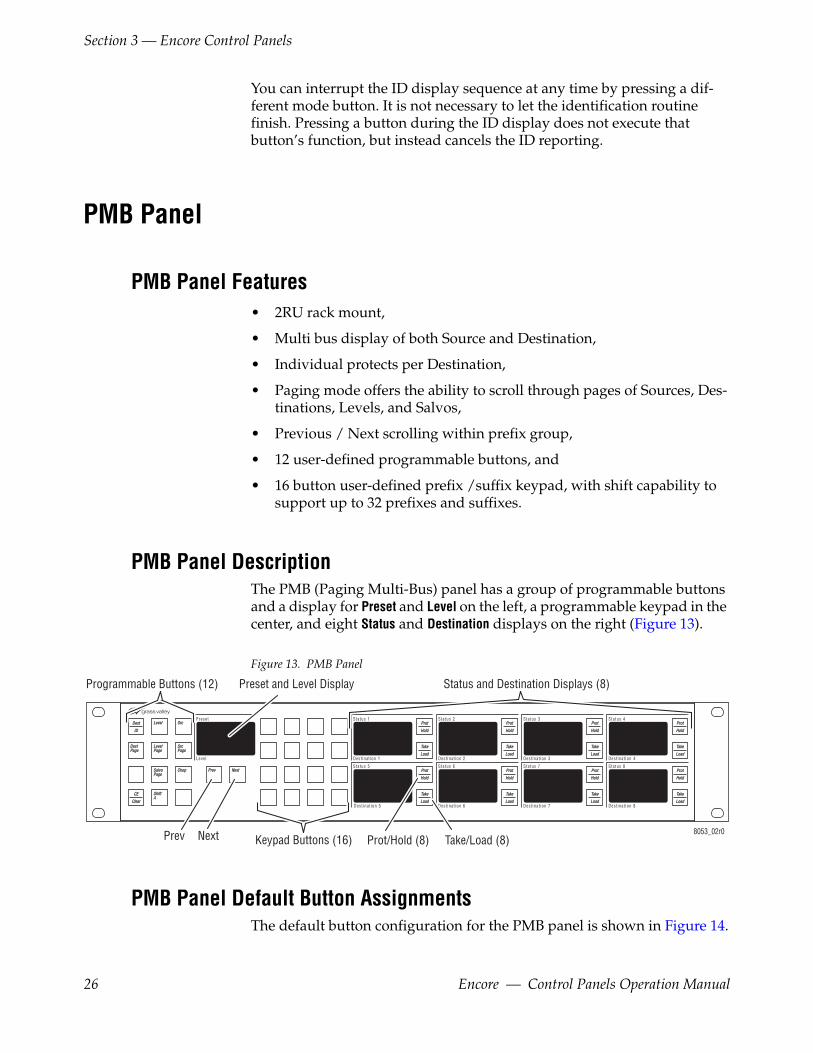
PMB Panel DescriptionThe PMB (Paging Multi-Bus) panel has a group of programmable buttons and a display for Preset and Level on the left, a programmable keypad in the center, and eight Status and Destination displays on the right (Figure 13).
Figure 13. PMB Panel
S ta tus 1
Des t inat ion 1
P reset
Leve l
S ta tus 2
Des t inat ion 2
S ta tus 3
Des t inat ion 3
S ta tus 4
Des t inat ion 4
S ta tus 5
Des t inat ion 5
S ta tus 6
Des t inat ion 6
S ta tus 7
Des t inat ion 7
S ta tus 8
Des t inat ion 8
DestDest
IDID
LevelLevel SrcSrc
DestDestPagePage
LevelLevelPagePage
SrcSrcPagePage
SalvoSalvoPagePage
ChopChop
CECE
ClearClear
ShiftShiftA
PrevPrev NextNext
ProtProt
HoldHold
TakeTake
LoadLoad
ProtProt
HoldHold
TakeTake
LoadLoad
ProtProt
HoldHold
TakeTake
LoadLoad
ProtProt
HoldHold
TakeTake
LoadLoad
ProtProt
HoldHold
TakeTake
LoadLoad
ProtProt
HoldHold
TakeTake
LoadLoad
ProtProt
HoldHold
TakeTake
LoadLoad
ProtProt
HoldHold
TakeTake
LoadLoad
Keypad Buttons (16)
Programmable Buttons (12)
Prev Next Prot/Hold (8) Take/Load (8)
Status and Destination Displays (8)Preset and Level Display
8053_02r0
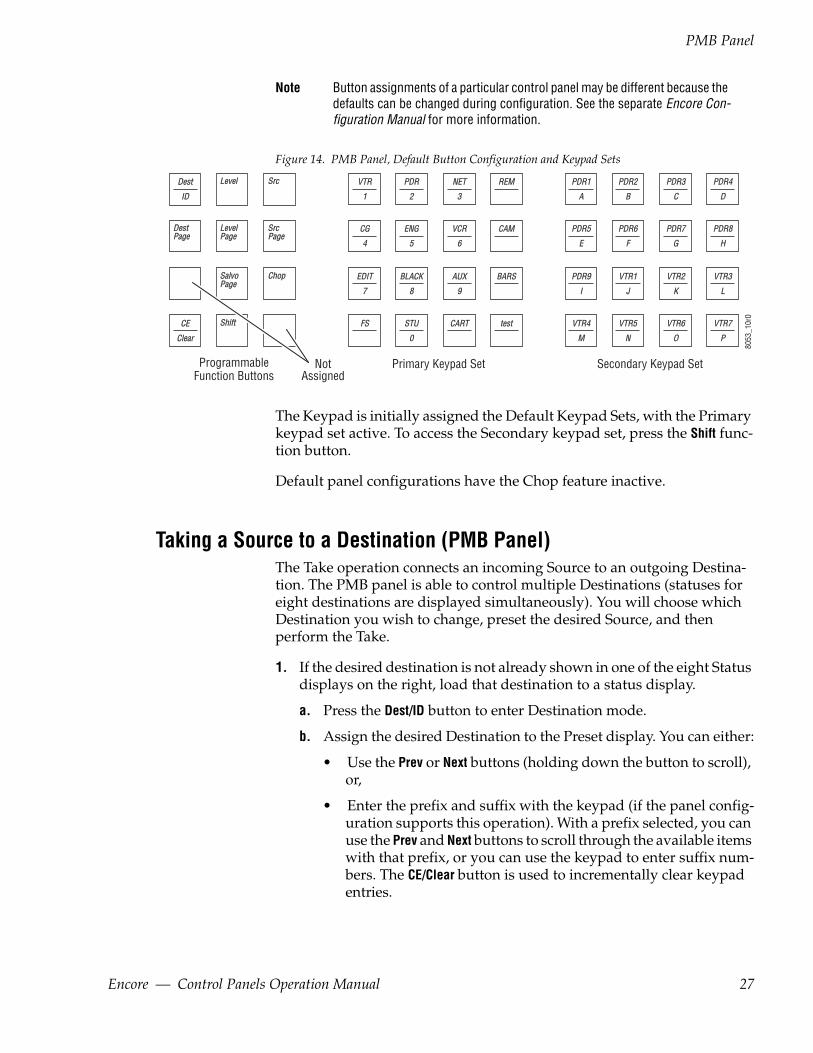
PMB Panel Default Button AssignmentsThe default button configuration for the PMB panel is shown in Figure 14.
26 Encore — Control Panels Operation Manual
PMB Panel
Note Button assignments of a particular control panel may be different because the
defaults can be changed during configuration. See the separate Encore Con-figuration Manual for more information.
Figure 14. PMB Panel, Default Button Configuration and Keypad Sets
AUXAUX
9
BLACKBLACK
8
BARSBARSEDITEDIT
7
CARTCARTSTUSTU
0
testtestFSFS
VCRVCR
6
ENGENG
5
CAMCAMCGCG
4
NETNET
3
PDRPDR
2
REMREMVTRVTR
1
PDR1PDR1
A
PDR2PDR2
B
PDR3PDR3
C
PDR4PDR4
D
PDR5PDR5
E
PDR6PDR6
F
PDR7PDR7
G
PDR8PDR8
H
PDR9PDR9
I
VTR1VTR1
J
VTR2VTR2
K
VTR3VTR3
L
VTR4VTR4
M
VTR5VTR5
N
VTR6VTR6
O
VTR7VTR7
P
DestDest
IDID
LevelLevel SrcSrc
DestDestPagePage
LevelLevelPagePage
SrcSrcPagePage
SalvoSalvoPagePage
ChopChop
CECE
ClearClear
ShiftShift
8053
_10r
0
Primary Keypad SetNotAssigned
ProgrammableFunction Buttons
Secondary Keypad Set
The Keypad is initially assigned the Default Keypad Sets, with the Primary keypad set active. To access the Secondary keypad set, press the Shift func-tion button.
Default panel configurations have the Chop feature inactive.
Taking a Source to a Destination (PMB Panel)The Take operation connects an incoming Source to an outgoing Destina-tion. The PMB panel is able to control multiple Destinations (statuses for eight destinations are displayed simultaneously). You will choose which Destination you wish to change, preset the desired Source, and then perform the Take.
1. If the desired destination is not already shown in one of the eight Status displays on the right, load that destination to a status display.
a. Press the Dest/ID button to enter Destination mode.
b. Assign the desired Destination to the Preset display. You can either:
• Use the Prev or Next buttons (holding down the button to scroll), or,
• Enter the prefix and suffix with the keypad (if the panel config-uration supports this operation). With a prefix selected, you can use the Prev and Next buttons to scroll through the available items with that prefix, or you can use the keypad to enter suffix num-bers. The CE/Clear button is used to incrementally clear keypad entries.
Encore — Control Panels Operation Manual 27

Section 3 — Encore Control Panels
c. Load that preset Destination to one of the Status displays on the
right by pressing the Take/Load button for that display. These buttons are illuminated (and active) only when Preset has a valid item.Note A panel’s configuration may exclude control of some Destinations or Levels. Excluded items will not be selectable in the Preset display.
2. Select the desired Source in the Preset display.
a. Press the Src button to enter Source mode.
b. Assign the desired Source to the Preset display (use the same procedure as Step b of Taking a Source to a Destination (PMB Panel) on page 27).
3. Press the Take/Load button on the Status display on the right for that Destination to take that preset Source. The name of the new Source will be displayed in that Destination’s status display.
Note If Destination and/or Source pages have been configured, the Dest Page and Src Page buttons can be used to browse successive groups of eight items.
Breakaway Take (PMB Panel)A breakaway Take switches Sources on only some Destination Levels, leaving the other Levels for that Destination unchanged. You will preset the Destination, examine the status for that Destination’s Levels, select the Level(s) to be changed, select the Source, and then Take that Source to only those Destination’s levels.
Note Destinations with active breakaways display an asterisk (*) in their Destina-tion Status displays.
1. Assign the Destination on which you wish to perform a breakaway Take to the Preset display.
a. Press the Dest/ID button to enter Destination mode.
b. Assign the desired Destination in the Preset display (use the same procedure as Step b on page 27).
2. Press the Level Page button to enter Level mode. In this mode the Status displays on the right show the status of only the preset Destination (not eight different Destinations). The current sources of each Level for that Destination are shown.
3. Illuminate the Take/Load buttons for only the Destination Levels you wish to change by toggling these buttons on or off. At least one Level must be selected.
4. Press the Src button to enter Source mode.
28 Encore — Control Panels Operation Manual

PMB Panel
5. Assign the desired Source to the Preset display (use the same procedure
as Step b on page 27).
6. Press the Take/Load button on the Status display on the right for the desired Destination. The name of the new Source will be displayed in that Destination’s status display and an asterisk will indicate it has a breakaway.
Note After setting up Levels for a breakaway, subsequent Take operations will change only those Levels for any currently selected Destination, not just the preset Destination.
Note The default panel configuration retains the Levels selected for a breakaway Take for all subsequent Take operations, until the Level selections are changed or a different Destination is selected.
Level Tally (PMB Panel)When a PMB panel displays the status of eight Destinations, each Destina-tion reports only one Source. When Destinations have multiple levels and breakaways are active, you may wish to choose which Level’s Source will be reported for each Destination.
1. Press the Level button to go to Level status selection mode.
2. Use the Prev and Next buttons to cycle through the available levels and leave the name of the desired level displayed.
Note If ALLLVL is selected the panel will report the Default Tally Level configured for that panel.
3. Press the Src button to return to Source mode. Now Sources for the level you selected will be reported on the Destination Status displays.
Protect (PMB Panel)
Note With default panel configurations, only the control panel that set the Protect can unprotect that Destination. When a Protect has been set, the Prot button on the panel that set the Protect will blink, and the Prot buttons on other panels accessing that destination will be illuminated without blinking.
Note Pressing and holding a steadily illuminated Prot button on a panel with a text display will report the name of the panel that set the Protect.
Encore — Control Panels Operation Manual 29

Section 3 — Encore Control Panels
To Protect a Destination
1. If the desired destination is not already shown in one of the eight Status displays on the right, load that destination to a status display (use the same procedure as Step 1 on page 27).
2. Press the Prot button located to the right of the Status display for the Destination you wish to Protect. The Prot button will blink on that panel. The Prot buttons will also illuminate steadily on all other Encore panels in your system with that Destination selected, indicating it is protected.
To Unprotect a Destination
1. If the desired destination is not already shown in one of the eight Status displays on the right, load that destination to a status display (use the same procedure as Step 1 on page 27).
2. Toggle the blinking Prot button so it is no longer illuminated.
Note PMB panels do not report Protects for Destinations not currently assigned to the Status displays. Care should be taken to relinquish all unneeded Protects before changing Destinations on these panels. You should also remember to free up all Destinations no longer requiring protection before you leave the vicinity of the PMB panel.
Salvo (PMB Panel)When a PMB panel has been configured with Salvo capabilities, you will be able to select a Salvo and execute it.
CAUTION Be sure you understand exactly what a Salvo will do before you use it, and only fire a Salvo when it is appropriate to do so. Changing multiple Destina-tions with a Salvo can have far-reaching consequences, including possibly disrupting on-air operations.
1. Press the Salvo Pg button to enter Salvo mode. The first page of available Salvos will be displayed in the Status displays on the right.
2. If multiple pages of Salvos have been configured, use the Prev and Next buttons to move through the available pages of Salvos.
3. When the desired Salvo is displayed, press the Take/Load button on that Status display to execute the Salvo.
4. Press the Src button to return to Source mode. If Destinations involved in that Salvo are displayed, their Status displays will report their new Sources.
30 Encore — Control Panels Operation Manual
XY Panel
XY PanelXY Panel Features• 1RU rack mount,
• Status, Preset, and Level display with three 8-character readouts,
• 16 button user-defined prefix /suffix keypad (2 rows of eight), and
• 18 programmable buttons.
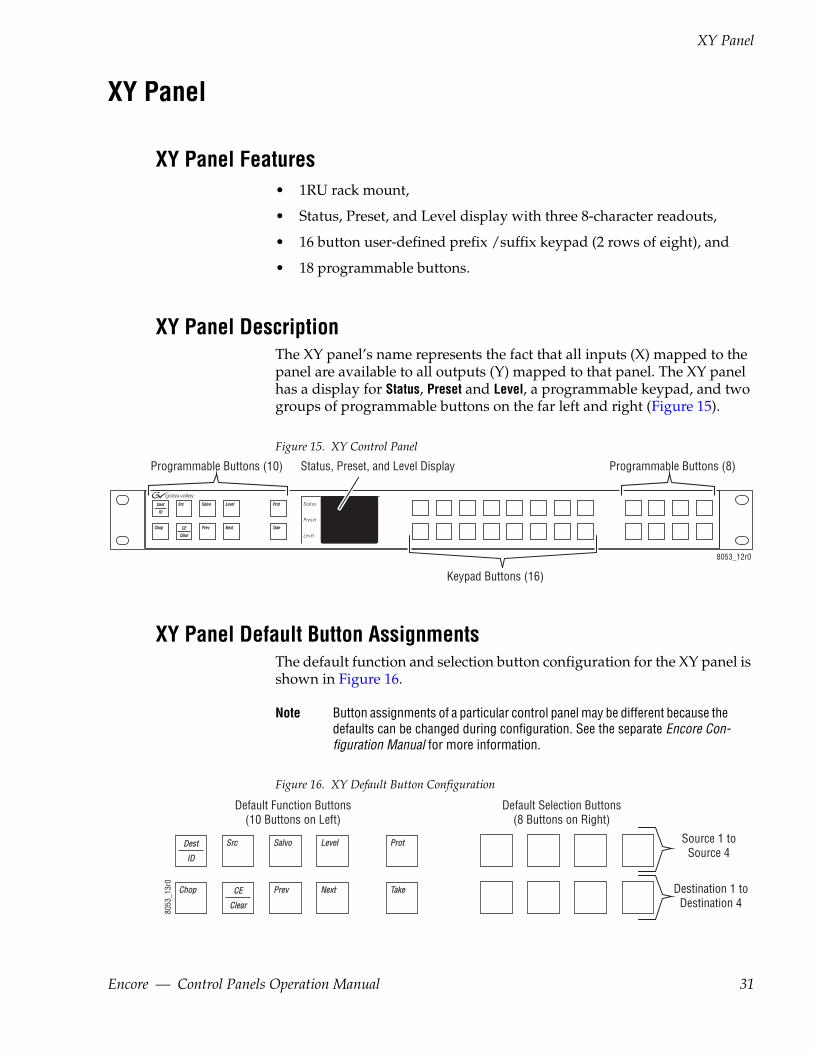
XY Panel DescriptionThe XY panel’s name represents the fact that all inputs (X) mapped to the panel are available to all outputs (Y) mapped to that panel. The XY panel has a display for Status, Preset and Level, a programmable keypad, and two groups of programmable buttons on the far left and right (Figure 15).
Figure 15. XY Control Panel
Status
Preset
Leve l
DestDest
IDID
ChopChop
SrcSrc
CECE
ClearClear
SalvoSalvo
PrevPrev
LevelLevel
NextNext
ProtProt
TakeTake
8053_12r0
Keypad Buttons (16)
Programmable Buttons (10) Programmable Buttons (8)Status, Preset, and Level Display
XY Panel Default Button AssignmentsThe default function and selection button configuration for the XY panel is shown in Figure 16.
Note Button assignments of a particular control panel may be different because the defaults can be changed during configuration. See the separate Encore Con-figuration Manual for more information.
Figure 16. XY Default Button Configuration
8053
_13r
0
DestDest
IDID
ChopChop
SrcSrc
CECE
ClearClear
SalvoSalvo
PrevPrev
LevelLevel
NextNext
ProtProt
TakeTake Destination 1 toDestination 4
Source 1 toSource 4
Default Function Buttons(10 Buttons on Left)
Default Selection Buttons(8 Buttons on Right)
Encore — Control Panels Operation Manual 31
Section 3 — Encore Control Panels
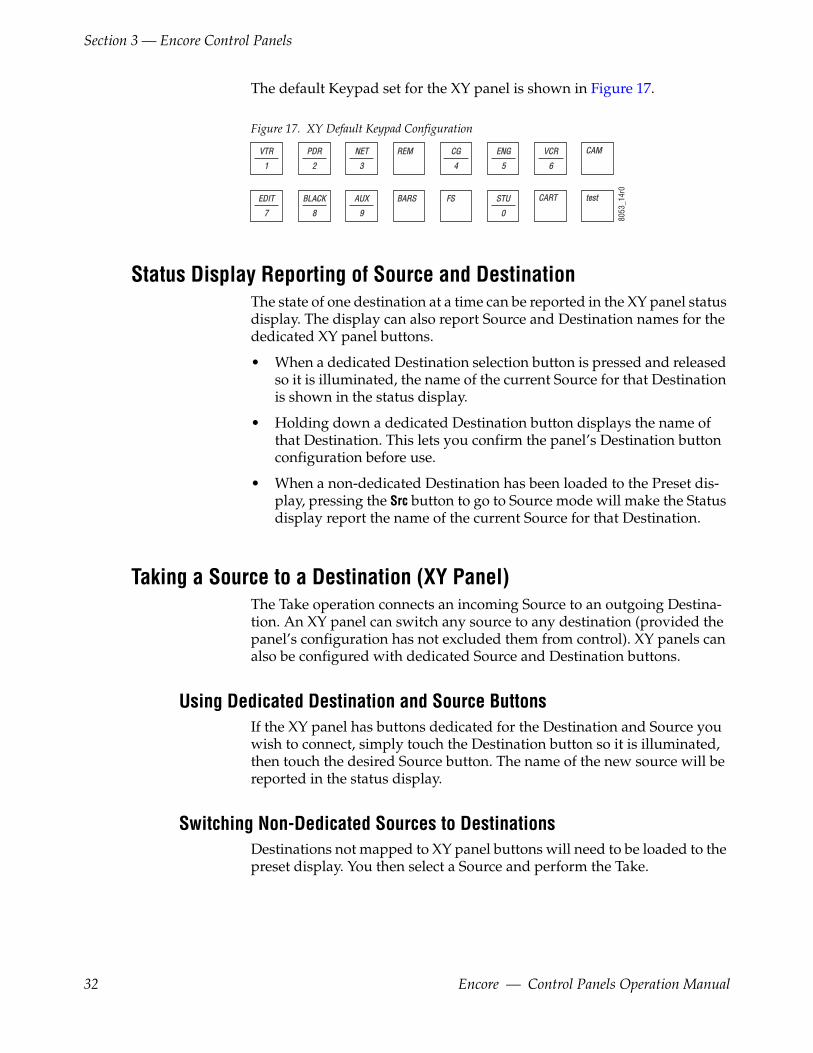
The default Keypad set for the XY panel is shown in Figure 17.
Figure 17.
AUXAUX
9
BARSBARS STUSTU
0
BLACKBLACK
8
CAMCAM
CARTCART
CGCG
4
FSFS
NETNET
3
PDRPDR
2
REMREM ENGENG
5
VCRVCR
6
EDITEDIT
7
testtest
VTRVTR
1
8053
_14r
0
XY Default Keypad Configuration
Status Display Reporting of Source and DestinationThe state of one destination at a time can be reported in the XY panel status display. The display can also report Source and Destination names for the dedicated XY panel buttons.
• When a dedicated Destination selection button is pressed and released so it is illuminated, the name of the current Source for that Destination is shown in the status display.
• Holding down a dedicated Destination button displays the name of that Destination. This lets you confirm the panel’s Destination button configuration before use.
• When a non-dedicated Destination has been loaded to the Preset dis-play, pressing the Src button to go to Source mode will make the Status display report the name of the current Source for that Destination.
Taking a Source to a Destination (XY Panel)The Take operation connects an incoming Source to an outgoing Destina-tion. An XY panel can switch any source to any destination (provided the panel’s configuration has not excluded them from control). XY panels can also be configured with dedicated Source and Destination buttons.
Using Dedicated Destination and Source ButtonsIf the XY panel has buttons dedicated for the Destination and Source you wish to connect, simply touch the Destination button so it is illuminated, then touch the desired Source button. The name of the new source will be reported in the status display.
Switching Non-Dedicated Sources to DestinationsDestinations not mapped to XY panel buttons will need to be loaded to the preset display. You then select a Source and perform the Take.
32 Encore — Control Panels Operation Manual

XY Panel
Note A panel’s configuration may exclude control of some Destinations and Levels.
Excluded items will not be selectable in the Preset display.
1. Press the Dest/ID button to enter Destination mode.
2. Assign the desired item to the Preset display. You can either:
• Use the Prev or Next buttons (holding down the button to scroll), or,
• Enter the prefix and suffix with the keypad (if the panel configura-tion supports this operation). With a prefix selected, you can use the Prev and Next buttons to scroll through the available items with that prefix, or you can use the keypad to enter suffix numbers. The CE/Clear button is used to incrementally clear keypad entries.
3. Load that Destination to preset by pressing the Take button. The name of that Destination will be reported in the display.
4. Press the Src button to enter Source mode.
5. Select the desired Source on the preset display (use the same procedure as Step 2 above).
6. With the name of the desired Source displayed, press the Take button. The connection will be made and the name of the new Source will be reported in the status display.
Note If the desired Source is mapped to an XY panel button, pressing that button in Source mode with the Destination preset will simultaneously select that source and perform the Take.
Breakaway Take (XY Panel)A breakaway Take switches Sources on only some Destination Levels, leaving the other Levels for that Destination unchanged. You will preset the Destination, select the Level(s) to be changed, select the Source, and then Take that Source to only those Destination’s levels.
Note A destination with an active breakaway displays an asterisk (*) in the Status display.
1. Assign the Destination on which you wish to perform a breakaway Take to the Preset display (see Step 1 through Step 3 of Switching Non-Dedicated Sources to Destinations on page 33).
2. Press the Level button to enter Level mode. In this mode you use the Prev and Next buttons to cycle through the available Levels for that Destination.
3. Illuminate the Take button for only the Destination Levels you wish to change by toggling the button on or off as you cycle through the levels with the Prev and Next buttons. At least one Level must be selected.
Encore — Control Panels Operation Manual 33

Section 3 — Encore Control Panels
4. Press the Src button to enter Source mode.
5. Select the Source for the breakaway Take, using the same procedure as Step 2 of Switching Non-Dedicated Sources to Destinations on page 32).
6. Press the Take button. The new Source will be connected to only the selected Levels and an asterisk will appear in the Status display to indicate it has a breakaway.
Note The default panel configuration retains the Levels selected for a breakaway Take for all subsequent Take operations, until the Level selections are changed or a different Destination is selected.
Protect (XY Panel)
Note With default panel configurations, only the control panel that set the Protect can unprotect that Destination. When a Protect has been set, the Prot button on the panel that set the Protect will blink, and the Prot buttons on other panels accessing that destination will be illuminated without blinking.
Note Pressing and holding a steadily illuminated Prot button on a panel with a text display will report the name of the panel that set the Protect.
With the desired Destination selected, either by pressing its dedicated Des-tination button or assigning it to the Preset display, toggle the Prot button to turn Protect On (illuminated) or Off for that Destination.
Note XY panels do not report Protects for Destinations not currently assigned to the Status display. Relinquish all unneeded Protects before changing Desti-nations on these panels. Also remember to free up all Destinations no longer requiring protection before you leave the vicinity of the XY panel.
Salvo (XY Panel)When an XY panel has been configured with Salvo capabilities you will be able to select a Salvo and execute it.
CAUTION Be sure you understand exactly what a Salvo will do before you use it, and only fire a Salvo when it is appropriate to do so. Changing multiple Destina-tions with a Salvo can have far-reaching consequences, including possibly disrupting on-air operations.
1. Press the Salvo button to enter Salvo mode.
2. Use the Prev and Next buttons to move through the available pages of Salvos.
3. When the desired Salvo is displayed, press the Take button on that Status display to execute the Salvo.
34 Encore — Control Panels Operation Manual
BPS Panel
BPS PanelBPS Panel Features• 1RU rack mount,
• Eight character Destination Status display,
• 42 user-defined programmable buttons, and
• Panel self configuration for alternative Source selection.
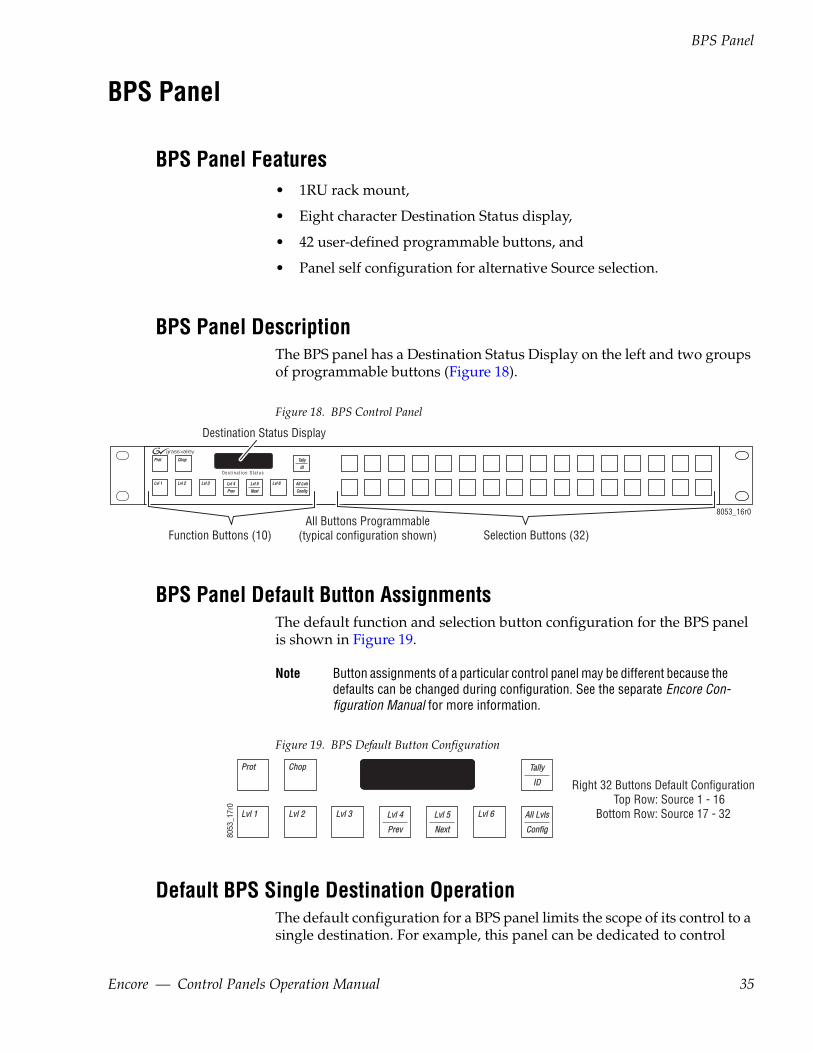
BPS Panel DescriptionThe BPS panel has a Destination Status Display on the left and two groups of programmable buttons (Figure 18).
Figure 18. BPS Control Panel
Des t inat ion S ta tus
ProtProt
Lvl 1Lvl 1
ChopChop
Lvl 2Lvl 2 Lvl 3Lvl 3 Lvl 6Lvl 6Lvl 4Lvl 4
PrevPrev
All LvlsAll Lvls
ConfigConfig
TallyTally
IDID
Lvl 5Lvl 5
NextNext
Selection Buttons (32)Function Buttons (10)All Buttons Programmable
(typical configuration shown)
Destination Status Display
8053_16r0
BPS Panel Default Button AssignmentsThe default function and selection button configuration for the BPS panel is shown in Figure 19.
Note Button assignments of a particular control panel may be different because the defaults can be changed during configuration. See the separate Encore Con-figuration Manual for more information.
Figure 19. BPS Default Button Configuration
ProtProt
Lvl 1Lvl 1
ChopChop
Lvl 2Lvl 2 Lvl 3Lvl 3 Lvl 6Lvl 6Lvl 4Lvl 4
PrevPrev
All LvlsAll Lvls
ConfigConfig
TallyTally
IDID
Lvl 5Lvl 5
NextNext
Right 32 Buttons Default Configuration Top Row: Source 1 - 16
Bottom Row: Source 17 - 32
8053
_17r
0
Default BPS Single Destination OperationThe default configuration for a BPS panel limits the scope of its control to a single destination. For example, this panel can be dedicated to control
Encore — Control Panels Operation Manual 35
Section 3 — Encore Control Panels
inputs to a particular VTR. Operating procedures for the default single des-
tination configuration are be described in this section.BPS panels are not limited to single destination control, however. All of the buttons on the BPS panel can actually be programmed for any function or source selection (except these panels do not support keypads). This makes it possible to configure a BPS panel with capabilities similar to an XY panel, except it will lack a keypad and have limited status reporting.
Taking a Source to a Destination (BPS Panel)On a default single Destination BPS, Sources are selected by pressing the desired Source selection button on the right. The Source is immediately taken to that Destination and the name of that source is reported in the Des-tination Status display.
Breakaway Take (BPS Panel)A breakaway Take switches Sources on only some Destination Levels, leaving the other Levels for that Destination unchanged. You will select the Level(s) to be changed, then Take that Source to only those Destination’s levels.
Note A destination with an active breakaways displays an asterisk (*) in the Status display.
1. Toggle the Lvl buttons to illuminate the Levels of that destination you wish to change.
2. Press the desired Source selection button. That Source will be taken to only the selected levels, and an asterisk will appear in the Status display to indicate it has a breakaway.
Note The default panel configuration retains the Levels selected for a breakaway Take for all subsequent Take operations until the Level selections are changed or a different Destination is selected.
Protect (BPS Panel)
Note With default panel configurations only the control panel that set the Protect can unprotect that Destination. When a Protect has been set the Prot button on the panel that set the Protect will blink, and the Prot buttons on other panels accessing that destination will be illuminated without blinking.
Note Pressing and holding a steadily illuminated Prot button on a panel with a text display will report the name of the panel that set the Protect.
36 Encore — Control Panels Operation Manual

BPS Panel
Toggle the Prot button to turn Protect On (illuminated) or Off for that Des-
tination.Salvo (BPS Panel)The default configuration for a BPS panel does not include any Salvo but-tons. If your panel has been configured for this feature a Salvo is fired simply by pressing the Salvo button configured for this purpose.
Self Configuration (BPS Panel)More than 32 Sources can be accessed by the BPS panel using the Self Con-figuration feature. This features allows BPS panel buttons to be remapped using the panel itself. BPS panel Level and Salvo buttons can also be self configured.
The normal reconfiguration process (using the Encore Panel Server appli-cation running on a PC to edit that panel’s configuration file) is not required to make these changes. The changes made with the Self Configu-ration are saved to that panel’s configuration file when the mode is exited and are persistent. Resetting a BPS panel after a Self Configuration will not change those settings.
The BPS panel default has the Self Configuration feature enabled. This feature can be disabled and so may not be available on a specific BPS panel.
Source Self Configuration
1. Press and hold down the All Lvls/Config button for five seconds. The panel will enter Self Configuration mode and all the Source selection and Level buttons will be illuminated.
2. Press an illuminated Source button. That button will blink.
3. Use the Prev and Next buttons to select a different Source for that button.
4. Press the blinking Source button to assign it that new Source.
5. Press the All Lvls/Config button to exit Self Configuration mode.
Level Self ConfigurationUse the procedure above, but press an illuminated Lvl button and then choose an alternative Level with the Prev and Next buttons.
Encore — Control Panels Operation Manual 37
Section 3 — Encore Control Panels
Salvo Self ConfigurationIf your panel is configured with Salvo selection buttons use the procedure above, but select an illuminated Salvo button and then choose an alterna-tive Salvo with the Prev and Next buttons.
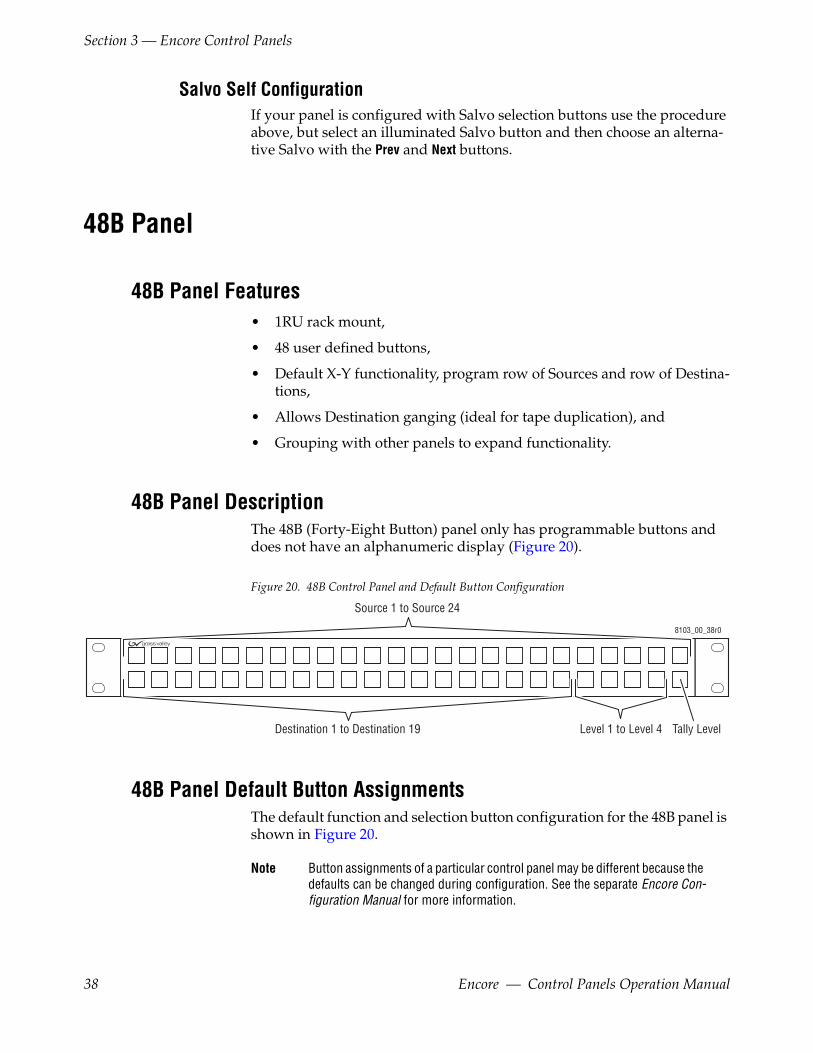
48B Panel
48B Panel Features• 1RU rack mount,
• 48 user defined buttons,
• Default X-Y functionality, program row of Sources and row of Destina-tions,
• Allows Destination ganging (ideal for tape duplication), and
• Grouping with other panels to expand functionality.
48B Panel DescriptionThe 48B (Forty-Eight Button) panel only has programmable buttons and does not have an alphanumeric display (Figure 20).
Figure 20. 48B Control Panel and Default Button Configuration
Source 1 to Source 24
Tally Level
8103_00_38r0
Destination 1 to Destination 19 Level 1 to Level 4
48B Panel Default Button AssignmentsThe default function and selection button configuration for the 48B panel is shown in Figure 20.
Note Button assignments of a particular control panel may be different because the defaults can be changed during configuration. See the separate Encore Con-figuration Manual for more information.
38 Encore — Control Panels Operation Manual
48B Panel
Taking a Source to a Destination (48B Panel)1. Press the desired Destination button so it is illuminated.
2. Press the desired Source button. That Source will be immediately taken to that Destination.
Breakaway Take (48B Panel)A breakaway Take switches Sources on only some Destination Levels, leaving the other Levels for that Destination unchanged. You will select the Level(s) to be changed, then Take that Source to only those Destination’s levels.
1. Press the desired Destination button so it is illuminated.
2. Toggle the Lvl buttons to illuminate the Levels you wish to change.
3. Press the desired Source button. That Source will be immediately taken only to the selected levels of that Destination.
Note The default panel configuration retains the Levels selected for a breakaway Take for all subsequent Take operations until the Level selections are changed or a different Destination is selected.
Auto Tally and the Tally Level ButtonThe Auto Tally feature automatically tallies the first valid and enabled Level for a Destination. This is useful for breakaway Takes on panels lacking alphanumeric displays, since only one Source button is illuminated at a time. The Auto Tally configuration flag can be turned on and off, and the factory default setting for this feature is ON for 48B panels. When Auto Tally is ON, the Tally Level button, if present on a panel, is disabled.
You can Tally the Source for each Level of a Destination when Auto Tally is ON by disabling the other Levels. The Source button for that remaining enabled Level will be illuminated on the panel.
The priority order of Tally Level reporting when multiple Levels are active is the top down order of Levels in the router configuration. Typically this top down priority order corresponds to a left right order of Level buttons on a panel (Level 1, Level 2, Level 3, etc.). So, for example, if only Levels 2 and 3 are enabled and they are listed in that top down order, Auto Tally would illuminate the Source button for Level 2. Disabling Level 2 in this sit-uation would make the Source button for Level 3 illuminate.
Encore — Control Panels Operation Manual 39

Section 3 — Encore Control Panels
Tally Level ButtonThe Tally Level button is used to change the Tally Level for the panel. Only the currently selected Level will be tallied.
Note On 48B panels the default setting for Auto Tally flag is ON, which disables the Tally Level button. Make sure Auto Tally is OFF on the configuration being used by the panel if you wish to use the Tally Level button.
Turning the Auto Tally flag OFF activates the Tally Level button, which is assigned to the lower right button by the factory default configuration (see Figure 20 on page 38).
To change the Tally Level of the panel, hold down the Tally Level button and press the Level button of the desired Level. The panel will use that Level for button tally until another Level is selected (or the Auto Tally flag is enabled).
Protect (48B Panel)The default configuration for a 48B panel does not include a Protect button. If your panel has been configured for this feature you can protect and unprotect the currently selected Destination by toggling the Prot button On or Off. The button is illuminated when a Protect is active on the selected Destination.
Salvo (48B Panel)The default configuration for a 48B panel does not include any Salvo but-tons. If your panel has been configured for this feature a Salvo is fired simply by pressing the Salvo button configured for this purpose. Salvo pages are not supported on 48B panels. A separate Salvo button is config-ured for each specific Salvo.
40 Encore — Control Panels Operation Manual
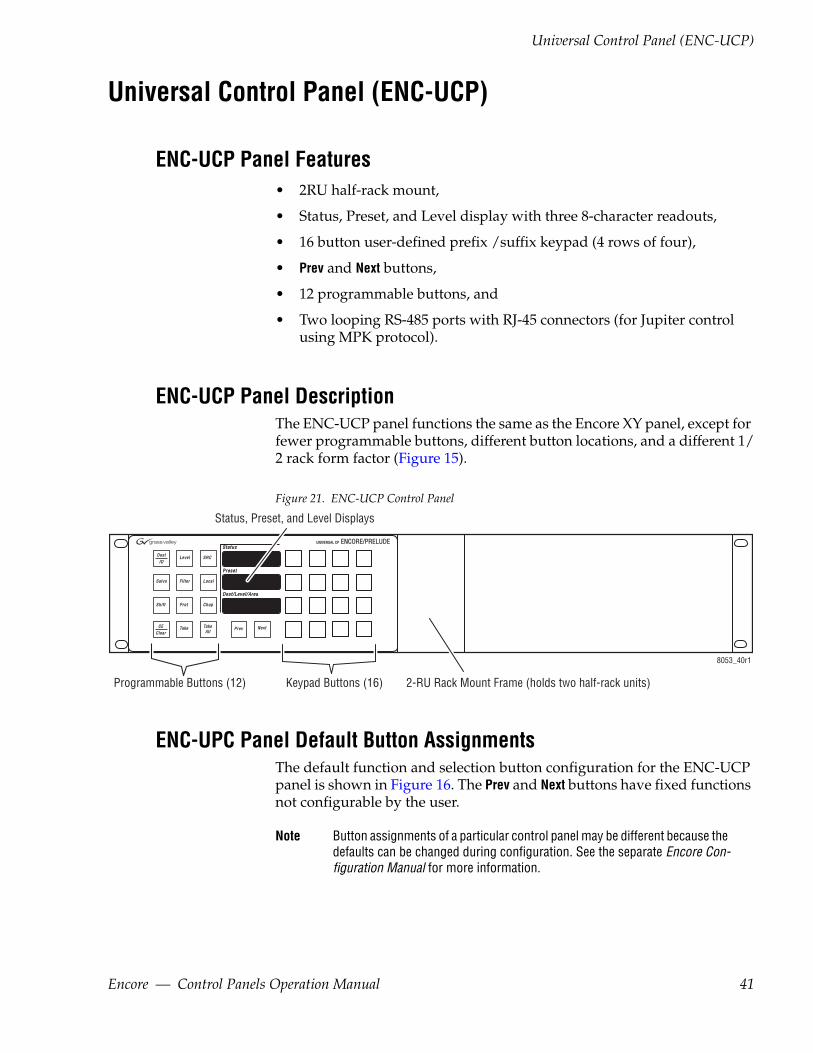
Universal Control Panel (ENC-UCP)
Universal Control Panel (ENC-UCP)ENC-UCP Panel Features• 2RU half-rack mount,
• Status, Preset, and Level display with three 8-character readouts,
• 16 button user-defined prefix /suffix keypad (4 rows of four),
• Prev and Next buttons,
• 12 programmable buttons, and
• Two looping RS-485 ports with RJ-45 connectors (for Jupiter control using MPK protocol).
ENC-UCP Panel DescriptionThe ENC-UCP panel functions the same as the Encore XY panel, except for fewer programmable buttons, different button locations, and a different 1/2 rack form factor (Figure 15).
Figure 21. ENC-UCP Control Panel
NextNextPrevPrev
SRCSRC
LocalLocal
ChopChop
TakeTakeAllAl l
LevelLevel
Fi l terFi l ter
ProtProt
TakeTake
SalvoSalvo
ShiftShift
DestDest
IDID
CE CE
ClearClear
UNIVERSAL CPUNIVERSAL CP ENCORE/PRELUDE ENCORE/PRELUDEStatusStatus
PresetPreset
Dest /Leve l /AreaDest /Leve l /Area
8053_40r1
Keypad Buttons (16)
Status, Preset, and Level Displays
2-RU Rack Mount Frame (holds two half-rack units)Programmable Buttons (12)
ENC-UPC Panel Default Button AssignmentsThe default function and selection button configuration for the ENC-UCP panel is shown in Figure 16. The Prev and Next buttons have fixed functions not configurable by the user.
Note Button assignments of a particular control panel may be different because the defaults can be changed during configuration. See the separate Encore Con-figuration Manual for more information.
Encore — Control Panels Operation Manual 41

Section 3 — Encore Control Panels
Figure 22. ENC-UCP Default Button Configuration
AUXAUX
9
BLACKBLACK
8
BARSBARSEDITEDIT
7
CARTCARTSTUSTU
0
testtestFSFS
VCRVCR
6
ENGENG
5
CAMCAMCGCG
4
NETNET
3
PDRPDR
2
REMREMVTRVTR
1
PDR1PDR1
A
PDR2PDR2
B
PDR3PDR3
C
PDR4PDR4
D
PDR5PDR5
E
PDR6PDR6
F
PDR7PDR7
G
PDR8PDR8
H
PDR9PDR9
I
VTR1VTR1
J
VTR2VTR2
K
VTR3VTR3
L
VTR4VTR4
M
VTR5VTR5
N
VTR6VTR6
O
VTR7VTR7
P
DestDest
IDIDLevelLevel SRCSRC
SalvoSalvo
ShiftShift
FilterFilter LocalLocal
ProtProt
CECE
ClearClearTakeTake
8053
_41r
1
Primary Keypad SetProgrammableFunction Buttons
Secondary Keypad SetNotAssigned
ENC-UCP OperationThe ENC-UCP panel operates the same as the Encore XY panel, but with relocated buttons. Refer to XY Panel on page 31 for operating instructions.
42 Encore — Control Panels Operation Manual

Section 4SMS7000 GSC Control Panels
IntroductionSMS7000 Global Serial Channel (GSC) control panels can be used with an Encore version 1.7 or higher system. The control panel’s internal software needs to updated for use with Encore and a GSC mezzanine must be installed in the Encore System Controller. SMS7000 GSC control panels connect to Encore via the GSC BNC connectors on the rear panel of the Encore System Controller frame. Each of the four GSC busses support up to 16 SMS7000 control panels for a total of 64 per Encore System Controller.
Because the GSC panels do not use Ethernet these panels are not visible to the Grass Valley NetConfig application. GSC panel software cannot be updated using NetConfig, but instead a PC and a direct serial connection are used. See the Encore Release Notes for the latest installation and software update procedures.
Once installed with the Encore software, GSC panels are configured the same as other Encore panels, using the Encore Panel Server application. See the Encore Configuration Manual for additional information.
In general, SMS7000 panel functionality under Encore does not mimic func-tionality under SMS7000 control; rather it is based on the existing function-ality of the equivalent Encore control panel type.
Because the GSC panels use older hardware and communication methods, their operating response will be slower than newer Encore control panels.
Encore — Control Panels Operation Manual 43

Section 4 — SMS7000 GSC Control Panels
UCP Panel
UCP Panel Features• 2RU half-width rack mount,
• Status, Preset, and Level alphanumeric displays,
• Access to all Destinations and Sources,
• 16 button user-defined prefix /suffix keypad, and
• Previous / Next scrolling within prefix group.
UCP Panel DescriptionThe UCP (Universal Control Panel) has a group of programmable buttons on the left, three alphanumeric displays in the center, and a programmable keypad on the right (Figure 23).
Figure 23. UCP - Universal Control Panel
8053_20r0
STATUSRemt 3
PRESETRemt 3
LEVELRemt 3
DESTID
LEVEL SRC
PREVSALVO NEXT
CECLEAR
PROT
TAKE
CHOP
UCP Panel Default Button AssignmentsThe default button configuration for the UCP panel is shown in Figure 24.
Note Button assignments of a particular control panel may be different because the defaults can be changed during configuration. See the separate Encore Con-figuration Manual for more information.
44 Encore — Control Panels Operation Manual

UCP Panel
Figure 24. UCP Panel, Default Button Configuration and Keypad Sets
AUXAUX
9
BLACKBLACK
8
BARSBARSEDITEDIT
7
CARTCARTSTUSTU
0
testtestFSFS
VCRVCR
6
ENGENG
5
CAMCAMCGCG
4
NETNET
3
PDRPDR
2
REMREMVTRVTR
1
PDR1PDR1
A
PDR2PDR2
B
PDR3PDR3
C
PDR4PDR4
D
PDR5PDR5
E
PDR6PDR6
F
PDR7PDR7
G
PDR8PDR8
H
PDR9PDR9
I
VTR1VTR1
J
VTR2VTR2
K
VTR3VTR3
L
VTR4VTR4
M
VTR5VTR5
N
VTR6VTR6
O
VTR7VTR7
P
DESTDESTIDID
LEVELLEVEL SRCSRC
SALVOSALVO PREVPREV NEXTNEXT
PROTPROT CHOPCHOP
TAKETAKE
CECECLEARCLEAR
8053
_21r
0
Primary Keypad SetProgrammableFunction Buttons
Secondary Keypad Set
The Secondary Keypad set will only be available on the panel if the default configuration is changed to include a Shift button.
Note The PREV and NEXT buttons are not equipped with LEDs and so will not tally if programmed for a different function.
Taking a Source to a Destination (UCP Panel)1. Press the DEST/ID button to enter Destination mode.
2. Use the PREV and NEXT buttons to show the desired Destination on the Preset display.
3. Press the TAKE button to assign that Destination to the Status display.
4. Press the SRC button to enter Source mode.
5. Use the PREV and NEXT buttons to show the desired Source on the Preset display.
6. Press the TAKE button. The new Source is taken to that Destination and that Source’s name is reported in the status display.
Note A panel’s configuration may exclude control of some Sources, Destinations, and Levels. Excluded items will not be selectable in the Preset display.
Breakaway Take (UCP Panel)1. Press the DEST/ID button to enter Destination mode.
2. Use the PREV and NEXT buttons to show the desired Destination on the Preset display.
3. Press the TAKE button to assign that Destination to the Status display.
Encore — Control Panels Operation Manual 45
Section 4 — SMS7000 GSC Control Panels
4. Press the LEVEL button to enter Level mode.
5. Use the PREV and NEXT buttons to show each Level in turn on the Level display. Press the TAKE button so it is illuminated to select the Levels you wish to change for that Destination. At least one Level must be selected.
6. Press the SRC button to enter Source mode.
7. Use the PREV and NEXT buttons to show the desired Source on the Preset display.
8. Press the TAKE button. The new Source is taken only on the selected Levels of that Destination.
Protect (UCP Panel)
Note With default panel configurations, only the control panel that set the Protect can unprotect that Destination. When a Protect has been set, the PROT button on the panel that set the Protect will blink, and the PROT buttons on other panels accessing that destination will be illuminated without blinking.
Note Pressing and holding a steadily illuminated PROT button on a panel with a text display will report the name of the panel that set the Protect.
1. Press the DEST/ID button to enter Destination mode.
2. Use the PREV and NEXT buttons to show the desired Destination on the Preset display.
3. Toggle the PROT button to turn Protect On (illuminated) or Off for that Destination.
Note UCP panels do not report Protects for Destinations not currently assigned to the Status display. Care should be taken to relinquish all unneeded Protects before changing Destinations on these panels. You should also remember to free up all Destinations no longer requiring protection before you leave the vicinity of the panel.
Salvo (UCP Panel)When a UCP panel has been configured with Salvo capabilities, you will be able to select a Salvo and execute it.
CAUTION Be sure you understand exactly what a Salvo will do before you use it, and only fire a Salvo when it is appropriate to do so. Changing multiple Destina-tions with a Salvo can have far-reaching consequences, including possibly disrupting on-air operations.
1. Press the SALVO button to enter Salvo mode.
46 Encore — Control Panels Operation Manual

P32 Panel
2. Use the PREV and NEXT buttons to show the desired Salvo on the Preset
display.
3. Press the TAKE button to fire the selected Salvo.
P32 Panel
P32 Panel Features• 1RU rack mount,
• Alphanumeric status display, and
• 36 user-defined programmable buttons.
P32 Panel DescriptionThe P32 (Programmable 32 button) panel was originally designed to control the routing of a limited number of Sources to a single Destination with a single button press. The default configuration has a minimal number of function buttons on the left, a single alphanumeric display, and Source selection buttons on the right (Figure 25).
Figure 25. P32 - Programmable Button-Per-Source Control Panel
8053_24r0
Bobs Cam
SRCID
LEVELINV
PROT
CHOP
Under Encore control all the P32 panel buttons can be programmed for dif-ferent functions or source selections, including the selection of Destina-tions. This section describes only the panel’s default behavior of controlling a single Destination.
P32 Panel Default Button AssignmentsThe default button configuration for the P32 panel is shown in Figure 26.
Note Button assignments of a particular control panel may be different because the defaults can be changed during configuration. See the separate Encore Con-figuration Manual for more information.
Encore — Control Panels Operation Manual 47

Section 4 — SMS7000 GSC Control Panels
Figure 26. P32 Panel, Default Button Configuration and Keypad Sets
SRCSRCIDID
PROTPROT
CHOPCHOP LEVELLEVELINVINV
8053
_25r
0
Right 32 Buttons Default ConfigurationTop Row: Source 1-16
Bottom Row: Source 17-32
ProgrammableFunction Buttons
Taking a Source to a Destination (P32 Panel)Press the button for the desired Source. It will immediately be taken to the Destination and the name of the Source appears in the status display.
Breakaway Take (P32 Panel)1. Press the LEVEL/INV button to enter Level mode. In this mode the buttons
on the right no longer select Sources. The first upper row buttons now correspond to the Levels available and will be illuminated when they have been selected.
2. Press the selection buttons to toggle the desired Levels On or Off.
Note Pressing the LEVEL/INV button when it is illuminated will swap the Level selections (On Levels go Off, and Off Levels go On).
3. Press the SRC/ID button to enter Source mode.
4. Press the desired Source button. The new Source is taken only to the selected Levels of that Destination.
Protect (P32 Panel)Toggle the PROT button to turn Protect On (illuminated) or Off for that Des-tination.
Note With default panel configurations only the control panel that set the Protect can unprotect that Destination. When a Protect has been set the PROT button on the panel that set the Protect will blink, and the PROT buttons on other panels accessing that destination will be illuminated without blinking.
Note Pressing and holding a steadily illuminated PROT button on a panel with a text display will report the name of the panel that set the Protect.
48 Encore — Control Panels Operation Manual

MB8 Panel
MB8 PanelFigure 27. MB8 - Programmable Multibus 8 Control Panel
8053_21r0
PRESET
Remt 3
LEVEL
DigVideo
DESTID
LEVEL SRC
PREVSALVO NEXT
CECLEAR
STO
RCL
CHOP
STATUS 1
VTR 12
PROT
TAKE
STATUS 5
Black
PROT
TAKE
STATUS 2
PROT
TAKE
STATUS 6
PROT
TAKE
STATUS 3
PROT
TAKE
STATUS 7
PROT
TAKE
STATUS 4
PROT
TAKE
STATUS 8
PROT
TAKE
VTR 6
Netwk
Remt 7
DVE 2
DiskRcdr
CGEN 4
The SMS7000 MB8 (Multi-Bus 8) panel operates essentially the same as an Encore PMB panel, except it has two fewer programmable buttons on the left and the default button configuration is slightly different.
Default Button Configuration (MB8 Panel)The default button configuration for the MB8 panel is shown in Figure 28.
Note Button assignments of a particular control panel may be different because the defaults can be changed during configuration. See the separate Encore Con-figuration Manual for more information.
Figure 28. MB8 Panel, Default Button Configuration and Keypad Sets
AUXAUX
9
BLACKBLACK
8
BARSBARSEDITEDIT
7
CARTCARTSTUSTU
0
testtestFSFS
VCRVCR
6
ENGENG
5
CAMCAMCGCG
4
NETNET
3
PDRPDR
2
REMREMVTRVTR
1
PDR1PDR1
A
PDR2PDR2
B
PDR3PDR3
C
PDR4PDR4
D
PDR5PDR5
E
PDR6PDR6
F
PDR7PDR7
G
PDR8PDR8
H
PDR9PDR9
I
VTR1VTR1
J
VTR2VTR2
K
VTR3VTR3
L
VTR4VTR4
M
VTR5VTR5
N
VTR6VTR6
O
VTR7VTR7
P
DESTDESTIDID
LEVELLEVEL SRCSRC
SALVOSALVO PREVPREV NEXTNEXT
SHIFTSHIFT
CECECLEARCLEAR
DESTDESTPAGEPAGE
LEVELLEVELPAGEPAGE
8053
_23r
0Primary Keypad SetProgrammable
Function ButtonsSecondary Keypad Set
The Secondary Keypad set will only be available on the panel if the default configuration is changed to include a Shift button.
Note The PREV and NEXT buttons are not equipped with LEDs and so will not tally if programmed for a different function.
Encore — Control Panels Operation Manual 49
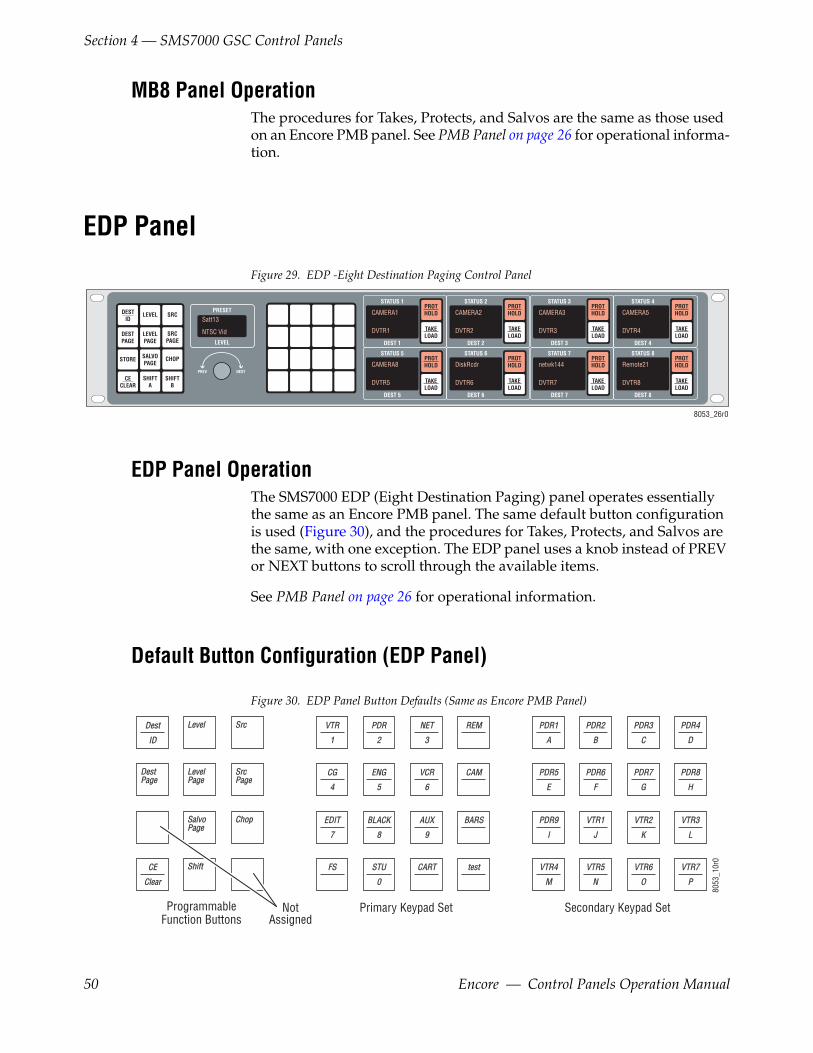
Section 4 — SMS7000 GSC Control Panels
MB8 Panel OperationThe procedures for Takes, Protects, and Salvos are the same as those used on an Encore PMB panel. See PMB Panel on page 26 for operational informa-tion.
EDP Panel
Figure 29. EDP -Eight Destination Paging Control Panel
PRESET
LEVEL
Satt13
NTSC Vid
DESTID
LEVEL SRC
LEVELPAGE
DESTPAGE
STORE
SRCPAGE
SALVOPAGE
SHIFTA
CHOP
CECLEAR
SHIFTB
STATUS 1
DEST 1
CAMERA1
DVTR1
PROTHOLD
TAKELOAD
STATUS 2
DEST 2
CAMERA2
DVTR2
PROTHOLD
TAKELOAD
STATUS 3
DEST 3
CAMERA3
DVTR3
PROTHOLD
TAKELOAD
STATUS 4
DEST 4
CAMERA5
DVTR4
PROTHOLD
TAKELOAD
STATUS 5
DEST 5
CAMERA8
DVTR5
PROTHOLD
TAKELOAD
STATUS 6
DEST 6
DiskRcdr
DVTR6
PROTHOLD
TAKELOAD
STATUS 7
DEST 7
netwk144
DVTR7
PROTHOLD
TAKELOAD
STATUS 8
DEST 8
Remote21
DVTR8
PROTHOLD
TAKELOAD
PREV NEXT
8053_26r0
EDP Panel OperationThe SMS7000 EDP (Eight Destination Paging) panel operates essentially the same as an Encore PMB panel. The same default button configuration is used (Figure 30), and the procedures for Takes, Protects, and Salvos are the same, with one exception. The EDP panel uses a knob instead of PREV or NEXT buttons to scroll through the available items.
See PMB Panel on page 26 for operational information.
Default Button Configuration (EDP Panel)
Figure 30.
AUXAUX
9
BLACKBLACK
8
BARSBARSEDITEDIT
7
CARTCARTSTUSTU
0
testtestFSFS
VCRVCR
6
ENGENG
5
CAMCAMCGCG
4
NETNET
3
PDRPDR
2
REMREMVTRVTR
1
PDR1PDR1
A
PDR2PDR2
B
PDR3PDR3
C
PDR4PDR4
D
PDR5PDR5
E
PDR6PDR6
F
PDR7PDR7
G
PDR8PDR8
H
PDR9PDR9
I
VTR1VTR1
J
VTR2VTR2
K
VTR3VTR3
L
VTR4VTR4
M
VTR5VTR5
N
VTR6VTR6
O
VTR7VTR7
P
DestDest
IDID
LevelLevel SrcSrc
DestDestPagePage
LevelLevelPagePage
SrcSrcPagePage
SalvoSalvoPagePage
ChopChop
CECE
ClearClear
ShiftShift
8053
_10r
0
Primary Keypad SetNotAssigned
ProgrammableFunction Buttons
Secondary Keypad Set
EDP Panel Button Defaults (Same as Encore PMB Panel)
50 Encore — Control Panels Operation Manual
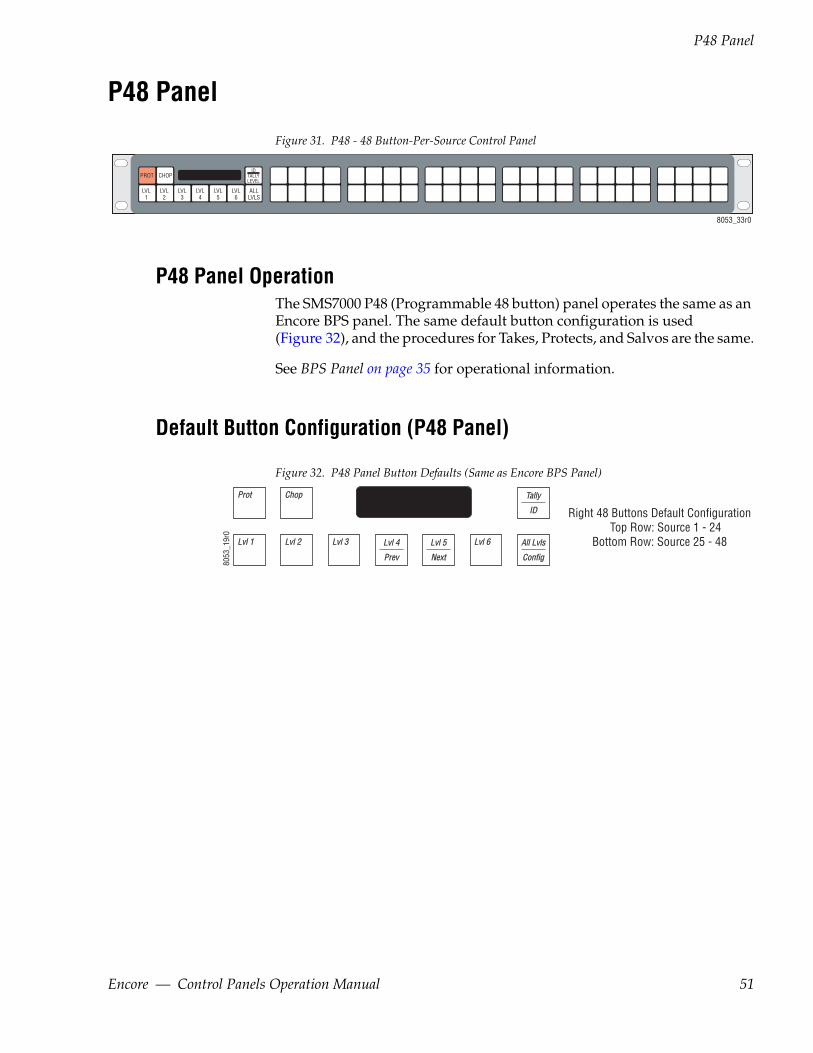
P48 Panel
P48 PanelFigure 31. P48 - 48 Button-Per-Source Control Panel
PROT CHOPID
TALLYLEVEL
ALLLVLS
LVL1
LVL2
LVL3
LVL4
LVL6
LVL5
8053_33r0
P48 Panel OperationThe SMS7000 P48 (Programmable 48 button) panel operates the same as an Encore BPS panel. The same default button configuration is used (Figure 32), and the procedures for Takes, Protects, and Salvos are the same.
See BPS Panel on page 35 for operational information.
Default Button Configuration (P48 Panel)
Figure 32.
ProtProt
Lvl 1Lvl 1
ChopChop
Lvl 2Lvl 2 Lvl 3Lvl 3 Lvl 6Lvl 6Lvl 4Lvl 4
PrevPrev
All LvlsAll Lvls
ConfigConfig
TallyTally
IDID
Lvl 5Lvl 5
NextNext
Right 48 Buttons Default Configuration Top Row: Source 1 - 24
Bottom Row: Source 25 - 48
8053
_19r
0
P48 Panel Button Defaults (Same as Encore BPS Panel)
Encore — Control Panels Operation Manual 51

Section 4 — SMS7000 GSC Control Panels
52 Encore — Control Panels Operation Manual

Section 5Kalypso Remote Aux Panels
IntroductionKalypso 32 button Remote Aux Panels can be used with an Encore version 1.7 or higher system. Older model Kalypso Aux Panels may need to have their software updated in order to work on an Encore system. See the Encore Release Notes for the latest installation and software update proce-dures. Once installed with the Encore software, Kalypso Remote Aux panels are configured the same as other Encore panels, using the Encore Panel Server application. See the Encore Configuration Manual for additional information.
Key Features• Web browser-based setup,
• 10Base-T Ethernet RJ-45 control interface, includes active and collision indication,
• Internal auto-ranging AC mains power supply,
• Back-lit buttons with display intensity adjustments,
• All buttons programmable, and
• Simple name-based identification.
Encore — Control Panels Operation Manual 53

Section 5 — Kalypso Remote Aux Panels
Remote Aux Panel Model TypesTwo different Remote Aux Panel models exist. Different names have been used for the documentation of these panels, depending on whether they are part of a Kalypso system or an Encore system.
• KAL-32AUX1, the original model name used for the 1RU Kalypso Remote Aux Panel, corresponds to the KSD (Kalypso Single Destina-tion) panel when used with Encore.
• KAL-32AUX2, the original model name used for the 2RU Kalypso Remote Aux Panel, corresponds to the KMD (Kalypso Multi Destina-tion) panel when used with Encore.
Note Because all the buttons on the KSD and KMD panels are programmable, it is possible to configure either panel for either single or multiple Destination control.
The Encore Panel Server OUI identifies Kalypso panels as KSD or KMD, and these terms are used in this section.
KMD PanelThe KMD panel has a group of 48 programmable buttons on the left (typi-cally used for selections), and a status display and ten programmable buttons on the right (typically used for functions). See Figure 33.
Figure 33. KMD Remote Aux Panel
KALYPSO REMOTE AUX PANEL
1 2 3 4 5 6 7 8 9 10 11 12 13 14 15 16 M/E1
M/E2
M/E3
PgmPst
Hold
17 18 19 20 21 22 23 24 25 26 27 28 29 30 31 32 Un-Shift
Shift KeySplit
NearSide
FarSide
AUX1
AUX2
AUX3
AUX4
AUX5
AUX6
AUX7
AUX8
AUX9
AUX10
AUX11
AUX12
AUX13
AUX14
AUX15
AUX16
Display Functionalityof BPS32
Function Buttons (10)Selection Buttons (48)
8053_27r0
The control panel button and display functionality of the KMD panel is modeled on the Encore BPS panel.
54 Encore — Control Panels Operation Manual

KMD Panel
KMD Panel IDThe KMD panel alphanumeric displays can report the following informa-tion for that panel.
• Panel IP Address
• Panel Name
• Controlled Destination Area
• Controlled Destination Name
• Name of the Panel Destination
• Name of the Current Tally Level
• Protect Override, if set
Holding down the Tally/ID button activates the panel ID mode.
You can interrupt the ID display sequence at any time by pressing any button to resume normal operation. It is not necessary to let the identifica-tion routine finish.
Default Button Configuration (KMD)The default button configuration for the KMD panel is shown in Figure 34.
Note Button assignments for a particular control panel may be different because the defaults can be changed during configuration. See the separate Encore Configuration Manual for more information.
Figure 34. KMD Default Button Configuration
ProtProt
Lvl 1Lvl 1
ChopChop
Lvl 2Lvl 2 Lvl 4Lvl 4
PrevPrev
All LvlsAll Lvls
ConfigConfig
TallyTally
IDID
Lvl 5Lvl 5
NextNext
Left Buttons Default Configuration Top Row: Source 1 - 16
Middle Row: Source 17 - 32Bottom Row: Source 33 - 48
8053
_30r
0
Not Assigned
KMD Panel OperationThe procedures for Takes, Protects, and Salvos are the same as those used on an Encore BPS panel. See BPS Panel on page 35 for operational informa-tion.
Encore — Control Panels Operation Manual 55
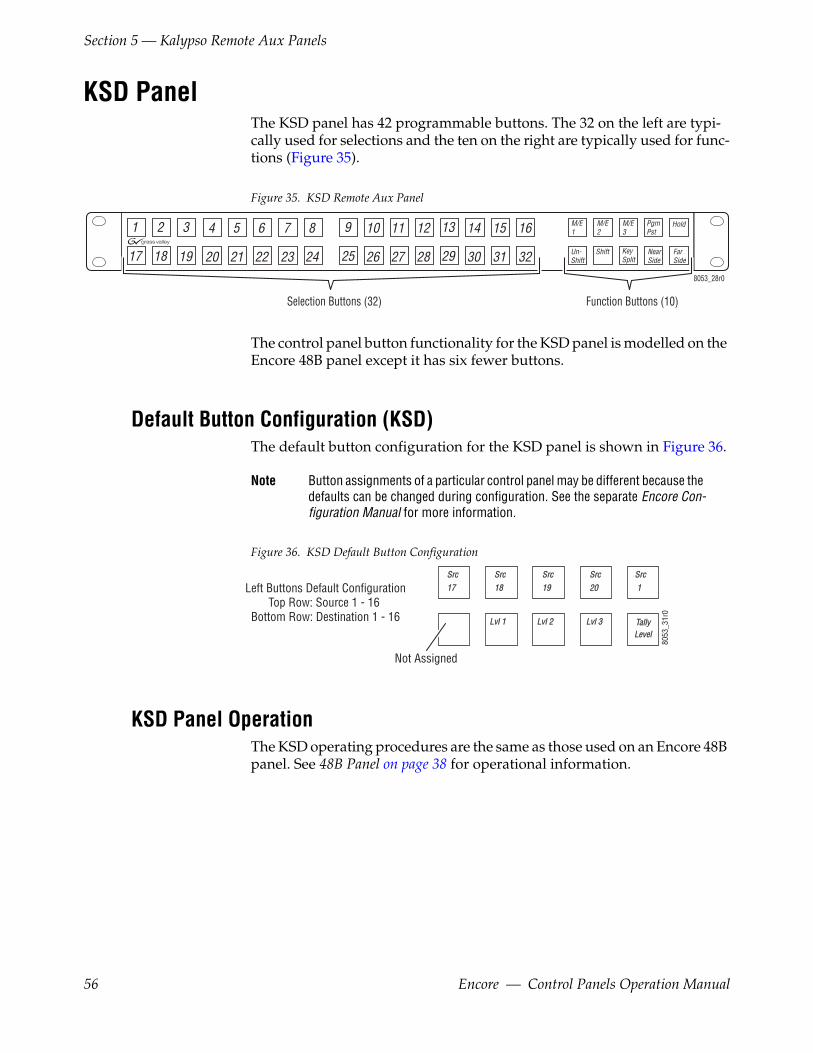
Section 5 — Kalypso Remote Aux Panels
KSD PanelThe KSD panel has 42 programmable buttons. The 32 on the left are typi-cally used for selections and the ten on the right are typically used for func-tions (Figure 35).
Figure 35. KSD Remote Aux Panel
KALYPSO REMOTE AUX PANEL
1 2 3 4 5 6 7 8 9 10 11 12 13 14 15 16 M/E1
M/E2
M/E3
PgmPst
Hold
17 18 19 20 21 22 23 24 25 26 27 28 29 30 31 32 Un-Shift
Shift KeySplit
NearSide
FarSide
8053_28r0
Function Buttons (10)Selection Buttons (32)
The control panel button functionality for the KSD panel is modelled on the Encore 48B panel except it has six fewer buttons.
Default Button Configuration (KSD)The default button configuration for the KSD panel is shown in Figure 36.
Note Button assignments of a particular control panel may be different because the defaults can be changed during configuration. See the separate Encore Con-figuration Manual for more information.
Figure 36. KSD Default Button Configuration
SrcSrc
1717
SrcSrc
1818
SrcSrc
1919
SrcSrc
2020
SrcSrc
1 1
Lvl 1Lvl 1 Lvl 2Lvl 2 Lvl 3Lvl 3 TallyTallyLevelLevel
Left Buttons Default Configuration Top Row: Source 1 - 16
Bottom Row: Destination 1 - 16
8053
_31r
0Not Assigned
KSD Panel OperationThe KSD operating procedures are the same as those used on an Encore 48B panel. See 48B Panel on page 38 for operational information.
56 Encore — Control Panels Operation Manual
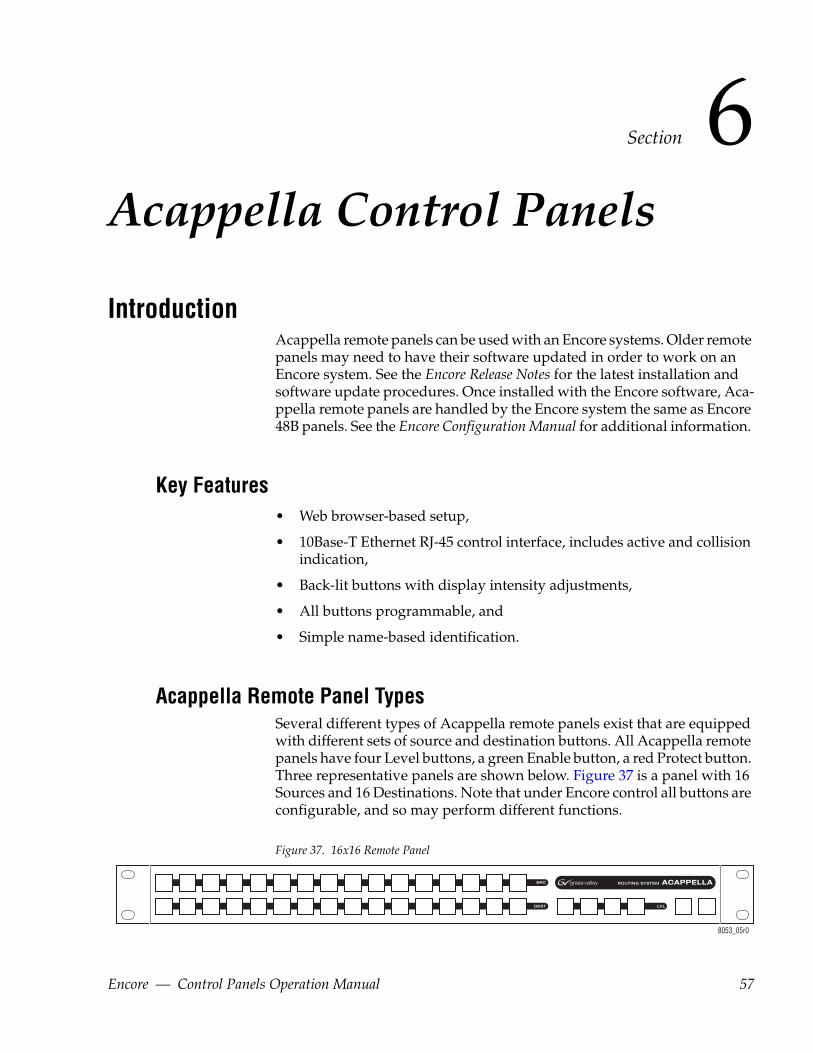
Section 6Acappella Control Panels
IntroductionAcappella remote panels can be used with an Encore systems. Older remote panels may need to have their software updated in order to work on an Encore system. See the Encore Release Notes for the latest installation and software update procedures. Once installed with the Encore software, Aca-ppella remote panels are handled by the Encore system the same as Encore 48B panels. See the Encore Configuration Manual for additional information.
Key Features• Web browser-based setup,
• 10Base-T Ethernet RJ-45 control interface, includes active and collision indication,
• Back-lit buttons with display intensity adjustments,
• All buttons programmable, and
• Simple name-based identification.
Acappella Remote Panel TypesSeveral different types of Acappella remote panels exist that are equipped with different sets of source and destination buttons. All Acappella remote panels have four Level buttons, a green Enable button, a red Protect button. Three representative panels are shown below. Figure 37 is a panel with 16 Sources and 16 Destinations. Note that under Encore control all buttons are configurable, and so may perform different functions.
Figure 37. 16x16 Remote Panel
8053_05r0
Encore — Control Panels Operation Manual 57
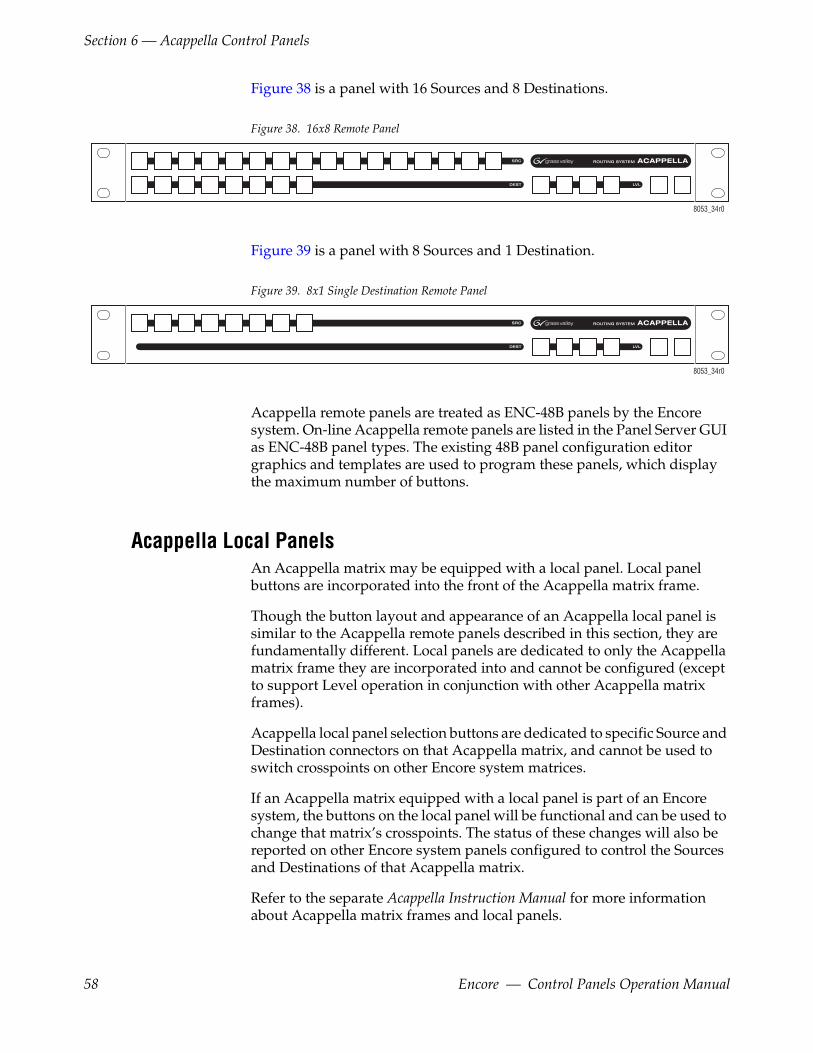
Section 6 — Acappella Control Panels
Figure 38 is a panel with 16 Sources and 8 Destinations.
Figure 38. 16x8 Remote
8053_34r0
Panel
Figure 39 is a panel with 8 Sources and 1 Destination.
Figure 39. 8x1 Single Destination Remote Panel
8053_34r0
Acappella remote panels are treated as ENC-48B panels by the Encore system. On-line Acappella remote panels are listed in the Panel Server GUI as ENC-48B panel types. The existing 48B panel configuration editor graphics and templates are used to program these panels, which display the maximum number of buttons.
Acappella Local PanelsAn Acappella matrix may be equipped with a local panel. Local panel buttons are incorporated into the front of the Acappella matrix frame.
Though the button layout and appearance of an Acappella local panel is similar to the Acappella remote panels described in this section, they are fundamentally different. Local panels are dedicated to only the Acappella matrix frame they are incorporated into and cannot be configured (except to support Level operation in conjunction with other Acappella matrix frames).
Acappella local panel selection buttons are dedicated to specific Source and Destination connectors on that Acappella matrix, and cannot be used to switch crosspoints on other Encore system matrices.
If an Acappella matrix equipped with a local panel is part of an Encore system, the buttons on the local panel will be functional and can be used to change that matrix’s crosspoints. The status of these changes will also be reported on other Encore system panels configured to control the Sources and Destinations of that Acappella matrix.
Refer to the separate Acappella Instruction Manual for more information about Acappella matrix frames and local panels.
58 Encore — Control Panels Operation Manual

Default Button Configuration (Acappella Remote Panel)
Default Button Configuration (Acappella Remote Panel)The default button configuration for all Acappella Remote Panels is the same as the Encore 48B panel, as is shown in Figure 40.
Note Button assignments of a particular control panel may be different because the defaults can be changed during configuration. See the separate Encore Con-figuration Manual for more information.
Figure 40. Acappella Remote Panel Default Button Configuration
8053_32r0
Source 1 to Source 16 Sources 17 through 24, Destination 17, Level 3 configured but no buttons exist
Tally Level
Dest 18
Dest 19
Level 1
Level 2
Level 4Destination 1 to Destination 16
Buttons not present on a given Acappella panel can be programmed but obviously will not be usable since the buttons don’t actually exist. Knowing which buttons are available on a particular Acappella remote panel type is required when these panels are programmed.
Note It may be useful to create control panel templates (from the basic 48B tem-plate) for each type of Acappella panel used. The appropriate functions can be assigned to buttons present on the panel, and buttons that do not exist could be configured as Not Assigned.
Acappella Remote Panel OperationThe procedures for Takes, Protects, and Salvos are the same as those used on an Encore 48B panel. See 48B Panel on page 38 for operational informa-tion.
Encore — Control Panels Operation Manual 59

Section 6 — Acappella Control Panels
60 Encore — Control Panels Operation Manual
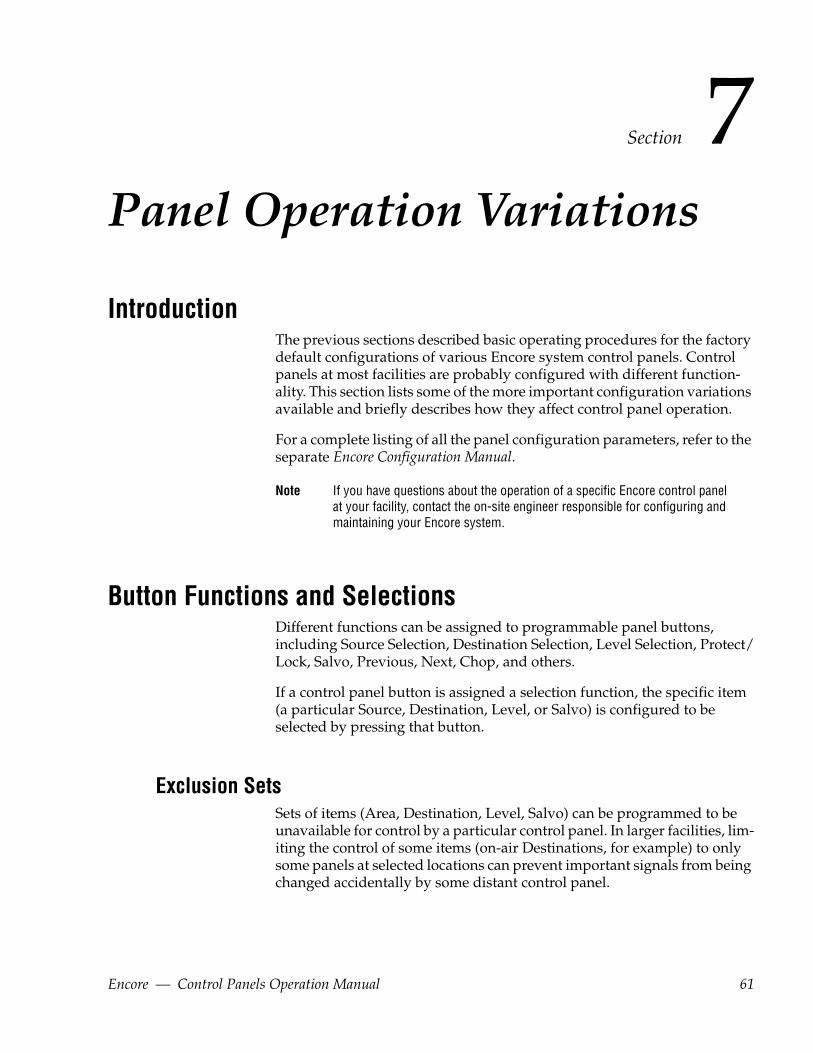
Section 7Panel Operation Variations
IntroductionThe previous sections described basic operating procedures for the factory default configurations of various Encore system control panels. Control panels at most facilities are probably configured with different function-ality. This section lists some of the more important configuration variations available and briefly describes how they affect control panel operation.
For a complete listing of all the panel configuration parameters, refer to the separate Encore Configuration Manual.
Note If you have questions about the operation of a specific Encore control panel at your facility, contact the on-site engineer responsible for configuring and maintaining your Encore system.
Button Functions and SelectionsDifferent functions can be assigned to programmable panel buttons, including Source Selection, Destination Selection, Level Selection, Protect/Lock, Salvo, Previous, Next, Chop, and others.
If a control panel button is assigned a selection function, the specific item (a particular Source, Destination, Level, or Salvo) is configured to be selected by pressing that button.
Exclusion SetsSets of items (Area, Destination, Level, Salvo) can be programmed to be unavailable for control by a particular control panel. In larger facilities, lim-iting the control of some items (on-air Destinations, for example) to only some panels at selected locations can prevent important signals from being changed accidentally by some distant control panel.
Encore — Control Panels Operation Manual 61
Section 7 — Panel Operation Variations
Keypad SetsAlternative keypad sets can be created that change, for example, which pre-fixes and suffixes are entered for item names. Keypad sets can be shared with multiple panels. Typically the same keypads sets are used throughout a facility so the various panels operate the same, but this is not required.
Page SetsPanels with multiple displays support page sets, which group items together so they can be called up simultaneously. Page sets exist for Desti-nations and Salvos.
Attributes and FlagsSome control panel behavior not related to a particular button function or selection can be changed by setting control panel attributes and/or flags during panel configuration. Some of the control panel attributes and flags that significantly affect panel operation are described below.
General Settings
Auto TallySets the Source Tally to the first active and enabled Level of the active Des-tination.
Note Turning Auto Tally ON disables Tally Level button functionality.
Auto Level LatchingWhen doing breakaway takes on panels without dedicated level buttons, the selected breakaway levels can be persistent (remain in force for subse-quent takes), or can be cleared automatically (revert to all levels after per-forming a take).
• When the Auto Level Latching flag is on, all levels of the current active destination are enabled after a take or change of active destination, regardless of the previous level enable states(s).
• When the Auto Level Latching flag is off, the current enabled/disabled levels state is applied to any subsequent takes or changes of active des-tination.
62 Encore — Control Panels Operation Manual
Attributes and Flags
Default Tally LevelSpecifies the Level that will Tally by default in panel displays if a Level has not been specifically selected for Tally on that panel.
Display Alias NamesAlternative, or Alias, names can be configured for Sources and Destina-tions. Setting this flag on will display alias names on control panels with displays.
Dst Change LockWhen on, Dst Change Lock disables the panel’s ability to change Destina-tions.
Level Change LockWhen on, Level Change Lock disables the panel’s ability to select indi-vidual Levels to perform a breakaway Take.
Protect and Lock SettingsBecause the Encore control system uses multiple points of control (various control panels, Encore OUI, automation interfaces) some flags affect how different control panels interact. Specifically, the Protect and Lock features determine how changing sources to destinations can be restricted. This is useful if, for example, a VTR operator needs to ensure that the incoming source remains present for the duration of a recording, and is not switched to another source by some other panel in the facility.
The Protect, Hard Lock, and Soft Lock flags are mutually exclusive. For example, setting a Hard Lock on a panel automatically clears a Protect or Soft Lock flag for that panel, if set.
ProtectThe Protect flag allows a control panel to set Protects on Destinations. Once a Protect is set, other panels cannot change the source to that Destination, but the panel that had set the Protect is able to change that Destination’s source, with some exceptions. Other panels with Lock/Protect Override or Force Unlock/Protect flags set can change sources on Protected destina-tions.
Hard LockThe Hard Lock flag acts like Protect, except even the panel that set the Lock also cannot change a locked Destination’s Source. That panel must first remove the lock before the Destination can be switched. Other panels with
Encore — Control Panels Operation Manual 63

Section 7 — Panel Operation Variations
Lock/Protect Override or Force Unlock/Protect flags set can change
sources on Locked destinations.Soft LockThe Soft Lock flag acts like Protect, except any other panel can also remove the Protect from a Destination.
Lock/Protect OverrideLock/Protect Override allows a panel to temporarily remove a Lock or Protect from a Destination, and change the Source to that Destination. The Lock or Protect remains in force after the change to the new Source.
Force Unlock/ProtectForce Unlock/Protect allows a panel to remove a Lock or Protect from a Destination.
Salvo Editor Lock/ProtectThe separate Salvo Editor application supports creating Salvos with Lock-Protect/Unlock-Unprotect capabilities. Executing a Salvo with this setting ON can, for example, lock one or more Destinations. A Salvo can also created to unlock one or more Destinations, perform Takes, and then either leave the Destinations unlocked or restore the Lock. Some limitations exist, including the inability to override some Protects, depending on the device issuing the Salvo. See the separate Salvo Editor Instruction Manual for spe-cific information.
Control Panel GroupingSome control panels can be configured to act together as a single larger control panel. Typically a 48B panel is grouped with a panel that has control functions and displays, and the 48B panel is configured with additional sources and/or destinations. See the separate Encore Configuration Manual for specific information.
Joystick OverrideSome control panels have GPI connectors that can be used for Joystick over-ride. Joystick override permits switching the displayed video to another Source, and then either returning to the previously selected Source or keeping the Override Source displayed. This feature is typically used for camera matching.
64 Encore — Control Panels Operation Manual
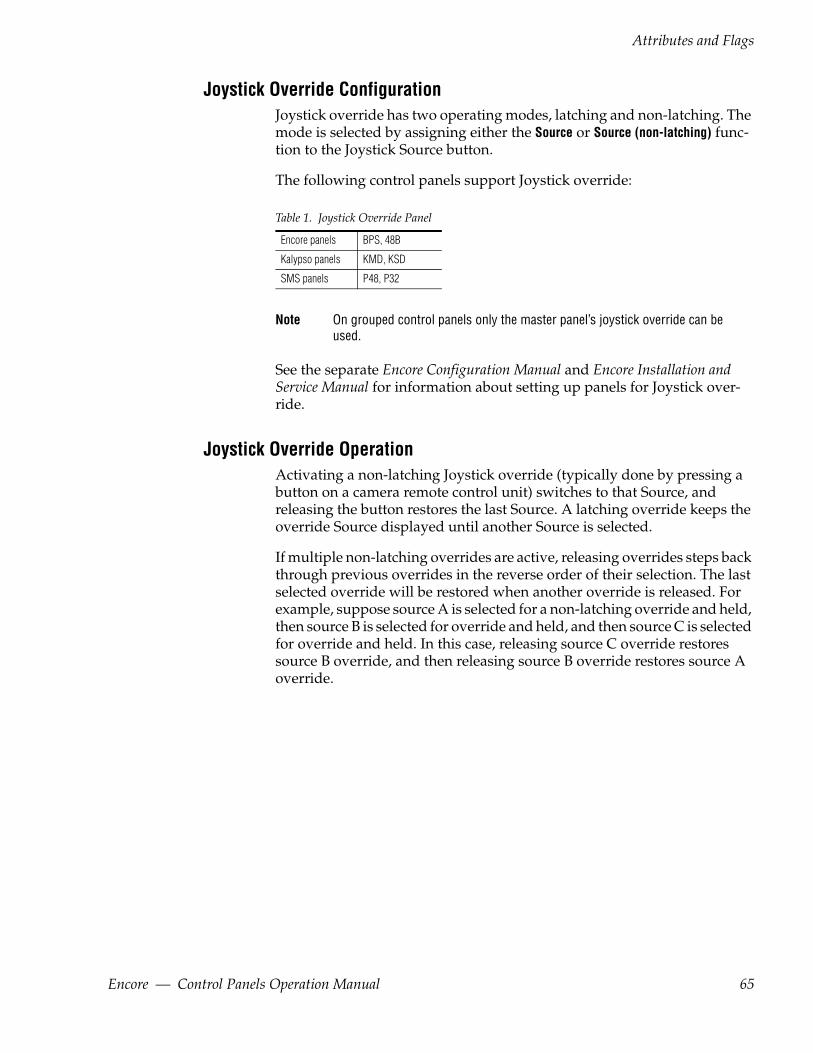
Attributes and Flags
Joystick Override ConfigurationJoystick override has two operating modes, latching and non-latching. The mode is selected by assigning either the Source or Source (non-latching) func-tion to the Joystick Source button.
The following control panels support Joystick override:
Table 1. Joystick Override Panel
Encore panels BPS, 48B
Kalypso panels KMD, KSD
SMS panels P48, P32
Note On grouped control panels only the master panel’s joystick override can be used.
See the separate Encore Configuration Manual and Encore Installation and Service Manual for information about setting up panels for Joystick over-ride.
Joystick Override OperationActivating a non-latching Joystick override (typically done by pressing a button on a camera remote control unit) switches to that Source, and releasing the button restores the last Source. A latching override keeps the override Source displayed until another Source is selected.
If multiple non-latching overrides are active, releasing overrides steps back through previous overrides in the reverse order of their selection. The last selected override will be restored when another override is released. For example, suppose source A is selected for a non-latching override and held, then source B is selected for override and held, and then source C is selected for override and held. In this case, releasing source C override restores source B override, and then releasing source B override restores source A override.
Encore — Control Panels Operation Manual 65

Section 7 — Panel Operation Variations
66 Encore — Control Panels Operation Manual

Index
breakaway Take procedure 36
Numerics48B panel 38Auto Tally feature 39breakaway Take procedure 39default button assignments 38features 38general description 38Protect procedure 40Salvo procedure 40Take procedure 39Tally Level procedure 40
7500 control by Encore 12
AAcappella
panel operation 59Acappella control by Encore 12Acappella local panel 58Acappella panel
buttons not present 59control panel templates 59default button assignments 59general description 57local 58operation 59software 57types 57
all level Take 18illustration 18
Apexcontrol by Encore 12
Areadefinition 16
Auto Level Latching flag 62Auto Tally feature 39Auto Tally flag 62
BBPS panel 35
default button assignments 35features 35general description 35Protect procedure 36Salvo procedure 37self configuration 37single destination default 35Take procedure 36
breakawaydefinition 16
breakaway Take 19illustration 19
breakaway Take procedureEncore 48B panel 39Encore BPS panel 36Encore PMB panel 28Encore XY panel 33SMS7000 P32 panel 48SMS7000 UCP panel 45
button selectionsavailable for panel buttons 61
Cchannel definition 16Chop
definition 16general description 24
Concerto control by Encore 12configuration
control panel 23configuration PC
general description 15control panel
Acappella features 57Acappella types 21, 57communications interfaces 23configuration 23Encore 48B 38Encore 48B features 38Encore BPS features 35
Encore — Control Panels Operation Manual 67
Index
Encore defaults 23 Destination
Encore features 25Encore PMB 26Encore types 21Encore UCP features 41Encore UCP general description 41Encore Universal 41Encore XY 31Encore XY features 31Encore XY general description 31general description 14grouping 64hardware types 21Kalypso KMD 54Kalypso KSD 56Kalypso remote aux types 21, 54operation with non-default settings 61SMS7000 EDP 50SMS7000 MB8 49SMS7000 P32 47SMS7000 P48 51SMS7000 types 21SMS7000 UCP 44software 22software update 22control panel buttonsavailable functions 61available selections 61
crosspointdefinition 16
Ddatabase
general description 15default button assignments
Acappella panel 59Encore 48B panel 38Encore BPS panel 35Encore PMB panel 26Encore XY panel 31, 41Kalypso KMD panel 55Kalypso KSD panel 56SMS7000 EDP panel 50SMS7000 MB8 panel 49SMS7000 P32 panel 47SMS7000 P48 panel 51SMS7000 UCP panel 44
DefaultTally Level flag 63
definition 16general description 18
Destination name reportingEncore XY panel 32
Display Alias Names flag 63distributed control 15documentation online 4documentation set 9Dst Change Lock flag 63
EEDP panel 50
default button assignments 50general description 50operation 50
Encoredatabase 15distributed control 15documentation set 9general description 11system diagram 11
Encore 48B panelgeneral description 38
Encore BPS panel 35general description 35
Encore control panelPanel ID 25
Encore PMBfeatures 26general description 26
Encore System Controllerconnectors 13general description 12multiple 13rear view 13
Encore system diagram 11Encore UCP 41Encore XY panel
status reporting 32ENC-UCP 41
operation 42ENC-UCP panel
general description 41ENC-UPC panel
features 41
68 Encore — Control Panels Operation Manual
Index
exclusion set Horizon control by Encore 12
definition 16types of 61
FFAQ database 4flag
Auto Level Latching 62Auto Tally 62Default Tally Level 63definition 16Display Alias Names 63Dst Change Lock 63Force Unlock/Protect 64Hard Lock 63Level Change Lock 63Lock/Protect Override 64Protect 63Soft Lock 64
Force Unlock/Protectflag 64
frequently asked questions 4Front
16x16 5716x8 588x1 58
functionsavailable for panel buttons 61
GGlobal Serial Channel (GSC) 22
general description 43Grass Valley web site 4grouping
control panel 64GSC (Global Serial Channel) 22GUI
Soft Panels 22
HHard Lock
flag 63hardware
controlled by Encore 12
JJoystick override 64
configuration 65latching 65non-latching 65operation 65
KKalypso KMD
panel operation 55Kalypso KSD
panel operation 56Kalypso remote aux panel
features 53general description 53Panel ID 55software 53types 54
keypad setalternative 62
KMD control panel 54KMD panel
default button assignments 55operation 55
KSD control panel 56KSD panel
default button assignments 56operation 56
LLevel
definition 16general description 17
Level Change Lock flag 63licensing 22Lock
configuration 63relationship to Protect 63
Lock/Protectusing Salvos 64
Lock/Protect Overrideflag 64
Encore — Control Panels Operation Manual 69
Index
Tally Level procedure 29
Mmatrixdefinition 16matrix crosspoints
general description 17MB8 panel 49
default button assignments 49general description 49operation 50
multi-level switchinggeneral description 18
NNetConfig
and SMS7000 panels 43
Oonline documentation 4
PP32 panel 47
breakaway Take procedure 48default button assignments 47features 47general description 47Protect procedure 48Take procedure 48
P48 panel 51default button assignments 51general description 51operation 51
page settypes of 62
Panel IDEncore control panel 25Kalypso remote aux panel 55
PMB panel 26breakaway Take procedure 28default button assignments 26features 26general description 26Protect procedure 29Salvo procedure 30Take procedure 27
presetdefinition 16
Protectconfiguration 63definition 16flag 63general description 24relationship to Lock 63
Protect procedureEncore 48B panel 40Encore BPS panel 36Encore PMB panel 29Encore XY panel 34SMS7000 P32 panel 48SMS7000UCP panel 46
Rremote aux panel
features 53routing terminology 16
SSalvo
definition 16general description 24
Salvo Editor application 64Salvo Editor Lock/Protect 64Salvo procedure
Encore 48B panel 40Encore BPS panel 37Encore PMB panel 30Encore XY panel 34SMS7000 UCP panel 46
self configurationEncore BPS panel 37
Sharergeneral description 15
Sharer PCgeneral descripion 15
SMS7000Global Serial Channel 22
SMS7000 control by Encore 12SMS7000 control panel
general description 43
70 Encore — Control Panels Operation Manual
Index
SMS7000 EDP breakaway 19
general description 50panel operation 50
SMS7000 MB8general description 49panel operation 50
SMS7000 P32features 47general description 47
SMS7000 P48general description 51panel operation 51
SMS7000 paneland NetConfig 43software 43
SMS7000 UCPfeatures 44general description 44
Soft Lockflag 64
Soft Panels 22general description 22GUI 22licensing 22
softwarecontrol panel 22control panel update 22
software download from web 4Source
definition 17general description 18
Source name reportingEncore XY panel 32
status reportingEncore XY panel 32
System Controllergeneral description 12power supply module 13reset button 13
System Controller Frameslots 13
TTake
all level 18all level illustration 18
breakaway iIlustration 19definition 17
Take procedureEncore 48B panel 39Encore BPS panel 36Encore PMB panel 27Encore XY panel 32SMS7000 P32 panel 48SMS7000 UCP panel 45
tallydefinition 17
Tally Level procedureEncore 48B panel 40Encore PMB panel 29
templatedefinition 17
terminology 16tie-line
definition 17general description 19
Trinixcontrol by Encore 12
UUCP control panel 44UCP panel
breakaway Take procedure 45default button assignments 44features 44general description 44Protect procedure 46Salvo procedure 46Take procedure 45
Universal control panel (Encore) 41Unlock/Unprotect
using Salvos 64
Vvirtual control panel 22
Wweb site documentation 4web site FAQ database 4
Encore — Control Panels Operation Manual 71
Index
web site Grass Valley 4
web site software download 4XXY panel 31
breakaway Take procedure 33default button assignments 31, 41features 31general description 31Protect procedure 34Salvo procedure 34status reporting 32Take procedure 32
72 Encore — Control Panels Operation Manual