created by hrms team · hrms position – create (pp03) use this procedure to create a position and...
TRANSCRIPT
Position - Create Page 1 of 12 Revised 12/28/16
HRMS Position – Create (PP03)
Use this procedure to create a Position and establish the Position attributes.
Roles: Organizational Management Processor
Note: Field definitions can be accessed within HRMS by pressing the “F1” key on the keyboard, or via On Line Quick Reference (OLQR), HRMS Data Definitions Resource Guide, and Glossary.
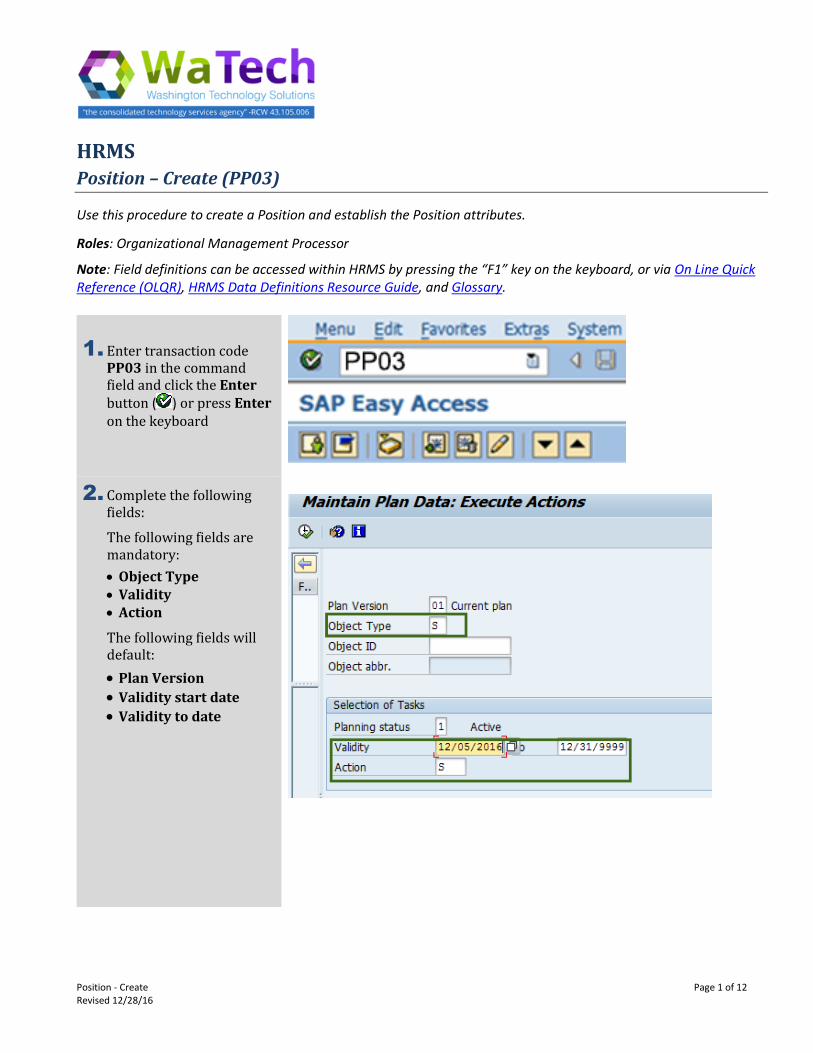
1. Enter transaction code PP03 in the command field and click the Enter button ( ) or press Enter on the keyboard
2. Complete the following fields:
The following fields are mandatory:
Object Type Validity Action
The following fields will default:
Plan Version
Validity start date
Validity to date
Position – Create (cont.)
Position - Create Page 2 of 12 Revised 12/28/16
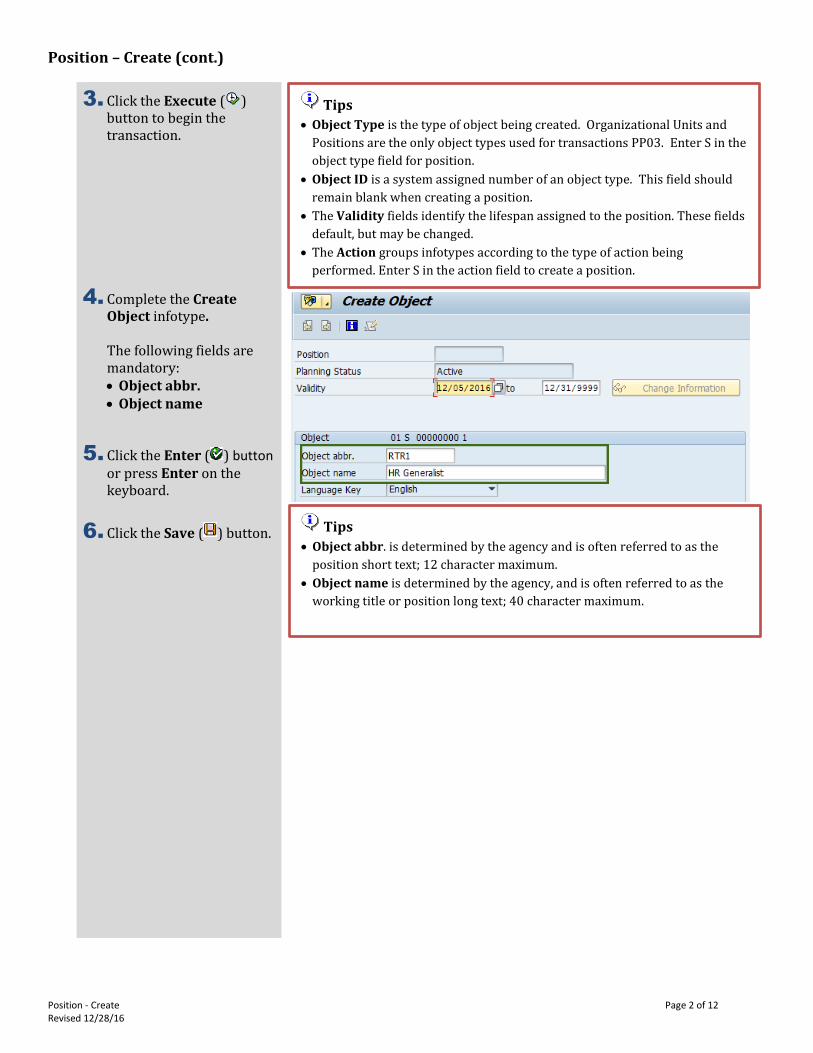
3. Click the Execute ( ) button to begin the transaction.
4. Complete the Create Object infotype. The following fields are mandatory: Object abbr. Object name
5. Click the Enter ( ) button or press Enter on the keyboard.
6. Click the Save ( ) button.
Tips
Object Type is the type of object being created. Organizational Units and
Positions are the only object types used for transactions PP03. Enter S in the
object type field for position.
Object ID is a system assigned number of an object type. This field should
remain blank when creating a position.
The Validity fields identify the lifespan assigned to the position. These fields
default, but may be changed.
The Action groups infotypes according to the type of action being
performed. Enter S in the action field to create a position.
Tips
Object abbr. is determined by the agency and is often referred to as the
position short text; 12 character maximum.
Object name is determined by the agency, and is often referred to as the
working title or position long text; 40 character maximum.

Position – Create (cont.)
Position - Create Page 3 of 12 Revised 12/28/16
7. Complete the Essential relationship Relationships infotype. The following field is mandatory: ID of related object
The following fields will default: Relationship
type/relationship Type of related object
8. Click the Enter ( ) button or press Enter on the keyboard.
9. Click the Save ( ) button.
10. Complete Essential Relationship Relationships infotype.
The following field is mandatory: ID of related object The following fields will default: Relationship
type/relationship Type of related object
11. Click the Enter ( ) button or press Enter on the keyboard.
12. Click the Save ( ) button.
Tips
The ID of related object establishes a relationship between the new
position and the organizational unit that the new position belongs to. This
relationship is necessary for all positions to identify where the position fits
in the agency’s organizational structure and for the system’s role-based
security.
Tips
The ID of related object establishes a relationship between the new
position and the job that the new position is described by. This relationship
is necessary for all positions to identify the job classification that the position
is allocated to.

Position – Create (cont.)
Position - Create Page 4 of 12 Revised 12/28/16
13. Complete the Create Relationships infotype.
The following field is mandatory: ID of related object
The following fields will default: Relationship
type/relationship Type of related object
14. Click the Enter ( ) button or press Enter on the keyboard.
15. Click the Save ( ) button.
16. Complete the Create Description infotype. The following fields are mandatory: Subtype Description
17. Click the Enter ( ) button or press Enter on the keyboard
Tips
The ID of related object establishes a relationship between the new position
and the position that the new position reports to. This relationship is necessary
to identify the position’s supervisor and the agency’s reporting structure.
Only these three position relationships are created during the position create
(PP03) action. If you have additional position relationships to create, refer to
the user procedures Position to Management Type Assignment Relationship,
Position- Market Segment, Position- WMS Inclusion Criteria, Position- WMS
Position JVAC, Position- Dual Language Relationship, and Assignment Pay to
Position Relationship located in the OLQR for guidance in creating additional
relationships such as management type, market segment, and JVAC.

Position – Create (cont.)
Position - Create Page 5 of 12 Revised 12/28/16
18. Click the Save ( ) button.
19. Complete the Essential relationship Employee Group/Subgroup infotype. The following fields are mandatory: Employee group EE subgroup
20. Click the Enter ( ) button or press Enter on the keyboard.
21. Click the Save ( ) button.
22. Complete the Essential relationship Acct. Assignment Features infotype.
The following fields are mandatory: Business Area Personnel area Pers. Subarea The following fields are conditional: Budgeted Retirement Eligible
23. Click the Enter ( ) button or press Enter on the keyboard.
24. Click the Save ( ) button.
Tips
The Subtype categorizes the description by selecting from a list of applicable
subtypes. The following subtypes display during the Create Position action:
o General Description
o In Training
o Shift Designation
The Description is a text field for entering a detailed description for the
selected subtype.
To create additional description subtypes, repeat steps 16-21.
You may skip any subtype by clicking the Cancel ( ) button. If there are no
descriptions to enter for the position, click the Cancel ( ) button for each
subtype then skip to step 22.
Tip
The Employee group is the status of the position. Refer to the HRMS Data
Definitions Resource Guide or press F1 in this field for Employee group
definitions.

Position – Create (cont.)
Position - Create Page 6 of 12 Revised 12/28/16
25. Complete the Essential relationship Planned Compensation infotype. Review the infotype and verify all the information is accurate.
26. Click the Save ( ) button.
27. Complete the Create Vacancy infotype.
28. Select the appropriate Vacancy option.
29. Click the Enter ( ) button or press Enter on the keyboard.
Tip
The Planned Compensation information will default from the job.
The Pay Grade tab is used for non-standard pay schedules, such as bands.
The Pay Scale tab is used for standard, incremental pay schedules, such as
steps.
Refer to the HRMS Data Definitions Resource Guide or press F1 in this field for
Pay Scale Area / Pay Grade Area definitions.
Refer to the user procedure Position- Maintain Planned Compensation located
in the OLQR for additional guidance in completing this infotype.

Position – Create (cont.)
Position - Create Page 7 of 12 Revised 12/28/16
30. Click the Save ( ) button.
31. Complete the Essential relationship Work Schedule infotype.
The following field is mandatory: Percentage
32. Click the Enter ( ) button or press Enter on the keyboard.
33. Click the Save ( ) button.
34. Complete the Essential relationship Cost Distribution infotype.
The following fields are mandatory: COAr Cost Ctr Pct. Fund Functional Area Cost Object AFRS Project AFRS Allocation
Tips
The Vacancy infotype is used to identify the position’s availability.
Tips
The remaining fields will populate once a Percentage is entered.
If the position is 100%, you can click on the Defaults ( ) button and
a Work Schedule Default Values window will appear. Click on the Transfer
( ) button to populate the default values.
A warning message may appear “Work time per month is calculated acc.
to.” Continue to click the Enter ( ) button or press Enter on the keyboard
until you are prompted to click the Save ( ) button.

Position – Create (cont.)
Position - Create Page 8 of 12 Revised 12/28/16
35. A list of Codes are available by clicking the matchcode in each of the Cost Distribution fields to narrow your search. Go to step 36 for help searching Cost Center codes using the matchcode. Skip to step 38 if you directly entered the Cost Distribution codes.
36. Enter your agency code with an asterisk (*) and
click the green check ( ) to begin search.
37. Select the appropriate code and click the Copy
( ) button or press Enter on your keyboard.
38. Click the Enter ( ) button or press Enter on the keyboard.
39. Click the Save ( ) button.
Tips
Review the cost distribution code and short text value before making your
selection.
Repeat steps 35-39 for each cost distribution field as necessary.
Caution
Enter cost distribution information on multiple rows as necessary. Pct. column
should add up to 100 percent.
Tips
For guidance in the Cost Distribution fields, see the Cost Accounting Equivalency
Crosswalk (AFRS to HRMS) in the Financial Reporting Job Aid located in the
OLQR.
Position – Create (cont.)
Position - Create Page 9 of 12 Revised 12/28/16
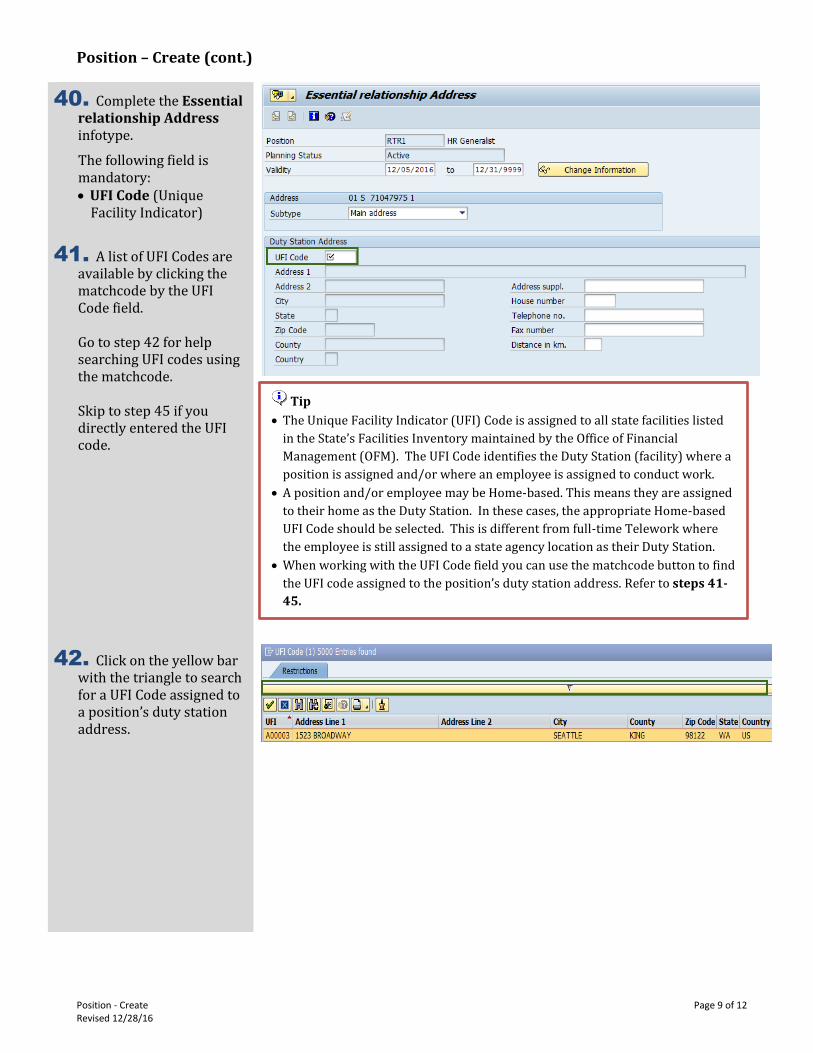
40. Complete the Essential relationship Address infotype.
The following field is mandatory: UFI Code (Unique
Facility Indicator)
41. A list of UFI Codes are available by clicking the matchcode by the UFI Code field. Go to step 42 for help searching UFI codes using the matchcode. Skip to step 45 if you directly entered the UFI code.
42. Click on the yellow bar with the triangle to search for a UFI Code assigned to a position’s duty station address.
Tip
The Unique Facility Indicator (UFI) Code is assigned to all state facilities listed
in the State’s Facilities Inventory maintained by the Office of Financial
Management (OFM). The UFI Code identifies the Duty Station (facility) where a
position is assigned and/or where an employee is assigned to conduct work.
A position and/or employee may be Home-based. This means they are assigned
to their home as the Duty Station. In these cases, the appropriate Home-based
UFI Code should be selected. This is different from full-time Telework where
the employee is still assigned to a state agency location as their Duty Station.
When working with the UFI Code field you can use the matchcode button to find
the UFI code assigned to the position’s duty station address. Refer to steps 41-
45.

Position – Create (cont.)
Position - Create Page 10 of 12 Revised 12/28/16
43. Enter Address information on the infotype. If address information is unknown, you can start the address information and enter an asterisk (*). Click the
green check ( ) to begin search.
44. Click on the green
check ( ) to accept the correct address. If results return more
than one entry, select the correct address.
If there is only one entry, it will be selected by default.
The UFI Code field will display the code you selected.
45. Click the Enter ( ) button or press Enter on the keyboard.
The following fields will auto-populate once you click Enter: Address 1 Address 2 City State Zip Code County Country
The following fields are optional: Address Suppl. House number Telephone no. Fax number Distance to km.
Tips
Make note of the position’s UFI County as it should match the position’s duty
station County on the Essential relationship Job Attributes infotype (step 47).
Position – Create (cont.)
Position - Create Page 11 of 12 Revised 12/28/16
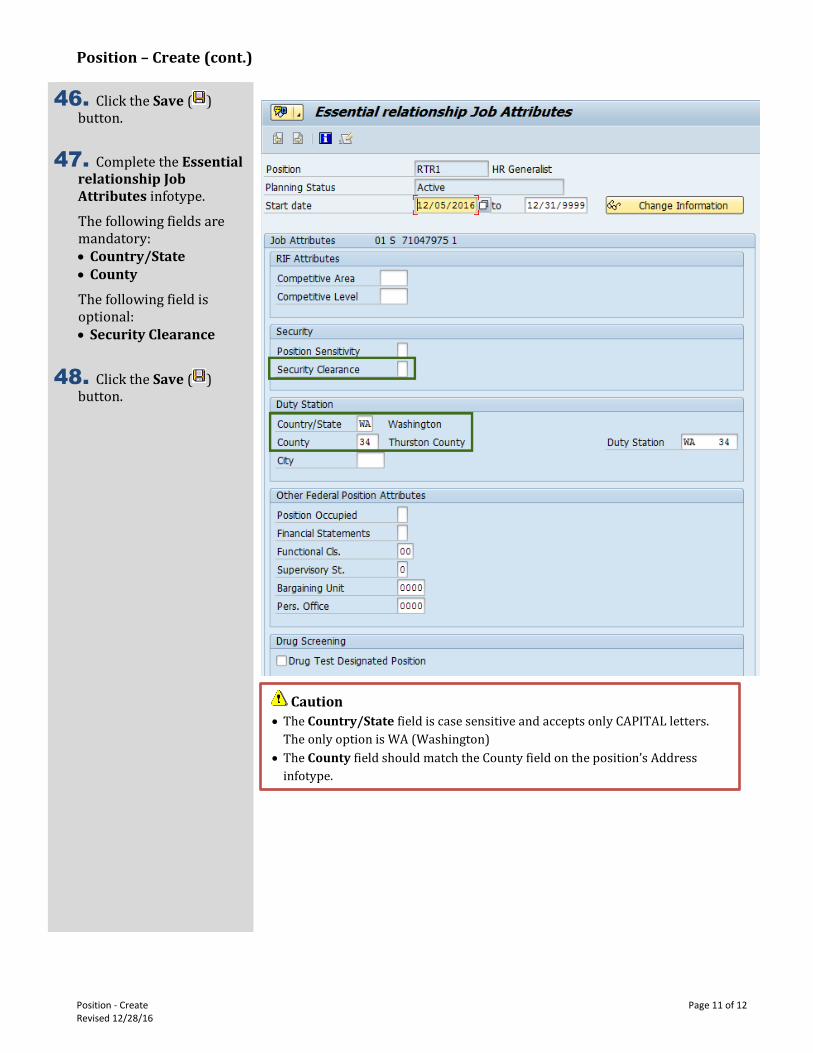
46. Click the Save ( ) button.
47. Complete the Essential relationship Job Attributes infotype.
The following fields are mandatory: Country/State County
The following field is optional: Security Clearance
48. Click the Save ( ) button.
Caution
The Country/State field is case sensitive and accepts only CAPITAL letters.
The only option is WA (Washington)
The County field should match the County field on the position’s Address
infotype.

Position – Create (cont.)
Position - Create Page 12 of 12 Revised 12/28/16
49. Complete the Create Telework/Flex Work (POS) infotype.
The following fields are mandatory: Telework (POS) Flextime (POS) Compressed
Workweek (POS)
50. Click the Save ( ) button.
51. You have successfully completed the Position Create procedure.
Tips
Refer to the HRMS Data Definitions Resource Guide or press F1 in this field for
Telework (POS), Flextime (POS), and Compressed Workweek (POS)
definitions.
Tip
The Position’s Object ID number will display for the new position. Be sure to
record this for future reference.