creating a survey in qualtrics using a template
TRANSCRIPT

Creating a Survey in Qualtrics Using a Template Qualtrics is a relatively easy to use survey software that gives a user many different options to create a survey. This set of screenshots will help you conduct a simple poll or survey in Qualtrics using one of the pre-configured templates. This will help you create a survey quickly and not get lost in the vast array of options available. This set of screenshots will walk you through the process of
• Creating a survey
• Sharing your results with an Anonymous Link
• Getting the results
• Reports.
Creating a survey
1. Open up any browser and type in the following URL into the search box: hanovercollege.qualtrics.com Then click Enter
2. This is the first screen that you’ll see if you’ve never used Qualtrics before. Click on the Create a New Project button

After you’ve set up one survey, the first screen that you’ll see will look different – it will look like what you see below. You’ll see your previously created surveys as well as the ones that you are currently working on arrayed vertically on the screen. You can either click on an older survey or click on the blue button to create a new one.
3. The first page will give you two options. You can either 1) make a survey up from scratch, or 2) use a template to create a survey. For this set of instructions, we’ll be making a survey using a template. We’re going to use the Quick Poll template, but note that there are many others – scroll down to see the full list.

4. Click on the Get Started button to…get started.
5. Give the project a name – we’ll call ours The Greatest Poll Ever Made. After we add the name to the field, we’ll click on the blue button to create the project.

6. You’ll see a message with some boilerplate instructions for you, the survey maker. Highlight this text
and delete it on this first slide. Then add any introductory information and instructions for survey respondents onto this first page. This might be a good place to add IRB information, if it applies to your survey. Here is a link to Hanover’s Institutional Research Board website for information and contacts to learn more if your survey may be classified as research on human subjects.
7. Here are the instructions that I’ve made for a fictious poll, the Greatest Poll Ever Made, which we’ll imagine is being given by the New Yorker magazine, rather than someone at Hanover. Once you’ve added these, use the slider on the right to scroll down. Below this introduction will be a page break and then some pre-configured questions that come with the template.

8. You will see three different question types arrayed below the introductory text box. You can repurpose any or all of questions by clicking on the text of the question or the answers and changing the wording of them. You can copy question types, as well. If you can click on the three dots or elipsis in the upper right corner, you’ll see a menu with a link that will allow you to copy a question, move it or delete it. Here, I’m going to just delete these three questions and create new ones. I’ll click on the three dots and then delete the questions.
9. Once I’ve deleted the three questions, I notice that each one had a page break separating the information from the first question. We’ll delete two of them so that we have only one page break between the information and the first question. To delete a page break, click on the line of the page break and a red circle appears. Click on this red circle with your cursor and the page break will disappear. I’ll do this with all three of the page breaks.

10. Now that I have just one page break between the introductory infornation and the rest of the poll, I’m going to click on the blue button to create a new question.
11. We’ll select a multiple-choice question to add here.

12. We’ll click near the question text to change what it says. When you click on the text, it highlights the text and allows you to make a change.
13. We’ve added the text.

14. You can click on the three dots next to a question to pull up the menu. From there you can move the question, copy it, or delete it, etc.
15. Click on Add a New Question.

16. We’ll add another multiple-choice question as our next question.
17. We’ll write the text of the question in the box – ‘Have you ever been to Indianapolis?’
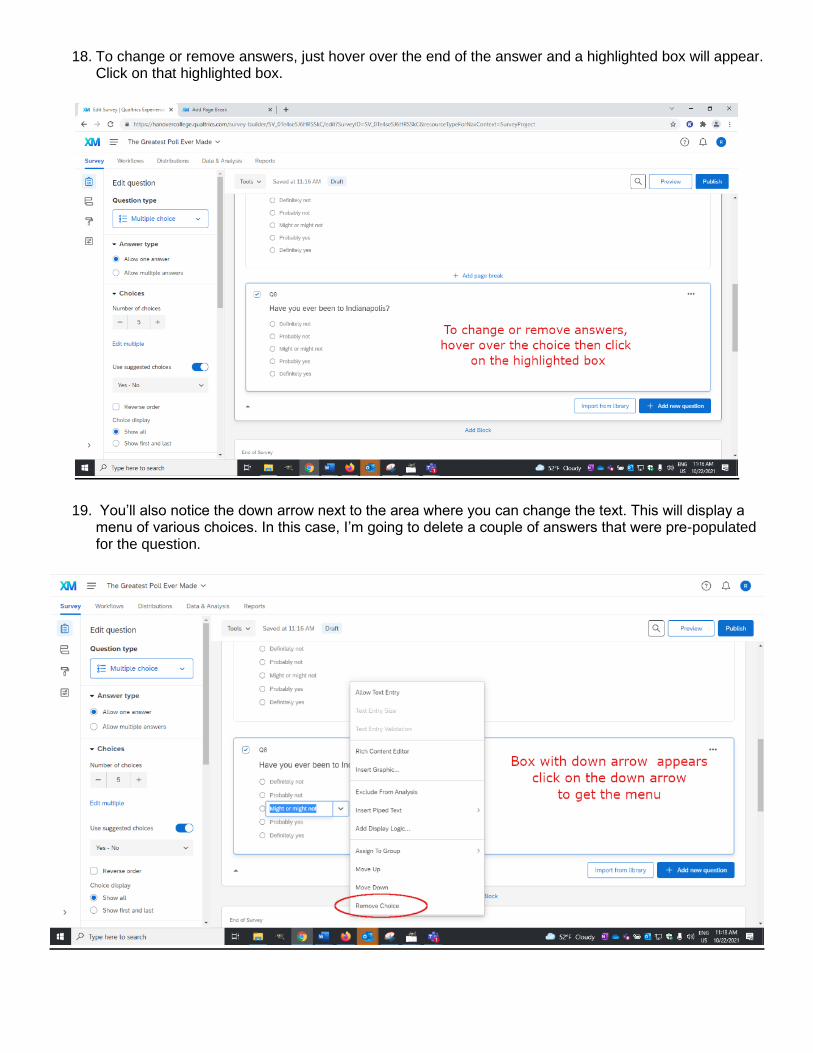
18. To change or remove answers, just hover over the end of the answer and a highlighted box will appear. Click on that highlighted box.
19. You’ll also notice the down arrow next to the area where you can change the text. This will display a menu of various choices. In this case, I’m going to delete a couple of answers that were pre-populated for the question.

20. You can click on the box with the down arrow and change the wording in the text for that answer.
21. After changing answers and deleting answers, we get this. We’ll click on the button to add a new question.

22. We’ll add a Text Entry question type. Essentially this is a fill-in-the-blank question.
23. If you want to re-order your questions, click on the ellipsis (or three dots), then on the menu that populates, click on Move Question.
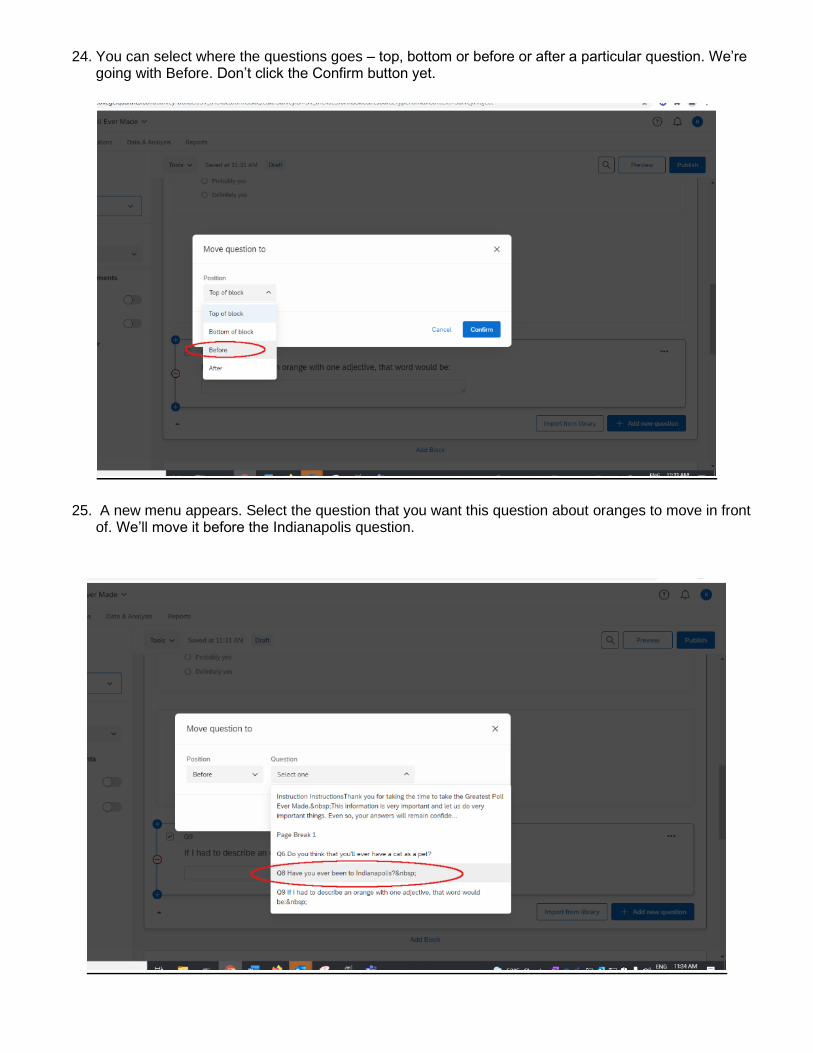
24. You can select where the questions goes – top, bottom or before or after a particular question. We’re going with Before. Don’t click the Confirm button yet.
25. A new menu appears. Select the question that you want this question about oranges to move in front of. We’ll move it before the Indianapolis question.

26. Once that question populates in the menu, I’ll click the blue Confirm button.
27. To change the number of a question, just click on it, and a box appears with the number highlighted inside it. Just type in the new number and click Enter, and the question now has a new number.

28. For each question, you can use the Edit Questions column to customize your question and its answers. These will apply to the activated question – the one with the box around it. This might be things like allowing one or multiple answers for a question, or adding more potential answers to the question, or formatting issues with how the question displays.
29. Further down the column, you can force users to answer a response to a specific question to continue, or you can validate the answer to ensure that the answer is give or stored in a correct format. This might be useful for things that require a certain format, like an email address or phone number.

30. When you require a response for a specific question, you’ll see an asterisk in the area near the upper right side of the question.
We’ll click on Preview to preview the quiz.
31. Here is the preview. This is the first page for both the web and for the mobile user. The navigation buttons will the black button at the bottom right (and once we get into the survey, on the left) of the page.

32. Here is what the survey looks like. With no page breaks, we’ll have to scroll down to get to the next question.
33. For the multiple-choice questions, you’ll want to click on an answer to activate it as a response.

34. At the end of the preview, you can click on a tab in your browser to get back to the quiz editing screen. There are also some options on the Tools menu in the upper right that you may or may not need for your survey.
35. If you are satisfied, click on the Publish button to finalize your survey and begin the process of sharing
it out.
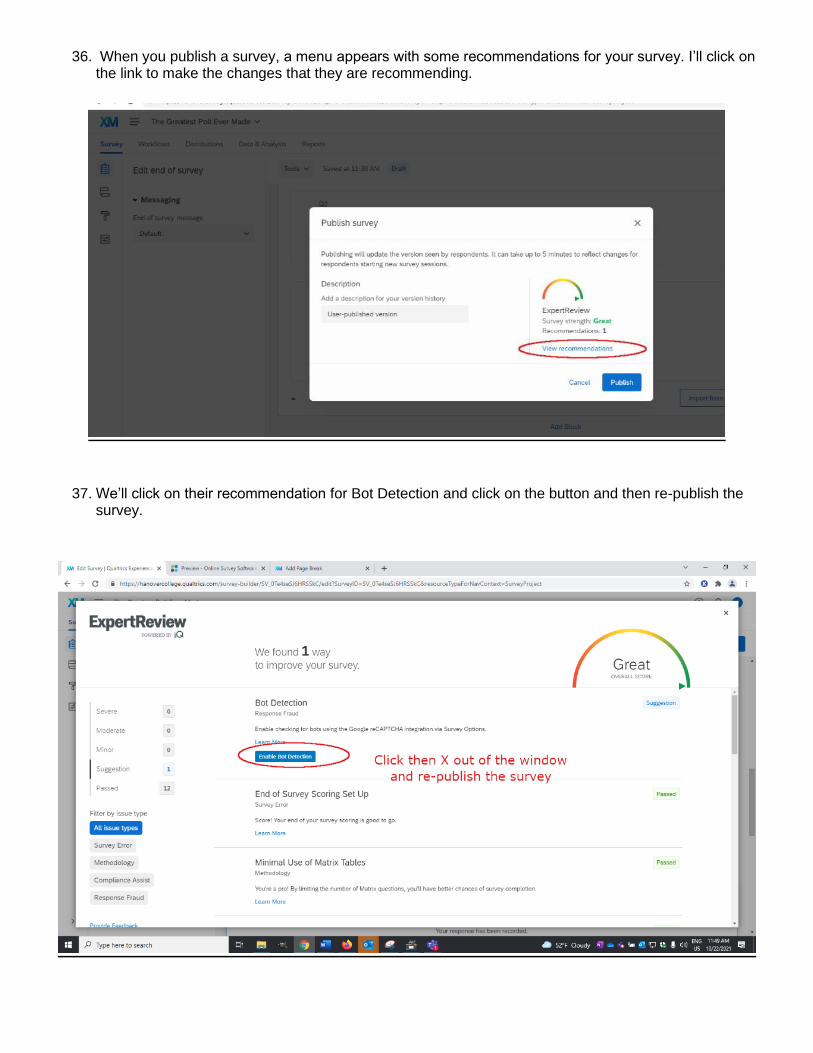
36. When you publish a survey, a menu appears with some recommendations for your survey. I’ll click on the link to make the changes that they are recommending.
37. We’ll click on their recommendation for Bot Detection and click on the button and then re-publish the survey.
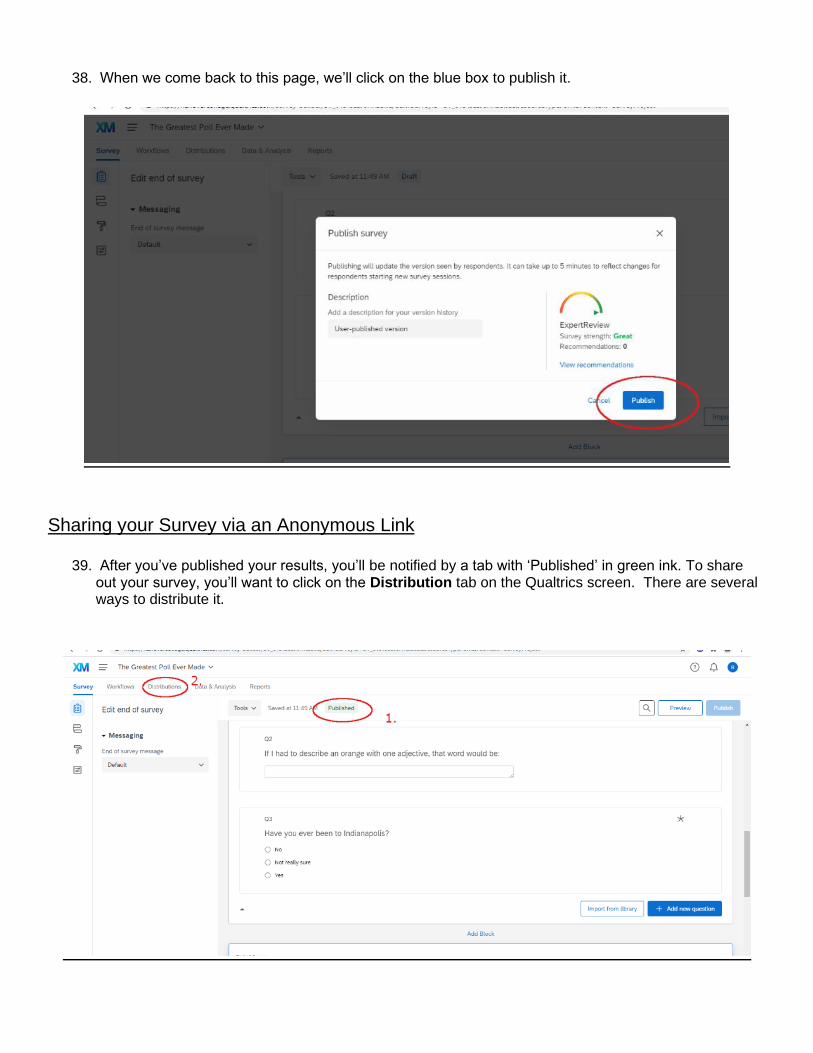
38. When we come back to this page, we’ll click on the blue box to publish it.
Sharing your Survey via an Anonymous Link
39. After you’ve published your results, you’ll be notified by a tab with ‘Published’ in green ink. To share out your survey, you’ll want to click on the Distribution tab on the Qualtrics screen. There are several ways to distribute it.

40. There are many ways to distribute the survey. We’ll start by talking about using links to send out access to the survey. There are two different ways to send out a survey by links – by an Anonymous Link, which will send out a link to the survey that does not allow you to track respondents or by a Personal Link which will allow you to track an individual’s response. This will show you how to send it via an Anonymous Link:
Click on the Copy this Link button and it saves the link to a clipboard. You can paste this link into an email, website, document or Moodle page.
41. You’ll see the ‘Link copied’ label when you’ve clicked on the Copy Link button.

42. You can copy this link onto a website, a Moodle class, a document or into an email. Here, I’m sending the survey out through a link in an email to Joe Student.
Getting the Results
43. Click on Data and Analysis to view responses to the survey. Since we used Anonymous Link, we cannot piece together what response was Joe Students and which was someone else’s.

44. The Tools menu gives you some options for what you can compile and analyze.
45. Use the Export or Import button to export or import data. The menu offers several different ways of doing this. We’ll click on the first one listed – Export Data.

46. There are a variety of formats that you can use to export the data. We’ll click on Excel and then click the Download button.
47. Here is the poll data downloaded to an Excel sheet. In Excel, if you see hashtags or number signs in a cell, the data is too large for the current size of the cell. Just pick one of the borders of the cell (like the right edge of B and C in the circle below) at the very top of the table and move it right to expand the size of the cell. At a certain point, they’ll become legible characters.

Reports
48. There are many options to the reports available to Qualtrics, but we’ll look at only some very basic
options. At the end of this document, you’ll find more information on more advanced reporting options.
49. Each survey question has its own page complete with a visualization of the data from the survey.

50. Beneath each visualization is data about each question.
51. You can export the information on each page in a variety of formats.

52. The Default Report menu allows you to create new reports using the data from the survey or to copy
reports.
53. Down the left hand side, you can click on a tab to open up a visualization corresponding to each question.

54. The center of the page includes visualizations of the response data from the survey.
55. By double-clicking on your visualization, you will open up a menu that will allow you to change the type of visualization for your data, or customize it’s look.

56. The gear button will allow you to change the default for the report. The Share Report button will allow you to export the survey data in a variety of formats, such as PDF or Word document, as PowerPoint slides, or as CSV data.
57. You can further filter your data by using the Add Filter’s button to the left. This could be metadata, like
start date, IP address, duration or response ID (among others) or by contact information, like name or email address (among others), if applicable.

58. If you have an active survey, notice the bell icon in the upper right when you log in. This is the notifications area. This will let you know if you have had some new survey results come through. Clicking on it will clear out the Red or Blue notifications. For more information on the notifications area, look at this link.