cremaldi cream machines - sanomat
TRANSCRIPT

Vaihinger GmbH Horstweg 29 65520 Bad Camberg-Erbach Telefon 0 64 34 / 94 05 0 Telefax 0 64 34 / 94 05 99 http://www.sanomat.com [email protected]
CREMALDI Cream machines
Operating instructions

Cream whipping machines
Operating instructions Cremaldi 2
CONTENTS
Important indications and security measures .......................................... 3 Unpacking, setting-up and connecting .................................................... 4 Starting the unit ......................................................................................... 4 • Pre cleaning .......................................................................................... 4 • Filling-in the liquid cream ...................................................................... 5 • Setting whipped cream consistency ..................................................... 5 Machine functions .................................................................................... 6 Cleaning the machine .............................................................................. 7 • Daily disinfecting cleaning by rinsing through ...................................... 7 • Cleaning of Air Regulation (monthly) .................................................... 9 • Thorough cleaning / Technical check-up ............................................. 10 Troubleshooting ..................................................................................... 16 Shipping information .............................................................................. 17 Disposal instructions .............................................................................. 17 Technical data ........................................................................................ 17 Spare parts ............................................................................................ 18 Declaration of conformity ........................................................................ 19

Cream whipping machines
Operating instructions Cremaldi 3
IMPORTANT INDICATIONS AND SECURITY MEASURES to be respected by all operators !
First read the operating instructions carefully, t han start the machine!
Before maintenance always pull-out the wall socket! (Maintenance shall always be carried out by an auth orized service agent)
Do not misuse the machine for other purposes!
Never use hose (or steam power washer) to clean the machine!
Only trained personnel should be allowed to operate the machine!
For cleaning/disinfection and repairing use only or iginal spare parts and accessories! Using other parts lead s to cancellation of the warranty and of the conformity of the machine!
Do not operate the machine, when parts are not fitt ed properly!
Let the machine cool over night (gives additional h ygienic security)!
Do not stick tools or other objects into the latera l air slots of the machine!

Cream whipping machines
Operating instructions Cremaldi 4
UNPACKING, SETTING-UP AND CONNECTING • Remove straps and outer packing!
• Remove inner protection packing!
• Check for shipping damages, if applicable, immediately submit a claim to the transport company
• Place the machine on a flat, level and solid surface!
• Avoid exposure to direct sunlight!
• Ensure lateral security clearance (to the left and the right of the machine at least 5cm or 2 “) ! Fire danger due to heat build-up!
Make sure the following - that the socket is properly grounded - right power supply: 230V/50Hz fuse at least 10A / 110-120V/60Hz / 100V/50/60Hz, fuse at least 15A
• Before start-up, let the machine stand idle for at least 2 hours until the refrigeration unit will have recovered from movement during transport.
• Plug-in the wall socket and switch-on machine switch on „I“. Machine switch lights up, refrigeration unit starts!
� The machine is now ready for use!
Indication: The machine needs at least 2 hours befo re the optimum cream-whipping temperature is reached! STARTING THE UNIT Pre cleaning Before first use, the machine must be thoroughly cl eaned and disinfected!! Carry-out disinfection cleaning as described under page 7!
Cream whipping machines
Operating instructions Cremaldi 5
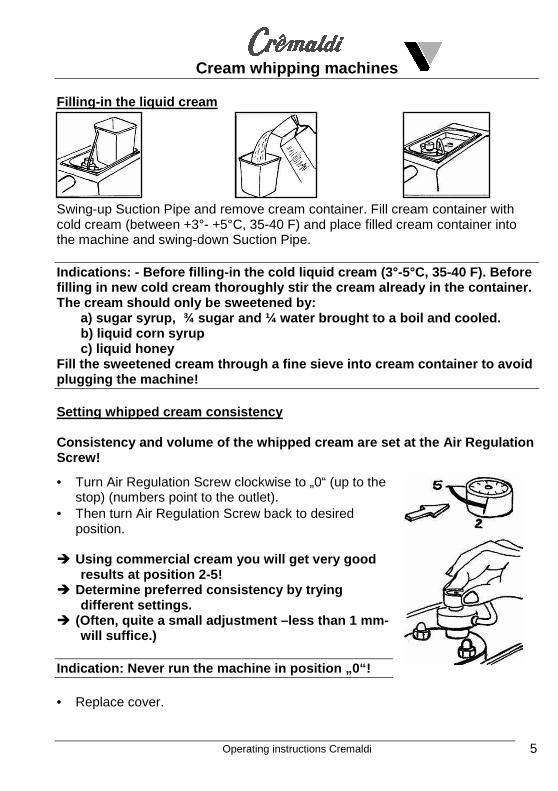
Filling-in the liquid cream Swing-up Suction Pipe and remove cream container. Fill cream container with cold cream (between +3°- +5°C, 35-40 F) and place filled cream container into the machine and swing-down Suction Pipe. Indications: - Before filling-in the cold liquid cr eam (3°-5°C, 35-40 F). Before filling in new cold cream thoroughly stir the cream already in the container. The cream should only be sweetened by:
a) sugar syrup, ¾ sugar and ¼ water brought to a b oil and cooled. b) liquid corn syrup c) liquid honey
Fill the sweetened cream through a fine sieve into cream container to avoid plugging the machine! Setting whipped cream consistency Consistency and volume of the whipped cream are set at the Air Regulation Screw!
• Turn Air Regulation Screw clockwise to „0“ (up to the stop) (numbers point to the outlet).
• Then turn Air Regulation Screw back to desired position.
� Using commercial cream you will get very good results at position 2-5!
� Determine preferred consistency by trying different settings.
� (Often, quite a small adjustment –less than 1 mm- will suffice.)
Indication: Never run the machine in position „0“! • Replace cover.

Cream whipping machines
Operating instructions Cremaldi 6
MACHINE FUNCTIONS Model: „UNO-S“ • In order to dispense any cream portion push Operator switch
downwards! ⇒ Production of whipped cream as long as the switch is held! Model: „VARIO-S“/ „GRANDE-VARIO“ Dispensing any cream portion: • In order to dispense any cream portion push Operator Switch
upwards! ⇒ Production of whipped cream as long as the switch is held! Pre-selection of cream portions: • Select desired cream portion by turning the Potentiometer
Button! Determine preferred portion size by trying different settings!
• The numbers 1-10 on the potentiometer correspond to cream portions of about 0-140g!
Dispensing pre-selected cream portion: • Push Operator Switch shortly down: ⇒ Desired cream portion will be dispensed. or: • Keep Operator Switch pushed down: ⇒ The machine will produce the pre-selected portion one after
the other as long as switch will be held!

Cream whipping machines
Operating instructions Cremaldi 7
CLEANING THE MACHINE Daily disinfecting cleaning by thorough rinsing
• Remove cover.
• Swing up Suction Pipe and clean its outside with a paper towel.
• Press Operator Switch (according to model) until Suction Pipe is empty.
• Remove Suction Pipe, cream container and Garnishing Nozzle. (If necessary fill remaining cream from cream container into another container, store in the refrigerator.)
• Wash Suction Pipe, cream container and Garnishing Nozzle with hot running water.
• Fill cream container with 1,5 litres warm drinking-water at max. 50°C. ( 120 F )
• Place cream container into the machine.
• Plug-in Suction-Pipe and Garnishing Nozzle and swing Suction Pipe into the water.
Cream whipping machines
Operating instructions Cremaldi 8
• Model „UNO“ Press Operator Switch several times downwards until container is empty (intermittent flushing). „VARIO“ / „GRANDE-VARIO“ Press Operator Switch several times upwards until container is empty (intermittent flushing). Remove Garnishing Nozzle and clean under running hot water.
• Replace Garnishing Nozzle with Cleaning Nozzle*! (S pecial equipment) .
• Fill cream container with 1,5 l warm drinking water (max. 50°C or120 F) and 40 ml (1 ½ oz ) Sano-Desinfekt-Plus (or other dairy approved disinfection-cleaner).
• Model „UNO“ Press Operator Switch several times downwards until container is empty (intermittent flushing) Models „VARIO“ / „GRANDE-VA RIO“ Press Operator Switch several times upwards until container is empty (intermittent flushing).
Indication: The instructions regarding utilization and quantities have to be respected. • Fill cream container with 1,5 litres cold water.
• Press Operator Switch (as described under page 7), until cream container is empty.
• Replace Cleaning Nozzle* with Garnishing Nozzle.
• At the end of the disinfecting Cleaning wipe the interior and the surface with clean towels.
• Replace cover.
Indications: Never use hose or steam power washer f or cleaning of the machine! Use only original accessories for the clea ning! Never leave the machine uncleaned over night! Do not use other disi nfecting cleaners! Do not use water with a higher temperature than 50°C ( 120 F) ! *not included in shipment

Cream whipping machines
Operating instructions Cremaldi 9
Cleaning of Air Regulation (monthly) • Remove Suction Pipe.
• Remove Air Regulation Screw.
• Remove Suction Case Air Regulation.
• Remove Locking Device from Cover Plate.
• Push Locking Device from the bottom into the Suction Case Air Regulation and push-out Plate for Air Regulation and Non Return Valve.
• Clean the opening in the Plate for Air Regulation with a small brush (special equipment).
• Clean all parts with disinfection cleaner (special equipment).
• Thoroughly rinse all parts with running hot water and dry them.
• Remount Air Regulation and replace onto the Cover Plate.
• First turn Air Regulation Screw onto „0“. Then turn it back to its normal position (see page ).
• Re-install Suction Pipe.
Indication: Apply Vaseline to O-rings (special equ ipment)!

Cream whipping machines
Operating instructions Cremaldi 10
THOROUGH CLEANING / TECHNICAL CHECK-UP Taking apart Indications: Switch off the machine before disassem bling! Unplug power cord!
Model „UNO“ • Pull front cap (1) away.
• Turn Garnishing Nozzle (2) to the left and remove.
• Pull Locking Device (3) out of Cover Plate (4).
• Remove Outlet (5) completely from the machine.
• Remove Whipping Column (6) of Whipping Pipe (7).
• Remove Locking Device (8) from Outlet Part (9).
• Remove Outlet Part (9) from Whipping Pipe (7).
• Remove Suction Pipe (10) from Air Regulation (11).
• Remove Air Regulation (11) from Cover Plate (4) clean and disassemble (12 – 16) (see page 9).
Note: Numbers of drawing are not order-numbers!!! Order numbers see at Spare Parts, page 18.

Cream whipping machines
Operating instructions Cremaldi 11
• Unscrew Hexagon Nuts (17) by Socket Wrench (special equipment) on Cover Plate (4).
• Pull-off Cover Plate (4).
• Remove Steering Disc (18).
• Remove Pump (19). Model „VARIO“ / „GRANDE-VARIO“ • Pull front cap (20) away.
• Turn Garnishing Nozzle (2) to the left and remove.
• Unscrew Hand Nut (21) on top of the Magnet Valve.
• Remove Magnetic Coil (22) and let it hang at its cable.
Note: Numbers of drawing are not order-numbers!!! Order numbers see at Spare Parts, page 18.
Cream whipping machines
Operating instructions Cremaldi 12
• Remove Upper Closing Unit (23) by the wrench (special equipment) .
• Disassemble Upper Closing Unit (23).
• Pull Locking Device (3) out of Cover Plate (24).
• Remove Outlet (25) completely from the machine.
• Remove Whipping Column (6) out of Whipping Pipe (7).
• Remove Locking Device (8) from Outlet Part (26).
• Remove Outlet Part (26) from Whipping Pipe (7).
• Remove Suction Pipe (10) from Air Regulation (11).
• Remove Air Regulation (11) from Cover Plate (24), clean and disassemble (12 – 16) (see page 9).
• Unscrew Hexagon Nuts (17) on Cover Plate (24) by Socket Wrench (special equipment ).
• Pull-off Cover Plate (24).
• Remove Steering Disc (18).
• Remove Pump (19).
Cleaning • Fill a clean bowl with hot water (drinking water) and add disinfection cleaner
according to producer´s indications. • Lay all disassembled parts, except for the pump , into this solution and clean
them thoroughly. Indications: Do not take the pump apart! Just rinse pump under hot running water. While rinsing turn rotor constantly! • Rinse all parts with running hot water and dry thoroughly.

Cream whipping machines
Operating instructions Cremaldi 13
Technical Check-Up In order to make sure, that your machine will function again without problems, the following points have to be respected:
• Check that the Pump-Rotor turns easily! • Check that all parts are in good condition ! exchange if necessary! • Check O-Rings (see sketch page 13+15 named „OR“ ) ! exchange if
necessary! Indication: Your authorized special dealer will inf orm/help you! Assembling
Note: Numbers of drawing are not order-numbers!!! Order numbers see at Spare Parts, page 18.
Model „Uno“

Cream whipping machines
Operating instructions Cremaldi 14
Modell „UNO“ • Place pump (19) onto the pump flange.
• Place Steering Disc (18) onto the pump (19).
• Place Cover Plate (4) onto the Steering Disc (18). Take care for the lock!
• Assemble Outlet Part (9) and Whipping Pipe (7).
• Insert Locking Device (8) into the Outlet Part (9).
• Insert Whipping Column (6) into the Whipping Pipe (7).
• Push Outlet (5) through the machine housing and insert into the Cover Plate (4) by turning lightly.
• Insert Locking Device (3) into Cover Plate (4).
• Place Hexagon Nuts (17) onto Cover Plate (4) and tighten alternately with the socket wrench (special equipment) .
• Assemble Air Regulation (11) and place onto Cover Plate (4).
• Insert Suction Pipe (10) into Air Regulation (11).
• Insert Garnishing Nozzle (2) and fix by turning to the right.
• Insert Front Cap (1) onto the Outlet Part (9) until it clicks in.
Models „VARIO“ / „GRANDE-VARIO“ • Place Pump (19) onto the pump flange.
• Place Steering Disc (18) onto the pump (19).
• Place Cover Plate (24) onto the Steering Disc (18). Take care for the lock!
• Assemble Outlet Part (26) and Whipping Pipe (7).
• Insert Locking Device (8) into the Outlet Part (26).
• Insert Whipping Column (6) into the Whipping Pipe (7).
• Push Outlet (25) through the machine housing and insert into the Cover Plate (24) by turning lightly.
• Insert Locking Device (3) into Cover Plate (24).
• Place Hexagon Nuts (17) onto Cover Plate (24) and tighten alternately with the socket wrench (special equipment) .
• Assemble Air Regulation (11) and place onto Cover Plate (24).
• Insert Suction Pipe (10) into Air Regulation (11).
• Assemble Upper Closing Unit (23).

Cream whipping machines
Operating instructions Cremaldi 15
• Place Upper Closing Unit (23) onto Outlet Part (26) and tighten by the wrench (special equipment) .
• Place Magnetic Coil (22) onto Upper Closing Unit (23).
• Insert Hand Nut (21) and tighten.
• Insert Garnishing Nozzle (2) and fix by turning to the right.
• Insert Front Cap (20) onto Outlet Part (26) until it clicks in.
Note: Numbers of drawing are not order-numbers!!! Order numbers see at Spare Parts, page 18.

Cream whipping machines
Operating instructions Cremaldi 16
TROUBLESHOOTING Machine switch 0/I does not light up
• Check plug in wall socket. • If there is no power: ⇒ Turn to a specialist! • Power cord is broken: ⇒ Turn to special dealer! • Control Box is broken: ⇒ Turn to special dealer! • Switch is broken: ⇒ Turn to special dealer!
The whipped cream is not perfect or not stable
• Air Regulation is on wrong position: ⇒ Add more air! • Cream has too low fat content: ⇒ Use different cream! • Air Regulation is plugged-up: ⇒ Clean Air Regulation! • The cream is too warm: ⇒ Check refrigerator!
Whipped cream is too light or too heavy
• Air Regulation is on wrong position: ⇒ Add less air! • Cream has too high fat content: ⇒ Dilute cream! • The cream is too warm: ⇒ Check refrigerator!
The pump is running but no whipped cream comes out.
• Hexagon Nuts on the Cover Plate are loose: ⇒ Tighten Hexagon Nuts alternately
and evenly! • Pump works unevenly: ⇒ Turn to special dealer!
(Models „VARIO“ / „GRANDE-VARIO“): Portions are irregular „VARIO“ / „GRANDE-VARIO“)
• Air Regulation is dirty: ⇒ Clean Air Regulation! • Pump works unevenly ⇒ Turn to special dealer! • Air Regulation is too wide open: ⇒ Choose lower position!

Cream whipping machines
Operating instructions Cremaldi 17
SHIPPING INFORMATION If you need to move the machine to a different loca tion or want to leave it with someone else, the following is very important: • Always transport machine in upright position! If moved on its side,
damage to the refrigeration unit may result! • Let the machine stand idle for at least 2 hours before starting again.
This time is needed for the refrigeration unit to recover from movement during transport!
• Pass-along operating instructions as well as equipm ent (special equipment) with the machine.
• Re-use machine according to operating instructions! . DISPOSAL INSTRUCTIONS • The local authorities give information about regulations regarding the disposal
of refrigerating machines. • Retain a copy of the technical data in case there are any questions at a later
date! Indication: Never put the machine out with the garb age TECHNICAL DATA
Model Cremaldi- UNO-S, VARIO-S GRANDE-VARIO Dimensions (without Outlet)(WxDxH
24,5x33x44 cm 32x40,5x49cm
Weight ca. 27 kg 35 kg Power 230 V~/ 50 Hz /// 110-120V/60Hz /
100V/50/60Hz Power consumption (total) max. 700 W max. 800 W Fuse min. 10 A /// 15A Noise level < 70 db (A) Capacity cream container 1,5 litres 5 litres Cream temperature (thermostatically controlled)
3-6°C
Coolant (sort / quantity) R134a/75 g Temperature Group N Maximum allowable extra pressure (refrigeration)
43 bar
Electrical protection class IP X1

Cream whipping machines
Operating instructions Cremaldi 18
Spare Parts Model „UNO-S“ Diagram Order -number Denomination
1 40 276 Front Cap 2 35 026 Garnishing Nozzle 3 11 055 Locking Device (big) 4 X-VKM-015 Cover Plate mounted 6 40 236 Whipping Column 7 40 242 Whipping Pipe 8 11 054 Locking Device (small) 9 X-ASM-012 Outlet Part mounted 10 36 049 Suction Pipe 11 X-LRM-001-1 Air Regulation mounted 12 X-LRS-001 Air Regulation Screw mounted 13 11 007 Spring (Air Regulation) 14 40 169-1 Plate for Air Regulation 15 X-RVL-004 Non Return Valve Air Regulation mounted 16 X-LRG-001 Suction Case Air Regulation 17 10 028 Hexagon Nut 18 14 020 Steering Disc 19 X-PUM-007 Pump
Model „VARIO-S“ / „GRANDE-VARIO“ Diagram Order -number Denomination
20 40 237 Front Cap 21 40 007 Hand Nut 23 38 000 Upper Closing Unit 24 X-VKM-016 Valve head 26 X-ASM-010 Outlet Part mounted
!!! Other spare parts are equal with model „UNO“ !! ! Special Equipment Diagram Order -number Denomination
51 006 Set of Gaskets X-RDM-001 Cleaning Nozzle mounted 34 004 Brush (medium) 34 003 Brush (small) 34 036 Brush (mini) 34 023 Socket Wrench 34 002 Wrench

Cream whipping machines
Operating instructions Cremaldi 19
Declaration of Conformity The manufacturer declares, that the Cream Machine named Cremaldi – UNO-S Cremaldi – VARIO-S Cremaldi – GRANDE-VARIO meets the following relevant regulations: 2006/42/EC Guide to application of the Machinery Directive 2006/95/EC Electrical equipment designed for use within certain voltage limits 2004/108/EC Electromagnetic Compatibility (EMC) EC No 1935/2004 on materials and articles intended to come into contact with food EU No 10/2011on plastic materials and articles intended to come into contact with food DIN EN 55014-1:2012-05 EMC. Requirements for household appliances, electric tools and
similar apparatus. Part 1 Emission DIN EN 55014-2:2009-06 EMC. Requirements for household appliances, electric tools and
similar apparatus. Part 2 Immunity DIN EN 61000-3-2:2010-03 EMC Limits. Limits for harmonic current emissions DIN EN 61000-3-3:2014-03 EMC. Limits. Limitation of voltage changes, voltage fluctuations and flicker DIN EN 82079 Preparation of instructions for use. Structuring, content and presentation. VDI 4500 Technical Documentation GPSG Equipment and Product Safety Act Vaihinger GmbH Horstweg 29 D 65520 Bad Camberg-Erbach Phone: ..49 / 64 34 / 94 05 – 0 Fax: ..49 / 64 34 / 94 05 – 99 http://www.vaihinger.com [email protected] 05/2015 Bernd Rehbein Manager