dell poweredge r720 installation and setup field...
TRANSCRIPT

Foglight™
Foglight APM on Dell™ PowerEdge™ R720/R710
Appliance Imaging Field Guide
© 2013 Quest Software, Inc. ALL RIGHTS RESERVED.This guide contains proprietary information protected by copyright. The software described in this guide is furnished under a software license or nondisclosure agreement. This software may be used or copied only in accordance with the terms of the applicable agreement. No part of this guide may be reproduced or transmitted in any form or by any means, electronic or mechanical, including photocopying and recording for any purpose other than the purchaser’s personal use without the written permission of Quest Software, Inc.
The information in this document is provided in connection with Quest products. No license, express or implied, by estoppel or otherwise, to any intellectual property right is granted by this document or in connection with the sale of Quest products. EXCEPT AS SET FORTH IN QUEST'S TERMS AND CONDITIONS AS SPECIFIED IN THE LICENSE AGREEMENT FOR THIS PRODUCT, QUEST ASSUMES NO LIABILITY WHATSOEVER AND DISCLAIMS ANY EXPRESS, IMPLIED OR STATUTORY WARRANTY RELATING TO ITS PRODUCTS INCLUDING, BUT NOT LIMITED TO, THE IMPLIED WARRANTY OF MERCHANTABILITY, FITNESS FOR A PARTICULAR PURPOSE, OR NON-INFRINGEMENT. IN NO EVENT SHALL QUEST BE LIABLE FOR ANY DIRECT, INDIRECT, CONSEQUENTIAL, PUNITIVE, SPECIAL OR INCIDENTAL DAMAGES (INCLUDING, WITHOUT LIMITATION, DAMAGES FOR LOSS OF PROFITS, BUSINESS INTERRUPTION OR LOSS OF INFORMATION) ARISING OUT OF THE USE OR INABILITY TO USE THIS DOCUMENT, EVEN IF QUEST HAS BEEN ADVISED OF THE POSSIBILITY OF SUCH DAMAGES. Quest makes no representations or warranties with respect to the accuracy or completeness of the contents of this document and reserves the right to make changes to specifications and product descriptions at any time without notice. Quest does not make any commitment to update the information contained in this document.
If you have any questions regarding your potential use of this material, contact: Quest Software World Headquarters LEGAL Dept 5 Polaris Way Aliso Viejo, CA 92656 www.quest.com email: [email protected]
Refer to our Web site for regional and international office information.
PatentsThis product is protected by U.S. Patents # 6,928,471; 7,539,655; 7,565,336; 7,941,385; 7,979,245; 8,175,862; and 8,175,863. Additional Patents Pending.
TrademarksQuest, Quest Software, the Quest Software logo, Foglight, IntelliProfile, PerformaSure, Spotlight, StealthCollect, TOAD, Tag and Follow, Vintela Single Sign-on for Java, vFoglight, and vOPS are trademarks and registered trademarks of Quest Software, Inc in the United States of America and other countries. For a complete list of Quest Software’s trademarks, please see http://www.quest.com/legal/trademark-information.aspx. Other trademarks and registered trademarks are property of their respective owners.
Third Party ContributionsFoglight contains some third party components. For a complete list, see the License Credits pages in Foglight online help.
Appliance Imaging Field Guide June 2013 Version 5.9.1

Table of Contents
Foglight APM on Dell™ PowerEdge™ R720/R710: Appliance Imaging Field Guide 3
Introduction to this Guide..................................................................................................................................................4
About Quest Software, Inc. ............................................................................................................................................................. 4Contacting Quest Software ..................................................................................................................................................... 4Contacting Quest Support ....................................................................................................................................................... 5
Imaging a Dell PowerEdge Server.....................................................................................................................................6
Before You Begin ............................................................................................................................................................................ 6Configuring RAID Volumes ............................................................................................................................................................. 7
Configuring RAID Volumes for All-in-One, APM, and Foglight Appliances ............................................................................. 8Configuring RAID Volumes for Sniffer and Archiver Appliances ........................................................................................... 11
Installing the Appliance Image ...................................................................................................................................................... 16
Index .................................................................................................................................................................................. 21
Introduction to this Guide
Foglight™ APM for Real User Experience (hereafter called Foglight APM) is an appliance-based application performance management solution. This Appliance Imaging Field Guide describes how to set up RAID volumes, update the BIOS settings, and install the Foglight APM appliance software on a Dell™ PowerEdge™ R720 or R710.
This guide is intended for technical audiences and Quest SC/PSO (System Consultant/Professional Services Organization) personnel working in the field.
About Quest Software, Inc.Established in 1987, Quest Software (Nasdaq: QSFT) provides simple and innovative IT management solutions that enable more than 100,000 global customers to save time and money across physical and virtual environments. Quest products solve complex IT challenges ranging from database management, data protection, identity and access management, monitoring, user workspace management to Windows management. For more information, visit www.quest.com.
Contacting Quest Software
Email [email protected]
Mail Quest Software, Inc. World Headquarters 5 Polaris Way Aliso Viejo, CA 92656 USA
Web site www.quest.com
Refer to our Web site for regional and international office information.

Foglight APM on Dell™ PowerEdge™ R720/R710: Appliance Imaging Field Guide 5Introduction to this Guide
Contacting Quest SupportQuest Support is available to customers who have a trial version of a Quest product or who have purchased a Quest product and have a valid maintenance contract. Quest Support provides unlimited 24x7 access to our Support Portal at http://quest.com/support.
From our Support Portal, you can do the following:
• Retrieve thousands of solutions from our Knowledge Base
• Download the latest releases and service packs
• Create, update, and review Support cases
View the Global Support Guide for a detailed explanation of support programs, online services, contact information, policies, and procedures. The guide is available at: https://support.quest.com/Shared/Images/GlobalSupportGuide.pdf.
1
Imaging a Dell PowerEdge Server
When you add appliances to an existing Foglight APM installation, you may want to reconfigure one or more of your Dell PowerEdge servers for use as a different kind of Foglight APM appliance. These instructions walk you through imaging or re-imaging Dell PowerEdge R720 servers purchased for use with Foglight APM. You can also use these instructions to re-image R710 and R720 servers originally purchased with Foglight Experience Monitor (FxM) or Foglight Experience Viewer (FxV).
This imaging workflow has the following steps:
1 Before You Begin
2 Configuring RAID Volumes
3 Configuring System BIOS Settings
4 Installing the Appliance Image
Before You BeginYou need to power up the server and obtain a current version of the appliance image.
Complete the following tasks:
• Attach the power, keyboard, and monitor cables to the appropriate ports on the rear panel of the Dell PowerEdge R720 or R710. If you need help identifying ports, see the diagram included in the Foglight APM Installation and Setup Guide or in your original FxV or FxM documentation.
• Ensure that the Foglight APM appliance image that you want to use is suitable for the server configuration. The following table lists the appliance types, software components, and the available Dell PowerEdge server configurations.
Note For details on the server configurations (R720 Large/Small and R710 Large/Small), see “System Requirements” in the Foglight APM Release Notes.

Foglight APM on Dell™ PowerEdge™ R720/R710: Appliance Imaging Field Guide 7Chapter 1—Imaging a Dell PowerEdge Server
Foglight APM Supported Dell PowerEdge Configurations
Appliance Hosted Software Components
R720 Large
R720 Small
R710 Large
R710 Small
All-in-One Appliance • Management Server• Sniffer• Archiver
Yes — Yes —
APM Appliance • Management Server• Archiver
Yes — Yes —
Foglight Appliance Management Server Yes — Yes —
Archiver Appliance Archiver Yes — Yes —
Sniffer Appliance Sniffer — Yes — Yes
• Download a current version of the desired appliance image from the Support Portal (see “Contacting Quest Support” on page 5). The appliance image is a single bootable ISO image. You can either burn the ISO image to a DVD as a disk image or boot it directly using the Dell Remote Access Controller (DRAC). If you need assistance, contact Quest Support or your Quest Sales Representative.
Configuring RAID VolumesYou prepare a PowerEdge server for a Foglight APM appliance image by configuring RAID volumes. The following table summarizes the RAID levels and number of disks required by appliance type.
Appliance Name RAID 1 Volume RAID 10 Volume RAID 5 Volume
All-in-One Appliance 2 disks 6 disks —
APM Appliance 2 disks 6 disks —
Foglight Appliance 2 disks 6 disks —
Archiver Appliance — 8 disks —
Sniffer Appliance on R720 Small — 4 disks —
Sniffer Appliance on R710 Small — — 3 disks*
* R710 Small servers have only three disks, which is insufficient for RAID 10. Use RAID 5.

Foglight APM on Dell™ PowerEdge™ R720/R710: Appliance Imaging Field Guide 8Chapter 1—Imaging a Dell PowerEdge Server
Follow the procedure for the desired appliance type:
• Configuring RAID Volumes for All-in-One, APM, and Foglight Appliances
• Configuring RAID Volumes for Sniffer and Archiver Appliances
Configuring RAID Volumes for All-in-One, APM, and Foglight AppliancesThe All-in-One, APM, and Foglight appliances require two RAID volumes: RAID 1 and RAID 10. This procedure requires the Large version of an R710 or R720. If the server already contains a virtual disk, you must delete it before creating the RAID volumes.
Tip Use the Tab key to navigate throughout the interface, use the spacebar to place a check mark in a field, and press the Enter key to select an option.
To configure the RAID volumes for an All-in-One, APM, or Foglight appliance:
1 Restart your appliance.
The reboot screen appears.
2 When you see the prompt Press <Ctrl><R> to Run Configuration Utility, press Ctrl+R.
The PERC H710P Mini BIOS Configuration Utility screen appears.
3 Important — Delete any existing virtual disks. For instructions, see “Deleting Virtual Disks” on page 13.
4 Create the RAID-1 virtual disk.
a Select PERC H701P Mini (Bus 0x02, Dev 0x00), press F2, and select Create New VD.
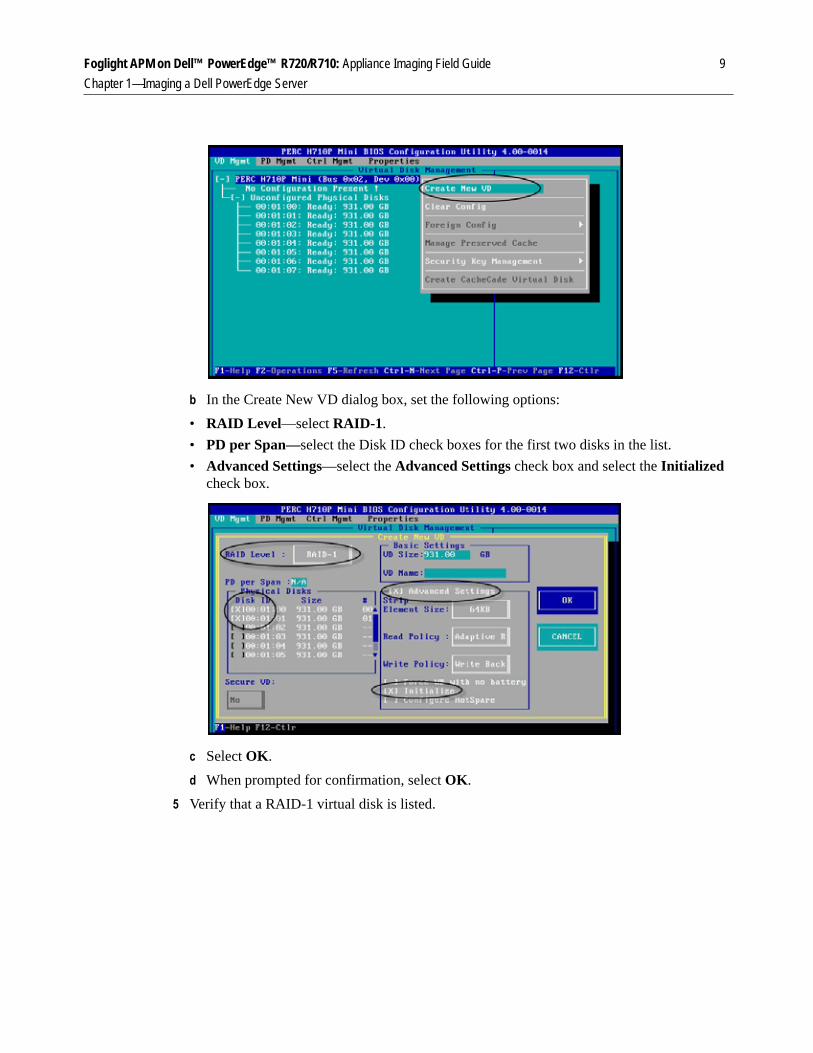
Foglight APM on Dell™ PowerEdge™ R720/R710: Appliance Imaging Field Guide 9Chapter 1—Imaging a Dell PowerEdge Server
b In the Create New VD dialog box, set the following options:
• RAID Level—select RAID-1.
• PD per Span—select the Disk ID check boxes for the first two disks in the list.
• Advanced Settings—select the Advanced Settings check box and select the Initialized check box.
c Select OK.
d When prompted for confirmation, select OK.
5 Verify that a RAID-1 virtual disk is listed.
Foglight APM on Dell™ PowerEdge™ R720/R710: Appliance Imaging Field Guide 10Chapter 1—Imaging a Dell PowerEdge Server
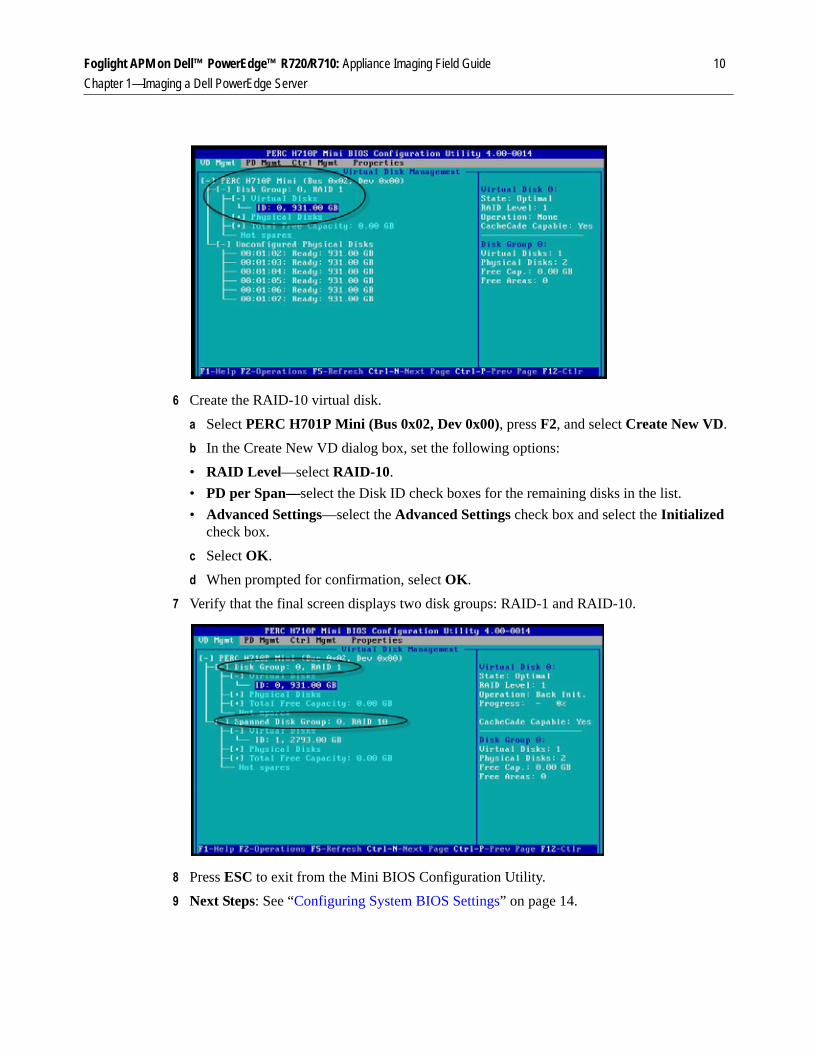
6 Create the RAID-10 virtual disk.
a Select PERC H701P Mini (Bus 0x02, Dev 0x00), press F2, and select Create New VD.
b In the Create New VD dialog box, set the following options:
• RAID Level—select RAID-10.
• PD per Span—select the Disk ID check boxes for the remaining disks in the list.
• Advanced Settings—select the Advanced Settings check box and select the Initialized check box.
c Select OK.
d When prompted for confirmation, select OK.
7 Verify that the final screen displays two disk groups: RAID-1 and RAID-10.
8 Press ESC to exit from the Mini BIOS Configuration Utility.
9 Next Steps: See “Configuring System BIOS Settings” on page 14.
Foglight APM on Dell™ PowerEdge™ R720/R710: Appliance Imaging Field Guide 11Chapter 1—Imaging a Dell PowerEdge Server
Configuring RAID Volumes for Sniffer and Archiver AppliancesThese appliance images require one RAID volume that includes all the available disks on the server. If the server already contains a virtual disk, you must delete it before creating the RAID volumes.
• Archiver Appliance on R720 or R710 Large—include all eight disks in a RAID 10 volume.
• Sniffer Appliance on R720 Small—include all four disks in a RAID 10 volume.
• Sniffer Appliance on R710 Small—include all three disks in a RAID 5 volume.
Tip Use the Tab key to navigate throughout the interface, use the spacebar to place a check mark in a field, and press the Enter key to select an option.
To configure the RAID volume for a Sniffer or Archiver Appliance:
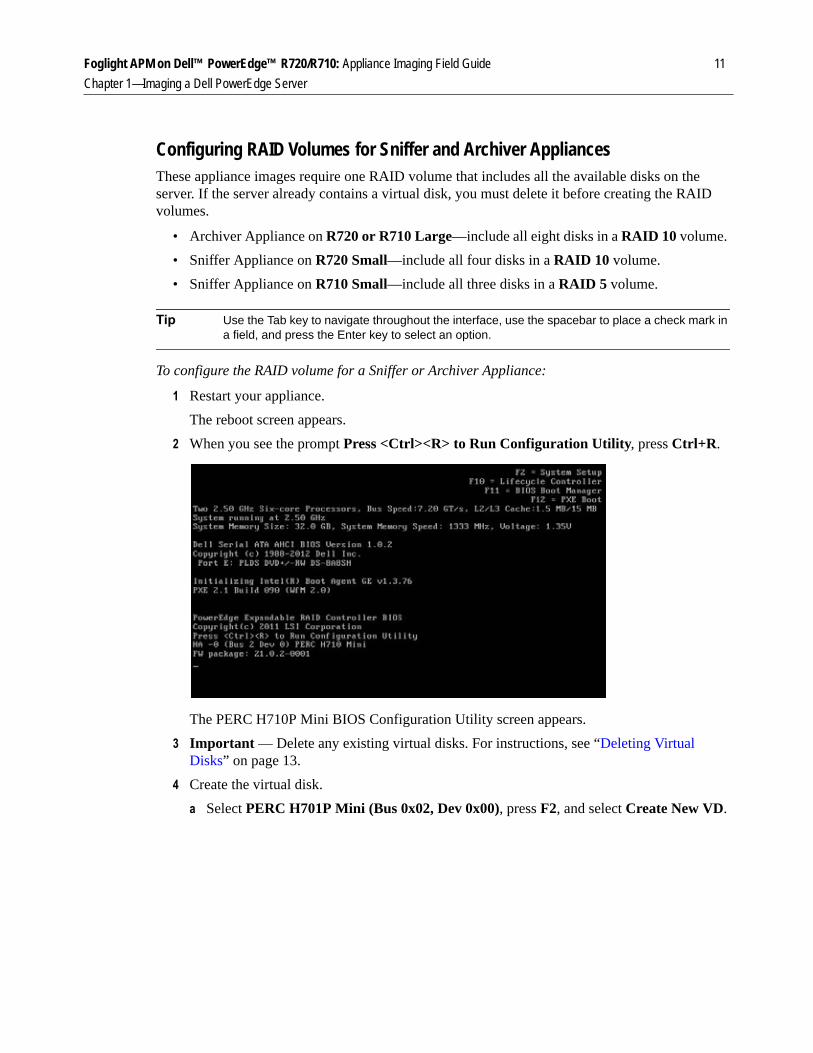
1 Restart your appliance.
The reboot screen appears.
2 When you see the prompt Press <Ctrl><R> to Run Configuration Utility, press Ctrl+R.
The PERC H710P Mini BIOS Configuration Utility screen appears.
3 Important — Delete any existing virtual disks. For instructions, see “Deleting Virtual Disks” on page 13.
4 Create the virtual disk.
a Select PERC H701P Mini (Bus 0x02, Dev 0x00), press F2, and select Create New VD.

Foglight APM on Dell™ PowerEdge™ R720/R710: Appliance Imaging Field Guide 12Chapter 1—Imaging a Dell PowerEdge Server
b In the Create New VD dialog box, set the following options:
• RAID Level—select RAID-10 (or RAID-5 if you have only three disks available).
• PD per Span—select the Disk ID check boxes for all the disks on the server.
• Advanced Settings—select the Advanced Settings check box and then select the Initialized check box.
c Select Yes.
d When prompted for confirmation, select Yes.
5 Verify that a configured RAID-10 virtual disk is listed.
6 Press ESC to exit from the Mini BIOS Configuration Utility.
7 Next Steps: See “Configuring System BIOS Settings” on page 14.

Foglight APM on Dell™ PowerEdge™ R720/R710: Appliance Imaging Field Guide 13Chapter 1—Imaging a Dell PowerEdge Server
Deleting Virtual DisksIf your server lists a virtual disk, you must delete it before configuring RAID volumes. At the end of this procedure, all physical disks should be unconfigured and in a Ready state. If any physical disk is in a state other than Ready, contact Quest Support for assistance.
To delete a virtual disk:
1 Select the virtual disk, press F2, and select Delete VD.
2 When prompted for confirmation, select Yes.
3 Verify that all the physical disks are in the Unconfigured Physical Disks list and that their state is Ready.

Foglight APM on Dell™ PowerEdge™ R720/R710: Appliance Imaging Field Guide 14Chapter 1—Imaging a Dell PowerEdge Server
Configuring System BIOS SettingsTo improve performance, modify the power conservation settings on the server.
To modify the power conservation settings:
1 Restart your server.
2 Press F2 to display the System Setup menu.
3 Click System BIOS.

Foglight APM on Dell™ PowerEdge™ R720/R710: Appliance Imaging Field Guide 15Chapter 1—Imaging a Dell PowerEdge Server
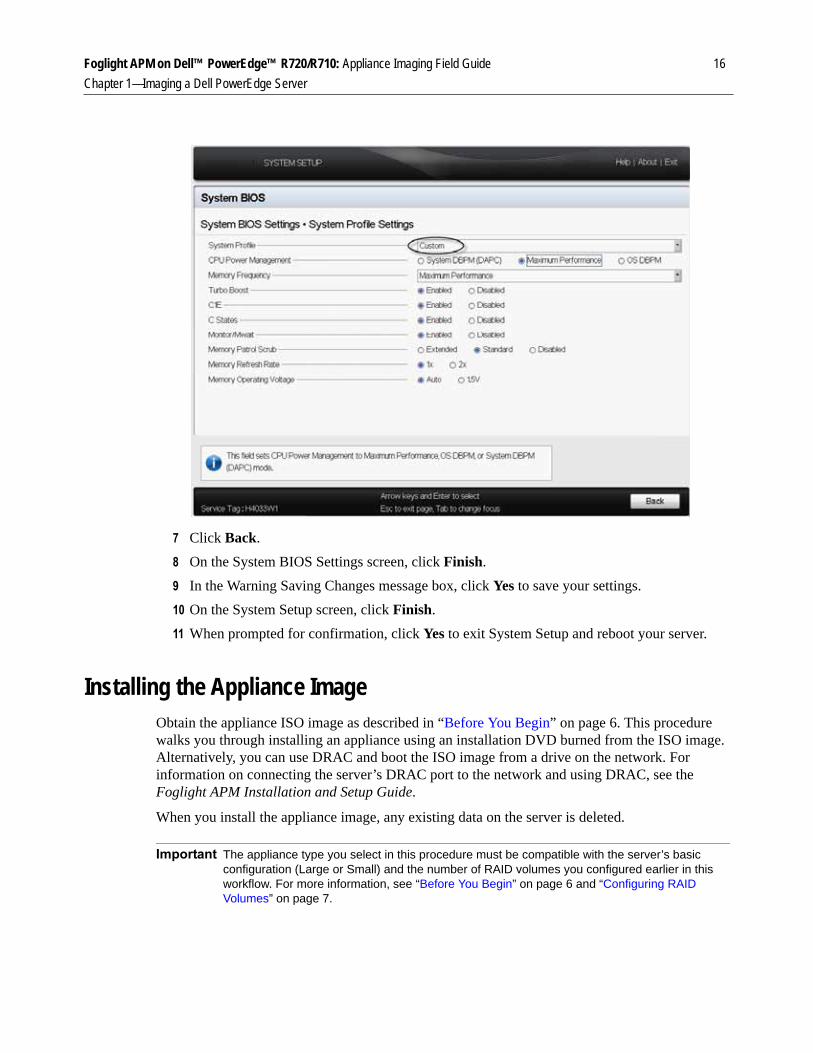
4 Click System Profile Settings.
5 In the Performance Per Watt (DAPC) field, select Custom.
6 Set the following custom options:
• CPU Power Management—select Maximum Performance.
• Memory Frequency—select Maximum Performance.
• Turbo Boost—select Enabled.
• C1E—select Enabled.
• C States—select Enabled.
• Monitor/Mwatt—select Enabled.
• Memory Patrol Scrub—select Standard.
• Memory Refresh Rate—select 1x.
• Memory Operating Voltage—select Auto.
Foglight APM on Dell™ PowerEdge™ R720/R710: Appliance Imaging Field Guide 16Chapter 1—Imaging a Dell PowerEdge Server
7 Click Back.
8 On the System BIOS Settings screen, click Finish.
9 In the Warning Saving Changes message box, click Yes to save your settings.
10 On the System Setup screen, click Finish.
11 When prompted for confirmation, click Yes to exit System Setup and reboot your server.
Installing the Appliance ImageObtain the appliance ISO image as described in “Before You Begin” on page 6. This procedure walks you through installing an appliance using an installation DVD burned from the ISO image. Alternatively, you can use DRAC and boot the ISO image from a drive on the network. For information on connecting the server’s DRAC port to the network and using DRAC, see the Foglight APM Installation and Setup Guide.
When you install the appliance image, any existing data on the server is deleted.
Important The appliance type you select in this procedure must be compatible with the server’s basic configuration (Large or Small) and the number of RAID volumes you configured earlier in this workflow. For more information, see “Before You Begin” on page 6 and “Configuring RAID Volumes” on page 7.
Foglight APM on Dell™ PowerEdge™ R720/R710: Appliance Imaging Field Guide 17Chapter 1—Imaging a Dell PowerEdge Server
To install a Foglight APM appliance image:
1 If the server is currently running, power down the server.
2 Insert the installation DVD that you burned from the appliance ISO image into the server’s DVD drive.
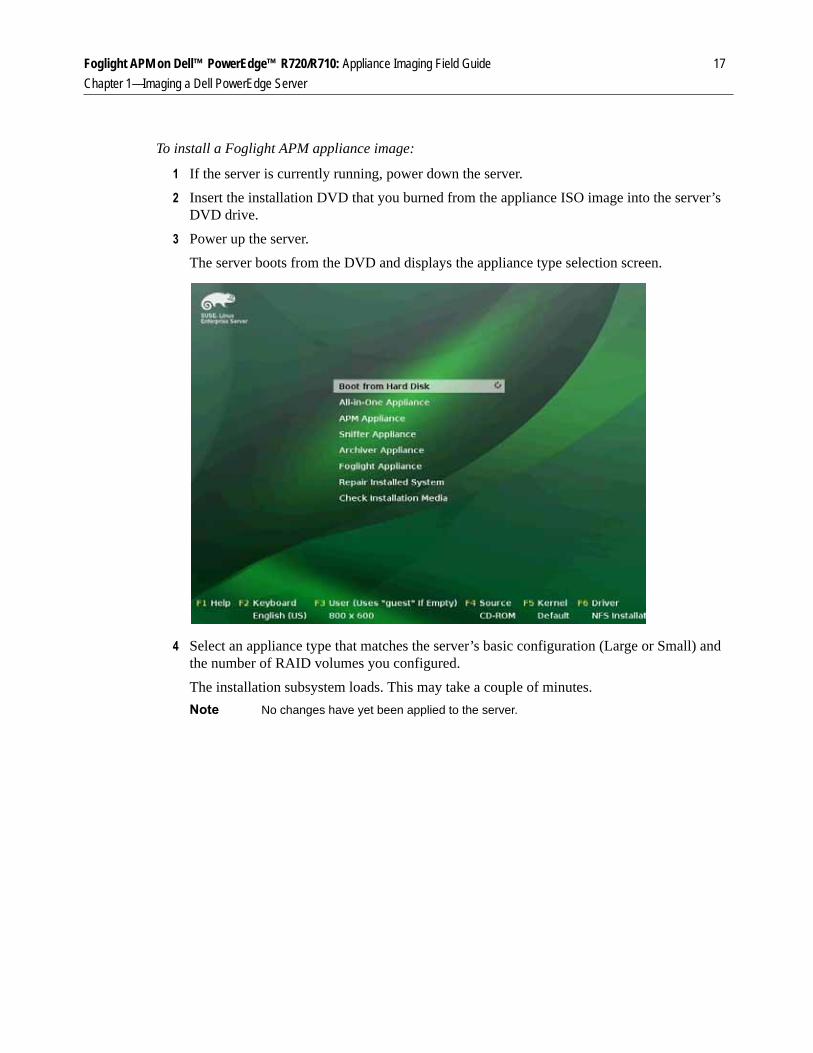
3 Power up the server.
The server boots from the DVD and displays the appliance type selection screen.
4 Select an appliance type that matches the server’s basic configuration (Large or Small) and the number of RAID volumes you configured.
The installation subsystem loads. This may take a couple of minutes.
Note No changes have yet been applied to the server.
Foglight APM on Dell™ PowerEdge™ R720/R710: Appliance Imaging Field Guide 18Chapter 1—Imaging a Dell PowerEdge Server
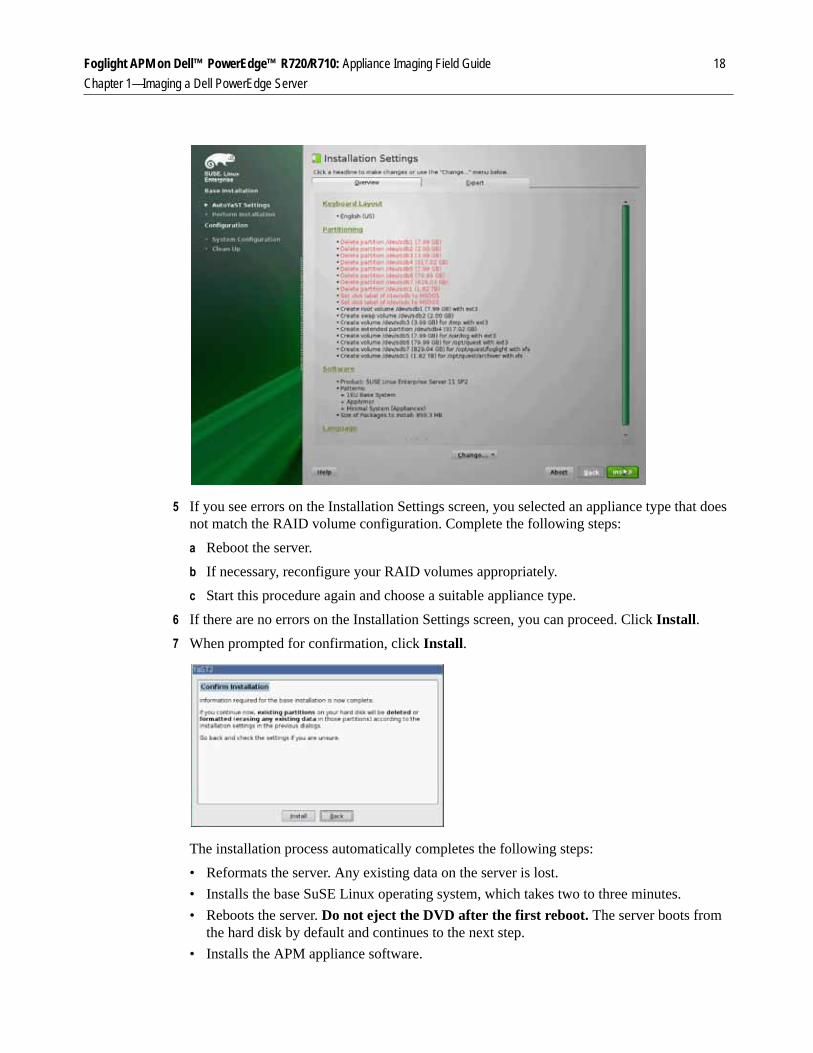
5 If you see errors on the Installation Settings screen, you selected an appliance type that does not match the RAID volume configuration. Complete the following steps:
a Reboot the server.
b If necessary, reconfigure your RAID volumes appropriately.
c Start this procedure again and choose a suitable appliance type.
6 If there are no errors on the Installation Settings screen, you can proceed. Click Install.
7 When prompted for confirmation, click Install.
The installation process automatically completes the following steps:
• Reformats the server. Any existing data on the server is lost.
• Installs the base SuSE Linux operating system, which takes two to three minutes.
• Reboots the server. Do not eject the DVD after the first reboot. The server boots from the hard disk by default and continues to the next step.
• Installs the APM appliance software.
Foglight APM on Dell™ PowerEdge™ R720/R710: Appliance Imaging Field Guide 19Chapter 1—Imaging a Dell PowerEdge Server
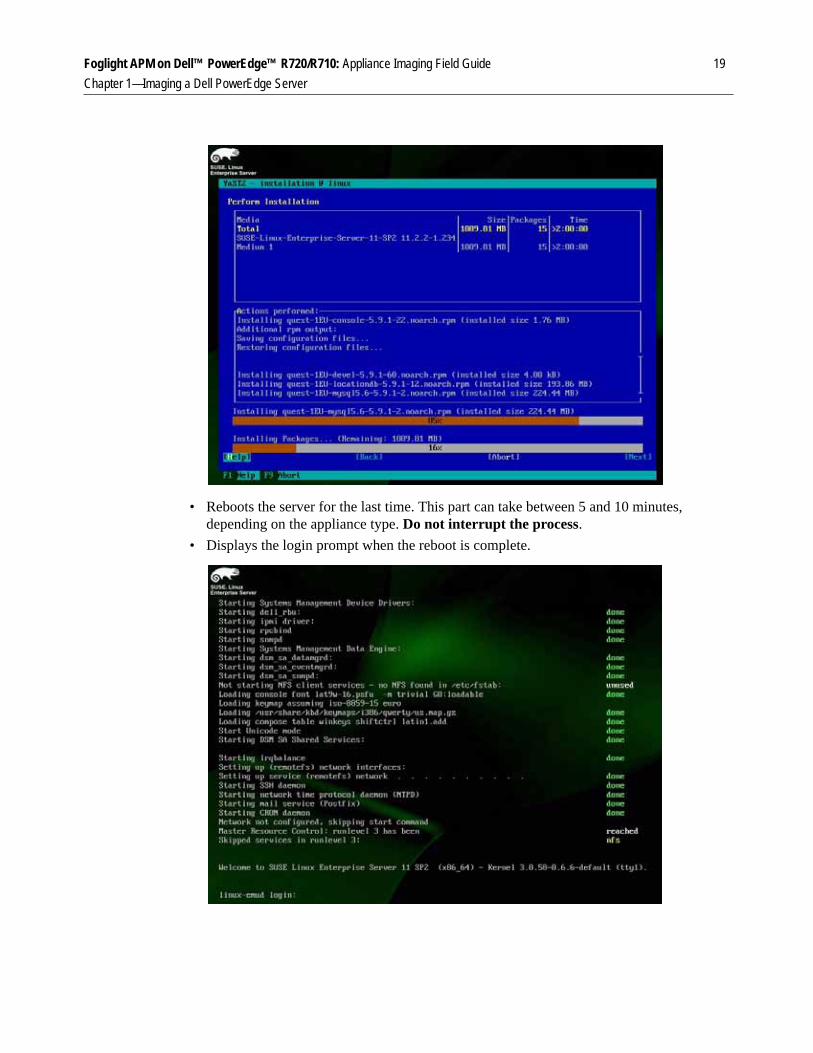
• Reboots the server for the last time. This part can take between 5 and 10 minutes, depending on the appliance type. Do not interrupt the process.
• Displays the login prompt when the reboot is complete.

Foglight APM on Dell™ PowerEdge™ R720/R710: Appliance Imaging Field Guide 20Chapter 1—Imaging a Dell PowerEdge Server
8 At the login prompt, log in with the following user credentials:
• User login: setup
• Password: setup
9 Eject the DVD.
10 Next Steps: Install and set up the newly-imaged Foglight APM appliance in your network. For instructions, see the Foglight APM Installation and Setup Guide.

Foglight APM on Dell™ PowerEdge™ R720/R710: Appliance Imaging Field Guide 21
Index
AAll-in-One Appliance
RAID requirements 7RAID volumes, configuring 8server configuration 7software components 7
APM ApplianceRAID requirements 7RAID volumes, configuring 8server configuration 7software components 7
appliancesSee also RAID volumesinstalling images 16operating system 18server configurations 7software components 7types of ISO images 7
Archiver ApplianceRAID requirements 7RAID volumes, configuring 11server configuration 7software components 7
BBIOS settings 14
Ccomponents, appliance software 7conserving power 14
DDell PowerEdge server configurations 7disks per RAID volume 7downloading ISO images 7DRAC 7DVD, burning ISO image 7
FFoglight Appliance
RAID requirements 7RAID volumes, configuring 8server configuration 7software components 7
Iimage
downloading ISO 7installing 16
installation DVDburning 7using 16
Ooperating system 18
Pperformance 14power conservation 14PowerEdge server configurations 7preparing to install 6
RRAID volumes
configuringAll-in-One Appliance 8APM Appliance 8Archiver Appliance 11Foglight Appliance 8Sniffer Appliance 11
requirements 7
Sservers, supported Dell PowerEdge 7Sniffer Appliance

Foglight on a Dell™ PowerEdge™ R720: Appliance Imaging Field Guide 22Index
RAID requirements 7RAID volumes, configuring 11server configuration 7software components 7
softwarecomponents on an appliance 7installing appliance 16
support 5system BIOS settings 14
Ttechnical support 5
Vvirtual disks, deleting 13