dosing scales dsw-2, dsw-2/4k - wassermann dental · dear customer, thank you for choosing a...
TRANSCRIPT

Dosing scalesDSW-2, DSW-2/4K
USER MANUAL
Dosing scale DSW-2/4K

Dear customer,
Thank you for choosing a product from the Wassermann range. Wassermann Dental-
Maschinen incorporates the highest standards of quality and the latest technology.
In order to enjoy maximum performance and years of trouble-free operation, please read
this user manual carefully before you connect this device and start work, and operate the
device according to the recommended guidelines. The operation safety and the
functionality of this device can only be guaranteed if you follow both the general safety
guidelines and the applying laws to prevent accidents as well as the precautions given in
this user manual. We are not liable for any damages which occur due to inappropriate
usage or faulty operation of this device.
Make sure that anyone using this device has read and understood this user manual.
Keep this user manual in a safe place where it can be referred to as required at
any time.
Company address:
Wassermann Dental-Maschinen GmbH
Rudorffweg 15-17
D-21031 Hamburg, Germany
Phone. : +49 (0)40 / 730 926 – 0 Fax.: +49 (0)40 / 730 37 24
E-mail: [email protected]
URL: http//www.wassermann-dental.com
Erstellt: 13.12.2012/msc Version: 1Auftrag: : 172988/009 / 172985 // 172989/012 / 172986
.

Contents
1 Features.............................................................................................................................5
1.1 Product description......................................................................................................5
1.2 Product design.............................................................................................................6
1.3 Mathematical basis for control and programming.......................................................6
2 Safety guidelines................................................................................................................7
2.1 Safety symbols used in this manual............................................................................7
2.2 Safety guidelines.........................................................................................................7
2.3 Responsibility for operation or damage.......................................................................8
3 Application..........................................................................................................................8
4 Before starting....................................................................................................................8
4.1 Transport.....................................................................................................................8
4.2 Installation...................................................................................................................9
4.3 Storage........................................................................................................................9
5 Installation / Start-up .......................................................................................................10
6 Operation.........................................................................................................................11
6.1 General operating instructions..................................................................................11
6.2 Programming.............................................................................................................12
6.2.1 Correcting incorrect input...................................................................................13
6.3 Calculating dosing quantities per pump....................................................................13
6.3.1 Determining the density of concentrates............................................................13
6.3.2 Example of calculating embedding materials.....................................................14
6.4 Rinsing / filling / emptying..........................................................................................17
6.4.1 Filling / rinsing / emptying the pump system......................................................17
6.5 Dosing.......................................................................................................................18
6.5.1 Stopping the dosing process..............................................................................19
6.6 Using cooling.............................................................................................................20
6.7 Tips and tricks...........................................................................................................20

7 Troubleshooting...............................................................................................................21
8 Care and maintenance.....................................................................................................22
8.1 Cleaning....................................................................................................................22
8.2 Maintenance..............................................................................................................23
8.3 Warranty ...................................................................................................................23
8.4 Spare parts................................................................................................................23
8.5 Scope of delivery / Accessories................................................................................24
8.6 Repairs......................................................................................................................24
8.7 Repairing the pump ..................................................................................................24
9 Technical data..................................................................................................................26
9.1 Weighing system:......................................................................................................26
9.2 DSW-2 / DSW-2/4 K..................................................................................................26
9.3 Cooling system..........................................................................................................27
10 EC Conformity Certificate..............................................................................................28
11 Short instruction for programming.................................................................................29
12 Instruction to start a program.........................................................................................29
13 Table of program............................................................................................................30

1 Features
1.1 Product description
Electronic scales with control system of 1 to 6 liquid pumps. Depending on whether plaster
or embedding powder is being weighed on the scales, this unit can, at the press of a
button, accurately reproduce up to 30 previously defined quantities. This feature derives
from the fact that up to 6 liquids can be dosed in sequence with a very high level of
accuracy.
The DSW-2/4K dosing center is especially suitable for this purpose.
This patented product also allows you to cool liquids to temperatures recommended by the
embedding-mixture manufacture. The unit delivers the same degree of precision over the
long term, yet pays for itself very quickly.
• precision scales for modern dosing and weighing technologies for mixing all
common plasters and embedding materials
• DSW-2/4 K: comes standard with 4 pumps for cooled liquids, it is possible to add 2
additional pumps (non-cooled)
• DSW-2: comes standard with 1 pump non-cooled, it is possible to add 5 additional
pumps (non-cooled)
• memory for up to 30 mix recipes, many program and expansion configurations
• constant mix ratios of powder and liquids
• precision scales: accuracy +/- 0.5 g, max. load 6 kg
• large, clear LCD display
• extremely durable, easy-clean housing, plastic powder coated
• scales in high-quality stainless steel
5

1.2 Product design
The DSW-2 dosing scales contains the following components:
• Scales
• Controller
• Dosing housing with 1 to 6 pumps (cooling unit), depending on configuration.
• Rubber plugs to seal hose ends
Pumps 1 to 6 (A to F) are located in a housing and are interchangeable.
1.3 Mathematical basis for control and programming
Dosing control is based on the following formula:
Gges = GY + MX1 * γ1 +MX2 * γ2 + MX3 * γ3 Equation 1
Gges = total quantity [in g] of all weighed amounts of different materials
GY = weight component of, eg, plaster powder or similar material
MX1... MX3 = quantity [in ml/100g] of liquid to be dosed from any selected pump
γ1 .... γ3 = density [in g/cm3 or g/ml] of particular material/liquid
6

2 Safety guidelines
2.1 Safety symbols used in this manual
Warning!
This is a warning of risk situations and dangers.
Failure to observe this warning could be life-threatening. These warnings has to
be observed.
Information!
This symbol draws your attention to specific features that has to be observed.
2.2 Safety guidelines
Configuring and operating this equipment requires precise knowledge and observance
of the instructions in this user manual. The equipment is designed only for its intended
application.
WARNING :
Servicing and repairs should be carried out only by authorised specialists.
Disconnect the power plug before starting any maintenance work.
Make sure that the equipment is connected to the correct power source.
When dosing, use only liquids recommended for mixing embedding materials
and plasters for dental applications. Do not use petrol, oil or acids, solvents or
flammable substances.
Concentrated embedding materials can damage your health. Read the
manufacturer’s data sheets carefully.
7

2.3 Responsibility for operation or damage
The responsibility for operating the device lies exclusively with the owner or user if said
device is incorrectly serviced, maintained or altered by persons not employed by an
authorised dealer or if the device is used in a manner contrary to its specified purpose.
The unit has to be maintained and operated in accordance with this user manual.
Wassermann Dental-Maschinen GmbH is not responsible for damage arising from the
nonobservance of these instructions.
Warranty and responsibility provisions contained in the sales and supply conditions of
Wassermann Dental-Maschinen GmbH are not extended by these instructions.
3 Application
The DSW-2 dosing scales allow you to mix embedding materials and plasters with
consistent accuracy.
Only use the device for this type of application.
4 Before starting
4.1 Transport
Before transporting the unit, ensure that it has been unplugged from the power socket.
Make sure that it is packed correctly in order to avoid accidental damage.
Be sure to check for any transport damage when unpacking the goods. Note down
any damage if found.
8

4.2 Installation
Open the box, remove the packing materials, and carefully lift out the device and
accessories. Check the included accessories.
Choose a location for the scales and container where they are protected from direct
sunlight or other sources of warmth such as heaters.
The device has to stand horizontally on a steady and even surface.
Install the device in a place where it will not block the working area and the
functionality (take the dimensions into account). Make sure that there are about
10 cm of free space on each side to guarantee air circulation (heat dissipation).
Do not install the unit outdoors or in places without proper ventilation.
Before start-up, be sure the device reaches room temperature.
4.3 Storage
If the unit is to be stored for an extended period, protect it from moisture and dust.
If the unit is not to be used for an extended period, seal the concentrate hose ends
with the rubber plugs.
9

5 Installation / Start-up
Make sure that the safety packing has been removed before you start the unit.
Follow the procedure below to remove the securing piece from the scales before you start
work:
1. Remove the stainless steel pan from the scales.
2. Remove the safety packing between the pan and the housing.
3. Replace the pan.
All plugs can only be inserted in one orientation.
Screw in all connectors.
• Select the appropriate quantities of the individual liquids. If using containers without
a 6.5mm hole, unscrew the cover. Use a tool such as a drill press and a
conventional drill bit to make a 6.5 mm hole in the center of the container lid.
• If the density of the media is known (if not, see 6.3.1), fill the containers with the
relevant liquids, then seal the containers. Mark each container and its lid with the
letter of the dosing pump. The sticker (Fig. 1) on the rear or top of the housing
indicates which hose belongs to which pump.
10
Fig. 1: Pump outlets

When removing or replacing a lid, hold the lid firmly and turn the container to
avoid twisting the hose.
• The hoses are now filled by flushing (see 6.4 / 6.4.1). Make sure there are no air
bubbles in the dosing hose.
• If a pump has been loaded with embedding material but you do not want to dose
immediately, seal the hose end with the rubber plug provided.
Finally, insert the power plug into the socket, making sure that the mains and the
unit operate on the same voltage.
• The scales should be level, clean and free of any unwanted loads.
• When you turn on the power, autotest characters (C1 to C6) appear on the display,
followed by the character or number of the program, then 0 to indicate the scales
have been tared.
• Now you can weigh, dose, rinse or program.
The scales has always to be horizontal.
6 Operation
6.1 General operating instructions
All instructions for using the unit, whether in verbal or written form, are based on our
own experience and experimentation and can only be regarded as guidelines.
11

6.2 Programming
1. Turn on the power. The READY light comes on.
2. Press P. Pr nr appears on the display and the READY light goes out.
3. Use the numeric keypad to enter the program number. If you choose 0 or a number
greater than 30 and press ENTER, the characters Err-P appear on the display,
followed by Pr nr.
4. Press ENTER. Set P appears on the display.
5. Press A, B, C, D, E or F to select the pump for the appropriate liquid.
6. On model DSW-2, make sure that only one pump is installed (A) and that on model
DSW-2k, pumps A, B, C and D are active.
7. P-A or the letter of the relevant pump appear on the display, with an o on the left to
indicate the "programming option".
8. The program stores the identifier of the first pump to be switched on, the sequence
of pumps to be activated, and the quantity assigned to each pump for dosing.
9. You then use the numeric keypad to enter the quantity of liquid (in ml/100g powder)
to be weighed.
10.That value appears immediately on the display.
11.Press ENTER. Pr-A or the identifier of another pump (depending on the key
pressed) appears on the display.
12. If you are not entering a liquid density for the selected pump, press ENTER again. A
standard value (γ = 1) is assumed.
13. If the density of the liquid is to be specified, that value should be entered using the
numeric keypad. The value entered appears on the display.
14.Press ENTER.
15.SET P appears again on the display.
16.Repeat points 4, 5, 6, 7, 8 for the following pump(s).
17.End programming by pressing ENTER. All ratios for mixing components and the
order in which the pumps are to be activated remain stored in memory until new
data are entered under that program number.
18.The o disappears and the READY light comes on. You can now weigh, dose,
program or rinse.
12

6.2.1 Correcting incorrect input
• You can press CLR at any time durifng programming to change incorrect data (eg,
pump number or density) in the current program.
• If CLR is pressed again, the program is stopped.
• When you press CLR, the letters CLR appear on the display, and lights READY
and END go out. You now press ENTER to continue working.
6.3 Calculating dosing quantities per pump
Generally speaking, all dosing quantity data [ml] relate to 100g powder. Thus, the dosing
quantity [in ml] and the density [in g/cm3 or g/ml] should be known for each liquid.
6.3.1 Determining the density of concentrates
If the manufacturer does not indicate the density of the concentrate, you can determine it
yourself quite easily. To do so, place a large calibrated beaker on the scales and press
TARE. A 0 will appear on the display. Fill the beaker to the 1000ml mark with concentrate.
Carefully note the weight. Then, simply divide the value shown by 1000 to get the density
in g/cm3 or g/ml. If the volume of concentrate is less than 1000ml, divide the weight of the
concentrate shown on the scales by the volume of concentrate to obtain the density.
If you do not have a large beaker, carry out several (say, 5) measurements with a smaller
beaker, then calculate the average value.
13
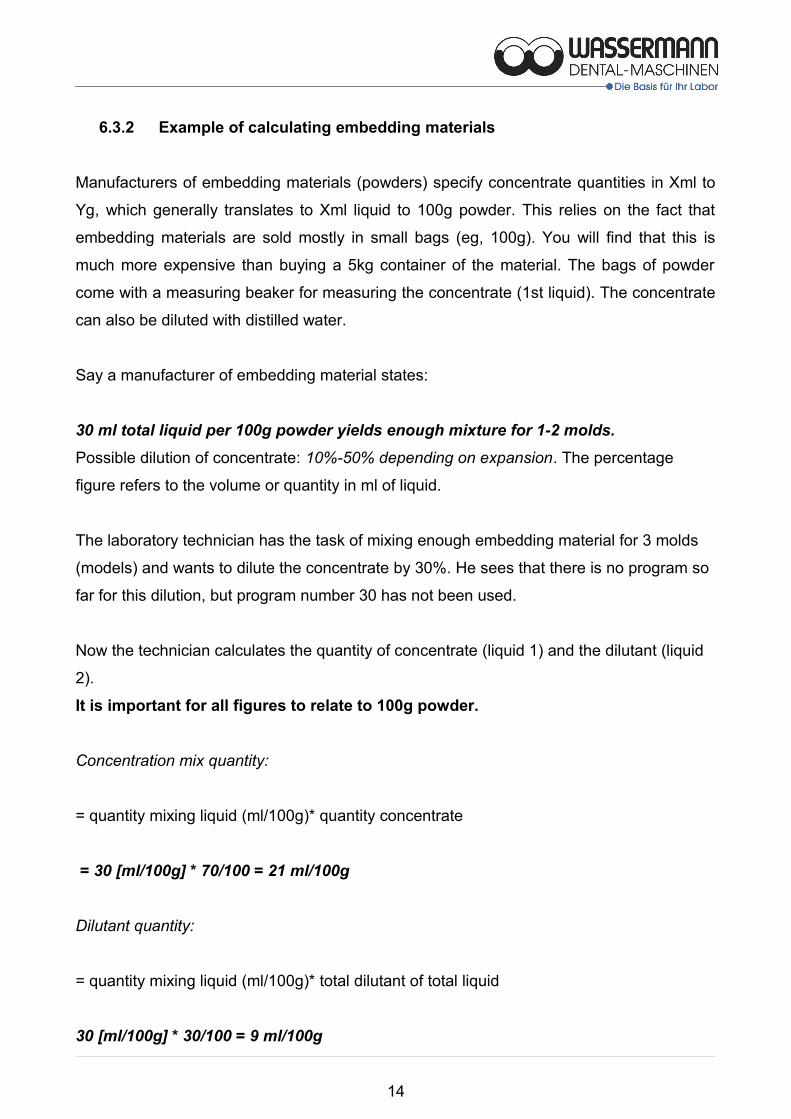
6.3.2 Example of calculating embedding materials
Manufacturers of embedding materials (powders) specify concentrate quantities in Xml to
Yg, which generally translates to Xml liquid to 100g powder. This relies on the fact that
embedding materials are sold mostly in small bags (eg, 100g). You will find that this is
much more expensive than buying a 5kg container of the material. The bags of powder
come with a measuring beaker for measuring the concentrate (1st liquid). The concentrate
can also be diluted with distilled water.
Say a manufacturer of embedding material states:
30 ml total liquid per 100g powder yields enough mixture for 1-2 molds.
Possible dilution of concentrate: 10%-50% depending on expansion. The percentage
figure refers to the volume or quantity in ml of liquid.
The laboratory technician has the task of mixing enough embedding material for 3 molds
(models) and wants to dilute the concentrate by 30%. He sees that there is no program so
far for this dilution, but program number 30 has not been used.
Now the technician calculates the quantity of concentrate (liquid 1) and the dilutant (liquid
2).
It is important for all figures to relate to 100g powder.
Concentration mix quantity:
= quantity mixing liquid (ml/100g)* quantity concentrate
= 30 [ml/100g] * 70/100 = 21 ml/100g
Dilutant quantity:
= quantity mixing liquid (ml/100g)* total dilutant of total liquid
30 [ml/100g] * 30/100 = 9 ml/100g
14
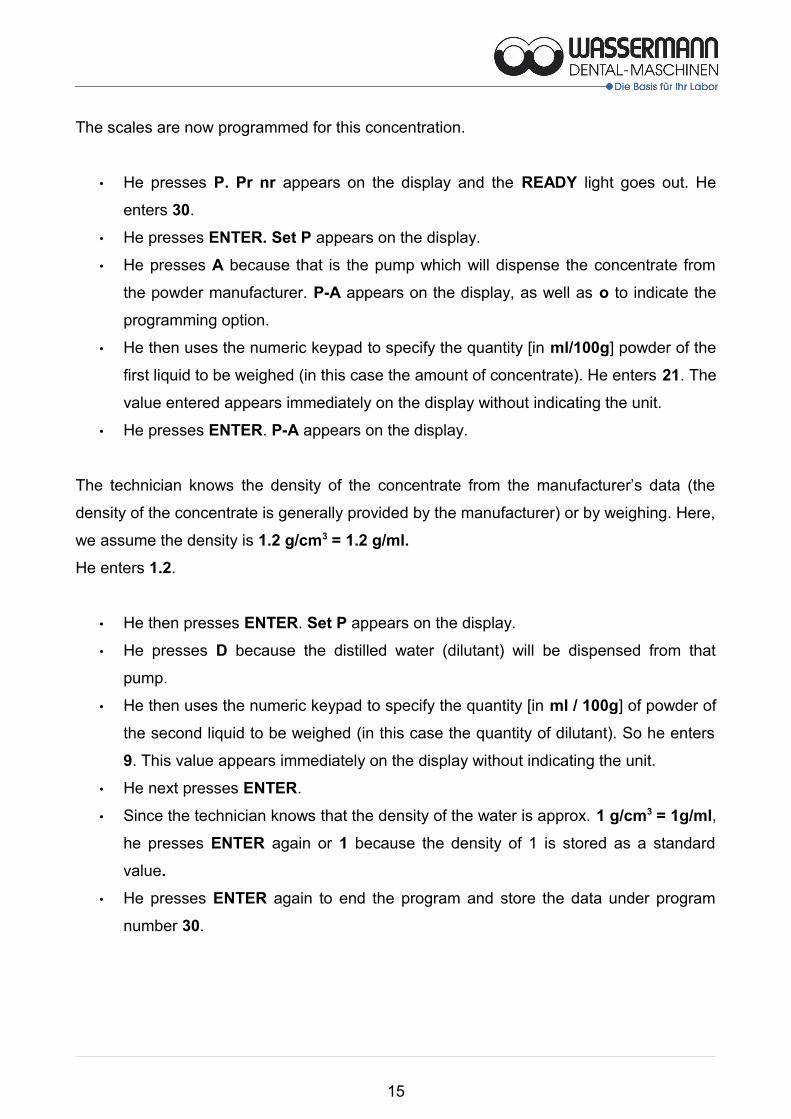
The scales are now programmed for this concentration.
• He presses P. Pr nr appears on the display and the READY light goes out. He
enters 30.
• He presses ENTER. Set P appears on the display.
• He presses A because that is the pump which will dispense the concentrate from
the powder manufacturer. P-A appears on the display, as well as o to indicate the
programming option.
• He then uses the numeric keypad to specify the quantity [in ml/100g] powder of the
first liquid to be weighed (in this case the amount of concentrate). He enters 21. The
value entered appears immediately on the display without indicating the unit.
• He presses ENTER. P-A appears on the display.
The technician knows the density of the concentrate from the manufacturer’s data (the
density of the concentrate is generally provided by the manufacturer) or by weighing. Here,
we assume the density is 1.2 g/cm3 = 1.2 g/ml.
He enters 1.2.
• He then presses ENTER. Set P appears on the display.
• He presses D because the distilled water (dilutant) will be dispensed from that
pump.
• He then uses the numeric keypad to specify the quantity [in ml / 100g] of powder of
the second liquid to be weighed (in this case the quantity of dilutant). So he enters
9. This value appears immediately on the display without indicating the unit.
• He next presses ENTER.
• Since the technician knows that the density of the water is approx. 1 g/cm3 = 1g/ml,
he presses ENTER again or 1 because the density of 1 is stored as a standard
value.
• He presses ENTER again to end the program and store the data under program
number 30.
15

He now places two empty mixing beakers on the scales and presses TARE.
Then, he takes a small spatula and transfers the approximate quantity of powder from the
5kg container to one of the beakers. The scales’ display reads 281g. This is too little
powder, so he adds the rest. The display now reads 315g.
• The technician presses START. Pr nr appears on the display and the READY light
goes out.
• He uses the numeric keypad to specify the program number and enters 30. He then
presses ENTER. Dosing starts and the READY light goes out.
The scales calculate the weight of the dosing liquids.
Of the concentrate
powder weight (g) * concentration (ml/100g powder) * density (g/cm3 = g/ml)
= 315g * 21ml/100g * 1.2g/cm^3 = 66.15 ml * 1.2 g/cm^3 = 66.15ml * 1.2 g/ml
we must now add an extra
= 79.38g.
Of the dilutant (distilled water):
315g * 9ml/100g * 1.0g/ml
we must now add an extra
= 28.71g. The technician transfers the powder into the liquid and it’s finished.
16

6.4 Rinsing / filling / emptying
If the pumps will remain unused for an extended period such as during holidays or when
the medium is being changed, the entire dosing system will need to be cleaned. This is
done by connecting a particular pump to the container filled with tap water or rinsing liquid.
Never blow compressed air through the hoses.
6.4.1 Filling / rinsing / emptying the pump system
Squeeze off the tube end briefly during flushing to remove air bubbles from
the system. There should be no more air bubbles present when the tube end
is released. This procedure can be repeated as often as you like.
• Screw the cover with the suction hose of the pump system to be filled or rinsed to
the container holding the water/rinsing liquid. Remember to turn only the container
to avoid twisting the hose.
• Place a suitable container under the dosing hose. If necessary, set the hose to the
correct height.
• There are 4 switches at the rear of the pump housing on the DSW-2K. These are
used to set the feed direction.
• Press S. SET P appears on the display and the READY light goes out.
• Press one of the six buttons assigned to the pumps (A, B, C, D, E or F). P-n
appears on the display (n = the letter of the selected pump).
• Press START.
• Rinsing begins and the ∇ symbol corresponding to that pump lights up.
• The rinsing process for cleaning the circuit should last for approx. 30 seconds.
• Once the rinsing is finished, the END light comes on.
17
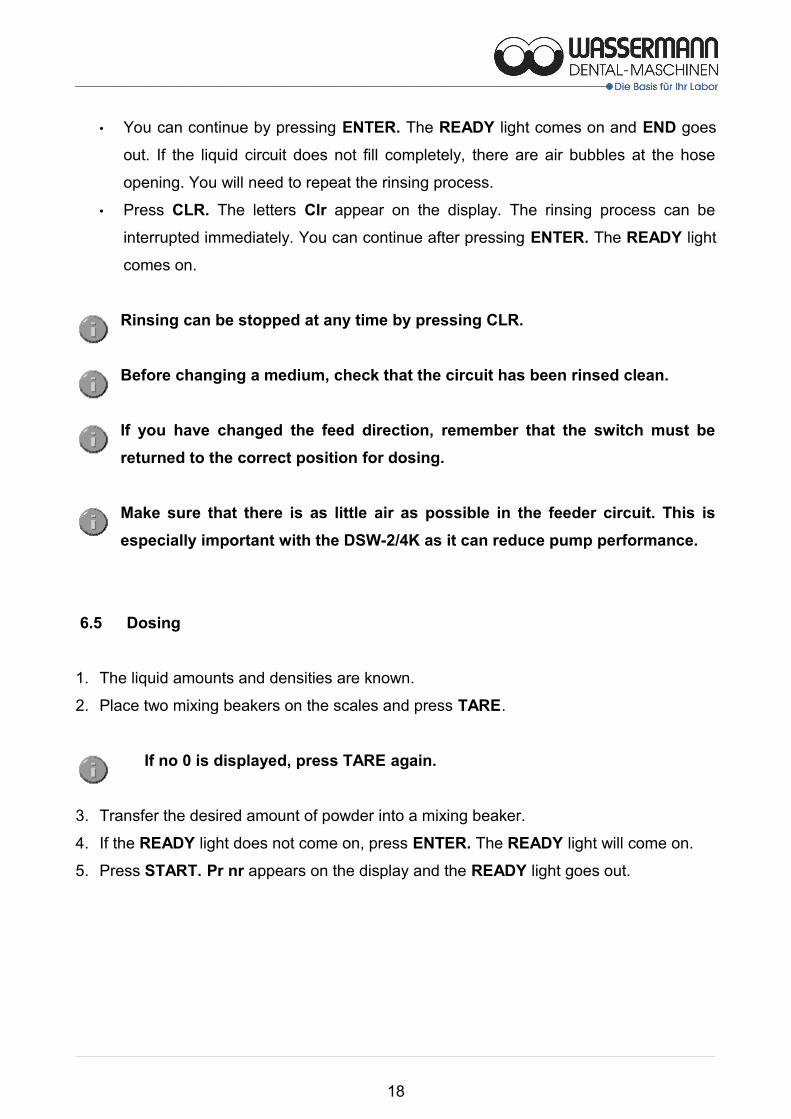
• You can continue by pressing ENTER. The READY light comes on and END goes
out. If the liquid circuit does not fill completely, there are air bubbles at the hose
opening. You will need to repeat the rinsing process.
• Press CLR. The letters Clr appear on the display. The rinsing process can be
interrupted immediately. You can continue after pressing ENTER. The READY light
comes on.
Rinsing can be stopped at any time by pressing CLR.
Before changing a medium, check that the circuit has been rinsed clean.
If you have changed the feed direction, remember that the switch must be
returned to the correct position for dosing.
Make sure that there is as little air as possible in the feeder circuit. This is
especially important with the DSW-2/4K as it can reduce pump performance.
6.5 Dosing
1. The liquid amounts and densities are known.
2. Place two mixing beakers on the scales and press TARE.
If no 0 is displayed, press TARE again.
3. Transfer the desired amount of powder into a mixing beaker.
4. If the READY light does not come on, press ENTER. The READY light will come on.
5. Press START. Pr nr appears on the display and the READY light goes out.
18

6. Use the numeric keypad to enter the program number. If you enter 0 or a number
greater then 30, Err-P then Pr nr appear on the display.
7. Press ENTER. Dosing starts and the READY light goes out.
The program checks that the quantities do not exceed the maximum value. If the
maximum value is exceeded, Err-H appears on the display and dosing is stopped.
8. The program also checks that the amount of powder is greater than 5g. If it is less, Err-
L appears on the display and dosing does not start. Another check is carried out to
make sure the maximum dosing portion does not exceed 1000% of the powder amount
(Err-H message) and that the minimum dosing portion is greater than 2g (if not,
message Err-L).
9. To interrupt the process, you press CLR, then ENTER to continue.
10. If no errors are detected, the symbol ∇ appears on the display to indicate which pump
is working.
11.The pump (or pumps) automatically dose(s) the predetermined quantity of liquid.
12.When the next pump is switched on, the display shows the ∇ symbol of the pump
which is working. When dosing finishes, the END light come on.
13.After ENTER is pressed, the dosing scales are ready to start again. The READY light
comes on and END goes out (only to program level C2_08).
6.5.1 Stopping the dosing process
• The dosing process can be stopped immediately by pressing CLR. Clr appears on
the display. You press ENTER to reset the unit. The READY light comes on.
Dosing can be stopped at anytime by pressing CLR.
19

6.6 Using cooling
– Turn on the green main switch (on the side of the unit).
– Select the temperature using the rocker switch at the side.
– Temperatures 17°,19° and 21° Celsius are available. (The middle temperature (19°)
is usually recommended.)
– Wait for the green LED to flash. This can take up to 45 minutes, depending on the
ambient temperature. The liquid will then have reached the tolerance range of the
set temperature.
– Green light means minimum permissible temperature reached. The cooling
switches itself off automatically. An occasional change between a steady and a
blinking green light on the display does not indicate a fault.
– Red light means "Warning" – cooling is faulty. Switch off immediately.
You are recommended to switch the cooling unit on in good time (timer) or to have it on
continuously. Try working at a higher temperature – this often yields better results.
6.7 Tips and tricks
• If you are mixing large quantities, add material by hand during the dosing process.
Take care, however, not to exceed the weight you want to weigh. Stop if you hear
the pump laboring before the nominal weight is reached.
• Remember that some embedding materials can only be worked for a short time at
temperatures above 25°C. Locate the dosing scales and the liquid container in a
cool place.
20

7 Troubleshooting
Fault Cause RemedyNo weight shown on display
Transport packing not removed
Remove transport packing.
Err-H displayed Maximum weight exceeded
Remove powder from mixing beaker and repeat dosing process.
Err-L displayed Under minimum weight or dosing quantity too small
Add more powder to beaker and repeat dosing process.
No response from keys P,S and START
END light is on, process isfinished or was stopped
Press ENTER and start process again.
Pump works but feeds nothing or too little
• Dirty hose
• Pinched hose
• Container empty
• Suction hose lengthin container too short
• Pump slipping
Clean hose and/or remove contamination. Check hose line and liquid level in container.
Unscrew unit at rear, demount pump head,
roughen shaft surface (see 8.7)
Irregular liquid flow Air bubbles in system System has to be vented
(see 6.4.1)
Pump does not respond • Pump faulty
• Pump blocked
• Pump not plugged in
Check pump or contact our Service Department.
Wrong medium supplied • Wrong lid and/or container
• Wrong material in container
• Error in program parameters
Check container and program. If necessary.
Red LED glows
(only DSW -2K)
Cooling system breakdown
Contact our Service Department.
If the above recommendations do not solve the problem, contact your dental depot
or our service department.
21

8 Care and maintenance
8.1 Cleaning
Disconnect the power plug before starting any maintenance work.
The identification plate has always to be kept in easily legible condition and has
not to be removed.
Remove external dirt from time to time with some form of cold cleaner.
Use only cold cleaners to avoid damaging the paintwork or removing the lettering.
The equipment should be cleaned at regular intervals to ensure trouble-free operation.
It requires only normal cleaning (sponge, damp cloth, mild detergent) and no further
chemical additives.
• The ends of the hoses used to supply embedding material concentrate should be
cleared regularly of crystallized material.
• Remember to clean the rubber plugs used to seal the hose ends.
Avoid skin contact with concentrates. Follow the manufacturer’s
guidelines.
Never blow compressed air through hoses.
If the unit is not to be used for an extended period, seal the concentrate hose
ends with the rubber plugs.
22

8.2 Maintenance
• The mechanical and electrical components of our dosing scales do not need
maintenance.
• Check the condition of the hoses on a regular basis. Hardened, dirty or severely
discolored hoses can be replaced by service personnel in a few minutes.
• Make sure that the unit is kept clean.
8.3 Warranty
The warranty period for our equipment is 12 months. If faults occur within the
warranty period, contact your dental depot or get in touch directly with our service
department.
Your equipment should only be operated in perfect condition. If faults occur which
could harm operators or third parties, the unit should not be used until it has been
fixed.
This warranty does not cover damage caused by improper use, external mechanical
causes, transport damage or interference with the unit by unauthorized persons.
8.4 Spare parts
If necessary please contact our service hotline phone:
0049 (0)40 / 730 92 6-0
23

8.5 Scope of delivery / Accessories
Incl. in delivery Item no.:
DSW-2/4 K with 4 pumps, cooled 172989 / 172986
DSW-2 with 1 pump, non-cooled 172988 / 172985
Accessories Item no.:
Upgrade with one pump, non-cooled 172299
8.6 Repairs
Servicing or repairs to the unit has only to be carried out by qualified technicians.
Only original spare parts are to be used. Responsibility for the product is voided
if unauthorised persons alter it or if inappropriate components are installed.
8.7 Repairing the pump
Turn the unit off and pull the plug out of the mains socket.
1. Undo the four screws at the rear so you can see the pump arrangement.
2. You can remove the pump head from the pump motor without taking the head apart
if you press the right and left clamps in at the same time.
24
Clamp
ClampPump motor
Pump head

3. Rub a piece of 180-240 grit abrasive paper up and down the pump motor shaft
several times (see steps 1-3).
4. Remount the pump head on the motor and check that it works correctly.
5. If the pump still does not deliver, demount the pump head by pressing in both
clamps (see pic.).
6. Check the silicone tube and feed rollers for residue. If the residue cannot be
removed, a new pump is required.
7. Also check the connections between the pump tube and PVC tube for blockages.
Warning! The connections must be held in place with hose clamps.
Warning! The pump must be built up grease-free.
25
Step 1 Step 2 Step 3
Pump-head cover
Pump-head housing
Silicone tube
Clamp
Feed rollers
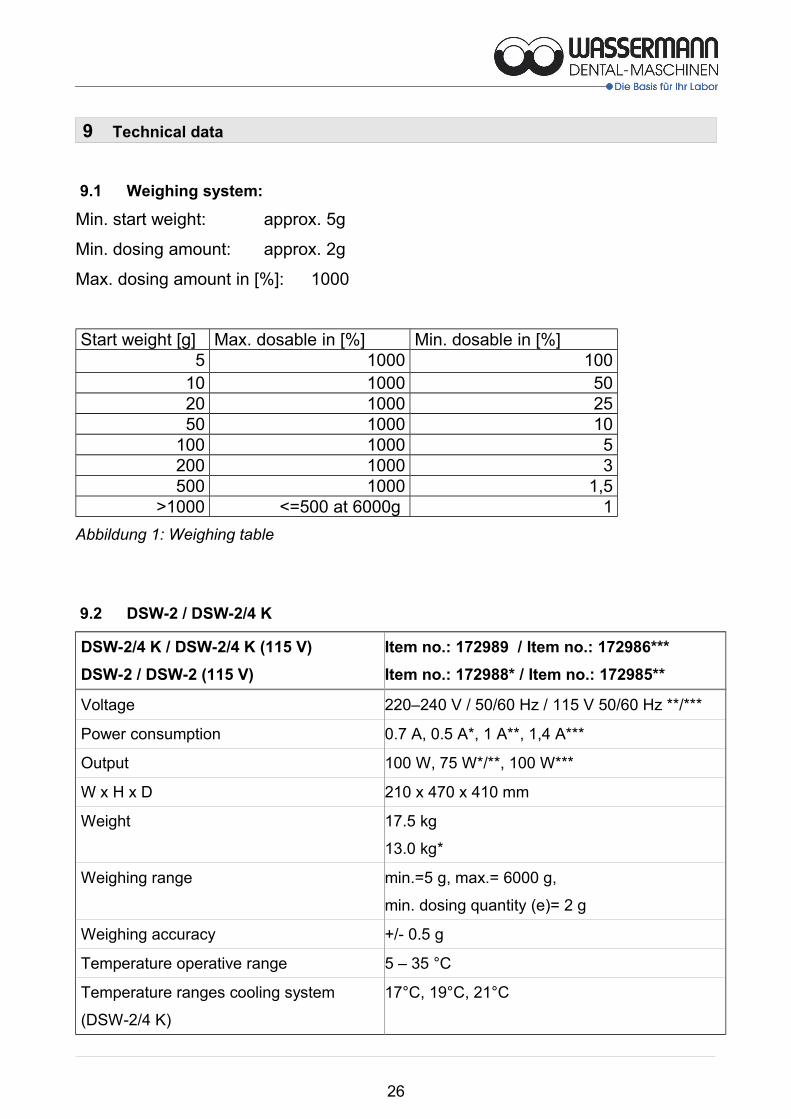
9 Technical data
9.1 Weighing system:
Min. start weight: approx. 5g
Min. dosing amount: approx. 2g
Max. dosing amount in [%]: 1000
Start weight [g] Max. dosable in [%] Min. dosable in [%]5 1000 100
10 1000 5020 1000 2550 1000 10
100 1000 5200 1000 3500 1000 1,5
>1000 <=500 at 6000g 1
Abbildung 1: Weighing table
9.2 DSW-2 / DSW-2/4 K
DSW-2/4 K / DSW-2/4 K (115 V)
DSW-2 / DSW-2 (115 V)
Item no.: 172989 / Item no.: 172986***
Item no.: 172988* / Item no.: 172985**
Voltage 220–240 V / 50/60 Hz / 115 V 50/60 Hz **/***
Power consumption 0.7 A, 0.5 A*, 1 A**, 1,4 A***
Output 100 W, 75 W*/**, 100 W***
W x H x D 210 x 470 x 410 mm
Weight 17.5 kg
13.0 kg*
Weighing range min.=5 g, max.= 6000 g,
min. dosing quantity (e)= 2 g
Weighing accuracy +/- 0.5 g
Temperature operative range 5 – 35 °C
Temperature ranges cooling system
(DSW-2/4 K)
17°C, 19°C, 21°C
26

9.3 Cooling system
Microprocessor-controlled electronic cooling unit.
Temperature ranges: 17°, 19° and 21° Celsius
Tolerance at measuring point: +/- 0.3° Celsius
Tolerance of entire cooling system: +/- 1° Celsius
No. cooling chambers: 4
Cooling volume per chamber: approx. 125ml
Cooling power: 28 W
Other voltages on request.
The noise level of the unit amounts to ≤ 70 dB (A).
The technical data are subject to change without prior notice.
27

10 EC Conformity Certificate
in accordance with 2006/95/EG (low-voltage guidelines) and 2004/108/EG (EMV guidelines) and 2006/42/EG (machinery guidelines)
Manufacturer: W A S S E R M A N NDental-Maschinen GmbHRudorffweg 15 - 17D-21031 Hamburg
Product description: Dosing scales for dental applications
Model: DSW-2 with one pumpDSW-2/4K with four pumps
Item-no. 172988 / 172985Item-no. 172989 / 172986
Applicable standards:
DIN EN 61010-1DIN EN 61000-6-3DIN EN 61000-6-1DIN 45635-1DIN EN 60335-1
Hiermit wird bestätigt, dass die oben bezeichnete Maschine den genannten EG-Richtlinienentspricht. Diese Erklärung wird ungültig, falls die Maschine ohne unsere Zustimmung verändert wird.
This is to confirm that the above mentioned machine complies with the described EC rules. This declaration becomes invalid if the machine is modified without our approval.
Cette machine est conforme aux normes en vigueur de la Communité Européene. Cet avis est nul et non avenant si cette machine est modifiée sans notre accord.
Esta máquina, anteriormente mencionada, cumple con los limites requeridos por el reglamento EC. Ahora bien, esta declaración quedará invalidada en caso de realizar modificaciones al aparato sin nuestra aprobación.
Hiermee wordt bevestigd dat bovengenoemde machine voldoet aan de voorgeschreven EU normen. Deze verklaring verliest geldigheid als er zonder onze uitdrukkelijke toestemming wijzigen aan de machine worden aangebracht.
Place, date: Hamburg, 13.12.2012 Company stamp:
Signature: ________________________ Wilfried Wassermann (Managing Director)
28

11 Short instruction for programming
1 Start of the Program "PRNR" appears on the display
2 Choose a program numberon the numeric keypad
3 "Set P" appears on thedisplay
4 Press A to F to select apump "P-X" appears on thedisplay
5 Please use the numerickeypad to enter the quantityof liquid(ml/100g powder)
6 "PR-X" appears on thedisplay
7 Please indicate the densityor confirm with "ENTER" thedensity of 1
8 "Set P" appears on thedisplay
9 You can store the programwhen pressing "ENTER" oryou can go further inprogramming starting withpoint 4 again
12 Instruction to start a program
1 Start of the program "PR NR" appears on thedisplay
2 Choose a program number on the numeric keypad
3 To confirm the program no.
29
P
1 30bis
ENTER
A Fbis
XX
ENTER
oderENTER 1.XX
ENTER
ENTER Zu 4oder
START
1 bis 30
ENTER

13 Table of program
Concentrate DilutionPr.No. Manufact. Productname Pump ml/100g Densit
y
Pump ml/100g Densit
y
Remarks
30

Notes:
31
