Download - HP DesignJet 755cm Plotter
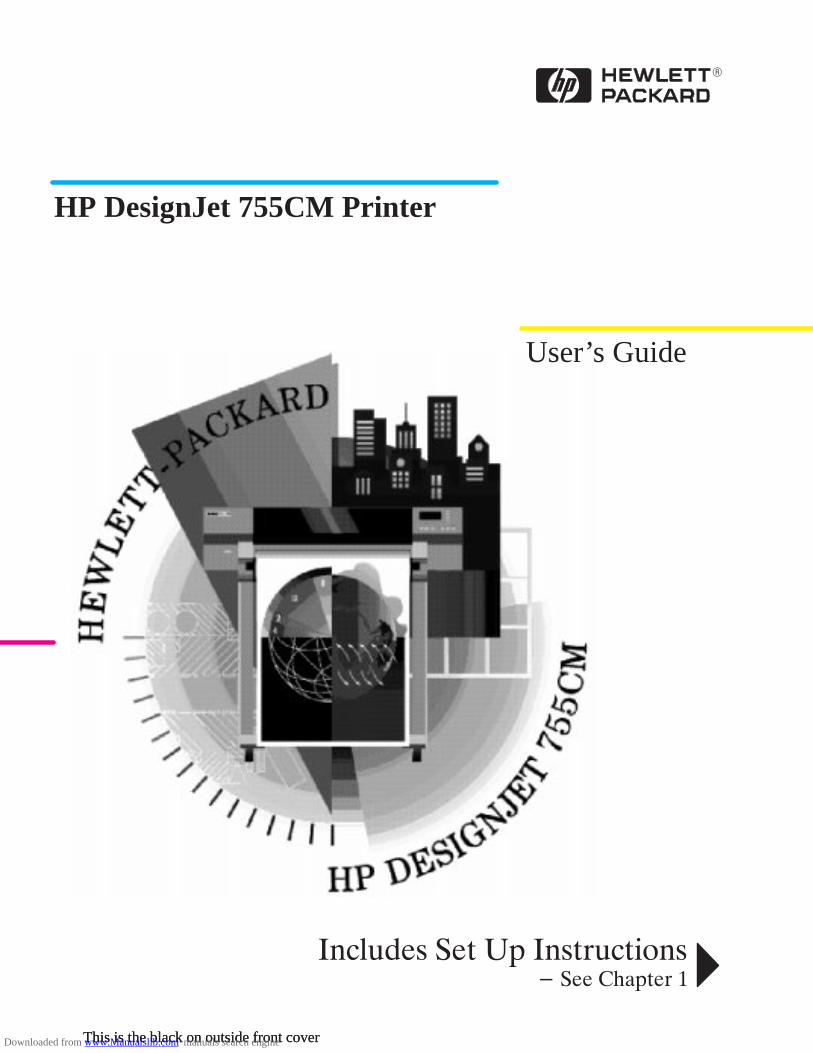
This is the black on outside front cover
Company confidential. Postillo/755CM User’s Guide Final Freeze status: Frozen
This is the black on outside front cover
This is the PANTONE 1665C on outside front coverThis is the PANTONE 2726C on outside front coverThis is the PANTONE 157C on the outside front cover
User’s Guide
�
��������������������� ������������������
HP DesignJet 755CM Printer
Downloaded from www.Manualslib.com manuals search engine
This is the black on inside front cover
Company confidential. Postillo/755CM User’s Guide Final Freeze status: Frozen
Manual part numberC3198-90091First edition, September 1996Printed in Europe
Customer re-order numberC3198-60051
All rights are reserved. No partof the document may bephotocopied, reproduced, ortranslated to another languagewithout the prior writtenconsent of Hewlett-PackardCompany.
Adobe is a trademark ofAdobe Systems Incorporatedwhich may be registered incertain jurisdictions.
Adobe PageMaker″ AdobePhotoshop and AldusPageMaker are trademarksof Adobe SystemsIncorporated which may beregistered in certainjurisdictions.
AutoCAD is a trademark ofAutoDesk Inc.
Bi-Tronics, HP-GL andHP-GL/2 are trademarks of Hewlett-Packard Company.
CorelDRAW! is a trademarkof Corel Corporation.
Macintosh is a product of Apple Computer Inc.
Microsoft� and MS-DOS� are registered trademarks ofMicrosoft Corporation.
Microsoft Windows is aregistered trademark ofMicrosoft Corporation.
PANTONE� and PANTONEMATCHING SYSTEM� arelicensed trademarks ofPantone, Inc.PANTONE�* Colorsgenerated by the HP DesignJet 650C plotter arefour-color process simulationsand may not matchPANTONE-identified solidcolor standards. Use currentPANTONE Color ReferenceManuals for accurate color.PANTONE Color simulationsare only obtainable on thisproduct when driven byqualified Pantone-licensedsoftware packages. ContactPantone, Inc. for a current listof qualified licensees.*Pantone, Inc.’scheck-standard trademark forcolor. �Pantone, Inc., 1988
PostScript� is a registeredtrademark of Adobe SystemsIncorporated
QuickDraw is a trademark ofApple Computer Inc.
UNIX� is a registered trademark in the United Statesand other countries, licensedexclusively through X/OpenCompany Limited.
NoticeThe information contained inthis document is subject tochange without notice andshould not be construed as acommitment byHewlett-Packard Company.
Hewlett-Packard assumes norespons ibility for any errorsthat may appear in thisdocument nor does it makeexpressed or impliedwarranty of any kind withregard to this material,including, but not limited to,the implied warranties ofmerchantability and fitnessfor a particular purpose.
The Hewlett-PackardCompany shall not be liablefor incidental or consequentialdamages in connection with,or arising out of the furnishing,performance, or use of thisdocument and the programmaterial which it describes.
Safety Symbols
The product is marked withthis symbol when it isnecessary for you to refer tothe instruction manual in orderto protect against damage tothe product.
Hazardous voltage symbol.
W A R N I N G
The Warning symbol callsattention to a procedure,practice, or the like, which, ifnot correctly performed oradhered to, could result inpersonal injury. Do notproceed beyond a Warningsymbol until the indicatedconditions are fully understoodand met.
C A U T I O N
The Caution symbol callsattention to an operatingprocedure, practice, or the like,which, if not correctlyperformed or adhered to, couldresult in damage to ordestruction of part or all of theproduct. Do not proceedbeyond a Caution symbol untilthe indicated conditions arefully understood and met.
CC
See
Loc
aliz
atio
n N
ote
in fo
oter
for
Trad
emar
k ch
ange
s
Downloaded from www.Manualslib.com manuals search engine
Company confidential. Postillo/755CM User’s Guide Final Freeze Status: Frozen
This is the cyan on page (seq: 1)
This is the black on page (seq: 1)
CC
C3198–90091 English
Localization Note. After puting your own part number att the top, write your own languagein English , e.g. German (not Deutsch), as this is for the printer not the user.Product Number added to title.
HP DesignJet 755CM PrinterC3198B
User’s Guide
Downloaded from www.Manualslib.com manuals search engine
ii
Company confidential. Postillo/755CM User’s Guide Final Freeze Status: Frozen
This is the cyan on page ii (seq: 2)This is the black on page ii (seq: 2)
This User’s Guide Contains:
A comprehensive explanation of all the printer’s features.
The Quick Reference Guide Contains:
Some information that you are most likely to need on a day-to-day basis. Forexample, the front-panel menu structure and media-type selections. It is storedin the pocket at the back of the printer.
Where in this manual to find the most commonly needed information
To find how to ... go to ...
Install the printer � chapter 1
Connect the printer � page 1-24
Choose media � page 3-2
Load media � page 3-9
Replace the cartridges � page 3-25
See the printer’s current configuration � pages 7-2 and 7-3
Clear a media jam � page 9-8
Solve print quality problems � page 9-16
Interpret a front-panel message � page 10-2
Order accessories � page 11-13
To find any other information ... � go to the index at the backof this manual.
On page D-1 at the back of this manual, you will find a Documentation Map,listing useful documents to help with:
Setting Up and Using the Printer
Using Application Software
Getting Support
Programmer’s Reference.
Localization Note. Bottom paragraph changed and bullets added.
Finding Information
Downloaded from www.Manualslib.com manuals search engine
iii
Company confidential. Postillo/755CM User’s Guide Final Freeze Status: Frozen
This is the cyan on page iii (seq: 3)
This is the black on page iii (seq: 3)
Finding information ii. . . . . . . . . . . . . . . . . . . . . . . . . . . . . . . . . . . . . . . .
Welcome xi. . . . . . . . . . . . . . . . . . . . . . . . . . . . . . . . . . . . . . . . . . . . . . . . . .
1 Setting Up The PrinterFast Track 1-2. . . . . . . . . . . . . . . . . . . . . . . . . . . . . . . . . . . . . . . . . . . . . . . . . . . . . . Set Up Checklist 1-3. . . . . . . . . . . . . . . . . . . . . . . . . . . . . . . . . . . . . . . . . . . . . . . . . Task 1: Check that You Have All the Items Required 1-4. . . . . . . . . . . . . . . . . . . . . Task 2: Switch On and Change the Language from English (Optional) 1-6. . . . . . . Task 3: Load Media 1-8. . . . . . . . . . . . . . . . . . . . . . . . . . . . . . . . . . . . . . . . . . . . . . . Task 4: Load the Print Cartridges 1-17. . . . . . . . . . . . . . . . . . . . . . . . . . . . . . . . . . . Task 5: Print a Demonstration File (Optional) 1-21. . . . . . . . . . . . . . . . . . . . . . . . . Task 6: Connect the Printer to Your Computer 1-24. . . . . . . . . . . . . . . . . . . . . . . . . Task 7: Configure the Interface (Serial Interface Users Only) 1-26. . . . . . . . . . . . . Task 8: Set Up Your Software 1-32. . . . . . . . . . . . . . . . . . . . . . . . . . . . . . . . . . . . . . Task 9: Print a Test File 1-36. . . . . . . . . . . . . . . . . . . . . . . . . . . . . . . . . . . . . . . . . . . Extra Tips for UNIX Users 1-37. . . . . . . . . . . . . . . . . . . . . . . . . . . . . . . . . . . . . . . .
2 Learning How To Use the Front-Panel Display (Tutorial)The Front Panel 2-2. . . . . . . . . . . . . . . . . . . . . . . . . . . . . . . . . . . . . . . . . . . . . . . . . .
The Display Section 2-3. . . . . . . . . . . . . . . . . . . . . . . . . . . . . . . . . . . . . . . . . . . . Printing the Menus Print 2-4. . . . . . . . . . . . . . . . . . . . . . . . . . . . . . . . . . . . . . . . . . .
Description of the Menus Print 2-4. . . . . . . . . . . . . . . . . . . . . . . . . . . . . . . . . . . . Entering the Menu System 2-5. . . . . . . . . . . . . . . . . . . . . . . . . . . . . . . . . . . . . . . . . Navigating the Menu System 2-6. . . . . . . . . . . . . . . . . . . . . . . . . . . . . . . . . . . . . . .
Menu Graphics Used in This Manual 2-8. . . . . . . . . . . . . . . . . . . . . . . . . . . . . . . Other Types of Screen 2-9. . . . . . . . . . . . . . . . . . . . . . . . . . . . . . . . . . . . . . . . . . . . . Examples 2-10. . . . . . . . . . . . . . . . . . . . . . . . . . . . . . . . . . . . . . . . . . . . . . . . . . . . . .
CO
NT
EN
TS
Contents
Downloaded from www.Manualslib.com manuals search engine
iv
Company confidential. Postillo/755CM User’s Guide Final Freeze Status: Frozen
This is the cyan on page iv (seq: 4)This is the black on page iv (seq: 4)
3 Working With Media and CartridgesChoosing Media 3-2. . . . . . . . . . . . . . . . . . . . . . . . . . . . . . . . . . . . . . . . . . . . . . . . . .
Five Important Points about Media Types 3-2. . . . . . . . . . . . . . . . . . . . . . . . . . . Supported Media Types 3-3. . . . . . . . . . . . . . . . . . . . . . . . . . . . . . . . . . . . . . . . . Physical Characteristics of Media types 3-4. . . . . . . . . . . . . . . . . . . . . . . . . . . . . Cost and Color Support of Media Types 3-5. . . . . . . . . . . . . . . . . . . . . . . . . . . . Combinations of Media Type and Print Quality 3-6. . . . . . . . . . . . . . . . . . . . . . . Typical Media-Type Choices by Application 3-7. . . . . . . . . . . . . . . . . . . . . . . . .
Caring for Your Media 3-8. . . . . . . . . . . . . . . . . . . . . . . . . . . . . . . . . . . . . . . . . . . . . Loading Media 3-9. . . . . . . . . . . . . . . . . . . . . . . . . . . . . . . . . . . . . . . . . . . . . . . . . . .
To Change a Roll 3-9. . . . . . . . . . . . . . . . . . . . . . . . . . . . . . . . . . . . . . . . . . . . . . To Load a Sheet 3-17. . . . . . . . . . . . . . . . . . . . . . . . . . . . . . . . . . . . . . . . . . . . . . Compensating for Badly Cut Media 3-20. . . . . . . . . . . . . . . . . . . . . . . . . . . . . . . To Adjust Skew Tolerance 3-20. . . . . . . . . . . . . . . . . . . . . . . . . . . . . . . . . . . . . .
Unloading Media 3-21. . . . . . . . . . . . . . . . . . . . . . . . . . . . . . . . . . . . . . . . . . . . . . . . Drying Time 3-21. . . . . . . . . . . . . . . . . . . . . . . . . . . . . . . . . . . . . . . . . . . . . . . . . To Adjust Drying Time 3-22. . . . . . . . . . . . . . . . . . . . . . . . . . . . . . . . . . . . . . . . . To Unload a Sheet after Printing 3-23. . . . . . . . . . . . . . . . . . . . . . . . . . . . . . . . . To Remove an Unused Sheet 3-24. . . . . . . . . . . . . . . . . . . . . . . . . . . . . . . . . . . .
Replacing Cartridges 3-25. . . . . . . . . . . . . . . . . . . . . . . . . . . . . . . . . . . . . . . . . . . . . When to Replace Cartridges 3-25. . . . . . . . . . . . . . . . . . . . . . . . . . . . . . . . . . . . . Before Replacing Cartridges 3-26. . . . . . . . . . . . . . . . . . . . . . . . . . . . . . . . . . . . . To Replace One or More Cartridges 3-27. . . . . . . . . . . . . . . . . . . . . . . . . . . . . . .
Contents
Downloaded from www.Manualslib.com manuals search engine

v
Company confidential. Postillo/755CM User’s Guide Final Freeze Status: Frozen
This is the cyan on page v (seq: 5)
This is the black on page v (seq: 5)
4 Controlling the Page FormatPage Size 4-2. . . . . . . . . . . . . . . . . . . . . . . . . . . . . . . . . . . . . . . . . . . . . . . . . . . . . . .
Do You Need to Adjust the Page Size in the Front Panel? 4-3. . . . . . . . . . . . . . . To Adjust the Page Size in the Front Panel 4-4. . . . . . . . . . . . . . . . . . . . . . . . . . Page Size and Clipped Images 4-6. . . . . . . . . . . . . . . . . . . . . . . . . . . . . . . . . . . . Page Size and Nesting (Roll Media Only) 4-6. . . . . . . . . . . . . . . . . . . . . . . . . . .
Adjusting the Margins (Roll Media Only) 4-7. . . . . . . . . . . . . . . . . . . . . . . . . . . . . Margins and Automatic Cutting 4-7. . . . . . . . . . . . . . . . . . . . . . . . . . . . . . . . . . .
Rotating a Drawing 4-8. . . . . . . . . . . . . . . . . . . . . . . . . . . . . . . . . . . . . . . . . . . . . . . Rotating a Drawing from the Front Panel 4-8. . . . . . . . . . . . . . . . . . . . . . . . . . . . To Rotate a Drawing from the Front Panel 4-8. . . . . . . . . . . . . . . . . . . . . . . . . . . Exactly What is Rotated? 4-9. . . . . . . . . . . . . . . . . . . . . . . . . . . . . . . . . . . . . . . . How Does Rotate Interact with Your Software? 4-10. . . . . . . . . . . . . . . . . . . . . .
For PostScript files 4-10. . . . . . . . . . . . . . . . . . . . . . . . . . . . . . . . . . . . . . . . . . For Non PostScript files 4–11. . . . . . . . . . . . . . . . . . . . . . . . . . . . . . . . . . . . . .
Printing a Mirror Image 4-12. . . . . . . . . . . . . . . . . . . . . . . . . . . . . . . . . . . . . . . . . . . Changing the Scale of a Printed Image 4-13. . . . . . . . . . . . . . . . . . . . . . . . . . . . . . .
Scale and Page Size 4-14. . . . . . . . . . . . . . . . . . . . . . . . . . . . . . . . . . . . . . . . . . .
5 Controlling a Print’s Overall AppearanceWays to Control the Print’s Appearance 5-2. . . . . . . . . . . . . . . . . . . . . . . . . . . . . . .
Why Change the Appearance of the Print Using the Front Panel Rather Thanfrom the Software? 5-3. . . . . . . . . . . . . . . . . . . . . . . . . . . . . . . . . . . . . . . . . . . . .
Changing Pen Widths and Colors Using the Printer’s Internal Palettes 5-4. . . . . . . To See the Current Palette Settings 5-4. . . . . . . . . . . . . . . . . . . . . . . . . . . . . . . . To See the Colors Available For a Palette 5-5. . . . . . . . . . . . . . . . . . . . . . . . . . . To Change the Palette Settings 5-6. . . . . . . . . . . . . . . . . . . . . . . . . . . . . . . . . . . . To Change the Selection of the Current Palette 5-7. . . . . . . . . . . . . . . . . . . . . . .
Changing the Treatment of Overlapping Lines (Merge Feature) 5-8. . . . . . . . . . . . Changing the Overall Lightness/Darkness of a Print 5-9. . . . . . . . . . . . . . . . . . . . . Printing Color Drawings in Monochrome 5-10. . . . . . . . . . . . . . . . . . . . . . . . . . . . .
To Switch Between Color and Monochrome 5-11. . . . . . . . . . . . . . . . . . . . . . . . Choosing an Appropriate Print Quality 5-12. . . . . . . . . . . . . . . . . . . . . . . . . . . . . . .
To Change the Print Quality 5-13. . . . . . . . . . . . . . . . . . . . . . . . . . . . . . . . . . . . . C
ON
TE
NT
SContents
Downloaded from www.Manualslib.com manuals search engine
vi
Company confidential. Postillo/755CM User’s Guide Final Freeze Status: Frozen
This is the cyan on page vi (seq: 6)This is the black on page vi (seq: 6)
6 Managing Your PrintsManaging Pages Being Printed or Drying 6-2. . . . . . . . . . . . . . . . . . . . . . . . . . . . . .
To Cancel a Page 6-2. . . . . . . . . . . . . . . . . . . . . . . . . . . . . . . . . . . . . . . . . . . . . . . To Cut a Page Before Drying is Complete (Roll Media Only) 6-2. . . . . . . . . . . . To Pause while Printing a Series of Pages 6-3. . . . . . . . . . . . . . . . . . . . . . . . . . .
Managing Pages Not Yet Printed (The Queue) 6-4. . . . . . . . . . . . . . . . . . . . . . . . . . To Start Printing a File That is Waiting For a Timeout 6-4. . . . . . . . . . . . . . . . . What is The Queue? 6-5. . . . . . . . . . . . . . . . . . . . . . . . . . . . . . . . . . . . . . . . . . . . To Identify a Page In The Queue 6-6. . . . . . . . . . . . . . . . . . . . . . . . . . . . . . . . . . To See the Size of a Page In The Queue 6-7. . . . . . . . . . . . . . . . . . . . . . . . . . . . . To Prioritize a Page in The Queue 6-7. . . . . . . . . . . . . . . . . . . . . . . . . . . . . . . . . To Delete a Page From The Queue 6-7. . . . . . . . . . . . . . . . . . . . . . . . . . . . . . . . . To Make Copies of a Page in The Queue 6-8. . . . . . . . . . . . . . . . . . . . . . . . . . . .
Avoiding Media Waste by Nesting Pages (Roll Media Only) 6-9. . . . . . . . . . . . . . . What is Nesting? 6-9. . . . . . . . . . . . . . . . . . . . . . . . . . . . . . . . . . . . . . . . . . . . . . . When Does the Printer Try to Nest Pages? 6-10. . . . . . . . . . . . . . . . . . . . . . . . . . Which Pages Qualify for Nesting? 6-10. . . . . . . . . . . . . . . . . . . . . . . . . . . . . . . . Which Pages May be Rotated? 6-10. . . . . . . . . . . . . . . . . . . . . . . . . . . . . . . . . . . To Turn Nesting On or Off and Choose the Nesting Method 6-11. . . . . . . . . . . . What Happens to Nesting if You Turn Queueing Off? 6-11. . . . . . . . . . . . . . . . . How Long Does the Printer Wait for Another File? 6-11. . . . . . . . . . . . . . . . . . . Getting the Best From Nesting (Nesting and Margins) 6-12. . . . . . . . . . . . . . . . Nesting and the Rotate Feature 6-12. . . . . . . . . . . . . . . . . . . . . . . . . . . . . . . . . . .
Contents
Downloaded from www.Manualslib.com manuals search engine
vii
Company confidential. Postillo/755CM User’s Guide Final Freeze Status: Frozen
This is the cyan on page vii (seq: 7)
This is the black on page vii (seq: 7)
7 Reconfiguring Your PrinterTo See the Current Overall Configuration of the Printer 7-2. . . . . . . . . . . . . . . . . . To See the Current Configuration of the Front-Panel Settings 7-3. . . . . . . . . . . . . . To Change the Front-Panel Settings 7-4. . . . . . . . . . . . . . . . . . . . . . . . . . . . . . . . . . Recalibrating the Printer for Accuracy 7-5. . . . . . . . . . . . . . . . . . . . . . . . . . . . . . . .
When to Recalibrate the Printer 7-5. . . . . . . . . . . . . . . . . . . . . . . . . . . . . . . . . . . A Quick Guide to Whether Recalibration is Necessary 7-5. . . . . . . . . . . . . . . . . To Recalibrate the Printer 7-6. . . . . . . . . . . . . . . . . . . . . . . . . . . . . . . . . . . . . . . . To Restore the Factory’s Calibration 7-6. . . . . . . . . . . . . . . . . . . . . . . . . . . . . . .
Changing the Graphics Language Setting for a Different Application 7-7. . . . . . . . To Change the Graphics Language Setting 7-7. . . . . . . . . . . . . . . . . . . . . . . . . . Graphics Language and Networks 7-8. . . . . . . . . . . . . . . . . . . . . . . . . . . . . . . . .
Changing the Interface Settings 7-9. . . . . . . . . . . . . . . . . . . . . . . . . . . . . . . . . . . . . . To Change the Serial Interface Settings 7-9. . . . . . . . . . . . . . . . . . . . . . . . . . . . .
To Change the I/O Timeout Setting 7-9. . . . . . . . . . . . . . . . . . . . . . . . . . . . . . . . . . .
8 Maintaining the PrinterReplacing the Print Cartridges 8-2. . . . . . . . . . . . . . . . . . . . . . . . . . . . . . . . . . . . . . . Cleaning the Printer 8-2. . . . . . . . . . . . . . . . . . . . . . . . . . . . . . . . . . . . . . . . . . . . . . . “Normal” Printer Use 8-3. . . . . . . . . . . . . . . . . . . . . . . . . . . . . . . . . . . . . . . . . . . . .
To Print the Service Configuration Print 8-4. . . . . . . . . . . . . . . . . . . . . . . . . . . .
CO
NT
EN
TSContents
Downloaded from www.Manualslib.com manuals search engine
viii
Company confidential. Postillo/755CM User’s Guide Final Freeze Status: Frozen
This is the cyan on page viii (seq: 8)This is the black on page viii (seq: 8)
9 TroubleshootingUsing the Documentation to Help Solve Problems 9-2. . . . . . . . . . . . . . . . . . . . . . . Locating the Source of the Problem 9-3. . . . . . . . . . . . . . . . . . . . . . . . . . . . . . . . . . Solving Media-Handling Problems 9-4. . . . . . . . . . . . . . . . . . . . . . . . . . . . . . . . . . .
If the Front Panel Keeps Indicating that Media isMisaligned or Mispositioned. 9-4. . . . . . . . . . . . . . . . . . . . . . . . . . . . . . . . . . . . . If Media Crumples When You Load it 9-5. . . . . . . . . . . . . . . . . . . . . . . . . . . . . . If Prints Do Not Feed Out Properly From the Printer 9-5. . . . . . . . . . . . . . . . . . If The Automatic Cutter Does Not Cut ImmediatelyWhen a Print Has Finished 9-5. . . . . . . . . . . . . . . . . . . . . . . . . . . . . . . . . . . . . . . If the Automatic Cutter Does Not Work 9-6. . . . . . . . . . . . . . . . . . . . . . . . . . . . . If Prints Fall on the Floor After Being Cut 9-6. . . . . . . . . . . . . . . . . . . . . . . . . . . If a Sheet Is Ejected When You Switch On the Printer 9-6. . . . . . . . . . . . . . . . . If Prints Do Not Stack Properly in the Bin 9-6. . . . . . . . . . . . . . . . . . . . . . . . . . .
Solving Print Cartridge Problems 9-7. . . . . . . . . . . . . . . . . . . . . . . . . . . . . . . . . . . . If the Access Cartridges Key Does Not Work 9-7. . . . . . . . . . . . . . . . . . . . . . . . If the Printer Runs the Cartridge-Alignment Routine Unexpectedly 9-7. . . . . . . If Brand New Cartridges Have Problems 9-7. . . . . . . . . . . . . . . . . . . . . . . . . . . .
Clearing a Media Jam 9-8. . . . . . . . . . . . . . . . . . . . . . . . . . . . . . . . . . . . . . . . . . . . . Solving Communication Problems 9-9. . . . . . . . . . . . . . . . . . . . . . . . . . . . . . . . . . .
If There is a Problem Communicating between Your Computerand the Printer 9-9. . . . . . . . . . . . . . . . . . . . . . . . . . . . . . . . . . . . . . . . . . . . . . . . .
Solving Problems with Image Position or Content 9-10. . . . . . . . . . . . . . . . . . . . . . If the Print Is Completely Blank 9-10. . . . . . . . . . . . . . . . . . . . . . . . . . . . . . . . . . If the Output Contains Only a Partial Print 9-11. . . . . . . . . . . . . . . . . . . . . . . . . If the Image Is Clipped 9-12. . . . . . . . . . . . . . . . . . . . . . . . . . . . . . . . . . . . . . . . . If a Long-Axis Print Is Clipped 9-12. . . . . . . . . . . . . . . . . . . . . . . . . . . . . . . . . . If the Entire Image Is in One Quadrant of the Correct Printing Area 9-13. . . . . If the Image Is Unexpectedly Rotated 9-13. . . . . . . . . . . . . . . . . . . . . . . . . . . . . If the Print Is a Mirror Image of Your Drawing 9-13. . . . . . . . . . . . . . . . . . . . . . If the Print Is Inaccurate 9-13. . . . . . . . . . . . . . . . . . . . . . . . . . . . . . . . . . . . . . . . If the Print Is Distorted or Unintelligible 9-14. . . . . . . . . . . . . . . . . . . . . . . . . . . If One Image Overlays Another on the Same Sheet 9-14. . . . . . . . . . . . . . . . . . . If Pen Settings Seem To Have No Effect 9-14. . . . . . . . . . . . . . . . . . . . . . . . . . . If the Printer Produces a Black and White Print When YouExpected a Color Print 9-14. . . . . . . . . . . . . . . . . . . . . . . . . . . . . . . . . . . . . . . . . If a Gray Box Appears Where an Image Should Be 9-15. . . . . . . . . . . . . . . . . . . If the Printer Has Printed a Different Print Than the One YouWere Expecting 9-15. . . . . . . . . . . . . . . . . . . . . . . . . . . . . . . . . . . . . . . . . . . . . . . If the Quality Of A Color Print Is Not as Sharp as You Were Expecting9-15. . .
Contents
Downloaded from www.Manualslib.com manuals search engine
ix
Company confidential. Postillo/755CM User’s Guide Final Freeze Status: Frozen
This is the cyan on page ix (seq: 9)
This is the black on page ix (seq: 9)
Solving Print-Quality Problems 9-16. . . . . . . . . . . . . . . . . . . . . . . . . . . . . . . . . . . . If the Color Is Not as Expected 9-16. . . . . . . . . . . . . . . . . . . . . . . . . . . . . . . . . . . If there Are White Streaks in Solid Areas 9-16. . . . . . . . . . . . . . . . . . . . . . . . . . If There are Other Gaps in Solid Areas Or in Lines 9-17. . . . . . . . . . . . . . . . . . . If There are Jagged Vertical or Horizontal Lines 9-18. . . . . . . . . . . . . . . . . . . . . If There are Slightly Warped Lines 9-18. . . . . . . . . . . . . . . . . . . . . . . . . . . . . . . . If There are Color “Shadows” 9-18. . . . . . . . . . . . . . . . . . . . . . . . . . . . . . . . . . . If One or More Cartridges are not Printing at All 9-18. . . . . . . . . . . . . . . . . . . . If There are Blurred Lines (Ink “Bleeds” from Lines) 9-19. . . . . . . . . . . . . . . . . If There are Blotchy Areas (Uneven Fill Density) 9-19. . . . . . . . . . . . . . . . . . . . If the Print Is Too Dark Or the Color Too Saturated 9-19. . . . . . . . . . . . . . . . . . If There Is Pronounced Banding in Area Fills 9-20. . . . . . . . . . . . . . . . . . . . . . . If Ink Smears After You Remove a Print 9-20. . . . . . . . . . . . . . . . . . . . . . . . . . .
Solving Front-Panel Problems 9-21. . . . . . . . . . . . . . . . . . . . . . . . . . . . . . . . . . . . . . If the Access Cartridges Key Does Not Work 9-21. . . . . . . . . . . . . . . . . . . . . . . If the Cancel key Does Not Work 9-21. . . . . . . . . . . . . . . . . . . . . . . . . . . . . . . . . If None Of the Front-Panel Keys Work 9-21. . . . . . . . . . . . . . . . . . . . . . . . . . . . If Page Format/Rotate Does Not Work 9-21. . . . . . . . . . . . . . . . . . . . . . . . . . . . . If a Display Message Will Not Clear 9-21. . . . . . . . . . . . . . . . . . . . . . . . . . . . . . If a “System Error” Message Is Displayed 9-22. . . . . . . . . . . . . . . . . . . . . . . . . . If an “Out Of Memory/Data Was Lost” Message Is Displayed 9-22. . . . . . . . . . File Size and Memory Usage 9-22. . . . . . . . . . . . . . . . . . . . . . . . . . . . . . . . . . . .
Solving Miscellaneous Problems 9-23. . . . . . . . . . . . . . . . . . . . . . . . . . . . . . . . . . . If the Printer Does not Print 9-23. . . . . . . . . . . . . . . . . . . . . . . . . . . . . . . . . . . . . If the Printer Seems Too Slow 9-23. . . . . . . . . . . . . . . . . . . . . . . . . . . . . . . . . . . If the Printer Waits Too Long to Print a Nest 9-24. . . . . . . . . . . . . . . . . . . . . . . . If the Printer Performs the Cartridge-Alignment Routine Unexpectedly9-24. . . If the Bail (Black Metal Bar) Does Not Lower All the Way 9-24. . . . . . . . . . . .
Getting Help 9-25. . . . . . . . . . . . . . . . . . . . . . . . . . . . . . . . . . . . . . . . . . . . . . . . . . . What to Do Before You Call 9-25. . . . . . . . . . . . . . . . . . . . . . . . . . . . . . . . . . . . . If a Repair is Needed 9-25. . . . . . . . . . . . . . . . . . . . . . . . . . . . . . . . . . . . . . . . . .
Contents
CO
NT
EN
TS
Downloaded from www.Manualslib.com manuals search engine
x
Company confidential. Postillo/755CM User’s Guide Final Freeze Status: Frozen
This is the cyan on page x (seq: 10)This is the black on page x (seq: 10)
10 Front-Panel Messages
11 ReferencePrinter Specifications 11-2. . . . . . . . . . . . . . . . . . . . . . . . . . . . . . . . . . . . . . . . . . . . . Interface Specifications 11-7. . . . . . . . . . . . . . . . . . . . . . . . . . . . . . . . . . . . . . . . . . . Interface Cables 11-8. . . . . . . . . . . . . . . . . . . . . . . . . . . . . . . . . . . . . . . . . . . . . . . . . Regulatory Notices 11-10. . . . . . . . . . . . . . . . . . . . . . . . . . . . . . . . . . . . . . . . . . . . . To Obtain a Material Safety Data Sheet (MSDS) 11-10. . . . . . . . . . . . . . . . . . . . . . Sound 11-10. . . . . . . . . . . . . . . . . . . . . . . . . . . . . . . . . . . . . . . . . . . . . . . . . . . . . . . . Electro-Magnetic Compatibility (EMC) 11-10. . . . . . . . . . . . . . . . . . . . . . . . . . . . . Telecommunications Statement 11-11. . . . . . . . . . . . . . . . . . . . . . . . . . . . . . . . . . . . Ordering Accessories 11-13. . . . . . . . . . . . . . . . . . . . . . . . . . . . . . . . . . . . . . . . . . . .
HP-GL/2 and HP RTL Programming Information 11-16. . . . . . . . . . . . . . . . . . . How to Order Supplies and Accessories 11-16. . . . . . . . . . . . . . . . . . . . . . . . . .
12 Glossary
Index
Documentation Map
Please Give Us Your Feedback (Removable)
ContentsContents
Downloaded from www.Manualslib.com manuals search engine
xi
Company confidential. Postillo/755CM User’s Guide Final Freeze Status: Frozen
This is the cyan on page xi (seq: 11)
This is the black on page xi (seq: 11)
Welcome
A Five-Minute Guide To Your Printer’s Main Features
The HP DesignJet 755CM printer is an E/A0 size large-format inkjet printer whichcan print in color or monochrome.
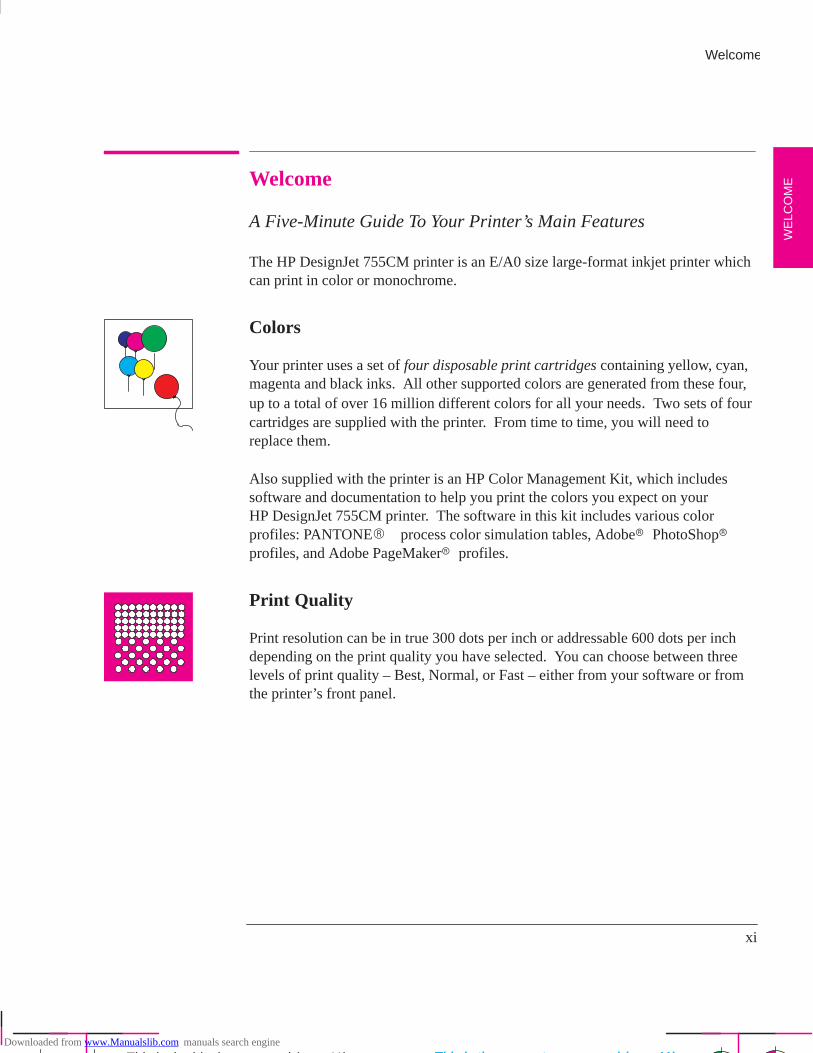
Colors
Your printer uses a set of four disposable print cartridges containing yellow, cyan,magenta and black inks. All other supported colors are generated from these four,up to a total of over 16 million different colors for all your needs. Two sets of fourcartridges are supplied with the printer. From time to time, you will need toreplace them.
Also supplied with the printer is an HP Color Management Kit, which includessoftware and documentation to help you print the colors you expect on your HP DesignJet 755CM printer. The software in this kit includes various colorprofiles: PANTONE� process color simulation tables, Adobe� PhotoShop�profiles, and Adobe PageMaker� profiles.
Print Quality
Print resolution can be in true 300 dots per inch or addressable 600 dots per inchdepending on the print quality you have selected. You can choose between threelevels of print quality – Best, Normal, or Fast – either from your software or fromthe printer’s front panel.
WE
LCO
ME
Welcome
This is the magenta on page xi (seq: 11)
This is the red on page xi (seq: 11)This is the blue on page xi (seq: 11)This is the green on page xi (seq: 11)
This is the yellow on page xi (seq: 11)
This is the magenta on page xi (seq: 11)
Localization Note. Same as Loquillo 755CM except Print Quality paragraph addressabledpi added.
Downloaded from www.Manualslib.com manuals search engine
Page format
Size
xii
Company confidential. Postillo/755CM User’s Guide Final Freeze Status: Frozen
This is the cyan on page xii (seq: 12)This is the black on page xii (seq: 12)
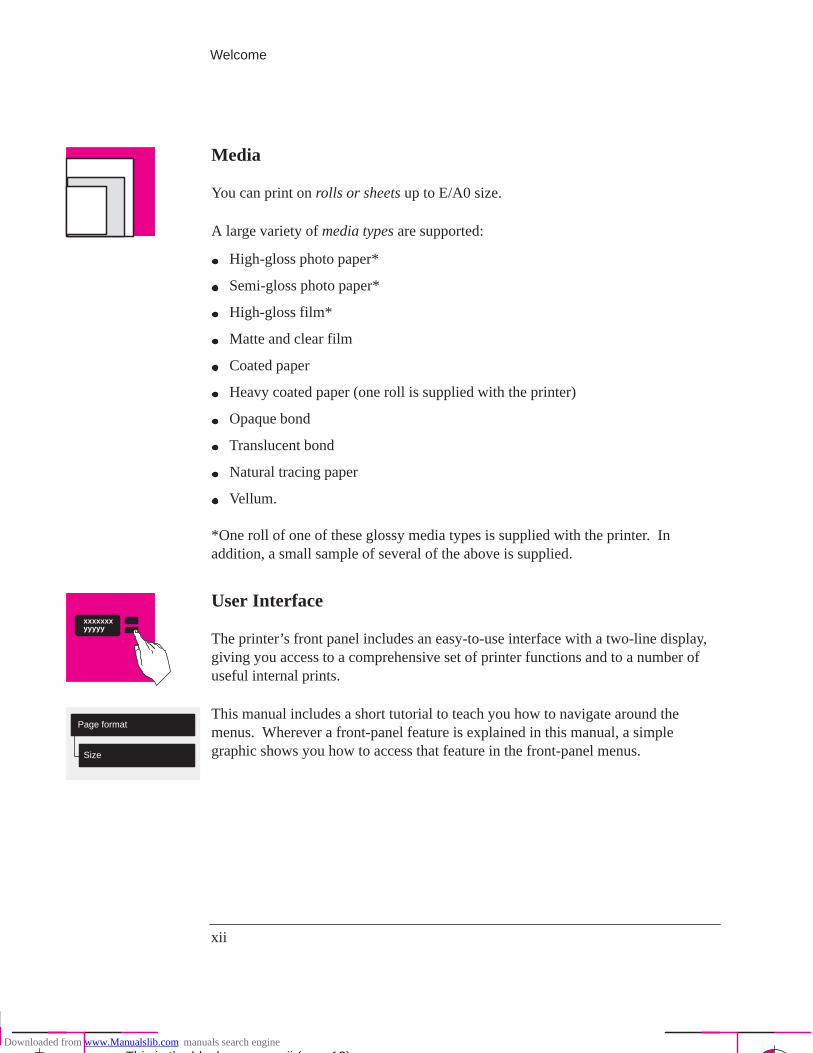
Media
You can print on rolls or sheets up to E/A0 size.
A large variety of media types are supported:
High-gloss photo paper*
Semi-gloss photo paper*
High-gloss film*
Matte and clear film
Coated paper
Heavy coated paper (one roll is supplied with the printer)
Opaque bond
Translucent bond
Natural tracing paper
Vellum.
*One roll of one of these glossy media types is supplied with the printer. Inaddition, a small sample of several of the above is supplied.
User Interface
The printer’s front panel includes an easy-to-use interface with a two-line display,giving you access to a comprehensive set of printer functions and to a number ofuseful internal prints.
This manual includes a short tutorial to teach you how to navigate around themenus. Wherever a front-panel feature is explained in this manual, a simplegraphic shows you how to access that feature in the front-panel menus.
Welcome
xxxxxxxyyyyy
Downloaded from www.Manualslib.com manuals search engine
xiii
Company confidential. Postillo/755CM User’s Guide Final Freeze Status: Frozen
This is the cyan on page xiii (seq: 13)
This is the black on page xiii (seq: 13)
Software Applications and Drivers
To make sure that your printer prints exactly what you were expecting – in terms ofsize, position, orientation, color and quality – the key is to use the correct driver forthe combination of your application software and your printer, and to be confidentthat it is configured correctly.
Three types of drivers are supplied with your printer:
HP DesignJet PostScript� drivers for Macintosh� (QuickDraw andQuickDraw GX) and Microsoft� Windows applications,
HP driver for users of Microsoft Windows applications,
HP drivers for AutoCAD users.
These drivers come with printed and on line documentation to help you install andconfigure them correctly. If you are printing using one of these drivers, then referto the driver’s documentation, as well as this manual, for advice on the use of thisprinter.
Generally, software applications include their own drivers too. With this printerwe have provided free of charge a set of Software Application Notes for the mostpopular applications. If you find your own application in these notes, werecommend that you use the information they contain as an overall guide toconfiguring the software for your printer.
The printer behaves differently when it receives a PostScript1 file than when itreceives a file in another “language” (HP-GL, HP-GL2, or RTL). For example, theprinter’s ability to scale images applies only to PostScript files, while its ability toqueue files does not apply to PostScript files. Therefore you will see the twosymbols on the left used now and then in this manual.
IMPORTANT. The printer does not support PostScript files created in Chinese,Korean and Taiwanese software applications.
If you don’t know whether your application sends PostScript files to a printer,consult your software documentation.
1 Here, and throughout this manual, references to “PostScript files” mean files sent to the printer usingthe HP DesignJet PostScript driver supplied with the printer and installed by you on your Macintoshor PC.
WE
LCO
ME
Welcome
Localization Note. French: Delete the last paragraph under Software applications .. .All: The ”HPDesignJet PostScript ...” drivers are Troglodyte, whose docs you will translate later, so choose a goodname for the drivers now!. European: Remove the important paragraph.
PS Does not applyto PostScriptfiles
PS Applies only toPostScript files
Downloaded from www.Manualslib.com manuals search engine
xiv
Company confidential. Postillo/755CM User’s Guide Final Freeze Status: Frozen
This is the cyan on page xiv (seq: 14)This is the black on page xiv (seq: 14)
Front Panel
Roll Cover
Window
Front Panel Display
Media Lever
Media-Entry Slot
Media Bin
ON/OFF Switch
Print Cartridges(Inside)
Front View
1835
Welcome
Downloaded from www.Manualslib.com manuals search engine
xv
Company confidential. Postillo/755CM User’s Guide Final Freeze Status: Frozen
This is the cyan on page xv (seq: 15)
This is the black on page xv (seq: 15)
Parallel-InterfaceSerial-Interface
Slot For Optional Network Interface
Slots For Upgrades(Behind Cover Plate)
Socket ForPower Cord
Rear View
Pocket ForQuick Reference GuideAnd Media Knife
1844W
ELC
OM
E
Welcome
Downloaded from www.Manualslib.com manuals search engine

xvi
Company confidential. Postillo/755CM User’s Guide Final Freeze Status: Frozen
This is the cyan on page xvi (seq: 16)This is the black on page xvi (seq: 16)
Connections
Your printer comes with an HP JetDirect network interface card, for LANconnections, as well as serial and parallel interfaces for a direct connection to yourcomputer.
Memory
Your printer comes with a memory of 75 Megabytes (3 Megabytes of internalmemory and 72 Megabytes of usable memory). No expansion is possible. Forfurther details of the memory specification, see page 9-22.
Welcome
Localization Note. Same as Loquillo 755CM except memory size changed
Downloaded from www.Manualslib.com manuals search engine
1-1
Company confidential. Postillo/755CM User’s Guide Final Freeze Status:Frozen
This is the cyan on page 1-1 (seq: 17)
This is the black on page 1-1 (seq: 17)
Fast Track 1-2. . . . . . . . . . . . . . . . . . . . . . . . . . . . . . . . . . . . . . . . .
Set Up Checklist 1-3. . . . . . . . . . . . . . . . . . . . . . . . . . . . . . . . . . . . .
Task 1: Check that You Have All the Items Required 1-4. . . . . .
Task 2: Switch On and
Change the Language from English (Optional) 1-6. . . . .
Task 3: Load Media 1-8. . . . . . . . . . . . . . . . . . . . . . . . . . . . . . . .
Task 4: Load the Print Cartridges 1-17. . . . . . . . . . . . . . . . . . . . .
Task 5: Print a Demonstration File (Optional) 1-21. . . . . . . . . . .
Task 6: Connect the Printer to Your Computer 1-24. . . . . . . . . . .
Task 7: Configure the Interface (Serial Interface Users Only)1-26
Task 8: Set Up Your Software 1-32. . . . . . . . . . . . . . . . . . . . . . .
Task 9: Print a Test File 1-36. . . . . . . . . . . . . . . . . . . . . . . . . . . .
Extra Tips For UNIX Users 1-37. . . . . . . . . . . . . . . . . . . . . . . . . . .
Setting Up the Printer
Installation, Connection,and Configuration
1
SE
TU
P1
Downloaded from www.Manualslib.com manuals search engine
1-2
Company confidential. Postillo/755CM User’s Guide Final Freeze Status:Frozen
This is the cyan on page 1-2 (seq: 18)
This is the black on page 1-2 (seq: 18)
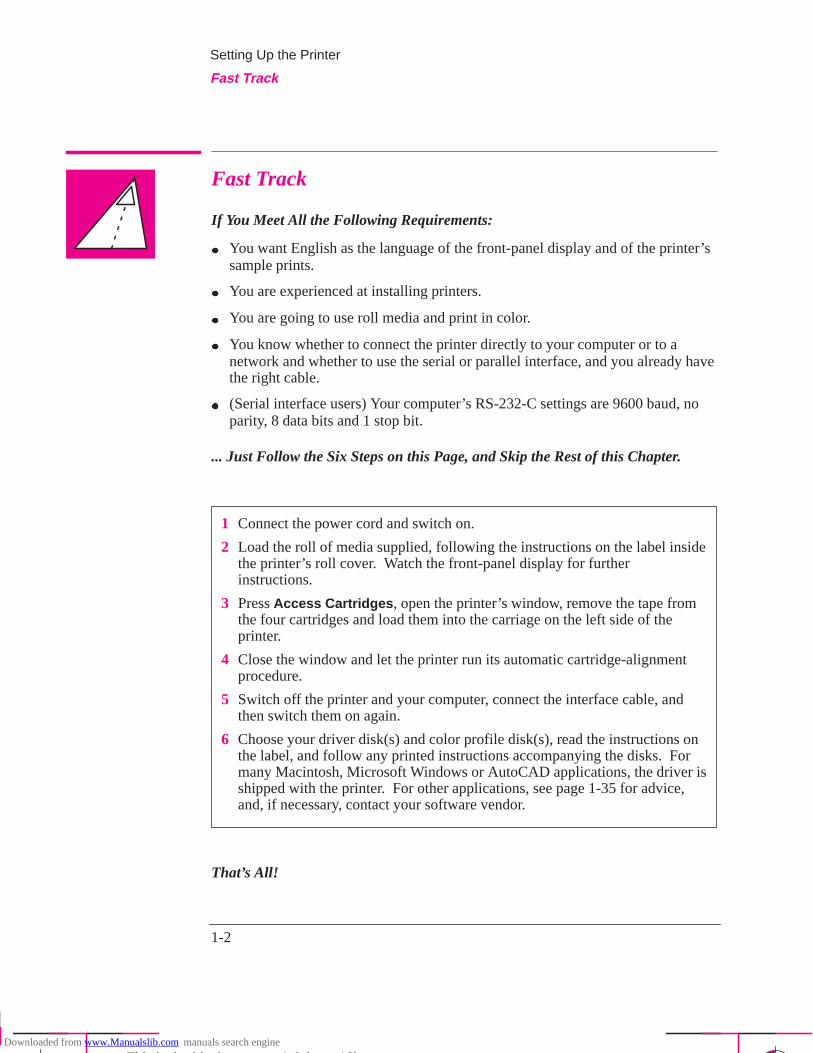
Fast Track
If You Meet All the Following Requirements:
You want English as the language of the front-panel display and of the printer’ssample prints.
You are experienced at installing printers.
You are going to use roll media and print in color.
You know whether to connect the printer directly to your computer or to anetwork and whether to use the serial or parallel interface, and you already havethe right cable.
(Serial interface users) Your computer’s RS-232-C settings are 9600 baud, noparity, 8 data bits and 1 stop bit.
... Just Follow the Six Steps on this Page, and Skip the Rest of this Chapter.
1 Connect the power cord and switch on.
2 Load the roll of media supplied, following the instructions on the label insidethe printer’s roll cover. Watch the front-panel display for furtherinstructions.
3 Press Access Cartridges , open the printer’s window, remove the tape fromthe four cartridges and load them into the carriage on the left side of theprinter.
4 Close the window and let the printer run its automatic cartridge-alignmentprocedure.
5 Switch off the printer and your computer, connect the interface cable, andthen switch them on again.
6 Choose your driver disk(s) and color profile disk(s), read the instructions onthe label, and follow any printed instructions accompanying the disks. Formany Macintosh, Microsoft Windows or AutoCAD applications, the driver isshipped with the printer. For other applications, see page 1-35 for advice,and, if necessary, contact your software vendor.
That’s All!
Setting Up the Printer
Fast Track
Downloaded from www.Manualslib.com manuals search engine
1-3
Company confidential. Postillo/755CM User’s Guide Final Freeze Status:Frozen
This is the cyan on page 1-3 (seq: 19)
This is the black on page 1-3 (seq: 19)
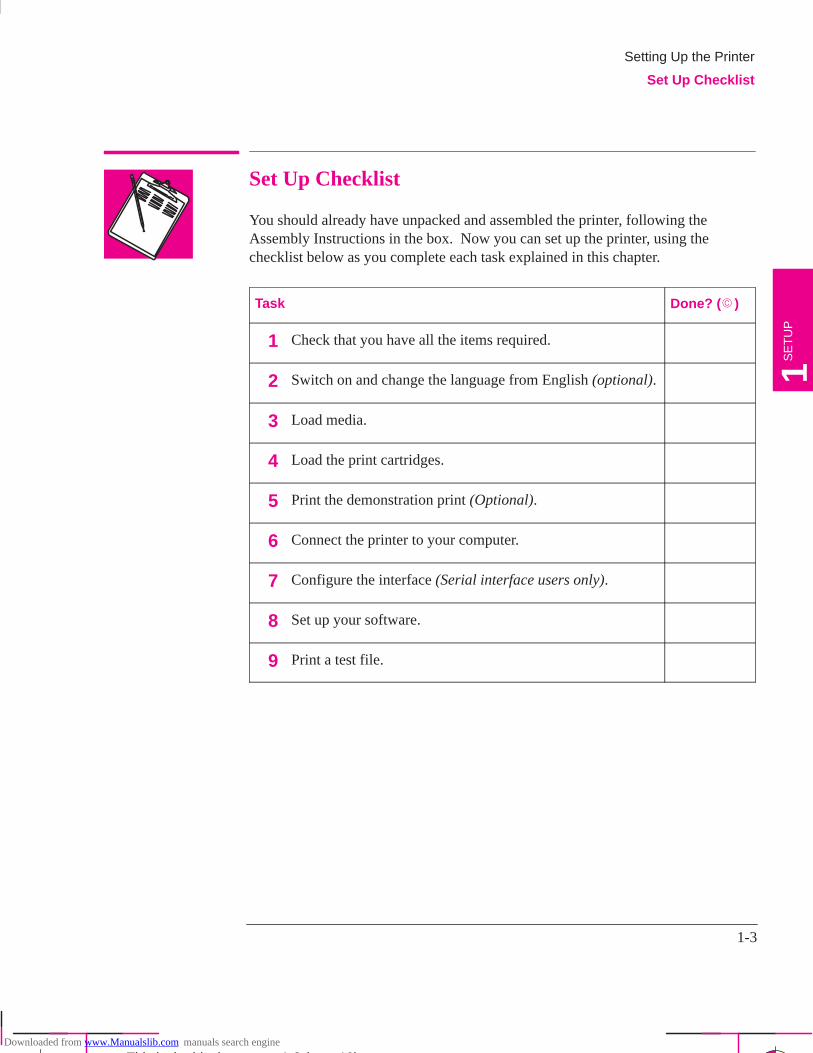
Set Up Checklist
You should already have unpacked and assembled the printer, following theAssembly Instructions in the box. Now you can set up the printer, using thechecklist below as you complete each task explained in this chapter.
Task Done? (� )
1 Check that you have all the items required.
2 Switch on and change the language from English (optional).
3 Load media.
4 Load the print cartridges.
5 Print the demonstration print (Optional).
6 Connect the printer to your computer.
7 Configure the interface (Serial interface users only).
8 Set up your software.
9 Print a test file.
Setting Up the Printer
Set Up Checklist
SE
TU
P1
Downloaded from www.Manualslib.com manuals search engine
1-4
Company confidential. Postillo/755CM User’s Guide Final Freeze Status:Frozen
This is the cyan on page 1-4 (seq: 20)
This is the black on page 1-4 (seq: 20)
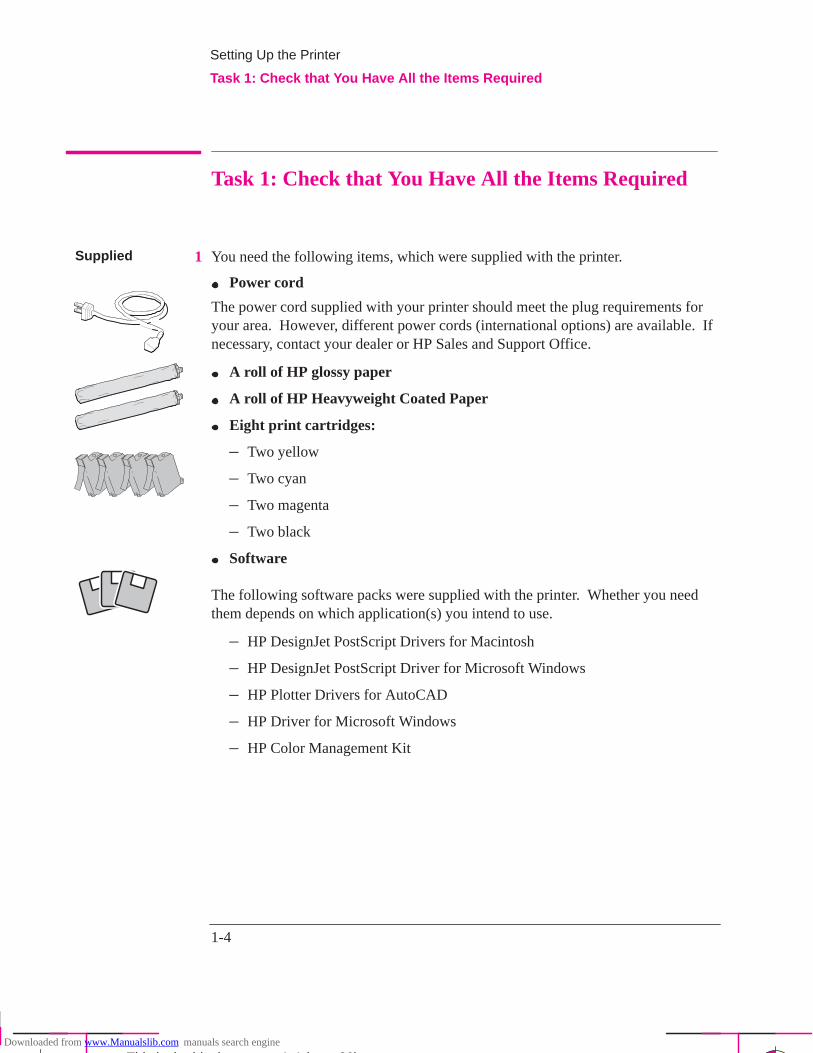
Task 1: Check that You Have All the Items Required
1 You need the following items, which were supplied with the printer.
Power cord
The power cord supplied with your printer should meet the plug requirements foryour area. However, different power cords (international options) are available. Ifnecessary, contact your dealer or HP Sales and Support Office.
A roll of HP glossy paper
A roll of HP Heavyweight Coated Paper
Eight print cartridges:
– Two yellow
– Two cyan
– Two magenta
– Two black
Software
The following software packs were supplied with the printer. Whether you needthem depends on which application(s) you intend to use.
– HP DesignJet PostScript Drivers for Macintosh
– HP DesignJet PostScript Driver for Microsoft Windows
– HP Plotter Drivers for AutoCAD
– HP Driver for Microsoft Windows
– HP Color Management Kit
Setting Up the Printer
Task 1: Check that You Have All the Items Required
Supplied
Downloaded from www.Manualslib.com manuals search engine
1-5
Company confidential. Postillo/755CM User’s Guide Final Freeze Status:Frozen
This is the cyan on page 1-5 (seq: 21)
This is the black on page 1-5 (seq: 21)
2 Inspect the printer itself and the above accessories. If you received any item in adamaged condition, notify the dealer or HP Sales and Support Office where youpurchased the printer, and file a claim with the carrier.
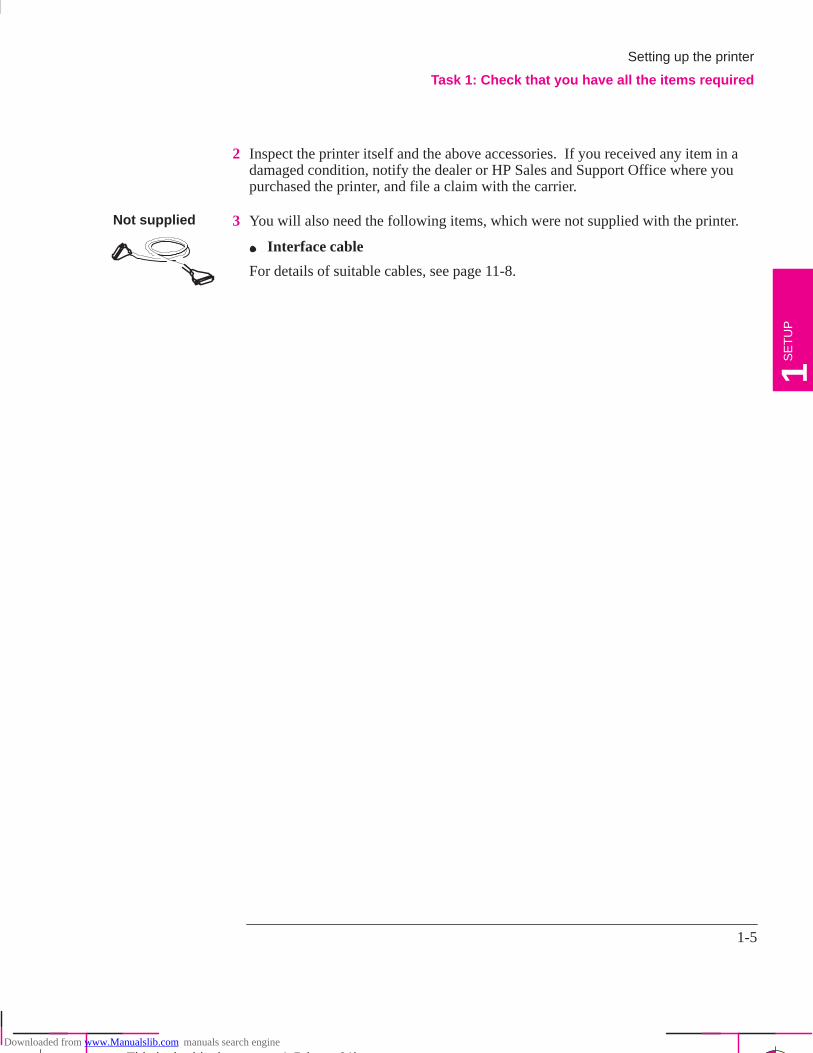
3 You will also need the following items, which were not supplied with the printer.
Interface cable
For details of suitable cables, see page 11-8.
Setting up the printer
Task 1: Check that you have all the items required
SE
TU
P1
Not supplied
Downloaded from www.Manualslib.com manuals search engine
1-6
Company confidential. Postillo/755CM User’s Guide Final Freeze Status:Frozen
This is the cyan on page 1-6 (seq: 22)
This is the black on page 1-6 (seq: 22)
Task 2: Switch On and Change the Language FromEnglish (Optional)
The printer’s front-panel menus and all the printer’s sample files are available inthe following languages1: English, French, German, Italian, Japanese, Portuguese,and Spanish. By default, the language is English.
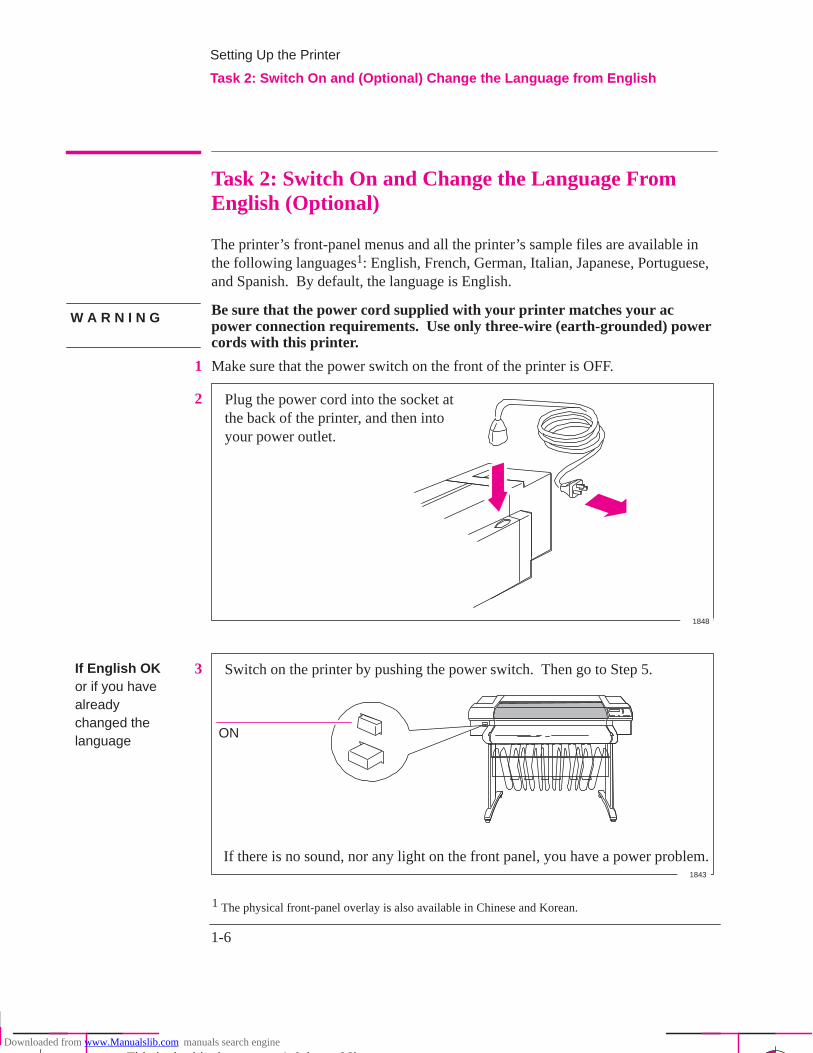
Be sure that the power cord supplied with your printer matches your acpower connection requirements. Use only three-wire (earth-grounded) powercords with this printer.
1 Make sure that the power switch on the front of the printer is OFF.
2 Plug the power cord into the socket atthe back of the printer, and then intoyour power outlet.
1848
3 Switch on the printer by pushing the power switch. Then go to Step 5.
ON
If there is no sound, nor any light on the front panel, you have a power problem.1843
1 The physical front-panel overlay is also available in Chinese and Korean.
Setting Up the Printer
Task 2: Switch On and (Optional) Change the Language from English
W A R N I N G
If English OKor if you havealreadychanged thelanguage
Downloaded from www.Manualslib.com manuals search engine
1-7
Company confidential. Postillo/755CM User’s Guide Final Freeze Status:Frozen
This is the cyan on page 1-7 (seq: 23)
This is the black on page 1-7 (seq: 23)
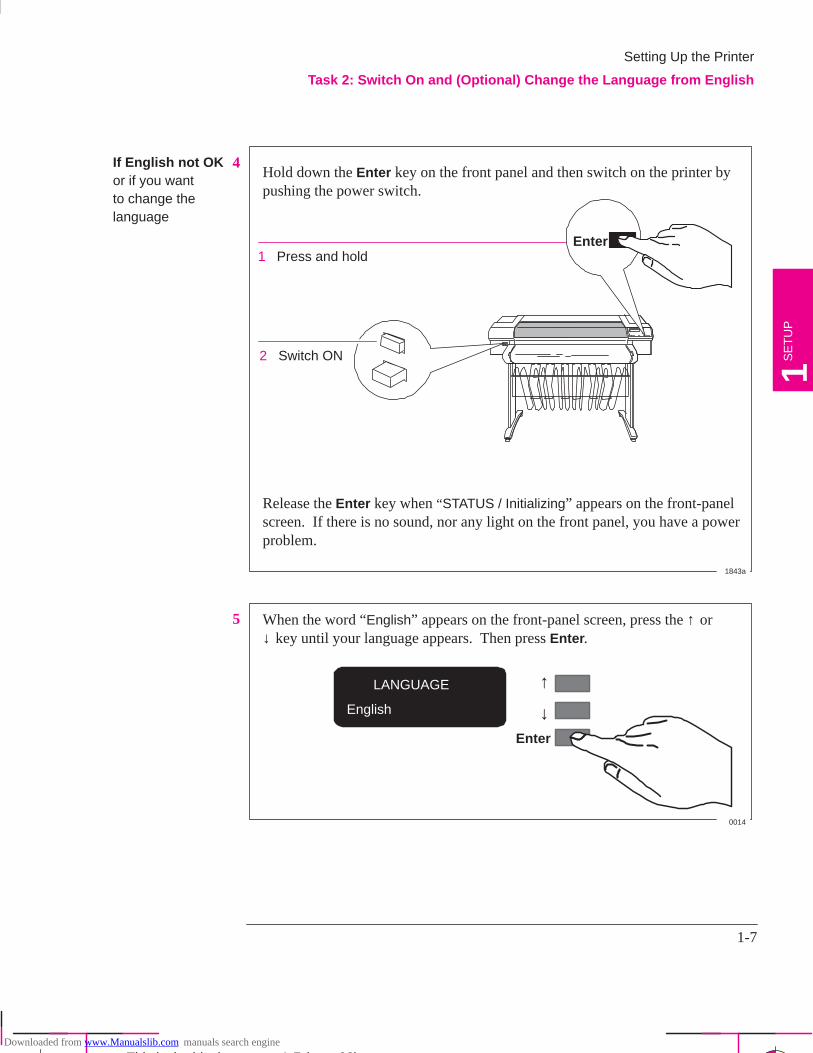
4Hold down the Enter key on the front panel and then switch on the printer bypushing the power switch.
Release the Enter key when “STATUS / Initializing” appears on the front-panelscreen. If there is no sound, nor any light on the front panel, you have a powerproblem.
2 Switch ON
1 Press and holdEnter
1843a
5 When the word “English” appears on the front-panel screen, press the ↑ or↓ key until your language appears. Then press Enter .
LANGUAGE
English
Enter
↓
↑
0014
Setting Up the Printer
Task 2: Switch On and (Optional) Change the Language from English
SE
TU
P1
If English not OKor if you wantto change thelanguage
Downloaded from www.Manualslib.com manuals search engine
1-8
Company confidential. Postillo/755CM User’s Guide Final Freeze Status:Frozen
This is the cyan on page 1-8 (seq: 24)
This is the black on page 1-8 (seq: 24)
Task 3: Load Media
For advice on the availability and use of different media types, see the sectionstarting on page 3-2.
IMPORTANT Because the next task is to load the cartridges and carry out theautomatic cartridge alignment procedure, you must load opaque media at this stage– for example, coated paper – as this is needed for the alignment procedure. Either of the rolls supplied with the printer is suitable.
To load roll media, start with step 1 below.
To load sheet media, go to page 1-15.
To Load a Roll1 Make sure the printer wheels are locked (the brake levers pressed down) to prevent
the printer from moving.
2 Open the roll cover and remove the empty spindle by pulling firmly on eachend. The two ends are different: end A has a media stop and end B a smallerendcap, as shown on the next page.
A
B
Roll cover
Place the spindle vertically on the floor, with the media stop at the bottom,ready for the new roll.
1865
Setting Up the Printer
Task 3: Load Media
Downloaded from www.Manualslib.com manuals search engine

1-9
Company confidential. Postillo/755CM User’s Guide Final Freeze Status:Frozen
This is the cyan on page 1-9 (seq: 25)
This is the black on page 1-9 (seq: 25)
3 Remove the new roll from its wrapping. Remove the endcap from the topof the spindle, and slide the new roll onto the spindle. The leading edge ofthe media must wind clockwise.
If the media stop falls off, push it backin until it snaps into position.
Endcap removed.
A
0015
4 Push the endcap back in, making sure that the tabs are flush against the ends ofthe roll. Push it far enough to be firm, but do not use excessive force as thismay break the tabs.
B
0016
Setting Up the Printer
Task 3: Load Media
SE
TU
P1
Downloaded from www.Manualslib.com manuals search engine
1-10
Company confidential. Postillo/755CM User’s Guide Final Freeze Status:Frozen
This is the cyan on page 1-10 (seq: 26)
This is the black on page 1-10 (seq: 26)
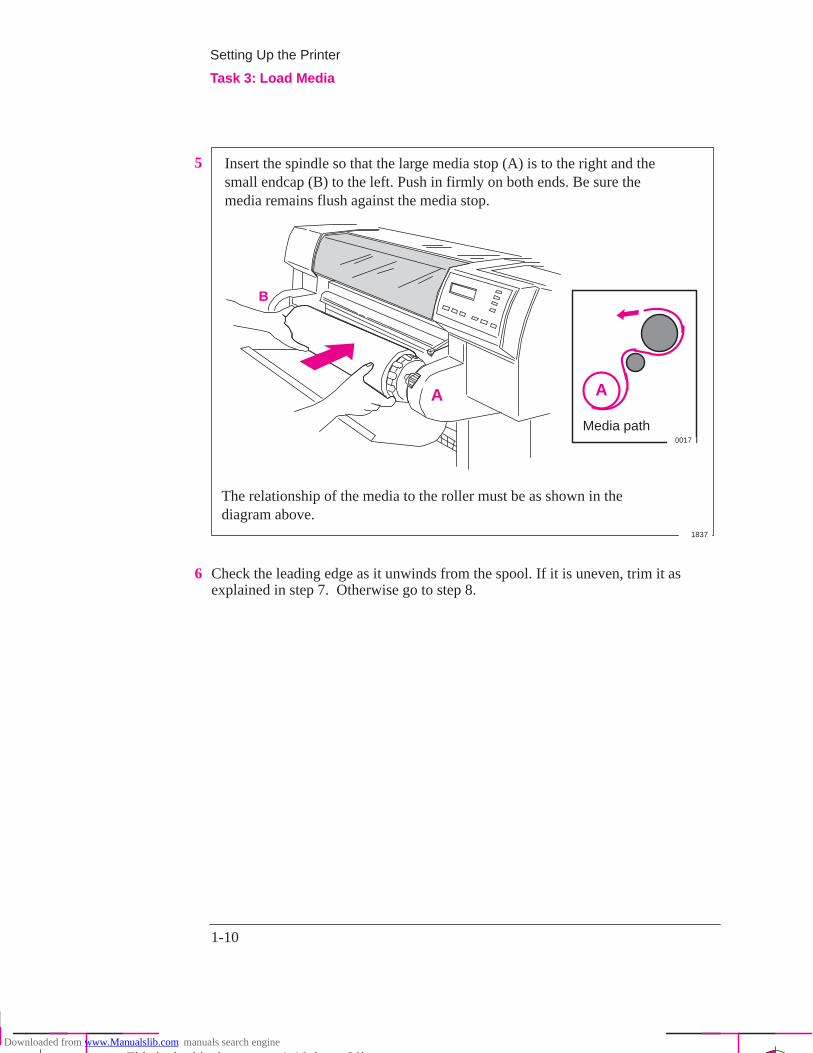
5 Insert the spindle so that the large media stop (A) is to the right and thesmall endcap (B) to the left. Push in firmly on both ends. Be sure themedia remains flush against the media stop.
A
B
A
Media path
1837
0017
The relationship of the media to the roller must be as shown in thediagram above.
6 Check the leading edge as it unwinds from the spool. If it is uneven, trim it asexplained in step 7. Otherwise go to step 8.
Setting Up the Printer
Task 3: Load Media
Downloaded from www.Manualslib.com manuals search engine
1-11
Company confidential. Postillo/755CM User’s Guide Final Freeze Status:Frozen
This is the cyan on page 1-11 (seq: 27)
This is the black on page 1-11 (seq: 27)
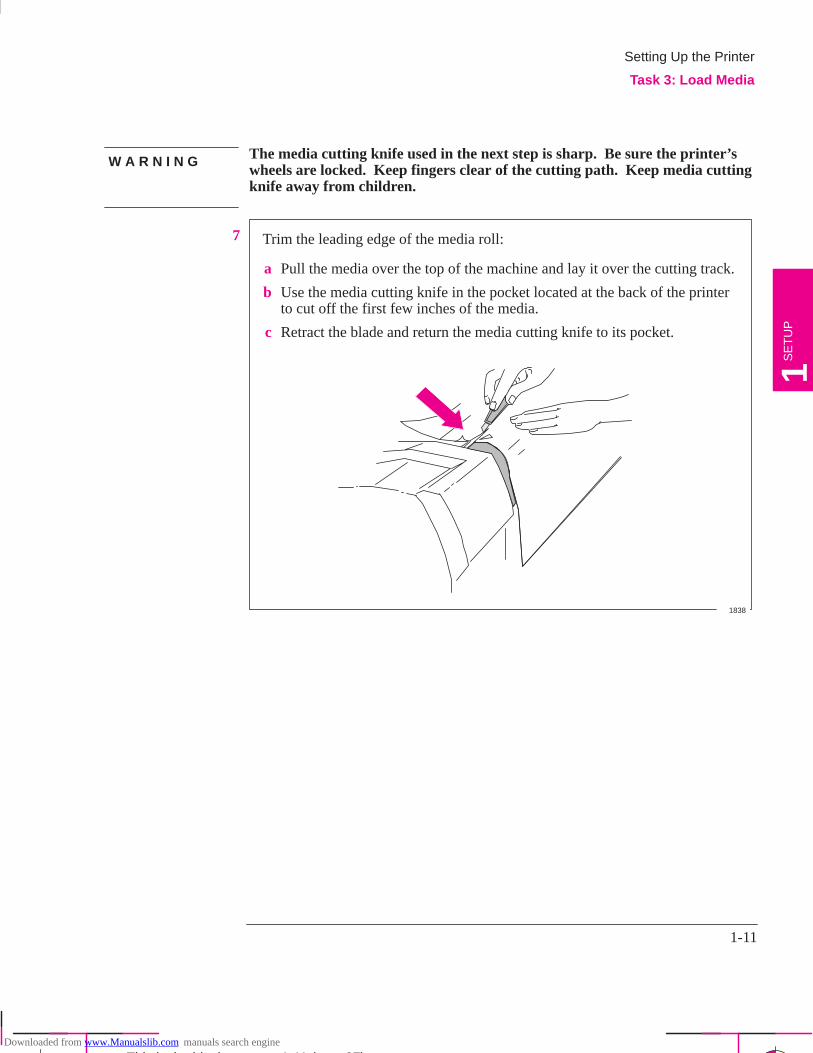
The media cutting knife used in the next step is sharp. Be sure the printer’swheels are locked. Keep fingers clear of the cutting path. Keep media cuttingknife away from children.
7
a Pull the media over the top of the machine and lay it over the cutting track.
b Use the media cutting knife in the pocket located at the back of the printerto cut off the first few inches of the media.
c Retract the blade and return the media cutting knife to its pocket.
Trim the leading edge of the media roll:
1838
Setting Up the Printer
Task 3: Load Media
SE
TU
P1
W A R N I N G
Downloaded from www.Manualslib.com manuals search engine
1-12
Company confidential. Postillo/755CM User’s Guide Final Freeze Status:Frozen
This is the cyan on page 1-12 (seq: 28)
This is the black on page 1-12 (seq: 28)
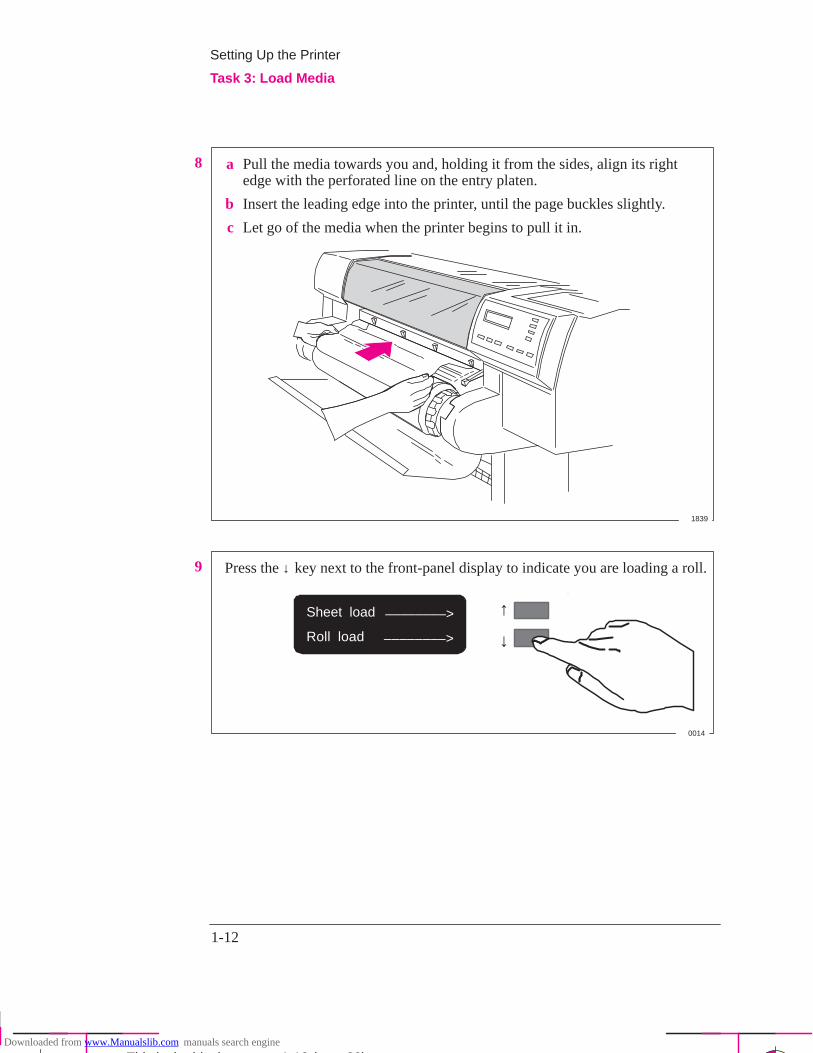
8 a Pull the media towards you and, holding it from the sides, align its rightedge with the perforated line on the entry platen.
b Insert the leading edge into the printer, until the page buckles slightly.
c Let go of the media when the printer begins to pull it in.
1839
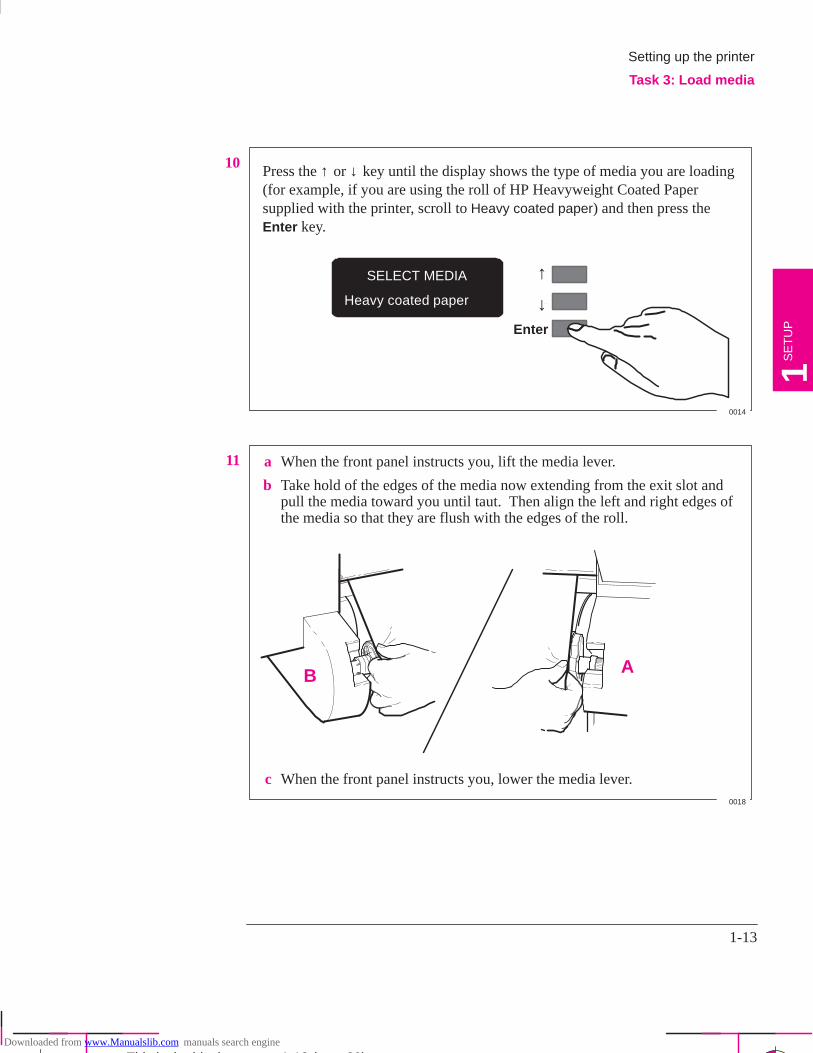
9 Press the ↓ key next to the front-panel display to indicate you are loading a roll.
Sheet load
Roll load ↓
↑––––––––>
––––––––>
0014
Setting Up the Printer
Task 3: Load Media
Downloaded from www.Manualslib.com manuals search engine
1-13
Company confidential. Postillo/755CM User’s Guide Final Freeze Status:Frozen
This is the cyan on page 1-13 (seq: 29)
This is the black on page 1-13 (seq: 29)
10
SELECT MEDIA
Heavy coated paper
Enter
↓
↑
Press the ↑ or ↓ key until the display shows the type of media you are loading(for example, if you are using the roll of HP Heavyweight Coated Papersupplied with the printer, scroll to Heavy coated paper) and then press theEnter key.
0014
11 a When the front panel instructs you, lift the media lever.
b Take hold of the edges of the media now extending from the exit slot andpull the media toward you until taut. Then align the left and right edges ofthe media so that they are flush with the edges of the roll.
c When the front panel instructs you, lower the media lever.
AB
0018
Setting up the printer
Task 3: Load media
SE
TU
P1
Downloaded from www.Manualslib.com manuals search engine
1-14
Company confidential. Postillo/755CM User’s Guide Final Freeze Status:Frozen
This is the cyan on page 1-14 (seq: 30)
This is the black on page 1-14 (seq: 30)
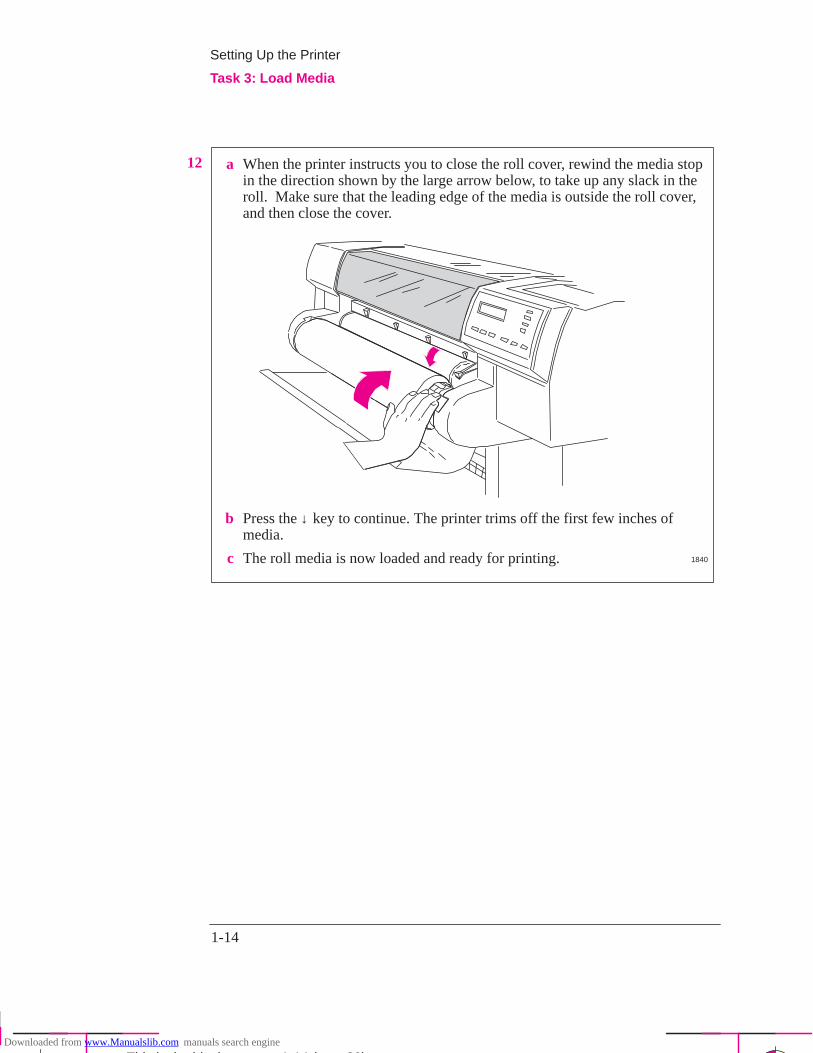
12 a When the printer instructs you to close the roll cover, rewind the media stopin the direction shown by the large arrow below, to take up any slack in theroll. Make sure that the leading edge of the media is outside the roll cover,and then close the cover.
b Press the ↓ key to continue. The printer trims off the first few inches ofmedia.
c The roll media is now loaded and ready for printing. 1840
Setting Up the Printer
Task 3: Load Media
Downloaded from www.Manualslib.com manuals search engine
1-15
Company confidential. Postillo/755CM User’s Guide Final Freeze Status:Frozen
This is the cyan on page 1-15 (seq: 31)
This is the black on page 1-15 (seq: 31)
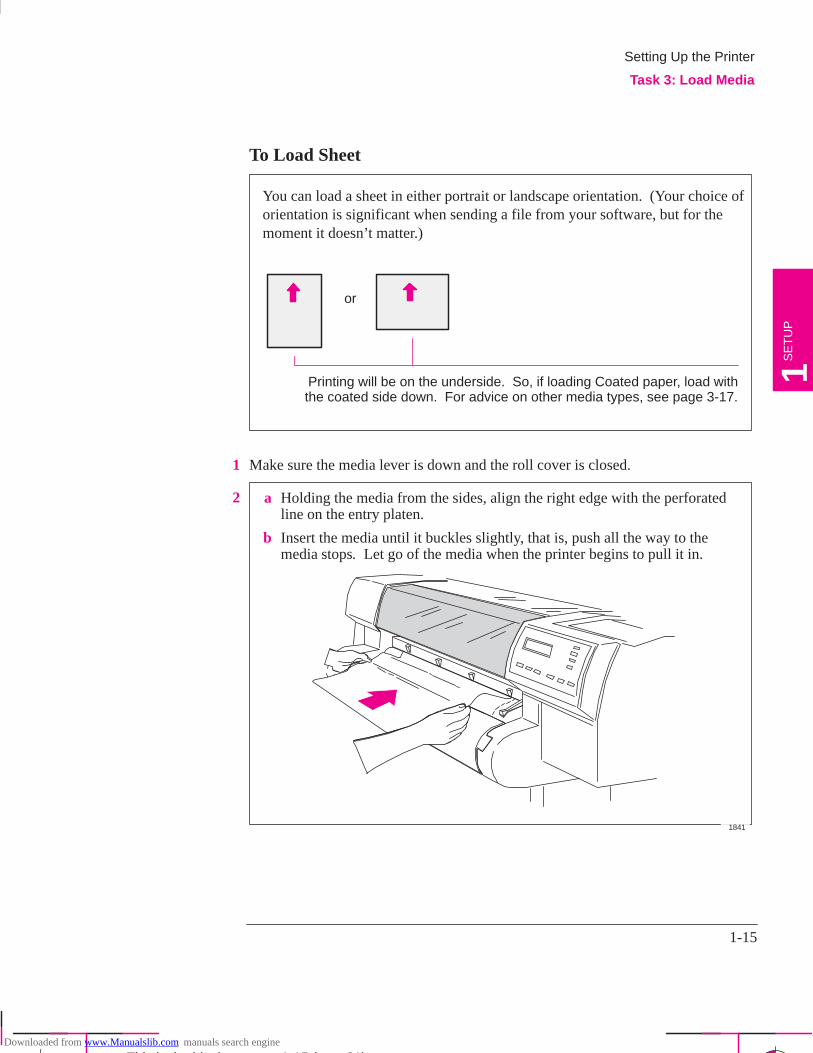
To Load Sheet
You can load a sheet in either portrait or landscape orientation. (Your choice oforientation is significant when sending a file from your software, but for themoment it doesn’t matter.)
or
Printing will be on the underside. So, if loading Coated paper, load withthe coated side down. For advice on other media types, see page 3-17.
1 Make sure the media lever is down and the roll cover is closed.
2 a Holding the media from the sides, align the right edge with the perforatedline on the entry platen.
b Insert the media until it buckles slightly, that is, push all the way to themedia stops. Let go of the media when the printer begins to pull it in.
1841
Setting Up the Printer
Task 3: Load Media
SE
TU
P1
Downloaded from www.Manualslib.com manuals search engine

1-16
Company confidential. Postillo/755CM User’s Guide Final Freeze Status:Frozen
This is the cyan on page 1-16 (seq: 32)
This is the black on page 1-16 (seq: 32)
3 Press the ↑ key next to the front-panel display to indicate you are loading asheet.
Sheet load
Roll load ↓
↑––––––––>
––––––––>
0014
4
SELECT MEDIA
Heavy coated paper
Enter
↓
↑
Press the ↑ or ↓ key until the display shows the type of media you are loading(if you are using heavyweight coated paper, scroll to Heavy coated paper), andthen press the Enter key.
0014
5 The printer moves the sheet in and out to check its size and alignment, and thenadvances it to the start of the page. When sheet loading is complete, STATUS / Ready is displayed.
If you have persistent difficulty loading media, this may indicate poorly cut media– see page 3-20 for advice.
Setting Up the Printer
Task 3: Load Media
Downloaded from www.Manualslib.com manuals search engine
1-17
Company confidential. Postillo/755CM User’s Guide Final Freeze Status:Frozen
This is the cyan on page 1-17 (seq: 33)
This is the black on page 1-17 (seq: 33)
Task 4: Load the Print Cartridges
Eight cartridges are supplied with your printer: two each of yellow, cyan, magentaand black. The printer will operate successfully in monochrome with just the blackcartridge loaded (except on glossy media), but these instructions assume that youare loading all four cartridges.
Cartridge types IMPORTANT Your printer is designed to operate only with the four cartridgetypes whose part numbers are listed on page 11-15, and samples of which aresupplied with the printer.
Do not touch the stainless steel strip that runs the length of the printer behindthe cartridge carriage; its edge is very sharp. Keep hair, jewelry, clothing,and foreign objects away from the printer mechanisms.
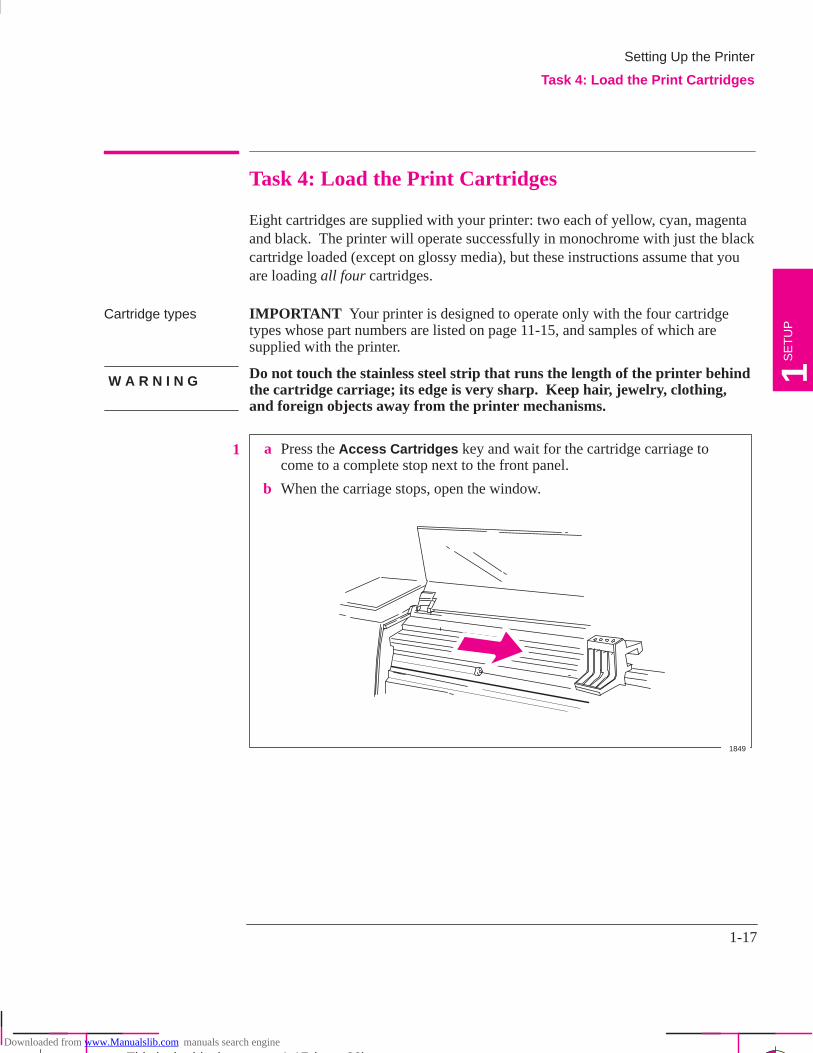
1 a Press the Access Cartridges key and wait for the cartridge carriage tocome to a complete stop next to the front panel.
b When the carriage stops, open the window.
1849
Setting Up the Printer
Task 4: Load the Print Cartridges
SE
TU
P1W A R N I N G
Downloaded from www.Manualslib.com manuals search engine
1-18
Company confidential. Postillo/755CM User’s Guide Final Freeze Status:Frozen
This is the cyan on page 1-18 (seq: 34)
This is the black on page 1-18 (seq: 34)
2 Notice that each stall in the empty carriage has a dot indicating the color: you mustput the correct cartridge in the correct stall.
For users with color-vision deficiencies: You can identify the colors of thecartridges by the part numbers on the boxes – see page 11-15. The sequence of thestalls is, from left to right, yellow, cyan, magenta and black.
It is essential to load the cartridges with the printer switched ON, otherwise youwill get poor print quality, and the reliability of your cartridges will beimpaired.
It is essential to load the cartridges in the correct stalls, otherwise not only willyour colors be wrong, but also print quality may be impacted.
Keep new and used print cartridges out of the reach of children.
Setting Up the Printer
Task 4: Load the Print Cartridges
C A U T I O N
W A R N I N G
Downloaded from www.Manualslib.com manuals search engine
1-19
Company confidential. Postillo/755CM User’s Guide Final Freeze Status:Frozen
This is the cyan on page 1-19 (seq: 35)
This is the black on page 1-19 (seq: 35)
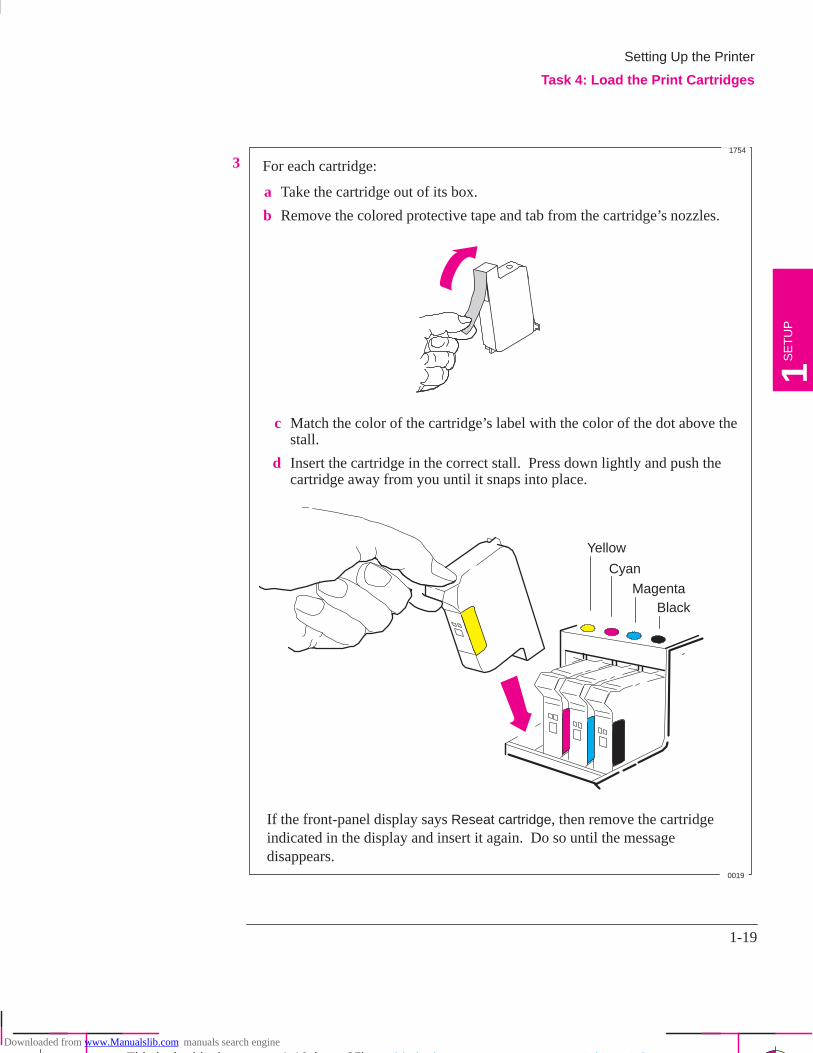
3 For each cartridge:
a Take the cartridge out of its box.
b Remove the colored protective tape and tab from the cartridge’s nozzles.
c Match the color of the cartridge’s label with the color of the dot above thestall.
d Insert the cartridge in the correct stall. Press down lightly and push thecartridge away from you until it snaps into place.
Yellow
Cyan
MagentaBlack
If the front-panel display says Reseat cartridge, then remove the cartridgeindicated in the display and insert it again. Do so until the messagedisappears.
0019
1754
Setting Up the Printer
Task 4: Load the Print Cartridges
SE
TU
P1
This is the magenta on page 1-19 (seq: 35)
This is the yellow on page 1-19 (seq: 35)
Downloaded from www.Manualslib.com manuals search engine
1-20
Company confidential. Postillo/755CM User’s Guide Final Freeze Status:Frozen
This is the cyan on page 1-20 (seq: 36)
This is the black on page 1-20 (seq: 36)
4 When all four cartridges are successfully installed, the printer automatically runsthe cartridge-alignment procedure. When the front-panel displays STATUS /Ready, the procedure is complete. You can throw away the small print producedduring the cartridge alignment procedure.
To make your cartridges last as long as possible, you should not remove them oncethey are installed, except to replace them.
Now that the cartridges are loaded, never turn the printer upside down, or inkwill spill.
Setting Up the Printer
Task 4: Load the Print Cartridges
C A U T I O N
Downloaded from www.Manualslib.com manuals search engine
1-21
Company confidential. Postillo/755CM User’s Guide Final Freeze Status:Frozen
This is the cyan on page 1-21 (seq: 37)
This is the black on page 1-21 (seq: 37)
Task 5: Print a Demonstration File (Optional)
Before you connect your printer to a computer, it is a good idea to print one of theinternal sample files. This ensures that the printer itself is operating properly.
1 If media is not already loaded, load a roll or a sheet, as explained earlier in task 3.For advice on the availability and use of different media types, see the sectionstarting on page 3-2.
Setting Up the Printer
Task 5: (Optional) Print a Demo
SE
TU
P1
Downloaded from www.Manualslib.com manuals search engine
1-22
Company confidential. Postillo/755CM User’s Guide Final Freeze Status:Frozen
This is the cyan on page 1-22 (seq: 38)
This is the black on page 1-22 (seq: 38)
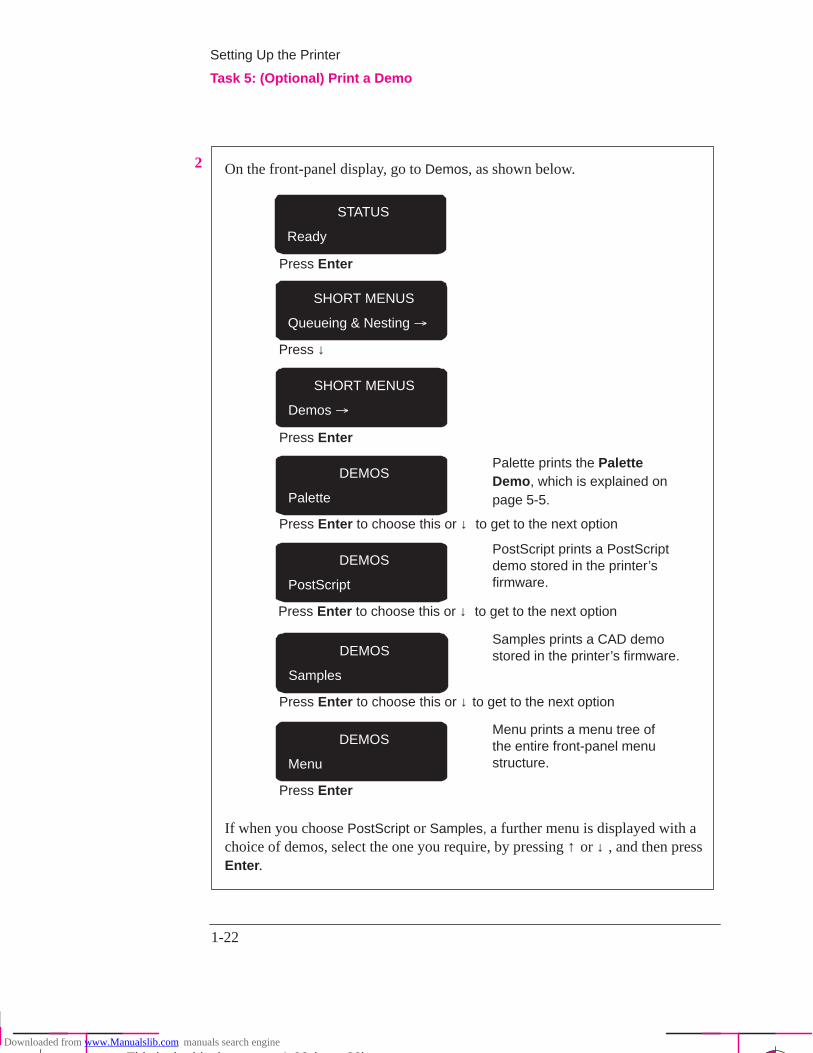
2 On the front-panel display, go to Demos, as shown below.
If when you choose PostScript or Samples, a further menu is displayed with achoice of demos, select the one you require, by pressing ↑ or ↓ , and then pressEnter .
Press Enter
Press Enter
Press Enter to choose this or ↓ to get to the next option
Press Enter to choose this or ↓ to get to the next option
Press Enter
STATUS
Ready
SHORT MENUS
Demos �
DEMOS
Palette
DEMOS
PostScript
DEMOS
Menu
Press ↓
SHORT MENUS
Queueing & Nesting �
Palette prints the PaletteDemo , which is explained onpage 5-5.
PostScript prints a PostScriptdemo stored in the printer’sfirmware.
DEMOS
Samples
Press Enter to choose this or ↓ to get to the next option
Samples prints a CAD demostored in the printer’s firmware.
Menu prints a menu tree ofthe entire front-panel menustructure.
Setting Up the Printer
Task 5: (Optional) Print a Demo
Downloaded from www.Manualslib.com manuals search engine
1-23
Company confidential. Postillo/755CM User’s Guide Final Freeze Status:Frozen
This is the cyan on page 1-23 (seq: 39)
This is the black on page 1-23 (seq: 39)
3 The Receiving light flashes while the file is being processed, and then the printerstarts printing. After it has finished:
On roll media, the printer waits for the ink to dry, if necessary, and drops thepage into the media bin.
On sheet media, wait until the ink is dry, if necessary (see the front-paneldisplay for an ink-drying message), and then gently pull the sheet from theprinter. On HP Coated Paper, you don’t need to wait at all.
4 Examine the print, with the following questions particularly in mind:
Are the lines clean and complete?
Are the area fills smooth?
Is the color of good quality?
Unless you changed it, the print-quality setting on the front panel was Best. If youhave any concerns about the print quality of the sample files, use thetroubleshooting advice starting on page 9-16.
Setting Up the Printer
Task 5: (Optional) Print a Demo
SE
TU
P1
Downloaded from www.Manualslib.com manuals search engine

1-24
Company confidential. Postillo/755CM User’s Guide Final Freeze Status:Frozen
This is the cyan on page 1-24 (seq: 40)
This is the black on page 1-24 (seq: 40)
Task 6: Connect the Printer to Your Computer
For UNIX systems, see also the tips starting on page 1-37.
If You are Connecting the Printer Directly To a Network
Your can connect your printer directly to a Local Area Network using its HPJetDirect Print Server. Depending on your needs, you may want to use thenetwork interface instead of, or in addition to, the parallel and serial interfaces.
HP JetDirect Print Server
1845c
For information concerning your HP JetDirect Print Server, see the HP JetDirect Print Server Software Installation Guide, supplied with this printer.
Setting Up the Printer
Task 6: Connect the Printer to Your Computer
Downloaded from www.Manualslib.com manuals search engine
1-25
Company confidential. Postillo/755CM User’s Guide Final Freeze Status:Frozen
This is the cyan on page 1-25 (seq: 41)
This is the black on page 1-25 (seq: 41)
If You are Connecting the Printer Directly to Your Computer
1 Decide whether to use the parallel or serial interface.
If your computer and your application software support it, use the parallelinterface, as it is faster. You can connect both the parallel and the serial interfacesimultaneously if you wish: the printer uses the interface that first receives data.
2 Choose an interface cable.
A list of recommended HP cables for various computers starts on page 11-8.
��������� To achieve the best performance from your printer, we recommend you only usegenuine Hewlett-Packard interface cables, whose reliability and performance havebeen thoroughly tested to give trouble-free performance.
3 Switch OFF the printer and then the computer.
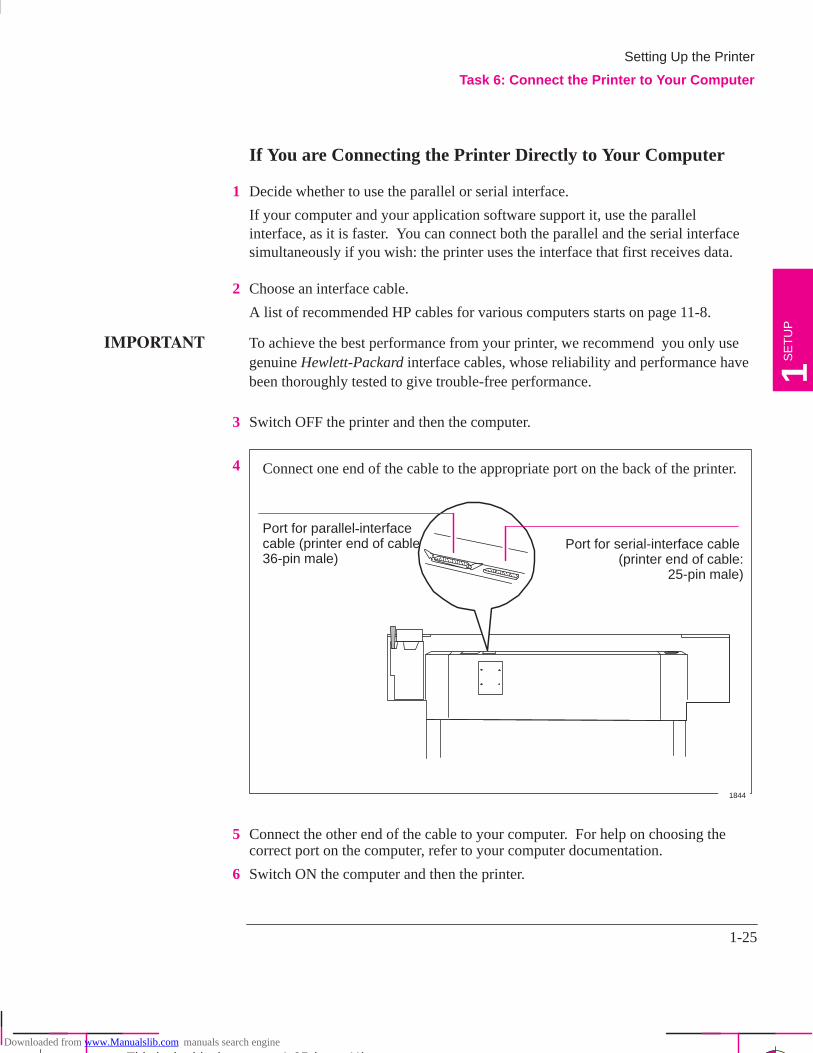
4 Connect one end of the cable to the appropriate port on the back of the printer.
Port for parallel-interfacecable (printer end of cable:36-pin male)
Port for serial-interface cable (printer end of cable:
25-pin male)
1844
5 Connect the other end of the cable to your computer. For help on choosing thecorrect port on the computer, refer to your computer documentation.
6 Switch ON the computer and then the printer.
Setting Up the Printer
Task 6: Connect the Printer to Your Computer
SE
TU
P1
Downloaded from www.Manualslib.com manuals search engine
1-26
Company confidential. Postillo/755CM User’s Guide Final Freeze Status:Frozen
This is the cyan on page 1-26 (seq: 42)
This is the black on page 1-26 (seq: 42)
Task 7: Configure the Interface (Serial Interface UsersOnly)
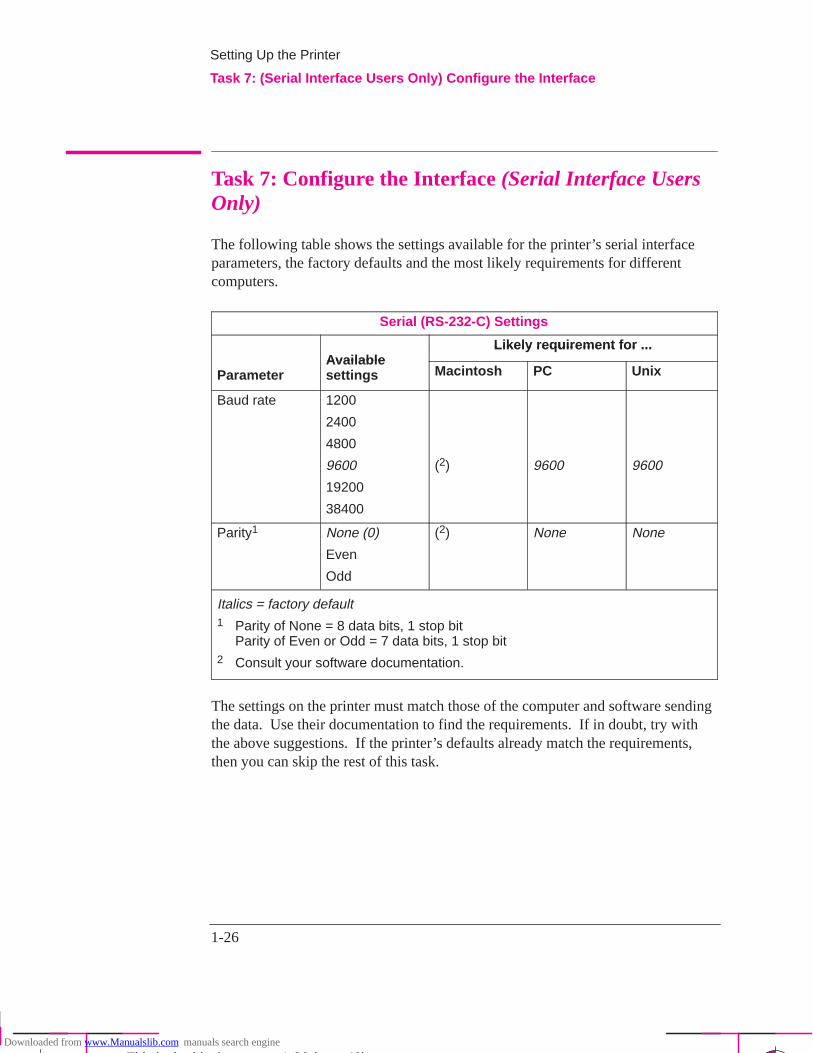
The following table shows the settings available for the printer’s serial interfaceparameters, the factory defaults and the most likely requirements for differentcomputers.
Serial (RS-232-C) Settings
Likely requirement for ...Available
Likely requirement for ...
ParameterAvailablesettings Macintosh PC Unix
Baud rate 1200
2400
4800
9600
19200
38400
(2) 9600 9600
Parity1 None (0)
Even
Odd
(2) None None
Italics = factory default1 Parity of None = 8 data bits, 1 stop bit
Parity of Even or Odd = 7 data bits, 1 stop bit2 Consult your software documentation.
The settings on the printer must match those of the computer and software sendingthe data. Use their documentation to find the requirements. If in doubt, try withthe above suggestions. If the printer’s defaults already match the requirements,then you can skip the rest of this task.
Setting Up the Printer
Task 7: (Serial Interface Users Only) Configure the Interface
Downloaded from www.Manualslib.com manuals search engine
1-27
Company confidential. Postillo/755CM User’s Guide Final Freeze Status:Frozen
This is the cyan on page 1-27 (seq: 43)
This is the black on page 1-27 (seq: 43)
To Change the Printer’s Serial Interface Settings
Through the front-panel display, you can create and save two sets of configurationsfor the serial interface, called Configurations A and B. By default they are set tothe factory defaults shown in the table on page 1-26. The factory defaultconfiguration is always available as well, giving you up to three storedconfigurations to choose from.
The instructions that follow explain how to specify and apply Configuration A.Configuration B can be specified in the same way. To restore the factory defaultconfiguration see page 7-6.
Setting Up the Printer
Task 7: (Serial Interface Users Only) Configure the Interface
SE
TU
P1
Downloaded from www.Manualslib.com manuals search engine
1-28
Company confidential. Postillo/755CM User’s Guide Final Freeze Status:Frozen
This is the cyan on page 1-28 (seq: 44)
This is the black on page 1-28 (seq: 44)
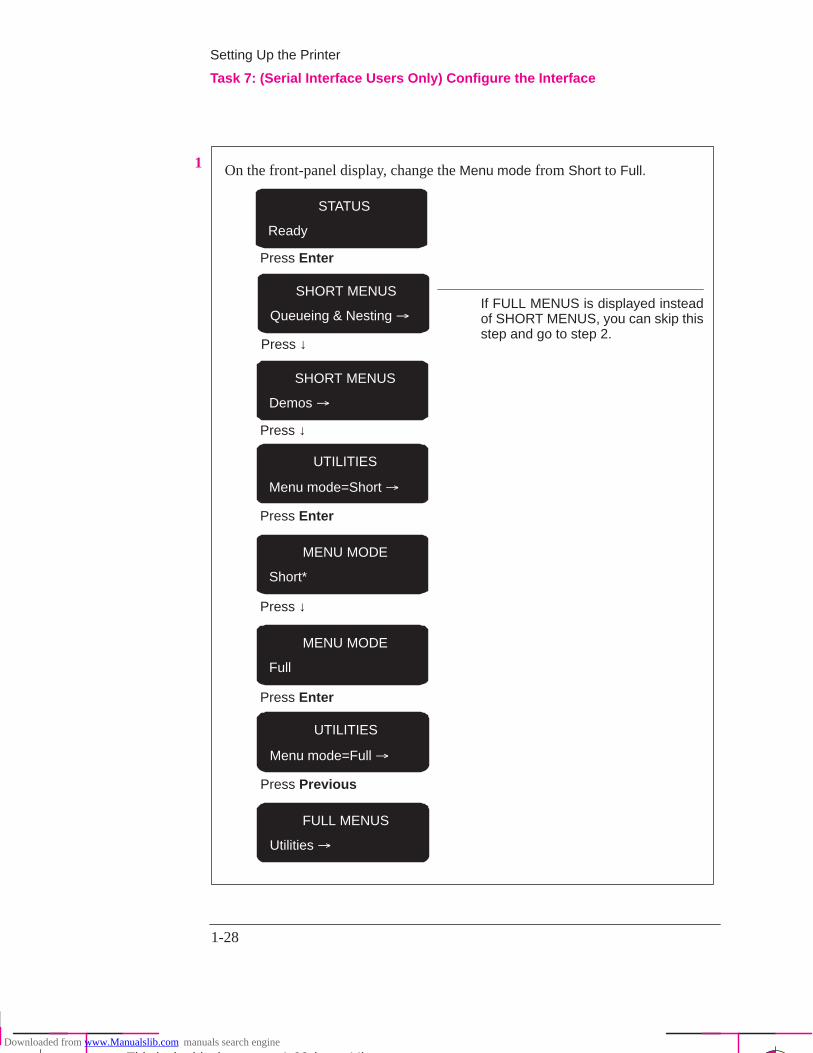
1 On the front-panel display, change the Menu mode from Short to Full.
If FULL MENUS is displayed insteadof SHORT MENUS, you can skip thisstep and go to step 2.
Press Enter
Press ↓
Press Enter
Press ↓
Press Enter
STATUS
Ready
SHORT MENUS
Demos �
UTILITIES
Menu mode=Short �
MENU MODE
Short*
MENU MODE
Full
Press Previous
UTILITIES
Menu mode=Full �
FULL MENUS
Utilities �
Press ↓
SHORT MENUS
Queueing & Nesting �
Setting Up the Printer
Task 7: (Serial Interface Users Only) Configure the Interface
Downloaded from www.Manualslib.com manuals search engine
1-29
Company confidential. Postillo/755CM User’s Guide Final Freeze Status:Frozen
This is the cyan on page 1-29 (seq: 45)
This is the black on page 1-29 (seq: 45)
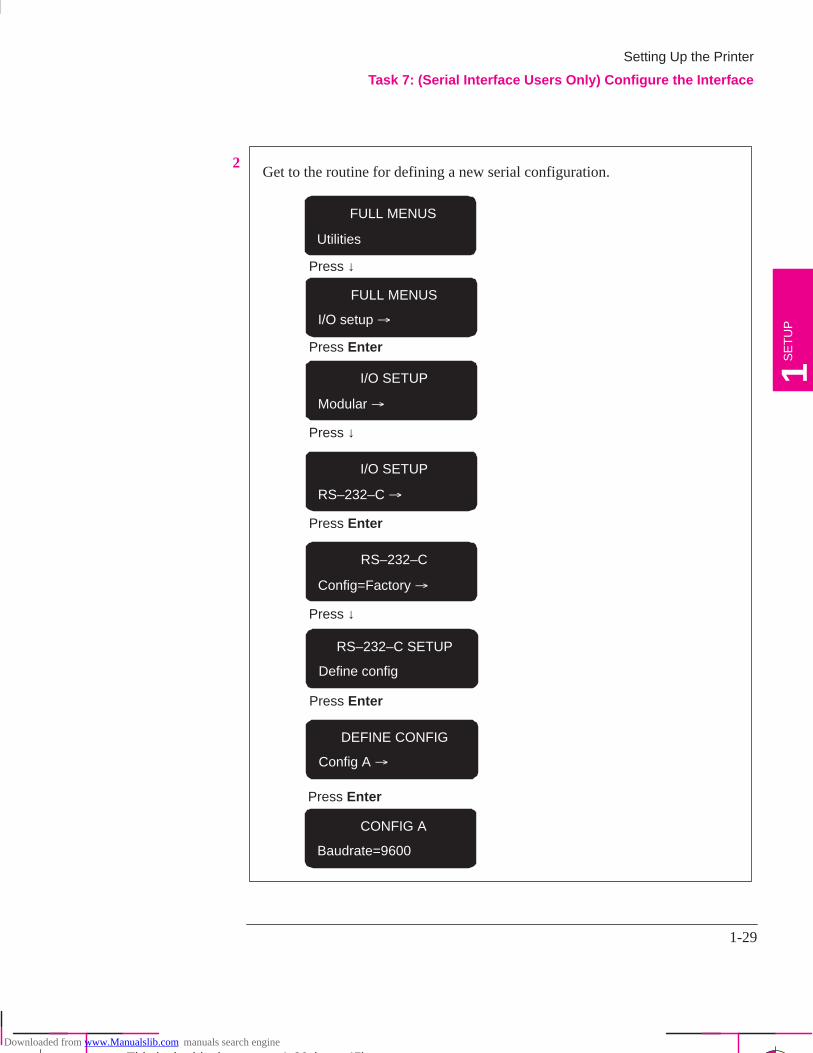
2Get to the routine for defining a new serial configuration.
Press Enter
Press ↓
Press Enter
Press ↓
FULL MENUS
Utilities
FULL MENUS
I/O setup �
I/O SETUP
Modular �
I/O SETUP
RS–232–C �
RS–232–C
Config=Factory �
Press Enter
RS–232–C SETUP
Define config
DEFINE CONFIG
Config A �
CONFIG A
Baudrate=9600
Press ↓
Press Enter
Setting Up the Printer
Task 7: (Serial Interface Users Only) Configure the Interface
SE
TU
P1
Downloaded from www.Manualslib.com manuals search engine
1-30
Company confidential. Postillo/755CM User’s Guide Final Freeze Status:Frozen
This is the cyan on page 1-30 (seq: 46)
This is the black on page 1-30 (seq: 46)
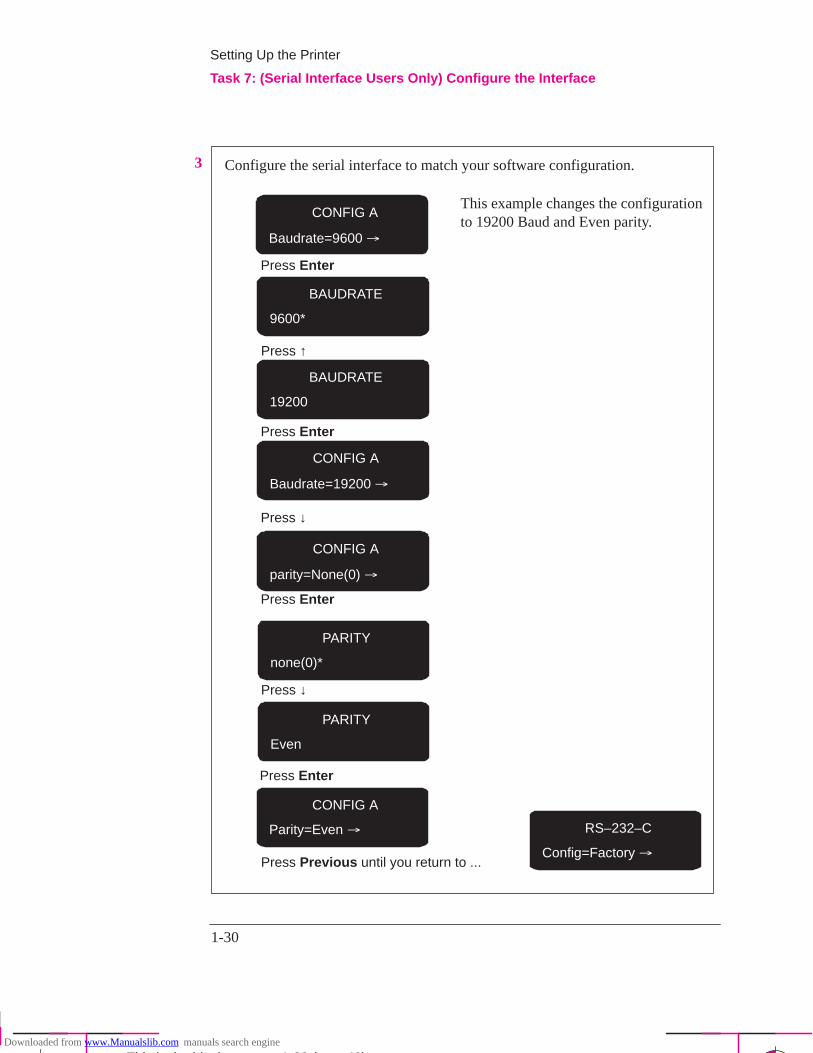
3 Configure the serial interface to match your software configuration.
Press ↑
Press Previous until you return to ...
Press Enter
Press ↓
Press Enter
CONFIG A
Baudrate=9600 �
BAUDRATE
9600*
BAUDRATE
19200
CONFIG A
Baudrate=19200 �
CONFIG A
parity=None(0) �
Press ↓
PARITY
none(0)*
PARITY
Even
CONFIG A
Parity=Even �
Press Enter
Press Enter
This example changes the configurationto 19200 Baud and Even parity.
RS–232–C
Config=Factory �
Setting Up the Printer
Task 7: (Serial Interface Users Only) Configure the Interface
Downloaded from www.Manualslib.com manuals search engine
1-31
Company confidential. Postillo/755CM User’s Guide Final Freeze Status:Frozen
This is the cyan on page 1-31 (seq: 47)
This is the black on page 1-31 (seq: 47)
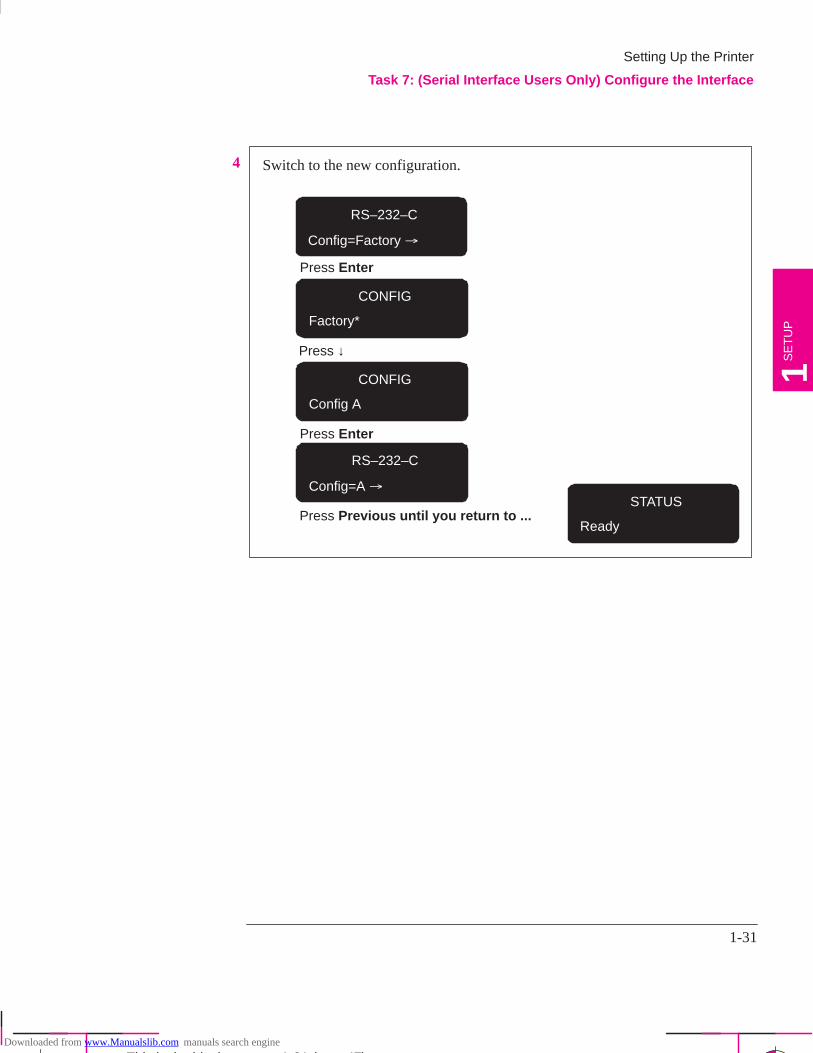
4 Switch to the new configuration.
Press Previous until you return to ...
Press Enter
RS–232–C
Config=Factory �
CONFIG
Factory*
CONFIG
Config A
RS–232–C
Config=A �
Press Enter
STATUS
Ready
Press ↓
Setting Up the Printer
Task 7: (Serial Interface Users Only) Configure the Interface
SE
TU
P1
Downloaded from www.Manualslib.com manuals search engine
1-32
Company confidential. Postillo/755CM User’s Guide Final Freeze Status:Frozen
This is the cyan on page 1-32 (seq: 48)
This is the black on page 1-32 (seq: 48)
Task 8: Set Up Your Software
This section gives a simple overview of the software-configuration tasks you needto perform and is designed for those users unfamiliar with this type of task. It alsopoints to documents containing detailed, application-specific advice.
More experienced users may prefer to go straight to those documents.
For UNIX systems, see also the tips starting on page 1-37.
Basic Terminology
Application software Application software means the software from which you intend to send files toyour printer – for example, a graphics package, a desktop publishing system, aCAD system, etc.
Drivers Your application software needs to know to which type of printer it is sendinginformation. This knowledge, and other configuration information, is held in a“driver.” The driver is a piece of software that handles communications betweenyour application software and your printer.
To make sure that your printer prints exactly what you expect – in terms of size,position, orientation, color and quality – use the correct driver for the combinationof your application software and your printer.
Setting Up the Printer
Task 8: Set Up Your Software
Downloaded from www.Manualslib.com manuals search engine
1-33
Company confidential. Postillo/755CM User’s Guide Final Freeze Status:Frozen
This is the cyan on page 1-33 (seq: 49)
This is the black on page 1-33 (seq: 49)
Typical Checklist of Tasks to Set Up Your Software
1 Identify which driver you need.
Some are supplied with this printer, as listed in the table on page 1-34. Others aresupplied with your application software.
2 If necessary, install the driver on your computer.
3 Add this printer to the device list in the software (Done as part of the installationroutine with the PostScript driver.)
This list may be accessed, for example, through Printer type (in Macintoshapplications), Printer setup (in Microsoft Windows applications) or CONFIG / Adda Printer (in AutoCAD). In most cases, you don’t need to add the printer for eachindividual software application, but, for example, just once for all MicrosoftWindows applications.
4 Install any extra color management software on your computer.
For example, you may want to install the software in the Color Management Kitsupplied with this printer, in order to be able to print simulations of PANTONEcolors. How to do this is explained in the documentation included in the kit.
5 Configure the driver and any color management software.
This usually involves a series of dialog boxes where you can specify such items asdefault media type, print quality etc.
IMPORTANT In most cases these settings will override any settings you make on the front panelof the printer.
Setting Up the Printer
Task 8: Set Up Your Software
SE
TU
P1
Downloaded from www.Manualslib.com manuals search engine
1-34
Company confidential. Postillo/755CM User’s Guide Final Freeze Status:Frozen
This is the cyan on page 1-34 (seq: 50)
This is the black on page 1-34 (seq: 50)
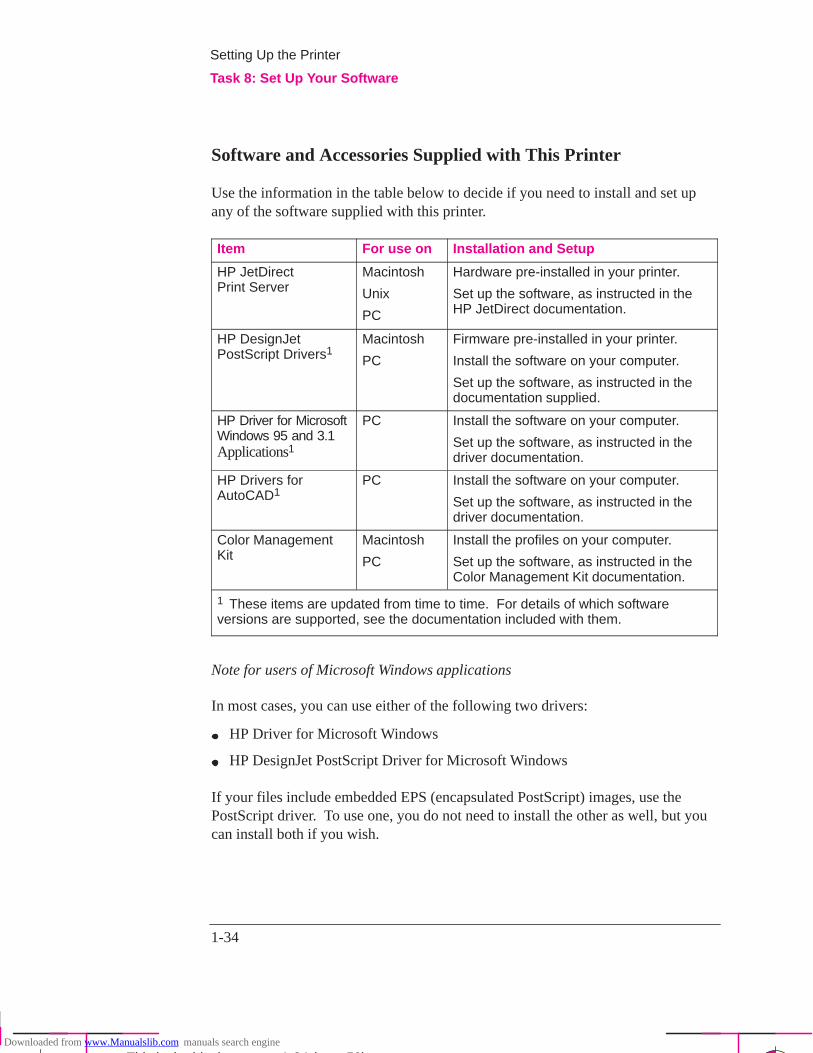
Software and Accessories Supplied with This Printer
Use the information in the table below to decide if you need to install and set upany of the software supplied with this printer.
Item For use on Installation and Setup
HP JetDirectPrint Server
Macintosh
Unix
PC
Hardware pre-installed in your printer.
Set up the software, as instructed in the HP JetDirect documentation.
HP DesignJetPostScript Drivers1
Macintosh
PC
Firmware pre-installed in your printer.
Install the software on your computer.
Set up the software, as instructed in thedocumentation supplied.
HP Driver for MicrosoftWindows 95 and 3.1Applications1
PC Install the software on your computer.
Set up the software, as instructed in thedriver documentation.
HP Drivers forAutoCAD1
PC Install the software on your computer.
Set up the software, as instructed in thedriver documentation.
Color ManagementKit
Macintosh
PC
Install the profiles on your computer.
Set up the software, as instructed in theColor Management Kit documentation.
1 These items are updated from time to time. For details of which softwareversions are supported, see the documentation included with them.
Note for users of Microsoft Windows applications
In most cases, you can use either of the following two drivers:
HP Driver for Microsoft Windows
HP DesignJet PostScript Driver for Microsoft Windows
If your files include embedded EPS (encapsulated PostScript) images, use thePostScript driver. To use one, you do not need to install the other as well, but youcan install both if you wish.
Setting Up the Printer
Task 8: Set Up Your Software
Downloaded from www.Manualslib.com manuals search engine
1-35
Company confidential. Postillo/755CM User’s Guide Final Freeze Status:Frozen
This is the cyan on page 1-35 (seq: 51)
This is the black on page 1-35 (seq: 51)
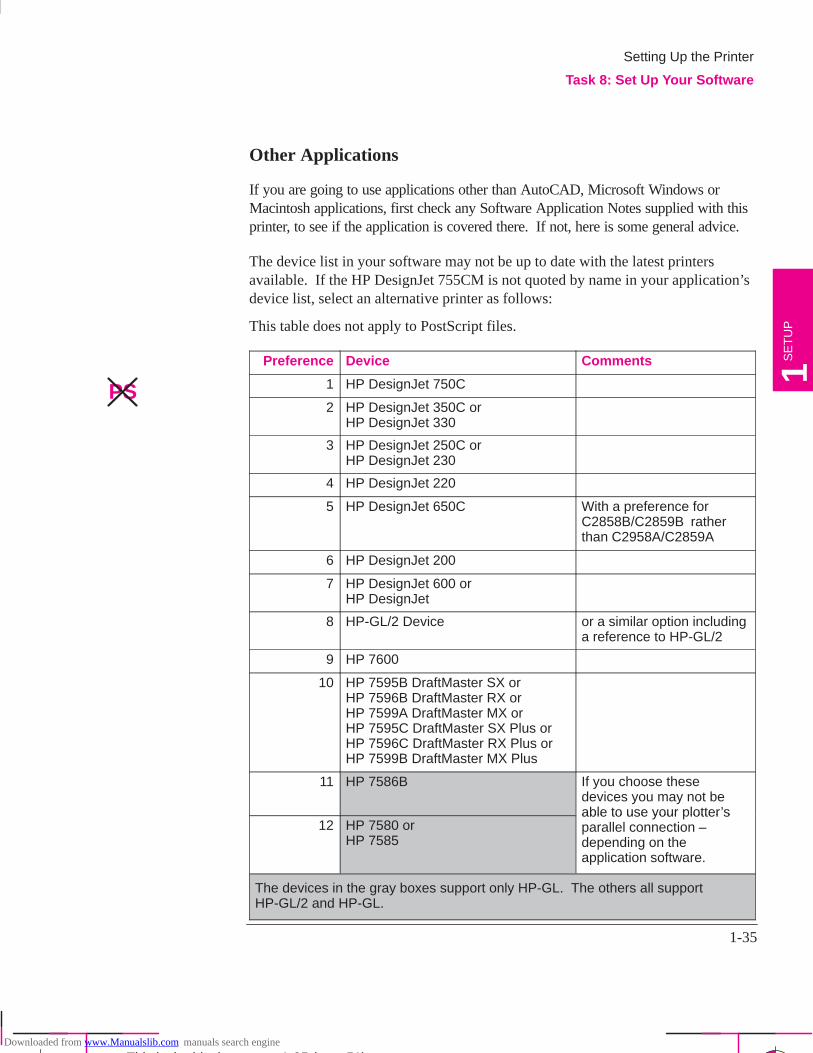
Other Applications
If you are going to use applications other than AutoCAD, Microsoft Windows orMacintosh applications, first check any Software Application Notes supplied with thisprinter, to see if the application is covered there. If not, here is some general advice.
The device list in your software may not be up to date with the latest printersavailable. If the HP DesignJet 755CM is not quoted by name in your application’sdevice list, select an alternative printer as follows:
This table does not apply to PostScript files.
Preference Device Comments
1 HP DesignJet 750C
2 HP DesignJet 350C orHP DesignJet 330
3 HP DesignJet 250C orHP DesignJet 230
4 HP DesignJet 220
5 HP DesignJet 650C With a preference forC2858B/C2859B ratherthan C2958A/C2859A
6 HP DesignJet 200
7 HP DesignJet 600 orHP DesignJet
8 HP-GL/2 Device or a similar option includinga reference to HP-GL/2
9 HP 7600
10 HP 7595B DraftMaster SX orHP 7596B DraftMaster RX orHP 7599A DraftMaster MX orHP 7595C DraftMaster SX Plus orHP 7596C DraftMaster RX Plus orHP 7599B DraftMaster MX Plus
11 HP 7586B If you choose thesedevices you may not beable to use your plotter’s
12 HP 7580 orHP 7585
able to use your lotter sparallel connection –depending on theapplication software.
The devices in the gray boxes support only HP-GL. The others all supportHP-GL/2 and HP-GL.
Setting Up the Printer
Task 8: Set Up Your Software
SE
TU
P1
PS
Downloaded from www.Manualslib.com manuals search engine
1-36
Company confidential. Postillo/755CM User’s Guide Final Freeze Status:Frozen
This is the cyan on page 1-36 (seq: 52)
This is the black on page 1-36 (seq: 52)
Task 9: Print a Test File
The sample files explained in task 5 simply verify the operation of the printeritself. Having connected the printer to your computer and configured the drivers orother software for your requirements, you should now be in a position to send atest using one of your own files.
Among the points you should be looking out for are:
Did the Receiving light on the front panel come on?
Do you see any error message on the front-panel display?
Does the image appear in the size, orientation and position on the sheet that youexpected?
Is any of the image clipped?
Are the lines of the correct width?
Are the colors an exact representation of what you expected?
If you find any problem at all, start by consulting chapter 9 of this manual,“Troubleshooting.” There you will find advice on many different types ofproblems, from obtaining no output at all, to tracking down the reason for aspecific print-quality issue. In case you do not solve your problem with theinformation supplied there, chapter 9 also contains advice on where else to turn forhelp.
Setting Up the Printer
Task 9: Print a Test File
Downloaded from www.Manualslib.com manuals search engine
1-37
Company confidential. Postillo/755CM User’s Guide Final Freeze Status:Frozen
This is the cyan on page 1-37 (seq: 53)
This is the black on page 1-37 (seq: 53)
Extra Tips for UNIX Users
PostScript Applications
The Adobe PostScript drivers supplied with this printer are for Macintosh andMicrosoft Windows applications only, and not for UNIX applications. Most UNIXapplications that output PostScript files include their own embedded PostScriptdriver. If you have any queries about whether your application supports thisprinter, or have any output problems that may be linked to a UNIX PostScriptdriver, first check your software documentation and, if necessary, contact yoursoftware vendor for advice.
Which Interface?
You can connect the printer to your workstation in one of two ways:
Via the UNIX print-spooling system, using any of the interfaces: network,parallel or serial
Directly using the serial interface
Recommendations The print-spooling system is recommended, so that printing takes place in thebackground while you continue using your application. A network interface is alsorecommended, as it will give you not only more flexibility in locating the printer,but also the possibility of network integration and centralized printerconfigurations using BOOTP (Bootstrap Protocol) and TFTP (Trivial File TransferProtocol).
If you choose the parallel interface, you may need a parallel-interface card foryour workstation. Contact your workstation supplier for details.
Setting Up the Printer
Extra Tips for UNIX Users
SE
TU
P1
Downloaded from www.Manualslib.com manuals search engine
1-38
Company confidential. Postillo/755CM User’s Guide Final Freeze Status:Frozen
This is the cyan on page 1-38 (seq: 54)
This is the black on page 1-38 (seq: 54)
Print Spooler Configuration Examples
Example 1: Configuring the SunOS 4.1.3 print spooler for Sun SPARCstations(parallel interface)
In order to perform the following steps you must be superuser.
1 Create a directory for print spooling. All application users need read and writepermission for this directory. For example, from the command line of a shell, type:
mkdir /usr/spool/cadchmod 777 /usr/spool/cad
2 Edit the /etc/printcap file to set up the printer configuration. You must assign aname to each printer managed by the print spooler. Refer to the example below ifyou need help completing this step.
Add the following lines to your /etc/printcap file. The example assumes:
your printer is named djet,
the device name of your parallel port is /dev/bpp0, and
your spool directory is called /usr/spool/cad.
# Entry for an HP printer on a parallel port djet:\
:mx#0:sf:sh:\:lp=/dev/bpp0:\:sd=/usr/spool/cad:\:lf=/usr/adm/lpd–errs:
Setting Up the Printer
Extra Tips for UNIX Users
Downloaded from www.Manualslib.com manuals search engine

1-39
Company confidential. Postillo/755CM User’s Guide Final Freeze Status:Frozen
This is the cyan on page 1-39 (seq: 55)
This is the black on page 1-39 (seq: 55)
Example 2: Configuring the SunOS 4.1.3 print spooler for Sun SPARCstations(serial interface)
In order to perform the following steps you must be superuser.
1 Create a directory for print spooling. All application users need read and writepermissions for this directory. For example, from the command line of a shell,type:
mkdir /usr/spool/cadchmod 777 /usr/spool/cad
2 Edit the /etc/printcap file to set up the printer configuration. You must assign aname to each printer managed by the print spooler. Refer to the example below ifyou need help completing this step.
3 Add the following lines to your /etc/printcap file. The example assumes:
your printer is named djet, and
your printer is connected to the device named /dev/ttya ������ ��� ����� ����� ��� �� ��� �����������, and
the spooling directory you created in step 1 is called /usr/spool/cad.
# Entry for an HP printer on a serial port djet:\
:lp=/dev/ttya:sd=/usr/spool/cad:br#9600:\:lf=/usr/adm/lpd–errs:\ :sf:sh:mx#0:xc#0177777:xs#040040:fc#050:\ :ms=–evenp:
4 Make sure the printer’s baud rate is 9600 and parity is even.
Example 3: Configuring the SunOS 4.1.3 print spooler for Sun SPARCstations(network interface with HP JetDirect)
See the Configuration Guide shipped with the HP JetDirect Network Interface.
Setting Up the Printer
Extra Tips for UNIX Users
SE
TU
P1
Downloaded from www.Manualslib.com manuals search engine
1-40
Company confidential. Postillo/755CM User’s Guide Final Freeze Status:Frozen
This is the cyan on page 1-40 (seq: 56)
This is the black on page 1-40 (seq: 56)
Example 4: Configuring the Solaris 2.x print spooler for Sun SPARCstations
In order to perform the following steps you must be a superuser or belong to thespecial sysadmin (GID=14) group. If you are using the NIS+ name service, youmay need NIS+ permissions to modify the printer table. Refer to your Sundocumentation for details.
1 Create a directory for print spooling. All application users need read and writepermission for this directory, so you must be a superuser to perform this step. Forexample, from the command line of a shell, type:
mkdir /usr/spool/cadchmod 777 /usr/spool/cad
2 Start the Administration Tool utility (from OpenWindows�).
% /bin/admintool
3 Load the Printer Manager window, and, from the Add Printer edit menu, select AddLocal Printer.
4 In the Add Local Printer dialog box:
Item Select ...
Printer Name: For example, HP DesignJet 755CM
Printer Type: Other, and set it to Unknown.
File Contents: Any.
Banner: Not required.
For full details on how to use the Printer Manager option of admintool, consult yourSun documentation.
5 Exit admintool.
6 For serial connections:
a Make sure the printer’s baud rate is 9600 and parity is even.
b From the command line of a shell, as superuser, enter the following:
lpadmin –p pname –o ”stty=’9600 evenp –cstopb ixon ixoff’”
where pname is the same as Printer Name in step 4. It is assumed that /usr/sbinis in the superuser’s path.
Setting Up the Printer
Extra Tips for UNIX Users
Downloaded from www.Manualslib.com manuals search engine
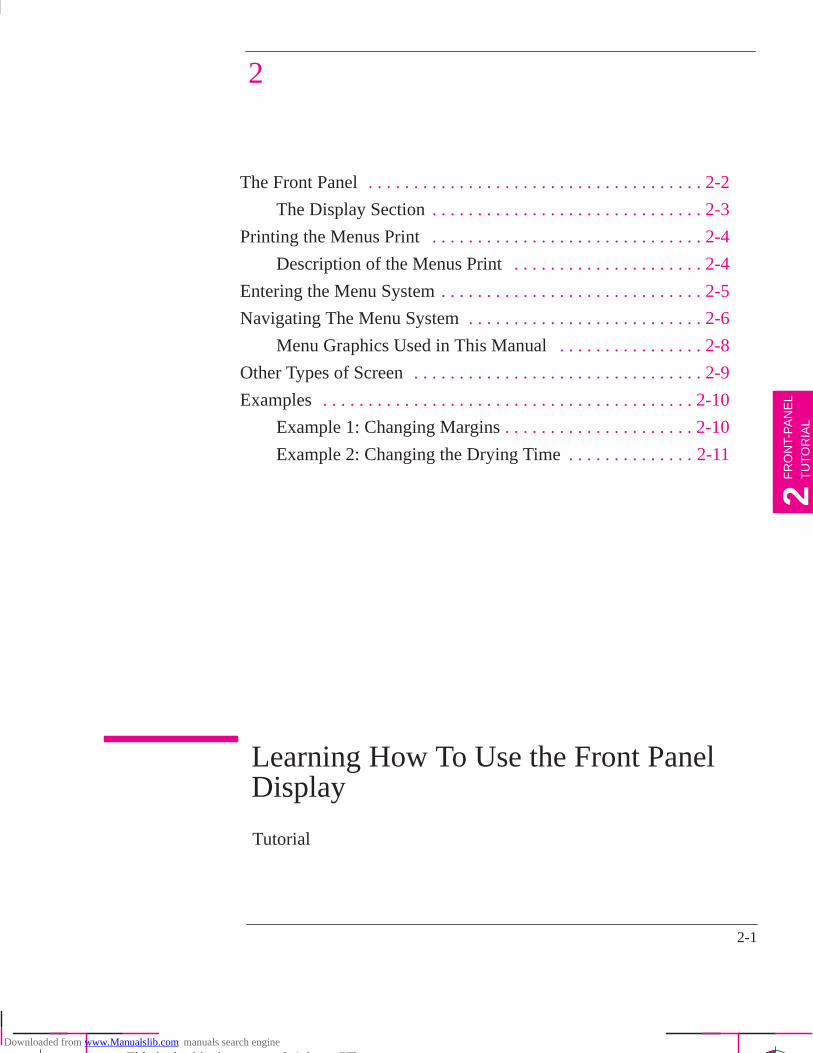
2-1
Company confidential. Postillo/755CM User’s Guide Final Freeze Status:Frozen
This is the cyan on page 2-1 (seq: 57)
This is the black on page 2-1 (seq: 57)
The Front Panel 2-2. . . . . . . . . . . . . . . . . . . . . . . . . . . . . . . . . . . . .
The Display Section 2-3. . . . . . . . . . . . . . . . . . . . . . . . . . . . . .
Printing the Menus Print 2-4. . . . . . . . . . . . . . . . . . . . . . . . . . . . . .
Description of the Menus Print 2-4. . . . . . . . . . . . . . . . . . . . .
Entering the Menu System 2-5. . . . . . . . . . . . . . . . . . . . . . . . . . . . .
Navigating The Menu System 2-6. . . . . . . . . . . . . . . . . . . . . . . . . .
Menu Graphics Used in This Manual 2-8. . . . . . . . . . . . . . . .
Other Types of Screen 2-9. . . . . . . . . . . . . . . . . . . . . . . . . . . . . . . .
Examples 2-10. . . . . . . . . . . . . . . . . . . . . . . . . . . . . . . . . . . . . . . . .
Example 1: Changing Margins 2-10. . . . . . . . . . . . . . . . . . . . .
Example 2: Changing the Drying Time 2-11. . . . . . . . . . . . . .
Learning How To Use the Front PanelDisplay
Tutorial
2
FR
ON
T-P
AN
EL
TU
TO
RIA
L2
Downloaded from www.Manualslib.com manuals search engine
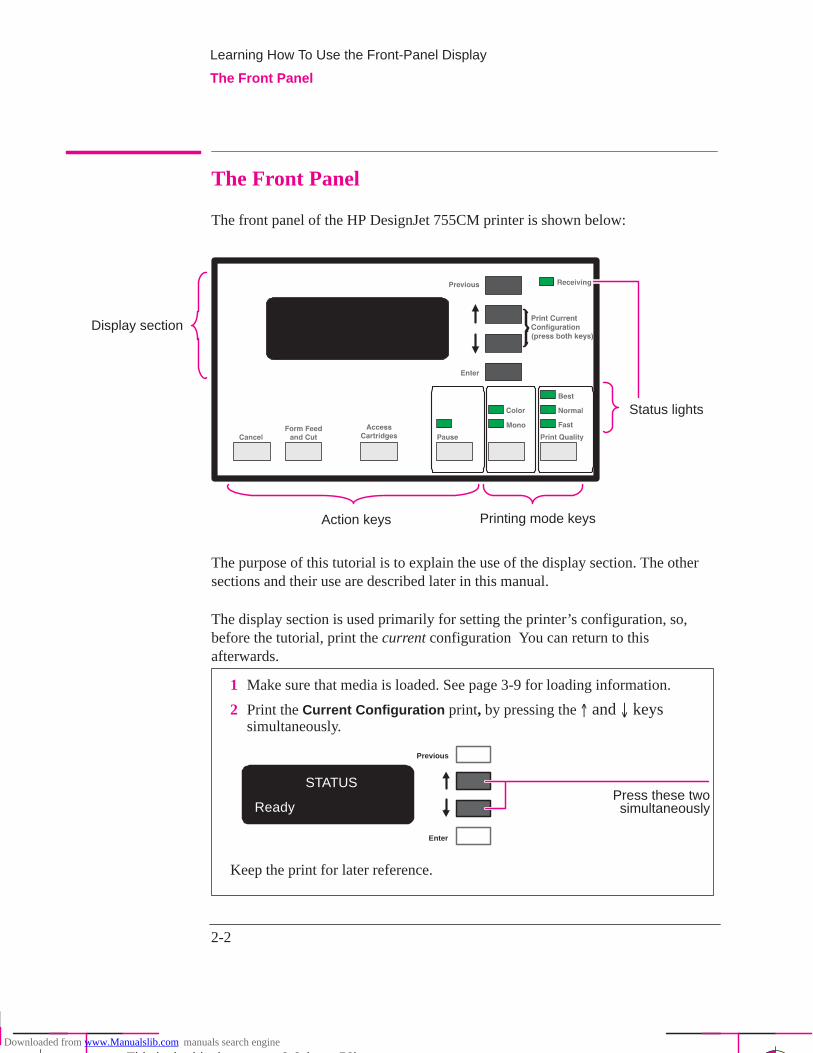
2-2
Company confidential. Postillo/755CM User’s Guide Final Freeze Status:Frozen
This is the cyan on page 2-2 (seq: 58)
This is the black on page 2-2 (seq: 58)
The Front Panel
The front panel of the HP DesignJet 755CM printer is shown below:
Display section
Action keys Printing mode keys
Status lights
The purpose of this tutorial is to explain the use of the display section. The othersections and their use are described later in this manual.
The display section is used primarily for setting the printer’s configuration, so,before the tutorial, print the current configuration You can return to thisafterwards.
1 Make sure that media is loaded. See page 3-9 for loading information.
2 Print the Current Configuration print, by pressing the � and � keyssimultaneously.
STATUS
Ready
Keep the print for later reference.
Press these twosimultaneously
Previous
Enter
This is the green on page 2-2 (seq: 58)
Learning How To Use the Front-Panel Display
The Front Panel
Downloaded from www.Manualslib.com manuals search engine
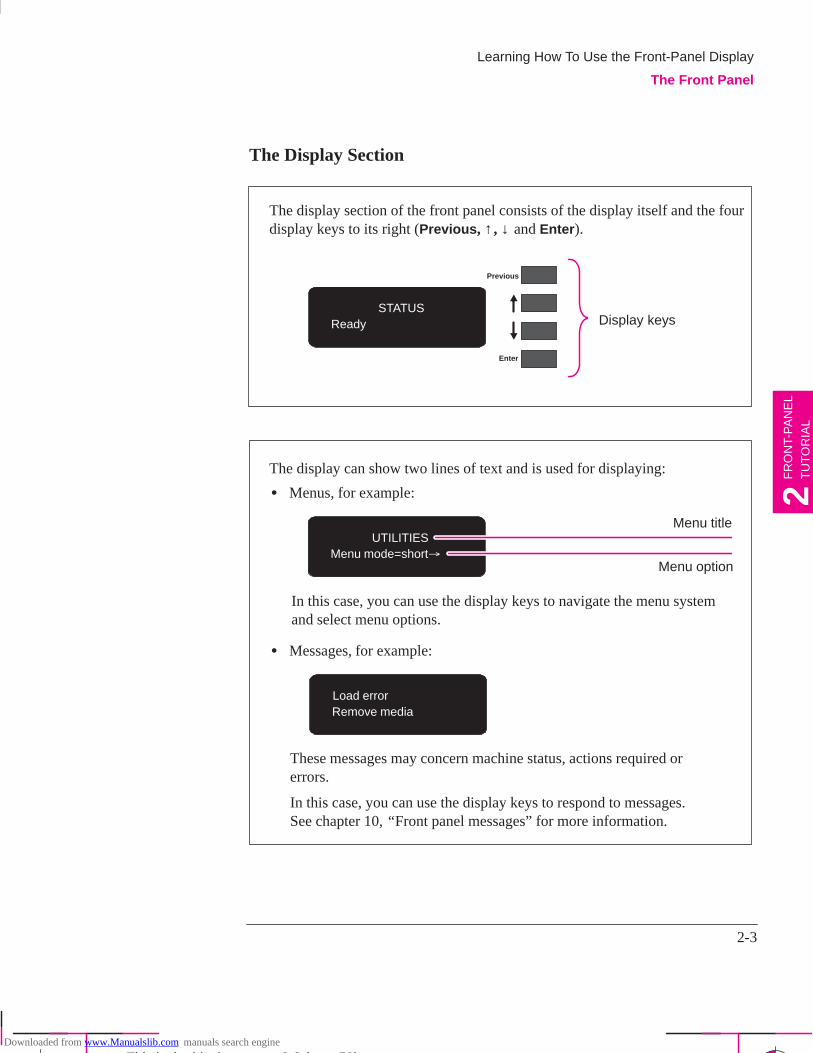
2-3
Company confidential. Postillo/755CM User’s Guide Final Freeze Status:Frozen
This is the cyan on page 2-3 (seq: 59)
This is the black on page 2-3 (seq: 59)
The Display Section
STATUSReady
The display section of the front panel consists of the display itself and the fourdisplay keys to its right (Previous , ↑ , ↓ and Enter ).
Previous
Enter
Display keys
The display can show two lines of text and is used for displaying:
� Menus, for example:
UTILITIESMenu mode=short�
� Messages, for example:
Load errorRemove media
These messages may concern machine status, actions required orerrors.
In this case, you can use the display keys to respond to messages.See chapter 10, “ Front panel messages” for more information.
In this case, you can use the display keys to navigate the menu systemand select menu options.
Menu title
Menu option
Learning How To Use the Front-Panel Display
The Front Panel
FR
ON
T-P
AN
EL
TU
TO
RIA
L2
Downloaded from www.Manualslib.com manuals search engine
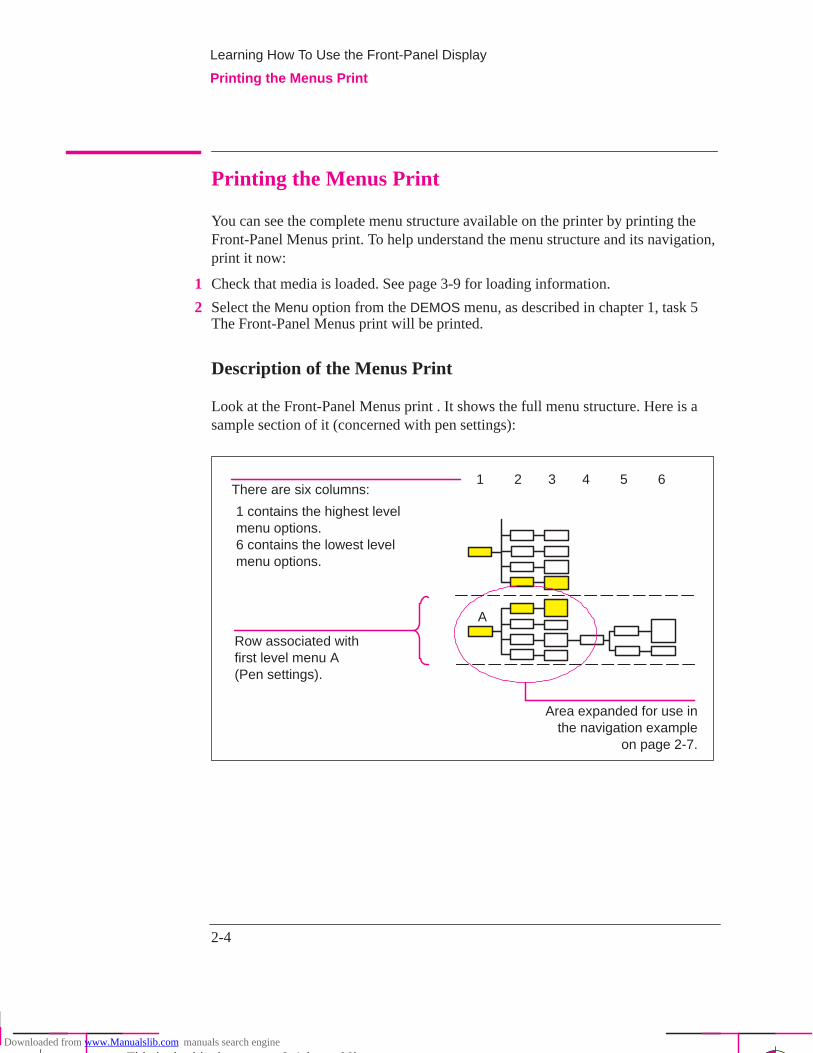
2-4
Company confidential. Postillo/755CM User’s Guide Final Freeze Status:Frozen
This is the cyan on page 2-4 (seq: 60)
This is the black on page 2-4 (seq: 60)
Printing the Menus Print
You can see the complete menu structure available on the printer by printing theFront-Panel Menus print. To help understand the menu structure and its navigation,print it now:
1 Check that media is loaded. See page 3-9 for loading information.
2 Select the Menu option from the DEMOS menu, as described in chapter 1, task 5The Front-Panel Menus print will be printed.
Description of the Menus Print
Look at the Front-Panel Menus print . It shows the full menu structure. Here is asample section of it (concerned with pen settings):
1 2 3 4 5 6There are six columns:
1 contains the highest levelmenu options.6 contains the lowest levelmenu options.
Area expanded for use inthe navigation example
on page 2-7.
Row associated withfirst level menu A(Pen settings).
A
This is the yellow on page 2-4 (seq: 60)
Learning How To Use the Front-Panel Display
Printing the Menus Print
Downloaded from www.Manualslib.com manuals search engine
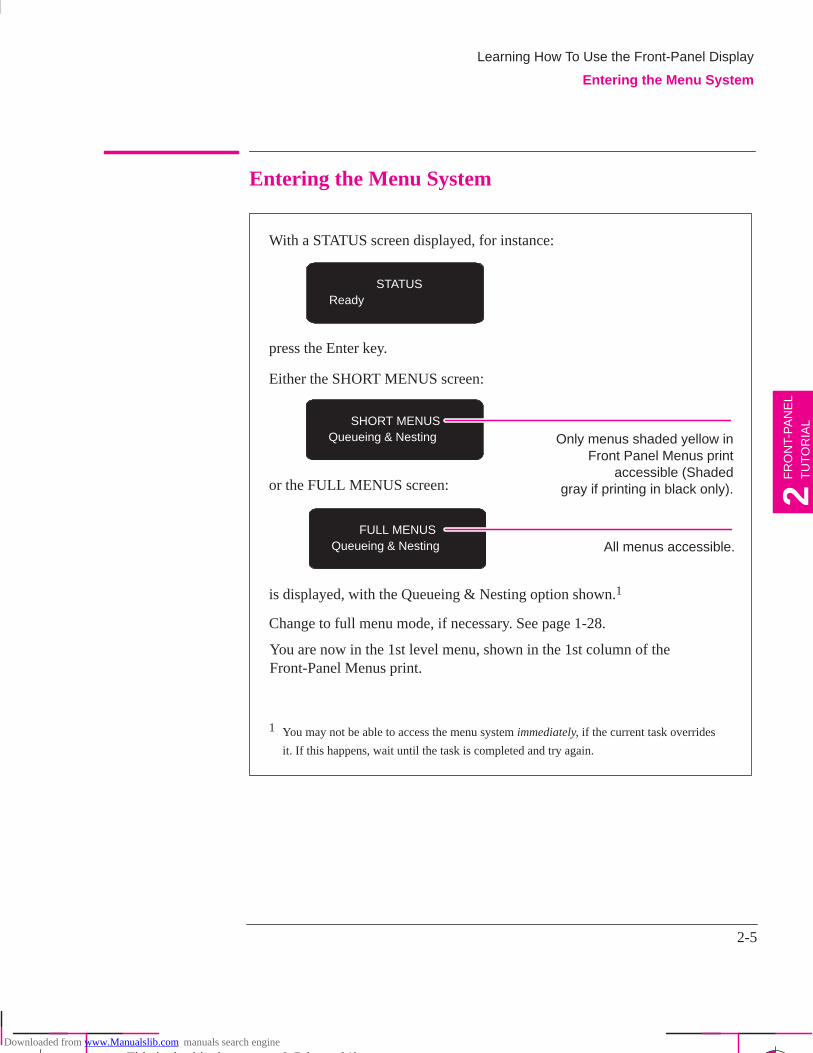
2-5
Company confidential. Postillo/755CM User’s Guide Final Freeze Status:Frozen
This is the cyan on page 2-5 (seq: 61)
This is the black on page 2-5 (seq: 61)
Entering the Menu System
With a STATUS screen displayed, for instance:
STATUSReady
Either the SHORT MENUS screen:
SHORT MENUSQueueing & Nesting
or the FULL MENUS screen:
FULL MENUSQueueing & Nesting
is displayed, with the Queueing & Nesting option shown.1
Only menus shaded yellow inFront Panel Menus print
accessible (Shadedgray if printing in black only).
All menus accessible.
Change to full menu mode, if necessary. See page 1-28.
press the Enter key.
1 You may not be able to access the menu system immediately, if the current task overrides
it. If this happens, wait until the task is completed and try again.
You are now in the 1st level menu, shown in the 1st column of theFront-Panel Menus print.
Learning How To Use the Front-Panel Display
Entering the Menu System
FR
ON
T-P
AN
EL
TU
TO
RIA
L2
Downloaded from www.Manualslib.com manuals search engine
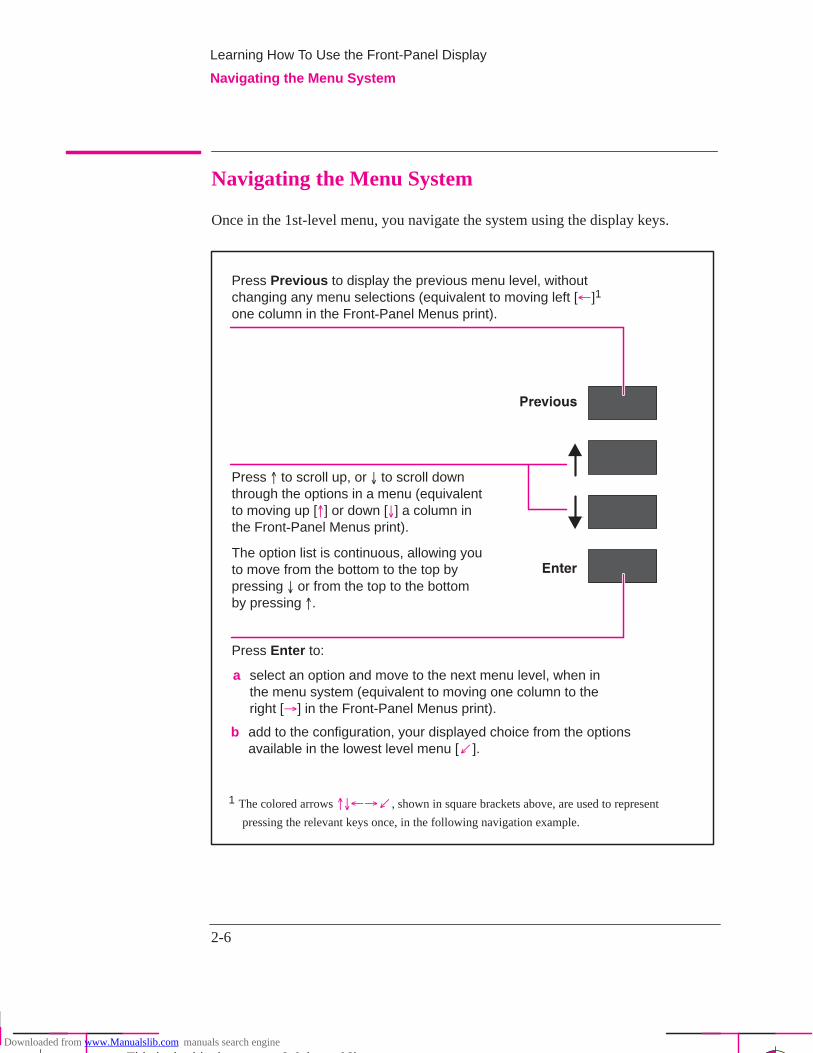
2-6
Company confidential. Postillo/755CM User’s Guide Final Freeze Status:Frozen
This is the cyan on page 2-6 (seq: 62)
This is the black on page 2-6 (seq: 62)
Navigating the Menu System
Once in the 1st-level menu, you navigate the system using the display keys.
Press Enter to:
Press � to scroll up, or � to scroll downthrough the options in a menu (equivalentto moving up [�] or down [�] a column inthe Front-Panel Menus print).
Press Previous to display the previous menu level, withoutchanging any menu selections (equivalent to moving left [�]1
one column in the Front-Panel Menus print).
The option list is continuous, allowing youto move from the bottom to the top bypressing � or from the top to the bottomby pressing �.
a select an option and move to the next menu level, when inthe menu system (equivalent to moving one column to theright [�] in the Front-Panel Menus print).
b add to the configuration, your displayed choice from the optionsavailable in the lowest level menu [�].
1 The colored arrows �����, shown in square brackets above, are used to represent
pressing the relevant keys once, in the following navigation example.
Learning How To Use the Front-Panel Display
Navigating the Menu System
Downloaded from www.Manualslib.com manuals search engine
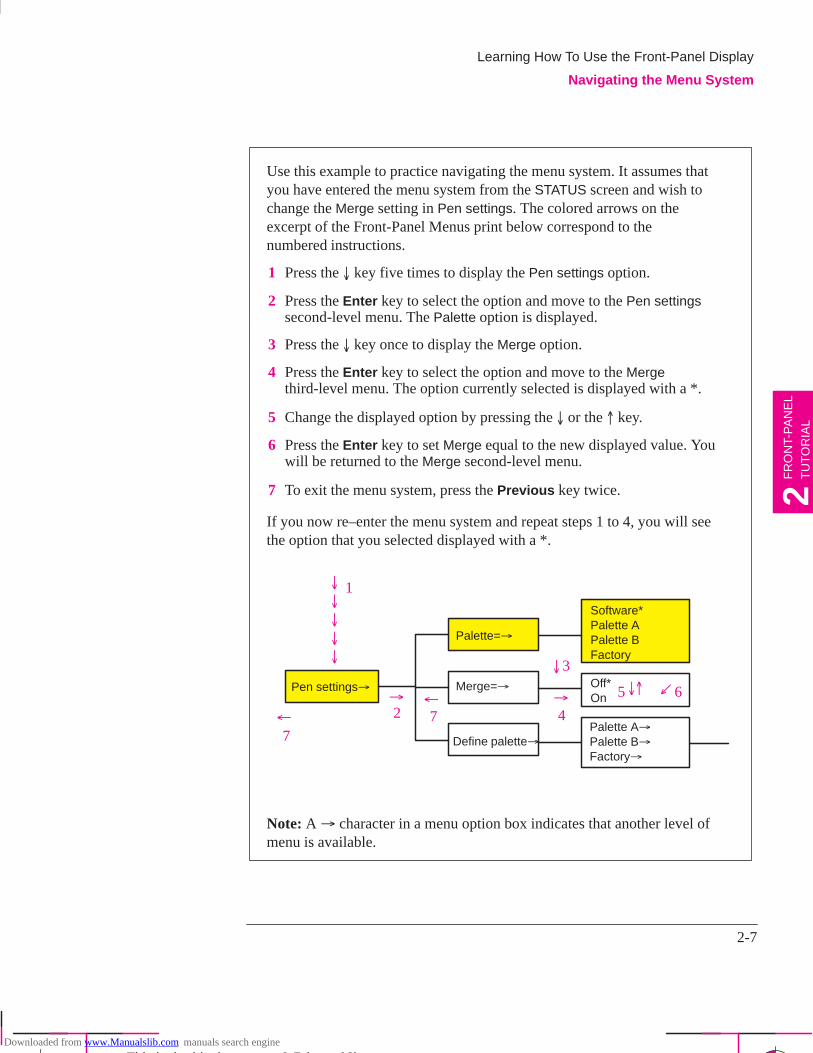
2-7
Company confidential. Postillo/755CM User’s Guide Final Freeze Status:Frozen
This is the cyan on page 2-7 (seq: 63)
This is the black on page 2-7 (seq: 63)
Use this example to practice navigating the menu system. It assumes thatyou have entered the menu system from the STATUS screen and wish tochange the Merge setting in Pen settings. The colored arrows on theexcerpt of the Front-Panel Menus print below correspond to thenumbered instructions.
1 Press the � key five times to display the Pen settings option.
2 Press the Enter key to select the option and move to the Pen settingssecond-level menu. The Palette option is displayed.
3 Press the � key once to display the Merge option.
4 Press the Enter key to select the option and move to the Mergethird-level menu. The option currently selected is displayed with a *.
5 Change the displayed option by pressing the � or the � key.
6 Press the Enter key to set Merge equal to the new displayed value. Youwill be returned to the Merge second-level menu.
7 To exit the menu system, press the Previous key twice.
Note: A � character in a menu option box indicates that another level ofmenu is available.
If you now re–enter the menu system and repeat steps 1 to 4, you will seethe option that you selected displayed with a *.
Pen settings�
Palette=�
Merge=�
Define palette�
Software*Palette APalette BFactory
Off*On
Palette A�Palette B�Factory�
1
2
3
7
5 6
74
�
�
�
�
��
��� �
�
��
This is the yellow on page 2-7 (seq: 63)
Learning How To Use the Front-Panel Display
Navigating the Menu System
FR
ON
T-P
AN
EL
TU
TO
RIA
L2
Downloaded from www.Manualslib.com manuals search engine
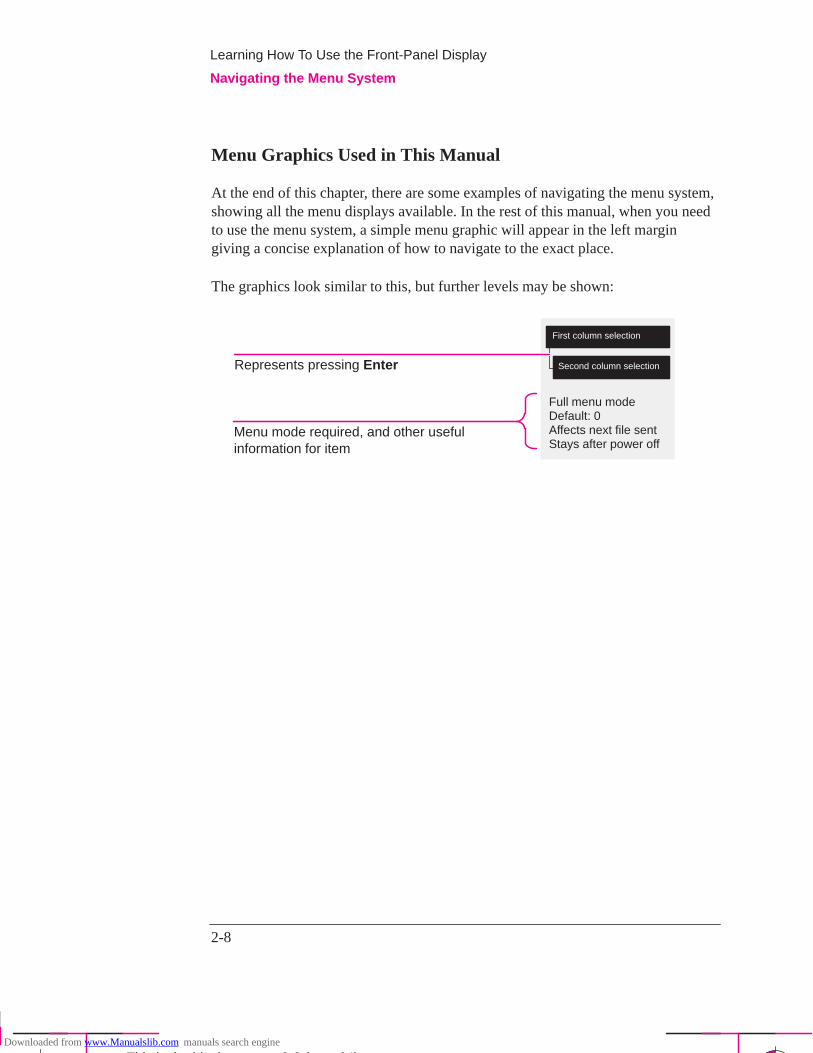
2-8
Company confidential. Postillo/755CM User’s Guide Final Freeze Status:Frozen
This is the cyan on page 2-8 (seq: 64)
This is the black on page 2-8 (seq: 64)
Menu Graphics Used in This Manual
At the end of this chapter, there are some examples of navigating the menu system,showing all the menu displays available. In the rest of this manual, when you needto use the menu system, a simple menu graphic will appear in the left margingiving a concise explanation of how to navigate to the exact place.
The graphics look similar to this, but further levels may be shown:
First column selection
Second column selectionRepresents pressing Enter
Menu mode required, and other usefulinformation for item
Full menu modeDefault: 0Affects next file sentStays after power off
Learning How To Use the Front-Panel Display
Navigating the Menu System
Downloaded from www.Manualslib.com manuals search engine
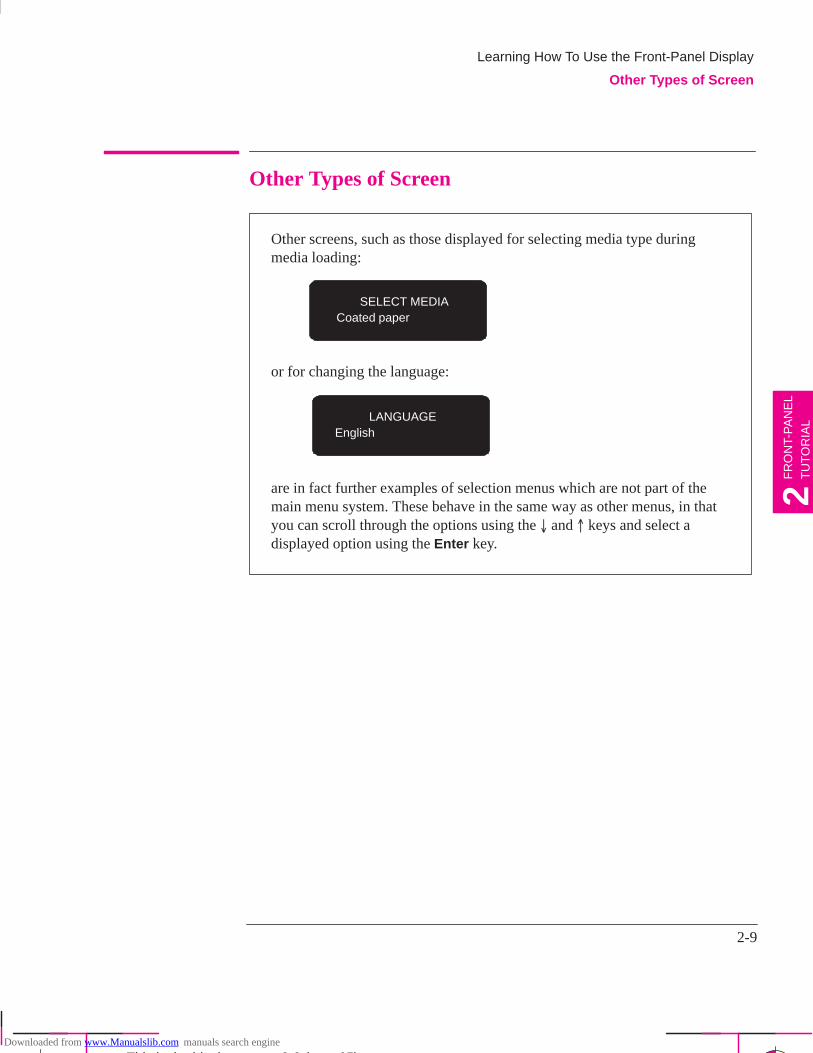
2-9
Company confidential. Postillo/755CM User’s Guide Final Freeze Status:Frozen
This is the cyan on page 2-9 (seq: 65)
This is the black on page 2-9 (seq: 65)
Other Types of Screen
LANGUAGEEnglish
SELECT MEDIACoated paper
or for changing the language:
Other screens, such as those displayed for selecting media type duringmedia loading:
are in fact further examples of selection menus which are not part of themain menu system. These behave in the same way as other menus, in thatyou can scroll through the options using the � and � keys and select adisplayed option using the Enter key.
Learning How To Use the Front-Panel Display
Other Types of Screen
FR
ON
T-P
AN
EL
TU
TO
RIA
L2
Downloaded from www.Manualslib.com manuals search engine
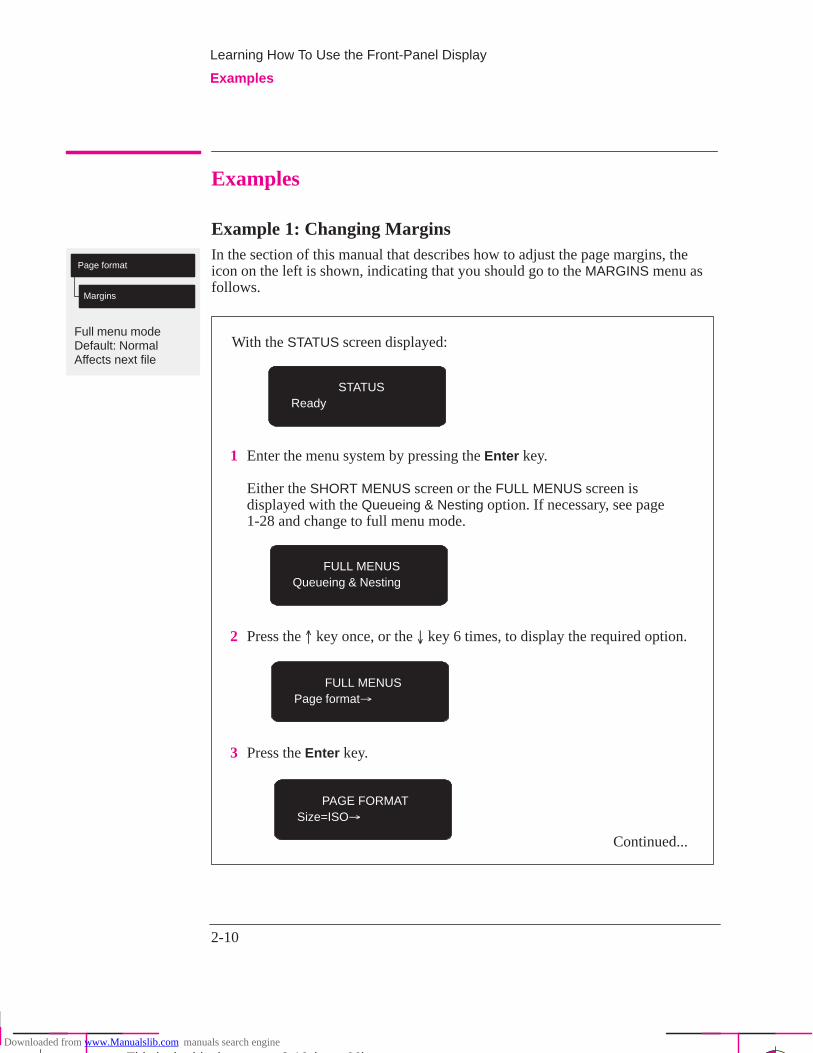
Full menu modeDefault: NormalAffects next file
Page format
Margins
2-10
Company confidential. Postillo/755CM User’s Guide Final Freeze Status:Frozen
This is the cyan on page 2-10 (seq: 66)
This is the black on page 2-10 (seq: 66)
Examples
Example 1: Changing MarginsIn the section of this manual that describes how to adjust the page margins, theicon on the left is shown, indicating that you should go to the MARGINS menu asfollows.
STATUSReady
1 Enter the menu system by pressing the Enter key.
Either the SHORT MENUS screen or the FULL MENUS screen isdisplayed with the Queueing & Nesting option. If necessary, see page1-28 and change to full menu mode.
FULL MENUSQueueing & Nesting
With the STATUS screen displayed:
2 Press the � key once, or the � key 6 times, to display the required option.
3 Press the Enter key.
FULL MENUSPage format�
PAGE FORMATSize=ISO�
Continued...
Learning How To Use the Front-Panel Display
Examples
Downloaded from www.Manualslib.com manuals search engine
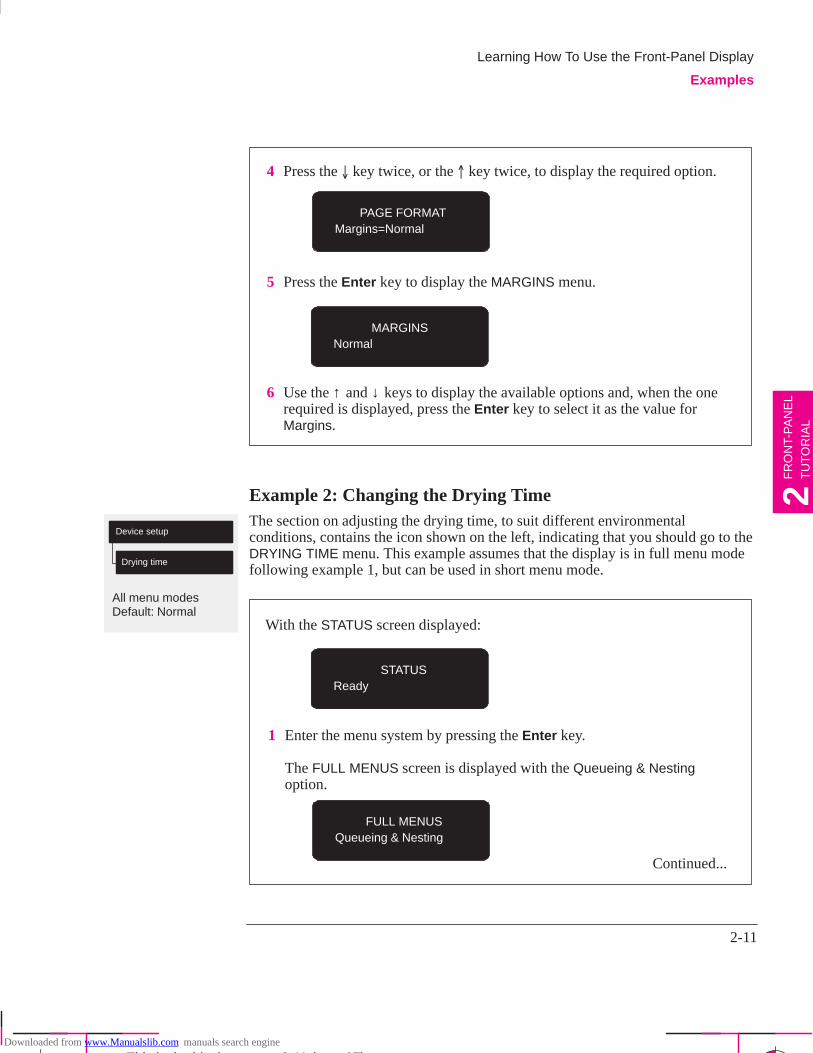
All menu modesDefault: Normal
Device setup
Drying time
2-11
Company confidential. Postillo/755CM User’s Guide Final Freeze Status:Frozen
This is the cyan on page 2-11 (seq: 67)
This is the black on page 2-11 (seq: 67)
4 Press the � key twice, or the � key twice, to display the required option.
PAGE FORMATMargins=Normal
5 Press the Enter key to display the MARGINS menu.
MARGINSNormal
6 Use the ↑ and ↓ keys to display the available options and, when the onerequired is displayed, press the Enter key to select it as the value forMargins.
Example 2: Changing the Drying TimeThe section on adjusting the drying time, to suit different environmentalconditions, contains the icon shown on the left, indicating that you should go to theDRYING TIME menu. This example assumes that the display is in full menu modefollowing example 1, but can be used in short menu mode.
With the STATUS screen displayed:
STATUSReady
1 Enter the menu system by pressing the Enter key.
The FULL MENUS screen is displayed with the Queueing & Nestingoption.
FULL MENUSQueueing & Nesting
Continued...
Learning How To Use the Front-Panel Display
Examples
FR
ON
T-P
AN
EL
TU
TO
RIA
L2
Downloaded from www.Manualslib.com manuals search engine
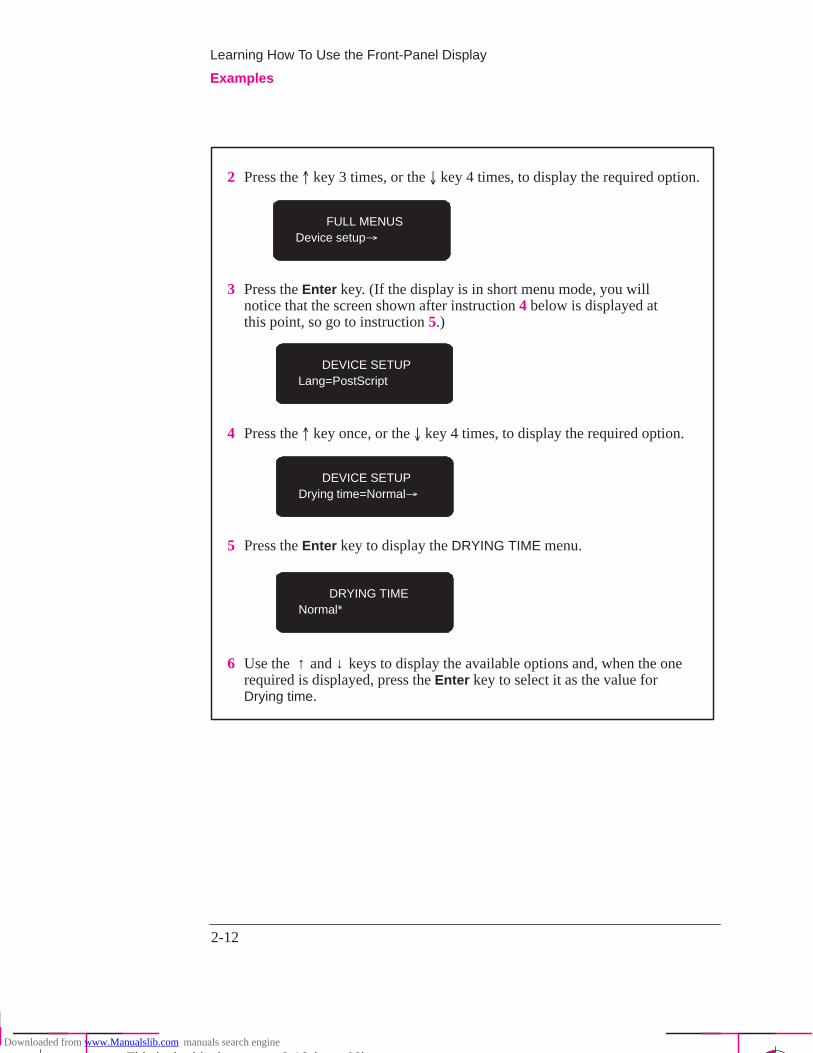
2-12
Company confidential. Postillo/755CM User’s Guide Final Freeze Status:Frozen
This is the cyan on page 2-12 (seq: 68)
This is the black on page 2-12 (seq: 68)
2 Press the � key 3 times, or the � key 4 times, to display the required option.
FULL MENUSDevice setup�
DEVICE SETUPLang=PostScript
3 Press the Enter key. (If the display is in short menu mode, you willnotice that the screen shown after instruction 4 below is displayed atthis point, so go to instruction 5.)
4 Press the � key once, or the � key 4 times, to display the required option.
DEVICE SETUPDrying time=Normal�
5 Press the Enter key to display the DRYING TIME menu.
DRYING TIMENormal*
6 Use the ↑ and ↓ keys to display the available options and, when the onerequired is displayed, press the Enter key to select it as the value forDrying time.
Learning How To Use the Front-Panel Display
Examples
Downloaded from www.Manualslib.com manuals search engine
3-1
Company confidential. Postillo/755CM User’s Guide Final Freeze Status:Frozen
This is the cyan on page 3-1 (seq: 69)
This is the black on page 3-1 (seq: 69)
Choosing Media 3-2. . . . . . . . . . . . . . . . . . . . . . . . . . . . . . . . . . . . .
Caring For Your Media 3-8. . . . . . . . . . . . . . . . . . . . . . . . . . . . . . .
Loading Media 3-9. . . . . . . . . . . . . . . . . . . . . . . . . . . . . . . . . . . . . .
Unloading Media 3-21. . . . . . . . . . . . . . . . . . . . . . . . . . . . . . . . . . .
Replacing Cartridges 3-25. . . . . . . . . . . . . . . . . . . . . . . . . . . . . . . .
Working With Media and Cartridges
3
ME
DIA
AN
DC
AR
TR
IDG
ES
3
Downloaded from www.Manualslib.com manuals search engine
3-2
Company confidential. Postillo/755CM User’s Guide Final Freeze Status:Frozen
This is the cyan on page 3-2 (seq: 70)
This is the black on page 3-2 (seq: 70)
Choosing Media
Your printer supports many types of paper and other media types. Choosing thebest media type for your requirements is the first (and most important) step inensuring good print quality. It is recommended you only use genuineHewlett-Packard media, whose reliability and performance have been developedand thoroughly tested to give trouble-free performance and optimal print quality.
For details of Hewlett-Packard media, see page 3-3 and the HP DesignJet Papersand Films catalog supplied with the printer.
Five Important Points about Media Types
When selecting different opaque paper types, be aware that you will usesignificantly less ink printing on coated types than on normal opaque bond.
Most media types are supported , However the quality of some prints may not be asgood if you do not use HP media. For media details, see the table on page 3-5.
Whenever you load a roll or a sheet, the printer’s front-panel display promptsyou to specify which media type you are loading. It is absolutely essential forgood print quality to specify this correctly. The table on page 3-3 gives you allthe information you need. If media is already loaded and you are unsure whichmedia type was specified, go to Utilities / Statistics in the front panel, asexplained on page 7-2.
You should also be aware of which print quality setting (best, normal or fast)you are using. You can set this either from your software or from the printer’sfront panel (the software driver setting will override any print quality settingmade on the front panel). The combination of media type and print qualitysettings automatically tells the printer how to place the ink on the media – forexample, in terms of ink density and number of passes of the cartridges. Formore details, see the tables on page(s) 3-6 and 3-7. There are print qualityimprovements which can be made using sharp lines on the front panel menu orin the Windows driver, this is described on page 5-15.
Included with this printer is a HP DesignJet Papers and Films catalog whichgives ordering details for Hewlett-Packard media supplies. To get the latestversion of this document, contact your local HP Sales and Support office.
Working with Media and Cartridges
Choosing Media
Downloaded from www.Manualslib.com manuals search engine
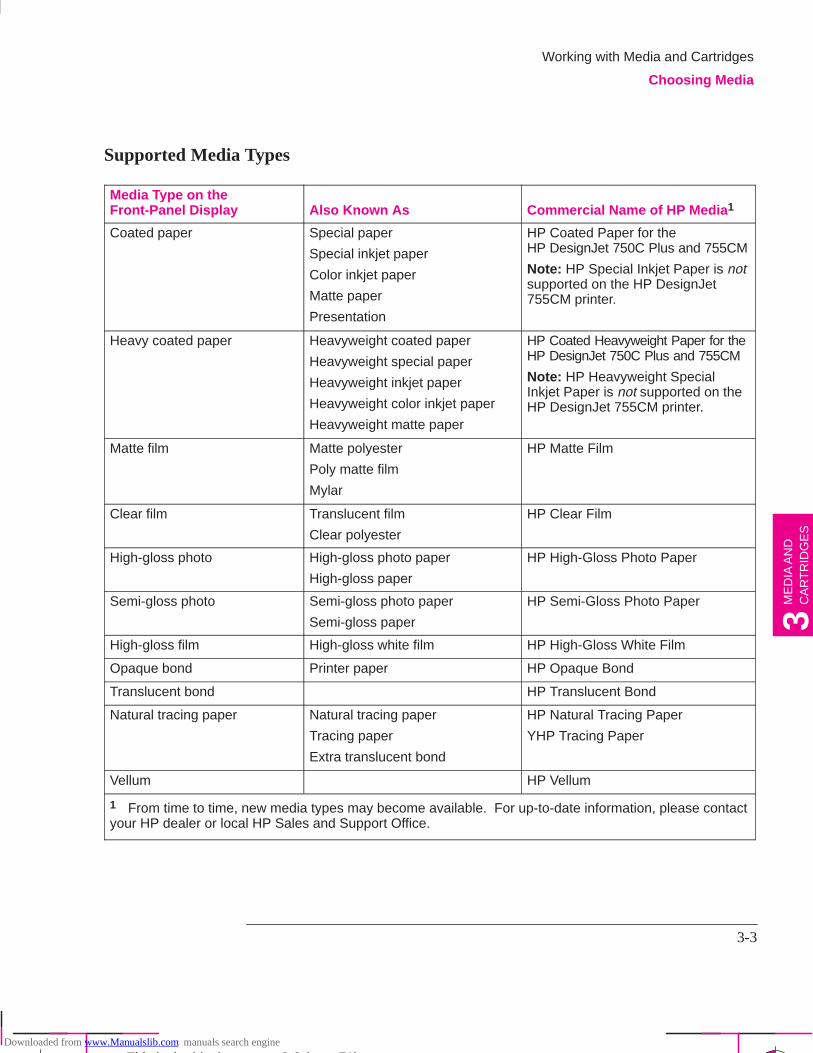
3-3
Company confidential. Postillo/755CM User’s Guide Final Freeze Status:Frozen
This is the cyan on page 3-3 (seq: 71)
This is the black on page 3-3 (seq: 71)
Supported Media Types
Media Type on theFront-Panel Display Also Known As Commercial Name of HP Media 1
Coated paper Special paper
Special inkjet paper
Color inkjet paper
Matte paper
Presentation
HP Coated Paper for the HP DesignJet 750C Plus and 755CM
Note: HP Special Inkjet Paper is notsupported on the HP DesignJet755CM printer.
Heavy coated paper Heavyweight coated paper
Heavyweight special paper
Heavyweight inkjet paper
Heavyweight color inkjet paper
Heavyweight matte paper
HP Coated Heavyweight Paper for theHP DesignJet 750C Plus and 755CM
Note: HP Heavyweight SpecialInkjet Paper is not supported on theHP DesignJet 755CM printer.
Matte film Matte polyester
Poly matte film
Mylar
HP Matte Film
Clear film Translucent film
Clear polyester
HP Clear Film
High-gloss photo High-gloss photo paper
High-gloss paper
HP High-Gloss Photo Paper
Semi-gloss photo Semi-gloss photo paper
Semi-gloss paper
HP Semi-Gloss Photo Paper
High-gloss film High-gloss white film HP High-Gloss White Film
Opaque bond Printer paper HP Opaque Bond
Translucent bond HP Translucent Bond
Natural tracing paper Natural tracing paper
Tracing paper
Extra translucent bond
HP Natural Tracing Paper
YHP Tracing Paper
Vellum HP Vellum
1 From time to time, new media types may become available. For up-to-date information, please contactyour HP dealer or local HP Sales and Support Office.
Working with Media and Cartridges
Choosing Media
ME
DIA
AN
DC
AR
TR
IDG
ES
3
Downloaded from www.Manualslib.com manuals search engine
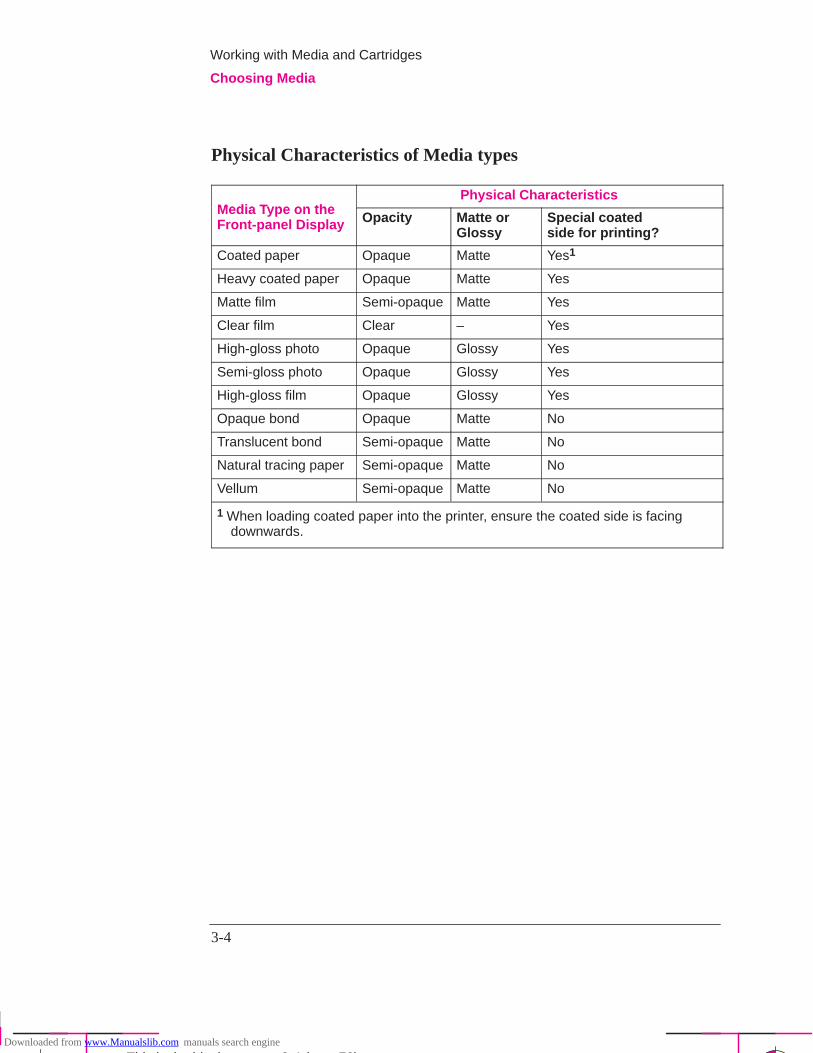
3-4
Company confidential. Postillo/755CM User’s Guide Final Freeze Status:Frozen
This is the cyan on page 3-4 (seq: 72)
This is the black on page 3-4 (seq: 72)
Physical Characteristics of Media types
Media Type on thePhysical Characteristics
Media Type on theFront-panel Display Opacity Matte or
GlossySpecial coatedside for printing?
Coated paper Opaque Matte Yes1
Heavy coated paper Opaque Matte Yes
Matte film Semi-opaque Matte Yes
Clear film Clear – Yes
High-gloss photo Opaque Glossy Yes
Semi-gloss photo Opaque Glossy Yes
High-gloss film Opaque Glossy Yes
Opaque bond Opaque Matte No
Translucent bond Semi-opaque Matte No
Natural tracing paper Semi-opaque Matte No
Vellum Semi-opaque Matte No
1 When loading coated paper into the printer, ensure the coated side is facingdownwards.
Working with Media and Cartridges
Choosing Media
Downloaded from www.Manualslib.com manuals search engine
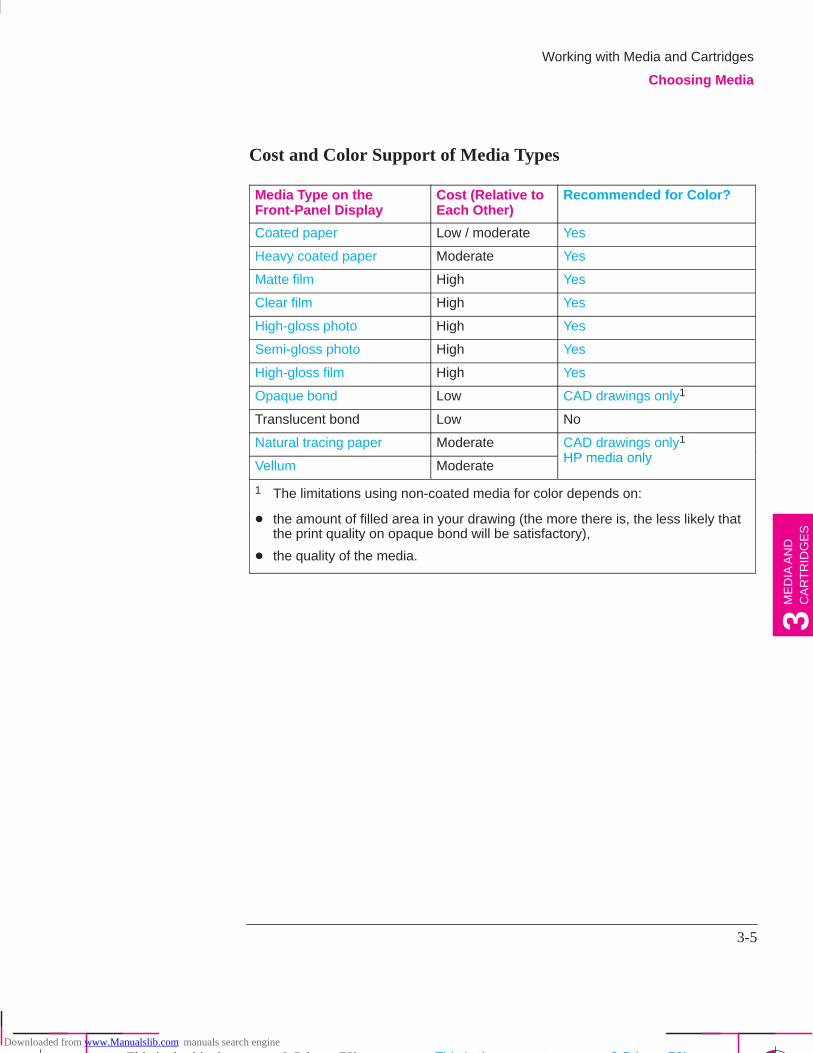
3-5
Company confidential. Postillo/755CM User’s Guide Final Freeze Status:Frozen
This is the cyan on page 3-5 (seq: 73)
This is the black on page 3-5 (seq: 73)
Cost and Color Support of Media Types
Media Type on theFront-Panel Display
Cost (Relative toEach Other)
Recommended for Color?
Coated paper Low / moderate Yes
Heavy coated paper Moderate Yes
Matte film High Yes
Clear film High Yes
High-gloss photo High Yes
Semi-gloss photo High Yes
High-gloss film High Yes
Opaque bond Low CAD drawings only1
Translucent bond Low No
Natural tracing paper Moderate CAD drawings only1
HP media onlyVellum Moderate
HP media only
1 The limitations using non-coated media for color depends on:
� the amount of filled area in your drawing (the more there is, the less likely thatthe print quality on opaque bond will be satisfactory),
� the quality of the media.
Working with Media and Cartridges
Choosing Media
ME
DIA
AN
DC
AR
TR
IDG
ES
3
This is the magenta on page 3-5 (seq: 73)Downloaded from www.Manualslib.com manuals search engine
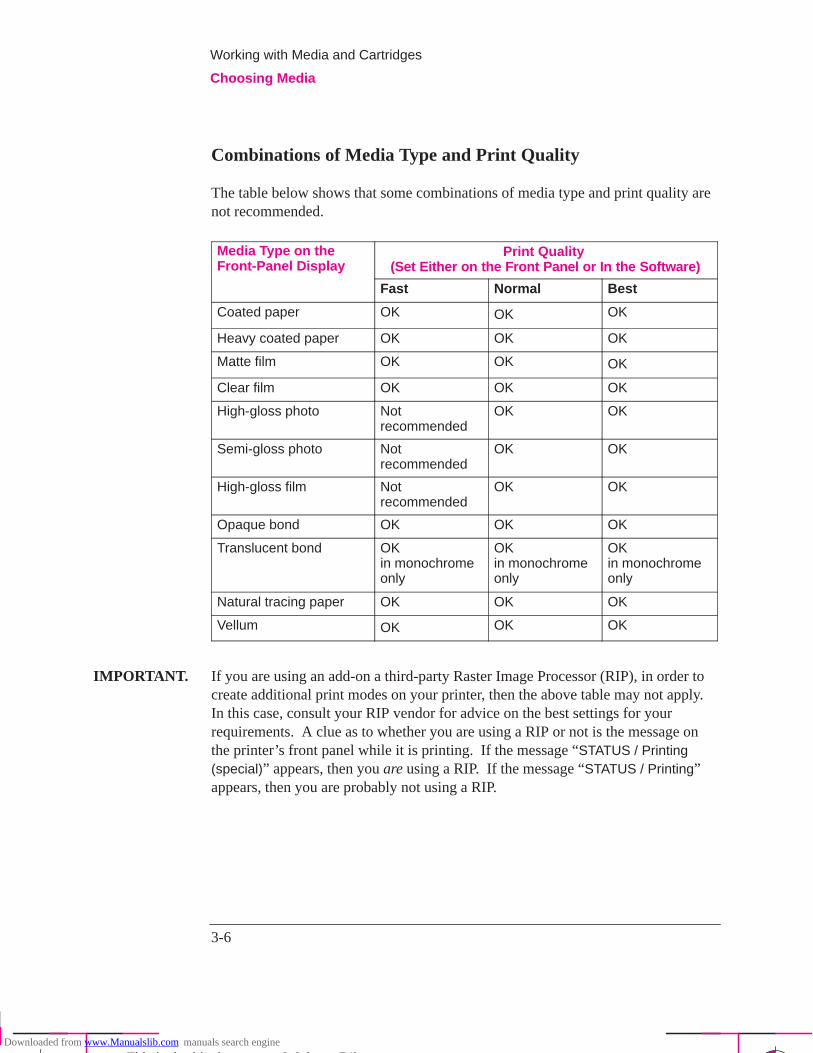
3-6
Company confidential. Postillo/755CM User’s Guide Final Freeze Status:Frozen
This is the cyan on page 3-6 (seq: 74)
This is the black on page 3-6 (seq: 74)
Combinations of Media Type and Print Quality
The table below shows that some combinations of media type and print quality arenot recommended.
Media Type on theFront-Panel Display
Print Quality (Set Either on the Front Panel or In the Software)
Fast Normal Best
Coated paper OK OK OK
Heavy coated paper OK OK OK
Matte film OK OK OK
Clear film OK OK OK
High-gloss photo Notrecommended
OK OK
Semi-gloss photo Notrecommended
OK OK
High-gloss film Notrecommended
OK OK
Opaque bond OK OK OK
Translucent bond OKin monochromeonly
OKin monochromeonly
OK in monochromeonly
Natural tracing paper OK OK OK
Vellum OK OK OK
IMPORTANT. If you are using an add-on a third-party Raster Image Processor (RIP), in order tocreate additional print modes on your printer, then the above table may not apply.In this case, consult your RIP vendor for advice on the best settings for yourrequirements. A clue as to whether you are using a RIP or not is the message onthe printer’s front panel while it is printing. If the message “STATUS / Printing(special)” appears, then you are using a RIP. If the message “STATUS / Printing”appears, then you are probably not using a RIP.
Working with Media and Cartridges
Choosing Media
Downloaded from www.Manualslib.com manuals search engine
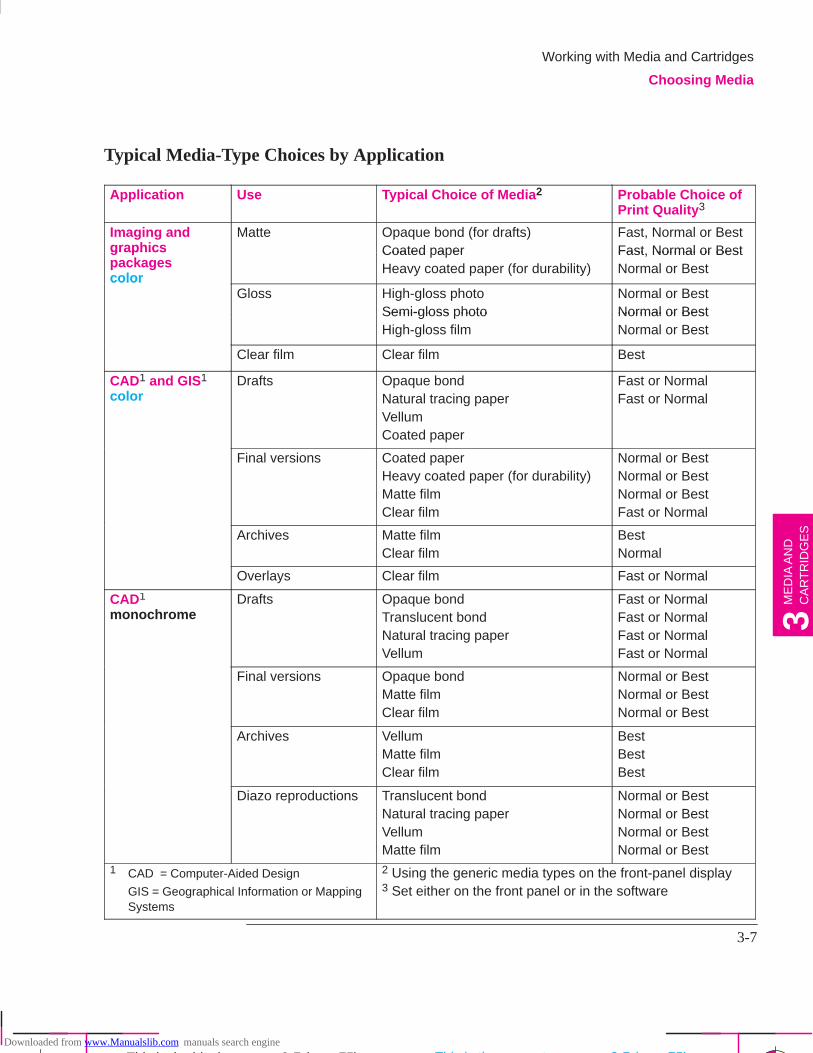
3-7
Company confidential. Postillo/755CM User’s Guide Final Freeze Status:Frozen
This is the cyan on page 3-7 (seq: 75)
This is the black on page 3-7 (seq: 75)
Typical Media-Type Choices by Application
Application Use Typical Choice of Media 2 Probable Choice ofPrint Quality 3
Imaging andgraphics
Matte Opaque bond (for drafts)Coated paper
Fast, Normal or BestFast Normal or Bestgraphics
packagescolor
Coated a erHeavy coated paper (for durability)
Fast, Normal or BestNormal or Best
colorGloss High-gloss photo
Semi-gloss photoNormal or BestNormal or BestSemi-gloss hoto
High-gloss filmNormal or BestNormal or Best
Clear film Clear film Best
CAD1 and GIS1
colorDrafts Opaque bond
Natural tracing paperVellumCoated paper
Fast or NormalFast or Normal
Final versions Coated paperHeavy coated paper (for durability)Matte filmClear film
Normal or BestNormal or BestNormal or BestFast or Normal
Archives Matte filmClear film
BestNormal
Overlays Clear film Fast or Normal
CAD1
monochromeDrafts Opaque bond
Translucent bondNatural tracing paperVellum
Fast or NormalFast or NormalFast or NormalFast or Normal
Final versions Opaque bondMatte filmClear film
Normal or BestNormal or BestNormal or Best
Archives VellumMatte filmClear film
BestBestBest
Diazo reproductions Translucent bondNatural tracing paperVellumMatte film
Normal or BestNormal or BestNormal or BestNormal or Best
1 CAD = Computer-Aided Design
GIS = Geographical Information or MappingSystems
2 Using the generic media types on the front-panel display3 Set either on the front panel or in the software
Working with Media and Cartridges
Choosing Media
ME
DIA
AN
DC
AR
TR
IDG
ES
3
This is the magenta on page 3-7 (seq: 75)Downloaded from www.Manualslib.com manuals search engine
3-8
Company confidential. Postillo/755CM User’s Guide Final Freeze Status:Frozen
This is the cyan on page 3-8 (seq: 76)
This is the black on page 3-8 (seq: 76)
Caring for Your Media
Handle film and glossy media by the edge(s) or wear cotton gloves. Skin oilscan interact with ink and cause it to smear.
Make sure the media bin is installed between the printer’s legs. When theprinter finishes each print on roll media, it automatically cuts the page and dropsit into the bin. Note that mixing page sizes can cause shorter prints to curl andshuffle in the bin.
Colors will eventually fade or change if exposed to office light or sunlight overa period of time. Therefore:
– avoid exposing your prints longer than necessary to direct sunlight.
– ideally, when not using your prints, store them away from any light, forexample, in a drawer.
Working with Media and Cartridges
Caring for Your Media
Downloaded from www.Manualslib.com manuals search engine
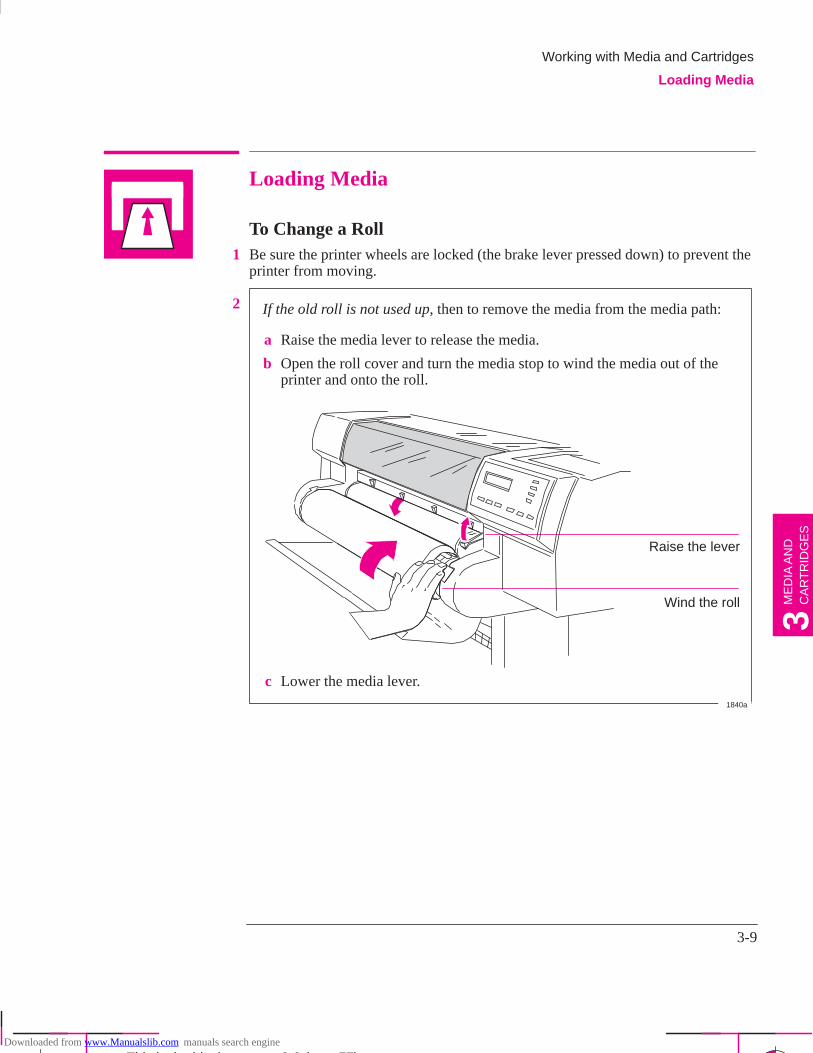
3-9
Company confidential. Postillo/755CM User’s Guide Final Freeze Status:Frozen
This is the cyan on page 3-9 (seq: 77)
This is the black on page 3-9 (seq: 77)
Loading Media
To Change a Roll1 Be sure the printer wheels are locked (the brake lever pressed down) to prevent the
printer from moving.
2 If the old roll is not used up, then to remove the media from the media path:
a Raise the media lever to release the media.
b Open the roll cover and turn the media stop to wind the media out of theprinter and onto the roll.
Raise the lever
Wind the roll
c Lower the media lever.
1840a
Working with Media and Cartridges
Loading Media
ME
DIA
AN
DC
AR
TR
IDG
ES
3
Downloaded from www.Manualslib.com manuals search engine
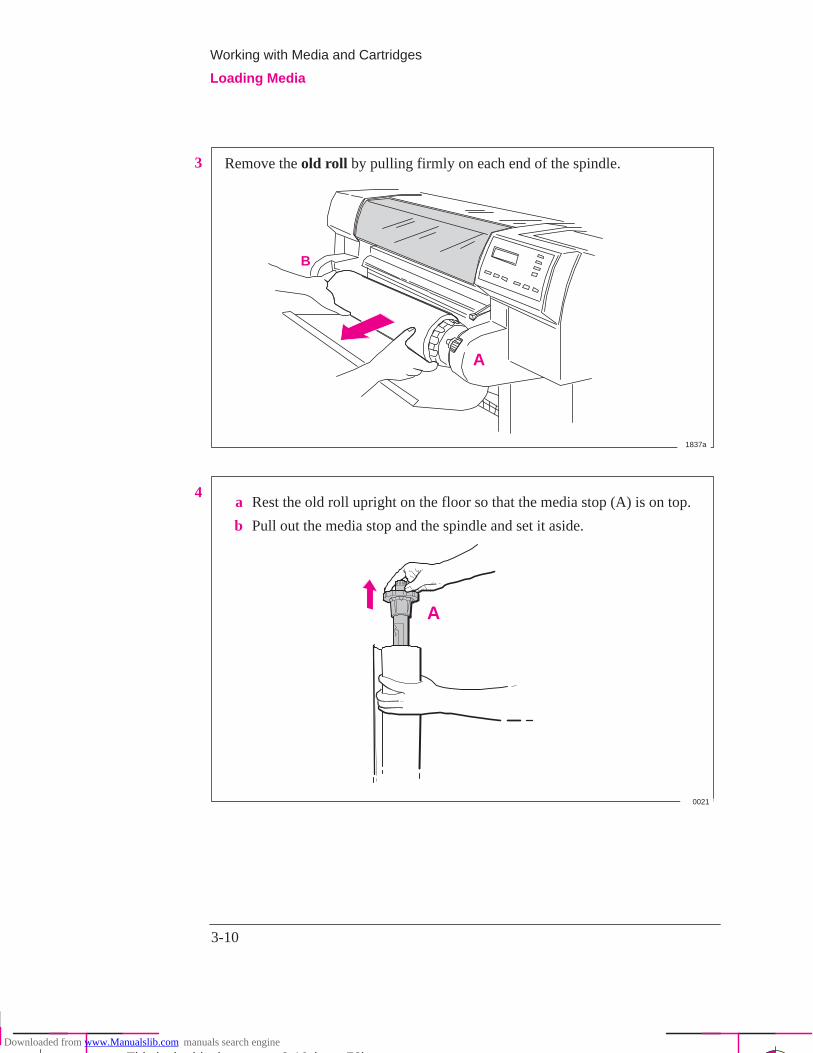
3-10
Company confidential. Postillo/755CM User’s Guide Final Freeze Status:Frozen
This is the cyan on page 3-10 (seq: 78)
This is the black on page 3-10 (seq: 78)
3 Remove the old roll by pulling firmly on each end of the spindle.
A
B
1837a
4a Rest the old roll upright on the floor so that the media stop (A) is on top.
b Pull out the media stop and the spindle and set it aside.
A
0021
Working with Media and Cartridges
Loading Media
Downloaded from www.Manualslib.com manuals search engine
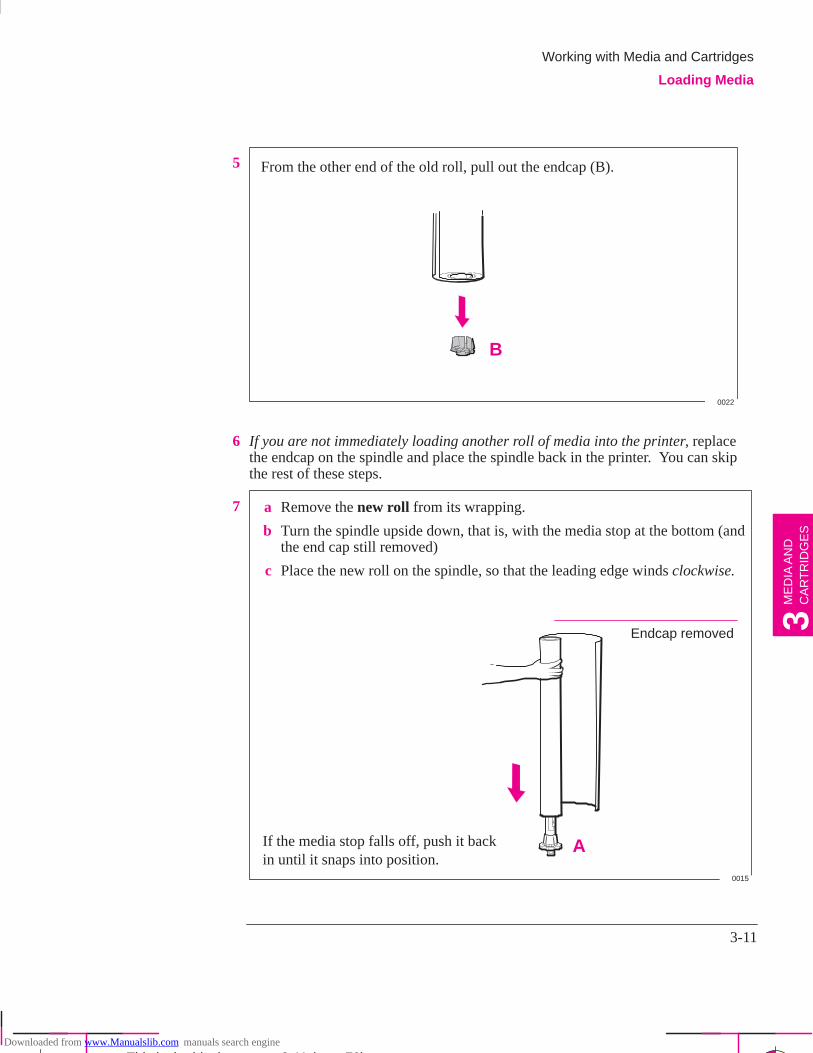
3-11
Company confidential. Postillo/755CM User’s Guide Final Freeze Status:Frozen
This is the cyan on page 3-11 (seq: 79)
This is the black on page 3-11 (seq: 79)
5 From the other end of the old roll, pull out the endcap (B).
B
0022
6 If you are not immediately loading another roll of media into the printer, replacethe endcap on the spindle and place the spindle back in the printer. You can skipthe rest of these steps.
7 a Remove the new roll from its wrapping.
b Turn the spindle upside down, that is, with the media stop at the bottom (andthe end cap still removed)
c Place the new roll on the spindle, so that the leading edge winds clockwise.
If the media stop falls off, push it backin until it snaps into position.
Endcap removed
A
0015
Working with Media and Cartridges
Loading Media
ME
DIA
AN
DC
AR
TR
IDG
ES
3
Downloaded from www.Manualslib.com manuals search engine
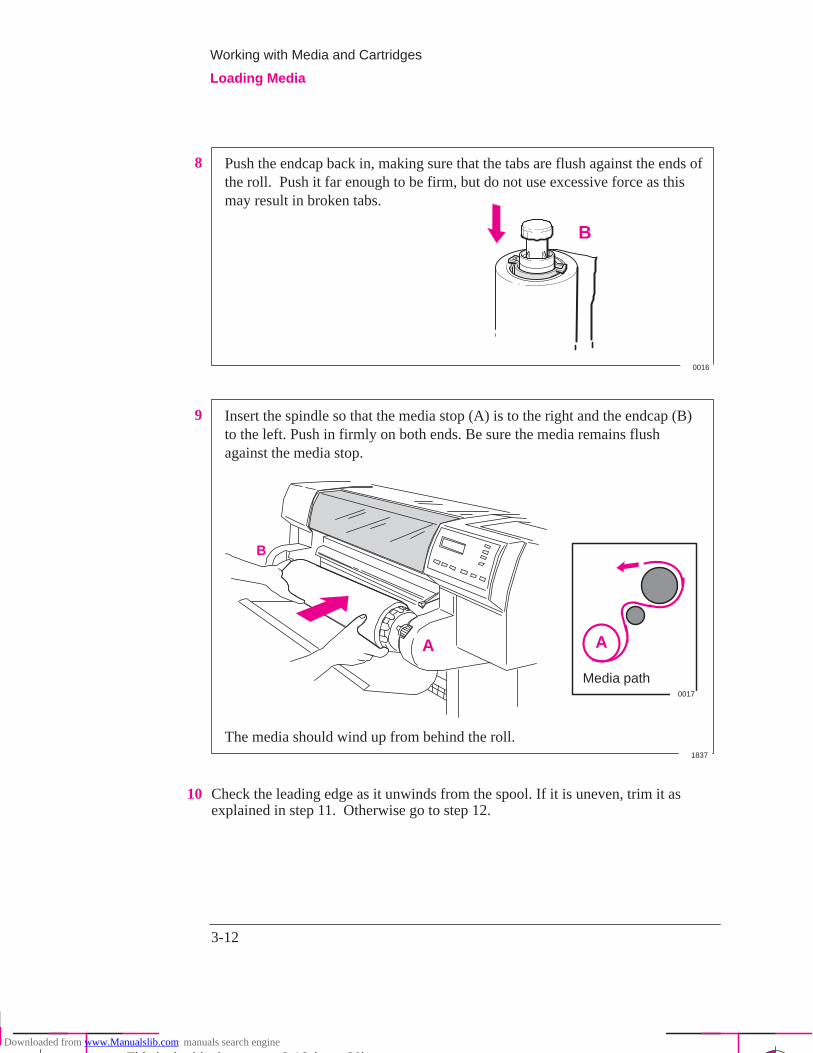
3-12
Company confidential. Postillo/755CM User’s Guide Final Freeze Status:Frozen
This is the cyan on page 3-12 (seq: 80)
This is the black on page 3-12 (seq: 80)
8 Push the endcap back in, making sure that the tabs are flush against the ends ofthe roll. Push it far enough to be firm, but do not use excessive force as thismay result in broken tabs.
B
0016
9 Insert the spindle so that the media stop (A) is to the right and the endcap (B)to the left. Push in firmly on both ends. Be sure the media remains flushagainst the media stop.
The media should wind up from behind the roll.
A
Media path
A
B
1837
0017
10 Check the leading edge as it unwinds from the spool. If it is uneven, trim it asexplained in step 11. Otherwise go to step 12.
Working with Media and Cartridges
Loading Media
Downloaded from www.Manualslib.com manuals search engine
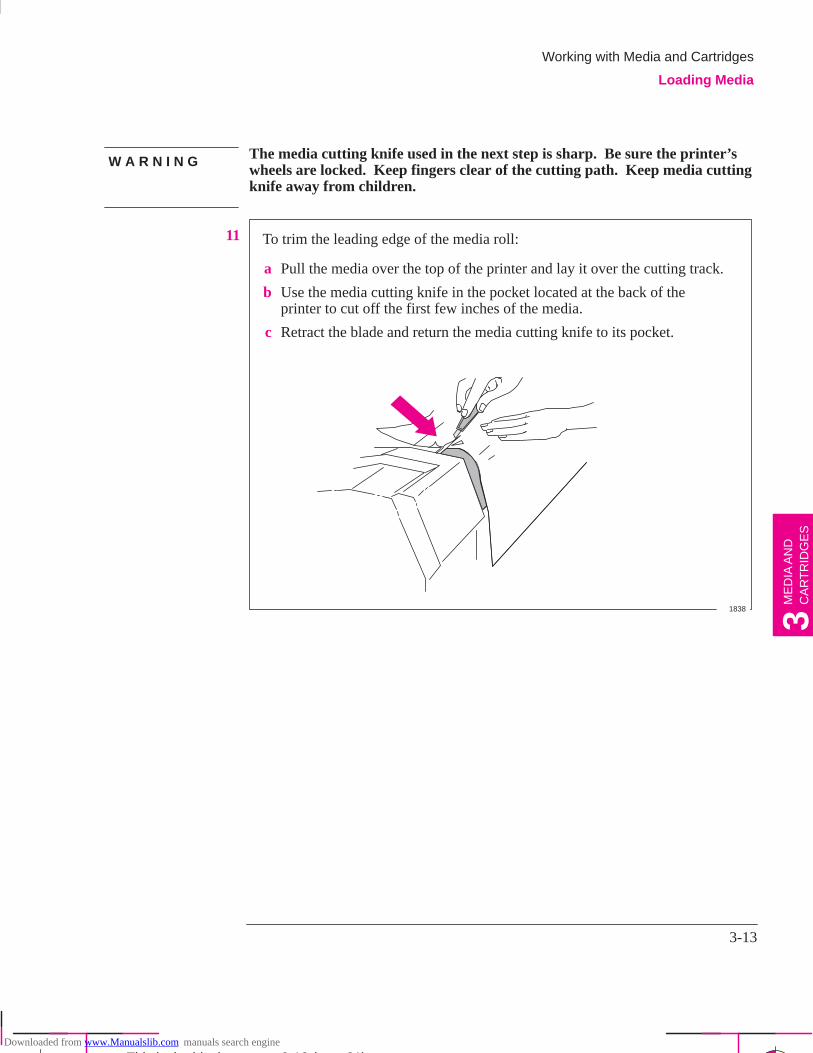
3-13
Company confidential. Postillo/755CM User’s Guide Final Freeze Status:Frozen
This is the cyan on page 3-13 (seq: 81)
This is the black on page 3-13 (seq: 81)
The media cutting knife used in the next step is sharp. Be sure the printer’swheels are locked. Keep fingers clear of the cutting path. Keep media cuttingknife away from children.
11
a Pull the media over the top of the printer and lay it over the cutting track.
b Use the media cutting knife in the pocket located at the back of theprinter to cut off the first few inches of the media.
c Retract the blade and return the media cutting knife to its pocket.
To trim the leading edge of the media roll:
1838
Working with Media and Cartridges
Loading Media
ME
DIA
AN
DC
AR
TR
IDG
ES
3
W A R N I N G
Downloaded from www.Manualslib.com manuals search engine
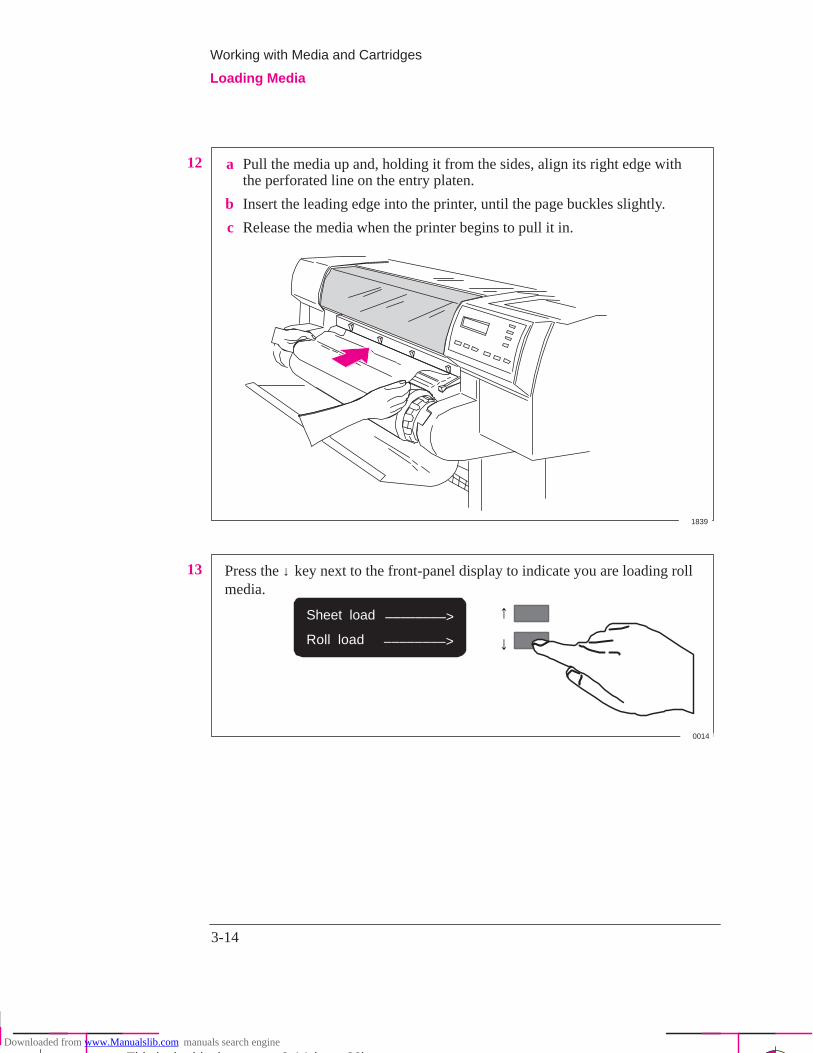
3-14
Company confidential. Postillo/755CM User’s Guide Final Freeze Status:Frozen
This is the cyan on page 3-14 (seq: 82)
This is the black on page 3-14 (seq: 82)
12 a Pull the media up and, holding it from the sides, align its right edge withthe perforated line on the entry platen.
b Insert the leading edge into the printer, until the page buckles slightly.
c Release the media when the printer begins to pull it in.
1839
13 Press the ↓ key next to the front-panel display to indicate you are loading rollmedia.
Sheet load
Roll load ↓
↑––––––––>
––––––––>
0014
Working with Media and Cartridges
Loading Media
Downloaded from www.Manualslib.com manuals search engine
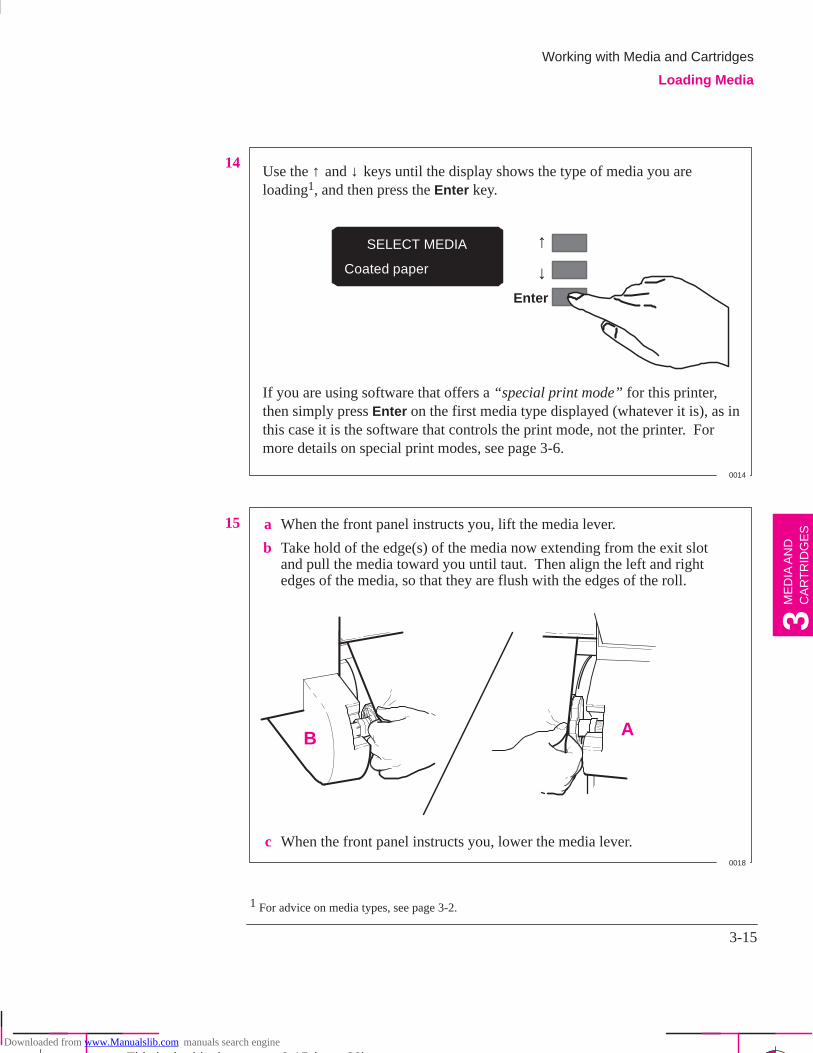
3-15
Company confidential. Postillo/755CM User’s Guide Final Freeze Status:Frozen
This is the cyan on page 3-15 (seq: 83)
This is the black on page 3-15 (seq: 83)
14
SELECT MEDIA
Coated paper
Enter
↓
↑
Use the ↑ and ↓ keys until the display shows the type of media you areloading1, and then press the Enter key.
If you are using software that offers a “special print mode” for this printer,then simply press Enter on the first media type displayed (whatever it is), as inthis case it is the software that controls the print mode, not the printer. Formore details on special print modes, see page 3-6.
0014
15 a When the front panel instructs you, lift the media lever.
b Take hold of the edge(s) of the media now extending from the exit slotand pull the media toward you until taut. Then align the left and rightedges of the media, so that they are flush with the edges of the roll.
c When the front panel instructs you, lower the media lever.
AB
0018
1 For advice on media types, see page 3-2.
Working with Media and Cartridges
Loading Media
ME
DIA
AN
DC
AR
TR
IDG
ES
3
Downloaded from www.Manualslib.com manuals search engine
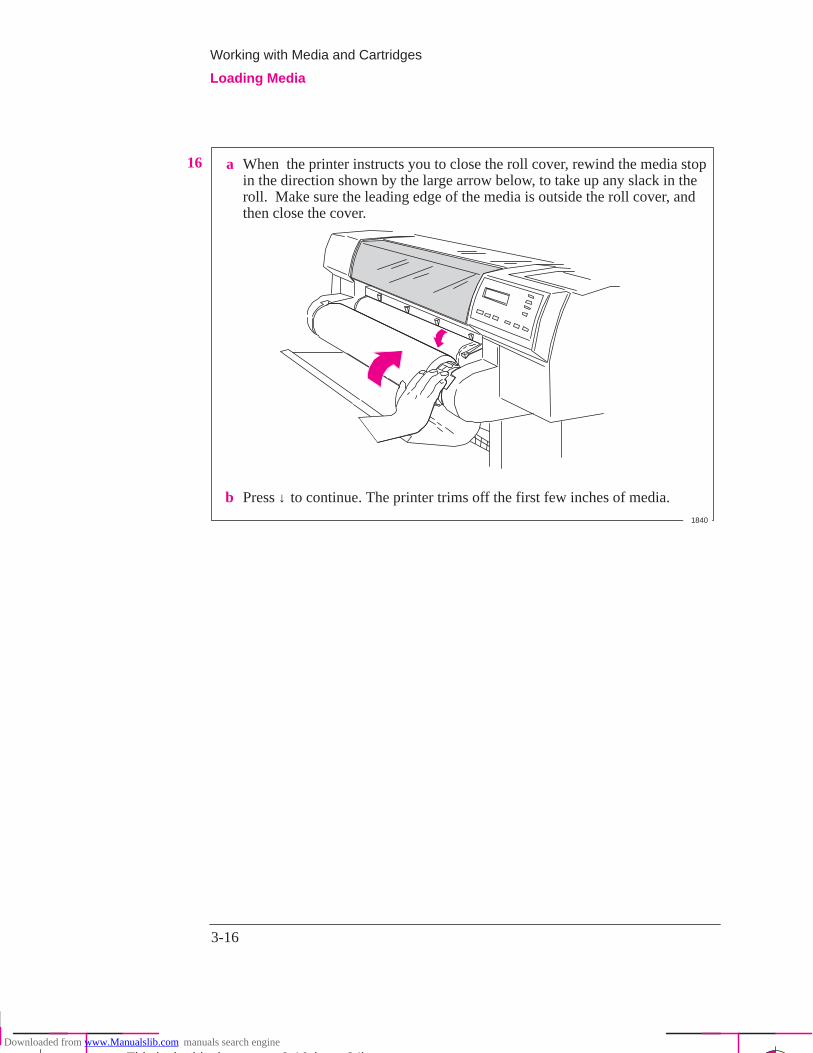
3-16
Company confidential. Postillo/755CM User’s Guide Final Freeze Status:Frozen
This is the cyan on page 3-16 (seq: 84)
This is the black on page 3-16 (seq: 84)
16 a When the printer instructs you to close the roll cover, rewind the media stopin the direction shown by the large arrow below, to take up any slack in theroll. Make sure the leading edge of the media is outside the roll cover, andthen close the cover.
b Press ↓ to continue. The printer trims off the first few inches of media.1840
Working with Media and Cartridges
Loading Media
Downloaded from www.Manualslib.com manuals search engine
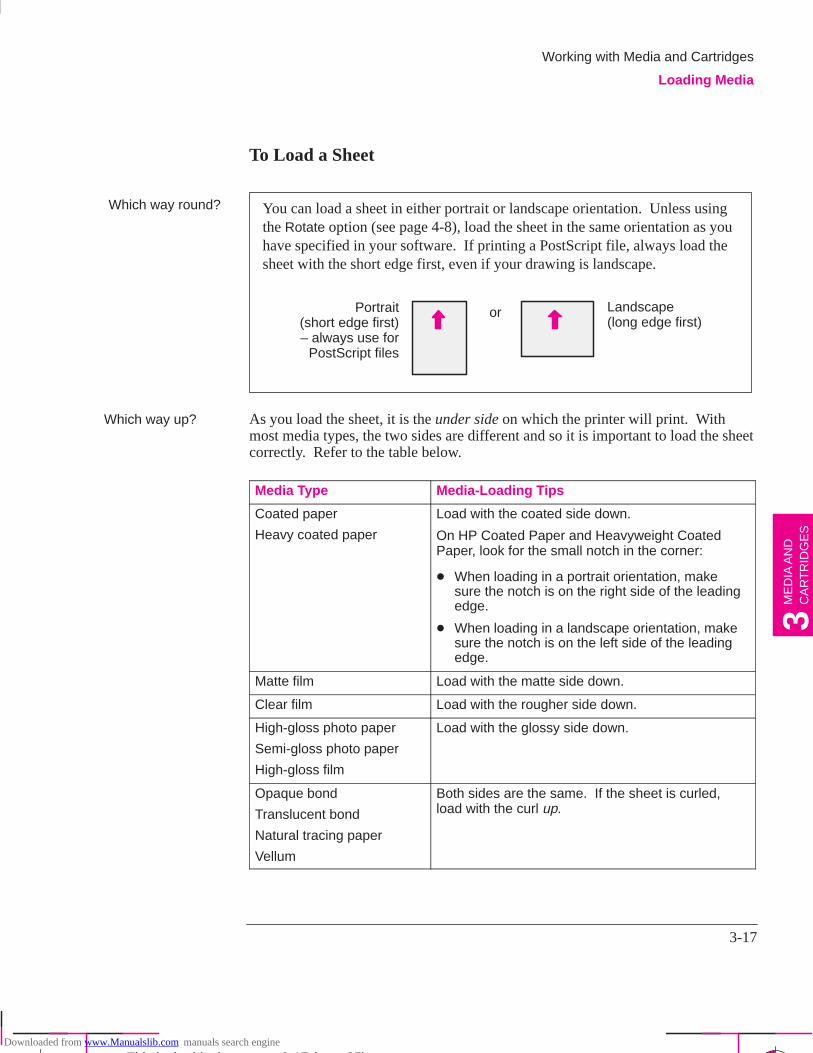
Which way round?
3-17
Company confidential. Postillo/755CM User’s Guide Final Freeze Status:Frozen
This is the cyan on page 3-17 (seq: 85)
This is the black on page 3-17 (seq: 85)
To Load a Sheet
You can load a sheet in either portrait or landscape orientation. Unless usingthe Rotate option (see page 4-8), load the sheet in the same orientation as youhave specified in your software. If printing a PostScript file, always load thesheet with the short edge first, even if your drawing is landscape.
orPortrait(short edge first)– always use for
PostScript files
Landscape(long edge first)
Which way up? As you load the sheet, it is the under side on which the printer will print. Withmost media types, the two sides are different and so it is important to load the sheetcorrectly. Refer to the table below.
Media Type Media-Loading Tips
Coated paper
Heavy coated paper
Load with the coated side down.
On HP Coated Paper and Heavyweight CoatedPaper, look for the small notch in the corner:
� When loading in a portrait orientation, makesure the notch is on the right side of the leadingedge.
� When loading in a landscape orientation, makesure the notch is on the left side of the leadingedge.
Matte film Load with the matte side down.
Clear film Load with the rougher side down.
High-gloss photo paper
Semi-gloss photo paper
High-gloss film
Load with the glossy side down.
Opaque bond
Translucent bond
Natural tracing paper
Vellum
Both sides are the same. If the sheet is curled,load with the curl up.
Working with Media and Cartridges
Loading Media
ME
DIA
AN
DC
AR
TR
IDG
ES
3
Downloaded from www.Manualslib.com manuals search engine
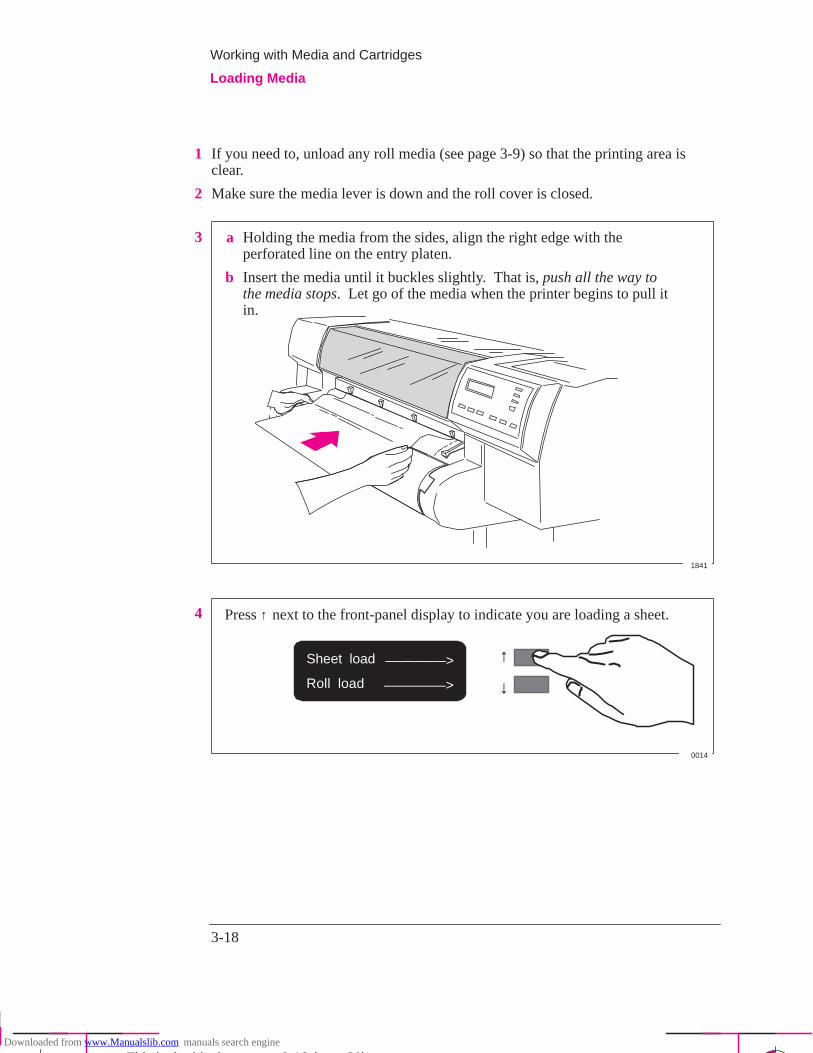
3-18
Company confidential. Postillo/755CM User’s Guide Final Freeze Status:Frozen
This is the cyan on page 3-18 (seq: 86)
This is the black on page 3-18 (seq: 86)
1 If you need to, unload any roll media (see page 3-9) so that the printing area isclear.
2 Make sure the media lever is down and the roll cover is closed.
3 a Holding the media from the sides, align the right edge with theperforated line on the entry platen.
b Insert the media until it buckles slightly. That is, push all the way tothe media stops. Let go of the media when the printer begins to pull itin.
1841
4 Press ↑ next to the front-panel display to indicate you are loading a sheet.
Sheet load
Roll load ↓
↑––––––––>
––––––––>
0014
Working with Media and Cartridges
Loading Media
Downloaded from www.Manualslib.com manuals search engine
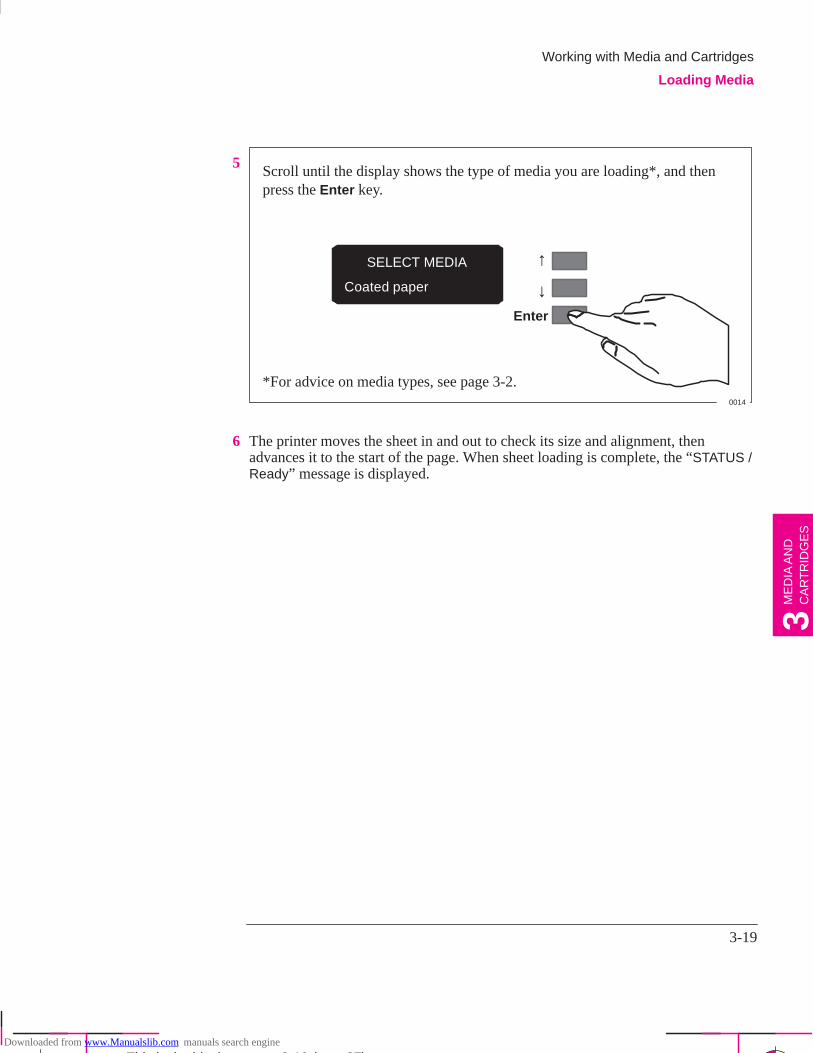
3-19
Company confidential. Postillo/755CM User’s Guide Final Freeze Status:Frozen
This is the cyan on page 3-19 (seq: 87)
This is the black on page 3-19 (seq: 87)
5
SELECT MEDIA
Coated paper
Enter
↓
↑
Scroll until the display shows the type of media you are loading*, and thenpress the Enter key.
*For advice on media types, see page 3-2.0014
6 The printer moves the sheet in and out to check its size and alignment, thenadvances it to the start of the page. When sheet loading is complete, the “STATUS /Ready” message is displayed.
Working with Media and Cartridges
Loading Media
ME
DIA
AN
DC
AR
TR
IDG
ES
3
Downloaded from www.Manualslib.com manuals search engine
Full menu modeDefault: OffResets after power off
Device setup
Skew tolerance
3-20
Company confidential. Postillo/755CM User’s Guide Final Freeze Status:Frozen
This is the cyan on page 3-20 (seq: 88)
This is the black on page 3-20 (seq: 88)
Compensating for Badly Cut Media
You can only use this feature when sheet media is selected on the front panel.
If the media is persistently difficult to load, it could be an indication that it hasbeen badly cut. That is, it has been cut unevenly with the media width on theleading edge different to the width of the trailing edge. A front-panel option calledSkew tolerance helps you compensate for the shape of some poorly cut media.When you properly load the leading edge of poorly cut media along the perforatedline on the platen, you may notice the trailing edge displaces from the line by asmall distance and the printer will not accept the media. The printer can acceptpoorly cut media that displaces less than 1.0 cm from the perforated line.
Media that is cut properly should not need the help of the skew tolerance feature.In fact, using this feature for properly cut media increases the risk of skewing yourprint on the page.
To Adjust Skew Tolerance
Skew Tolerancein Front Panel
Maximum Acceptable Skew of Loaded Sheet
Off 0.4 cm
On 1.0 cm
Working with Media and Cartridges
Loading Media
Downloaded from www.Manualslib.com manuals search engine
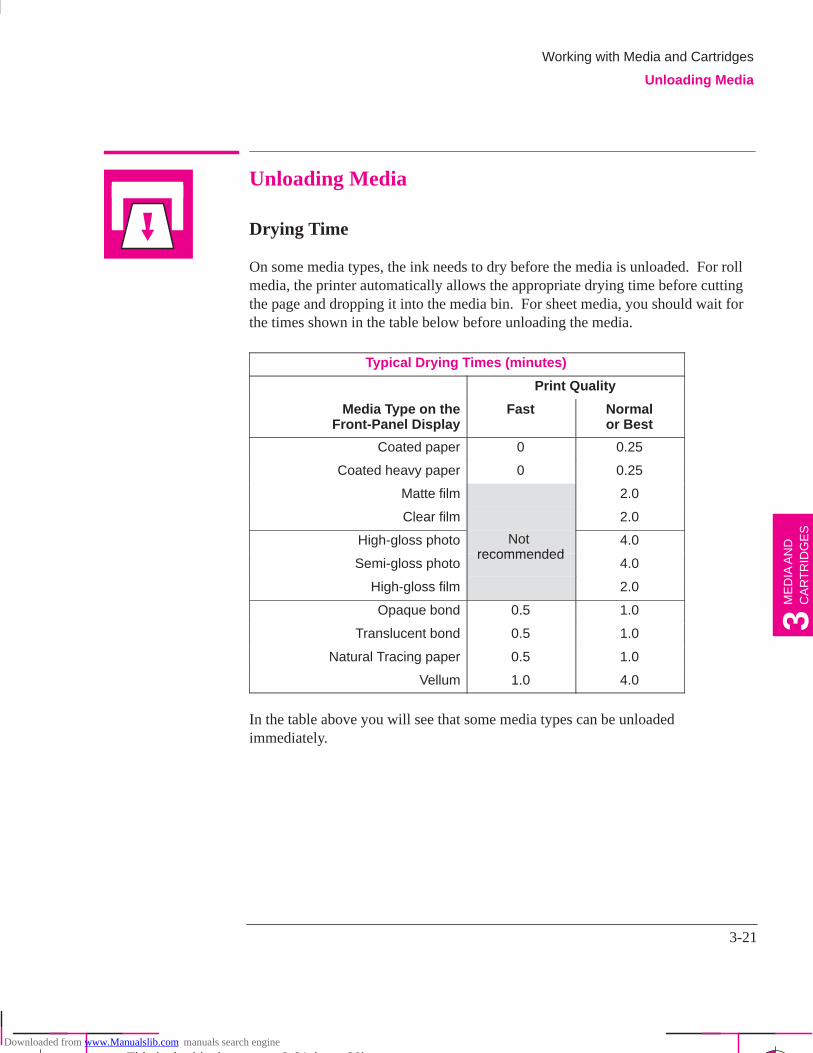
3-21
Company confidential. Postillo/755CM User’s Guide Final Freeze Status:Frozen
This is the cyan on page 3-21 (seq: 89)
This is the black on page 3-21 (seq: 89)
Unloading Media
Drying Time
On some media types, the ink needs to dry before the media is unloaded. For rollmedia, the printer automatically allows the appropriate drying time before cuttingthe page and dropping it into the media bin. For sheet media, you should wait forthe times shown in the table below before unloading the media.
Typical Drying Times (minutes)
Print Quality
Media Type on theFront-Panel Display
Fast Normalor Best
Coated paper 0 0.25
Coated heavy paper 0 0.25
Matte film 2.0
Clear film 2.0
High-gloss photo Not recommended
4.0
Semi-gloss photorecommended
4.0
High-gloss film 2.0
Opaque bond 0.5 1.0
Translucent bond 0.5 1.0
Natural Tracing paper 0.5 1.0
Vellum 1.0 4.0
In the table above you will see that some media types can be unloadedimmediately.
Working with Media and Cartridges
Unloading Media
ME
DIA
AN
DC
AR
TR
IDG
ES
3
Downloaded from www.Manualslib.com manuals search engine
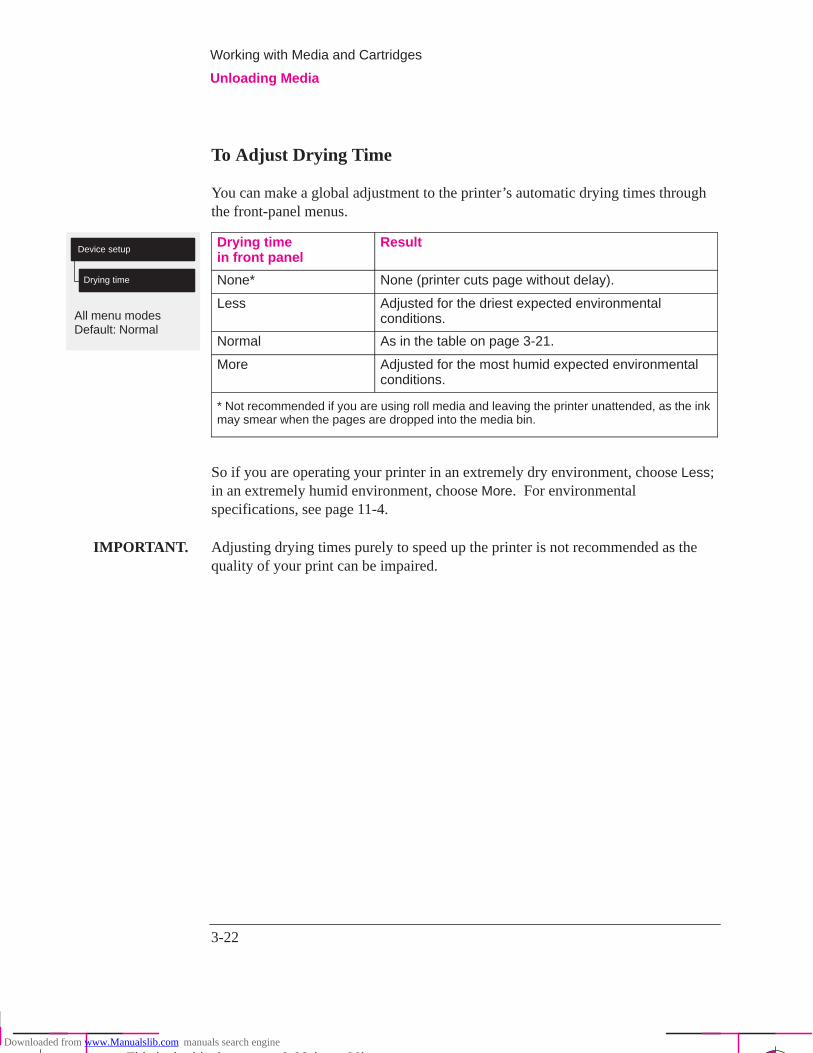
All menu modesDefault: Normal
Device setup
Drying time
3-22
Company confidential. Postillo/755CM User’s Guide Final Freeze Status:Frozen
This is the cyan on page 3-22 (seq: 90)
This is the black on page 3-22 (seq: 90)
To Adjust Drying Time
You can make a global adjustment to the printer’s automatic drying times throughthe front-panel menus.
Drying timein front panel
Result
None* None (printer cuts page without delay).
Less Adjusted for the driest expected environmentalconditions.
Normal As in the table on page 3-21.
More Adjusted for the most humid expected environmentalconditions.
* Not recommended if you are using roll media and leaving the printer unattended, as the inkmay smear when the pages are dropped into the media bin.
So if you are operating your printer in an extremely dry environment, choose Less;in an extremely humid environment, choose More. For environmentalspecifications, see page 11-4.
IMPORTANT. Adjusting drying times purely to speed up the printer is not recommended as thequality of your print can be impaired.
Working with Media and Cartridges
Unloading Media
Downloaded from www.Manualslib.com manuals search engine
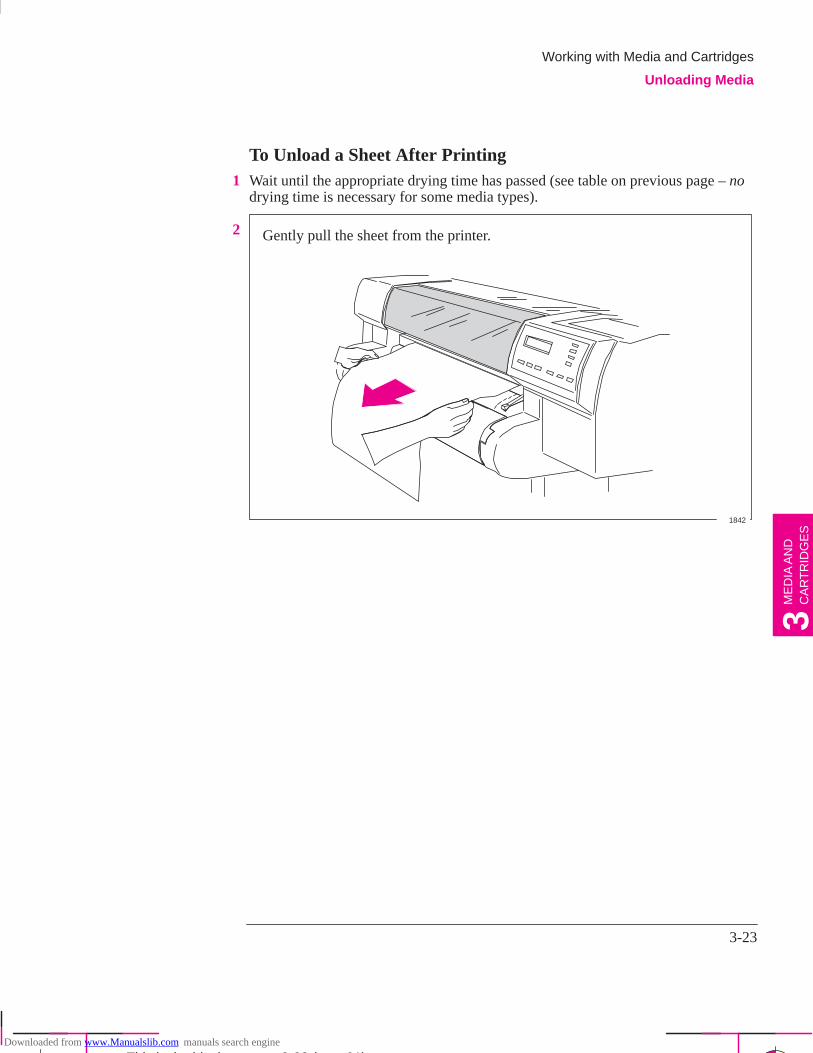
3-23
Company confidential. Postillo/755CM User’s Guide Final Freeze Status:Frozen
This is the cyan on page 3-23 (seq: 91)
This is the black on page 3-23 (seq: 91)
To Unload a Sheet After Printing1 Wait until the appropriate drying time has passed (see table on previous page – no
drying time is necessary for some media types).
2 Gently pull the sheet from the printer.
1842
Working with Media and Cartridges
Unloading Media
ME
DIA
AN
DC
AR
TR
IDG
ES
3
Downloaded from www.Manualslib.com manuals search engine
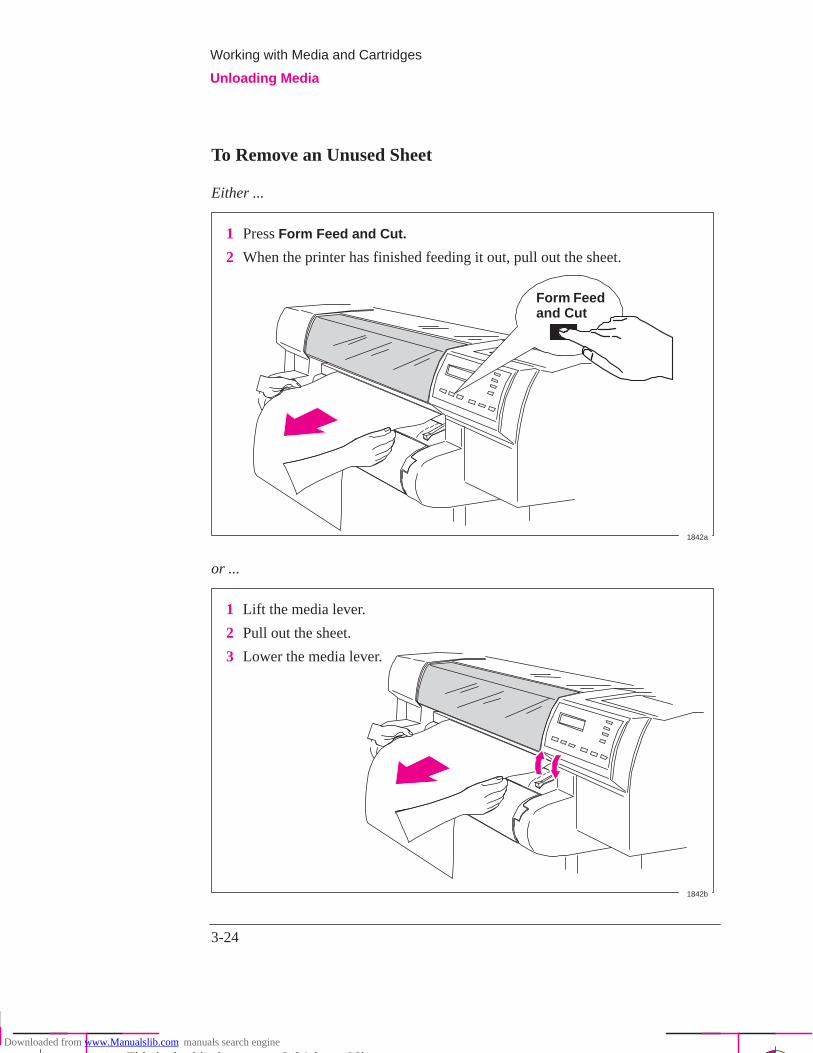
3-24
Company confidential. Postillo/755CM User’s Guide Final Freeze Status:Frozen
This is the cyan on page 3-24 (seq: 92)
This is the black on page 3-24 (seq: 92)
To Remove an Unused Sheet
Either ...
1 Press Form Feed and Cut.
2 When the printer has finished feeding it out, pull out the sheet.
Form Feedand Cut
1842a
or ...
1 Lift the media lever.
2 Pull out the sheet.
3 Lower the media lever.
1842b
Working with Media and Cartridges
Unloading Media
Downloaded from www.Manualslib.com manuals search engine
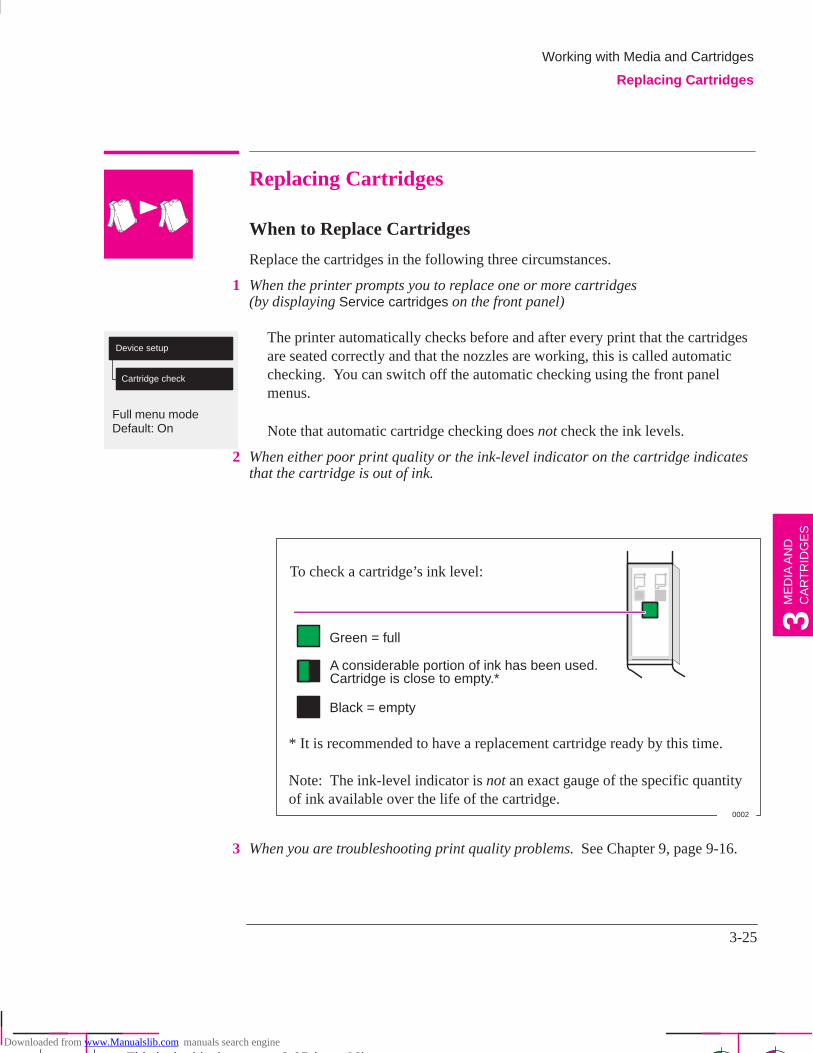
Full menu modeDefault: On
Device setup
Cartridge check
3-25
Company confidential. Postillo/755CM User’s Guide Final Freeze Status:Frozen
This is the cyan on page 3-25 (seq: 93)
This is the black on page 3-25 (seq: 93)
Replacing Cartridges
When to Replace Cartridges
Replace the cartridges in the following three circumstances.
1 When the printer prompts you to replace one or more cartridges(by displaying Service cartridges on the front panel)
The printer automatically checks before and after every print that the cartridgesare seated correctly and that the nozzles are working, this is called automaticchecking. You can switch off the automatic checking using the front panelmenus.
Note that automatic cartridge checking does not check the ink levels.
2 When either poor print quality or the ink-level indicator on the cartridge indicatesthat the cartridge is out of ink.
To check a cartridge’s ink level:
Green = full
Black = empty
A considerable portion of ink has been used.
0002
* It is recommended to have a replacement cartridge ready by this time.
Note: The ink-level indicator is not an exact gauge of the specific quantityof ink available over the life of the cartridge.
Cartridge is close to empty.*
3 When you are troubleshooting print quality problems. See Chapter 9, page 9-16.
Working with Media and Cartridges
Replacing Cartridges
ME
DIA
AN
DC
AR
TR
IDG
ES
3
This is the green on page 3-25 (seq: 93)
Downloaded from www.Manualslib.com manuals search engine
3-26
Company confidential. Postillo/755CM User’s Guide Final Freeze Status:Frozen
This is the cyan on page 3-26 (seq: 94)
This is the black on page 3-26 (seq: 94)
Before Replacing Cartridges
Four important points:
1 Your printer is designed to operate only with the four cartridge types whosespecific part numbers are listed on page 11-15. Except on glossy media types, theprinter will operate successfully in monochrome with just the black cartridgeloaded, although the Best print quality may not be as good as if all cartridges wereloaded. Otherwise, all four must be loaded.
2 Every time you replace, or even adjust, a cartridge, the printer afterwards runs anautomatic alignment procedure, for which it needs an opaque media type, forexample opaque bond (regular printer paper) or coated paper. So make sure thateither a roll or a sheet of the appropriate media is loaded before you replace acartridge. If the automatic cartridge alignment procedure is not run on a suitablemedia type, print quality will be affected.
3 Once the cartridges have been installed they should not be removed, except toreplace them. This will ensure the best lifetime for your cartridges.
4 Make sure you are aware of the general warnings and caution below.
Don’t touch the stainless steel strip that runs the length of the printer behindthe cartridge carriage; its edge is very sharp. Keep hair, jewelry, clothing,and foreign objects away from the printer mechanisms. Keep new and usedprint cartridges out of the reach of children.
Only touch the plastic parts of the cartridge. Do not touch, wipe, or attempt toclean the cartridge nozzles or contacts as they can become clogged orscratched and are easily damaged.
Each time you access the cartridges to load or reseat them, the nozzles areexposed to air. If the nozzles are exposed to air (except during printing) formore than a few minutes at a time, they are susceptible to clogging anddrying.
It is absolutely essential to load the cartridge(s) in the correct stalls, or yourcolors will be wrong and print quality may be impacted.
Working with Media and Cartridges
Replacing Cartridges
W A R N I N G
C A U T I O N
C A U T I O N
C A U T I O N
Downloaded from www.Manualslib.com manuals search engine
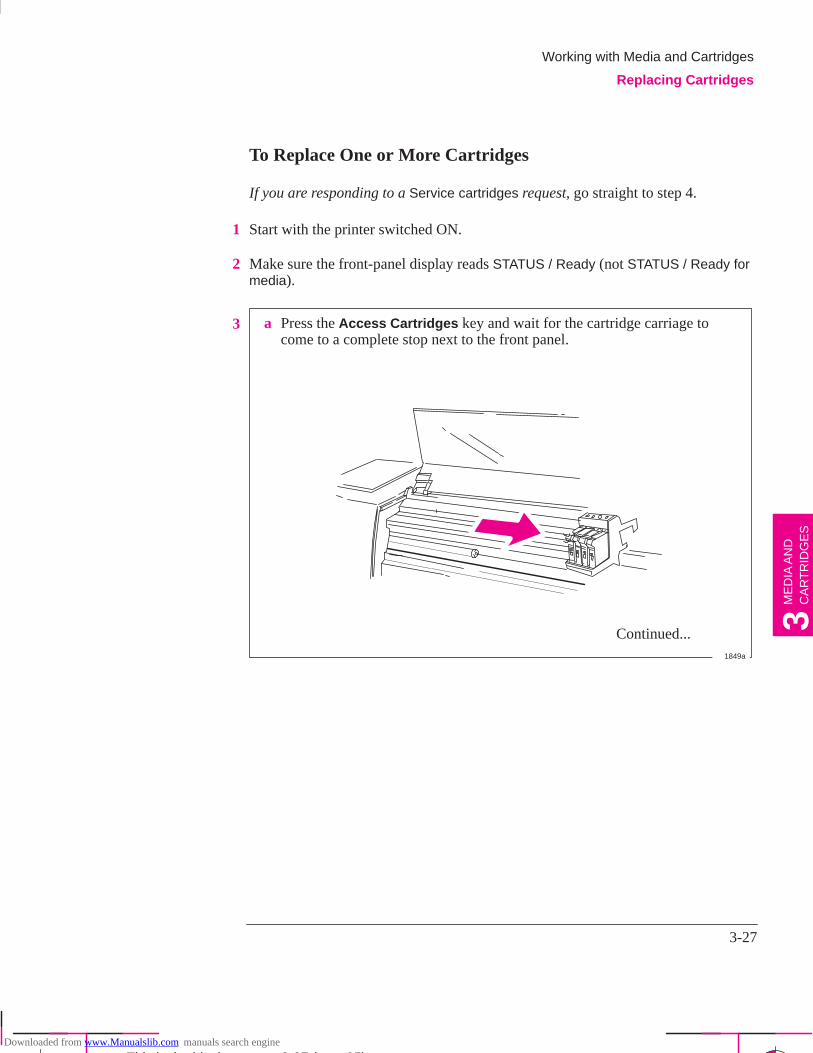
3-27
Company confidential. Postillo/755CM User’s Guide Final Freeze Status:Frozen
This is the cyan on page 3-27 (seq: 95)
This is the black on page 3-27 (seq: 95)
To Replace One or More Cartridges
If you are responding to a Service cartridges request, go straight to step 4.
1 Start with the printer switched ON.
2 Make sure the front-panel display reads STATUS / Ready (not STATUS / Ready formedia).
3 a Press the Access Cartridges key and wait for the cartridge carriage tocome to a complete stop next to the front panel.
1849a
Continued...
Working with Media and Cartridges
Replacing Cartridges
ME
DIA
AN
DC
AR
TR
IDG
ES
3
Downloaded from www.Manualslib.com manuals search engine
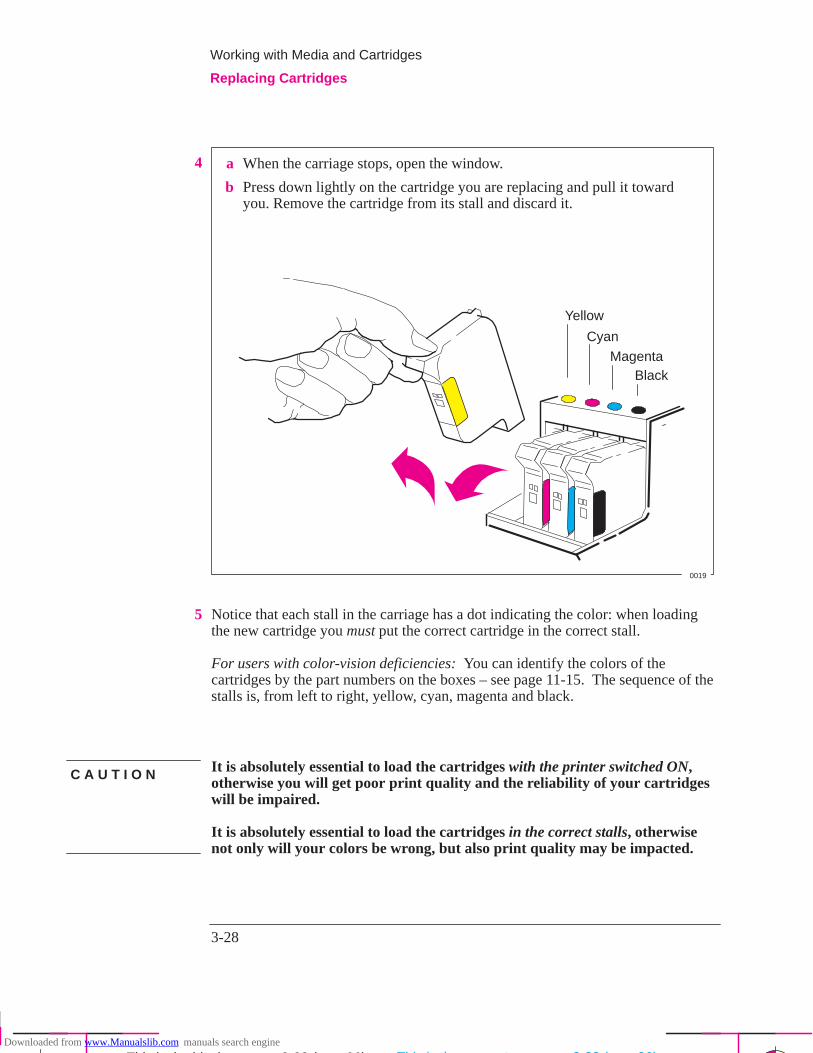
3-28
Company confidential. Postillo/755CM User’s Guide Final Freeze Status:Frozen
This is the cyan on page 3-28 (seq: 96)
This is the black on page 3-28 (seq: 96)
4 a When the carriage stops, open the window.
b Press down lightly on the cartridge you are replacing and pull it towardyou. Remove the cartridge from its stall and discard it.
Yellow
Cyan
MagentaBlack
0019
5 Notice that each stall in the carriage has a dot indicating the color: when loadingthe new cartridge you must put the correct cartridge in the correct stall.
For users with color-vision deficiencies: You can identify the colors of thecartridges by the part numbers on the boxes – see page 11-15. The sequence of thestalls is, from left to right, yellow, cyan, magenta and black.
It is absolutely essential to load the cartridges with the printer switched ON,otherwise you will get poor print quality and the reliability of your cartridgeswill be impaired.
It is absolutely essential to load the cartridges in the correct stalls, otherwisenot only will your colors be wrong, but also print quality may be impacted.
Working with Media and Cartridges
Replacing Cartridges
This is the magenta on page 3-28 (seq: 96)
This is the yellow on page 3-28 (seq: 96)
C A U T I O N
Downloaded from www.Manualslib.com manuals search engine
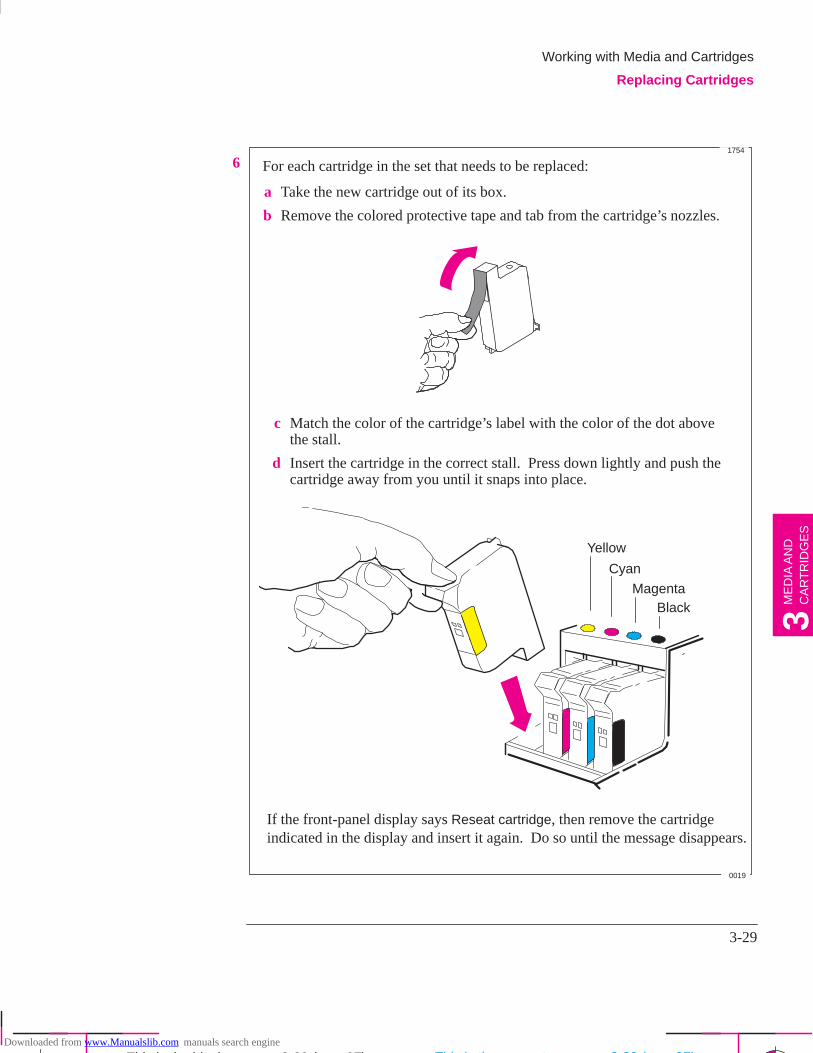
3-29
Company confidential. Postillo/755CM User’s Guide Final Freeze Status:Frozen
This is the cyan on page 3-29 (seq: 97)
This is the black on page 3-29 (seq: 97)
6 For each cartridge in the set that needs to be replaced:
a Take the new cartridge out of its box.
b Remove the colored protective tape and tab from the cartridge’s nozzles.
c Match the color of the cartridge’s label with the color of the dot abovethe stall.
d Insert the cartridge in the correct stall. Press down lightly and push thecartridge away from you until it snaps into place.
Yellow
Cyan
MagentaBlack
If the front-panel display says Reseat cartridge, then remove the cartridgeindicated in the display and insert it again. Do so until the message disappears.
0019
1754
Working with Media and Cartridges
Replacing Cartridges
ME
DIA
AN
DC
AR
TR
IDG
ES
3
This is the magenta on page 3-29 (seq: 97)
This is the yellow on page 3-29 (seq: 97)
Downloaded from www.Manualslib.com manuals search engine
3-30
Company confidential. Postillo/755CM User’s Guide Final Freeze Status:Frozen
This is the cyan on page 3-30 (seq: 98)
This is the black on page 3-30 (seq: 98)
7 When you have finished installing the cartridges, the printer runs the automaticcartridge-alignment procedure. When the front-panel displays STATUS / Ready,the procedure is complete. You can throw away the small print produced duringthe alignment procedure.
Working with Media and Cartridges
Replacing Cartridges
Downloaded from www.Manualslib.com manuals search engine
4-1
Company confidential. Postillo/755CM User’s Guide Final Freeze Status:Frozen
This is the cyan on page 4-1 (seq: 99)
This is the black on page 4-1 (seq: 99)
Page Size 4-2. . . . . . . . . . . . . . . . . . . . . . . . . . . . . . . . . . . . . . . . . .
Adjusting the Margins (Roll Media Only) 4-7. . . . . . . . . . . . . . . . .
Rotating a Drawing 4-8. . . . . . . . . . . . . . . . . . . . . . . . . . . . . . . . . .
Printing a Mirror Image 4-12. . . . . . . . . . . . . . . . . . . . . . . . . . . . . .
Changing the Scale of a Printed Image 4-13. . . . . . . . . . . . . . . . . .
Controlling the Page Format
Page Size, Margins and Other Controls
4
PA
GE
FO
RM
AT
4
Downloaded from www.Manualslib.com manuals search engine

4-2
Company confidential. Postillo/755CM User’s Guide Final Freeze Status:Frozen
This is the cyan on page 4-2 (seq: 100)
This is the black on page 4-2 (seq: 100)
Page Size
This chapter explains how to make sure that the printer produces your print in thepage size you want.
Inked area
Printing area
Margin
Page size
MediaTerminology
0023
Page size This can be specified from the front panel or in the software, where it may becalled ‘‘Page Size”, ‘‘Media Size”, ‘‘Paper Size” etc., and where the optionsinclude, for example, ISO A3, ANSI Letter, Architectural E and Custom. If thedrivers setting is ‘‘default”, the front panel setting is used. Any other softwaresetting overrides the front panel setting, unless the latter is Inked area and you aresending a PostScript file: in this case the front panel setting takes precedence.
Margins These are specific to the printer and are normally 17 mm on the leading andtrailing edges and 5 mm on the sides. Except with PostScript files, the 17 mm canbe adjusted for roll media, as explained on page 11-2.
Printing area This is the page size minus the margins. For a table showing the printing areas forstandard media sizes, see page 11-6.
����� ���� This is the smallest rectangle that contains the entire drawing, while maintaining itsrelative dimensions.
Controlling the Page Format
Page Size
Downloaded from www.Manualslib.com manuals search engine
4-3
Company confidential. Postillo/755CM User’s Guide Final Freeze Status:Frozen
This is the cyan on page 4-3 (seq: 101)
This is the black on page 4-3 (seq: 101)
Do You Need to Adjust the Page Size in the Front Panel?
PostScript files
The answer is normally no, because the page size you have selected in your driveroverrides the page size selected in the printer. However, some of the circumstancesin which you may want to change the default setting are:
When you are using the Scale feature. See page 4-14.
When you are not using one of the HP DesignJet PostScript drivers suppliedwith your printer; for example, if you are sending a PostScript file from a UNIXapplication.
When you want to save media by printing only the inked area of your print, plusthe margins. In this case set Page format / Size to Inked area.
Non-PostScript files
Depending on the driver you are using, you may not need to change the page sizein the front panel. The default setting of the printer looks to your software for thepage size settings: if it is there, the printer uses it.
However, some of the circumstances in which you may want to change the defaultsetting are:
If you want to print the inked area only, but the driver you are using does notspecify “Inked area”.
In this case, set Page format / Size to Inked area.
Note: If you can select Inked area from your driver, any selection you have madein the front panel menu will be overridden by the settings in the driver.
When the prints you are creating need to be of a specific standard (for example,ISO or ANSI), but the actual size within that standard is not important. Forexample, your page size may need to conform to a standard ISO page size, but itdoes not matter whether the final page size is ISO A4 or ISO A3.
In this case, set Page format / Size to ISO > Best... or ANSI > Best ... etc. Theprinter uses the smallest standard size into which the inked area will fit.
PA
GE
FO
RM
AT
4
Controlling the Page Format
Page Size
PS
PS
Downloaded from www.Manualslib.com manuals search engine
4-4
Company confidential. Postillo/755CM User’s Guide Final Freeze Status:Frozen
This is the cyan on page 4-4 (seq: 102)
This is the black on page 4-4 (seq: 102)
To Adjust the Page Size in the Front Panel
PostScript files
Unless you are using the front-panel Scale option (see page 4-13), the front-panelpage-size setting has no effect on PostScript files that already contain page sizeinformation, which includes all PostScript files sent using one of the HP DesignJetPostScript drivers supplied with this printer.
If you are using the front-panel Scale option, then the printer uses the page size setin the printer’s front panel. If this is set to Inked area, Software, or a “Best ...”option, then it takes the page width from this, and calculates the page length as 1.5times the width. If this is set to a discrete size, it uses the specified page size.
Controlling the Page Format
Page Size
PS
Downloaded from www.Manualslib.com manuals search engine
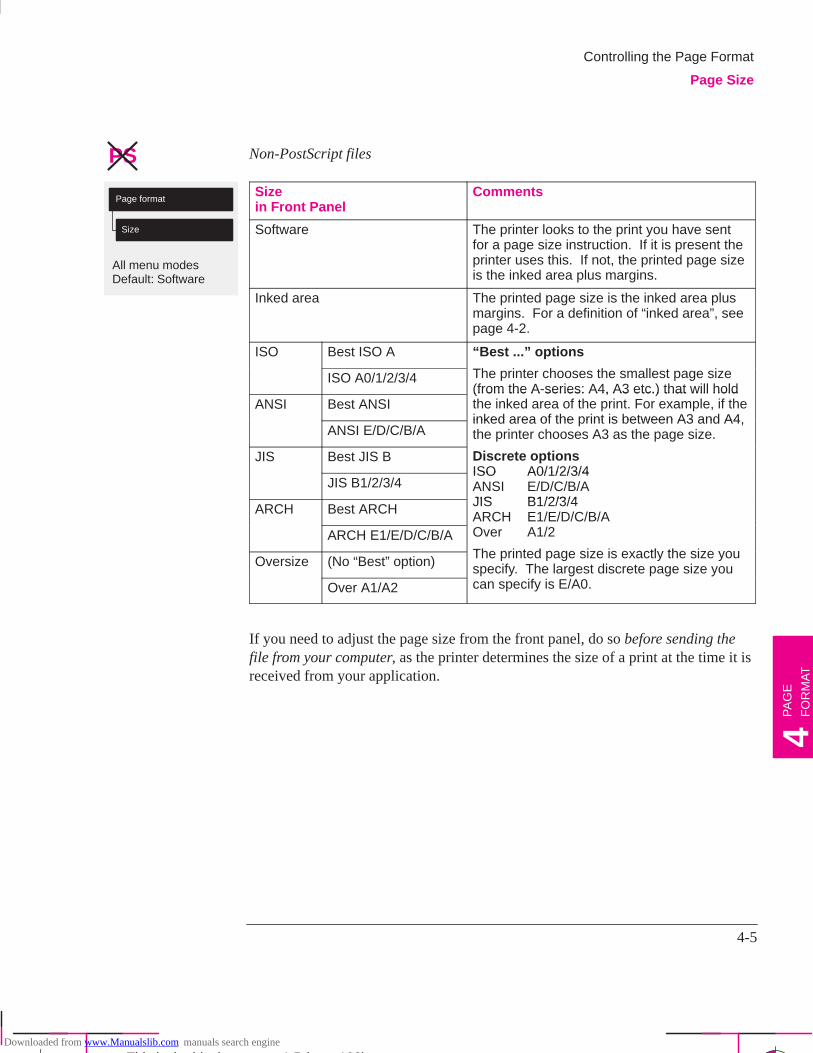
All menu modesDefault: Software
Page format
Size
4-5
Company confidential. Postillo/755CM User’s Guide Final Freeze Status:Frozen
This is the cyan on page 4-5 (seq: 103)
This is the black on page 4-5 (seq: 103)
Non-PostScript files
Sizein Front Panel
Comments
Software The printer looks to the print you have sentfor a page size instruction. If it is present theprinter uses this. If not, the printed page sizeis the inked area plus margins.
Inked area The printed page size is the inked area plusmargins. For a definition of “inked area”, seepage 4-2.
ISO Best ISO A “Best ...” options
ISO A0/1/2/3/4 The printer chooses the smallest page size(from the A-series: A4, A3 etc.) that will hold
ANSI Best ANSI(from the A series: A4, A3 etc.) that will holdthe inked area of the print. For example, if theinked area of the print is between A3 and A4
ANSI E/D/C/B/Ainked area of the rint is between A3 and A4,the printer chooses A3 as the page size.
JIS Best JIS B Discrete optionsISO A0/1/2/3/4
JIS B1/2/3/4ISO A0/1/2/3/4ANSI E/D/C/B/AJIS B1/2/3/4ARCH Best ARCH JIS B1/2/3/4ARCH E1/E/D/C/B/A
ARCH E1/E/D/C/B/A Over A1/2
The printed page size is exactly the size youOversize (No “Best” option) The printed page size is exactly the size youspecify. The largest discrete page size you
Over A1/A2y g g y
can specify is E/A0.
If you need to adjust the page size from the front panel, do so before sending thefile from your computer, as the printer determines the size of a print at the time it isreceived from your application.
PA
GE
FO
RM
AT
4
Controlling the Page Format
Page Size
PS
Downloaded from www.Manualslib.com manuals search engine
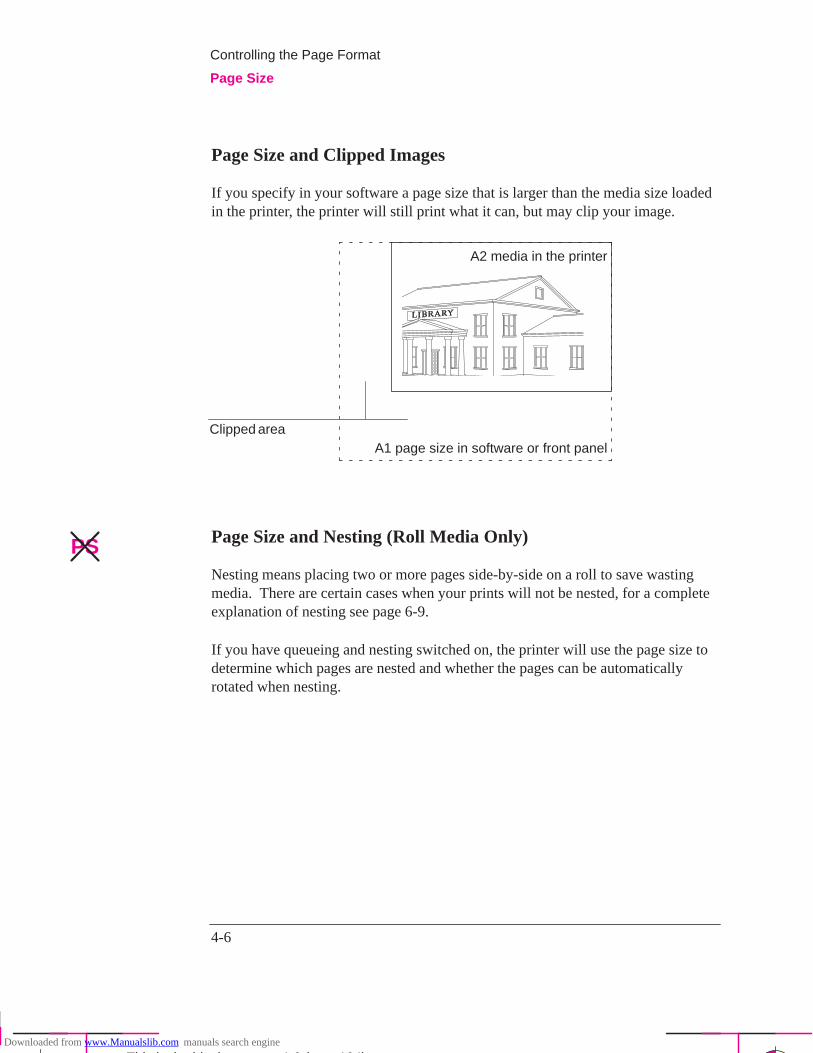
4-6
Company confidential. Postillo/755CM User’s Guide Final Freeze Status:Frozen
This is the cyan on page 4-6 (seq: 104)
This is the black on page 4-6 (seq: 104)
Page Size and Clipped Images
If you specify in your software a page size that is larger than the media size loadedin the printer, the printer will still print what it can, but may clip your image.
A2 media in the printer
A1 page size in software or front panelClipped area
Page Size and Nesting (Roll Media Only)
Nesting means placing two or more pages side-by-side on a roll to save wastingmedia. There are certain cases when your prints will not be nested, for a completeexplanation of nesting see page 6-9.
If you have queueing and nesting switched on, the printer will use the page size todetermine which pages are nested and whether the pages can be automaticallyrotated when nesting.
Controlling the Page Format
Page Size
PS
Downloaded from www.Manualslib.com manuals search engine
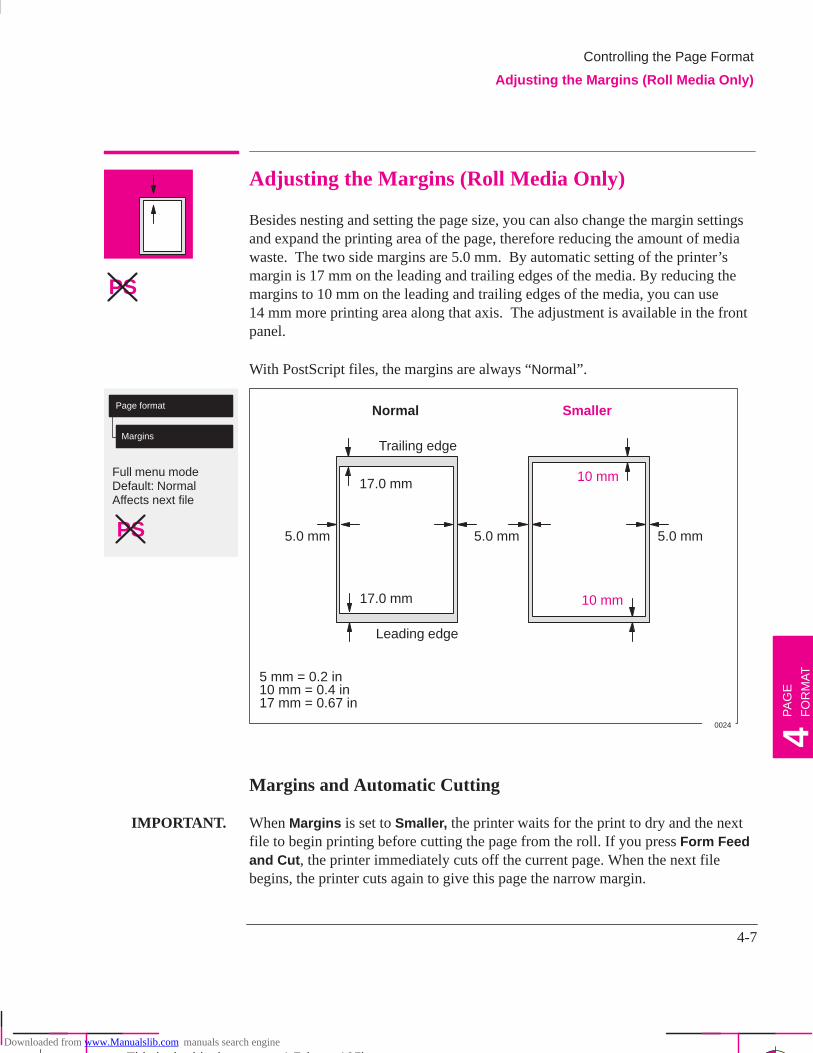
Full menu modeDefault: NormalAffects next file
Page format
Margins
PS
4-7
Company confidential. Postillo/755CM User’s Guide Final Freeze Status:Frozen
This is the cyan on page 4-7 (seq: 105)
This is the black on page 4-7 (seq: 105)
Adjusting the Margins (Roll Media Only)
Besides nesting and setting the page size, you can also change the margin settingsand expand the printing area of the page, therefore reducing the amount of mediawaste. The two side margins are 5.0 mm. By automatic setting of the printer’smargin is 17 mm on the leading and trailing edges of the media. By reducing themargins to 10 mm on the leading and trailing edges of the media, you can use14 mm more printing area along that axis. The adjustment is available in the frontpanel.
With PostScript files, the margins are always “Normal”.
5.0 mm 5.0 mm
17.0 mm
17.0 mm
5.0 mm
10 mm
10 mm
SmallerNormal
Leading edge
Trailing edge
5 mm = 0.2 in10 mm = 0.4 in17 mm = 0.67 in
0024
Margins and Automatic Cutting
IMPORTANT. When Margins is set to Smaller, the printer waits for the print to dry and the nextfile to begin printing before cutting the page from the roll. If you press Form Feedand Cut , the printer immediately cuts off the current page. When the next filebegins, the printer cuts again to give this page the narrow margin.
PA
GE
FO
RM
AT
4
PS
Controlling the Page Format
Adjusting the Margins (Roll Media Only)
Downloaded from www.Manualslib.com manuals search engine
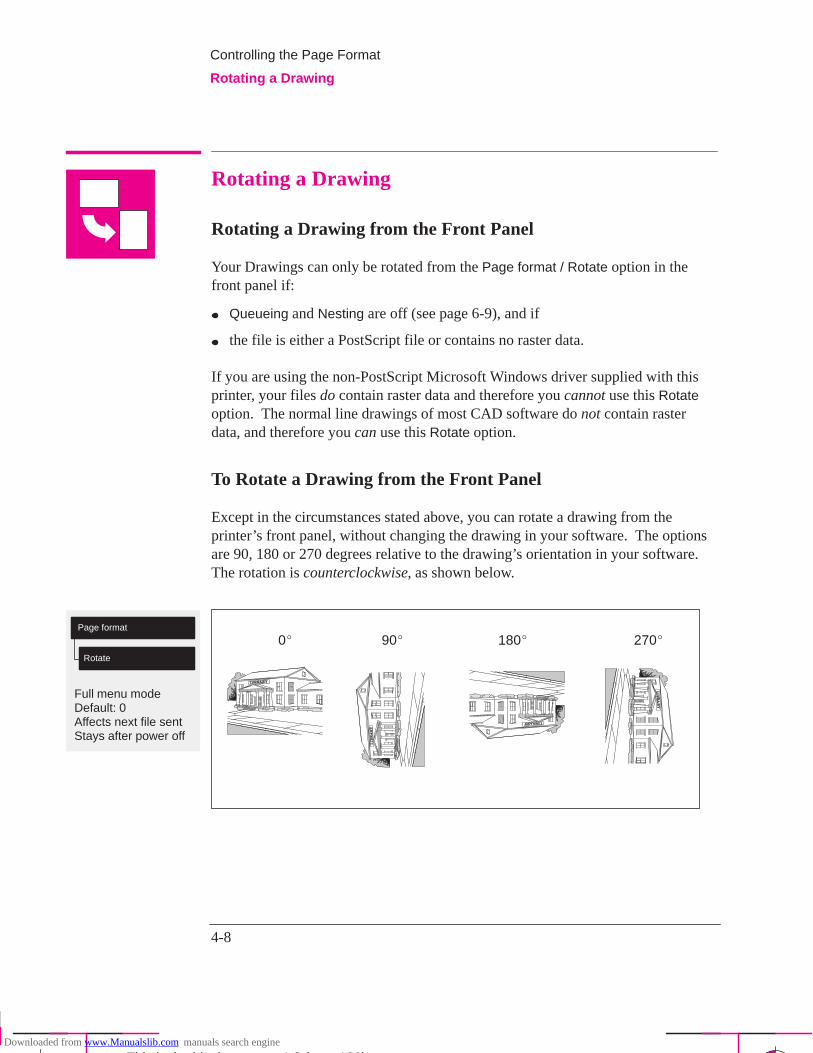
Full menu modeDefault: 0Affects next file sentStays after power off
Page format
Rotate
4-8
Company confidential. Postillo/755CM User’s Guide Final Freeze Status:Frozen
This is the cyan on page 4-8 (seq: 106)
This is the black on page 4-8 (seq: 106)
Rotating a Drawing
Rotating a Drawing from the Front Panel
Your Drawings can only be rotated from the Page format / Rotate option in thefront panel if:
Queueing and Nesting are off (see page 6-9), and if
the file is either a PostScript file or contains no raster data.
If you are using the non-PostScript Microsoft Windows driver supplied with thisprinter, your files do contain raster data and therefore you cannot use this Rotateoption. The normal line drawings of most CAD software do not contain rasterdata, and therefore you can use this Rotate option.
To Rotate a Drawing from the Front Panel
Except in the circumstances stated above, you can rotate a drawing from theprinter’s front panel, without changing the drawing in your software. The optionsare 90, 180 or 270 degrees relative to the drawing’s orientation in your software.The rotation is counterclockwise, as shown below.
0� 90� 180� 270�
Controlling the Page Format
Rotating a Drawing
Downloaded from www.Manualslib.com manuals search engine
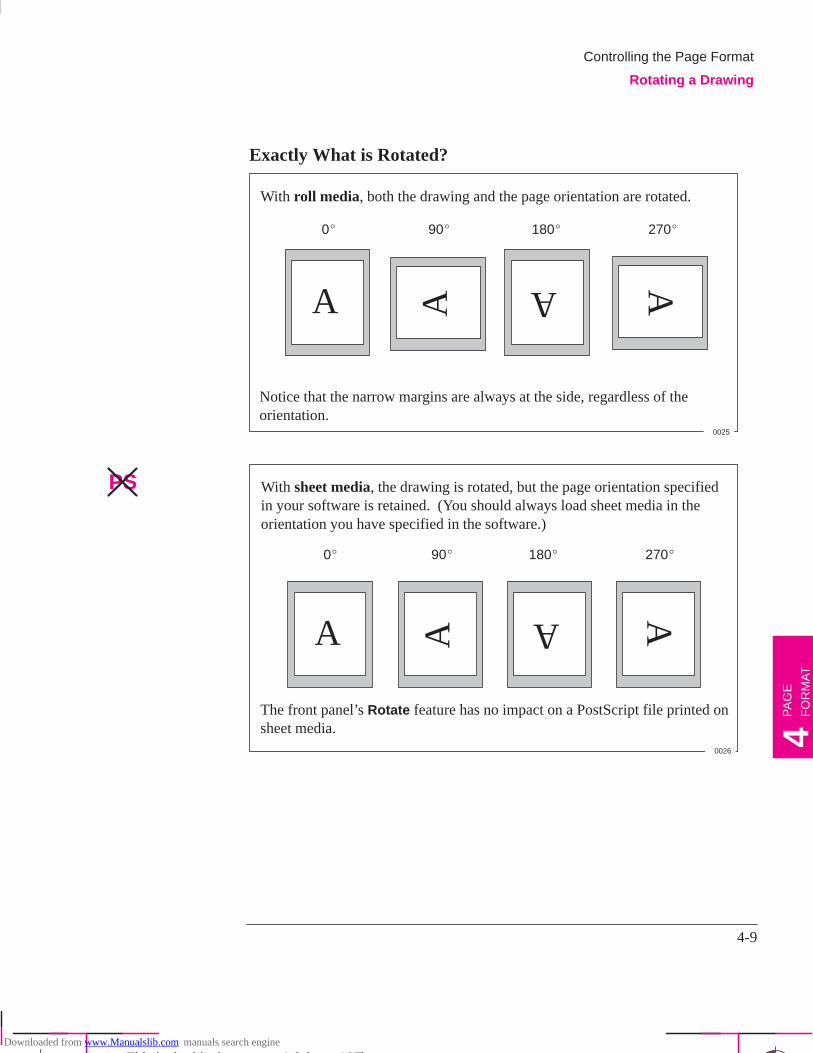
4-9
Company confidential. Postillo/755CM User’s Guide Final Freeze Status:Frozen
This is the cyan on page 4-9 (seq: 107)
This is the black on page 4-9 (seq: 107)
Exactly What is Rotated?
With roll media, both the drawing and the page orientation are rotated.
A A
A
Notice that the narrow margins are always at the side, regardless of theorientation.
A
0� 90� 180� 270�
0025
With sheet media, the drawing is rotated, but the page orientation specifiedin your software is retained. (You should always load sheet media in theorientation you have specified in the software.)
A AA A
0� 90� 180� 270�
0026
The front panel’s Rotate feature has no impact on a PostScript file printed onsheet media.
PA
GE
FO
RM
AT
4
Controlling the Page Format
Rotating a Drawing
PS
Downloaded from www.Manualslib.com manuals search engine

4-10
Company confidential. Postillo/755CM User’s Guide Final Freeze Status:Frozen
This is the cyan on page 4-10 (seq: 108)
This is the black on page 4-10 (seq: 108)
How Does Rotate Interact with Your Software?
For PostScript files
On sheet media, the front-panel Rotate feature has no impact.
On roll media the front-panel Rotate feature does work: you may want to use itto save wasting media, by printing the page in landscape orientation, that is,with the short edge parallel to the media path. When rotated by 90� or 270� thepage size is enlarged by 17–5 = 12 mm, i.e.
[leading and trailing edges] – [side margins] = 12 mm
at the top and bottom. This is to prevent the larger margins resulting from therotation encroaching on the image.
X + 12 + 12 mm
0� 90�
AX
A
Controlling the Page Format
Rotating a Drawing
PS
Downloaded from www.Manualslib.com manuals search engine
4-11
Company confidential. Postillo/755CM User’s Guide Final Freeze Status:Frozen
This is the cyan on page 4-11 (seq: 109)
This is the black on page 4-11 (seq: 109)
For Non-PostScript Files
The printer adds the rotation setting to any rotation angle you specify in yoursoftware. For example:
For software applications which, like the printer, rotate counter-clockwise (forexample, CorelDRAW!) the result is the sum. For example, if your softwarespecifies 180 degrees rotation, and you set Rotate in the front panel to 90, yourdrawing’s final rotation will be 270 degrees.
For software applications which rotate clockwise (for example, AutoCAD) theresult is the difference. For example, if your software specifies 90 degreesrotation, and you set Rotate in the front panel to 90, there will be no rotation.
For further information on the Rotate feature see page 9-21 in the Troubleshootingchapter which details some of the most common problems.
Possibility of clipped images with rotated non-PostScript files
With either roll or sheet media, if you rotate a portrait drawing, it is possible thatthe media is not wide enough for the drawing, and so it may be clipped. Forexample, rotating by 90 degrees a portrait E/A0-size drawing on E/A0-size mediawill probably result in a clipped image.
PA
GE
FO
RM
AT
4
Controlling the Page Format
Rotating a Drawing
PS
Downloaded from www.Manualslib.com manuals search engine
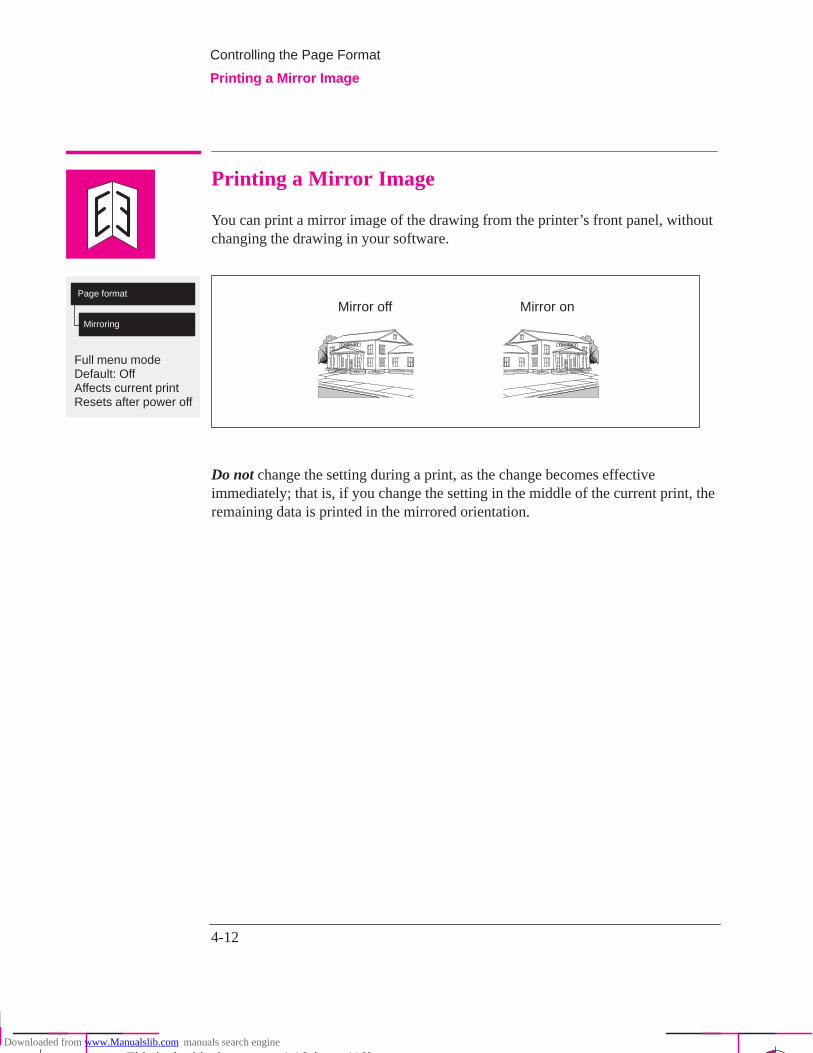
Full menu modeDefault: OffAffects current printResets after power off
Page format
Mirroring
4-12
Company confidential. Postillo/755CM User’s Guide Final Freeze Status:Frozen
This is the cyan on page 4-12 (seq: 110)
This is the black on page 4-12 (seq: 110)
Printing a Mirror Image
You can print a mirror image of the drawing from the printer’s front panel, withoutchanging the drawing in your software.
Mirror off Mirror on
Do not change the setting during a print, as the change becomes effectiveimmediately; that is, if you change the setting in the middle of the current print, theremaining data is printed in the mirrored orientation.
Controlling the Page Format
Printing a Mirror Image
Downloaded from www.Manualslib.com manuals search engine

Full menu mode only
Device setup
Lang
PostScript
Scale
PS
4-13
Company confidential. Postillo/755CM User’s Guide Final Freeze Status:Frozen
This is the cyan on page 4-13 (seq: 111)
This is the black on page 4-13 (seq: 111)
Changing the Scale of a Printed Image
With a PostScript file, you can enlarge your printed image from the printer’s frontpanel by using the Scale option, accessed from the Device setup menu, as shown inthe menu graphic, below left. Notice that, in order to use this feature, you have toswitch the front-panel graphics language setting from Automatic (the default) toPostScript. If you regularly send non-PostScript files to your printer as well asPostScript files, it is a good idea to switch this back to Automatic after using theScale feature.
The Scale feature is useful:
If your software does not support large formats.
If your file is too large for the printer’s memory, and therefore you try reducingthe page size in your software and then scaling it up again using this front-paneloption.
To scale your ANSI A PostScript file to...
ANSI B
ANSI C
Arch C
ANSI D
Arch D
ArchE1
ANSI E
Arch E
Use... 129% 200% 210% 258% 282% 352% 400% 419%
To scale your ISO A4 PostScript file to...
ISO A3
ISO/JISA2
OS A2
ISO/JISA1
OSA1
ISO/JISA0
OSA0
Use... 141% 200% 210% 282% 352% 400% 419%
The scaling factors are cumulative with software settings. Whatever scale youchoose will be used for PostScript files until you choose another scale, even if youchange the graphics language from PostScript and back again.
PA
GE
FO
RM
AT
4
Controlling the Page Format
Changing the Scale of a Printed Image
Downloaded from www.Manualslib.com manuals search engine

4-14
Company confidential. Postillo/755CM User’s Guide Final Freeze Status:Frozen
This is the cyan on page 4-14 (seq: 112)
This is the black on page 4-14 (seq: 112)
Scale and Page Size
If you use this Scale option, the printer ignores the page size you set in yoursoftware and instead uses the page size set in the printer’s front panel (seepage 4-4).
Controlling the Page Format
Changing the Scale of a Printed Image
Downloaded from www.Manualslib.com manuals search engine
5-1
Company confidential. Postillo/755CM User’s Guide Final Freeze Status:Frozen
This is the cyan on page 5-1 (seq: 113)
This is the black on page 5-1 (seq: 113)
Ways to Control the Print’s Appearance 5-2. . . . . . . . . . . . . . . . . .
Changing Pen Widths and Colors Using the
Printer’s Internal Palettes 5-4. . . . . . . . . . . . . . . . . . . . . . . . . . . .
Changing the Treatment of Overlapping Lines
(Merge Feature) 5-8. . . . . . . . . . . . . . . . . . . . . . . . . . . . . . . . . . .
Changing the Overall Lightness/Darkness of a Print 5-9. . . . . . . . .
Printing Color Drawings in Monochrome 5-10. . . . . . . . . . . . . . . .
Choosing an Appropriate Print Quality 5-12. . . . . . . . . . . . . . . . . .
Controlling a Print’s Overall Appearance
5
PR
INT
AP
PE
AR
AN
CE
5
Downloaded from www.Manualslib.com manuals search engine
5-2
Company confidential. Postillo/755CM User’s Guide Final Freeze Status:Frozen
This is the cyan on page 5-2 (seq: 114)
This is the black on page 5-2 (seq: 114)
Ways to Control the Prints’ Appearance
Note. The “pens” discussed throughout this chapter are the “conceptual” pens in asoftware palette, rather than the printer’s physical print cartridges.
This chapter discusses the ways you can control the overall appearance of yourprints from the front panel in terms of:
pen width
pen color
the treatment of overlapping lines
overall lightness/darkness
rendering color drawings in monochrome
overall print quality and resolution.
Some of these front-panel items take effect only on the next file you send fromyour computer, that is, they do not affect any pages already in the printer’s queue.If this is the case, it is stated in the relevant part of this chapter.
Some of the controls are available using the front-panel menus (pen width, pencolor, overlapping lines and lightness). Print quality and color/monochrome printoptions are controlled from the front-panel keys. This chapter explains them in thesequence of the list at the top of this page.
Controlling a Print’s Overall Appearance
Ways to Control the Print’s Appearance
Downloaded from www.Manualslib.com manuals search engine
5-3
Company confidential. Postillo/755CM User’s Guide Final Freeze Status:Frozen
This is the cyan on page 5-3 (seq: 115)
This is the black on page 5-3 (seq: 115)
Why Change the Appearance of the Print Using the Front PanelRather Than from Your Software?
By default, the printer looks to your software to provide information on all theabove attributes. However, you may want to experiment with various effects, ortry a temporary change, without the need to change your drawing or your driversettings.
Unless you have specifically indicated in your software that the printer’s settingsare to be used (by choosing, for example, Printer’s Current Setting in a MacintoshPrint Options window), the software settings for a PostScript file override all theprinter front-panel features described in this chapter.
PR
INT
AP
PE
AR
AN
CE
5
Controlling a Print’s Overall Appearance
Ways to Control the Print’s Appearance
PS
Downloaded from www.Manualslib.com manuals search engine

5-4
Company confidential. Postillo/755CM User’s Guide Final Freeze Status:Frozen
This is the cyan on page 5-4 (seq: 116)
This is the black on page 5-4 (seq: 116)
Changing Pen Widths and Colors Using the Printer’sInternal Palettes
The printer has three pen palettes. The factory palette cannot be changed. Youcan, however, change the line width and color settings for each pen in theremaining two palettes (called palette A and palette B). Initially, all three palettesare identical. Each palette has 16 pens1 which can include pens of different widthsand any combination of the printer’s internal 256 colors.
These internal palettes have no effect on PostScript files.
To See the Current Palette Settings1 Make sure either a roll or a sheet of media is loaded.
2 Make sure that the front-panel Color/Mono switch is set to Color .
3 Print the Current Configuration Print , by pressing the ↑ and ↓ keyssimultaneously..
STATUS
Ready ↓↑
Press these twosimultaneously
0014
Notice on the Current Configuration Print that the 16 pens are numbered 0 through15 and the 256 colors are numbered 0 through 255. These colors are specified inthe Palette Print, as now explained.
1 We are discussing “conceptual” pens here.
PS
Controlling a Print’s Overall Appearance
Changing Pen Widths and Colors Using the Printer’s Internal Palettes
Downloaded from www.Manualslib.com manuals search engine
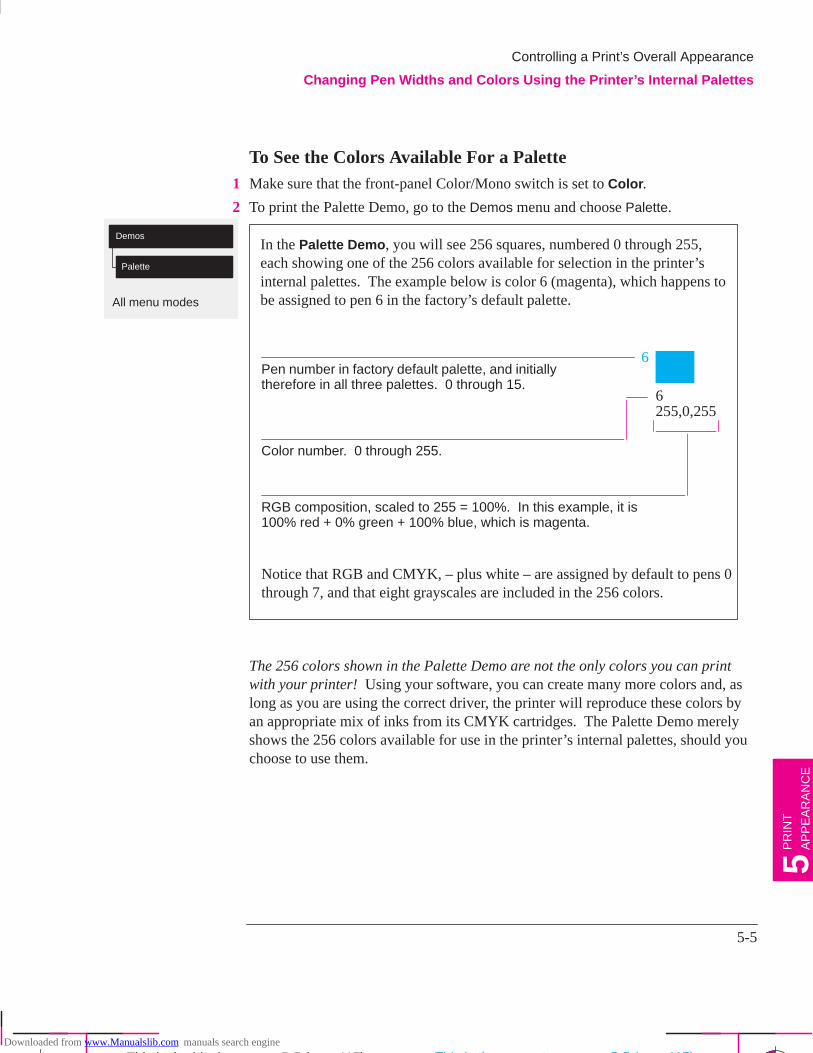
All menu modes
Demos
Palette
5-5
Company confidential. Postillo/755CM User’s Guide Final Freeze Status:Frozen
This is the cyan on page 5-5 (seq: 117)
This is the black on page 5-5 (seq: 117)
To See the Colors Available For a Palette1 Make sure that the front-panel Color/Mono switch is set to Color .
2 To print the Palette Demo, go to the Demos menu and choose Palette.
In the Palette Demo , you will see 256 squares, numbered 0 through 255,each showing one of the 256 colors available for selection in the printer’sinternal palettes. The example below is color 6 (magenta), which happens tobe assigned to pen 6 in the factory’s default palette.
6
6255,0,255
RGB composition, scaled to 255 = 100%. In this example, it is100% red + 0% green + 100% blue, which is magenta.
Color number. 0 through 255.
Pen number in factory default palette, and initiallytherefore in all three palettes. 0 through 15.
Notice that RGB and CMYK, – plus white – are assigned by default to pens 0through 7, and that eight grayscales are included in the 256 colors.
The 256 colors shown in the Palette Demo are not the only colors you can printwith your printer! Using your software, you can create many more colors and, aslong as you are using the correct driver, the printer will reproduce these colors byan appropriate mix of inks from its CMYK cartridges. The Palette Demo merelyshows the 256 colors available for use in the printer’s internal palettes, should youchoose to use them.
PR
INT
AP
PE
AR
AN
CE
5
Controlling a Print’s Overall Appearance
Changing Pen Widths and Colors Using the Printer’s Internal Palettes
This is the magenta on page 5-5 (seq: 117)Downloaded from www.Manualslib.com manuals search engine
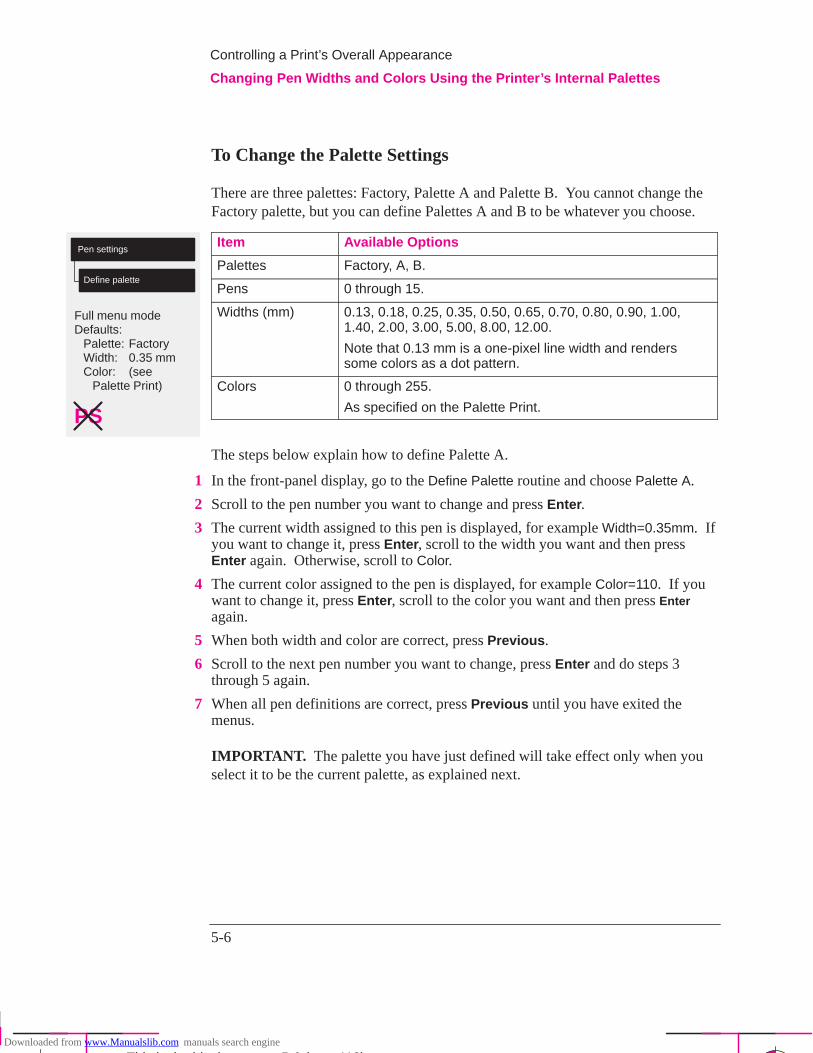
Full menu modeDefaults:
Palette: FactoryWidth: 0.35 mmColor: (see
Palette Print)
Pen settings
Define palette
PS
5-6
Company confidential. Postillo/755CM User’s Guide Final Freeze Status:Frozen
This is the cyan on page 5-6 (seq: 118)
This is the black on page 5-6 (seq: 118)
To Change the Palette Settings
There are three palettes: Factory, Palette A and Palette B. You cannot change theFactory palette, but you can define Palettes A and B to be whatever you choose.
Item Available Options
Palettes Factory, A, B.
Pens 0 through 15.
Widths (mm) 0.13, 0.18, 0.25, 0.35, 0.50, 0.65, 0.70, 0.80, 0.90, 1.00,1.40, 2.00, 3.00, 5.00, 8.00, 12.00.
Note that 0.13 mm is a one-pixel line width and renderssome colors as a dot pattern.
Colors 0 through 255.
As specified on the Palette Print.
The steps below explain how to define Palette A.
1 In the front-panel display, go to the Define Palette routine and choose Palette A.
2 Scroll to the pen number you want to change and press Enter .
3 The current width assigned to this pen is displayed, for example Width=0.35mm. Ifyou want to change it, press Enter , scroll to the width you want and then pressEnter again. Otherwise, scroll to Color.
4 The current color assigned to the pen is displayed, for example Color=110. If youwant to change it, press Enter , scroll to the color you want and then press Enteragain.
5 When both width and color are correct, press Previous .
6 Scroll to the next pen number you want to change, press Enter and do steps 3through 5 again.
7 When all pen definitions are correct, press Previous until you have exited themenus.
IMPORTANT. The palette you have just defined will take effect only when youselect it to be the current palette, as explained next.
Controlling a Print’s Overall Appearance
Changing Pen Widths and Colors Using the Printer’s Internal Palettes
Downloaded from www.Manualslib.com manuals search engine
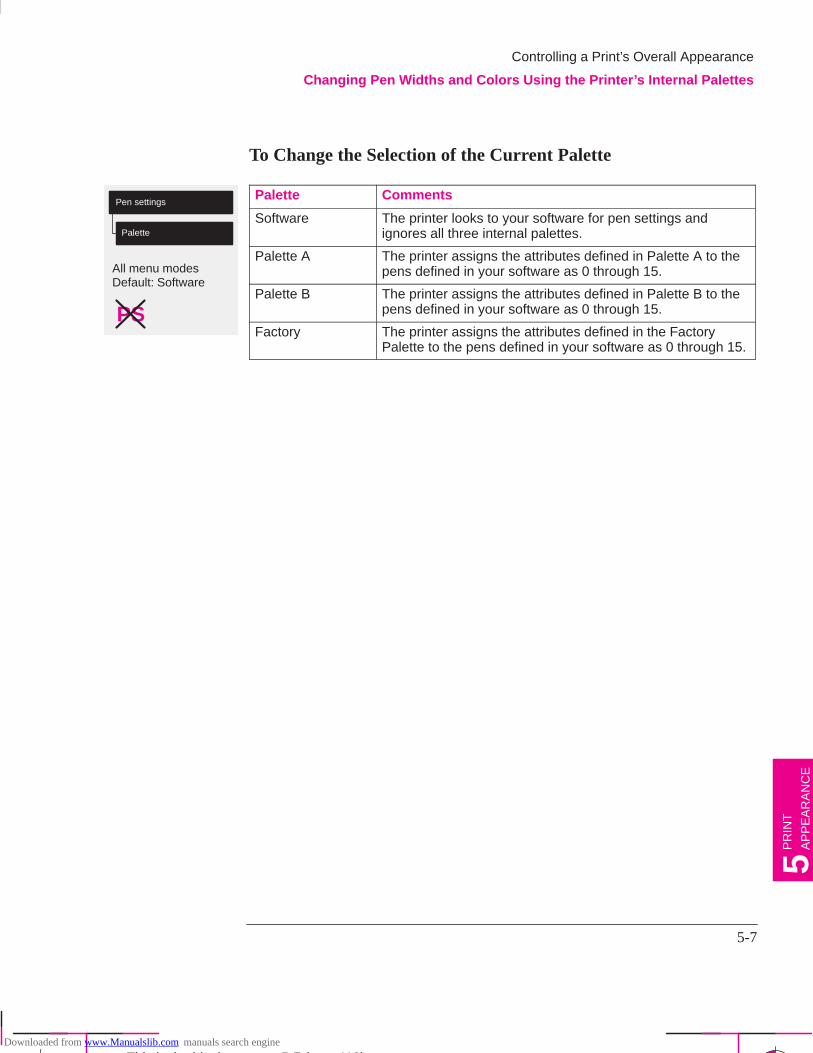
All menu modesDefault: Software
Pen settings
Palette
PS
5-7
Company confidential. Postillo/755CM User’s Guide Final Freeze Status:Frozen
This is the cyan on page 5-7 (seq: 119)
This is the black on page 5-7 (seq: 119)
To Change the Selection of the Current Palette
Palette Comments
Software The printer looks to your software for pen settings andignores all three internal palettes.
Palette A The printer assigns the attributes defined in Palette A to thepens defined in your software as 0 through 15.
Palette B The printer assigns the attributes defined in Palette B to thepens defined in your software as 0 through 15.
Factory The printer assigns the attributes defined in the FactoryPalette to the pens defined in your software as 0 through 15.
PR
INT
AP
PE
AR
AN
CE
5
Controlling a Print’s Overall Appearance
Changing Pen Widths and Colors Using the Printer’s Internal Palettes
Downloaded from www.Manualslib.com manuals search engine

Full menu modeDefault: Off
Pen settings
Merge
PS
5-8
Company confidential. Postillo/755CM User’s Guide Final Freeze Status:Frozen
This is the cyan on page 5-8 (seq: 120)
This is the black on page 5-8 (seq: 120)
Changing the Treatment of Overlapping Lines (Merge Feature)
There are two alternative settings for controlling overlapping lines. The feature iscalled Merge . This feature has no effect on PostScript files.
Merge off.A subsequent line hides aprevious line where theyoverlap.
Merge on.Overlapping lines and areafills are merged.
You can set this feature from your software in some applications, for example inAutoCAD.
Controlling a Print’s Overall Appearance
Changing the Treatment of Overlapping Lines (Merge Feature)
This is the yellow on page 5-8 (seq: 120)
This is the green on page 5-8 (seq: 120)
Downloaded from www.Manualslib.com manuals search engine
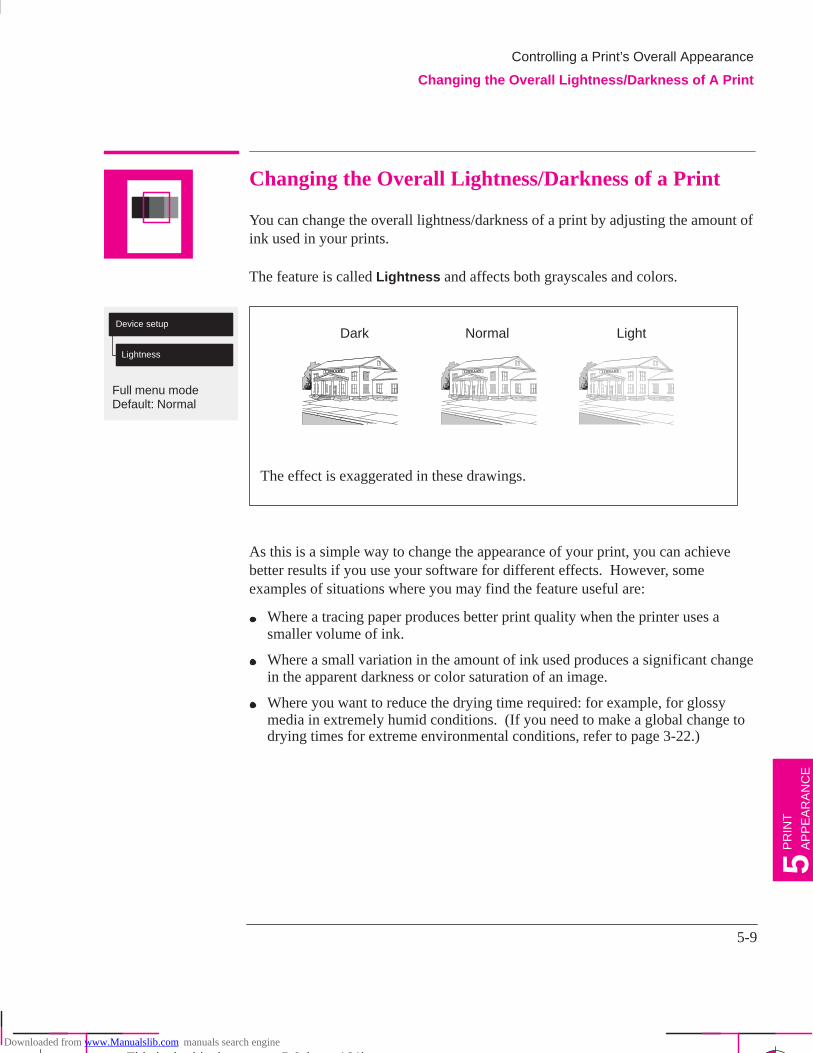
Full menu modeDefault: Normal
Device setup
Lightness
5-9
Company confidential. Postillo/755CM User’s Guide Final Freeze Status:Frozen
This is the cyan on page 5-9 (seq: 121)
This is the black on page 5-9 (seq: 121)
Changing the Overall Lightness/Darkness of a Print
You can change the overall lightness/darkness of a print by adjusting the amount ofink used in your prints.
The feature is called Lightness and affects both grayscales and colors.
Dark Normal Light
The effect is exaggerated in these drawings.
As this is a simple way to change the appearance of your print, you can achievebetter results if you use your software for different effects. However, someexamples of situations where you may find the feature useful are:
Where a tracing paper produces better print quality when the printer uses asmaller volume of ink.
Where a small variation in the amount of ink used produces a significant changein the apparent darkness or color saturation of an image.
Where you want to reduce the drying time required: for example, for glossymedia in extremely humid conditions. (If you need to make a global change todrying times for extreme environmental conditions, refer to page 3-22.)
PR
INT
AP
PE
AR
AN
CE
5
Controlling a Print’s Overall Appearance
Changing the Overall Lightness/Darkness of A Print
Downloaded from www.Manualslib.com manuals search engine
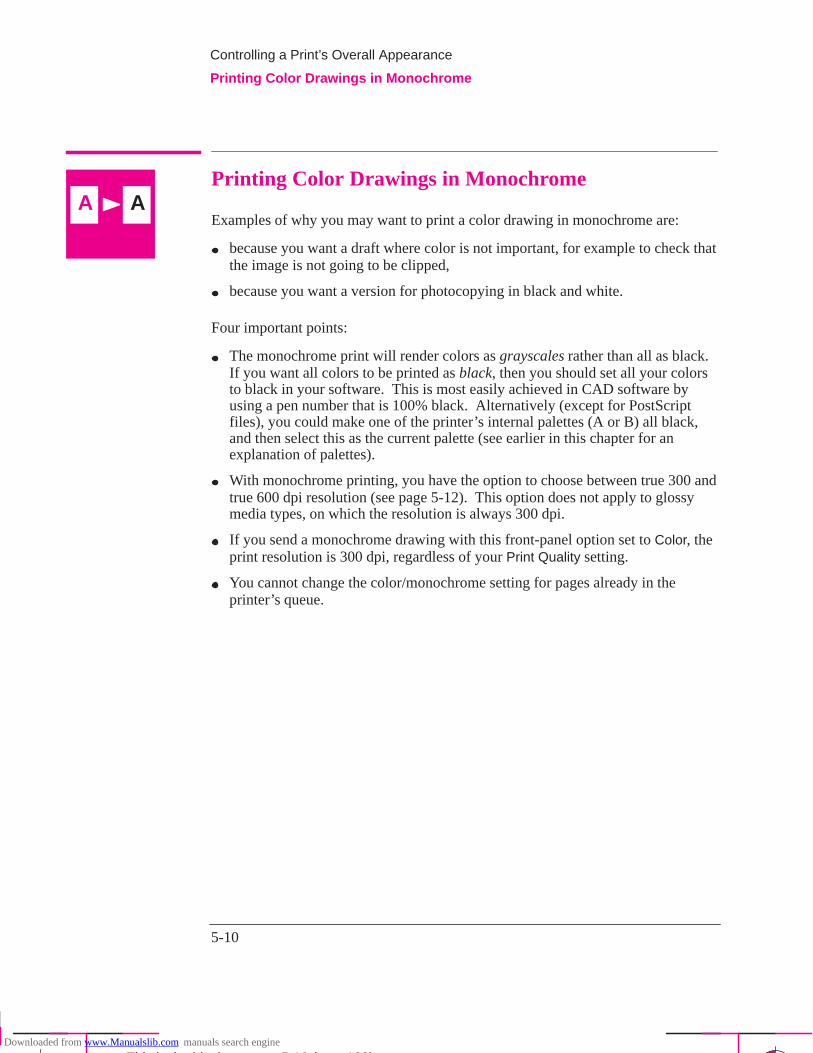
5-10
Company confidential. Postillo/755CM User’s Guide Final Freeze Status:Frozen
This is the cyan on page 5-10 (seq: 122)
This is the black on page 5-10 (seq: 122)
Printing Color Drawings in Monochrome
Examples of why you may want to print a color drawing in monochrome are:
because you want a draft where color is not important, for example to check thatthe image is not going to be clipped,
because you want a version for photocopying in black and white.
Four important points:
The monochrome print will render colors as grayscales rather than all as black.If you want all colors to be printed as black, then you should set all your colorsto black in your software. This is most easily achieved in CAD software byusing a pen number that is 100% black. Alternatively (except for PostScriptfiles), you could make one of the printer’s internal palettes (A or B) all black,and then select this as the current palette (see earlier in this chapter for anexplanation of palettes).
With monochrome printing, you have the option to choose between true 300 andtrue 600 dpi resolution (see page 5-12). This option does not apply to glossymedia types, on which the resolution is always 300 dpi.
If you send a monochrome drawing with this front-panel option set to Color, theprint resolution is 300 dpi, regardless of your Print Quality setting.
You cannot change the color/monochrome setting for pages already in theprinter’s queue.
AA
Controlling a Print’s Overall Appearance
Printing Color Drawings in Monochrome
Downloaded from www.Manualslib.com manuals search engine
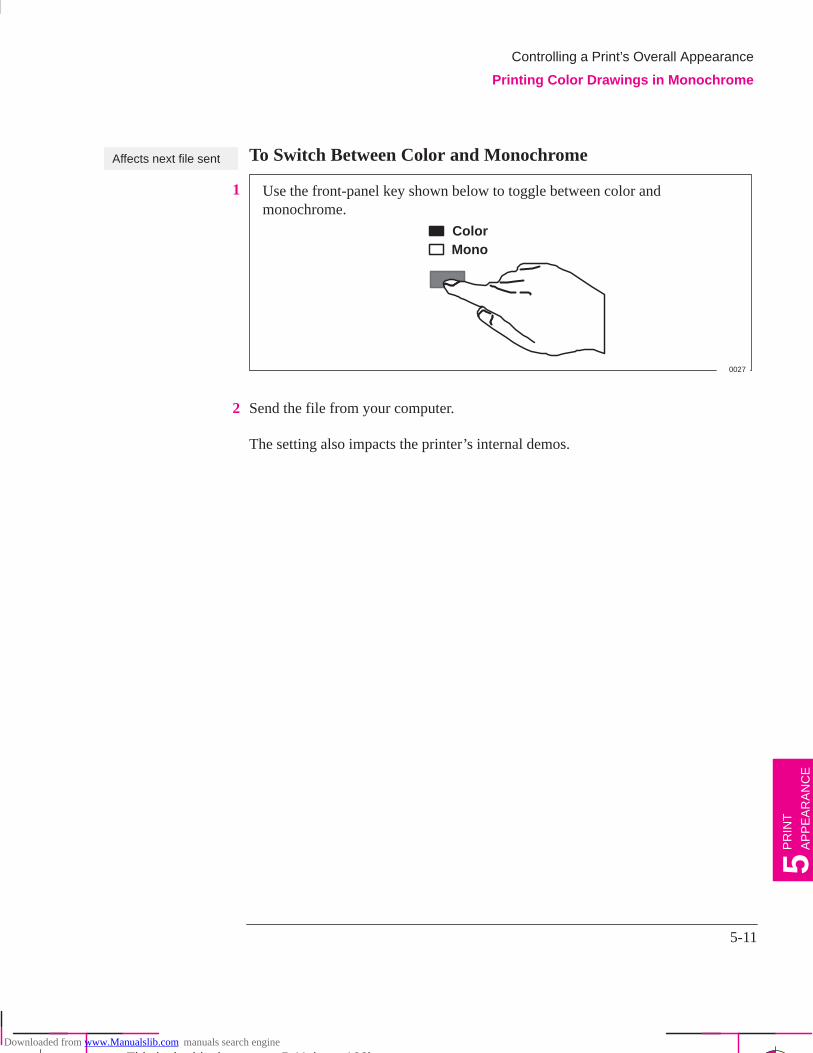
Affects next file sent
5-11
Company confidential. Postillo/755CM User’s Guide Final Freeze Status:Frozen
This is the cyan on page 5-11 (seq: 123)
This is the black on page 5-11 (seq: 123)
To Switch Between Color and Monochrome
1 Use the front-panel key shown below to toggle between color andmonochrome.
ColorMono
0027
2 Send the file from your computer.
The setting also impacts the printer’s internal demos.
PR
INT
AP
PE
AR
AN
CE
5
Controlling a Print’s Overall Appearance
Printing Color Drawings in Monochrome
Downloaded from www.Manualslib.com manuals search engine
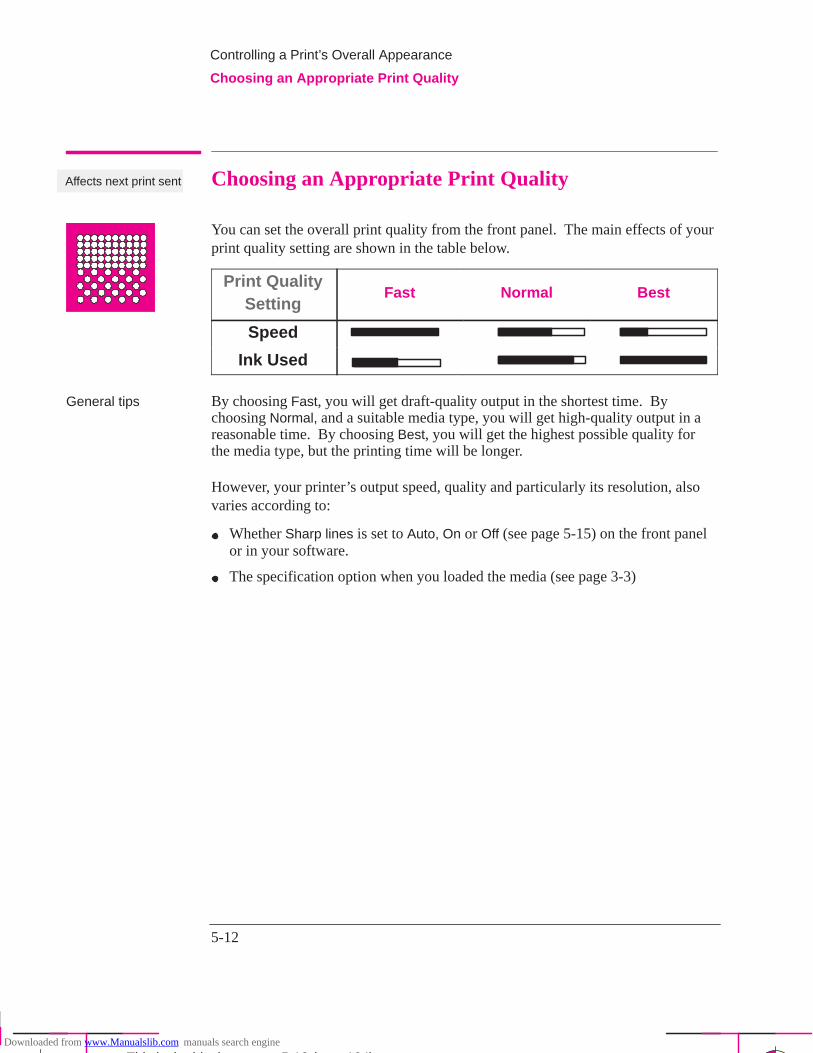
Affects next print sent
5-12
Company confidential. Postillo/755CM User’s Guide Final Freeze Status:Frozen
This is the cyan on page 5-12 (seq: 124)
This is the black on page 5-12 (seq: 124)
Choosing an Appropriate Print Quality
You can set the overall print quality from the front panel. The main effects of yourprint quality setting are shown in the table below.
Print QualitySetting
Fast Normal Best
Speed
Ink Used
General tips By choosing Fast, you will get draft-quality output in the shortest time. Bychoosing Normal, and a suitable media type, you will get high-quality output in areasonable time. By choosing Best, you will get the highest possible quality forthe media type, but the printing time will be longer.
However, your printer’s output speed, quality and particularly its resolution, alsovaries according to:
Whether Sharp lines is set to Auto, On or Off (see page 5-15) on the front panelor in your software.
The specification option when you loaded the media (see page 3-3)
Controlling a Print’s Overall Appearance
Choosing an Appropriate Print Quality
Downloaded from www.Manualslib.com manuals search engine
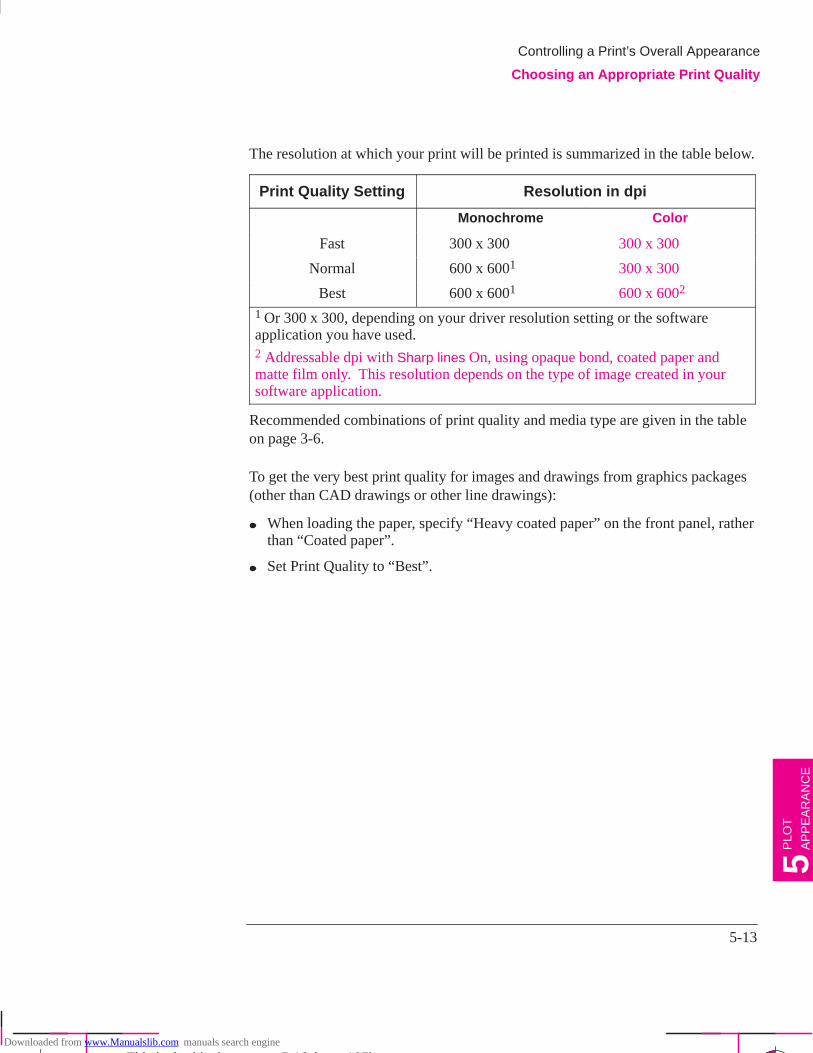
5-13
Company confidential. Postillo/755CM User’s Guide Final Freeze Status:Frozen
This is the cyan on page 5-13 (seq: 125)
This is the black on page 5-13 (seq: 125)
The resolution at which your print will be printed is summarized in the table below.
Print Quality Setting Resolution in dpi
Monochrome Color
Fast 300 x 300 300 x 300
Normal 600 x 6001 300 x 300
Best 600 x 6001 600 x 6002
1 Or 300 x 300, depending on your driver resolution setting or the softwareapplication you have used.2 Addressable dpi with Sharp lines On, using opaque bond, coated paper andmatte film only. This resolution depends on the type of image created in yoursoftware application.
Recommended combinations of print quality and media type are given in the tableon page 3-6.
To get the very best print quality for images and drawings from graphics packages(other than CAD drawings or other line drawings):
When loading the paper, specify “Heavy coated paper” on the front panel, ratherthan “Coated paper”.
Set Print Quality to “Best”.
Controlling a Print’s Overall Appearance
Choosing an Appropriate Print Quality
PLO
T
AP
PE
AR
AN
CE
5
Downloaded from www.Manualslib.com manuals search engine
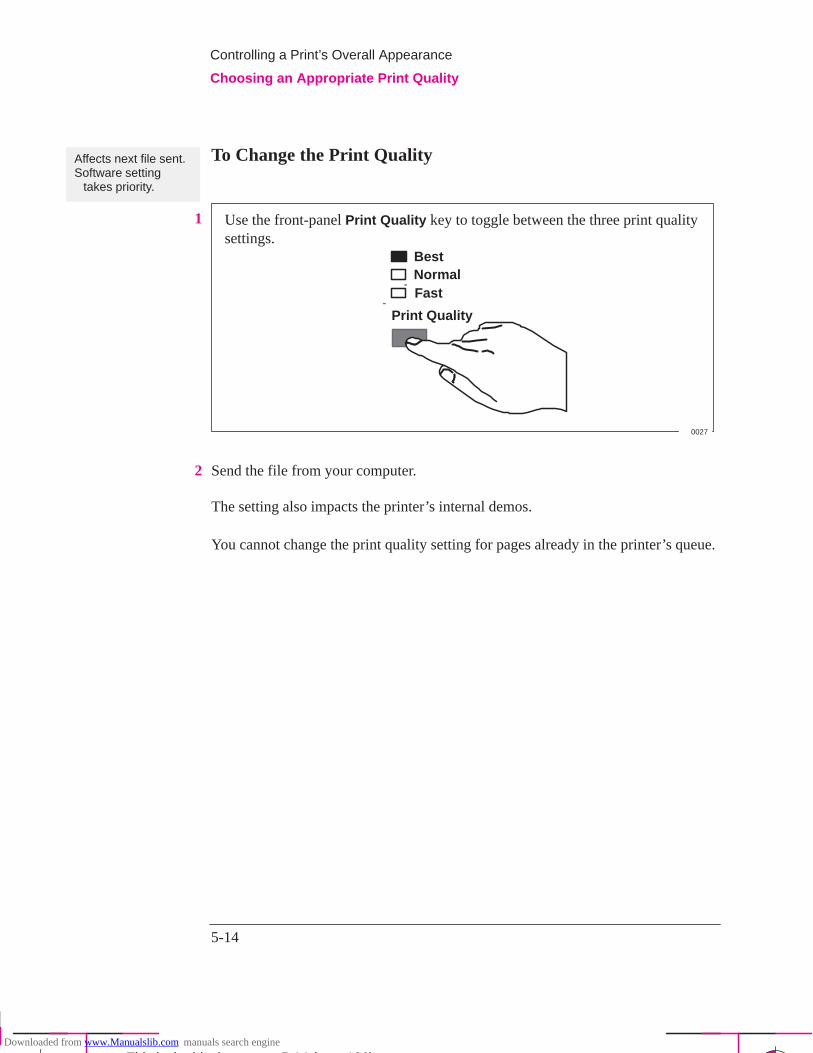
Affects next file sent.Software setting
takes priority.
5-14
Company confidential. Postillo/755CM User’s Guide Final Freeze Status:Frozen
This is the cyan on page 5-14 (seq: 126)
This is the black on page 5-14 (seq: 126)
To Change the Print Quality
1 Use the front-panel Print Quality key to toggle between the three print qualitysettings.
NormalFast
Print Quality
Best
0027
2 Send the file from your computer.
The setting also impacts the printer’s internal demos.
You cannot change the print quality setting for pages already in the printer’s queue.
Controlling a Print’s Overall Appearance
Choosing an Appropriate Print Quality
Downloaded from www.Manualslib.com manuals search engine

Full menu modeDefault: Auto
Device setup
Sharp lines
5-15
Company confidential. Postillo/755CM User’s Guide Final Freeze Status:Frozen
This is the cyan on page 5-15 (seq: 127)
This is the black on page 5-15 (seq: 127)
Improving Line Quality and Graphics Detail
The Sharp lines option refines the print quality of line drawings by smoothing thefine gradations along the angles and curves of the printed image. Thisenhancement produces:
Crisper lines.
Finer detail.
Line drawings with a ‘sharp’ appearance.
Only prints that have color content are affected by the Sharp lines option toproduce addressable 600 dpi resolution. Monochrome images are not affected bythe Sharp lines option as these are produced in true 300 or 600 dpi resolution,depending on the print quality that you have selected.
The Sharp lines option has has three settings, Auto, Off and On, and can be seteither through the front-panel menu or HP supported Windows drivers. Thefactory default setting is Auto.
With Sharp lines set to Auto you will always get best quality color prints, exceptwhen you send the following files:
Mixed lines and scanned color images.
Mixed lines and color photographs.
CorelDRAW! (with color images).
For these files it is recommended that the Sharp lines default setting is changed,depending on your preference for image or line quality:
Select On if you have a file which contains line and color images and you wantthe lines to be printed in Best quality, even if there is possible degradation to thequality of the color image.
Select Off if you have a file which contains line and color images and you wantto optimize the quality of the color images.
Select Off if the print is a complex vector file, such as a CorelDRAW! Theprint quality will be optimized for these circumstances.
Select Off if the output speed of the printer is more important than Best quality.
PS
Controlling a Print’s Overall Appearance
Choosing an Appropriate Print Quality
PLO
T
AP
PE
AR
AN
CE
5
Downloaded from www.Manualslib.com manuals search engine
5-16
Company confidential. Postillo/755CM User’s Guide Final Freeze Status:Frozen
This is the cyan on page 5-16 (seq: 128)
This is the black on page 5-16 (seq: 128)
For further information on Sharp lines see Troubleshooting, page 9-15.
With the Sharp lines set to Auto or On in the front-panel menu, the printermay not always produce an addressable 600 dpi print. This may be because:
You have not selected Best on the front-panel Print Quality key, refer topage 5-14.
You are using media other than Coated paper, Opaque bond or Mattefilm.
Your application-software driver is overriding the front–panel selection.
You are printing a color raster image or a line drawing combined with acolor raster image.
���������
Controlling a Print’s Overall Appearance
Choosing an Appropriate Print Quality
Downloaded from www.Manualslib.com manuals search engine
6-1
Company confidential. Postillo/755CM User’s Guide Final Freeze Status:Frozen
This is the cyan on page 6-1 (seq: 129)
This is the black on page 6-1 (seq: 129)
Managing Pages Being Printed or Drying 6-2. . . . . . . . . . . . . . . . .
Managing Pages Not Yet Printed (The Queue) 6-4. . . . . . . . . . . . .
Avoiding Media Waste by Nesting Pages (Roll Media Only)6-9. .
Managing Your Prints
6
PR
INT
MA
NA
GM
EN
T6
Downloaded from www.Manualslib.com manuals search engine
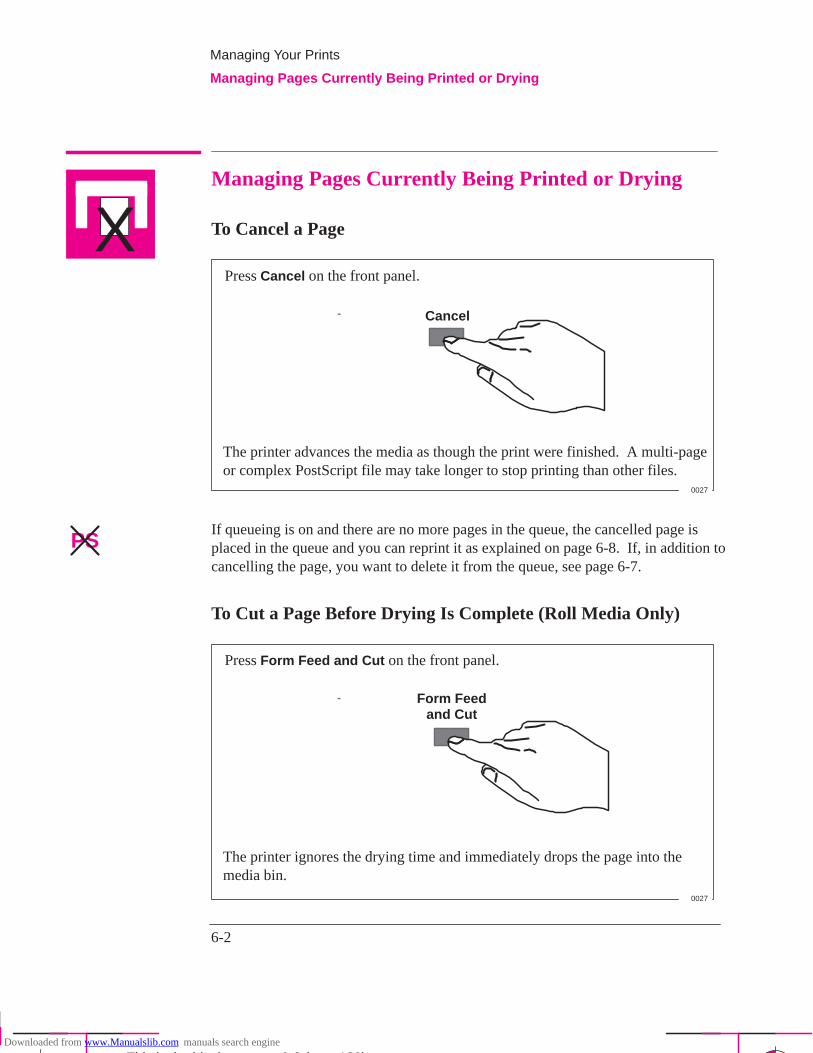
6-2
Company confidential. Postillo/755CM User’s Guide Final Freeze Status:Frozen
This is the cyan on page 6-2 (seq: 130)
This is the black on page 6-2 (seq: 130)
Managing Pages Currently Being Printed or Drying
To Cancel a Page
Press Cancel on the front panel.
Cancel
The printer advances the media as though the print were finished. A multi-pageor complex PostScript file may take longer to stop printing than other files.
0027
If queueing is on and there are no more pages in the queue, the cancelled page isplaced in the queue and you can reprint it as explained on page 6-8. If, in addition tocancelling the page, you want to delete it from the queue, see page 6-7.
To Cut a Page Before Drying Is Complete (Roll Media Only)
Press Form Feed and Cut on the front panel.
Form Feedand Cut
The printer ignores the drying time and immediately drops the page into themedia bin.
0027
X
Managing Your Prints
Managing Pages Currently Being Printed or Drying
PS
Downloaded from www.Manualslib.com manuals search engine
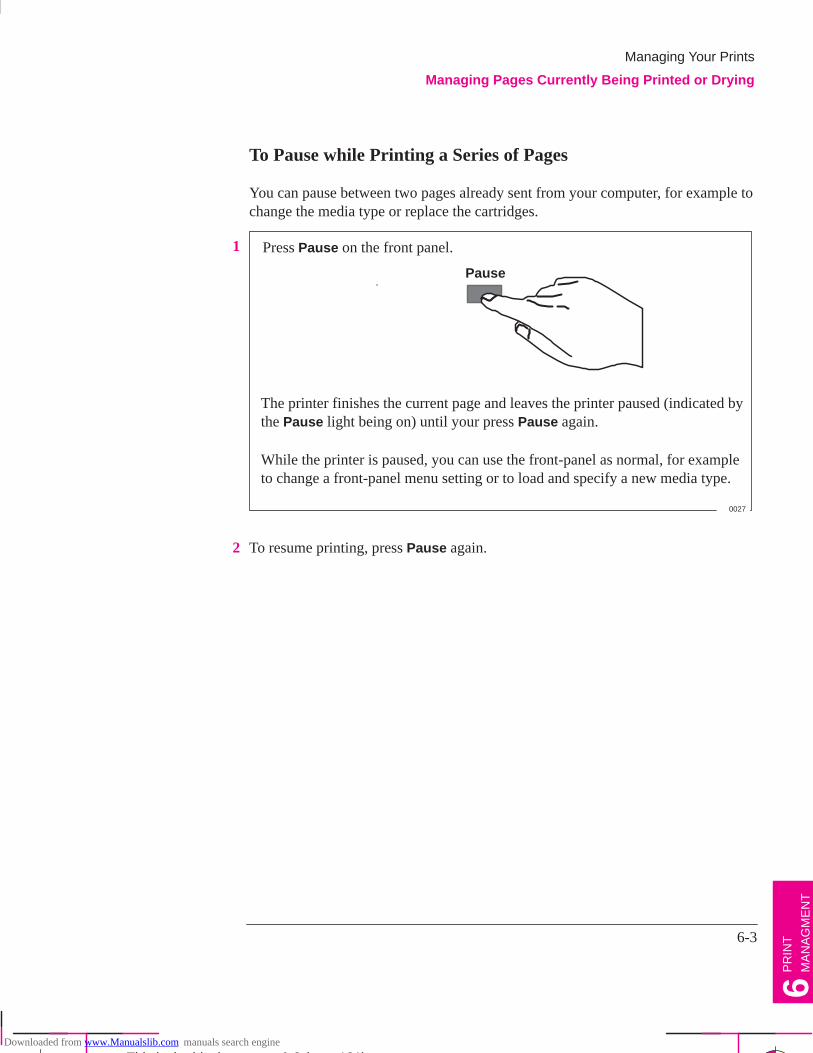
6-3
Company confidential. Postillo/755CM User’s Guide Final Freeze Status:Frozen
This is the cyan on page 6-3 (seq: 131)
This is the black on page 6-3 (seq: 131)
To Pause while Printing a Series of Pages
You can pause between two pages already sent from your computer, for example tochange the media type or replace the cartridges.
1 Press Pause on the front panel.
Pause
The printer finishes the current page and leaves the printer paused (indicated bythe Pause light being on) until your press Pause again.
While the printer is paused, you can use the front-panel as normal, for exampleto change a front-panel menu setting or to load and specify a new media type.
0027
2 To resume printing, press Pause again.
Managing Your Prints
Managing Pages Currently Being Printed or Drying
PR
INT
MA
NA
GM
EN
T6
Downloaded from www.Manualslib.com manuals search engine
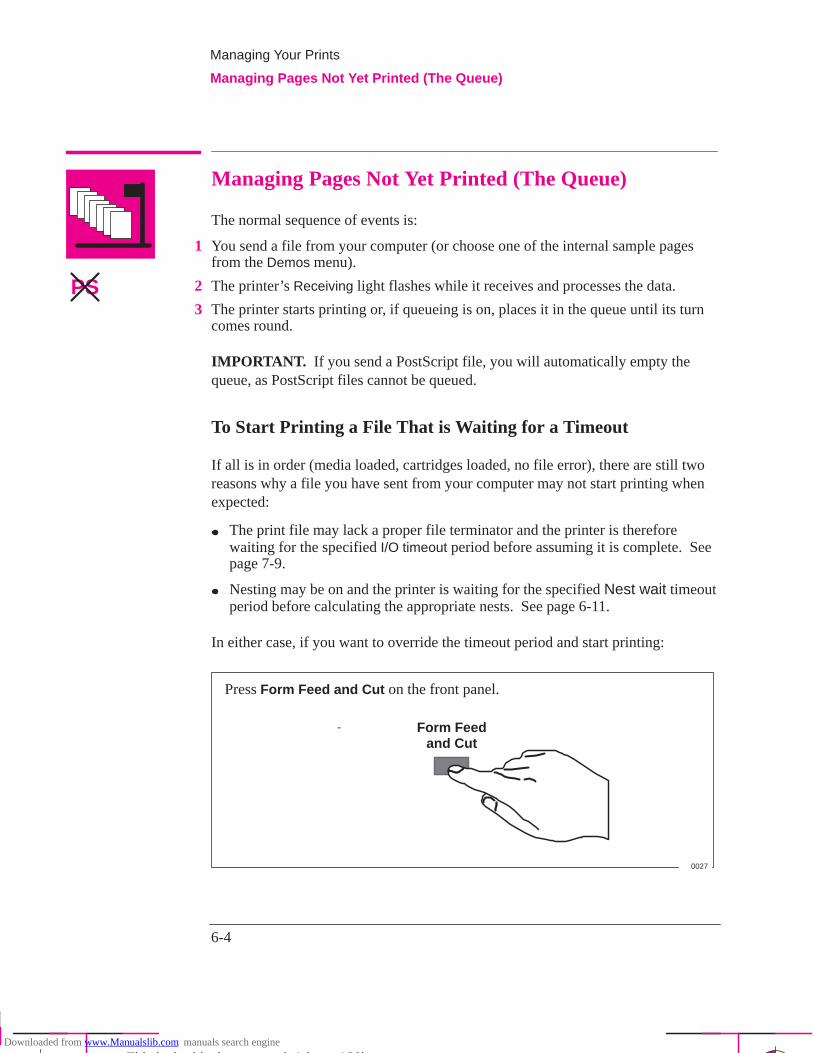
6-4
Company confidential. Postillo/755CM User’s Guide Final Freeze Status:Frozen
This is the cyan on page 6-4 (seq: 132)
This is the black on page 6-4 (seq: 132)
Managing Pages Not Yet Printed (The Queue)
The normal sequence of events is:
1 You send a file from your computer (or choose one of the internal sample pagesfrom the Demos menu).
2 The printer’s Receiving light flashes while it receives and processes the data.
3 The printer starts printing or, if queueing is on, places it in the queue until its turncomes round.
IMPORTANT. If you send a PostScript file, you will automatically empty thequeue, as PostScript files cannot be queued.
To Start Printing a File That is Waiting for a Timeout
If all is in order (media loaded, cartridges loaded, no file error), there are still tworeasons why a file you have sent from your computer may not start printing whenexpected:
The print file may lack a proper file terminator and the printer is thereforewaiting for the specified I/O timeout period before assuming it is complete. Seepage 7-9.
Nesting may be on and the printer is waiting for the specified Nest wait timeoutperiod before calculating the appropriate nests. See page 6-11.
In either case, if you want to override the timeout period and start printing:
Press Form Feed and Cut on the front panel.
Form Feedand Cut
0027
Managing Your Prints
Managing Pages Not Yet Printed (The Queue)
PS
Downloaded from www.Manualslib.com manuals search engine
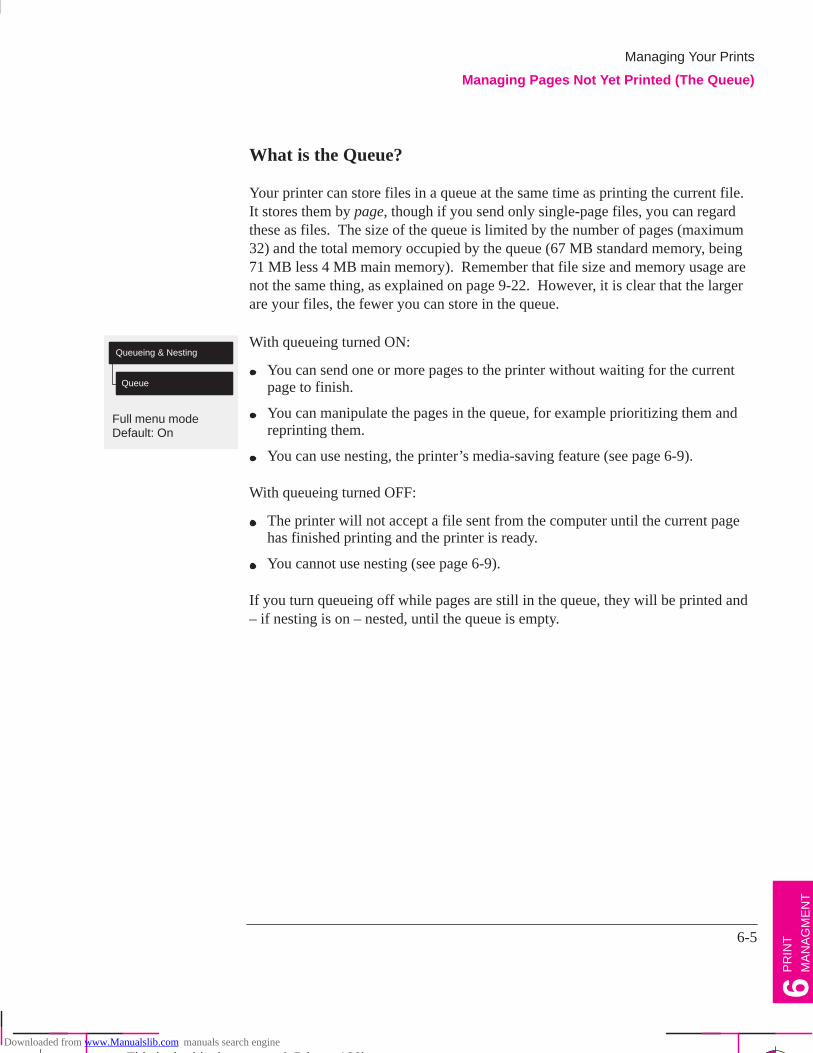
Full menu modeDefault: On
Queueing & Nesting
Queue
6-5
Company confidential. Postillo/755CM User’s Guide Final Freeze Status:Frozen
This is the cyan on page 6-5 (seq: 133)
This is the black on page 6-5 (seq: 133)
What is the Queue?
Your printer can store files in a queue at the same time as printing the current file.It stores them by page, though if you send only single-page files, you can regardthese as files. The size of the queue is limited by the number of pages (maximum32) and the total memory occupied by the queue (67 MB standard memory, being71 MB less 4 MB main memory). Remember that file size and memory usage arenot the same thing, as explained on page 9-22. However, it is clear that the largerare your files, the fewer you can store in the queue.
With queueing turned ON:
You can send one or more pages to the printer without waiting for the currentpage to finish.
You can manipulate the pages in the queue, for example prioritizing them andreprinting them.
You can use nesting, the printer’s media-saving feature (see page 6-9).
With queueing turned OFF:
The printer will not accept a file sent from the computer until the current pagehas finished printing and the printer is ready.
You cannot use nesting (see page 6-9).
If you turn queueing off while pages are still in the queue, they will be printed and– if nesting is on – nested, until the queue is empty.
Managing Your Prints
Managing Pages Not Yet Printed (The Queue)
PR
INT
MA
NA
GM
EN
T6
Downloaded from www.Manualslib.com manuals search engine

All menu modes
Queueing & Nesting
Queue mgmt
Page ID
6-6
Company confidential. Postillo/755CM User’s Guide Final Freeze Status:Frozen
This is the cyan on page 6-6 (seq: 134)
This is the black on page 6-6 (seq: 134)
To Identify a Page In The Queue
In Queueing & Nesting, you can scroll through the pages in the queue.
Each has a identifier, comprising:
<position in queue> : <drawing name>
Position in queue The page currently being printed is in position 0. The next page to be printed is inposition 1, the one after in position 2, etc. The previous page printed isposition –1, the one before that in position –2, etc.
210
–1–2
current page
pages yet to be printed
pages already printed–3
up to32 pages
3
Drawing name Some applications let you give your drawing a descriptive name which it thensends to the printer – for example “Building 2 Exterior”. If your software supportsthis feature, this drawing name is applied to each page and displayed after its queueposition:
1:Building 2 Exterior
Position in queue ��� ���� �������
If your software does not support this feature, your printer will assign names to thepages in its queue. The printer-assigned name indicates how many thousands ofvectors make up the page:
1:92K Vectors
Position in queue ��� �� ����� � ������ � �� ����
Note that this is not an indication of the amount of memory the page requires. Forthat, see page 9-22.
Managing Your Prints
Managing Pages Not Yet Printed (The Queue)
Downloaded from www.Manualslib.com manuals search engine
All menu modes
Page ID
Statistics
All menu modes
Page ID
Move to top
All menu modes
Page ID
Delete page
6-7
Company confidential. Postillo/755CM User’s Guide Final Freeze Status:Frozen
This is the cyan on page 6-7 (seq: 135)
This is the black on page 6-7 (seq: 135)
To See the Size of a Page In the Queue
Statistic Comments
Width The shorter side of the page, in millimeters.
Length The longer side of the page, in millimeters.
To Prioritize a Page in the Queue
To make any page in the queue the next one to be printed, select it and chooseMove to top.
If nesting is turned on (see page 6-9), the prioritized page may still be nested withothers. If you really want this page to be printed next and on its own on the roll,then first turn nesting off and then use Move to top to move it the top of the queue.
To Delete a Page From The Queue
Under normal circumstances, there is no need to delete a page from the queue afterprinting it, as it will just “fall off the end” of the queue as more files are sent.However, if you have sent a file in error and want to avoid any chance of it beingreprinted, you can simply delete it, by selecting it and choosing Delete page.
To remove a page that has not yet been printed, simply identify it by it’s position inthe queue (see page 6-6) and delete it, by choosing Delete page.
If the page is currently being printed (its queue position is 0), and you want both tocancel the page and to delete it, first press Cancel and then delete it from thequeue.
Managing Your Prints
Managing Pages Not Yet Printed (The Queue)
PR
INT
MA
NA
GM
EN
T6
Downloaded from www.Manualslib.com manuals search engine
All menu modesDefault: 1
Page ID
Copies
6-8
Company confidential. Postillo/755CM User’s Guide Final Freeze Status:Frozen
This is the cyan on page 6-8 (seq: 136)
This is the black on page 6-8 (seq: 136)
To Make Copies of a Page in The Queue
Has the pagealready beenprinted?
Do you wantone copy orseveral? What to do
Yes One Use Move to top (see page 6-7).
Several Use Copies (see below) and then use Moveto top (see page 6-7).
No One Use Copies (see below).
Several
In all cases, the page must be still in the queue.
Having selected the page and chosen Copies, use the scrolling keys to specify thenumber of copies required, and press Enter. The number you enter is the actualnumber of pages to be printed; for example, choosing 2 for a page not yet printedmeans you will get the one original and one copy. The maximum is 99.
The setting you specify in this option overrides any value set by your software.
Note that, if Rotate (see page 4-8) was on when you sent the file, every copy willbe rotated too.
Managing Your Prints
Managing Pages Not Yet Printed (The Queue)
Downloaded from www.Manualslib.com manuals search engine
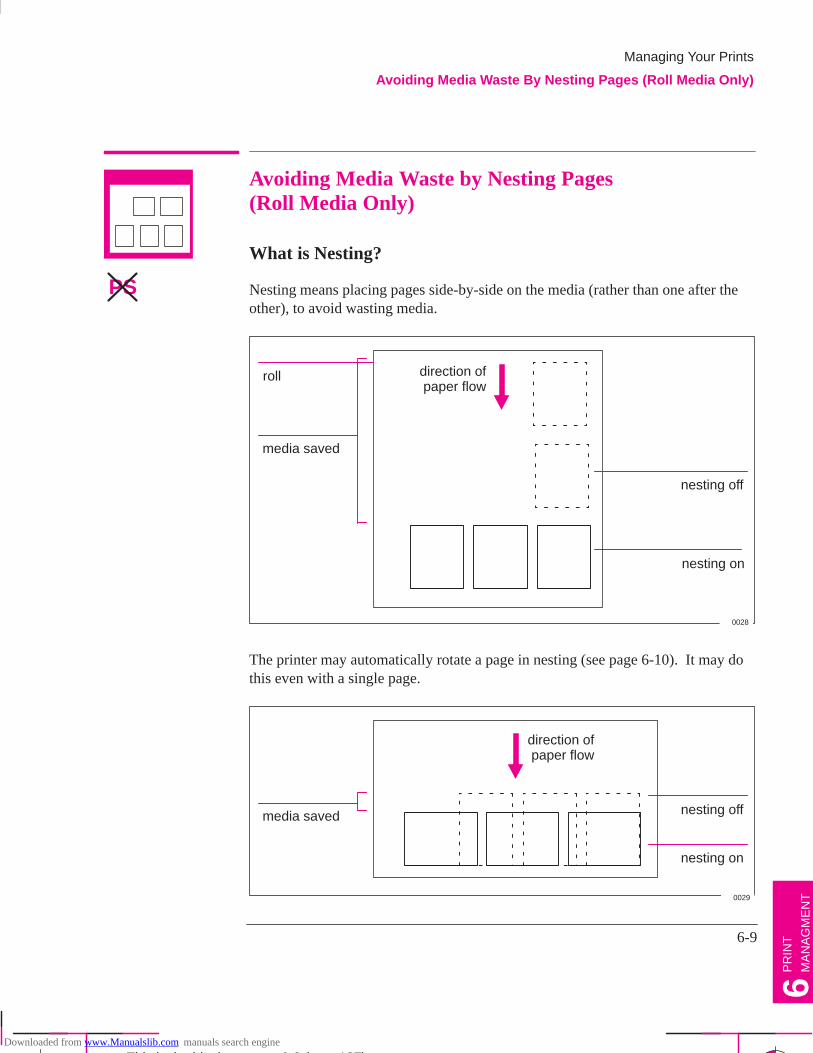
6-9
Company confidential. Postillo/755CM User’s Guide Final Freeze Status:Frozen
This is the cyan on page 6-9 (seq: 137)
This is the black on page 6-9 (seq: 137)
Avoiding Media Waste by Nesting Pages (Roll Media Only)
What is Nesting?
Nesting means placing pages side-by-side on the media (rather than one after theother), to avoid wasting media.
nesting on
roll
nesting off
media saved
0028
direction ofpaper flow
The printer may automatically rotate a page in nesting (see page 6-10). It may dothis even with a single page.
nesting on
nesting offmedia saved
0029
direction ofpaper flow
PS
Managing Your Prints
Avoiding Media Waste By Nesting Pages (Roll Media Only)
PR
INT
MA
NA
GM
EN
T6
Downloaded from www.Manualslib.com manuals search engine
6-10
Company confidential. Postillo/755CM User’s Guide Final Freeze Status:Frozen
This is the cyan on page 6-10 (seq: 138)
This is the black on page 6-10 (seq: 138)
When Does the Printer Try to Nest Pages?
When all the following are true:
The printer is loaded with roll media rather than sheet media.
In the front-panel menus, Queue is ON (the default). See page 6-5.
In the front-panel menus, Nest is ON (that is, set to either Optimal or In order).See page 6-11.
Which Pages Qualify for Nesting?
In order to be in the same nest, the individual pages must be compatible on boththe following criteria:
Color or monochrome
Either all are color or all are monochrome. Remember that monochrome mayinclude a color page rendered in grayscales by use of the front-panel Color/Mono key – see page 5-10.
Print resolution
Either all are 300 dpi or all are 600 dpi – see page 5-13.
Which Pages May be Rotated?
Apart from obvious physical limitations on the roll, any page containing raster datawill not be rotated.
If you are using the Microsoft Windows driver supplied with this printer, your filesdo contain raster data and therefore the pages will not be rotated in nesting. Thenormal line drawings of most CAD software do not contain raster data, andtherefore may be rotated in nesting.
Managing Your Prints
Avoiding Media Waste By Nesting Pages (Roll Media Only)
Downloaded from www.Manualslib.com manuals search engine
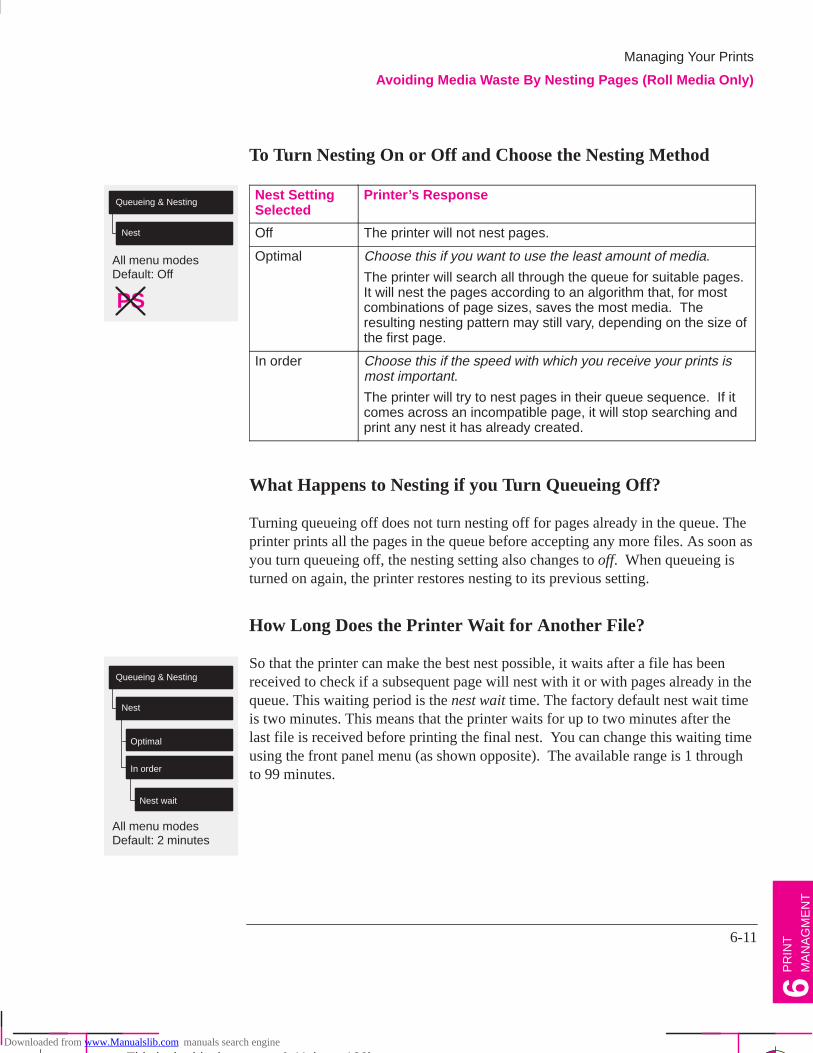
All menu modesDefault: Off
Queueing & Nesting
Nest
PS
All menu modesDefault: 2 minutes
Queueing & Nesting
Nest
Optimal
Nest wait
In order
6-11
Company confidential. Postillo/755CM User’s Guide Final Freeze Status:Frozen
This is the cyan on page 6-11 (seq: 139)
This is the black on page 6-11 (seq: 139)
To Turn Nesting On or Off and Choose the Nesting Method
Nest SettingSelected
Printer’s Response
Off The printer will not nest pages.
Optimal Choose this if you want to use the least amount of media.
The printer will search all through the queue for suitable pages.It will nest the pages according to an algorithm that, for mostcombinations of page sizes, saves the most media. Theresulting nesting pattern may still vary, depending on the size ofthe first page.
In order Choose this if the speed with which you receive your prints ismost important.
The printer will try to nest pages in their queue sequence. If itcomes across an incompatible page, it will stop searching andprint any nest it has already created.
What Happens to Nesting if you Turn Queueing Off?
Turning queueing off does not turn nesting off for pages already in the queue. Theprinter prints all the pages in the queue before accepting any more files. As soon asyou turn queueing off, the nesting setting also changes to off. When queueing isturned on again, the printer restores nesting to its previous setting.
How Long Does the Printer Wait for Another File?
So that the printer can make the best nest possible, it waits after a file has beenreceived to check if a subsequent page will nest with it or with pages already in thequeue. This waiting period is the nest wait time. The factory default nest wait timeis two minutes. This means that the printer waits for up to two minutes after thelast file is received before printing the final nest. You can change this waiting timeusing the front panel menu (as shown opposite). The available range is 1 throughto 99 minutes.
Managing Your Prints
Avoiding Media Waste By Nesting Pages (Roll Media Only)
PR
INT
MA
NA
GM
EN
T6
Downloaded from www.Manualslib.com manuals search engine
6-12
Company confidential. Postillo/755CM User’s Guide Final Freeze Status:Frozen
This is the cyan on page 6-12 (seq: 140)
This is the black on page 6-12 (seq: 140)
Getting the Best from Nesting (Nesting and Margins)
In order to “squeeze in” one more page, the printer may reduce the right margin ofthe right-most page by up to 3 mm (0.08 in). This is done only if:
your Page format / Size is set either to a Best option or to a discrete standardsize, and if
the roll of media loaded is slightly narrower than a standard size.
You can reduce the side margins too, for every page, as explained on page 4-7. Inorder to give the printer the best chance of nesting the most pages, we recommendthat you set Page format / Margins to Smaller.
Nesting and the Rotate Feature
Since nesting may automatically rotate pages, the front panel’s Page format /Rotate setting is ignored as long as nesting is on.
Managing Your Prints
Avoiding Media Waste By Nesting Pages (Roll Media Only)
What the printermay do
What you can do
Downloaded from www.Manualslib.com manuals search engine
7-1
Company confidential. Postillo/755CM User’s Guide Final Freeze Status:Frozen
This is the cyan on page 7-1 (seq: 141)
This is the black on page 7-1 (seq: 141)
To See the Current Overall Configuration of the Printer 7-2. . . . . .
To See the Current Configuration of the Front-Panel Settings7-3.
To Change the Front-Panel Settings 7-4. . . . . . . . . . . . . . . . . . . . . .
Recalibrating the Printer for Accuracy 7-5. . . . . . . . . . . . . . . . . . .
Changing the Graphics Language Setting for a Different
Application 7-7. . . . . . . . . . . . . . . . . . . . . . . . . . . . . . . . . . . . .
Changing the Interface Settings 7-9. . . . . . . . . . . . . . . . . . . . . . . . .
To Change The I/O Timeout Setting 7-9. . . . . . . . . . . . . . . . . . . . .
Reconfiguring Your Printer
Reconfiguration and Recalibration
7
RE
CO
NF
IG.
7
Downloaded from www.Manualslib.com manuals search engine
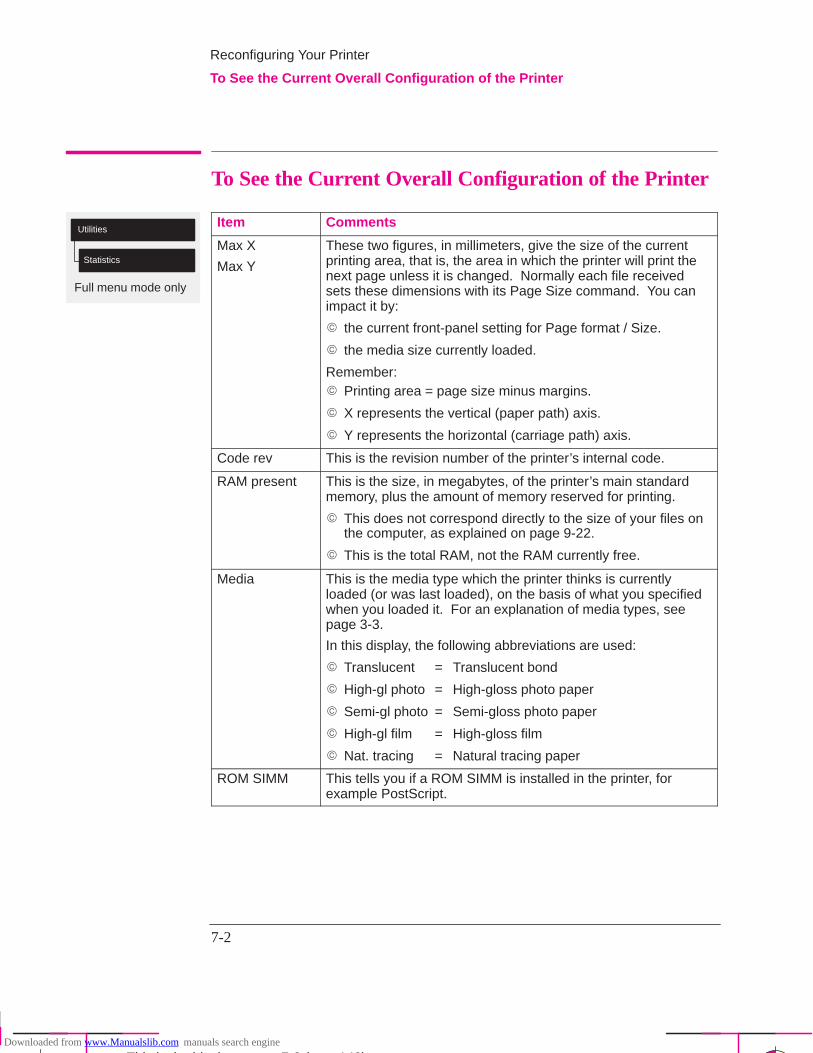
Full menu mode only
Utilities
Statistics
7-2
Company confidential. Postillo/755CM User’s Guide Final Freeze Status:Frozen
This is the cyan on page 7-2 (seq: 142)
This is the black on page 7-2 (seq: 142)
To See the Current Overall Configuration of the Printer
Item Comments
Max X
Max Y
These two figures, in millimeters, give the size of the currentprinting area, that is, the area in which the printer will print thenext page unless it is changed. Normally each file receivedsets these dimensions with its Page Size command. You canimpact it by:
� the current front-panel setting for Page format / Size.
� the media size currently loaded.
Remember:� Printing area = page size minus margins.
� X represents the vertical (paper path) axis.
� Y represents the horizontal (carriage path) axis.
Code rev This is the revision number of the printer’s internal code.
RAM present This is the size, in megabytes, of the printer’s main standardmemory, plus the amount of memory reserved for printing.
� This does not correspond directly to the size of your files onthe computer, as explained on page 9-22.
� This is the total RAM, not the RAM currently free.
Media This is the media type which the printer thinks is currentlyloaded (or was last loaded), on the basis of what you specifiedwhen you loaded it. For an explanation of media types, seepage 3-3.
In this display, the following abbreviations are used:
� Translucent = Translucent bond
� High-gl photo = High-gloss photo paper
� Semi-gl photo = Semi-gloss photo paper
� High-gl film = High-gloss film
� Nat. tracing = Natural tracing paper
ROM SIMM This tells you if a ROM SIMM is installed in the printer, forexample PostScript.
Reconfiguring Your Printer
To See the Current Overall Configuration of the Printer
Downloaded from www.Manualslib.com manuals search engine
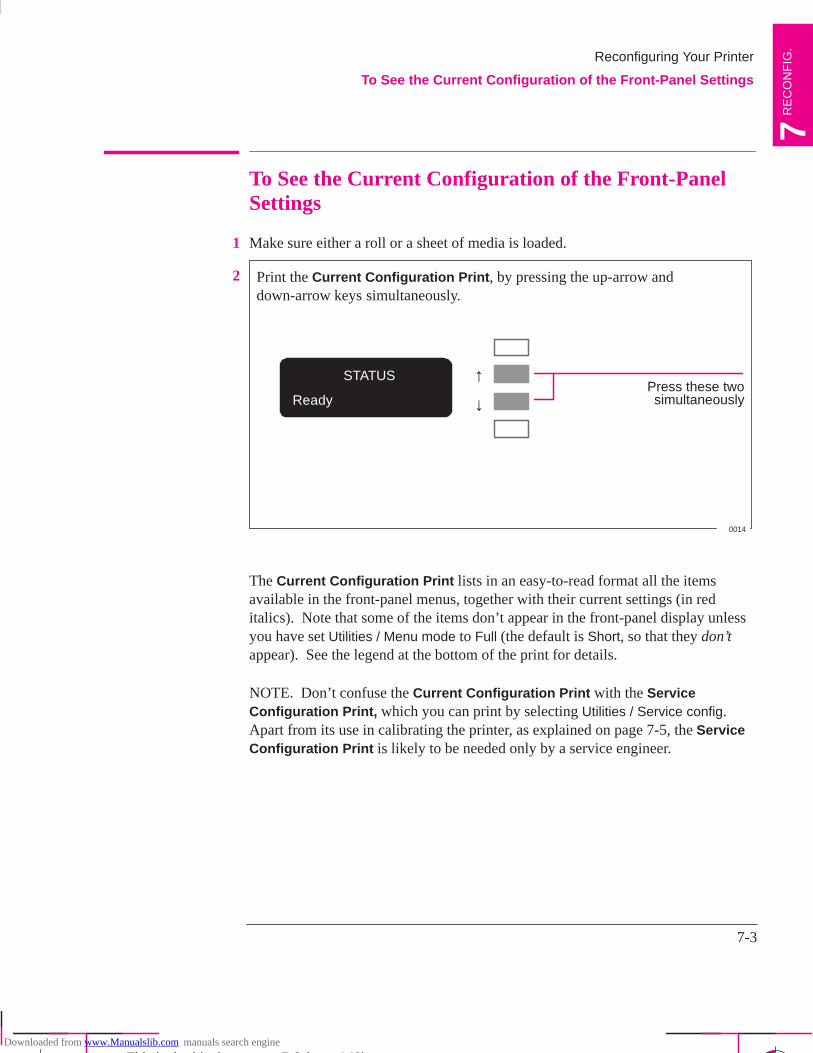
7-3
Company confidential. Postillo/755CM User’s Guide Final Freeze Status:Frozen
This is the cyan on page 7-3 (seq: 143)
This is the black on page 7-3 (seq: 143)
To See the Current Configuration of the Front-PanelSettings
1 Make sure either a roll or a sheet of media is loaded.
2 Print the Current Configuration Print , by pressing the up-arrow anddown-arrow keys simultaneously.
STATUS
Ready ↓↑
Press these twosimultaneously
0014
The Current Configuration Print lists in an easy-to-read format all the itemsavailable in the front-panel menus, together with their current settings (in reditalics). Note that some of the items don’t appear in the front-panel display unlessyou have set Utilities / Menu mode to Full (the default is Short, so that they don’tappear). See the legend at the bottom of the print for details.
NOTE. Don’t confuse the Current Configuration Print with the ServiceConfiguration Print, which you can print by selecting Utilities / Service config.Apart from its use in calibrating the printer, as explained on page 7-5, the ServiceConfiguration Print is likely to be needed only by a service engineer.
RE
CO
NF
IG.
7
Reconfiguring Your Printer
To See the Current Configuration of the Front-Panel Settings
Downloaded from www.Manualslib.com manuals search engine
These graphics
are explained in
chapter 2.
7-4
Company confidential. Postillo/755CM User’s Guide Final Freeze Status:Frozen
This is the cyan on page 7-4 (seq: 144)
This is the black on page 7-4 (seq: 144)
To Change the Front-Panel Settings
Chapter 2 of this manual explains how to use the front-panel display, includinghow to change any of the settings. It also explains the small menu graphics thatappear in the left margins of this manual whenever a particular menu item isexplained.
The meanings of all the items in the front-panel menus are explained at therelevant point in this manual. Refer to the index at the back of the manual for theitem you want to change.
Reconfiguring Your Printer
To Change the Front-Panel Settings
Downloaded from www.Manualslib.com manuals search engine

Full menu mode
Utilities
Service config
7-5
Company confidential. Postillo/755CM User’s Guide Final Freeze Status:Frozen
This is the cyan on page 7-5 (seq: 145)
This is the black on page 7-5 (seq: 145)
Recalibrating the Printer for Accuracy
When to Recalibrate the Printer
Your printer was calibrated at the factory using HP Matte Film, with a thickness of0.12 mm (0.0048 in);
at 23�C (73�F),
with 50-60% relative humidity.
It will operate with greatest accuracy in similar environmental conditions. If youare operating under significantly different conditions, you should recalibrate theprinter as explained here. The printer’s environmental specifications are given onpage 11-4. Also, if you are using a non-standard media type, you should firstrecalibrate the printer for that media type. For supported media types, see page 3-3. You may also need to recalibrate the printer if you have bandingproblems, see page 9-20.
A Quick Guide to Whether Recalibration is Necessary1 Make sure E/A0-size or D/A1-size media is loaded.
2 Print the Service Configuration print, by choosing the option shown in the menugraphic on the left.
3 Near the top of this print are a pair of Xs. With a ruler measure the distancebetween them. It should be 500 mm. If significantly different you will need torecalibrate the printer as described on the following page
XX 500mm
Reconfiguring Your Printer
Recalibrating the Printer for Accuracy
RE
CO
NF
IG.
7
Downloaded from www.Manualslib.com manuals search engine
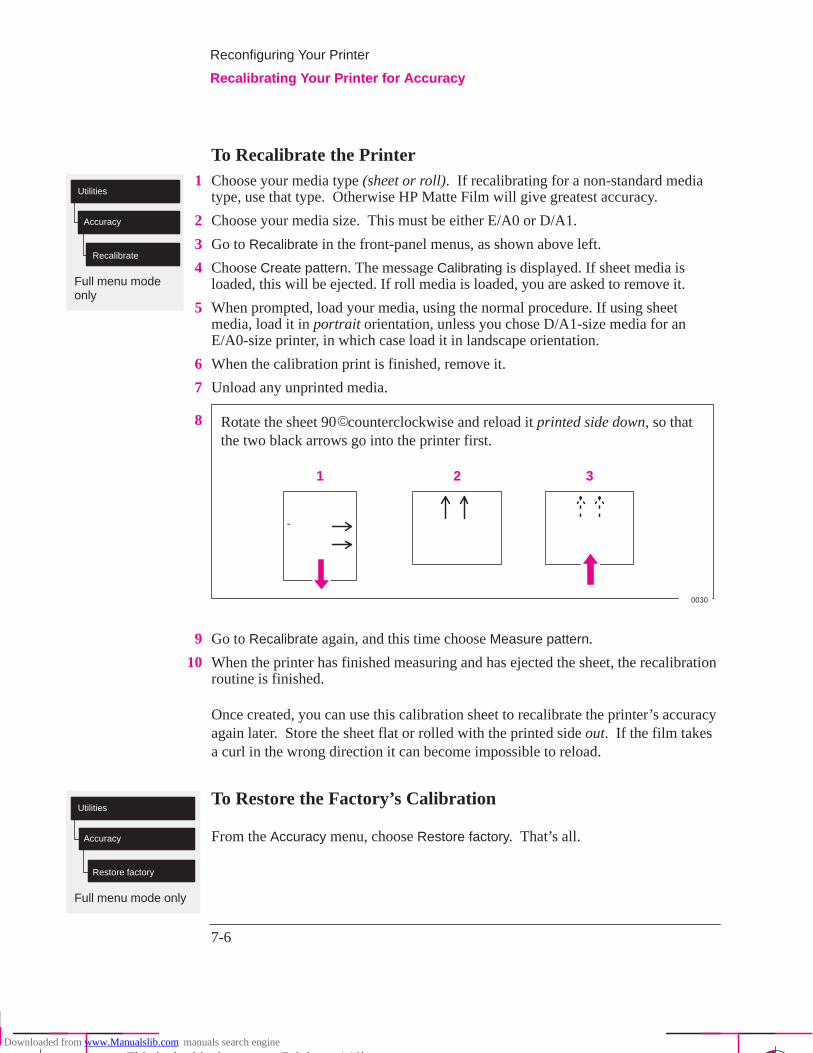
Full menu mode only
Utilities
Accuracy
Recalibrate
Full menu mode only
Utilities
Accuracy
Restore factory
7-6
Company confidential. Postillo/755CM User’s Guide Final Freeze Status:Frozen
This is the cyan on page 7-6 (seq: 146)
This is the black on page 7-6 (seq: 146)
To Recalibrate the Printer1 Choose your media type (sheet or roll). If recalibrating for a non-standard media
type, use that type. Otherwise HP Matte Film will give greatest accuracy.
2 Choose your media size. This must be either E/A0 or D/A1.
3 Go to Recalibrate in the front-panel menus, as shown above left.
4 Choose Create pattern. The message Calibrating is displayed. If sheet media isloaded, this will be ejected. If roll media is loaded, you are asked to remove it.
5 When prompted, load your media, using the normal procedure. If using sheetmedia, load it in portrait orientation, unless you chose D/A1-size media for anE/A0-size printer, in which case load it in landscape orientation.
6 When the calibration print is finished, remove it.
7 Unload any unprinted media.
8 Rotate the sheet 90� counterclockwise and reload it printed side down, so thatthe two black arrows go into the printer first.
1 2 3
0030
9 Go to Recalibrate again, and this time choose Measure pattern.
10 When the printer has finished measuring and has ejected the sheet, the recalibrationroutine is finished.
Once created, you can use this calibration sheet to recalibrate the printer’s accuracyagain later. Store the sheet flat or rolled with the printed side out. If the film takesa curl in the wrong direction it can become impossible to reload.
To Restore the Factory’s Calibration
From the Accuracy menu, choose Restore factory. That’s all.
Reconfiguring Your Printer
Recalibrating Your Printer for Accuracy
Downloaded from www.Manualslib.com manuals search engine
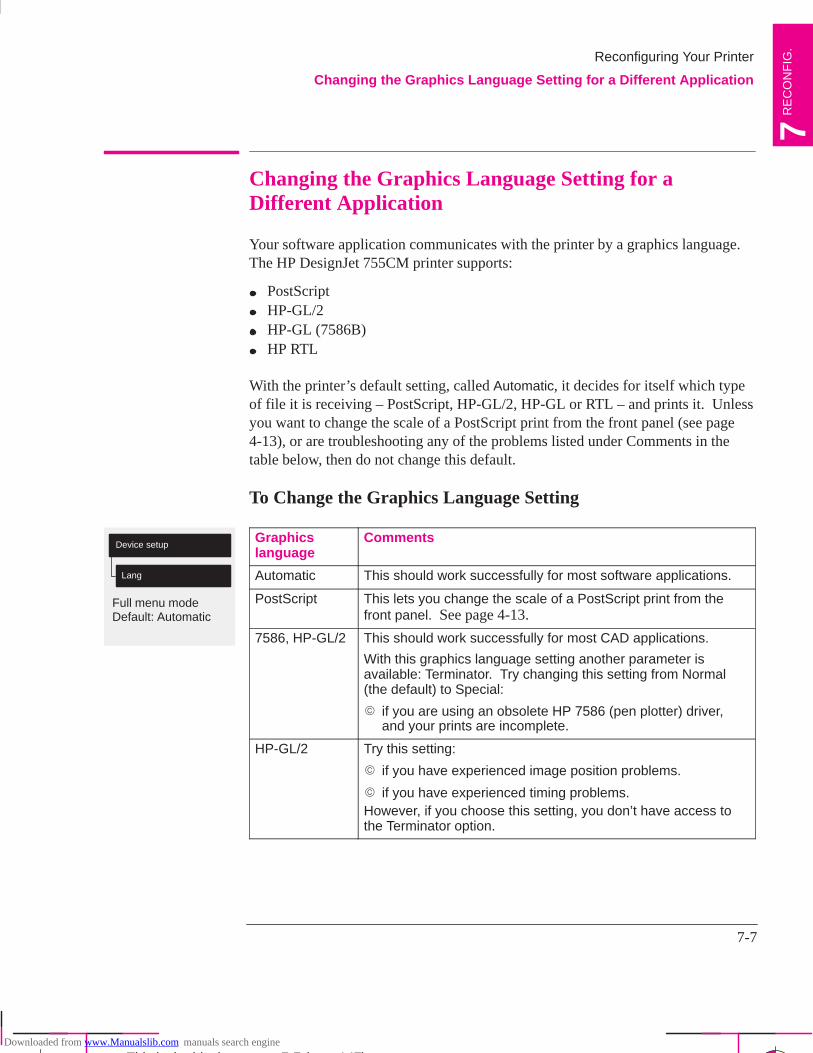
Full menu modeDefault: Automatic
Device setup
Lang
7-7
Company confidential. Postillo/755CM User’s Guide Final Freeze Status:Frozen
This is the cyan on page 7-7 (seq: 147)
This is the black on page 7-7 (seq: 147)
Changing the Graphics Language Setting for aDifferent Application
Your software application communicates with the printer by a graphics language.The HP DesignJet 755CM printer supports:
PostScriptHP-GL/2HP-GL (7586B)HP RTL
With the printer’s default setting, called Automatic, it decides for itself which typeof file it is receiving – PostScript, HP-GL/2, HP-GL or RTL – and prints it. Unlessyou want to change the scale of a PostScript print from the front panel (see page4-13), or are troubleshooting any of the problems listed under Comments in thetable below, then do not change this default.
To Change the Graphics Language Setting
Graphicslanguage
Comments
Automatic This should work successfully for most software applications.
PostScript This lets you change the scale of a PostScript print from thefront panel. See page 4-13.
7586, HP-GL/2 This should work successfully for most CAD applications.
With this graphics language setting another parameter isavailable: Terminator. Try changing this setting from Normal(the default) to Special:
� if you are using an obsolete HP 7586 (pen plotter) driver,and your prints are incomplete.
HP-GL/2 Try this setting:
� if you have experienced image position problems.
� if you have experienced timing problems.However, if you choose this setting, you don’t have access tothe Terminator option.
Reconfiguring Your Printer
Changing the Graphics Language Setting for a Different Application
RE
CO
NF
IG.
7
Downloaded from www.Manualslib.com manuals search engine
7-8
Company confidential. Postillo/755CM User’s Guide Final Freeze Status:Frozen
This is the cyan on page 7-8 (seq: 148)
This is the black on page 7-8 (seq: 148)
Graphics Language and Networks
Note for system administrator. If you are using the printer with a networkspooler, consider modifying the spooler to insert automatically the PJLlanguage-switching commands at the beginning and end of each file. This allowsthe printer to switch automatically into the correct graphics language for yourcurrent print and returns the printer to the front panel graphics language setting forsubsequent prints. For PJL reference information, see page 11-13.
Reconfiguring Your Printer
Changing the Graphics Language Setting for a Different Application
Downloaded from www.Manualslib.com manuals search engine

Full menu mode
I/O Setup
RS-232-C
Full menu mode
I/O Setup
I/O timeout
7-9
Company confidential. Postillo/755CM User’s Guide Final Freeze Status:Frozen
This is the cyan on page 7-9 (seq: 149)
This is the black on page 7-9 (seq: 149)
Changing the Interface Settings
Network With a network interface (such as HP JetDirect Print Server), refer to your networkinterface documentation for advice on any front-panel configuration. Thefront-panel menu is I/O Setup / Modular / MIO ...
Serial With a serial interface, you should have configured it when installing the printer, asexplained from page 1-26. However, you may need to reconfigure it:
when you connect a new computer to the printer
when you output to the printer from a new application
if you experience problems with distorted or unintelligible prints
Parallel With a parallel interface, no front-panel configuration is necessary.
To Change the Serial Interface Settings
This task is explained in detail from page 1-26, including a note of the defaults andlikely requirements.
To Change the I/O Timeout Setting
Some software may not write a proper file terminator at the end of the file. In thiscase, the printer will not know that the file is complete and will wait for more datauntil the end of the “I/O Timeout” period. By default, this period is 30 minutes,but you can change it in the menu (indicated on the left) to as little as 30 seconds.
Reconfiguring Your Printer
Changing the Interface Settings and I/O Timeout Setting
RE
CO
NF
IG.
7
Downloaded from www.Manualslib.com manuals search engine

7-10
Company confidential. Postillo/755CM User’s Guide Final Freeze Status:Frozen
This is the cyan on page 7-10 (seq: 150)
This is the black on page 7-10 (seq: 150)Downloaded from www.Manualslib.com manuals search engine
8-1
Company confidential. Postillo/755CM User’s Guide Final Freeze Status:Frozen
This is the cyan on page 8-1 (seq: 151)
This is the black on page 8-1 (seq: 151)
Replacing the Print Cartridges 8-2. . . . . . . . . . . . . . . . . . . . . . . . . .
Cleaning the Printer 8-2. . . . . . . . . . . . . . . . . . . . . . . . . . . . . . . . . .
“Normal” Printer Use 8-3. . . . . . . . . . . . . . . . . . . . . . . . . . . . . . . . .
Maintaining Your Printer
Cleaning and Service
8
MA
INT
EN
AN
CE
8
Downloaded from www.Manualslib.com manuals search engine
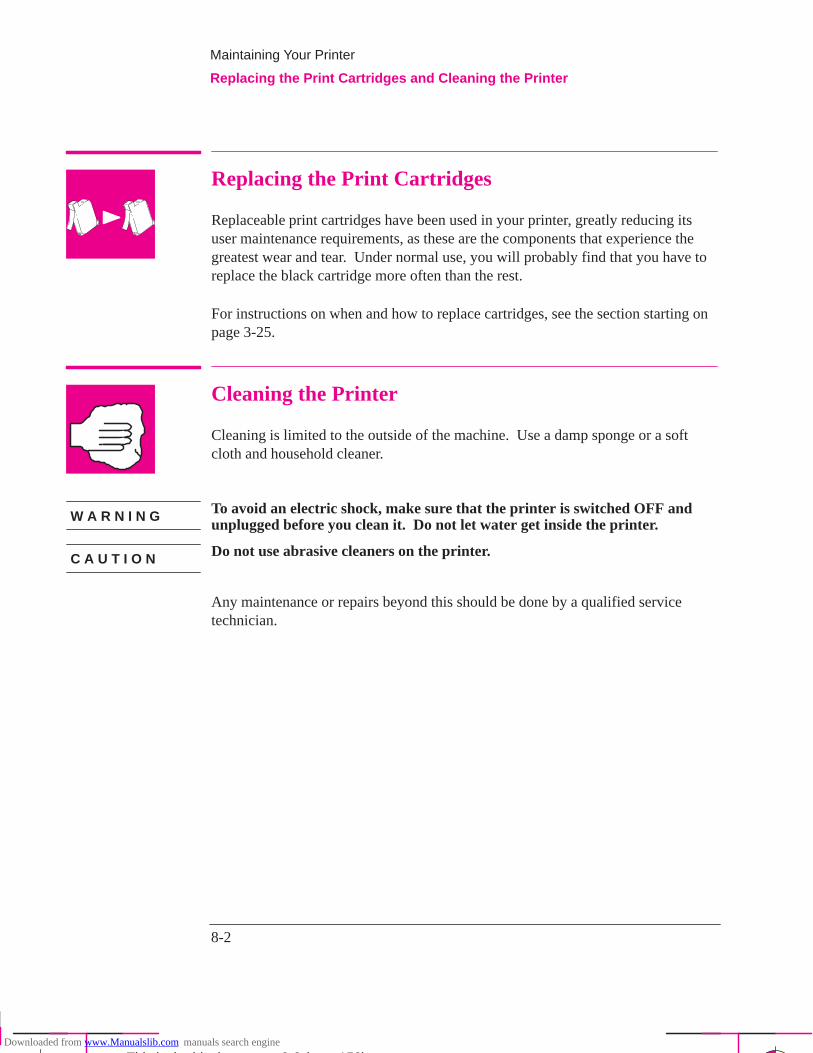
8-2
Company confidential. Postillo/755CM User’s Guide Final Freeze Status:Frozen
This is the cyan on page 8-2 (seq: 152)
This is the black on page 8-2 (seq: 152)
Replacing the Print Cartridges
Replaceable print cartridges have been used in your printer, greatly reducing itsuser maintenance requirements, as these are the components that experience thegreatest wear and tear. Under normal use, you will probably find that you have toreplace the black cartridge more often than the rest.
For instructions on when and how to replace cartridges, see the section starting onpage 3-25.
Cleaning the Printer
Cleaning is limited to the outside of the machine. Use a damp sponge or a softcloth and household cleaner.
To avoid an electric shock, make sure that the printer is switched OFF andunplugged before you clean it. Do not let water get inside the printer.
Do not use abrasive cleaners on the printer.
Any maintenance or repairs beyond this should be done by a qualified servicetechnician.
Maintaining Your Printer
Replacing the Print Cartridges and Cleaning the Printer
W A R N I N G
C A U T I O N
Downloaded from www.Manualslib.com manuals search engine
8-3
Company confidential. Postillo/755CM User’s Guide Final Freeze Status:Frozen
This is the cyan on page 8-3 (seq: 153)
This is the black on page 8-3 (seq: 153)
“Normal” Printer Use
“Normal” printer use means less than:
12 pages per day (if medium-density E/A0 image prints), or
20 pages per day (if medium-density E/A0 CAD prints)
If your drawings are smaller than E/A0, the number of pages per day can be higher.
If you use the printer less than this, it is unlikely you will need to get it serviced. Ifyou use the printer more than this, it is possible that, after a period of time, it willneed to be serviced. The printer itself keeps an internal count of total pages printedand total passes of the print cartridges. If the front panel periodically displays:
STATUS
Maintenance advised
this means that your use of the printer has exceeded one of the followingwarranty limits:
either 20,000 pages printed
or 4,500,000 passes of the cartridge carriage.
Contact your local HP dealer or HP service engineer to arrange a service. Afterthe service the message will disappear. If you choose to ignore the message, youmay continue to use the printer as normal, but may encounter a number ofoperational or print-quality problems.
You can check your current count of pages printed and passes of cartridge carriageby printing the Service Configuration Print.
MA
INT
EN
AN
CE
8
Maintaining Your printer
“ Normal” Printer Use
Downloaded from www.Manualslib.com manuals search engine
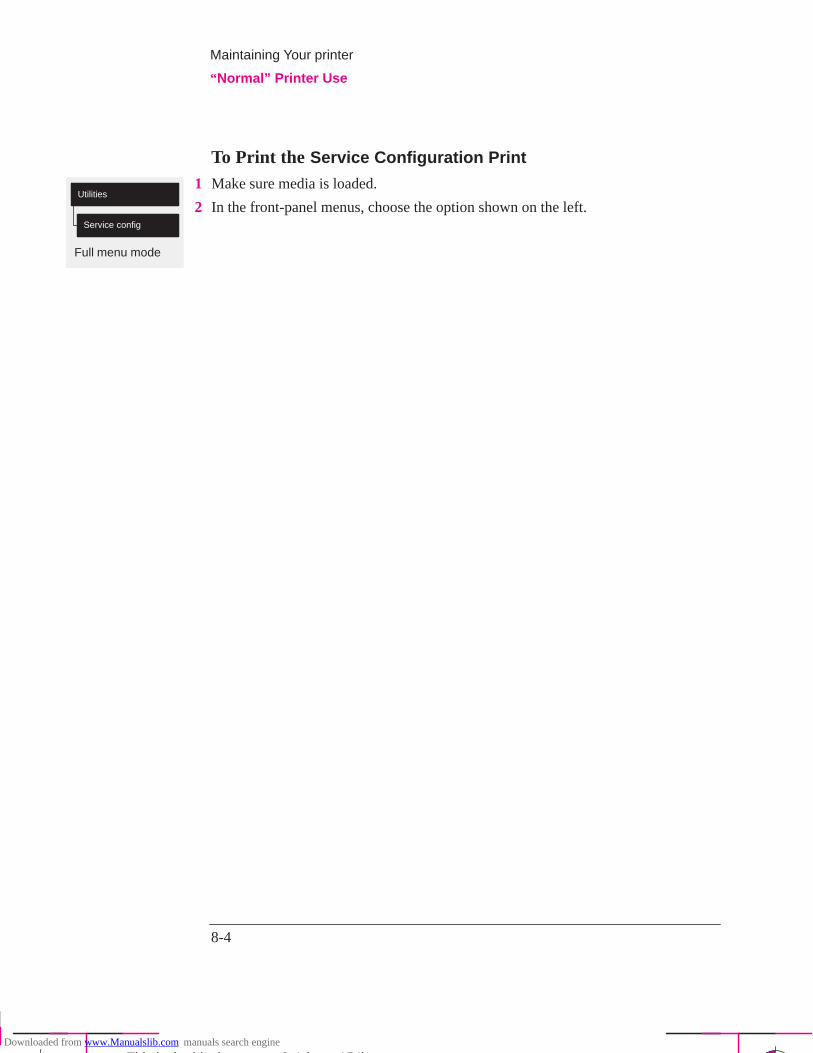
Full menu mode
Utilities
Service config
8-4
Company confidential. Postillo/755CM User’s Guide Final Freeze Status:Frozen
This is the cyan on page 8-4 (seq: 154)
This is the black on page 8-4 (seq: 154)
To Print the Service Configuration Print
1 Make sure media is loaded.
2 In the front-panel menus, choose the option shown on the left.
Maintaining Your printer
“ Normal” Printer Use
Downloaded from www.Manualslib.com manuals search engine
9-1
Company confidential. Postillo/755CM User’s Guide Final Freeze Status:Frozen
This is the cyan on page 9-1 (seq: 155)
This is the black on page 9-1 (seq: 155)
Using the Documentation to Help Solve Problems 9-2. . . . . . . . . .
Locating the Source of Your Problem 9-3. . . . . . . . . . . . . . . . . . . .
Solving Media-Handling Problems 9-4. . . . . . . . . . . . . . . . . . . . . .
Solving Print-Cartridge Problems 9-7. . . . . . . . . . . . . . . . . . . . . . .
Clearing a Media Jam 9-8. . . . . . . . . . . . . . . . . . . . . . . . . . . . . . . .
Solving Communication Problems 9-9. . . . . . . . . . . . . . . . . . . . . .
Solving Problems with Image Position or Content 9-10. . . . . . . . .
Solving Print-Quality Problems 9-16. . . . . . . . . . . . . . . . . . . . . . . .
Solving Front-Panel Problems 9-21. . . . . . . . . . . . . . . . . . . . . . . . .
Solving Miscellaneous Problems 9-23. . . . . . . . . . . . . . . . . . . . . . .
Getting Help 9-25. . . . . . . . . . . . . . . . . . . . . . . . . . . . . . . . . . . . . . .
This is the magenta on page 9-1 (seq: 155)
Troubleshooting
9
TR
OU
BLE
-
SH
OO
TIN
G9
Downloaded from www.Manualslib.com manuals search engine
9-2
Company confidential. Postillo/755CM User’s Guide Final Freeze Status:Frozen
This is the cyan on page 9-2 (seq: 156)
This is the black on page 9-2 (seq: 156)
Using the Documentation to Help Solve ProblemsIf you are looking for the meaning of an error message, see chapter 10.
If you know the problem is related to a certain task, first check the relevantsection in this manual, for the step-by-step procedures. Use this manual’s indexto find the section. For example, if you are having difficulty with your pageformat, refer to chapter 4, titled: Controlling the Page Format.
If the problem persists, refer to the appropriate section in this chapter. Thesections are
– Solving media-handling problems
– Clearing a media jam
– Solving problems with image position or content
– Solving print-quality problems
– Solving miscellaneous problems.
If the problem could be related to your software driver, and you are using anHP driver, refer to the drivers’ troubleshooting documentation and the ‘On-Line-Help’ in your application software.
If the problem has no obvious cause, read “Locating the source of your prob-lem” on the next page.
If you still cannot solve the problem, refer to “Getting help” on page 9-25.
Troubleshooting
Using the Documentation to Help Solve Your Problem
Downloaded from www.Manualslib.com manuals search engine
9-3
Company confidential. Postillo/755CM User’s Guide Final Freeze Status:Frozen
This is the cyan on page 9-3 (seq: 157)
This is the black on page 9-3 (seq: 157)
Locating the Source of the Problem1 Look at the front-panel display for any error message. For an explanation, see
chapter 10.
2 Test the printer.
Switch the printer off. Ensure that the power cord is firmly inserted in theprinter and plugged in to an outlet that you know works.
Switch the printer on. Print a sample file (see page 1-21). If the printer printsthis correctly, the problem is probably not with the printer.
3 Test your computer hardware and interface.
Ensure that you have the correct interface cable between the computer and theprinter and that it is firmly connected to the correct ports (see the sectionsstarting on page 1-24).
Check that your printer’s graphics language setting (in Device setup / Lang)matches the requirements of your software.
Serial interface users only. Check that your printer’s serial interface settings(in I/O Setup / RS-232-C) match the requirements of your computer hardwareand application software. See page 1-26 for details. Also, if you have changedyour interface, switch the printer off and then on again before trying to print.
This is the magenta on page 9-3 (seq: 157)
TR
OU
BLE
-
SH
OO
TIN
G9
Troubleshooting
Locating the Source of Your Problem
Downloaded from www.Manualslib.com manuals search engine
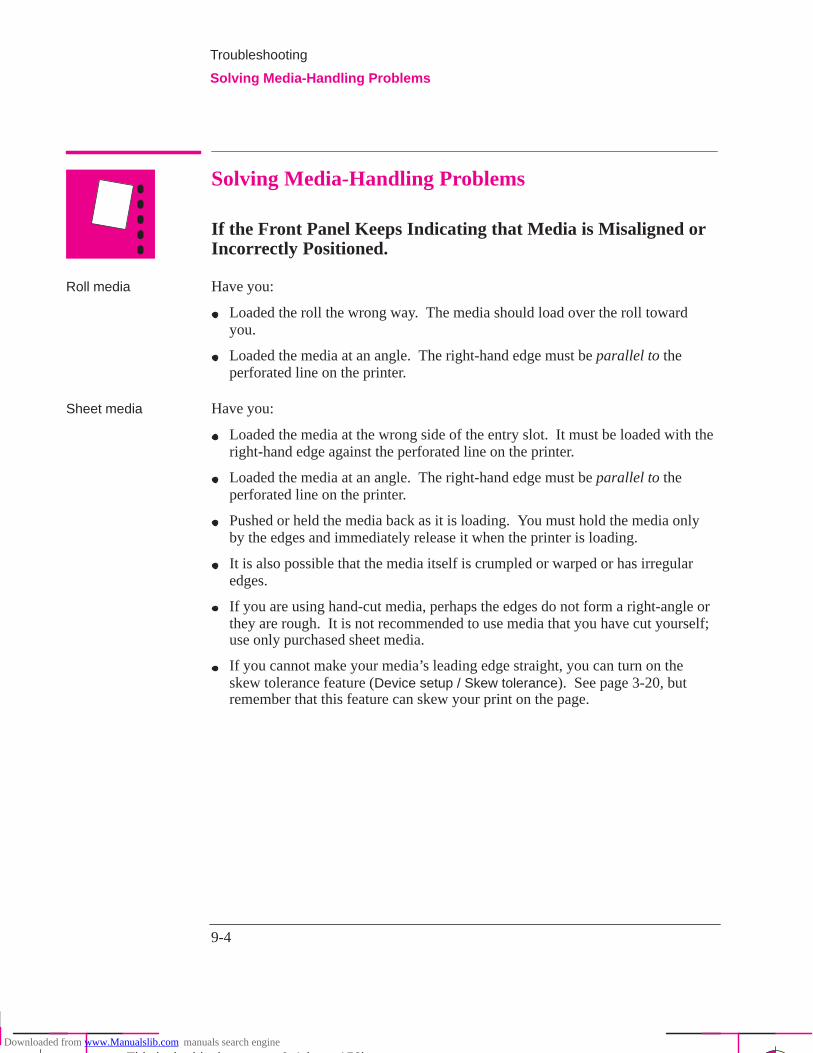
9-4
Company confidential. Postillo/755CM User’s Guide Final Freeze Status:Frozen
This is the cyan on page 9-4 (seq: 158)
This is the black on page 9-4 (seq: 158)
Solving Media-Handling Problems
If the Front Panel Keeps Indicating that Media is Misaligned orIncorrectly Positioned.
Roll media Have you:
Loaded the roll the wrong way. The media should load over the roll towardyou.
Loaded the media at an angle. The right-hand edge must be parallel to theperforated line on the printer.
Sheet media Have you:
Loaded the media at the wrong side of the entry slot. It must be loaded with theright-hand edge against the perforated line on the printer.
Loaded the media at an angle. The right-hand edge must be parallel to theperforated line on the printer.
Pushed or held the media back as it is loading. You must hold the media onlyby the edges and immediately release it when the printer is loading.
It is also possible that the media itself is crumpled or warped or has irregularedges.
If you are using hand-cut media, perhaps the edges do not form a right-angle orthey are rough. It is not recommended to use media that you have cut yourself;use only purchased sheet media.
If you cannot make your media’s leading edge straight, you can turn on theskew tolerance feature (Device setup / Skew tolerance). See page 3-20, butremember that this feature can skew your print on the page.
Troubleshooting
Solving Media-Handling Problems
Downloaded from www.Manualslib.com manuals search engine
9-5
Company confidential. Postillo/755CM User’s Guide Final Freeze Status:Frozen
This is the cyan on page 9-5 (seq: 159)
This is the black on page 9-5 (seq: 159)
If Media Crumples When You Load it
Clear any obstructions in the media path.
Be sure the leading edge is straight and free of tears. Cut a straight edge withthe knife if necessary.
If your media is curled, and if both sides are the same, load it with the curved(hollow) side towards you (Certain media types – for example coated paper –have a printing side and a non-printing side and these must be loaded printingside down).
When loading media, hold each edge and push the media into the printer evenlyagainst the stops until a slight buckle develops evenly across the media. Let goas soon as it starts to feed into the printer.
If you have just moved the printer or your media from an environment with adifferent humidity level, let the media stabilize for at least 15 minutes beforeloading it.
Roll media only. Open the roll cover and raise the lever. Unload the leadingedge of the roll. Push the media all the way to the right so that it is flush againstthe media stop on the roll core. Then reload the media.
If Prints Do Not Feed Out Properly From the Printer
Make sure the roll cover is completely closed before you print.
If The Automatic Cutter Does Not Cut Immediately When aPrint Has Finished
Check the Page format / Margins setting. When this is set to Smaller, the printerwaits until the next print begins printing so it can create a 10 mm margin be-tween both prints or nesting sets.
Press the Form Feed and Cut key if you need to cut the media before theink-drying time has passed or before the next print begins printing. Use cautionto avoid smearing the ink.
Check the ink-drying time and change if necessary (Device setup / Drying time).
This is the magenta on page 9-5 (seq: 159)
TR
OU
BLE
-
SH
OO
TIN
G9
Troubleshooting
Solving Media-Handling Problems
Downloaded from www.Manualslib.com manuals search engine
9-6
Company confidential. Postillo/755CM User’s Guide Final Freeze Status:Frozen
This is the cyan on page 9-6 (seq: 160)
This is the black on page 9-6 (seq: 160)
If the Automatic Cutter Does Not Work
The automatic cutter is activated only when roll media is loaded.
Your software application may have disabled the automatic cutter. Refer to yoursoftware documentation or contact your software vendor for more information.
If Prints Fall on the Floor After Being Cut
Do not let more than twenty prints accumulate in the bin.
Be sure you have loaded roll media properly. If loaded incorrectly, the naturalcurl of the media may cause it to miss the bin and fall to the floor.
If a Sheet Is Ejected When You Switch On the Printer
The printer is undertaking an automatic calibration check. Simply wait for theSTATUS / Ready message and then reload the sheet.
If Prints Do Not Stack Properly in the Bin
You may be too close to the end of the roll. The natural curl near the end of theroll can cause stacking problems. Load a new roll or remove prints manually asthey are completed.
If printed media is sagging or wrinkling between the bin wires after it is cut andfed out, try placing a sheet of scrap paper in the bin shelf that is at least the sizeof the print.
If you are mixing prints or nesting sets of several different sizes, you are morelikely to have stacking problems because of the different sizes of media in thebin.
Troubleshooting
Solving Media-Handling Problems
Downloaded from www.Manualslib.com manuals search engine
9-7
Company confidential. Postillo/755CM User’s Guide Final Freeze Status:Frozen
This is the cyan on page 9-7 (seq: 161)
This is the black on page 9-7 (seq: 161)
Solving Print-Cartridge Problems
If the Access Cartridges Key Does Not Work
Make sure the window is closed before you press Access Cartridges .
If the Printer Runs the Cartridge-Alignment RoutineUnexpectedly
The printer runs the automatic cartridge alignment procedure every time youload, replace or even reseat a cartridge, whether it is a new cartridge or not. Donot remove the cartridges unnecessarily.
You can stop the alignment by pressing Cancel , but the printer will restart thealignment procedure the next time you try to switch it on.
If Brand New Cartridges Have Problems
Check the cartridges to be sure you have removed the protective nozzle tape.
Try reseating cartridges.
Don’t forget that, after you remove or reseat a cartridge, the printer will run itsautomatic cartridge alignment procedure – see page 3-26.
For troubleshooting other problems with the print cartridges, see the sectionstarting on page 9-16.
This is the magenta on page 9-7 (seq: 161)
!
TR
OU
BLE
-
SH
OO
TIN
G9
Troubleshooting
Solving Print-Cartridge Problems
Downloaded from www.Manualslib.com manuals search engine
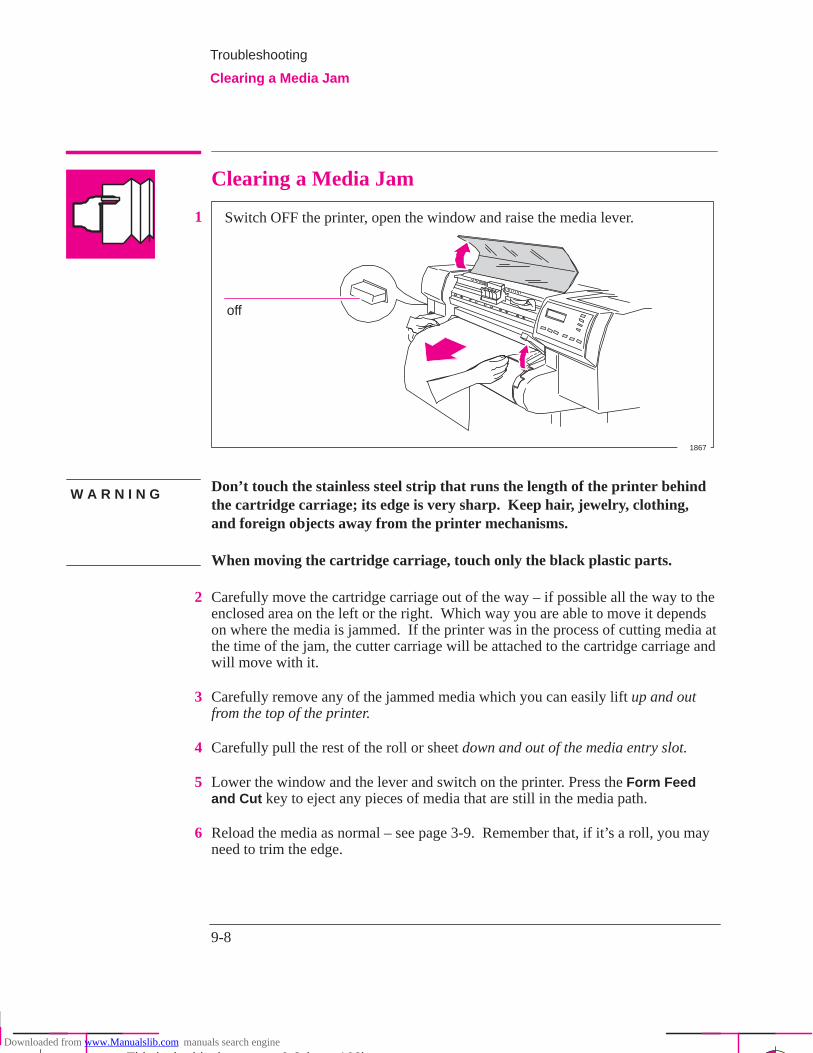
9-8
Company confidential. Postillo/755CM User’s Guide Final Freeze Status:Frozen
This is the cyan on page 9-8 (seq: 162)
This is the black on page 9-8 (seq: 162)
Clearing a Media Jam
1 Switch OFF the printer, open the window and raise the media lever.
off
1867
Don’t touch the stainless steel strip that runs the length of the printer behindthe cartridge carriage; its edge is very sharp. Keep hair, jewelry, clothing,and foreign objects away from the printer mechanisms.
When moving the cartridge carriage, touch only the black plastic parts.
2 Carefully move the cartridge carriage out of the way – if possible all the way to theenclosed area on the left or the right. Which way you are able to move it dependson where the media is jammed. If the printer was in the process of cutting media atthe time of the jam, the cutter carriage will be attached to the cartridge carriage andwill move with it.
3 Carefully remove any of the jammed media which you can easily lift up and outfrom the top of the printer.
4 Carefully pull the rest of the roll or sheet down and out of the media entry slot.
5 Lower the window and the lever and switch on the printer. Press the Form Feedand Cut key to eject any pieces of media that are still in the media path.
6 Reload the media as normal – see page 3-9. Remember that, if it’s a roll, you mayneed to trim the edge.
Troubleshooting
Clearing a Media Jam
W A R N I N G
Downloaded from www.Manualslib.com manuals search engine
9-9
Company confidential. Postillo/755CM User’s Guide Final Freeze Status:Frozen
This is the cyan on page 9-9 (seq: 163)
This is the black on page 9-9 (seq: 163)
Solving Communication Problems
If There is a Problem Communicating between Your Computerand the Printer
Some symptoms of a communication problem are:
– The front-panel Receiving light does not come on.
– The front-panel display does not show STATUS / Receiving.
– Your computer displays an error message when you are trying to print.
– Your computer or printer “hangs” (stays idle) while communication is takingplace.
– Your printed output shows random or inexplicable errors (misplaced lines,partial drawings etc.)
Items to start checking are:
Have you selected the correct interface port in your software?
Does the printer work correctly when receiving files from other software?
If the printer is connected to a network, try using it when connected directly toyour computer.
If your printer is connected to your computer via any other intermediate de-vices, such as switch boxes, buffer boxes, cable adapters, cable converters etc.,try using it when connected directly to your computer.
Try another interface cable. For details of supported cables, see page 11-8.
This is the magenta on page 9-9 (seq: 163)
TR
OU
BLE
-
SH
OO
TIN
G9
Troubleshooting
Solving Communication Problems
?
Downloaded from www.Manualslib.com manuals search engine
9-10
Company confidential. Postillo/755CM User’s Guide Final Freeze Status:Frozen
This is the cyan on page 9-10 (seq: 164)
This is the black on page 9-10 (seq: 164)
Solving Problems with Image Position or Content
If you don’t find the solution to the problem here, other sources of help are:
The documentation supplied with the driver that you are using to manage theoutput from your software application to the printer. For example, the onlineand printed documentation included in the following drivers supplied with yourprinter:
– HP DesignJet PostScript Drivers for Macintosh
– HP DesignJet PostScript Driver for Microsoft Windows
– HP Driver for Microsoft Windows
– HP Printer Drivers for AutoCAD
The documentation supplied with your application software
If the Print Is Completely Blank
Check the print cartridges to be sure you have removed the protective nozzletape from all of them. Do not forget that, after you remove or reseat a cartridge,the printer will run its automatic cartridge alignment procedure – see page 3-26.
Cartridges may be out of ink. For an explanation of how to check if a cartridgeis out of ink, see page 3-25.
If the front-panel graphics language setting is Automatic (the default), try theother settings (PostScript for a PostScript file, HP-GL/2 for an HP-GL/2 fileetc.) and send the file again. See page 7-7.
Troubleshooting
Solving Problems With Image Position or Content
Downloaded from www.Manualslib.com manuals search engine
9-11
Company confidential. Postillo/755CM User’s Guide Final Freeze Status:Frozen
This is the cyan on page 9-11 (seq: 165)
This is the black on page 9-11 (seq: 165)
If the Output Contains Only a Partial Print
Did you press Form Feed and Cut before all the data was received by theprinter? If so, you have ended the data transmission and will have to print thepage again. (You normally don’t need to press Form Feed and Cut to unloadthe print.)
The I/O Setup / I/O Timeout setting may be too short. Increase the setting andprint again. See page 7-9.
The file may be too big for the printer’s memory. See the note on page 9-22.
There may be a communications problem between your computer and theprinter. Check your interface cable.
Check to make sure that your software settings are correct for your current pagesize (e.g., long-axis prints).
If you are using network software, make sure it has not timed out.
See also under “If the image is clipped” on page 9-12.
This is the magenta on page 9-11 (seq: 165)
TR
OU
BLE
-
SH
OO
TIN
G9
Troubleshooting
Solving Problems with Image Position or Content
Downloaded from www.Manualslib.com manuals search engine
9-12
Company confidential. Postillo/755CM User’s Guide Final Freeze Status:Frozen
This is the cyan on page 9-12 (seq: 166)
This is the black on page 9-12 (seq: 166)
If the Image Is Clipped
This normally indicates a discrepancy between the actual printing area on theloaded media and the printing area as understood by your software. For generaladvice on printing areas and page size, see chapter 4.
Check the actual printing area for the media size you have loaded. printing area= media size minus margins. For media size and margins, see page 11-2. Foractual printing areas, see page 11-6.
Check what your software understands to be the printing area (which it may call“printable area” or “imageable area”). For example, AutoCAD assumes stan-dard printing areas that are larger than those used in this printer.
Check that the orientation of the media is the same as that assumed by yoursoftware. The front–panel Page format / Rotate option changes the orientationof a drawing and, on roll media, the orientation of the page. It is possible that arotated image on roll media may be slightly clipped in order to retain the correctpage size, as explained on page 4-11.
You may have asked to rotate the page from portrait to landscape on media thatis not wide enough, for example a D/A1-size page rotated on a D/A1-size roll.
If necessary, change the printing area in your software.
The file may be too big for the printer’s memory. This is the case if the frontpanel displays “Out of memory – data was lost”. See the note on page 9-22.
If a Long-Axis Print Is Clipped
Does your software support long-axis prints?
Have you specified an appropriate media size in your software?
Unless it is a PostScript file, make sure that the printer’s Page format / Size isset to Inked area.
Troubleshooting
Solving Problems with Image Position or Content
Downloaded from www.Manualslib.com manuals search engine
9-13
Company confidential. Postillo/755CM User’s Guide Final Freeze Status:Frozen
This is the cyan on page 9-13 (seq: 167)
This is the black on page 9-13 (seq: 167)
If the Entire Image Is in One Quadrant of the Correct PrintingArea
Is the page size configured in the software too small?
Are you sure that your software doesn’t believe the drawing to be in one quad-rant of the page?
Otherwise, this indicates an incompatibility between the software and the printer:
Is your software configured for this printer? For general advice, see page 1-32.For advice specific to your software, see either the documentation supplied withthe driver or any Software Application Notes supplied with your printer.
If you still haven’t found the solution, try changing the printer’s GraphicsLanguage setting on the front panel (Device setup / Lang).
If the Image Is Unexpectedly Rotated
Check the front-panel Page format / Rotate setting. See page 4-8.
For non-PostScript files: if Queueing and Nesting are both ON, pages may beautomatically rotated to save media. See page 6-10.
For an explanation of rotation for PostScript files, see page 4-10.
If the Print Is a Mirror Image of Your Drawing
Check the front-panel Page format / Mirror setting.
If the Print Is Inaccurate
If you notice problems with accuracy, print the Service Config print, asexplained on page 7-5, to see if the printer needs to be recalibrated.
This is the magenta on page 9-13 (seq: 167)
TR
OU
BLE
-
SH
OO
TIN
G9
Troubleshooting
Solving Problems with Image Position or Content
Downloaded from www.Manualslib.com manuals search engine
9-14
Company confidential. Postillo/755CM User’s Guide Final Freeze Status:Frozen
This is the cyan on page 9-14 (seq: 168)
This is the black on page 9-14 (seq: 168)
If the Print Is Distorted or Unintelligible
The interface cable between your computer and the printer could be faulty. Tryanother cable to see if the problem is corrected.
If you are using a serial interface between the printer and your computer, makesure the printer’s serial interface settings match the settings and requirements ofyour software and hardware. See page 1-26.
If the front-panel graphics language setting is Automatic (the default), try theother settings (PostScript for a PostScript file, HP-GL/2 for an HP-GL/2 fileetc.) and send the file again. See page 7-7.
If One Image Overlays Another on the Same Sheet
The I/O Setup / I/O Timeout setting may be too long. Decrease the setting andprint again. See page 7-9.
If Device setup / Lang is set to 7586,HP–GL/2 (the default), try changing theTerminator setting and send the files again.
If Pen Settings Seem To Have No Effect
Either you have changed them in Pen settings / Define palette but forgotten toselect that palette in Pen settings / Palette,
or you expected the software-driven pen settings but in the front panel Pensettings / Palette is not set to Software.
See page 5-7.
If the Printer Produces a Black and White Print When YouExpected a Color Print
Check the front panel Color/Mono setting, and the equivalent setting in yoursoftware.
If a Gray Box Appears Where an Image Should Be
If the image is an embedded EPS (encapsulated PostScript) file, and you printedit using the non-PostScript Microsoft Windows driver, try using the HP DesignJet PostScript driver for Microsoft Windows instead.
Troubleshooting
Solving Problems with Image Position or Content
!
Downloaded from www.Manualslib.com manuals search engine
9-15
Company confidential. Postillo/755CM User’s Guide Final Freeze Status:Frozen
This is the cyan on page 9-15 (seq: 169)
This is the black on page 9-15 (seq: 169)
If the Printer Has Printed a Different Print Than the One YouWere Expecting
One possibility is that you have accidentally initiated one of the printer’s internalprints:
The Cartridge Alignment Print. (A small pattern of colored lines without text.)This is printed automatically every time you replace, or even reseat a cartridge.
The Current Configuration Print . This is printed by simultaneously pressingthe two arrow keys on the front-panel.
The Demos . These are printed from the front-panel menu options Demos /PostScript and Demos / Samples.
The Front-Panel Menu Print . This is printed from the front-panel menuDemos / Menu.
The Palette Print . This is printed from the front-panel menu Demos / Palette.
The Service Configuration Print . This is printed from the front-panel menuDemos / Service Config.
If the Quality Of A Color Print Is Not as Sharp as You WereExpecting
Select Best on the front-panel Print Quality key and print again.
Did you specify the correct media type when loading? The highest line qualityis only produced using Opaque Bond, Coated Paper or Matte Film. For detailsof media types, see page 3-3. To find out the printers’ current media typesetting, see page 7-2.
Your application-software driver may be overriding the Sharp lines selection onthe front–panel menu.
Are you printing something other than a line drawing, for example aCorelDRAW! file? If so, you may want to experiment to improve the outputquality by setting Sharp lines to Off on the front-panel menu, and print again.
Are you printing a CAD drawing with small raster images? Try setting Sharplines to On and print again.
When loading the paper, specify “Heavy coated paper” on the front panel, ratherthan “Coated paper”.
This is the magenta on page 9-15 (seq: 169)
TR
OU
BLE
-
SH
OO
TIN
G9
Troubleshooting
Solving Problems With Image Position or Content
?!
Downloaded from www.Manualslib.com manuals search engine
9-16
Company confidential. Postillo/755CM User’s Guide Final Freeze Status:Frozen
This is the cyan on page 9-16 (seq: 170)
This is the black on page 9-16 (seq: 170)
Solving Print-Quality Problems
To achieve the best performance from your printer, we recommend you only usegenuine HP accessories and supplies, whose reliability and performance have beenthoroughly tested to give trouble-free performance and best-quality prints. Fordetails of HP media, see page 3-3 and the Supplies Source catalog supplied withthe printer.
If the Color Is Not as Expected
The means of accurately managing the colors printed by your printer vary with thesoftware application and driver being used. Refer to the following documentation:
That included as part of the HP Color Management Kit supplied with theprinter.
The Software Application Note for your application, in the specific packageshipped with your printer.
Online documentation in the drivers shipped with your printer, for example inthe Color Options dialog box of the non-PostScript Microsoft Windows driver.
Additionally, remember that your printer may be configured to use one of itsinternal pen palettes instead of your software’s palette (which is the default). Seethe section starting on page 5-5. If you cannot find any reason for the discrepancy,before getting help, find out for which CMYK printer inks the colors have beenspecified.
If there Are White Streaks in Solid Areas
This may mean that a cartridge nozzle is blocked. Unless you have switchedcartridge check off (see page 3-25), the printer normally detects this problem andtries to clear the nozzle automatically. However, some nozzles may still remainblocked, and in this case, the printer will display Service cartridges on the frontpanel. This means you should replace the problem cartridge, as explained frompage 3-25. If you are unsure which cartridge has the problem, refer to the nextpage.
Troubleshooting
Solving Print-Quality Problems
This is the cyan on page 9-16 (seq: 170)Downloaded from www.Manualslib.com manuals search engine
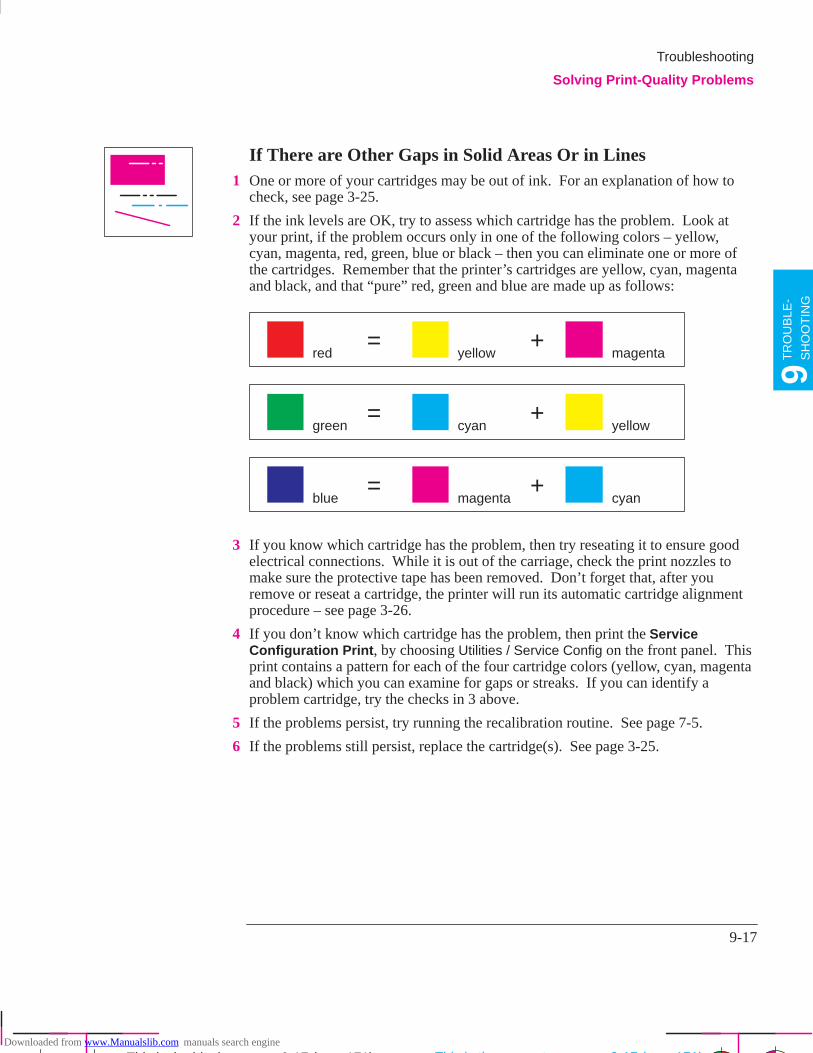
9-17
Company confidential. Postillo/755CM User’s Guide Final Freeze Status:Frozen
This is the cyan on page 9-17 (seq: 171)
This is the black on page 9-17 (seq: 171)
If There are Other Gaps in Solid Areas Or in Lines1 One or more of your cartridges may be out of ink. For an explanation of how to
check, see page 3-25.
2 If the ink levels are OK, try to assess which cartridge has the problem. Look atyour print, if the problem occurs only in one of the following colors – yellow,cyan, magenta, red, green, blue or black – then you can eliminate one or more ofthe cartridges. Remember that the printer’s cartridges are yellow, cyan, magentaand black, and that “pure” red, green and blue are made up as follows:
+=
+=
+=
red
green
blue
yellow
cyan
magenta
yellow
cyan
magenta
3 If you know which cartridge has the problem, then try reseating it to ensure goodelectrical connections. While it is out of the carriage, check the print nozzles tomake sure the protective tape has been removed. Don’t forget that, after youremove or reseat a cartridge, the printer will run its automatic cartridge alignmentprocedure – see page 3-26.
4 If you don’t know which cartridge has the problem, then print the ServiceConfiguration Print , by choosing Utilities / Service Config on the front panel. Thisprint contains a pattern for each of the four cartridge colors (yellow, cyan, magentaand black) which you can examine for gaps or streaks. If you can identify aproblem cartridge, try the checks in 3 above.
5 If the problems persist, try running the recalibration routine. See page 7-5.
6 If the problems still persist, replace the cartridge(s). See page 3-25.
TR
OU
BLE
-
SH
OO
TIN
G9
Troubleshooting
Solving Print-Quality Problems
This is the magenta on page 9-17 (seq: 171)
This is the yellow on page 9-17 (seq: 171)
This is the green on page 9-17 (seq: 171)This is the red on page 9-17 (seq: 171)This is the blue on page 9-17 (seq: 171)
Downloaded from www.Manualslib.com manuals search engine
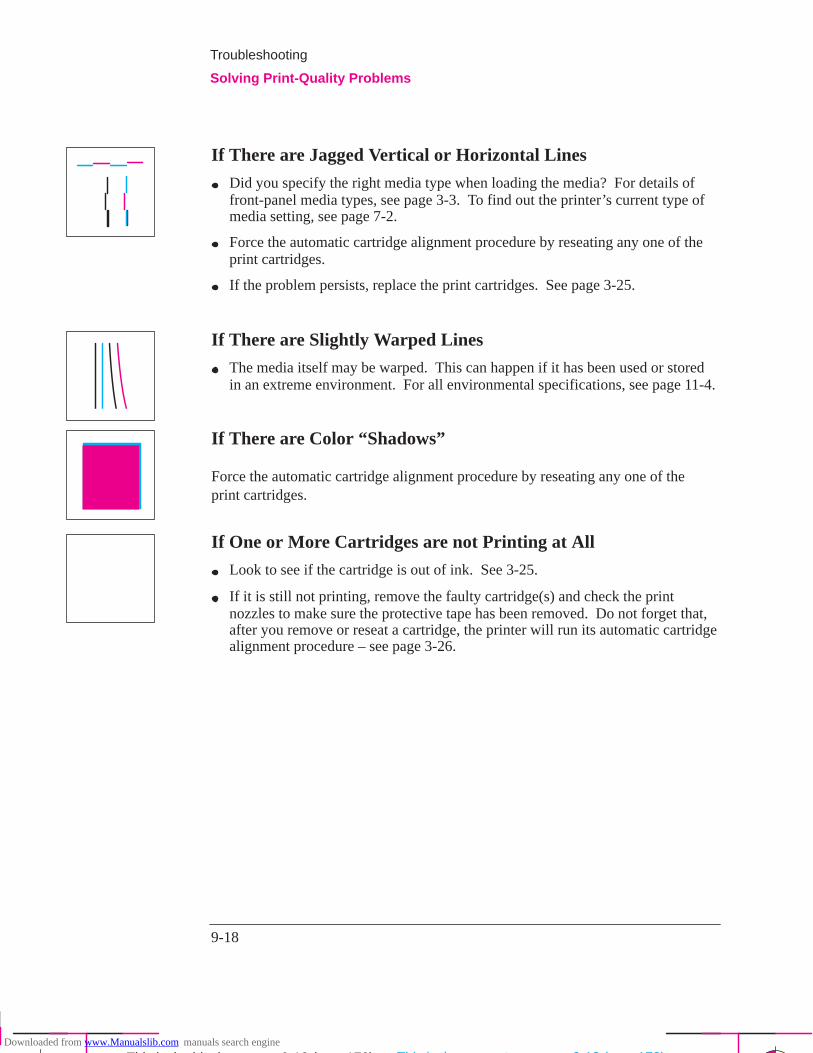
9-18
Company confidential. Postillo/755CM User’s Guide Final Freeze Status:Frozen
This is the cyan on page 9-18 (seq: 172)
This is the black on page 9-18 (seq: 172)
If There are Jagged Vertical or Horizontal Lines
Did you specify the right media type when loading the media? For details offront-panel media types, see page 3-3. To find out the printer’s current type ofmedia setting, see page 7-2.
Force the automatic cartridge alignment procedure by reseating any one of theprint cartridges.
If the problem persists, replace the print cartridges. See page 3-25.
If There are Slightly Warped Lines
The media itself may be warped. This can happen if it has been used or storedin an extreme environment. For all environmental specifications, see page 11-4.
If There are Color “Shadows”
Force the automatic cartridge alignment procedure by reseating any one of theprint cartridges.
If One or More Cartridges are not Printing at All
Look to see if the cartridge is out of ink. See 3-25.
If it is still not printing, remove the faulty cartridge(s) and check the printnozzles to make sure the protective tape has been removed. Do not forget that,after you remove or reseat a cartridge, the printer will run its automatic cartridgealignment procedure – see page 3-26.
Troubleshooting
Solving Print-Quality Problems
This is the magenta on page 9-18 (seq: 172)Downloaded from www.Manualslib.com manuals search engine
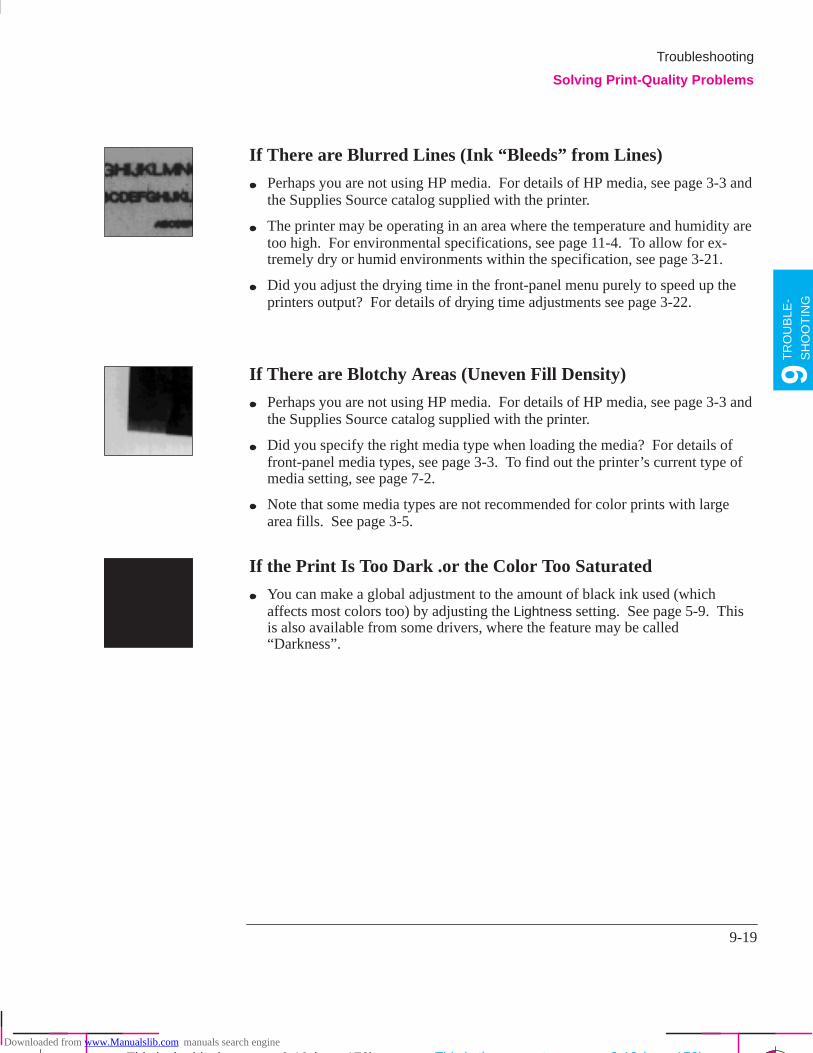
9-19
Company confidential. Postillo/755CM User’s Guide Final Freeze Status:Frozen
This is the cyan on page 9-19 (seq: 173)
This is the black on page 9-19 (seq: 173)
If There are Blurred Lines (Ink “Bleeds” from Lines)
Perhaps you are not using HP media. For details of HP media, see page 3-3 andthe Supplies Source catalog supplied with the printer.
The printer may be operating in an area where the temperature and humidity aretoo high. For environmental specifications, see page 11-4. To allow for ex-tremely dry or humid environments within the specification, see page 3-21.
Did you adjust the drying time in the front-panel menu purely to speed up theprinters output? For details of drying time adjustments see page 3-22.
If There are Blotchy Areas (Uneven Fill Density)
Perhaps you are not using HP media. For details of HP media, see page 3-3 andthe Supplies Source catalog supplied with the printer.
Did you specify the right media type when loading the media? For details offront-panel media types, see page 3-3. To find out the printer’s current type ofmedia setting, see page 7-2.
Note that some media types are not recommended for color prints with largearea fills. See page 3-5.
If the Print Is Too Dark .or the Color Too Saturated
You can make a global adjustment to the amount of black ink used (whichaffects most colors too) by adjusting the Lightness setting. See page 5-9. Thisis also available from some drivers, where the feature may be called“Darkness”.
This is the magenta on page 9-19 (seq: 173)
TR
OU
BLE
-
SH
OO
TIN
G9
Troubleshooting
Solving Print-Quality Problems
Downloaded from www.Manualslib.com manuals search engine
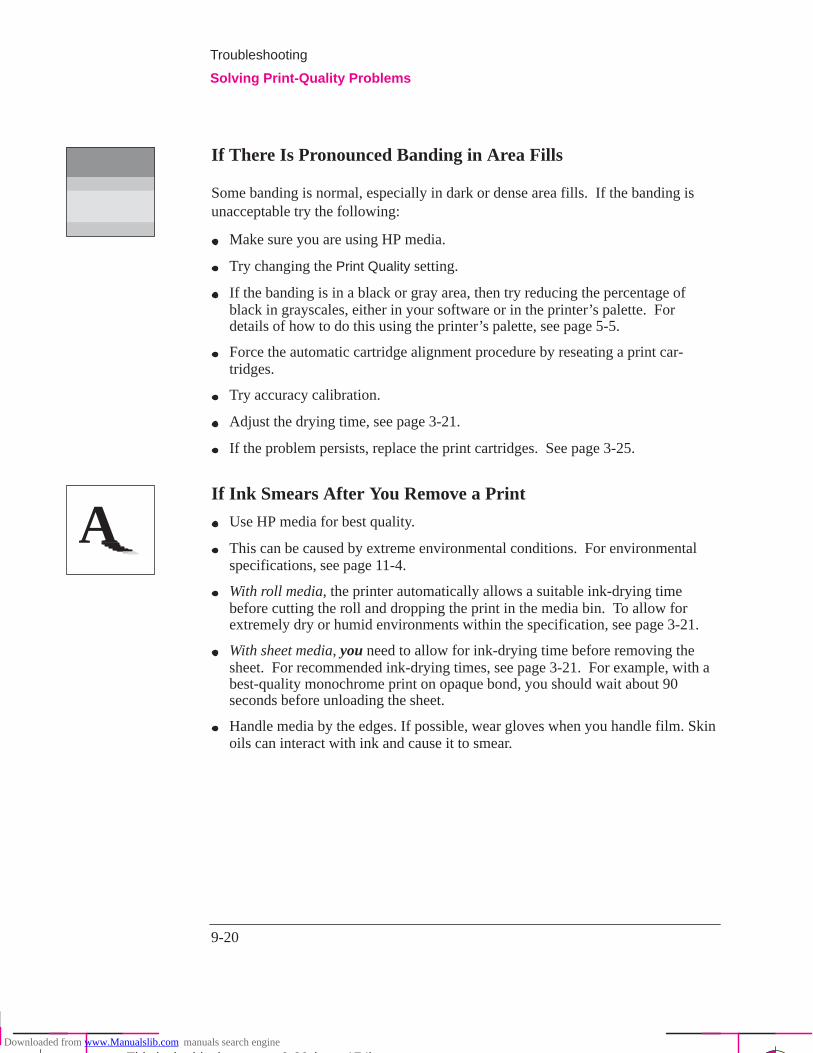
9-20
Company confidential. Postillo/755CM User’s Guide Final Freeze Status:Frozen
This is the cyan on page 9-20 (seq: 174)
This is the black on page 9-20 (seq: 174)
If There Is Pronounced Banding in Area Fills
Some banding is normal, especially in dark or dense area fills. If the banding isunacceptable try the following:
Make sure you are using HP media.
Try changing the Print Quality setting.
If the banding is in a black or gray area, then try reducing the percentage ofblack in grayscales, either in your software or in the printer’s palette. Fordetails of how to do this using the printer’s palette, see page 5-5.
Force the automatic cartridge alignment procedure by reseating a print car-tridges.
Try accuracy calibration.
Adjust the drying time, see page 3-21.
If the problem persists, replace the print cartridges. See page 3-25.
If Ink Smears After You Remove a Print
Use HP media for best quality.
This can be caused by extreme environmental conditions. For environmentalspecifications, see page 11-4.
With roll media, the printer automatically allows a suitable ink-drying timebefore cutting the roll and dropping the print in the media bin. To allow forextremely dry or humid environments within the specification, see page 3-21.
With sheet media, you need to allow for ink-drying time before removing thesheet. For recommended ink-drying times, see page 3-21. For example, with abest-quality monochrome print on opaque bond, you should wait about 90seconds before unloading the sheet.
Handle media by the edges. If possible, wear gloves when you handle film. Skinoils can interact with ink and cause it to smear.
Troubleshooting
Solving Print-Quality Problems
A
Downloaded from www.Manualslib.com manuals search engine
9-21
Company confidential. Postillo/755CM User’s Guide Final Freeze Status:Frozen
This is the cyan on page 9-21 (seq: 175)
This is the black on page 9-21 (seq: 175)
Solving Front-Panel Problems
If the Access Cartridges Key Does Not Work
Make sure the window is closed before you press Access Cartridges .
If the Cancel key Does Not Work
A PostScript file will carry on printing for a while before implementing a cancelrequest. Simply wait until the front panel display STATUS / Ready.
If None Of the Front-Panel Keys Work
Turn the printer off and then on again. If the problem persists, have your printerserviced.
If Page Format/Rotate Does Not Work
Your print file may be too big for the printer’s memory. See the note on page9-22.
The printer cannot rotate raster images (except for PostScript files). If yournon-PostScript file contains raster data (typically, images with heavy area filland shading that you have scanned into your software) you will not be able torotate the print.
The printer cannot rotate any file sent using the non-PostScript MicrosoftWindows driver supplied with the printer, as they contain raster images.
If a Display Message Will Not Clear
Look up the message in chapter 10. The message description may help youunderstand and resolve the problem.
If looking up the message did not help, press Enter . If that does not work, turnthe power off, then on again. If the message still displays, have the printerserviced. If the message says “System Error” and has an alphanumeric code,refer to the next explanation.
This is the magenta on page 9-21 (seq: 175)
TR
OU
BLE
-
SH
OO
TIN
G9
Troubleshooting
Solving Front-Panel Problems
!
Downloaded from www.Manualslib.com manuals search engine

9-22
Company confidential. Postillo/755CM User’s Guide Final Freeze Status:Frozen
This is the cyan on page 9-22 (seq: 176)
This is the black on page 9-22 (seq: 176)
If a “System Error” Message Is Displayed
Press Enter . If the message does not clear, turn the printer off, then on again totry to clear the error message. If media appears to be jammed, clear it. If themessage is still displayed, record the alphanumeric code and have the printerserviced. Report the code to the service technician; knowing the code numberwill help the technician resolve the problem.
If an “Out Of Memory/Data Was Lost” Message Is Displayed
The current file is too large for the printer’s memory.
File Size and Memory Usage
There is no direct relationship between file size on your computer and memoryused in the printer to print that file. In fact, because of file compression (andgeneral complexity) it is often impossible to estimate how much memory will beused. In general, thicker lines (� 0.5 mm), complex objects (such as polylines)and fills will all use significantly more memory.
This also means that size of the largest file you can store in the printer’s queue isnot the same thing as the amount of memory installed in your printer.
Two tips for PostScript users with file-size problems:
Try reducing the page size in your software and then scale the print in theprinter’s front panel. See page 4-13.
Try reducing the resolution of any bit-map objects in your file, for examplephotographs.
Troubleshooting
Solving Front-Panel Problems
Downloaded from www.Manualslib.com manuals search engine
9-23
Company confidential. Postillo/755CM User’s Guide Final Freeze Status:Frozen
This is the cyan on page 9-23 (seq: 177)
This is the black on page 9-23 (seq: 177)
Solving Miscellaneous Problems
If the Printer Does not Print
You may have a power problem. If there is no activity at all from the printer,and no lights on the front panel, check that the power cable is connected cor-rectly and that there is power available at the socket.
You may have a problem with your application driver. Is your software confi-gured for this printer? For general advice, see page 1-32. For advice specific toyour software, see either the documentation supplied with the driver or a rele-vant Software Application Note supplied with your printer.
The file may be too big for the printer’s memory. Look on your computerscreen for any error message: some drivers, for example the Microsoft Windowsdriver supplied with your printer, allow you to choose a different printing modeand try to send the file again.
If you continue to have problems, see “Getting help” on page 9-25.
If the Printer Seems Too Slow
Did you specify Best Print Quality level on the front panel? Best qualityprints are produced more slowly. See page 5-12.
Did you specify the right media type when loading the media? For details offront-panel media types, see page 3-3. To find out the printer’s current mediatype setting, see page 7-2.
If you are using the non-PostScript Microsoft Windows driver shipped with theprinter, check the settings in the “Print Setup / Options” dialog box, where someof the settings impact printing speed. If in doubt, use the on-screen help system.
Is Sharp lines set to Auto on the front panel or in your driver? If so, setting it toOff will speed up your printer but may reduce the quality of your print. Seepage 5-15.
This is the magenta on page 9-23 (seq: 177)
TR
OU
BLE
-
SH
OO
TIN
G9
Troubleshooting
Solving Miscellaneous Problems
?
Downloaded from www.Manualslib.com manuals search engine
9-24
Company confidential. Postillo/755CM User’s Guide Final Freeze Status:Frozen
This is the cyan on page 9-24 (seq: 178)
This is the black on page 9-24 (seq: 178)
If the Printer Waits Too Long to Print a Nest
Change the Nest wait setting. See page 6-11.
If the Printer Performs the Cartridge Alignment RoutineUnexpectedly
This is a normal printer operation. The printer will align the cartridges everytime you replace, or even reseat, a cartridge, whether or not it is new.
If the Bail (Black Metal Bar) Does Not Lower All the Way
If the the bail (the black metal bar just inside the printer’s window) will notlower all the way, check for obstructions underneath it.
Make sure the cutting carriage is pushed all the way to the right.
Troubleshooting
Solving Miscellaneous Problems
Downloaded from www.Manualslib.com manuals search engine
9-25
Company confidential. Postillo/755CM User’s Guide Final Freeze Status:Frozen
This is the cyan on page 9-25 (seq: 179)
This is the black on page 9-25 (seq: 179)
Getting Help
Hewlett-Packard has support services available to help you in case you have aproblem with your printer.
For a list of the support services available, refer to the Hewlett-PackardSupport Services booklet shipped with this printer.
What to Do Before You Call1 Review the troubleshooting suggestions:
in this chapter,
in the relevant driver documentation supplied with this printer (for userssending PostScript files or those using Microsoft Windows and AutoCADapplications),
in any relevant Software Application Note supplied with this printer.
2 Print the demo as explained on page 1-21. If the demos work and do not displaythe problems you have found with your own prints, then the problem is probablynot with your printer.
3 If the problem appears to be related to your software application, first contact yoursoftware vendor.
4 If you still have difficulty, refer to the HP Support Services booklet shipped withthis printer. This document contains a comprehensive list of various supportservices available to help solve printer problems.
5 If you do call one of the Hewlett-Packard offices, please have the followinginformation available to help us answer your questions more quickly:
The printer you are using.
The computer you are using.
Any special equipment or software you are using (for example, spoolers,networks, switch-boxes, modems, or special software drivers).
The cable you are using (by part number) and where you purchased it.
The type of interface used on your printer (RS-232-C, parallel, or modular).
The software name and version you are currently using.
If a Repair Is NeededContact the Hewlett-Packard dealer or HP Sales and Support Office nearest towhere you purchased the printer for complete service information.
TR
OU
BLE
-
SH
OO
TIN
G9
Troubleshooting
Getting Help
Downloaded from www.Manualslib.com manuals search engine

9-26
Company confidential. Postillo/755CM User’s Guide Final Freeze Status:Frozen
This is the cyan on page 9-26 (seq: 180)
This is the black on page 9-26 (seq: 180)Downloaded from www.Manualslib.com manuals search engine
10-1
Company confidential. Postillo/755CM User’s Guide Final Freeze Status:Frozen
This is the cyan on page 10-1 (seq: 181)
This is the black on page 10-1 (seq: 181)
Front-Panel Messages
10
ME
SS
AG
ES
10
Downloaded from www.Manualslib.com manuals search engine
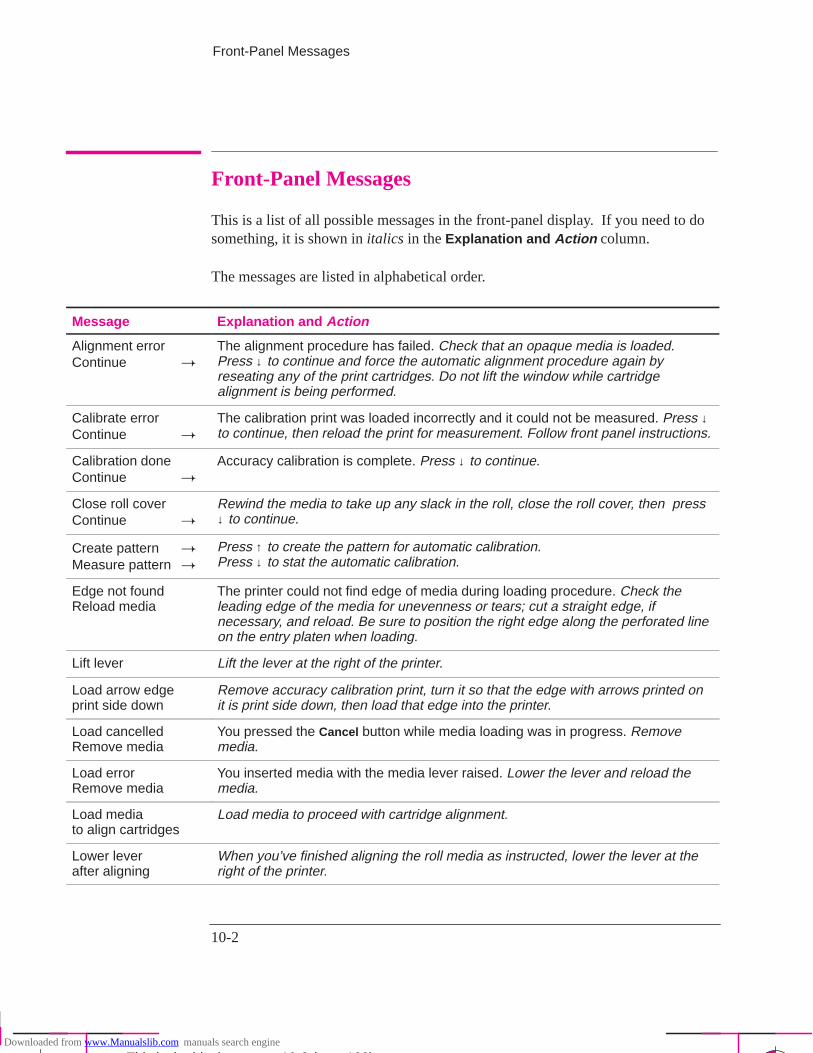
10-2
Company confidential. Postillo/755CM User’s Guide Final Freeze Status:Frozen
This is the cyan on page 10-2 (seq: 182)
This is the black on page 10-2 (seq: 182)
Front-Panel Messages
This is a list of all possible messages in the front-panel display. If you need to dosomething, it is shown in italics in the Explanation and Action column.
The messages are listed in alphabetical order.
Message Explanation and Action
Alignment errorContinue �
The alignment procedure has failed. Check that an opaque media is loaded.Press ↓ to continue and force the automatic alignment procedure again byreseating any of the print cartridges. Do not lift the window while cartridgealignment is being performed.
Calibrate errorContinue �
The calibration print was loaded incorrectly and it could not be measured. Press ↓to continue, then reload the print for measurement. Follow front panel instructions.
Calibration doneContinue �
Accuracy calibration is complete. Press ↓ to continue.
Close roll coverContinue �
Rewind the media to take up any slack in the roll, close the roll cover, then press↓ to continue.
Create pattern �
Measure pattern �Press ↑ to create the pattern for automatic calibration.Press ↓ to stat the automatic calibration.
Edge not foundReload media
The printer could not find edge of media during loading procedure. Check theleading edge of the media for unevenness or tears; cut a straight edge, ifnecessary, and reload. Be sure to position the right edge along the perforated lineon the entry platen when loading.
Lift lever Lift the lever at the right of the printer.
Load arrow edgeprint side down
Remove accuracy calibration print, turn it so that the edge with arrows printed onit is print side down, then load that edge into the printer.
Load cancelledRemove media
You pressed the Cancel button while media loading was in progress. Removemedia.
Load errorRemove media
You inserted media with the media lever raised. Lower the lever and reload themedia.
Load mediato align cartridges
Load media to proceed with cartridge alignment.
Lower leverafter aligning
When you’ve finished aligning the roll media as instructed, lower the lever at theright of the printer.
Front-Panel Messages
Downloaded from www.Manualslib.com manuals search engine

10-3
Company confidential. Postillo/755CM User’s Guide Final Freeze Status:Frozen
This is the cyan on page 10-3 (seq: 183)
This is the black on page 10-3 (seq: 183)
Message Explanation and Action
Lower leverto continue
You lifted the media lever while the processor was busy. Lower the lever tocontinue.
Lower windowto continue
You opened the window while the processor was busy. Close the window tocontinue.
Media too small The media you loaded for accuracy calibration or cartridge alignment is too small.Reload appropriate media. See page 7-5.
MispositionedReload roll
The roll is mispositioned. Reload media.
MispositionedReload sheet
The sheet is mispositioned. Remove it and reload it with the right edge no morethan 0.2 inches (0.5 cm) from either side of the perforated line on the entry platen.
MIO data error You configured the modular interface incorrectly. Press Enter to clear the messagefrom the front panel display. Recheck the MIO configuration settings.
MIO errorCommunicationbreak
You prematurely stopped the flow of data from the computer to the printer (e.g., byturning off the computer before all data is sent). Press Enter to clear the messagefrom the front panel display.
Open window toaccess cartridges
Lift the window to access the cartridges.
Out of memoryData was lost
The current file is too large for the printer’s buffer. See the note on page 9-22.
Pull � / Align �edges to roll
Grasp the left and right free edges of the roll media and pull toward you until themedia is taut. At the same time, align the left and right edges of the media so thatthey are flush with the left and right edges of the roll.
Remove mediaContinue �
The ink is dry. Remove the accuracy calibration print the printer just produced.Press ↓ to continue with accuracy calibration.
Remove mediaLower lever
You have attempted to load media while the lever at the right of the printer wasraised. Remove the media, lower the lever, and reload media with the lever down.
Replace cartridge(s)����
The cartridge indicated has a clogged nozzle. Replace it to continue.
Reseat cartridge(s)����
The cartridge indicated is badly seated. Reseat it to continue.
Roll misalignedReload roll
Roll media is skewed. Reload media.
RS-232 errorBaud, parity
You configured the RS-232-C interface incorrectly. Press Enter to clear themessage from the front panel display. Check the baud rate and parity settings inthe front panel, in the hardware configuration, and in your software to be sure theyare all compatible.
ME
SS
AG
ES
10
Front-Panel Messages
Downloaded from www.Manualslib.com manuals search engine
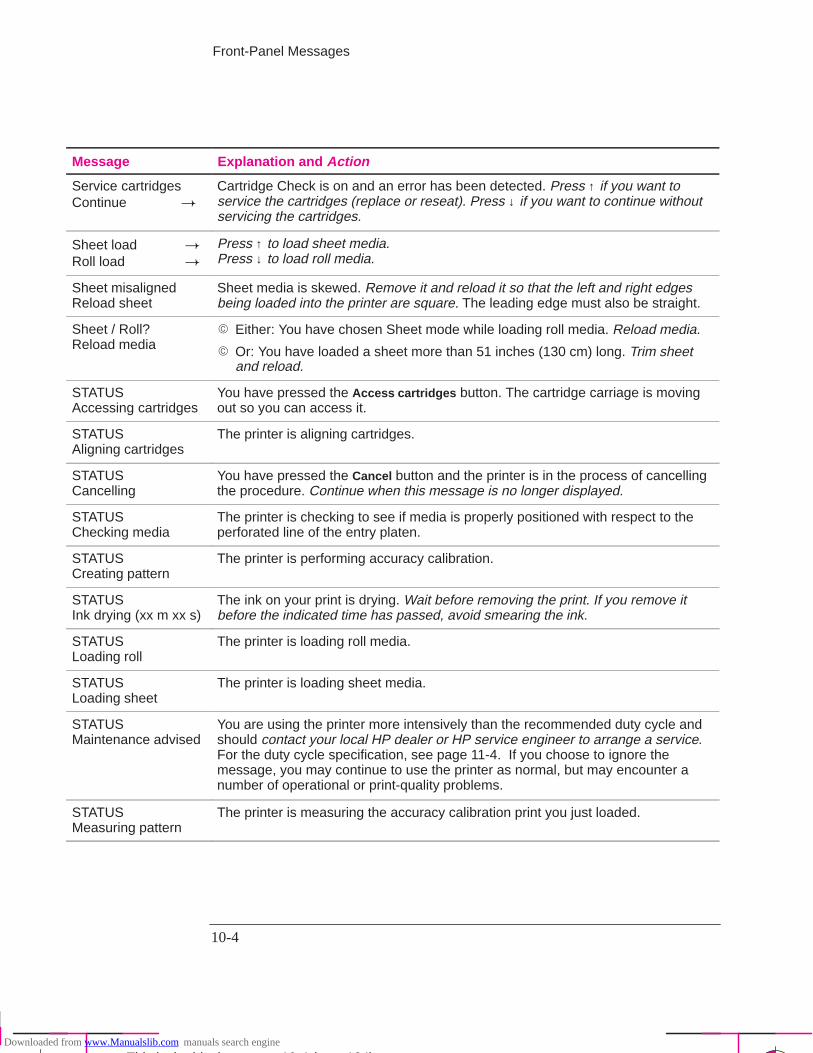
10-4
Company confidential. Postillo/755CM User’s Guide Final Freeze Status:Frozen
This is the cyan on page 10-4 (seq: 184)
This is the black on page 10-4 (seq: 184)
Message Explanation and Action
Service cartridgesContinue �
Cartridge Check is on and an error has been detected. Press ↑ if you want toservice the cartridges (replace or reseat). Press ↓ if you want to continue withoutservicing the cartridges.
Sheet load �Roll load �
Press ↑ to load sheet media.Press ↓ to load roll media.
Sheet misalignedReload sheet
Sheet media is skewed. Remove it and reload it so that the left and right edgesbeing loaded into the printer are square. The leading edge must also be straight.
Sheet / Roll? Reload media
� Either: You have chosen Sheet mode while loading roll media. Reload media.
� Or: You have loaded a sheet more than 51 inches (130 cm) long. Trim sheetand reload.
STATUSAccessing cartridges
You have pressed the Access cartridges button. The cartridge carriage is movingout so you can access it.
STATUSAligning cartridges
The printer is aligning cartridges.
STATUSCancelling
You have pressed the Cancel button and the printer is in the process of cancellingthe procedure. Continue when this message is no longer displayed.
STATUSChecking media
The printer is checking to see if media is properly positioned with respect to theperforated line of the entry platen.
STATUSCreating pattern
The printer is performing accuracy calibration.
STATUSInk drying (xx m xx s)
The ink on your print is drying. Wait before removing the print. If you remove itbefore the indicated time has passed, avoid smearing the ink.
STATUSLoading roll
The printer is loading roll media.
STATUSLoading sheet
The printer is loading sheet media.
STATUSMaintenance advised
You are using the printer more intensively than the recommended duty cycle andshould contact your local HP dealer or HP service engineer to arrange a service.For the duty cycle specification, see page 11-4. If you choose to ignore themessage, you may continue to use the printer as normal, but may encounter anumber of operational or print-quality problems.
STATUSMeasuring pattern
The printer is measuring the accuracy calibration print you just loaded.
Front-Panel Messages
Downloaded from www.Manualslib.com manuals search engine
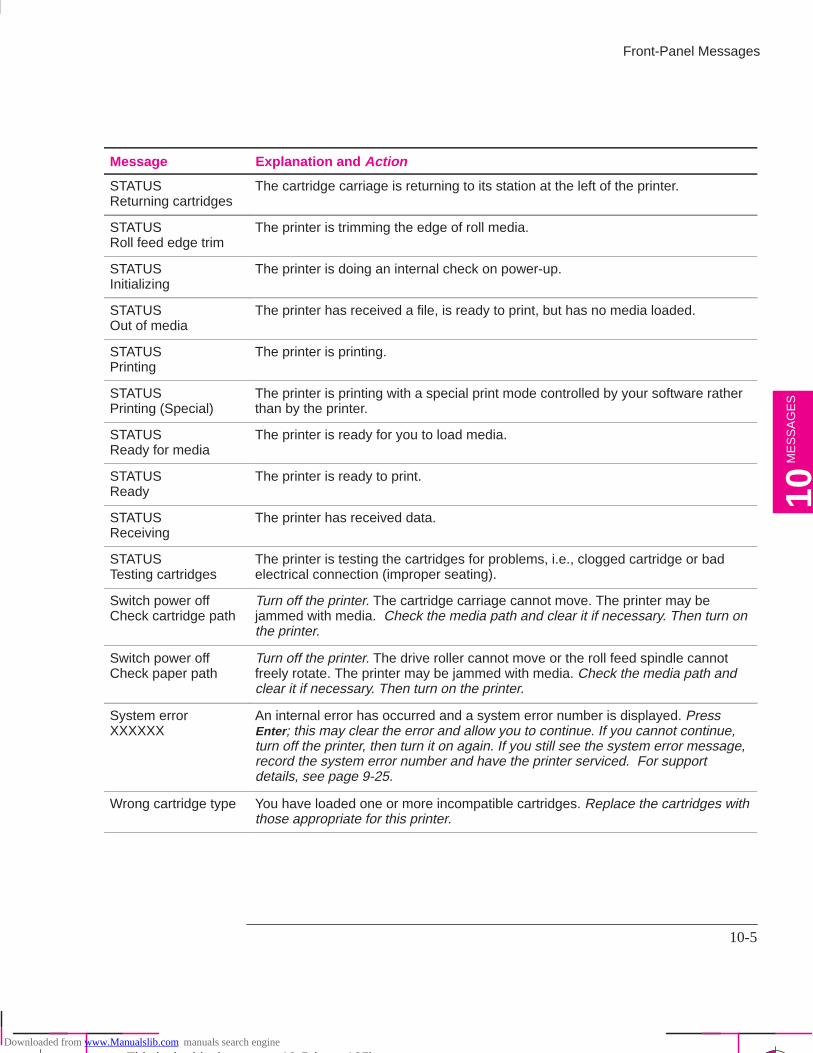
10-5
Company confidential. Postillo/755CM User’s Guide Final Freeze Status:Frozen
This is the cyan on page 10-5 (seq: 185)
This is the black on page 10-5 (seq: 185)
Message Explanation and Action
STATUSReturning cartridges
The cartridge carriage is returning to its station at the left of the printer.
STATUSRoll feed edge trim
The printer is trimming the edge of roll media.
STATUSInitializing
The printer is doing an internal check on power-up.
STATUSOut of media
The printer has received a file, is ready to print, but has no media loaded.
STATUSPrinting
The printer is printing.
STATUSPrinting (Special)
The printer is printing with a special print mode controlled by your software ratherthan by the printer.
STATUSReady for media
The printer is ready for you to load media.
STATUSReady
The printer is ready to print.
STATUSReceiving
The printer has received data.
STATUSTesting cartridges
The printer is testing the cartridges for problems, i.e., clogged cartridge or badelectrical connection (improper seating).
Switch power offCheck cartridge path
Turn off the printer. The cartridge carriage cannot move. The printer may bejammed with media. Check the media path and clear it if necessary. Then turn onthe printer.
Switch power offCheck paper path
Turn off the printer. The drive roller cannot move or the roll feed spindle cannotfreely rotate. The printer may be jammed with media. Check the media path andclear it if necessary. Then turn on the printer.
System errorXXXXXX
An internal error has occurred and a system error number is displayed. PressEnter ; this may clear the error and allow you to continue. If you cannot continue,turn off the printer, then turn it on again. If you still see the system error message,record the system error number and have the printer serviced. For supportdetails, see page 9-25.
Wrong cartridge type You have loaded one or more incompatible cartridges. Replace the cartridges withthose appropriate for this printer.
Front-Panel Messages
ME
SS
AG
ES
10
Downloaded from www.Manualslib.com manuals search engine

10-6
Company confidential. Postillo/755CM User’s Guide Final Freeze Status:Frozen
This is the cyan on page 10-6 (seq: 186)
This is the black on page 10-6 (seq: 186)Downloaded from www.Manualslib.com manuals search engine
11-1
Company confidential. Postillo/755CM User’s Guide Final Freeze Status:Frozen
This is the cyan on page 11-1 (seq: 187)
This is the black on page 11-1 (seq: 187)
Printer Specifications 11-2. . . . . . . . . . . . . . . . . . . . . . . . . . . . . . . .
Interface Specifications 11-7. . . . . . . . . . . . . . . . . . . . . . . . . . . . . .
Interface Cables 11-8. . . . . . . . . . . . . . . . . . . . . . . . . . . . . . . . . . . .
Regulatory Notices 11-10. . . . . . . . . . . . . . . . . . . . . . . . . . . . . . . . .
Ordering Accessories 11-13. . . . . . . . . . . . . . . . . . . . . . . . . . . . . . .
Reference
11
RE
FE
RE
NC
E11
Downloaded from www.Manualslib.com manuals search engine
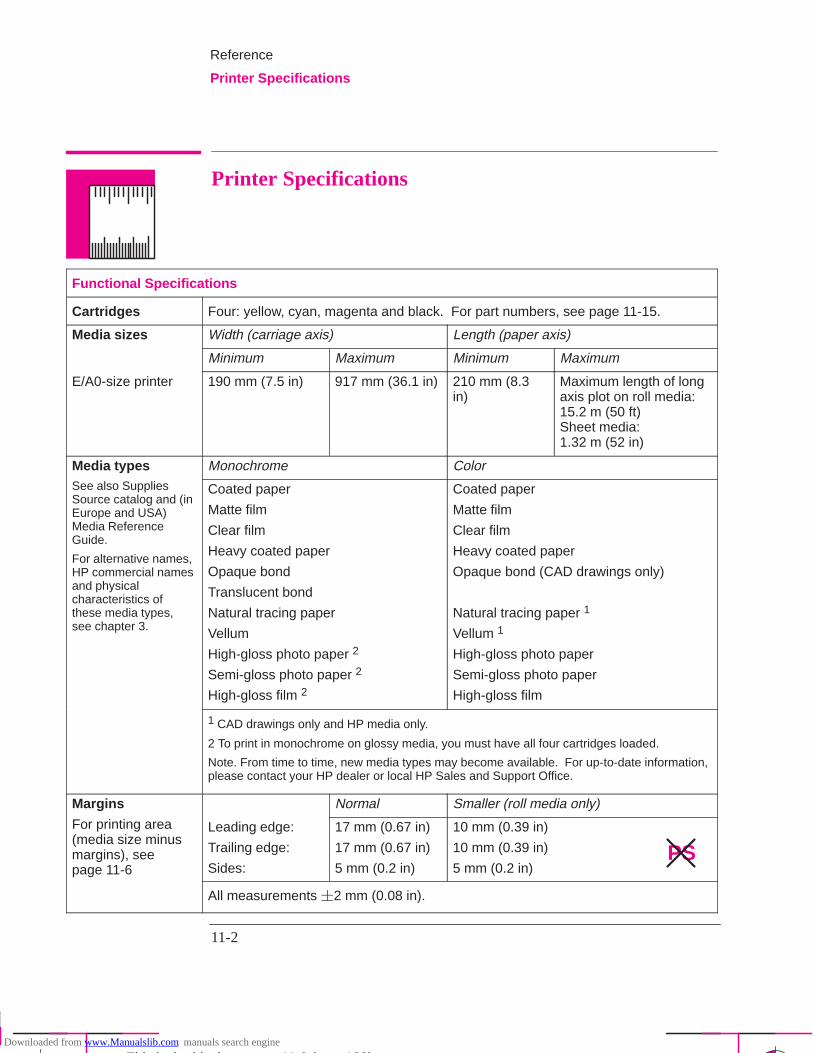
11-2
Company confidential. Postillo/755CM User’s Guide Final Freeze Status:Frozen
This is the cyan on page 11-2 (seq: 188)
This is the black on page 11-2 (seq: 188)
Printer Specifications
Functional Specifications
Cartridges Four: yellow, cyan, magenta and black. For part numbers, see page 11-15.
Media sizes Width (carriage axis) Length (paper axis)
Minimum Maximum Minimum Maximum
E/A0-size printer 190 mm (7.5 in) 917 mm (36.1 in) 210 mm (8.3in)
Maximum length of longaxis plot on roll media:15.2 m (50 ft)Sheet media:1.32 m (52 in)
Media types Monochrome ColorSee also SuppliesSource catalog and (inEurope and USA)Media ReferenceGuide.
For alternative names,HP commercial namesand physicalcharacteristics ofthese media types,see chapter 3.
Coated paper
Matte film
Clear film
Heavy coated paper
Opaque bond
Translucent bond
Natural tracing paper
Vellum
High-gloss photo paper 2
Semi-gloss photo paper 2
High-gloss film 2
Coated paper
Matte film
Clear film
Heavy coated paper
Opaque bond (CAD drawings only)
Natural tracing paper 1
Vellum 1
High-gloss photo paper
Semi-gloss photo paper
High-gloss film
1 CAD drawings only and HP media only.
2 To print in monochrome on glossy media, you must have all four cartridges loaded.
Note. From time to time, new media types may become available. For up-to-date information,please contact your HP dealer or local HP Sales and Support Office.
Margins Normal Smaller (roll media only)
For printing area(media size minusmargins), see page 11-6
Leading edge:
Trailing edge:
Sides:
17 mm (0.67 in)
17 mm (0.67 in)
5 mm (0.2 in)
10 mm (0.39 in)
10 mm (0.39 in)
5 mm (0.2 in)
All measurements �2 mm (0.08 in).
Reference
Printer Specifications
PS
Downloaded from www.Manualslib.com manuals search engine
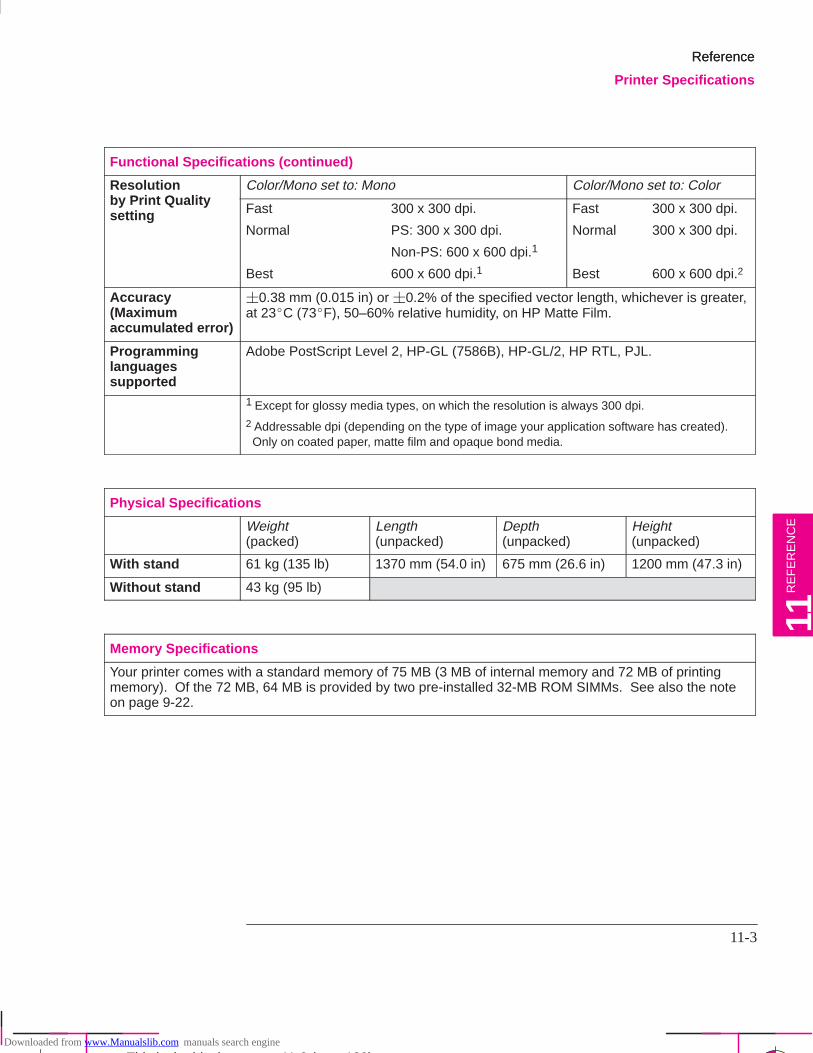
11-3
Company confidential. Postillo/755CM User’s Guide Final Freeze Status:Frozen
This is the cyan on page 11-3 (seq: 189)
This is the black on page 11-3 (seq: 189)
Functional Specifications (continued)
Resolutionby Print Q ality
Color/Mono set to: Mono Color/Mono set to: Colorby Print Qualit ysetting Fast
Normal
Best
300 x 300 dpi.
PS: 300 x 300 dpi.
Non-PS: 600 x 600 dpi.1
600 x 600 dpi.1
Fast
Normal
Best
300 x 300 dpi.
300 x 300 dpi.
600 x 600 dpi.2
Accuracy(Maximum accumulated error)
�0.38 mm (0.015 in) or �0.2% of the specified vector length, whichever is greater,at 23�C (73�F), 50–60% relative humidity, on HP Matte Film.
Programminglanguagessupported
Adobe PostScript Level 2, HP-GL (7586B), HP-GL/2, HP RTL, PJL.
1 Except for glossy media types, on which the resolution is always 300 dpi.2 Addressable dpi (depending on the type of image your application software has created). Only on coated paper, matte film and opaque bond media.
Physical Specifications
Weight (packed)
Length (unpacked)
Depth (unpacked)
Height (unpacked)
With stand 61 kg (135 lb) 1370 mm (54.0 in) 675 mm (26.6 in) 1200 mm (47.3 in)
Without stand 43 kg (95 lb)
Memory Specifications
Your printer comes with a standard memory of 75 MB (3 MB of internal memory and 72 MB of printingmemory). Of the 72 MB, 64 MB is provided by two pre-installed 32-MB ROM SIMMs. See also the noteon page 9-22.
Reference
RE
FE
RE
NC
E11
Reference
Printer Specifications
RE
FE
RE
NC
E11
Downloaded from www.Manualslib.com manuals search engine
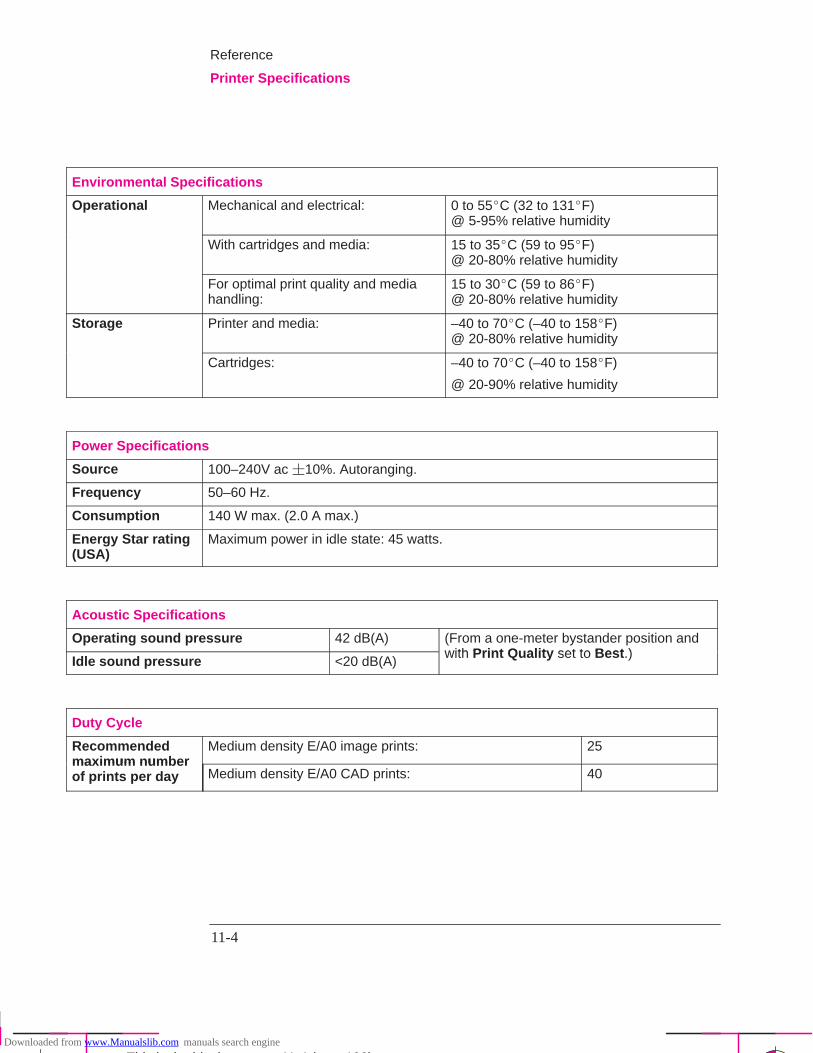
11-4
Company confidential. Postillo/755CM User’s Guide Final Freeze Status:Frozen
This is the cyan on page 11-4 (seq: 190)
This is the black on page 11-4 (seq: 190)
Environmental Specifications
Operational Mechanical and electrical: 0 to 55�C (32 to 131�F) @ 5-95% relative humidity
With cartridges and media: 15 to 35�C (59 to 95�F) @ 20-80% relative humidity
For optimal print quality and media handling:
15 to 30�C (59 to 86�F) @ 20-80% relative humidity
Storage Printer and media: –40 to 70�C (–40 to 158�F) @ 20-80% relative humidity
Cartridges: –40 to 70�C (–40 to 158�F)
@ 20-90% relative humidity
Power Specifications
Source 100–240V ac �10%. Autoranging.
Frequency 50–60 Hz.
Consumption 140 W max. (2.0 A max.)
Energy Star rating(USA)
Maximum power in idle state: 45 watts.
Acoustic Specifications
Operating sound pressure 42 dB(A) (From a one-meter bystander position andwith Print Q ality set to Best )Idle sound pressure <20 dB(A)with Print Qualit y set to Best.)
Duty Cycle
Recommendedmaximum number
Medium density E/A0 image prints: 25maxim um numberof prints per day Medium density E/A0 CAD prints: 40
Reference
Printer Specifications
Downloaded from www.Manualslib.com manuals search engine
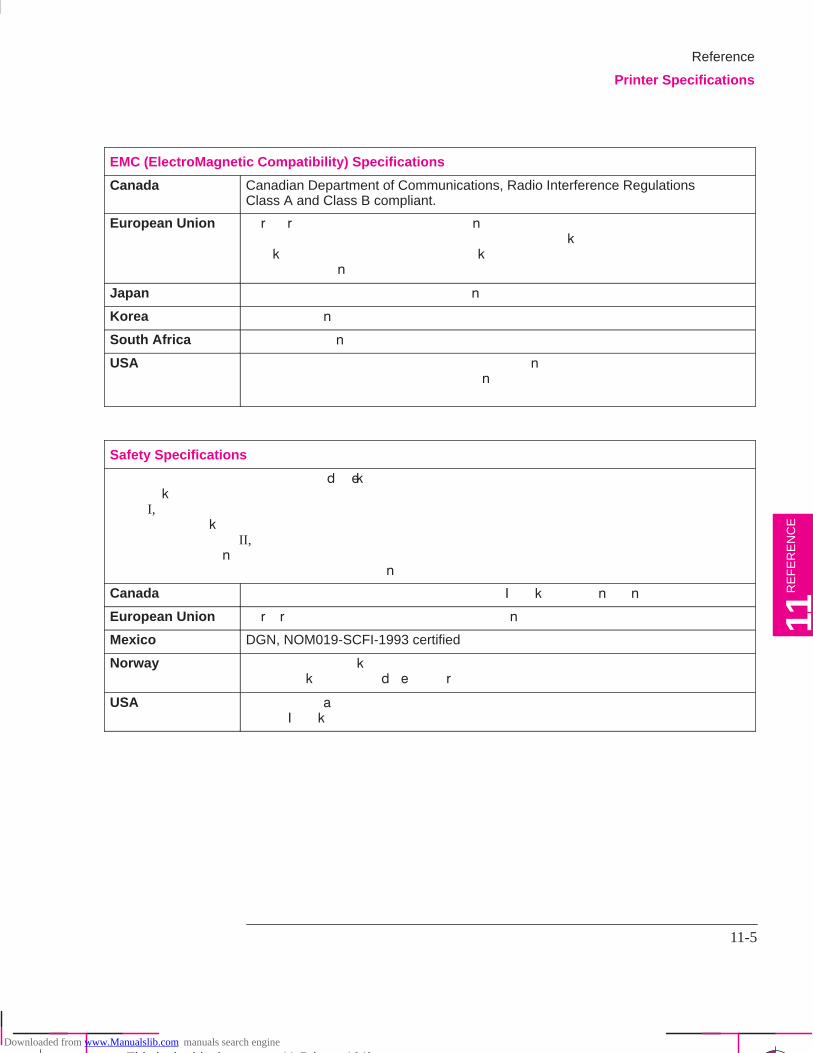
11-5
Company confidential. Postillo/755CM User’s Guide Final Freeze Status:Frozen
This is the cyan on page 11-5 (seq: 191)
This is the black on page 11-5 (seq: 191)
EMC (ElectroMagnetic Compatibility) Specifications
Canada Canadian Department of Communications, Radio Interference Regulations Class A and Class B compliant.
European Union ���������� ��� �-4)'6-8) '1/2.-%06�
�))65 �� ���� �.%55 � %0( �.%55 � )/-55-10 .-/-65� 24�� ��� <�
�!�� 24����� <� %(-%6)( �//70-6:� 24�� ��� <
�%56 "4%05-)065�
Japan )+-56)4)( $��� �.%55 %0( �.%55 ��
Korea � ')46-*-)(�
South Africa !��! .-')05)(�
USA �)()4%. �1//70-'%6-105 �1//-55-10 ')46-*-)(�
�.%55 � %0( �.%55 � '1/276-0+ ()8-')�
�� � �%46 �
Safety Specifications
�0*14/%6-10 ")',01.1+: �37-2/)06 ��"���
�18%&.)�
�.%55 I, �.7+%&.) ":2) ��
�056%..%6-10 �%6)+14: II, �1..76-10 �)+4)) ��
�14 -0(114 '10641..)( 1**-') )08-410/)065 75)�
Canada �%0%(-%0 !6%0(%4(5 �551'-%6-10 ;�)46-*-)(� �"�� �!� ����� �1���
European Union ��������� �19 $1.6%+) �-4)'6-8) '1/2.-%06� �))65 �� ���
Mexico DGN, NOM019-SCFI-1993 certified
Norway ����� %22418)(�
�� ���� ���� "!��� �������
USA #0()494-6)45� �%&14%614-)5
;�-56)(� �"�� #� ��
Reference
Printer Specifications
RE
FE
RE
NC
E11
Downloaded from www.Manualslib.com manuals search engine
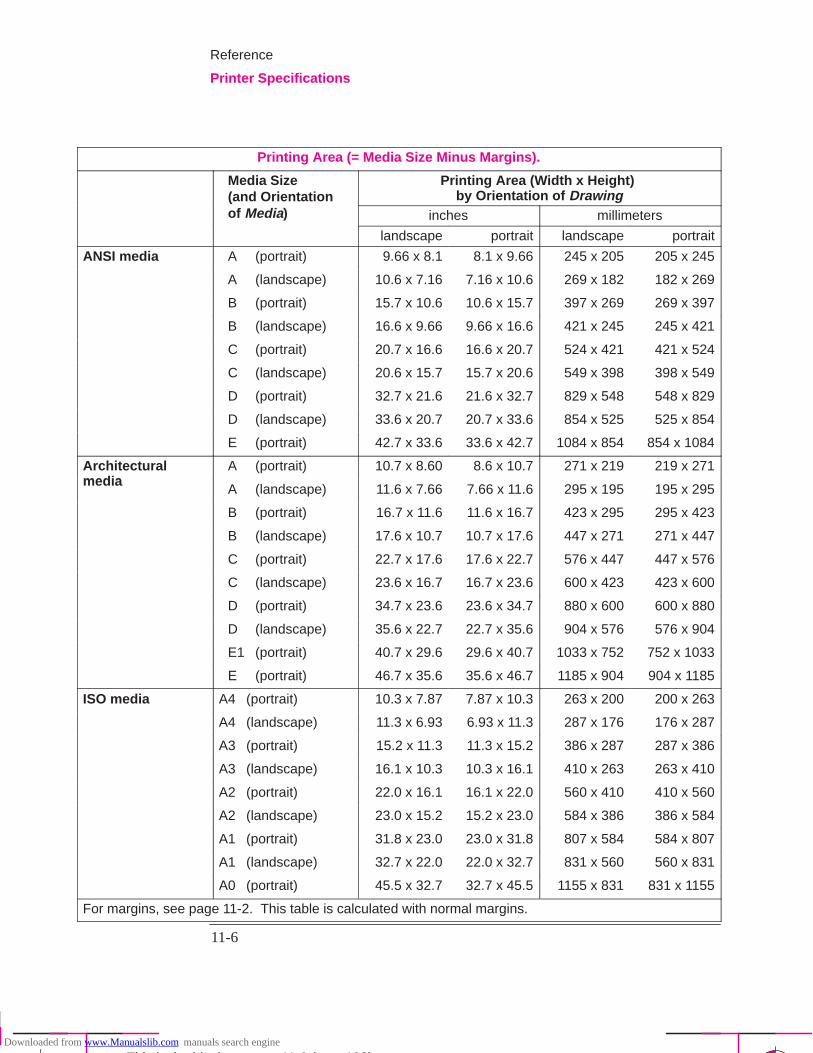
11-6
Company confidential. Postillo/755CM User’s Guide Final Freeze Status:Frozen
This is the cyan on page 11-6 (seq: 192)
This is the black on page 11-6 (seq: 192)
Printing Area (= Media Size Minus Margins).
Media Size(and Orientation
Printing Area (Width x Height) by Orientation of Drawing(
of Media) inches millimeters
landscape portrait landscape portrait
ANSI media A (portrait) 9.66 x 8.1 8.1 x 9.66 245 x 205 205 x 245
A (landscape) 10.6 x 7.16 7.16 x 10.6 269 x 182 182 x 269
B (portrait) 15.7 x 10.6 10.6 x 15.7 397 x 269 269 x 397
B (landscape) 16.6 x 9.66 9.66 x 16.6 421 x 245 245 x 421
C (portrait) 20.7 x 16.6 16.6 x 20.7 524 x 421 421 x 524
C (landscape) 20.6 x 15.7 15.7 x 20.6 549 x 398 398 x 549
D (portrait) 32.7 x 21.6 21.6 x 32.7 829 x 548 548 x 829
D (landscape) 33.6 x 20.7 20.7 x 33.6 854 x 525 525 x 854
E (portrait) 42.7 x 33.6 33.6 x 42.7 1084 x 854 854 x 1084
Architecturalmedia
A (portrait) 10.7 x 8.60 8.6 x 10.7 271 x 219 219 x 271media
A (landscape) 11.6 x 7.66 7.66 x 11.6 295 x 195 195 x 295
B (portrait) 16.7 x 11.6 11.6 x 16.7 423 x 295 295 x 423
B (landscape) 17.6 x 10.7 10.7 x 17.6 447 x 271 271 x 447
C (portrait) 22.7 x 17.6 17.6 x 22.7 576 x 447 447 x 576
C (landscape) 23.6 x 16.7 16.7 x 23.6 600 x 423 423 x 600
D (portrait) 34.7 x 23.6 23.6 x 34.7 880 x 600 600 x 880
D (landscape) 35.6 x 22.7 22.7 x 35.6 904 x 576 576 x 904
E1 (portrait) 40.7 x 29.6 29.6 x 40.7 1033 x 752 752 x 1033
E (portrait) 46.7 x 35.6 35.6 x 46.7 1185 x 904 904 x 1185
ISO media A4 (portrait) 10.3 x 7.87 7.87 x 10.3 263 x 200 200 x 263
A4 (landscape) 11.3 x 6.93 6.93 x 11.3 287 x 176 176 x 287
A3 (portrait) 15.2 x 11.3 11.3 x 15.2 386 x 287 287 x 386
A3 (landscape) 16.1 x 10.3 10.3 x 16.1 410 x 263 263 x 410
A2 (portrait) 22.0 x 16.1 16.1 x 22.0 560 x 410 410 x 560
A2 (landscape) 23.0 x 15.2 15.2 x 23.0 584 x 386 386 x 584
A1 (portrait) 31.8 x 23.0 23.0 x 31.8 807 x 584 584 x 807
A1 (landscape) 32.7 x 22.0 22.0 x 32.7 831 x 560 560 x 831
A0 (portrait) 45.5 x 32.7 32.7 x 45.5 1155 x 831 831 x 1155
For margins, see page 11-2. This table is calculated with normal margins.
Reference
Printer Specifications
Downloaded from www.Manualslib.com manuals search engine
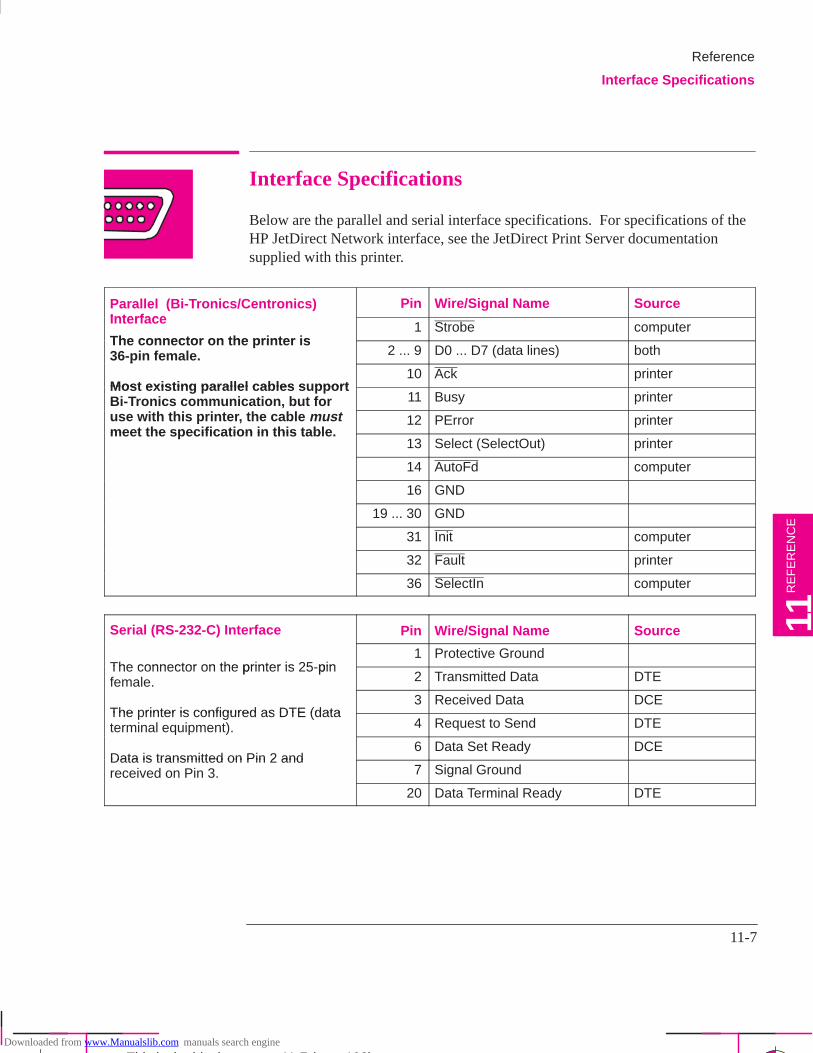
11-7
Company confidential. Postillo/755CM User’s Guide Final Freeze Status:Frozen
This is the cyan on page 11-7 (seq: 193)
This is the black on page 11-7 (seq: 193)
Interface Specifications
Below are the parallel and serial interface specifications. For specifications of theHP JetDirect Network interface, see the JetDirect Print Server documentationsupplied with this printer.
Parallel (Bi-Tronics/Centronics)Interface
Pin Wire/Signal Name SourceInterface
The connector on the printer is1 Strobe computer
The connector on the printer is36-pin female. 2 ... 9 D0 ... D7 (data lines) bothp
Most existing parallel cables s pport10 Ack printer
Most existing parallel cables supportBi-Tronics communication, but for 11 Busy printeruse with this printer, the cable mustmeet the specification in this table
12 PError printermeet the specification in this table .
13 Select (SelectOut) printer
14 AutoFd computer
16 GND
19 ... 30 GND
31 Init computer
32 Fault printer
36 SelectIn computer
Serial (RS-232-C) Interface Pin Wire/Signal Name Source
The connector on the printer is 25 pin1 Protective Ground
The connector on the printer is 25-pinfemale. 2 Transmitted Data DTE
The printer is configured as DTE (data3 Received Data DCE
The rinter is configured as DTE (dataterminal equipment). 4 Request to Send DTEq )
Data is transmitted on Pin 2 and6 Data Set Ready DCE
Data is transmitted on Pin 2 andreceived on Pin 3. 7 Signal Ground
20 Data Terminal Ready DTE
Reference
Interface Specifications
RE
FE
RE
NC
E11
Downloaded from www.Manualslib.com manuals search engine
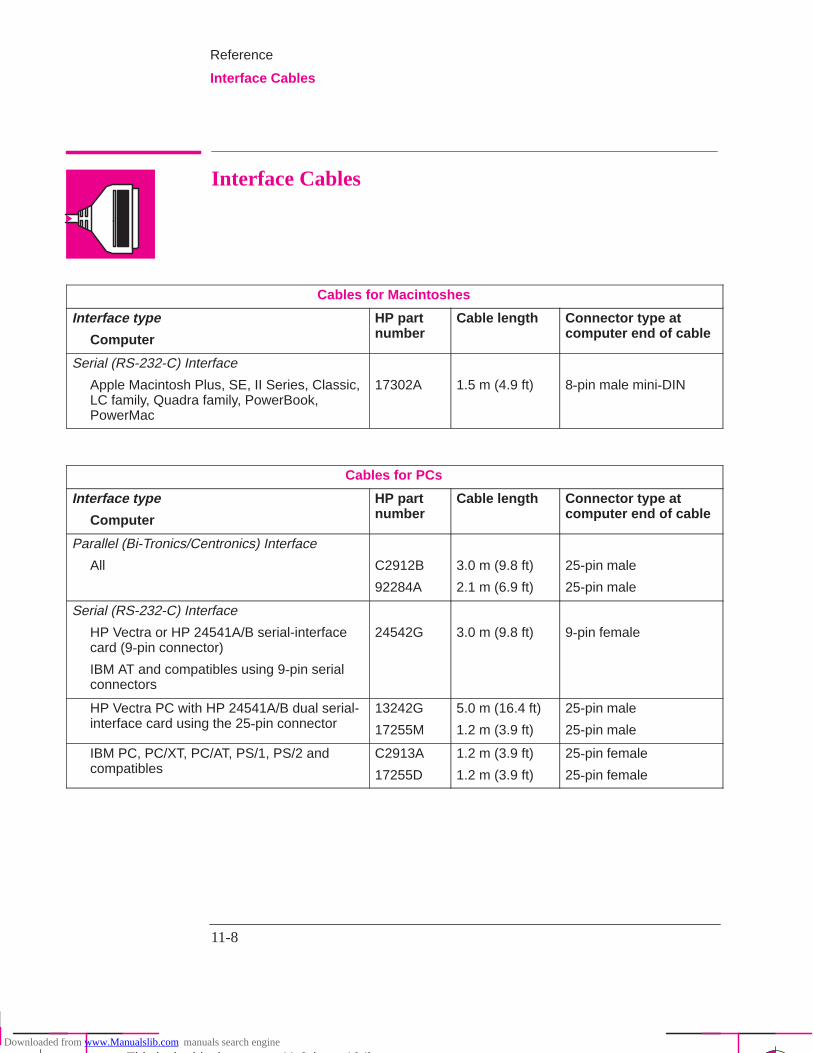
11-8
Company confidential. Postillo/755CM User’s Guide Final Freeze Status:Frozen
This is the cyan on page 11-8 (seq: 194)
This is the black on page 11-8 (seq: 194)
Interface Cables
Cables for Macintoshes
Interface type
Computer
HP partnumber
Cable length Connector type atcomputer end of cable
Serial (RS-232-C) Interface
Apple Macintosh Plus, SE, II Series, Classic,LC family, Quadra family, PowerBook,PowerMac
17302A 1.5 m (4.9 ft) 8-pin male mini-DIN
Cables for PCs
Interface type
Computer
HP partnumber
Cable length Connector type atcomputer end of cable
Parallel (Bi-Tronics/Centronics) Interface
All C2912B
92284A
3.0 m (9.8 ft)
2.1 m (6.9 ft)
25-pin male
25-pin male
Serial (RS-232-C) Interface
HP Vectra or HP 24541A/B serial-interfacecard (9-pin connector)
IBM AT and compatibles using 9-pin serialconnectors
24542G 3.0 m (9.8 ft) 9-pin female
HP Vectra PC with HP 24541A/B dual serial-interface card using the 25-pin connector
13242G
17255M
5.0 m (16.4 ft)
1.2 m (3.9 ft)
25-pin male
25-pin male
IBM PC, PC/XT, PC/AT, PS/1, PS/2 andcompatibles
C2913A
17255D
1.2 m (3.9 ft)
1.2 m (3.9 ft)
25-pin female
25-pin female
Reference
Interface Cables
Downloaded from www.Manualslib.com manuals search engine
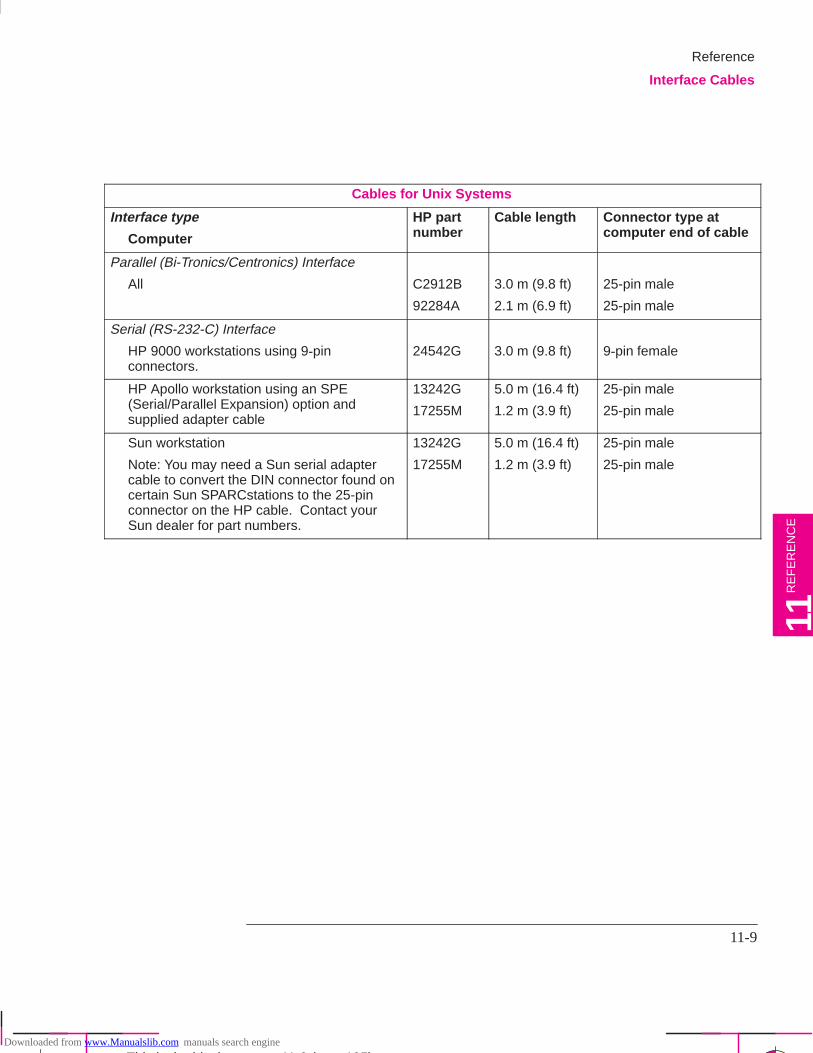
11-9
Company confidential. Postillo/755CM User’s Guide Final Freeze Status:Frozen
This is the cyan on page 11-9 (seq: 195)
This is the black on page 11-9 (seq: 195)
Cables for Unix Systems
Interface type
Computer
HP partnumber
Cable length Connector type atcomputer end of cable
Parallel (Bi-Tronics/Centronics) Interface
All C2912B
92284A
3.0 m (9.8 ft)
2.1 m (6.9 ft)
25-pin male
25-pin male
Serial (RS-232-C) Interface
HP 9000 workstations using 9-pinconnectors.
24542G 3.0 m (9.8 ft) 9-pin female
HP Apollo workstation using an SPE(Serial/Parallel Expansion) option andsupplied adapter cable
13242G
17255M
5.0 m (16.4 ft)
1.2 m (3.9 ft)
25-pin male
25-pin male
Sun workstation
Note: You may need a Sun serial adaptercable to convert the DIN connector found oncertain Sun SPARCstations to the 25-pinconnector on the HP cable. Contact yourSun dealer for part numbers.
13242G
17255M
5.0 m (16.4 ft)
1.2 m (3.9 ft)
25-pin male
25-pin male
Reference
Interface Cables
RE
FE
RE
NC
E11
Downloaded from www.Manualslib.com manuals search engine
11-10
Company confidential. Postillo/755CM User’s Guide Final Freeze Status:Frozen
This is the cyan on page 11-10 (seq: 196)
This is the black on page 11-10 (seq: 196)
Regulatory Notices
To Obtain a Material Safety Data Sheet (MSDS)
You can obtain current Material Safety Data Sheets for the print cartridges used in the printer (HP Partnumbers 51644C [cyan], 51644M [magenta], 51644Y [yellow] and 51645A [black]) by mailing arequest to this address: Hewlett-Packard Customer Information Center, 19310 Pruneridge Avenue,Dept. MSDS, Cupertino, CA 95014, U.S.A.
Sound
LpA < 70 dB, am Arbeitsplatz, im Normalbetrieb, nach DIN 45635 T. 19.
Electro-Magnetic Compatibility (EMC)
The U.S. Federal Communications Commission (in 47 cfr 15.105) has specified that the followingnotices be brought to the attention of users of this product.
Pursuant to Part 15.21 of the FCC Rules, any changes or modifications to this equipment not expresslyapproved by the Hewlett-Packard Company, may cause harmful interference and void the FCCauthorization to operate this equipment.
This equipment has been tested and found to comply with the limits for a Class B digital device,pursuant to part 15 of the FCC Rules. These limits are designed to provide reasonable protectionagainst harmful interference in a residential installation. This equipment generates, uses and can radiateradio frequency energy and, if not installed and used in accordance with the instructions, may causeharmful interference to radio communications. However, there is no guarantee that interference will notoccur in a particular installation. If this equipment does cause harmful interference to radio or televisionreception, which can be determined by turning the equipment off and on, the user is encouraged to tryand correct the interferences by one or more of the following measures:
Reorient the receiving antenna
Increase the separation between the equipment and the receiver
Connect the equipment into an outlet on a circuit different from that to which the receiver isconnected
Consult the dealer or an experienced radio/TV technician for help
The user may find useful the following booklet prepared by the FCC: “How to Identify and ResolveRadio�TV Interference Problems”. This booklet is available from the US Government Printing Office,Washington, DC 20402, Stock No. 004�������������
This equipment has been tested and found to comply with the limits for a Class A digital device,pursuant to part 15 of the FCC Rules. These limits are designed to provide reasonable protectionagainst harmful interference in a commercial environment. This equipment generates, uses and canradiate radio frequency energy and, if not installed and used in accordance with the instructions, maycause harmful interference to radio communications. Operation of this equipment in a residential areais likely to cause harmful interference in which case the user will be required to correct the interferenceat their own expense.
Reference
Regulatory Notices
Geräuschemission(Germany)
FCC Statements(U.S.A.)
C A U T I O N
When connected toan IEEE 802.3 orEthernet network ...
Downloaded from www.Manualslib.com manuals search engine
11-11
Company confidential. Postillo/755CM User’s Guide Final Freeze Status:Frozen
This is the cyan on page 11-11 (seq: 197)
This is the black on page 11-11 (seq: 197)
Le présent appareil numérique n’émet pas de bruits radioélectriques dépassant les limites applicablesaux appareils numériques de Classe B prescrites dans le réglement sur le brouillage radioélectriqueédicté par le Ministère des Communications du Canada.
Le présent appareil numérique, connecté à un réseau de type IEEE 802.3 ou Ethernet, n’émet pas debruits radioélectriques dépassant les limites applicables aux appareils numériques de Classe Aprescrites dans le réglement sur le brouillage radioélectrique édicté par le Ministère desCommunications du Canada.
This digital apparatus does not exceed the Class B limits for radio noise emissions from digitalapparatus set out in the Radio Interference Regulations of the Canadian Department ofCommunications.
When connected to an IEEE 802.3 or Ethernet network, this digital apparatus does not exceed the Class A limits for radio noise emissions from digital apparatus set out in the Radio InterferenceRegulations of the Canadian Department of Communications.
Telecommunications Statement
The HP DesignJet 755CM printer, model C3198B, is approved under Approval NumberNS/G/1234/5/100003 for indirect connection to public telecommunication systems within the UnitedKingdom.
Normes de sécurité(Canada)
Reference
Regulatory Notices
RE
FE
RE
NC
E11
DOC statement (Canada)
Korean EMI statement
Tele-communicationsGeneral Approval(UK)
Downloaded from www.Manualslib.com manuals search engine
11-12
Company confidential. Postillo/755CM User’s Guide Final Freeze Status:Frozen
This is the cyan on page 11-12 (seq: 198)
This is the black on page 11-12 (seq: 198)
DECLARATION OF CONFORMITYaccording to ISO/IEC Guide 22 and EN 45014
Manufacturer’s Name: Hewlett-Packard Española S.A.
Manufacturer’s Address: Hewlett-Packard Española S.A.BARCELONA DIVISIONAvda. Graells, 50108190 Sant Cugat del VallèsBarcelona, Spain
declares that the productProduct Name:Model Number:
conforms to the following Product Specifications:
InkJet PrinterHP C3198B
IEC 950: 1991 + A1, A2 / EN 60950 (1992) + A1, A2CSA C22.2 No. 950 (1993) UL 1950 (1993)EMKO-TSE(74)DK207/94NOM-019-SCFI-1993
Safety:
EMC: CISPR 22: 1993 / EN 55022 (1994): Class B(1)
CISPR 22: 1993 / EN 55022 (1994): Class A(2)
EN 50082-1 (1992)IEC 801–2: 1991 / prEN 55024–2 (1992): 4KV CD
8KV ADIEC 801–3: 1984 / prEN 55024–3 (1991): 3 V/mIEC 801–4: 1988 / prEN 55024–4 (1992): 1KV Power Lines
0.5KV Signal LinesFCC Part 15 – Class B / DOC–B / VCCI–2 / RRL–AFCC Part 15 – Class A / DOC–A / VCCI–1 / RRL–A(2)
Supplementary Information:
(1) The product was tested with a system, consisting of: a Macintosh personalcomputer for LocalTalk, keyboard, mouse, and an HP QuietJet printer as thesecond peripheral.(2) The product was tested with IEEE 802.3 or 802.5 cables.
Sant Cugat del Vallès (Barcelona), September 1st, 1996European Contact: Your local Hewlett-Packard Sales and Service Office or Hewlett-Packard GmbH, Department HQ/TRE
Europe, Herrenberger Strasse 130, D-71034 Boeblingen, Germany (fax: (+49) 7031 143143).
Jordi Balderas,Quality Engineering Manager
The product herewith complies with the requirements of the Low Voltage Directive 73/23/EEC and theEMC Directive 89/336/EEC, and carries the CE marking accordingly.
Reference
Regulatory Notices
Downloaded from www.Manualslib.com manuals search engine
11-13
Company confidential. Postillo/755CM User’s Guide Final Freeze Status:Frozen
This is the cyan on page 11-13 (seq: 199)
This is the black on page 11-13 (seq: 199)
Ordering AccessoriesHP PartNumber
Cables See page11-8
Documentation
User’s Guide and Quick Reference Guide Chinese C3198-60060
English C3198-60051
French C3198-60055
German C3198-60054
Italian C3198-60057
Korean C3198-60052
Portuguese C3198-60059
Spanish C3198-60056
Software Application Notes (CAD)
Software Application Notes (graphics packages)
English
English
C4705-90006
C3198-90121
Hewlett-Packard Support Services Multi (1)
HP-GL/2 and RTL Programmer’s Reference Guide English 5959-9733 (2)
The Product Comparison Guide for HP-GL/2 and HP RTL Peripherals
English 5959-9734 (2)
PJL Technical Reference Manual English 5961-0938
1 This item is updated regularly. For details of the latest version available, please contact your HPdealer or sales representative.2 See note on page 11-16.
RE
FE
RE
NC
E11
Reference
Ordering Accessories
Downloaded from www.Manualslib.com manuals search engine
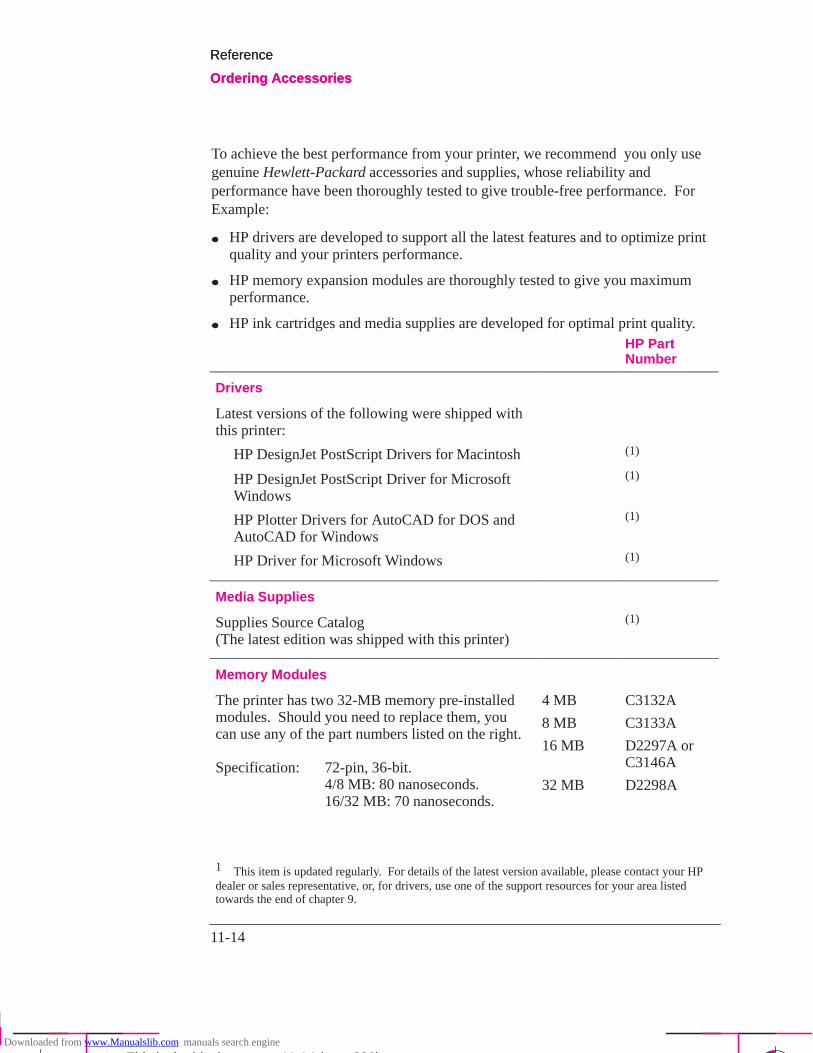
11-14
Company confidential. Postillo/755CM User’s Guide Final Freeze Status:Frozen
This is the cyan on page 11-14 (seq: 200)
This is the black on page 11-14 (seq: 200)
To achieve the best performance from your printer, we recommend you only usegenuine Hewlett-Packard accessories and supplies, whose reliability andperformance have been thoroughly tested to give trouble-free performance. ForExample:
HP drivers are developed to support all the latest features and to optimize printquality and your printers performance.
HP memory expansion modules are thoroughly tested to give you maximumperformance.
HP ink cartridges and media supplies are developed for optimal print quality.HP PartNumber
Drivers
Latest versions of the following were shipped withthis printer:
HP DesignJet PostScript Drivers for Macintosh (1)
HP DesignJet PostScript Driver for MicrosoftWindows
(1)
HP Plotter Drivers for AutoCAD for DOS andAutoCAD for Windows
(1)
HP Driver for Microsoft Windows (1)
Media Supplies
Supplies Source Catalog (The latest edition was shipped with this printer)
(1)
Memory Modules
The printer has two 32-MB memory pre-installedmodules. Should you need to replace them, youcan use any of the part numbers listed on the right.
4 MB
8 MB
16 MB
C3132A
C3133A
D2297A or
Specification: 72-pin, 36-bit.4/8 MB: 80 nanoseconds.16/32 MB: 70 nanoseconds.
32 MB
C3146A
D2298A
1 This item is updated regularly. For details of the latest version available, please contact your HPdealer or sales representative, or, for drivers, use one of the support resources for your area listedtowards the end of chapter 9.
Reference
Ordering Accessories
Reference
Ordering Accessories
Downloaded from www.Manualslib.com manuals search engine

11-15
Company confidential. Postillo/755CM User’s Guide Final Freeze Status:Frozen
This is the cyan on page 11-15 (seq: 201)
This is the black on page 11-15 (seq: 201)
HP PartNumber
Print Cartridges Yellow 51644Y
Although other cartridges may appear to fit in thet ll l th t b
Cyan 51644Cstalls, use only these part numbers. Magenta 51644M
Black 51645A
Spindle Assembly
E/A0-size C3173A
Reference
Ordering accessories
RE
FE
RE
NC
E11
Downloaded from www.Manualslib.com manuals search engine
11-16
Company confidential. Postillo/755CM User’s Guide Final Freeze Status:Frozen
This is the cyan on page 11-16 (seq: 202)
This is the black on page 11-16 (seq: 202)
HP-GL/2 and HP RTL Programming Information
The HP-GL/2 and HP RTL Reference Guide provides complete explanations andexamples of the HP-GL/2 and HP RTL graphic and interfacing instructions. If youare writing an HP-GL/2 or RTL driver for your printer, you will find this guide aninvaluable source of general instruction information. It is published byAddison-Wesley Publishing Company and you can can order it through most bookstores (ISBN 0-201-56308-8).
For specific parameter information, refer to The Product Comparison Guide forHP-GL/2 and HP RTL Peripherals, which you can order through your HP Salesoffice.
How to Order Supplies and Accessories
You can order supplies and accessories in any of the following ways:
Call your local authorized HP dealer.
Contact your local HP Sales and Support office.
Refer to the Hewlett-Packard Services Booklet that was supplied with yourprinter.
Reference
Ordering Accessories
Downloaded from www.Manualslib.com manuals search engine
12-1
Company confidential. Postillo/755CM User’s Guide Final Freeze Status:Frozen
This is the cyan on page 12-1 (seq: 203)
This is the black on page 12-1 (seq: 203)
Glossary
12
GLO
SS
AR
Y12
Downloaded from www.Manualslib.com manuals search engine
12–2
Company confidential. Postillo755 User’s Guide. Final Freeze Status: Frozen
This is the cyan on page 12–2 (seq: 204)
This is the black on page 12–2 (seq: 204)
ac Alternating current.
addressable dpi A resolution higher than nominalvalue of the cartridges, giving a finer grid on whichthe plotter can selectively position dots and improveprint quality.
ANSI size An American standard paper size; e.g.D, E, etc.
application The software you use to create yourdrawings.
bail The black metal bar inside the printer, whichholds the media in place.
baud rate The data transmission rate in a serialinterface between a computer and a device, in bitsper second.
Bi-tronics A standard for the parallel interfacebetween computer and device, compatible withCentronics.
CAD Computer-aided design.
cartridge Print cartridge, containing ink.
Centronics A standard for the parallel interfacebetween computer and device.
clear film See-through, polyester media type.
clipping Losing part of a drawing at the edges.
CMYK Cyan, magenta, yellow and black. Thecolors of the printer’s four inks, and also a standardcolor model.
coated paper Paper coated on one side for inkjetprinting.
default A value or condition that is assumed if noother value or condition is specified.
device An external item connected to thecomputer: printer, plotter, tape drive etc. Your HP DesignJet is a device.
dpi Dots per inch, a measure of print resolution.
driver The software that controls thecommunication between a computer and a device.
front panel The control panel on the right of theprinter.
front-panel menus The structure of options in thefront-panel display.
GIS Geographical information system (mappingsoftware).
graphics language A programming languagetelling a print device how to output graphic data.
grayscale Shades of gray to represent colors.
high-gloss film A glossy, opaque, polyester mediatype.
Glossary
Downloaded from www.Manualslib.com manuals search engine
12–3
Company confidential. Postillo755 User’s Guide. Final Freeze Status: Frozen
This is the cyan on page 12–3 (seq: 205)
This is the black on page 12–3 (seq: 205)
high-gloss photo A glossy, opaque photographicpaper.
HP-GL One of Hewlett-Packard’s standardgraphics languages for plotters and printers.Produces vector data. Forerunner to HP-GL/2.
HP-GL/2 One of Hewlett-Packard’s standardgraphics languages for plotters and printers.Produces vector data. Newer than HP-GL.
I/O Input/output. The transmission of databetween a computer and a device.
inked area The smallest rectangle that containsall the content of the drawing, while maintaining itsrelative dimensions.
ISO size An international standard paper size; e.g.A1, A2, etc.
JIS size A Japanese standard paper size.
LAN Local area network.
long-axis printing Printing a page whose X-axis(the axis vertical to the printer as you look at it fromthe front) is longer than a standard page size.
margin The space around the page added by theprinter to separate one page from another and toavoid printing right to the edge of the media.
matte Not glossy.
matte film Opaque, polyester media type.
media The material, usually paper, onto which theprinter prints.
media bin The catcher situated below the printer.
MIO Modular input/output. Refers to theprinter’s network interface.
nesting Placing two or more pages side-by-sideon the media to avoid waste.
opaque bond A matte paper media.
palette A set of logical pens defined by color andwidth.
PJL Printer Job Language. A programminglanguage that controls jobs going to a printer.
PML Printer management language.
parallel interface A type of interface betweencomputer and device. Generally faster than a serialinterface.
PANTONE The PANTONE MATCHINGSYSTEM� is an international standard for colorcommunication in the graphics art industry.
pen Even though the plotter has no physical pens,the lines it draws match the attributes of a pen.
platen The exterior part of the printer on whichthe media rests before going into the media-entryslot.
printing area Page size minus margins.
AA
GLO
SS
AR
Y12
Glossary
Downloaded from www.Manualslib.com manuals search engine
12–4
Company confidential. Postillo755 User’s Guide. Final Freeze Status: Frozen
This is the cyan on page 12–4 (seq: 206)
This is the black on page 12–4 (seq: 206)
PostScript A standard page-markup language,commonly used by graphics and desktop publishingsoftware applications.
queueing Placing each page of each file receivedby the device in line, before and after printing.
parity An error-checking method in a serialinterface between a computer and a device.
raster A method for defining an image, in termsof dots rather than lines. Raster data typically needsmore memory than vector data.
RGB Red, green and blue. A standard colormodel.
RS-232-C A serial interface standard.
RTL One of Hewlett-Packard’s standard graphicslanguages for plotters and printers. Produces rasterdata.
ROM SIMM A physical module containingread-only data, that can be installed in the back ofthe printer to provide upgrades.
semi-gloss photo A semi glossy, opaquephotographic paper.
serial interface A type of interface betweencomputer and device. Generally slower than aparallel interface.
spindle The rod which holds the roll of media.
tracing paper A semi-opaque matte paper type.
translucent bond A semi-opaque matte papertype.
vector A line. A method for defining an image,in terms of lines rather than dots. Vector datatypically needs less memory than raster data.
vellum Cotton-fiber-based, semi-opaque mattemedia type.
X-axis The vertical axis, as you look at the printerfrom the front.
Y-axis The horizontal axis, as you look at theprinter from the front.
Glossary
Downloaded from www.Manualslib.com manuals search engine
I-1
Company confidential. Postillo/755CM User’s Guide Final Freeze Status: Frozen
This is the cyan on page I-1 (seq: 207)
This is the black on page I-1 (seq: 207)
AAccess Cartridges key, 1-17, 3-27
problems, 9-7accessories, 1-4–1-6
list, 11-13ordering, 11-16
accuracy, specification, 11-3acoustic specifications, 11-4action keys, 2-2addressable 600 dpi, Sharp lines, 5-16addressable dpi, 5-15Apollo, cables to connect, 11-9Apple
See also Macintoshcables to connect, 11-8
archive prints, 3-8area fill problems, 9-19arrow keys, 2-6AutoCAD, drivers, 11-14automatic cutter, problems with,9-5–9-6
Bbanding problems, 9-20Bi-Tronics interface, 11-7black cartridge only, operating with,1-17–1-20
blank print, 9-10bleeding lines, 9-19blurred lines, 9-19BOOTP, 1-37buttons. See keys
Ccables
ordering, 11-8–11-9power, 1-4problems, 9-9supplied/not supplied, 1-5
CAD, demo, 1-22calibration. See recalibrationCancel key, 6-2cancelling a page, 6-2cartridge alignment procedure, 3-30Cartridge check, 3-25cartridge stalls, 1-18–1-19, 3-28–3-30cartridges
before replacing, 3-26
black only, 1-17colors, 1-4, 1-17, 1-18–1-19,3-28–3-30
environmental specifications, 11-4ink level, 3-25loading, 1-17–1-20ordering, 11-15part numbers, 11-15problems with, 9-7, 9-18removing tab, 3-29replacing, 3-25–3-30supplied, 1-4
choosing media, 3-2–3-7cleaning the printer, 8-2clearing the media path, 3-24clipped print, 9-12clipping, and page size, 4-6CMYK, 5-5color management, software, 1-33Color Management Kit, installationand setup, 1-34
color printing, media type for, 11-2color problems, 9-16–9-21color-vision deficiencies, advice forusers with, 1-18, 3-28
Color/Mono key, 5-11color/monochrome switching, 5-11colors
CMYK, 5-5RGB, 5-5
communications, problems, 9-9compensating for poorly cut media,3-20
components of printer, xiv–xvicomputer, connection to, 1-24–1-27conceptual pens, settings, 5-2–5-5configuration
changing, 1-27–1-31current front-panel, 7-3current overall, 7-2print current, 2-2setting parameter values, 2-7
connectorparallel, 1-25serial, 1-25
Copies, 6-8CorelDRAW!, 5-15
color quality, 9-15Create pattern, 7-6curl, on media, 9-5Current Configuration Print, 2-2, 5-4,7-3
cuttingand margins, 4-7immediately after printing, 6-2problems with, 9-5–9-6
Ddarkness of print, adjusting, 5-9Declaration of Conformity (EC),11-12
default page margins, 4-7Define palette, 5-6Delete page, 6-7demonstration prints, 1-21–1-23Demos, 1-22device lists, 1-35dimensions of printer, 11-3display, front panel, 2-3display keys, 2-3, 2-6documentation, 11-13, 11-16
map, D-1down arrow key, 2-6driver, choice of, 1-34–1-35drivers, 1-32, 1-34–1-35, 11-14
supplied, 1-4drying time, 3-21–3-22
adjusting, 3-22duty cycle, 11-4
Eelectrical specifications, 11-4EMC (electromagnetic compatibility),11-5, 11-10
enlarging an image, 4-13Enter key, 2-6EPS files, 1-34, 9-14
Ffast track, 1-2file size and memory usage, 9-22,11-3
filled area problems, 9-19film, 11-2finding information, ii
IND
EX
Index
Downloaded from www.Manualslib.com manuals search engine
I-2
This is the cyan on page I-2 (seq: 208)
This is the black on page I-2 (seq: 208)
Company confidential. Postillo/755CM User’s Guide Final Freeze Status: Frozen
firmware, supplied, 1-34Form Feed and Cut key, 3-24, 6-2, 6-4
to clear the media path, 9-8front panel, 2-2
action keys, 2-2display section, 2-3messages, 10-2–10-6printing mode keys, 2-2problems with, 9-21–9-22status lights, 2-2
Front Panel Menus print, printing, 2-4front view of printer, xiv
Ggaps in lines, 9-16, 9-17gaps in solid areas, 9-16getting help, 9-25graphics languages, 11-3
and networks, 7-8changing, 7-7
Hheavyweight media, 11-2help, 9-25–9-27HP DesignJets, other, 1-35HP JetDirect, 1-24HP RTL, 7-7
documentation, 11-13, 11-16HP Special Inkjet Paper, 3-3HP Special Inkjet paper, 11-2HP-GL (7586B), 7-7HP-GL/2, 7-7
documentation, 11-13, 11-16humidity specifications, 11-4
II/O Setup, 7-9I/O timeout, changing, 7-9images, problems printing, 9-14ink problems, 9-16–9-21installation. See setting upinterface
parallel specifications, 11-7problems, 9-9serial, 9-3serial specifications, 11-7specifications, 11-7–11-8with application software, 9-3
introduction to printer, xi
Jjagged lines, 9-18jammed media, 9-8–9-9
Kkeys
Access Cartridges, 1-17, 3-27action, 2-2Cancel, 6-2Color/Mono, 5-11display, 2-3, 2-6down arrow, 2-6Enter, 2-6Form Feed and Cut, 3-24, 6-2, 6-4Pause, 6-3Previous, 2-6Print Quality, 5-14printing mode, 2-2up arrow, 2-6
LLAN, 1-24Lang, 7-7languages (graphics), 11-3
and networks, 7-8changing, 7-7documentation, 11-16
languages (human)changing, 1-6manuals available in, 11-13
lever, for media jam, 9-8–9-9light, effect of, 3-8Lightness (of print), adjusting, 5-9line quality problems, 9-16–9-21loading media
roll, 3-9–3-16sheet, 3-17–3-20
Local Area Network, 1-24long-axis prints, problems with, 9-12
MMacintosh
cables to connect, 11-8drivers, 1-34
Maintenance advised, 8-3managing prints
before printing, 6-4
during printing or drying, 6-2manuals, 11-13, 11-16, D-1margins, 4-7, 11-2
and cutting, 4-7and nesting, 6-12
margins (printing areas), 11-6maximum media sizes, 11-2Measure pattern, 7-6media
adjusting drying time, 3-22and print quality, 3-6care of, 3-8cost and color support, 3-5curled, 9-5drying time, 3-21environmental specifications, 11-4guidelines for loading, 3-8handling, 3-8handling problems, 9-4important points, 3-2leading edge, 9-5loading problems, 9-4loading roll, 3-9–3-16loading sheet, 3-17–3-20physical characteristics, 3-4poorly cut, 3-20roll. See roll mediaselecting, 3-2–3-7, 3-14–3-15,3-18–3-19
sheet orientation, 3-17sizes and printing areas, 11-6sizes supported, 11-2skew tolerance, 3-20supplied, xii, 1-4supplies, 11-14trimming roll, 3-13type for application, 3-7types supported, 3-3, 11-2unloading, 3-21–3-24
media bin, 3-8stacking problems, 9-6
Media bypass. See skew tolerancemedia jam, 9-8–9-9media types supported, 11-2memory, xvi, 11-3, 11-14memory usage and file size, 9-22,11-3
Index
Downloaded from www.Manualslib.com manuals search engine
I-3
Company confidential. Postillo/755CM User’s Guide Final Freeze Status: Frozen
This is the cyan on page I-3 (seq: 209)
This is the black on page I-3 (seq: 209)
menu graphics, 2-8Menu mode, changing, 1-28menu print, printing, 2-4menu system
entering, 2-5navigating, 2-6–2-8navigation examples, 2-10–2-12printing, 2-4
Merge, 5-8messages, front panel, 10-2–10-6Microsoft Windows
driver, 11-14drivers, 1-34, 11-14notes on use with, 1-34
minimum media sizes, 11-2Mirroring an image, 4-12monochrome, printing color in, 5-10monochrome/color switching, 5-11Move to top, 6-7MSDS (Material Safety Data Sheet),11-10
NNest, 6-11Nest wait, 6-11nesting
algorithms, 6-11and margins, 6-12and page size, 6-12and Rotate, 6-12interaction with queue, 6-11optimizing, 6-12order, 6-11overview, 6-9requirements, 6-10sets, 6-11
network, xviconnections, 1-24
no print?, 9-23non-PostScript, drivers, 1-34–1-35,11-14
Normal usage, 8-3nozzle blockages, 9-16
Ooptions. See accessoriesordering accessories, 11-13output
cancelling, 6-2management before printing, 6-4
overlapping lines, treatment of, 5-8overlay of one print on another, 9-14
Ppage
cancelling, 6-2copying in a queue, 6-8deleting from a queue, 6-7identifying in a queue, 6-6prioritizing in a queue, 6-7
Page format, Rotate. See solvingproblems
Page ID, 6-6page information, 6-7page margins, 4-7page size, 4-2–4-5
adjusting, 4-3–4-4and clipping, 4-6and nesting, 4-6, 6-12
Palette, 5-5, 5-7palette
changing current selection, 5-7changing settings, 5-6
Palette Demo, 5-5PANTONE, 1-33paper, clearing jammed. See mediaparameter values, setting, 2-7part numbers, 11-13Pause key, 6-3pausing between prints, 6-3PCs, cables to connect, 11-8pen, settings, have no effect, 9-14pens, limiting exposure, 3-26pens (conceptual), colors, 5-5pens (logical)
current palette settings, 5-4settings, 5-2–5-5
pens (physical). See cartridgesphysical specifications, 11-3pin-outs, 11-7–11-10PJL, 7-8
documentation, 11-13plot resolution, quality, 9-15polyester film, 11-2ports
on computer, 1-25
on printer, 1-25PostScript, 1-34, 7-7
demo, 1-22drivers, 1-34, 11-14on UNIX, 1-37
PostScript/non-PostScript, featuresapplicable, xiii
powercord, 1-4, 1-6socket, 1-6supply, 1-6switch, 1-7
power specifications, 11-4Previous key, 2-6print
blank, 9-10cancelling, 6-2clipped, 9-12content problems, 9-10–9-16distorted, 9-14management before printing, 6-4management during printing, 6-2position problems, 9-10–9-16unexpected, 9-15
print appearance, controlling, 5-2print cartridges. See cartridgesPrint quality, sharpen lines, 5-15print quality
and banding, 9-20changing, 5-14choosing, 5-12
Print Quality key, 5-14print quality problems, 9-16–9-21print spooler, UNIX, 1-37printer
components, xiv–xviviews of, xiv–xvi
printing area, 11-6printing mode keys, 2-2problem-solving. See troubleshootingprogramming documentation, 11-16programming languages, 11-3
Qquality problems, 9-16–9-21Queue, 6-5
copy page in, 6-8deleting a page from, 6-7
Index
IND
EX
Downloaded from www.Manualslib.com manuals search engine
I-4
This is the cyan on page I-4 (seq: 210)
This is the black on page I-4 (seq: 210)
Company confidential. Postillo/755CM User’s Guide Final Freeze Status: Frozen
identifying a page in, 6-6interaction with nesting, 6-11management, 6-4–6-8page information, 6-7prioritizing a page, 6-7
queue, cancelling a page, 6-2queueing, 6-5quick setup, 1-2
RRear view of printer, xvRecalibrate, 7-6recalibration
for accuracy, 7-5–7-7restoring factory settings, 7-6
Receiving light, 1-23regulations
Declaration of Conformity (EC),11-12
EMC, 11-5notices, 11-10–11-13safety, 11-5
regulatory notices, 11-10–11-13replacing cartridges, 3-25reprinting an image, 6-2Restore factory, 7-6RGB, 5-5roll media
handling, 3-8loading, 3-9–3-16stacking problems, 9-6trimming, 3-13
Rotateand nesting, 6-12interaction with software, 4-10problems with, 9-21
Rotating a drawing, 4-8–4-10RS-232-C, 7-9RS-232-C, specifications, 11-7RTL documentation, 11-13, 11-16
Ssafety, MSDS, 11-10safety specifications, 11-5Samples, 1-22scaling an image, 4-13selecting media, 3-14–3-15,3-18–3-19
serial interfacechanging settings, 7-9configuring, 1-26–1-31
Service config, 7-5, 8-4print, 8-4
setting upchecklist, 1-3fast track (quick setup), 1-2full instructions, 1-3–1-40items required, 1-4
shadows of color, 9-18Sharp lines, 5-15
CorelDRAW!, 5-15troubleshooting, 9-15
sheet medialoading, 3-17–3-20orientation, 3-17
sheet sizes supported, 11-2side-by-side prints. See nestingsignal specifications, 11-7Size, 4-4size, printer, 11-3size of image, scale, 4-13sizes of media supported, 11-2skew tolerance, 3-20slow printing, 9-23smears, 9-20software
setting up, 1-32–1-35supplied, 1-4, 1-34
Software Application Notes, 11-13sound levels, 11-4special inkjet paper, 3-3, 11-2specification, accuracy, 11-3specifications, 11-2–11-7
acoustic, 11-4electromagnetic, 11-5EMC, 11-5environmental, 11-4functional, 11-2, 11-3interface, 11-7–11-8physical, 11-3power, 11-4safety, 11-5
speed problems, 9-23Statistics, 6-7, 7-2status lights, 2-2
storing prints, 3-8Sun, cables to connect, 11-9supplies. See accessoriesSupplies Source Catalog, 11-14support, 9-25–9-27support services, 11-13
Ttemperature specifications, 11-4test file, printing, 1-36testing the printer, 9-3TFTP, 1-37timeout, overriding, 6-4translucent, 11-2trimming roll media, 3-13troubleshooting, 9-1
Access Cartridges key, 9-7automatic cutter, 9-5–9-6lightfastness, 3-8long-axis prints, 9-12media bin, 9-6media handling, 9-4media jam, 9-8–9-9media loading, 9-4miscellaneous problems, 9-23–9-25print content, 9-10–9-16print position, 9-10–9-16print quality problems, 9-16–9-21procedure, 9-2–9-3Rotate, 9-21stacking media in bin, 9-6
UUNIX systems, cables to connect, 11-9UNIX tips, 1-37unloading media, 3-21–3-24unprinted sheet, removing, 3-24up arrow key, 2-6
Vvellum, 11-2
Wwarped lines, 9-18weights, 11-3Windows applications
driver, 11-14drivers, 1-34, 11-14
workstation, cables to connect, 11-9
Index
Downloaded from www.Manualslib.com manuals search engine
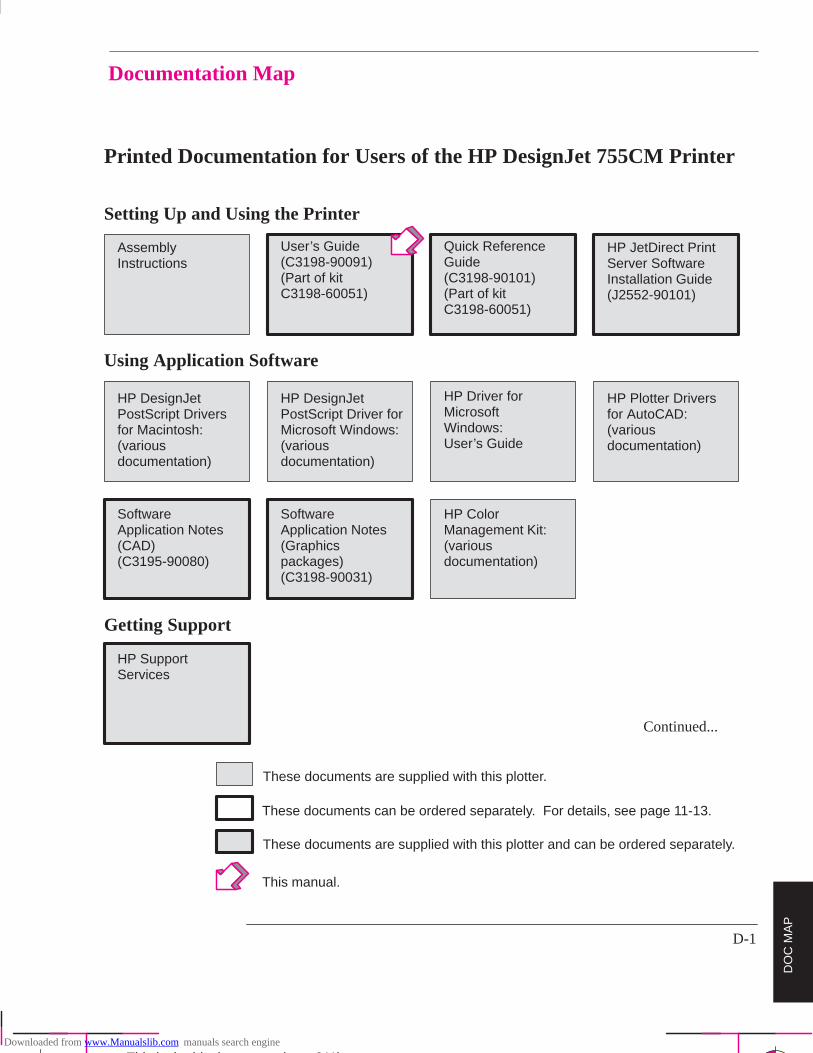
D-1
Company confidential. Postillo/755CM User’s Guide Final Freeze Status: Frozen
This is the cyan on page (seq: 211)
This is the black on page (seq: 211)
Printed Documentation for Users of the HP DesignJet 755CM Printer
Setting Up and Using the Printer
AssemblyInstructions
User’s Guide(C3198-90091)(Part of kitC3198-60051)
Quick ReferenceGuide(C3198-90101)(Part of kitC3198-60051)
HP JetDirect PrintServer SoftwareInstallation Guide(J2552-90101)
Using Application Software
SoftwareApplication Notes(CAD)(C3195-90080)
HP DesignJetPostScript Driversfor Macintosh:(variousdocumentation)
HP Driver forMicrosoftWindows: User’s Guide
HP ColorManagement Kit:(variousdocumentation)
SoftwareApplication Notes(Graphicspackages)(C3198-90031)
HP Plotter Driversfor AutoCAD: (variousdocumentation)
HP DesignJetPostScript Driver forMicrosoft Windows: (variousdocumentation)
Getting Support
HP SupportServices
Continued...
These documents are supplied with this plotter.
These documents can be ordered separately. For details, see page 11-13.
This manual.
These documents are supplied with this plotter and can be ordered separately.
DO
C M
AP
Documentation Map
Downloaded from www.Manualslib.com manuals search engine

D-2
Company confidential. Postillo/755CM User’s Guide Final Freeze Status Frozen
This is the cyan on page (seq: 212)This is the black on page (seq: 212)
Programmer’s Reference
The ProductComparison Guidefor HP-GL/2 and HP RTL Peripherals(5959-9734)
HP-GL/2 and RTLProgrammer’sReference Guide(5959-9733)
PJL TechnicalReference Manual(5961-0938)
These documents are supplied with this plotter.
These documents can be ordered separately. For details, see page 11-13.
This manual.
These documents are supplied with this plotter and can be ordered separately.
Documentation Map
Downloaded from www.Manualslib.com manuals search engine

Please Give Us Your Feedback on the Quality of This Documentation
Circle the appropriate score
Overall ease of use of this manual
Overall ease of use of the Quick Reference Guide
Use of language in both documents
Use of graphics in both documents
Please explain any low score:
Any other comments on any of the documentation accompanying the plotter:
1 2 3 4 5
1 2 3 4 5
1 2 3 4 5
1 2 3 4 5
Poor � � � Excellent
Cut
her
e
Name:
Organization:
Address:
Job Title:
Phone:
If mailing to the addressin the USA (see over), fillout this sheet .
If mailing to the address inSpain, fill out the othersheet .
Thank youC3198-90091
Alternatively, you can fax thisform to:USA (1) 619 655 6640,Attn: HP DesignJet MarketingDept. orSpain (34) 3 582 1400,Attn: Learning Products Dept.
Company confidential. Postillo/755CM User’s Guide Final Freeze Status: Frozen
This is the black on page (seq: 213)This is the cyan on page (seq: 213)
Downloaded from www.Manualslib.com manuals search engine
HP DesignJet Marketing CenterHewlett-Packard CompanyBuilding #716399 West Bernardo DriveSan Diego, CA 92127U.S.A.
BUSINESS REPLY MAILFIRST CLASS MAIL PERMIT NO. 24343 SAN DIEGO, CA
POSTAGE WILL BE PAID BY ADDRESSEE
NO POSTAGENECESSARY
IF MAILEDIN THE
UNITED STATES
�
� Fold here and then staple or tape the ends together �
� � � Any comments?
Company confidential. Postillo/755CM User’s Guide Final Freeze Status: Frozen
This is the black on page (seq: 214)This is the cyan on page (seq: 214)
Downloaded from www.Manualslib.com manuals search engine
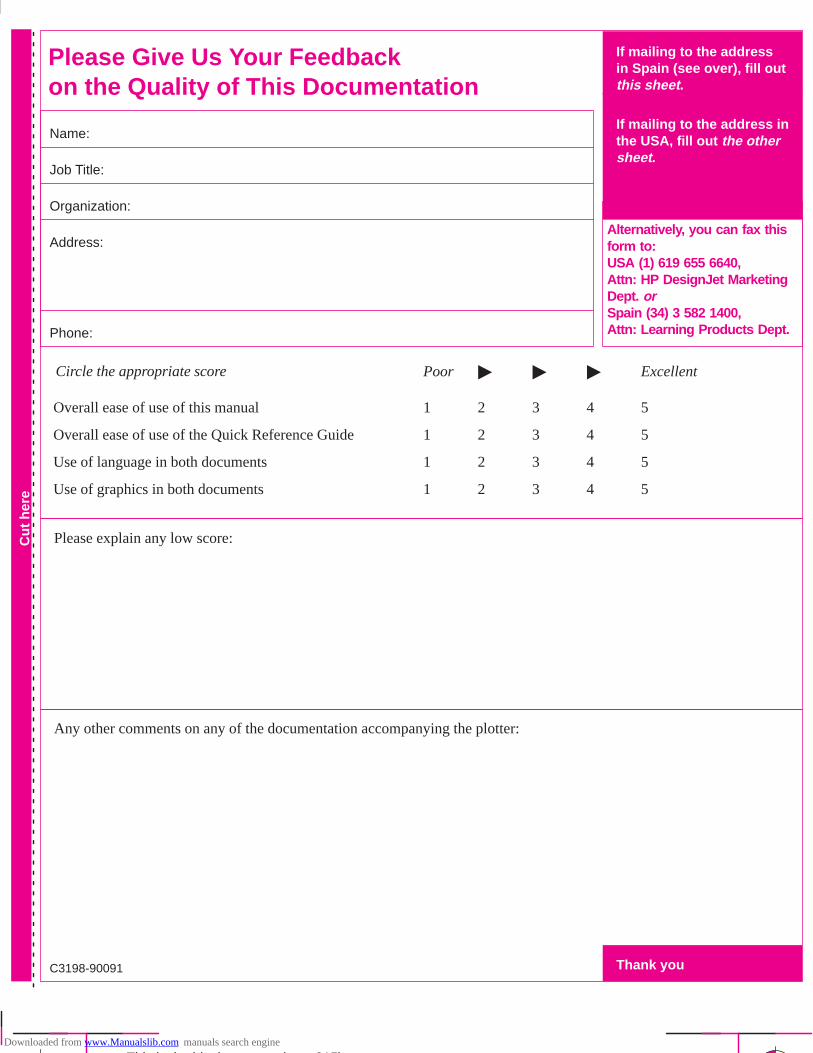
Please Give Us Your Feedback on the Quality of This Documentation
Circle the appropriate score
Overall ease of use of this manual
Overall ease of use of the Quick Reference Guide
Use of language in both documents
Use of graphics in both documents
Please explain any low score:
Any other comments on any of the documentation accompanying the plotter:
1 2 3 4 5
1 2 3 4 5
1 2 3 4 5
1 2 3 4 5
Poor � � � Excellent
Cut
her
e
Name:
Organization:
Address:
Job Title:
Phone:
Thank you
If mailing to the addressin Spain (see over), fill outthis sheet .
If mailing to the address inthe USA, fill out the othersheet .
C3198-90091
Alternatively, you can fax thisform to:USA (1) 619 655 6640,Attn: HP DesignJet MarketingDept. orSpain (34) 3 582 1400,Attn: Learning Products Dept.
Company confidential. Postillo/755CM User’s Guide Final Freeze Status: Frozen
This is the black on page (seq: 215)This is the cyan on page (seq: 215)
Downloaded from www.Manualslib.com manuals search engine
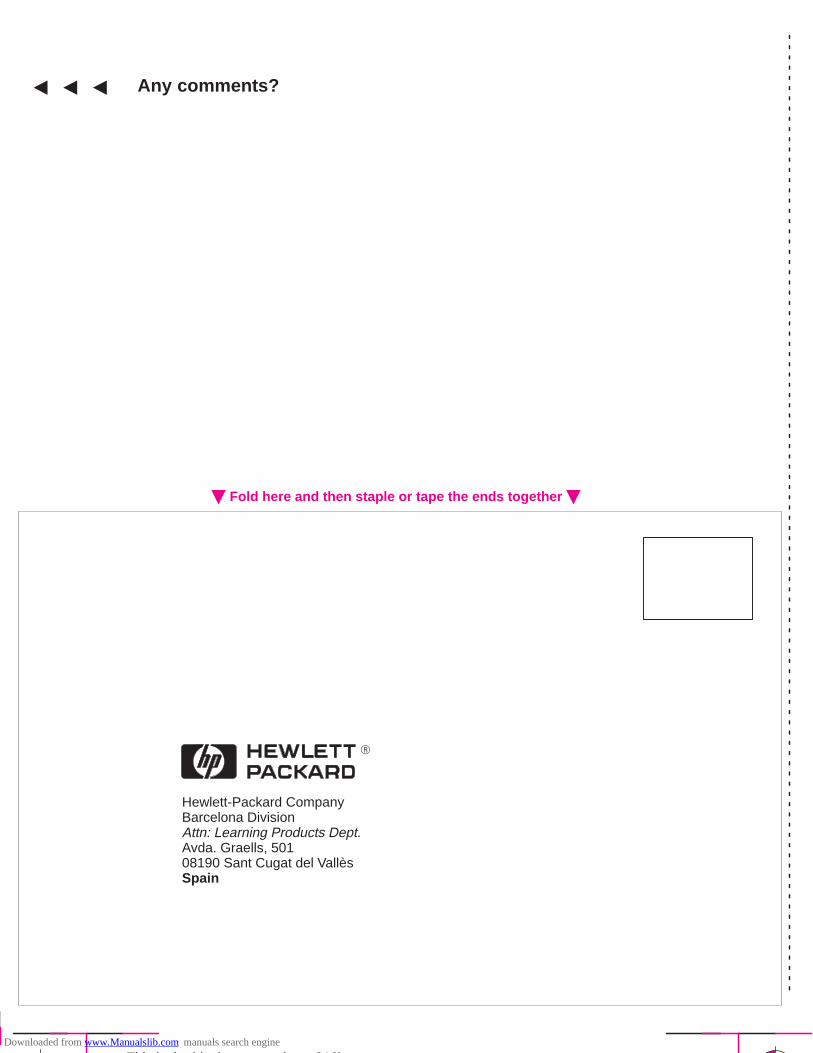
Hewlett-Packard CompanyBarcelona DivisionAttn: Learning Products Dept.Avda. Graells, 50108190 Sant Cugat del VallèsSpain
�
� Fold here and then staple or tape the ends together �
� � � Any comments?
Company confidential. Postillo/755CM User’s Guide Final Freeze Status: Frozen
This is the black on page (seq: 216)This is the cyan on page (seq: 216)
Downloaded from www.Manualslib.com manuals search engine
Company confidential. Postillo/755CM User’s Guide Final Freeze status: Frozen.
????????????Phone
For support details, see the section “ Getting help” in chapter 9.
HP CustomerSupportin the
(208) 323 2551Phone
USA
This is the black on the inside back cover
����� ��������
�*"8�"�. �*8�&0"��.!3�." ��..�*05
�4 ",0 3%"* ,1. %�/"!�/ ,�.0 +# � /5/0")��"3("008�� '�.! 3�..�*0/5+1. $.�,%& / ,".&,%".�(%�.!3�." ,.+!1 0 �$�&*/0!"#" 0/ &* )�0".&�(/ �*!3+.')�*/%&, #+. � ,".&+!+# +*" 5"�. #.+) ." "&,0�5 0%" "*! 1/". �,.++# +#,1. %�/" ."-1&."!�� �# ��." "&2"/ *+0& " +# /1 %!"#" 0/ !1.&*$ 0%"3�..�*05 ,".&+!� �� 3&(("&0%".� �0 &0/ +,0&+*�.",�&. +. .",(� " ,.+!1 0/0%�0 ,.+2" 0+ �"!"#" 0&2"�
�%+1(! �� �" 1*��(" 0+.",�&. +. .",(� " 0%",.+!1 0 3&0%&* �."�/+*��(" �)+1*0 +#0&)"� 0%" 1/0+)".�/�(0".*�0&2" "4 (1/&2".")"!5 /%�(( �" ."#1*! +#0%" ,1. %�/" ,.& " 1,+*."01.* +# 0%" ,.+!1 0�
�# 0%&/ ,.+!1 0 3�/,1. %�/"! �/ ,�.0 +# �*�� /5/0") &* � ++.!&*�0"! /%&,)"*0 +.�/ � /5/0") �!!8+*� &0 &/3�..�*0"! �$�&*/0 !"#" 0/&* )�0".&�( �*!3+.')�*/%&, !1.&*$ 0%"/�)" ,".&+! �/ 0%" ��/5/0")�
����������
�%" ��+2" 3�..�*05 /%�((*+0 �,,(5 0+ !"#" 0/."/1(0&*$ #.+) &),.+,".+. &*�!"-1�0")�&*0"*�* " �5 1/0+)".� 1/0+)".8/1,,(&"!/+#03�." +. &*0".#� &*$�1*�10%+.&6"!)+!&#& �0&+* +. )&/1/"�+,".�0&+* +10/&!" +# 0%""*2&.+*)"*0�(/," &#& �0&+*/ #+. 0%",.+!1 0� +,".�0&+* +#*+*8/1,,+.0"! )"!&�� +.&),.+,". /&0" ,.",�.�0&+*�*! )�&*0"*�* "�1/�$" "4 ""!&*$ 0%",.+!1 0 3�..�*05 (&)&0/�/"" ,�$" �8��
����� ����������
�� )�'"/ *+ +0%".3�..�*05� "&0%"."4,."//"! +. &),(&"!�3&0% ."/," 0 0+ 0%&/,.+!1 0� �� /," &#& �((5!&/ (�&)/ 0%" &),(&"!3�..�*0&"/ +#)". %�*0��&(&05 �*!#&0*"// #+. � ,�.0& 1(�.,1.,+/"� �+)" /0�0"/ +.,.+2&* "/ !+ *+0 �((+3(&)&0�0&+*/ +* 0%"!1.�0&+* +# �* &),(&"!3�..�*05� /+ 0%" ��+2"(&)&0�0&+* +. "4 (1/&+*)�5 *+0 �,,(5 0+ 5+1��+3"2".� �*5 &),(&"!3�..�*05 +#)". %�*0��&(&05 +. #&0*"//&/ (&)&0"! 0+ 0%" +*"85"�.!1.�0&+* +# 0%&/ 3.&00"*3�..�*05�
�%&/ 3�..�*05 $&2"/ 5+1/," &#& ("$�( .&$%0/� �*!5+1 )�5 �(/+ %�2" +0%"..&$%0/ 3%& % )�5 2�.5#.+) /0�0" 0+ /0�0"� +.,.+2&* " 0+ ,.+2&* "�
�������� ������� ������
����� �����
�# 5+1. %�.!3�." /%+1(!#�&( !1.&*$ 0%" 3�..�*05,".&+!� ."�! 0%"7�.+1�("/%++0&*$�/" 0&+* &* 0%&/ $1&!"� 0%"* +*0� 0 5+1. (+ �(�"3("008�� '�.! ��("/�*! �1,,+.0 �##& " +. �*�10%+.&6"! �� �"./+*�(�+),10". �"�(". �",�&.�"*0". �*! �..�*$" #+.+*8/&0" .",�&. +# 0%",.+!1 0� �"0�&* ,.++# +#,1. %�/" &* +.!". 0++�0�&* 3�..�*05 /".2& "�
�# � /".2& " �(( &/,.+),0"! �5 0%"���&*0"*�* " �!2&/"!�)"//�$" �/"" ,�$" �8�� &0&/ *+0 +2"."! 1*!". 0%&/3�..�*05�
����� ��� �����
�����
�# 5+1. %�.!3�." /%+1(!#�&( �#0". 0%" 3�..�*05,".&+!� ."�! 0%" ,.+�(")/+(2&*$ /" 0&+*/ &* 0%&/$1&!"� 0%"* +*0� 0 �*�10%+.&6"! �� �"./+*�(�+),10". �"�(". �",�&.�"*0". +. �(( �* ����("/ �*! �1,,+.0 �##& "#+. !"0�&(/ +# 0%" /".2& "/�2�&(��("� �# 5+1 %�2" �*�� ��&*0"*�* "�$."")"*0� ."-1"/0/".2& " 1*!". 5+1.�$."")"*0�
����� ���� � �����
�!&0&+* !�0"/ �." �/#+((+3/
�/0 "!&0&+*��",0")�". ���
�"3 "!&0&+*/ �." +),("0" ."2&/&+*/ +# 0%")�*1�(� �%�*$" /%""0/�3%& % )�5 �" &//1"!�"03""* "!&0&+*/� +*0�&*�!!&0&+*�( &*#+.)�0&+*��%" !�0"/ +* 0%" 0&0(",�$" %�*$" +*(5 3%"* �*"3 "!&0&+* &/ ,1�(&/%"!��&*+. +.." 0&+*/ 0%�0 !+*+0 �##" 0 0%" #1* 0&+* +#0%" ,.+!1 0 )�5 �" )�!"�0 .",.&*0 3&0%+10 � %�*$" 0+ 0%" ,.&*0 !�0"�
��*5 ,.+!1 0 1,!�0"/�*! #&4"/ !+ *+0 ."-1&.")�*1�( %�*$"/ �*!� +*2"./"(5� )�*1�( +.." 0&+*/ )�5 �" !+*"3&0%+10 � +),�*5&*$,.+!1 0 %�*$"/��%"."#+."� !+ *+0 "4," 0� +*" 0+ +*" +.."/,+*!"* " �"03""*,.+!1 0 1,!�0"/ �*!)�*1�( ."2&/&+*/�
Downloaded from www.Manualslib.com manuals search engine
Company confidential. Postillo/755CM User’s Guide Final Freeze status: Frozen.
This is the black on outside back cover
This is the PANTONE 1665C on outside back cover
This is the PANTONE 157C on the outside back cover
Customer re-order number: C3198-60051
Manual Part Number: C3198-90091Edition 1, September 1996
EnglishPrinted in Europe
This manual has been printed on chlorine-free bleached paper
C
�
CC
Downloaded from www.Manualslib.com manuals search engine


