dp-c262/c322(for embedded web launcher and web server)
TRANSCRIPT
App
endi
xEm
bedd
ed
Web
Ser
ver
Embe
dded
Web
Lau
nche
rG
ener
al D
escr
iptio
nSy
stem
Req
uire
men
ts
SoftwareOperating Instructions
(For Embedded Web Launcher and Web Server)
Model No. DP-C262/C322
Before using this software, please read these instructions completely and keep these operating instructions for future reference.
English
2
The following trademarks and registered trademarks are used throughout this manual:
Microsoft, MS-DOS, Windows, Windows NT and Windows Server are either registered trademarks or trademarks of Microsoft Corporation in the USA and other countries.i386, i486, Celeron, Intel Centrino and Pentium are trademarks of Intel Corporation.The USB-IF Logos are trademarks of Universal Serial Bus Implementers Forum, Inc.TrueType is a registered trademark of Apple Computer, Inc.Novell, NetWare, IntranetWare, NDS are registered trademarks of Novell, Inc. in the USA and other countries.PEERLESSPageTM is a trademark of the PEERLESS Systems Corporation; and,PEERLESSPrint and Memory Reduction Technology R are registered trademarks PEERLESSSystems Corporation; and, COPYRIGHT c 2002 PEERLESS Systems Corporation.Universal Font Scaling Technology (UFST) and all typefaces have been licensed from Agfa Monotype.PCL is a trademark of Hewlett-Packard Company.Adobe, Acrobat, Adobe Reader, Adobe Type Manager, PostScript, PostScript 3 and Reader are either registered trademarks or trademarks of Adobe Systems Incorporated in the United States and/or other countries.All other product/brand names, trademarks or registered trademarks identified herein are the property of their respective owners.
c 2005 Panasonic Communications Co., Ltd. All Right Reserved.Unauthorized copying and distribution is a violation of law.Published in Japan.
The contents of these Operating Instructions are subject to change without notice.

3
Table of Contents
General Description .......................................... 4System Requirements ....................................... 6Embedded Web Launcher.................................. 8
Main Window.............................................................................................. 9Searching Devices ..................................................................................... 12Accessing Embedded Web from the Embedded Web Launcher ............... 14Accessing Embedded Web from the Device Explorer................................ 15
Embedded Web Server ...................................... 18Screen Layout of the Embedded Web Page .............................................. 18Menu Structure........................................................................................... 20Status Menu ............................................................................................... 23Device Menu .............................................................................................. 24Network Menu ............................................................................................ 35Device Configuration Menu ........................................................................ 49Network Configuration Menu...................................................................... 55Language Menu ......................................................................................... 76Links Menu ................................................................................................. 77Scanner Image Box Menu.......................................................................... 79
Appendix............................................................ 82Troubleshooting.......................................................................................... 82
4
General D
escription
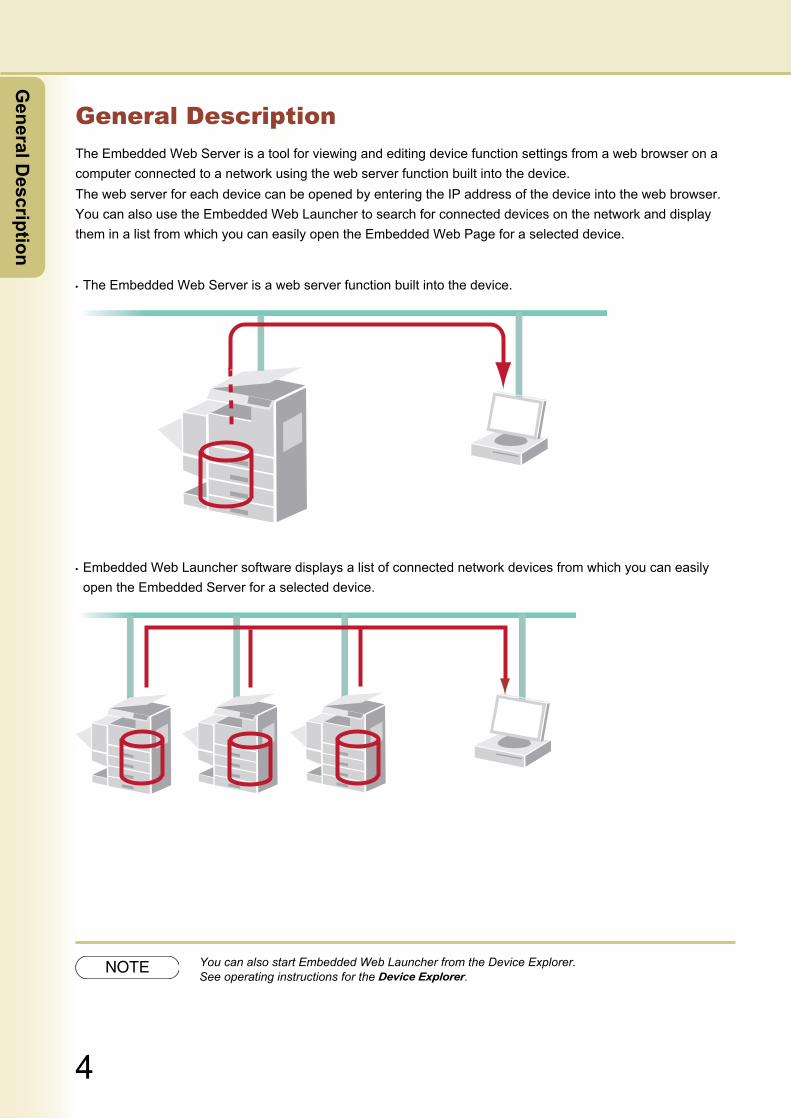
General DescriptionThe Embedded Web Server is a tool for viewing and editing device function settings from a web browser on a computer connected to a network using the web server function built into the device.The web server for each device can be opened by entering the IP address of the device into the web browser. You can also use the Embedded Web Launcher to search for connected devices on the network and display them in a list from which you can easily open the Embedded Web Page for a selected device.
The Embedded Web Server is a web server function built into the device.
Embedded Web Launcher software displays a list of connected network devices from which you can easily open the Embedded Server for a selected device.
NOTE You can also start Embedded Web Launcher from the Device Explorer. See operating instructions for the Device Explorer.
5
Gen
eral
Des
crip
tion
General DescriptionHow to Access the Embedded Web Page
The following two methods can be used to access the Embedded Web Page.
1. Access directly from the Device ExplorerThis opens the Embedded Web Page directly from the Device Explorer. This is the recommended method.The procedure is described in "Accessing Embedded Web from the Device Explorer" on page 15.
Note:When this procedure is used, the Embedded Web Launcher runs in the background and does not appear on the screen.
2. Start the Embedded Web Launcher, and then access the page Start the Embedded Web Launcher, search for devices, and then open the Embedded Web Page. The
procedure is described in "Accessing Embedded Web from the Embedded Web Launcher" on page 14.
6
System R
equirements
7
Syst
em R
equi
rem
ents
System RequirementsThe system requirements for the Embedded Web Launcher and the Embedded Web Page editing function are as follows.
Embedded Web Launcher
Embedded Web Page
*1 Microsoft® Windows® 98 operating system (hereafter Windows 98)*2 Microsoft® Windows® Millennium Edition operating system (hereafter Windows Me)*3 Microsoft® Windows NT® operating system Version 4.0 (hereafter Windows NT 4.0)*4 Microsoft® Windows® 2000 operating system (hereafter Windows 2000)*5 Microsoft® Windows® XP operating system (hereafter Windows XP)*6 Microsoft® Windows Server ™ 2003 operating system (hereafter Windows Server 2003)
Operating System : Windows 98*1, Windows Me*2, Windows NT 4.0*3 (With Service Pack 3 or later is required), Windows 2000*4, Windows XP*5, Windows Server 2003*6
Personal Computer : IBM PC/AT and compatibles (CPU Pentium II or greater is required, Pentium 4 or greater is recommended)
Port number : 80 (Standard port)
Supported browsers : Internet Explorer 5.01 or laterNetscape 7.0 or later
Operating System : Windows 98, Windows Me, Windows NT, Windows 2000, Windows XP, Windows Server 2003Mac OS 8.6/9.0/9.1/9.2, Mac OS X 10.1/10.2/10.3
Interface : 10Base-T/100Base-TX Ethernet port
CD-ROM Drive : Used for installing the software and utilities from the CD-ROM.
Free Disk Space : 200 MB or greater
System Memory : The minimum recommended Memory for each OS is as follows:
Windows 98, Windows Me : 128 MB or greater
Windows 2000, Windows XP, Windows NT 4.0, Windows Server 2003 : 256 MB or greater

6
System R
equirements
7
Syst
em R
equi
rem
ents
Memo
8
Embedded
Web Launcher
Embedded Web LauncherThis section describes the procedure for searching devices with the Embedded Web Launcher, and then accessing the Embedded Web Page on the device.
Note:For instructions on how to open the Embedded Web Page directly from the Device Explorer, refer to "Accessing Embedded Web from the Device Explorer" on page 15.
9
Embe
dded
Web
Lau
nche
r
Continued on the next page...
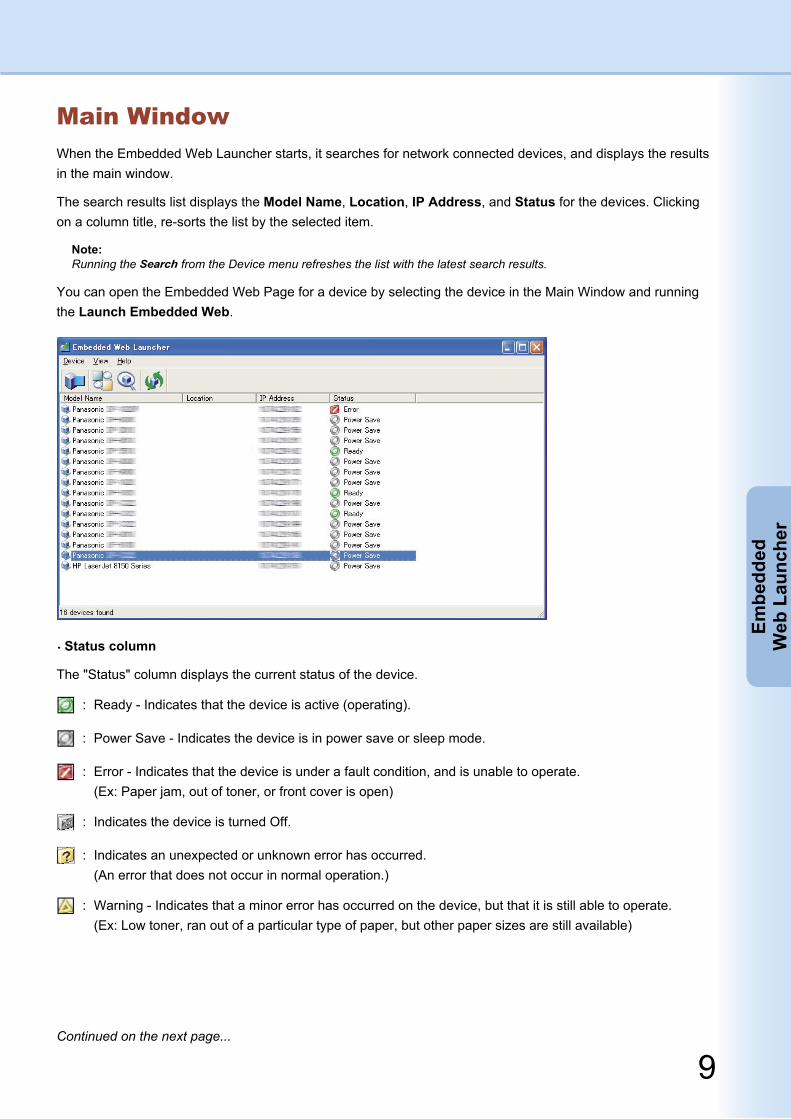
Main WindowWhen the Embedded Web Launcher starts, it searches for network connected devices, and displays the results in the main window.
The search results list displays the Model Name, Location, IP Address, and Status for the devices. Clicking on a column title, re-sorts the list by the selected item.
Note:Running the Search from the Device menu refreshes the list with the latest search results.
You can open the Embedded Web Page for a device by selecting the device in the Main Window and running the Launch Embedded Web.
Status column
The "Status" column displays the current status of the device.
: Ready - Indicates that the device is active (operating).
: Power Save - Indicates the device is in power save or sleep mode.
: Error - Indicates that the device is under a fault condition, and is unable to operate. (Ex: Paper jam, out of toner, or front cover is open)
: Indicates the device is turned Off.
: Indicates an unexpected or unknown error has occurred. (An error that does not occur in normal operation.)
: Warning - Indicates that a minor error has occurred on the device, but that it is still able to operate. (Ex: Low toner, ran out of a particular type of paper, but other paper sizes are still available)
10
Embedded
Web Launcher
Menu Menu Item Description
Device Launch Embedded Web Opens the Embedded Web Page for the selected device in the web browser.
Search Setting Specifies how to search for devices with the Embedded Web Launcher.
Search Search the network for devices, and refresh the window with the latest results.
Exit Exits the Embedded Web Launcher.
View Toolbar Large Icons Shows large icons in the toolbar.
Small Icons Shows small icons in the toolbar.
Hide Toolbar Hides the toolbar.
Refresh Updates the device Status column with the latest information.
Help Help Opens the help file.
About... Displays the information about the Embedded Web Launcher version information.
Main Window MenusSelect commands from the main window menu to perform the corresponding operation.
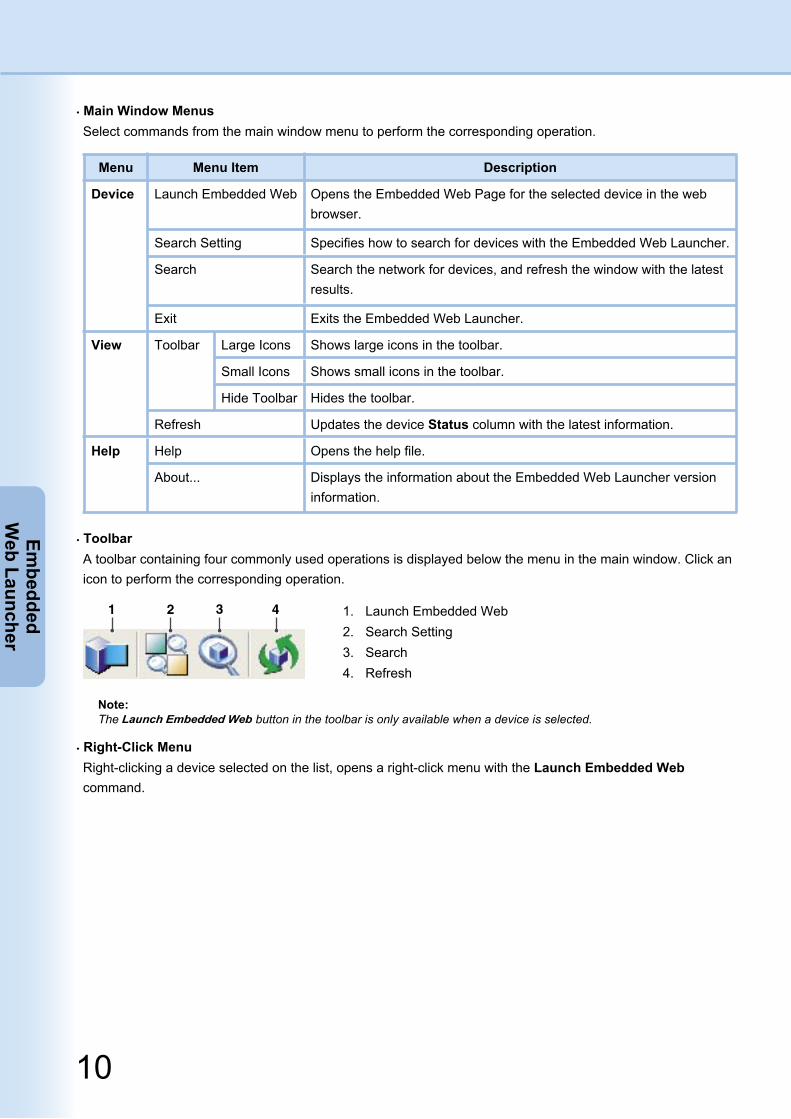
ToolbarA toolbar containing four commonly used operations is displayed below the menu in the main window. Click an icon to perform the corresponding operation.
1. Launch Embedded Web2. Search Setting3. Search4. Refresh
Note:The Launch Embedded Web button in the toolbar is only available when a device is selected.
Right-Click MenuRight-clicking a device selected on the list, opens a right-click menu with the Launch Embedded Web command.
11
Embe
dded
Web
Lau
nche
r
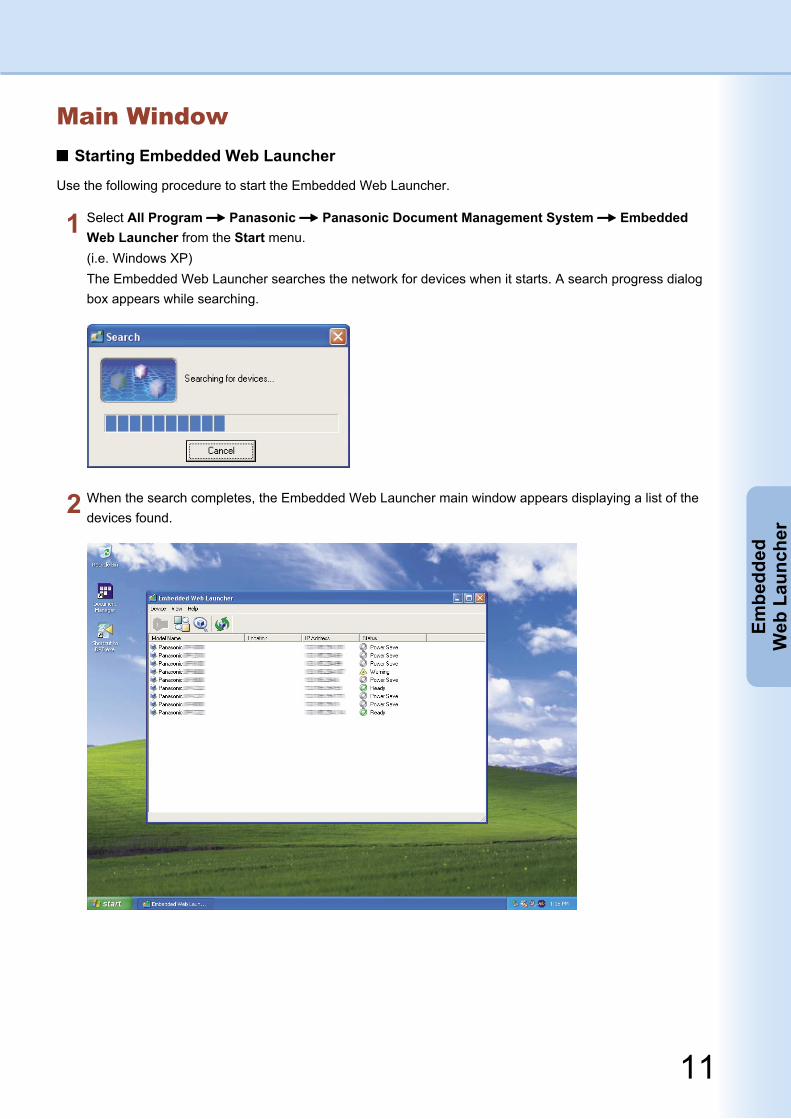
Main WindowStarting Embedded Web Launcher
Use the following procedure to start the Embedded Web Launcher.
Select All Program Panasonic Panasonic Document Management System Embedded Web Launcher from the Start menu.(i.e. Windows XP)The Embedded Web Launcher searches the network for devices when it starts. A search progress dialog box appears while searching.
When the search completes, the Embedded Web Launcher main window appears displaying a list of the devices found.
12
Embedded
Web Launcher
13
Embe
dded
Web
Lau
nche
r
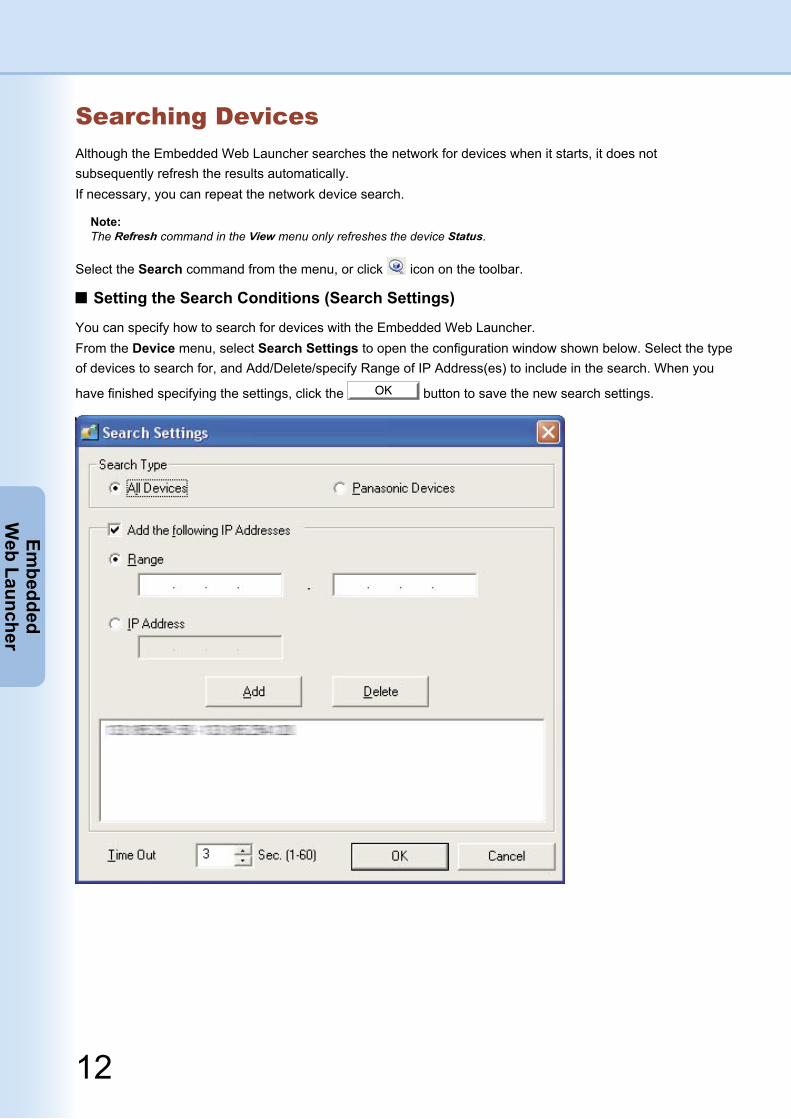
Searching DevicesAlthough the Embedded Web Launcher searches the network for devices when it starts, it does not subsequently refresh the results automatically.If necessary, you can repeat the network device search.
Note:The Refresh command in the View menu only refreshes the device Status.
Select the Search command from the menu, or click icon on the toolbar.
Setting the Search Conditions (Search Settings)
You can specify how to search for devices with the Embedded Web Launcher.From the Device menu, select Search Settings to open the configuration window shown below. Select the type of devices to search for, and Add/Delete/specify Range of IP Address(es) to include in the search. When you
have finished specifying the settings, click the OK button to save the new search settings.

12
Embedded
Web Launcher
13
Embe
dded
Web
Lau
nche
r
Item Setting
Search Type All Devices Select this option button to search for all devices including brands other than Panasonic. (Default)
Panasonic Devices Select this option button to search for Panasonic devices only.
Add the following IP Address
Select this check box to add IP Addresses or an IP Address Range for the search.
Range Specifies an IP Address Range for the search. Select the option button, and enter the starting & ending IP Address range directly.
IP Address Adds a single IP Address for the search. Select the option button, and enter a single IP Address directly.
Add button Adds the specified Range or IP Address for the search.Note:An error message appears if more than 255 IP Addresses or Ranges are specified.An error message appears if the same IP Address or Range is specified more than once.
Delete button Deletes an IP Address or Range.
Time Out Specify the communications timeout for searching. (1 to 60 seconds; default is 3 seconds)
NOTE Make sure that the Community Name (1) on the device is set to public when searching the network for devices. If the Community Name (1) is set to a different name, it will be excluded from the search.
14
Embedded
Web Launcher
Accessing Embedded Web from the Embedded Web LauncherWhen a device is found by the Embedded Web Launcher, open the Embedded Web Page to view, or modify the device settings.Select one of the four methods to open the Embedded Web Page for a device found with the Embedded Web Launcher.
Double-click on the device in the search list.
Select the device, and then select Launch Embedded Web from the Device menu.
Select the device, and then click icon on the toolbar.
Right click the device, and then select Launch Embedded Web from the right-click menu.
Note: You can open Embedded Web Pages for more than one device. In this case, each page is opened in a new web browser. An error appears if the device does not have an Embedded Web Page (web server function). You can open the Embedded Web Page for a device directly from the Device Explorer. See "Accessing Embedded Web from the Device Explorer" on page 15 for details.
15
Embe
dded
Web
Lau
nche
r
Continued on the next page...
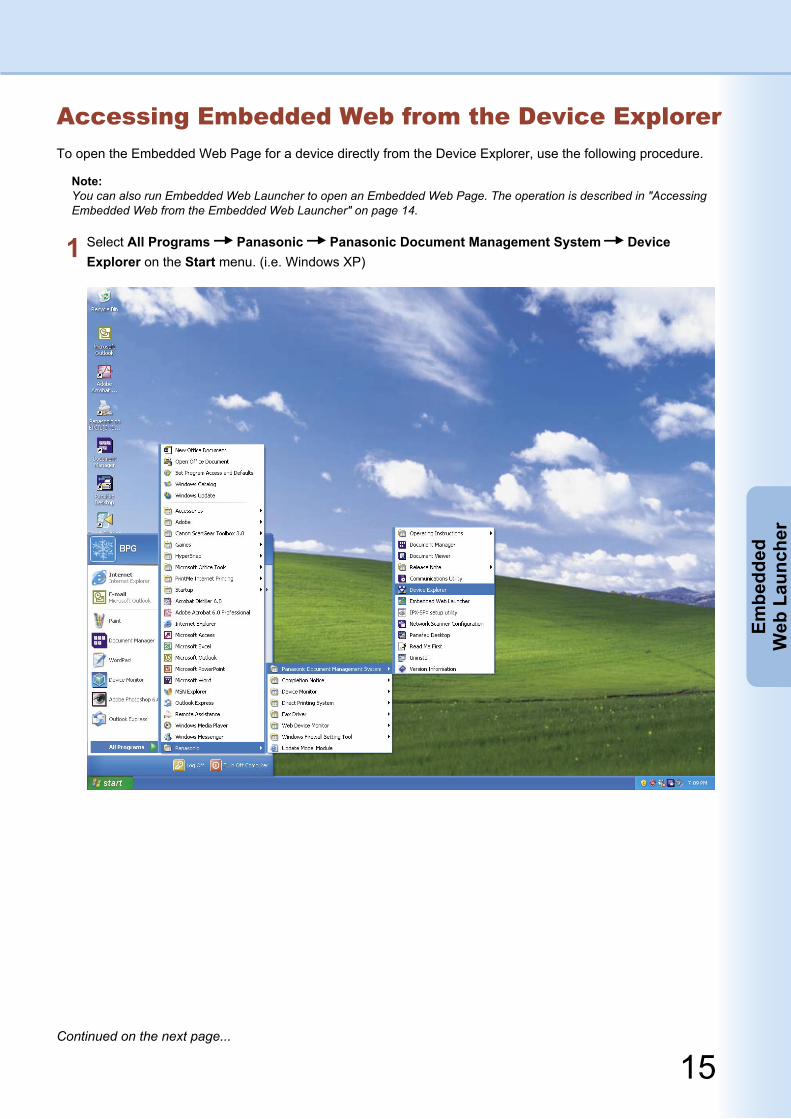
Accessing Embedded Web from the Device ExplorerTo open the Embedded Web Page for a device directly from the Device Explorer, use the following procedure.
Note:You can also run Embedded Web Launcher to open an Embedded Web Page. The operation is described in "Accessing Embedded Web from the Embedded Web Launcher" on page 14.
Select All Programs Panasonic Panasonic Document Management System Device Explorer on the Start menu. (i.e. Windows XP)
16
Embedded
Web Launcher
17
Embe
dded
Web
Lau
nche
r
Right-click the desired device, and then select Launch Embedded Web from the right-click menu.
If the web server on the device is accessed, the Embedded Web Page can be opened in a web browser.
Note: You can open the Embedded Web Page for more than one device. In this case, each page is opened in a new web browser.
An error appears if the device does not have an Embedded Web Page (web server function).
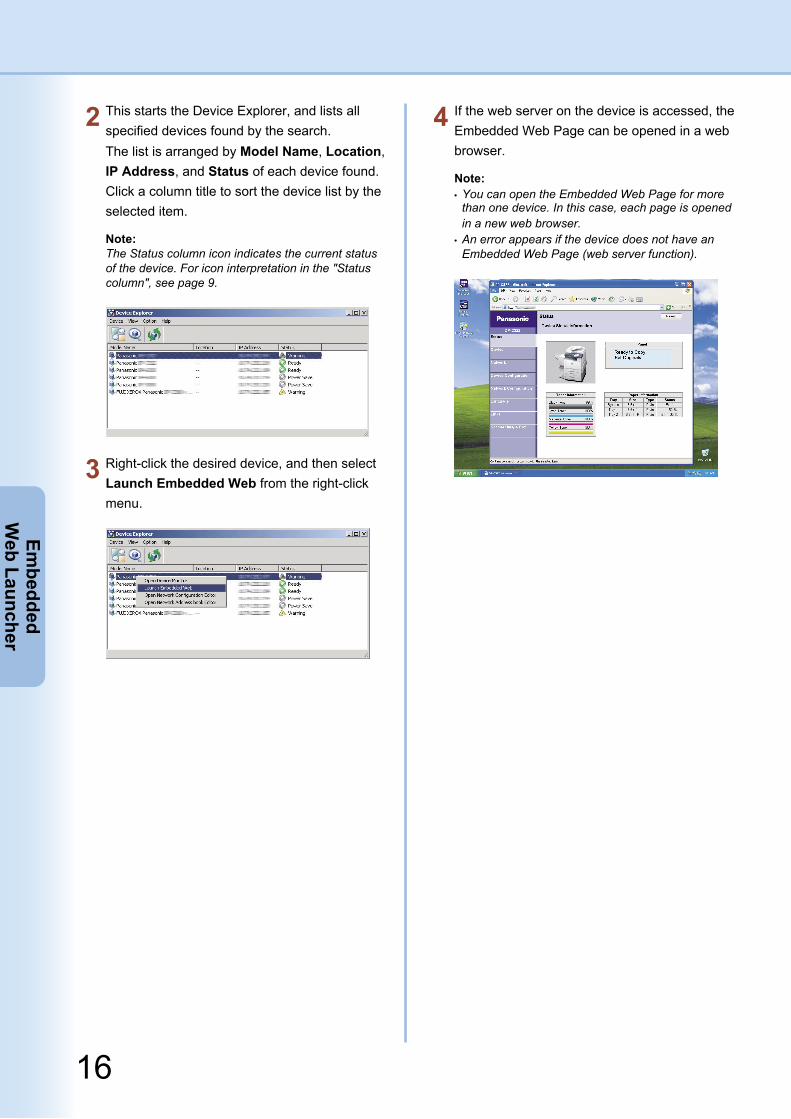
This starts the Device Explorer, and lists all specified devices found by the search.The list is arranged by Model Name, Location, IP Address, and Status of each device found. Click a column title to sort the device list by the selected item.
Note:The Status column icon indicates the current status of the device. For icon interpretation in the "Status column", see page 9.
16
Embedded
Web Launcher
17
Embe
dded
Web
Lau
nche
r
Memo

18
Embedded
Web Server
Screen Layout of the Embedded Web PageThe Embedded Web Page can be used to view device information, and to edit device settings.The left side of the Embedded Web Page contains the Model name, and Main menu. Selecting a menu item displays detailed information on the Display/edit area on the right of the screen. If the Display/edit area contains a Tab menu, selecting Tab menu items switches between the associated display pages. Clicking the
Reload button refreshes the page with the latest information.
Model name
Main menu
Reload button
Tab menu
Display/edit area
19
Embe
dded
W
eb S
erve
r
Screen Layout of the Embedded Web PageBasic Operation
Click an item in the Main menu to select the information you want to view or edit.
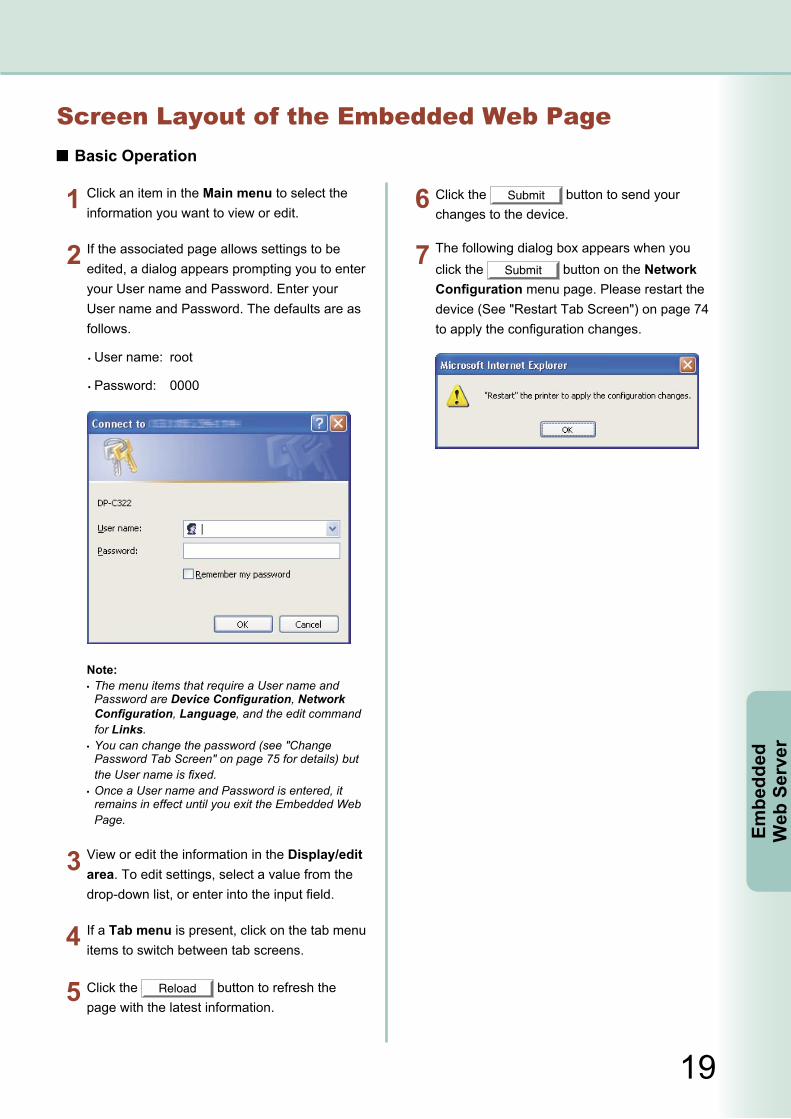
If the associated page allows settings to be edited, a dialog appears prompting you to enter your User name and Password. Enter your User name and Password. The defaults are as follows.
User name: root
Password: 0000
Note: The menu items that require a User name and Password are Device Configuration, Network Configuration, Language, and the edit command for Links.
You can change the password (see "Change Password Tab Screen" on page 75 for details) but the User name is fixed.
Once a User name and Password is entered, it remains in effect until you exit the Embedded Web Page.
View or edit the information in the Display/edit area. To edit settings, select a value from the drop-down list, or enter into the input field.
If a Tab menu is present, click on the tab menu items to switch between tab screens.
Click the Reload button to refresh the page with the latest information.
Click the Submit button to send your changes to the device.
The following dialog box appears when you click the Submit button on the Network Configuration menu page. Please restart the device (See "Restart Tab Screen") on page 74 to apply the configuration changes.
20
Embedded
Web Server
Menu StructureThis section lists the Main menu and Tab menu items. The following sections describe details of each menu item selection.
Main Menu
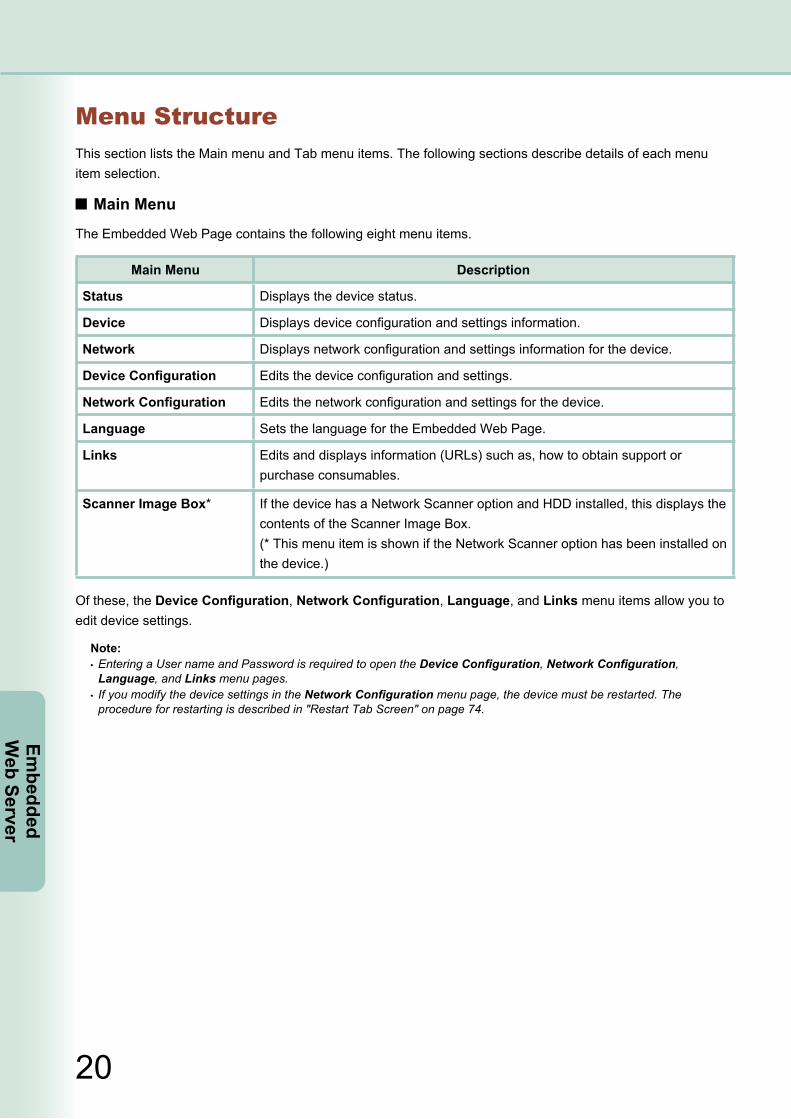
The Embedded Web Page contains the following eight menu items.
Main Menu Description
Status Displays the device status.
Device Displays device configuration and settings information.
Network Displays network configuration and settings information for the device.
Device Configuration Edits the device configuration and settings.
Network Configuration Edits the network configuration and settings for the device.
Language Sets the language for the Embedded Web Page.
Links Edits and displays information (URLs) such as, how to obtain support or purchase consumables.
Scanner Image Box* If the device has a Network Scanner option and HDD installed, this displays the contents of the Scanner Image Box.(* This menu item is shown if the Network Scanner option has been installed on the device.)
Of these, the Device Configuration, Network Configuration, Language, and Links menu items allow you to edit device settings.
Note: Entering a User name and Password is required to open the Device Configuration, Network Configuration, Language, and Links menu pages.
If you modify the device settings in the Network Configuration menu page, the device must be restarted. The procedure for restarting is described in "Restart Tab Screen" on page 74.

21
Embe
dded
W
eb S
erve
r
Continued on the next page...
Menu StructureTab Menu List
The Device, Network, Device Configuration, and Network Configuration menu pages contain a tab menu.
Main Menu Tab Menu Description
Device General Information Displays the memory size, HDD drive, option module configuration, and other general information.
Consumables Displays the status of consumables (remaining level).
Tray Displays the default tray, the media type and paper size loaded in each tray.
Print Displays print settings and custom paper sizes.
System Displays the Control Panel Language, Power Save Mode Timer setting, and Sleep Mode Timer setting.
PCL Displays the PCL (Printer Control Language) settings.
Maintenance Displays maintenance information such as, the number of pages printed for each page type, frequency of color usage, and similar information.
Network General Displays the ethernet settings.
TCP/IP Displays TCP/IP protocol settings.
SMB Displays SMB settings.
NetWare Displays NetWare settings.
SNMP Displays SNMP settings.
EMAIL* Displays Email function settings.(* This tab menu item is shown if the Internet FAX, or Network Scanner option has been installed on the device.)
AppleTalk* Displays AppleTalk settings.(* This tab menu item is shown if the PostScript option has been installed on the device.)
Rendezvous* Displays Rendezvous settings.(* This tab menu item is shown if the PostScript option has been installed on the device.)
IPv6 Displays IPv6 settings.
Device Configuration
Tray Configures the media type and paper size for each tray.
Print Configures printing parameters and custom paper sizes.
System Configures Power Save Mode and/or Sleep Mode and sets the Timer.
PCL Configures PCL (Printer Control Language) settings.
22
Embedded
Web Server
Main Menu Tab Menu Description
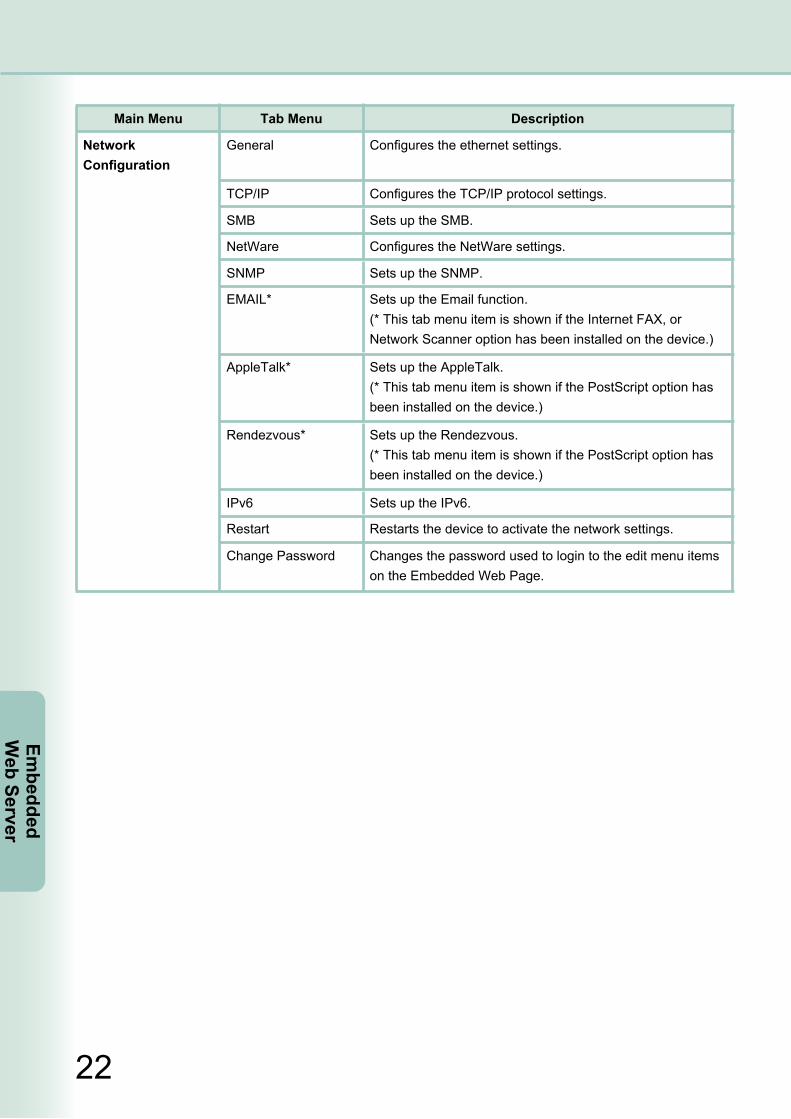
Network Configuration
General Configures the ethernet settings.
TCP/IP Configures the TCP/IP protocol settings.
SMB Sets up the SMB.
NetWare Configures the NetWare settings.
SNMP Sets up the SNMP.
EMAIL* Sets up the Email function.(* This tab menu item is shown if the Internet FAX, or Network Scanner option has been installed on the device.)
AppleTalk* Sets up the AppleTalk.(* This tab menu item is shown if the PostScript option has been installed on the device.)
Rendezvous* Sets up the Rendezvous.(* This tab menu item is shown if the PostScript option has been installed on the device.)
IPv6 Sets up the IPv6.
Restart Restarts the device to activate the network settings.
Change Password Changes the password used to login to the edit menu items on the Embedded Web Page.
23
Embe
dded
W
eb S
erve
r
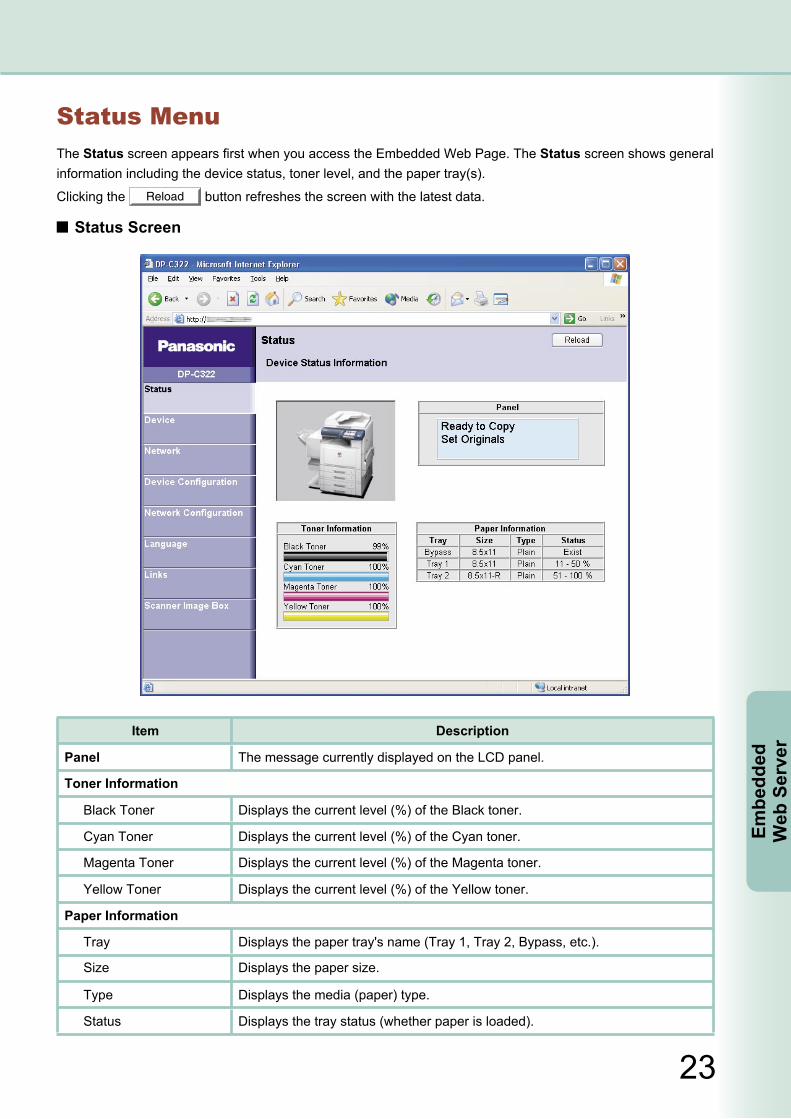
Status MenuThe Status screen appears first when you access the Embedded Web Page. The Status screen shows general information including the device status, toner level, and the paper tray(s).
Clicking the Reload button refreshes the screen with the latest data.
Status Screen
Item Description
Panel The message currently displayed on the LCD panel.
Toner Information
Black Toner Displays the current level (%) of the Black toner.
Cyan Toner Displays the current level (%) of the Cyan toner.
Magenta Toner Displays the current level (%) of the Magenta toner.
Yellow Toner Displays the current level (%) of the Yellow toner.
Paper Information
Tray Displays the paper tray's name (Tray 1, Tray 2, Bypass, etc.).
Size Displays the paper size.
Type Displays the media (paper) type.
Status Displays the tray status (whether paper is loaded).
24
Embedded
Web Server
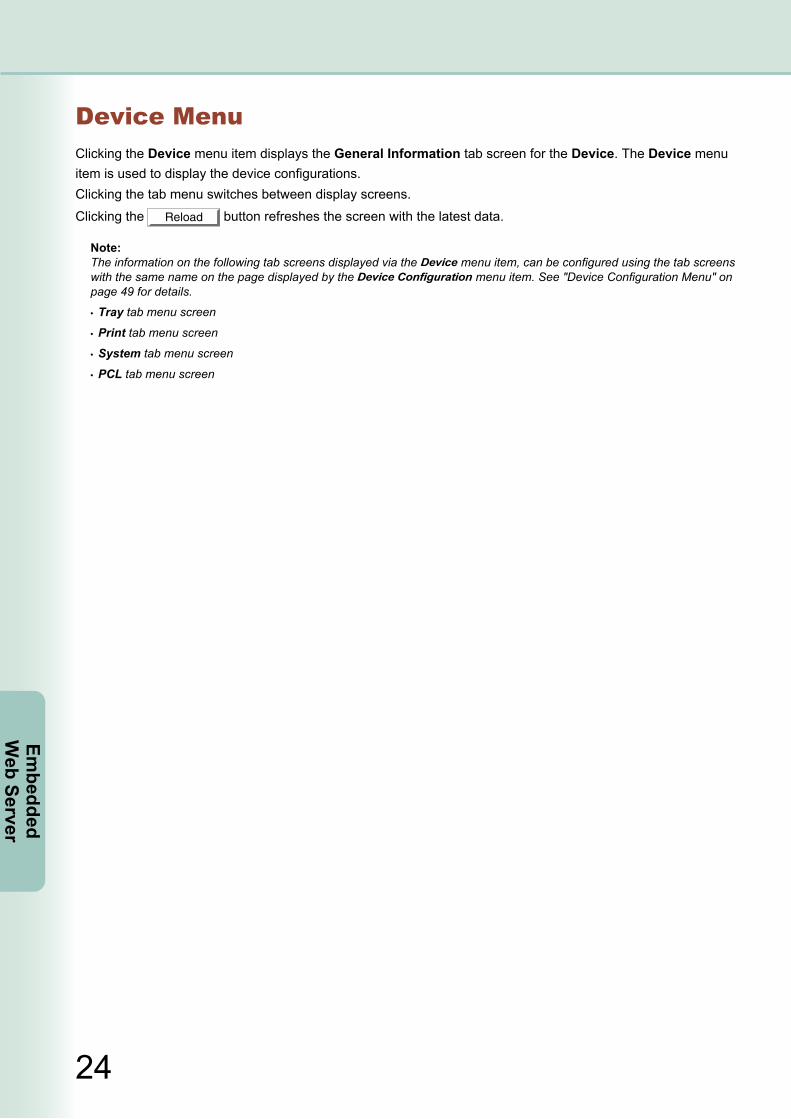
Device MenuClicking the Device menu item displays the General Information tab screen for the Device. The Device menu item is used to display the device configurations.Clicking the tab menu switches between display screens.
Clicking the Reload button refreshes the screen with the latest data.
Tray tab menu screen
Print tab menu screen
System tab menu screen
PCL tab menu screen
Note:The information on the following tab screens displayed via the Device menu item, can be configured using the tab screens with the same name on the page displayed by the Device Configuration menu item. See "Device Configuration Menu" on page 49 for details.

25
Embe
dded
W
eb S
erve
r
Continued on the next page...
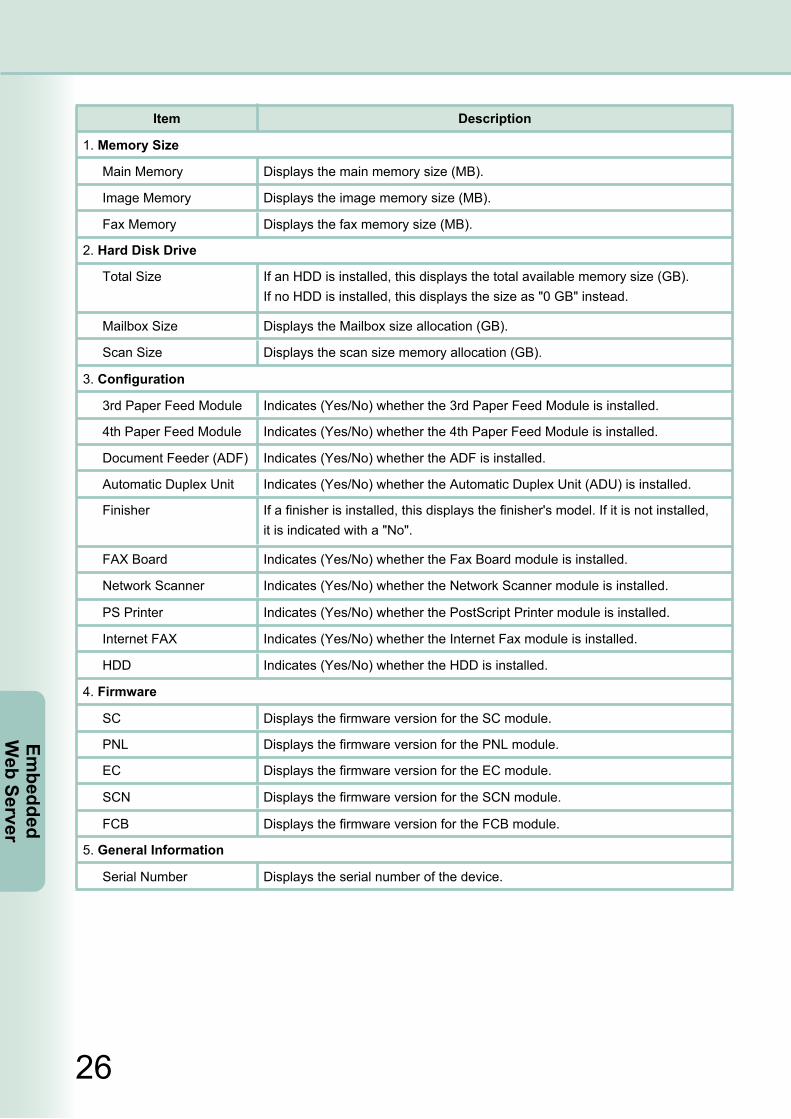
Device MenuGeneral Information Tab Screen
The General Information tab screen displays information such as, the device memory size, HDD drive, and option module configuration.
26
Embedded
Web Server
Item Description
1. Memory Size
Main Memory Displays the main memory size (MB).
Image Memory Displays the image memory size (MB).
Fax Memory Displays the fax memory size (MB).
2. Hard Disk Drive
Total Size If an HDD is installed, this displays the total available memory size (GB).If no HDD is installed, this displays the size as "0 GB" instead.
Mailbox Size Displays the Mailbox size allocation (GB).
Scan Size Displays the scan size memory allocation (GB).
3. Configuration
3rd Paper Feed Module Indicates (Yes/No) whether the 3rd Paper Feed Module is installed.
4th Paper Feed Module Indicates (Yes/No) whether the 4th Paper Feed Module is installed.
Document Feeder (ADF) Indicates (Yes/No) whether the ADF is installed.
Automatic Duplex Unit Indicates (Yes/No) whether the Automatic Duplex Unit (ADU) is installed.
Finisher If a finisher is installed, this displays the finisher's model. If it is not installed, it is indicated with a "No".
FAX Board Indicates (Yes/No) whether the Fax Board module is installed.
Network Scanner Indicates (Yes/No) whether the Network Scanner module is installed.
PS Printer Indicates (Yes/No) whether the PostScript Printer module is installed.
Internet FAX Indicates (Yes/No) whether the Internet Fax module is installed.
HDD Indicates (Yes/No) whether the HDD is installed.
4. Firmware
SC Displays the firmware version for the SC module.
PNL Displays the firmware version for the PNL module.
EC Displays the firmware version for the EC module.
SCN Displays the firmware version for the SCN module.
FCB Displays the firmware version for the FCB module.
5. General Information
Serial Number Displays the serial number of the device.
27
Embe
dded
W
eb S
erve
r
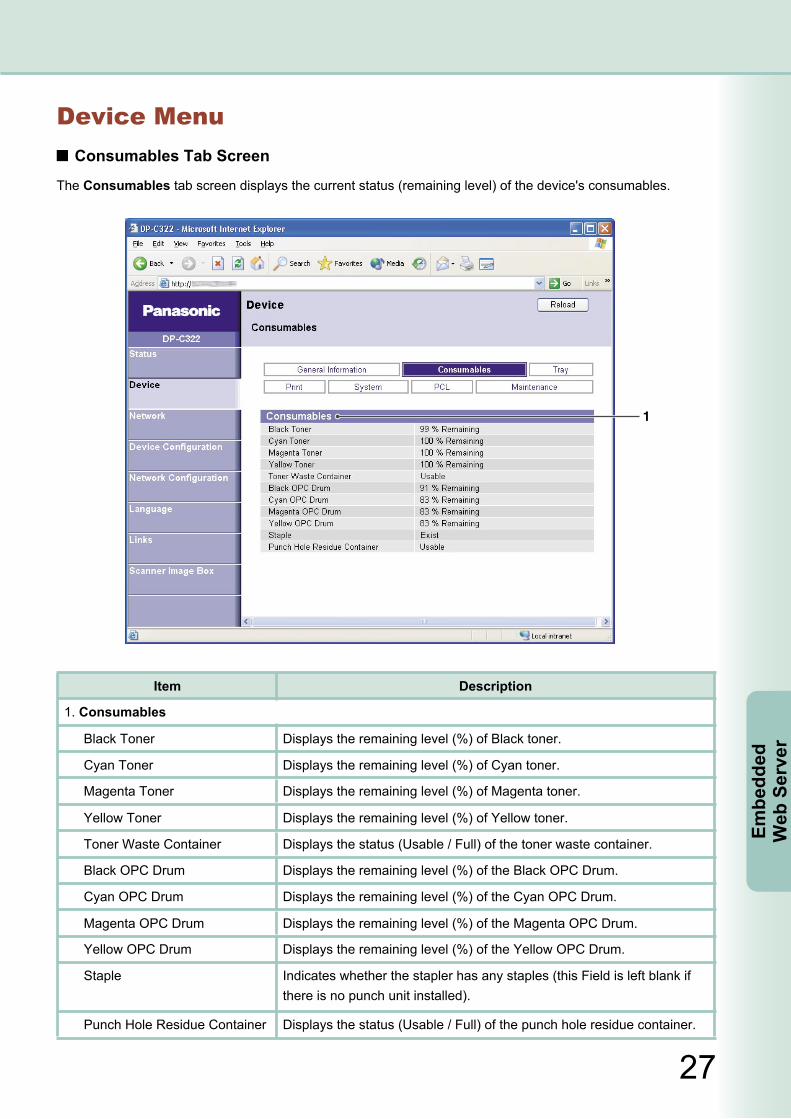
Device MenuConsumables Tab Screen
The Consumables tab screen displays the current status (remaining level) of the device's consumables.
Item Description
1. Consumables
Black Toner Displays the remaining level (%) of Black toner.
Cyan Toner Displays the remaining level (%) of Cyan toner.
Magenta Toner Displays the remaining level (%) of Magenta toner.
Yellow Toner Displays the remaining level (%) of Yellow toner.
Toner Waste Container Displays the status (Usable / Full) of the toner waste container.
Black OPC Drum Displays the remaining level (%) of the Black OPC Drum.
Cyan OPC Drum Displays the remaining level (%) of the Cyan OPC Drum.
Magenta OPC Drum Displays the remaining level (%) of the Magenta OPC Drum.
Yellow OPC Drum Displays the remaining level (%) of the Yellow OPC Drum.
Staple Indicates whether the stapler has any staples (this Field is left blank if there is no punch unit installed).
Punch Hole Residue Container Displays the status (Usable / Full) of the punch hole residue container.
28
Embedded
Web Server
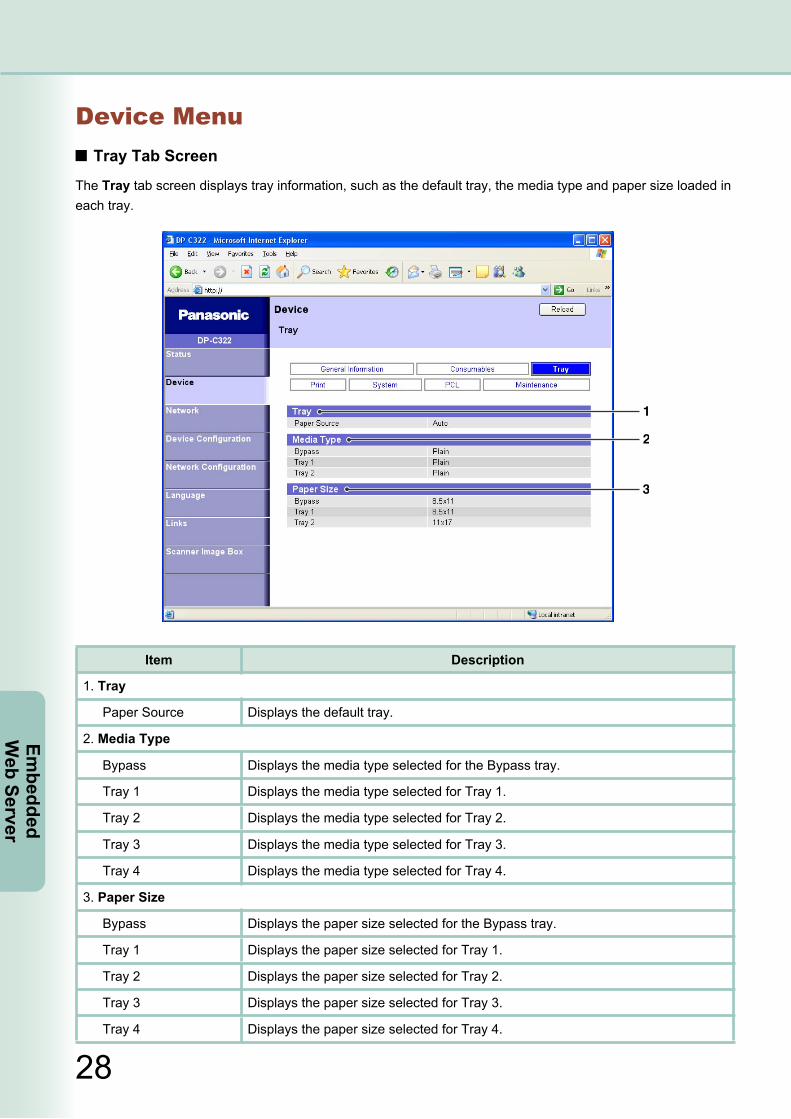
Device MenuTray Tab Screen
The Tray tab screen displays tray information, such as the default tray, the media type and paper size loaded in each tray.
Item Description
1. Tray
Paper Source Displays the default tray.
2. Media Type
Bypass Displays the media type selected for the Bypass tray.
Tray 1 Displays the media type selected for Tray 1.
Tray 2 Displays the media type selected for Tray 2.
Tray 3 Displays the media type selected for Tray 3.
Tray 4 Displays the media type selected for Tray 4.
3. Paper Size
Bypass Displays the paper size selected for the Bypass tray.
Tray 1 Displays the paper size selected for Tray 1.
Tray 2 Displays the paper size selected for Tray 2.
Tray 3 Displays the paper size selected for Tray 3.
Tray 4 Displays the paper size selected for Tray 4.
29
Embe
dded
W
eb S
erve
r
Continued on the next page...
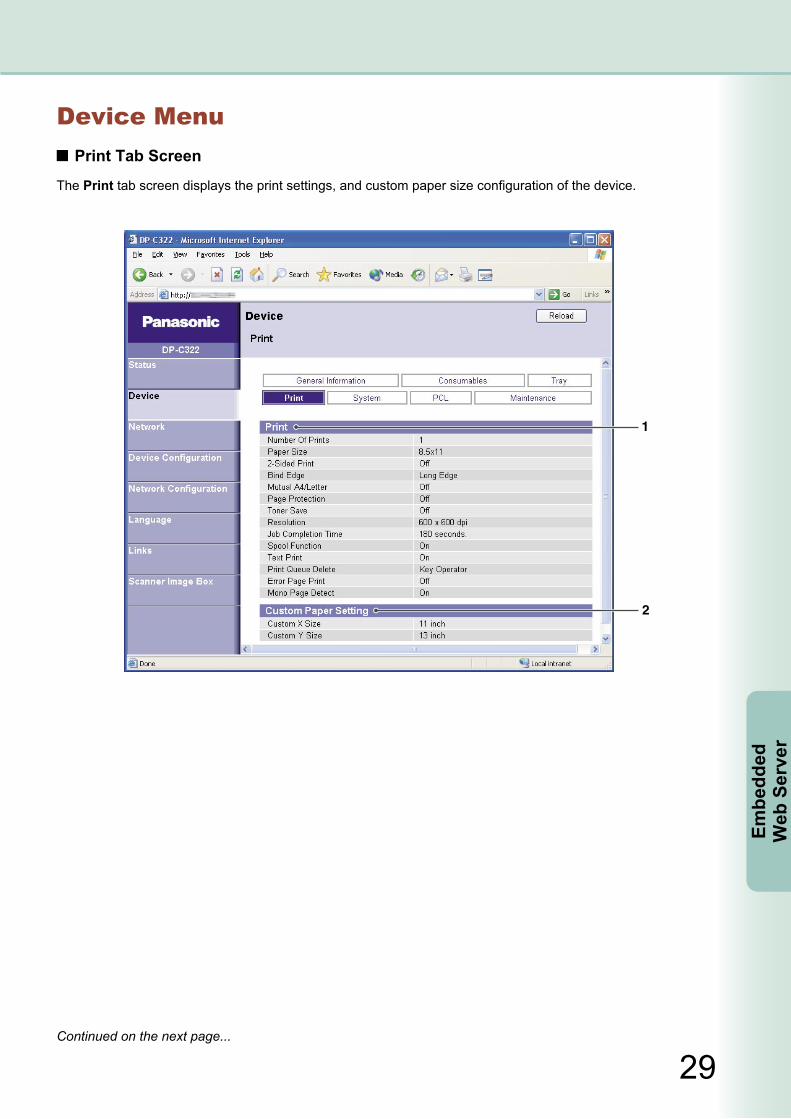
Device MenuPrint Tab Screen
The Print tab screen displays the print settings, and custom paper size configuration of the device.
30
Embedded
Web Server
Item Description
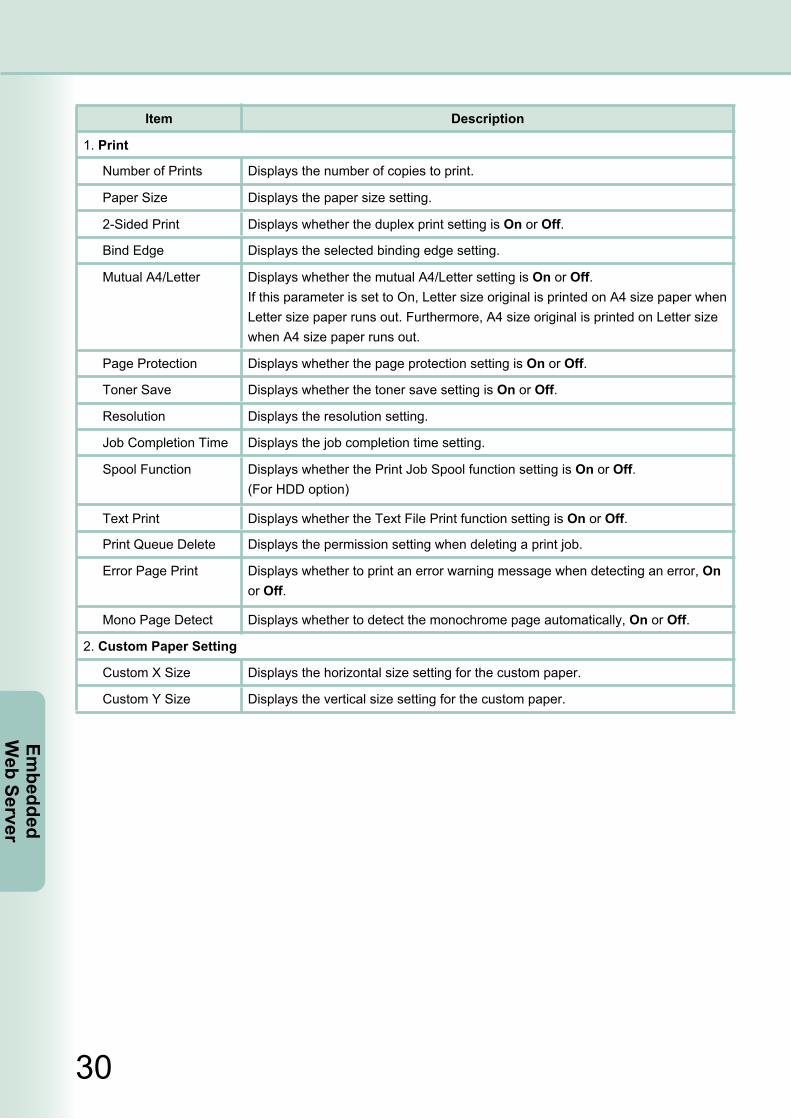
1. Print
Number of Prints Displays the number of copies to print.
Paper Size Displays the paper size setting.
2-Sided Print Displays whether the duplex print setting is On or Off.
Bind Edge Displays the selected binding edge setting.
Mutual A4/Letter Displays whether the mutual A4/Letter setting is On or Off.If this parameter is set to On, Letter size original is printed on A4 size paper when Letter size paper runs out. Furthermore, A4 size original is printed on Letter size when A4 size paper runs out.
Page Protection Displays whether the page protection setting is On or Off.
Toner Save Displays whether the toner save setting is On or Off.
Resolution Displays the resolution setting.
Job Completion Time Displays the job completion time setting.
Spool Function Displays whether the Print Job Spool function setting is On or Off. (For HDD option)
Text Print Displays whether the Text File Print function setting is On or Off.
Print Queue Delete Displays the permission setting when deleting a print job.
Error Page Print Displays whether to print an error warning message when detecting an error, On or Off.
Mono Page Detect Displays whether to detect the monochrome page automatically, On or Off.
2. Custom Paper Setting
Custom X Size Displays the horizontal size setting for the custom paper.
Custom Y Size Displays the vertical size setting for the custom paper.
31
Embe
dded
W
eb S
erve
r
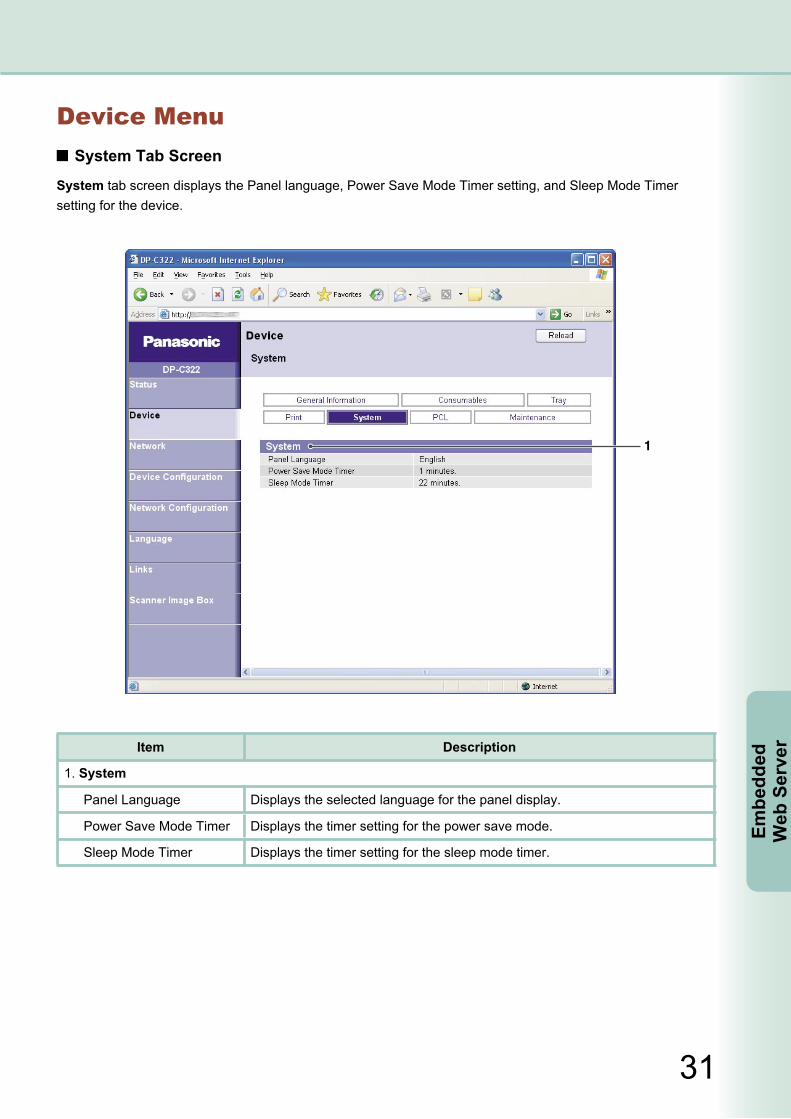
Device MenuSystem Tab Screen
System tab screen displays the Panel language, Power Save Mode Timer setting, and Sleep Mode Timer setting for the device.
Item Description
1. System
Panel Language Displays the selected language for the panel display.
Power Save Mode Timer Displays the timer setting for the power save mode.
Sleep Mode Timer Displays the timer setting for the sleep mode timer.
32
Embedded
Web Server
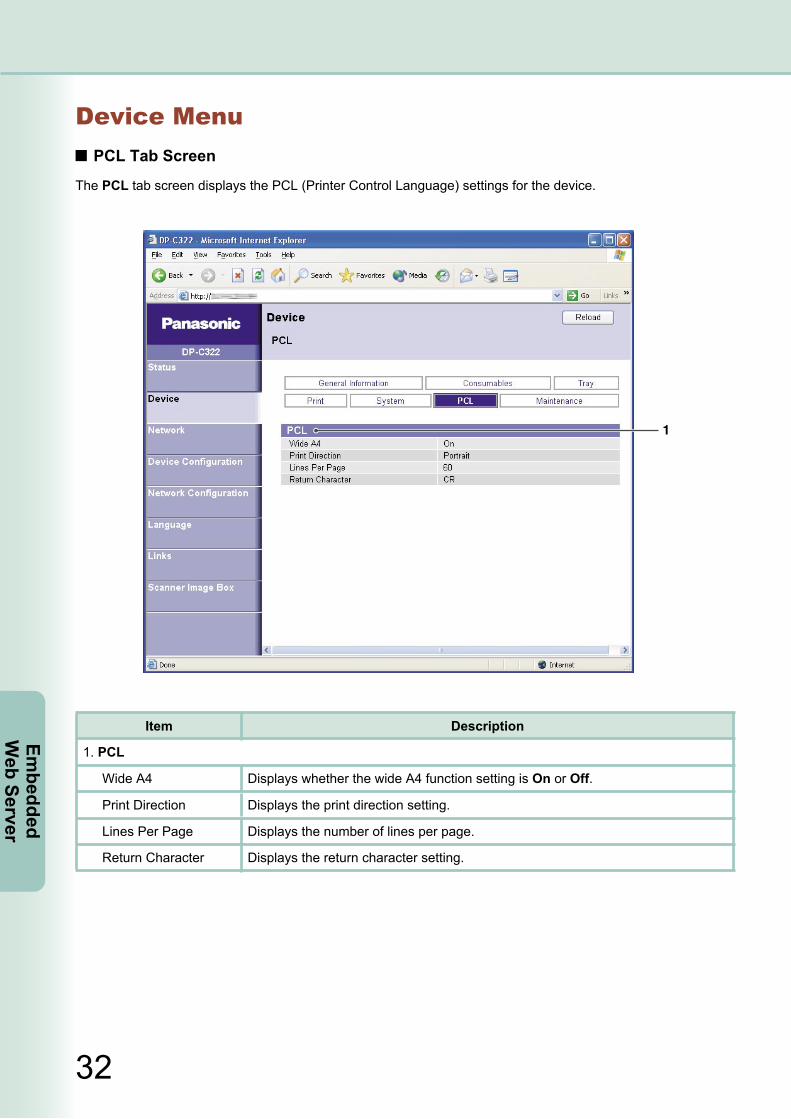
Device MenuPCL Tab Screen
The PCL tab screen displays the PCL (Printer Control Language) settings for the device.
Item Description
1. PCL
Wide A4 Displays whether the wide A4 function setting is On or Off.
Print Direction Displays the print direction setting.
Lines Per Page Displays the number of lines per page.
Return Character Displays the return character setting.
33
Embe
dded
W
eb S
erve
r
Continued on the next page...
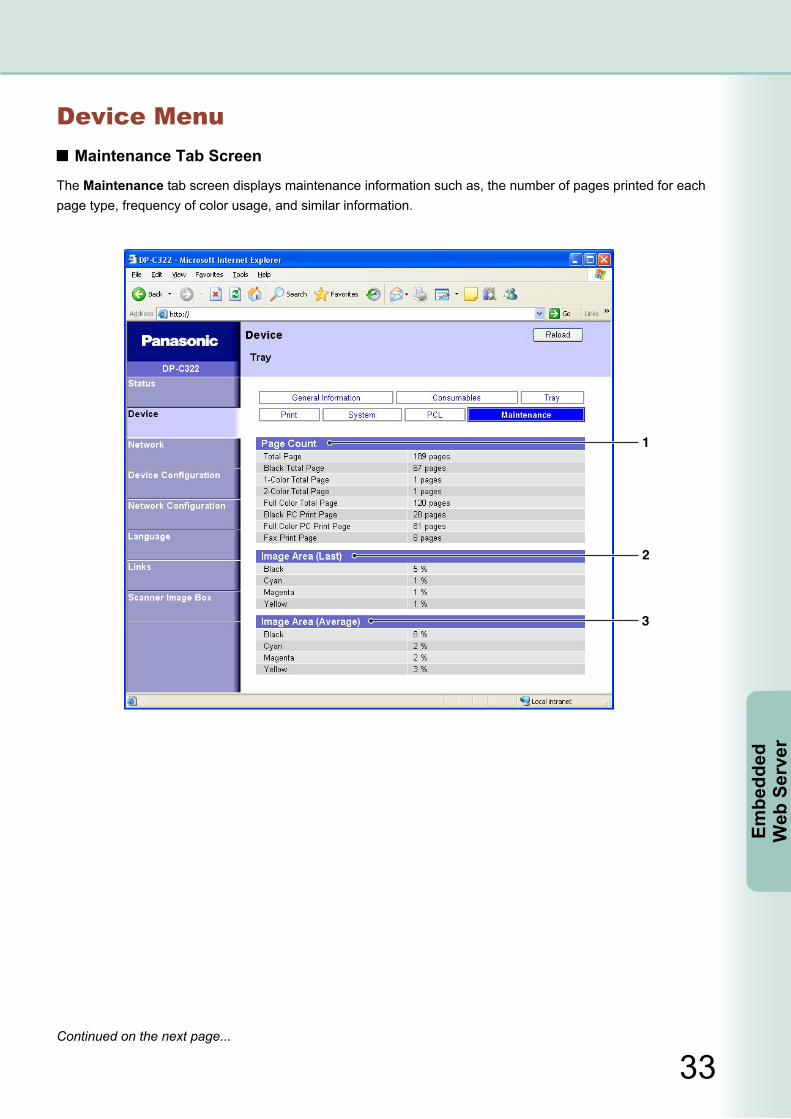
Device MenuMaintenance Tab Screen
The Maintenance tab screen displays maintenance information such as, the number of pages printed for each page type, frequency of color usage, and similar information.
34
Embedded
Web Server
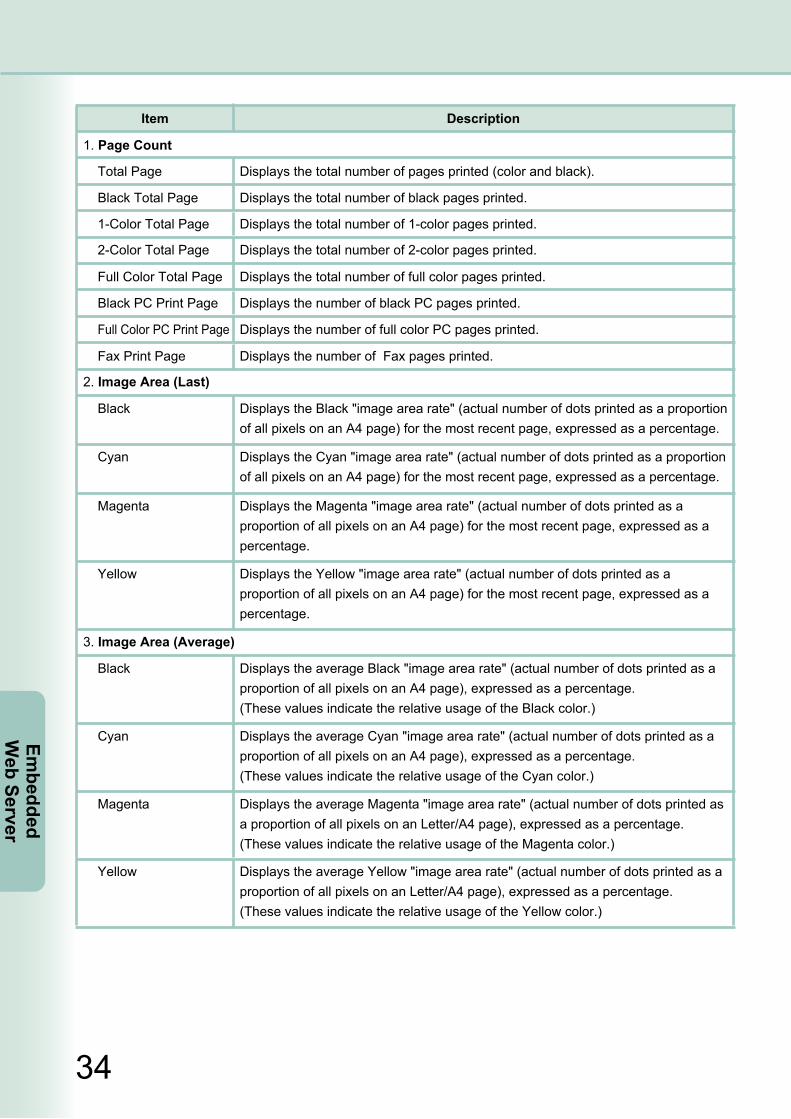
Cyan Displays the Cyan "image area rate" (actual number of dots printed as a proportion of all pixels on an A4 page) for the most recent page, expressed as a percentage.
Magenta Displays the Magenta "image area rate" (actual number of dots printed as a proportion of all pixels on an A4 page) for the most recent page, expressed as a percentage.
Yellow Displays the Yellow "image area rate" (actual number of dots printed as a proportion of all pixels on an A4 page) for the most recent page, expressed as a percentage.
3. Image Area (Average)
Black Displays the average Black "image area rate" (actual number of dots printed as a proportion of all pixels on an A4 page), expressed as a percentage.(These values indicate the relative usage of the Black color.)
Cyan Displays the average Cyan "image area rate" (actual number of dots printed as a proportion of all pixels on an A4 page), expressed as a percentage.(These values indicate the relative usage of the Cyan color.)
Magenta Displays the average Magenta "image area rate" (actual number of dots printed as a proportion of all pixels on an Letter/A4 page), expressed as a percentage.(These values indicate the relative usage of the Magenta color.)
Yellow Displays the average Yellow "image area rate" (actual number of dots printed as a proportion of all pixels on an Letter/A4 page), expressed as a percentage.(These values indicate the relative usage of the Yellow color.)
Full Color PC Print Page Displays the number of full color PC pages printed.
Fax Print Page Displays the number of Fax pages printed.
2. Image Area (Last)
Black Displays the Black "image area rate" (actual number of dots printed as a proportion of all pixels on an A4 page) for the most recent page, expressed as a percentage.
Item Description
1. Page Count
Total Page Displays the total number of pages printed (color and black).
Black Total Page Displays the total number of black pages printed.
1-Color Total Page Displays the total number of 1-color pages printed.
2-Color Total Page Displays the total number of 2-color pages printed.
Full Color Total Page Displays the total number of full color pages printed.
Black PC Print Page Displays the number of black PC pages printed.
35
Embe
dded
W
eb S
erve
r
Note:The information on the tab screens displayed via the Network menu item can be configured using the tab screens with the same name on the page displayed by the Network Configuration menu item. See "Network Configuration Menu" on page 55 for details.
Network MenuClicking the Network menu item displays the General tab screen for Network. The Network menu item is used to display the network configuration and settings for the device.Clicking the tab menu switches between display screens.
Clicking the Reload button refreshes the screen with the latest data.
36
Embedded
Web Server
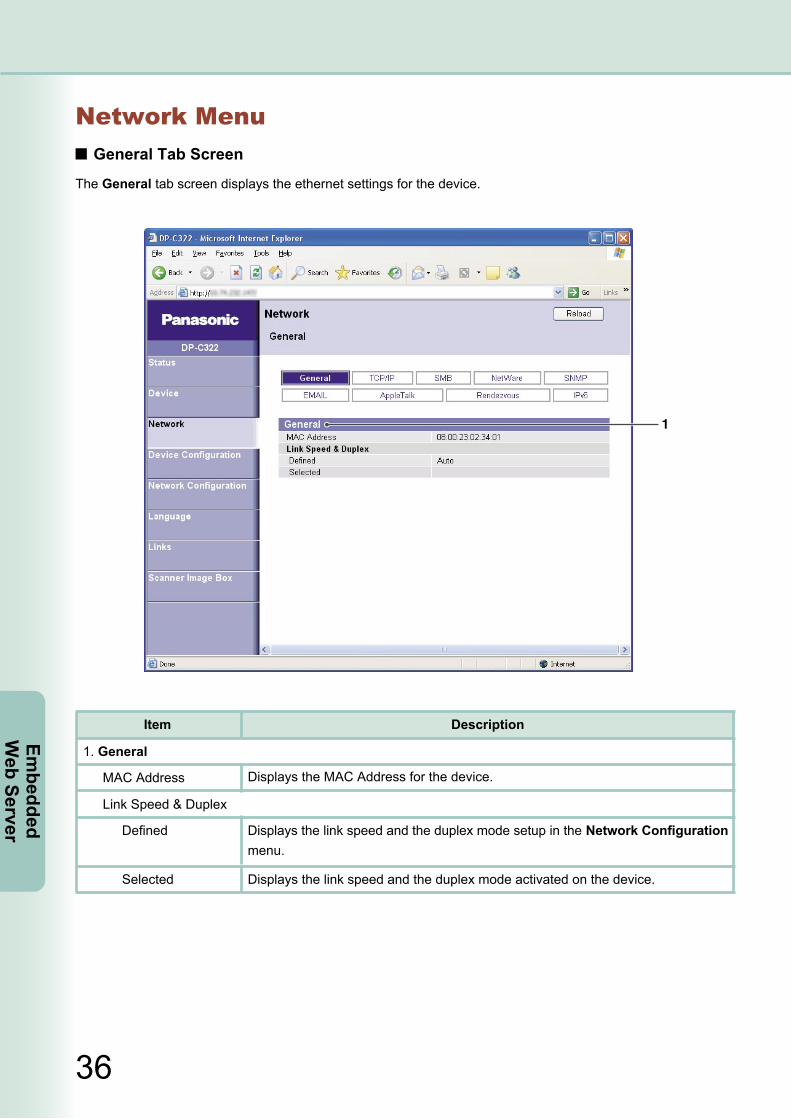
Network MenuGeneral Tab Screen
The General tab screen displays the ethernet settings for the device.
Item Description
1. General
MAC Address Displays the MAC Address for the device.
Link Speed & Duplex
Defined Displays the link speed and the duplex mode setup in the Network Configuration menu.
Selected Displays the link speed and the duplex mode activated on the device.

37
Embe
dded
W
eb S
erve
r
Continued on the next page...
Network MenuTCP/IP Tab Screen
The TCP/IP tab screen displays the TCP/IP settings for the device.
38
Embedded
Web Server
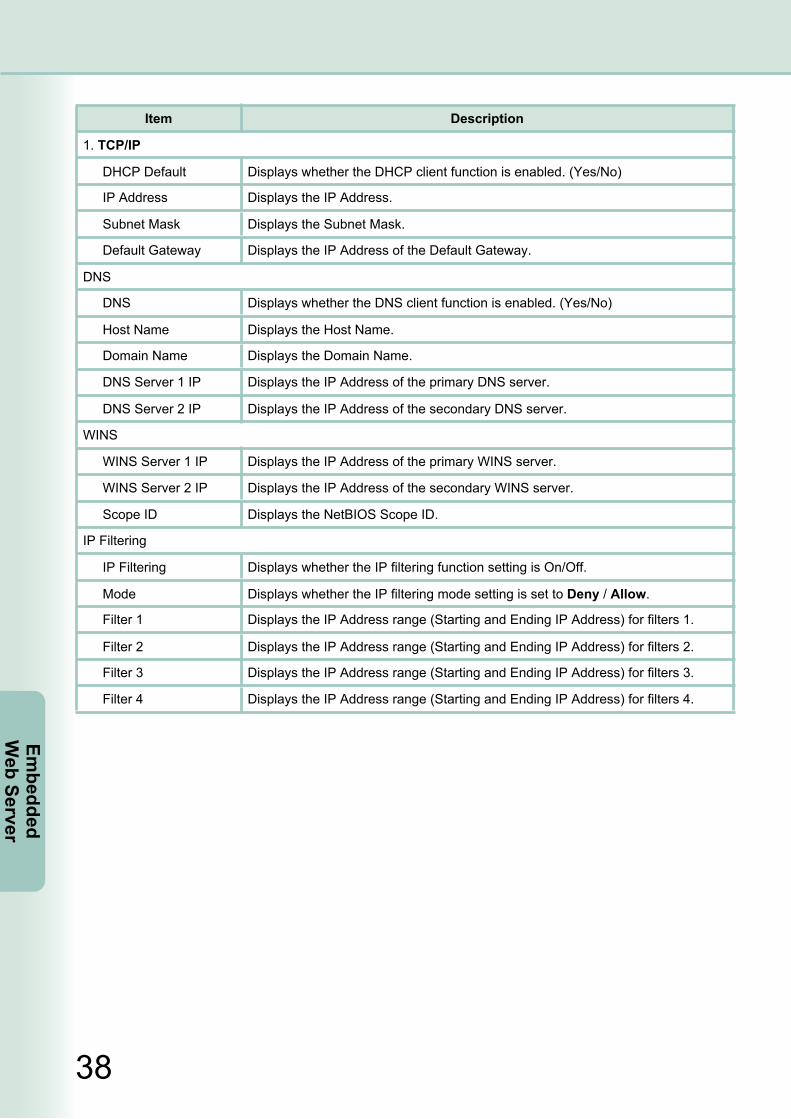
DNS Server 1 IP Displays the IP Address of the primary DNS server.
DNS Server 2 IP Displays the IP Address of the secondary DNS server.
WINS
WINS Server 1 IP Displays the IP Address of the primary WINS server.
WINS Server 2 IP Displays the IP Address of the secondary WINS server.
Scope ID Displays the NetBIOS Scope ID.
IP Filtering
IP Filtering Displays whether the IP filtering function setting is On/Off.
Mode Displays whether the IP filtering mode setting is set to Deny / Allow.
Filter 1 Displays the IP Address range (Starting and Ending IP Address) for filters 1.
Filter 2 Displays the IP Address range (Starting and Ending IP Address) for filters 2.
Filter 3 Displays the IP Address range (Starting and Ending IP Address) for filters 3.
Filter 4 Displays the IP Address range (Starting and Ending IP Address) for filters 4.
Item Description
1. TCP/IP
Displays whether the DHCP client function is enabled. (Yes/No)
Displays the IP Address.
Displays the Subnet Mask.
Displays the IP Address of the Default Gateway.
DNS
DNS Displays whether the DNS client function is enabled. (Yes/No)
Host Name Displays the Host Name.
Domain Name Displays the Domain Name.
DHCP Default
IP Address
Subnet Mask
Default Gateway
39
Embe
dded
W
eb S
erve
r
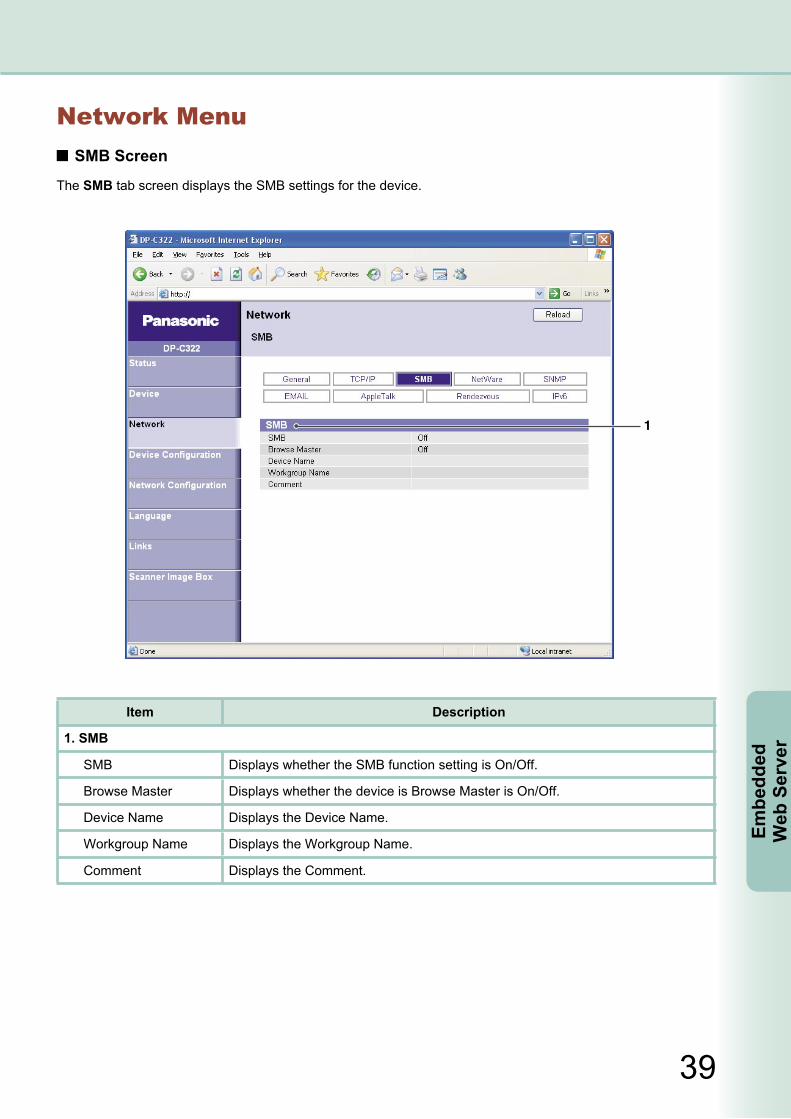
Network MenuSMB Screen
The SMB tab screen displays the SMB settings for the device.
Item Description
1. SMB
SMB Displays whether the SMB function setting is On/Off.
Browse Master Displays whether the device is Browse Master is On/Off.
Device Name Displays the Device Name.
Workgroup Name Displays the Workgroup Name.
Comment Displays the Comment.
40
Embedded
Web Server
41
Embe
dded
W
eb S
erve
r
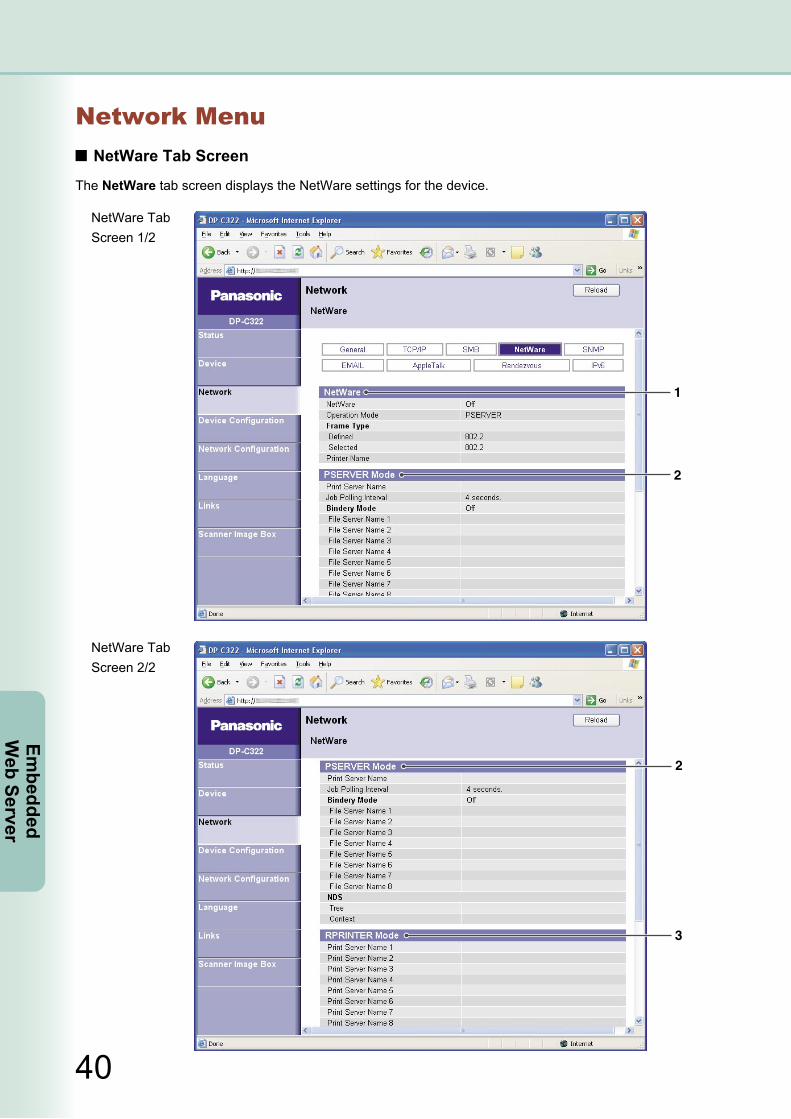
Network MenuNetWare Tab Screen
The NetWare tab screen displays the NetWare settings for the device.
NetWare Tab Screen 1/2
NetWare Tab Screen 2/2

40
Embedded
Web Server
41
Embe
dded
W
eb S
erve
r
Item Description
1. NetWare
NetWare Displays whether the NetWare function setting is On/Off.
Operation Mode Displays whether the operation mode is configured to Print Server/Remote Printer.
Frame Type
Defined Displays the frame type setup in the Network Configuration menu.
Selected Displays the frame type activated on the device.
Printer Name Displays the printer name.
2. PSERVER Mode
Print Server Name Displays the print server name.
Job Polling Interval Displays the job polling time interval is seconds.
Bindery Mode Displays whether the bindery mode setting is On/Off.
File Server Name 1 Displays the names of file server 1.
File Server Name 2 Displays the names of file server 2.
File Server Name 3 Displays the names of file server 3.
File Server Name 4 Displays the names of file server 4.
File Server Name 5 Displays the names of file server 5.
File Server Name 6 Displays the names of file server 6.
File Server Name 7 Displays the names of file server 7.
File Server Name 8 Displays the names of file server 8.
NDS
Tree Displays the NDS tree name.
Context Displays the NDS context.
3. RPRINTER Mode
Print Server Name 1 Displays the names of print server 1.
Print Server Name 2 Displays the names of print server 2.
Print Server Name 3 Displays the names of print server 3.
Print Server Name 4 Displays the names of print server 4.
Print Server Name 5 Displays the names of print server 5.
Displays the job timeout setting.
Print Server Name 6 Displays the names of print server 6.
Print Server Name 7 Displays the names of print server 7.
Print Server Name 8 Displays the names of print server 8.
Job Timeout
42
Embedded
Web Server
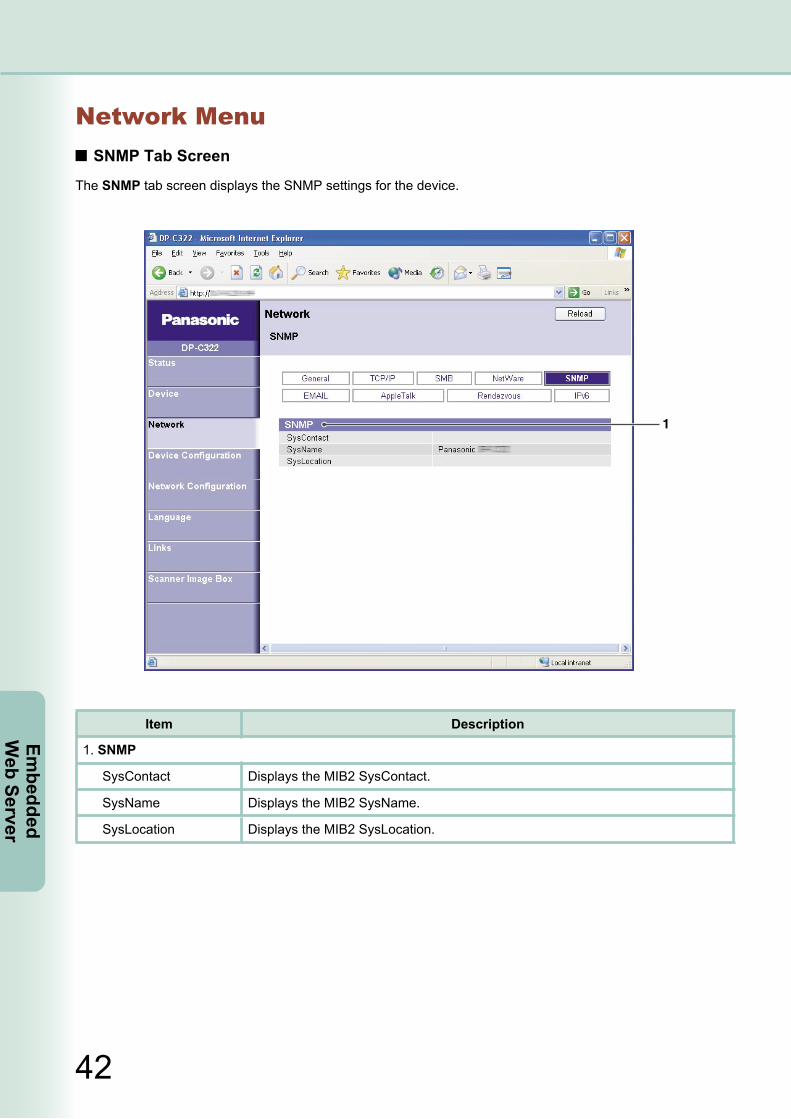
Network MenuSNMP Tab Screen
The SNMP tab screen displays the SNMP settings for the device.
Item Description
1. SNMP
SysContact Displays the MIB2 SysContact.
SysName Displays the MIB2 SysName.
SysLocation Displays the MIB2 SysLocation.
43
Embe
dded
W
eb S
erve
r
Continued on the next page...
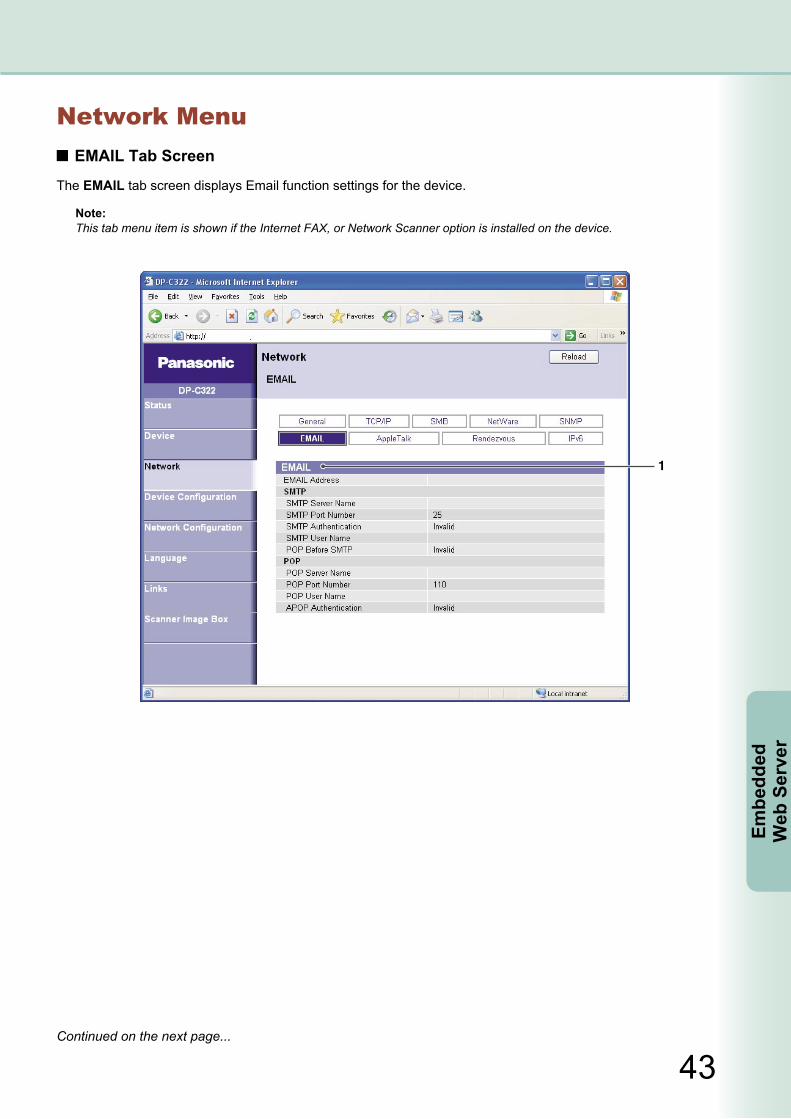
Network MenuEMAIL Tab Screen
The EMAIL tab screen displays Email function settings for the device.
Note:This tab menu item is shown if the Internet FAX, or Network Scanner option is installed on the device.
44
Embedded
Web Server
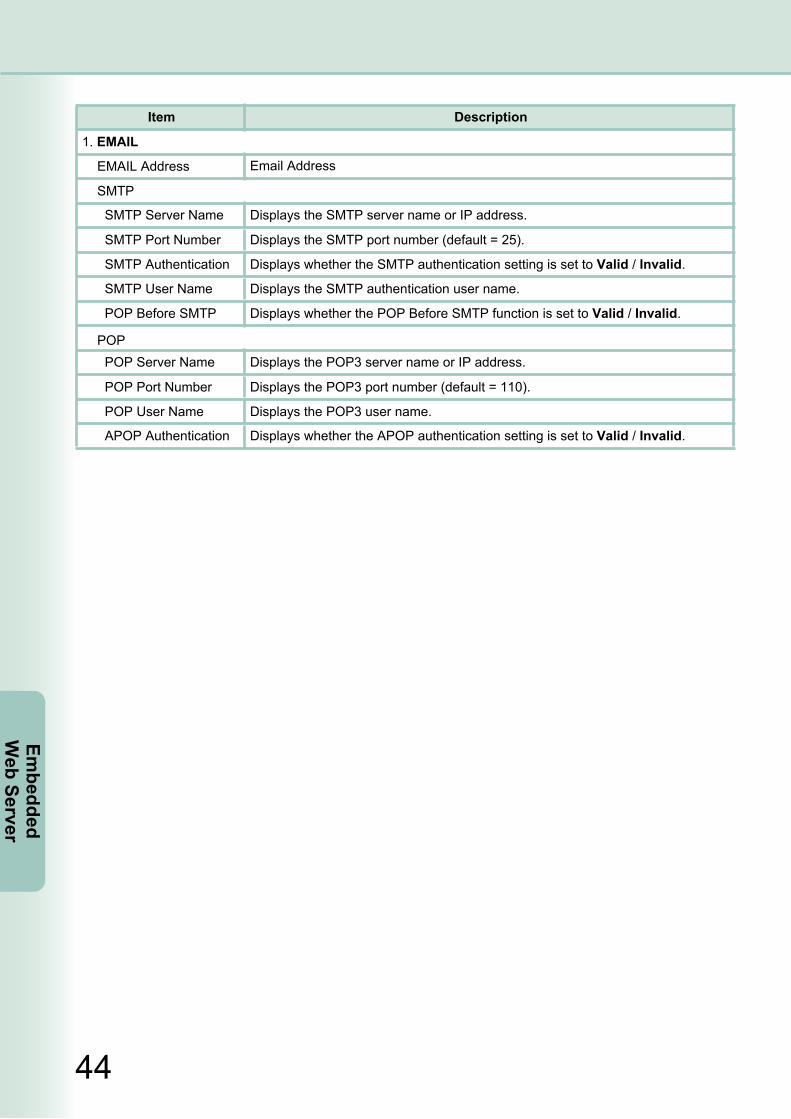
Item Description
1. EMAIL
EMAIL Address Email Address
SMTP
SMTP Server Name Displays the SMTP server name or IP address.
SMTP Port Number Displays the SMTP port number (default = 25).
SMTP Authentication Displays whether the SMTP authentication setting is set to Valid / Invalid.
SMTP User Name Displays the SMTP authentication user name.
POP Before SMTP Displays whether the POP Before SMTP function is set to Valid / Invalid.
POPPOP Server Name Displays the POP3 server name or IP address.
POP Port Number Displays the POP3 port number (default = 110).
POP User Name Displays the POP3 user name.
APOP Authentication Displays whether the APOP authentication setting is set to Valid / Invalid.
45
Embe
dded
W
eb S
erve
r
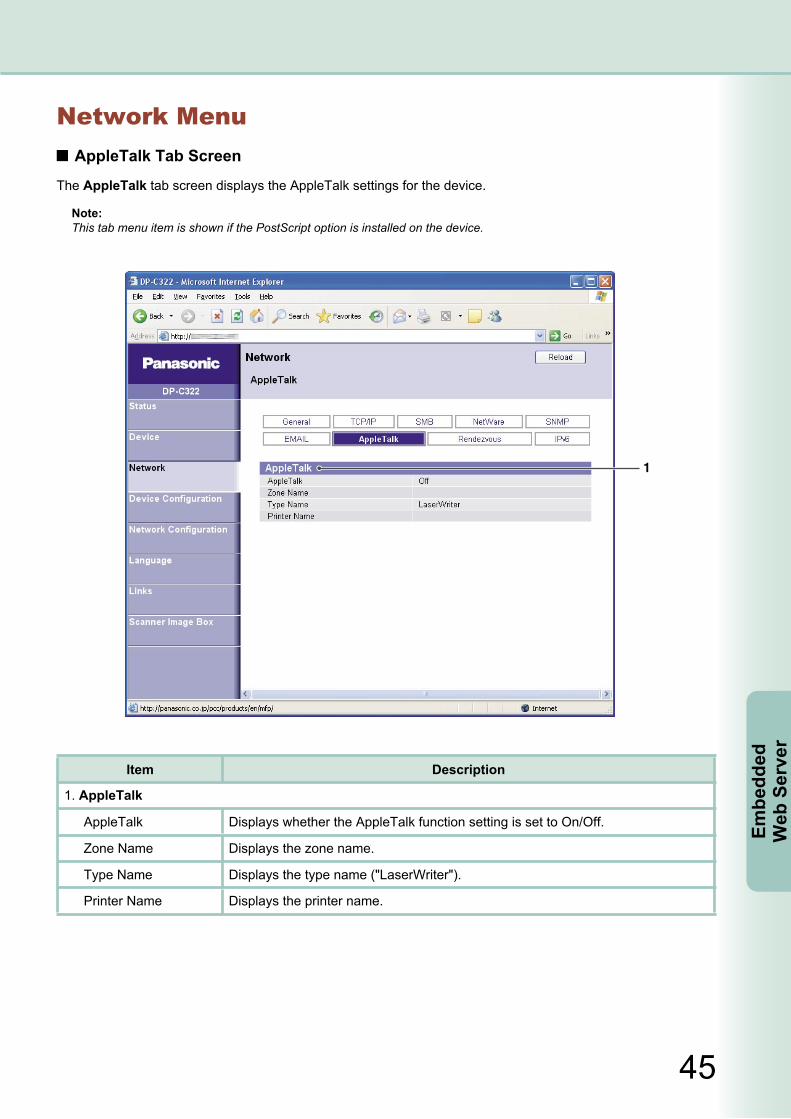
Network MenuAppleTalk Tab Screen
The AppleTalk tab screen displays the AppleTalk settings for the device.
Note:This tab menu item is shown if the PostScript option is installed on the device.
Item Description
1. AppleTalk
AppleTalk Displays whether the AppleTalk function setting is set to On/Off.
Zone Name Displays the zone name.
Type Name Displays the type name ("LaserWriter").
Printer Name Displays the printer name.

46
Embedded
Web Server
Network MenuRendezvous Tab Screen
The Rendezvous tab screen displays the Rendezvous setting for the device.
Note:This tab menu item is shown if the PostScript option is installed on the device.
Item Description
1. Rendezvous
Rendezvous Displays whether the Rendezvous function setting is set to On/Off.
Rendezvous Name Displays the Rendezvous name.
Network Address Displays the IP address.
47
Embe
dded
W
eb S
erve
r
Continued on the next page...
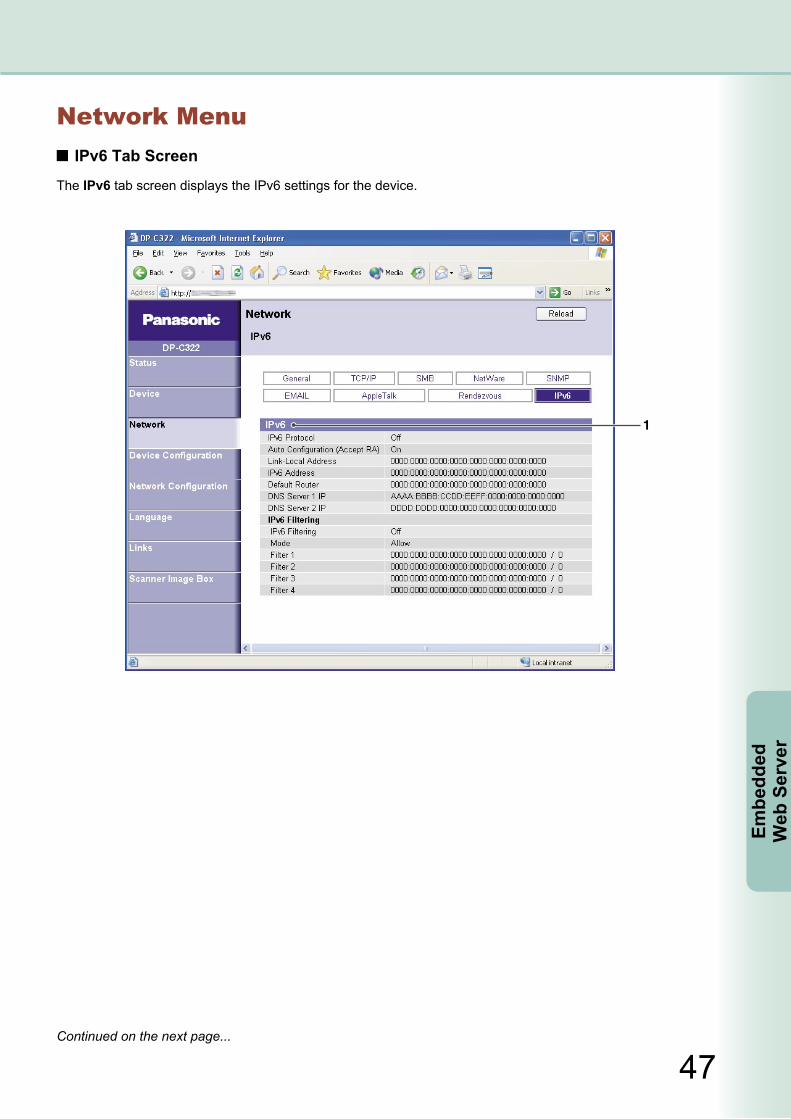
Network MenuIPv6 Tab Screen
The IPv6 tab screen displays the IPv6 settings for the device.
48
Embedded
Web Server
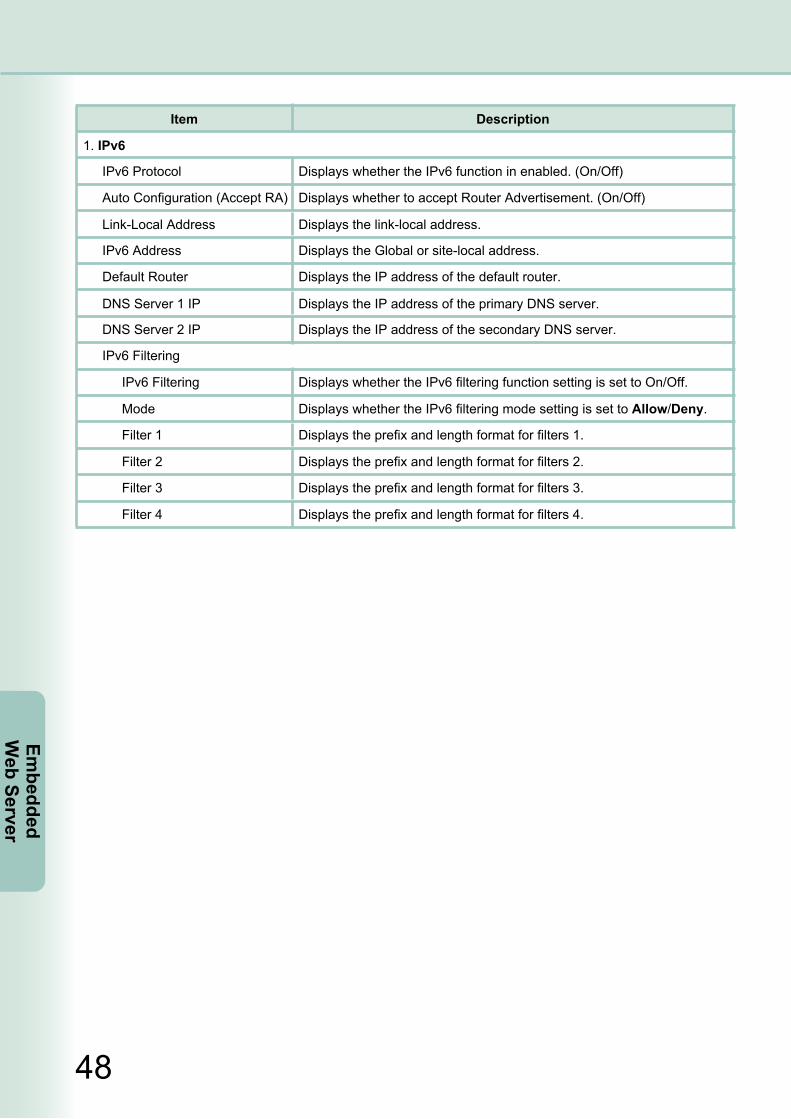
Item Description
1. IPv6
IPv6 Protocol Displays whether the IPv6 function in enabled. (On/Off)
Auto Configuration (Accept RA) Displays whether to accept Router Advertisement. (On/Off)
Link-Local Address Displays the link-local address.
IPv6 Address Displays the Global or site-local address.
Default Router Displays the IP address of the default router.
DNS Server 1 IP Displays the IP address of the primary DNS server.
DNS Server 2 IP Displays the IP address of the secondary DNS server.
IPv6 Filtering
IPv6 Filtering Displays whether the IPv6 filtering function setting is set to On/Off.
Mode Displays whether the IPv6 filtering mode setting is set to Allow/Deny.
Filter 1 Displays the prefix and length format for filters 1.
Filter 2 Displays the prefix and length format for filters 2.
Filter 3 Displays the prefix and length format for filters 3.
Filter 4 Displays the prefix and length format for filters 4.

49
Embe
dded
W
eb S
erve
r
Continued on the next page...
Device Configuration MenuClicking the Device Configuration menu item displays the Tray tab screen for Device Configuration. The Device Configuration menu item is used to configure the device settings.
Clicking the tab menu switches between display screens.
Clicking the Reload button refreshes the screen with the latest data.
Clicking the Submit button sends the new settings to the device.
Note: A user name and password are required to open the Device Configuration menu page. The values set or modified via the Device Configuration menu can be viewed using the Device menu. See "Device Menu" on page 24.
Tray Tab Screen
The Tray tab screen is used to configure the tray attributes, such as the default tray, media type, and paper size in each tray.
Select the desired settings from the drop-down lists, and then click the Submit button to apply the new settings.
Note:Tray 3 and Tray 4 only appear if they are installed on the device.
50
Embedded
Web Server
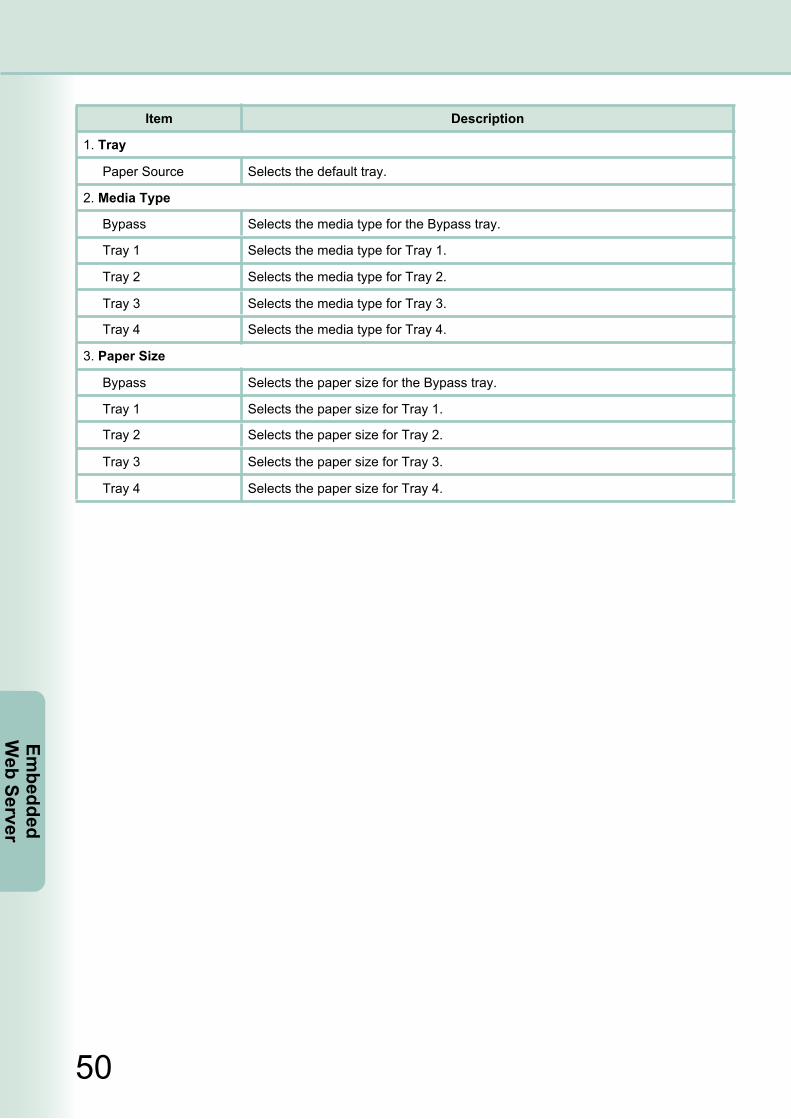
Item Description
1. Tray
Paper Source Selects the default tray.
2. Media Type
Bypass Selects the media type for the Bypass tray.
Tray 1 Selects the media type for Tray 1.
Tray 2 Selects the media type for Tray 2.
Tray 3 Selects the media type for Tray 3.
Tray 4 Selects the media type for Tray 4.
3. Paper Size
Bypass Selects the paper size for the Bypass tray.
Tray 1 Selects the paper size for Tray 1.
Tray 2 Selects the paper size for Tray 2.
Tray 3 Selects the paper size for Tray 3.
Tray 4 Selects the paper size for Tray 4.
51
Embe
dded
W
eb S
erve
r
Continued on the next page...
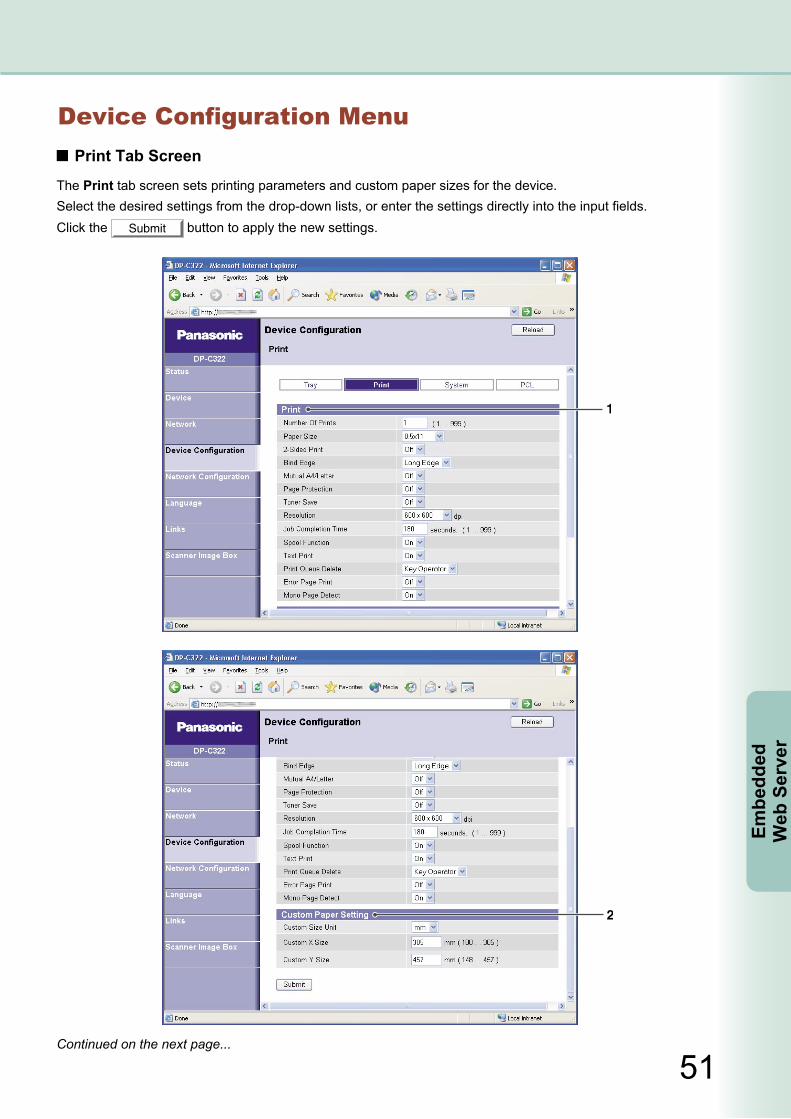
Device Configuration MenuPrint Tab Screen
The Print tab screen sets printing parameters and custom paper sizes for the device.Select the desired settings from the drop-down lists, or enter the settings directly into the input fields. Click the Submit button to apply the new settings.

52
Embedded
Web Server
Item Description
1. Print
Number of Prints Selects the number of copies to print.
Paper Size Selects the paper size.
2-Sided Print Selects whether to set the duplex print to On or Off.
Bind Edge Selects the binding edge.
Mutual A4/Letter Selects whether the "Mutual A4/Letter" setting is set to On or Off.If this parameter is set to On, Letter size original is printed on A4 size paper when Letter size paper runs out. Furthermore, A4 size original is printed on Letter size when A4 size paper runs out.
Page Protection Selects whether the page protection setting is set to On or Off.
Toner Save Selects whether the toner save setting is On or Off.
Resolution Selects the resolution.
Job Completion Time Selects the job completion time.
Spool Function Selects whether the Print Job Spool function is set to On or Off. (For HDD option)
Text Print Selects whether the Text File Print function is set to On or Off.
Print Queue Delete Selects whether to require the Key Operator password when deleting the print queue.
Error Page Print Selects whether to print an error warning message when detecting an error, On or Off.
Mono Page Detect Selects whether to detect the monochrome page automatically, On or Off.
2. Custom Paper Setting
Custom Size Unit Selects the unit of measurement (mm / inch) for the custom size setting.
Custom X Size Enters the horizontal size for the custom paper.
Custom Y Size Enters the vertical size for the custom paper.

53
Embe
dded
W
eb S
erve
r
Device Configuration MenuSystem Tab Screen
The System tab screen is used to configure the settings of the Power Save Mode and/or Sleep Mode.Select the desired settings from the drop-down lists, or enter them into the input fields. Click the Submit button to apply the new settings.
Item Description
1. System
Power Save Selects whether to use Power Save Mode only, or both Power Save Mode and Sleep Mode.
Power Save Mode Timer Selects the timer setting for the Power Save Mode.
Sleep Mode Timer Selects the timer setting for the Sleep Mode.

54
Embedded
Web Server
Device Configuration MenuPCL Tab Screen
The PCL tab screen is used to configure the PCL (Printer Control Language) settings for the device.Select the desired settings from the drop-down lists, or enter them into the input fields. Click the Submit button to apply the new settings.
Item Description
1. PCL
Wide A4 Specifies whether to enable the Wide A4 function
Print Direction Selects the print direction.
Lines Per Page Enters the number of lines per page.
Return Character Selects the return character.
55
Embe
dded
W
eb S
erve
r
Continued on the next page...
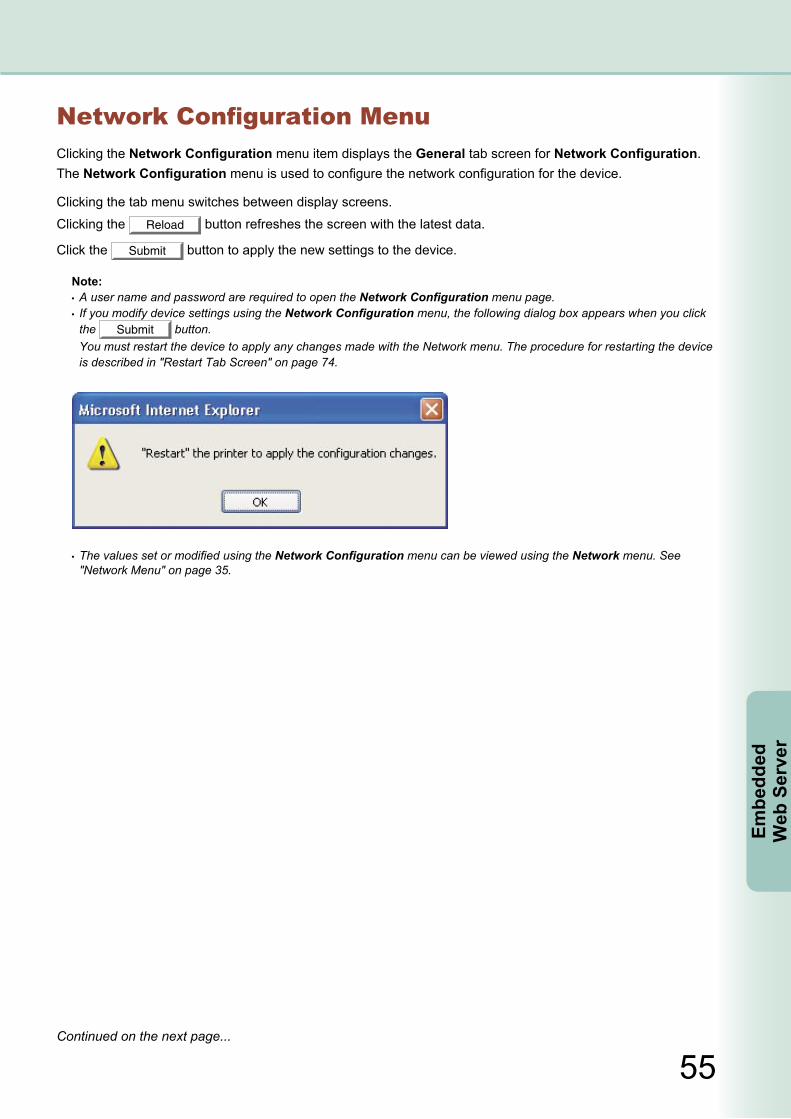
Network Configuration MenuClicking the Network Configuration menu item displays the General tab screen for Network Configuration. The Network Configuration menu is used to configure the network configuration for the device.
Clicking the tab menu switches between display screens.
Clicking the Reload button refreshes the screen with the latest data.
Click the Submit button to apply the new settings to the device.
Note: A user name and password are required to open the Network Configuration menu page. If you modify device settings using the Network Configuration menu, the following dialog box appears when you click the Submit button.
You must restart the device to apply any changes made with the Network menu. The procedure for restarting the device is described in "Restart Tab Screen" on page 74.
The values set or modified using the Network Configuration menu can be viewed using the Network menu. See "Network Menu" on page 35.

56
Embedded
Web Server
General Tab Screen
The General tab screen is used to configure the ethernet settings for the device.
Select the desired settings from the drop-down lists, and then click the Submit button to apply the new settings.
Item Description
1. General
MAC Address Displays the device's MAC address.
Link Speed & Duplex Selects whether the negotiation mode setting is set to Auto or a fixed rate.
57
Embe
dded
W
eb S
erve
r
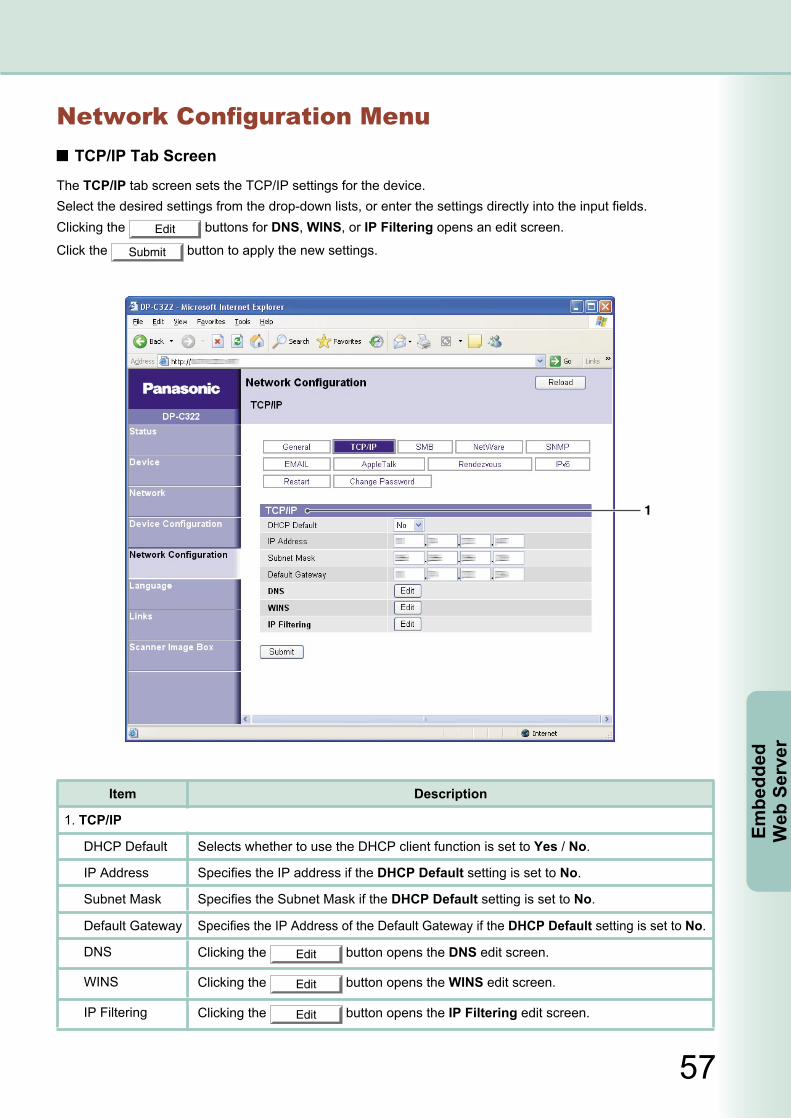
Network Configuration MenuTCP/IP Tab Screen
The TCP/IP tab screen sets the TCP/IP settings for the device.Select the desired settings from the drop-down lists, or enter the settings directly into the input fields.Clicking the Edit buttons for DNS, WINS, or IP Filtering opens an edit screen.
Click the Submit button to apply the new settings.
Item Description
1. TCP/IP
DHCP Default Selects whether to use the DHCP client function is set to Yes / No.
IP Address Specifies the IP address if the DHCP Default setting is set to No.
Subnet Mask Specifies the Subnet Mask if the DHCP Default setting is set to No.
Default Gateway Specifies the IP Address of the Default Gateway if the DHCP Default setting is set to No.
DNS Clicking the Edit button opens the DNS edit screen.
WINS Clicking the Edit button opens the WINS edit screen.
IP Filtering Clicking the Edit button opens the IP Filtering edit screen.
58
Embedded
Web Server
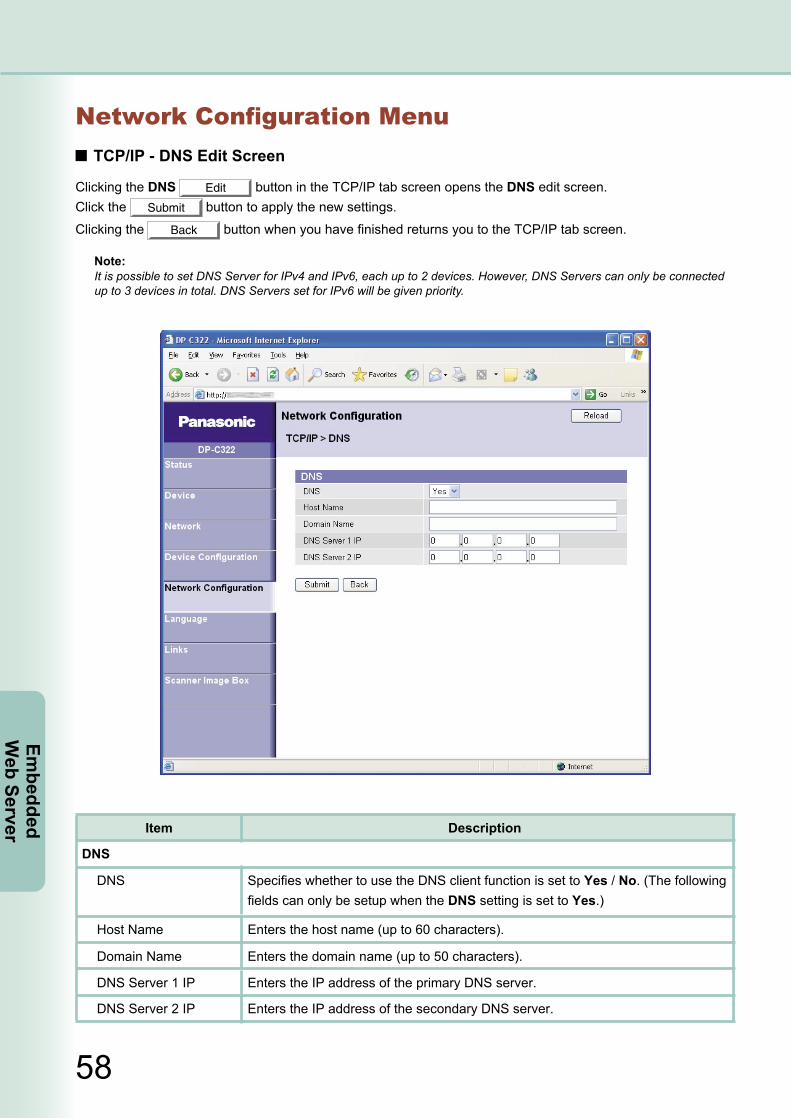
Network Configuration MenuTCP/IP - DNS Edit Screen
Clicking the DNS Edit button in the TCP/IP tab screen opens the DNS edit screen. Click the Submit button to apply the new settings.
Clicking the Back button when you have finished returns you to the TCP/IP tab screen.
Item Description
DNS
DNS Specifies whether to use the DNS client function is set to Yes / No. (The following fields can only be setup when the DNS setting is set to Yes.)
Host Name Enters the host name (up to 60 characters).
Domain Name Enters the domain name (up to 50 characters).
DNS Server 1 IP Enters the IP address of the primary DNS server.
DNS Server 2 IP Enters the IP address of the secondary DNS server.
Note:It is possible to set DNS Server for IPv4 and IPv6, each up to 2 devices. However, DNS Servers can only be connected up to 3 devices in total. DNS Servers set for IPv6 will be given priority.

59
Embe
dded
W
eb S
erve
r
Network Configuration MenuTCP/IP - WINS Edit Screen
Clicking the WINS Edit button in the TCP/IP tab screen opens the WINS edit screen. Click the Submit button to apply the new settings.Clicking the Back button when you have finished returns you to the TCP/IP tab screen.
Item Description
WINS
WINS Server 1 IP Enters the address of the primary WINS server.
WINS Server 2 IP Enters the address of the secondary WINS server.
Scope ID Enters the NetBIOS scope ID (up to 223 characters).

60
Embedded
Web Server
Network Configuration MenuTCP/IP - IP Filtering Edit Screen
Clicking the IP Filtering Edit button in the TCP/IP tab screen opens the IP Filtering edit screen. Click the Submit button to apply the new settings.
Clicking the Back button when you have finished returns you to the TCP/IP tab screen.
Item Description
IP Filtering
IP Filtering Selects whether the IP filtering function is set to On or Off. (The following fields can only be setup when the IP Filtering setting is set to On.)
Mode Selects whether to use the IP filtering mode setting is set to Deny / Allow.
Filter 1 to Filter 4
Start Address Selects the start IP Addresses for filters 1 to 4.
End Address Selects the end IP Addresses for filters 1 to 4.
61
Embe
dded
W
eb S
erve
r
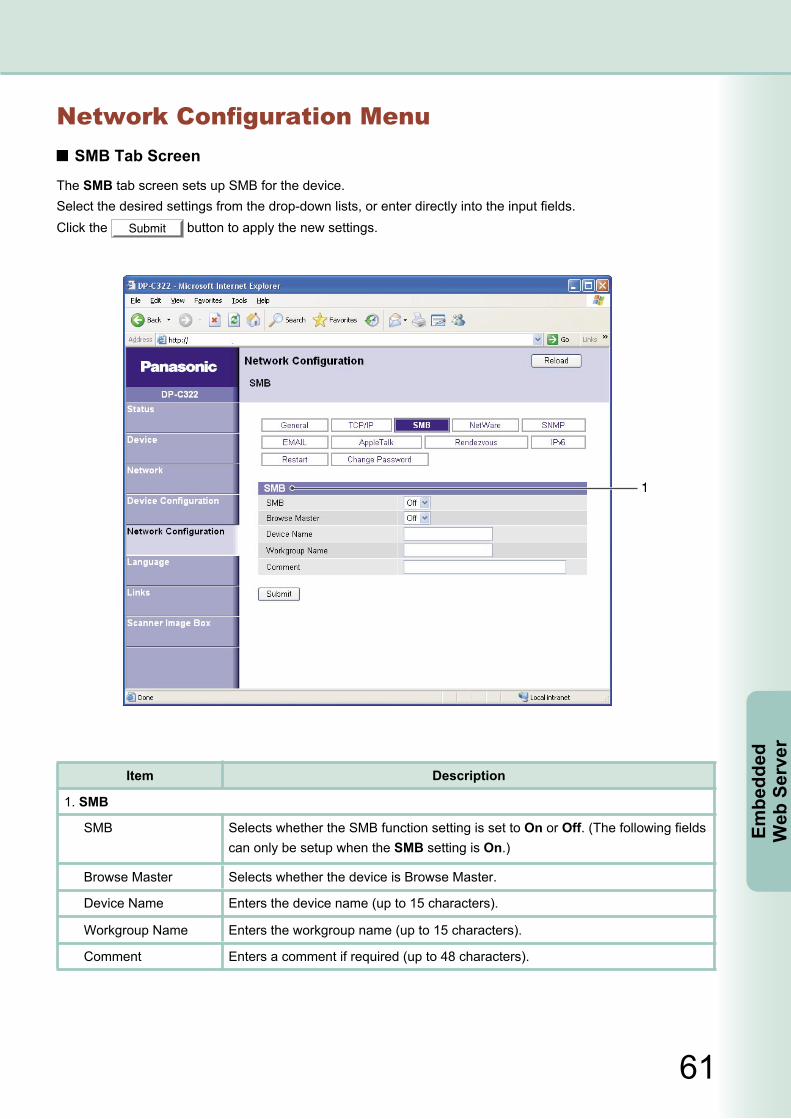
Network Configuration MenuSMB Tab Screen
The SMB tab screen sets up SMB for the device.Select the desired settings from the drop-down lists, or enter directly into the input fields. Click the Submit button to apply the new settings.
Item Description
1. SMB
SMB Selects whether the SMB function setting is set to On or Off. (The following fields can only be setup when the SMB setting is On.)
Browse Master Selects whether the device is Browse Master.
Device Name Enters the device name (up to 15 characters).
Workgroup Name Enters the workgroup name (up to 15 characters).
Comment Enters a comment if required (up to 48 characters).
62
Embedded
Web Server
63
Embe
dded
W
eb S
erve
r
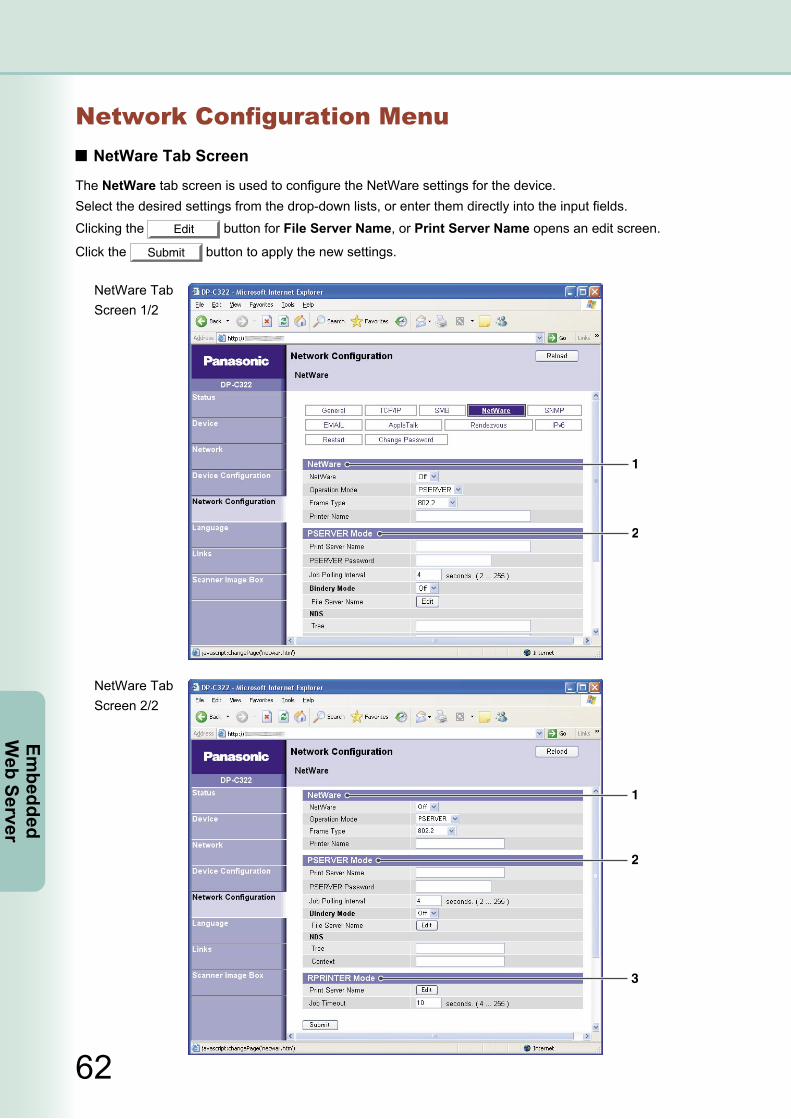
Network Configuration MenuNetWare Tab Screen
The NetWare tab screen is used to configure the NetWare settings for the device.Select the desired settings from the drop-down lists, or enter them directly into the input fields.
Clicking the Edit button for File Server Name, or Print Server Name opens an edit screen.
Click the Submit button to apply the new settings.
NetWare Tab Screen 1/2
NetWare Tab Screen 2/2
62
Embedded
Web Server
63
Embe
dded
W
eb S
erve
r
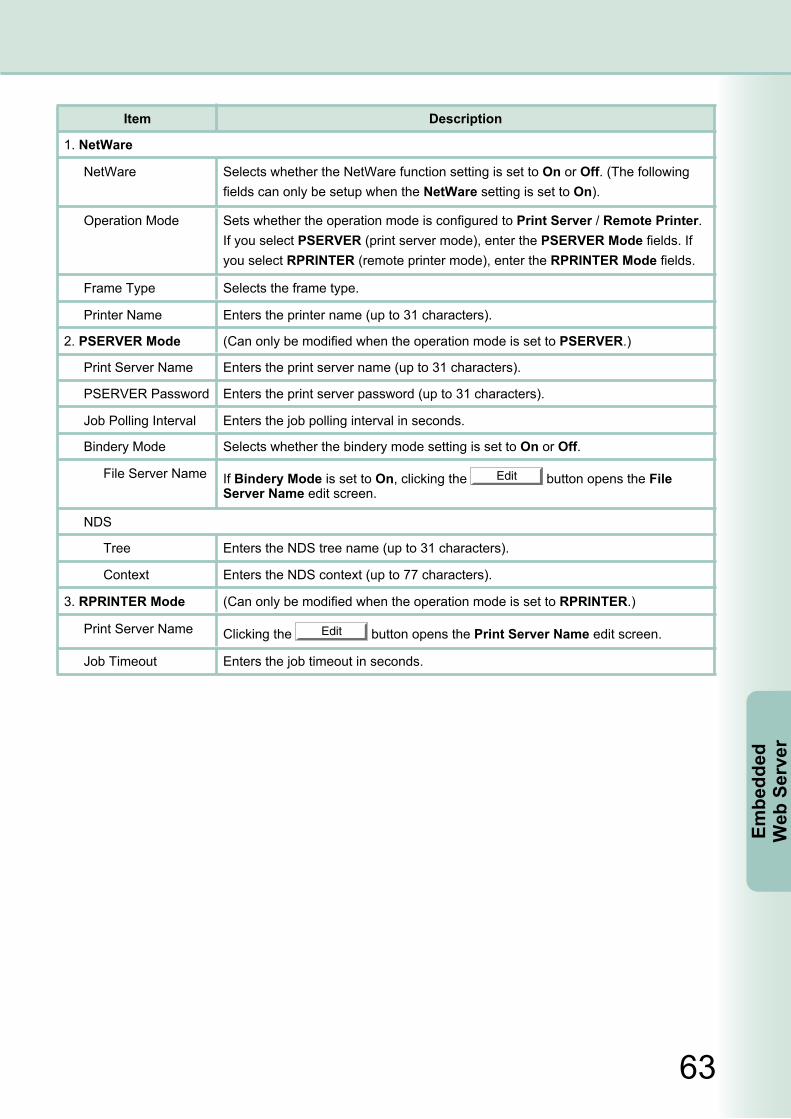
Item Description
1. NetWare
NetWare Selects whether the NetWare function setting is set to On or Off. (The following fields can only be setup when the NetWare setting is set to On).
Operation Mode Sets whether the operation mode is configured to Print Server / Remote Printer.If you select PSERVER (print server mode), enter the PSERVER Mode fields. If you select RPRINTER (remote printer mode), enter the RPRINTER Mode fields.
Frame Type Selects the frame type.
Printer Name Enters the printer name (up to 31 characters).
2. PSERVER Mode (Can only be modified when the operation mode is set to PSERVER.)
Print Server Name Enters the print server name (up to 31 characters).
PSERVER Password Enters the print server password (up to 31 characters).
Job Polling Interval Enters the job polling interval in seconds.
Bindery Mode Selects whether the bindery mode setting is set to On or Off.
File Server Name If Bindery Mode is set to On, clicking the Edit button opens the File Server Name edit screen.
NDS
Tree Enters the NDS tree name (up to 31 characters).
Context Enters the NDS context (up to 77 characters).
3. RPRINTER Mode (Can only be modified when the operation mode is set to RPRINTER.)
Print Server Name Clicking the Edit button opens the Print Server Name edit screen.
Job Timeout Enters the job timeout in seconds.
64
Embedded
Web Server
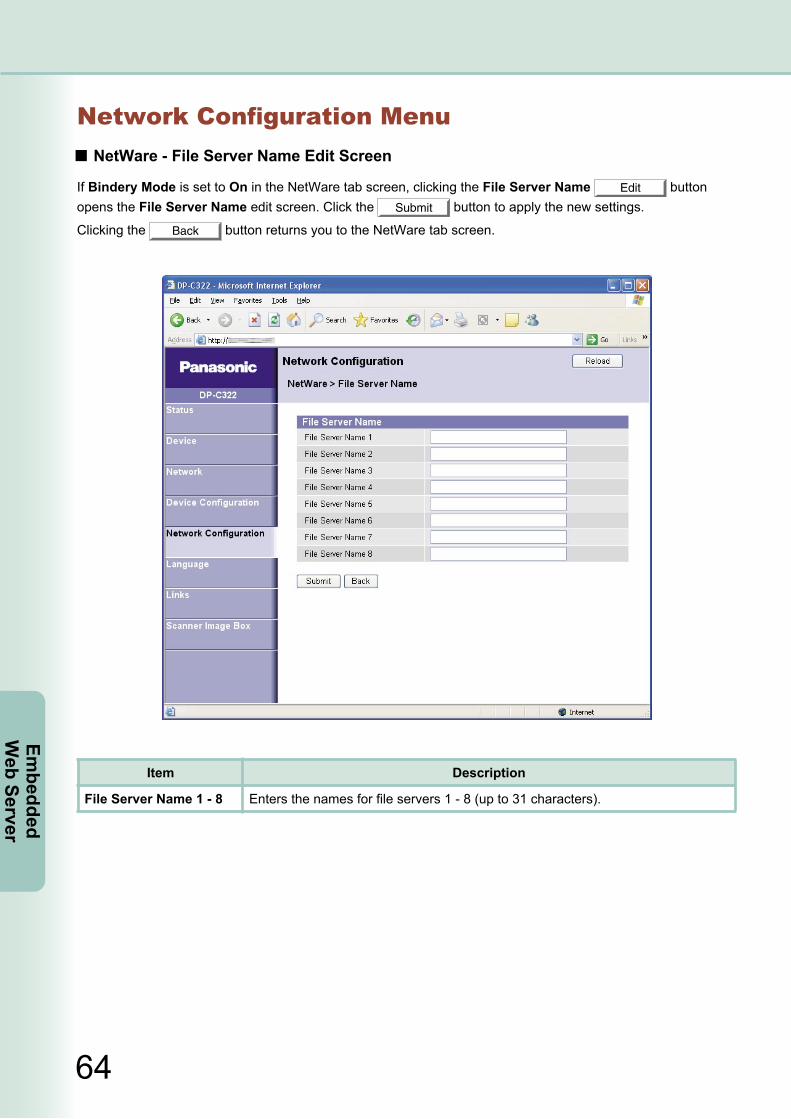
Network Configuration MenuNetWare - File Server Name Edit Screen
If Bindery Mode is set to On in the NetWare tab screen, clicking the File Server Name Edit button opens the File Server Name edit screen. Click the Submit button to apply the new settings.
Clicking the Back button returns you to the NetWare tab screen.
Item Description
File Server Name 1 - 8 Enters the names for file servers 1 - 8 (up to 31 characters).

65
Embe
dded
W
eb S
erve
r
Network Configuration MenuNetWare - Print Server Name Edit Screen
If the Operation Mode in the NetWare tab screen is set to RPRINTER, clicking the Print Server Name Edit button opens the Print Server Name edit screen. Click the Submit button to apply the new
settings.
Clicking the Back button returns you to the NetWare tab screen.
Item Description
Print Server Name 1 - 8 Enters the names of print servers 1 - 8 (up to 31 characters).

66
Embedded
Web Server
Network Configuration MenuSNMP Tab Screen
The SNMP tab screen is used to configure the SNMP for the device.
Configure the settings and then click the Submit button.
Item Description
1. SNMP
Community (Read Only) Enters the read only community name (up to 15 characters). (The entered name is not displayed with the correct character for the security purpose.)
Community (Read Write) Enters the read write community name (up to 15 characters). (The entered name is not displayed with the correct character for the security purpose.)
SysContact Enters the MIB2 SysContact (up to 31 characters).
SysName Enters the MIB2 SysName (up to 31 characters).
SysLocation Enters the MIB2 SysLocation (up to 31 characters).
67
Embe
dded
W
eb S
erve
r
Continued on the next page...
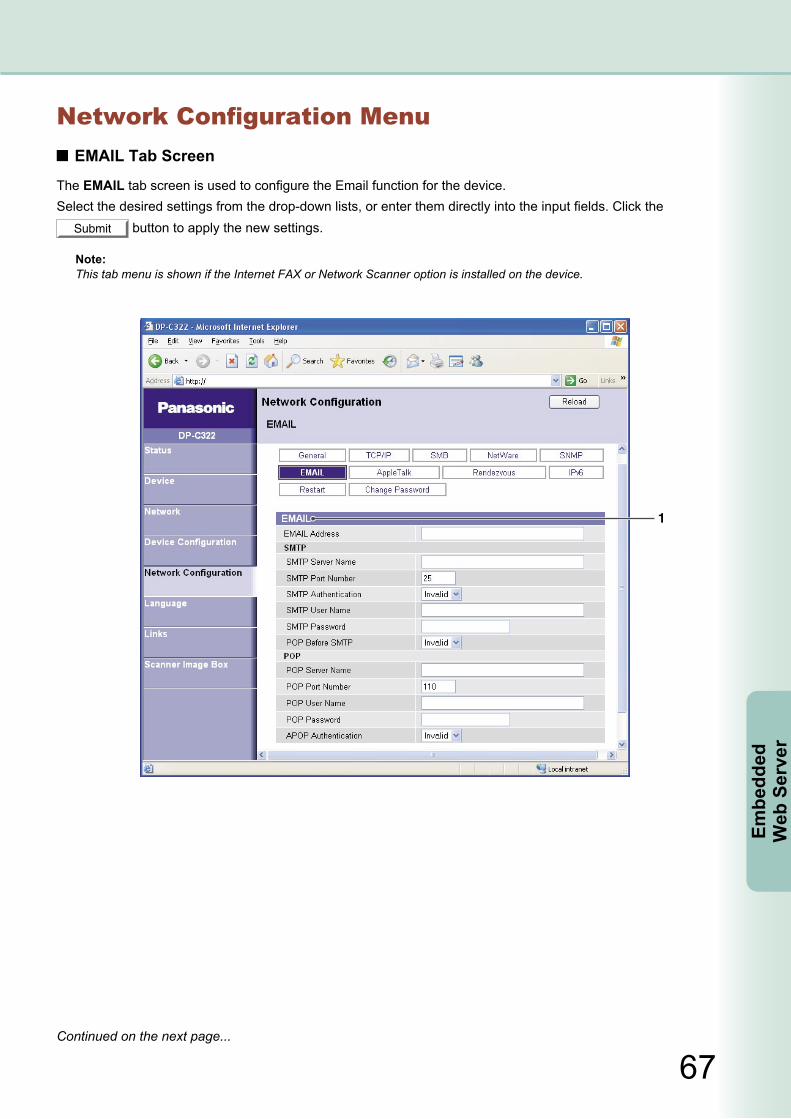
Network Configuration MenuEMAIL Tab Screen
The EMAIL tab screen is used to configure the Email function for the device.Select the desired settings from the drop-down lists, or enter them directly into the input fields. Click the
Submit button to apply the new settings.
Note:This tab menu is shown if the Internet FAX or Network Scanner option is installed on the device.
68
Embedded
Web Server
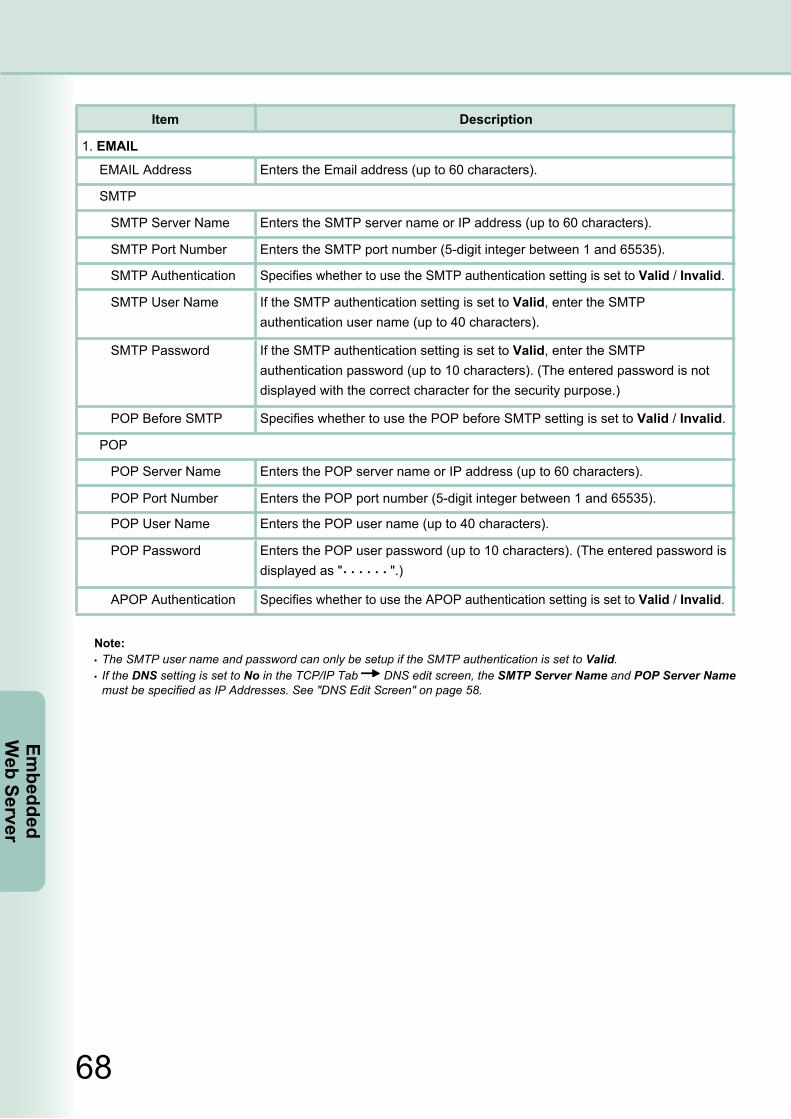
Item Description
1. EMAIL
EMAIL Address Enters the Email address (up to 60 characters).
SMTP
SMTP Server Name Enters the SMTP server name or IP address (up to 60 characters).
SMTP Port Number Enters the SMTP port number (5-digit integer between 1 and 65535).
SMTP Authentication Specifies whether to use the SMTP authentication setting is set to Valid / Invalid.
SMTP User Name If the SMTP authentication setting is set to Valid, enter the SMTP authentication user name (up to 40 characters).
SMTP Password If the SMTP authentication setting is set to Valid, enter the SMTP authentication password (up to 10 characters). (The entered password is not displayed with the correct character for the security purpose.)
POP Before SMTP Specifies whether to use the POP before SMTP setting is set to Valid / Invalid.
POP
POP Server Name Enters the POP server name or IP address (up to 60 characters).
POP Port Number Enters the POP port number (5-digit integer between 1 and 65535).
POP User Name Enters the POP user name (up to 40 characters).
POP Password Enters the POP user password (up to 10 characters). (The entered password is displayed as " ".)
APOP Authentication Specifies whether to use the APOP authentication setting is set to Valid / Invalid.
Note: The SMTP user name and password can only be setup if the SMTP authentication is set to Valid. If the DNS setting is set to No in the TCP/IP Tab DNS edit screen, the SMTP Server Name and POP Server Name must be specified as IP Addresses. See "DNS Edit Screen" on page 58.
69
Embe
dded
W
eb S
erve
r
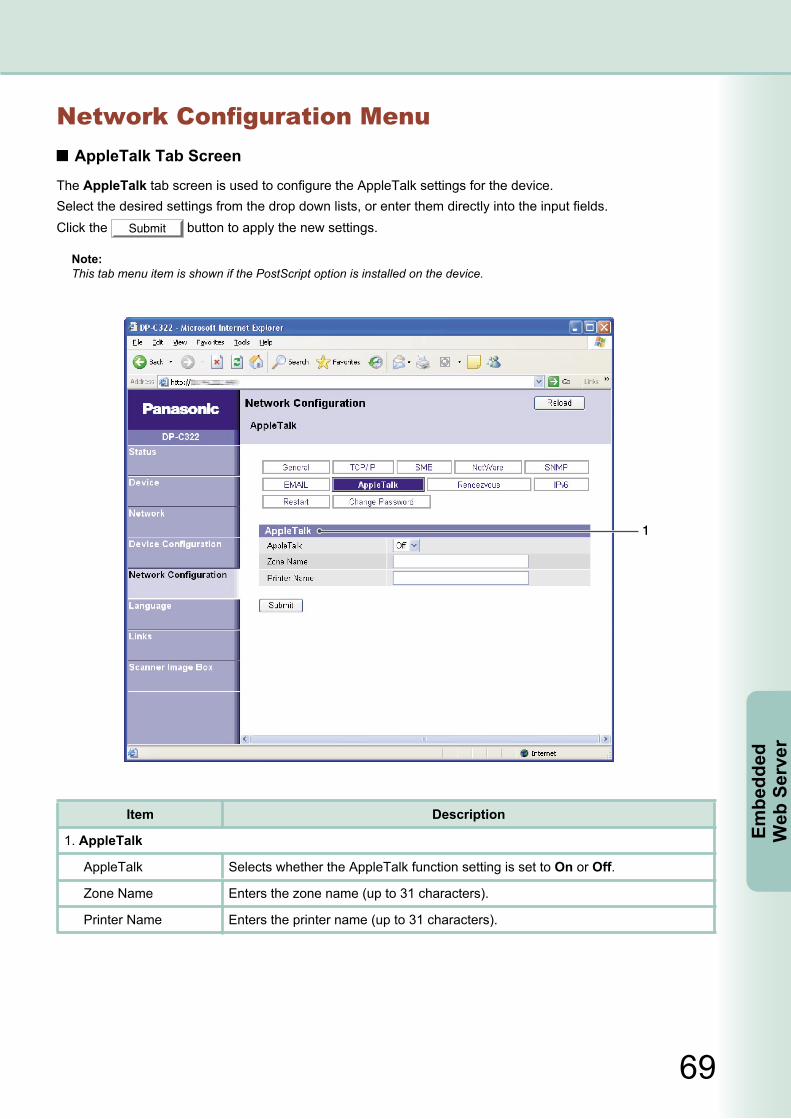
Network Configuration MenuAppleTalk Tab Screen
The AppleTalk tab screen is used to configure the AppleTalk settings for the device.Select the desired settings from the drop down lists, or enter them directly into the input fields. Click the Submit button to apply the new settings.
Note:This tab menu item is shown if the PostScript option is installed on the device.
Item Description
1. AppleTalk
AppleTalk Selects whether the AppleTalk function setting is set to On or Off.
Zone Name Enters the zone name (up to 31 characters).
Printer Name Enters the printer name (up to 31 characters).
70
Embedded
Web Server
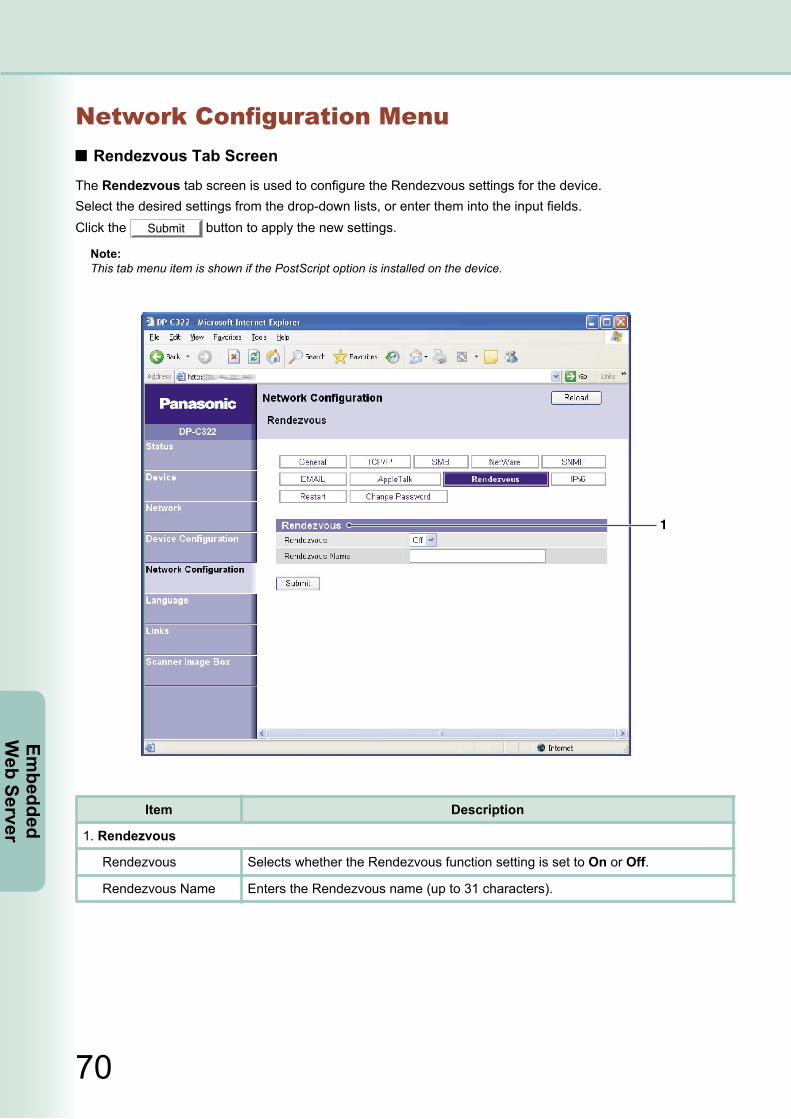
Network Configuration MenuRendezvous Tab Screen
The Rendezvous tab screen is used to configure the Rendezvous settings for the device.Select the desired settings from the drop-down lists, or enter them into the input fields. Click the Submit button to apply the new settings.
Note:This tab menu item is shown if the PostScript option is installed on the device.
Item Description
1. Rendezvous
Rendezvous Selects whether the Rendezvous function setting is set to On or Off.
Rendezvous Name Enters the Rendezvous name (up to 31 characters).

71
Embe
dded
W
eb S
erve
r
Continued on the next page...
Network Configuration MenuIPv6 Tab Screen
The IPv6 tab screen is used to configure the IPv6 settings for the device.
Select the desired settings from the drop-down lists, or enter them directly into the input fields.
Clicking the IPv6 Filtering Edit button opens an edit screen.
Click the Submit button to apply the new settings.
72
Embedded
Web Server
Item Description
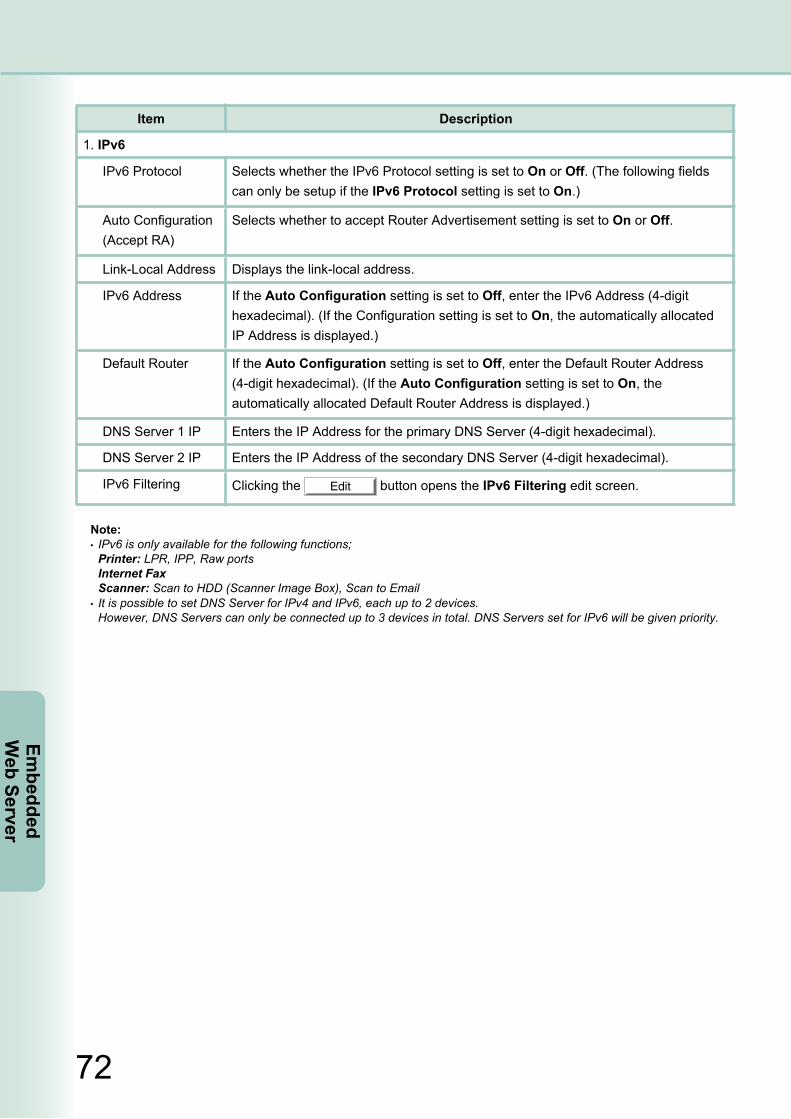
1. IPv6
IPv6 Protocol Selects whether the IPv6 Protocol setting is set to On or Off. (The following fields can only be setup if the IPv6 Protocol setting is set to On.)
Auto Configuration (Accept RA)
Selects whether to accept Router Advertisement setting is set to On or Off.
Link-Local Address Displays the link-local address.
IPv6 Address If the Auto Configuration setting is set to Off, enter the IPv6 Address (4-digit hexadecimal). (If the Configuration setting is set to On, the automatically allocated IP Address is displayed.)
Default Router If the Auto Configuration setting is set to Off, enter the Default Router Address (4-digit hexadecimal). (If the Auto Configuration setting is set to On, the automatically allocated Default Router Address is displayed.)
DNS Server 1 IP Enters the IP Address for the primary DNS Server (4-digit hexadecimal).
DNS Server 2 IP Enters the IP Address of the secondary DNS Server (4-digit hexadecimal).
IPv6 Filtering Clicking the Edit button opens the IPv6 Filtering edit screen.
Note: IPv6 is only available for the following functions; Printer: LPR, IPP, Raw ports Internet Fax Scanner: Scan to HDD (Scanner Image Box), Scan to Email It is possible to set DNS Server for IPv4 and IPv6, each up to 2 devices. However, DNS Servers can only be connected up to 3 devices in total. DNS Servers set for IPv6 will be given priority.
73
Embe
dded
W
eb S
erve
r
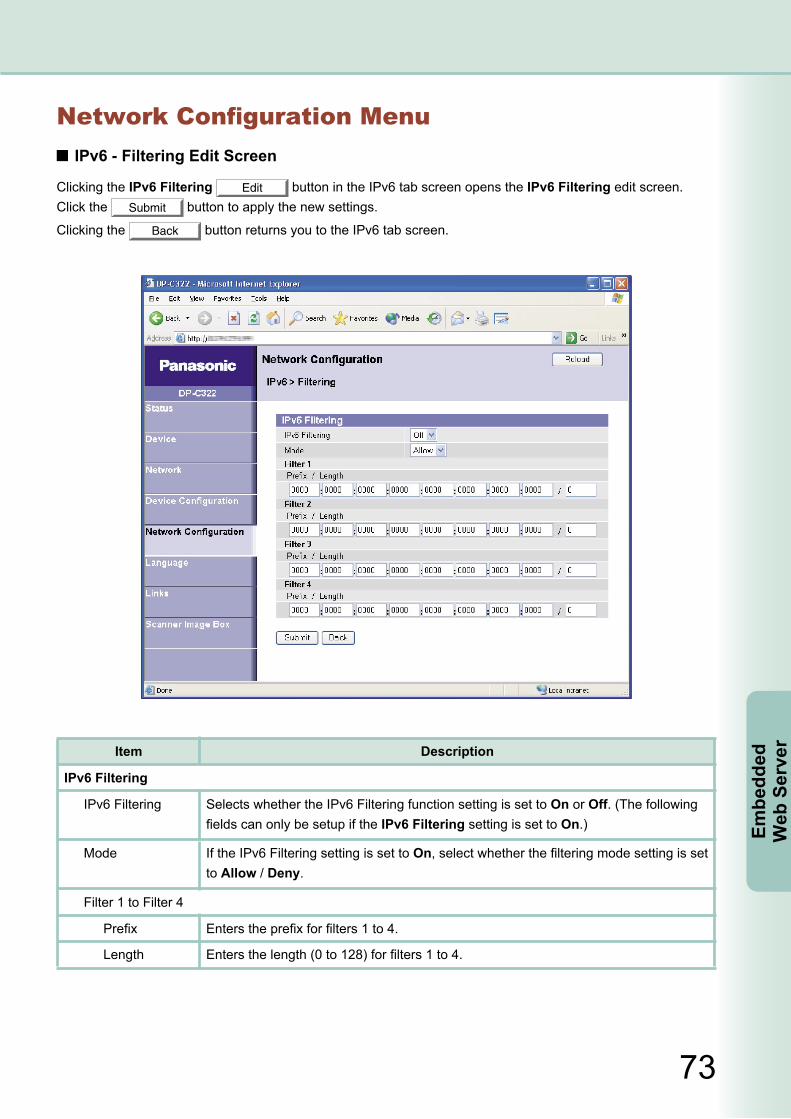
Network Configuration MenuIPv6 - Filtering Edit Screen
Clicking the IPv6 Filtering Edit button in the IPv6 tab screen opens the IPv6 Filtering edit screen. Click the Submit button to apply the new settings.
Clicking the Back button returns you to the IPv6 tab screen.
Item Description
IPv6 Filtering
IPv6 Filtering Selects whether the IPv6 Filtering function setting is set to On or Off. (The following fields can only be setup if the IPv6 Filtering setting is set to On.)
Mode If the IPv6 Filtering setting is set to On, select whether the filtering mode setting is set to Allow / Deny.
Filter 1 to Filter 4
Prefix Enters the prefix for filters 1 to 4.
Length Enters the length (0 to 128) for filters 1 to 4.
74
Embedded
Web Server
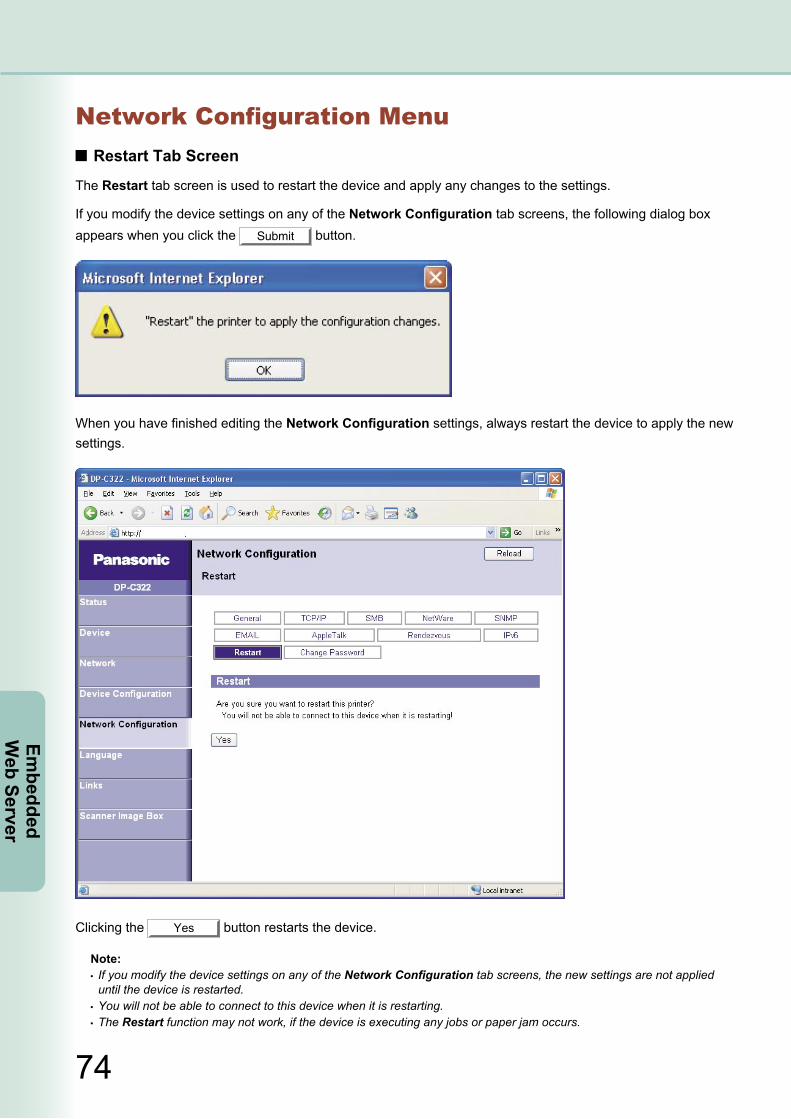
Network Configuration MenuRestart Tab Screen
The Restart tab screen is used to restart the device and apply any changes to the settings.
If you modify the device settings on any of the Network Configuration tab screens, the following dialog box appears when you click the Submit button.
When you have finished editing the Network Configuration settings, always restart the device to apply the new settings.
Clicking the Yes button restarts the device.
Note: If you modify the device settings on any of the Network Configuration tab screens, the new settings are not applied until the device is restarted.
You will not be able to connect to this device when it is restarting. The Restart function may not work, if the device is executing any jobs or paper jam occurs.
75
Embe
dded
W
eb S
erve
r
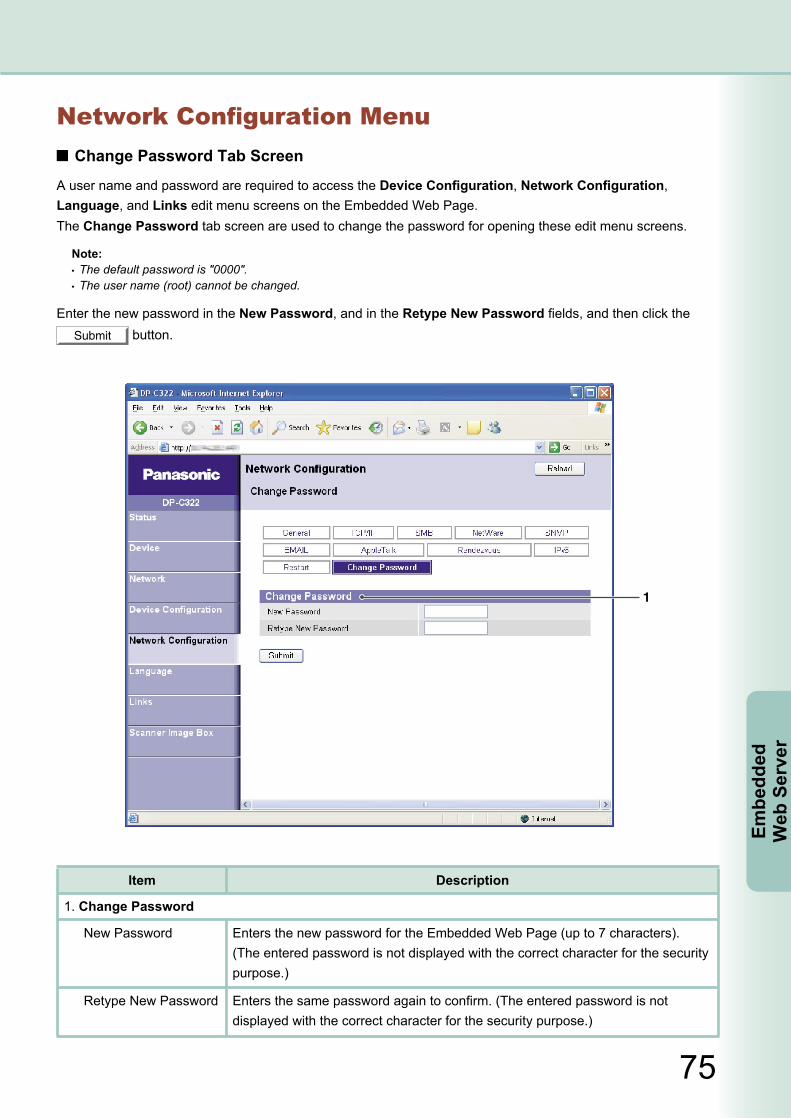
Network Configuration MenuChange Password Tab Screen
A user name and password are required to access the Device Configuration, Network Configuration, Language, and Links edit menu screens on the Embedded Web Page.The Change Password tab screen are used to change the password for opening these edit menu screens.
Note: The default password is "0000". The user name (root) cannot be changed.
Enter the new password in the New Password, and in the Retype New Password fields, and then click the Submit button.
Item Description
1. Change Password
New Password Enters the new password for the Embedded Web Page (up to 7 characters). (The entered password is not displayed with the correct character for the security purpose.)
Retype New Password Enters the same password again to confirm. (The entered password is not displayed with the correct character for the security purpose.)

76
Embedded
Web Server
Language MenuClicking the Language menu opens the Change Language screen. The Change Language screen is used to select the language used on the Embedded Web Page.
Clicking the Reload button refreshes the screen with the latest data.
Select the desired language from the drop-down list, and then click the Submit button.
Note:A user name and password are required to open the Language menu page.
Change Language Screen
Item Description
Change Language
Language Selects the desired language.

77
Embe
dded
W
eb S
erve
r
Links MenuClicking the Links menu opens the Support Information screen.
The Support Information screen displays support information, such as, who to contact if a fault occurs, and from whom to order replacement consumables.
Clicking an entered URL link opens the associated web site. You can also click the EMAIL field to send Email.
Clicking the Edit button at the bottom of the screen opens an edit screen which you can use to add, or modify the support information.
78
Embedded
Web Server
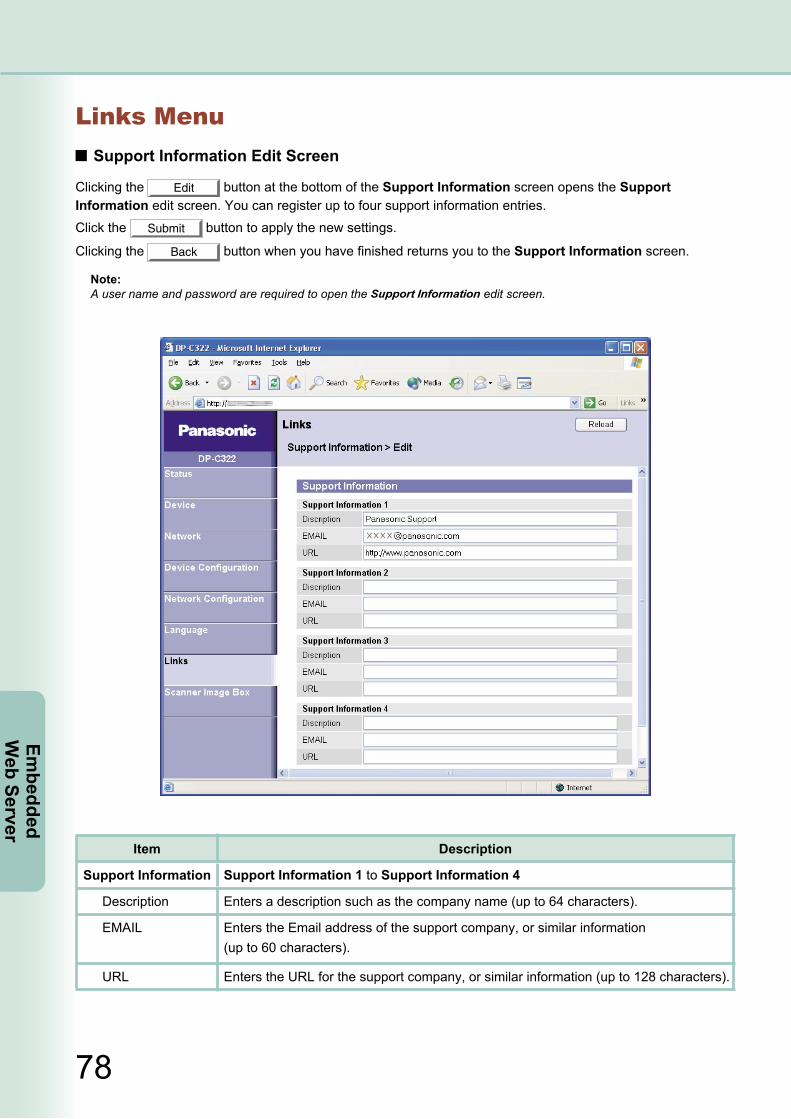
Links MenuSupport Information Edit Screen
Clicking the Edit button at the bottom of the Support Information screen opens the Support Information edit screen. You can register up to four support information entries.
Click the Submit button to apply the new settings.
Clicking the Back button when you have finished returns you to the Support Information screen.
Note:A user name and password are required to open the Support Information edit screen.
Support Information
Item Description
Support Information 1 to Support Information 4
Description Enters a description such as the company name (up to 64 characters).
EMAIL Enters the Email address of the support company, or similar information (up to 60 characters).
URL Enters the URL for the support company, or similar information (up to 128 characters).
79
Embe
dded
W
eb S
erve
r
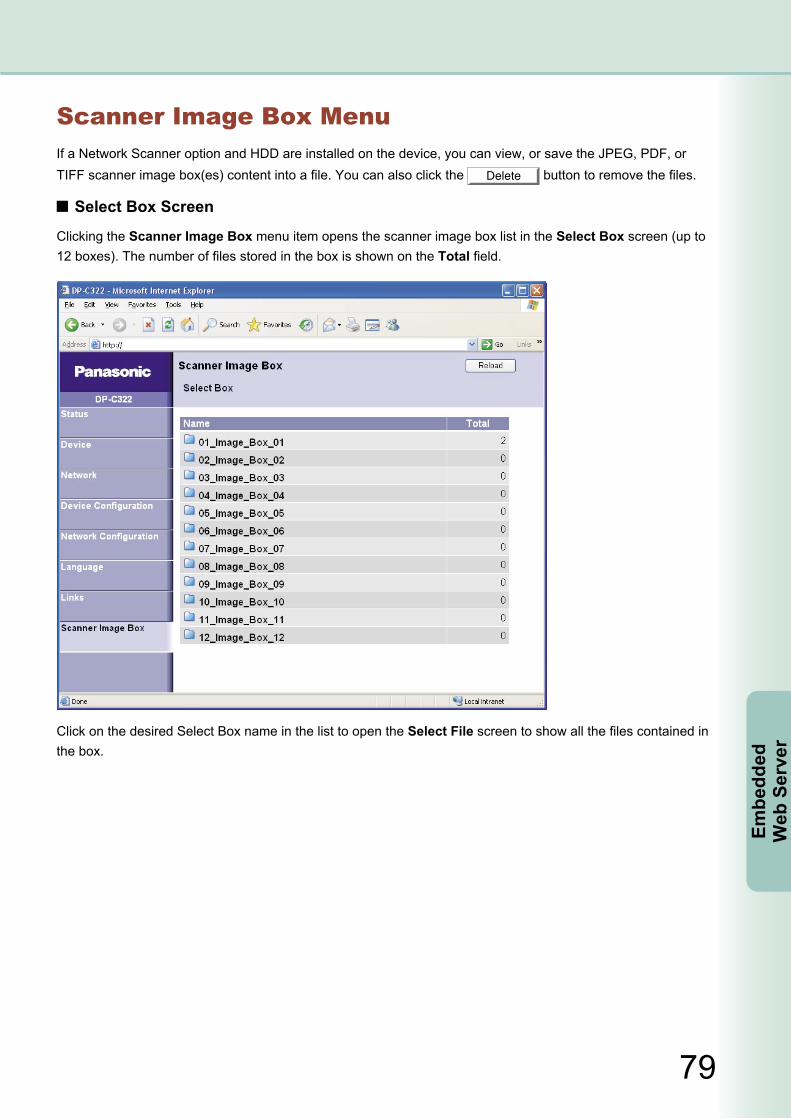
Scanner Image Box MenuIf a Network Scanner option and HDD are installed on the device, you can view, or save the JPEG, PDF, or TIFF scanner image box(es) content into a file. You can also click the Delete button to remove the files.
Select Box Screen
Clicking the Scanner Image Box menu item opens the scanner image box list in the Select Box screen (up to 12 boxes). The number of files stored in the box is shown on the Total field.
Click on the desired Select Box name in the list to open the Select File screen to show all the files contained in the box.
80
Embedded
Web Server
81
Embe
dded
W
eb S
erve
r
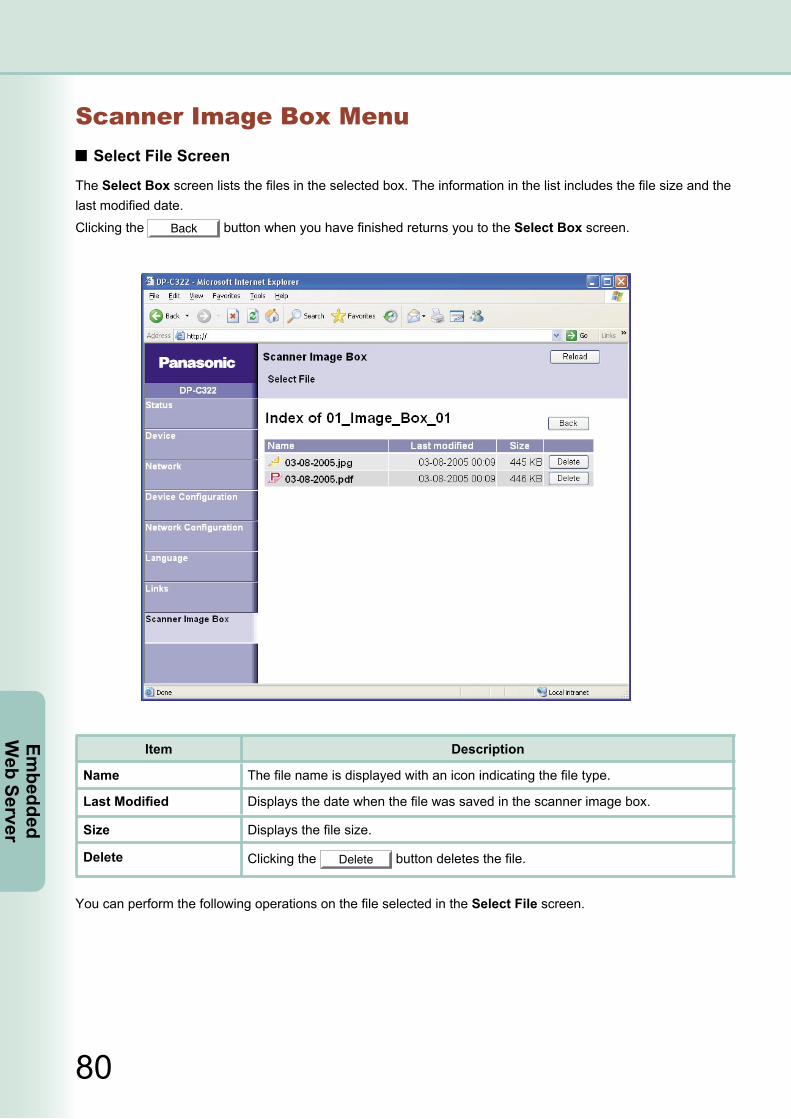
Scanner Image Box MenuSelect File Screen
The Select Box screen lists the files in the selected box. The information in the list includes the file size and the last modified date.
Clicking the Back button when you have finished returns you to the Select Box screen.
Item Description
Name The file name is displayed with an icon indicating the file type.
Last Modified Displays the date when the file was saved in the scanner image box.
Size Displays the file size.
Delete Clicking the Delete button deletes the file.
You can perform the following operations on the file selected in the Select File screen.
80
Embedded
Web Server
81
Embe
dded
W
eb S
erve
r
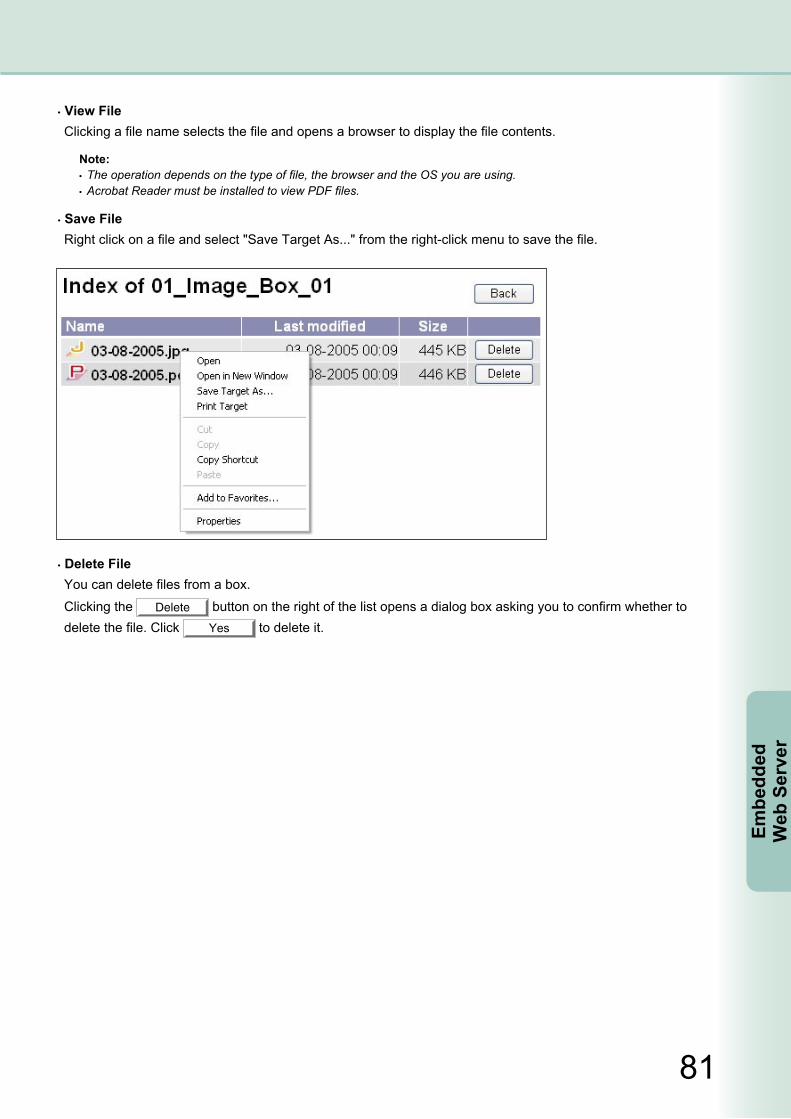
View FileClicking a file name selects the file and opens a browser to display the file contents.
Note: The operation depends on the type of file, the browser and the OS you are using. Acrobat Reader must be installed to view PDF files.
Save FileRight click on a file and select "Save Target As..." from the right-click menu to save the file.
Delete FileYou can delete files from a box.
Clicking the Delete button on the right of the list opens a dialog box asking you to confirm whether to delete the file. Click Yes to delete it.
82
Appendix
83
App
endi
x
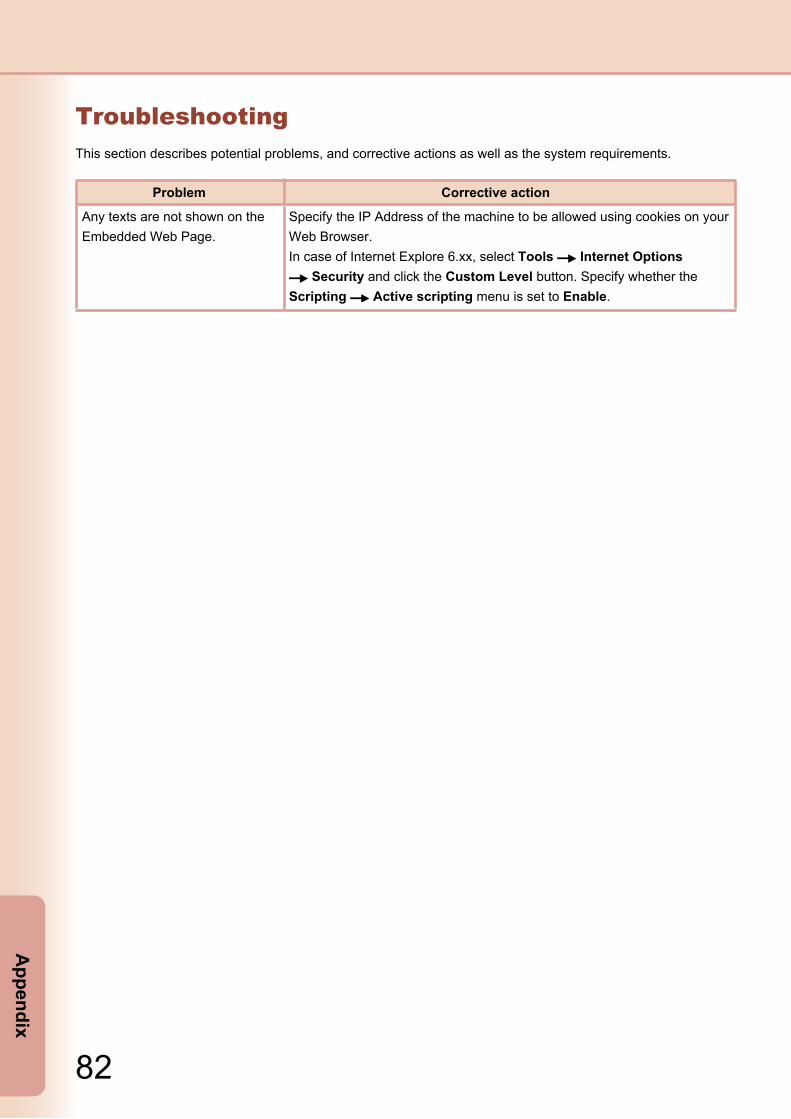
TroubleshootingThis section describes potential problems, and corrective actions as well as the system requirements.
Problem Corrective action
Any texts are not shown on the Embedded Web Page.
Specify the IP Address of the machine to be allowed using cookies on your Web Browser.In case of Internet Explore 6.xx, select Tools Internet Options
Security and click the Custom Level button. Specify whether the Scripting Active scripting menu is set to Enable.
82
Appendix
83
App
endi
x
Memo

PANASONIC DIGITAL DOCUMENT COMPANY MAKES NO WARRANTIES, GUARANTEES OR REPRESENTATIONS, EXPRESSED OR IMPLIED, TO THE CUSTOMER WITH RESPECT TO THIS PANASONIC MACHINE, INCLUDING BUT NOT LIMITED TO, ANY IMPLIED WARRANTY OF MERCHANTABILITY OR FITNESS FOR A PARTICULAR PURPOSE.
PANASONIC DIGITAL DOCUMENT COMPANY ASSUMES NO RISK AND SHALL NOT BE SUBJECT TO LIABILITY FOR ANY DAMAGE, INCLUDING, BUT NOT LIMITED TO DIRECT, INDIRECT, SPECIAL, INCIDENTAL OR CONSEQUENTIAL DAMAGES OR LOSS OF PROFITS SUSTAINED BY THE CUSTOMER IN CONNECTION WITH THE USE OR APPLICATION OF THIS PANASONIC MACHINE. SEE YOUR DEALER FOR DETAILS OF DEALER’S WARRANTY.
USA Only
WARRANTY
For Service, Call:
Panasonic Digital Document Company,Unit of Panasonic Corporation of North AmericaTwo Panasonic WaySecaucus, New Jersey 07094http://panasonic.co.jp/pcc/en/
Panasonic Canada Inc.5770 Ambler DriveMississauga, Ontario L4W 2T3http://www.panasonic.ca
For Customer Support (Except forUSA and Canada Users):Panasonic Communications Co., Ltd.Fukuoka, Japanhttp://www.panasonic.co.jp/global/
T0305-4055PJQMC0404ZEMay 2005Published in Japan