driver’s handbook - prince edward island · the purpose of this driver’s handbook is to help...
TRANSCRIPT

Driver’s Handbook
The Department of Transportation and Infrastructure Renewal, Highway Safety
Driver’s H
and
bo
ok
Prince Ed
ward
Island

©Crown Copyright, Government of Prince Edward Island, 2002
Unless otherwise specifically stated herein, all text, graphics, photographs and other material are the property of the Government of Prince Edward Island. All rights reserved. All dates and Criminal Code references are correct as of the date printed and are subject to change without notice.
Edited by: Highway Safety staff, Strategic Marketing and Graphic Design and The PEI Literacy AllianceOriginal Design and Illustrations: Graphic Communications Inc.Produced by: The Department of Transportation and Infrastructure Renewal, Highway Safety
Revised: Spring 2011
Please return to any Highway Safety Office or
Access PEI Centre
Please note the Driver`s Handbook is intended as a guide. For exact wording on items related to Statutes and/or Regulations please refer to the PEI Highway Traffic Act and Regulations or visit the following website: www.gov.pe.ca.

i
Letter from the MinisterThe purpose of this Driver’s Handbook is to help you with the skills to prevent against collisions and injuryto you and others on our roads. Driving is a privilege and as a driver, you have a responsibility to contribute to the overall safety of Island roads.
By following the safe driving practices in this book you will reduce the risk to yourself and to others on ourroads. New drivers will want to study the Driver’s Handbook and experienced drivers will find it a convenient reference for refreshing their knowledge.
Driving conditions are often affected by things beyond your control. Changing weather, road conditions and mechanical failures are just a few examples. Other drivers, pedestrians, and cyclists also make use of our roads and must be respected by drivers. Remember, as a new driver, safer roads begin with you.
Thank you,The MinisterDepartment of Transportation and Infrastructure Renewal

iiiTable of Contents
CHAPTER 1: YOUR DRIVER’S LICENCEChapter 1: Class 5 Driver’s Licence Checklist
• Class 5 Checklist Form . . . . . . . . . . . . . . . . . . . . . . . . . . 2Chapter 1: Your Driver’s Licence
• Introduction. . . . . . . . . . . . . . . . . . . . . . . . . . . . . . . . . . . . 3• Who May Apply for an Instruction Permit . . . . . . . . 3• Documents Required . . . . . . . . . . . . . . . . . . . . . . . . . . . 3• Instruction Permit . . . . . . . . . . . . . . . . . . . . . . . . . . . . . . 4• Graduated Driver Licence Program Restrictions. . 5• Farm Tractor Permit. . . . . . . . . . . . . . . . . . . . . . . . . . . . . 6• Driver Education Licensing Certification Program . . . . . . . . . . . . . . . . . . . . . . . . . . . 6• Students Enrolled in a Driver Education Course . . . . . . . . . . . . . . . . . . . . . . . . 7• Driver Education Passenger Restrictions . . . . . . . . . 7
Chapter 1: What The Tests Are All About• The Knowledge Test . . . . . . . . . . . . . . . . . . . . . . . . . . . . 8• The Vision Test . . . . . . . . . . . . . . . . . . . . . . . . . . . . . . . . . . 9• The Novice Driver Course . . . . . . . . . . . . . . . . . . . . . . 10
• The Road Test. . . . . . . . . . . . . . . . . . . . . . . . . . . . . . . . . . 10• The Purposes of The Road Test . . . . . . . . . . . . . . . . . 11
Chapter 1: Classified Licenses• Allowing Someone to Drive Your Vehicle. . . . . . . . 13• Motorcycle Operators’ Licences . . . . . . . . . . . . . . . . 13• Change of Name or Address. . . . . . . . . . . . . . . . . . . . 13• Lost, Destroyed or Illegible Licences . . . . . . . . . . . . 14• Out-of-Province Drivers’ Licences . . . . . . . . . . . . . . . 14• Licence Exchange. . . . . . . . . . . . . . . . . . . . . . . . . . . . . . 15• Instruction Permit (Class 7) Exchange. . . . . . . . . . . 16• Expired Instruction Permits . . . . . . . . . . . . . . . . . . . . 16• Renewing or Obtaining a Driver’s Licence. . . . . . . 16• Class 1. . . . . . . . . . . . . . . . . . . . . . . . . . . . . . . . . . . . . . . . . 17• Class 2. . . . . . . . . . . . . . . . . . . . . . . . . . . . . . . . . . . . . . . . . 18• Class 3. . . . . . . . . . . . . . . . . . . . . . . . . . . . . . . . . . . . . . . . . 18• Class 4. . . . . . . . . . . . . . . . . . . . . . . . . . . . . . . . . . . . . . . . . 19• Class 5. . . . . . . . . . . . . . . . . . . . . . . . . . . . . . . . . . . . . . . . . 19• Class 6. . . . . . . . . . . . . . . . . . . . . . . . . . . . . . . . . . . . . . . . . 20• Class 7. . . . . . . . . . . . . . . . . . . . . . . . . . . . . . . . . . . . . . . . . 21

ivTable of Contents
• Class 8. . . . . . . . . . . . . . . . . . . . . . . . . . . . . . . . . . . . . . . . . 21• Class 9. . . . . . . . . . . . . . . . . . . . . . . . . . . . . . . . . . . . . . . . . 22Chapter 1: Vehicle Registration• In-Transit Permits . . . . . . . . . . . . . . . . . . . . . . . . . . . . . . 22• Application for Registration . . . . . . . . . . . . . . . . . . . . 23• Number Plates. . . . . . . . . . . . . . . . . . . . . . . . . . . . . . . . . 23• Personalized Plates . . . . . . . . . . . . . . . . . . . . . . . . . . . . 24• Parking Permit for the Physically Challenged. . . . 24• Registration Permit . . . . . . . . . . . . . . . . . . . . . . . . . . . . 24• Motorcycle Registration. . . . . . . . . . . . . . . . . . . . . . . . 25• Off-Highway Vehicles . . . . . . . . . . . . . . . . . . . . . . . . . . 25• Registration Of Snowmobiles . . . . . . . . . . . . . . . . . . 27• Off-Highway Vehicle Information . . . . . . . . . . . . . . . 27• Change of Name or Address. . . . . . . . . . . . . . . . . . . . 28• Expiration of Registration . . . . . . . . . . . . . . . . . . . . . . 28• Non-resident Privileges . . . . . . . . . . . . . . . . . . . . . . . . 28• Transfer of Ownership . . . . . . . . . . . . . . . . . . . . . . . . . 29
Chapter 1: Motor Vehicle Safety Inspection • Rejected Vehicles . . . . . . . . . . . . . . . . . . . . . . . . . . . . . . 30
Chapter 1: Required Vehicle Equipment • Head Lamps and Rear Lamps. . . . . . . . . . . . . . . . . . . 31• Head Lamps . . . . . . . . . . . . . . . . . . . . . . . . . . . . . . . . . . . 31• Tail Lamps . . . . . . . . . . . . . . . . . . . . . . . . . . . . . . . . . . . . . 32• Flashing Lights . . . . . . . . . . . . . . . . . . . . . . . . . . . . . . . . 32• Clearance Lamps and Reflectors. . . . . . . . . . . . . . . . 33• Stop Lights . . . . . . . . . . . . . . . . . . . . . . . . . . . . . . . . . . . . 33• Signal Lights. . . . . . . . . . . . . . . . . . . . . . . . . . . . . . . . . . . 33• Parking Lights . . . . . . . . . . . . . . . . . . . . . . . . . . . . . . . . . 33• Brakes . . . . . . . . . . . . . . . . . . . . . . . . . . . . . . . . . . . . . . . . . 34• Horn . . . . . . . . . . . . . . . . . . . . . . . . . . . . . . . . . . . . . . . . . . 34• Mirror . . . . . . . . . . . . . . . . . . . . . . . . . . . . . . . . . . . . . . . . . 34• Windshield and Windows . . . . . . . . . . . . . . . . . . . . . . 34• Tinted Glass or Window Glazing . . . . . . . . . . . . . . . . 35• Windshield Wipers . . . . . . . . . . . . . . . . . . . . . . . . . . . . . 35• Ornaments . . . . . . . . . . . . . . . . . . . . . . . . . . . . . . . . . . . . 35• Flag or Light at End of Load . . . . . . . . . . . . . . . . . . . . 35• Slow-Moving Vehicle Sign. . . . . . . . . . . . . . . . . . . . . . 35• Muffler . . . . . . . . . . . . . . . . . . . . . . . . . . . . . . . . . . . . . . . . 36

vTable of Contents
• Speedometer, Bumper, Safety Glass, Tires . . . . . . . 36• Flares or Lanterns . . . . . . . . . . . . . . . . . . . . . . . . . . . . . . 36• Fire Extinguishers . . . . . . . . . . . . . . . . . . . . . . . . . . . . . . 37• Width, Height and Length of Vehicle . . . . . . . . . . . . 37• Transportation of Dangerous Goods . . . . . . . . . . . . 37
Chapter 1: Transportation of Dangerous Goods . . . . 38Chapter 1: Help Protect the Environment . . . . . . . . . . 39
• Save Energy, Save Money . . . . . . . . . . . . . . . . . . . . . . 39• Winter Tips for Driver’s – Driving Habits. . . . . . . . . 41
CHAPTER 2: RULES OF THE ROADChapter 2: Driver Responsibility . . . . . . . . . . . . . . . . . . . 46
• Infants . . . . . . . . . . . . . . . . . . . . . . . . . . . . . . . . . . . . . . . . 47• Toddlers . . . . . . . . . . . . . . . . . . . . . . . . . . . . . . . . . . . . . . . 48• Preschoolers. . . . . . . . . . . . . . . . . . . . . . . . . . . . . . . . . . . 48• Booster Seats . . . . . . . . . . . . . . . . . . . . . . . . . . . . . . . . . . 48• Proper Fit of Seat belts . . . . . . . . . . . . . . . . . . . . . . . . . 49• Air Bags . . . . . . . . . . . . . . . . . . . . . . . . . . . . . . . . . . . . . . . 49• Some Seat belt and Air Bag Facts . . . . . . . . . . . . . . . 50
Chapter 2: Rules of The Road . . . . . . . . . . . . . . . . . . . . . . 52 • Right-of-Way at Three-Way or Four-Way Intersections Controlled by Stop Signs . . . . . . . . . 52
• Right-of-Way of a Car Turning Left . . . . . . . . . . . . . . 53• Right-of- Way at Lanes, Driveways and Alleys. . . . 53• Right-of Way at Stop Signs . . . . . . . . . . . . . . . . . . . . . 54• Right-of Way of Emergency Vehicles . . . . . . . . . . . . 55• Right-of-Way of Funeral Processions . . . . . . . . . . . . 55• Right-of-Way at Yield Signs . . . . . . . . . . . . . . . . . . . . . 56• Pedestrians’ Rights and Duties at Intersections Controlled by Traffic Signals . . . . . . . . . . . . . . . . . . . . 56• Pedestrians’ Rights and Duties at Lights Flashing Red. . . . . . . . . . . . . . . . . . . . . . . . . . 57• Flashing Amber. . . . . . . . . . . . . . . . . . . . . . . . . . . . . . . . 57• Pedestrians’ Rights and Duties at Intersections With No Traffic Signals. . . . . . . . . . 57• Vehicles Stopped for Pedestrians . . . . . . . . . . . . . . . 58• Advice to Pedestrians . . . . . . . . . . . . . . . . . . . . . . . . . . 58• Advice To Drivers . . . . . . . . . . . . . . . . . . . . . . . . . . . . . . 59

viTable of Contents
• School Crosswalks . . . . . . . . . . . . . . . . . . . . . . . . . . . . . 66• Special Crosswalks . . . . . . . . . . . . . . . . . . . . . . . . . . . . . 66• Crosswalks With Traffic Signals . . . . . . . . . . . . . . . . . 66• Pavement Markings. . . . . . . . . . . . . . . . . . . . . . . . . . . . 66• Yellow Lines . . . . . . . . . . . . . . . . . . . . . . . . . . . . . . . . . . . 67• White Lines . . . . . . . . . . . . . . . . . . . . . . . . . . . . . . . . . . . . 67• Diagonal Markings/Crosshatches. . . . . . . . . . . . . . . 68• Stop Lines . . . . . . . . . . . . . . . . . . . . . . . . . . . . . . . . . . . . . 68• Crosswalk Lines. . . . . . . . . . . . . . . . . . . . . . . . . . . . . . . . 68• Intersection Arrows . . . . . . . . . . . . . . . . . . . . . . . . . . . . 68Chapter 3: Traffic Signs . . . . . . . . . . . . . . . . . . . . . . . . . . 69• Sign Shapes and Their Meanings . . . . . . . . . . . . . . . 69• Stop Sign − White Letters on Red Background . . 69• Yield Sign − Red on White . . . . . . . . . . . . . . . . . . . . . . 70• Vertical Rectangle . . . . . . . . . . . . . . . . . . . . . . . . . . . . . 70• Playground Warning Sign . . . . . . . . . . . . . . . . . . . . . . 70• Construction Signs. . . . . . . . . . . . . . . . . . . . . . . . . . . . . 71• Information Signs. . . . . . . . . . . . . . . . . . . . . . . . . . . . . . 72• Regulatory Signs. . . . . . . . . . . . . . . . . . . . . . . . . . . . . . . 73
CHAPTER 3: SIGNS, PAVEMENT MARKINGS, AND WORK ZONESChapter 3: Traffic Signals . . . . . . . . . . . . . . . . . . . . . . . . . . 62
• Green Lights. . . . . . . . . . . . . . . . . . . . . . . . . . . . . . . . . . . 62• Amber Lights . . . . . . . . . . . . . . . . . . . . . . . . . . . . . . . . . . 62• Red Light . . . . . . . . . . . . . . . . . . . . . . . . . . . . . . . . . . . . . . 63• Right Turns At Red Light . . . . . . . . . . . . . . . . . . . . . . . 63• Flashing Red Light . . . . . . . . . . . . . . . . . . . . . . . . . . . . . 63• Flashing Amber Light . . . . . . . . . . . . . . . . . . . . . . . . . . 64• School Signal Lights . . . . . . . . . . . . . . . . . . . . . . . . . . . 64• Railway Crossing Lights . . . . . . . . . . . . . . . . . . . . . . . . 64• Advance Warning Signs . . . . . . . . . . . . . . . . . . . . . . . . 64• Pavement Markings. . . . . . . . . . . . . . . . . . . . . . . . . . . . 65• Railway Crossing Signs . . . . . . . . . . . . . . . . . . . . . . . . . 65• Railway Crossing Signs With A Stop Sign. . . . . . . . 65• Railway Crossing Signs With Flashing Lights And Bell . . . . . . . . . . . . . . . . . . . . . . . . . . . . . . . . 65• Crosswalks . . . . . . . . . . . . . . . . . . . . . . . . . . . . . . . . . . . . 65• Crosswalks at Intersections. . . . . . . . . . . . . . . . . . . . . 66

viiTable of Contents
• Warning Signs . . . . . . . . . . . . . . . . . . . . . . . . . . . . . . . . . 76• Lane Arrows . . . . . . . . . . . . . . . . . . . . . . . . . . . . . . . . . . . 78• Change Lane Destination Lights. . . . . . . . . . . . . . . . 80• Railway Signs . . . . . . . . . . . . . . . . . . . . . . . . . . . . . . . . . . 81• Crosswalk Signs . . . . . . . . . . . . . . . . . . . . . . . . . . . . . . . 81• Additional Signs . . . . . . . . . . . . . . . . . . . . . . . . . . . . . . . 81
CHAPTER 4: SPEED LIMITS, FOLLOWING DISTANCES AND DRIVING SKILLSChapter 4: Speed Limits, Following Distances and Driving Skills . . . . . . . . . . . . . . . . . . . . . . . . . . . . . . . . . . . . . 84
• Slow Driving. . . . . . . . . . . . . . . . . . . . . . . . . . . . . . . . . . . 85• Drag Racing . . . . . . . . . . . . . . . . . . . . . . . . . . . . . . . . . . . 85• Following Distances − The Time-Interval Formula . . . . . . . . . . . . . . . . . . . . . 85
Chapter 4: Changing Lanes. . . . . . . . . . . . . . . . . . . . . . . . 89• Changing Lanes . . . . . . . . . . . . . . . . . . . . . . . . . . . . . . . 89• Signals and Changing Lanes . . . . . . . . . . . . . . . . . . . 89• Hand Signals . . . . . . . . . . . . . . . . . . . . . . . . . . . . . . . . . . 90
Chapter 4: Turning . . . . . . . . . . . . . . . . . . . . . . . . . . . . . . . . 91• Turning at Intersections . . . . . . . . . . . . . . . . . . . . . . . . 91• Left Turns. . . . . . . . . . . . . . . . . . . . . . . . . . . . . . . . . . . . . . 92• Vehicle Position While Turning Left . . . . . . . . . . . . . 93• Right Turns on a Red Light . . . . . . . . . . . . . . . . . . . . . 94• Making U-Turns. . . . . . . . . . . . . . . . . . . . . . . . . . . . . . . . 94
Chapter 4: Passing Other Vehicles . . . . . . . . . . . . . . . . . .95• Responsibilities of Driver Being Passed . . . . . . . . . .95• Safe Passing Practices . . . . . . . . . . . . . . . . . . . . . . . . . . 96
Chapter 4: School Buses. . . . . . . . . . . . . . . . . . . . . . . . . . . 97Chapter 4: Heavy Vehicles − The No-Zones. . . . . . . . . 98
• What Are the No-Zones? . . . . . . . . . . . . . . . . . . . . . . . 98• Side No-Zones . . . . . . . . . . . . . . . . . . . . . . . . . . . . . . . . . 98• Rear No-Zones. . . . . . . . . . . . . . . . . . . . . . . . . . . . . . . . . 99• Front No-Zones . . . . . . . . . . . . . . . . . . . . . . . . . . . . . . . . 99• Backing Up in No-Zones . . . . . . . . . . . . . . . . . . . . . . . 99• Wide Right Turns. . . . . . . . . . . . . . . . . . . . . . . . . . . . . . . 99
Chapter 4: Meeting Oncoming Traffic. . . . . . . . . . . . . 100Chapter 4: Parking and Stopping . . . . . . . . . . . . . . . . . 100

viiiTable of Contents
• Parking Regulations . . . . . . . . . . . . . . . . . . . . . . . . . . 100• Steps in Parallel Parking. . . . . . . . . . . . . . . . . . . . . . . 102• Angle Parking . . . . . . . . . . . . . . . . . . . . . . . . . . . . . . . . 102
Chapter 4: Backing. . . . . . . . . . . . . . . . . . . . . . . . . . . . . . . 104 • Steps in Backing . . . . . . . . . . . . . . . . . . . . . . . . . . . . . . 104Chapter 4: Driving in a Village, Town Or City. . . . . . . 105Chapter 4: Driving on the Highway . . . . . . . . . . . . . . . 106
• Acceleration and Deceleration Lanes . . . . . . . . . . 106• Merging . . . . . . . . . . . . . . . . . . . . . . . . . . . . . . . . . . . . . . 106• Soft or Low Shoulders. . . . . . . . . . . . . . . . . . . . . . . . . 107• To Reduce the Risk of a Collision. . . . . . . . . . . . . . . 108
Chapter 4: Roundabouts − How They Work . . . . . . . 109 • Single-lane Roundabouts . . . . . . . . . . . . . . . . . . . . . 109 • Dual-lane Roundabouts. . . . . . . . . . . . . . . . . . . . . . . 109Chapter 4: Night Driving . . . . . . . . . . . . . . . . . . . . . . . . . 112
• Lights . . . . . . . . . . . . . . . . . . . . . . . . . . . . . . . . . . . . . . . . 112• Speed . . . . . . . . . . . . . . . . . . . . . . . . . . . . . . . . . . . . . . . . 112• High and Low Headlights Beams . . . . . . . . . . . . . . 112• High and Low Headlight Beams (Example). . . . . 113
Chapter 4: Winter Driving . . . . . . . . . . . . . . . . . . . . . . . . 114• The Radiator . . . . . . . . . . . . . . . . . . . . . . . . . . . . . . . . . . 114• The Tires. . . . . . . . . . . . . . . . . . . . . . . . . . . . . . . . . . . . . . 114• The Brakes. . . . . . . . . . . . . . . . . . . . . . . . . . . . . . . . . . . . 114• The Windshield Wipers and Heater Defroster. . . 114• The Muffler . . . . . . . . . . . . . . . . . . . . . . . . . . . . . . . . . . . 114• Tips for Safe Winter Driving . . . . . . . . . . . . . . . . . . . 114 Slow Down . . . . . . . . . . . . . . . . . . . . . . . . . . . . . . . . . 114 Get The “Feel” of the Road . . . . . . . . . . . . . . . . . . . 115 Be Alert. . . . . . . . . . . . . . . . . . . . . . . . . . . . . . . . . . . . . 115 Braking Carefully. . . . . . . . . . . . . . . . . . . . . . . . . . . . 115• Anti-Lock Brake Systems (ABS) . . . . . . . . . . . . . . . . 115• Black Ice. . . . . . . . . . . . . . . . . . . . . . . . . . . . . . . . . . . . . . 116• Bridge Freezes Before Road . . . . . . . . . . . . . . . . . . . 116• Winter Kit. . . . . . . . . . . . . . . . . . . . . . . . . . . . . . . . . . . . . 116• Steering . . . . . . . . . . . . . . . . . . . . . . . . . . . . . . . . . . . . . . 117• Starting . . . . . . . . . . . . . . . . . . . . . . . . . . . . . . . . . . . . . . 117• Other Causes of Skidding . . . . . . . . . . . . . . . . . . . . . 117• How to Recover From a Skid. . . . . . . . . . . . . . . . . . . 118

ixTable of Contents
Chapter 4: Highway, Weather and Visibility Conditions . . . . . . . . . . . . . . . . . . . . . . . . . . . . . 119
• Front Wheel Drive Vehicles (FWDV) . . . . . . . . . . . . 119• Driving in the Rain . . . . . . . . . . . . . . . . . . . . . . . . . . . . 119• Hydroplaning - “Water Skiing On The Highway” . . . . . . . . . . . . . . . . . . . . . . . . . . . . . 119• Visibility . . . . . . . . . . . . . . . . . . . . . . . . . . . . . . . . . . . . . . 120
Chapter 4: Driving Distractions . . . . . . . . . . . . . . . . . . . 120• Driving Distractions. . . . . . . . . . . . . . . . . . . . . . . . . . . 120• Law for Cell Phone Usage . . . . . . . . . . . . . . . . . . . . . 123
Chapter 4: Impaired Driving. . . . . . . . . . . . . . . . . . . . . . 124• Drugs . . . . . . . . . . . . . . . . . . . . . . . . . . . . . . . . . . . . . . . . 124• Alcohol. . . . . . . . . . . . . . . . . . . . . . . . . . . . . . . . . . . . . . . 124• The Effects of Alcohol . . . . . . . . . . . . . . . . . . . . . . . . . 125
Reduced Vision . . . . . . . . . . . . . . . . . . . . . . . . . . . . . . 125Slower Reaction Time. . . . . . . . . . . . . . . . . . . . . . . . 125Alcohol and Collisions . . . . . . . . . . . . . . . . . . . . . . . 126
• The Effects of Mixing Alcohol and Other Drugs . . . . . . . . . . . . . . . . . . . . . . . . . . . . . . . . . . 126
• What Can You “Gain” By Driving While Impaired? . . . . . . . . . . . . . . . . . . . . . . . . . . . . . . 127• Short-term Suspensions . . . . . . . . . . . . . . . . . . . . . . 128• Penalties For Impaired Driving - Administration Driving Prohibition (ADP) . . . . . . 128• Under the Age of Nineteen − “Zero Tolerance” . . . . . . . . . . . . . . . . . . . . . . . . . . . . . . 128• Habitual Offenders . . . . . . . . . . . . . . . . . . . . . . . . . . . 128
CHAPTER 5: MOTORCYCLES AND MOPEDSChapter 5: Motorcycles and Mopeds . . . . . . . . . . . . . 130
• Motorcycles and Mopeds . . . . . . . . . . . . . . . . . . . . . 130• Choosing the Right Motorcycle. . . . . . . . . . . . . . . . 130• Motorcycle Equipment. . . . . . . . . . . . . . . . . . . . . . . . 131• Bike Check . . . . . . . . . . . . . . . . . . . . . . . . . . . . . . . . . . . 132• What a Motorcycle Driver Should Know. . . . . . . . 134• Wear Proper Clothing . . . . . . . . . . . . . . . . . . . . . . . . . 135• Always Wear a Helmet . . . . . . . . . . . . . . . . . . . . . . . . 135• Always Wear Boots. . . . . . . . . . . . . . . . . . . . . . . . . . . . 135

xTable of Contents
• Protect Your Eyes . . . . . . . . . . . . . . . . . . . . . . . . . . . . . 136• Wear Gloves . . . . . . . . . . . . . . . . . . . . . . . . . . . . . . . . . . 136• Be Seen . . . . . . . . . . . . . . . . . . . . . . . . . . . . . . . . . . . . . . 136• Before Starting Out Check The Following . . . . . . 136• Make Sure Your Way Is Clear . . . . . . . . . . . . . . . . . . . 137• Before You Pull Away Make Sure it is Safe . . . . . . 137• Starting on a Hill . . . . . . . . . . . . . . . . . . . . . . . . . . . . . . 137• Shifting Gears . . . . . . . . . . . . . . . . . . . . . . . . . . . . . . . . 138• Downshifting. . . . . . . . . . . . . . . . . . . . . . . . . . . . . . . . . 138• Shifting in a Turn. . . . . . . . . . . . . . . . . . . . . . . . . . . . . . 138• Turns and Corners . . . . . . . . . . . . . . . . . . . . . . . . . . . . 139• Braking and Stopping. . . . . . . . . . . . . . . . . . . . . . . . . 140• Here Are Some Braking Tips . . . . . . . . . . . . . . . . . . . 140• Skids . . . . . . . . . . . . . . . . . . . . . . . . . . . . . . . . . . . . . . . . . 141• Parking. . . . . . . . . . . . . . . . . . . . . . . . . . . . . . . . . . . . . . . 142• Where to Drive in Traffic. . . . . . . . . . . . . . . . . . . . . . . 143• Maintain a Space Cushion. . . . . . . . . . . . . . . . . . . . . 143• Lane Position . . . . . . . . . . . . . . . . . . . . . . . . . . . . . . . . . 144• Intersections . . . . . . . . . . . . . . . . . . . . . . . . . . . . . . . . . 145
• Changing Lanes . . . . . . . . . . . . . . . . . . . . . . . . . . . . . . 146• Passing . . . . . . . . . . . . . . . . . . . . . . . . . . . . . . . . . . . . . . . 146• Driving With Passengers . . . . . . . . . . . . . . . . . . . . . . 147• Tips for Safe Driving. . . . . . . . . . . . . . . . . . . . . . . . . . . 148• To Adjust for Added Weight of a Passenger, You Should . . . . . . . . . . . . . . . . . . . . . . . . 148• Group Riding . . . . . . . . . . . . . . . . . . . . . . . . . . . . . . . . . 149• Tips for Group Riding . . . . . . . . . . . . . . . . . . . . . . . . . 149• Hazard Awareness . . . . . . . . . . . . . . . . . . . . . . . . . . . . 149• Night Driving . . . . . . . . . . . . . . . . . . . . . . . . . . . . . . . . . 150• Riding in Poor Weather. . . . . . . . . . . . . . . . . . . . . . . . 151• Riding on Dangerous Surfaces . . . . . . . . . . . . . . . . 151• Avoiding Obstacles . . . . . . . . . . . . . . . . . . . . . . . . . . . 152• Riding Over Obstacles . . . . . . . . . . . . . . . . . . . . . . . . 152• Sudden Stops . . . . . . . . . . . . . . . . . . . . . . . . . . . . . . . . 153• Other Problems. . . . . . . . . . . . . . . . . . . . . . . . . . . . . . . 153
Blowouts . . . . . . . . . . . . . . . . . . . . . . . . . . . . . . . . . . . 153Stuck Throttle . . . . . . . . . . . . . . . . . . . . . . . . . . . . . . 154Wobble . . . . . . . . . . . . . . . . . . . . . . . . . . . . . . . . . . . . .154
xiTable of Contents
CHAPTER 7: HIGHWAY SAFETY PROGRAMSChapter 7: Highway Safety Programs . . . . . . . . . . . . . 165
• Driver Rehabilitation Course . . . . . . . . . . . . . . . . . . 166• Defensive Driving Course . . . . . . . . . . . . . . . . . . . . . 167• Driver Improvement Course. . . . . . . . . . . . . . . . . . . 167• Demerit Point System Schedule for Experienced Drivers . . . . . . . . . . . . . . . . . . . . . . . . . . . . . . . . . . . . . . . 168• The Demerit Point System. . . . . . . . . . . . . . . . . . . . . .169
GRADUATED DRIVER’S PROGRAM• Newly Licensed Drivers . . . . . . . . . . . . . . . . . . . . . . . 170• Graduated Licensing Approach . . . . . . . . . . . . . . . 170• Passenger Restrictions . . . . . . . . . . . . . . . . . . . . . . . . 171• Suspensions Under The Demerit Point System. . . . . . . . . . . . . . . . . . . . . 171• “0” Blood Alcohol Content (BAC) for New Drivers . . . . . . . . . . . . . . . . . . . . . . . . . . . . . . . 171• Offences Respecting Voluntary Identifications/ Drivers’ Licences . . . . . . . . . . . . . . . . . . . . . . . . . . . . . . 172
Flying Objects . . . . . . . . . . . . . . . . . . . . . . . . . . . . . . 154Summary of Riding Tips . . . . . . . . . . . . . . . . . . . . . 155
CHAPTER 6: BICYCLESChapter 6: Bicycles. . . . . . . . . . . . . . . . . . . . . . . . . . . . . . . 157
• Information for Motorists . . . . . . . . . . . . . . . . . . . . . 158• Rules of the Road for Bicyclists . . . . . . . . . . . . . . . . 159• Special Rules for Cyclists . . . . . . . . . . . . . . . . . . . . . . 160• E-Bikes . . . . . . . . . . . . . . . . . . . . . . . . . . . . . . . . . . . . . . . 160
Chapter 6: Bicycle Helmets . . . . . . . . . . . . . . . . . . . . . . . 161• What is a Bike Helmet? . . . . . . . . . . . . . . . . . . . . . . . . 161• How Does a Helmet Work? . . . . . . . . . . . . . . . . . . . . 161• Why Wear One? . . . . . . . . . . . . . . . . . . . . . . . . . . . . . . . 161• How Do I Pick One? . . . . . . . . . . . . . . . . . . . . . . . . . . . 161• Can I Wear it to Skate? . . . . . . . . . . . . . . . . . . . . . . . . 162• What if I Crash? . . . . . . . . . . . . . . . . . . . . . . . . . . . . . . . 162• Fitting a Bicycle Helmet . . . . . . . . . . . . . . . . . . . . . . . 162• Five Step Helmet Fit Test . . . . . . . . . . . . . . . . . . . . . . 163

xiiTable of Contents
Chapter 8: 911 Emergency/First Aid• Reporting An Emergency Using Your Cell Phone. . . . . . . . . . . . . . . . . . . . . . . . . 180• First Aid . . . . . . . . . . . . . . . . . . . . . . . . . . . . . . . . . . . . . . 180
CHAPTER 9: MATURE DRIVERChapter 9: Mature Driver . . . . . . . . . . . . . . . . . . . . . . . . . 182 • The Older But Wiser Driver . . . . . . . . . . . . . . . . . . . . 182 • The 55 Alive Driver Refresher Course . . . . . . . . . . 184
CHAPTER 10: DOCUMENTS AND REQUIREMENTSChapter 10: Documents and Requirements . . . . . . . 186
• Documents and Requirements for Stage 1 (Instruction Permit) . . . . . . . . . . . . . . . . . . . . . . . . . . . 186• Documents and Requirements for a Road Test . . . . . . . . . . . . . . . . . . . . . . . . . . . . . . . . .187
• Criminal Code Offences . . . . . . . . . . . . . . . . . . . . . . . 173• 24-Hour Roadside Suspension . . . . . . . . . . . . . . . . 173• Driving While Disqualified. . . . . . . . . . . . . . . . . . . . . 174
• Vehicle Impoundment . . . . . . . . . . . . . . . . . . . . . . . . 174
IGNITION INTERLOCK PROGRAM• What is the Ignition Interlock Program?. . . . . . . . 175• How Does an Ignition Interlock Device Work? . . 175• How Can I Apply for Installation of the Device? 175• How Does the Program Work?. . . . . . . . . . . . . . . . . 175• Who is Eligible to Participate in the Program? . . 176
CHAPTER 8: COLLISIONSChapter 8: If You Are Involved In A Collision . . . . . . . 178
• Five Points In Reporting A Collision . . . . . . . . . . . . 178• If You Should Be The First To Arrive At The Scene Of A Collision . . . . . . . . . . . . . . . . . . . . . . 178

1
Chapter 1:
Your Driver’s Licence

2Chapter 1: Class 5 Driver ’s L icence Checklist
Class 5 Driver’s Licence Checklist Form

3Chapter 1: Your Driver ’s L icence
INTRODUCTIONThere are a number of things you should know about your Driver’s Licence and you should read this section very carefully so that you will understand them.
You need a valid Driver’s Licence to drive a motor vehicle in Prince Edward Island. It must not be expired, suspended, cancelled or invalidated. Your Driver’s Licence gives you the privilege of driving only as long as you are careful, considerate and obey the traffic laws; otherwise, it will be suspended.
Drivers’ licences are valid only for the operation of the class(es) of the vehicle(s) shown on the licence and are always subject to any restrictions shown on the licence.
WHO MAY APPLY FOR AN INSTRUCTION PERMITIf you are 16 years of age or older, you may apply for an Instruction Permit if your driving privilege is not
under suspension. An Instruction Permit will allow you to operate a motor vehicle under supervision to receive instruction. The Instruction Permit is called a Stage 1 or Class 7 licence and is valid for two years from date of issue.
DOCUMENTS REQUIREDEvery person applying for a first Instruction Permit, or Driver’s Licence, must produce a birth certificate, passport, or Immigration papers before a Driver’s Licence or Instruction Permit will be issued.
If your previous address was outside of Canada, you must show your Canadian Immigration Identification Record of Entry form when you apply. The PEI Association for Newcomers to Canada can assist you with the translation of your home country’s Driver’s Licence. There may be a fee for this service.

4Chapter 1: Your Driver ’s L icence
In addition, Acceptable Residency/Address Information is required. Two pieces of the following must be shown:
• currentutilitybills(electric,cable,phone,etc)• formalrentalorleaseagreement• letterofemploymentoncompanyletterheador
paystubwithnameandaddress• mailfromFederalorProvincialGovernment(tax,
GST,correspondence,etc.)• bankchequewithnameandaddress• mortgagedocuments• creditcardbill/bankstatement
All of the above must have a name and current Prince Edward Island address.
INSTRUCTION PERMIT (CLASS 7)If you are a beginning driver and have reached 16 years of age, you may apply for an Instruction Permit.To get this permit you must:
• study this Driver’s Handbook carefully;• make an appointment for your written test and pay the applicable fee;• appear at the Highway
Safety office in your area for written and sign-recognition tests based on the Driver’s Handbook;
• if you are less than 18 years of age, have your application approved by your parents or legal guardians by their signing the parents’ consent
form found in the “Co-Pilot” brochure, and present this consent form along with a birth certificate. The parents or legal guardian may withdraw such
consent and if notice of withdrawal is given in writing to the registrar, the permit or licence will be cancelled at once;

5Chapter 1: Your Driver ’s L icence
• complete a vision test conducted by Highway Safety Staff; and• pay Permit Fee.Driver education schools conduct the InstructionPermit (Class 7) tests as well as the Driver’s Licence(Class 5) road tests.
GRADUATED DRIVER LICENSING RESTRICTIONS:Congratulations! You now have your Instruction Permit (Class 7, Stage 1) and have become part of the Graduated Driver Licensing (GDL) Program. The following restrictions apply:• You may drive a motor vehicle only when a licensed
driver, who has held a Driver’s Licence for at least four years, and who does not have a blood alcohol count of 0.05 or more, occupies the seat beside you.
• The only passengers permitted in the vehicle are the person providing the instruction and that person’s immediate family.
• If you are enrolled in a driver education program, you may take your first road test after waiting 275 days. If you are not enrolled in a driver education program, you must wait 365 days before taking a road test.
• Drivers in the GDL Program must have zero blood alcohol content (BAC).
• Law enforcement has the explicit authority to ask to see the driver’s licence of the individual providing the instruction.
• The vehicle operated by the beginner must display a decal on the vehicle that identifies the operator of the vehicle as a beginner. (The decal is bright yellow in colour with a black letter L which is placed just above the Motor Vehicle Inspection sticker.) It is made of a material that allows it to be removed so it can be placed on other vehicles.
• Drivers in the GDL Program may not drive between the hours of 1 a.m. and 5 a.m. This does not apply to

6Chapter 1: Your Driver ’s L icence
individuals who have an Instruction Permit (Class 7) and are 21 years old or older.
• Any violation that results in demerit points will result in the suspension of the Instruction Permit (Class 7).
• Any conviction you receive for failure to wear a seat belt while you are in the GDL Program will result in the suspension of your driver’s licence. The first offence will result in a suspension of 30 days and second offence will result in a suspension of 90 days. In addition, while you are in the GDL Program, and any passenger fails to wear a seat belt, you may be issued a fine.
• The use of handheld communication devices such as cell phones and MP3 players is prohibited for an individual who is in the Graduated Driver Licensing Program.
• You must fulfill the requirements of the Novice Driver Course.
FARM TRACTOR PERMITIf you are14 years old, you may be licensed to drive a farm tractor on the highway under the supervision of a licensed operator with four years experience.
DRIVER EDUCATION LICENSING CERTIFICATION PROGRAMIf you are a student enrolled in a Driver Education Course, you will write your Instruction Permit (Class 7)examination at the driving school. After completion of the Driver Education Program, the driving school willalso conduct the road test to certify you for a Class 5 Driver’s Licence unless randomly selected to be evaluated by Highway Safety.
The Province monitors the Driver Education Licensing Certification Program. You may be required to have a second road test during your newly licensed driver probationary period. There is no fee for this evaluation
7Chapter 1: Your Driver ’s L icence
and it will be conducted by a Highway Safety examiner.
STUDENTS ENROLLED IN A DRIVER EDUCATION COURSEIf you are a beginning driver enrolled in a licensed Driver Education Program, to receive your InstructionPermit (Class 7) you need to:• successfully complete the written examinations at an authorized driving school;• go to the Highway Safety/Access PEI office in your area for a vision test; and• if you are less than 18 years of age, have your application approved by your parents or legal guardians by their signing the parents’ consent form found in the “Co-Pilot” brochure, and present this consent form along with a birth certificate.Once you have passed the written and vision exams, you will get an Instruction Permit (Class 7) that has
been certified by your driver education instructor. You will be issued an Instruction Permit valid for two years.
DRIVER EDUCATION PASSENGER RESTRICTIONS• During this time the holder of an instruction permit is accompanied by a licensed instructor giving instruction to persons enrolled in a recognized motor vehicle driver instruction course and no more than four persons not including the instructor are in the motor vehicle.• You may also operate a motor vehicle if a licensed operator, who has held a valid Driver’s Licence for at least four years, occupies the seat beside you, and no other people, except members of the immediate family of the licensed driver, are allowed in the vehicle.• You must wait a minimum 275 days before a road test can be conducted by the driving school for certification of a Class 5 Driver’s Licence.

8Chapter 1: What the Tests Are All About
• When you successfully complete the road test bythe driver education school instructor, you must return to the Highway Safety/Access PEI office to get your photo Driver’s Licence.
NOTE: The Instruction Permit (Class 7) is not a Class 5 Driver’s Licence. It remains an Instruction Permit until a photo driver licence has been issued. You must get your Class 5 photo licence within 30 days after you successfully complete the road test. If you do not, you may have to be retested by a Highway Safety examiner and pay the appropriate fees.
These tests are to protect the general public from incapable drivers. They are not designed to keep youoff the road but to point out areas where you can improve. The tests represent the minimum requirements for safe and courteous driving practices.
Passing the tests does not guarantee that you will never become involved in a collision. As the number ofcars on the road increases, the risk of collision increases. There are many traffic signs and controls that you must recognize and obey. Driving makes great demands on drivers. You must be skillful, alert and always practise care, caution and courtesy.
THE KNOWLEDGE TESTYou will take a written or oral test which examines your knowledge of traffic laws and safe driving practices. This test includes recognition of standard road signs. All of this information can be found in this handbook.
If you can’t read and understand the written test, you may ask for an oral test. You will be asked about therules of the road and safe driving practices, recognition of road signs by their shape, and your

9Chapter 1: What the Tests Are All About
ability to read and understand the meaning of the signs. If you do not successfully complete the written or oral test, you may make an appointment and take another test at a later date.
THE VISION TESTYou must meet certain vision standards. If you cannot meet these standards, you may be referred to aneye specialist (ophthalmologist or optometrist) to have the findings checked. If you cannot meet the vision standards without the aid of corrective lenses (glasses or contact lenses), you must obtain and wear corrective lenses while driving. Your Instruction Permit and Driver’s Licence will contain a condition allowing you to drive a motor vehicle only while wearing corrective lenses. You will also be given:• a colour vision test;
• a distance judgment test; and• a field of vision test.Any deficiencies uncovered by these tests will be carefully explained to you so that you can compensatefor them in your driving. For example, if you are colour blind, you will have to learn the relative positions ofthe traffic signal lights. You will also have to exercise greater care when visibility is poor and certain coloured cars may blend into the background, making them invisible to you.
If your field of vision is very narrow, you may be refused a licence until the defect is corrected. In somecases you may get a licence if your vehicle is equipped with mirrors which give the driver a clear view tothe rear and both sides. In this case your licence will restrict you to driving with this kind of equipment atall times. If you cannot meet the minimum vision standard, even with glasses, you will be refused a licence.

10Chapter 1: What the Tests Are All About
THE NOVICE DRIVER COURSEIf you have an Instruction Permit (Class 7), you must complete the Novice Driver Course before you areeligible for a road test. This material is covered in the classroom component of the Driver Education Program. It is the beginning of the most important stage of your driving experience - learning how to operate a motor vehicle properly and safely.
The Novice Driver Course explains:• the Graduated Driver Licensing Program;• the demerit point system;• impaired driving aspects of the Criminal Code;• alcohol and drug education; and• how to handle certain driving conditions.
The course lasts about five hours and is usually taught
in two separate sessions. You must register inadvance. Bring your Instruction Permit to the first class.To inquire about a course location and to register, call a Highway Safety/Access PEI office near you.
THE ROAD TESTYou must provide the vehicle for your road test, and you must be accompanied by a licensed driver. Motor vehicles used for the driving test will be checked before your test for:• valid licence plates;• lights;• horn;• a rear-view mirror;• seat belts;• windshield wipers;• muffler;• brakes;• tires;

11Chapter 1: What the Tests Are All About
• windshield;• window glass; • valid inspection sticker; and• speedometer.
A driving test will not be given in any vehicle which is unsafe or does not meet equipment requirements. All vehicles for road tests must be covered by public liability insurance. Proof of insurance, in the form of a pink insurance card, must be produced before the road test. A valid copy of the vehicle registration is also required.
THE PURPOSES OF THE ROAD TEST ARE:• to measure your ability to operate the vehicle properly and safely under typical driving conditions;• to determine whether or not retraining is necessary; • to serve as a basis for additional training; and • to assist you in correcting errors uncovered during the test.
Your examiner will tell you about the procedure of the road test. Simply follow the instructions of theexaminer who will ride with you. During the driving test, do not talk unnecessarily with the examiner, as this may distract your attention from your driving. The examiner will not coach you during the driving test. If there are questions you would like to ask, do so before the start of the test. No other person will be permitted to ride in the vehicle during the test.
The road test is a sample of your ability to perform certain maneuvres properly and safely, you will bechecked on:• starting;• stopping;

12Chapter 1: Classified Licences
• turning;• parking;• traffic signs and signals;• travelling through controlled, partly controlled and
uncontrolled intersections;• anticipation of potentially hazardous conditions,• attitude toward others; and• other safe driving practices given throughout this handbook.
The examiner will analyse your driving and make suggestions about ways to improve your driving skills.Please cooperate with the examiner as he or she is trying to assist you in obtaining a Driver’s Licence.
NOTE: Drivers must comply with all conditions on their Driver’s Licence. Failure to do so is an offenceunder the Highway Traffic Act.
The growth in the number and variety of motor
vehicles requires frequent updating of the qualifications of drivers. Under the Classified Licence System, drivers are licensed for the class or classes of vehicles for which they are qualified to operate. Drivers must meet vision, physical fitness, knowledge and skill standards for the particular class or classes of vehicles they wish to operate.
Drivers who are learning to operate vehicles in Classes 5, 6 and 9 must obtain an Instruction Permit (Class 7).
Drivers applying to learn to operate vehicles in Classes 1, 2, 3 or 4 must have a valid Class 5 Driver’s Licence for a minimum of two years as an Instruction Permit for the class of vehicle for which they wish to take instruction. They must be accompanied by a licensed driver who has held a valid class of licence for at least four years for the vehicle in which instruction is being given.

13Chapter 1: Classified Licences
NOTE: All Driver’s Licences expire at midnight on the birthday of the licensed driver.NOTE: Instruction Permits (Class 7) are valid for two years from the date of issue.
ALLOWING SOMEONE TO DRIVE YOUR VEHICLEMake sure anyone who drives your vehicle holds a valid Driver’s Licence or Instruction Permit (in which case, he or she is accompanied by a licensed driver who has held a valid Driver’s Licence for at least four years).
MOTORCYCLE OPERATORS’ LICENCESTo qualify for a Motorcycle Operator’s Licence a motorcycle operator must successfully complete a knowledge test, a vision test and a road test on a motorcycle. The procedures for
obtaining a Motorcycle Operator’s Licence are very similar to those for obtaining a Class 5 Driver’s Licence. The holder of an Instruction Permit who takes a road test on a motorcycle but not in a car, will be issued a licence specifying motorcycle operation only. During the 356 days after receiving an Instruction Permit to practise driving a motorcycle, a small, yellow learner’s decal will be reqired to be placed on the back of the motorcycle operator’s helmet.
Drivers who hold a valid Class 1, 2, 3, 4, or 5 licence may apply for a Motorcycle Instruction Permit. This permit has the following conditions:• daytime use only within 30 km of residence;• NO passengers; and• valid for 30 days from the date of endorsement.
CHANGE OF NAME OR ADDRESSIf you change your name by marriage or other legal process, you must have your licence endorsed with a

14Chapter 1: Classified Licences
change of name or address within 10 days from the effective date of the change. There is no charge for this service.
Change of an address must be reported to the registrar of motor vehicles within 30 days from the effective day of the change. Failure to notify the registrar of a change of name or address is an offence under the Highway Traffic Act.
Change of name or address may be reported to any of the Highway Safety/Access PEI offices.
LOST, DESTROYED OR ILLEGIBLE LICENCESIf you lose or misplace your Driver’s Licence or if it becomes illegible, you must apply for a duplicate licence. There is a fee for this service. Bring the number of the licence to be replaced and the date that licence was issued. If you don’t have this information, bring your birth certificate with you.
Duplicate licences may be applied for at any Highway Safety/Access PEI office.
OUT-OF-PROVINCE DRIVERS’ LICENCESIf you are 16 years or older and you hold a valid Driver’s Licence from another province, state, territory or country, you may drive in PEI for up to 120 days if you have not been prohibited from driving under the laws of any province, state, territory or country. You are subject to any limitations or restrictions on the licence. You may only drive a vehicle of the class for which you are authorized to drive under the licence held.
Seasonal workers (as defined in Highway Safety Act Section 80(3) ) to drive vehicles in PEI require a Class 5 driver’s license and may drive for a period of 8 months if they have in their possession a valid Foreign Driver’s License that does allow for the operation of vehicles that would require a Class 5 in PEI and an International Driving Permit (IDP)

15Chapter 1: Classified Licences
This does not apply if you are attending university or college full-time.
LICENCE EXCHANGENova Scotia and New Brunswick:• A former resident of Nova Scotia or New Brunswick who holds a valid Class 5 Driver’s Licence and is now a resident of Prince Edward Island may exchange their Class 5 Driver’s Licence at no charge.• The PEI licence will be issued up to the amount of time allowed on a PEI driver’s licence.• The out-of-province licence must be surrendered when you get your PEI licence or Class 7.
All other residents:• A valid Driver’s Licence from other Canadian provinces and territories and the United States expired less than three years may be exchanged without written, vision or driving tests (immigration
visa and passport required if applicant was born outside of Canada).• Most foreign licences are not acceptable for exchange. Written, vision and driving tests must be successfully completed.• Any person applying for a PEI Driver’s Licence with a previous address outside of Canada must produce a Canadian Immigration Identification Record of Entry form and a passport at the time of application.• Where no proof can be shown of previous licensing, all applicants must undergo a normal Instruction Permit (Class 7) procedure including successful completion of written and vision tests, issuance of an Instruction Permit (Class 7), and successfully complete the driving test.• The out-of-province licence must be surrendered at the time of issue of the PEI licence.• International licences are not proof of previous licence and are not exchangeable.

16Chapter 1: Classified Licences
INSTRUCTION PERMIT(CLASS 7) EXCHANGE• The Instruction Permit (Class 7) must be valid.• You must have residency on PEI.• A Driver Education Program must have been completed with proof, i.e., Driver Education Certificate, or a letter from a recognized driving school. If no Driver Education Program was completed, you must take the Novice Driver Course.• Valid Canadian Instruction permits (Class 7) are exchangeable. Waiting periods and required courses may apply prior to taking a road test.• Only Instruction permits from Canada are exchangeable.
EXPIRED INSTRUCTION PERMITSApplicants with Instruction Permits expired less than one year may be re-issued for two years without waiting period. Permits expired more than one year but less than three years successfully complete a
written exam without a waiting period. Permits expired more than three years successfully complete a written exam and the 365-day waiting period will apply. Fees will apply.
RENEWING OR OBTAINING A DRIVER’S LICENCEYou may apply for a Driver’s Licence:• if you have never been licensed as a driver;• if you allow your Driver’s Licence to expire over an allotted time; and• if the only licence you hold is a licence from another country which is not honoured in this province.
Anyone who holds a valid licence may be required to be retested. You may be retested if you have had a number of collisions and/or convictions, your licence has been suspended for any cause or you suffer from a medical condition that may affect your driving.

17Chapter 1: Classified Licences
CLASS 1
CLASS 2
CLASS 3
CLASS 4
CLASS 5
CLASS 6
CLASS 7
CLASS 8
CLASS 9
CLASS 1CLASS 1 VEHICLES are any combinations of a truck-tractor and trailer, fifth wheel with air brakes, but nota bus carrying passengers.
A CLASS 1 Licence permits the holder to operate all motor vehicles in Classes 1, 3, 5, 8 and 9.
REQUIREMENTS FOR CLASS 1 Licence: Have successfully completed the GDL Program; minimum age: 19 years; a medical certificate is required; you must meet prescribed vision standards; pass written tests on air brake operation; and pass a road test in a Class 1 vehicle.
NOTE: Drivers in the Graduated Driver Licensing Program must exit Stage 3 before they are eligible to obtain a Class 1, 2, 3, or 4 Drivers Licence.

18Chapter 1: Classified Licences
CLASS 3CLASS 3 VEHICLES are trucks exceeding 14,000 kgs gross mass or any combination of such vehicles;any special mobile equipment; and gooseneck trailers.
A CLASS 3 Licence permits the holder to operate all motor vehicles in Classes 3, 5, 8 and 9.
REQUIREMENTS FOR CLASS 3 LicenceHave successfully completed the GDL Program; minimum age: 19 years; a medical certificate is required; you must meet prescribed vision standards; pass written tests on air brake operation where required; and pass a road test in a Class 3 vehicle, or Class 5 with a gooseneck trailer.
CLASS 2CLASS 2 VEHICLES are buses carrying more than 24 passengers, including school buses.
A CLASS 2 Licence permits the holder to operate all motor vehicles in Classes 2, 3, 4, 5, 8 and 9.
REQUIREMENTS FOR A CLASS 2 Licence:Have successfully completed the GDL Program; minimum age: 19 years (21 years for a school bus) a medical certificate is required; you must meet prescribed vision standards; pass written tests on air brake operation; and pass a road test in a Class 2 vehicle. School bus operators must have held a Class 1, 3, 4 or 5 licence for at least five years preceding application.

19Chapter 1: Classified Licences
CLASS 4CLASS 4 VEHICLES are any motor vehicles used as ambulance, taxis or buses carrying 24 passengersor less.
A CLASS 4 Licence permits the holder to operate all motor vehicles in Classes 4, 5, 8 and 9.
REQUIREMENTS FOR CLASS 4 LicenceHave successfully completed the GDL Program; minimum age: 19 years; a medical certificate is required; you must meet prescribed vision standards; and pass a road test in a Class 4 vehicle.
CLASS 5CLASS 5 VEHICLES are any motor vehicles not exceeding 14,000 kgs gross mass, and any combination of such vehicles and a towed vehicle not exceeding a gross mass of 4,500 kg, but excluding(a) a motorcycle; or(b) a bus carrying passengers.
A CLASS 5 Licence permits the holder to operate all motor vehicles in Classes 5, 8 and 9.
REQUIREMENTS FOR CLASS 5 LicenceHave successfully completed the GDL Program; minimum age: 17; a medical certificate is requiredwhen requested; you must meet prescribed vision standards; pass written or oral tests on basic rules andsigns (not required if a holder of a Class 6 or 7 licence); and pass a road test in a Class 5 vehicle.

20Chapter 1: Classified Licences
CLASS 6 are motorcycles.
A CLASS 6 Licence permits the holder to operate all motor vehicles in Classes 6 and 8 only.
REQUIREMENTS FOR CLASS 6 LicenceMinimum age: 17 years; a medical certificate is required when requested; you must meet prescribedvision standards; pass written or oral tests on this class of vehicle; pass a road test in a Class 6 vehicle; parental approval if under age 18; and a birth certificate is required (not required if a holder of any other class of licence).
Less than4,500 kgs

21Chapter 1: Classified Licences
CLASS 7 is an instruction permit.
A CLASS 7 Licence permits the holder to operate a motor vehicle in Classes 5, 6, 8 and 9 when accompanied by a licenced driver for that class of vehicle.
REQUIREMENTS FOR A CLASS 7 Licence (Instruction Permit):Minimum age: 16 years; a medical certificate is required when requested; you must meet prescribed vision standards; pass written or oral and sign recognition tests; and parental approval is required if less than 18 years; abirth certificate or passport is required.
CLASS 8CLASS 8 VEHICLES are mopeds (pedal-assisted).
A CLASS 8 Licence permits the holder to operate Class 8 vehicles only.
REQUIREMENTS FOR CLASS 8 LicenceMinimum age: 17 years; a medical certificate is required when requested; you must meet prescribedvision standards; pass written or oral and sign recognition tests; pass a road test on a Class 8 vehicle; parental approval is required if less than 18 years; and a birth certificate is required (not required if a holder of any other class of licence).

22Chapter 1: Vehicle Registration
You may not operate, or being the owner, allow another person to operate a motor vehicle on a highway in Prince Edward Island unless:• the motor vehicle is registered;• any trailer drawn by the motor vehicle is registered;• the vehicle and trailer have a licence according to its class; and• the motor vehicle and trailer have the proper number plates, valid inspection stickers or markers which have been issued under the Highway Traffic Act.
IN-TRANSIT PERMITSPermits for single journeys of unregistered unladen vehicles may be issued by the registrar of motorvehicles, for a fee, for such purposes as movement to a registration office for registration of the vehicle ormovement of the vehicle from one place to another for repairs or for inspection prior to registration, etc.
CLASS 9CLASS 9 VEHICLES are farm tractors.
A CLASS 9 Licence permits the holder to operate Class 9 vehicles only.
REQUIREMENTS FOR A CLASS 9 LicenceMinimum age: 14 years; a medical certificate is required when requested; you must meet prescribedvision standards; pass written or oral and sign recognition tests; and a birth certificate is required and parental approval required if less than 18 years. There is no road test required for this class.

23Chapter 1: Vehicle Registration
Proof of public liability must be shown when making application for in-transit permits.
APPLICATION FOR REGISTRATIONTo apply for registration, you need:• the proper application form from your Highway Safety/Access PEI office;• the public liability insurance card; and• a successful motor vehicle inspection report form.
An application for registration of a vehicle owned by a corporate body should be signed by a signing officer, on behalf of that body.
A Highway Safety official may require that the vehicle be re-examined at your expense to confirm its condition. An inspector may ask you to dismantle and expose any part of the vehicle.
NUMBER PLATESHighway Safety issues one number plate only for all vehicles including trailers, motorcycles and mopeds.Validation stickers may be issued to put on the number plate. Make sure the plate is always securelyfastened to the vehicle. It must be at least 200 millimetres (12 inches) from the ground measured from the bottom of the plate.
Motorcycle and trailer plates must be clearly visible from the rear.
Keep your number plate clean and in good condition so it is always clearly visible and legible. The vehicleor its equipment or load must not obscure the view of the plate. At night a rear light must shine on the plate.
Do not put a plate or number on your vehicle which could be confused with your proper number plate.

24Chapter 1: Vehicle Registration
PARKING PERMIT FOR THE PHYSICALLY CHALLENGEDHanging passes for the physically challenged are also available for use on vehicles. To obtain a Parking Permit application contact the Council of the Disabled or one of the Access PEI sites. Application forms must be completed by a doctor and returned to the Council of the Disabled. There is an annual fee for the permit.
REGISTRATION PERMITThe registration permit will be kept in the vehicle for which it is issued and the driver of the vehicle willproduce the permit whenever a traffic officer or an inspector asks for it.
Access for the physically
challenged.
A traffic officer may seize the plate if he or she suspects that:• it was issued for a different vehicle;• it was obtained by false pretenses; or• it is being used contrary to the act or the regulations.
The traffic officer may keep the number plate until the facts about the plate have been determined.
PERSONALIZED PLATESPersonalized plates are available and may be used on vehicles normally requiring passenger vehicle or commercial plates. There is an additional fee for these plates.
Applications for personalized plates may be obtained from any Highway Safety/Access PEI office.

25Chapter 1: Vehicle Registration
MOTORCYCLE REGISTRATIONAll motorcycles and mopeds operated on public streets and highways must be registered and must display valid licence plates. Motorcycles and mopeds must be covered by public liability insurance in order to be registered.
NOTE: Minibikes are not registered for highway use on Prince Edward Island. They cannot be used on public roads or sidewalks. They MUST be registered for off- highway use according to the Off-Highway Vehicle Act and display an off-highway vehicle plate.
OFF-HIGHWAY VEHICLESOff-highway vehicles are important equipment to farmers, wood lot operators, trappers and others whose jobs require travel over rough terrain; however, the vast majority of them are used for recreation –sometimes by people who lack experience with either the vehicle or the environment, or both.
Off-highway vehicles may be fun, but they are not toys. With a capacity for speeds up to 100 kilometresper hour, these machines can be dangerous in the hands of inexperienced operators.
In addition to the risk of injury, off-highway vehicles can do serious environmental damage, destroy crops or harm private property. The restrictions placed on the use of off-highway vehicles are intended to lessen the potential for injury or property damage, without

26Chapter 1: Vehicle Registration
recommended by the manufacturer for the age and weight of the operator.• No person shall operate an off-highway vehicle in the ditch next to a highway.• The owner of the off-highway vehicle is prohibited from permitting a person to operate it, unless the person holds a valid driver’s licence and the person has held a driver’s licence for 24 months; or has successfully completed an off-highway vehicle safety training course approved by the registrar.• No person shall operate an off-highway vehicle by crossing a highway unless that person holds a valid driver’s licence and that person has held a driver’s licence for 24 months; or has successfully
completed an off-highway vehicle safety trainingcourse approved by the registrar.
• Any person who is less than 14 years of age is prohibited from operating an off-highway vehicle, other than a snowmobile.
depriving responsible operators and their families of the benefits and pleasures of using off-highway vehicles.
The following is a list of all vehicles included in the PEI Off-Highway Vehicle Act:• four-wheel drive or low pressure tire vehicles,• power motorcycles and related two-wheel vehicles,• amphibious machines,• all terrain vehicles, and• snow vehicles.
NOTE:Effective February 10, 2007, the following regulations came into effect:• No person shall operate an off-highway vehicle without protective clothing and equipment. • No person shall operate an off-highway vehicle that has an engine size in excess of that

27Chapter 1: Vehicle Registration
• No person who is 14 or 15 years of age shall operate an off-highway vehicle, other than a snowmobile, unless that person has successfully completed an off-highway vehicle safety training course approved by the registrar and that person is supervised by an adult who meets certain requirements. • If you are16 years of age or older, you must have held a driver’s licence for 24 months; or have successfully completed an ATV safety training course approved by the registrar. • The owner of an off-highway vehicle is prohibited from permitting the operation of the off-highway vehicle by a person who is prohibited from operating it.
REGISTRATION OF SNOWMOBILESRegistration is required for snowmobiles annually on or before November 30. If a transfer of ownership
occurs, the snowmobile must be registered in the new owner’s name within seven days from the date of purchase. All other off-highway vehicles have to be registered only once by the owner and have to be re-registered only if there is a transfer of ownership.
When a snowmobile is registered, a number plate is provided which must be firmly attached to the rear ofthe machine. If the number plate should become lost or illegible, the owner must purchase a new platefrom any office of Highway Safety/Access PEI.
OFF-HIGHWAY VEHICLE REGISTRATIONAll off-highway vehicles must be registered. You must produce the certificate of registration if any peace officer asks for it.

28Chapter 1: Vehicle Registration
NON-RESIDENT PRIVILEGESIf you are a non-resident of Prince Edward Island, you may operate your passenger vehicle which is registered in your province, state, territory or country for your own private use in Prince Edward Island for up to four months in any year without registering the vehicle here.
If you are a non-resident who enters Prince Edward Island with the vehicle to solicit business, you mayoperate the vehicle in this province for up to 10 days in any year without registering the vehicle.
No commercial motor vehicle owned or operated by or on behalf of a non-resident may be operated inPrince Edward Island unless it is registered here.
Every vehicle owned or operated by a non-resident in this province is subject to all the restrictions and
A peace officer is any police officer, a Highway Safety officer or a park warden. The peace officer will give the vehicle operator reasonable time to produce the certificate of registration. If you do not follow this rule, you may be found guilty of an offence and be fined.
CHANGE OF NAME OR ADDRESSIf a motor vehicle’s certificate of registration is issued to you and you later change your name or address, you must notify the Highway Safety office of the change within 30 days.
EXPIRATION OF REGISTRATIONAll vehicle registrations, including the licence or identification plate, marker and permit expire on the registered owner’s birthday or company’s registration date.

29Chapter 1: Vehicle Registration
The vehicle registration permit, the motor vehicle inspection report form and proof of liability insurance must be presented to the Highway Safety/Access PEI Office, and the required fee paid.
Most registered motor vehicles and trailers must have a yearly safety inspection at an official inspection station. These stations are situated all across the province. An authorized inspection mechanic will conduct a prescribed safety inspection in accordance with Motor Vehicle Inspection Regulations. A motor vehicle inspection approval sticker will be placed in a prescribed area. It must be kept in good condition. You will also receive a motor vehicle inspection report that must be kept in good condition in the vehicle and must be shown to a peace officer on request. Approval stickers issued for the month in which a vehicle was inspected will normally be valid until the end of that month in the following year.
control which apply to a vehicle registered in theprovince.
For all other non-Canadian residents, they are permitted to drive in PEI with an immigration visa, a valid passport and a valid foreign driver’s licence. Foreign driver’s licences must be turned in before a PEI driver’s licence is issued. Foreign driver’s licences are valid to drive with for 120 days upon entry into PEI.
TRANSFER OF OWNERSHIPWhenever the owner of a registered vehicle transfers or sells the vehicle the owner must, within seven days of the transfer, notify Highway Safety of the transfer on a Notification of Transfer form (contained on the vehicle registration permit or available from any Highway Safety/Access PEI office). The new owner must within seven days of the transfer have the registration permit transferred into his/her name.

30Chapter 1: Motor Vehicle Safety Inspection
REJECTED VEHICLESThe owner or operator of a rejected vehicle has 10 days from the date of rejection to have the defects corrected and the vehicle re-inspected. This does notpermit the operation of an unsafe vehicle during this time.
The Highway Traffic Act requires all equipment on your vehicle which must be maintained in good working order.
Note: While a rejected sticker is valid for 10 days after it has been punched, it will not be accepted on a vehicle to be used for a driving test.
You cannot register a vehicle that you have bought unless it has a valid approval sticker. The registrar or any peace officer may order a vehicle to be re-inspected at any time.
When a registered owner takes up residence in Prince Edward Island, a private passenger vehicle inspected in either Nova Scotia or New Brunswick may be registered without local inspection. Its provincialinspection will be considered valid for one year from the date of inspection. Prior to that expiry date, it must have an inspection in Prince Edward Island. Vehicles from all other places must be inspected in Prince Edward Island before being registered here.
31Chapter 1: Required Vehicle Equipment
TIP: Check all your vehicle lights regularly and keep them clean.
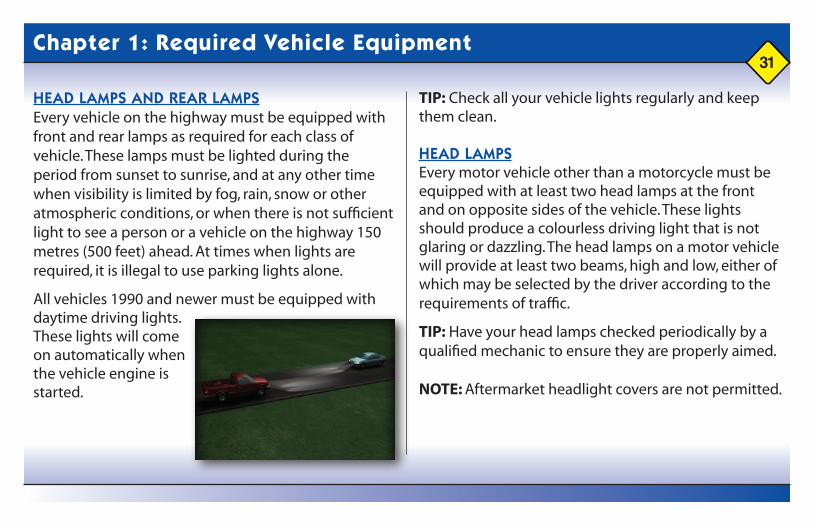
HEAD LAMPSEvery motor vehicle other than a motorcycle must be equipped with at least two head lamps at the frontand on opposite sides of the vehicle. These lights should produce a colourless driving light that is notglaring or dazzling. The head lamps on a motor vehicle will provide at least two beams, high and low, either of which may be selected by the driver according to the requirements of traffic.
TIP: Have your head lamps checked periodically by a qualified mechanic to ensure they are properly aimed.
NOTE: Aftermarket headlight covers are not permitted.
HEAD LAMPS AND REAR LAMPSEvery vehicle on the highway must be equipped with front and rear lamps as required for each class ofvehicle. These lamps must be lighted during the period from sunset to sunrise, and at any other timewhen visibility is limited by fog, rain, snow or other atmospheric conditions, or when there is not sufficientlight to see a person or a vehicle on the highway 150 metres (500 feet) ahead. At times when lights are required, it is illegal to use parking lights alone.
All vehicles 1990 and newer must be equipped with daytime driving lights. These lights will come on automatically when the vehicle engine is started.

32Chapter 1: Required Vehicle Equipment
TAIL LAMPSEvery motor vehicle, trailer or semi-trailer that is being towed must have at the rear two lamps which exhibit a red light plainly visible under normal atmospheric conditions at a distance of 150 metres (500 feet) to the rear. A white light illuminating the number plate which enables the plate to be read from a distance of 15 metres (50 feet) is also required.
FLASHING LIGHTSThe use of flashing or revolving lights on motor vehicles is restricted. A flashing red light visible from the front may only be used on:
• an ambulance (red); • a police vehicle (red and blue); • fire department vehicle (red); • a school bus while taking
on or unloading passengers (red);• the cars of voluntary fire department members, when acting in an emergency (red); or• hearses (purple).
A flashing/revolving/strobe AMBER light visible from any direction may only be used on:• service trucks or towing trucks which are equipped for lifting and towing vehicles, when towing or rendering service to a disabled motor vehicle; • vehicles of the Department of Transportation and Infrstructure Renewal, or of a city or town, being used for removal of snow or maintenance of the highway; and• school buses, which must be equipped with flashing red and amber lights.
In addition, flashing amber lights may be used on:• a vehicle transporting explosives; or• a motor vehicle towing an oversized load.

33Chapter 1: Required Vehicle Equipment
CLEARANCE LAMPS AND REFLECTORSEvery vehicle other than a standard passenger motor vehicle having a width in excess of two metres (80inches) must have:• on the front, two amber clearance lamps, one at each side;• on the rear and as high as practical, two red clearance lamps, one at each side, visible for 150 metres (500 feet);• in the centre, three indicator lamps; • on each side, two amber reflectors, one at or near the front and one at or near the midpoint; and• at the rear, a red marker light.
STOP LIGHTSAll motor vehicles required to be registered must be equipped with two “stop” lights. These must give a redsignal to the rear of the vehicle that is plainly visible in normal sunlight from a distance of 150 metres (500 feet).
They must light up when the brakes are applied. They may or may not be the same as the signal lamp unit.
SIGNAL LIGHTSWhen a vehicle is equipped with signal lights to signal the driver’s intention to turn, the signal lights must give an amber or yellow signal to the front and a red or an amber signal to the rear, on or toward the side of the vehicle in the direction in which the turn is to be made. A signal must not project a glaring or dazzling light. Electric turn indicators must show a flashing light to indicate a turn and must have a device within the driver’s vision to indicate to the driver that the turn indicators are working.
PARKING LIGHTSWhenever a vehicle is stopped or parked along the right side of the highway during the times when lights are required, the vehicle must display its parking lights, which are two amber lights visible from the front of

34Chapter 1: Required Vehicle Equipment
the vehicle and two red lights visible to the rear of the vehicle from a distance of 150 metres (500 feet). If thestopped vehicle presents a temporary hazard to other traffic, its flashing hazard lights should be displayed.
BRAKESEvery motor vehicle including a motorcycle must be equipped with adequate brakes, having two separatemeans of application. Parking/emergency brakes must be kept in effective working order.
HORNEvery motor vehicle must be equipped with a horn in good working order capable of being heard at adistance of 60 metres (200 feet). Sound your horn whenever it is reasonably necessary to do so and when passing another vehicle. It is an offence to use a bell, siren, compression or exhaust whistle on a privatevehicle or to use the approved horn when unnecessary.
MIRROREvery motor vehicle must be equipped with a mirror that reflects to the driver a view of the highway for at least 60 metres (200 feet) behind the vehicle. An outside rear-view mirror on both sides of a motor vehicle is required when the view to the rear is obstructed by a trailer being towed or by the load ofthe vehicle.
WINDSHIELDS AND WINDOWSEvery motor vehicle operated on a highway, except a motorcycle, construction equipment or farmequipment, must be equipped with a windshield. Windshields and windows must be kept clear of all non-transparent material other than stickers or devices required or permitted to be displayed by the Highway Traffic Act and its Regulations. The glass in thewindshield or any window must not be broken, shattered or otherwise damaged or discoloured,
35Chapter 1: Required Vehicle Equipment
and must be kept completely clear of snow, ice, dirt or other matter that obstructs the driver’s vision.
TINTED GLASS OR WINDOW GLAZINGIt is illegal to apply or operate a motor vehicle with aftermarket vehicle glass darkening material to the windshield and the front side windows. It is permitted on the rear side windows and the rear window, if you have two side mirrors.
WINDSHIELD WIPERSEvery motor vehicle other than a motorcycle or farm tractor must be equipped with a device for cleaningrain, snow or moisture from the driver’s and passenger’s side of the windshield. The driver must be able to control and operate the windshield wipers. The wipers must be kept in good working order.
ORNAMENTSOrnaments and decorations, either inside or outside of the vehicle, must be located so that they do notobstruct the vision or distract the attention of the driver.
FLAG OR LIGHT AT END OF LOADWhenever the load of any motor vehicle extends more than 1.2 metres (four feet) beyond the rear of the body, a red flag not less than 0.3 metres (12 inches) in length and width must be displayed during daylight hours. A red light which is plainly visible for 150 metres (500 feet) must be displayed during hours of darkness.
SLOW-MOVING VEHICLE SIGNAny motor vehicle not capable of maintaining a rate of speed in excess of 40 km/hr (25 mph) under normalconditions and every farm tractor must display a slow-moving vehicle sign at the rear.

36Chapter 1: Required Vehicle Equipment
MUFFLERNo person may drive a motor vehicle on a highway unless the vehicle is equipped with a muffler in goodworking order so as to prevent excessive or unusual noise. The use of a muffler cut-out bypass, straightexhaust, gutted muffler, Hollywood muffler or similar device is prohibited. In addition, the engine of anyvehicle may not emit excessive smoke or fumes.
SPEEDOMETER, BUMPERS, SAFETY GLASS, TIRESMotor vehicles must be equipped with:• a speedometer in good working order;• front and rear bumpers (if the motor vehicle has been so designed by the manufacturer); and• tires must be replaced if their tread depth is less than 1.6 mm (2/32 of an inch) when measured in any three locations 120 degrees apart.
FLARES OR LANTERNSA passenger vehicle with a seating capacity of eight passengers or more and a vehicle having a capacityof more than one-half ton of freight must be equipped with at least two flares, reflectors or red lanterns, and two red flags for warning other drivers of an emergency breakdown.
A commercial vehicle of 2.05 metres (80 inches) or more in width, a passenger bus with a seating capacity of eight or more, and a motor vehicle towing a travel trailer must be equipped with at least three flares or three red electric lanterns, each of which is capable of being seen at a distance of 150 metres (500 feet) under normal nighttime conditions.
A truck tractor or vehicle carrying flammable liquids in bulk or compressed flammable gases must beequipped with at least three red electric lanterns.

37Chapter 1: Required Vehicle Equipment
When any vehicle becomes disabled on the travelled portion of any highway or shoulder at any time when lighted lamps are required on vehicles, its driver must display three lighted lanterns or flares, one at a distance of 30 metres (100 feet) to the rear of the vehicle, one at a distance of 30 metres (100 feet) to the front of the vehicle and one on the traffic side of the vehicle approximately three metres (10 feet) rearward or forward. During daytime hours these vehicles are required to display two red flags on the roadway in the lane of traffic it occupies at distances of 30 metres (100 feet) to the front and the rear of the vehicle. Flares should be displayed in poor weather conditions orwhen the vehicle has to be stopped where oncoming drivers cannot easily see it.
FIRE EXTINGUISHERSEvery commercial vehicle transporting any explosives as cargo must be equipped with not less than two fire
extinguishers, filled and ready for use. Every school bus must be equipped with at least one fire extinguisher, filled and ready for use.
WIDTH, HEIGHT AND LENGTH OF VEHICLENo vehicle may exceed a total outside width, including loads, of 2.6 metres (102 inches), or a height of4.15 metres (14 feet, six inches) without a special permit. A single motor vehicle may not exceed a length of 12.5 metres (40 feet), and a combination of vehicles coupled together may not exceed a total length of 25 metres (81 feet) without a special permit.
TRANSPORTATION OF DANGEROUS GOODSOnly qualified people may transport dangerous goods. It is illegal to transport these materials in your vehicle. Always make sure that you know the law and follow all safety precautions when hauling these types of materials.

38Chapter 1: Transportation of Dangerous Goods
Class 1Explosives
Class 2.1Compressed Gas
Class 2.2Non-flammable
Non-toxic
Class 3Flammable Liquids
Class 66.1 Poisonous
Substances
Class 7Radioactive
Class 4Flammable Solids and Spontaneous
Combustion
Class 5 Oxidizers and Organic
Peroxides
Class 8 Corrosives
Class 9Misc. Products and
Substances

39Chapter 1: Help Protect the Environment
SAVE ENERGY, SAVE MONEY You can control the costs of operating a vehicle and minimize the emissions it produces by making a commitment to drive less and to drive more efficiently. The following tips can improve your fuel efficiency by helping you drive the Auto$mart way.
Maintain your vehicle. Give your car a full tune-up, including an oil and oil filter change. Oil breaks down under use and won’t lubricate, cool or protect as well. A poorly tuned engine increases fuel consumption. And a well-tuned engine minimizes engine wear.
Measure the inflation pressure of your tires at least once a month when the tires are cold (i.e., when your vehicle has not been driven for at least three hours or when it has been driven for less than two kilometres). Warm tires give an inaccurate reading because heat buildup increases tire pressure during use.
Under-inflated tires wear faster, waste fuel and are unsafe.
Idling consumes fuel. Ten seconds of idling can use up more fuel than restarting the engine. Turn off the ignition if you are waiting for someone.
Using an air conditioner in stop-and-go traffic can increase fuel consumption by as much as 20 per cent. To stay cool at highway speeds, use your car’s flow-through ventilation. Open windows can be a fuel-saving alternative to air conditioning at low city speeds; however, at highway speeds open windows increase drag and heighten fuel consumption.
A full roof rack can increase fuel consumption. Even the most streamlined roof rack will increase fuel consumption. If the carrier is not permanently affixed to your automobile, remove it when it’s not needed.

40Chapter 1: Help Protect the Environment
Cruise control allows you to set the car’s cruising speed and take your foot off the gas pedal. By maintaining a constant speed on long trips, your cruise control feature will reduce fuel consumption, provided the terrain is relatively flat.
Drive the posted speed limit. Increasing your speed from 100 km/h to 120 km/h will increase fuel consumption by about 20%.
Avoid “flooring” your gas pedal from a dead stop. You’ll consume about 37% more fuel during a “jackrabbit” start than if you pull away gradually.
Visit vehicles.gc.ca to get more information on how to buy, drive and maintain your vehicle to save energy and money, as well as protect the environment.

41Chapter 1: Help Protect the Environment
WINTER TIPS FOR DRIVERS – DRIVING HABITSWinter weather can increase your vehicle’s fuel consumption by as much as 50%. Canadian drivers that adopt these simple-to-do winter driving tips highlighted below can save money, fuel, help protect the environment, and improve road safety by winterizing their vehicles.
To learn more visit: www.vehicles.gc.ca
Remote car starters result in unnecessary idling and wasted fuel. Remote car starters may seem like a convenient accessory however there are many hidden costs associated with their regular use. People with remote car starters tend to start their cars long before they are ready to drive, which needlessly burns fuel. Since car starters are significantly less effective than block heaters in warming up your engine, cars equipped with car starters will be more likely to
develop buildups of harmful sludge and deposits in their engines and engine components from improperly combusted fuel. Regular use of remote car starters is also not an environmentally friendly practice as they needlessly contribute to harmful greenhouse gas emissions, which feed climate change.
Save fuel and save money by using a timed block heater. Use an automatic timer to switch on the block heater two hours before you plan to drive your vehicle. A block heater enables the vehicle’s engine to start more easily and reach its peak operating temperature faster. In below-zero temperatures, block heaters can improve overall fuel economy by as much as 10% or more.
Prevent fogging. The sooner you can clear your windows the sooner you can get on the road. Waiting for your windows to defog is frustrating when you are

42Chapter 1: Help Protect the Environment
in a hurry to go. There are two simple tricks to prevent your car windows from fogging up. One is to open a window as soon as you enter the vehicle. The second is to clear all the snow from the air intake on top of the hood. Otherwise, the defroster will draw moisture into the system and fog the windshield, which will delay you from getting on the road.
Clear away snow and ice. Fuel consumption increases as snow and ice build up on and around the vehicle you’re driving. Everyone knows that driving with extra weight in your vehicle makes your engine work harder and increases fuel consumption. As snow and ice build in wheel wells and under bumpers, it adds weight and rubs against tires, further increasing rolling resistance. Snow piled on top of the vehicle increases aerodynamic drag as well as vehicle weight. For safety as well as fuel economy, clear all the snow and ice off your vehicle before you drive away.
Combine your stops. The fewer stops you make the better. Did you know that a vehicle operating with a cold engine consumes 50% more fuel, until it warms up many minutes later, compared to a vehicle operating with a warm engine? By combining your errands you not only save fuel by reducing your travel but also ensure that your engine reaches its optimal operating temperature – and stays that way. Combining your trips minimizes your fuel consumption and emissions.
Plan your trip. Trip planning is particularly important in the winter. The less time you spend driving the less fuel your vehicle will consume. Carefully planning your trip before you head out on the road will help ensure that you spend less time on the road and more time doing things you enjoy. Plan your route to avoid obstacles such as unplowed roads, hills and multiple traffic lights. In many cases it is more fuel-efficient

43Chapter 1: Help Protect the Environment
to take a slightly longer route if it is relatively free of many traffic obstacles, which can slow you down. When parking, try to park your vehicle downhill; andif possible, try to park your vehicle in sheltered areas, i.e., on the side of a building sheltered by the wind. These simple tricks will help to ensure that it will be easier to pull away from the parking spot.
Drive efficiently. Excessive acceleration and braking dramatically increases fuel consumption. Drivers can save fuel by driving at a smooth, even speed and by anticipating lane changes and traffic obstructions. Winter conditions make slowing down and stopping more difficult. Drivers should be aware that winter road conditions, such as wet, icy or snow covered roads, increase braking distance. By increasing your following distance between you and the vehicle in front you will allow yourself more response time
which will help to save fuel and to make winter driving easier on yourself and other drivers on the roadways.
Take it easy. Give yourself more time to get from A to B in the winter. More thought and care are required for driving in the winter season. The faster and more aggressively you drive in the winter the more your vehicle slips and slides and spins its wheels. Not only will these actions use more fuel, but also you will be at a higher risk of being involved in a serious collision.
Ski racks. Ski racks are a drag when not in use. Avid skiers know well enough that drag affects aerodynamics. Therefore, you should remove your ski racks when not heading to the slopes. The drag caused by mounted ski racks increases fuel consumption, so consider using removable ski racks that you can easily remove from your vehicle when not needed.

44Chapter 1: Help Protect the Environment

45
Chapter 2:
Rules of the Road

46Chapter 2: Driver Responsibility
Automobile collisions can be traumatic events. Responsible drivers greatly reduce the risk of a collision by obeying traffic regulations. These drivers realize it is their responsibility to drive carefully so as not to cause any harm to themselves or other persons or damage to property.
Collisions do happen even to the most careful drivers. The force of a collision is so great that unrestrained persons may strike each other, the interior of the vehicle or may be ejected from the vehicle. Severe injuries or death often result. Using a seat belt or child restraint system correctly helps hold all persons in place in the vehicle. This provides them with a far better chance of avoiding serious injury.
Seat belts and child restraints also help prevent injuries during “regular” driving. A driver may have to swerve and stop, or stop suddenly to avoid a collision.
Fewer than one percent of all injury-producing collisions involve fire or submersion. In these situations, wearing a seat belt greatly increases the chances of remaining conscious in order to escape from the vehicle.
Everyone 16 years of age and older, whether a driver or passenger riding in a motor vehicle in Prince Edward Island, is required by law to wear a seat belt if a seating position with a seat belt is available to them. A driver is responsible for ensuring that all passengers under 16 years of age are wearing a seat belt in a seating position with a seat belt available to them. Young children must be placed in an approved child restraint system that is appropriate for them.

47Chapter 2: Driver Responsibility
INFANTSThe law requires that infants from birth weight to 10 kg (22 lb) and a minimum of one year of age travel rear-facing in a child restraint seat that conforms to the requirements of Standard 213.1 under the Canadian Motor Vehicle Safety Standards (CMVSS) – Transport Canada, and the PEI Seat Belt Regulations. This may be a portable infant carrier or a convertible seat that will serve infants and toddlers. Current regulations state infants from birth weight to 10 kg (22 lb) must travel rear-facing. Every child restraint system sold in Canada must meet Canadian Motor Vehicle Safety Standards.
The standards are set by Transport Canada, but it is the manufacturers who must certify that their products meet the applicable standard(s). Transport Canada does random testing of child restraints to ensure compliance. CMVSS documentation is available at www.tc.gc.ca/actsregs/mvsa/tocmvs.htm. CMVSS 213 Child Restraint Systems, (May 11, 1984)CMVSS 213.1 Infant Restraint Systems, (September 1, 1982)CMVSS 213.2 Booster Seats, (March 1983)CMVSS 213.3 Restraint Systems for Disabled Persons, (July 24, 1989)CMVSS 213.4 Built-In Restraint Systems, (April 25, 1995)CMVSS 213.5 Restraint Systems for Infants with Special Needs, (March 15, 1998)

48Chapter 2: Driver Responsibility
TODDLERSToddlers from 10 to 18 kg (22 to 40 lb) must travel in a child restraint seat conforming to the requirements of the Highway Traffic Act or the CMVSS.This can be the convertible type of seat used by infants too, or a child seat made just for toddlers. When a toddler travels in a vehicle, other than a parent’s or legal guardian’s, a lap belt may be used.
NOTE: Restraint seats must have a properly installed anchor as your forward facing seat must use a tether strap. You can contact your automobile dealer concerning installation.
PRESCHOOLERSBooster seats are required for children who are too big for a child car seat but too small to be protected by a seat belt. This includes preschool to primary-grade children weighing between 18 and 36 kg (40 to 80 lb), with a standing height of less than 145 cm (four feet 9 inches) or under the age of ten years. All booster seats must be used with the lap shoulder belt for children who have outgrown their forward-facing child restraint seat. Make sure it is used in the back seat and the lap belt is worn snugly over the child’s hips (not over the stomach). Children under the age of 12 should ride in the back seat of the car. It’s the safest place.

49Chapter 2: Driver Responsibility
PROPER FIT OF SEAT BELTSLap belts should be worn snugly and as low around the hips as possible. Shoulder belts must never be worn without a lap belt. Shoulder belts should not be too tight. Leave a fist’s width between your chest and the belt. The use of a shoulder belt is not recommended for a child or an adult less than 140 cm (47 in) in height.
AIR BAGSAir bags are safety devices that protect the head and upper body from injury in a collision. They prevent the driver’s head from hitting the steering wheel and the front passenger’s head from striking the dashboard.
While air bags save many lives each year, they do not protect in all kinds of crashes. They deploy in frontalimpacts only, and not in rear-end collisions, side impacts or rollovers. They may also deploy in low-speed collisions sometimes as low as 15 kilometres per hour. Seat belts, on the other hand, protect the entire body and are effective in all types of collisions. In low and moderate-speed impacts, seat belts aloneprovide all the protection necessary. Air bags are most effective in high-speed crashes, where they are often necessary to prevent serious injury. Together, seat belts and air bags offer good protection in most collisions.
CAUTION: People who sit close to the air bag module, usually because they are short, are at risk of injurywhen the air bag is deployed. Children are also vulnerable because they are small. They should beproperly belted, and those under the age of 12 should be seated in the back seat.

50Chapter 2: Driver Responsibility
WARNING: It is very important to prevent children from sitting or standing close to the dashboard. Neverinstall a rearward-facing infant restraint system in a seat equipped with an air bag. If the air bag deploys,the infant restraint system will be propelled into the back of the seat.
SOME SEAT BELT AND AIR BAG FACTS• You are many times more likely to be killed or seriously injured if thrown from the vehicle in a collision.• Fire or submersion in water is rare in collisions. Safety belts keep you conscious and uninjured, enabling you to get free of the car.• Safety belts can help prevent serious collisions by keeping the driver behind the wheel and in control of the vehicle.• Many injuries and deaths result from collisions at 60 km/h (40 mph) or less.
• Most collisions occur close to home.• Unbelted vehicle occupants can seriously injure fellow passengers by striking or crushing them against the car in a collision.• Children should never be held on an adult lap because the force of a collision may tear the child from the adult’s arms. In addition, the child may be crushed between the adult and the car if the adult is not buckled in.• Injuries from safety belts are very rare, usually occurring only in very severe collisions and resulting from improper use or adjustment of the belts.• Never have more than one person in a seat belt.

51Chapter 2: Driver Responsibility

52Chapter 2: Rules of the Road
The Rules of the Road are laws and safe practices that have developed out of custom and experience. They are for the safe and efficient movement of vehicles, pedestrians and other road users. They cover such things as starting, signaling, turning, overtaking and passing, stopping and other actions of drivers and other road users. You will be required to demonstrate your knowledge of these rules and your ability toapply them properly before you can get a licence.
RIGHT-OF-WAY AT THREE-WAY OR FOUR-WAY INTERSECTIONS CONTROLLED BY STOP SIGNSWhen two or more vehicles enter such an intersection from different directions at approximately the sametime, the vehicle on the left will yield the right-of-way to the vehicle on the right. It is a good practice to slow down to a speed that will permit you to stop if you see a vehicle coming from your right that is travelling at
such a speed, or is so close, that a collision will occur if each continues on its respective way. Since most of these intersections are in residential areas, your view of approaching cars, cyclists, pedestrians and children will often be obscured. Under such conditions youshould slow down to a speed that will permit you to have complete control of your vehicle. Remember thatyou do not automatically have the right-of-way by entering the intersection first.
The law says that before entering a highway you must come to a complete stop and not proceed unless you can do so safely. The stop must be made before any marked or unmarked crosswalk, or where none exists, then

53Chapter 2: Rules of the Road
before the travelled portion of the highway you are about to enter.
RIGHT-OF-WAY OF A CAR TURNING LEFTThere are many duties and responsibilities of a driver making a left turn. When you turn left you must:• be in the proper lane;• give a visible signal of your intention to turn; and• yield the right-of-way to any vehicle or pedestrian within, or so close to the intersection that a collision could result.
RIGHT-OF-WAY AT LANES, DRIVEWAYS AND ALLEYSIf you are driving in a rural area and you wish to enter or cross a highway from a private road, lane, driveway, or building you must:• stop and yield the right-of-way to traffic on the street or highway;• not enter the highway if there is any danger of collision; and• not enter the highway if the other driver would be forced to swerve or brake to avoid a collision.

54Chapter 2: Rules of the Road
If you are driving in a restricted speed area, such as a 50 km/h (30 mph) zone in any city or town, you must:• stop your car before driving onto the crosswalk;• check for pedestrians and other vehicles that may be approaching and yield the right-of-way to them; and• do not proceed until you are sure it is safe to do so.Always remember that the responsibility to avoid a collision rests with you.
RIGHT-OF-WAY AT STOP SIGNSStop signs are placed at those intersections where extra hazards exist, such as heavy traffic or limitedvisibility. When you approach a stop sign always follow these rules:• start slowing down soon enough so that you can stop smoothly;• in a city or town, stop your vehicle: a) before entering a crosswalk; or
b) at a clearly marked stop line; or c) at a point nearest the intersecting roadways where pedestrians would normally cross.• in rural areas: a) stop your vehicle before the edge of the roadway you are about to enter; b) look carefully in both directions before starting to observe the speed and distance of approaching traffic; c) if the road is slippery you will need a larger gap in traffic before you can start up; d) look twice in both directions starting with the left (or closest lanes of traffic); and

55Chapter 2: Rules of the Road
e) yield the right-of-way to any traffic that is close, or is travelling at such a speed, that there would be danger of a collision if you proceeded.
Rolling a stop sign is illegal. Remember that stop signs are placed at those intersections where extra hazards exist, such as heavy traffic or limited visibility. Slowing rather than stopping for stop signs is a dangerous practice and one that will eventually lead to collisions. If you are a beginner, develop the habit of always making a full stop. If you have driven for some years, you may have developed the habit of “rolling” through stop signs; this habit must be corrected.
RIGHT-OF-WAY OF EMERGENCY VEHICLESWhenever an emergency vehicle, ambulance, fire department vehicle or police car, sounding a siren, horn or warning signals, approaches from any direction, you must yield the right-of-way by:
• immediately moving clear of an intersection;• driving as closely as possible to the right-hand curb or edge of the roadway; and• stopping and remaining stopped until the emergency vehicle or vehicles have passed.
NOTE: On one-way streets, pull to the right or left.
RIGHT-OF-WAY OF FUNERAL PROCESSIONDrivers of vehicles in a funeral procession with lighted headlights are required to exercise care whencoming to a red traffic light or stop sign. Only if a

56Chapter 2: Rules of the Road
police officer is present and directs, then may youproceed through the red light or stop sign with caution. All approaching vehicles must reduce their speed to half the posted speed limit. At no time will a driver of a vehicle attempt to pass through a funeral procession from behind. Funeral vehicles on PEI are equipped with purple flashing lights.
RIGHT-OF-WAY AT YIELD SIGNSYield signs provide a realistic and flexible means of controlling traffic at certain locations. When approaching a yield sign, you must slow down to a speed that will make it possible for you to stop and yield the right-of-way to pedestrians and vehicles. If necessary, stop and yield the right-of-way to anyone on the roadway, then proceed with caution.
PEDESTRIANS’ RIGHTS AND DUTIES AT INTERSECTIONS CONTROLLED BY TRAFFIC SIGNALSBoth drivers and pedestrians must obey the traffic signal that controls an intersection. Whenever apedestrian enters the crosswalk with a “walk” or green signal light, the pedestrian has the right-of-way over all vehicles. A pedestrian must not leave the curb and walk or run into the path of a vehicle that is so close that a driver cannot safely yield the right-of-way.
When the amber light or “wait” sign appears a pedestrian must not start to cross. If a pedestrian is in the intersection when the amber light or “wait” sign appears, he or she must proceed to the nearest sidewalk. A driver must yield the right-of-way to a pedestrian and must not proceed until the pedestrian is safely across the street.

57Chapter 2: Rules of the Road
PEDESTRIANS’ RIGHTS AND DUTIES AT FLASHING RED LIGHTSWhen approaching an intersection controlled by a flashing red light, a driver must come to a full stop and remain stopped until it is safe to proceed. Pedestrians may enter the roadway with caution, and have the right-of-way over vehicles.
FLASHING AMBERWhen approaching an intersection controlled by a flashing amber light, a driver must enter with caution and yield the right-of-way to any pedestrians within the crosswalks. Pedestrians should remember that drivers are not required to come to a full stop for a
flashing amber light; and before entering the roadway against an amber light, a pedestrian should exercise extra care and be on guard against drivers who may not be prepared to stop.
PEDESTRIANS’ RIGHTS AND DUTIES AT INTERSECTIONS WITH NO TRAFFIC SIGNALSPedestrians have the right-of-way within a marked or unmarked crosswalk at an intersection with a stop sign or yield sign, and at an open intersection. Drivers must yield to a pedestrian. Pedestrians should always exercise caution when enter-ing an intersection where drivers are not required to stop.

58Chapter 2: Rules of the Road
VEHICLES STOPPED FOR PEDESTRIANSOne of the frequent causes of pedestrian collisions is one vehicle passing another that is stopped forpedestrians. The law requires that when a vehicle has stopped for a pedestrian, a driver approaching frombehind must not pass the stopped vehicle. The driver of the first vehicle approaching the crosswalk shouldattempt to stop a sufficient distance away to give other drivers a clear view of the crosswalk and the driver of the oncoming vehicle must also stop. Always use extreme caution before you attempt to pass a vehicle which is stopped or slowing down at an intersection. Remember that he or she has a clearer view of the road ahead.
If you are about to pass a larger vehicle, always be aware of the pedestrian who may walk or run into your path. This is particularly true if you are driving in the lane next to the stopped vehicle. Slow down as you are about to pass. Never pass a vehicle stopped for a pedestrian.
ADVICE TO PEDESTRIANS• Always cross at intersections and keep within the crosswalk. Crossing between intersections is a hazardous practice. If you must cross between intersections, first yield the right-of-way to all vehicles.

59Chapter 2: Rules of the Road
• Never walk into the roadway from behind parked vehicles or from the rear of a stopped bus. If the driver cannot see you, he or she cannot avoid you.• Always look for turning vehicles before trying to cross.• Teach your children never to play on or near the roadway, and always to use the crosswalks.• At night wear white, light coloured or retro reflective material clothing. The driver will be able to see you at a greater distance.• On the highways, always walk on the left, facing traffic, so that you can see approaching vehicles; whenever possible stay off the pavement.• New crosswalks have sounds in addition to the light signalling pedestrians that it is safe to cross the road. This is for the visually impaired pedestrians.
ADVICE TO DRIVERS• The law requires that you exercise care for the safety of pedestrians WHEREVER they may be crossing.• In residential areas, slow down and be on alert for youngsters who may suddenly run into your path.• If you see any children, or a confused or incapaci- tated person, slow down and be prepared to stop.• Always stop for pedestrians within crosswalks and never pass a vehicle that has stopped for a pedestrian.• A blind or partially blind person carries a white cane to indicate that he or she cannot see. Whenever you see a pedestrian carrying a white cane, drive with caution and be prepared to stop. Often a blind person will raise his/her cane when they are uncertain of crossing the street in safety. That is your signal to STOP and allow him/her to go ahead. The same courtesy should be extended to persons led by a seeing-eye dog. Remember that their lives may depend on you.

60Chapter 2: Rules of the Road

61
Chapter 3:Signs, Pavement Markings and Work Zones
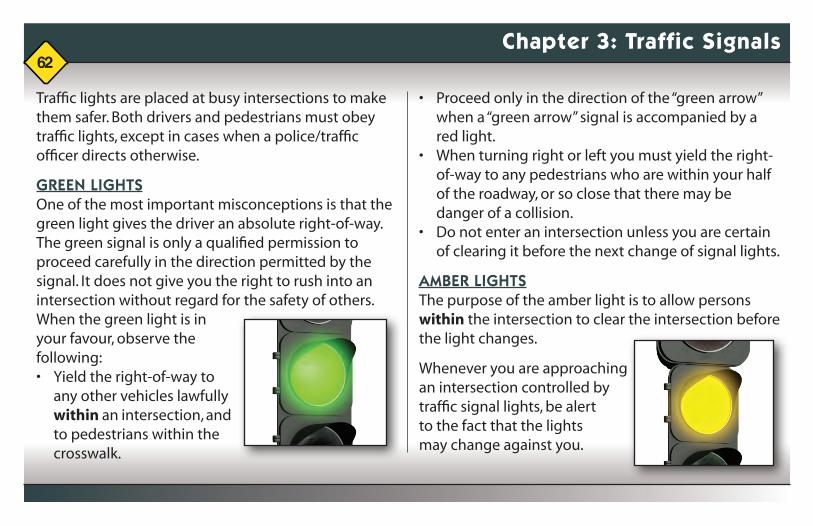
62Chapter 3: Traffic Signals
Traffic lights are placed at busy intersections to make them safer. Both drivers and pedestrians must obeytraffic lights, except in cases when a police/traffic officer directs otherwise.
GREEN LIGHTSOne of the most important misconceptions is that the green light gives the driver an absolute right-of-way.The green signal is only a qualified permission to proceed carefully in the direction permitted by the signal. It does not give you the right to rush into an intersection without regard for the safety of others. When the green light is in your favour, observe the following:• Yield the right-of-way to any other vehicles lawfully within an intersection, and to pedestrians within the crosswalk.
• Proceed only in the direction of the “green arrow” when a “green arrow” signal is accompanied by a red light.• When turning right or left you must yield the right- of-way to any pedestrians who are within your half of the roadway, or so close that there may be danger of a collision.• Do not enter an intersection unless you are certain of clearing it before the next change of signal lights.
AMBER LIGHTSThe purpose of the amber light is to allow persons within the intersection to clear the intersection beforethe light changes.
Whenever you are approaching an intersection controlled by traffic signal lights, be alert to the fact that the lights may change against you.

63Chapter 3: Traffic Signals
Have your car under control, and never speed up as you approach an intersection. Try to be aware of traffic lights at least a block ahead of you in order to anticipate that a green light may change before you get there. It is a violation of the Highway Traffic Act to enter an intersection on an amber light, unless stopping cannot be done safely.
RED LIGHTA red light means you must bring your vehicle to a stop at a clearly marked stop line or, if none, at the nearest crosswalk or, if none, before entering the intersection.
Wait until the signal changes to green before proceeding through the intersection unless signs or signals permit special movements of traffic to proceed.
RIGHT TURNS AT RED LIGHTA right turn is permitted at a red light after making a complete stop, providing there is no sign prohibiting a turn, and subject to the right-of-way of pedestrians or other traffic in or approaching the intersection.
Do not impede or hold up traffic behind you after you have stopped and the way is clear safely proceed.
FLASHING RED LIGHTA flashing red light means you must bring your vehicle to a complete stop and proceed only when it is safe to do so.
The flashing red light may be an overhead light, a standard traffic signal light or a beacon located directly above a stop sign.

64Chapter 3: Traffic Signals
FLASHING AMBER LIGHTA flashing amber light means caution. When facing a flashing amber light, slow down and be prepared to stop.
SCHOOL SIGNAL LIGHTSAt many points where traffic is heavy, signal lights have been placed at intersections and betweenintersections to make crossing of these streets safer for children. These signals are in operation whenchildren are going to or from school. There may be advance warning signs before the signal light.
RAILROAD CROSSING LIGHTSAlthough there are no railways in Prince Edward Island, extra caution should be taken by drivers whendriving outside of Prince Edward Island. Signal lights or warning lights flash when a train is approaching. When approaching a railway crossing where a signal device
is warning of the approach of a train, you must stop not less than five metres (15 feet) from the nearest rail. The same rule applies when a flagperson signals that a train is coming.
The deadliest of all highway collisions occur between a motor vehicle and a train. Public highway/railwaycrossings are marked with signs, and may also have mechanical or electrical warning devices. Learn whatthey are and watch for them.
• ADVANCE WARNING SIGNSThese signs tell you to look, listen and slow down because you may have to stop. There may be an advisory speed tab erected below the advance warning sign to show that the safe road speed is less than the posted speed. The advance warning sign also advises the driver of the angle it crosses the road.

65Chapter 3: Traffic Signals
• PAVEMENT MARKINGSPavement markings consist of an “X” and/or STOP line that may be painted on the pavement at the approach to highway/railway crossings.
• RAILWAY CROSSING SIGNSRailway crossing signs are found at all public highway/railway crossings. A railway crossing sign means drivers must yield to all trains. If there is more than one track, the sign below the railway crossing sign indicates the number of tracks.
• RAILWAY CROSSING SIGNS WITH A STOP SIGNIf a stop sign is erected at a highway/railway crossing, the driver must stop no closer than five metres (15feet) and no further than 15 metres (45 metres) from the nearest rail. Drivers must not proceed until theycan do so safely.
• RAILWAY CROSSING SIGNS WITH FLASHING LIGHTS AND BELLIf flashing lights and bell are erected at a highway/railway crossing, the driver must stop when the lightsand bell are activated because this means that a train is approaching. All drivers must stop at the stop line painted on the roadway or if none exists, no closer than five metres (15 feet) from the nearest rail. Do not proceed until the lights and bell have stopped, the train has passed or until you can do so safely. If there is more than one track, make sure all the tracks are clear before crossing.
CROSSWALKSCrosswalks are provided at intersections and other locations where they may be required by the volume of vehicles and pedestrians.

66Chapter 3: Traffic Signals
CROSSWALKS AT INTERSECTIONSCrosswalks connect sidewalks on each side of the roadway indicating the path that pedestrians are to follow when crossing the street. At intersections without traffic signals drivers are required to stop when a pedestrian enters the crosswalk on or close to the side of the roadway that the driver is using.
SCHOOL CROSSWALKSSchool crosswalks are provided where the school or community posts a crossing guard to control the students and traffic in order to provide a safe time for the students to cross. When a school crossing guard is posted, drivers must stop when signalled to do so by the crossing guard and remain stopped until the crosswalk is clear and the guard has left the crosswalk.
SPECIAL CROSSWALKSOverhead signs and flashing amber beacons provide greater warning to drivers especially on
multi-lane streets. When special crosswalks are installed and beacons are activated by pedestrians, the drivers must stop before entering the crosswalk when the beacons are flashing.
CROSSWALKS WITH TRAFFIC SIGNALSWhere crosswalks are equipped with traffic signals, the driver must respond to the traffic signals.
PAVEMENT MARKINGSPavement markings are placed on a highway to indicate to the driver where the driving lanes are andmarkings provide any additional information which may be appropriate.
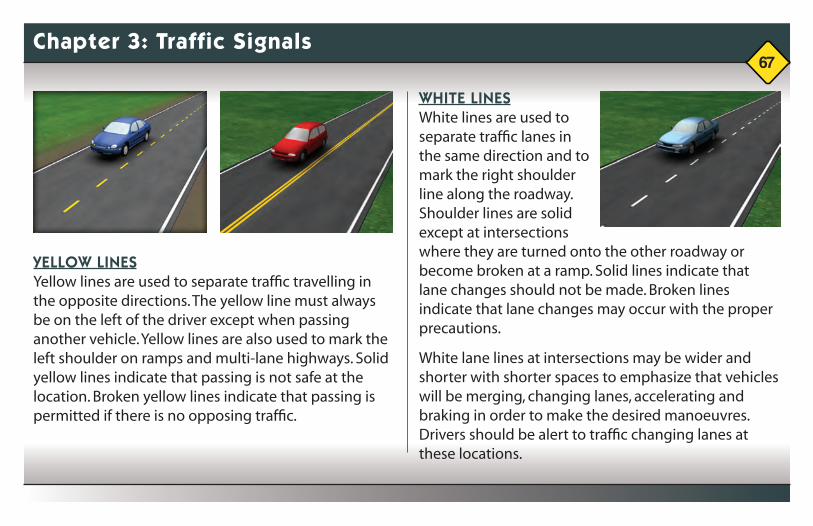
67Chapter 3: Traffic Signals
YELLOW LINESYellow lines are used to separate traffic travelling in the opposite directions. The yellow line must alwaysbe on the left of the driver except when passing another vehicle. Yellow lines are also used to mark the left shoulder on ramps and multi-lane highways. Solid yellow lines indicate that passing is not safe at thelocation. Broken yellow lines indicate that passing is permitted if there is no opposing traffic.
WHITE LINESWhite lines are used to separate traffic lanes in the same direction and to mark the right shoulder line along the roadway. Shoulder lines are solid except at intersections where they are turned onto the other roadway or become broken at a ramp. Solid lines indicate that lane changes should not be made. Broken lines indicate that lane changes may occur with the proper precautions.
White lane lines at intersections may be wider and shorter with shorter spaces to emphasize that vehicleswill be merging, changing lanes, accelerating and braking in order to make the desired manoeuvres.Drivers should be alert to traffic changing lanes at these locations.

68Chapter 3: Traffic Signals
DIAGONAL MARKINGS/CROSSHATCHESDiagonal markings/crosshatches may be used in advance of traffic islands, merging areas, lanetransitions or medians to warn traffic that the paved area is not intended for use as a traffic lane. Driversshould not use such areas as traffic lanes and should observe the colour of the markings and keep to theappropriate side.
STOP LINESStop lines may be painted on the highway’s surface at intersections to indicate to a driver the appropriatelocations to stop. The driver should stop so that the front of the vehicle does not extend beyond the stoplines. Stop lines are always white. Stop signs do not show where to stop.
CROSSWALK LINESCrosswalk lines are painted on the highway surface to indicate the location of a crosswalk. When a stop is required and there is a crosswalk without a stop line, a driver must stop his/her vehicle before any part of it extends into the crosswalk. Crosswalk lines are always white.
INTERSECTION ARROWSIntersection arrows may be used in advance of an intersection to indicate which lane the driver must be in to make a specific manoeuver. Intersection arrows are always white.

69Chapter 3: Traffic Signs
Along with traffic signal lights, traffic signs provide for the safe and efficient movement of traffic. There areseveral different types of traffic signs, including regulatory, warning, construction and information signs. The shape and colour of each sign, as well as the message printed on it, carry a message for the driver.For instance, red is used to indicate prohibited manoeuvres while green designates permittedmovements. Stop signs always have an eight-sided shape, yield signs are always triangular in shape andspeed limit signs are always a vertical rectangle. Each shape carries a distinctive meaning so that ifdarkness or falling rain or snow obscure the lettering, the safety message can still be identified.
All Canadian provinces and territories use uniform traffic signs. In most instances these are the same as those used in the United States, making driving easier and safer for all. Familiarize yourself with them, so that you will be ready to recognize their message and be prepared to obey their direction.
SIGN SHAPES AND THEIR MEANINGS
Stop Sign - White Letters on Red Background• Make a complete stop at the clearly marked stop line, or before entering the crosswalk, or in places
stop yield
warning
regulatory
school zoneslow movingvehicle

70Chapter 3: Traffic Signs
where there are no stop lines or crosswalks, before entering the intersection.• Look right and left and ahead and yield to traffic and pedestrians before proceeding.
Yield Sign - Red on White• Slow down when approaching this sign.• Look left and right and ahead and yield to traffic and pedestrians.• Stop when necessary to avoid pedestrians or traffic.
Vertical RectangleWhite with black or other coloured lettering; these regulatory signs state the law, such as speed limits, parking regulations and turning and passing movements.
• This sign is used to indicate streets or highways upon which the traffic is allowed in one direction only.
• This sign indicates the street or highway is divided by an island and approaching vehicles must keep to the right.
• This sign is on the right-hand side of the roadway facing traffic entering the roadway or ramp in the wrong direction. A white on red WRONG WAY sign may be placed further down the prohibited direction.
PLAYGROUND WARNING SIGNReduce speed and be prepared to make an emergency stop as children may run onto the roadway.

71Chapter 3: Traffic Signs
CONSTRUCTION SIGNSTraffic can expect to be delayed due to construction repair operations. Please obey the flagperson’s signal. Speed limits in construction zones must be obeyed at all times, even when workers and equipment are not working. Construction hazards such as bumps, detours, fresh oil and loose gravel may still be present.
Construction ahead
Road work ahead Survey crew ahead
Stopping prohibited
Lane ends Lane ends ahead
Detour ahead Bump or rough road ahead

72Chapter 3: Traffic Signs
gas
hospital zone
food lodging telephone
campground trailer park picnic tables
INFORMATION SIGNSGuide signs are essential to guide the motorist along established roads, to inform of intersecting roads, and generally to give such information as will help the driver in the most simple, direct method possible.These signs are square in shape. They indicate the location of various facilities.
CONSTRUCTION SIGNS CONTINUED...
Uneven lanes Low shoulder ahead. Difference in elevation due to
construction
High shoulder ahead. Difference in elevation due to
construction
Detour ahead Tar constructionahead
Traffic control person ahead

73Chapter 3: Traffic Signs
No left turn permitted
No U-turn permitted
Do not enter
No stopping permitted
Passing permitted Do not litter
airport ferry Trans-Canada Highway
PEI highway route
REGULATORY SIGNS
Police post sign PEI place name

74Chapter 3: Traffic Signs
Keep to the right of traffic island
Indicates only the turns permitted
Maximum speed limit ahead
REGULATORY SIGNS CONTINUED...
Truck route No turns No right on red signal
Hazard warnings Drive to the
direction the slopes are pointing
School zone Access for the physically
challenged
No parking in either direction
One way Do not enter

75Chapter 3: Traffic Signs
Snowmobile route
Parking
Dangerousgoods route
Cul-de-sacDangerousgoods
prohibited
Snowmobile restricted
REGULATORY SIGNS CONTINUED...
Weight School bus stop ahead
Amber Lights - when activated, slow down and be prepared to stop
Red Lights - when activated and flashing red, all traffic MUST stop

76Chapter 3: Traffic Signs
Narrow bridge Low clearanceUnderpass ahead
Divided highway ahead
Divided highway ends
Right lane ends Stop sign ahead
WARNING SIGNS
These guide drivers around
sharp curves
Hidden intersection ahead
Merge
Steep incline ahead
Bumpy or rough road ahead
Road narrows ahead

77Chapter 3: Traffic Signs
Traffic signal lights ahead
Slippery when wet Truck entering
Bridge opening ahead
Fire truck entrance ahead
Road narrows ahead
Sharp turn or bend in the roadway
ahead
Right curve ahead Posted speed sign
indicates safe speed for this turn
WARNING SIGNS CONTINUED...
School bus entrance
Snowmobile entrance
Bicycle crossingBridge freezes

78Chapter 3: Traffic Signs
Left turn only Right turn only Straight through or left turn only
LANE ARROWS
Straight through or right turn only
Right or left turn only
All movements permitted
WARNING SIGNS CONTINUED...
Pavement ends T intersection Double arrow
Truck InspectionStation
Truck InspectionStation advance
Truck InspectionStation exit

79Chapter 3: Traffic Signs
Straight through only
Side-mounted multiple lane designation
Side-mounted multiple lane designation
LANE ARROWS CONTINUED...
Side-mounted multiple lane designation
Side-mounted multiple lane designation
Two-way left-turn lane
Side-mounted multiple lane designation

80Chapter 3: Traffic Signs
Steady through
green arrow
CHANGE LANE DESTINATION LIGHTS
Flashing green arrow
Steady amber arrow
Transitpriority signal
Steady through this
lane
Flashing/steady red X

81Chapter 3: Traffic Signs
RAILWAY SIGNS
Crossbuck Indicates number of tracks to cross
Posted in advance of a railway crossbuck
Pedestrian crosswalk
School crosswalk
CROSSWALK SIGNS
ADDITIONAL SIGNS
Wide load/oversized
Pedestrians prohibitedSlow moving
vehicle
Pedestrian pushbutton
Cycling prohibited
Littering prohibitedReserved bicycle lane

82Chapter 3: Traffic Signs

83
Chapter 4:Speed Limits, Following Distances and Driving Skills
84Chapter 4: Speed Limits, Following Distances and Driving Skills
A driver must not drive a vehicle on a highway at a speed that is greater than is reasonable and prudentaccording to the conditions and hazards on or near the highway. A driver must exercise due care andattention and reasonable consideration for other people. A driver must control the speed of a vehicle toavoid a collision with people, vehicles, animals or other obstacles on the highway.
A driver of a motor vehicle must, when on a highway and approaching or passing an animal, exercisereasonable caution to avoid injuring the animal.
Speeding is risky, but the safest speed is not always the slowest speed. If you drive much slower thansurrounding traffic, other drivers might get frustrated and try to pass you. What you are aiming for is a speed appropriate for the conditions in which you are driving.
The maximum speed limit in Prince Edward Island unless otherwise posted is 80 kilometres per hour(km/h). The basic speed limits are:• 40 km/h (25 mph) in most municipalities (municipalities may establish the maximum speed limit within their boundaries);• 50 km/h (30 mph) in urban areas;• 60 km/h (40 mph) in school zones designated as such by the erection of signs at the entrance and the exit, between 8 a.m. and 5 p.m. when children are present on or near the highway on school days;• 80 km/h (50 mph) on most provincial highways; and• 90 km/h (55 mph) on the TransCanada and other designated highways.
Posted speed limits indicate the maximum safe speed under favourable driving conditions.

85Chapter 4: Speed Limits, Following Distances and Driving Skills
A reduction in speed is essential when driving under unfavourable conditions, such as:• poor visibility, due to darkness, rain, fog or snow, etc;• wet or slippery road surfaces;• heavy traffic;• pedestrians on or near the highway; or• fatigue, illness or nervous tension on the part of the driver.
SLOW DRIVINGA driver must not drive a vehicle at such a slow speed as to impede or block the normal and reasonablemovement of traffic. If for some reason you must drive slowly because of mechanical or other problems, itis a matter of common sense and courtesy to:• move over to the right lane and permit other traffic to pass; or• pull off the roadway and stop to allow traffic to get by.
DRAG RACINGIt is illegal to race or stunt drive a vehicle or bicycle on any street or highway. This extremely dangerous activity is prohibited. Drivers may lose their driving privileges if convicted of this offence.
FOLLOWING DISTANCES – THE TIME-INTERVAL FORMULAThe “Time-Interval Driving Method” will allow you to calculate a safe following distance between yourvehicle and a vehicle ahead.
Under normal conditions, follow at a distance of at least three seconds. When the driver ahead of you passes a fixed marker, begin counting from the back of the vehicle

86Chapter 4: Speed Limits, Following Distances and Driving Skills
to the front of yours --- “one thousand and one, one thousand and two, one thousand and three.” If you reach the mark before you’ve finished counting, you are following too closely. Ease off the accelerator and check yourself again. Under normal conditions, the three-second time-interval will provide you with enough distance to stop.
Here’s what to do under other conditions:
When you are pulling a trailer, increase your time interval to four seconds. You will need the extra time and space to stop.
Motorcycles are light and can stop quickly. Allow yourself another second or two of following distancewhen following a motorcycle.
When driving under adverse weather, road or traffic conditions, add more seconds to your following distance to four or more seconds.
It is sometimes hard to estimate a reasonable distance between your vehicle and the vehicle you arefollowing to be sure of having a safe space in which to stop. The volume of traffic, road conditions andtraffic speed constantly demands adjustments in your following distance.
To stop your vehicle, three separate acts are involved. These are actions that involve only you, the driver.1) You must see a reason for stopping. To see the reason for an emergency stop calls for continual close attention to road and traffic conditions.2) You must react. Reaction time varies with individual drivers but the average is about three-quarters of a second. In three-quarters of a second a vehicle traveling at 50 km/h (30 mph) will go 10 metres (33 feet) or about two vehicle lengths before the driver can start to apply the brakes.3) You must then depress the brake pedal and bring the vehicle to a complete stop.

87Chapter 4: Speed Limits, Following Distances and Driving Skills
Remember that the total stopping distance also depends on the efficiency of your brakes and tires and the condition of the road surface.
The distance traveled before the brakes will stop the vehicle depends on:• the speed the car is being driven;• the condition of the brakes;• the condition of the tires;• the condition of the road surface; or• whether the vehicle is being driven on a level highway or on a hill.
CAUTION: On wet or icy roads your vehicle cannot be stopped as quickly as on dry roads. When slowingor stopping, pump or apply the brakes quickly* (but gently) and as quickly release them. Keep repeatingthis on and off braking until you come to a full stop or the speed you desire. Do not apply hard, steadybrake pressure as this will lock the wheels and start
you skidding. Always drive at a speed which willenable you to stop within the clear, visible distance ahead.
*Note: This does not apply to vehicles with ABS (Antilock Braking Systems)
Following Distances... continued on next page

88Chapter 4: Speed Limits, Following Distances and Driving Skills
1. The car ahead is about to pass a checkpoint (sign, driveway, pole or other marker.)
2. Begin counting seconds as the rear of the car you are following passes your selected checkpoint.
3. If it takes fewer than three seconds for your car to pass the same checkpoint, your interval is too short to allow you to stop in the assured clear distance ahead.
4. If it takes three seconds or more for your car to pass the same checkpoint you have developed a reasonable interval between your car and the vehicle ahead.

89Chapter 4: Changing Lanes
CHANGING LANESWhen you must change lanes always practice these steps:• make sure that you are not following other traffic too closely;• look in your rear-view mirror for traffic approaching from the rear;• look in your side-view mirrors for any traffic;• signal your intention; and• turn your head in the direction of your turn, and check over your shoulder for cars that are too close to be visible in your side rear-view mirror.
All vehicles have a “blind spot” in the right and left rear corners. Your inside rearview mirror will not show a vehicle in the lane next to yours,
when the front bumper is about even with, or past your rear bumper.
SIGNALS AND CHANGING LANESOne of the most fundamental principles of safe driving is using reasonable care and signalling before turning, changing lanes or stopping. Giving signals properly and in sufficient time is an important practice. The proper signals are simple and can be easily learned. Moreover, all vehicles made during or after 1971 must be equipped with signal lights, which makes signalling even easier. To be effective, signals must be given in sufficient time to warn other drivers of your intentions; in the city signal 30 metres (100 feet) in advance of a turn or stop. On highways where traffic travels at much higher speeds, signals should be given at least 150 metres (500 feet) before turning or stopping. Even if your vehicle is equipped with a signalling device, know the proper hand signals.

90Chapter 4: Changing Lanes
You are required to give a signal before:• changing from one lane to another;• turning;• pulling over to stop;• pulling out from a parked position; or• attempting to pass, and after you have passed and are moving back into the right lane.
Make it a practice to give signals at all times. If you misjudge a situation, at least the other driver will bebetter prepared to avoid a collision.
HAND SIGNALS

91Chapter 4: Turning
TURNING AT INTERSECTIONSThese are the steps for making safe, courteous and legal turns.• Prepare for the turn before you get there. Decide well ahead where you want to turn. If you are not sure, drive slowly until you can read the street signs or markers or decide in some other way the direction you desire to turn. Never make last-minute turns; they are dangerous.• Get into the correct lane as soon as possible. You should get into the proper lane sooner in fast- moving and/or heavy traffic.• Look behind and on both sides to see where other traffic may be so that you can change lanes and make the turn safely.• Signal your intention to change lanes and to turn.• If you are going faster than is safe to make the turn, slow down before you reach the crosswalk and complete the turn at the same speed at which you
enter the intersection. Do not have the brake or clutch pedal pushed down or shift gears while actually turning but be prepared to do so.• Finish the turn in the proper lane.

92Chapter 4: Turning
LEFT TURNSDrivers making left turns must be alert for pedestrians and other traffic. Pedestrians in a crosswalk havethe right-of-way to proceed across the street. The driver turning left must watch not only for trafficapproaching from the opposite direction, but also for any other vehicles that may be entering theintersection.
When turning left into a lane or driveway, make sure that you:• are in the proper lane for a left turn;• have given a signal for a sufficient distance; or• yield to oncoming traffic (oncoming vehicles have the right-of-way even if you have reached the turning point first).
CAUTION: If you have stopped to make a left turn, and must wait for oncoming traffic, do not turn thesteering wheel to the left until you are ready to
complete the turn. If you are struck from the rear whilestopped with the wheels turned to the left, your car may be pushed into oncoming traffic and cause another collision.
Turning left on highways presents special problems due to the high speeds of other vehicles. When youmake a left turn on a highway, remember to stay on your side of the center line until you are ready to begin the turn. Watch for cars that may be passing you, and signal to give other drivers ample warning.

93Chapter 4: Vehicle Position While Turning Left
one-way road to a two-way road two-way road to a two-way road
two-way road to a one-way roadposition while turning left

94Chapter 4: Turning
RIGHT TURNS ON A RED LIGHTUnless forbidden by a sign at the intersection, drivers are permitted to make a right turn on a red light aftercoming to a complete stop. This procedure, when carried out with certain precautions, contributes to thesmooth, orderly and safe movement of traffic in urban areas.The following steps will apply:• come to a complete stop at the intersection;• check for other motor vehicles and pedestrians who have a prior right to use the intersection at that time and yield to them; and• proceed with caution if the way is completely clear. It is both dangerous and illegal to make a right turn on a red light without first coming to a complete stop and yielding to other traffic and pedestrians using the intersection.
MAKING U-TURNSU-turns are hazardous.
U-turns are permitted:• between intersections in a municipality if a local bylaw permits them; and• on a highway if you can be seen by traffic approaching from either direction within 150 metres (500 feet).U-turns are not permitted:• in a municipality at an intersection which is controlled by traffic lights;• at any place or intersection where a sign prohibits them; or• on a curve, near the crest of a hill or at any point where such a turn would interfere with other traffic.

95Chapter 4: Passing Other Vehicles
LEARN THESE RULES FOR SAFE PASSING AND PRACTICE THEM AT ALL TIMES
You must not pass:• at an intersection, if it would be necessary to cross over the solid centre line. If the car ahead is signaling for a right or left turn, you may cautiously pass on the side opposite the direction of the turn but you must not cross over a solid yellow line;• at any crosswalk or any other place where a car has stopped to yield the right-of-way to a pedestrian or other vehicle;• in a school zone;• on the right side of a vehicle except on a street with two or more lanes in the same direction;• when you have to drive on the left side of the roadway to pass and there is not sufficient clear road ahead to pass safely; or• in a posted no passing zone.
RESPONSIBILITIES OF DRIVER BEING PASSEDIf you are the driver being passed, you have responsibilities. These responsibilities are:• whenever the driver behind sounds the horn and signals with lights that he or she wants to pass, move to the right and do not change into a left lane until the vehicle has passed; and• never speed up when being passed;
To reduce the risk of a head-on collision follow these suggestions:• when another vehicle is passing you, look ahead to make sure that there will be no danger of collision or being cut off by the passing vehicle;• in heavy traffic, watch for drivers who insist on passing even at the risk of a collision; and• check your rear-view mirror regularly.

96Chapter 4: Passing Other Vehicles
SAFE PASSING PRACTICESHead-on collisions, sideswiping and rear-end collisions are caused by improper and unsafe passing practices. Develop safe passing practices. These are some suggestions:• Pay close attention to the distance between you and the vehicle ahead.• Don’t try to pass in heavy traffic.• Don’t take unnecessary risks in an attempt to be “the first in line.”• Keep a safe following distance before passing. Moving up closely behind a vehicle obscures your view of the road ahead and it becomes necessary to pull out sharply to pass.• Never pull out to pass behind another vehicle that is also passing. The driver ahead may not realize that two cars are passing and may not adjust his or her speed. Wait until the first car has completely passed and your view is unobstructed.
• Check your speed. High speeds and frequent passing go hand-in-hand.
NOTE: Remember, when passing, the law requires that you signal your intention and sound your horn.

97Chapter 4: School Buses
School buses are specially marked and equipped with alternating amber and red flashing lights.
Alternating flashing AMBER lights are displayed before the school bus stops to pick up or let off students. You should be ALERT for students when these lights are flashing and be prepared to stop. and you shall reduce speed and proceed with caution and you may pass the bus only with caution.
Alternating flashing RED lights are used when the school bus is stopped to pick up or let off students.When you are approaching a school bus with the FLASHING RED LIGHTS activated, you must stop yourvehicle not less than 6 metres (20 feet) from the front or rear of the bus. Remain stopped until the flashingred lights stop flashing. IT IS ILLEGAL TO PASS a school bus when the alternating flashing RED lights are displayed.
Note: Passing a school bus when the red lights are flashing could result in a charge under the Highway Traffic Act.

98Chapter 4: Heavy Vehicles - The No-Zones
WHAT ARE THE NO-ZONES?No-Zones are danger areas around trucks and buses where crashes are more likely to occur. Some ofthese No-Zones are actual blind spots where your car “disappears” from the view of the truck or bus driver.
Truck and bus drivers can’t always see certain areas around their vehicles. The size of heavy vehicles increases the risk of collision in those areas. When you are driving your car through a heavy vehicle No-Zone, please drive with care.
SIDE NO-ZONESTrucks and buses have big blind spots on both sides. If you can’t see the driver’s face in the side-view mirror, he or she can’t see you. If that driver needs to change lanes for any reason, you could have a collision.

99Chapter 4: Heavy Vehicles - The No-Zones
WIDE RIGHT TURNSTruck and bus drivers sometimes need to swing wide to the left in order to safely make a right turn. Theycan’t see cars squeezing in between them and the curb. Watch for their signal lights and give them roomto turn.
Remember:• don’t “hang out” on either side of trucks or buses;• avoid tailgating;• pass safely;• never cross behind a truck that is backing up.
REAR NO-ZONESUnlike cars, trucks and buses have huge No-Zones directly behind them. Truck or bus drivers can’t seeyour car behind them, and you can’t see what’s going on ahead of you. If the truck or bus drivers brakesuddenly, you may collide. Maintain a safe following distance at all times.
FRONT NO-ZONESDon’t cut in front too soon after passing. Truck and bus drivers need nearly twice the time and room tostop as cars. Look for the whole front of the truck in your rear-view mirror before pulling in front, and thendon’t slow down.
BACKING UP IN NO-ZONESNever cross behind a truck that is backing up. Truck drivers may not see you cutting in behind them.

100Chapter 4: Meeting Oncoming Traffic & Parking Regulations
There are certain rules for drivers going in opposite directions and meeting each other.• The basic rule is to keep your vehicle in your half of the roadway. Never permit your vehicle to wander into another traffic lane; you should drive in the centre of your lane of traffic except when passing or turning.• When meeting another vehicle on a narrow street or road, BOTH drivers must slow down or stop, and assist one another to pass safely. On streets that are made narrow by parked vehicles, watch for oncoming vehicles. If the parked vehicles are on your half of the road, move into a gap whenever possible.• You should not drive in the city with your high beams on unless they are required for safety. On the highway, when meeting other traffic you must dim your lights when you are within 150 metres (500 feet) of the other car.
PARKING REGULATIONSIt is illegal to stop or park a vehicle:• in front of a private
driveway, lane or intersection;
• within 2.5 metres (8 feet) of a fire
hydrant;• on a crosswalk;• within six metres (20 feet) of the
approach to a crosswalk;• on the roadway side of another vehicle that is
already stopped or parked (double parking);• so that it obstructs traffic or constitutes a hazard to others;

101Chapter 4: Parking and Stopping
• you must set your hand or foot brake, stop the motor and remove the keys from the ignition; and
• when getting out of a vehicle on the left side, or the right side on a one-way street, always look before opening the door. A passing cyclist or another car may strike the door, or pin you against the vehicle.
On a highway never park or stop on a travelled lane unless your vehicle is so disabled that you cannot move it. If for any reason you cannot move your vehicle off the highway, always turn on your parking lights or hazard lights when visibility is poor. But most important, get the vehicle off the highway as soon as possible.
If you have to stop or park at night on the highway, pull over as far to the right as you can. Turn on yourparking or hazard lights. Do not stand on the highway if you have to make repairs or change a flat tire. Carry a warning signal light which you can put on the
• within 15 metres (50 feet) of the nearest
rail of a railway crossing;• within 12 metres (40 feet) of a stop sign or
traffic signal; and• in a space designated for
the disabled unless the vehicle has a valid emblem approved by Highway Safety Division and The Council of the Disabled that clearly identifies the vehicle is owned, operated by or used for transportation of a disabled person. Violation of this law will result in a fine.
The following parking rules also apply:• where parallel parking is permitted, you must have
the vehicle’s wheels within 0.3 metres (12 inches) of the curb;

102Chapter 4: Parking and Stopping
shoulder of the road behind your vehicle. Buses,heavy commercial vehicles and trucks must carry flares or warning lamps, which must be placed at least60 metres (200 feet) in front of and to the rear of the vehicle.
STEPS IN PARALLEL PARKING• Stop even with the car ahead about 0.45 metres (1.5 feet) away from it.• Back slowly, turning the wheel sharply to the right until the car is at a 45-degree angle with the curb, then straighten the wheels.• Back slowly until the left headlight of the rear car is visible; then turn the wheels sharply to the left and again back slowly.• Turn wheel sharply to the right and pull forward to the centre of the parking space.
ANGLE PARKINGDrive forward into the space, with equal space on each side between the lines.
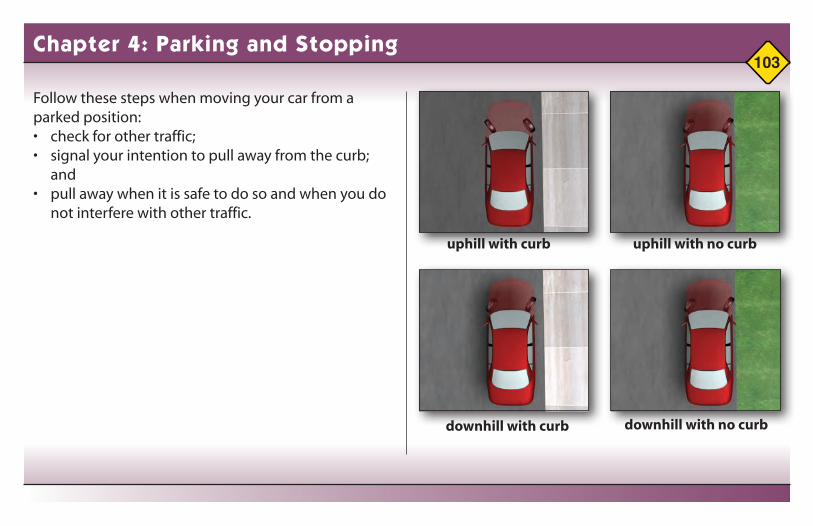
103Chapter 4: Parking and Stopping
Follow these steps when moving your car from a parked position:• check for other traffic;• signal your intention to pull away from the curb; and• pull away when it is safe to do so and when you do not interfere with other traffic.
uphill with curb uphill with no curb
downhill with curb downhill with no curb

104Chapter 4: Backing
Although backing forms a minor portion of driving, it deserves particular attention because it is an especially hazardous movement. A driver’s blind spot keeps him or her from being completely aware ofeverything in the path of his or her vehicle when backing up. The law requires that a driver must not back a vehicle unless the movement can be made safely and without interfering with traffic.
STEPS IN BACKING• Check all around the vehicle before you get in the vehicle.• Look out the rear window.• Sound the horn immediately before backing, to alert any pedestrians you may have missed.• Back up slowly.• Check both sides as you back up.• When backing from a driveway, check for pedestrian and vehicle traffic before crossing the sidewalk and entering the roadway.
• Backing is permitted only when safe to do so.

105Chapter 4: Driving in a Village, Town or City
Things to remember when driving in a village, town or city:• Watch for pedestrians and other vehicles when approaching any intersection.• Obey the speed limits. At a higher speed you may be unable to stop when necessary.• Plan your route ahead so that you will be in the proper lane for any turns you may have to make. Signal well in advance.• If you are parked at a curb, do not pull away until you have signaled, checked for other traffic and are sure you can do so safely.• Be alert for signs and signals.• Slow down in residential areas and watch for children and bicyclists.• If you must drive at a slower speed than the flow of traffic, keep to the right lane.• Keep your speed down in lanes and alleys. Stop before you enter a street from a lane or alley.
• Do not block an intersection. If your lane beyond the intersection is blocked with traffic, stop before entering it and wait until the traffic ahead moves.• Do not “weave” in traffic. When you have to change lanes, signal and watch for traffic behind you.• Do not follow other vehicles too closely.
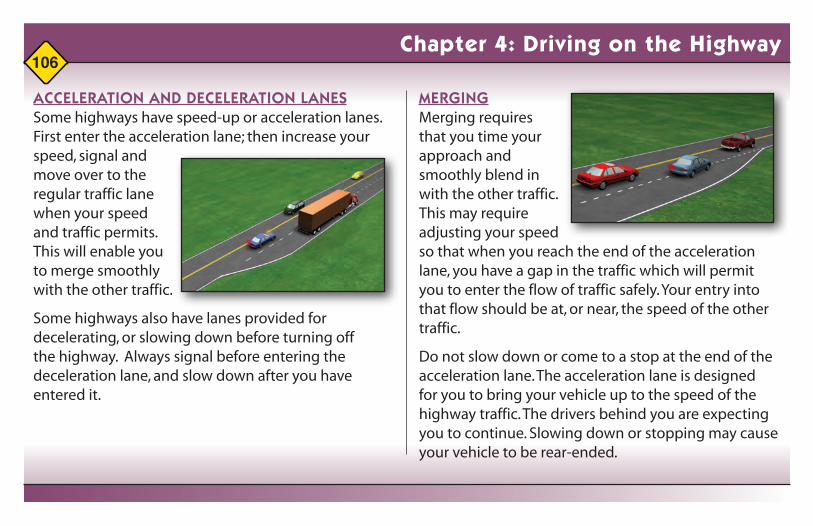
106Chapter 4: Driving on the Highway
ACCELERATION AND DECELERATION LANESSome highways have speed-up or acceleration lanes. First enter the acceleration lane; then increase yourspeed, signal and move over to the regular traffic lane when your speed and traffic permits. This will enable you to merge smoothly with the other traffic.
Some highways also have lanes provided for decelerating, or slowing down before turning off the highway. Always signal before entering the deceleration lane, and slow down after you have entered it.
MERGINGMerging requires that you time your approach and smoothly blend in with the other traffic. This may require adjusting your speed so that when you reach the end of the acceleration lane, you have a gap in the traffic which will permit you to enter the flow of traffic safely. Your entry into that flow should be at, or near, the speed of the other traffic.
Do not slow down or come to a stop at the end of the acceleration lane. The acceleration lane is designedfor you to bring your vehicle up to the speed of the highway traffic. The drivers behind you are expectingyou to continue. Slowing down or stopping may cause your vehicle to be rear-ended.

107Chapter 4: Driving on the Highway
Here are some tips for safe merging:• check the traffic flow that is on the highway;• choose your entry position;• as your vehicle enters the acceleration lane, signal;• accelerate to the speed of the highway traffic;• keep checking the gap and any following vehicles;• pull into the gap; and• turn off your signal light.
Drivers already on the highway should, when approaching an acceleration lane, slow down and leave a gap for the merging vehicle or move over to the left-hand lane if there are two or more lanes travelling in the same direction, if it is safe to do so, leaving the right travel lane clear for the merging vehicles. Remember, be courteous and allow the merging driver to enter the highway.
SOFT OR LOW SHOULDERSIf one or more wheels of your vehicle suddenly drops off the edge of the pavement onto a soft or low dirtshoulder, follow these four steps to keep control and return to the pavement safely:• Steer firmly. Hold the wheel with both hands. Straddle the edge with one side of the vehicle on the pavement and the other side on the shoulder.• Slow down gradually. Lift your foot from the accelerator, but don’t brake.• Ease to a slower speed.• Return to the pavement at a 45-degree angle when the vehicle has slowed enough to give you complete control over it. Don’t allow the side of the tires to rub against the pavement edge. Returning to the pavement at too high a speed may cause the vehicle to swerve into the lane of oncoming traffic.• Straighten out the vehicle in the correct lane of traffic.

108Chapter 4: Driving on the Highway
Note: You may have to continue on the shoulder of the road until the shoulder and road are at an even level.
TO REDUCE THE RISK OF A COLLISION• Stay alert and attentive.• Stop driving when tired.• Adjust speed to conditions.• Maintain a safe following distance.• Follow proper procedures for passing, turning and changing lanes.• Drive in the right lane of a four-lane highway when not passing.• At dusk, turn on your headlights to help other drivers see you.
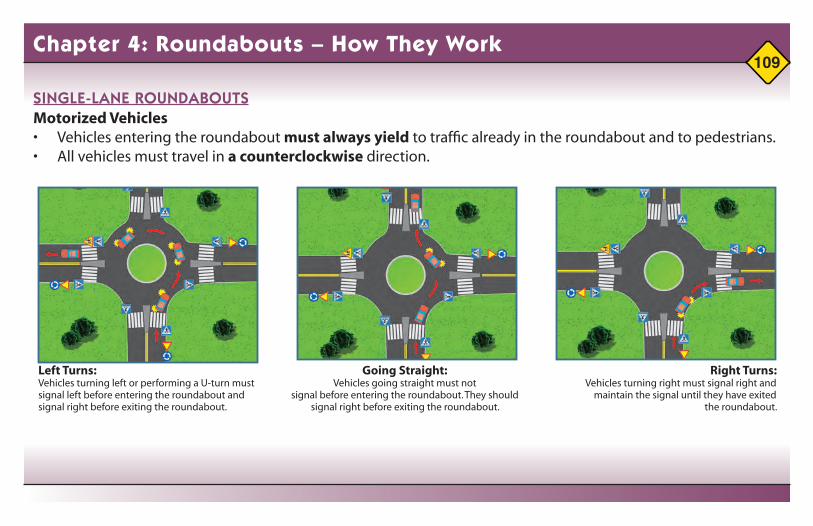
109Chapter 4: Roundabouts – How They Work
SINGLE-LANE ROUNDABOUTS
Left Turns:Vehicles turning left or performing a U-turn must signal left before entering the roundabout and signal right before exiting the roundabout.
Going Straight:Vehicles going straight must not
signal before entering the roundabout. They should signal right before exiting the roundabout.
Right Turns:Vehicles turning right must signal right and
maintain the signal until they have exited the roundabout.
Motorized Vehicles• Vehicles entering the roundabout must always yield to traffic already in the roundabout and to pedestrians.• All vehicles must travel in a counterclockwise direction.

110Chapter 4: Roundabouts – How They Work
DUAL-LANE ROUNDABOUTSMotorized Vehicles• Vehicles entering the roundabout must always yield to traffic already in the roundabout and to pedestrians.• Vehicles should not enter a roundabout alongside another vehicle already in the roundabout.• Vehicles must remain in their lane until exiting the roundabout and should not change lanes while in the
roundabout.• All vehicles must travel in a counterclockwise direction.
Left Turns:Vehicles turning left or performing a U-turn must be in the left-hand lane. They must signal left before entering the roundabout and signal right before exiting the roundabout.
Going Straight:Vehicles going straight can be in the left- or right-hand lanes. They must not signal before entering the roundabout. They should signal right before exiting the roundabout.

111Chapter 4: Roundabouts – How They Work
Right Turns:Vehicles turning right must be in the right-hand lane. They must signal right and maintain the signal until they have exited the roundabout.
PedestriansRules for pedestrians are the same in a roundabout as they are at all other crosswalks on the road. But there are a few things to keep in mind:
Signal your intention to cross by extending your arm.
• Crosswalks at modern roundabouts have two sections and, in some cases, two lanes to cross at each section. Pedestrians must ensure both lanes of traffic are yielding. Cross the first section to the splitter island, stop, make sure traffic is yielding to you, then cross the second section.
• Always try to make eye contact with drivers to ensure they acknowledge that you are going to cross and that they are yielding to you.
BicyclesCyclists have two options:
• First, they can use the roundabout with the same rules as a vehicle and travel in the centre of the appropriate lane.
• Second, they can leave the road at the crosswalk, get off their bicycle and navigate the roundabout as a pedestrian would.
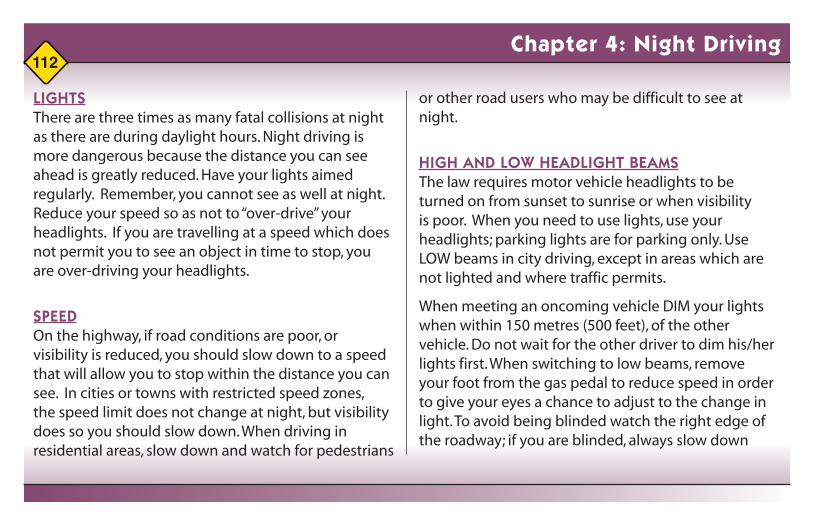
112Chapter 4: Night Driving
or other road users who may be difficult to see at night.
HIGH AND LOW HEADLIGHT BEAMSThe law requires motor vehicle headlights to be turned on from sunset to sunrise or when visibility is poor. When you need to use lights, use your headlights; parking lights are for parking only. Use LOW beams in city driving, except in areas which are not lighted and where traffic permits.
When meeting an oncoming vehicle DIM your lights when within 150 metres (500 feet), of the other vehicle. Do not wait for the other driver to dim his/her lights first. When switching to low beams, remove your foot from the gas pedal to reduce speed in order to give your eyes a chance to adjust to the change in light. To avoid being blinded watch the right edge of the roadway; if you are blinded, always slow down
LIGHTSThere are three times as many fatal collisions at night as there are during daylight hours. Night driving ismore dangerous because the distance you can see ahead is greatly reduced. Have your lights aimedregularly. Remember, you cannot see as well at night. Reduce your speed so as not to “over-drive” your headlights. If you are travelling at a speed which does not permit you to see an object in time to stop, you are over-driving your headlights.
SPEEDOn the highway, if road conditions are poor, or visibility is reduced, you should slow down to a speed that will allow you to stop within the distance you can see. In cities or towns with restricted speed zones, the speed limit does not change at night, but visibility does so you should slow down. When driving in residential areas, slow down and watch for pedestrians

113Chapter 4: Night Driving
when meeting another vehicle. When following a vehicle, use your LOW beam when within 60 metres (200 feet) of it. If you do not, your bright lights will reflect from the rear-view mirror and blind the driver in front.
low beams high beams
HIGH AND LOW HEADLIGHT BEAMS (EXAMPLE)

114Chapter 4: Winter Driving
• THE WINDSHIELD WIPERS AND HEATER DEFROSTER Be sure your wiper blades are in good condition at all times. Check your heater defroster unit to be sure it is in good working order.
• THE MUFFLER Have it checked for leaks. A leaking muffler or exhaust system can create a carbon monoxide hazard, particularly if you are stalled in traffic or in a blizzard. Never start your car in a closed garage.
TIPS FOR SAFE WINTER DRIVING
• SLOW DOWN Slow down whenever roads are icy or covered with snow. Keep well back of the vehicle ahead. It takes from three to 12 times more distance to stop on snow and ice than it does on dry pavement.
To prepare for winter driving have these items carefully checked and repaired if necessary:
• THE RADIATOR Check for leaks and put in antifreeze.
• THE TIRES Check tires and replace any damaged or “bald” tires. Studded tires may be used between October 1 and May 31. It is unlawful to use them at any other time. Studded tires greatly improve traction and shorten stopping distance on slippery roads.
• THE BRAKES Have brakes adjusted or relined if necessary. Be sure your four brakes are braking equally. On icy roads poorly adjusted brakes can throw your car into a dangerous skid.

115Chapter 4: Winter Driving
• GET THE “FEEL” OF THE ROAD The road may be more slippery than you think. When traffic permits, apply your brakes to see how well they hold.
• BE ALERT a) Watch out for pedestrians. They are cold and in a hurry. Extend every courtesy to them. b) In early fall and late spring, shaded spots on the highway retain frost and ice much longer and may be slippery. c) Watch for snowdrifts and patches of icy surfaces. Hitting a snow drift or icy patch at high speed can throw your vehicle out of control.
• BRAKING CAREFULLY To stop or slow down on icy roads, gently apply your brakes. Probably no single action causes more skids and collisions than locking the brakes.
By pressing hard on the brakes you simply lock the wheels and turn your vehicle into a “toboggan.” (This does not apply if your car is equipped with an anti-lock brake system.) Once you lock your wheels you lose traction and steering ability. With power brakes you have to be even more careful so as not to lock your wheels on icy roads.
ANTILOCK BRAKE SYSTEMS (ABS)Antilock brake system is an advanced electronic braking system that will prevent skidding. When youneed to stop, don’t pump the brakes. Just hold the brake pedal down. With ABS, you can steer and brakeat the same time; however, any type of braking system requires the driver to use good judgment andextra caution to avoid collisions. If your vehicle is equipped with ABS, consult your owner’s manual formore information.

116Chapter 4: Winter Driving
• a heat source (candle, matches, deep can to hold the candle);• nonperishable food, candy, nuts;• shovel;• hatchet or axe;• inflated spare tire and jack;• sand, salt;• approved warning devices;• tow rope;• first aid kit;• ice scraper, snow brush;• methyl hydrate (gas line antifreeze);• tire chains;• a flashlight with spare batteries;• jumper cables; and• if you have a cellular phone, carry it with you.
If your vehicle battery fails, consult your vehicle owner’s manual for proper instructions for boosting your vehicle battery.
BLACK ICEBlack ice is a very dangerous road condition. It occurs when the road is wet and the temperature drops toor below the freezing level. This can also occur at anytime during the winter months where water mayfreeze into ice. Black ice is very difficult to see or may not be seen at all. Please be aware that icy conditions may occur without warning or any visible appearance.
BRIDGE FREEZES BEFORE ROADDuring the winter months, bridges will have ice on the road surface before ice forms on the highway. Please use caution when approaching bridges during winter.
WINTER KITHere are some helpful things you might carry in your car in winter:• a blanket and extra clothing;

117Chapter 4: Winter Driving
If you find yourself stranded, stay with your vehicle. Run the engine just often enough to keep yourselfwarm. Keep the vehicle ventilated by opening a window slightly while the engine is running to prevent carbon monoxide poisoning. Save your energy and be patient. You are safer and more likely to be foundif you stay with the vehicle.
STEERINGNever make any sudden and sharp turns on slippery roads, a dangerous skid could result. Steeringbecomes very easy during a skid — almost like power steering. Try to anticipate your turns and start slowing down well before you reach the intersection or curve on the highway.
STARTINGAnother common cause of collisions is misjudgment
by drivers of the time it will take them to cross an intersection from a complete stop. Often drivers who start from a stop sign or traffic light cannot get across the intersection in time. Never spin your wheels when starting. Spinning tires melt snow, turning it into ice. With standard transmission put your car into second gear when on icy roads. Then gently press the accelerator pedal until your car starts to roll. The first sign of spinning means too much gas, ease off a bit. With automatic transmission, apply gentle pressure on the accelerator, just enough to start your car rolling. You will also have to allow for the longer start by looking for greater gaps in traffic. Remember that just as it will take you longer to start, the other driver will require a longer distance to stop for you.
OTHER CAUSES OF SKIDDING• Driving too fast on bumpy roads, or when crossing a road crown, railway tracks or icy ruts.

118Chapter 4: Winter Driving
bumpy road surface or icy ruts, take your foot off the gas pedal, but do not apply brakes, and steer gently but firmly;
• if the skid was caused by gearing down at too fast a speed, shift back into high gear, steering in the direction of the skid at the same time;
• when the skid occurs at slow speeds due to improper braking or steering, moderate acceleration may aid in recovering from it. This should be resorted to only if all else fails; and
• if your tire blows out, make sure that you have a firm grip on the steering wheel. Do not drive with one hand.
• Driving on the edge of the road. If one wheel drops off the pavement onto the shoulder, a skid may result.• Changing to lower gear at too fast a speed. The sudden deceleration caused by the compression of your motor may throw you into a skid.
HOW TO RECOVER FROM A SKIDIn case your vehicle does go into a skid, learn how to recover from it:• keep calm and keep control of yourself, but act
promptly;• if the skid was caused by slamming on the brakes,
ease off the brakes and steer in the direction in which the rear end is skidding. Do not oversteer;
• if the skid was caused by accelerating too fast, ease up on the gas pedal and steer in the direction of the skid;
• when the skid is caused by driving too fast over a

119Chapter 4: Highway, Weather and Visibility Conditions
FRONT WHEEL DRIVE VEHICLES (FWDV)Experienced FWDV drivers may find that gentle acceleration will help the vehicle pull out of a rear wheel skid. If the front wheels skid, take your foot off the accelerator. The engine braking effect may slow the car to the point where front end traction is regained. If the skid continues, depress the clutch or select neutral. Freely rolling wheels are better able to regain traction.
DRIVING IN THE RAINRoads are likely to be especially slippery JUST AFTER IT BEGINS TO RAIN. The first few drops loosen the grease and dirt accumulated on the surface of the road. The loosened grease and dirt mix with the raindrops and the road is quickly covered with a slippery film that makes it extremely dangerous. The first few drops of rain are danger signals telling you to slow down and use extra caution.
HYDROPLANING — “Water Skiing on the Highway”Hydroplaning takes place on wet roads. As speed increases, your tires start to ride up on a film of water. In a standard passenger car, partial hydroplaning starts at about 60 km/h (35 mph), and increases with speedto about 90 km/h (55 mph), at which point the tires may be totally up on the water. In a severe rainstormthe tires lose all contact with the road at 90 km/h (55 mph). When this is the case, there is no frictionavailable to brake, accelerate or turn. A gust of wind, a change of road conditions or a slight turn can create an unpredictable and uncontrollable skid. The best thing to do is to take your foot off the accelerator and let the car slow down. If you skid while your car is only partially hydroplaning, you should be able to regain control by correcting for the particular type of skid. On the other hand, if you’re totally hydroplaning, all you can do is release the accelerator and ride out the skid.

120Chapter 4: Highway, Weather and Visibility Conditions
are permitted in the front seat. Any load within the vehicle, including passengers, must not obstruct the driver’s vision to the front, sides or rear of the vehicle.
Clear and unobstructed vision is always essential for a driver, but in adverse weather conditions, goodvision becomes even more important. In fog, rain or snow, always turn your headlights on low beams. Highbeams will only reflect off fog or snow and hamper your vision and that of approaching drivers. If yourvehicle is equipped with fog lights, use them when driving in fog.
DRIVER DISTRACTIONSBe familiar with the equipment in your car, such as the stereo system and cell phone. This is especiallyimportant if you have a new phone or car, or a rental vehicle. Practice before driving so you can performbasic functions without taking your eyes off the road.
To prevent hydroplaning, it is most helpful to have good tires with deep treads. The treads allow the water to escape from under the tires and tend to prevent complete hydroplaning at normal speeds; however,when the depth of the water exceeds the depth of the treads, complete hydroplaning can be expected atspeeds from 80 to 90 km/h (50 to 55 mph).
VISIBILITYThe law requires that the driver have a clear unobstructed line of vision. All windows must be kept free of dirt, condensation, ice and snow. Clean your windows before every trip and stop to clean them whenever conditions require it. It is illegal to drive your vehicle when your vision is completely or partially obstructed. Ornaments or decorations on any part of the vehicle which obstruct the driver’s vision or distract his or her attention are prohibited. No more than two adult passengers and the driver

121Chapter 4: Driving Distractions
Program your favourite stations into the radio for easyaccess. Arrange tapes and CDs in an easy-to-reach spot.• Keep your hands on the wheel and your eyes on the road. If you choose to use your wireless phone, you must use a hands-free device and keep it in its holder.
• Make sure your children are comfortable and properly buckled up. To keep children from distracting the driver, provide them with safe items they may need for the road trip. Teach your children the importance of good behaviour while in a vehicle. Don’t underestimate how distracting it can be to tend to them in the car.
• Pull over to eat or drink. By stopping, you can give yourself a break from the traffic and enjoy your refreshments. Children or adults may choke on food while in the vehicle, causing a severe distraction for
the driver. Avoid eating while driving, but if you must, choose easy-to-handle items and make sure all drinks are secured in cup holders.
• Check your route before leaving. If you are unfamiliar with where you’re going, study a road map to avoid unnecessary stress and distractions. Do not attempt to read the road map while driving.
• Complete your grooming before leaving. Don’t rely on the time in your vehicle to take care of your personal routine such as applying makeup, combing your hair or shaving. Don’t try to retrieve items that fall to the floor while driving. Wait until your vehicle is parked.
• Do not engage in emotionally charged conversations either with the passengers or on your mobile phone. Such discussions can result in aggressive or erratic driving behaviour.

122Chapter 4: Driving Distractions
lead to aggressive driving behaviours like tailgating and speeding. Remember, every other driver on the road is subject to the same stress, fatigue, anger and distractions that you are.
• Oncoming traffic. Be alert for unanticipated movements like a car drifting across the centre line or cutting into your lane. Be prepared to drive calmly into the ditch if necessary to avoid a crash. Don’t panic and try to oversteer – this can lead to a rollover. Approach intersections with caution. Just because you have the right-of-way doesn’t mean the other drivers will stop.
• Breaks. Schedule frequent rest breaks for your passengers as well as yourself. If children are bored and restless, they can be distracting. Driver distraction is a leading cause of motor vehicle crashes.
• Never take notes while driving. Always find a safe place to stop before writing things down. Designate a front-seat passenger to serve as “co-pilot” rather than fumble with maps or unfamiliar navigation systems.
• Drive defensively. Be prepared for the unsafe actions of other motorists or for poor driving conditions. If you find yourself ‘lost in thought’ while driving, take a break.
• Tired driving. Don’t begin your trip unless you are well rested. Dozing off behind the wheel for just two to three seconds can be deadly. If you’re driving 90 km per hour, your car can travel the length of a football field in three seconds.
• Heavy traffic. Plan your drive times to avoid the “rush hours” of people leaving the city. Agitation can

123Chapter 4: Driving Distractions
• Stopping. Always stop at stop signs – whether or not you can see there are any vehicles coming. Fatal crashes can happen because someone didn’t stop because they were certain the “coast was clear.”
BAN ON HAND HELD CELL PHONES FOR DRIVERS• It’s now the law – it is illegal to text, dial, chat, email
or search using a hand-held communication device while driving in Prince Edward Island.
• Fines will range from $250 to $400 and three demerit points upon conviction.
• Under the new cell phone law, no one shall drive a motor vehicle on a highway while holding or using a hand-held wireless communication device that is capable of receiving or transmitting telephone communications, electronic data, email or text messages.
• Such devices include cellular phones, BlackBerrys, Iphones, 10-4 phones, GPS systems or laptops.
• Drivers can use hands-free technology activated by a single touch to a button, or when it is safe to do so, drivers can pull over and stop the vehicle to talk or email.
• Calls to 911 are exempt as are calls from the driver of an ambulance, fire department vehicle or police vehicle.

124Chapter 4: Impaired Driving
Other:• Hallucinogens (LSD, MDA, mescaline)• Cannabis (marijuana, hashish)
Some prescription mood-altering drugs include antidepressants such as Prozac and other medications for depression, manic depression and psychosis. For information on the effects and potential side effects ofa mood-altering drug ask your pharmacist or doctor.
ALCOHOLAlcohol abuse is the most common type of drug problem in Canada and North America. Alcoholimpairment continues to be a leading cause of traffic fatalities.
It is important that all drivers understand the danger of drinking and driving and the laws and penaltiesinvolved.
DRUGSIt is essential to understand the effects of any drug you are taking before operating a motor vehicle. Mood-altering (psychoactive) drugs are of particular concern because they can change the way you think,behave and physically respond. The following is a partial list of mood-altering drugs:Depressants:• Alcohol• Sedatives (Halcion)• Minor tranquillizers (Valium, Ativan)• Narcotic analgesics (heroin, morphine, codeine, Talwin)
Stimulants:• Amphetamines• Cocaine

125Chapter 4: Impaired Driving
Driving after drinking is an irresponsible act. It disregards the safety of others. Many people do notunderstand the effects of alcohol on the mind and body.
There has been a lot of research on the effect of alcohol on people. All of these studies have demonstrated that even in small amounts, alcohol has a deteriorating effect on people. Despite the scientific evidence that alcohol impairs the ability of all drivers, drinking and driving is still a major safety problem.
THE EFFECTS OF ALCOHOLReduced visionExperiments show that alcohol has the same effect on vision as a grey glass in front of the eyes, or drivingwith sun glasses at dusk or in darkness. These tests show a person who had the equivalent of four ounces of alcohol needs a stronger light to see objects clearly.
Dimly lit objects are not seen at all. Drivers who have been drinking and who are blinded by glaring light take longer to recover their normal vision than drivers who have not been drinking.
Slower reaction timeAfter seeing an object, such as a child running into the path of a car, the average reaction time for takingthe foot off the gas pedal and putting it on the brake is about three quarters of a second. Tests show that adriver who is alcohol impaired, but not drunk, has his or her reaction slowed down by 20%.
At a speed of 50 km/h (30 mph) a car travels approximately 14 metres per second (44 feet per second). In three-quarters of a second the car will travel about 10.5 metres (33 feet). It will take a drinking driver nearly one second to apply the brakes

126Chapter 4: Impaired Driving
A conviction for impaired driving in Prince Edward Island with a blood alcohol count (BAC) in excess of.08 or refusal to take a blood/alcohol test will result in the cancellation and a disqualification from holding or obtaining a licence for a period of:• one year for a first offence;• three years for a second offence; and• five years for a third or subsequent offence.
THE EFFECT OF MIXING ALCOHOL AND OTHER DRUGSMixing alcohol with other drugs can cause a serious reaction. This is especially dangerous when the useof a motor vehicle is involved.
For example:Two drinks of an alcoholic beverage in combination with one normal dose of a common tranquilizer
and in that time the car will travel 3.5 metres (11 feet) farther – perhaps enough to cause an accident. At a speed of 100 km/h (60 mph), a vehicle will travel about six metres (22 feet) farther before the impaired driver applies the brakes.
Alcohol and collisionsDrinking and driving is one of the major causes of traffic collisions. Studies conclusively prove that driverswho drink and drive are involved in 10 times as many collisions as drivers who are sober. Collisions involving a drinking driver are more likely to be serious. This is understandable, since a drinking driver tends to drive faster and has impaired vision, judgment and reaction time.
The result is that he or she may strike a pedestrian, other vehicles or lose control of the vehicle even atslower speeds.

127Chapter 4: Impaired Driving
equals the impairment level produced by six drinks. Remember that one bottle of beer is equal to 1¼ ounces of liquor or four ounces of wine.
Two drinks of an alcoholic beverage and one light dose of marijuana can equal the impairment producedby five drinks.
If you are taking medication or a drug, know what the results of “mixing” will be before drinking. This advice is true whether the drug is by a doctor’s prescription, “off the shelf” or “off the street.”
You must not drive while impaired. Your life, and the lives of others, depend on you.
WHAT CAN YOU “GAIN” BY DRIVING WHILE IMPAIRED?• heavy fines• a criminal record• the loss of your licence• loss of employment (if driving is required)• reduced social life (no Driver’s Licence)• higher automobile insurance costs• time in jail• damage to property• serious injuries• death

128Chapter 4: Impaired Driving
UNDER THE AGE OF 19 – “ZERO TOLERANCE”In the case of a driver who is less than 19, or is in the GDL Program and a valid Driver’s Licence for less than two years, and a roadside screening device registers a blood alcohol content (BAC) reading, a police officer has the authority to impose a 24-hour driving suspension in addition to the 90-day administrative driving prohibition.
HABITUAL OFFENDERSHabitual offenders are drivers with two or more convictions of impaired driving. They must undergo analcohol/drug assessment and possible treatment before reinstatement of their driving privileges.
SHORT-TERM SUSPENSIONSAll drivers whose BAC exceeds .05 but not .08, is subject to a period of suspension of twenty-four hours for the first offence, thirty days for a second offence within 24 months, and ninety days for a third and subsequent offence within 24 months.
PENALTIES FOR IMPAIRED DRIVINGADMINISTRATION DRIVING PROHIBITION (ADP)A police officer has the authority to issue a 90-day suspension of a Driver’s Licence (ADP) at the time ofan impaired driving charge. This administrative suspension becomes effective seven days after the date of the charge. The conviction for this offence later results in a cancellation of your driving privileges for one, three or five years.

129
Chapter 5:
Motorcycles/Mopeds

130Chapter 5: Motorcycles and Mopeds
MOTORCYCLES AND MOPEDSMotorcycles and mopeds and their drivers are part of the Highway Traffic Act of Prince Edward Island. A motorcycle is a motor vehicle having a saddle/seat for the rider and is designed to travel with not more than three wheels. A moped or “motor-assisted bicycle” is like a motorcycle but smaller in size and with lesspower. A moped travels at speeds up to 50 km/h (30 mph). Motor scooters are included in the definition ofmotorcycles and are governed by the same regulations.
Laws concerning motorcycles and mopeds cover such areas as licensing, registration, valid inspection and driving procedures. You must be licensed in order to drive a motorcycle or moped on a public street or highway.
Motorcycle and moped operators must:• wear adequate protective, approved headgear;
• know and comply with the rules of the road when driving their vehicles;• sit on the regular seat of the vehicle, not the handlebars or foot pegs, etc; and• carry only as many passengers as the vehicle has been designed and built to carry.
CHOOSING THE RIGHT MOTORCYCLEIn choosing your bike, consider what type of driving you plan to do. A small motorcycle may lack the powerrequired to maintain highway speeds and may be unstable at higher speeds.
On the other hand a motorcycle that is too big may be difficult to control. If your motorcycle is the rightsize, you should be able to:• have one foot flat on the ground as you straddle your upright bike;• push, park and put your bike on its stand without straining;

131Chapter 5: Motorcycles and Mopeds
• comfortably reach and operate all controls without straining or stretching;• lift the motorcycle by the handlebars when it is lying on its side (lock front wheel when lifting if possible); and• know what type of driving you plan to do and make sure you choose a motorcycle that is designed for that purpose.
MOTORCYCLE EQUIPMENT• Brakes — capable of being operated on not fewer than two wheels.• Headlight — at least one and not more than two headlights must be on when the motorcycle is being driven.• Rear lamp and brake light — one rear lamp and brake light. These may or may not be the same light.
The licence plate must be well lit.• Muffler —
a muffler in good working order. Inspect the exhaust system for the presence of a sound muffling device, broken mounts, removal of internal baffles or packing and the addition of any cut-out or bypass device.
• Handlebars — must be securely fastened and not exceed 0.3 metres (12 inches) in height as measured vertically from its point of attachment at the frame.• Foot rests — for use in the normal sitting position by an operator and passenger where the motorcycle is equipped for carrying a passenger.• Left side rear-view mirror — must give the driver a view of the highway at least 60 metres (200 feet) to the rear and will not be less than 75 mm in size.

132Chapter 5: Motorcycles and Mopeds
• Horn — capable of being heard at 60 metres (200 feet).• Seat — carry only as many people on the motorcycle as it has been designed and built to carry.• Turn signal lights — amber lights on the front and amber or red lights on the rear are required.• Goggles — It is advisable that both drivers and passengers are protected by glasses, goggles or a transparent shield. This shield should be colourless for night driving and should not alter your perception.• Helmet — required for all riders and passengers; must be approved by the DOT, Canada Standards Association, ANSI or SNELL.• Annual motorcycle inspection is required.
BIKE CHECK• Tires - be sure that your tires are properly inflated. Use an air pressure gauge to check pressure in both tires every day before you ride. High or low tire pressure may cause improper handling. Always check the tires for tread wear. Never ride on tires that show cracks, cuts or bulges which could cause a blow out. Badly worn tires are dangerous, especially in wet weather.• Nuts, bolts and cotter pins - your bike’s vibrations may loosen nuts, bolts and pins. Check them regularly.• Horn - test it. It may save your life.• Cables - check for worn, frayed, kinked or broken strands. If you find them, replace them. Make

133Chapter 5: Motorcycles and Mopeds
sure all cables are well lubricated. Make sure the throttle cable returns to idle position when released. Check the clutch cable for proper adjustment.• Brakes - apply the front and rear brakes one at a time to make sure that each one is working properly.• Lights - your headlight should come on when the motor is running. Check both its high and low beam. Also check your turn signals and brake lights before you ride.• Chain, drive belt or drive shaft - adjust and lubricate the motorcycle’s drive chain on a regular basis as outlined in your owner’s manual.
Check your owner’s manual for proper adjustment of the drive belt. If your motorcycle has a drive shaft, check its oil level(s) regularly.• Mirrors - keep your mirrors clean. Each mirror should allow you to see about half of the lane behind you and as much as possible of the lane beside you. When properly adjusted a mirror may show part of your arm or shoulder. Make these adjustments before starting as it is difficult and dangerous to make them while moving. Remember that objects in your mirrors may be closer than they look. Take a quick look over your shoulder before every turn. Never rely entirely on your mirrors.• Gas, water and oil levels - check the levels of your gas, water and oil levels before starting. Check for leaks. A seized motor could cause your rear wheel to lock and cause a loss of control.
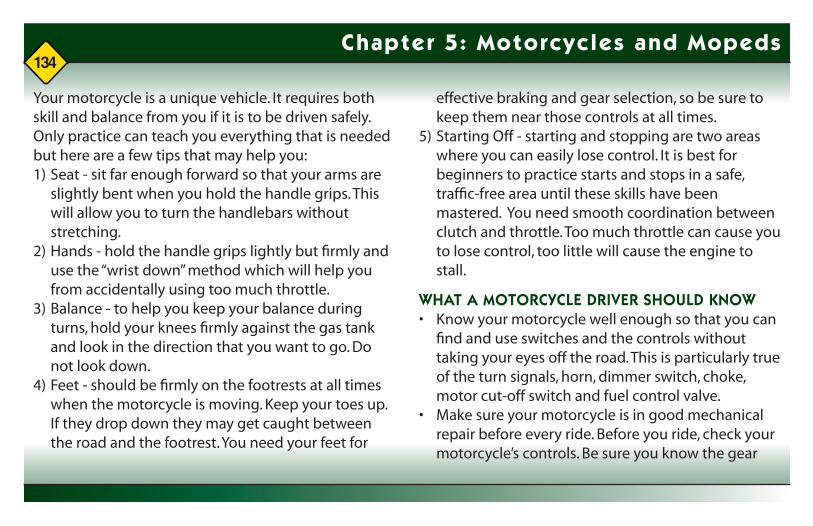
134Chapter 5: Motorcycles and Mopeds
Your motorcycle is a unique vehicle. It requires both skill and balance from you if it is to be driven safely.Only practice can teach you everything that is needed but here are a few tips that may help you:1) Seat - sit far enough forward so that your arms are slightly bent when you hold the handle grips. This will allow you to turn the handlebars without stretching.2) Hands - hold the handle grips lightly but firmly and use the “wrist down” method which will help you from accidentally using too much throttle.3) Balance - to help you keep your balance during turns, hold your knees firmly against the gas tank and look in the direction that you want to go. Do not look down.4) Feet - should be firmly on the footrests at all times when the motorcycle is moving. Keep your toes up. If they drop down they may get caught between the road and the footrest. You need your feet for
effective braking and gear selection, so be sure to keep them near those controls at all times.5) Starting Off - starting and stopping are two areas where you can easily lose control. It is best for beginners to practice starts and stops in a safe, traffic-free area until these skills have been mastered. You need smooth coordination between clutch and throttle. Too much throttle can cause you to lose control, too little will cause the engine to stall.
WHAT A MOTORCYCLE DRIVER SHOULD KNOW• Know your motorcycle well enough so that you can find and use switches and the controls without taking your eyes off the road. This is particularly true of the turn signals, horn, dimmer switch, choke, motor cut-off switch and fuel control valve.• Make sure your motorcycle is in good mechanical repair before every ride. Before you ride, check your motorcycle’s controls. Be sure you know the gear

135Chapter 5: Motorcycles and Mopeds
pattern. Work the throttle, clutch and brakes a few times before you start. Ride with extra care until you are used to the way your motorcycle handles. Slow down on corners and give yourself extra stopping distance.• Remember that you have no seat belt or metal box around you for protection in a collision. Always drive with extreme care.• Never ride after drinking alcohol or taking drugs which may affect your reactions and judgment.• Do not drive when you are tired.• Avoid becoming dehydrated.
WEAR PROPER CLOTHINGProtect your skin and eyes from the sun, wind, bugs and debris. Leather is best but heavy nylon or denimjackets and long pants are acceptable. Do not let flaps, laces or anything else dangle from your clothing.Do not wear clothing that may flap or balloon in the wind as this may tire you or prove distracting. Wear
gloves and other clothing which is designed for motorcycle use.
ALWAYS WEAR A HELMETHelmets approved for motorcycle use are required by law in PEI and must be worn by the driver andpassenger. Helmets should fit correctly. It should be snug enough so that it does not slip around your headwith the chin strap done up. Make sure your helmet meets all safety standards before you buy it. Replacehelmets that have been dropped, scraped or damaged in a collision. Use only soap and water to cleanyour helmet.
ALWAYS WEAR BOOTSDo not wear shoes that are loose fitting or that have rings or laces that may catch on controls. Leather orheavy nylon boots are best. They should be sturdy and high enough to protect your ankles. Their solesshould be made of hard material and should have a

136Chapter 5: Motorcycles and Mopeds
pronounced tread pattern. Wear footwear that allowsyou to properly operate the foot controls.
PROTECT YOUR EYESWind and rain can tire your eyes and blur your vision. Dust, bugs and debris can hurt your eyes andcause you to lose control of your motorcycle. Windshields help deflect wind, rain and flying objects but do not protect your eyes. Wear protection even behind a windshield.
Your eye protection should:• be free of scratches;• allow clear vision on both sides;• allow room for eyeglasses, sunglasses or safety glasses;• be securely fastened; and• be made of shatterproof material.
WEAR GLOVESGloves keep your hands warm and give you a better grip on the controls. Gloves specifically designed foruse on motorcycles are best.
BE SEENFor a motorcyclist, being seen may be the difference between life and death. Wear bright colours such asorange, red or yellow. Fluorescent colours are especially good. Reflective tape on your motorcycle, helmet and jacket is a good idea.
BEFORE STARTING OUT CHECK THE FOLLOWING:• the front wheel is not locked;• the rear-view mirror is adjusted;• the gas is turned on;• the engine is warmed up and running smoothly; and• the lights are on.

137Chapter 5: Motorcycles and Mopeds
Take the motorcycle off the stand before you allow passengers to get on. Always check your footingbefore you take the bike off the stand.
MAKE SURE YOUR WAY IS CLEAR OF:• children;• pedestrians;• other traffic; and• any obstacle.
BEFORE YOU PULL AWAY MAKE SURE IT IS SAFEUse your rear-view mirror but don’t rely on it exclusively. Look over both shoulders to check the spots you can’t see in the mirror.
Make sure traffic sees you. Many car drivers have trouble seeing motorcycles and may pull out in front of you. Most car drivers involved in a collision with a motorcycle say they never saw it. Use your signals andyield to other traffic when entering the traffic flow.
STARTING ON A HILLIt is more difficult to get a motorcycle moving on an upgrade than it is on flat ground. There is a greaterdanger of rolling backward into someone behind you or stalling the motor. Here is the best way to start ona hill.1) Use the front brake to hold the motorcycle while you start the engine and shift into first gear.2) Change to the foot brake to hold the cycle while you operate the throttle with your right hand.3) Open the throttle a little bit for more power.4) Slowly release the clutch and rear brake as you apply more power with the throttle. If you release it too quickly, the front wheel may come off the ground or the engine may stall.5) Release the foot brake when the engine begins to slow down as the clutch takes hold.

138Chapter 5: Motorcycles and Mopeds
SHIFTING GEARSSmooth and timely gear-shifting takes practice but, once you learn it, it will reduce wear on yourmotorcycle and help you maintain control.Your owner’s manual will tell you the maximum speed for each gear. Remember, always be in the correctgear for the speed at which you are traveling, whether you’re speeding up or slowing down.
There is more to shifting gears than simply getting the motorcycle to accelerate smoothly. Loss of controlor collisions occurs if the gears are used incorrectly when downshifting, turning or on hills.
DOWNSHIFTINGDownshifting can be more difficult to do smoothly than upshifting. Here is how to do it:1) Close the throttle.2) Squeeze the clutch lever and open the throttle slightly, with a firm positive motion, and push down
the gear-change pedal as far as it will go and release it.3) Release the clutch lever fully but gradually as you apply more throttle to match the engine speed for the desired speed of travel.4) Make sure you shift down through all gears as you slow down or stop. This way you always have enough power to accelerate quickly if required.
Make certain you are going slowly enough when you shift into a lower gear. If you are going too fast, themotorcycle will lurch and the rear wheel may lock. This is even more likely to happen while you are goingdownhill or shifting into first gear. Under those conditions you may need to use the brakes in order to slow down enough to shift safely.
SHIFTING IN A TURNDo not shift gears in a turn except in an emergency. A

139Chapter 5: Motorcycles and Mopeds
sudden change in power to the rear wheel cancause it to lock or spin, creating a skid. It is best to shift gears before entering a turn.
TURNS AND CORNERSThere are two ways to turn your motorcycle. When driving a motorcycle less than 20 km/h, you can steerby turning the front wheel in the direction you want to go. This requires good balance and coordinationbetween the clutch and the throttle. Practise doing this in a safe, traffic-free area.
At speeds greater than 20 km/h you must lean with the motorcycle and master the skill called counter steering or push steering. As you turn a corner at higher speeds, your motorcycle is pushed outward by centrifugal force. To counter this outward push, you must lean inward. The greater the speed the moreyou must lean. Many motorcyclists, especially
inexperienced ones, misjudge their speeds and attempt to corner too fast. Slow down before you reach the corner. Look through the corner in the direction in which you are turning.
To produce your inward lean, push forward on your handlebar on the side toward which you want to turn.In other words push forward on the handlebar with your right hand in order to turn right. Push forward with your left hand in order to turn left.
As the bike begins to lean you will automatically turn the handlebars in the direction of the lean. Thistechnique is helpful in everyday situations and in avoiding debris, potholes and collisions.
Things to remember:• use a light but a firm grip on the handlebars for all turns;• lean in the direction of the turn;• gradually roll on the throttle through the turn;

140Chapter 5: Motorcycles and Mopeds
• maintain a steady speed or accelerate gradually;• avoid slowing down while in the turn; and• accelerate slightly and use push steering to straighten the bike as you come out of the turn.
BRAKING AND STOPPINGMost motorcycles have two brakes which are operated independently. When stopping, use both front and rear brakes, applying both at the same time. The front brake provides about 75% of your motorcycle’s braking power and should be used in most circumstances; however, at low speeds use of the front brake may cause a fall.
Some motorcycles have been equipped with integrated braking systems that link front and rear brake operation together. Antilock brake systems are also available on some models. If your bike has eitherone of these systems, check your owner’s manual for instruction on the best way to use your brakes.
HERE ARE SOME BRAKING TIPS:• downshifting as you brake will allow you to use the engine compression as a brake, as well;• use extra caution when braking in a turn or on slippery or rough roads. For maximum braking in a curve, straighten the bike to the upright position, straighten or square the handlebars before firmly applying both brakes;• practise controlled stops in a safe, traffic-free area;• learn to apply even braking and acquire a feeling for when your wheels are about to lock up;• you can brake in a turn by applying both brakes but use caution. Take care not to lock either wheel, especially on slippery road surfaces;• remain in first gear while you are stopped so you can move out quickly if necessary. Keep at least one brake firmly applied while you are stopped in case the clutch becomes engaged by mistake;• never ride with your brake partially applied. It turns

141Chapter 5: Motorcycles and Mopeds
on your brake light which confuses other drivers and causes unnecessary wear on your brakes;• it is important that you stay aware of what is behind you by checking your mirrors often. Leave plenty of space, at least three seconds between you and the vehicle ahead. Not only will this help you avoid a collision with the vehicle in front, but it will also help you drive more smoothly and save you from sudden stops which could get you rear-ended;• for emergency braking use both brakes to the maximum effort but do not lock the wheels. Overbraking one, or both wheels is one of the most common causes of skidding;• apply the front brake fully. If it locks, release the brake immediately. At the same time press down on the rear brake. If it accidentally locks, keep it locked until you have stopped completely. If your motorcycle is upright and moving in a straight line, you can still control it even if the rear wheel locks. If
the skid is caused by over-acceleration, ease up on the throttle. Steer in the direction you want the front of the bike to go; and• avoid sudden braking on loose sand or gravel, slippery roads, painted or metal surfaces, or on wet roads, especially during the first few minutes of rain.
SKIDSMost skids are the result of driver error such as:• turning too sharply or at too great a speed;• braking too hard, usually the rear wheel; or• accelerating too fast.
These driver errors are made even worse by poor road conditions such as slippery surfaces or loose sandor gravel. Plan ahead so that you will not be forced to make rapid movements. If you are not familiar with the road, drive more slowly.
If you do get into a skid, don’t panic. If handled

142Chapter 5: Motorcycles and Mopeds
properly, you may be able to get out of difficulty.
When a slight rear wheel skid is caused by over braking, it can be corrected by steering in the direction of the skid and slowly letting up on the brake.
The proper method of correcting a skid is explained in the previous section under the heading Braking andStopping.
PARKINGPark where it is safe and legal. Signs, curb markings and common sense will tell you if you can park.
Your motorcycle may have a centre stand, a side stand or both. These are usually operated from the driver’s left side. You should make a habit of dismounting to your left.
When leaving your motorcycle parked make sure the transmission is in first gear, the front wheel is lockedand the ignition key is removed.
Try to avoid parking your motorcycle on a hill.
Many motorists do not expect, or see motorcycles sharing the same roadway with them. Although acollision may be their fault that won’t help the cyclist

143Chapter 5: Motorcycles and Mopeds
who, almost always, will wind up on the short end ofany crash.
WHERE TO DRIVE IN TRAFFICOne of the ways for you to be seen is to know and use the correct road position for every situation. While there is no single position that is best, the following is good positioning advice.
MAINTAIN A SPACE CUSHIONAvoid remaining beside other moving vehicles. They may suddenly change lanes by moving into yourlane.
Keep your distance. The closer you follow another vehicle, the greater the risk to you. The bestprotection you can have is the distance between you and others.
Distance provides three advantages:• time to react so that you don’t hit anything or
anyone;• some place to go should the unexpected happen;
and• the ability to avoid panic stops which could cause
you to be rear-ended.
Stay at least three seconds behind the vehicle ahead. At higher speeds, or when road conditions are not perfect, stay even further behind.
Increase your following distance if the vehicle behind you is following you too closely. This will allow you tostop more gradually and may save you from being rear-ended.
Remember that speed limits are posted as the

144Chapter 5: Motorcycles and Mopeds
maximum speed limit. If conditions are not ideal, slow down.
LANE POSITIONExperienced riders know that they must constantly adjust and readjust their lane positions depending upon changing traffic conditions. The left track of an automobile is often recommended as the best place to ride because:• you can avoid the oil slick formed in the centre of the lane by drippings from other vehicles;
• you can see oncoming vehicles more easily;• oncoming drivers can see you more easily;• you use the full lane you are entitled to, discouraging
motorists from trying to share your lane; and• you can see farther into, and be more easily seen
from, road junctions on the right.
These are advantages most of the time, but there are
many times when it is smarter to use the centre or right portion of the lane in order to expand your space cushion.
When following another vehicle, stay out of the other driver’s blind spot. Ride where you can be seenclearly in the other vehicle’s rear-view mirror. Stay well back so that you will be better seen. This will also give you more time to react to unexpected actions of others and to road hazards such as potholes anddebris. Be prepared to sound your horn if necessary to let other drivers know you are there.
Always assume the other drivers around you do not

145Chapter 5: Motorcycles and Mopeds
know you are there. Try to fore-see what other drivers may do and plan ahead what you will do to avoid them.
Drive in a lane position that clearly establishes your space. Do not hug the centre line or the curb as itmay tempt other drivers to drive into the lane beside you.
Do not try to share a lane with other drivers, not even to get around a line of stopped traffic. You will notbe expected and you could be seriously hurt.
Be extremely careful when driving beside other traffic. You may not be seen and the other driver mightmake a sudden shift into your lane. Be sure you are where the other driver has the best chance to seeyou. Stay out of the other driver’s blind spot.
INTERSECTIONSMost collisions involving motorcycles happen at
intersections. The two main causes of collisions atintersections are from:1) oncoming vehicles making a left turn in front of amotorcycle; and2) vehicles entering from a side street.
To avoid collisions:• give yourself lots
of room;• always slow down before entering an intersection; even if other traffic is required to yield to you;• be prepared to stop;• always check your rear-view mirror so you know
how closely vehicles are following you;• be prepared to move to either side of your lane, whichever side will give you the most room;

146Chapter 5: Motorcycles and Mopeds
• do not assume you have been seen until you get some recognition from the driver; and• don’t try to pass by squeezing past cars in your lane.
If you stall in the intersection and cannot start your motorcycle, walk the motorcycle clear of all traffic andout of the intersection. Put on your four-way flashers if the motorcycle has them.
CHANGING LANESThere is always some risk involved when changing lanes and it’s up to you to do it safely. Avoid unnecessary lane changes. The few seconds you might save by constantly switching lanes is not worththe risk. Plan ahead as you drive so that you are not trapped into making sudden lane changes.
When changing from one lane to another:• make sure a lane change is permitted;• check traffic ahead and use your mirrors to check
traffic behind you;• always look back quickly over your shoulder to the lane into which you will be moving because mirrors do not show all areas where there are blind spots;• give proper signals; and• look again and, if it is safe, make the lane change.
PASSINGCooperate if someone is passing you. It is illegal and dangerous to speed up when you are being passed.Slow down if necessary to make sure the passing vehicle has room to move in safely.
Be careful when a large vehicle is coming toward you as it can block a strong crosswind or create a pull ofits own which may cause you to lose control.Passing another vehicle looks easy but there is always risk involved. Don’t pass unless it is necessary. Ifit is necessary to pass, be sure you are passing in a legal passing zone and make sure it is safe to pass.

147Chapter 5: Motorcycles and Mopeds
Do not pass:• near the crest of
a hill;• within an
intersection;• at a railway
crossing;• on a curve or
any place where your view ahead is obstructed;
• on the shoulder of the road;• when the traffic in front of you is slowing down for
an unknown reason; or• a vehicle that has stopped for a pedestrian.
When passing:• check your rear-view mirror;• take a quick look over your shoulder into the lane
into which you will be moving;
• signal;• look ahead for oncoming traffic;• check over your shoulder one more time; and• go ahead if it is safe.
After passing a vehicle:• make sure it is visible in your rear-view mirror;• check over your shoulder;• signal;• allow a sufficient space cushion; and• move back into your travel lane when it is safe to do so.
NOTE: It is illegal to go over the speed limit when passinganother vehicle.
DRIVING WITH PASSENGERSYou should not carry a passenger until you become experienced in the operation of a motorcycle. The

148Chapter 5: Motorcycles and Mopeds
extra weight changes the way a motorcycle handles, the way it turns, speeds up and slows down. You are legally responsible for your passenger’s safety.
TIPS FOR SAFE DRIVING• The person behind you should sit as far forward as possible without crowding you.• Make sure your passenger understands that they must sit still, especially when you are manoeuvring your motorcycle.• Have a proper seat and foot pegs that allow the passenger to sit behind you without moving you from your normal position.• A passenger should have the same type of protective equipment, eye protection and clothing as the driver.• Be sure your passenger knows what is expected of them before you start out.
• Tell your passenger never to get on or off the motorcycle without asking you first.• Allow first-time passengers to get used to riding by first taking them out at slow speeds in light traffic situations.
NOTE: Both passenger and drivers are required by law to wear approved helmets.TO ADJUST FOR ADDED WEIGHT OF A PASSENGER, YOU SHOULD:• operate at a slower speed, particularly on corners, curves or bumps;• begin to slow down earlier than usual when you approach a stop;• allow a greater following distance; and• look for the large gaps whenever you cross, enter or merge with traffic.
NOTE: Before you make any new move, be sure to warn your passenger so that there are no surprises.

149Chapter 5: Motorcycles and Mopeds
GROUP RIDINGGroup riding is acceptable but you and the group have no special rights on the road.
TIPS FOR GROUP RIDING• Select an experienced leader and put inexperienced riders behind the leader.• Be considerate by limiting the size of your group to four or five motorcycles. If you have more drivers than that, break into two or more smaller groups.• Never ride side by side. If you do it in the same lane, it is illegal; and, if you do it in separate lanes, it may impede traffic and limit your ability to manoeuvre in an emergency.• Use the three-second following rule. Keep a safe distance between motorcycles.• Plan ahead. Make sure everyone knows the route.• Let the last motorcycle set the pace. No one should have to race to keep up. Use your mirrors to keep an eye on the motorcycle behind you.
HAZARD AWARENESSAnticipation is the best way to avoid a dangerous situation. If you can recognize and prepare for adangerous situation before it becomes unavoidable, you can plan your escape in time. Stay fully aware ofwhat is going on around you and adjust accordingly. When you see a potential danger, slow down andplan a course of action that allows for the unexpected.Examples:• if children are playing near the street, plan what you will do if one runs out;• if cars are approaching from either side at an intersection and one is not yielding, be prepared to react;• know how to proceed when you hear a train whistle sound as you approach a railway crossing; and• understand what it means to you and your motorcycle when the road ahead of you changes from pavement to loose gravel.

150Chapter 5: Motorcycles and Mopeds
These are only a few cases that could put you or someone else in a dangerous situation. In your plan ofaction, you must not only consider the danger you have seen but any additional danger that may becreated while trying to avoid the first problem. For example, you must know how close the car is behind you before you brake suddenly. You must know what is developing in all directions around you.
NIGHT DRIVINGYou have a greater risk of being in a collision when driving at night. Even with the best lights, you cannotsee or be seen as clearly at night.
To drive safely, you should:• cut your speed at night to below daytime speed;• allow more distance when following another vehicle to give yourself more time to react. Keep a following distance of three or four seconds;• signal earlier and brake sooner;
• not pass unless it’s necessary;• make sure you can stop in time for any sudden obstruction within the range of your headlights. Don’t overdrive your headlights;
• stay alert. Everything is harder to see at night. If you are sleepy, stop;• keep your goggles, face shield and windshield clean. If they’re badly scratched, replace them. At night use only clear untinted lenses;• make sure you’re visible. Clean your headlights and reflectors if they’re dirty. Wear bright colours. Add reflective tape where it will do the most good. A reflective vest is ideal; and• be alert for animals that can run out of ditches to cross the road. Scan the roadside far ahead and look for movements or the reflection of an animal’s eyes.

151Chapter 5: Motorcycles and Mopeds
RIDING IN POOR WEATHERTake the same precautions you would as when you are riding at night. When you are faced with poorweather at night, use extra care when braking or accelerating. Think twice before you drive in any poorweather.
RIDING ON DANGEROUS SURFACESSurfaces such as wet pavement, gravel roads, mud, snow, ice, painted lane markings and steel surfaces(utility hole covers) should be avoided if at all possible. If you cannot avoid these surfaces:• slow down;• use your brakes smoothly and gently;• avoid sudden moves. You should turn, brake, accelerate and change gears as little and as gradually as possible;• release the clutch smoothly when shifting gears;• remember, loose material on a paved road is as
dangerous as a slippery road;• slow down and ride with care. Gravel and sand surfaces may be less dangerous if you slow to a moderate speed;• maintain a relaxed but firm grip on the handlebars; • keep your arms and wrists loose and keep your feet on the pegs; and• if the front wheel weaves a little, let it. Avoid fast stops if possible.
When crossing a rough surface, try to meet the obstacles head-on if possible. Some road surfaces such as bridge decks are made of metal gratings. Your bike will vibrate and wander slightly as it crosses thegrating. Don’t fight it. It is usually not dangerous if you slow down in advance and maintain a constant speed.
Caution: Oil from cars and trucks usually builds up in the centre of the lane. To avoid this danger, drive in the

152Chapter 5: Motorcycles and Mopeds
track made by the left tires of other vehicles and use extreme care and good judgment.
When crossing railroad tracks that are at an angle to the highway, it is advisable to slow down before thetracks and to cross them by proceeding straight ahead.
AVOIDINGOBSTACLESA quick stop may not be enough to keep you from hitting something in your path. If a piece of debris or apothole appear suddenly visible, sometimes the only way to avoid a collision is with a quick turn.
The trick to making a quick turn is to get the motorcycle to lean quickly in the direction you wish to turn. To get the motorcycle to lean quickly, counter steer. This means steering one way to send the motorcycle in the opposite direction. If you wish to turn right, push on the right-hand grip. This will cause the front wheel to move slightly left. The result is a lean to the right. As the motorcycle begins to lean, you now can turn the handlebars in the direction it is leaning to keep from falling over.
RIDING OVER OBSTACLESSometimes you have no choice but to ride over an object that is seen too late to steer around. In this typeof situation, the basic rules to follow are:• maintain a relaxed but a firm grip on the handlebars;• keep a straight course;• stand slightly on the foot pegs;• shift your weight back;

153Chapter 5: Motorcycles and Mopeds
• accelerate slightly as the front wheel reaches the object;• slow down and move forward as you go over the object; and• resume your normal seating position and speed.
SUDDEN STOPSIf you have to stop quickly:• keep the motorcycle upright and in a straight line with the handlebars straight;• apply each brake as hard as you can without locking either wheel. If the wheel locks up and skids, it may slide to one side making the bike hard to control; and• if you are forced to brake when the front wheel is turned, do it gradually. Give more emphasis on the back brake.
You need practice to know how hard you can brake without locking the wheels and skidding.
In an emergency situation, use both brakes to the maximum . Even though this may lock up your wheels,you might have no other choice.
Remember, if you take your feet off the pegs for balance, only your front brake remains on.
OTHER PROBLEMS
BLOWOUTSIf you have a blowout, you will need to react quickly to keep your balance. You cannot always hear a tireblowout but you should be able to detect a flat tire from the way the motorcycle reacts. A front wheel blowout is more dangerous since it affects your steering. If the front tire goes flat, the steering will feel heavy. If the rear tire goes flat, the back of the bike will tend to sway from side to side.

154Chapter 5: Motorcycles and Mopeds
STUCK THROTTLEA stuck throttle requires quick thinking. If the throttle is wide open, use the engine stop switch and clutch together, followed by the brakes. If it is stuck at a normal operating speed, look for a safe place to stop, signal your intention, move to a safe place before using your engine stop switch and clutch together, and then apply your brakes.
WOBBLEWhen travelling at fairly high speeds, the front wheel can suddenly start to wobble or shake from side toside. Here is what to do:• don’t brake;• grip the handlebars firmly but don’t try to stop the wobble; and• gradually close the throttle and pull off the travelled portion of the road as soon as you can.Trying to accelerate out of a wobble will only make the problem worse.
Causes of wobbles are:• unequal tire pressure;• bent or misaligned wheels;• loose spokes;• improperly mounted windshields;• poor load distribution; or• riding too fast for the design of the bike.
FLYING OBJECTSA motorcycle rider may be struck by such flying objects as insects or stones caused by other vehicles. Whatever happens, concentrate on controlling your motorcycle and staying on the road. As soon as it is safe, pull off the travelled portion of the road and fix the problem. Never try to fix the problem while you are in traffic. You will need both hands and all of your concentration to handle either problem. It is best to do only one thing at a time.

155Chapter 5: Motorcycles and Mopeds
Summary of Riding Tips• Learn to operate a motorcycle properly. Get professional driver training.• Get your experience under the best conditions and in light traffic.• A large number of motorcycle collisions happen to drivers with just a few months of operating experience.
A motorcyclist is subject to the same rules of the road that apply to other motorists.• Remember the headlight on your bike must be on at all times when riding.• Understand that overbraking one or both wheels is one of the most common causes of skidding. If the front wheel locks, release the front brake immediately. If you lock the rear wheel, keep it locked. If the skid is because of over-acceleration,
ease up on the throttle. Steer slightly in the direction you want the front to go.• Watch for loose sand, gravel or spilled fluids on paved streets. This could be dangerous, causing loss of control. Slow down and grip the handlebars securely.• Maintain your position in your lane. Do not cut in and out of traffic. Maintain a proper following distance by using the three-second rule.• Always take a quick look over your shoulder before changing lanes.• Use your eyes and your mirrors. Know where other drivers are and what they are doing.• Always signal your intentions well in advance.• Keep your knees against the gas tank while in motion.• Do not overload your motorcycle. Check your owner’s manual for guidelines.• Protect yourself from the weather. Dress properly
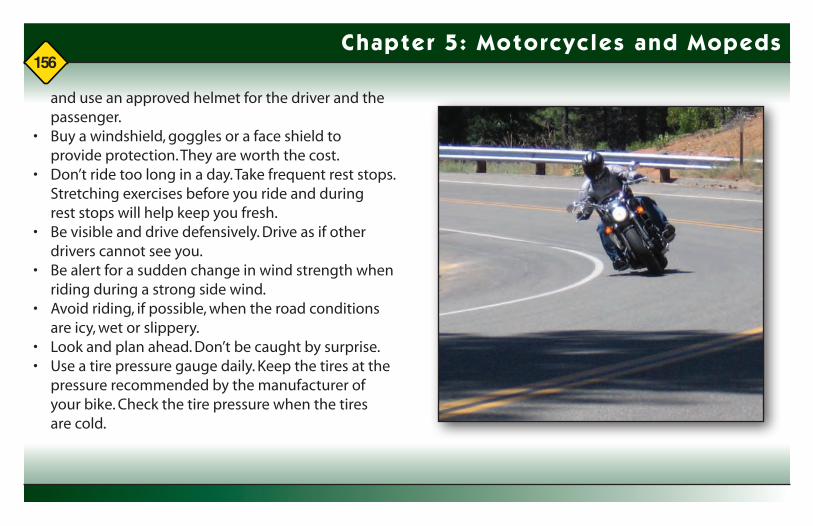
156Chapter 5: Motorcycles and Mopeds
and use an approved helmet for the driver and the passenger.• Buy a windshield, goggles or a face shield to provide protection. They are worth the cost.• Don’t ride too long in a day. Take frequent rest stops. Stretching exercises before you ride and during rest stops will help keep you fresh.• Be visible and drive defensively. Drive as if other drivers cannot see you.• Be alert for a sudden change in wind strength when riding during a strong side wind.• Avoid riding, if possible, when the road conditions are icy, wet or slippery.• Look and plan ahead. Don’t be caught by surprise.• Use a tire pressure gauge daily. Keep the tires at the pressure recommended by the manufacturer of your bike. Check the tire pressure when the tires are cold.

157
Chapter 6:
Bicycles

158Chapter 6: Bicycles
Bicycle use continues to increase as more people use a bicycle for transportation, recreation, physical fitness and energy conservation. Cyclists must obey the rules of the road the same way as vehicles and are also entitled to an equal share of the road.
INFORMATION FOR MOTORISTS:When you are sharing the road with cyclists please remember:• many children riding bicycles on the street are very young and lack the necessary training and skills for safe cycling;• be alert for small children on oversized bicycles. This will increase the likelihood of erratic moves;• when passing a cyclist, go around them like you would any other vehicle;• when you are preparing to make a right turn, watch for cyclists who may pull up alongside your vehicle. Check your blind spots;
• when making a right turn, do not pull up beside a cyclist and then turn directly in front of them and cut them off;• when pulling away from the curb always check for cyclists who may be trying to pass you;• when parked at the curb, always check for cyclists when you open your vehicle door. It is the driver’s responsibility not to open the vehicle door into oncoming traffic;• do not drive too closely behind cyclists as they do not have brake lights to warn you when they are stopping;• cyclists are entitled to make left turns in the same manner as motorists. Since they are exposed on left turns, they will need extra consideration especially on multi-lane roads;• cyclists are entitled to ride at least one metre from the curb and may ride even further out when they have to steer away from drainage grates, pot holes, debris, loose gravel or sand, wet or slippery
159Chapter 6: Bicycles
surfaces, rutted or grooved pavement and even dogs. Be aware of the roadway conditions that may affect a cyclist; and• do not blow your horn when you are passing a cyclist. It may frighten them and cause them to steer into your path. If you feel that you must use your horn, tap it quickly and lightly while you are still some distance away from the cyclist.
RULES OF THE ROAD FOR CYCLISTSDO:• keep both your hands on the handlebars except when making a hand signal;• keep both your feet on the pedals;• ride in a single file except when overtaking and passing another cycle;• make sure your bike is equipped with at least one headlamp (but not more than two), one red tail lamp and at least one red reflector mounted on the rear of the cycle when cycling at night;
• make sure your bike has effective brakes. You should be able to make the braked wheels skid on dry, level, clean pavement;• always ride on the right side of the roadway as close as possible to the right curb or the edge of the road;• use a bicycle path adjacent to a street or highway if there is one;• ride on the regular seat of the bicycle; and• carry parcels in bicycle carriers so they do not interfere with your control of the bicycle.
DO NOT:• ride on a sidewalk;• ride on a highway where signs prohibit bicycles;• ride the wrong way on a one-way street. There are no traffic signs in place for wrong way drivers;• carry more people at one time than the cycle was designed for; or• hold onto or attach the cycle to any other moving vehicle.
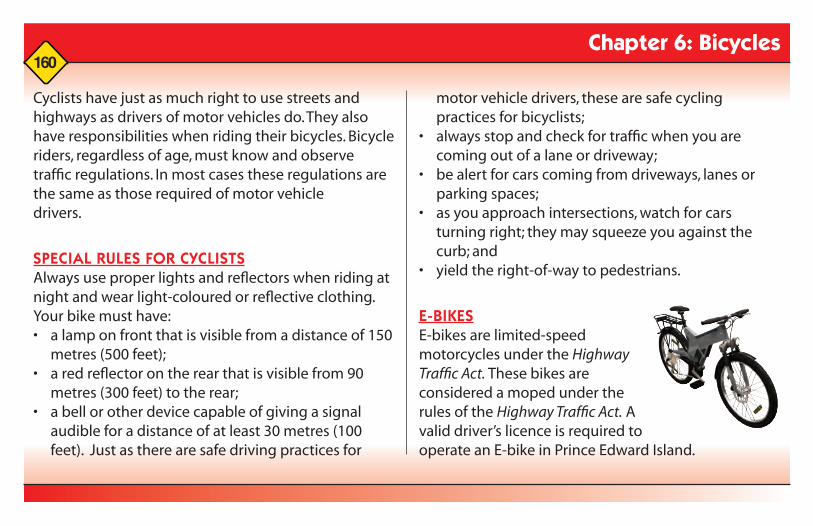
160Chapter 6: Bicycles
Cyclists have just as much right to use streets and highways as drivers of motor vehicles do. They alsohave responsibilities when riding their bicycles. Bicycle riders, regardless of age, must know and observetraffic regulations. In most cases these regulations are the same as those required of motor vehicledrivers.
SPECIAL RULES FOR CYCLISTSAlways use proper lights and reflectors when riding at night and wear light-coloured or reflective clothing.Your bike must have:• a lamp on front that is visible from a distance of 150 metres (500 feet);• a red reflector on the rear that is visible from 90 metres (300 feet) to the rear;• a bell or other device capable of giving a signal audible for a distance of at least 30 metres (100 feet). Just as there are safe driving practices for
motor vehicle drivers, these are safe cycling practices for bicyclists;• always stop and check for traffic when you are coming out of a lane or driveway;• be alert for cars coming from driveways, lanes or parking spaces;• as you approach intersections, watch for cars turning right; they may squeeze you against the curb; and• yield the right-of-way to pedestrians.
E-BIKESE-bikes are limited-speed motorcycles under the Highway Traffic Act. These bikes are considered a moped under the rules of the Highway Traffic Act. A valid driver’s licence is required to operate an E-bike in Prince Edward Island.

161Chapter 6: Bicycle Helmets
WHAT IS A BIKE HELMET?A helmet protects your head from injury when you fall. It has a plastic shell on the outside and foam inside. It has a strap to keep it on when you fly through the air. It only covers your head, and the rest of your body is still exposed, so you still have to be careful.
HOW DOES A HELMET WORK?The foam crushes when you hit the road. That cushions the blow, and usually saves your brain. The shell makes it skid on the street so your neck does not get jerked. The shell also keeps the foam in one piece. It can split when you hit the car and not be there when you hit the street.
If the strap is not tight, your helmet can slip to the side or to the back. Then your bare head hits the road. Ouch. Pavement is very, very hard.
WHY WEAR ONE?Under the Bicycle Helmet Regulations, everyone who operates a bicycle must wear an approved safety helmet. Being careful and not crashing is the best way to stay safe. That’s better than crashing in a helmet! The helmet only covers your head, so you need to learn the rules of the road, but even the best riders crash. If you hurt your brain, it can change you. You may not be able to read this page, or play video games, or talk, or run, or even feed yourself.
HOW DO I PICK ONE?A magazine called Consumer Reports can tell you which helmets are best, but they don’t test them every year.
First, make sure the helmet has a sticker inside with the letters CPSC somewhere on it. That means it works. Then find one that fits you. That will keep it on

162Chapter 6: Bicycle Helmets
your head while you fly through the air. Work on the straps to get the fit just right. You don’t have to pay a lot for a good helmet. But be sure you like it and will wear it.
CAN I WEAR IT TO SKATE?Yes if you have in-line skates. For skateboards, you need another helmet. Skateboards crash a lot.
WHAT IF I CRASH?You will have to buy a new helmet. It is good for only one crash.
FITTING A BICYCLE HELMETPOSITIONPut the helmet on your head so it sits evenly between the ears and rests low on your forehead. It should be about only one to two finger widths above your eyebrow.

163Chapter 6: Bicycle Helmets
FIVE STEP HELMET FIT TESTSTEP 1With one hand, gently lift the front of the helmet up and back. Problem Helmet moves back to uncover the forehead. Solution Tighten front strap to junction. Also, adjust padding thickness and/or position, especially in back. Make sure chin strap is snug. If this doesn’t work, the helmet may be too big.
STEP 2With one hand, gently lift the back of the helmet up and forward. Problem - Helmet moves forward to cover the eyes Solution - Tighten back strap. Make sure chin strap is snug. Also, adjust padding thickness and/or position, especially in front.
PADSPut foam pads inside the helmet so it feels comfortable but really snug. Usually, the helmet includes more than one size of foam pads that can be affixed inside the helmet for a better fit.
STRAPSTighten the chin strap as snugly as possible. Adjust the junction of front and back straps just under the ears and secure back strap without putting pressure on the front strap. If all of this sounds confusing, follow the simple Five Step Helmet Fit Test below.
A GOOD HELMET FIT is as important as wearing one... but it takes time. Allow as much as a half hour to get a proper helmet fit. If fitting your child, don’t try to “rush” it when they are trying to go outside to ride. Do it while they’re relaxed and you have plenty of time. Then secure the adjustments so the helmet is ready for the next ride.

164Chapter 6: Bicycle Helmets
STEP 3Put a hand on each side of the helmet and rock from side to side. Shake your head “no” as hard as possible. Problem Helmet slips from side to side. Solution Check padding on sides and make sure straps are evenly adjusted.
STEP 4Open your mouth (lower jaw) as wide as possible, without moving your head. The top of your helmet should pull down. Problem Helmet does not pull down when opening your mouth. Solution Tighten chin strap. Make sure junction is under each ear.
STEP 5Check to see if the front edge of the helmet covers your forehead. The front edge of the helmet should not be more than one to two finger widths from your eyebrows. Problem Helmet does not cover the forehead. Solution Position helmet no more than one to two finger widths above eyebrows. Tighten any loose straps. Make adjustments so the helmet stays over the forehead.
Have someone else test your helmet fit by doing the Five-Step Test outlined above. Hold your head still during the test. The helmet should pass each of the five steps.

165
Chapter 7:
Highway Safety Programs

166Chapter 7: Highway Safety Programs
Safety is the main aim of the Highway Safety Division. We are responsible for driver licensing, vehicle registration and inspection. Highway Safety administers programs for drivers who havedifficulty maintaining safe driving practices. These programs are Driver Rehabilitation Courses, DriverImprovement Courses and the Novice Driver Course.
DRIVER REHABILITATION COURSEAlcohol is a major factor in automobile collisions and fatalities. The Highway Traffic Act requires people who are convicted of a first impaired driving charge under the Criminal Code of Canada to take a DriverRehabilitation Course.
Highway Safety runs a Driver Rehabilitation Course (DRC) to educate people convicted of:• impaired driving;• refusing the alcohol roadside screening test; or
• failing the breathalyzer test, e.g., having more than 0.08 blood alcohol content.
Each person having a conviction must attend and successfully complete a Driver Rehabilitation Coursebefore he or she can become eligible for the reinstatement of their Driver’s Licence.
A Driver Rehabilitation Course involves resource people, including addiction counsellors, police, legal,insurance and other professionals.
The course includes:• a series of films;• discussions;• lectures;• demonstration projects; and• written assignments about the problems involved in drinking and driving.The course is held in Charlottetown, Summerside and Montague.

167Chapter 7: Highway Safety Programs
DEFENSIVE DRIVING COURSEThis course is for drivers who wish to improve their knowledge, skills and safe driving attitudes. They mayalso wish to reduce the number of demerit points accumulated on their driving record and avoid a possible suspension. Drivers with up to 11 demerit points may, upon successful completion of the course and exam, be awarded three merit points. The course includes six, one-hour sessions. Each session dealswith different methods of preventing collisions. It offers drivers a way of improving their driving skills and avoiding collisions.
The Canada Safety Council’s Defensive Driving Course (D.D.C.) is made available in Prince Edward Islandthrough the St. John Ambulance (PEI Safety Council.)
DRIVER IMPROVEMENT COURSEDrivers suspended under the Demerit Point System must attend and complete the Driver ImprovementCourse within a six-month period following the reinstatement of a Driver’s Licence. Participation in thecourse is not required of drivers whose licences are suspended for other reasons.
The aims of the course are to improve drivers’ attitudes and to encourage improved driving skills. Emphasis is placed on a driver’s attitude toward obeying the law and accepting responsibility.
The Driver Improvement Course consists of four, two- hour classroom sessions which include lectures,films and discussion. Drivers enrolled must pass a test at the end of the course.
To find out more about these courses call the Highway Safety office at (902) 368-5210.

168Chapter 7: Highway Safety Programs
DEMERIT POINT SYSTEM SCHEDULE FOR EXPERIENCED DRIVERSThe Demerit Point System gives a graduated number of demerit points for traffic convictions based on theseriousness of the traffic violation.
An experienced driver is a driver who has held a valid Driver’s Licence for more than two years and is not a newly licensed driver under the Graduated Driver Licensing (GDL) Program.
The violations are as follows:• accumulation of 6, 7 or 8 points – a warning letter;• accumulation of 9, 10 or 11 points – an interview; • accumulation of 12 or more points – a three-month
suspension.
The violator loses his or her Driver’s Licence when 12 demerit points are accumulated on his or her record within a two-year period.
(see chart on next page)

169Chapter 7: Highway Safety Programs
Points Description of Offence
12 Criminal negligence involving the use of motor vehicle
12 Motor manslaughter
12 Failing to stop at a scene of an accident
12 Dangerous driving
12 Obtaining licence by misrepresentation
8 Failing to stop for a school bus receiving or discharging school children
6 Driving while registration or licence under suspension or while disqualified
6 Speeding - 30 or more kilometres per hour over the legal speed limit
5 Racing
5 Driving imprudently or without due care and attention or if disabled
3 Failing to wear a seat belt
3 Failing to report an accident
3 Speeding - under 30 kilometres per hour over the legal speed limit
3 Improper passing
3 Any offence under the Highway Traffic Act involving the use of a vehicle in motion, improperly parked or being operated with unsafe or insufficient equipment
Demerit Point System
NOTE: This is a sample of some of the demerit points assigned.

170Chapter 7: Highway Safety Programs
THE DEMERIT POINT SYSTEMThe Demerit Point System provides for a graduated number of demerit points for traffic convictions. The system identifies drivers whose records show them to consistently disregard the Rules of the Road,thereby endangering their own and others’ safety. When a driver accumulates a specified number of demerit points, his/her Driver’s Licence will be suspended for at least three months.
GRADUATED DRIVER LICENSING PROGRAM
NEWLY LICENSED DRIVERSNewly licensed drivers undergo a probationary period of two years, and passenger restrictions. During Stage 2, a newly licensed driver is warned at three, four or five demerit points, and suspended for one month at the six-point level. During Stage 3, a warning will occur at five, six, seven or eight demerit points and a suspension for one month when nine demerit points
are accumulated. Corrective action is taken by safety specialists during or shortly after the suspension.
While in the Graduated Driver Licensing Program, if you receive a seat-belt fine, your licence will be suspended. If any of your passengers are charged forfailing to wear a seat belt, you may be issued a fine.
GRADUATED LICENSING APPROACHRecent changes to the Prince Edward Island Highway Traffic Act regarding a Graduated Driver Licensing Program for drivers went into effect April 1, 2007. Following are the important changes:
Waiting PeriodAll drivers who receive their Instruction Permit must wait 365 days (275 days if actively enrolled in a driver education program) before taking their road test.

171Chapter 7: Highway Safety Programs
Drivers Providing InstructionDrivers providing instruction to a beginner driver with an Instruction Permit must have held a valid Driver’s Licence for at least four years.
PASSENGER RESTRICTIONSEffective February 5, 2007, all newly licensed drivers (one who has held a licence less than two years) will be subject to the following passenger restrictions:
• during Stage 2, a newly licensed driver, regardless of age, will be restricted to one non-family passenger. Any additional passengers must be the newly licenced driver’s immediate family. All passengers in the vehicle shall be restricted to the number of seat belts;
• during Stage 3, a newly licensed driver, regardless of age, will require all passengers in the vehicle to be restricted to the number of seat belts.
SUSPENSIONS UNDER THE DEMERIT POINT SYSTEMUpon the accumulation of nine to 11 demerit points within 24 months, a driver must show cause why his/her licence should not be suspended. When such cause is not shown, the Driver’s Licence can be suspended for up to three months. Upon the accumulation of 12 or more demerit points, the Driver’s Licence will be suspended for three months.
Following suspension, a driver will be placed on probation for a period of one year. Conviction for an offence involving the use of a motor vehicle in motion or improper parking while on probation results inanother three-month suspension.
“0” BLOOD ALCOHOL CONTENT (BAC) FOR NEW DRIVERSAll new drivers under 19 years of age or new drivers who have held their Driver’s Licence for less than

172Chapter 7: Highway Safety Programs
three years (regardless of age) must have a “0” blood alcohol content (BAC) when driving. An offence will result in a 24-hour roadside suspension and a 90-day administrative prohibition.
OFFENCES RESPECTING VOLUNTARY IDENTIFICATIONS/ DRIVERS’ LICENCESVoluntary IdentificationsAny person who:(a) presents a false document for the purpose of
obtaining a photographic identification;(b) permits any other person to use a photographic
identification issued to the first person;(c) uses a photographic identification for the purpose
of making a false representation;(d) defaces or alters a photographic identification; or(e) has in one’s possession a photographic
identification that has been defaced or altered;is guilty of an offence and liable on summary conviction to a fine not exceeding $500.
Driver’s Licence OffencesAny person who:(a) defaces or alters a Driver’s Licence or displays or
causes or permits to be displayed or has in one’s possession a Driver’s Licence that is fictitious or has been defaced, altered, canceled or suspended;
(b) lends to or permits the use of by another person any Driver’s Licence issued to the person so lending or permitting the use thereof;
(c) displays or represents as one’s own, any Driver’s Licence not issued to him/her;
(d) fails or refuses to surrender to the registrar or to a peace officer or inspector upon notice or demand a Driver’s Licence that has been suspended or cancelled; or
(e) gives a false or fictitious name or gives a false address in any application for a Driver’s Licence or duplicate thereof or makes a false statement or conceals a material fact in the application or in any

173Chapter 7: Highway Safety Programs
statement made or in giving information to the registrar for any purpose in connection with the Highway Traffic Act;
is guilty of an offence and on summary conviction will have 12 demerit points entered on their drivingrecord and their Driver’s Licence suspended for aperiod of three months.
CRIMINAL CODE OFFENCESCriminal negligence, motor manslaughter, failing to stop at the scene of an accident and dangerous driving are Criminal Code offences. Conviction for any of these offences results in a 12-month suspension under the Demerit Point System Regulations.
Impaired driving, failure or refusal to provide a blood sample, refusing the breathalyser demand or any approved roadside screening device, and failing the breathalyzer (a reading of more than 0.08) are Criminal
Code offences. Conviction for any of these offences results in the following cancellations under the Highway Traffic Act: First Offence one-year cancellation Second Offence three-year cancellation Subsequent Offences five-year cancellation
24-HOUR ROADSIDE SUSPENSIONAny person who is the driver of a motor vehicle where, upon demand of a peace officer provides a sample of his/her breath which, on an analysis by an approved screening device, registers “WARN” or “FAIL” is guilty of an offence and a peace officer shall request the driver to surrender his/her licence and his/her driving privileges will be suspended for a period of 24 hours from the time the request is made.

174Chapter 7: Highway Safety Programs
DRIVING WHILE DISQUALIFIEDA conviction for driving while disqualified will result in a six-month cancellation to be applied consecutively to the period of the existing suspension, cancellation or disqualification.
VEHICLE IMPOUNDMENTA vehicle impoundment may be issued when a person is operating, or has care or control of a motor vehicle, while they are prohibited from doing so by reason of a suspended or cancelled driver’s licence and has been convicted in the past two years, for driving while suspended or disqualified. Impoundment will be for 30 days for a first offence and up to 60 days for a subsequent offence.

175Chapter 7: Ignition Interlock Program
WHAT IS THE IGNITION INTERLOCK PROGRAM?The Prince Edward Island Ignition Interlock Program will allow early reinstatement of a driver’s licence after a drinking and driving conviction, upon a successful application. The program is available to offenders and is designed to encourage these individuals to get help quickly and address any alcohol-related problems.
HOW DOES AN IGNITION INTERLOCK DEVICE WORK?Before starting the vehicle, the driver must blow into the device. If the recorded blood alcohol concentration (BAC) is above the pre-set limit, the vehicle will not start. Once the vehicle is started, the interlock device requires random breath samples at pre-set times.
If a breath sample is not provided or if the BAC exceeds the limit, the device will issue a warning, record the event and activate specific alarm systems (i.e. , alarm activated, horn honking, etc.) until the ignition is turned off.
HOW CAN I APPLY FOR INSTALLATION OF THE DEVICE?You may complete and submit an application form.
HOW DOES THE PROGRAM WORK?Eligible drivers will have interlock devices installed in their vehicles. The driver will be issued a restricted driver’s licence which allows the individual to operate only vehicles equipped with an ignition interlock device. The device prevents the driver from starting the vehicle if the device detects alcohol above the pre-set level in the driver’s breath samples. The driver
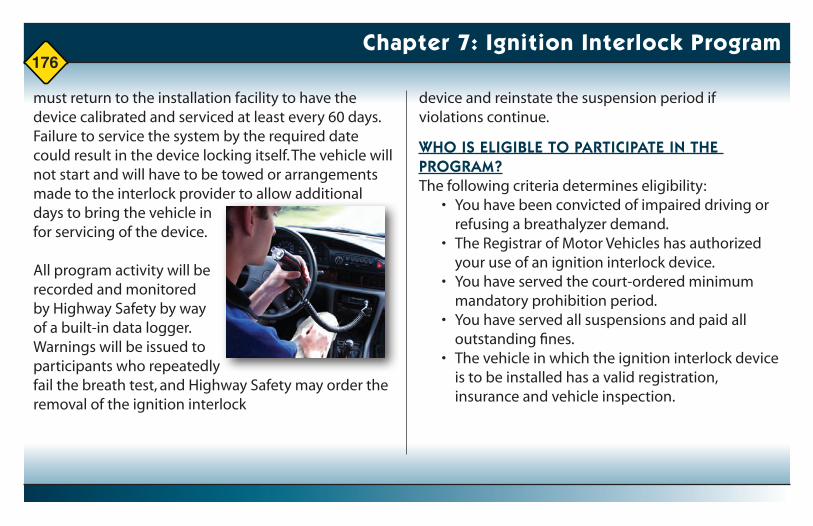
176Chapter 7: Ignition Interlock Program
must return to the installation facility to have the device calibrated and serviced at least every 60 days. Failure to service the system by the required date could result in the device locking itself. The vehicle will not start and will have to be towed or arrangements made to the interlock provider to allow additional days to bring the vehicle in for servicing of the device.
All program activity will be recorded and monitored by Highway Safety by way of a built-in data logger. Warnings will be issued to participants who repeatedly fail the breath test, and Highway Safety may order the removal of the ignition interlock
device and reinstate the suspension period if violations continue.
WHO IS ELIGIBLE TO PARTICIPATE IN THE PROGRAM?The following criteria determines eligibility: • You have been convicted of impaired driving or
refusing a breathalyzer demand. • The Registrar of Motor Vehicles has authorized
your use of an ignition interlock device. • You have served the court-ordered minimum
mandatory prohibition period. • You have served all suspensions and paid all
outstanding fines. • The vehicle in which the ignition interlock device is to be installed has a valid registration, insurance and vehicle inspection.

177
Chapter 8:
Collisions

178Chapter 8: If You Are Involved in a Collision
Sometimes in spite of all your efforts to avoid a collision, you may find yourself involved in one. All drivers involved in a collision have certain duties and responsibilities. The law provides stiff penalties for failure to satisfy these requirements.
After any motor vehicle collision involving death, injury or property damage where the damage to ALLproperty apparently exceeds $1,000 you must report the collision to the police immediately.
FIVE POINTS IN REPORTING COLLISIONS1) The exact location.2) The time of the collision.3) The nature of damage to cars or other property.4) The nature and extent of injuries to all people involved in the collision.5) The names and addresses of the drivers and owners and their Drivers’ Licences and vehicle registration
numbers, and insurance details. It is also advisable to obtain the names and addresses of any people who witnessed the collision.
IF YOU SHOULD BE THE FIRST TO ARRIVE AT THE SCENE OF A COLLISIONIf you are the first to arrive at a serious collision, your first instinct may be to run to the car involved andstart pulling people out. Unfortunately, the efforts of the rescuers often aggravate the injuries caused bythe collision.
Here is what you should do:
Park your car off the road, far enough away from the collision scene to protect the vehicles from furthercollisions with other cars. If a cell phone is available, call 911 or send someone to call 911.

179Chapter 8: If You Are Involved in a Collision
When you get to the cars involved, turn off the ignitions to prevent fire.
If the occupants of the vehicle are hurt, leave them in the car until trained help arrives. Do not twist or turnthem. They may have suffered a fracture of the spine or neck, and moving them may do further damage.If someone is pinned in the car, but otherwise free from injury, crawl in the car and try to release the injured person. If a driver is trapped by the steering wheel, the pressure can be eased by releasing the seat catch and pulling the seat back.
In case of fire, try to put it out with a fire extinguisher, dirt or a blanket. Most fires start when the electricalwiring is short-circuited. If you know how, try to disconnect the battery, but be careful not to touch metal parts with the “hot wire”, which could cause a spark.
If you have been trained in first aid, you may give the injured people some assistance. If not, follow thesetips:• cover the injured people with blankets or coats to keep them warm;• loosen collars, ties and belts to help the injured people to breathe;• calm and reassure the injured people and tell them help is on the way; and• keep spectators away from the injured people.

180Chapter 8: 911 Emergency/First Aid
REPORTING AN EMERGENCY USING YOUR CELL PHONEFirst of all, as soon as you contact the 911 call-taker, give them your name and cell phone number including the area code so that if the connection is broken, they can call you back. The call-taker will ask you specific questions about the emergency service you require and the location and nature of the emergency. Remain calm and answer the questions to the best of your ability.
The location is essential. If the emergency is in an area that you are not familiar with, try to describe thearea as accurately as possible. Concentrate on nearby civic numbers, if there are any, or the street name. You may have to walk or drive to the nearest intersection to look at the road sign, or the community name. You may have to ask someone in the area for any or all of this information.
Leave your cell phone turned on. If you lose contact with the call-taker as you move along a street orthrough an area, try to re-establish contact with the call-taker as soon as possible when you enter an areaof good transmission and reception. If need be, and if at all possible, tell the call-taker that you will meet the emergency vehicle at the nearest intersection and guide them to the emergency.
FIRST AIDPlease be aware of first aid procedures in case of a collision. Drivers may encounter situations where first aid will be a valuable asset. We have included a few first aid tips.
For more information on first aid contact:Red Cross at 902-628-6262 or www.redcross.caor St. John Ambulance at 1-800-565-5056 orwww.stjohnambulance.pe.ca

181
Chapter 9:
Mature Driver

182Chapter 9: Mature Driver
THE OLDER BUT WISER DRIVERAfter years spent behind the wheel, many senior drivers have developed the skills, behaviours andattitudes that keep them, and their fellow drivers, safe on our roads. Studies show that older drivers are more likely to obey the rules of the road, drive within posted speed limits and really take to heart the prohibition against drinking and driving.
Unfortunately, aging can take its toll on sight, hearing, judgment of speed and distance, memory, attention and reflexes. These changes can creep up so gradually that older drivers don’t notice any impact on their driving ability, until, one day, they are in a crash.
The good news is that we can compensate for the effects of aging. All drivers, and especially older drivers,can minimize their risks on the road by maintaining physical well-being through proper diet and exercise,
planning their trips carefully, driving defensively and choosing a vehicle that meets their needs.
Overall well-being contributes to driving performance, so it is important that drivers talk with their doctorsabout any problems that may interfere with their driving. Regular check-ups and eye exams can revealspecific conditions that affect driving. Some medications can have an affect on driving performance, so be sure to discuss this with your physician. It is important for every driver, regardless of age, to understand how medications and drug interactions can affect them. Even over-the-counter drugs can cause drowsiness, slow reaction time, diminished concentration, blurred vision and impaired mobility.
Ideally, drivers should assess their own driving performance and try to identify situations that
183Chapter 9: Mature Driver
challenge them on the road. Here are some questions that can help you assess your status as a driver.
In the past few months, have you:• experienced difficulty in negotiating sharp turns and intersections;• hesitated over right-of-way decisions or situations you once took for granted;• been surprised by the sudden presence of other vehicles or pedestrians;• received negative feedback (such as honking) from other drivers;• had difficulty seeing at night;• become lost on familiar routes;• felt nervous or exhausted after driving; or• been cited for traffic violations or found at fault in crashes?
If the answer to any of these questions is yes, it may be time to take a driver refresher course or to consider
restricting when and where you drive. You may want to limit your trips to daylight driving and avoid driving in rush-hour traffic or in adverse weather conditions. Choose routes that are well-marked, well-lit and that have easy-to-reach parking places.
When selecting a vehicle, consider one with height-adjustable seats; tilt/telescoping steering wheel;height-adjustable seat-belt anchors; legible instruments; roof pillars that minimize blind spots; big, glareproof mirrors; and push-button controls and levers.
Drivers should enjoy the freedom of mobility that their cars offer for as long as it is safe for them to do so.A driver’s age is not an adequate predictor of individual driving ability. Performance is what counts on the road. With careful attention to our health and our driving skills, we will all become older but wiser drivers.

184Chapter 9: Mature Driver
THE 55 ALIVE DRIVER REFRESHER COURSEThe 55 Alive Driver Refresher Course is designed to help Canadians 55 years and over to maintain their independence and their driving privileges. The 55 Alive course is designed to help you ...
• Gain more confidence behind the wheel• Improve your awareness of traffic hazards• Update yourself on traffic laws and new technology• Anticipate the actions of the other drivers• Identify and correct bad habits• Voice your concerns in a friendly relaxed environment
For more information, please contact the PEI Seniors Federation at 902-368-9008.

185
Chapter 10:Documents and Requirements

186Chapter 10: Documents and Requirements
DOCUMENTS AND REQUIREMENTS FOR STAGE 1 (INSTRUCTION PERMIT)- Parents’ consent form (found in the “Co-Pilot” brochure) signed by both parents or legal guardians.- Birth certificate or passport.- Successful completion of a vision test.- Driver education students must return a completed Master Sheet approved by the driving school.

187Chapter 10: Documents and Requirements
DOCUMENTS AND REQUIREMENTS FOR ROAD TEST- Valid registration and insurance.- Accompanied by a licensed driver who has held a valid Driver’s Licence for at least four years.- Vehicle meeting safety requirements.- Valid Instruction Permit.- Completion of a Novice Driver Course.
Instruction Permit format introduced October 2006

188Chapter 10: Documents and Requirements
Driver’s Handbook
The Department of Transportation and Infrastructure Renewal, Highway Safety
Driver’s H
and
bo
ok
Prince Ed
ward
Island