dualog connection suite™ · · 2013-12-28this manual provides an overview of the webmail...
TRANSCRIPT
Dualog® Connection Suite™
WebMail™ and Crew E-Mail Overview
Author(s) Dualog AS & Dualog UK Ltd
Date 03. September 2013
Description WebMail and Crew E-Mail Overview
Revision Number 1.5
Dualog AS
Alkeveien 14
N-9015 Tromsø
Norway
www.dualog.com
Connection Suite – WebMail and Crew E-Mail Overview
Dualog © 2008 - 2013 Page 2 of 27
TABLE OF CONTENTS
1 DOCUMENT DESCRIPTION ......................................................................................... 4
1.1 Computer Operating System ...................................................................................... 4
1.2 Requirements .............................................................................................................. 4
2 WEBMAIL ACCOUNT TYPES ...................................................................................... 5
2.1 Account Types ............................................................................................................ 5
2.2 Limitations (Personal Users) ...................................................................................... 5
3 ACCESSING DUALOG CONNECTION SUITE ............................................................. 6
3.1 Shore Access .............................................................................................................. 6
3.2 Ship Access ................................................................................................................ 6
3.2.1 Home Page (Internet Explorer) .......................................................................... 6
3.3 Adobe Flash Player (Required) .................................................................................. 7
3.4 Connection Suite – Logging On ................................................................................. 7
3.4.1 On Board Registration (Ship Only) .................................................................... 8
3.5 Logged On – Main User Interface .............................................................................. 9
3.6 Connection Suite – Logging Off ................................................................................ 9
4 CONNECTION SUITE MAIN USER INTERFACE ........................................................10
4.1 Tabs (Overview) ....................................................................................................... 10
4.2 Tab Specific Options and Functions ........................................................................ 10
5 WEBMAIL (E-MAIL) .....................................................................................................11
5.1 Sending a New Message .......................................................................................... 12
5.1.1 Adding e-mail recipients .................................................................................. 13
5.1.2 Message Text .................................................................................................... 14
5.1.3 Attachments ...................................................................................................... 14
5.1.4 Posting the (Completed) Message .................................................................... 15
5.1.5 New Message – Description of Fields and Options ......................................... 16
5.1.6 Message Size Limits (Ship Only) ..................................................................... 16
5.1.7 Inbox (Received Messages) ............................................................................. 17
5.1.8 Get New Messages (Refresh) ........................................................................... 17
5.1.9 Sorting .............................................................................................................. 17
5.1.10 Deleting One or More Messages ...................................................................... 17
5.1.11 Opening a Received Message .......................................................................... 18
5.1.12 Saving Attachments .......................................................................................... 18
5.1.13 Received / Opened Message – Options ............................................................ 18
5.2 Sent Messages .......................................................................................................... 19

Connection Suite – WebMail and Crew E-Mail Overview
Dualog © 2008 - 2013 Page 3 of 27
5.2.1 Sorting .............................................................................................................. 19
5.2.2 Deleting Messages ............................................................................................ 19
5.2.3 Opening a Previously Sent Message ................................................................ 19
5.2.4 Saving Attachments .......................................................................................... 20
5.2.5 Sent Message – Options ................................................................................... 20
5.3 Using the Address Book ........................................................................................... 20
The address book can be accessed from the main menu: ..................................................... 20
5.3.1 Address Book Maintenance ............................................................................. 21
5.4 E-Mail Configuration ............................................................................................... 22
5.4.1 Create Folders .................................................................................................. 23
6 MY PAGE .....................................................................................................................24
6.1 Personal Details ........................................................................................................ 24
6.1.1 Language .......................................................................................................... 25
6.1.2 Change Password ............................................................................................. 25
6.2 E-Mail Preferences ................................................................................................... 26
6.2.1 E-Mail Format .................................................................................................. 26
6.2.2 Adding senders/recipients to address book ...................................................... 26
6.3 Crew Schedule .......................................................................................................... 27

Connection Suite – WebMail and Crew E-Mail Overview
Dualog © 2008 - 2013 Page 4 of 27
1 Document Description This manual provides an overview of the WebMail Extension of Dualog Connection Suite with a primary focus on personal use by Crew Members.
1.1 Computer Operating System This document assumes that the computer being used to access Connection Suite is running a (32 bit) version of Microsoft® Windows™ as the operating system. Screen-shots and illustrations in this document are from a computer running Windows® Windows Vista™ using Microsoft® Internet Explorer® version 7 as the default Web browser.
1.2 Requirements Ship:
Connection Suite Ship software as the ship’s primary data communication system.
Computer equipped with a Web Browser application (e.g. Microsoft® Internet Explorer®).
Adobe® Flash Player™ (provided by Connection Suite if necessary).
Access to the Connection Suite computer via the Web Browser (via the ship’s Local Area Network or directly on the Connection Suite computer itself).
Valid user ID (e-mail address) and password. Shore:
Computer equipped with a Web Browser application (e.g. Microsoft® Internet Explorer®).
Access to the Internet with permissions to access web pages (HTTP and HTTPS protocols – IP ports 80 and 443 respectively).
Adobe® Flash Player™ (provided by Connection Suite if necessary).
Valid user ID (e-mail address) and password.

Connection Suite – WebMail and Crew E-Mail Overview
Dualog © 2008 - 2013 Page 5 of 27
2 WebMail Account Types
2.1 Account Types WebMail is an Extension in the Dualog Connection Suite Ship and Shore systems. There are two types of Connection Suite users with access to WebMail:
Static: Corporate accounts (used for business) on ships can use WebMail only on the single ship permanently hosting the account.
Personal: Roaming accounts (e.g. personal crew e-mail users) can use WebMail both on any ship in the fleet and, e.g. when on leave, via the Connection Suite Shore system.
All e-mail messages to Connection Suite users are received by the Shore systems in Tromsoe, Norway. When the system receives messages:
Copies for static accounts are placed into the appropriate ship mailbox(es) for collection.
Copies for roaming accounts are stored in the Shore system (for terrestrial access) and copied to the appropriate ship mailbox if the user is currently registered on board one of the ships in the fleet.
2.2 Limitations (Personal Users)
Messages sent from one ship are not visible in the “Sent Messages” folder on any other ship in the fleet.
Messages received on a ship (during a period of on board registration) are not visible in the “Inbox” folder on any other ship in the fleet.

Connection Suite – WebMail and Crew E-Mail Overview
Dualog © 2008 - 2013 Page 6 of 27
3 Accessing Dualog Connection Suite A user with a personal / crew account can access Dualog Connection Suite from shore and ship. The same account credentials (e-mail address and password) are used to log on to both systems. A user with a corporate / static account can access Dualog Connection Suite on the ship only.
3.1 Shore Access The Dualog Connection Suite WebMail system is hosted at www.dualog.net. Note: Your Company might have registered a new Internet domain for Connection Suite e-mail in which case they must supply you with the appropriate details.
3.2 Ship Access If you are accessing Connection Suite on the computer where the Dualog Connection Suite services are installed there is a shortcut on the desktop:
The shortcut enables access to the Connection Suite (Intranet) logon page via the computer’s default Web browser. Note: If the Connection Suite desktop shortcut is not present you will need to know the computer name (or IP address) of the Dualog Connection Suite computer. In your Web browser, enter the name / address of that computer (with prefix http://) in the address field – e.g.:
Note: Once you access the Dualog Connection Suite “Logon” page you can configure your Web browser to use Dualog Connection Suite as the default home page:
3.2.1 Home Page (Internet Explorer) The “home page” (that opened by default when the Web Browser is started) is configured within Microsoft® Internet Explorer® as follows:
Ensure you are currently viewing the Connection Suite “Logon” page.
From the toolbar select “Tools”.
From the drop-down menu that appears select “Internet Options”.
On the first tab (“General”) click button “Use Current” (to set the “home page” to that currently being viewed – Dualog Connection Suite).
To save the configuration click “Apply” followed by “OK”.

Connection Suite – WebMail and Crew E-Mail Overview
Dualog © 2008 - 2013 Page 7 of 27
3.3 Adobe Flash Player (Required) Dualog Connection Suite Intranet pages are rendered via Adobe® Flash Player. If your computer does not have Flash Player installed then the page displayed will contain a “Get Flash” hyperlink. Clicking the hyperlink will cause Flash Player to be downloaded and installed:
Note: If you install Flash Player (via the hyperlink) then you will, afterwards, need to close and re-open your Web browser before continuing.
3.4 Connection Suite – Logging On Each Connection Suite user has a unique Internet e-mail address which is also the “user name”. The user name and user password are required to logon to the Connection Suite system:
Predictive List (Ship Only)
1
2 3

Connection Suite – WebMail and Crew E-Mail Overview
Dualog © 2008 - 2013 Page 8 of 27
Note: As characters are entered the user name is predicted and options presented via a dropdown list. You can enter or select your address from the dropdown list. This applies to Connection Suite Ship only. For security, you must enter your e-mail address fully on the Connection Suite Shore system. When the user name and password have been entered click “Login” to access the main user interface and Log In WebMail to access WebMail:
3.4.1 On Board Registration (Ship Only) On board a ship your “on board status” is checked as you log on. If you are not currently registered on board you will be prompted to provide the start date and end date (estimated if required) of your time on board:
Notes:
If the “Register onboard” button is clicked before setting the “From” and “To” dates the main Connection Suite user interface is shown but the user is not correctly registered on board.
If an estimated “To” date is initially configured this can later be corrected via the “My Page” section of the main Connection Suite user interface.
If you are on board beyond the configured “To” date then repeat registration will be required. The registration form (as above) will be displayed automatically when you log on after the original “To” date.
User Name
Password
Click to Access the Main User Interface
Click to set “Start Date”
Click to set “End Date”
Register On Board
Click to Access WebMail directly
Connection Suite – WebMail and Crew E-Mail Overview
Dualog © 2008 - 2013 Page 9 of 27
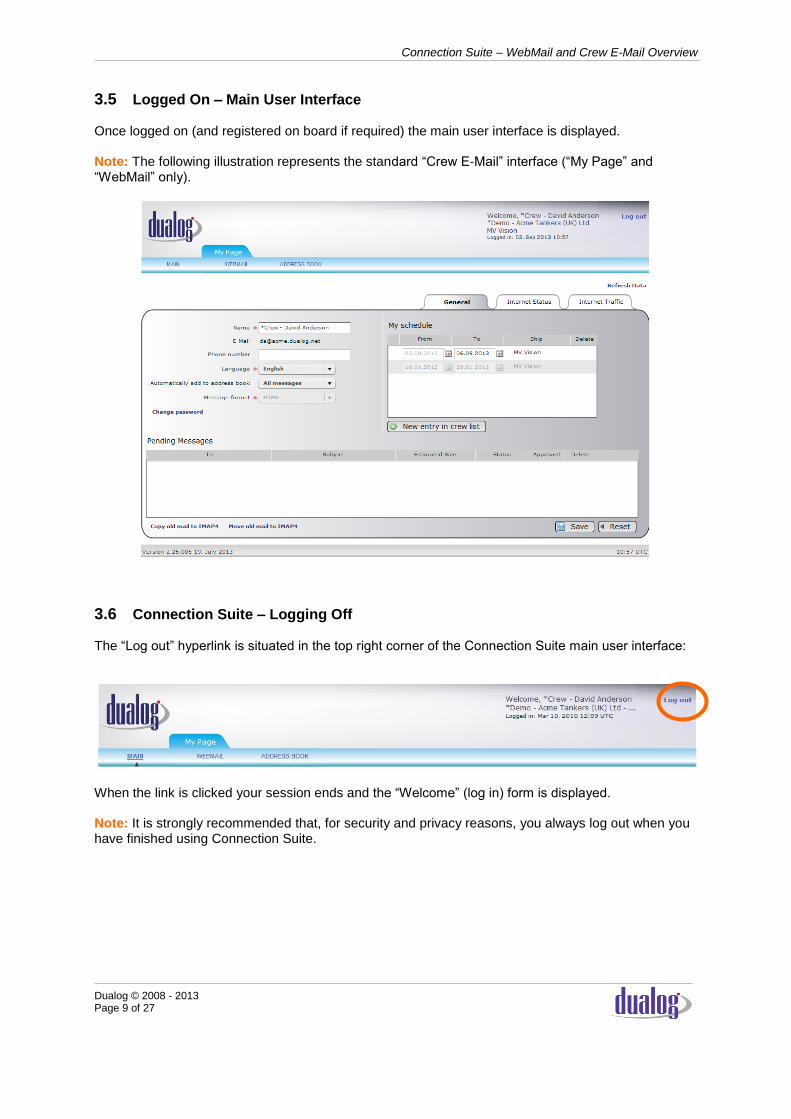
3.5 Logged On – Main User Interface Once logged on (and registered on board if required) the main user interface is displayed. Note: The following illustration represents the standard “Crew E-Mail” interface (“My Page” and “WebMail” only).
3.6 Connection Suite – Logging Off The “Log out” hyperlink is situated in the top right corner of the Connection Suite main user interface:
When the link is clicked your session ends and the “Welcome” (log in) form is displayed. Note: It is strongly recommended that, for security and privacy reasons, you always log out when you have finished using Connection Suite.

Connection Suite – WebMail and Crew E-Mail Overview
Dualog © 2008 - 2013 Page 10 of 27
4 Connection Suite Main User Interface
4.1 Tabs (Overview) A horizontal row of “tabs” provides access to the main sections. The number of tabs visible depends upon the rights assigned to you by the system / fleet Administrator. As a minimum (for crew e-mail), access is normally provided to the “My Page” tab:
4.2 Tab Specific Options and Functions When a “main tab” has been selected the tab specific options and functions are displayed immediately below the main tabs.
Note: Not all tabs have sub-options in which case the options and functions bar is blank.
Tab Specific Options and Functions

Connection Suite – WebMail and Crew E-Mail Overview
Dualog © 2008 - 2013 Page 11 of 27
5 WebMail (E-Mail) The WebMail component is accessed by clicking on “WEBMAIL” on the functions and options bar.
When accessing WebMail for the first time, you are prompted to modify/complete your user data. Here you can add a default signature:
A new window will open, showing the main view of webmail functions:
Connection Suite – WebMail and Crew E-Mail Overview
Dualog © 2008 - 2013 Page 12 of 27
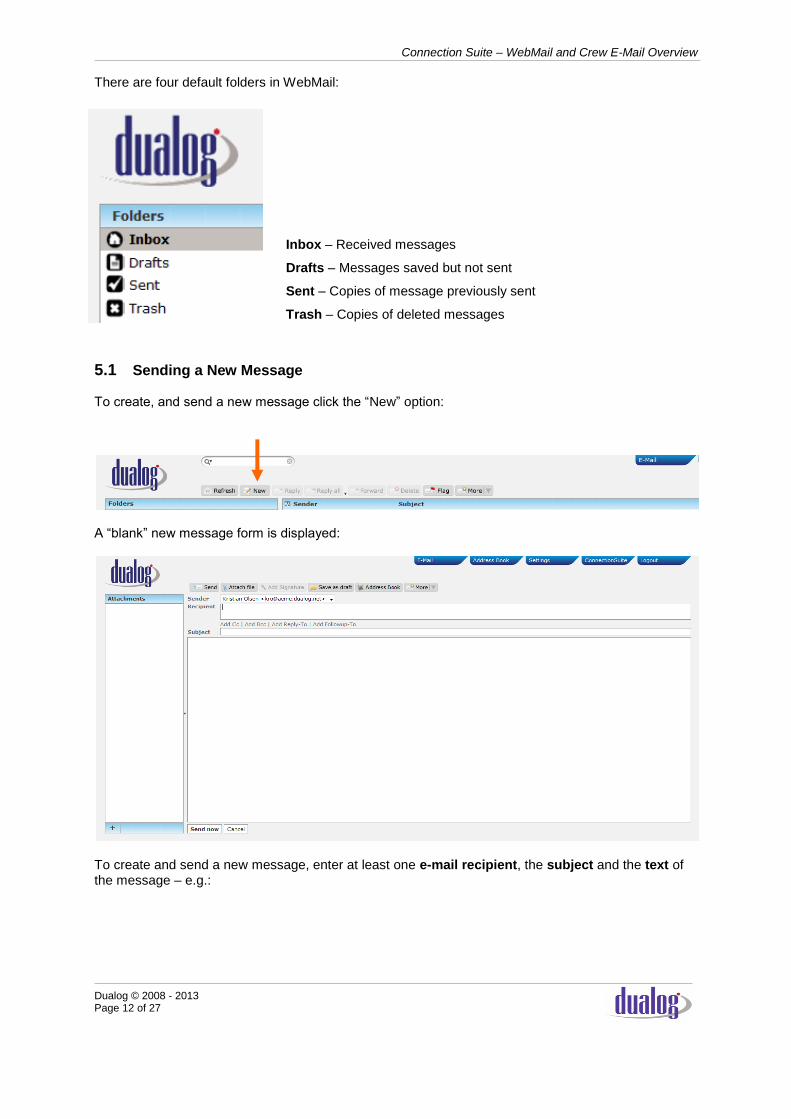
There are four default folders in WebMail:
Inbox – Received messages
Drafts – Messages saved but not sent
Sent – Copies of message previously sent
Trash – Copies of deleted messages
5.1 Sending a New Message To create, and send a new message click the “New” option:
A “blank” new message form is displayed:
To create and send a new message, enter at least one e-mail recipient, the subject and the text of the message – e.g.:

Connection Suite – WebMail and Crew E-Mail Overview
Dualog © 2008 - 2013 Page 13 of 27
5.1.1 Adding e-mail recipients
E-mail recipients can be added the following ways:
1. Type the complete e-mail address of the recipient 2. Start typing a name or e-mail address. WebMail will then suggest recipients found in the
address book 3. Open the Address Book and select recipients from here
To activate Copy to, Blind Copy, a different Reply to address or a follow-up address:

Connection Suite – WebMail and Crew E-Mail Overview
Dualog © 2008 - 2013 Page 14 of 27
5.1.2 Message Text The message text can, if required, be formatted using the controls immediately below the main text field:
Please note that these controls will only be available when composing HTML messages. Select Settings-Composing Messages to edit:
Please note that using HTML will increase message size. Default configuration is “Never”.
5.1.3 Attachments
Files can be attached to the message by selecting .
The standard Windows File Selector Window” will appear. Select the files to attach (multiple files can
be selected), then click . Finally click to add the files to the message.

Connection Suite – WebMail and Crew E-Mail Overview
Dualog © 2008 - 2013 Page 15 of 27
When the file has been successfully included into the message its name will be listed under “Attachments”
5.1.4 Posting the (Completed) Message When the “envelope” (to, subject etc.) and “content” (text and attachments) are complete click
(bottom left). The message will then be submitted to the Message Handling System. Note: If the message contains attachments posting might take longer as the files must be uploaded to the Message Handling System for inclusion in the message. In this case progress is displayed on screen. When the message has been successfully posted you are informed by this message:
The view then changes back to the “Sent” folder.
File(s) Currently Attached
Click to Remove the Attachment if Required
Connection Suite – WebMail and Crew E-Mail Overview
Dualog © 2008 - 2013 Page 16 of 27
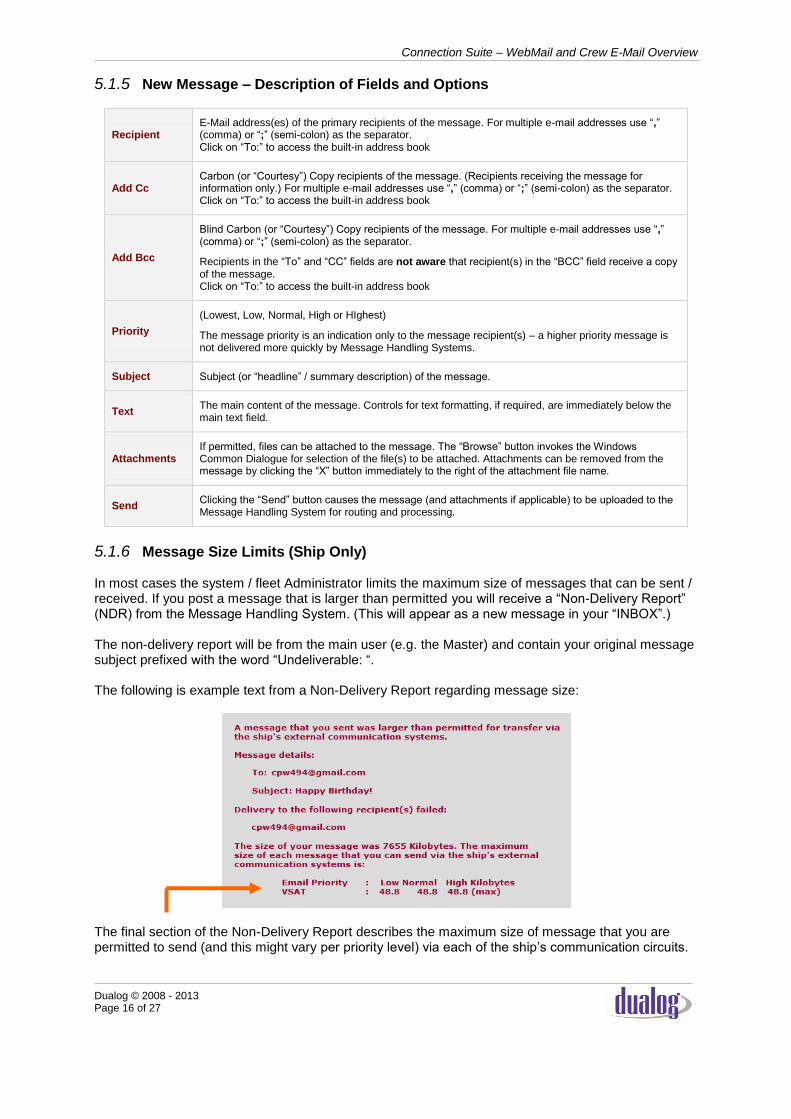
5.1.5 New Message – Description of Fields and Options
Recipient E-Mail address(es) of the primary recipients of the message. For multiple e-mail addresses use “,” (comma) or “;” (semi-colon) as the separator. Click on “To:” to access the built-in address book
Add Cc Carbon (or “Courtesy”) Copy recipients of the message. (Recipients receiving the message for information only.) For multiple e-mail addresses use “,” (comma) or “;” (semi-colon) as the separator. Click on “To:” to access the built-in address book
Add Bcc
Blind Carbon (or “Courtesy”) Copy recipients of the message. For multiple e-mail addresses use “,” (comma) or “;” (semi-colon) as the separator.
Recipients in the “To” and “CC” fields are not aware that recipient(s) in the “BCC” field receive a copy of the message. Click on “To:” to access the built-in address book
Priority
(Lowest, Low, Normal, High or HIghest)
The message priority is an indication only to the message recipient(s) – a higher priority message is not delivered more quickly by Message Handling Systems.
Subject Subject (or “headline” / summary description) of the message.
Text The main content of the message. Controls for text formatting, if required, are immediately below the main text field.
Attachments If permitted, files can be attached to the message. The “Browse” button invokes the Windows Common Dialogue for selection of the file(s) to be attached. Attachments can be removed from the message by clicking the “X” button immediately to the right of the attachment file name.
Send Clicking the “Send” button causes the message (and attachments if applicable) to be uploaded to the Message Handling System for routing and processing.
5.1.6 Message Size Limits (Ship Only) In most cases the system / fleet Administrator limits the maximum size of messages that can be sent / received. If you post a message that is larger than permitted you will receive a “Non-Delivery Report” (NDR) from the Message Handling System. (This will appear as a new message in your “INBOX”.) The non-delivery report will be from the main user (e.g. the Master) and contain your original message subject prefixed with the word “Undeliverable: “. The following is example text from a Non-Delivery Report regarding message size:
The final section of the Non-Delivery Report describes the maximum size of message that you are permitted to send (and this might vary per priority level) via each of the ship’s communication circuits.
Connection Suite – WebMail and Crew E-Mail Overview
Dualog © 2008 - 2013 Page 17 of 27
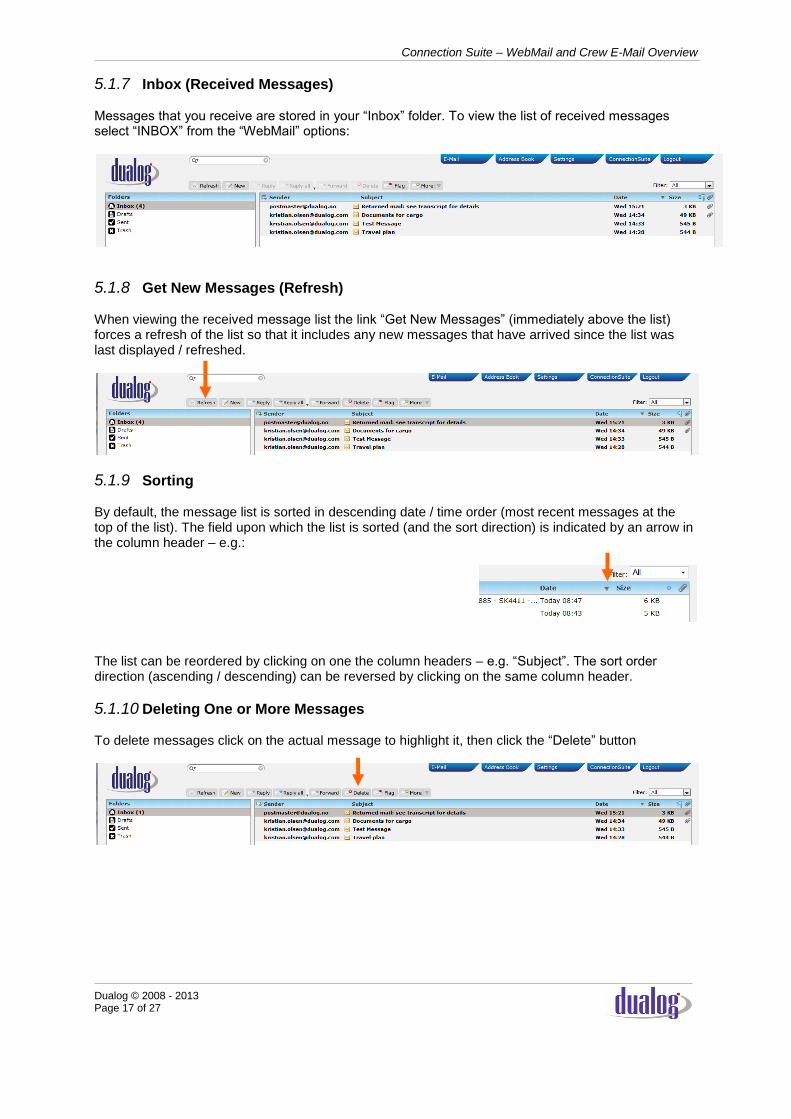
5.1.7 Inbox (Received Messages) Messages that you receive are stored in your “Inbox” folder. To view the list of received messages select “INBOX” from the “WebMail” options:
5.1.8 Get New Messages (Refresh) When viewing the received message list the link “Get New Messages” (immediately above the list) forces a refresh of the list so that it includes any new messages that have arrived since the list was last displayed / refreshed.
5.1.9 Sorting By default, the message list is sorted in descending date / time order (most recent messages at the top of the list). The field upon which the list is sorted (and the sort direction) is indicated by an arrow in the column header – e.g.:
The list can be reordered by clicking on one the column headers – e.g. “Subject”. The sort order direction (ascending / descending) can be reversed by clicking on the same column header.
5.1.10 Deleting One or More Messages To delete messages click on the actual message to highlight it, then click the “Delete” button

Connection Suite – WebMail and Crew E-Mail Overview
Dualog © 2008 - 2013 Page 18 of 27
5.1.11 Opening a Received Message On the appropriate row in any folder, double click on any of the display fields (Sender / Subject / Date) to open a message.
The message envelope (Subject, Sender, Recipient, Copy, Date) and content (text, attachments) are then displayed in the viewer:
5.1.12 Saving Attachments The names of files attached to the message are displayed in the “Attachments” field:
Clicking an attachment file name launches the Windows Common Dialogue “Save As”. Choose a target folder to save the attachment.
5.1.13 Received / Opened Message – Options All opened message options are represented by buttons displayed immediately above the message text:
A new message form is opened.
A new outbound message, for editing, is created addressed (only) to the sender as described in the “From” field. The sender’s message text forms the initial text of the new message.
A new outbound message, for editing, is created addressed to all recipients as described in the “From”, “To” and “CC” fields (except for you). The sender’s message text forms the initial text of the new message.
Attached File
Connection Suite – WebMail and Crew E-Mail Overview
Dualog © 2008 - 2013 Page 19 of 27
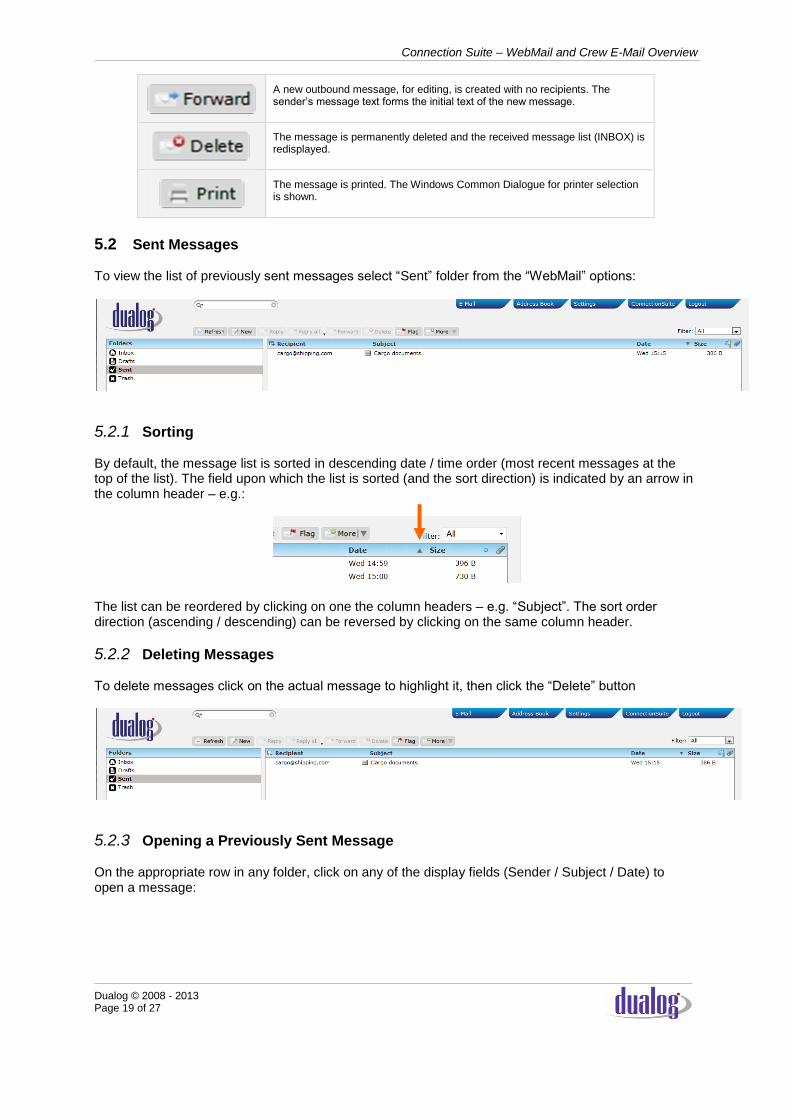
A new outbound message, for editing, is created with no recipients. The sender’s message text forms the initial text of the new message.
The message is permanently deleted and the received message list (INBOX) is redisplayed.
The message is printed. The Windows Common Dialogue for printer selection is shown.
5.2 Sent Messages To view the list of previously sent messages select “Sent” folder from the “WebMail” options:
5.2.1 Sorting By default, the message list is sorted in descending date / time order (most recent messages at the top of the list). The field upon which the list is sorted (and the sort direction) is indicated by an arrow in the column header – e.g.:
The list can be reordered by clicking on one the column headers – e.g. “Subject”. The sort order direction (ascending / descending) can be reversed by clicking on the same column header.
5.2.2 Deleting Messages To delete messages click on the actual message to highlight it, then click the “Delete” button
5.2.3 Opening a Previously Sent Message On the appropriate row in any folder, click on any of the display fields (Sender / Subject / Date) to open a message:

Connection Suite – WebMail and Crew E-Mail Overview
Dualog © 2008 - 2013 Page 20 of 27
5.2.4 Saving Attachments The names of files attached to the message are displayed in the “Attachments” field:
Clicking an attachment file name launches the Windows Common Dialogue “Save As”. Choose a target folder to save the attachment.
5.2.5 Sent Message – Options All sent message options are represented by buttons displayed immediately below the message text:
A new message form is opened.
A new outbound message, for editing, is created addressed (only) to the sender as described in the “From” field. The sender’s message text forms the initial text of the new message.
A new outbound message, for editing, is created addressed to all recipients as described in the “From”, “To” and “CC” fields (except for you). The sender’s message text forms the initial text of the new message.
A new outbound message, for editing, is created with no recipients. The sender’s message text forms the initial text of the new message.
The message is permanently deleted and the received message list (INBOX) is redisplayed.
The message is printed. The Windows Common Dialogue for printer selection is shown.
5.3 Using the Address Book The address book can be accessed from the main menu:
Attached File
Select Address Book in meny

Connection Suite – WebMail and Crew E-Mail Overview
Dualog © 2008 - 2013 Page 21 of 27
When selecting Address Book in the menu, the following window will appear:
The Address Book window has two sections:
Address Add, change and delete entries in the address book
Address Group Create lists of addresses, which again can be accessed as one entry when composing messages
5.3.1 Address Book Maintenance The address book is divided into three Categories:
Personal Each user can have their personal address book which will be available only for the owner
Ship Available for users on the ship, if access is granted
Company Available for users within the company granted access
For each section available, users can add, change or delete address book entries. Each entry contain a name, e-mail address and what address groups they are added to. To add a contact to the address book, do the following steps:

Connection Suite – WebMail and Crew E-Mail Overview
Dualog © 2008 - 2013 Page 22 of 27
1. Click on the button. The name and e-mail address will now be ready for input 2. Select Category for this Contact: Personal, Ship or Company 3. Add Contact Name and e-mail address. First name, last name and phone number is optional
4. Click on to save the contact.
Editing contact: Select contact, change the required values, then press
Deleting contact: Select contact, click then to commit deleting the entry.
5.4 E-Mail Configuration
To access the settings of the E-Mail account, do the following steps:
1: On My Page, select WebMail 2: In WebMail, select Settings
1
2 3
4
1
2
Connection Suite – WebMail and Crew E-Mail Overview
Dualog © 2008 - 2013 Page 23 of 27
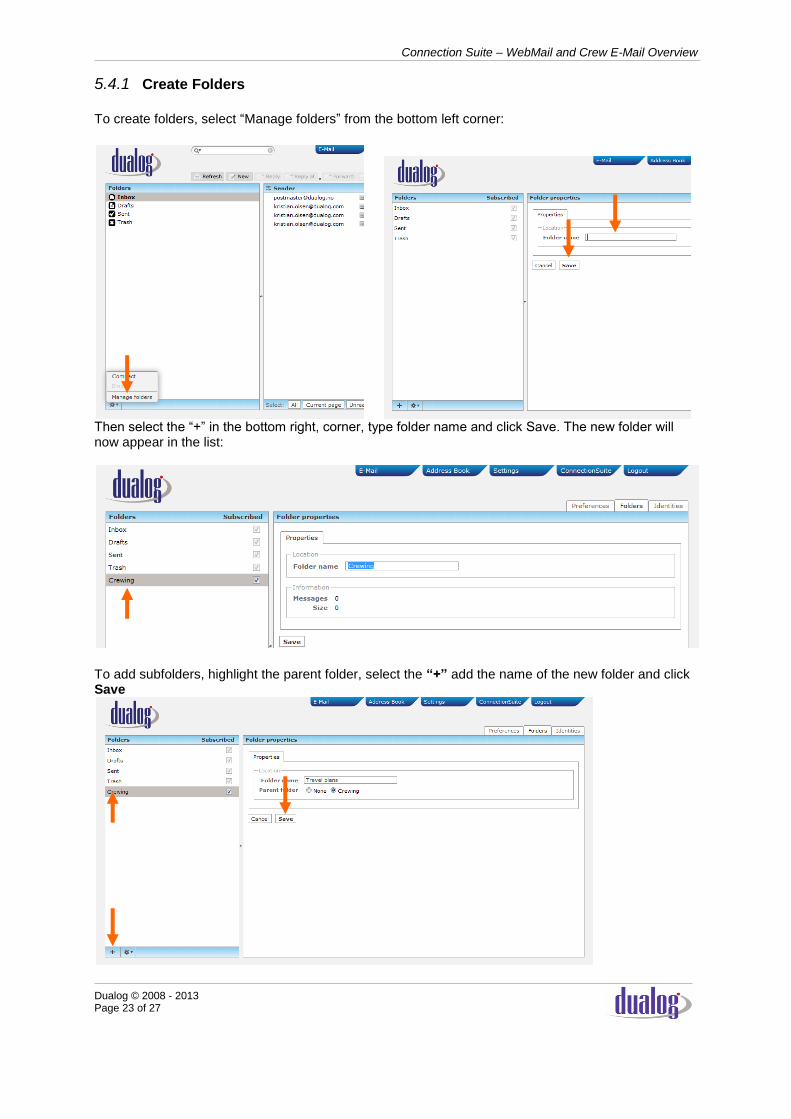
5.4.1 Create Folders
To create folders, select “Manage folders” from the bottom left corner:
Then select the “+” in the bottom right, corner, type folder name and click Save. The new folder will now appear in the list:
To add subfolders, highlight the parent folder, select the “+” add the name of the new folder and click Save
Connection Suite – WebMail and Crew E-Mail Overview
Dualog © 2008 - 2013 Page 24 of 27
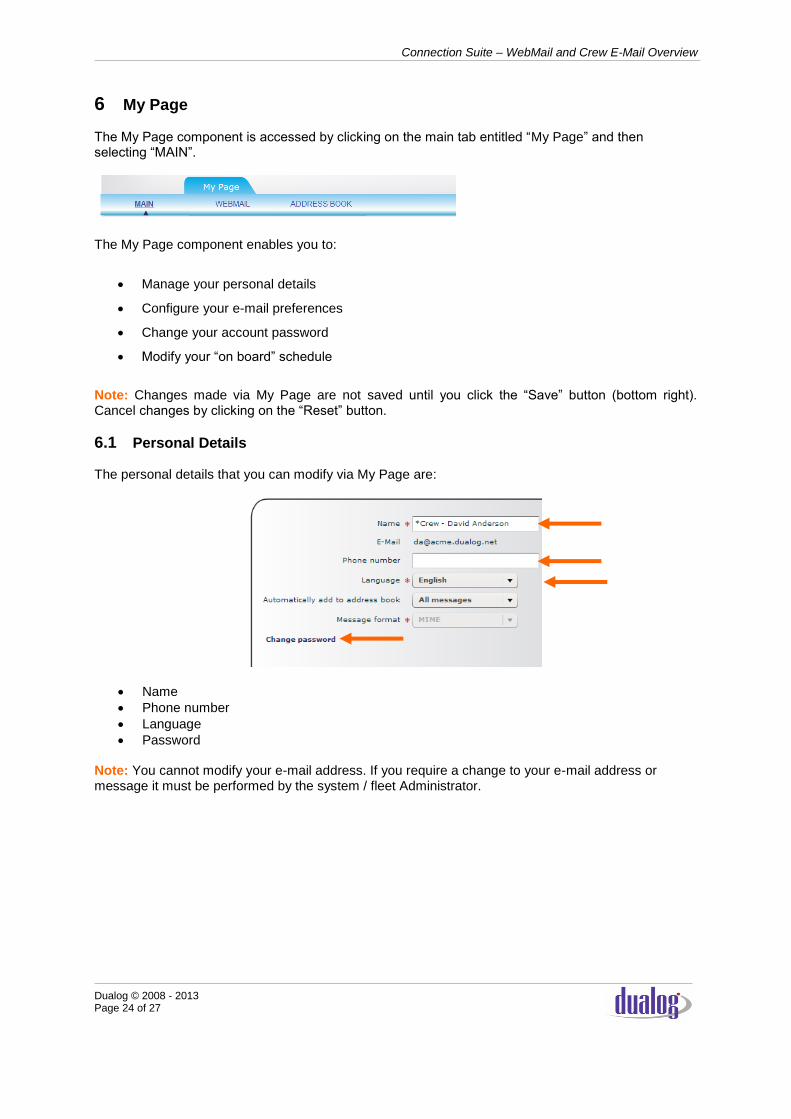
6 My Page The My Page component is accessed by clicking on the main tab entitled “My Page” and then selecting “MAIN”.
The My Page component enables you to:
Manage your personal details
Configure your e-mail preferences
Change your account password
Modify your “on board” schedule
Note: Changes made via My Page are not saved until you click the “Save” button (bottom right). Cancel changes by clicking on the “Reset” button.
6.1 Personal Details The personal details that you can modify via My Page are:
Name
Phone number
Language
Password Note: You cannot modify your e-mail address. If you require a change to your e-mail address or message it must be performed by the system / fleet Administrator.

Connection Suite – WebMail and Crew E-Mail Overview
Dualog © 2008 - 2013 Page 25 of 27
6.1.1 Language
Currently, the Connection Suite Web interface supports English and Norwegian. The setting determines the language of text on labels, buttons and list column headers – e.g. (Norwegian)
(English)
Note: If you select a different interface language, the change will not become apparent until logon again.
6.1.2 Change Password To change your password you must enter the existing password and enter (plus confirm) the new password.
Existing
New
Confirm New Save

Connection Suite – WebMail and Crew E-Mail Overview
Dualog © 2008 - 2013 Page 26 of 27
Notes:
If you change your password on a ship that change will be applied at the shore system (and, subsequently, other ships in the fleet) after the next ship-shore communication session.
If you change your password via Connection Suite Shore the change is replicated to all ships in the fleet. The new password is applied on each ship after each performs its next ship-shore communication session.
If you have forgotten your password, the captain can reset it. After a password reset, you must enter a new password on your first login
6.2 E-Mail Preferences
6.2.1 E-Mail Format The e-mail format option determines how much information Connection Suite Message Handling System includes in the messages that you send and receive. The “Dualog” option causes all unnecessary envelope items to be removed from the messages. It also forces “plain text” for message bodies. The “MIME” option ensures that all Internet mail format options are preserved (e.g. rich text).
6.2.2 Adding senders/recipients to address book Automatically add to address book: This option lets you choose whether unknown senders and recipients are added to your address book. Options are “No”, “Sent messages” and “All messages”.
Connection Suite – WebMail and Crew E-Mail Overview
Dualog © 2008 - 2013 Page 27 of 27
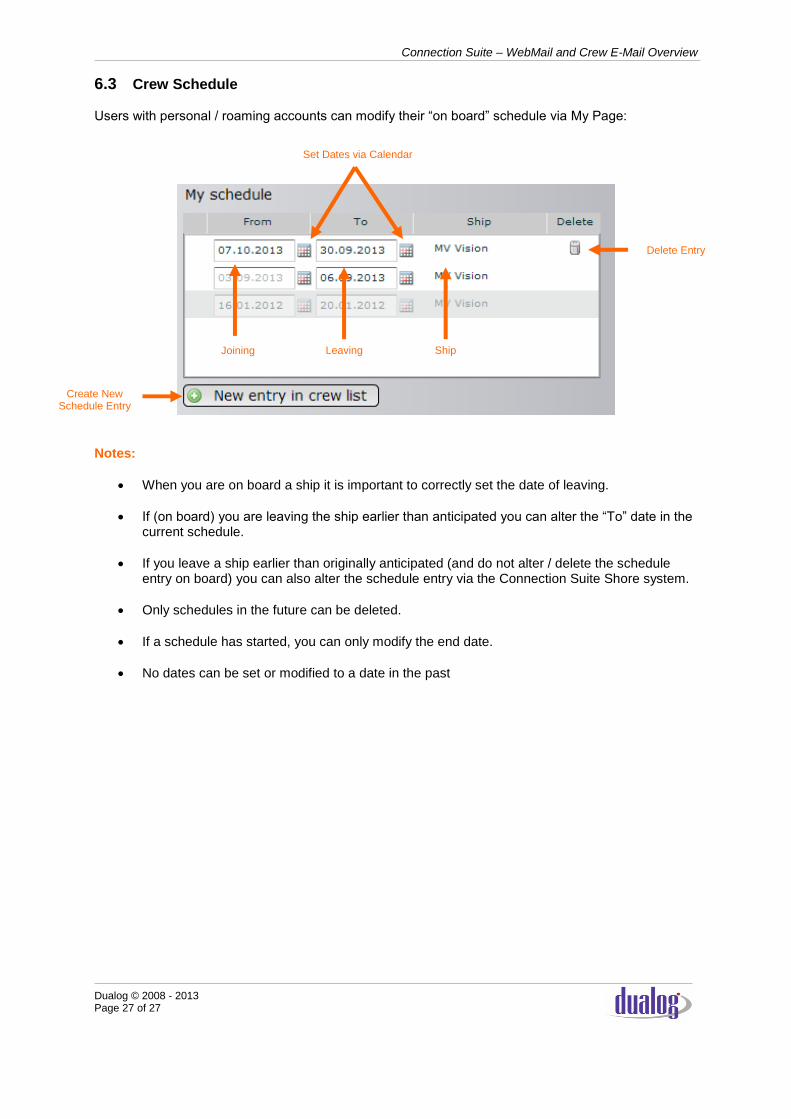
6.3 Crew Schedule Users with personal / roaming accounts can modify their “on board” schedule via My Page:
Notes:
When you are on board a ship it is important to correctly set the date of leaving.
If (on board) you are leaving the ship earlier than anticipated you can alter the “To” date in the current schedule.
If you leave a ship earlier than originally anticipated (and do not alter / delete the schedule entry on board) you can also alter the schedule entry via the Connection Suite Shore system.
Only schedules in the future can be deleted.
If a schedule has started, you can only modify the end date.
No dates can be set or modified to a date in the past
Joining Leaving Ship
Delete Entry
Set Dates via Calendar
Create New Schedule Entry