零 件 图 floor-mount bath & shower faucet floor-mount bath & shower faucet...
TRANSCRIPT
所有的资料是按最新出版的产品资料编写而成。科勒公司保留任何时候不经通知即可改变产品特性、包装或产品可供类型的权利。
说明书包括重要的安装、保养及清洁方面的内容,请把这些资料交给用户阅读。
注意事项:1. 一定要先彻底冲洗供水管以清除管道中的杂质。
2. 检查供水管有无损坏。如需要,进行替换。
3. 遵守当地管路安装条例。4. 切换器正常工作的最小压力为0.05MPa(0.5bar)。
5. 预埋前测试安装连接部位是否有渗漏,根据需要修理之。6. 花洒最高工作压力:0.5MPa(5bar)。水压超过0.5MPa(5bar)须安装减压阀。花洒最高工作温度及环境温度:60ºC。请特别注意花洒同花洒连接的臂管须远离加热器,否则可能损坏花洒及其密封件,甚至对使用者造成伤害。
BEFORE YOU BEGIN
All information is based on the latest product information available at the time of publication. Kohler Co. reserves the right to make changes in product characteristics, packaging, or availability at any time without notice. Please leave these instructions for the consumer. They contain important information.
NOTES:1. Flush the water supply pipes thoroughly to remove debris.2. Inspect the supply tubing for damage. Replace as necessary.3. Observe local plumbing codes.4. The minimum inlet water pressure for the diverter is 0.05MPa(0.5bar).5. Check for leaks before covering the pipes, repairs as needed.6. The highest working pressure for handspray is 0.5MPa(5 bar). If it exceeds 0.5MPa(5 bar), a pressure reducer is needed. The highest water and environment temperature is 60ºC. Please keep handspray and shower arm away from heater, or it may become damaged and cause injury to the user.
1206398-2-F 1
98614T-4 落地式浴缸花洒龙头
安装之前
INSTALLATION INSTRUCTIONS 安装说明书
98614T-4 落地式浴缸花洒龙头
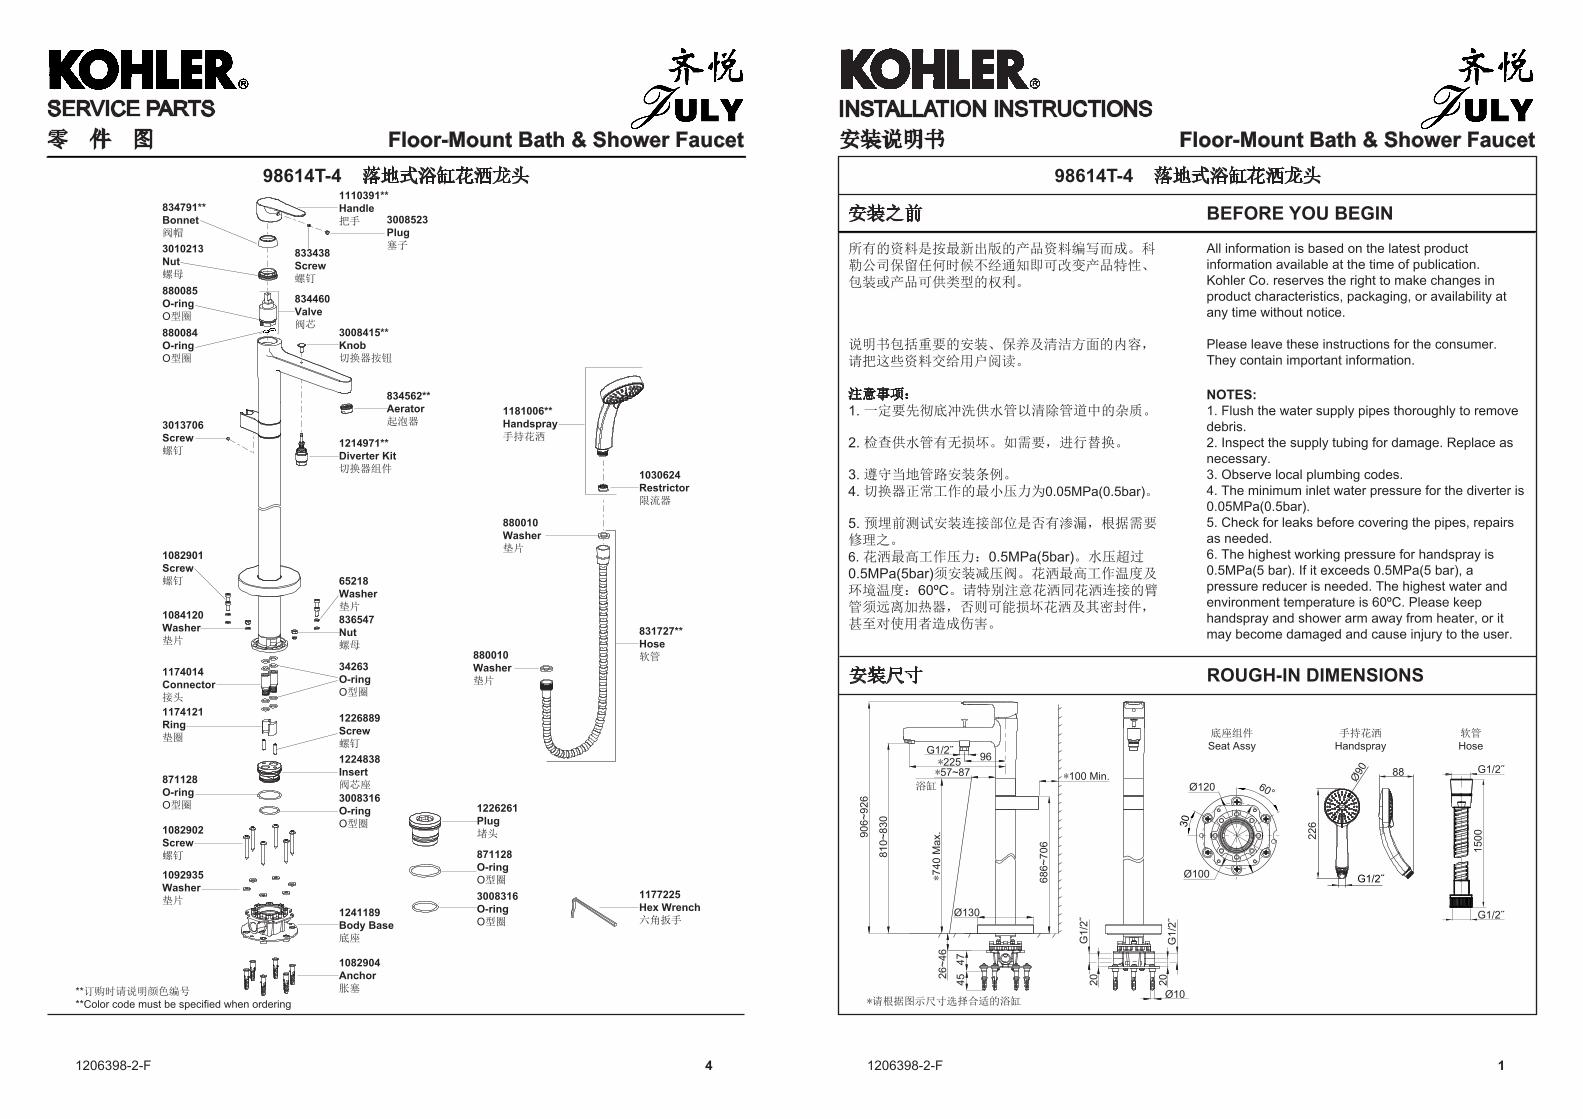
安装尺寸 ROUGH-IN DIMENSIONS
G1/2˝
G1/2˝
*请根据图示尺寸选择合适的浴缸
1500
Ø100
Ø120 60°
30
手持花洒Handspray
软管Hose
底座组件Seat Assy
**订购时请说明颜色编号**Color code must be specified when ordering
SERVICE PARTS 零 件 图
1206398-2-F 4
浴缸
G1/2˝
G1/2˝
G1/2˝
20204547
26~4
6
*57~87 *100 Min.
686~
706
*740
Max
.
810~
830
906~
926
1177225Hex Wrench六角扳手
Ø10
Ø130
96*225
880010Washer垫片
831727**Hose软管880010
Washer垫片
1214971**Diverter Kit切换器组件
834562**Aerator起泡器3013706
Screw螺钉
833438Screw螺钉
3008523Plug塞子
3008415**Knob切换器按钮
1110391**Handle把手
1084120Washer垫片
65218Washer垫片836547Nut螺母
34263O-ringO型圈
3008316O-ringO型圈
871128O-ringO型圈
1082904Anchor胀塞
1092935Washer垫片
1174014Connector接头
1082901Screw螺钉
1226889Screw螺钉
1224838Insert阀芯座
1174121Ring垫圈
3010213Nut螺母
834791**Bonnet阀帽
880084O-ringO型圈
880085O-ringO型圈
834460Valve阀芯
Floor-Mount Bath & Shower Faucet Floor-Mount Bath & Shower Faucet
1030624Restrictor限流器
1181006**Handspray手持花洒
226
G1/2˝
Ø90 88
3008316O-ringO型圈
871128O-ringO型圈
1082902Screw螺钉
1241189Body Base底座
1226261Plug堵头
1206398-2-F 2
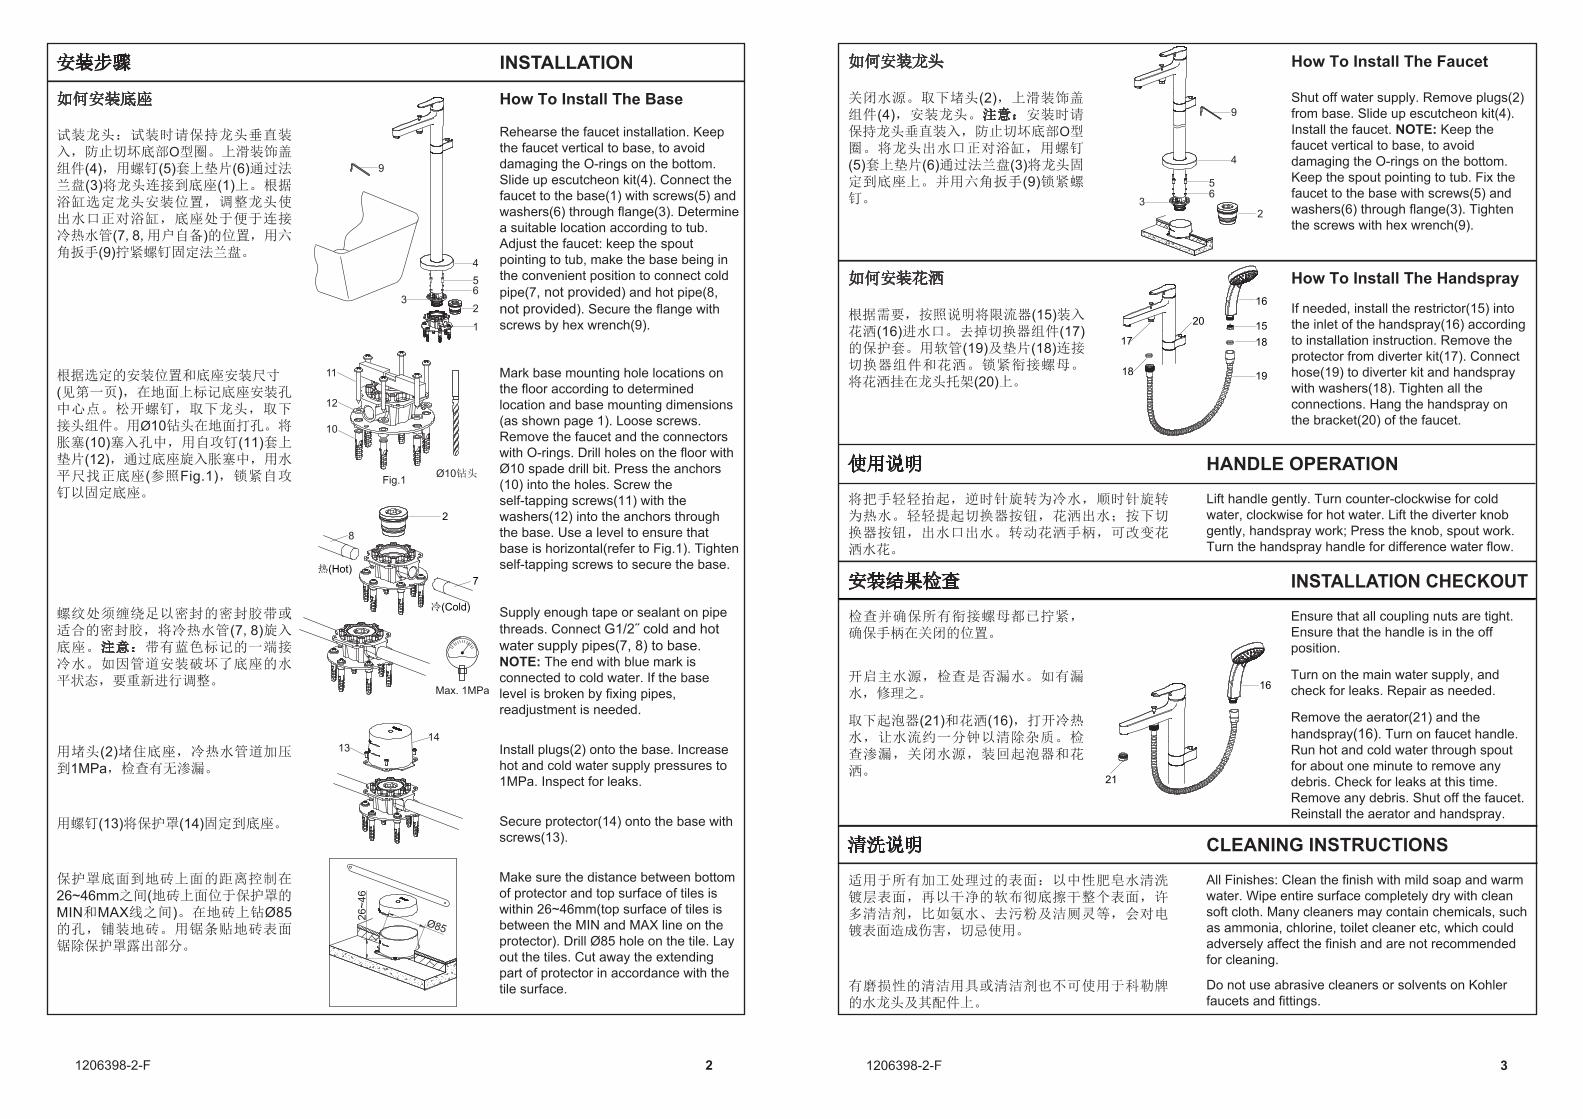
How To Install The Base
Rehearse the faucet installation. Keep the faucet vertical to base, to avoid damaging the O-rings on the bottom. Slide up escutcheon kit(4). Connect the faucet to the base(1) with screws(5) and washers(6) through flange(3). Determine a suitable location according to tub. Adjust the faucet: keep the spout pointing to tub, make the base being in the convenient position to connect cold pipe(7, not provided) and hot pipe(8, not provided). Secure the flange with screws by hex wrench(9).
Mark base mounting hole locations on the floor according to determined location and base mounting dimensions (as shown page 1). Loose screws. Remove the faucet and the connectors with O-rings. Drill holes on the floor with Ø10 spade drill bit. Press the anchors (10) into the holes. Screw the self-tapping screws(11) with the washers(12) into the anchors through the base. Use a level to ensure that base is horizontal(refer to Fig.1). Tighten self-tapping screws to secure the base.
Supply enough tape or sealant on pipe threads. Connect G1/2˝ cold and hot water supply pipes(7, 8) to base. NOTE: The end with blue mark is connected to cold water. If the base level is broken by fixing pipes, readjustment is needed.
Install plugs(2) onto the base. Increase hot and cold water supply pressures to 1MPa. Inspect for leaks.
Secure protector(14) onto the base with screws(13).
Make sure the distance between bottom of protector and top surface of tiles is within 26~46mm(top surface of tiles is between the MIN and MAX line on the protector). Drill Ø85 hole on the tile. Lay out the tiles. Cut away the extending part of protector in accordance with the tile surface.
如何安装底座
试装龙头:试装时请保持龙头垂直装入,防止切坏底部O型圈。上滑装饰盖组件(4),用螺钉(5)套上垫片(6)通过法兰盘(3)将龙头连接到底座(1)上。根据浴缸选定龙头安装位置,调整龙头使出水口正对浴缸,底座处于便于连接冷热水管(7,8,用户自备)的位置,用六角扳手(9)拧紧螺钉固定法兰盘。
根据选定的安装位置和底座安装尺寸(见第一页),在地面上标记底座安装孔中心点。松开螺钉,取下龙头,取下接头组件。用Ø10钻头在地面打孔。将胀塞(10)塞入孔中,用自攻钉(11)套上垫片(12),通过底座旋入胀塞中,用水平尺找正底座(参照Fig.1),锁紧自攻钉以固定底座。
螺纹处须缠绕足以密封的密封胶带或适合的密封胶,将冷热水管(7,8)旋入底座。注意:带有蓝色标记的一端接冷水。如因管道安装破坏了底座的水平状态,要重新进行调整。
用堵头(2)堵住底座,冷热水管道加压到1MPa,检查有无渗漏。
用螺钉(13)将保护罩(14)固定到底座。
保护罩底面到地砖上面的距离控制在26~46mm之间(地砖上面位于保护罩的MIN和MAX线之间)。在地砖上钻Ø85的孔,铺装地砖。用锯条贴地砖表面锯除保护罩露出部分。
1206398-2-F 3
安装步骤 INSTALLATION How To Install The Faucet
Shut off water supply. Remove plugs(2) from base. Slide up escutcheon kit(4). Install the faucet. NOTE: Keep the faucet vertical to base, to avoid damaging the O-rings on the bottom. Keep the spout pointing to tub. Fix the faucet to the base with screws(5) and washers(6) through flange(3). Tighten the screws with hex wrench(9).
如何安装龙头
关闭水源。取下堵头(2),上滑装饰盖组件(4),安装龙头。注意:安装时请保持龙头垂直装入,防止切坏底部O型圈。将龙头出水口正对浴缸,用螺钉(5)套上垫片(6)通过法兰盘(3)将龙头固定到底座上。并用六角扳手(9)锁紧螺钉。
16
15
How To Install The Handspray
If needed, install the restrictor(15) into the inlet of the handspray(16) according to installation instruction. Remove the protector from diverter kit(17). Connect hose(19) to diverter kit and handspray with washers(18). Tighten all the connections. Hang the handspray on the bracket(20) of the faucet.
如何安装花洒
根据需要,按照说明将限流器(15)装入花洒(16)进水口。去掉切换器组件(17)的保护套。用软管(19)及垫片(18)连接切换器组件和花洒。锁紧衔接螺母。将花洒挂在龙头托架(20)上。
清洗说明 CLEANING INSTRUCTIONS
安装结果检查 INSTALLATION CHECKOUT
检查并确保所有衔接螺母都已拧紧,确保手柄在关闭的位置。
开启主水源,检查是否漏水。如有漏水,修理之。
取下起泡器(21)和花洒(16),打开冷热水,让水流约一分钟以清除杂质。检查渗漏,关闭水源,装回起泡器和花洒。
适用于所有加工处理过的表面:以中性肥皂水清洗镀层表面,再以干净的软布彻底擦干整个表面,许多清洁剂,比如氨水、去污粉及洁厕灵等,会对电镀表面造成伤害,切忌使用。
有磨损性的清洁用具或清洁剂也不可使用于科勒牌的水龙头及其配件上。
All Finishes: Clean the finish with mild soap and warm water. Wipe entire surface completely dry with clean soft cloth. Many cleaners may contain chemicals, such as ammonia, chlorine, toilet cleaner etc, which could adversely affect the finish and are not recommended for cleaning.
Do not use abrasive cleaners or solvents on Kohler faucets and fittings.
Ensure that all coupling nuts are tight. Ensure that the handle is in the off position.
Turn on the main water supply, and check for leaks. Repair as needed.
Remove the aerator(21) and the handspray(16). Turn on faucet handle. Run hot and cold water through spout for about one minute to remove any debris. Check for leaks at this time. Remove any debris. Shut off the faucet. Reinstall the aerator and handspray.
Ø10钻头
10
11
12
1413
19
17
18
18
9
Fig.1
2
16
21
20
4
63
5
使用说明 HANDLE OPERATION
将把手轻轻抬起,逆时针旋转为冷水,顺时针旋转为热水。轻轻提起切换器按钮,花洒出水;按下切换器按钮,出水口出水。转动花洒手柄,可改变花洒水花。
Lift handle gently. Turn counter-clockwise for cold water, clockwise for hot water. Lift the diverter knob gently, handspray work; Press the knob, spout work. Turn the handspray handle for difference water flow.
冷(Cold)
热(Hot)7
8
2
9
1
23
56
4
26~4
6
Ø85
Max. 1MPa