enhance your sales cloud implementation - … · enhance your sales cloud implementation...
TRANSCRIPT

Enhance Your Sales CloudImplementation
Salesforce, Summer ’17
@salesforcedocsLast updated: August 31, 2017

© Copyright 2000–2017 salesforce.com, inc. All rights reserved. Salesforce is a registered trademark of salesforce.com, inc.,as are other names and marks. Other marks appearing herein may be trademarks of their respective owners.

CONTENTS
INTRODUCTION . . . . . . . . . . . . . . . . . . . . . . . . . . . . . . . . . . . . . . . . . . . . . . . . . . . 1Next Steps With Salesforce . . . . . . . . . . . . . . . . . . . . . . . . . . . . . . . . . . . . . . . . . . . . . . . . 1Key Concepts and Terms . . . . . . . . . . . . . . . . . . . . . . . . . . . . . . . . . . . . . . . . . . . . . . . . 2
SET UP BASIC SHARING AND SECURITY . . . . . . . . . . . . . . . . . . . . . . . . . . . . . 5Learning About Basic Sharing and Security . . . . . . . . . . . . . . . . . . . . . . . . . . . . . . . . . . . . . 5
SET UP YOUR ROLE HIERARCHY . . . . . . . . . . . . . . . . . . . . . . . . . . . . . . . . . . . . 6User Role Hierarchy . . . . . . . . . . . . . . . . . . . . . . . . . . . . . . . . . . . . . . . . . . . . . . . . . . . . 6Guidelines for Success with Roles . . . . . . . . . . . . . . . . . . . . . . . . . . . . . . . . . . . . . . . . . . . 6Assign Users to Roles . . . . . . . . . . . . . . . . . . . . . . . . . . . . . . . . . . . . . . . . . . . . . . . . . . . 7
ADD NEW FIELDS, OBJECTS, AND TABS . . . . . . . . . . . . . . . . . . . . . . . . . . . . . 8Create Custom Fields . . . . . . . . . . . . . . . . . . . . . . . . . . . . . . . . . . . . . . . . . . . . . . . . . . . 8Store Information That’s Unique to Your Organization . . . . . . . . . . . . . . . . . . . . . . . . . . . . . 10Object Relationships Overview . . . . . . . . . . . . . . . . . . . . . . . . . . . . . . . . . . . . . . . . . . . . 10Define a Custom Object . . . . . . . . . . . . . . . . . . . . . . . . . . . . . . . . . . . . . . . . . . . . . . . . . 12
Define a Custom Object in Lightning Experience . . . . . . . . . . . . . . . . . . . . . . . . . . . . . 13Define a Custom Object in Salesforce Classic . . . . . . . . . . . . . . . . . . . . . . . . . . . . . . . 13Fields for Defining Custom Objects . . . . . . . . . . . . . . . . . . . . . . . . . . . . . . . . . . . . . . 14Considerations for Creating Custom Objects . . . . . . . . . . . . . . . . . . . . . . . . . . . . . . . 17
Manage Custom Objects . . . . . . . . . . . . . . . . . . . . . . . . . . . . . . . . . . . . . . . . . . . . . . . . 18Show Custom Object Data for Your Users . . . . . . . . . . . . . . . . . . . . . . . . . . . . . . . . . . . . . 19Require Field Input to Ensure Data Quality . . . . . . . . . . . . . . . . . . . . . . . . . . . . . . . . . . . . 20
SET UP PAGE LAYOUTS AND INTERACTIONS FOR CRM OBJECTS . . . . . . 21Control User Access to Fields . . . . . . . . . . . . . . . . . . . . . . . . . . . . . . . . . . . . . . . . . . . . . 21Page Layouts . . . . . . . . . . . . . . . . . . . . . . . . . . . . . . . . . . . . . . . . . . . . . . . . . . . . . . . 22Edit Page Layouts for Standard Objects . . . . . . . . . . . . . . . . . . . . . . . . . . . . . . . . . . . . . . 23Edit Page Layouts for Custom and External Objects . . . . . . . . . . . . . . . . . . . . . . . . . . . . . . 23Custom Button and Link Considerations . . . . . . . . . . . . . . . . . . . . . . . . . . . . . . . . . . . . . . 24Define Custom Buttons and Links . . . . . . . . . . . . . . . . . . . . . . . . . . . . . . . . . . . . . . . . . . 26Custom Button and Link Samples . . . . . . . . . . . . . . . . . . . . . . . . . . . . . . . . . . . . . . . . . . 27
AUTOMATE BASIC SALES PROCESSES . . . . . . . . . . . . . . . . . . . . . . . . . . . . . . 28Workflow and Approvals Overview . . . . . . . . . . . . . . . . . . . . . . . . . . . . . . . . . . . . . . . . . 28Workflow Overview . . . . . . . . . . . . . . . . . . . . . . . . . . . . . . . . . . . . . . . . . . . . . . . . . . . 28Workflow Terminology . . . . . . . . . . . . . . . . . . . . . . . . . . . . . . . . . . . . . . . . . . . . . . . . . 29Create Workflow Rules . . . . . . . . . . . . . . . . . . . . . . . . . . . . . . . . . . . . . . . . . . . . . . . . . 30

Select the Object for Your Workflow Rule . . . . . . . . . . . . . . . . . . . . . . . . . . . . . . . . . . 30Set the Criteria for Your Workflow Rule . . . . . . . . . . . . . . . . . . . . . . . . . . . . . . . . . . . . 31Add Automated Actions to Your Workflow Rule . . . . . . . . . . . . . . . . . . . . . . . . . . . . . 33Activate Your Workflow Rule . . . . . . . . . . . . . . . . . . . . . . . . . . . . . . . . . . . . . . . . . . 33
Approvals . . . . . . . . . . . . . . . . . . . . . . . . . . . . . . . . . . . . . . . . . . . . . . . . . . . . . . . . . . 34Approval Process Terminology . . . . . . . . . . . . . . . . . . . . . . . . . . . . . . . . . . . . . . . . . . . . 34Create Approval Processes . . . . . . . . . . . . . . . . . . . . . . . . . . . . . . . . . . . . . . . . . . . . . . 35
Set Up Basic Approval Processes . . . . . . . . . . . . . . . . . . . . . . . . . . . . . . . . . . . . . . 36Modify Basic Details of an Approval Process . . . . . . . . . . . . . . . . . . . . . . . . . . . . . . . 36Add Steps to an Approval Process . . . . . . . . . . . . . . . . . . . . . . . . . . . . . . . . . . . . . . 37Create New Approval Actions . . . . . . . . . . . . . . . . . . . . . . . . . . . . . . . . . . . . . . . . . 37Add an Existing Action to an Approval Process . . . . . . . . . . . . . . . . . . . . . . . . . . . . . 37Activate an Approval Process . . . . . . . . . . . . . . . . . . . . . . . . . . . . . . . . . . . . . . . . . 38
ROLL SALESFORCE OUT . . . . . . . . . . . . . . . . . . . . . . . . . . . . . . . . . . . . . . . . . . . 39Best Practices for a Successful Rollout . . . . . . . . . . . . . . . . . . . . . . . . . . . . . . . . . . . . . . . 39
AFTER YOU IMPLEMENT SALESFORCE . . . . . . . . . . . . . . . . . . . . . . . . . . . . . . 40Stay Current with Salesforce . . . . . . . . . . . . . . . . . . . . . . . . . . . . . . . . . . . . . . . . . . . . . . 40
INDEX . . . . . . . . . . . . . . . . . . . . . . . . . . . . . . . . . . . . . . . . . . . . . . . . . . . . . . . . . . . 41
Contents

INTRODUCTION
Next Steps With Salesforce
Even the most basic Salesforce organization helps your company work smarter, connect better with customers, sell more, and growyour business faster. But you can help your company do even more by implementing a few additional features.
Salesforce offers a customizable platform that can grow with your business. Salesforce stores critical information about your customersand helps you connect and close deals with new customers. You can modify the Salesforce platform as needed to best reflect how yourcompany does business, and you’ll add new features as your grow, so that your information system is always the right size for yourbusiness.
This guide is designed to help Salesforce administrators set up and customize a new sales organization. We assume you’re familiar withcommon office programs such as Microsoft® Excel® and know at least a little about computer systems. You don’t have to be a Salesforceexpert to get started. You’ll learn much of what you need to know as you work in Salesforce.
How to Use This GuideWe’ve arranged the information in this guide in the order you’ll need it.
1. Secure Users and DataProtect your company’s business records by reviewing and modifying the settings that determine who can view and edit recordsand reports.
2. Set Up a User HierarchyThe role hierarchy supplements basic sharing and security by organizing users into levels. Where each user lands in the role hierarchydetermines how much data they can see.
3. Customize Existing ObjectsBecause each business is unique, you may find that Salesforce doesn’t have a place for every bit of data you need to collect. Addnew fields or change the page layout to make Salesforce better suit your business needs.
4. Add New ObjectsSalesforce provides you with standard objects that help you capture most common types of sales data. If your company has datathat doesn’t fit into an existing object, you can create a custom object to store it.
5. Automate Basic Sales ProcessesStreamline records management by setting up Salesforce to automatically act when your users make certain changes to your records.
6. Roll It OutFinally, we’ll provide some tips on how to roll out Salesforce to your users. Your roll-out strategy will drive how quickly and happilyyour users adopt Salesforce. We’ll also show you where you can learn more about other existing features and keep up-to-date withthe latest Salesforce products and features.
Before You Get StartedIf your company is already using Salesforce, carefully plan when and how you’ll implement changes. You may need to make someupdates at a time when other users don’t need to access Salesforce. Before you jump in, make a schedule and communicate with yourusers about how and when you’ll be making changes, and what they should or shouldn’t do to ensure that their work isn’t interrupted.
1

How to Get HelpAs you set up Salesforce, you may find that you have questions that aren’t answered in this guide, or that your organiztion has specialrequirements that aren’t discussed here. Here’s where you can go for help.
Salesforce Online HelpSalesforce online help offers explanations and instructions on hundreds of topics. Search for topics of interest athttp://help.salesforce.com/
Getting Started Success CommunitySalesforce Success Communities are the place to go to ask questions and get help from other admins and Salesforce experts. Visitthe Getting Started Success Community for help while implementing Salesforce.
Key Concepts and Terms
As you getting up to speed with Salesforce, it’s helpful to learn some key concepts and terms. They come up frequently as you interactwith the product, our documentation, and our service professionals. The concepts here will help you understand how Salesforce works.And the terms will help you understand some of its main components.
Concepts
DefinitionConcept
A Salesforce name for a loose federation of features that help you accomplish certain types activities,such as selling products or supporting your customers. Two common examples are Service Cloud andSales Cloud.
Cloud
Technology that enables Internet-based services that let you sign up and log in through a browser.Salesforce delivers its service in the cloud. Other familiar cloud computing services include Google Appsand Amazon.com.
Cloud Computing
Software delivered not by traditional means (such as on disk) but in the cloud, as a service. There’s nothingto download or install, and updates are automatic.
Software as a Service (SaaS)
A Salesforce term for its company-wide commitment to building and delivering the most secure, fast,and reliable cloud-based service available.
trust.salesforce.com is a systems status website that provides Salesforce customers and thecommunity access to real-time and historical system performance information and updates. It also listsincident reports and maintenance schedules across all its key system components.
Trust
trust.salesforce.com is free to all members of the Salesforce community.
Terms
DefinitionTerm
Short for application. A collection of components such as tabs, reports, dashboards, and Visualforce pagesthat address specific business needs. Salesforce provides standard apps, which you can customize, suchas Sales and Service. You can customize the standard apps to match the way you work.
App
2
Key Concepts and TermsIntroduction

DefinitionTerm
One of several bundles of Salesforce products and services, each geared toward a different set of businessneeds. All Salesforce editions share the look and feel, but they vary by feature, functionality, and pricing.
Edition
A definition of a specific type of information you can store in Salesforce. For example, the Case objectlets you store information about customer inquiries. For each object, your organization has multiple,specific records.
Salesforce comes with lots of standard objects, but you can create custom objects, as well.
Object
A deployment of Salesforce that has a defined set of licensed users. Your organization includes all yourdata and applications.
Organization
A collection of fields that store information about a specific item of a specific type. A record is an object,such as a contact, an account, or an opportunity. For example, you can have a contact record to storeinformation about Joe Smith, and a case record store information about his training inquiry.
Record
Salesforce releases new products and features three times per year, and we identify releases byseason—Winter, Spring, and Summer—along with the calendar year. Example: Winter ’15.
For every Salesforce release, the Salesforce release notes include new features and products that aregenerally available or in beta release. They also describe all changes to existing features and products.You can find the release notes when you search for “Release Notes” in the Salesforce Help.
Release
The name of the Salesforce cloud computing CRM service and the company name.Salesforce
Standard Objects
DefinitionConcept
An organization, individual, or company that you want to track in Salesforce. An account can includecustomers, competitors, partners, or any other entity that makes sense for your business. An account
Account
contains records--or connects to--all information about your interactions with the company, such aspoints of contact, in-progress and completed opportunities, and records of past interactions.
A person who works at an organization represented by an account. A contact record contains informationsuch as phone numbers, titles, and the person’s role in the deal. With contacts, you can capture all thepersonal information you need to develop the relationships that are so important in sales.
When a lead is converted, the information in the lead is automatically transferred into the contact. Asyour engagement with the company widens and your reps meet more people, they can keep creatingadditional contacts associated with the corresponding account.
Contact
A lead is a potential customer: any person who may be interested in your products and services. Forexample, this could include someone you met at a conference or who filled out a form on your website.
Lead
If a rep qualifies a lead and decides to pursue it, the lead is “converted”, which automatically transfers thelead’s data into three objects: an account, a contact, and an opportunity.
An opportunity is a deal you’re working on, and the opportunity object in Salesforce tracks all theinformation you’re tracking about the deal, such as size and expected close date. The opportunity object
Opportunity
3
Key Concepts and TermsIntroduction

DefinitionConcept
is at the core of your sales process. By adding an opportunity, you build a “pipeline” you can use forforecasting.
4
Key Concepts and TermsIntroduction

SET UP BASIC SHARING AND SECURITY
Learning About Basic Sharing and Security
Take advantage of basic sharing and security in Salesforce, and learn how you can customize sharing and security to meet the specificneeds of your organization.
You may find that the basic sharing and security functions in Salesforce work well for you and your organization’s needs. But if you don’t,you can customize the way sharing and security works.
Learn how you can control who sees what data in your organization.
Who Sees What: Overview (Salesforce Classic)
5

SET UP YOUR ROLE HIERARCHY
User Role Hierarchy
EDITIONS
Available in: SalesforceClassic and LightningExperience
Available in: Professional,Enterprise, Performance,Unlimited, and DeveloperEditions
USER PERMISSIONS
To create, edit, and deleteroles:• Manage Roles
To assign users to roles:• Manage Internal Users
Salesforce offers a user role hierarchy that you can use with sharing settings to determine the levelsof access that users have to your Salesforce org’s data. Roles within the hierarchy affect access onkey components such as records and reports.
If your organization-wide defaults are more restrictive than Public Read/Write, use rolehierarchy to make records more accessible to users.
Watch a Demo: Who Sees What: Record Access via the Role Hierarchy (SalesforceClassic)
Users at any role level can view, edit, and report on all data that’s owned by or shared with usersbelow them in the role hierarchy, unless your Salesforce org’s sharing model for an object specifiesotherwise. Specifically, in the Organization-Wide Defaults related list, you can disable the GrantAccess Using Hierarchies option for a custom object. When disabled, only the record owner andusers who are granted access by the organization-wide defaults receive access to the object’srecords.
Roles determine user access to cases, contacts, and opportunities, regardless of who owns thoserecords. The access level is specified on the Role Edit page. For example, you can set the contactaccess so that users in a role can edit all contacts associated with accounts that they own, regardlessof who owns the contacts. And you can set the opportunity access so that users in a role can edit all opportunities associated withaccounts that they own, regardless of who owns the opportunities.
After you share a folder with a role, it’s visible only to users in that role, not to superior roles in the hierarchy.
Guidelines for Success with Roles
EDITIONS
Available in: SalesforceClassic and LightningExperience
Available in: Professional,Enterprise, Performance,Unlimited, and DeveloperEditions
Understand key rule behaviors and apply best practices for success with roles.
For best practices on designing record access in a large organization, see Designing RecordAccess for Enterprise Scale.
• To simplify user management in organizations with large numbers of users, enable delegatedadministrators to manage users in specified roles and all subordinate roles.
• You can create up to 500 roles for your organization.
• Every user must be assigned to a role, or their data will not display in opportunity reports,forecast roll-ups, and other displays based on roles.
• All users that require visibility to the entire organization should belong to the highest level in the hierarchy.
6
• It is not necessary to create individual roles for each title at your company. Instead, define a hierarchy of roles to control access ofinformation entered by users in lower level roles.
• When you change a user’s role, the sharing rules for the new role are applied.
• If you are a Salesforce Knowledge user, you can modify category visibility settings on the role detail page.
• To avoid performance issues, no single user should own more than 10,000 records of an object. Users who need to own more thanthat number of objects should either not be assigned a role or placed in a separate role at the top of the hierarchy. It’s also importantto keep that user out of public groups that might be used as the source for sharing rules.
• When an account owner is not assigned a role, the sharing access for related contacts is Read/Write, provided the organization-widedefault for contacts is not Controlled by Parent. Sharing access on related opportunities and cases is No Access.
• If your organization uses Territory Management, forecasts are based on the territory hierarchy rather than the role hierarchy.
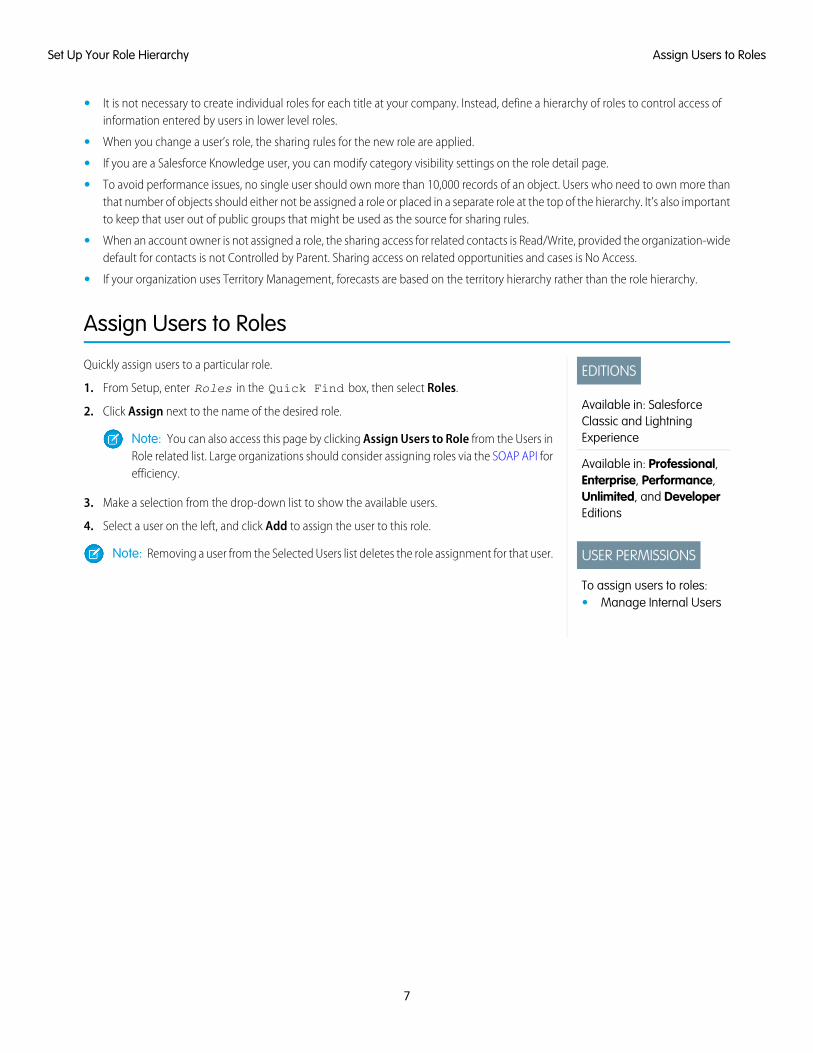
Assign Users to Roles
EDITIONS
Available in: SalesforceClassic and LightningExperience
Available in: Professional,Enterprise, Performance,Unlimited, and DeveloperEditions
USER PERMISSIONS
To assign users to roles:• Manage Internal Users
Quickly assign users to a particular role.
1. From Setup, enter Roles in the Quick Find box, then select Roles.
2. Click Assign next to the name of the desired role.
Note: You can also access this page by clicking Assign Users to Role from the Users inRole related list. Large organizations should consider assigning roles via the SOAP API forefficiency.
3. Make a selection from the drop-down list to show the available users.
4. Select a user on the left, and click Add to assign the user to this role.
Note: Removing a user from the Selected Users list deletes the role assignment for that user.
7
Assign Users to RolesSet Up Your Role Hierarchy

ADD NEW FIELDS, OBJECTS, AND TABS
Create Custom Fields
EDITIONS
Available in: both SalesforceClassic and LightningExperience
Available in: ContactManager, Group,Professional, Enterprise,Performance, Unlimited,Developer, andDatabase.com Editions
Salesforce Connect externalobjects are available in:Developer Edition and foran extra cost in: Enterprise,Performance, andUnlimited Editions
Custom fields aren’tavailable on Activities inGroup Edition
Custom settings aren’tavailable in ProfessionalEdition
Layouts aren’t available inDatabase.com
USER PERMISSIONS
To create or change customfields:• Customize Application
Capture your unique business data by storing it in custom fields. When you create a custom field,you configure where you want it to appear and optionally control security at the field level.
Watch a Demo: How to Create a Custom Field in Salesforce
Want to customize Salesforce so it captures all your business data? This short video walks youthrough how to create a custom picklist field, from choosing the correct field type to applying fieldlevel security.
Before you begin, determine the type of field you want to create.
Note: When your org is close to the limit of 800 custom fields and you delete or create fields,field creation can fail. The physical delete process reclaims and cleans fields, making themcount temporarily toward the limit. The delete process runs only when the queue is full, soit can take days or weeks to start. In the meantime, the deleted fields are still counted as partof the limit. To request immediate deletion of fields, contact Salesforce Support.
1. From the management settings for the object you want to add a field to, go to Fields.
Custom task and event fields are accessible from the object management settings for Activities.
2. Click New.
Tip: On custom objects, you can also set field dependencies and field history tracking inthis section.
3. Choose the type of field and click Next. Consider the following.
• Some data types are available for certain configurations only. For example, theMaster-Detail Relationship option is available for custom objects only whenthe custom object doesn’t already have a master-detail relationship.
• Custom settings and external objects allow only a subset of the available data types.
• You can’t add a multi-select picklist, rich text area, or dependent picklist custom field toopportunity splits.
• Relationship fields count towards custom field limits.
• Additional field types may appear if an AppExchange package using those field types isinstalled.
• The Roll-Up Summary option is available on certain objects only.
• Field types correspond to API data types.
• If your organization uses Shield Platform Encryption, ensure you understand how to encrypt custom fields using the ShieldPlatform Encryption offering.
4. For relationship fields, associate an object with the field and click Next.
8

5. For indirect lookup relationship fields, select a unique, external ID field on the parent object, and then click Next. The parent fieldvalues are matched against the values of the child indirect lookup relationship field to determine which records are related to eachother.
6. To base a picklist field on a global picklist value set, select the value set to use.
7. Enter a field label.
Salesforce populates Field Name using the field label. This name can contain only underscores and alphanumeric characters,and must be unique in your org. It must begin with a letter, not include spaces, not end with an underscore, and not contain twoconsecutive underscores. Use the field name for merge fields in custom links, custom s-controls, and when referencing the fieldfrom the API.
Tip: Ensure that the custom field name and label are unique for that object.
• If a standard and custom field have identical names or labels, the merge field displays the custom field value.
• If two custom fields have identical names or labels, the merge field may display an unexpected value.
If you create a field label called Email and a standard field labeled Email already exists, the merge field may be unableto distinguish between the fields. Adding a character to the custom field name makes it unique. For example, Email2.
8. Enter field attributes and select the appropriate checkboxes to specify whether the field must be populated and what happens ifthe record is deleted.
9. For master-detail relationships on custom objects, optionally select Allow reparenting to allow a child record in the master-detailrelationship to be reparented to a different parent record.
10. For relationship fields, optionally create a lookup filter to limit search results for the field. Not available for external objects.
11. Click Next.
12. In Enterprise, Unlimited, Performance, and Developer Editions, specify the field’s access settings for each profile, and click Next.
Enabled SettingsAccess Level
VisibleUsers can read and edit the field.
Visible and Read-OnlyUsers can read but not edit the field.
NoneUsers can’t read or edit the field.
Note:
• When you create a custom field, by default the field isn’t visible or editable for portal profiles, unless the field is universallyrequired.
13. Choose the page layouts that will display the editable field and click Next.
Location on Page LayoutField
Last field in the first two-column section.Normal
End of the first one-column section.Long text area
Bottom of the user detail page.User
Can’t remove it from page layouts or make read only.Universally required
9
Create Custom FieldsAdd New Fields, Objects, and Tabs
14. For relationship fields, optionally create an associated records related list and add it to page layouts for that object.
• To edit the related list name on page layouts, click Related List Label and enter the new name.
• To add the related list to customized page layouts, select Append related list to users’ existing personalcustomizations.
15. Click Save to finish or Save & New to create more custom fields.
Note: Creating fields may require changing a large number of records at once. To process these changes efficiently, your requestmay be queued and you may receive an email notification when the process has completed.
SEE ALSO:
Salesforce Help: Find Object Management Settings
Store Information That’s Unique to Your Organization
EDITIONS
Available in: both SalesforceClassic and LightningExperience
Available in: ContactManager, Group,Professional, Enterprise,Performance, Unlimited,and Developer Editions
Create custom objects to store information that’s unique to your organization. Choose whetheryour custom objects are searchable, support sharing, or include access to the Bulk API and StreamingAPI.
Every custom object is classified as either an Enterprise Application object or a Light Application object.The difference between these two categories is that Light Application objects don’t support sharing,access to the Bulk API, or access to the Streaming API.
If you need to track your organization’s usage of each category, create a custom report type witha primary object of User Licenses and a child object of Custom Object Usage by User License Metrics.
By default, all custom objects are Enterprise Application objects. To make your custom object aLight Application object, disable Allow Sharing, Allow Bulk API Access, andAllow Streaming API Access on the object’s detail page.
Object Relationships Overview
EDITIONS
Available in: SalesforceClassic
Available in: ContactManager, Group,Professional, Enterprise,Performance, Unlimited,Developer, andDatabase.com Editions
Create relationships to link objects with each other, so that when your users view records, they canalso see related data. For example, link a custom object called “Bugs” to cases to track productdefects that are associated with customer cases.
You can define different types of relationships by creating custom relationship fields on an object.Before you begin creating relationships, determine the type of relationship that suits your needs.
Different types of relationships between objects in Salesforce determine how they handle datadeletion, sharing, and required fields in page layouts. Let’s review the types of relationships.
Master-detailClosely links objects together such that the master record controls certain behaviors of thedetail and subdetail record. For example, you can define a two-object master-detail relationship,such as Account—Expense Report, that extends the relationship to subdetail records, such asAccount—Expense Report—Expense Line Item. You can then perform operations across themaster—detail—subdetail relationship.
Tip: Create a master-detail relationship before a custom object contains data.
Behaviors of master-detail relationships:
10
Store Information That’s Unique to Your OrganizationAdd New Fields, Objects, and Tabs

• Deleting a detail record moves it to the Recycle Bin and leaves the master record intact; deleting a master record also deletesrelated detail and subdetail records. Undeleting a detail record restores it, and undeleting a master record also undeletes relateddetail and subdetail records. However, if you delete a detail record and later, separately, delete its master record, you cannotundelete the detail record, as it no longer has a master record to relate to.
• By default, records can’t be reparented in master-detail relationships. Administrators can, however, allow child records inmaster-detail relationships on custom objects to be reparented to different parent records by selecting the Allowreparenting option in the master-detail relationship definition.
• The Owner field on the detail and subdetail records is not available and is automatically set to the owner of the master record.Custom objects on the “detail” side of a master-detail relationship can't have sharing rules, manual sharing, or queues, as theserequire the Owner field.
• Detail and subdetail records inherit security settings and permissions from the master record. You can’t set permissions on thedetail record independently.
• The master-detail relationship field (which is the field linking the objects) is required on the page layout of the detail and subdetailrecords.
• The master object can be a standard object, such as Account or Opportunity, or a custom object.
• As a best practice, don't exceed 10,000 child records for a master-detail relationship.
• Each custom object can have up to two master-detail relationships and up to 25 total relationships.
• The Related To entry can’t be changed after you save the relationship.
Many-to-manyYou can use master-detail relationships to model many-to-many relationships between any two objects. A many-to-many relationshipallows each record of one object to be linked to multiple records from another object and vice versa. For example, you create acustom object called “Bug” that relates to the standard case object such that a bug could be related to multiple cases and a casecould also be related to multiple bugs.
LookupLinks two objects together. Lookup relationships are similar to master-detail relationships, except they do not support sharing orroll-up summary fields. With a lookup relationship, you can:
• Link two different objects.
• Link an object with itself (with the exception of the user object; see Hierarchical on page 12). For example, you might want tolink a custom object called “Bug” with itself to show how two different bugs are related to the same problem.
Note: Lookup relationships from objects related to the campaign member object aren’t supported; however, you can createlookup relationships from the campaign member object related to other objects.
When you create a lookup relationship, you can set these options:
• Make the lookup field required for saving a record, requiring it on the corresponding page layout as well.
• If the lookup field is optional, you can specify one of three behaviors to occur if the lookup record is deleted:
– Clear the value of this field This is the default. Clearing the field is a good choice when the field does nothave to contain a value from the associated lookup record.
– Don’t allow deletion of the lookup record that’s part of a lookup relationshipThis option restricts the lookup record from being deleted if you have any dependencies, such as a workflow rule, built onthe relationship.
– Delete this record also Available only if a custom object contains the lookup relationship, not if it’s containedby a standard object. However, the lookup object can be either standard or custom. Choose when the lookup field and itsassociated record are tightly coupled and you want to completely delete related data. For example, say that you have anexpense report record with a lookup relationship to individual expense records. When you delete the report, you probablywant to delete all the expense records, too.
11
Object Relationships OverviewAdd New Fields, Objects, and Tabs

Warning: Choosing Delete this record also can result in a cascade-delete. A cascade-delete bypassessecurity and sharing settings, which means users can delete records when the target lookup record is deleted even ifthey don’t have access to the records. To prevent records from being accidentally deleted, cascade-delete is disabled bydefault. Contact Salesforce to get the cascade-delete option enabled for your organization.
Cascade-delete and its related options are not available for lookup relationships to business hours, community, lead,price book, product, or user objects.
When you define a lookup relationship, you can include a lookup field on the page layouts for that object as well as create a relatedlist on the associated object's page layouts. For example, if you have a custom object called “PTO Requests” and you want your usersto link a PTO request with the employee submitting the request, create a lookup relationship from the PTO Request custom objectwith the user object.
If the parent record in a lookup relationship is deleted, the field history tracking for the child record does not record the deletion.For example, if a parent account is deleted, the Account History related list for the child account does not show the deletion.
You can't delete an object or record in a lookup relationship if the combined number of records between the two linked objects ismore than 100,000. To delete an object or record in a lookup relationship, first delete an appropriate number of its child records.
External lookupAn external lookup relationship links a child standard, custom, or external object to a parent external object. When you create anexternal lookup relationship field, the standard External ID field on the parent external object is matched against the values of thechild’s external lookup relationship field. External object field values come from an external data source.
Indirect lookupAn indirect lookup relationship links a child external object to a parent standard or custom object. When you create an indirectlookup relationship field on an external object, you specify the parent object field and the child object field to match and associaterecords in the relationship. Specifically, you select a custom unique, external ID field on the parent object to match against the child’sindirect lookup relationship field, whose values come from an external data source.
HierarchicalA special lookup relationship available for only the user object. It lets users use a lookup field to associate one user with another thatdoes not directly or indirectly refer to itself. For example, you can create a custom hierarchical relationship field to store each user'sdirect manager.
Tip: When creating a hierarchical field in Personal, Contact Manager, Group, and Professional Editions, you can select theRestricted Field checkbox so that only users with the “Manage Internal Users” permission can edit it. In Professional, Enterprise,Unlimited, Performance, and Developer Edition, use field-level security instead.
Define a Custom Object
Track and store data that’s unique to your organization. Follow different steps, depending on which Salesforce experience you’re using.
IN THIS SECTION:
Define a Custom Object in Lightning Experience
Track and store data that’s unique to your organization. If you see the App Launcher icon ( ) on the left side of the navigation barat the top of your screen, you're in Lightning Experience. If not, you're in Salesforce Classic.
Define a Custom Object in Salesforce Classic
Track and store data that’s unique to your org.
12
Define a Custom ObjectAdd New Fields, Objects, and Tabs

Fields for Defining Custom Objects
When you create a custom object, several fields are required to define how you can access the object.
Considerations for Creating Custom Objects
Before you create a custom object, make sure that you’ve reviewed the considerations.
Define a Custom Object in Lightning Experience
EDITIONS
Available in: LightningExperience
Available in: ContactManager, Group,Professional, Enterprise,Performance, Unlimited,and Developer Editions
USER PERMISSIONS
To create and edit customobjects:• Customize Application
Track and store data that’s unique to your organization. If you see the App Launcher icon ( ) onthe left side of the navigation bar at the top of your screen, you're in Lightning Experience. If not,you're in Salesforce Classic.
1. From the top right corner of any page in Setup, click Create > Custom Object.
2. Complete the fields for your custom object.
3. Save the new object.
Define a Custom Object in Salesforce Classic
EDITIONS
Available in: SalesforceClassic
Available in: ContactManager, Group,Professional, Enterprise,Performance, Unlimited,and Developer Editions
USER PERMISSIONS
To create and edit customobjects:• Customize Application
Track and store data that’s unique to your org.
1. From Setup, enter Objects in the Quick Find box, then select Objects.
2. Click New Custom Object.
3. Follow the wizard to complete the fields for your custom object.
4. Save the new object.
13
Define a Custom Object in Lightning ExperienceAdd New Fields, Objects, and Tabs

Fields for Defining Custom Objects
EDITIONS
Available in: LightningExperience and SalesforceClassic
Available in: ContactManager, Group,Professional, Enterprise,Performance, Unlimited,and Developer Editions
When you create a custom object, several fields are required to define how you can access theobject.
Note: If an administrator created a tab without including help, contact your administratorif you need help with how a custom object works.
DescriptionField
This name is used to refer to the object in a userinterface page.
Label
The plural name of the object. If you create atab for this object, this name is used for the tab.
Plural Label
If it is appropriate for your organization’s defaultlanguage, specify the gender of the label. This
Gender
field appears if the organization-wide defaultlanguage expects gender. Your personallanguage preference setting does not affectwhether the field appears. For example, if theorganization’s default language is English andyour personal language is French, you aren’tprompted for gender when creating a customobject.
If it is appropriate for your organization’s defaultlanguage, indicate whether the label is precededby “an” instead of “a.”
Starts with a vowel sound
A unique name used to refer to the object whenusing the API. In managed packages, this name
Object Name
prevents naming conflicts with packageinstallations. Use only alphanumeric charactersand underscores. The name must begin with aletter and have no spaces. It cannot end withan underscore nor have two consecutiveunderscores.
An optional description of the object. Ameaningful description helps you remember
Description
the differences between your custom objectswhen you are viewing them in a list.
Defines what displays when a user clicks Helpfor this Page from the custom object record
Context-Sensitive Help Setting
home (overview), edit, and detail pages, listviews, and related lists.
To display the standard Salesforce help availablefor any custom object record, select Open the
14
Fields for Defining Custom ObjectsAdd New Fields, Objects, and Tabs

DescriptionField
standard Salesforce Help & Training window.
To display custom object-level help for your custom object, selectOpen a window using a Visualforce page and then select theVisualforce page to use as the target of the context-sensitive helplink from that custom object’s pages.
Note: This setting doesn’t affect the Help & Training linkat the top of a page. That link always opens the SalesforceHelp & Training window.
The name used in page layouts, list views, related lists, and searchresults.
Record Name
The type of field (text or auto-number) for the record name. Recordsthat have unique IDs instead of names are auto-numbered andalways a read-only field.
Data Type
For an auto-numbered record name, enter the display format. Youcan have up to two sets of curly braces. For more information, seeCustom Field Attributes.
Display Format
For an auto-numbered record name, enter the number to usewhen creating your first record for this custom object.
Starting Number
Makes the data in the custom object records available for reportingpurposes.
To create reports on custom objects, choose the Other Reportsreport type category, unless the custom object has a relationship
Allow Reports
with a standard object. When the custom object has a master-detailrelationship with a standard object or is a lookup object on astandard object, select the standard object for the report typecategory instead.
Allows users to associate tasks and scheduled calendar eventsrelated to the custom object records.
Allow Activities
Allows users to add records of this custom object type to Chattergroups.
When true, users with permissions can create records of thisobject type using the group publisher. The created record is
Allow in Chatter Groups
associated with the group and appears in the group record list.When false, users with permissions can use the group publisherto create records of this object type, but the record is not associatedwith the group.
If your organization has divisions enabled, select this option toenable the custom object for divisions. Divisions group records for
Enable Divisions
simplified search results, list views, reports, and other areas withinSalesforce. Salesforce adds a Division field to the custom
15
Fields for Defining Custom ObjectsAdd New Fields, Objects, and Tabs
DescriptionField
object. If the custom object is the master in a master-detailrelationship, custom objects on the detail side also get theDivision field and inherit their division from the master record.
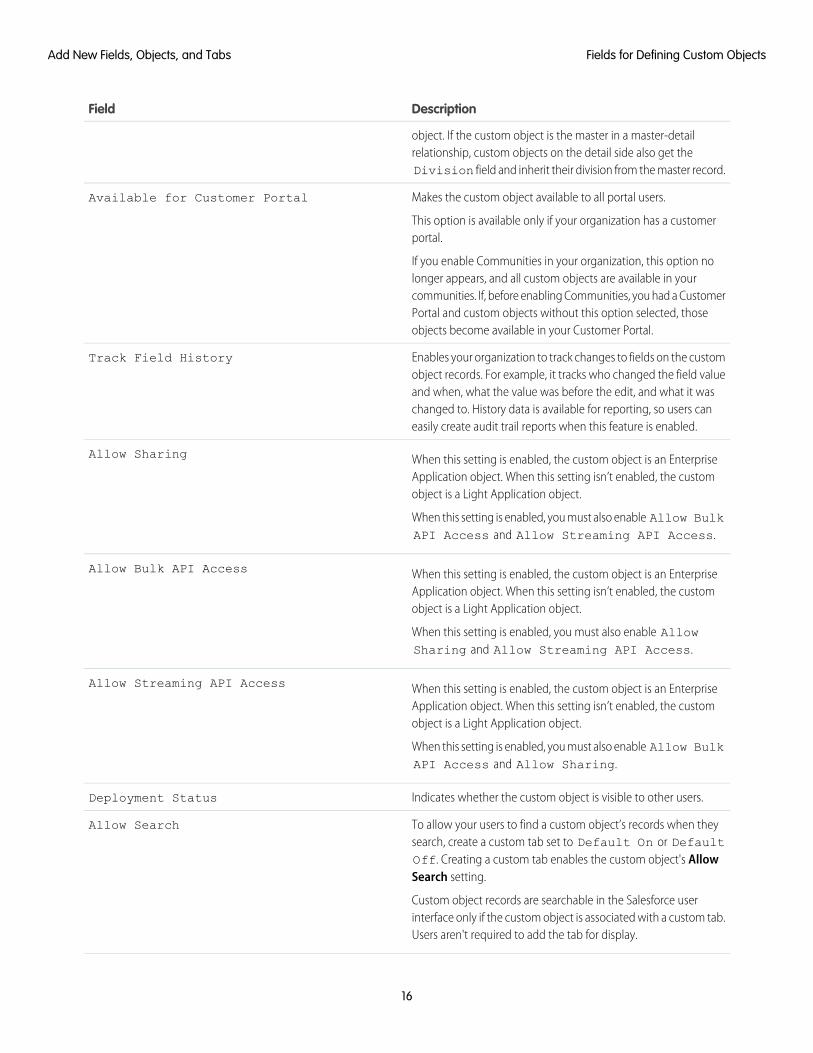
Makes the custom object available to all portal users.
This option is available only if your organization has a customerportal.
Available for Customer Portal
If you enable Communities in your organization, this option nolonger appears, and all custom objects are available in yourcommunities. If, before enabling Communities, you had a CustomerPortal and custom objects without this option selected, thoseobjects become available in your Customer Portal.
Enables your organization to track changes to fields on the customobject records. For example, it tracks who changed the field value
Track Field History
and when, what the value was before the edit, and what it waschanged to. History data is available for reporting, so users caneasily create audit trail reports when this feature is enabled.
When this setting is enabled, the custom object is an EnterpriseApplication object. When this setting isn’t enabled, the customobject is a Light Application object.
Allow Sharing
When this setting is enabled, you must also enable Allow BulkAPI Access and Allow Streaming API Access.
When this setting is enabled, the custom object is an EnterpriseApplication object. When this setting isn’t enabled, the customobject is a Light Application object.
Allow Bulk API Access
When this setting is enabled, you must also enable AllowSharing and Allow Streaming API Access.
When this setting is enabled, the custom object is an EnterpriseApplication object. When this setting isn’t enabled, the customobject is a Light Application object.
Allow Streaming API Access
When this setting is enabled, you must also enable Allow BulkAPI Access and Allow Sharing.
Indicates whether the custom object is visible to other users.Deployment Status
To allow your users to find a custom object’s records when theysearch, create a custom tab set to Default On or Default
Allow Search
Off. Creating a custom tab enables the custom object's AllowSearch setting.
Custom object records are searchable in the Salesforce userinterface only if the custom object is associated with a custom tab.Users aren't required to add the tab for display.
16
Fields for Defining Custom ObjectsAdd New Fields, Objects, and Tabs

DescriptionField
Allows users to attach notes and attachments to custom objectrecords. You can attach external documents to any object record
Add Notes & Attachments...
in much the same way that you can add a PDF file or photo as anattachment to an email.
This option is available only when you are creating a new object.
Starts the custom tab wizard after you save the custom object.Launch the New Custom Tab Wizard
Considerations for Creating Custom Objects
EDITIONS
Available in: both SalesforceClassic and LightningExperience
Available in: ContactManager, Group,Professional, Enterprise,Performance, Unlimited,and Developer Editions
Before you create a custom object, make sure that you’ve reviewed the considerations.
Object Creation
• Establish object relationships first before adding all custom fields, page layouts, and relatedlists.
• The standard Name field is required on custom object related lists and page layouts.
• Provide meaningful names for your custom objects. The plural label of the custom objectis used as the label of the custom tab based on that object.
Object PermissionsIn Enterprise, Unlimited, Performance, Professional, and Developer Editions, when you createa custom object, the “Read,” “Create,” “Edit,” and “Delete” permissions for that object are disabledfor profiles that have “View All Data” or “Modify All Data” disabled. Enable access to customobjects in permission sets or custom profiles, and assign them to the users who need access.
In Contact Manager and Group Editions, when you create a custom object, the “Read,” “Create,” “Edit,” and “Delete” permissions forthat object are enabled for all profiles.
Sharing ModelAn org-wide default setting controls the data sharing model for custom objects. For more information, see Custom Object Security.
Delegating Custom Object AdministrationAfter you create a custom object, you can delegate its administration to non-admin users.
QueuesAfter you create a custom object, you can define queues to distribute ownership of custom object records to your users.
17
Considerations for Creating Custom ObjectsAdd New Fields, Objects, and Tabs

Manage Custom Objects
EDITIONS
Available in: both SalesforceClassic and LightningExperience
Available in: ContactManager, Group,Professional, Enterprise,Performance, Unlimited,Developer, andDatabase.com Editions
Managed Packages are notavailable in Database.com.
USER PERMISSIONS
To create and edit customobjects:• Customize Application
Create, customize, edit, delete, or truncate custom objects to extend the functionality that standardobjects, like accounts and contacts, provide.
Note: Your administrator may have created a tab without any help. If you need help tounderstand how a tab for a custom object works, contact your administrator.
Your object management settings list the custom objects that are defined for your organization.From this list, you can:
• Define a custom object.
• Display detailed information about a custom object.
Optional features you can customize include enabling search and reports, tracking activities,tracking field history, and making the object available for the Salesforce Customer Portal.
• To update the custom object definition, click Edit and update the desired fields.
Note: The Allow Reports, Allow Activities, and Allow Search fieldsare not locked in Managed - Released and can be changed by the developer in futurereleases of a managed package.
• To delete a custom object, click Del.
• To truncate a custom object, click Truncate.
• To view deleted custom objects, click the Deleted Objects link. The total number of deletedcustom objects for your organization is listed in parentheses.
The detail page of the custom object provides information about various characteristics of the object, including standard fields, customfields, field history tracking, relationships, custom links, search layouts, page layouts, and object limits. You can:
• Click individual items to display additional detail.
• To delete a custom field, click Del next to its name in the Custom Fields & Relationships section.
• Click More at the bottom of the page or View More below a related list to display more items.
• Click New to directly add new items.
Note: The object limit percentages are truncated, not rounded. For example, if your org uses 95.55% of the limit for a particularcustomization, the object limit displays 95%.
SEE ALSO:
Salesforce Help: Find Object Management Settings
18
Manage Custom ObjectsAdd New Fields, Objects, and Tabs

Show Custom Object Data for Your Users
EDITIONS
Available in: both SalesforceClassic and LightningExperience
Custom Object Tabs andWeb Tabs available in:Contact Manager, Group,Professional, Enterprise,Performance, Unlimited,and Developer Editions
Visualforce Tabs availablein: Contact Manager,Group, Professional,Enterprise, Performance,Unlimited, and DeveloperEditions
Lightning Page Tabsavailable in: All Editionsexcept Database.com
USER PERMISSIONS
To create and edit customtabs:• Customize Application
Custom tabs let you display custom object data or other web content in Salesforce. When you adda custom tab to an app in Salesforce Classic, it displays as a tab. When you add a custom tab to anapp in Lightning Experience, it displays as an item in the app’s navigation bar.
Custom tabs display custom object data or other web content embedded in the app. You can createany of these types of custom tabs.
Custom Object TabsCustom object tabs (available only at an app level and not on subtab apps) display the data ofyour custom object. Custom object tabs look and function just like standard tabs.
Web TabsCustom web tabs display any external web-based application or web page. You can designweb tabs to include the sidebar or span across the entire page without the sidebar.
Visualforce TabsVisualforce tabs display data from a Visualforce page. Visualforce tabs look and function justlike standard tabs.
Lightning Component TabsLightning component tabs make Lightning components available in the Salesforce1 mobileapp (via the navigation list) or in Lightning Experience. Lightning components aren’t supportedin Salesforce Classic.
Note: To expose Lightning components via Lightning component tabs, you must enableand deploy My Domain.
Lightning Page TabsLightning page tabs let you add “App Page” Lightning pages to the Salesforce1 navigation listand the Lightning Experience navigation bar.
In Salesforce Classic, Lightning page tabs don’t display on the All Tabs page when you click .Lightning page tabs also don’t appear in the Available Tabs list when you customize the tabsfor your apps.
Subtab apps support only web tabs and Visualforce tabs.
Delegated administrators who can manage specified custom objects can also create and customize tabs for those custom objects.
In Lightning Experience, Lightning page tabs, Visualforce tabs, and Lightning component tabs have a fixed, friendly URL structure of/one/one.app#/n/customTabDevName.
19
Show Custom Object Data for Your UsersAdd New Fields, Objects, and Tabs

Require Field Input to Ensure Data Quality
EDITIONS
Available in: both SalesforceClassic and LightningExperience
Available in: ContactManager, Group,Professional, Enterprise,Performance, Unlimited,Developer, andDatabase.com Editions
Connect Offline,Salesforce for Outlook, theSelf-Service portal,Web-to-Lead, andWeb-to-Case are notavailable in Database.com
.
Improve the quality of data that users enter in Salesforce by creating universally required fields.
A universally required field is a custom field. It must have a value whenever a record is saved withinSalesforce, the Force.com API, Connect Offline, Salesforce for Outlook, the Self-Service portal, orautomated processes such as Web-to-Lead and Web-to-Case. Making a field required on a pagelayout or through field-level security ensures that users must enter a value. Making a field requireduniversally gives you a higher level of data quality beyond the presentation level of page layouts.
You can make the following types of custom fields universally required:
• Currency
• Date
• Date/Time
• Master-Detail Relationship (always required)
• Number
• Percent
• Phone
• Picklist
• Text
• Text Area
• URL
To make a custom field universally required, select the Required checkbox when defining the custom field.
Note: You must specify a default value for required campaign member custom fields.
If you make a user field universally required, you must specify a default value for that field.
Relationship group members do not support universally required fields.
20
Require Field Input to Ensure Data QualityAdd New Fields, Objects, and Tabs

SET UP PAGE LAYOUTS AND INTERACTIONS FOR CRMOBJECTS
Control User Access to Fields
EDITIONS
Available in: both SalesforceClassic and LightningExperience
Page layouts and searchlayouts available in: AllEditions
Field-level security availablein: Enterprise, Performance,Unlimited, Developer, andDatabase.com Editions
Use field-level security to control user access to fields. Use page layouts to control the layout andorganization of detail and edit pages in Salesforce, the Self-Service Portal, and the SalesforceCustomer Portal. Customize search layouts to change which fields display in search results and thebuttons that display on list views.
Important: When you use page layouts to hide fields from detail and edit pages, users canstill access them. Users see fields via reports, search results, list views, and the API. To restrictfield access, use field-level security. Field-level security doesn’t prevent searching on thevalues in a field. When search terms match on field values protected by field-level security,the associated records are returned in the search results without the protected fields andtheir values. Also don’t use page layouts to secure data. For example, removing the Editbutton from a page layout doesn’t prevent users from using inline editing. To prevent usersfrom editing data, use sharing rules, field-level security, page layout field properties, validationrules, object permissions, and Visualforce pages.
Field-Level Security• Restrict users’ access to view and edit fields. For example, restrict access in reports, search results, list views, related lists, email and
mail merge templates, custom links, Connect Offline. Also restrict API access and when synchronizing data or importing personaldata.
• Override less-restrictive field access settings in page layouts and mini page layouts. For example, if a page layout requires a fieldthat’s read-only in field-level security settings, the field remains read-only for the user.
• Override less-restrictive field settings in search layouts. For example, if a field is visible in the search layout but hidden via field-levelsecurity settings, the field remains hidden.
Page Layouts• Control the layout and organization of detail and edit pages.
• Control which fields, related lists, and custom links users see, on detail and edit pages only.
• Control which standard and custom buttons display on detail pages and related lists.
• Determine whether fields are visible, read only, or required, on detail and edit pages only.
• Determine the fields that users can import data into.
• In Personal, Contact Manager, Group, and Professional Editions, control which fields users can access in related lists, list views, reports,Connect Offline, email and mail merge templates, custom links, and when synchronizing data.
• In Professional, Enterprise, Unlimited, Performance, and Developer Editions, determine aspects of mini page layouts, including:
– record type
– profile associations
– related lists
21

– fields and field access settings.
The visible fields and related lists of the mini page layout can be further customized. However, other items inherited from theassociated page layout cannot be changed on the mini page layout. Mini page layouts display selected fields and related lists ofrecords in the mini view of the console.
Tip: To automatically add a field to all page layouts and make it visible and required everywhere regardless of field-level security,make it a universally required field.
Page Layouts
EDITIONS
Available in: both SalesforceClassic and LightningExperience
Page layouts are availablein: All Editions
Creation and deletion ofpage layouts is available in:Professional, Enterprise,Performance, Unlimited,and Developer Editions
USER PERMISSIONS
To create, edit, and deletepage layouts:• Customize Application
Page layouts control the layout and organization of buttons, fields, s-controls, Visualforce, customlinks, and related lists on object record pages. They also help determine which fields are visible,read only, and required. Use page layouts to customize the content of record pages for your users.
Page layouts can include s-controls and Visualforce pages that are rendered within a field sectionwhen the page displays. You can control the size of the s-controls and Visualforce pages, anddetermine whether or not a label and scroll bars display.
Salesforce has two drag-and-drop tools for editing page layouts: the original page layout editorand an enhanced page layout editor. The enhanced page layout editor is enabled by default, andprovides all the functionality of the original editor, as well as additional functionality and aneasier-to-use WYSIWYG interface.
You can enable the original page layout editor in the User Interface settings. Your Salesforce orgcan use only one page layout editor at a time.
From within a page layout, you can access a mini page layout. The mini page layout defines thehover details that display when you mouse over a field on an object’s detail page in the Agentconsole or in the Recent Items section of the sidebar in Salesforce Classic.
For Personal, Contact Manager, and Group Edition orgs, every user views the same layout.Professional, Enterprise, Unlimited, Performance, and Developer Edition orgs can create differentpage layouts for use by different profiles and record types and set field-level security settings tofurther restrict users’ access to specific fields.
In Professional, Enterprise, Performance, Unlimited, and Developer Editions, you can set the mini page layouts and related objects thatappear in the Console tab.
22
Page LayoutsSet Up Page Layouts and Interactions for CRM Objects

Edit Page Layouts for Standard Objects
EDITIONS
Available in: both SalesforceClassic and LightningExperience
Available in all editions
USER PERMISSIONS
To customize page layouts:• Customize Application
To view page layouts:• View Setup and
Configuration
Change the look and feel of page layouts for standard Salesforce objects.
From the management settings for the appropriate object, go to Page Layouts.
Alternately, if you’re using the Enhanced Page Layout Editor, which is enabled by default, you cancustomize a standard object’s page layout by clicking Edit Layout on the object’s detail page.
Edit Page Layouts for Custom and External Objects
EDITIONS
Available in: both SalesforceClassic and LightningExperience
Available in all editions
USER PERMISSIONS
To customize page layouts:• Customize Application
To view page layouts:• View Setup and
Configuration
Change the look and feel of page layouts for custom and external objects.
1. From the management settings for the object whose page layout you want to edit, go to PageLayouts.
2. Complete one of the following.
a. If you have “Customize Application” permission, open the page layout that you want tocustomize for edit.
b. If you have the “View Setup and Configuration” permission, click the page layout that youwant to view.
23
Edit Page Layouts for Standard ObjectsSet Up Page Layouts and Interactions for CRM Objects

Custom Button and Link Considerations
EDITIONS
Available in: SalesforceClassic and LightningExperience
Custom buttons and linksare available in: All Editions
Visualforce pages ands-controls are available in:Contact Manager, Group,Professional, Enterprise,Performance, Unlimited,and Developer Editions
USER PERMISSIONS
To create or change custombuttons or links:• Customize Application
Keep these considerations in mind when working with custom buttons and links.
Implementation Tips• Custom buttons display at the top and bottom of the detail page to the right of all standard
buttons.
• Custom buttons aren’t distinguished from standard buttons in any graphical way. However,you can recognize them by their location on the right of all standard buttons.
• If the button bar gets too wide on the detail page layout, the browser displays a horizontalscroll bar. If the button bar gets too wide on the list view, search result, tagging result, or relatedlist layouts, the buttons wrap.
• Custom buttons are available for activities under the individual setup links for tasks and events.To add a custom button to an activity list view or search layout, first create a custom list buttonin tasks or events. Next, add it to your activity list view or search result layouts. You can overridea button that applies to both tasks and events.
• Person Account records use the custom buttons and links you have made for accounts.
• If your organization uses the Console tab, list buttons are available in Mass Action. Listbuttons don’t display in the mini page layouts. Pages that display due to custom buttons andlinks display in the console without the header or sidebar.
• If you get an error message when overriding a button that appears in a list, try calling thes-control using the URLFOR function.
• When creating custom buttons, be aware of any validation rules your organization has for records on that object. For example, acustom list button that changes case status may conflict with a case validation rule. In this scenario, Salesforce displays the errormessage for the validation rule when users click the custom button.
• To replace a standard button with a custom button, first define the custom button, then customize the page layout to hide thestandard button and display the custom one in its place
• Visualforce pages used as custom links on the home page can’t specify a controller.
• Visualforce pages used as custom buttons or links on detail pages must specify a standard controller of the same object.
• Visualforce pages used as custom list buttons must use a standard list controller of the same object.
• A Web tab or custom link could display a blank page if the embedded site:
– Has been set to deny the loading of its content in a frame.
– Has been set to allow the loading of its content in a frame only if the same site is delivering the content.
– Contains a mix of secure and unsecure content, and the user’s browser has been configured to block mixed active content.
To resolve this issue, try these workarounds.
– Set your custom link to either open in a new window or display in the existing window without the sidebar or header.
– Move the URL from a Web tab into a custom link instead, and set the URL to either open in a new window or display in theexisting window without the sidebar or header.
– If the site you’re embedding has an HTTP prefix and mixed active content, try changing the prefix to HTTPS. If the embeddedsite has a valid security certificate and it hasn’t blocked itself from being displayed in frames, using HTTPS as the prefix allowsthe site to display.
24
Custom Button and Link ConsiderationsSet Up Page Layouts and Interactions for CRM Objects

Best Practices• Use formula functions in custom buttons with caution. Because functions run on the server before your HTML or JavaScript is passed
to the browser, they can only evaluate information that exists at that time. Avoid using functions like IF to evaluate conditions thatonly exist when the code reaches the browser, such as the value of a JavaScript variable that is returned from your code.
• To prevent a user from performing a particular action, such as creating or editing, change the user's permissions rather than hidingthe standard button. Hiding a standard button removes it from a page layout, but the link is still available and users can navigate tothe new or edit page manually.
• Use global variables to access special merge fields for components like custom buttons, links, and s-controls. For example, the$Request global variable allows you to access query parameters inside a snippet, s-control, or custom button.
• Don’t select Display Checkboxes (for Multi-Record Selection) for list buttons that link to a URL that doesn’tsupport post operations. Checkboxes display next to records in a list if you have selected Display Checkboxes (forMulti-Record Selection) for at least one list button in that list. However, selected records in this list are unaffected whenclicking a custom list button that doesn’t have this option selected.
Limitations• A custom link’s label can’t exceed 1,024 characters.
• A link URL can be up to 2,048 bytes. When data is substituted for the tokens in the URL, the link can exceed 3,000 bytes. Somebrowsers enforce limits on the maximum URL length.
• Custom buttons that call JavaScript aren’t supported in Lightning Experience.
• Custom buttons with a content source of OnClick JavaScript aren’t supported in the Salesforce1 mobile app.
• Using URL custom buttons to pass parameters to standard pages in Salesforce Classic—such as pre-populating fields when creatinga record—doesn’t work in Salesforce1 or Lightning Experience.
• On record detail pages for external objects that are associated with high-data-volume external data sources, custom buttons andlinks that call JavaScript aren’t supported.
• Custom buttons aren’t available for Web-to-Lead, Web-to-Case, the Case Teams related list, or the user object.
25
Custom Button and Link ConsiderationsSet Up Page Layouts and Interactions for CRM Objects

Define Custom Buttons and Links
EDITIONS
Available in: SalesforceClassic and LightningExperience
Custom buttons and linksare available in: All Editions
Visualforce pages ands-controls are available in:Contact Manager, Group,Professional, Enterprise,Performance, Unlimited,and Developer Editions
USER PERMISSIONS
To create or change custombuttons or links:• Customize Application
Define the action that occurs when a user clicks a custom button or link. Custom buttons and linkscan streamline actions within Salesforce or integrate Salesforce data with external URLs, applications,or systems.
Watch a demo video of creating a custom link.
If you want the button or link to launch a custom page or other code, consider a Visualforce page.
1. From the management settings for the object that you want to edit, go to Buttons, Links, andActions.
Note: Custom buttons aren’t available on the User object or custom home pages. Custombuttons and links are available for activities under the individual object managementsettings for tasks and events. To override a standard button that applies to both tasks andevents, go to the object management settings for activities.
2. Click New Button or Link. Alternatively, click Default Custom Links to add a predefinedcustom link.
3. Enter the button or link attributes.
Here’s an example of the attributes for a button that performs a web search for an account’sname.
4. To validate all Salesforce merge fields and functions, click Check Syntax.
5. Click Save when you’re finished, or click Quick Save to save and continue editing. Saving validates the URL you defined if you setthe content source to URL.
6. To open a button or link using settings other than the user’s default browser settings, click Window Open Properties on the buttonor link’s detail page.
7. To view all references to the new button or link, click Where is this used? on its detail page.
26
Define Custom Buttons and LinksSet Up Page Layouts and Interactions for CRM Objects

Custom links for users are automatically added to the Custom Links section of the user detail page. You can add page buttons onlyto the Button section of a page layout.
Note: A link URL can be up to 2,048 bytes. When data is substituted for the tokens in the URL, the link can exceed 3,000 bytes.Some browsers enforce limits on the maximum URL length.
Before you can use your custom buttons and links, add them to an object’s page layout. You can then see and use the button or link ona record detail page.
Custom Button and Link Samples
USER PERMISSIONS
To create or change custombuttons or links:• Customize Application
EDITIONS
Available in: SalesforceClassic and LightningExperience
Custom buttons and linksare available in: All Editions
Visualforce pages ands-controls are available in:Contact Manager, Group,Professional, Enterprise,Performance, Unlimited,and Developer Editions
Use samples of custom Salesforce buttons and links to determine whether they can work for you.
27
Custom Button and Link SamplesSet Up Page Layouts and Interactions for CRM Objects

AUTOMATE BASIC SALES PROCESSES
Workflow and Approvals Overview
EDITIONS
Available in: both SalesforceClassic and LightningExperience
Available in: Enterprise,Performance, Unlimited,and Developer Editions
Your sales team operates more efficiently with standardized internal procedures and automatedbusiness processes. Many of the tasks that you normally assign, the emails that you regularly send,and other record updates are part of an organization's standard processes. Instead of doing thiswork manually, you can configure workflow and approvals to do it automatically.
Workflow rules automate actions, such as task assignment, notifications, and field updates. Theyhelp make sure that your sales team doesn’t miss any of the critical information that they need tosatisfy customers issues and close sales.
Approval processes automate the process by which you approve records in Salesforce. An approvalprocess specifies the steps that are necessary for a record to be approved, who must approve it ateach step, and the actions to take when a record is approved, rejected, recalled, or first submitted.
Workflow Overview
EDITIONS
Available in: both SalesforceClassic and LightningExperience
Available in: Enterprise,Performance, Unlimited,and Developer Editions
Workflow rules automate actions, such as task assignment, notifications, and field updates. Theyhelp make sure that your sales team doesn’t miss any of the critical information they need to satisfycustomers issues and close sales.
Each workflow rule consists of:
• Criteria that determine when Salesforce executes the workflow rule. Any change that causes arecord to match this criteria can trigger the workflow rule—even changes to hidden fields.
• Immediate actions to take when the workflow rule executes. For example, Salesforce canautomatically send an email that notifies the opportunity team when a new high-valueopportunity is created.
• Time-dependent actions that Salesforce queues when the workflow rule executes. For example,Salesforce can automatically send an email reminder to the account team if a high-value opportunity is still open 10 days before thespecified close date. When Salesforce triggers a workflow rule that has time-dependent actions, you can use the workflow queueto monitor and cancel pending actions.
Workflow automates the following types of actions:
Email AlertsSend an email to one or more recipients. For example, automatically send sales management an email alert when a sales representativequalifies a large deal.
TasksAssign a new task to a user, role, or record owner. For example, automatically assign follow-up tasks to a support representative oneweek after a case is updated.
Field UpdatesUpdate the value of a field on a record. For example, automatically change the Owner field on a contract three days before itexpires.
28

Flow TriggersLaunch an autolaunched flow. The pilot program for flow trigger workflow actions is closed. If you've already enabled the pilot inyour org, you can continue to create and edit flow trigger workflow actions. If you didn't enable the pilot in your org, use the Flowsaction in Process Builder instead.
Outbound MessagesSend a secure configurable API message (in XML format) to a designated listener. For example, automatically initiate the reimbursementprocess for an approved expense report by triggering an outbound API message to an external HR system.
Workflow Terminology
EDITIONS
Available in: both SalesforceClassic and LightningExperience
Flow triggers are notavailable in LightningExperience
Available in: Enterprise,Performance, Unlimited,and Developer Editions
Email alerts and outboundmessages available in:Professional, Enterprise,Performance, Unlimited,and Developer Editions
The following terms are used when describing workflow features and functionality.
Workflow RuleA workflow rule sets workflow actions into motion when its designated conditions are met.You can configure workflow actions to execute immediately when a record meets the conditionsin your workflow rule, or set time triggers that execute the workflow actions on a specific day.If a workflow action hasn’t executed yet, you can view and modify it in the workflow queue.
Workflow ActionA workflow action, such as an email alert, field update, outbound message, or task, fires whenthe conditions of a workflow rule are met.
Email AlertEmail alerts are actions that send emails, using a specified email template, to specified recipients.Workflow alerts can be sent to any user or contact, as long as they have a valid email address.
Field UpdateA field update is an action that automatically updates a field with a new value.
FlowA flow is an application that can execute logic, interact with the Salesforce database, call Apexclasses, and collect data from users. You can build flows by using the Cloud Flow Designer.
Flow TriggerA flow trigger is a workflow action that launches a flow. With flow triggers, you can automate complex business processes—createflows to perform logic, and have events trigger the flows via workflow rules—without writing code.
The pilot program for flow trigger workflow actions is closed. If you've already enabled the pilot in your org, you can continue tocreate and edit flow trigger workflow actions. If you didn't enable the pilot in your org, use the Flows action in Process Builder instead.
Outbound MessageAn outbound message sends information to a designated endpoint, like an external service. Outbound messages are configuredfrom Setup. You must configure the external endpoint and create a listener for the messages using the SOAP API.
29
Workflow TerminologyAutomate Basic Sales Processes

Create Workflow Rules
EDITIONS
Available in: both SalesforceClassic and LightningExperience
Available in: Enterprise,Performance, Unlimited,and Developer Editions
Automate your organization’s standard processes by configuring workflow rules.
Watch a Demo: Creating a Workflow Rule (Salesforce Classic)
Note: You can find examples of some common workflow rules by searching the SalesforceHelp for “Examples of Workflow Rules.” Just modify the sample settings to create the workflowrules that you need to make your business run smoothly.
IN THIS SECTION:
Select the Object for Your Workflow Rule
Get started with creating a new workflow rule by selecting the object the rule relates to.
Set the Criteria for Your Workflow Rule
Get started with creating a new workflow rule by selecting the object the rule relates to and configuring its criteria.
Add Automated Actions to Your Workflow Rule
Once you’ve set the criteria for your workflow rule, identify what to do when that criteria are met.
Activate Your Workflow Rule
Salesforce doesn't trigger a workflow rule until you activate it.
Select the Object for Your Workflow Rule
EDITIONS
Available in: both LightningExperience and SalesforceClassic
Available in: Enterprise,Performance, Unlimited,and Developer Editions
USER PERMISSIONS
To create or changeworkflow rules and actions:• Customize Application
Get started with creating a new workflow rule by selecting the object the rule relates to.
1. From Setup, enter Workflow Rules in the Quick Find box, then select WorkflowRules.
2. On the workflow rules list page, click New Rule.
3. Choose an object to which you want this workflow rule to apply.
Note:
• If you have a workflow action that updates a field on a related object, that targetobject isn't the one that's associated with the workflow rule.
• To create workflow rules based on new case comments or incoming email messagesthat automatically update fields on their associated cases, choose Case Comment orEmail Message. See Workflow Considerations for more information.
• To create a site usage rule, choose one of the following:
– Organization (for monthly page views allowed and monthly page viewsused fields)
– Site (for site detail, daily bandwidth and request time, monthly page viewsallowed, and other fields)
– User License (for the monthly logins allowed and monthly logins usedfields)
The Organization and Site objects are only available if Force.com sites is enabled foryour organization. The User License object isn't dependent on sites, and is onlyavailable if you have Customer Portals or partner portals enabled for your organization.
30
Create Workflow RulesAutomate Basic Sales Processes
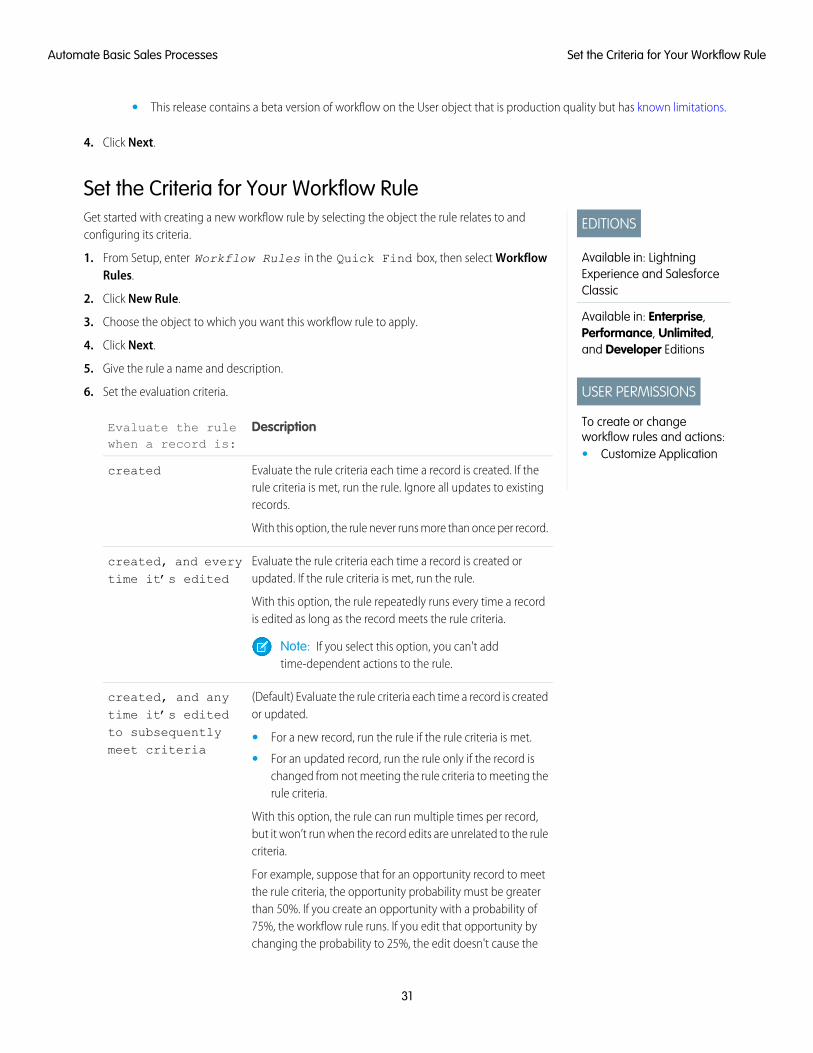
• This release contains a beta version of workflow on the User object that is production quality but has known limitations.
4. Click Next.
Set the Criteria for Your Workflow Rule
EDITIONS
Available in: LightningExperience and SalesforceClassic
Available in: Enterprise,Performance, Unlimited,and Developer Editions
USER PERMISSIONS
To create or changeworkflow rules and actions:• Customize Application
Get started with creating a new workflow rule by selecting the object the rule relates to andconfiguring its criteria.
1. From Setup, enter Workflow Rules in the Quick Find box, then select WorkflowRules.
2. Click New Rule.
3. Choose the object to which you want this workflow rule to apply.
4. Click Next.
5. Give the rule a name and description.
6. Set the evaluation criteria.
DescriptionEvaluate the rulewhen a record is:
Evaluate the rule criteria each time a record is created. If therule criteria is met, run the rule. Ignore all updates to existingrecords.
With this option, the rule never runs more than once per record.
created
Evaluate the rule criteria each time a record is created orupdated. If the rule criteria is met, run the rule.
With this option, the rule repeatedly runs every time a recordis edited as long as the record meets the rule criteria.
created, and everytime it’s edited
Note: If you select this option, you can't addtime-dependent actions to the rule.
(Default) Evaluate the rule criteria each time a record is createdor updated.
created, and anytime it’s editedto subsequentlymeet criteria
• For a new record, run the rule if the rule criteria is met.
• For an updated record, run the rule only if the record ischanged from not meeting the rule criteria to meeting therule criteria.
With this option, the rule can run multiple times per record,but it won’t run when the record edits are unrelated to the rulecriteria.
For example, suppose that for an opportunity record to meetthe rule criteria, the opportunity probability must be greaterthan 50%. If you create an opportunity with a probability of75%, the workflow rule runs. If you edit that opportunity bychanging the probability to 25%, the edit doesn't cause the
31
Set the Criteria for Your Workflow RuleAutomate Basic Sales Processes

DescriptionEvaluate the rule when arecord is:
rule to run. If you then edit that opportunity by changing the probability from 25% to75%, the edit causes the rule to run. With this last edit, the rule runs, because the recordis changed from not meeting the rule criteria to meeting the rule criteria.
7. Enter your rule criteria.
• Choose criteria are met and select the filter criteria that a record must meet to trigger the rule. For example, set thefilter to “Opportunity: Amount greater than 5000” if you want opportunity records with an amount greater than $5,000 to triggerthe rule. If your organization uses multiple languages, enter filter values in your individual language. You can add up to 25 filtercriteria, of up to 255 characters each.
• Choose formula evaluates to true and enter a formula that returns a value of “True” or “False.” Salesforce triggersthe rule if the formula returns “True.”
Examples of useful workflow formulas include:
– If the number of filled positions equals the number of total positions on a job, update the Job Status field to “Filled.”
– If mileage expenses associated with visiting a customer site are 35 cents per mile and exceed a $1,000 limit, automaticallyupdate the Approval Required field to “Required.”
– If a monthly subscription-based opportunity amount is greater than $10,000, create a task for an opportunity owner to followup 60 days after the opportunity is closed.
The $Label variable isn’t supported in workflow rule formulas. Also, some functions aren't available in workflow rule formulas.
Tip: You can use merge fields for directly related objects in workflow rule formulas.
8. Click Save & Next.
32
Set the Criteria for Your Workflow RuleAutomate Basic Sales Processes

Add Automated Actions to Your Workflow Rule
EDITIONS
Available in: both SalesforceClassic and LightningExperience
Flow triggers are notavailable in LightningExperience
Available in: Enterprise,Performance, Unlimited,and Developer Editions
Email alert actions andoutbound message actionsavailable in: Professional,Enterprise, Performance,Unlimited, and DeveloperEditions
USER PERMISSIONS
To create or changeworkflow rules and actions:• Customize Application
Once you’ve set the criteria for your workflow rule, identify what to do when that criteria are met.
Activate Your Workflow Rule
EDITIONS
Available in: both LightningExperience and SalesforceClassic
Available in: Enterprise,Performance, Unlimited,and Developer Editions
USER PERMISSIONS
To create or changeworkflow rules and actions:• Customize Application
Salesforce doesn't trigger a workflow rule until you activate it.
To activate a workflow rule, click Activate on the workflow rule detail page. Click Deactivate toprevent a rule from triggering or if you want to edit the time-dependent actions and time triggersthat are associated with the rule.
You can deactivate a workflow rule at any time. However, if you deactivate a rule that has pendingactions, Salesforce completes those actions as long as the record that triggered the rule is notupdated.
Note:
• You can't delete a workflow rule that has pending actions in the workflow queue. Waituntil pending actions are processed, or use the workflow queue to cancel the pendingactions.
• You can't add time-dependent workflow actions to active workflow rules. Deactivate theworkflow rule first, add the time-dependent workflow action, and reactivate the rule.
33
Add Automated Actions to Your Workflow RuleAutomate Basic Sales Processes

Approvals
EDITIONS
Available in: both SalesforceClassic and LightningExperience
Available in: Enterprise,Performance, Unlimited,and Developer Editions
It’s likely that you’re familiar with process automation in the form of workflow rules. Approvals takeautomation one step further, letting you specify a sequence of steps that are required to approvea record.
An approval process automates how records are approved in Salesforce. An approval processspecifies each step of approval, including from whom to request approval and what to do at eachpoint of the process.
Example: Your org has a three-tier process for approving expenses. This approval processautomatically assigns each request to right person in your org, based on the amount requested.
If an expense record is submitted for approval, lock the record so that users cannot edit it andchange the status to Submitted.
If the amount is $50 or less, approve the request. If the amount is greater than $50, send anapproval request to the direct manager. If the amount is greater than $5,000 and the firstapproval request is approved, send an approval request to the vice president.
If all approval requests are approved, change the status to Approved and unlock the record.If any approval requests are rejected, change the status to Rejected and unlock the record.
Approval Process Terminology
EDITIONS
Available in: both SalesforceClassic and LightningExperience
Available in: Enterprise,Performance, Unlimited,and Developer Editions
Salesforce uses this terminology for approval processes.
Approval ActionsAn approval action occurs when all required approvers approved a step.
Approval ProcessAn approval process automates how records are approved in Salesforce. An approval processspecifies each step of approval, including from whom to request approval and what to do ateach point of the process.
Approval RequestAn approval request is an email, Salesforce1 notification, Lightning Experience notification, orChatter post. The approval request notifies the recipients that a record was submitted for themto approve.
Approval StepsApproval steps define the chain of approval for a particular approval process. Each step determines
• Which records can advance to that step
• To whom to assign approval requests
• Whether to let each approver’s delegate respond to the requests
The first step specifies what to do if a record doesn’t advance to that step. Later steps specify what happens if an approver rejectsthe request.
Assigned ApproverThe assigned approver is the user responsible for responding to an approval request.
Delegated ApproverA delegated approver is someone appointed by an assigned approver as an alternate for approval requests.
34
ApprovalsAutomate Basic Sales Processes
Email Approval ResponseEmail approval response lets users respond to approval requests by replying to an email notification.
Initial Submission ActionsAn initial submission action occurs when a user first submits a record for approval. By default, the record is locked.
Final Approval ActionsFinal approval actions occur when all required approvals were obtained.
Final Rejection ActionsA final rejection action occurs when an approver rejects the request and it moves to the final rejection state.
Outbound MessageAn outbound message sends information to a designated endpoint, like an external service. You can configure outbound messagesfrom Setup. Configure the external endpoint and use the SOAP API to create a listener for the messages.
Process InstanceA process instance represents one instance of an approval process. A new process instance is created each time a record is submittedfor approval.
Process Instance NodeA process instance node represents an instance of an approval step. The system creates a process instance node each time a recordenters a step in an approval process. The system doesn’t create a process instance node when the record doesn’t meet the stepcriteria or the approval process instance is completed without entering the step.
Recall ActionsA recall action occurs when a submitted approval request is recalled. By default, the record is unlocked.
Record LockingRecord locking prevents users from editing a record, regardless of field-level security or sharing settings. By default, Salesforce locksrecords that are pending approval. Only admins can edit locked records.
Create Approval Processes
EDITIONS
Available in: both SalesforceClassic and LightningExperience
Available in: Enterprise,Performance, Unlimited,and Developer Editions
USER PERMISSIONS
To create, modify, or activateapproval processes:• Customize Appllication
To get started creating approval processes, you can create a basic approval process by using awizard and add approval steps and actions to fully automate a process with any level of complexity.
Before creating an approval process, take a few minutes to think about what you want the processto do, and who will interact with it. You might also need to set up templates, such as an emailtemplate to notify approvers who need to approve or reject a step in the approval process.
IN THIS SECTION:
Set Up Basic Approval Processes
The Approval Process Jump Start Wizard simplifies and streamlines the creation of basic approvalprocesses. Approval processes that are created by using the Jump Start Wizard initially havejust one step, but you can add more later. To simplify the creation of approval processes, theJump Start Wizard automatically chooses some default options for you.
Modify Basic Details of an Approval Process
You can modify the basic definition for an approval process by using the Standard Wizard forapproval processes or by editing each part of the basic definition on the approval process’sdetail page.
35
Create Approval ProcessesAutomate Basic Sales Processes

Add Steps to an Approval Process
Each step in an approval process specifies which records the step applies to, who can approve or reject the record at that step, and,optionally, what to do if the record is rejected or approved during the step.
Create New Approval Actions
As part of an approval process, Salesforce performs automatic actions. Actions can include assigning tasks to users, sending emailby using a specified template, updating a field, or sending a message to a designated address. After you’ve created an action, youcan use it as part of a step or designate it as an initial, final, or recall action.
Add an Existing Action to an Approval Process
Any action can be added to an approval process step, including actions that are created as part of a workflow rule, or for anotherapproval process, as long as they relate to the same record type.
Activate an Approval Process
Activate an approval process when it’s ready to be used.
Set Up Basic Approval ProcessesThe Approval Process Jump Start Wizard simplifies and streamlines the creation of basic approval processes. Approval processes thatare created by using the Jump Start Wizard initially have just one step, but you can add more later. To simplify the creation of approvalprocesses, the Jump Start Wizard automatically chooses some default options for you.
1. Start the Jump Start Wizard.
a. From Setup, enter Approval Processes in the Quick Find box, then select Approval Processes.
b. Select the object that your approval process relates to.
c. Click Create New Approval Process and select Use Jump Start Wizard.
2. Create an approval process.
a. Enter a name for the approval process that will help users find it. Salesforce will generate a unique name for your process, whichis required for the API.
b. Optionally, you can designate an email template for Salesforce to use when approvals are assigned and add the Approval Historyrelated list to pages on the object.
c. To apply the process to only some records, create crtiteria by which records are selected into this approval process.
d. Choose how an approver will be selected for this process.
Modify Basic Details of an Approval ProcessYou can modify the basic definition for an approval process by using the Standard Wizard for approval processes or by editing each partof the basic definition on the approval process’s detail page.
• To modify an approval process by using the Standard Wizard interface, from Setup, enter Approval Processes in the QuickFind box, then select Approval Processes. From the Inactive Approval Processes related list, click Edit next to the approvalprocess that you’d like to modify.
• To modify an approval process from the detail page for the approval process, from Setup, enter Approval Processes in theQuick Find box, then select Approval Processes, and then select the name of the approval process. On the approval processdetail page, click Edit, and then select the part of the process that you’d like to modify.
36
Set Up Basic Approval ProcessesAutomate Basic Sales Processes
Add Steps to an Approval ProcessEach step in an approval process specifies which records the step applies to, who can approve or reject the record at that step, and,optionally, what to do if the record is rejected or approved during the step.
The first approval step in a process specifies what happens to a record if it doesn’t meet the entry criteria for the step. Subsequent stepsspecify what happens to the record at each step if it’s approved or rejected during that step. Each approval process can have up to 30steps.
1. From Setup, enter Approval Processes in the Quick Find box, then select Approval Processes.
2. Select the object that you’d like to create an approval process for, and then click the name of the approval process.
3. Click New Approval Step from the Approval Steps related list.
4. Enter a name, unique name, and description for this step, and a step number. The step number determines the order of this steprelated to other steps in the process.
5. Determine which records this step applies to, and what happens to records that don’t enter it.
6. Specify who will review records that enter the step and which reviewers must give approval.
7. Optionally, specify what happens to the record if it’s rejected during this step. If you don’t specify a rejection path, you’ll need to adda step to handle rejected records.
8. Optionally, add one or more rejection or approval actions.
Create New Approval ActionsAs part of an approval process, Salesforce performs automatic actions. Actions can include assigning tasks to users, sending email byusing a specified template, updating a field, or sending a message to a designated address. After you’ve created an action, you can useit as part of a step or designate it as an initial, final, or recall action.
After they’re created, approval actions can be used by any approval process, so be sure to give each action a clear name or description.
Within each approval process, you can add up to 40 actions—10 of each type—for Salesforce to perform when a record initially entersan approval process, at final approval, at final rejection, or if a submitted approval request is recalled. You can also add up to 40 actions—10of each type—to each step in an approval process.
1. From the approval process detail page, select the type of action you’d like to create.
• In the Initial Submissions Action related list, Final Approval actions related list, Final Rejection Actions related list, or Recall Actionsrelated list, click Add New.
• In the Approval Steps related list, click Show Actions, and then click Add New in the Approval Actions or Rejection Actionsrelated lists.
2. Select the type of action that you’d like to add.
3. Configure the action, and then save it.
Add an Existing Action to an Approval ProcessAny action can be added to an approval process step, including actions that are created as part of a workflow rule, or for another approvalprocess, as long as they relate to the same record type.
Rather than creating a new action that duplicates an action that you’ve already created for a workflow rule or different approval process,you can add an existing action.
37
Add Steps to an Approval ProcessAutomate Basic Sales Processes
For example, suppose you’ve created a workflow rule that includes an email alert that notifies the account owner when a contact'sinformation is updated. Now you need to create an approval process related that's to contacts, and at the end of the process, you wantto notify the account owner about a change to a contact. You can reuse the email alert that you originally created as part of a workflowrule as an action in your workflow process. You don't need to create multiple identical email alerts in separate places.
1. On the approval process detail page, do one of the following.
• Click Add Existing in the Initial Submissions Action related list, Final Approval actions related list, Final Rejection Actions relatedlist, or Recall Actions related list.
• In the Approval Steps related list, click Show Actions, and then click Add Existing in the Approval Actions or Rejection Actionsrelated lists.
2. Choose an action type.
3. In the Available Actions box, select the action you'd like to add, and then click the Add button to move it into the Selection Actionsbox. You can add up to 10 actions of a particular type to each action or step.
Activate an Approval ProcessActivate an approval process when it’s ready to be used.
Note: After an approval process is activated, you can’t add, delete, or change the order of the steps, or change it's reject or skipbehavior, even if you deactivate the process.
1. From Setup, enter Approval Processes in the Quick Find box, then select Approval Processes.
2. Select the object that you’d like to create an approval process for, and then click the name of the approval process.
3. Next to the approval process that you’d like to activate, click Activate. You can deactivate the approval process in the same place.
38
Activate an Approval ProcessAutomate Basic Sales Processes

ROLL SALESFORCE OUT
Best Practices for a Successful Rollout
For a successful Salesforce implementation, it’s important to plan your rollout to users. Here are some general guidelines.
Communicate Your ScheduleCommunicate your roll-out plans and go-live date to your users, so they know what to expect.
Train Your UsersSet up a time to train your users. You may need to prepare different training for each type of user. Your users will feel more comfortablewith new features you’ve set up in Salesforce after you’ve shown them how to complete each of their critical job functions. Butremember, changes your users make during training are real changes to your data, so plan ahead to ensure that training activitiesdon’t impact your business.
Provide Users With ResourcesHandy resources for users may include Salesforce Help articles, videos, workbooks, online training, and success communities. Pointyour users to these resources so they can learn on their own. See the Resources list for some ideas.
Gather FeedbackOnce your users start to use Salesforce, they may have suggestions or requests. Let your users know how you prefer to have themcommunicate these issues to you.
39

AFTER YOU IMPLEMENT SALESFORCE
Stay Current with Salesforce
Where to Find ItWhy You Need ItWhat It Is
View the most recent Salesforce releasenotes athttp://docs.releasenotes.salesforce.com/
Salesforce typically releases softwareupdates and new features about three timesannually, in the spring, summer, and winter.
Release Notes & Release Resources
http://help.salesforce.comOnline help is updated with each release toensure that you can always find the most
Salesforce Online Help
current information about features andservices you use.
Visit http://w.salesforce.com and clickCommunity.
Success Communities connect you withother Salesforce customers, partners, andexperts. Here, you can ask and answer
Salesforce Success Communities
questions about Salesforce, or review pastquestions and discussions for tips, tricks, andanswers to make better use of Salesforce.
Visit https://trailhead.salesforce.comTrailhead provides administrators anddevelopers with self-paced guided learning
Salesforce Trailhead
pathways through the key features ofSalesforce using a set of online, interactivetutorials. New trails are added frequently.
Visit http://help.salesforce.com and clickHelp & Training.
Salesforce University offers training classesto help you and your users developexpertise and expand knowledge inadministering and using Salesforce.
Training Classes
http://dreamforce.salesforce.comWant to know where the industry is headedand how your company can use Salesforce
Dreamforce
to get there first? Dreamforce is fourhigh-energy days of innovation, fun, andgiving back. It’s your chance to learn fromindustry visionaries, product experts, andworld leaders who can help you transformyour business and your life.
40

INDEX
AActivating
workflow rules 33Approval processes
activate 38add steps 37create new actions 37modify basic information about 36overview 34Process creation overview 36terminology 34
Approvalsoverview 28
Automationapprovals overview 28workflow overview 28
BButtons
considerations, custom buttons 24
CConfiguring
workflow actions 33Creating
custom objects 12–13, 17workflow rules 30–31, 33
Custom buttons 26–27Custom links 26–27Custom objects
creating 12–13, 17creating relationships 8fields 14managing 18overview 10related lists 8relationships 10
Custom settingscreating fields 8
Custom tabsdefinition 19
EEnhanced page layout editor
accessing for custom and external objects 23
Enhanced page layout editor (continued)accessing for standard objects 23
external objectsadding fields 8creating relationship as new custom field 8related lists 8
FFields
adding 8creating 8universally required 20
HHelp with Salesforce, Finding 40
IIntroduction 1
LLayouts
See also Page layouts 22
OOriginal page layout editor
accessing for custom and external objects 23accessing for standard objects 23
PPage layouts
accessing editors for custom and external objects 23accessing editors for standard objects 23overview 22
RRelationships
adding 8defining 8overview 10
Release Notes 40Roles
assigning to users 7manage 6managing 6view 6viewing 6
41

rolling out Salesforce 39
TTerminology 2
UUniversally required fields
about 20User roles
hierarchy 6See Roles 6
Usersassigning roles 7
WWorkflow
actions 33activating a rule 33creating rules 30overview 28rules 30–31, 33terminology 29
42
Index