environment bems in a blackberry uem · • import the blackberry proxy and the blackberry uem...
TRANSCRIPT

BEMS in a BlackBerry UEMenvironmentConfiguration Guide
2.10

2019-05-13Z
| | 2

Contents
About this guide................................................................................................7
Steps to configure BEMS.................................................................................. 8
Configuring BEMS-Core.................................................................................... 9Importing CA Certificates for BEMS.....................................................................................................................9
Import non-public certificates to BEMS.................................................................................................... 9Importing and configuring certificates............................................................................................................... 10
Replacing the auto-generated SSL certificate........................................................................................ 10Configuring HTTPS for BEMS to BlackBerry Proxy................................................................................14Assign the BEMS SSL certificate to users..............................................................................................15Import third-party server certificates into the BEMS Java keystore..................................................... 16Download certificates from the Cisco Unified Communications Manager and Cisco IM and
Presence servers into the BEMS Java keystore............................................................................... 16Keystore commands.................................................................................................................................17
Add dashboard administrators........................................................................................................................... 17Configure the BlackBerry Dynamics server in BEMS........................................................................................ 18Configure a web proxy server for the Push Notifications service....................................................................18Enable log file compression................................................................................................................................19Uploading BEMS log and statistical information...............................................................................................19
Specify log upload credentials................................................................................................................ 20Upload log files......................................................................................................................................... 20Enable upload of BEMS statistics........................................................................................................... 20
Firebase Push Notifications................................................................................................................................ 21Create Firebase Cloud Messaging API keys.......................................................................................... 21
Configuring BEMS services.............................................................................22Configuring the Push Notifications service....................................................................................................... 22
Configuring Push Notifications................................................................................................................22Configuring BlackBerry UEM for BlackBerry Work, BlackBerry Tasks, and BlackBerry Notes............. 31Set the detailed Notifications Cutoff Time.............................................................................................31Configuring the Push Notifications service for high availability........................................................... 31Configuring the Push Notifications service for disaster recovery........................................................ 33Push Notifications service logging and diagnostics..............................................................................33
Configuring the Connect service.........................................................................................................................34Configuring the Connect service in the BEMS dashboard.....................................................................34Configuring BlackBerry UEM for BlackBerry Connect............................................................................43Enabling persistent chat...........................................................................................................................43Configuring the Connect service for high availability............................................................................ 43Configuring the Connect service for disaster recovery......................................................................... 43Specify the BlackBerry Proxy the BlackBerry Connect service contacts in a cluster...........................45Using friendly names for certificates in BlackBerry Connect................................................................45Configuring the Connect service to receive SSL communications.......................................................46
| | iii
Configuring Windows Services................................................................................................................ 49Troubleshooting BlackBerry Connect Issues..........................................................................................50
Configuring the BlackBerry Presence service....................................................................................................51Configuring the BlackBerry Presence service in the BEMS Dashboard................................................51Manually configure the Presence service for multiple application endpoints......................................57Configuring BlackBerry UEM for BlackBerry Presence.......................................................................... 58Configuring the Presence service for high availability...........................................................................58Configuring Presence service for disaster recovery.............................................................................. 58Using friendly names for certificates in Presence................................................................................. 59Troubleshooting BlackBerry Presence Issues........................................................................................ 60
Configuring the BlackBerry Docs service...........................................................................................................60Configure a web proxy server for the Docs service...............................................................................60Configure the database for the BlackBerry Docs service......................................................................61Repositories...............................................................................................................................................61Storage services........................................................................................................................................61Configure the Docs security settings......................................................................................................62Configure your Audit properties.............................................................................................................. 62Add an app server hosting the BlackBerry Docs app to a BlackBerry Dynamics connectivity profile...63Configuring BlackBerry UEM for the BlackBerry Docs service .............................................................63Configuring Docs for Rights Management Services..............................................................................63Configuring the Docs instance for high availability............................................................................... 67Configuring the Docs service for disaster recovery...............................................................................67
Obtain an Azure app ID for the Connect, Presence, and Docs service...............70
Global catalog for Connect and Presence....................................................... 73Enable the Connect service to use a global catalog.........................................................................................73
Revert the Connect service settings to use the local Active Directory................................................. 74Enable the Presence service to use a global catalog....................................................................................... 74
Revert the Presence service settings to use the local Active Directory............................................... 75Enable Microsoft Lync Server or Skype for Business related attributes in the global catalog....................... 75
Updating the Connect and Presence services using Lync Director................... 77Specify the Connect and Presence services to use a Lync Director................................................................77
Managing Repositories....................................................................................78Configuring repositories...................................................................................................................................... 78Admin-defined shares .........................................................................................................................................79
Granting User Access Permissions.........................................................................................................79Define a repository....................................................................................................................................80Change a repository................................................................................................................................. 82Define a repository list............................................................................................................................. 82Add users and user groups to repositories and list definitions............................................................83
Allow user-defined repositories.......................................................................................................................... 83Enable user-defined repository permissions.......................................................................................... 83Change user access permissions........................................................................................................... 85
View user repository rights................................................................................................................................. 85Enable users to access Box repository using a custom Box email address...................................................85Using the Docs Self-Service web console..........................................................................................................87
| | iv

Log in to the Docs Self-Service web console.........................................................................................87
Add a CMIS storage service............................................................................89
Enable modern authentication for the SharePoint storage service................... 90
Windows Folder Redirection (Native).............................................................. 91Enable folder redirection and configure access................................................................................................91
Local Folder Synchronization – Offline Folders (Native)..................................93
Configuring support for Microsoft SharePoint Online and Microsoft OneDrivefor Business................................................................................................ 95
Configure Microsoft SharePoint Online and Microsoft OneDrive for Business...............................................95
Microsoft SharePoint Online authentication setup.......................................... 97Troubleshooting Microsoft SharePoint Issues.................................................................................................. 97
BlackBerry Work Docs fails to find a Microsoft SharePoint view by name.......................................... 97
Configuring Microsoft Office Web Apps server for Docs service support......... 98Supported file types............................................................................................................................................. 98
Supported files and storage types........................................................................................................ 100Configure the Docs service for Microsoft Office Web Apps access............................................................. 100
Configuring resource based Kerberos constrained delegation for the Docsservice....................................................................................................... 102
Configure resource based Kerberos constrained delegation......................................................................... 102Verify the delegation is configured correctly...................................................................................................104Turn on resource based Kerberos constrained delegation............................................................................ 104Remove resource based Kerberos constrained delegation............................................................................105
Configuring Kerberos constrained delegation for Docs..................................106Configuring Kerberos constrained delegation for the Docs service.............................................................. 106
Find the SharePoint application pool identity and port....................................................................... 107Create Service Principal Names............................................................................................................107Add Kerberos constrained delegation in Microsoft Active Directory for Microsoft SharePoint........ 107Add Kerberos constrained delegation for file shares.......................................................................... 108Turn on Kerberos constrained delegation............................................................................................ 108
Configuring BlackBerry Dynamics Launcher..................................................110Configuring Good Enterprise Services in BlackBerry UEM............................................................................. 110
Verify that Good Enterprise Services are available in BlackBerry UEM.............................................. 111
| | v
Add the BEMS instance to the Good Enterprise Services and BlackBerry Work entitlement app.....111Setting a customized icon for the BlackBerry Dynamics Launcher............................................................... 112
Specify a customized icon for the BlackBerry Dynamics Launcher................................................... 112Remove a customized icon for the BlackBerry Dynamics Launcher.................................................. 113
Monitoring.....................................................................................................114Monitoring the status of BEMS and users using the BEMS Lookout tool..................................................... 114
Install the BEMS Lookout tool...............................................................................................................114Monitoring probes...................................................................................................................................115Run the BEMS Lookout tool...................................................................................................................116
Monitoring the status of Push Notifications using JMX-compliant monitoring tools.................................. 117Monitoring attributes.............................................................................................................................. 117View the Push Notifications statistics using the JMX tool.................................................................119
Appendix A: Understanding the BEMS-Connect configuration file................. 120
Appendix B: Understanding the Skype for Business Online Common Settingsconfiguration file....................................................................................... 126
Appendix C: Java Memory Settings.............................................................. 128
Appendix D: Setting up IIS on the BEMS....................................................... 129
Appendix E: BEMS Windows Event Log Messages.........................................130
Appendix F: File types supported by the BlackBerry Docs service..................135
Glossary........................................................................................................ 136
Legal notice.................................................................................................. 137
| | vi
About this guideThis guide describes how to configure and administer BEMS in your BlackBerry UEM environment.
This guide is intended for senior and junior IT professionals who are responsible for configuring andadministering BEMS.
Note: For ease of following the instructions in this guide, the content refers to the suggested database namesthat are used in the installation guide.
After you complete the tasks in this guide, see to the following content to install and configure BlackBerryDynamics apps:
• BlackBerry Work, Notes and Tasks administration content• BlackBerry Connect administration content• BlackBerry Access administration content
| About this guide | 7

Steps to configure BEMSWhen you configure BEMS, you perform the following actions:
Step Action
Configure the BEMS-Core settings.
Configure one or more of the BEMS Services.
• Push Notifications (Mail)• Connect• Presence• Docs
Optional, enable the Connect service and the Presence service to use a global catalog.
Optional, set a customized icon for the BlackBerry Dynamics Launcher.
Optional, configure the BEMS Lookout tool to monitor the status of BEMS and users.
| Steps to configure BEMS | 8
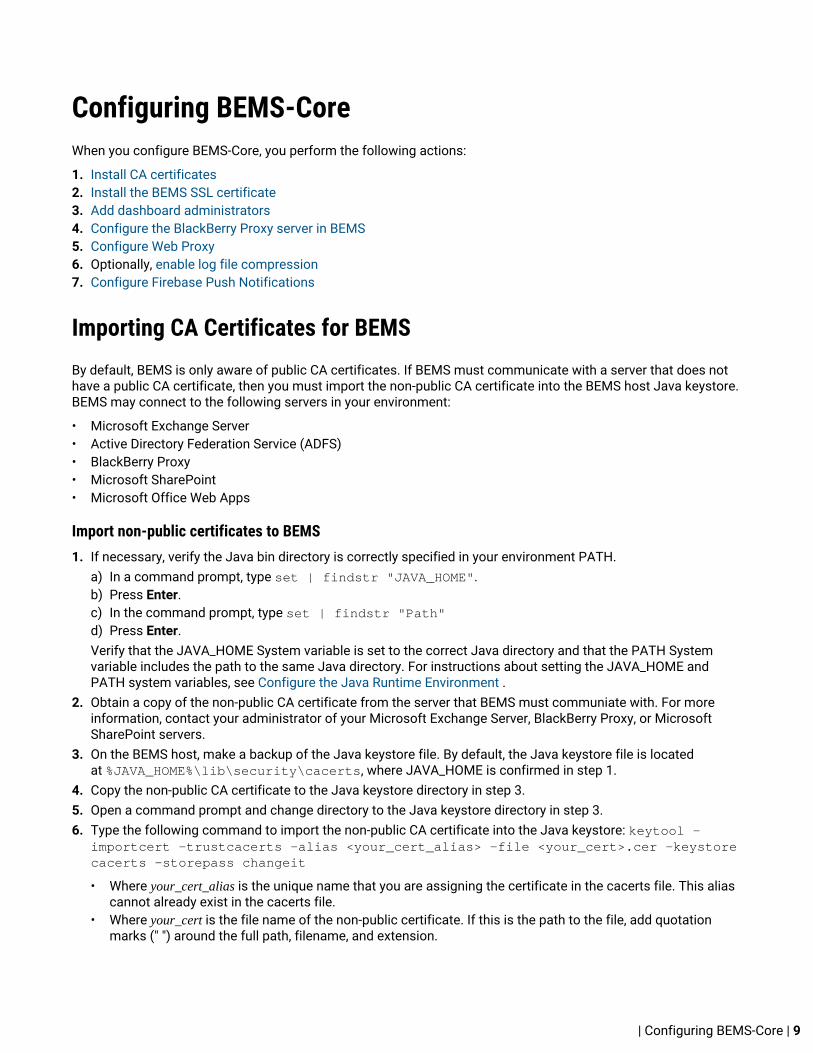
Configuring BEMS-CoreWhen you configure BEMS-Core, you perform the following actions:
1. Install CA certificates2. Install the BEMS SSL certificate3. Add dashboard administrators4. Configure the BlackBerry Proxy server in BEMS5. Configure Web Proxy6. Optionally, enable log file compression7. Configure Firebase Push Notifications
Importing CA Certificates for BEMSBy default, BEMS is only aware of public CA certificates. If BEMS must communicate with a server that does nothave a public CA certificate, then you must import the non-public CA certificate into the BEMS host Java keystore.BEMS may connect to the following servers in your environment:
• Microsoft Exchange Server• Active Directory Federation Service (ADFS)• BlackBerry Proxy• Microsoft SharePoint• Microsoft Office Web Apps
Import non-public certificates to BEMS1. If necessary, verify the Java bin directory is correctly specified in your environment PATH.
a) In a command prompt, type set | findstr "JAVA_HOME".b) Press Enter.c) In the command prompt, type set | findstr "Path"d) Press Enter.Verify that the JAVA_HOME System variable is set to the correct Java directory and that the PATH Systemvariable includes the path to the same Java directory. For instructions about setting the JAVA_HOME andPATH system variables, see Configure the Java Runtime Environment .
2. Obtain a copy of the non-public CA certificate from the server that BEMS must communiate with. For moreinformation, contact your administrator of your Microsoft Exchange Server, BlackBerry Proxy, or MicrosoftSharePoint servers.
3. On the BEMS host, make a backup of the Java keystore file. By default, the Java keystore file is locatedat %JAVA_HOME%\lib\security\cacerts, where JAVA_HOME is confirmed in step 1.
4. Copy the non-public CA certificate to the Java keystore directory in step 3.5. Open a command prompt and change directory to the Java keystore directory in step 3.6. Type the following command to import the non-public CA certificate into the Java keystore: keytool -
importcert -trustcacerts -alias <your_cert_alias> -file <your_cert>.cer -keystorecacerts -storepass changeit
• Where your_cert_alias is the unique name that you are assigning the certificate in the cacerts file. This aliascannot already exist in the cacerts file.
• Where your_cert is the file name of the non-public certificate. If this is the path to the file, add quotationmarks (" ") around the full path, filename, and extension.
| Configuring BEMS-Core | 9
7. Repeat Steps 2 to 6 for each non-public CA certificate.8. In the Windows Service Manager, restart the Good Technology Common Services service.
Importing and configuring certificatesConsider the following when you import certificates:
• Import a new SSL certificate, if you want to replace the BEMS auto-generated SSL certificate.• Import the BlackBerry Proxy and the BlackBerry UEM certificate chains into the BEMS Java keystore.• Assign the BEMS SSL certificate to users using a CA certificate profile, if necessary.
Replacing the auto-generated SSL certificateNote: To replace the BEMS SSL certificate or to replace or update the gems.jks file, you must log in as the serviceaccount you used to install the BEMS software.
By default, BEMS is remotely accessible using HTTPS only. During installation, a BEMS Java keystore calledgems.jks is created and located in <drive>\Program Files\BlackBerry\BlackBerry EnterpriseMobility Server\Good Server Distribution\gems-quickstart-<version>\etc\keystores\. If you previously created a self-signed certificate, then your existing certificate and certificate password areretained.
The default password for the gems.jks keystore is "changeit."
When you replace the auto-generated SSL certificate, you perform the following actions:
1. If you need to obtain a signed certificate for BEMS, Create a new keystore, generate a CSR request, and obtaina signed certificate from a CA.
2. If you have an existing certificate (.pfx), Import a previously issued certificate using a .pfx file3. Move the certificate into the BEMS keystore.4. Update the certificate passwords in BEMS.
Note: The browser will report that your SSL certificate is untrusted because it is a self-signed certificate.
Create a new keystore, generate a CSR request, and obtain a signed certificate from a CA
1. If necessary, verify that the PATH system variable includes the path to the Java bin directory.a) In a command prompt, type set | findstr "Path".b) Press Enter.For instructions to set the Path system variable, see Configure the Java Runtime Environment.
2. On the computer that hosts BEMS, create a temporary folder (for example, C:\bemscert).3. Create a new Java keystore and key pair.
a) Open a command prompt.b) Navigate to the folder that you created in step 1.c) Type keytool -genkeypair -alias serverkey -keyalg RSA -keystore bemsnew.jks
-keysize 2048 -dname "CN=<FQDN of BEMS host>, OU=<BEMS name>, O=<domain>,L=<location>, S=<state or province>, C=<country>" -validity <number of daysbefore the certificate expires> -storepass <mystorepassword>. For example, keytool -genkeypair -alias serverkey -keyalg RSA -keystorebemsnew.jks -keysize 2048 -dname "CN=BEMShost.example.net, OU=BEMShost,O=example, L=Waterloo, S=Ontario, C=CA" -validity 730 -storepassmystorepasssword
| Configuring BEMS-Core | 10
For more information about keystore commands, see Keystore commands.d) Press Enter.e) Type a password for the serverkey certificate's private key. To set the serverkey password to be the same
as the keystore password, press Enter.f) Optionally, to view the contents of the certificate before you submit it to a CA, type keytool -list -v -
keystore bemsnew.jks -storepass <mystorepassword>
4. Generate a CSR for the BEMS Java keystore. In the command prompt, type keytool -certreq-alias serverkey -file bemsnewcert.csr -keystore bemsnew.jks -storepass<mystorepassword> -keypass <mykeypassword>
If the serverkey password and the keystore password are the same, type keytool -certreq -alias serverkey -file bemsnewcert.csr -keystore bemsnew.jks -storepass<mystorepassword> -keypass <mystorepassword>
5. Submit the CSR to a CA. 6. Receive the CA-signed certificate from the CA and save it to the folder that you created in step 1.7. Import the CA-signed certificate to the request. In the command prompt, type keytool -importcert -
keystore bemsnew.jks -storepass <mystorepassword> -file <"certificate filenamereceived in step 5"> -alias serverkey
For example, keytool -importcert -keystore bemsnew.jks -storepass mystorepassword -file "bemsnew certnew.cer" -alias serverkey
8. View the new contents of the keystore, type keytool -list -v -keystore bemsnew.jks -storepass<mystorepassword>
After you finish: Move the certificate into the BEMS keystore
Import a previously issued certificate using a .pfx file
Before you begin: You have a previously issued certificate using a .pfx file.
1. If necessary, verify that the PATH system variable includes the path to the Java bin directory.a) In a command prompt, type set | findstr "Path".b) Press Enter.For instructions to set the Path system variable, see Configure the Java Runtime Environment.
2. On the computer that hosts BEMS, create a temporary folder (for example, C:\bemscert). 3. Copy the .pfx certificate into the temporary folder. 4. Copy the existing gems.jks file to the temporary folder that you created in step 2. By default, the gems.jks file
is located at c:\Program Files\BlackBerry\BlackBerry Enterprise Mobility Server\GoodServer Distribution\gems-quickstart-<version>\etc\keystores\gems.jks
5. Open a command prompt and navigate to the temporary folder that you created in step 2.6. Confirm the alias of the existing certificate in the gems.jks keystore. Type keytool -list -keystore
gems.jks -storepass changeit.7. Remove the existing certificate from the keystore. In the command prompt, type keytool.exe -
delete -alias <alias from step 6> -keystore gems.jks -storepass changeit. Forexample, keytool.exe -delete -alias serverkey -keystore gems.jks -storepasschangeit
The BEMS Dashboard keystore file can only have one certificate installed. Multiple certificates can exist in thekeystore file, but you cannot use this import method to replace an existing certificate entry indicated by it'scertificate alias. If you try to import a certificate with an alias that exists, you receive an error message that theentry already exists. The BEMS Dashboard only supports one certificate in the gems.jks keystore file.
For more information about keystore commands, see Keystore commands.
| Configuring BEMS-Core | 11
8. Confirm the alias of the newly generated and signed certificate in the .pfx file. Type keytool.exe -list-keystore <source_certificate_file_name>.pfx" -storepass <pfx_file_password>. Forexample, keytool.exe -list -keystore "bems_console_cert.pfx" -storepass password
9. Import the new certificate. Type keytool.exe -importkeystore -srckeystore<source_certificate_file_name>.pfx -srcstoretype pkcs12 -alias<certificate_alias_from step 8> -srcstorepass <pfx_file_password> -destkeystoregems.jks -storepass changeit.
10.View the new contents of the keystore to confirm the correct certificate was imported, type keytool -list-v -keystore gems.jks -storepass changeit
After you finish: Move the certificate into the BEMS keystore.
Move the certificate into the BEMS keystore
The Java keytool is used to import the certificate into the Java keystore. The default location of this tool on theBEMS host is %JAVA_HOME%\bin. For example, C:\Program Files\Java\jre1.8.0_<version>\bin.
Complete one of the following tasks:
If the keystore filename is Task
not gems.jks Copy the new keystore file, bemsnew.jks, from C:\bemscertto <drive>:\Program Files\BlackBerry\BlackBerryEnterprise Mobility Server\Good Server Distribution\gems-quickstart-<version>\etc\keystores.
gems.jks Copy the keystore file, gems.jks, from C:\bemscert to <drive>:\Program Files\BlackBerry\BlackBerry EnterpriseMobility Server\Good Server Distribution\gems-quickstart-<version>\etc\keystores
a. Stop the Good Technology Common Services service from theWindows Service Manager.
b. Navigate to <drive>:\Program Files\BlackBerry\BlackBerry Enterprise Mobility Server\GoodServer Distribution\gems-quickstart-<version>\etc\keystores.
c. Rename the gems.jks file to gems_bak.jks.d. Copy the gems.jks file from C:\bemscert to <drive>:\Program
Files\BlackBerry\BlackBerry Enterprise MobilityServer\Good Server Distribution\gems-quickstart-<version>\etc\keystores.
After you finish: Update the certificate passwords in BEMS
Update the certificate passwords in BEMS
For BEMS to access your certificate private key, you must include the challenge password in the jetty.xmlfile. The password must be obfuscated. This can be done with the BEMS SSL Tech Tool. For instructions,visit support.blackberry.com/community to read article 41823.
Before you begin: On the computer that hosts BEMS, download the BEMS Tech Tools and extract the sslcertfolder. You can download the BEMS Tech Tools here.
1. Generate the obfuscated challenge password for your serverkey certificate private key and keystore password.
| Configuring BEMS-Core | 12

Note: When you run the BEMS SSL Tech Tool to obfuscate the password, the BEMS SSL Tech Tool generatesa new gems.jks file. You can then delete the gems.jks file that the tool generates. The BEMS SSL Tech Toolalso generates a log file, SelfSignCertificate.log.0, for review. This file contains the same information as thescreen outputs.
a) In a command prompt, navigate to the extracted sslcert utility folder.b) Type sslcert.bat <mykeypassword> <mystorepassword> <fqdn of BEMS host>
For example: sslcert.bat mykeypassword mystorepassword bemshost.example.comc) Copy the screen outputs to a text file for later reference.
2. Backup the jetty.xml file. By default the jetty.xml file is located at <drive>:\Program Files\BlackBerry\BlackBerry Enterprise Mobility Server\Good Server Distribution\gems-quickstart-<version>\etc.
3. Update the keyStore, trustStore, keyStorePassword, trustStorePassword, and keyManagerPassword in thejetty.xml file with the obfuscated password. For examples, see Jetty.xml file reference.a) In a text editor, open the jetty.xml file.b) Locate the <Call name="addConnector"> section.
Note: Make sure you locate the Call name tag that is not commented out. c) If the new keystore filename has changed from the default gems.jks to bemsnew.jks, locate <Set
name=”keyStore”> and <Set name=”trustStore”> elements and update them as required.d) Locate the <Set name=”keyStorePassword”> and <Set name=”trustStorePassword”> elements and update
them with the obfuscated passwords from the sslcert text outputs, Key Store Password and Trust StorePassword, respectively. The text outputs are the obfuscated values of the keystore password, referencedas <mystorepassword> in step 1b.
e) Locate the <Set name=”keyManagerPassword”> element and update it with the new obfuscated passwordfrom the sslcert text output, Key Manager Password. The text output is the obfuscated value of the keypasspassword, referenced as <mykeypassword> in step 1b.
4. Restart the Good Technology Common Services service from the Windows Service Manager.5. Test the new certificate by accessing the BEMS Dashboard in a browser. Its certificate information now
reflects the newly imported certificated.
Jetty.xml file reference
The keystore file is referenced in jetty.xml. Its default location of the jetty.xml file is on the computer hostingBEMS at <BEMS Machine Path>\BlackBerry\BlackBerry Enterprise Mobility Server\GoodServer Distribution\gems-quickstart-<version>\etc\. You can access this folder using the serviceaccount you used to install the BEMS software or the local system account.
The relevant snippet from jetty.xml referencing the location of the keystore file and its associated passwordwould look like the following:
<New class="org.eclipse.jetty.util.ssl.SslContextFactory" id="sslContextFactory"> <Set name="KeyStorePath"><SystemProperty default="." name="jetty.home"/>/etc/keystores/gems.jks</Set> <Set name="TrustStorePath"><SystemProperty default="." name="jetty.home"/>/etc/keystores/gems.jks</Set> <Set name="KeyStorePassword">OBF:1vn21ugu1saj1v9i1v941sar1ugw1vo0</Set> <Set name="KeyManagerPassword">OBF:19qb1lqa1wga1ky61kr51a4h1m0n18xt1l0w1wo19q3</Set> <Set name="TrustStorePassword">OBF:1vn21ugu1saj1v9i1v941sar1ugw1vo0</Set>
The passwords are obfuscated. The keyStorePassword and the trustStorePassword are typically identical andrepresent the Java keystore password. The keyManagerPassword is the challenge password for the certificate.
| Configuring BEMS-Core | 13
Certificate format
Any certificate used should be PKCS #12 and the private key must contain a challenge password. In addition,make sure that the certificate has the appropriate key chain. For example, the root and intermediate certificate.
Configuring HTTPS for BEMS to BlackBerry ProxyBy default, the Java keystore on the computer that hosts BEMS does not contain the CA root certificate forthe BlackBerry Proxy server. The BlackBerry Proxy server uses a certificate that is signed by the BlackBerryControl or BlackBerry UEM. This means that BEMS cannot verify the BlackBerry Proxy server’s SSL certificate; and,therefore, any HTTPS connection made from BEMS to the BlackBerry Proxy server fails.
Export the BlackBerry Proxy CA certificate chain to your desktop
If your environment enforces the use of SSL certificate validation when BEMS communicates with BlackBerryDynamics, you must export the root and intermediate BlackBerry UEM certificate chains used by the BlackBerryProxy and import them into the BEMS Java keystore.
Note: The following task is not browser-specific. For specific instructions, see the documentation for the browseryou are using in Windows Internet Explorer, Microsoft Edge, or Google Chrome.
1. In a browser, enter the FQDN of the BlackBerry Proxy server and port 17433 (for example, https://<BlackBerry_Proxy_server_FQDN>:17433). You may see a certificate error message because the certificatemight be signed by the BlackBerry UEM or Control CA or another internal CA, but the browser does notrecognize it as a well-known CA.
2. To open the Certificate dialog, click the certificate icon in the URL field.3. Click Certificate (Invalid).4. Click Certification Path.5. Click the root certificate. The root certificate is the first item in the Certificate hierarchy.6. Click View Certificate.7. Click the Details tab. 8. Click Copy to File. 9. Click Next. 10.Select Base-64 encoded X.509 (.CER).11.Click Next. 12.Enter name for the certificate and export it to your desktop (for example, bproot.cer).13.Click Save.14.Click Finish.15.Click OK.
After you finish: Import the BlackBerry Proxy CA certificate into the Java keystore on BEMS
Import the BlackBerry Proxy CA certificate into the Java keystore on BEMS
Before you begin: Save a copy of the bproot.cer certificate that you exported to a convenient location on thecomputer that hosts (for example, C:\bemscert). For instructions, see Export the BlackBerry Proxy CA certificatechain to your desktop.
1. On the computer that hosts BEMS, verify the Java directory is specified in the JAVA_HOME systemenvironment variable. In a command prompt, change to the %JAVA_HOME% folder. Type cd %JAVA_HOME%.For more information, see Configure the Java Runtime Environment.
| Configuring BEMS-Core | 14
2. Make a backup of the Java keystore file. The Java keystore file is located at %JAVA_HOME%\lib\security\cacerts, where JAVA_HOME is confirmed in Step 1.
3. Import the BlackBerry Proxy root certificate. In a command prompt, type bin\keytool.exe -importcert-trustcacerts -file"<drive>:\bemscert\bproot.cer" -keystore lib\security\cacerts-alias gdca -storepass changeit
The -alias value must be unique in the destination keystore. If it is duplicated, you might experience importerrors. You can output the cacerts keystore to a text file to manually confirm the existing certificates using atext editor. Type bin\keytool.exe -list -v -keystore lib\security\cacerts > c:\bemscert\cacertsoutput.txt
For more information about keystore commands, see Keystore commands.
Important: If you do not specify the -keystore parameter correctly or omit it, the keytool creates a newkeystore. BEMS services do not use the new keystore.”
4. If you did not import the BlackBerry Proxy root certificate into the Windows keystore, import it now. Forinstructions, see Import the BlackBerry Proxy CA certificate to the BEMS Windows keystore
5. Restart the Good Technology Common Services service in the Windows Service Manager.
After you finish: Configure the Core BEMS service for communicating to BlackBerry Dynamics. For instructions,see Configure the BlackBerry Dynamics server in BEMS.
Configure BEMS for the BlackBerry Connect app. For instructions, see Configure BEMS connectivitywith BlackBerry Dynamics.
Import the BlackBerry Proxy CA certificate to the BEMS Windows keystore
For the Connect service to trust the BlackBerry Proxy server’s certificate, you must import the BlackBerryProxyroot CA certificate to the Connect service Windows keystore.
1. Open the Microsoft Management Console.2. Click Console Root.3. Click File > Add/Remove Snap-in.4. Click Certificates.5. Select Computer Account > Local computer > OK.6. Expand Certificates (Local Computer) > Trusted Root Certification Authorities.7. Right-click Certificates, and click All Tasks > Import.8. Click Next.9. Browse to where you saved the BlackBerry Proxy CA certificate that you exported (for example <drive>:
\bemscert\bproot.cer). Click Open.10.Click Next. 11.Click Finish. Click OK.
After you finish: Configure the Core BEMS service for communicating to BlackBerry Dynamics. For instructions,see Configure the BlackBerry Dynamics server in BEMS.
Assign the BEMS SSL certificate to usersBy default, BEMS uses a self-signed certificate that is generated by the BEMS installer. If the BEMS SSL certificateis CA signed, export the CA root and intermediates as described in Replacing the auto-generated SSL certificate.
1. On the computer hosting BEMS, export the SSL certificate to a file.a) In the BlackBerry Enterprise Mobility Server Dashboard, under BEMS System Settings, click SSL
Certificate.b) Click Download SSL Certificate. By default, the BemsCert.cer file is saved to the Downloads folder.
| Configuring BEMS-Core | 15
2. In BlackBerry UEM, create a CA certificate profile for the BEMS Self-Signed certificate, or create individual CAcertificate profiles for the CA Root certificate and any CA Intermediate certificates. Assign the profiles to usersor user groups. For instructions on creating a CA certificate profile and assigning it to users or user groups,see the BlackBerry UEM administration content.
Note: In the Certificate file field, browse to the BemsCert.cer file you exported in step 1.
Import third-party server certificates into the BEMS Java keystoreIf your environment enforces the use of SSL certificate validation when BEMS communicates with the MicrosoftExchange Server, LDAP server or other third-party server, you must export the certificate and import it into theBEMS Java keystore.
Before you begin: The third-party server certificate is saved to your desktop.
1. Open a command prompt.2. Import the third-party server certificate chain that you saved to your desktop. Type keytool -importcert
-trustcacerts -alias <your_server_cert_alias> -file <your_cert>.cer -keystore<drive>:\Program Files\Java\jre<version>\lib\security\cacerts.
3. Restart the Good Technology Common Services from the Windows Service Manager.
Download certificates from the Cisco Unified Communications Manager and Cisco IM and Presenceservers into the BEMS Java keystoreYou must import the following certificates from the Cisco Unified Communications Manager (CUCM)and Cisco IM and Presence (CIMP) servers. For multi-server certificates, only one certificate per cluster mustbe imported. If the certificate is not a multi-server certificate, a copy must be downloaded from each CUCM andCIMP server in a cluster and imported separately.
• Tomcat.der
• If your environment uses a multi-server certificate, a single copy of the certificate downloaded from theCUCM Publisher and CIMP Publisher servers is required.
• If your environment does not use a multi-server certificate, a copy of the certificate downloaded from eachCUCM and CIMP node is required.
• Cup.der
• A copy of the certificate downloaded from each CIMP node is required.• Cup-xmpp.pem and Cup-xmpp-ECDSA.pem (in a Cisco 11.5 environment environment)
• If using a multi-server certificate, a single copy of the certificate downloaded from the CIMP Publisher isrequired.
• If not using a multi-server certificate, a copy of the certificate downloaded from each CIMP node isrequired.
1. Log on to the appropriate CUCM server.2. In the top-right Navigation drop-down list, click Cisco Unified OS Administration.3. Click Security > Certificate Management.4. Download the certificate named tomcat as a .der file.5. Log on to the appropriate CIMP server.6. In the top-right Navigation drop-down list, click Cisco Unified IM and Presence OS Administration.7. Click Security > Certificate Management.8. Download the cup-xmpp certificate and cup-xmpp-ECDSA certificate as a .pem file.9. Download the cup certificate as .der file.
| Configuring BEMS-Core | 16

After you finish: Import these certificates into the BEMS Java keystore. For instructions, see Import third-partyserver certificates into the BEMS Java keystore .
Keystore commandsThe following table lists the keystore commands that are available at the command line. For more informationabout using the Java keytool, visit docs.oracle.com/javase/8/docs/technotes/tools/windows/keytool.html.
Action Command
Check which certificates arecurrently in the keystore
keytool -list -v -keystore <keystore file>
Export a list of the certificates thatare currently in the keystore
keytool.exe -list -v -keystore lib\security\cacerts >c:\bemscert\cacertsoutput.txt
Export a certificate from thekeystore
keytool -exportcert -alias <alias_name> -file<file_name>.crt -keystore <keystore file>
Check a standalone certificate keytool -printcert -v -file <filename>.crt
Delete a certificate from thekeystore
keytool -delete -alias <alias_name> -keystore<keystore file>
Import a signed primary certificateto an existing BEMS Java keystore
keytool -importcert -trustcacerts -alias <alias_name>-file <file_name>.crt -keystore <keystore file>
Import a certificate into BEMSJavakeystore
keytool -importcert -trustcacerts -alias<cert_alias_name> -file <your_cert>.cer -keystore“<drive>:\Program Files\Java\jre1.8.0_<version>\lib\security\cacerts”
Add dashboard administratorsYou add groups using Microsoft Active Directory groups to the Dashboard Administrators setting and givemembers of the group dashboard login and configuration permissions. You can add one or more groups, but thegroup must be a part of the security groups. Users who are members of the Local Administrators group can alsolog in to BEMS Dashboard and have configuration rights.
1. In the BlackBerry Enterprise Mobility Server Dashboard, under BEMS System Settings, click BEMSConfiguration.
2. Click Dashboard Administrators.3. Click Add Group.4. In the Active Directory Security Group field, type the name of the Microsoft Active Directory security group.5. Click Save.6. Repeat steps 3 to 5 to add additional security groups.
| Configuring BEMS-Core | 17
Configure the BlackBerry Dynamics server in BEMSYour BEMS environment must be configured to trust the Root CA for the BlackBerry Proxy HTTPS configuration orimplement the Karaf workaround. For instructions, see Importing and configuring certificates.
The BlackBerry Dynamics server information in the following instructions refers to the FQDN of the serverthat hosts the BlackBerry Proxy service. The BlackBerry Proxy service is installed on on-premises BlackBerryUEM servers that have the BlackBerry Connectivity Node. The BlackBerry Connectivity Node is requiredfor some BlackBerry UEM Cloud deployments when they link a company directory to the BlackBerry UEMCloud tenant, and to offer on-premises connectivity to BlackBerry Dynamics users activated using the BlackBerryUEM Cloud. For more information about the BlackBerry Connectivity Node, see the BlackBerry UEM Planningcontent.
1. In the BlackBerry Enterprise Mobility Server Dashboard, under BEMS System Settings, click BEMSConfiguration.
2. Click BlackBerry Dynamics.3. Complete one of the following actions:
Task Steps
If a BlackBerry Proxy server is not defined a. Click Add BlackBerry Proxy.b. In the Host Name field, type the FQDN of the
server that hosts the BlackBerry Proxy service. c. In the Protocol drop-down list, select the protocol
used to communicate with the BlackBerryProxy server.
• If you select HTTPS, the Port fieldprepopulates to 17433.
• If you select HTTP, the Port field prepopulatesto 17080.
d. Click Test to test the connection.e. Repeat steps 1 to 4 to add additional BlackBerry
Proxy servers for redundancy continuity.
If one or more BlackBerry Proxy servers are defined No action is required. Previously defined BlackBerryProxy servers are listed.
4. Select the Apply to other nodes in the BEMS cluster check box to communicate the BlackBerry Proxy serverinformation to all of the BEMS nodes in the cluster.
5. Optionally, select the Enforce the SLL Certificate validation when communicating with BlackBerryDynamics check box when you use the https protocol to communicate with the BlackBerry Proxy server.
6. Click Save.
Configure a web proxy server for the Push Notifications serviceBecause APNS pushes are sent using the BlackBerry Dynamics NOC, which resides outside of your enterprisenetwork, a proxy server might be required to access the BlackBerry Dynamics NOC.
| Configuring BEMS-Core | 18
1. In the BlackBerry Enterprise Mobility Server Dashboard, under BEMS System Settings click BEMSConfiguration.
2. Click Web Proxy.3. Select the Use Web Proxy checkbox.4. In the Proxy Address field, enter the FQDN of the web proxy server.5. In the Proxy Port field, type the port number.6. Optionally, depending on your environment configuration you can specify URLs or domains that you want to
pass through the web proxy server or bypass the web proxy server. If you enter multiple URLs or domains,separate them with a comma (,).
7. In the Proxy Server Authentication Type drop-down list, select an authentication type. By default, theauthetication is set to None.If you choose Basic or NTLM authentication, enter the credentials and, optionally, the Domain.
8. Select the Use the same web proxy settings to connect to an externally hosted Exchange checkbox, if youwant to use the web proxy to communicate with a hosted Microsoft Exchange Server (cloud deployed).
9. Select the Apply to other nodes in the BEMS cluster check box to communicate the BlackBerry Proxy serverinformation to all of the BEMS nodes in the cluster.
10.Click Test to verify the connection to the proxy server.11.Click Save.12.Restart the Good Technology Common Services in the Windows Services Manager.
Enable log file compressionYou can compress the log files that are generated and saved in the default log folder or folder you specifiedduring the installation of BEMS. Currently, log files are generated and rotated when they reach 100 MB in size.When you enable log compression, log files can be larger than 100 MB. When a log file exceeds 100 MB, it iscompressed and saved to the appropriate log file folder. By default, log file compression is disabled.
1. In the BlackBerry Enterprise Mobility Server Dashboard, under BEMS System Settings click BEMSConfiguration.
2. Click log Log Settings.3. Select the Enable Log Compression.4. Click Save.
Uploading BEMS log and statistical informationThe BEMS Dashboard provides several aids for collecting troubleshooting data.
Troubleshooting aid Description
Log Upload Credentials Enter your username and password that you use to log on to theBlackBerry Online Portal.
Note: These credentials are not stored, and are only used to ensure thatthis BEMS is authorized for log uploads.
| Configuring BEMS-Core | 19
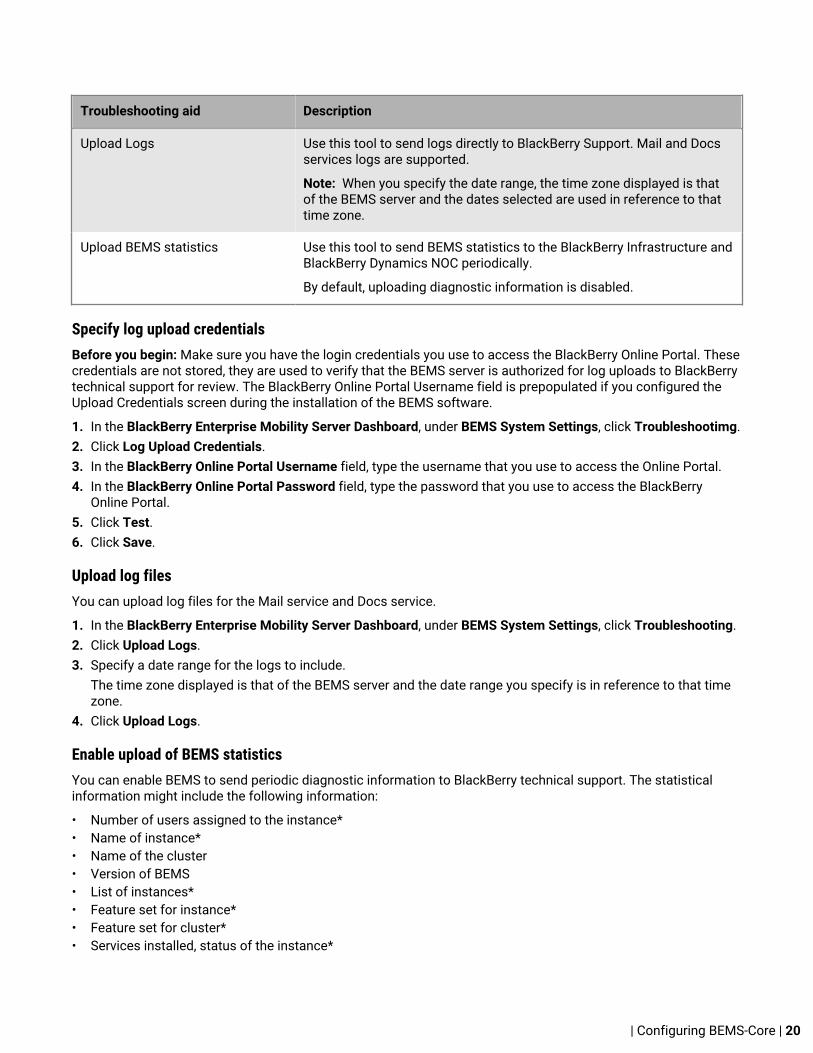
Troubleshooting aid Description
Upload Logs Use this tool to send logs directly to BlackBerry Support. Mail and Docsservices logs are supported.
Note: When you specify the date range, the time zone displayed is thatof the BEMS server and the dates selected are used in reference to thattime zone.
Upload BEMS statistics Use this tool to send BEMS statistics to the BlackBerry Infrastructure andBlackBerry Dynamics NOC periodically.
By default, uploading diagnostic information is disabled.
Specify log upload credentialsBefore you begin: Make sure you have the login credentials you use to access the BlackBerry Online Portal. Thesecredentials are not stored, they are used to verify that the BEMS server is authorized for log uploads to BlackBerrytechnical support for review. The BlackBerry Online Portal Username field is prepopulated if you configured theUpload Credentials screen during the installation of the BEMS software.
1. In the BlackBerry Enterprise Mobility Server Dashboard, under BEMS System Settings, click Troubleshootimg.2. Click Log Upload Credentials.3. In the BlackBerry Online Portal Username field, type the username that you use to access the Online Portal.4. In the BlackBerry Online Portal Password field, type the password that you use to access the BlackBerry
Online Portal.5. Click Test.6. Click Save.
Upload log filesYou can upload log files for the Mail service and Docs service.
1. In the BlackBerry Enterprise Mobility Server Dashboard, under BEMS System Settings, click Troubleshooting.2. Click Upload Logs.3. Specify a date range for the logs to include.
The time zone displayed is that of the BEMS server and the date range you specify is in reference to that timezone.
4. Click Upload Logs.
Enable upload of BEMS statisticsYou can enable BEMS to send periodic diagnostic information to BlackBerry technical support. The statisticalinformation might include the following information:
• Number of users assigned to the instance*• Name of instance*• Name of the cluster• Version of BEMS• List of instances*• Feature set for instance*• Feature set for cluster*• Services installed, status of the instance*
| Configuring BEMS-Core | 20

• JVM Version• Last restart time• System bugs• Operating system• Schema version• System health
* The Mail service must be installed for this information to be retrieved. This page is prepopulated if youconfigured the Upload Credentials screen during the installation of the BEMS software.
1. In the BlackBerry Enterprise Mobility Server Dashboard, under BEMS System Settings, click Troubleshooting.2. Click Upload BEMS statistics.3. Select the Allow this BEMS server to send diagnostic information to BlackBerry Support checkbox.4. Type your cluster name and domain name. By default, the Upload Interval is 30 minutes.5. Click Save.
Firebase Push NotificationsConfigure FCM to send notifications to Android devices when the BlackBerry Work 2.13 or later appand BlackBerry Connect 2.7 or later app are in the background. If you configured your environment for GoogleCloud Messaging, no additional configuration is required after you upgrade. The BEMS Dashboard automaticallyassociates the GCM configuration with the FCM configuration.
1. In the BlackBerry Enterprise Mobility Server Dashboard, under BEMS System Settings click BEMSConfiguration.
2. Click Firebase Push Notification. 3. In the FCM Sender ID field, type the Sender ID value of the project you created in Firebase. For instructions,
see Create Firebase Cloud Messaging API keys4. In the FCM API key field, enter the Server key value of the project you created in Firebase.5. Click Save.
Create Firebase Cloud Messaging API keysThese are the details for obtaining keys for the Firebase Cloud Messaging (FCM) API, which is used by BEMS tobe able to send new mail notifications to Android devices. Google now uses the new service Firebase, replacingthe Google Cloud Messaging (GCM) API site and project spaces. For more information about creatingthe Firebase Cloud Messaging API Keys, visit http://support.blackberry.com/kb to read article 44617.
Before you begin: You must have a Google account.
1. In a browser, open https://console.firebase.google.com/ and log in with a valid account.2. Click Create New Project. 3. In the Create a project dialog box, type a project name and select the Country/region you are located in. 4. Click Create Project.5. In the upper left-hand side of the screen, click > Project settings.6. Click Cloud Messaging.7. Copy the value of Server key. This is used as the FCM API Key value in the BEMS Dashboard. 8. Copy the value of Sender ID. This is used as the FCM Sender ID value in the BEMS Dashboard.
| Configuring BEMS-Core | 21

Configuring BEMS servicesYou can configure one or more services and in any order based on your organization's requirements. When youconfigure the BEMS services, you configure one or more of the following services:
• BlackBerry Push Notifications• BlackBerry Connect• BlackBerry Presence• BlackBerry Docs• BlackBerry Dynamics Launcher• BlackBerry Certificate Lookup
Configuring the Push Notifications serviceWhen you configure BEMS for Push Notifications support of the BlackBerry Work app, which includes mail,contacts, and calendar, you perform the following:
• Configure the Mail service in the BEMS dashboard• Configure BlackBerry UEM for BlackBerry Work• Optionally, configure the Push Notifications service for high availability
Configuring Push NotificationsWhen you configure the Mail service, you perform the following actions:
Important: Complete the configuration in the following order to avoid connectivity issues.
1. Database2. Microsoft Exchange Server3. Stop Notifications4. User Directory Lookup5. Certificate Directory Lookup
Configure the Microsoft SQL Server database for Push Notifications service
1. In the BlackBerry Enterprise Mobility Server Dashboard, under BlackBerry Services Configuration, click Mail. 2. Click Database. 3. In the Server field, verify the Microsoft SQL Server host name and instance. This field is prepopulated with
the information you provided during the BEMS installation. The Microsoft SQL Server must be in the followingformat: <SQLServer_hostname>\<instance_name>. If you configured the database for an AlwaysOn Availability Group, set the server to the AlwaysOn ListenerFQDN. Do not use the cluster name or host name of the server in the cluster.
4. In the Database field, verify the database name. For example, BEMS-Core. If you configured the database for an AlwaysOn Availability Group, set the database to the name of thedatabase added to the AlwaysOn Availability Group.
5. In the Authentication Type drop-down list, complete one of the following tasks:
• If you select Windows Authentication, the Push Notifications service uses the Windows credentials toaccess the Microsoft SQL Server database.
• If you select SQL Server Login, type the username and password used to access the Microsoft SQLServer database.
| Configuring BEMS services | 22

6. If your organization uses AlwaysOn support for SQL Server, in the Additional Properties field,type MultiSubnetFailover=true.
7. Click Test.8. Click Save. 9. Restart the Good Technology Common Services in the Windows Services Manager.
Configure BEMS to communicate with the Microsoft Exchange Server or Microsoft Office 365
You must allow BEMS to authenticate to Microsoft Exchange Server or Microsoft Office 365 to access users’mailboxes and send notifications to users’ devices when new email is received on the device.
Before you begin:
• Verify that the service account has impersonation rights on the Microsoft Exchange Server. Forinstructions, see Grant application impersonation permission to the BEMS service account.
• In a Microsoft Office 365 environment, if you plan to enable Modern Authentication, verify that you completedthe following:• If you enable Modern Authentication using Credential, the Client Application ID.• If you enable Modern Authentication using a Client Certificate,
• the Client Application ID with certificate based authentication• request and associate the .pfx certificate with the Azure app ID for BEMS
1. In the BlackBerry Enterprise Mobility Server Dashboard, under BlackBerry Services Configuration, click Mail.2. Click Microsoft Exchange. 3. In the Select Authentication type section, select an authentication type based on your environment
and complete the associated tasks to allow BEMS to communicate with the Microsoft ExchangeServer or Microsoft Office 365:
Authenticationtype Environment Description Task
Integrated MicrosoftExchangeServer on-premises
This optionuses Windows authenticationcredentials toauthenticate tothe MicrosoftExchange Server.
No additional actions are required.
Credential • MicrosoftExchangeServer on-premises
• MicrosoftOffice 365
This option usesthe BEMS usernameand passwordto authenticateto the MicrosoftExchangeServer or MicrosoftOffice 365.
a. In the Username field, enter the usernameof the BEMS service account.
• For Microsoft Office 365, enter theservice account's User Principal Name(UPN).
• For on-premises Microsoft ExchangeServer, use the format <domain>\<username>.
b. In the Password field, enter the passwordfor the service account.
| Configuring BEMS services | 23
Authenticationtype Environment Description Task
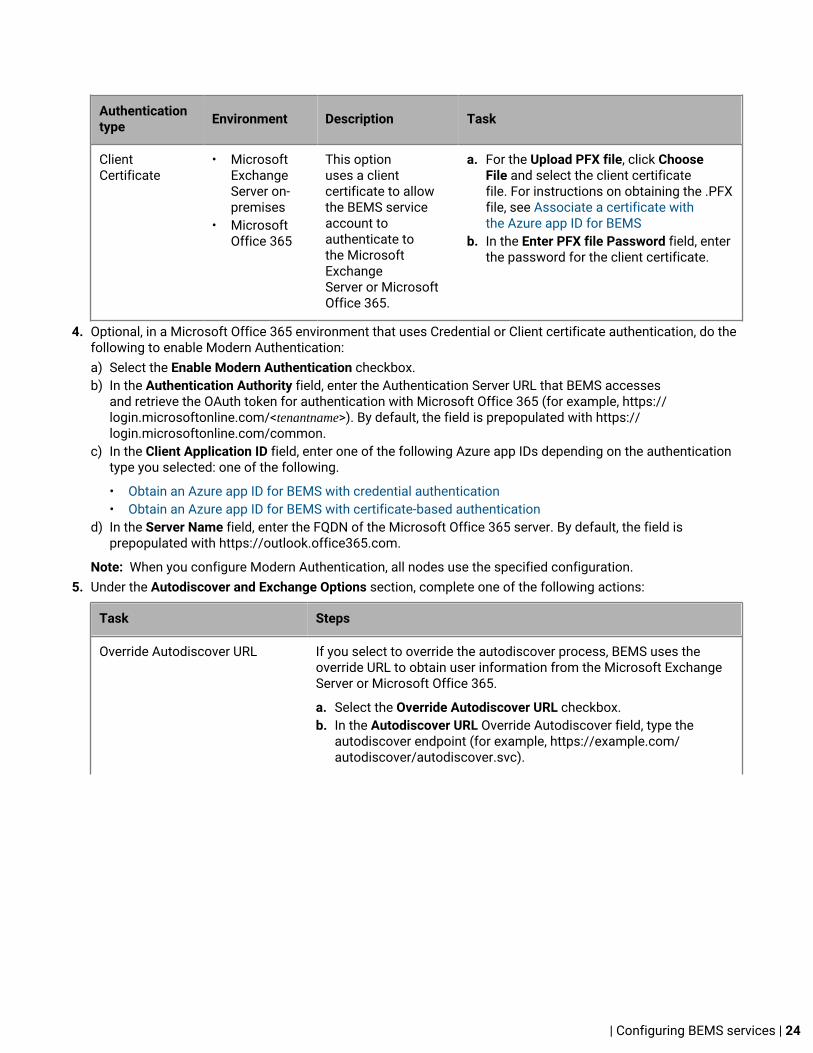
ClientCertificate
• MicrosoftExchangeServer on-premises
• MicrosoftOffice 365
This optionuses a clientcertificate to allowthe BEMS serviceaccount toauthenticate tothe MicrosoftExchangeServer or MicrosoftOffice 365.
a. For the Upload PFX file, click ChooseFile and select the client certificatefile. For instructions on obtaining the .PFXfile, see Associate a certificate withthe Azure app ID for BEMS
b. In the Enter PFX file Password field, enterthe password for the client certificate.
4. Optional, in a Microsoft Office 365 environment that uses Credential or Client certificate authentication, do thefollowing to enable Modern Authentication: a) Select the Enable Modern Authentication checkbox.b) In the Authentication Authority field, enter the Authentication Server URL that BEMS accesses
and retrieve the OAuth token for authentication with Microsoft Office 365 (for example, https://login.microsoftonline.com/<tenantname>). By default, the field is prepopulated with https://login.microsoftonline.com/common.
c) In the Client Application ID field, enter one of the following Azure app IDs depending on the authenticationtype you selected: one of the following.
• Obtain an Azure app ID for BEMS with credential authentication• Obtain an Azure app ID for BEMS with certificate-based authentication
d) In the Server Name field, enter the FQDN of the Microsoft Office 365 server. By default, the field isprepopulated with https://outlook.office365.com.
Note: When you configure Modern Authentication, all nodes use the specified configuration. 5. Under the Autodiscover and Exchange Options section, complete one of the following actions:
Task Steps
Override Autodiscover URL If you select to override the autodiscover process, BEMS uses theoverride URL to obtain user information from the Microsoft ExchangeServer or Microsoft Office 365.
a. Select the Override Autodiscover URL checkbox. b. In the Autodiscover URL Override Autodiscover field, type the
autodiscover endpoint (for example, https://example.com/autodiscover/autodiscover.svc).
| Configuring BEMS services | 24

Task Steps
Autodiscover and MicrosoftExchange Server options
a. Select the Swap ordering of <domain.com>/autodiscover andautodiscover. <domain.com>/autodiscover check box to assist inresolving the autodiscover URL. Consider selecting this option if theorder results in timeouts or other failures.
b. Optionally, modify the TCP Connect timeout for Autodiscoverurl (milliseconds) field as required to prevent failures whenautodiscovery takes too long. By default, the timeout is set to120000. The recommended timeout for the Autodiscover url isbetween 5000 milliseconds (5 seconds) and 120000 milliseconds(120 seconds).
c. By default, the Enable SCP record lookup checkbox is selected. Ifyou clear the checkbox, BEMS does not perform a Microsoft ActiveDirectory lookup of Autodiscover URLs. This option is not availablewhen Override Autodiscover URL is selected.
d. Optionally, select the Use SSL connection when doing SCPlookup check box to allow BEMS to communicate withthe Microsoft Active Directory using SSL. If you enable this feature,you must import the Microsoft Active Directory certificate to eachcomputer that hosts an instance of BEMS. This option is notavailable when Override Autodiscover URL is selected.
e. By default the Enforce SSL Certificate validation whencommunicating with Microsoft Exchange and LDAP server checkbox is selected. If you clear this setting and use an un-trustedcertificate, then the connection to the on-premises MicrosoftExchange Server fails.
f. By default, the Allow HTTP redirection and DNS SRV record checkbox is selected. If you clear the checkbox, you disable HTTPRedirection and DNS SRV record lookups for retrieving theAutodiscover URL when discovering users for BlackBerryWork Push Notifications.
g. Optionally, select the Force re-autodiscover of user on allMicrosoft Exchange errors checkbox to force BEMS to performthe autodiscover again for the user when the Microsoft ExchangeServer or Microsoft Office 365 returns an error message.
6. In the End User Email Address field, type an email address to test connectivity to the Microsoft ExchangeServer or Microsoft Office 365 using the service account. You can delete the email address after you completethe test.If the service account is correctly configured and the test fails, BEMS is attempting to communicate withan Microsoft Exchange Server that is not using a trusted SSL Certificate. If your Microsoft Exchange Server isnot set up to use a trusted SSL certificate, see Importing CA Certificates for BEMS.
7. Click Save.
After you finish: If you selected Client Certificate authentication, you can view the certificate information.Click Mail. The following certificate information is displayed:
• Subject• Issuer• Validation period• Serial number
| Configuring BEMS services | 25
Obtain an Azure app ID for BEMS with credential authentication
1. Log on to portal.azure.com.2. In the left column, click Azure Active Directory.3. Click App registrations.4. Click New application registration.5. In the Name field, enter a name for the application.6. In the Application type drop-down list, select Native.7. In the Redirect URI field, enter https://localhost:84438. Press Enter.9. Click Create.10.Select the application name that you created.11.Click Settings.12.Click Required permissions.13.Click Add.14.Click Select an API.15.Select Office 365 Exchange Online (Microsoft Exchange).16.Click Select.17.Set the Access mailboxes as the signed-in user via Exchange Web Service permission for Microsoft Office
365.18.Click Select.19.Click Done.20.Click Grant Permissions.21.Click Yes.22.Click Add.23.Click Select an API24.Click Microsoft Graph.25.Click Select.26.In the Delegated Permissions section, select the Sign in and read user profile checkbox.27.Click Select.28.Click Done.29.Click Grant Permissions. 30.Click Yes. 31.Copy the Application ID. The Application ID is displayed in the main App Registrations page for the specified
app. This is used as the Client application ID.
Obtain an Azure app ID for BEMS with certificate-based authentication
1. Log in to portal.azure.com.2. In the left column, click Azure Active Directory.3. Click App registrations.4. Click New application registration.5. In the Name field, enter a name for the app.6. In the Application type drop-down list, select Web app / API.
| Configuring BEMS services | 26
7. In the Sign-on URI field, enter http://<name of the app given in step 5>This app is a daemon, not a web app, and does not have a sign-on URL.
8. Press Enter. 9. Click Create.10.Select the app name that you created.11.Click Settings.12.In the Settings column, click Properties.13.In the Properties column, copy the Appl ID URI.14.Click Required permissions.15.Click Add.16.Click Select an API.17.Select Office 365 Exchange Online (Microsoft Exchange).18.Click Select.19.In the Select an Application Permissions section, select the Use Exchange Web Service with full access to all
mailboxes checkbox.20.Click Select.21.Click Done.22.Click Grant Permissions.23.Click Yes.24.Click Add.25.Click Select an API26.Click Microsoft Graph.27.Click Select.28.In the Delegated Permissions section, select the Sign in and read user profile checkbox.29.Click Select.30.Click Done.31.Click Grant Permissions. 32.Click Yes. 33.Copy the Application ID. The Application ID is displayed in the main App Registrations page for the specified
app. This is used as the Client application ID.34.Do not close portal.azure.com.
After you finish: Associate a certificate with the Azure app ID for BEMS
Associate a certificate with the Azure app ID for BEMS
You can use an existing certificate from your CA server or the New-SelfSignedCertificate command to create aself-signed certificate. For more information, visit docs.microsoft.com and read New-SelfSignedCertificate.
Before you begin: Verify that you have the app name you assigned in BEMS with certificate-based authentication.For instructions, see Obtain an Azure app ID for BEMS with certificate-based authentication
1. If you have a certificate issued by a CA server, go to step 2. Create a self-signed certificate.a) On the computer running Microsoft Windows, open the Windows PowerShell.b) Enter the following command: $cert=New-SelfSignedCertificate -Subject "CN=<app name>"
-CertStoreLocation "Cert:\CurrentUser\My" -KeyExportPolicy Exportable -KeySpecSignature
| Configuring BEMS services | 27
• Where <app name> is the name you assigned the app in step 5 of Obtain an Azure app ID for BEMS withcertificate-based authentication.
c) Press Enter.2. Export the certificate from the MicrosoftManagement Console (MMC). This creates the public certificate.
Make sure to save the public certificate as a .CER or .PEM.a) On the computer running Windows, open the Certificate Manager for the logged in user. b) Expand Personal.c) Click Certificates.d) Right-click the <user>@<domain> and click All Tasks > Export.e) In the Certificate Export Wizard, click No, do not export private key..f) Click Next.g) Select Base-64 encoded X.509 (.CER). Click Next.h) Provide a name for the certificate and save it to your desktop.i) Click Next.j) Click Finish.k) Click OK.
3. Upload the public certificate to associate the certificate credentials with the Azure app ID for BEMS. a) In portal.azure.com, open the <app name> you assigned the app in step 5 of Obtain an Azure app ID
for BEMS with certificate-based authentication.b) Click Settings > Keys.c) Click Upload Public Key.d)
Click and navigate to the location where you exported the certificate in step 2. e) Click Open.f) Click Save.
After you finish: Export the certificate in .pfx format using the Manage User Certificate MMC snap-in. Make sureto include the private key. For instructions, visit docs.microsoft.com and read Export a Certificate with the PrivateKey.
Troubleshooting the Push Notifications database
BEMS cannot connect to the Push Notifications database
Possible cause
The Microsoft Exchange configuration information was applied before the Database information.
Possible solution
1. Restart the Good Technology Common Services.2. Verify the Database information. For instructions, see Configure the Microsoft SQL Server database for Push
Notifications service3. Repopulate the Microsoft Exchange Server information. For instructions, see Configure BEMS to communicate
with the Microsoft Exchange Server or Microsoft Office 365
| Configuring BEMS services | 28

Configure Stop Notifications
By default, notifications are sent to a user's device and are regulated by timers. The Stop Notifications featureallows you to immediately stop notification for all devices associated with a particular user. A user canresubscribe to notifications, but only if the user is entitled to an app that can subscribe to notification services.
1. In the BlackBerry Enterprise Mobility Server Dashboard, under BlackBerry Services Configuration, click Mail.2. Click Stop Notifications.3. In the User Email Address field, type the email address of the user you want to stop notifications for.4. Click Save.
Configure User Directory Lookup
The User Directory Lookup service allows client apps to look up first name, last name, and the associated photoor avatar from your company directory. A User ID Property Name determines whether query results from varioussources, such as Microsoft Exchange Web Services (EWS) and LDAP, correspond to the same user and maytherefore be consolidated into a single result.
1. In the BlackBerry Enterprise Mobility Server Dashboard, under BlackBerry Services Configuration, click Mail.2. Click User Directory Lookup.3. In the User ID Property Name field, type the name of the property that identifies the user. By default, this is
"Alias".4. Select the Enable GAL Lookup checkbox, the Enable LDAP Lookup checkbox, or both.5. If you enable LDAP lookup, you can use it to validate digital certificate connections to the LDAP server.
a) In the LDAP Server Name field, type the name of the LDAP Server. For example, ldap.<DNS_domain_name>.b) In the LDAP Server port field, type the port number of the LDAP Server. By default, the port number is 389.c) Optionally, select the Enable SSL LDAP checkbox to tunnel data through an SSL-encrypted connection. If
you enable SSL LDAP, the port number defaults to 636.d) Optionally, edit the LDAP User Name Query Template field. The LDAP user name query searches for a user
by their user name. BEMS replaces the "{key}" with the user name when performing the query. By default,the template is
(&(|(mail=*{key}*)(name=*{key}*)(displayName=*{key}*)(sAMAccountName=*{key}*) (givenName=*{key}*)(sn=*{key}*))(objectClass=user)(objectCategory=person)(!(userAccountControl:1.2.840.113556.1.4.803:=2)))
e) Optionally, in the LDAP Base DN field, provide a base DN for the LDAP search. If this field is not completed,BEMS tries to find the base DN in the namingContexts attribute.
f) In the Authentication Type drop-down list, select an authentication type. By default the Authentication Typeis Anonymous.
• If you select Basic, enter the LDAP Logon User name and password.• If you selected the Enable SSL LDAP checkbox, and select Certificate authentication, enter the keystore
password and add the certificate file.g) In the User search key field, type a username or email address to search for.h) Click Test.
6. Click Save.
Searching for users by phone number
BEMS supports users searching for other users in the GAL by phone number.
To allow BEMS to support this feature, your environment must meet the following requirements:
| Configuring BEMS services | 29
• The Microsoft Active Directory phone attributes must be indexed and enabled for ANR• The phone number must be in one of the following formats:
• +1 (555) 123 4567• +1.555.123.4567• +1-555-123-4567• 15551234567• 555.123.4567• +1 5551234567
By default, the phone attribute is disabled for GAL search.
Enable contact lookup by phone number
To allow users in your environment to lookup contacts using their phone number, use the Microsoft ActiveDirectory schema MMC snap-in to index and enable ANR for the applicable phone attributes.
Before you begin: The phone number must be in a supported format. For a list of supported formats, seeSearching for users by phone number.
1. Click the Attributes folder in the snap-in.2. In the right panel, right-click the desired attribute, and then click Properties.3. Select the Index this attribute check box.4. Select the Ambiguous Name Resolution (ANR) check box.5. Click OK.6. If you have multiple phone attributes, repeat steps 2 to 5 for each attribute.
Configure the Certificate Directory Lookup
The Certificate Directory Lookup service retrieves S/MIME digital certificates from the user's Microsoft ActiveDirectory. These certificates enable email encryption and signature functionality in BlackBerry Work apps. Formore information about configuring and using S/MIME on devices, see the Client Certificates for BlackBerryWork Product Guide.
1. In the BlackBerry Enterprise Mobility Server Dashboard, under BlackBerry Services Configuration, click Mail. 2. Click Certificate Directory Lookup. 3. Optionally, select the Include expired certificates in results checkbox.4. By default, the Enable Contact Lookup checkbox and Enable GAL Lookup checkbox are selected.5. Optionally, select the Enable LDAP Lookup checkbox. 6. If you select LDAP lookup, you can use it to validate digital certificate connections to the LDAP server.
a) In the LDAP Server Name field, type the name of the LDAP Server. For example, ldap.<DNS_domain_name>. b) In the LDAP Server port field, type the port number of the LDAP Server. By default, the port number is 389.c) Optionally, select the Enable SSL LDAP checkbox to tunnel data through an SSL-encrypted connection. If
you enable SSL LDAP, the port number defaults to 636. d) Optionally, edit the LDAP User Name Query Template field. The LDAP user name query searches for a user
by their user name. BEMS replaces the "{key}" with the user name when performing the query. The defaulttemplate is
(&(|(mail=*{key}*)(name=*{key}*)(displayName=*{key}*)(sAMAccountName=*{key}*) (givenName=*{key}*)(sn=*{key}*))(objectClass=user)(objectCategory=person)(!(userAccountControl:1.2.840.113556.1.4.803:=2)))
| Configuring BEMS services | 30

e) Optionally, in the LDAP Base DN field, provide a base DN for the LDAP search. BEMS will try to find the baseDN in the namingContexts attribute if this entry is not set. If this field is not completed, BEMS tries to findthe base DN in the namingContexts attribute.
f) In the Authentication Type drop-down list, select an authentication type. By default the Authentication Typeis Anonymous.
• If you select Basic, enter the LDAP Logon User name and password. • If you selected the Enable SSL LDAP checkbox, and select Client Certificate authentication, enter the
keystore password and certificate file.g) In the End User Email Address field, type an enduser email address to search for.h) Click Test.
7. Click Save.
After you finish: If you selected Certificate authentication, you can view the certificate information.Click Certificate Directory Lookup. The following certificate information is displayed:
• Subject• Issuer• Validation period• Serial number
Configuring BlackBerry UEM for BlackBerry Work, BlackBerry Tasks, and BlackBerry NotesWhen you use BEMS in a BlackBerry UEM environment, you must prepare the BlackBerry UEM by completing thefollowing tasks:
• If required, synchronize your existing Good Control server information, such as policies and profiles,to BlackBerry UEM.
• Manage BlackBerry Dynamics apps, such as BlackBerry Work, by adding them to BlackBerry UEM. • Manage users and groups.• Activate devices.
For more information about configuring BlackBerry UEM for BlackBerry Work, BlackBerry Tasks, and BlackBerryNotes, see the BlackBerry Work, BlackBerry Tasks, and BlackBerry Notes Administration content.
Set the detailed Notifications Cutoff TimeIf BlackBerry Work has not been unlocked and actively used on a device after a specified time, the BEMS PushNotifications service removes details about individual email messages from Notifications that are displayed onthe device. Message details in Notifications sent by the BEMS Push Notifications service resumes the next timeBlackBerry Work is unlocked and used on the device.
1. Open a browser and go to the Apache Karaf Web Console Configuration web site located at http://<fqdn_of_the_bems_host:8443/system/console/configMgr and login as administrator with theappropriate Microsoft Active Directory credentials.
2. On the menu, click OSGi > Configuration.3. Click Good Technology Email Push Coalescing.4. In the pushDowngradeCutoffSec field, increase or decrease the value, in seconds, as required. The default
value is 43200 seconds or 12 hours. The maximum value is 259200 seconds, or 3 days.5. Click Save.
Configuring the Push Notifications service for high availabilityHigh availability for the Push Notifications service is based on clustering. The Push Notifications servicesupports high availability by adding additional servers running Push Notifications. The BEMS instances that
| Configuring BEMS services | 31
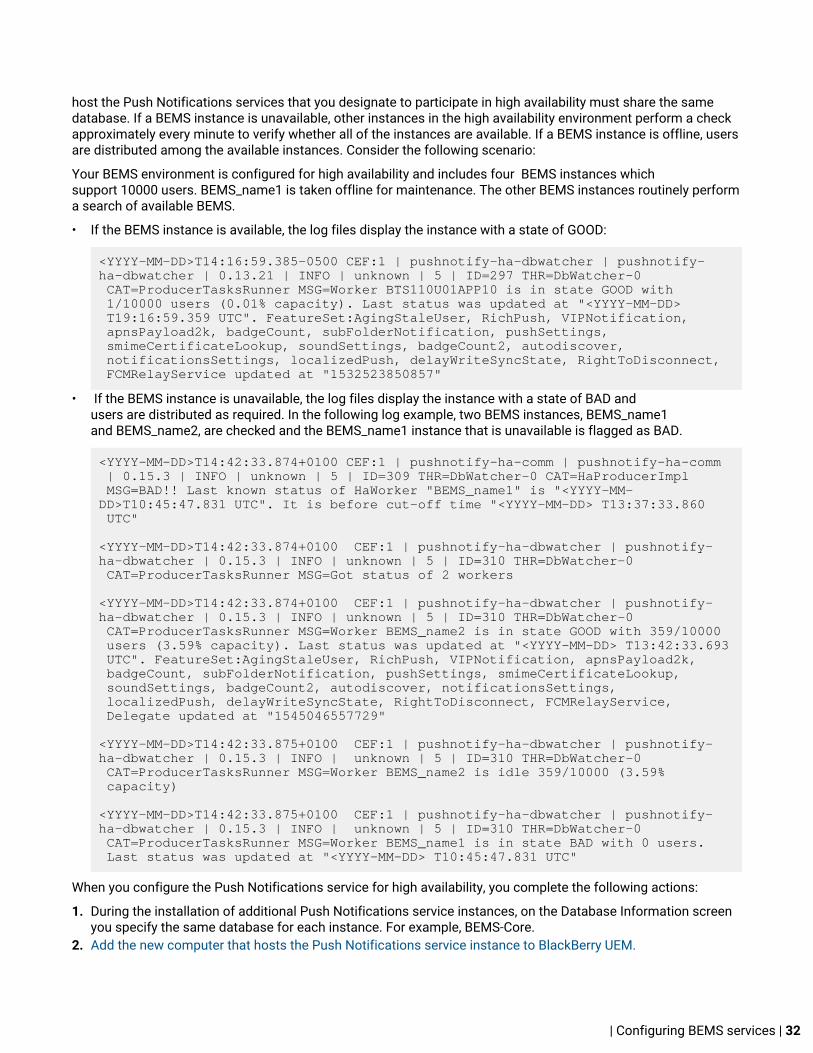
host the Push Notifications services that you designate to participate in high availability must share the samedatabase. If a BEMS instance is unavailable, other instances in the high availability environment perform a checkapproximately every minute to verify whether all of the instances are available. If a BEMS instance is offline, usersare distributed among the available instances. Consider the following scenario:
Your BEMS environment is configured for high availability and includes four BEMS instances whichsupport 10000 users. BEMS_name1 is taken offline for maintenance. The other BEMS instances routinely performa search of available BEMS.
• If the BEMS instance is available, the log files display the instance with a state of GOOD:
<YYYY-MM-DD>T14:16:59.385-0500 CEF:1 | pushnotify-ha-dbwatcher | pushnotify-ha-dbwatcher | 0.13.21 | INFO | unknown | 5 | ID=297 THR=DbWatcher-0 CAT=ProducerTasksRunner MSG=Worker BTS110U01APP10 is in state GOOD with 1/10000 users (0.01% capacity). Last status was updated at "<YYYY-MM-DD> T19:16:59.359 UTC". FeatureSet:AgingStaleUser, RichPush, VIPNotification, apnsPayload2k, badgeCount, subFolderNotification, pushSettings, smimeCertificateLookup, soundSettings, badgeCount2, autodiscover, notificationsSettings, localizedPush, delayWriteSyncState, RightToDisconnect, FCMRelayService updated at "1532523850857"
• If the BEMS instance is unavailable, the log files display the instance with a state of BAD andusers are distributed as required. In the following log example, two BEMS instances, BEMS_name1and BEMS_name2, are checked and the BEMS_name1 instance that is unavailable is flagged as BAD.
<YYYY-MM-DD>T14:42:33.874+0100 CEF:1 | pushnotify-ha-comm | pushnotify-ha-comm | 0.15.3 | INFO | unknown | 5 | ID=309 THR=DbWatcher-0 CAT=HaProducerImpl MSG=BAD!! Last known status of HaWorker "BEMS_name1" is "<YYYY-MM-DD>T10:45:47.831 UTC". It is before cut-off time "<YYYY-MM-DD> T13:37:33.860 UTC"
<YYYY-MM-DD>T14:42:33.874+0100 CEF:1 | pushnotify-ha-dbwatcher | pushnotify-ha-dbwatcher | 0.15.3 | INFO | unknown | 5 | ID=310 THR=DbWatcher-0 CAT=ProducerTasksRunner MSG=Got status of 2 workers
<YYYY-MM-DD>T14:42:33.874+0100 CEF:1 | pushnotify-ha-dbwatcher | pushnotify-ha-dbwatcher | 0.15.3 | INFO | unknown | 5 | ID=310 THR=DbWatcher-0 CAT=ProducerTasksRunner MSG=Worker BEMS_name2 is in state GOOD with 359/10000 users (3.59% capacity). Last status was updated at "<YYYY-MM-DD> T13:42:33.693 UTC". FeatureSet:AgingStaleUser, RichPush, VIPNotification, apnsPayload2k, badgeCount, subFolderNotification, pushSettings, smimeCertificateLookup, soundSettings, badgeCount2, autodiscover, notificationsSettings, localizedPush, delayWriteSyncState, RightToDisconnect, FCMRelayService, Delegate updated at "1545046557729"
<YYYY-MM-DD>T14:42:33.875+0100 CEF:1 | pushnotify-ha-dbwatcher | pushnotify-ha-dbwatcher | 0.15.3 | INFO | unknown | 5 | ID=310 THR=DbWatcher-0 CAT=ProducerTasksRunner MSG=Worker BEMS_name2 is idle 359/10000 (3.59% capacity)
<YYYY-MM-DD>T14:42:33.875+0100 CEF:1 | pushnotify-ha-dbwatcher | pushnotify-ha-dbwatcher | 0.15.3 | INFO | unknown | 5 | ID=310 THR=DbWatcher-0 CAT=ProducerTasksRunner MSG=Worker BEMS_name1 is in state BAD with 0 users. Last status was updated at "<YYYY-MM-DD> T10:45:47.831 UTC"
When you configure the Push Notifications service for high availability, you complete the following actions:
1. During the installation of additional Push Notifications service instances, on the Database Information screenyou specify the same database for each instance. For example, BEMS-Core.
2. Add the new computer that hosts the Push Notifications service instance to BlackBerry UEM.
| Configuring BEMS services | 32
Configuring the Push Notifications service for disaster recoveryRecommended disaster recovery measures for Push Notifications service are based on an active/warm standbyclustering model. For more information on configuring your environment for disaster recovery, see the BlackBerryUEM Disaster Recovery content.
Before adding a Push Notifications service instance for disaster recovery, you complete the following actions:
1. Install the Push Notifications service in the disaster recovery site. 2. Configure database replication for the Push Notifications service database (BEMS-Core) from your primary
site to your disaster recovery site. SQL log shipping is recommended. Consult your database administrator forassistance.
3. Make sure that the appropriate network ports are open to allow the Push Notifications service servers withinyour disaster recovery site to communicate with the database, Microsoft Exchange Server, and BlackBerryProxy servers in your disaster recovery and primary site.
When you configure a disaster recovery Push Notifications service instance, you complete the following actions:
1. Configure the disaster recovery Push Notifications service instance to use the primary database (for example,DBPrimaryCluster) in the cluster. For instructions, see Configure the Microsoft SQL Server database for PushNotifications service.
2. Allow the disaster recovery Push Notifications service server and port in BlackBerry UEM. For instructions,see Allow the disaster recovery server that hosts the BlackBerry Push Notifications instance in BlackBerryUEM .
Note: After the disaster recovery Push Notifications service instance is installed and configured, stop the GoodTechnology Common Services to place the Push Notifications service instance in warm standby.
In a disaster recovery situation in which you want to failover, you complete the following actions:
1. Stop the BlackBerry Common service on all your primary Push Notifications service instances. For example,DBPrimaryCluster.
2. Failover your Push Notifications service database (BEMS-Core) on your database server. For example, makethe Push Notifications service database active.
3. Failover your database FQDN DNS to your disaster recovery database server. 4. If you cannot failover your database FQDN DNS, log in to the BEMS Dashboard and update the Push
Notifications service database information to point to your disaster recovery database server, then restartthe Good Technology Common Services.
5. Start the Good Technology Common Services on your disaster recovery Push Notifications service instance.
Push Notifications service logging and diagnosticsPerformance logs and diagnostic information for BEMS and the BlackBerry Push Notifications service are locatedin the BEMS Web Console. To set and change the administrator's password, see Changing the BEMS servicesaccount password.
The log files are stored in the BEMS installation directory. By default, the log files are located in: C:\blackberry\bemslogs.
View relevant logs in the BEMS Web Console
The BEMS Web Console provides advanced configuration and tuning options for BEMS. It should be used withcare as it offers advanced maintenance capabilities intended for expert users of the system.
1. Open a browser and go to the Apache Karaf Web Console Configuration web site located at http://<fqdn_of_the_bems_host:8443/system/console/configMgr and login as administrator with theappropriate Microsoft Active Directory credentials.
| Configuring BEMS services | 33

2. On the menu, click OSGi > Log Service.3. Scroll through the log activity. It's listed in chronological order.
After you finish: You can view the logs from the BEMS installation directory.
Checking EWS Listener and Push Channels
The following lists the web addresses you can query on BEMS to verify if the Push Channels and EWS Listener areworking:
Push Channels diagnostic URL: http://127.0.0.1:8181/pushnotify/pushchannel
• Sample output
[{"registrationId":"[email protected]#3EFED82C-BE27-4A71-BF64-7F68424122B4","account":"[email protected]","pushToken": "8FAE82462C794005BFC90C7A4B654B523CDB2FCC59A922BDAFBAFD30D2460614","bundleId": "com.good.gcs.g3.enterprise","ewsProfileId":"51","deviceType":"ios"}]
If the outputs are NULL ([]), check the log for the reasons why. If outputs are not found, then refer to the SSHconsole for additional detail.
EWS Listener diagnostic URL: http://127.0.0.1:8181/ewslistener/user
• Sample output
[{"connectionId":45946713,"email":"[email protected]","stage":"Streaming","lastErrorTime":null,"status ":null}]
Using the first check, you see a push channel registration if the device successfully connected to BEMS. Then,if your Exchange Configuration is set up properly you see a streaming EWS Listener subscription.
Configuring the Connect serviceThe Connect service governs instant messaging and presence capabilities of the BlackBerry Connect app.
When you configure the Connect service, you perform the following actions.
1. Configure the Connect service in the BEMS Dashboard.2. Configure BlackBerry UEM for BlackBerry Connect.3. Configure the Connect service for SSL communications using BlackBerry Proxy.4. Optionally, enable the Connect service to use a global catalog.
Configuring the Connect service in the BEMS dashboardThe Connect service components are not accessible until you enter the service account credentialsfor BEMS. BEMS uses this information to securely connect to Microsoft Services like Microsoft ActiveDirectory, Microsoft Lync Server, Microsoft Exchange Server, Skype for Business server, and Microsoft SQLServer. The service account credentials are not stored after the browser session ends and must be entered eachtime you access the Connect service. The service account must have RTCUniversalReadOnlyAdmins rights. If anaccount has not yet been created, contact your Windows domain administrator to request an account.
Before you configure the BlackBerry Connect service, if you have an on-premises Microsoft Lync Server or Skypefor Business server make sure you prepare the Microsoft Lync Server or Skype for Business topology for BEMS.For instructions, see Preparing the Microsoft Lync Server and Skype for Business topology for BEMS.
| Configuring BEMS services | 34
Note: If you make changes to the BEMS dashboard, you must first stop the Good Technology Connect service,make the changes, and then start the Good Technology Connect service for the changes to take affect.
When you configure the Connect service, you configure the following components:
• Database• BlackBerry Dynamics• Microsoft Lync Server 2010, Microsoft Lync Server 2013, Skype for Business, or Cisco Jabber• Optionally, Microsoft Exchange Server• Optionally, Web proxy
Configure the Microsoft SQL Server database for the Connect service
1. In the BlackBerry Enterprise Mobility Server Dashboard, under BlackBerry Services Configuration,click Connect.
2. If necessary, click Service Account and enter the BEMS service account credentials. 3. Click Database4. Enter the Microsoft SQL Server and database name. 5. In the Authentication Type drop-down list, select one of the following options:
• If you select Windows Authentication, the Connect service uses the Windows credentials accessthe Microsoft SQL Server database.
• If you select SQL Server Login, type the username and password used to access the Microsoft SQLServer database.
6. If your organization uses AlwaysOn support for SQL Server, in the Additional Properties field,type MultiSubnetFailover=true.
7. Click Test to verify the connection with the database.8. Click Save.
Configure BEMS connectivity with BlackBerry Dynamics
Before you begin: Make sure that the BlackBerry Control and BlackBerry Proxy servers, are installed andoperating. For more information, see the BlackBerry UEM Installation and Upgrade content.
The BlackBerry Dynamics server information in the following instructions refers to the FQDN of the serverthat hosts the BlackBerry Proxy service. The BlackBerry Proxy service is installed on on-premises BlackBerryUEM servers that have BlackBerry Connectivity Node. The BlackBerry Connectivity Node is required forsome BlackBerry UEM Cloud deployments when they link a company directory to the BlackBerry UEMCloud tenant and to offer on-premises connectivity to BlackBerry Dynamics users activated using the BlackBerryUEM Cloud. For more information about the BlackBerry Connectivity Node, see the BlackBerry UEM Planningcontent.
1. In the BlackBerry Enterprise Mobility Server Dashboard, under BlackBerry Services Configuration,click Connect.
2. Click Service Account. 3. Enter the service account username and password. 4. Click Save. 5. Click BlackBerry Dynamics.6. In the Hostname field, type the FQDN of the server hosting the BlackBerry Proxy service.7. In the Port field, the port number is prepopulated based on the communication type that you select.
• If you select HTTP, the Port field prepopulates to 17080.
| Configuring BEMS services | 35
• If you select HTTPS, the Port field prepopulates to 17433.
Note: If you select HTTPS, you must import the trusted certificate to the Windows keystore. For instructions,see Import the BlackBerry Proxy CA certificate to the BEMS Windows keystore.
8. Click Test to verify the connection to the BlackBerry Proxy server. 9. Click Save.
After you finish: If you selected HTTPS, you must configure the BlackBerry Connect app to use SSLcommunications. For instructions, see "Configuring BlackBerry Connect app settings" for your environment inthe BlackBerry Connect Administration content.
Configure Microsoft Lync Server 2010, Microsoft Lync Server 2013, Skype for Business, or Skype for Business Online forthe Connect service
You can configure your environment to work with Microsoft Lync Server, Skype for Business and Skype forBusiness Online.
Before you begin:
• If your environment uses multiple Skype for Business on-premises servers using trusted application modeor non-trusted application mode, have the Skype for Business servers load balanced with a load balanceserver. For more information about load balancing requirements, visit https://docs.microsoft.com/en-us/skypeforbusiness/plan-your-deployment/network-requirements/load-balancing .
• If you configure your environment to use Skype for Business Online, have the following information:• Skype for Business Online tenant name• Connect service app ID and app Key• BlackBerry Connect app ID
1. In the BlackBerry Enterprise Mobility Server Dashboard, under BlackBerry Services Configuration,click Connect.
2. If necessary, click Service Account and enter the BEMS service account credentials. 3. Click Lync 2010, Lync 2013, or Skype for Business. The system queries the instant messaging server to verify
that the appropriate BEMS instant messaging server topology is added. This can take a few moments.4. Complete one of the following tasks:
Instant messaging server inenvironment Tasks
Microsoft Lync Server 2010or Microsoft Lync Server 2013
a. In the Application ID drop-down list,select <appid_connect.mycompany.com>.
If the drop-down list is empty, either the BEMS <instant messagingserver type> topology is not set up correctly or the service accountdoes not have permissions to query these settings.
| Configuring BEMS services | 36

Instant messaging server inenvironment Tasks
Skype for Business Online a. Select the Skype for Business Online checkbox.b. In the Tenant name/ID field, enter the tenant name for your Skype
for Business Online. If you need to connect to more than onetenant, enter common.
c. In the BlackBerry BEMS Connect/Presence Service AppID field, enter the BlackBerry BEMS Connect service app ID. Forinstructions on obtaining the app ID, see Obtain an Azure app ID forthe Connect, Presence, and Docs service.
d. In the BlackBerry BEMS Connect/Presence Service App Key field,enter the BlackBerry BEMS Connect service app key.
e. In the BlackBerry Connect Client App ID field, enterthe BlackBerry BEMS Connect service app key.
Skype for Business on-premisesusing trusted application mode
Note: Using this configuration,the Connect service is trustedby Skype for Business and canimpersonate a user. End userauthentication is not required onthe device to access BlackBerryConnect.
a. Select the Skype for Business On-Premises check box.b. Select Trusted Application Mode. c. Beside the Application ID dropdown list, click Browse. This step
can take up to a minute to complete. d. In the Application ID drop-down list, select the app ID. For
example, <appid_connect.mycompany.com>.
If the drop-down list is empty, either the BEMS <instant messagingserver type> topology is not set up correctly or the service accountdoes not have permissions to query these settings.
e. If you enable persistent chat in your environment, in the PersistentChat Default Category field, enter the default category. For moreinformation on enabling persistent chat, see the BlackBerryConnect Administration content.
Skype for Business on-premisesusing non-trusted applicationmode
Note: Using this configuration,the Connect service is not trustedby Skype for Business and cannotimpersonate a user. End userauthentication on the device isrequired to access BlackBerryConnect.
a. Select the Skype for Business On-Premises check box.b. Select Non-trusted Application Mode. c. Complete one or both of the following actions:
• Select the Auto discover servers checkbox tohave BEMS discover the Skype for Business servers in theenvironment.
• Enter the default Skype for Business on-premises FQDN or thecomplete URL to the Skype for Business server for BEMS to useif autodiscovery is not enabled or fails. For example, http(s)://<BEMS-FQDN>/Autodiscover/AutodiscoverService.svc/root/oauth/user.
Skype for Business and Skype forBusiness Online
• Complete the tasks for Skype for Business Online and Skype forBusiness on-premises using trusted application mode or non-trusted mode.
5. Click Test to verify the connection to the instant messaging server.6. Complete one or both of the following actions to log in to the user account:
• If you configure the environment to use Skype for Business On-Premises
a. Click Test.
| Configuring BEMS services | 37
b. Enter a user email address and password. c. Click Test.
• If you configure the environment to use Skype for Business Online
a. Click Test.b. Sign in to a user account.
7. Click Save.
Obtain an Azure app ID for Connect client
Before you begin: To grant permissions, you must use an account with tenant administrator privileges.
1. Log on to portal.azure.com.2. In the left column, click Azure Active Directory.3. Click App registrations.4. Click New application registration.5. In the Name field, enter a name for the application.6. In the Application type drop-down list, select Native.7. In the Redirect URI field, enter urn:ietf:wg:oauth:2.0:oob8. Press Enter.9. Click Create.10.Click Settings.11.Add an additional Redirect URI.
a) Click Redirect URIs.b) In the Redirect URIs column, enter com.blackberry.connect://ADAL/
12.Click Required permissions.13.Click Add.14.Click Select an API.15.Search for and select the application name that you created for Obtain an Azure app ID for
the Connect, Presence, and Docs service.16.Click Select.17.Set the following permissions: Delegated Permissions: make sure that all options are selected. 18.Click Select.19.Click Done.20.Complete only one of the following tasks:
Important: Either of these tasks requires tenant administrator privileges.
• In the Required permissions column, click Grant Permissions. Click Yes. • Click Azure Active Directory > Users and groups > User settings. Set the Users can consent to apps
accessing company data on their behalf to No. Click Save.
Complete this option to present each BlackBerry Connect user with a prompt to approve that their useraccount is used to access the Connect service when they log in.
21.Copy the Application ID. The Application ID is displayed in the main App Registrations page for the specifiedapp. This is used as the BlackBerry Connect Client App ID for BlackBerry Connect and BlackBerry ConnectClient App ID for the Presence service.
| Configuring BEMS services | 38
Configuring the BEMS-Presence and BEMS-Connect services in a multi-cluster Cisco Unified Communications Manager for IMand Presence environment
You can configure the BEMS-Presence and BEMS-Connect services for users that are located in multi-clusterCisco Unified Communications Manager for IM and Presence deployments to locate and communicate with eachother.
Configuring your Cisco Unified Communications Manager for IM and Presence multi-cluster environment with theBEMS Presence and Connect service allows users to connect and communicate with users in the same Presencedomain and located in separate clusters.
Steps to configure a multicluster Cisco Unified Communications Manager IM and Presence environments for BlackBerryConnect and BlackBerry Presence services
When you configure a multicluster Cisco Unified Communications Manager IM and Presence environmentfor BlackBerry Connect and BlackBerry Presence services, you perform the following actions:
Step Action
Make sure your multi-cluster environment has the following configured:
• DNS SRV records for Cisco Jabber Service Discovery. For instructions, see " ServiceDiscovery" in the Cisco Jabber Planning Guide for your version of Cisco Jabber.
• Cisco Intercluster Lookup Service (ILS) between the CUCM clusters in your environment.For instructions, see "Intercluster Lookup Service" in the Cisco Unified CommunicationsManager Features and Services Guide for your version of Cisco Unified CommunicationsManager.
• Intercluster Peering between the CIMP clusters in your environment. For instructions,see " Intercluster Peer Configuration" in the Cisco Unified CommunicationsManager Configuration and Administration Guide for your version of the Cisco UnifiedCommunications Manager.
Create the following users and passwords on each CUCM server in each multi-cluster domain. These must be the same, including case sensitivity on eachserver. BEMS uses these users and password to authenticate to the CUCM server foruser Presence information.
For BlackBerry Connect
• AXL application user username and password. The AXL application user must be auser that is in a group that is assigned the Standard AXL API Access role. For moreinformation, see your Cisco documentation.
For BlackBerry Presence
• Application user and password. For instructions, see Create an Application User.• UDS Username (Dummy user). For instructions, see Create a Dummy User.
Download the required certificates from each cluster.
• Tomcat.der • Cup.der• Cup-xmpp.pem and Cup-xmpp-ECDSA.pem (in a Cisco 11.5 environment environment) • CUCM SSL certificate. Visit the Cisco Devnet to see Download the Cisco Unified CM SSL
Certificate
| Configuring BEMS services | 39

Step Action
Import the certificates into the Java keystore. For instructions, see Import the BlackBerryProxy CA certificate into the Java keystore on BEMS.
Configure the BlackBerry Connect service.
Configure the BlackBerry Presence service.
Configure the BEMS-Connect service for Cisco Unified Communications Manager IM and Presence
With BEMS installed, the initial configuration dashboard URL used will not match the self-signed certificate thatwas created. You can replace localhost with the FQDN that you specified during the installation, and bookmarkthis for future use.
Before you begin: Stop the Good Technology Connect service.
1. In the BlackBerry Enterprise Mobility Server Dashboard, under BlackBerry Services Configuration,click Connect.
2. If necessary, click Service Account and enter the BEMS service account credentials. 3. Click Jabber.4. In the IM and Presence SIP domain field, enter the SIP domain.5. If your environment consists of multiple IM and Presence service clusters, select the Enable Service
Discovery checkbox and enter the following information:
• Enter the AXL Application user username and AXL Application password. The AXL Application usermust be in a group that is assigned the Standard AXL API Access role. For more information, seeyour Cisco documentation.
• If the voice service and XMPP service domains are not the same in your environment, in the ServiceDomain field, enter the domain where the SRV records are located.
6. In the Cisco Unified Communications Manager User Data Service (UDS) FQDN field, enter the FQDN ofthe Cisco Unified Communications Manager server that Jabber Presence Provider (JPP) needs to access andquery the contact cards.
7. In the Cisco Unified Communications Manager User Data Service (UDS) port field, enter the Cisco UnifiedCommunications Manager server port number that JPP uses with the ciscoUDSServer to query the contactcards. For example, 8443.
8. In the Cisco Unified Communications Manager IM and Presence XMPP client service FQDN field, enter theFQDN of the Cisco Unified Communications Manager IM and Presence server. Cisco Jabber uses CUCM LDAP only. It does not use directory lookup.
9. In the Cisco Unified Communications Manager IM and Presence XMPP client service port field, enterthe outbound port that points to the Cisco Jabber XMPP Service. By default this 5222.
10.Start the Good Technology Connect service.
Configure BEMS to access on-premises Microsoft Exchange Server conversation histories
Note: Complete this task only if your environment includes an on-premises Microsoft Exchange Server. If yourenvironment uses Microsoft Exchange Online, complete the instructions in Configure BEMS to access MicrosoftExchange Online conversation histories.
| Configuring BEMS services | 40
You can enable the conversation history to allow users to access conversations that are saved in theConversation History folder of the user's Microsoft Exchange mailbox. Saving the conversation history issupported in the following environments:
• Users in a Skype for Business on-premises and have mailboxes on an on-premises Microsoft Exchange Server.• Users in a Skype for Business Online environment and have mailboxes on an on-premises Microsoft Exchange
Server.• Users in a Skype for Business Online environment and have mailboxes on Microsoft Office 365.
Saving the conversation history is not supported in an on-premises Skype for Business environment where usershave mailboxes on Microsoft Office 365.
Before you begin:
• Enable Autodiscovery on the Microsoft Exchange Server. For instructions, see your Microsoft ExchangeServer documentation.
• Integrate the Microsoft Lync Server or Skype for Business integration with the Microsoft ExchangeServer. For instructions, see your Microsoft Exchange Server and Microsoft Lync Server or Skype forBusiness documentation.
• Install the Microsoft Exchange Server SSL certificates on the computer that hosts the Connect service.Failing to correctly install the SSL certificate on the computer that hosts the Connect service results in thehistory logging to the Microsoft Exchange Server to fail. For instructions, see your Microsoft ExchangeServer documentation.
• The conversation history is enabled on the enterprise Microsoft Lync Server 2010, Microsoft Lync Server 2013,or Skype for Business for which you configure BlackBerry Connect.
• You prepared the Microsoft Lync Server or Skype for Business topology for BEMS. For instructions,see Preparing the Microsoft Lync Server and Skype for Business topology for BEMS
• Grant application impersonation permission to the BEMS service account on the Microsoft Exchange Server.
1. In the BlackBerry Enterprise Mobility Server Dashboard, under BlackBerry Services Configuration,click Connect.
2. If necessary, click Service Account and enter the BEMS service account credentials. 3. Click Microsoft Exchange. 4. Select the Enable Conversation History checkbox. Complete the following actions:
• In the Please enter the Microsoft Exchange Server information field, type the web address ofyour Microsoft Exchange Server.
• In the Exchange Server Type drop-down list, select the Microsoft Exchange Server version that is in yourenvironment.
• In the Server Write Interval field, type the frequency, in minutes, that each unique conversation is sent tothe Microsoft Exchange Server.
• If required, select the Requires Credential checkbox. Type the user name and password used to accessthe Microsoft Exchange Server.
5. Click Test.6. Click Save.
Grant application impersonation permissions to the BEMS service account
Complete this task only if your environment has an on-premises Microsoft Exchange Server. Forthe Connect service to save instant messaging chats to the Microsoft Exchange Server Conversation History,the Connect service account must have impersonation permissions. Complete this task if you use a differentservice account for Connect.
| Configuring BEMS services | 41

Execute the following Microsoft Exchange Management Shell command to apply Application Impersonationpermissions to the Connect service account. This task enables application impersonation for all users tothe Connect service account.
1. On the Microsoft Exchange Server open the Microsoft Exchange Management Shell.2. Type New-ManagementRoleAssignment -Name:<ImpersonationAssignmentName>
-Role:ApplicationImpersonation -User:<ConnectServiceAccount> (forexample, New-ManagementRoleAssignment -Name:BlackBerryAppImpersonation -Role:ApplicationImpersonation -User ConnectAdmin).
Configure BEMS to access Microsoft Exchange Online conversation histories
Note: Complete this task only if your environment includes a Microsoft Exchange Online. If your environmentuses an on-premises Microsoft Exchange Server, complete the instructions in Obtain an Azure app ID forthe Connect, Presence, and Docs service.
If you configure the Connect service, you can enable the conversation history to allow users to accessconversations that are saved in the Conversation History folder of the user's Microsoft Exchange mailbox. Savingthe conversation history is supported in the following environments:
• Users in a Skype for Business on-premises and have mailboxes on an on-premises Microsoft Exchange Server.• Users in a Skype for Business Online environment and have mailboxes on an on-premises Microsoft Exchange
Server.• Users in a Skype for Business Online environment and have mailboxes on Microsoft Office 365.
Saving the conversation history is not supported in an on-premises Skype for Business environment where usershave mailboxes on Microsoft Office 365.
Configure the BEMS Internet connection using a proxy server
Complete this task if your company uses a web proxy server to connect to the Internet.
1. In the BlackBerry Enterprise Mobility Server Dashboard, under BlackBerry Services Configuration, clickConnect.
2. If necessary, click Service Account and enter the BEMS service account credentials.3. Click Web Proxy.4. Select the Use Web Proxy checkbox.5. Type the proxy web address and port number.6. In the Proxy Authentication Type drop-down list, select one of the following authentication types:
• Basic authentication requires a user name and password by the Connect service to authenticate a request.• Digest authentication is more secure because it applies a hash function to the password before sending it
over the network.• None, if no authentication is required.
Note: If you specify an authentication type, the Connect service username and password are automaticallypopulated based on the Windows domain service account you assigned to the Connect service underConfiguring Windows Services.
7. Optionally, specify a domain.8. Optionally, click Test to verify the connection to the web proxy.9. Click Save.
| Configuring BEMS services | 42
Configuring BlackBerry UEM for BlackBerry ConnectWhen you use BEMS in a BlackBerry UEM environment, you must prepare the BlackBerry UEM by completing thefollowing tasks:
• If required, synchronize your existing Good Control server information, such as policies and profiles,to BlackBerry UEM.
• Manage BlackBerry Dynamics apps, such as BlackBerry Connect, by adding them to BlackBerry UEM. • Manage users and groups.• Activate devices.
For more information about configuring BlackBerry UEM for BlackBerry Connect, see the BlackBerryConnect Administration content.
Enabling persistent chatThe persistent chat feature allows users to create topic-based discussion rooms and participate in rooms.If you enable persistent chat in Microsoft Lync Server 2013 or Skype for Business, you can enable it inyour BEMS environment.
For more information about enabling persistent chat for BlackBerry Connect, see the BlackBerryConnect Administration content.
Configuring the Connect service for high availabilityConfiguring Connect for high availability is not supported for Connect using Cisco Jabber.
When you configure the Connect service for high availability, you perform the following actions:
1. Configure each new Connect instance to use the existing database.2. In the BEMS Dashboard, configure each new Connect instance to point to the same BlackBerry Proxy server.3. In the BlackBerry UEM console, add the new computer hosting the Connect service instance to BlackBerry
UEM.4. Add each new computer hosting the Connect instance to the BlackBerry Connect app settings.
Configuring the Connect service for disaster recoveryDisaster Recovery for the BlackBerry Connect service is based on an active/warm standby clustering model.Disaster recovery is not supported for BlackBerry Connect using Cisco Jabber.
Before you add a BlackBerry Connect instance for disaster recorvery, you complete the following actions:
1. Evaluate your Microsoft Lync Server or Skype for Business disaster recovery strategy.
If you have separate Front End pools for disaster recovery, create a separate Trusted Application Pool for yourConnect instances. This separate Trusted Application Pool should be associated with the disaster recoveryFront End pool. Associate all disaster recovery BlackBerry Connect instances to this Trusted Application Pool.If you don’t have separate Front End pools for disaster recovery, then using a single Trusted Application Pool,but make sure your Lync or Skype for Business disaster recovery strategy properly preserves the TrustedApplication Pool in event of a failover.
Consider the following for Microsoft Lync Server or Skype for Business front-end pool:
Your environment has the following Microsoft Lync Server or Skype for Business Front-End pools:
• Pool1 is for general use• Pool2 is for high availabilty use
| Configuring BEMS services | 43
You create a Trusted Application Pool for Pool1. It is recommended you create an additonal TrustedApplication Pool for the high availability instances. The additional Trusted Application Pool is created in yourfront-end high availability pool.
2. Make sure that the appropriate network ports are open to allow BlackBerry Connect servers in your disasterrecovery site to communicate with database, Microsoft Lync Server or Skype for Business Server, MicrosoftLync Server or Skype for Business database, and BlackBerry Proxy servers in your disaster recovery andprimary site.
Add a new Connect service instance for disaster recovery
1. Install a new Connect service instance and turn off the service.2. Do not provide the name of the Connect database during the disaster recovery Connect installation. 3. After the installation, configure Connect to use the database in the disaster recovery site.4. Configure your disaster recovery Connect instance to use the secondary BlackBerry Proxy server in the cluster.5. Allow the disaster recovery server hosting the BlackBerry Connect instance in BlackBerry UEM. Make sure you
set the priority setting to Secondary or Tertiary.
After you finish: After the disaster recovery Connect instance is installed and configured, stop the GoodTechnology Connect service. This places the disaster recovery Connect instance in warm standby.
Allow the disaster recovery server hosting the BlackBerry Connect instance in BlackBerry UEM
1. On the menu bar, click Policies and Profiles.2. Click Networks and Connections > BlackBerry Dynamics connectivity.3.
Click to create a new connectivity profile or click on the Default connectivity profile to edit it.4.
In the Additional servers section, click .5. In the Server field, specify the FQDN of the BlackBerry Enterprise Mobility Server.6. In the Port field, specify the port for the BlackBerry Enterprise Mobility Server. By default, the port number is
8080 or 8443.7. In the Primary BlackBerry Proxy cluster drop-down list, specify the name of the BlackBerry Proxy cluster that
you want to set as the primary cluster.8. In the Secondary BlackBerry Proxy cluster drop-down list, specify the name of the BlackBerry Proxy cluster
that you want to set as the secondary cluster.9. Click Save.10.In the App servers section, click Add.11.Search for and select BlackBerry Work.12.Click Save.13.
In the table for the app, click .14.In the Server field, specify the FQDN of the BlackBerry Enterprise Mobility Server that is hosting the BlackBerry
Connect service..15.In the Port field, specify the port of the BlackBerry Proxy cluster that is used to access the BlackBerry
Enterprise Mobility Server.16.In the Priority drop-down list, specify the priority of the BlackBerry Proxy cluster that must be used to reach the
domain. Select Secondary or Tertiary.17.Click Save.
| Configuring BEMS services | 44
Failover in disaster recovery
1. Stop the Good Technology Connect service on all your primary Connect instances.2. Start the Good Technology Connect service on your disaster recovery Connect instance.
Specify the BlackBerry Proxy the BlackBerry Connect service contacts in a clusterYou can specify the BlackBerry Proxy server that the Connect service contacts first. When you specify theBlackBerry Proxy, it forces BEMS to always communicate with this BlackBerry Proxy server first for any BlackBerryDynamics messages. The Connect service uses the BlackBerry Proxy server to create a list of BlackBerry Proxyservers to use. If the BlackBerry Proxy server that you specified in the BEMS Dashboard fails, then the Connectservice contacts the next primary BlackBerry Proxy server in the list.
By default, this feature is disabled.
Before you begin:
• More then one BlackBerry Proxy is installed and configured in clusters in your environment.• BEMS is configured to use a BlackBerry Proxy.
1. On the computer that hosts BEMS, in a text editor, open the GoodConnectServer.exe.config file. By default,the file is located in <drive>:\Program Files\BlackBerry\BlackBerry Enterprise MobilityServer\BlackBerry Connect\.
2. Add the following key and value to the file: type <add key="ENABLE_CONFIGURED_GP_PIN”value="true" />.
3. Save the file.4. Restart the Good Technology Connect service.
Using friendly names for certificates in BlackBerry ConnectThe friendly name of a certificate can be helpful when multiple certificates with similar subjects exist ina certificate store. Friendly names are properties in the X.509 certificate store that associate aliases withcertificates so they can be easily identified.
You can restrict certificates used for BlackBerry Connect to a Friendly Name by completing the following actions
1. If you do no have one, create and enroll a certificate. 2. Change the certificate friendly name and description.3. Setting the new certificate friendly name string value in the BlackBerry Connect Server configuration file
(GoodConnectServer.exe.config).
If you do not already have a certificate, you can create and verify a BEMS SSL certificate for Lync. For moreinformation, see Create and add the BEMS SSL certificate for Microsoft Lync Server 2010, Microsoft LyncServer 2013, and Skype for Business.
Change the certificate friendly name description
1. Open the Microsoft Management Console (MMC).2. Click Console Root.3. Click File > Add/Remove Snap-in.4. In the Available snap-ins column, click Certificates > Add.5. Select Computer account. Click Next.6. Select Local Computer. Click Finish.7. Click OK.
| Configuring BEMS services | 45
8. Click Certificates (Local Computer) > Personal > Certificates.9. Double-click the certificate you want to change.10.Click the Details tab.11.In the Show drop-down list, click <All>.12.Click Edit Properties.13.In the Friendly name field, type a friendly name.14.In the Description field, type a description.15.Click Apply.16.Click OK. Click OK again.
After you finish: Specify the certificate's friendly name in the configuration file for the Connect service.
Add the certificate friendly name to the BlackBerry Connect server configuration file
Before you begin: Specify the certificate friendly name.
1. In a text editor, open the GoodConnectServer.exe.config file. By default, the GoodConnectServer.exe.config fileis located in <install path>\Program Files\BlackBerry\BlackBerry Enterprise MobilityServer\Good Connect\.
2. At the end of the file, type <add key="RESTRICT_CERT_BY_FRIENDLY_NAME"value="<cert_friendly_name>"/>. The key value is case sensitive.
3. Save your changes.4. Restart the Good Technology Connect service.
Configuring the Connect service to receive SSL communicationsBy default, SSL is disabled, but the Connect service can be configured to run securely using SSL/TLS (HTTPS) tocommunicate with the BlackBerry Connect app.
BEMS requires a signed server SSL certificate from a third-party Certificate Authority (CA).
When you enable SSL support, you perform the following actions:
1. Create a CSR request.2. Submit a CSR request to a certificate authority. You must install the certificate on the server that generated the
CRS.3. Import the signed certificate to the computer that hosts the Connect service.4. Bind the SSL certificate to the Connect service SSL port.5. Enable SSL in the Connect service.6. Configure the BlackBerry Connect app to send requests over SSL.7. Enable SSL for BEMS Common and Connect communications.
Create a CSR request
1. Log in to the computer hosting BEMS with the service account.2. Open the Microsoft Management Console (MMC).3. Click Console Root.4. Click File > Add/Remove Snap-in5. In the Available snap-ins column, click Certificates > Add.6. In the Certificates snap-in wizard, select Computer account. Click Next.7. On the Computer > Select Computer screen, select Local Computer. Click Finish.
| Configuring BEMS services | 46

8. Click OK.9. In the Microsoft Management Console, expand Certificates (Local Computer).10.Right-click Personal and click All Tasks > Advanced Operations > Create Custom Request.11.In the Certificate Enrollment wizard, click Next.12.On the Select Certificate Enrollment Policy screen, select Proceed without enrollment policy. Click Next.13.On the Custom request screen, select the following settings:
• In the Template field, select (No template) Legacy key• In the Request format option, select PKCS #10
14.Click Next.15.On the Certificate Information screen, expand Details for the custom request.16.Click Properties.17.Click the Subject tab.18.On the Subject tab, in the Subject name section, complete the following actions:
a) In the Type drop-down list, select Common Name.b) In the Value field, type the <BEMSFQDN> of the computer that hosts the Connect service (for example,
BEMSHost.mycompany.com).c) Click Add.
19.In the Alternative name section, add two values by completing the following actions:a) In the Type drop-down list, select DNS.b) In the Value field, type the <BEMSFQDN> of the computer that hosts the Connect service (for example,
BEMSHost.mycompany.com).c) Click Add.
20.On the Extensions tab, complete the following actions:a) In the Extended Key Usage (application policies) drop-down list, in the Available options column, click
Server Authentication.b) Click Add.
21.On the Private Key tab, complete the following actions:a) In the Cryptographic Service Provider drop-down list, in the Select cryptographic service provider(CSP)
section, clear all the check boxes.b) Select the Microsoft RSA SChannel Crytographic Provider (Encryption) check box.c) In the Key size field, type 2048.d) In the Key options drop-down list, in the Key type drop-down list, select Exchange.
22.Click Apply.23.Click OK.24.Click Next.25.Enter a name for the certificate request and save it to your desktop.26.In the File format section, select Base 64.27.Click Finish.
After you finish:
1. Submit the certificate request that you created to the certificate authority to obtain a certificate.2. Import the signed certificate to the computer that hosts the Connect service
Import the signed certificate to the computer that hosts the Connect service
Make sure that you install the certificate on the server that generated the CSR.
| Configuring BEMS services | 47
1. If necessary, open the Microsoft Management Console (MMC).2. Expand Certificates (Local Computer).3. Right-click Personal and click All Tasks > Import.4. Click Next.5. Navigate to the certificate file that you obtained from the certificate authority.6. Click Next.7. On the File to Import screen, select the file and click Open8. Click Next.9. In the Certificate Store screen, click Browse and click Trusted Root Certification Authorities.10.Click Next.11.Click Finish.
After you finish:
1. Copy the thumbprint of the imported certificate.a. Double-click the imported certificate.b. Click the Details tab.c. In the Show dropdown list, click Properties Only.d. In the Field column, click Thumbprint.e. Copy the hexidecimal values into a text editor. Delete the spaces between the hexadecimal values. For
example, if you copied 80 82 41 2f..., it becomes 8082412f...f. Keep the text editor open.
2. Bind the signed certificate to the Connect service SSL port.
Bind the SSL certificate to the Connect service SSL port
Before you begin:
• Import the CA-signed certificate to the computer that hosts the Connect service.• Export the signed certificate thumbprint to a text editor.
1. If required, login to the computer that hosts the Connect service with the service account.2. Open a command prompt (run as administrator).3. Check that a certificate is not already bound to port 8082. Type netsh http show sslcert.
If a certificate is bound to port 8082, type netstat -abn > netstatoutput.txt to output the list ofports and processes to which they are bound. You must first delete the certificate before binding the newcertificate or select a new port to bind the SSL. If you choose to bind the certificate to another port, considerthis modification when configuring the Connect service. To delete the existing certificate, type netsh httpdelete sslcert ipport=0.0.0.0:8082
For more information about netsh, visit the Technet Library to see Netsh Commands for Hypertext TransferProtocol (HTTP).
4. Bind the certificate to the SSL port. In a command prompt (run as administrator), typenetsh http add sslcert ipport=0.0.0.0:<port> certhash=<thumbprint>appid={AD67330E-7F41-4722-83E2-F6DF9687BC71}
Where <thumbprint> is the thumbprint of the signed certificate that you exported to the text editor. Forinstructions, see Import the signed certificate to the computer that hosts the Connect service.
5. Press Enter.6. To verify the certificate binding, type netsh http show sslcert.
After you finish:
| Configuring BEMS services | 48
1. Enable SSL in the Connect service.2. Configure the BlackBerry Connect to send requests over SSL.
Enable SSL in the Connect service
Before you begin: Backup the BlackBerry Connect server configuration file.
1. To modify the server configuration to use the correct SSL certificate, navigate to theGoodConnectServer.exe.config file. By default, the file is located in <drive>:\Program Files\BlackBerry\BlackBerry Enterprise Mobility Server\Good Connect\.
2. In a text editor (run as administrator), edit the GoodConnectServer.exe.config file.3. Locate <add key="BASE_URL" value="http://*:8080/"/>.4. Change the line to <add key="BASE_URL" value="https://*:8082/"/>.5. Save your changes.6. Restart the Good Technology Connect service.
After you finish: Configure the BlackBerry Connect to send requests over SSL.
Configure the BlackBerry Connect app to send requests over SSL
Before you begin: If you configured the BlackBerry Connect app configuration to use the default port of 8080, youcan update the app configuration to use the SSL port information.
Complete the instructions in the Configure BlackBerry Connect app settings in the BlackBerry Connect Administrationcontent. For the Connect Server Hosts field, make sure you type the FQDN of the computers that hostthe BlackBerry Connect server and use the SSL port 8082. For example, if you have multiple servers,separate the names using commas, no spaces. For example, https://domain01.example.com:8082,https://domain02.example.com:8082,https://domain03.example.com:8082.
Enable SSL for BEMS Common and Connect communications
1. On the computer that hosts BEMS, open the Apache Karaf Web Console. Open a browser window and navigateto https://<BEMS instance hostname>:8443/system/console/configMgr.
2. Scroll to and click Good Technology Core Adaptor Service.3. In the connect.websocket.uri field, change the current URI to wss://localhost:8082/
AdapterNotifyService/Notify/ws.4. Click Save.
Configuring Windows ServicesThe BlackBerry Connect server is now listed in Windows Services. You can view the service status and the serviceaccount user you entered for the Connect service.
For Connect to run as another domain user, the alternate domain user must:
• Have access to the private key of the computer certificate.• Be enabled to “Log on as a service” through the Local Security Policy tool.
Configure permissions for the service account
1. On the computer that hosts BlackBerry Connect, run the Local Security Policy administrative tool.2. In the left pane, expand Local Policies.3. Click User Rights Agreement.
| Configuring BEMS services | 49
4. Configure the BlackBerry Connect service account for the Log on as a service permission.
Troubleshooting BlackBerry Connect Issues
Finding log files
By default, a server log file is created for each BEMS server and is stored daily on the computer that hosts BEMS.
BEMS names the log files gems_<server_name_time stamp>.log.
By default, the BEMS log files are stored daily in C:\BlackBerry\bemslogs.
Note: The timestamp is reset daily at 0:00. It is also reset each time that the service is restarted and when the filesize is a maximum of 100 MB.
By default, the BEMS Presence log files are stored in C:\Program Files\BlackBerry\BlackBerryEnterprise Mobility Server\Good Connect\Logs\
Failed to start BlackBerry Connect server
Possible cause Possible solution
If the Application-log displays Failedto start GoodConnectServer:Microsoft.Rtc.Signaling.ConnectionFailureException:Unable to establish a connection. --->System.Net.Sockets.SocketException: No such host isknown, then the hostname value in the configuration file for the keyOCS_SERVER does not exist or is not recognized as a valid server.
Correct the OCS_SERVER value inthe configuration file.
If the Application-log displays Failed tostart BlackBerryConnectServer:Microsoft.Rtc.Signaling.ConnectionFailureException:Failed to listen on any address and port supplied,then the port number specified for UCMA_APPLICATION_PORT in theconfiguration file is either blocked by a firewall or used by anotherapplication.
Unblock port if it is a firewall issueor choose another port number.
If the Application-log displays Failed tostart BlackBerryConnectServer:WCFGaslampServiceLibrary.OCSCertificateNotFoundException:Certificate not found, then the certificate's subjectName doesn'tcontain the local host's FQDN and the private key for the certificate isn'tenabled for the user which executes the BEMS software.
Enable private keys for thiscertificate for the user runningthe BEMS machine.
Error message: The process was terminated due to an unhandled exception. Microsoft.Rtc.Internal.Sip.TLSException
Possible cause
The SSL certificate was not created with the correct cryptographic service provider and key spec. The KeySpecproperty sets or retrieves the type of key generated. Valid values are determined by the cryptographic serviceprovider in use, typically Microsoft RSA.
| Configuring BEMS services | 50

Possible solution
Verify that the Provider, ProviderType, and KeySpec values are the same as the examples below or the CA mustreissue a new SSL and appropriate provider and key spec values.
1. On the computer that hostsBEMS, open the Windows PowerShell and type the following command:certutil.exe –v –store “my” <name of ssl cert>” > c:\temp\ssl.txt
2. In a text editor, open the ssl.txt file. By default, the ssl.txt file is located in <drive>:\temp.3. Search for CERT_KEY_PROV_INFO_PROP_ID.4. The SSL certificate information should return the following information:
CERT_KEY_PROV_INFO_PROP_ID(2):Key Container = 9ad85141c0b791ad17f0687d00358b70_dd7675d5-867d-479c-90b0-cd24435fe903Provider = Microsoft RSA SChannel Cryptographic ProviderProviderType = cFlags = 20KeySpec = 1 -- AT_KEYEXCHANGE
Configuring the BlackBerry Presence serviceWhen you configure the BlackBerry Presence service to support BlackBerry Work, you perform the followingactions.
• Configure BlackBerry Presence in the BEMS Dashboard.• Manually configure the Presence service for multiple application endpoints.• Configure BlackBerry UEM for Presence.• Optionally, configure BlackBerry UEM for high availability.• Optionally, configure BlackBerry UEM for disaster recovery.
Configuring the BlackBerry Presence service in the BEMS DashboardThe BlackBerry Presence service exposes the Lync Presence Provider (LLP) to third-party BlackBerry Dynamicsapplications.
When you configure the BlackBerry Presence service, you complete the following actions:
• Log in with the service account credentials• If not completed, configure BlackBerry Dynamics• Optionally, configure the BlackBerry Presence service settings• Configure Microsoft Lync Server 2010, Microsoft Lync Server 2013, and Skype for Business for the BlackBerry
Presence service• Configure Jabber for the BlackBerry Presence service
Logging in to the Presence service
The BlackBerry Presence service components are unavailable until you provide the correct service accountcredentials for BEMS. BEMS uses this information to securely connect to Microsoft Services like MicrosoftActive Directory, Microsoft Lync Server, Microsoft Exchange Server, Skype for Business server, and MicrosoftSQL Server. The service account must have RTCUniversalReadOnlyAdmins rights. If an account has not yet beencreated, contact your Windows domain administrator to request an account.
| Configuring BEMS services | 51
Note: The service account credentials are not stored after the current browser session ends and must be enteredeach time you access the Presence service. Stop the Good Technology Presence service before you configure theservice account for BEMS.
Allow Presence subscriptions to users in specified domains using Microsoft Lync Server 2010, Microsoft LyncServer 2013, Skype for Business or Skype for Business Online
Your organization can use whitelisting to control which users in internal and federated Microsoft LyncServer 2010, Microsoft Lync Server 2013, Skype for Business or Skype for Business Online environments canbe subscribed to. By allowing specific domains to be subscribed to, you can improve the performance ofthe Presence service and exclude domains that are not part of the internal or federated domains. You can alsolimit presence subscriptions to specific internal and federated domains. By default, the whitelisting feature isdisabled and all internal and external domain subscriptions are attempted. When this feature is configured, youcan manage the allowed list from all computers hosting the Presence service.
When your organization enables whitelisting, contacts in an email domain that is not listed are restricted andno presence subscriptions are attempted to that domain. Consider the following scenarios when you enabledomainwhite listing:
• If you enable domain whitelisting, but do not specify one or more email domains, all email domains arerestricted from requesting Presence subscriptions.
• If you enable domain whitelisting and specify one or more email domains, only contacts in the specified emaildomains are included in the subscription request to the instant messaging server. If a contact is not a user inthe whitelisted email domains, the user presence is not displayed.
• If you do not enable domain whitelisting, then contacts in any email domain are included in the subscriptionrequest to the instance messaging server.
Configure the BlackBerry Presence service settings
You can specify the settings for the BlackBerry Presence service or keep the default settings.
1. In the BlackBerry Enterprise Mobility Server Dashboard, under BlackBerry Services Configuration, clickPresence.
2. Click Service Account and type the login credentials for the BEMS service account.3. Click Settings.4. Optionally, in the Subscription Expiration Time field, type an expiration time in seconds. The Subscription
Expiration Time is the time interval when BlackBerry Work contacts the Presence service for user presencestatus updates. By default, this is 180 seconds.
5. Select the Enable domain whitelisting checkbox.6. In the Domains whitelist dialog box, click .7. In the Domains whitelist text box, type the email domains for which you want to allow presence subscriptions.
When adding multiple domains, you can add the domains using one or more of the following formats toseparate the domains.
• Comma, followed by a space• Semi-colon, followed by a space• Space• New line
For example, example.com, example1.com, and so forth8.
Click .9. Click Test.
| Configuring BEMS services | 52

10.Click Save.
Remove a domain and restrict users from requesting subscription requests
You can remove domains and restrict users of that domain from requesting subscription requests
1. In the BlackBerry Enterprise Mobility Server Dashboard, under BlackBerry Services Configuration, clickPresence.
2. If necessary, click Service Account and type the login credentials for the BEMS service account.3. Click Settings.4. In the Domains whitelist dialog box, click the X beside the domain you want to remove from the list.5. Click Save.
Configure Microsoft Lync Server 2010, Microsoft Lync Server 2013, Skype for Business, or Skype for Business Online forthe Presence service
Before you begin:
• If your environment uses multiple Skype for Business on-premises servers using trusted application modeor non-trusted application mode, have the Skype for Business servers load balanced with a load balanceserver. For more information about load balancing requirements, visit https://docs.microsoft.com/en-us/skypeforbusiness/plan-your-deployment/network-requirements/load-balancing.
• If you configure your environment to use Skype for Business Online, have the following information. If youconfigured the Connect service, reuse the tenant name and app ID and app Key. For instructions, see Obtainan Azure app ID for the Connect, Presence, and Docs service.• Tenant name• Service app ID and app Key• BlackBerry Work app ID
1. In the BlackBerry Enterprise Mobility Server Dashboard, under BlackBerry Services Configuration,click Presence.
2. If necessary, click Service Account and type the login credentials for the BEMS service account. 3. Click Lync 2010, Lync 2013, or Skype for Business. The system queries the instant messaging server to verify
that the appropriate BEMS instant messaging server topology is added. This can take a few moments tocomplete.
4. Complete one of the following tasks:
Instant messaging server in environment Tasks
Microsoft Lync Server 2010 or MicrosoftLync Server 2013
a. In the Application ID drop-down list,select <appid_connect.mycompany.com>.
If the drop-down list is empty, either the BEMS <instantmessaging server type> topology is not set up correctly orthe service account does not have permissions to querythese settings.
b. In the Application Endpoint drop-down list, select thecorresponding application endpoint.
| Configuring BEMS services | 53

Instant messaging server in environment Tasks
Skype for Business Online
Note: Presence service configuredwith modern authentication requiresan updated BlackBerry Work app. Anupdated BlackBerry Work app will bereleased in the near future.
a. Select the Skype for Business Online checkbox.b. In the Tenant name/ID field, enter the name of
your Skype for Business Online tenant. If you need toconnect to more than one tenant, enter common.
c. In the BlackBerry BEMS Connect/Presence ServiceApp ID field, enter the BlackBerry Presence serviceapp ID. For instructions on obtaining the app ID,see Obtain an Azure app ID for the Connect, Presence,and Docs service.
d. In the BlackBerry BEMS Connect/Presence Service AppKey field, enter the BlackBerry Presence service app key.
e. In the BlackBerry Presence Client App ID field, enterthe BlackBerry Work app ID.
Skype for Business on-premises usingtrusted application mode
Note: Using this configuration,the Presence service is trusted by Skype forBusiness and can impersonate a user. Enduser authentication is not required on thedevice to view the presence status
a. Select the Skype for Business On-Premises check box. b. Select Trusted Application Mode. c. Beside the Application ID drop-down list, click Browse.
This step can take up to a minute to complete. d. In the Application ID drop-down list, select the app ID.
For example, <appid_connect.mycompany.com>.
If the drop-down list is empty, either the BEMS <instantmessaging server type> topology is not set up correctly orthe service account does not have permissions to querythese settings.
Skype for Business on-premises using non-trusted application mode
Note:
• Using this configuration,the Presence service is not trustedby Skype for Business and cannotimpersonate a user. End userauthentication on the device is required.
• Support for Skype for Business withthe Connect service configured usingnon-trusted application requiresthe latest version of the BlackBerryWork app. An updated BlackBerryWork app will be released in the nearfuture.
a. Select the Skype for Business On-Premises check box.b. Select Non-trusted Application Mode. c. Complete one or both of the following actions:
• Select the Auto discover servers checkbox tohave BEMS discover the Skype for Business servers inthe environment.
• Enter the default Skype for Business on-premisesFQDN or the complete URL to the Skype forBusiness server for BEMS to use if autodiscovery isnot enabled or fails. For example, http(s)://<BEMS-FQDN>/Autodiscover/AutodiscoverService.svc/root/oauth/user.
5. Click Test to verify the connection to the instant messaging server.6. Complete one or both of the following actions to log in to the user account:
• If you configure the environment to use Skype for Business on-premises:
a. Enter a user email address and password.b. Click Test.
• If you configure the environment to use Skype for Business Online:
| Configuring BEMS services | 54
a. Click Test.b. Sign in to a user account.
7. Click Save. 8. Complete one of the following actions:
• If you configured the Presence service for Microsoft Lync Server 2010, Microsoft Lync Server 2013,or Skype for Business on-premises using trusted application mode, start the Good TechnologyPresence service. Make sure that you save the configuration in the Dashboard prior to starting the service.
• If you configured the Presence service for Skype for Business Online or Skype for Business on-premises using non-trusted application mode only, you do not need to start the Good TechnologyPresence service. Skype for Business Online and Skype for Business on-premises using non-trustedapplication mode don't require the Presence service to view users' presence status. If you try to start theservice, the following error message is displayed. Windows could not start the Good Technology Presenceservice on Local Computer. Error 5: Access denied.
Obtain an Azure app ID for BlackBerry Work
If you are configuring Office 365 settings in the app configuration for BlackBerry Work, you may need to obtainand copy the Azure app ID for BlackBerry Work.
1. Log on to portal.azure.com.2. In the left column, click Azure Active Directory.3. Click App registrations.4. Click New application registration.5. In the Name field, enter a name for the application. This is the name that users will see.6. In the Application type drop-down list, select Native.7. In the Redirect URI field, enter the following:
• com.blackberry.work://connect/o365/redirect8. Click Create.9. After the app has been created, in the toolbar under the name of the app, click Settings.10.Under API Access, click Required permissions.11.Click Add.12.Click Select an API13.Select Office 365 Exchange Online.14.Click Select.15.Select the following permission for Office 365 Exchange Online:
• Access mailboxes as the signed-in user via Exchange Web Services16.Click Select. 17.Click Done.18.Click Add. 19.Click Select an API.20.Click Microsoft Graph. 21.Select the following permissions for Microsoft Graph:
• Delegated Permissions
• Sign in and read user profile
| Configuring BEMS services | 55

• Send mail as a user22.Click Select.23.Click Done.24.Click Select an API.25.Click Windows Azure Active Directory.26.If it is not already selected, select Sign in and read user profile and then click Save if you changed the value.27.Click Select.28.Click Done.29.Click Add.30.Click Select an API. 31.If your environment is configured for Skype for Business Online, search for and select the application name
that you created for Obtain an Azure app ID for the Connect, Presence, and Docs service (for example,AzureAppIDforBEMS).
32.Click Select.33.Set the following permissions: Delegated Permissions: Make sure that all options are selected.34.Click Select.35.Click Done.36.Click Grant Permissions to apply the permissions for the app. These settings will not be applied to the app
until you have granted the updated permissions.37.Click Yes. You can now copy the Application ID for the app that you created. It is located under the name of the
app, in the Application ID field.
Configure Jabber for the Presence service
Complete this task only if you have a Cisco CM IM and Presence server in your environment.
1. In the BlackBerry Enterprise Mobility Server Dashboard, under BlackBerry Services Configuration,click Presence.
2. If necessary, click Service Account and type the login credentials for the BEMS service account. 3. Click Jabber.4. In the Cisco Unified Communications Manager User Data Service (UDS) FQDN field, enter the FQDN of
the Cisco Unified Communications Manager server that Jabber Presence Provider (JPP) needs to access andquery the contact cards.
5. In the Cisco Unified Communications Manager User Data Service (UDS) port field, enter the Cisco UnifiedCommunications Manager server port number that JPP uses with the ciscoUDSServer to query the contactcards. For example, 8443.
6. In the Presence SIP domain field, enter the domain that the Cisco Unified CM IM and Presence server islocated in.
7. In the Cisco Unified Communications Manager Server User field, enter the Cisco Unified CommunicationsManager enduser. This is the user you created in Create a Dummy User. If you install multiple BEMS instances,you must use the same user account for each instance.
8. In the REST-based Client Configuration Web Service Endpoint field, enter the web address of the computerhosting the REST-based Presence Web Service. This must be the Cisco IM and Presence server that thedummy user is assigned to. For example, https://<Cisco IM and Presence FQDN>:8443/EPASSoap/service.
9. In the REST-based Presence Web Service Endpoint field, enter the web address of the computer hosting theREST-based Presence Web Service. This must be the Cisco IM and Presence server that the dummy user isassigned to. For example, https://<Cisco IM and Presence FQDN>:8083/presence-service.
| Configuring BEMS services | 56
10.In the Application Username field, enter the username of the application user. If you installmultiple BEMS instances, you must use a different username for each instance.
11.In the Application Password field, enter the password of the application user. 12.In the BEMS Presence Keystore File Location field, enter the Java keystore file location that you imported
the Cisco certificates into when you completed the task Import non-public certificates to BEMS. Forexample, C:\Program Files\Java\jre1.8.0_<version>\lib\security\cacerts
13.Click Test to verify the fields are completed. The test does not verify that the information in the fields areaccurate.
14.Click Save.
Manually configure the Presence service for multiple application endpoints You can manually configure multiple application endpoints for BlackBerry Presence to loadbalance Presence requests between multiple endpoints on a single BEMS instance. Multiple application endpointsare not supported for Cisco Jabber.
Before you begin: You must have a Microsoft Lync Server 2010, Microsoft Lync Server 2013, or Skype forBusiness setup in your environment.
1. On the computer that hosts BEMS, navigate to the LyncPresenceProviderService.exe.config file. By default,the LyncPresenceProviderService.exe.config file is located in <drive>:\Program Files\BlackBerry\BlackBerry Enterprise Mobility Server\Good Presence.
2. In a text editor, open the LyncPresenceProviderService.exe.config and record the values for the followingproperties:
• UCMA_APPLICATION_NAME• LYNC_TRUSTED_APPLICATION_POOL• UCMA_ENDPOINT_SIP
3. Determine a naming convention for the additional Trusted Application Endpoints (virtual SIP addresses).By default, the format for the existing SIP Addresses is sip:presence_<BEMSFQDN>@<SIPDomain>.For example, sip:[email protected],sip:[email protected], and so on.
4. Create the additional Trusted Application Endpoints in the Microsoft Lync Server or Skype forBusiness topology using the information from steps 2 and 3 above. For instructions on creating additionalTrusted Application Endpoints, see Prepare additional computers hosting BEMS.
5. In a text editor, open LyncPresenceProviderService.exe.config. 6. Locate the <ucmaEndpointSips> section. Add the value of the new additional application endpoints that you
published in step 4.For example,
<ucmaEndpointSips> <collection> <add item="sip:[email protected]" /> <add item="sip:[email protected]" /> <add item="sip:[email protected]" /> </collection> </ucmaEndpointSips>
7. Specify the maximum contact subscriptions that each application endpoint can manage. By default, theMAX_SUBSCRIPTIONS_PER_ENDPOINT is 1000. You can specify a subscription value between 1 and 5000.
| Configuring BEMS services | 57
For example, if you specify that each application endpoint can manage 2000 contact subscriptions, you wouldlocate the MAX_SUBSCRIPTIONS_PER_ENDPOINT key and change the value as required.
<add key="MAX_SUBSCRIPTIONS_PER_ENDPOINT" value="2000" />
Note: Specifying the MAX_SUBSCRIPTIONS_PER_ENDPOINT, doesn't load balance the subscriptions acrossall endpoints, it assigns 2000 subscriptions to the first endpoint before assinging the next 2000 subscriptionsto the next endpoint.
8. Save the file. 9. Restart the Good Technology Presence service from the Windows Service Manager.
Configuring BlackBerry UEM for BlackBerry PresenceBlackBerry Presence is one of three services, along with BlackBerry FollowMe and BlackBerry Directory Lookup,enabled through BlackBerry UEM using the Good Enterprise Services entitlement app. You add BEMS as theapplication server to the Good Enterprise Services entitlement once to enable all three services.
If you configured Configuring BlackBerry UEM for BlackBerry Work, BlackBerry Tasks, and BlackBerry Notes whenyou configured the BlackBerry Push Notifications no additional configuration is required.
Configuring the Presence service for high availabilityThe BlackBerry Presence service supports high availability by adding additional BEMS servers runningthe Presence service.
When you configure Presence for high availability, you perform the following actions:
1. Configure each new Presence instance to use the same BlackBerry Proxy server.2. Add the new computer hosting the Presence service instance to BlackBerry UEM.3. Configure each new Presence instance in BlackBerry UEM for the Good Enterprise Services
(com.good.gdservice-entitlement.enterprise) app. .
Your environment has the following Microsoft Lync Server or Skype for Business front-end pools:
• Pool1 is for general use• Pool2 is for high availabilty use
If you create a Trusted Application Pool for Pool1, it is recommended you create an additonal Trusted ApplicationPool for the high availability instances. The additional Trusted Application Pool is created in your front-end highavailability pool.
Configuring Presence service for disaster recoveryDisaster recovery for BlackBerry Presence is based on an active/warm standby clustering model.
Before you add a Presence instance for disaster recovery, you complete the following actions:
1. Evaluate your Microsoft Lync Server or Skype for Business disaster recovery strategy.
If you have separate Front End pools for disaster recovery, it is recommended that you create a separateTrusted Application Pool for your BlackBerry Connect instances. This separate Trusted Application Poolshould be associated with the disaster recovery Front End pool. Associate all disaster recovery BlackBerryConnect instances to this Trusted Application Pool. If you don’t have separate Front End pools for disasterrecovery, then using a single Trusted Application Pool is fine, although you must make sure your Lync disasterrecovery strategy properly preserves the Trusted Application Pool in event of a failover.
Note: Presence and Connect can use the same Trusted Application Pool for disaster recovery.
| Configuring BEMS services | 58
2. Ensure that the appropriate network ports are open to allow Connect servers in your disaster recovery site tocommunicate with with database, Microsoft Lync Server or Skype for Business Server, Microsoft Lync Serveror Skype for Business database, and BlackBerry Proxy servers in your disaster recovery and Primary site.
Add a new Presence service instance for disaster recovery
Complete this task only if you installed the Presence service on a separate computer.
Allow your disaster recovery BlackBerry Presence instance server host and port in BlackBerry UEM. Make sure tospecify the BlackBerry Proxy cluster of the new site as the primary proxy cluster for these services.
After you finish: After the disaster recovery Presence instance is installed and configured, stop the GoodTechnology Presence service. This places the Presence instance for disaster recovery in warm standby.
Failover in disaster recovery
1. Stop the Good Technology Connect service on all your primary Connect instances.2. Start the Good Technology Connect service on your disaster recovery Connect instance.
Using friendly names for certificates in PresenceThe friendly name of a certificate can be helpful when multiple certificates with a similar subject exist ina certificate store. Friendly names are properties in the X.509 certificate store that associate aliases withcertificates so they can be easily identified.
You can restrict certificates used for BlackBerry Presence to a friendly name by completing the following actions
1. If you do no have one, create and enroll a certificate. 2. Change the certificate friendly nand description.3. Setting the new certificate friendly name string value in the BEMS Lync Presence Provider (LLP) service
configuration file (LyncPresenceProviderService.exe.config).
If you do not already have a certificate, you can create and verify a BEMS SSL certificate for Lync. For moreinformation, see Create and add the BEMS SSL certificate for Microsoft Lync Server 2010, Microsoft LyncServer 2013, and Skype for Business.
Change the certificate friendly name description
1. Open the Microsoft Management Console (MMC).2. Click Console Root.3. Click File > Add/Remove Snap-in.4. In the Available snap-ins column, click Certificates > Add.5. Select Computer account. Click Next.6. Select Local Computer. Click Finish.7. Click OK.8. Click Certificates (Local Computer) > Personal > Certificates.9. Double-click the certificate you want to change.10.Click the Details tab.11.In the Show drop-down list, click <All>.12.Click Edit Properties.13.In the Friendly name field, type a friendly name.14.In the Description field, type a description.
| Configuring BEMS services | 59
15.Click Apply.16.Click OK. Click OK again.
After you finish: Specify the certificate's friendly name in the configuration file for the Connect service.
Add the certificate friendly name to the Presence server configuration file
Before you begin: Specify the certificate friendly name.
1. In a text editor, open the LyncPresenceProviderService.exe.config file. By default, theLyncPresenceProviderService.exe.config file is located in <install path>\Technology\BlackBerryEnterprise Mobility Server\BlackBerry Presence\.
2. At the end of the file, type <add key="RESTRICT_CERT_BY_FRIENDLY_NAME"value="<cert_friendly_name>"/>. The cert_friendly_name is case sensitive.
3. Save your changes.4. Start the Good Technology Presence service.
Troubleshooting BlackBerry Presence Issues
Finding log files
By default, a server log file is created for each BEMS server and is stored daily on the computer that hosts BEMS.
BEMS names the log files gems_<server_name_time stamp>.log.
By default, the BEMS log files are stored daily in C:\BlackBerry\bemslogs.
Note: The timestamp is reset daily at 0:00. It is also reset each time that the service is restarted and when the filesize is a maximum of 100 MB.
By default, the BEMS Presence log files are stored in C:\Program Files\BlackBerry\BlackBerryEnterprise Mobility Server\Good Presence\Logs\
Configuring the BlackBerry Docs serviceYou use the BEMS dashboard to configure and maintain document/file repositories (for example, file shares,Microsoft SharePoint, Box, and CMIS-supported content management systems) and user access policies formobile app users of the service.
When you configure the BlackBerry Docs service, you configure the following components:
1. Configure the Web Proxy.2. Configure the Database.3. Confirm the Repositories.4. Configure storages.5. Configure the Settings.6. Configure Audit.
Configure a web proxy server for the Docs serviceIf you use a web proxy to connect your enterprise servers to the Internet for Microsoft SharePoint, MicrosoftSharePoint Online, and Microsoft Office Web Apps (OWAS), you must enable Use Web Proxy and configure itsaddress, port, and authentication type for the Docs service.
1. In the BlackBerry Enterprise Mobility Server Dashboard, under BlackBerry Services Configuration, click Docs.
| Configuring BEMS services | 60
2. Click Web Proxy.3. Select the Use Web Proxy.4. In the Proxy Address field, type the FQDN of the web proxy server. 5. In the Proxy port field, type the port number of the proxy server. 6. In the Proxy Server Authentication Type drop-list, click an authentication type. If you select Basic or NTLM
authentication, enter the required login credentials. 7. Click Test to verify the connection to the proxy server.8. Click Save.
Configure the database for the BlackBerry Docs serviceIn configuring your Microsoft SQL Server database for BEMS-Docs, you have a choice of usingeither Windows Authentication or SQL Authentication for granting access to the database by BEMS. Afterrestarting the Good Technology Common Services, perform the steps below for either Windows Authentication orSQL Authentication.
1. In the BlackBerry Enterprise Mobility Server Dashboard, under BlackBerry Services Configuration, click Docs. 2. Click Database3. Enter the Microsoft SQL Server name and password. 4. In the Authentication Type drop-down list, select one of the following options:.
• If you select Windows Authentication, the credentials for the Windows service account configured forthe BlackBerry Connect service are used.
• If you select SQL Server Login, enter the Microsoft SQL Server username and password.5. If your organization uses AlwaysOn support for SQL Server, in the Additional Properties field,
type MultiSubnetFailover=true.6. Click Test to verify the connection with the Microsoft SQL Server database.7. Click Save. 8. Restart the Good Technology Common Services service.
RepositoriesThe Docs service furnishes your end users with access to stored enterprise data from their mobile devices.A Docs repository (also called a "share") lives on an enterprise server containing files shared by authorized users.
Before you configure your repositories, configure the Docs security settings, and then configure BlackBerryUEM to entitle your users so that they can access the repositories you add and define from their devices. Formore information about setting up and maintaining your enterprise shares in BEMS and the associated useraccess, see Managing Repositories.
Storage servicesThe Docs service supports a number of storage services, including File Share, Microsoft SharePoint, Box, andCMIS-based providers.
The Docs service supports the ability to add or delete access to storage providers and their repositoriesfrom BEMS. By default, BEMS allows corporate box.com cloud storage users to view the Box repositoriesusing BlackBerry Work Docs. If you delete the predefined Box storage, the hidden authentication parameters arealso removed. For more information about determining if you are using a non-default Box storage and how to re-add the default Box storage, visit support.blackberry.com/kb to read article 48469.
Note: Only Microsoft Active Directory users are supported for CMIS. That is, the content management systemmust be connect to a Microsoft Active Directory for user authentication for Docs to support it.
| Configuring BEMS services | 61
Configure the Docs security settingsDocs security settings control acceptable Microsoft SharePoint Online domains, the URL of theapproved Microsoft Office Web Apps (OWAS), the appropriate LDAP domains to use, whether you want to useKerberos constrained delegation for user authentication, and Azure-IP authentication. Delegation allows a serviceto impersonate a user account to access resources throughout the network. Constrained delegation limits thistrust to a select group of services explicitly specified by a domain administrator.
Before you begin: Verify that one or more of the following are configured in your environment:
• Kerberos constrained delegation for the BlackBerry Docs service is configured in your environment. Forinstructions, see Configuring Kerberos constrained delegation for the Docs service.
• Resource-based Kerberos constrained delegation for the BlackBerry Docs service is configured in yourenvironment. For instructions, see Configuring resource based Kerberos constrained delegation for the Docsservice.
• Your environment is configured to use Azure-IP, have the following information. For instructions, see Obtainthe Azure IP authentication information for the Docs service.• BPOS TenantID• Symmetric Key• AppPrincipalID• Azure Tenant Name• BEMS Service Azure Application ID• BEMS Service Azure Application Key
1. In the BlackBerry Enterprise Mobility Server Dashboard, under BlackBerry Services Configuration, click Docs. 2. Click Settings.3. Select the Enable Kerberos Constrained Delegation checkbox to allow Docs to use Kerberos constrained
delegation.4. Separated by a comma, enter each of the Microsoft SharePoint Online domains you plan to make available.
For more information, see Configuring support for Microsoft SharePoint Online and Microsoft OneDrive forBusiness.
5. Enter the URL for your approved Office Web App Server. 6. Provide your Microsoft Active Directory user domains (separated by commas), then enter the
corresponding LDAP Port. LDAP (Lighweight Directory Access Protocol) is used to look up users and theirmembership in user groups.
7. Select the Use SSL for LDAP checkbox for secure communication with your Microsoft Active Directory servers.8. Add the Workspaces Public Key. Adding the public key allows BEMS and the BlackBerry Workspaces server
to communicate with each other. For more information about locating the public key, contact BlackBerryTechnical Support Services.
9. Select the Enable Azure Information Protections check box to allow Docs to authenticate to Azure-IP.Complete the required fields to authenticate Docs to Azure-IP to allow the Docs to decrypt protecteddocuments and confirm the rights any given user has on a document.
10.Click Save. 11.Restart the Good Technology Common Services for the changes to take effect.
Configure your Audit propertiesYour Audit settings enable or disable Docs service audit logs. If audit logs are enabled, then actions are logged tothe database, including user downloads, deletions, browsing history, and files created.
1. In the BlackBerry Enterprise Mobility Server Dashboard, under BlackBerry Services Configuration, click Docs.
| Configuring BEMS services | 62

2. Click Audit.3. On the Audit Settings tab, select the Enable Audit Logs checkbox.4. In the Audit Operations section, select the audit operations you want the log files to include logging for. 5. Click Save. It can take up to two minutes for the changes to take effect. 6. On the Audit Purge tab, in the Purge audit logs from the database before field, select a purge-before date.
Click Purge to remove audit records logged to the database earlier than the purge date selected.
After you finish:
Configure BlackBerry UEM to entitle your users, using user groups, to use the Docs service. Following userentitlement, see Managing Repositories to set up your file shares, SharePoint sites, and Box storage.
Add an app server hosting the BlackBerry Docs app to a BlackBerry Dynamics connectivity profileIf you have a BlackBerry Docs app that is served from an app server or web server, you can specify the name ofthat server and the priority of the BlackBerry Proxy clusters used for communication with it.
1. On the menu bar, click Policies and Profiles.2. Click Networks and Connections > BlackBerry Dynamics connectivity.3.
Click to create a new connectivity profile or click the BlackBerry Dynamics connectivity profile that youwant to add an app server to.
4. If necessary, click .5. Under App servers, click Add.6. Select the Feature - Docs Service Entitlement app that you want to add an app server for. 7. Click Save.8.
In the table for the app, click .9. In the Server field, specify the FQDN of the BEMS server. 10.In the Port field, specify the port of the BlackBerry Proxy cluster that is used to access the server. By default,
the port is 8443. 11.In the Priority drop-down list, specify the priority of this or these servers as primary.12.In the Primary BlackBerry Proxy cluster drop-down list, specify the name of the BlackBerry Proxy cluster
(primary cluster 1) that you want to set as the primary cluster.13.In the Secondary BlackBerry Proxy cluster drop-down list, specify the name of the BlackBerry Proxy cluster
that you want to set as the secondary cluster.14.Click Save.
Configuring BlackBerry UEM for the BlackBerry Docs service For users to access, synchronize, and share documents natively using their enterprise file server, SharePoint, Box,and content management systems supporting CMIS, without the need for VPN software, firewall reconfiguration,or duplicate data stores, app entitlements must be assigned to the organization before the users canuse the BlackBerry Docs app. For more information about managing BlackBerry Work, see the BlackBerryWork, BlackBerry Notes, and BlackBerry Tasks Administration content.
Configuring Docs for Rights Management ServicesActive Directory Rights Management Services (AD RMS) and Azure-IP RMS from Microsoft allows documents tobe protected against access by unauthorized people by storing permissions to the documents in the documentfile itself. Access restrictions can be enforced wherever the document resides or is copied or forwarded to. Fordocuments to be protected with AD RMS or Azure-IP RMS, the app that the document is associated with must be
| Configuring BEMS services | 63

RMS aware. For more information about AD RMS and Azure-IP RMS, visit Comparing Azure Information Protectionand AD RMS.
Note: For this release, BEMS doesn't support both the AD RMS and Azure-IP RMS in the same environment.
Support for RMS protected documents is provided through two methods:
• In Docs and BlackBerry Work, support for RMS protected documents is provided through the MicrosoftOffice Web Apps server with viewing and editing enabled through the BlackBerry Access browser. Note thatwhile BlackBerry Access browser is a BlackBerry Dynamics app with all the secure features it provides, it hasonly partial support for RMS features.
• In BlackBerry Work, support for RMS protected documents is provided directly in BlackBerry Work andthrough BlackBerry Work.
The following table compares the features of RMS protected documents in BlackBerryWork and through BlackBerry Access. These features require a client that is RMS aware.
RMS protected documents directlyin BlackBerry Work
RMS protected documentsthrough BlackBerry Access
Features • View protected documents directlyin BlackBerry Work.
• This feature requires BEMS 2.10 or later.
• View and edit protected documentsin Docs and BlackBerry Work throughthe BlackBerry Access browser.
| Configuring BEMS services | 64
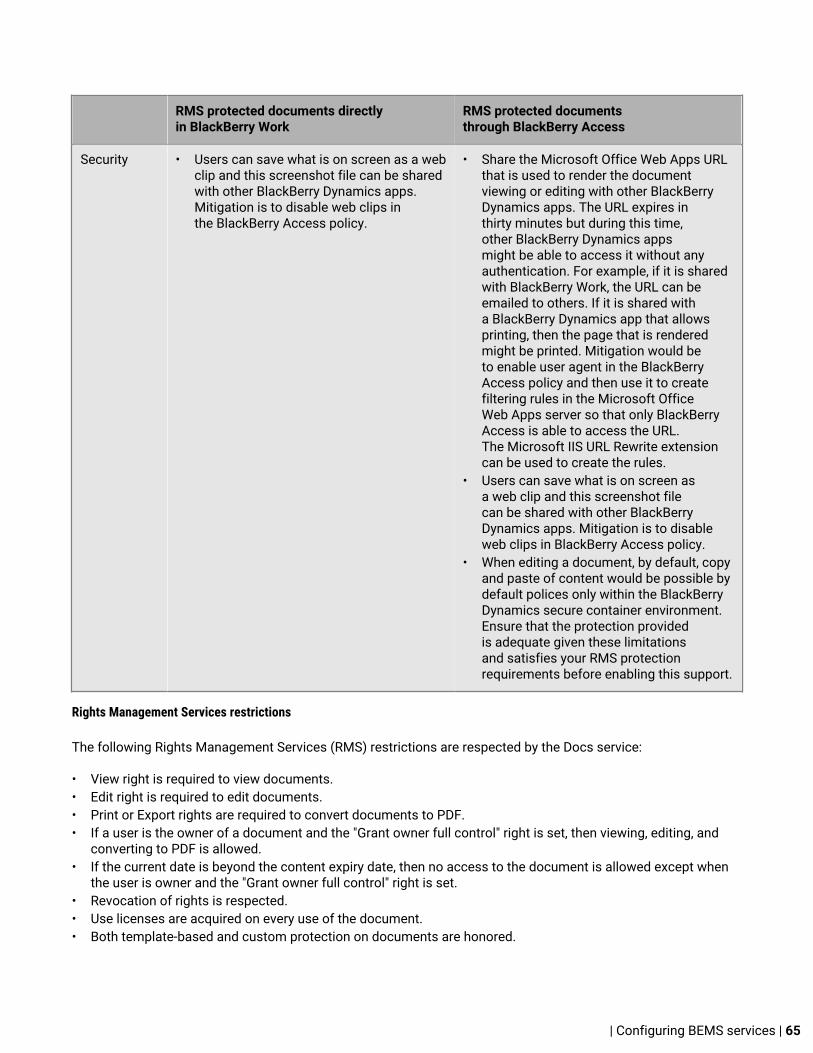
RMS protected documents directlyin BlackBerry Work
RMS protected documentsthrough BlackBerry Access
Security • Users can save what is on screen as a webclip and this screenshot file can be sharedwith other BlackBerry Dynamics apps.Mitigation is to disable web clips inthe BlackBerry Access policy.
• Share the Microsoft Office Web Apps URLthat is used to render the documentviewing or editing with other BlackBerryDynamics apps. The URL expires inthirty minutes but during this time,other BlackBerry Dynamics appsmight be able to access it without anyauthentication. For example, if it is sharedwith BlackBerry Work, the URL can beemailed to others. If it is shared witha BlackBerry Dynamics app that allowsprinting, then the page that is renderedmight be printed. Mitigation would beto enable user agent in the BlackBerryAccess policy and then use it to createfiltering rules in the Microsoft OfficeWeb Apps server so that only BlackBerryAccess is able to access the URL.The Microsoft IIS URL Rewrite extensioncan be used to create the rules.
• Users can save what is on screen asa web clip and this screenshot filecan be shared with other BlackBerryDynamics apps. Mitigation is to disableweb clips in BlackBerry Access policy.
• When editing a document, by default, copyand paste of content would be possible bydefault polices only within the BlackBerryDynamics secure container environment.Ensure that the protection providedis adequate given these limitationsand satisfies your RMS protectionrequirements before enabling this support.
Rights Management Services restrictions
The following Rights Management Services (RMS) restrictions are respected by the Docs service:
• View right is required to view documents.• Edit right is required to edit documents.• Print or Export rights are required to convert documents to PDF.• If a user is the owner of a document and the "Grant owner full control" right is set, then viewing, editing, and
converting to PDF is allowed.• If the current date is beyond the content expiry date, then no access to the document is allowed except when
the user is owner and the "Grant owner full control" right is set.• Revocation of rights is respected.• Use licenses are acquired on every use of the document.• Both template-based and custom protection on documents are honored.
| Configuring BEMS services | 65
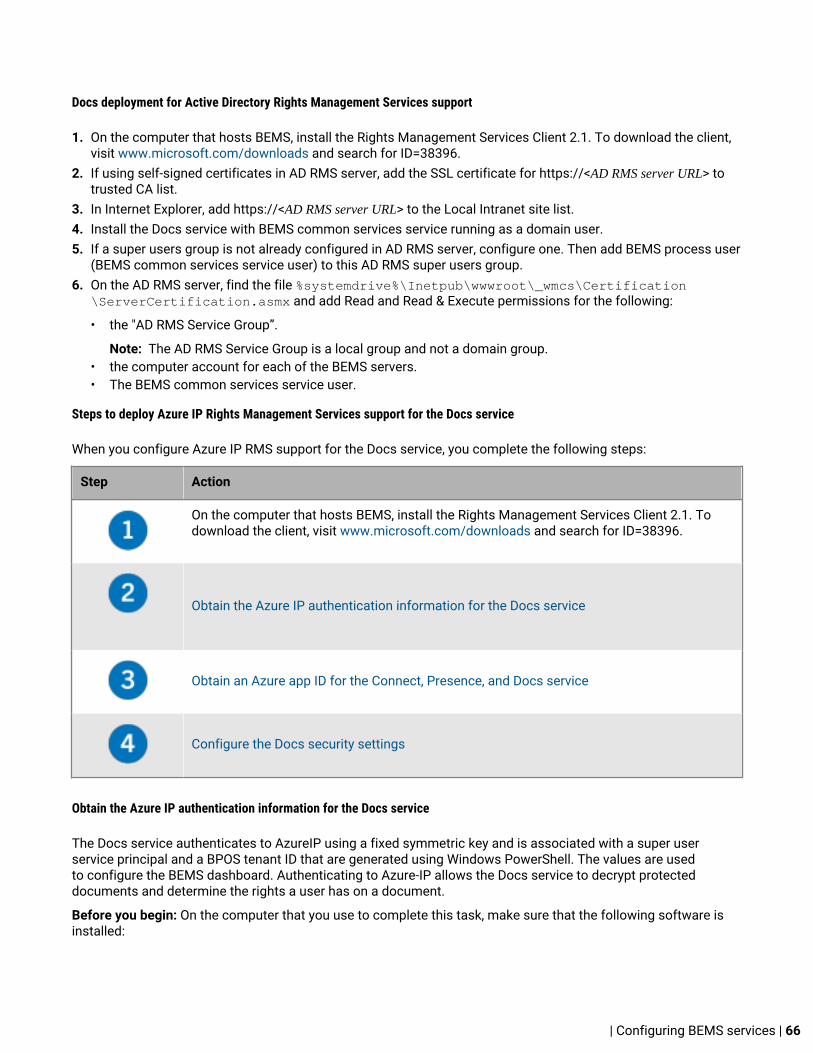
Docs deployment for Active Directory Rights Management Services support
1. On the computer that hosts BEMS, install the Rights Management Services Client 2.1. To download the client,visit www.microsoft.com/downloads and search for ID=38396.
2. If using self-signed certificates in AD RMS server, add the SSL certificate for https://<AD RMS server URL> totrusted CA list.
3. In Internet Explorer, add https://<AD RMS server URL> to the Local Intranet site list.4. Install the Docs service with BEMS common services service running as a domain user.5. If a super users group is not already configured in AD RMS server, configure one. Then add BEMS process user
(BEMS common services service user) to this AD RMS super users group.6. On the AD RMS server, find the file %systemdrive%\Inetpub\wwwroot\_wmcs\Certification
\ServerCertification.asmx and add Read and Read & Execute permissions for the following:
• the "AD RMS Service Group”.
Note: The AD RMS Service Group is a local group and not a domain group.• the computer account for each of the BEMS servers.• The BEMS common services service user.
Steps to deploy Azure IP Rights Management Services support for the Docs service
When you configure Azure IP RMS support for the Docs service, you complete the following steps:
Step Action
On the computer that hosts BEMS, install the Rights Management Services Client 2.1. Todownload the client, visit www.microsoft.com/downloads and search for ID=38396.
Obtain the Azure IP authentication information for the Docs service
Obtain an Azure app ID for the Connect, Presence, and Docs service
Configure the Docs security settings
Obtain the Azure IP authentication information for the Docs service
The Docs service authenticates to AzureIP using a fixed symmetric key and is associated with a super userservice principal and a BPOS tenant ID that are generated using Windows PowerShell. The values are usedto configure the BEMS dashboard. Authenticating to Azure-IP allows the Docs service to decrypt protecteddocuments and determine the rights a user has on a document.
Before you begin: On the computer that you use to complete this task, make sure that the following software isinstalled:
| Configuring BEMS services | 66
• Windows PowerShell 3.0 or later.• Windows PowerShellGet (previously known as OneGet). For more information about downloading
PowerShellGet, visit https://www.microsoft.com/en-us/download/details.aspx?id=51451. • Microsoft NuGet. For more information about NuGet, visit https://docs.microsoft.com/en-us/nuget/.
To install NuGet, in Windows PowerShell type Install-PackageProvider -Name NuGet -MinimumVersion <version number> -Force. Where <version number> is a minimum of 2.8.5.201.
• AADRM (Azure AD Rights Management). For more information about AADRM, visit https://docs.microsoft.com/en-us/azure/information-protection/install-powershellTo install AADRM, in Windows PowerShell, type Install-Module -Name AADRM.
• Azure Active Directory (MSOnline). For more information about MSOnline, visit https://docs.microsoft.com/en-us/powershell/module/msonline/?view=azureadps-1.0.To install MSOnline, in Windows PowerShell type Install-Module MSOnline.
For more information about the following commands, visit https://docs.microsoft.com/en-us/azure/information-protection/rms-client/client-admin-guide-powershell.
1. Open the Windows PowerShell (run as administrator) and complete the following instructions.2. Connect to the Azure AD with an account that has tenant administrator permissions. Type Connect-
MsolService. Press Enter.3. Create a new service principal. Type New-MsolServicePrincipal. Add a display name for the service
principal. For example, BEMSDocsAzureIPServicePrincipal. Press Enter.4. Record the the following information:
• Symmetric key• AppPrincipalID
5. Connect to AzureIP with an account that has tenant administrator permissions. Type Connect-AadrmService. Press Enter.
6. Obtain the BPOS Tenant ID. Type (Get-AadrmConfiguration).BPOSId. Press Enter. Record the BPOSTenant ID.
7. If the super user feature is not enabled, enable it now. Type Enable-AadrmSuperUserFeature.Press Enter.
8. Make the service principal a super user for Azure IP. Type Add-AadrmSuperUser -ServicePrincipalId<AppPrincipalId>. Press Enter. Where <AppPrincipalId> is the AppPrincipalID from step 3.
9. Disconnect from AzureIP. Type Disconnect-AadrmService. Press Enter.
Configuring the Docs instance for high availabilityWhen you configure Docs for high availability, you perform the following actions:
1. Configure each new Docs instance to use the existing database.2. Configure each new Docs instance to point to the same BlackBerry Proxy server.3. Add the computer that hosts the Docs service, to the entitlement.
Configuring the Docs service for disaster recoveryDisaster Recovery for Docs is based on an active/warm standby clustering model.
Before you add a Docs instance for disaster recovery, you complete the following actions:
1. Evaluate the disaster recovery strategy for your network resources such as File Share, Microsoft SharePoint,Microsoft Office Web Apps (OWAS), and so forth, then make sure your network resources are accessible fromyour disaster recovery site in the event a disaster recovery situation arises.
| Configuring BEMS services | 67
2. Configure database replication for the Docs database from your primary site to your disaster recovery site.SQL log shipping is recommended. Consult your database administrator for assistance.
3. Ensure that the appropriate network ports are open to allow Docs servers in your disaster recovery site tocommunicate with the database, network resources, and Good Proxy servers in your disaster recovery andPrimary sites.
Add a new Docs instance for disaster recovery
1. Configure your disaster recovery Docs instance to use the Docs database in your primary site.2. Allow the disaster recovery server that hosts the BlackBerry Docs instance in BlackBerry UEM. Make sure your
disaster recovery Docs instance uses the primary BlackBerry Proxy server in the cluster.3. Configure your disaster recovery Docs instance in BlackBerry UEM for the BlackBerry Work App. Make sure the
Priority is set to Secondary or Tertiary.4. Add the server, or servers if the Docs service is installed on a separate computer, to the entitlement. Make sure
to specify the BlackBerry Proxy cluster of the new site as the primary proxy cluster for these services.
After you finish: After the disaster recovery Docs instance is installed and configured, stop the Good TechnologyCommon Services. This places the disaster recovery Docs instance in warm standby.
Allow the disaster recovery server that hosts the BlackBerry Docs instance in BlackBerry UEM
1. On the menu bar, click Policies and Profiles.2. Click Networks and Connections > BlackBerry Dynamics connectivity.3.
Click to create a new connectivity profile or click on the Default connectivity profile to edit it.4.
In the Additional servers section, click .5. In the Server field, specify the FQDN of the BlackBerry Enterprise Mobility Server.6. In the Port field, specify the port for the BlackBerry Enterprise Mobility Server. By default, the port number is
8443.7. In the Primary BlackBerry Proxy cluster drop-down list, specify the name of the BlackBerry Proxy cluster that
you want to set as the primary cluster. Make sure you set the priority of the server to be secondary. 8. Click Save.9. In the App servers section, click Add.10.Search for and select BlackBerry Work.11.Click Save.12.
In the table for the app, click .13.In the Server field, specify the FQDN of the BlackBerry Enterprise Mobility Server.14.In the Port field, specify the port of the BlackBerry Proxy cluster that is used to access the BlackBerry
Enterprise Mobility Server.15.In the Priority drop-down list, specify the priority of the BlackBerry Proxy cluster that must be used to reach the
domain. Select Secondary or Tertiary. Make sure you select the BlackBerry Proxy cluster of the new cluster. 16.Click Save.
Failover in disaster recovery
1. Stop the BlackBerry Common Services on all your Primary Docs instances2. Failover your Docs database on your database server (for example, make the Docs database in your disaster
recovery site active).
| Configuring BEMS services | 68

3. Failover your database FQDN DNS to your disaster recovery database server.If you were not able to failover the database DNS, then you must login to the BEMS Dashboard and update theDocs database information to point to your disaster recovery database server. Restart the BlackBerry CommonServices for the new database settings to take effect.
4. Start the Good Technology Common Services on your disaster recovery Docs instance.5. If you also failed over your BlackBerry Proxy servers in this process, you must update the BlackBerry Proxy
information in the BEMS Dashboard for the Docs service.
| Configuring BEMS services | 69
Obtain an Azure app ID for the Connect, Presence,and Docs serviceWhen your environment is configured for Skype for Business Online, Microsoft SharePoint Online or MicrosoftAzure-IP you must register the BEMS component services in Azure. You can register one or more of the servicesin Azure. In this task, the Connect, Presence, and Docs services and Microsoft Azure-IP are registered in Azure.
If you configure the Connect service, you can enable the conversation history to allow users to accessconversations that are saved in the Conversation History folder of the user's Microsoft Exchange mailbox. Savingthe conversation history is supported in the following environments:
• Users in a Skype for Business on-premises that have mailboxes on an on-premises Microsoft Exchange Server.• Users in a Skype for Business Online environment that have mailboxes on an on-premises Microsoft Exchange
Server.• Users in a Skype for Business Online environment that have mailboxes on Microsoft Office 365.
Saving the conversation history is not supported in an on-premises Skype for Business environment where usershave mailboxes on Microsoft Office 365.
Before you begin: To grant permissions, you must use an account with tenant administrator privileges.
1. Log on to portal.azure.com.2. In the left column, click Azure Active Directory.3. Click App registrations.4. Click New application registration.5. In the Name field, enter a name for the application. For example, AzureAppIDforBEMS.6. In the Application type drop-down list, select Web app / API.7. In the Sign-On URL field, enter https://localhost:8443.8. Press Enter.9. Click Create.10.Click Settings. 11.Click Required permissions.12.Click Add.13.Click Select an API. 14.Complete one of more of the following tasks:
| Obtain an Azure app ID for the Connect, Presence, and Docs service | 70
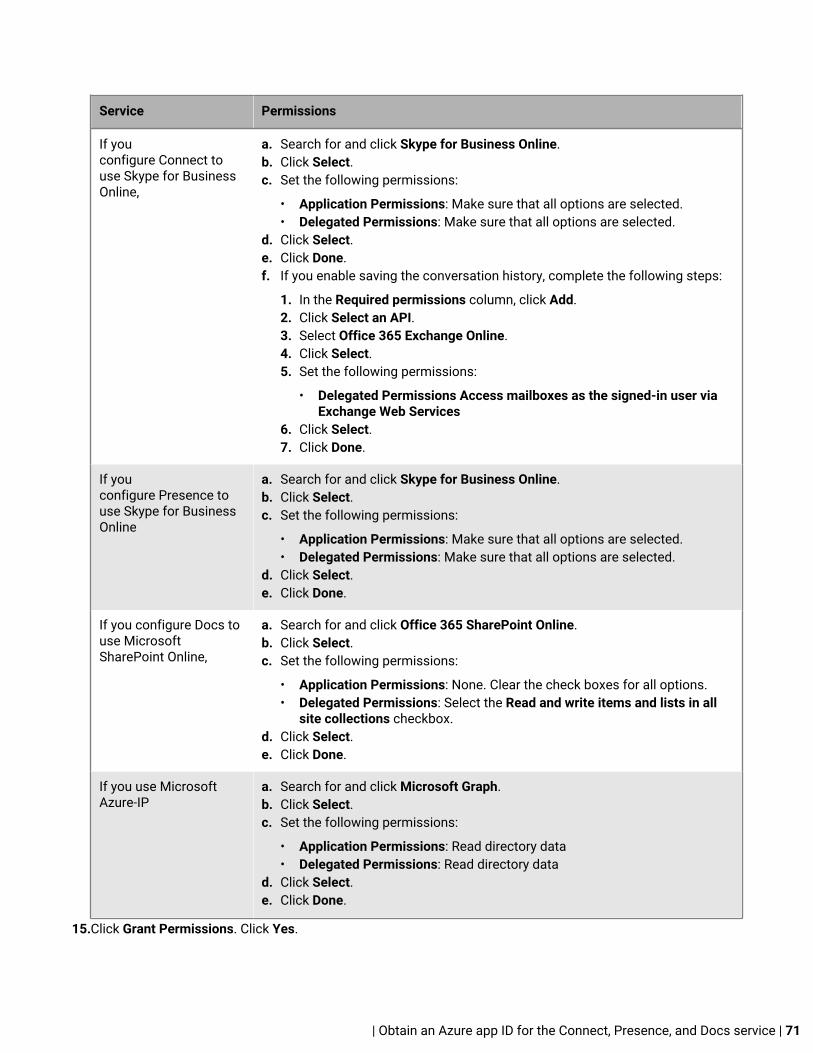
Service Permissions
If youconfigure Connect touse Skype for BusinessOnline,
a. Search for and click Skype for Business Online. b. Click Select.c. Set the following permissions:
• Application Permissions: Make sure that all options are selected.• Delegated Permissions: Make sure that all options are selected.
d. Click Select.e. Click Done.f. If you enable saving the conversation history, complete the following steps:
1. In the Required permissions column, click Add.2. Click Select an API.3. Select Office 365 Exchange Online.4. Click Select.5. Set the following permissions:
• Delegated Permissions Access mailboxes as the signed-in user viaExchange Web Services
6. Click Select.7. Click Done.
If youconfigure Presence touse Skype for BusinessOnline
a. Search for and click Skype for Business Online. b. Click Select.c. Set the following permissions:
• Application Permissions: Make sure that all options are selected.• Delegated Permissions: Make sure that all options are selected.
d. Click Select.e. Click Done.
If you configure Docs touse MicrosoftSharePoint Online,
a. Search for and click Office 365 SharePoint Online.b. Click Select.c. Set the following permissions:
• Application Permissions: None. Clear the check boxes for all options.• Delegated Permissions: Select the Read and write items and lists in all
site collections checkbox.d. Click Select.e. Click Done.
If you use MicrosoftAzure-IP
a. Search for and click Microsoft Graph.b. Click Select.c. Set the following permissions:
• Application Permissions: Read directory data• Delegated Permissions: Read directory data
d. Click Select.e. Click Done.
15.Click Grant Permissions. Click Yes.
| Obtain an Azure app ID for the Connect, Presence, and Docs service | 71
Important: This step requires tenant administrator privileges. 16.In the Settings column, click Keys.17.In the Key description field, enter a key description up to a maximum of 16 characters including spaces.18.I n the Duration field, select an expiration. Available expirations are: In 1 year, In 2 years, Never expires. 19.Click Save. 20.Copy the key Value.
Important: The Value is available only when you create it. You cannot access it after you leavethe page. This is used as the BlackBerry BEMS Connect/Presence Service App Key value inthe Connect and Presence services and Application Key in the Docs service in the BEMS Dashboard.
21.Copy the Application ID. The Application ID is displayed in the main App Registrations page forthe specified app. This is used as the BlackBerry BEMS Connect/Presence Service App ID inthe Connect and Presence services, the Application Key and in the Docs > Storages service, and the BEMSService Azure Application ID in the Docs > Settings in the BEMS Dashboard.
| Obtain an Azure app ID for the Connect, Presence, and Docs service | 72
Global catalog for Connect and PresenceThe global catalog is a distributed data repository that contains a searchable, partial representation of everyobject in every domain in a multi-domain Active Directory Domain Services (AD DS) forest. Global catalogsare typically used in a single AD DS forest that has more than one domain. A global catalog provides a way forproducts and services to access data that is available in other domains in the same forest. For more informationabout global catalogs, visit the Technet Library to see What Is the Global Catalog?.
You can configure the Connect service to use the global catalog so that the Connect service can find users whoexist in other domains within your AD DS forest. This enables the BlackBerry Connect app to search for people inthose other domains and start conversations with them, or add them to the contact list.
You can also configure the Presence service to use the global catalog so that the Presence service can subscribethe receive presence information for Lync users who exist in other domains within your AD DS forest. This ishelpful if you are using a Presence client, such as BlackBerry Work, by users who email with others who reside inother domains in your AD DS forest.
In addition to configuring the Connect and Presence services to use the global catalog, you must replicatesome additional Microsoft Lync Server or Skype for Business attributes to the global catalog. You mustperform this set up only once, whether the global catalog is used for one or both services. Some environmentsmight require some Active Directory attributes to be correctly replicated to the global catalog in the otherdomains. For more information about enabling replication of user attributes to the global catalog server, visitsupport.blackberry.com/kb to read article 46152.
Enable the Connect service to use a global catalogThe instructions in this topic use the environment example.com to configure the Connect service to use a globalcatalog.
1. In a text editor, open the GoodConnectServer.exe.config file. By default, the file is located in <drive>:\Program Files\BlackBerry\BlackBerry Enterprise Mobility Server\Good Connect folder.
2. In the <appSettings> section of the file, locate the following values:
• <addkey = "AD_USERS_SOURCE" value= "" />• <addkey = "AD_USERS_SOURCE_DOMAIN" value="" />
3. Update the values as required for your environment. For example, to configure the Connect service to accessActive Directory domains outside of the local domain that the BEMS is located in, complete the followingsteps:a) In the value double quotation marks of the <addkey = "AD_USERS_SOURCE" value= "" /> key, enter GC.b) In the value double quotation marks of the <addkey = "AD_USERS_SOURCE_DOMAIN" value="" /> key,
enter DC=EXAMPLE,DC=COM or the fully qualified domain name EXAMPLE.COM. Make sure that you usethe distinguished name of the domain. For more information, see Appendix A: Understanding the BEMS-Connect configuration file.The following example shows the GoodConnectServer.config file configured to access a global catalog:
.
.<!-- valid values are: GC - Global Catalog; LDAP - Active Directory (default) --><add key="AD_USERS_SOURCE" value="GC" /><!-- valid values are: "DC=GOOD,DC=COM" - GC/AD at good.com (example only, change to your domain); No value attribute (default) - Domain the Good Connect resides; -->
| Global catalog for Connect and Presence | 73

<add key="AD_USERS_SOURCE_DOMAIN" value="DC=EXAMPLE,DC=COM" />..
4. In the Windows Manager, restart the Good Technology Connect service.
Revert the Connect service settings to use the local Active DirectoryIf you configured the Connect service to use a global catalog, you can modify the GoodConnectServer.exe.configfile to have the Connect service use the local Active Directory domain that the BEMS is located in. In the followingexample, the Connect service was configured to use the global catalog in the example.com environment.
1. In a text editor, open the GoodConnectServer.exe.config file. By default, the file is located in <drive>:\Program Files\BlackBerry\BlackBerry Enterprise Mobility Server\Good Connect folder.
2. In the <appSettings> section of the file, locate the following values:
• <addkey = "AD_USERS_SOURCE" value= "GC" />• <addkey = "AD_USERS_SOURCE_DOMAIN" value="DC=EXAMPLE,DC=COM" />
3. Remove the specified values from the double quotation marks. The following example shows theGoodConnectServer.exe.config file configured to use the local Active Directory domain where the BEMS islocated:
.
.<!-- valid values are: GC - Global Catalog; LDAP - Active Directory (default) --><add key="AD_USERS_SOURCE" value="" /><!-- valid values are: "DC=GOOD,DC=COM" - GC/AD at good.com (example only, change to your domain); No value attribute (default) - Domain the Good Connect resides; --><add key="AD_USERS_SOURCE_DOMAIN" value="" />..
4. In the Windows Manager, restart the Good Technology Connect service.
Enable the Presence service to use a global catalogThe instructions in this topic use the environment example.com to configure the Presence service to use a globalcatalog.
1. In a text editor, open the LyncPresenceProviderService.exe.config file. By default, the file is located in<drive>:\Program Files\BlackBerry\BlackBerry Enterprise Mobility Server\GoodPresence folder.
2. In the <appSettings> section of the file, locate the following values:
• <addkey = "AD_USERS_SOURCE" value= "" />• <addkey = "AD_USERS_SOURCE_DOMAIN" value="" />
3. Update the values as required for your environment. For example, if your environment (example.com) requiresaccess to a global catalog, complete the following steps:a) In the value double quotation marks of the <addkey = "AD_USERS_SOURCE" value= "" /> key, enter GC.b) In the value double quotation marks of the <addkey = "AD_USERS_SOURCE_DOMAIN" value="" /> key, enter
the distinguished domain name using DC=EXAMPLE,DC=COM or the fully qualified domain name usingEXAMPLE.COM. Make sure that you use the the distinguished name of the domain. For more information,see Appendix A: Understanding the BEMS-Connect configuration file.
| Global catalog for Connect and Presence | 74
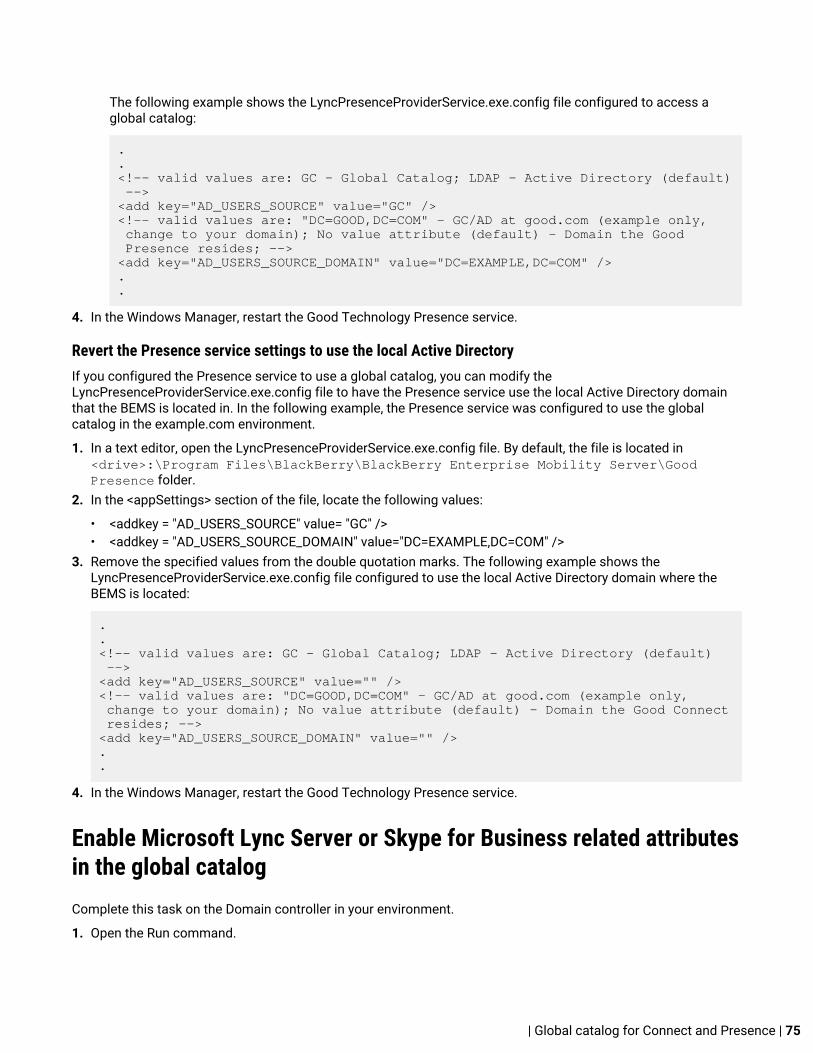
The following example shows the LyncPresenceProviderService.exe.config file configured to access aglobal catalog:
.
.<!-- valid values are: GC - Global Catalog; LDAP - Active Directory (default) --><add key="AD_USERS_SOURCE" value="GC" /><!-- valid values are: "DC=GOOD,DC=COM" - GC/AD at good.com (example only, change to your domain); No value attribute (default) - Domain the Good Presence resides; --><add key="AD_USERS_SOURCE_DOMAIN" value="DC=EXAMPLE,DC=COM" />..
4. In the Windows Manager, restart the Good Technology Presence service.
Revert the Presence service settings to use the local Active DirectoryIf you configured the Presence service to use a global catalog, you can modify theLyncPresenceProviderService.exe.config file to have the Presence service use the local Active Directory domainthat the BEMS is located in. In the following example, the Presence service was configured to use the globalcatalog in the example.com environment.
1. In a text editor, open the LyncPresenceProviderService.exe.config file. By default, the file is located in<drive>:\Program Files\BlackBerry\BlackBerry Enterprise Mobility Server\GoodPresence folder.
2. In the <appSettings> section of the file, locate the following values:
• <addkey = "AD_USERS_SOURCE" value= "GC" />• <addkey = "AD_USERS_SOURCE_DOMAIN" value="DC=EXAMPLE,DC=COM" />
3. Remove the specified values from the double quotation marks. The following example shows theLyncPresenceProviderService.exe.config file configured to use the local Active Directory domain where theBEMS is located:
.
.<!-- valid values are: GC - Global Catalog; LDAP - Active Directory (default) --><add key="AD_USERS_SOURCE" value="" /><!-- valid values are: "DC=GOOD,DC=COM" - GC/AD at good.com (example only, change to your domain); No value attribute (default) - Domain the Good Connect resides; --><add key="AD_USERS_SOURCE_DOMAIN" value="" />..
4. In the Windows Manager, restart the Good Technology Presence service.
Enable Microsoft Lync Server or Skype for Business related attributesin the global catalogComplete this task on the Domain controller in your environment.
1. Open the Run command.
| Global catalog for Connect and Presence | 75
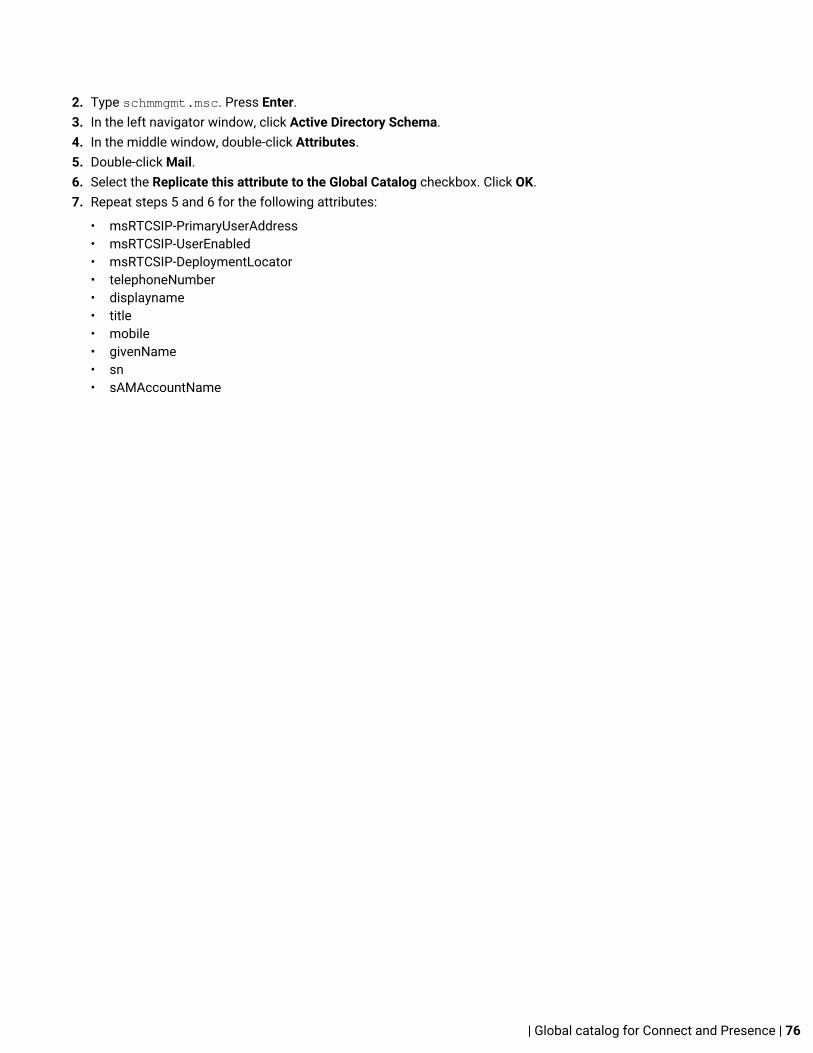
2. Type schmmgmt.msc. Press Enter.3. In the left navigator window, click Active Directory Schema.4. In the middle window, double-click Attributes.5. Double-click Mail.6. Select the Replicate this attribute to the Global Catalog checkbox. Click OK.7. Repeat steps 5 and 6 for the following attributes:
• msRTCSIP-PrimaryUserAddress• msRTCSIP-UserEnabled• msRTCSIP-DeploymentLocator• telephoneNumber• displayname• title• mobile• givenName• sn• sAMAccountName
| Global catalog for Connect and Presence | 76
Updating the Connect and Presence services using LyncDirectorThe Lync Director role provides functionality for users accessing the Microsoft Lync Server, internally andexternally. For more information about the Lync Director, visit the Technet Wiki and see Lync Director.
To support this capability, the Microsoft Lync Server is deployed as one or more pools, based on Standard Editionor Enterprise Edition Microsoft Lync Server. Users can be homed on only a single pool. Clients can be configuredto find their Lync pool automatically. However, the DNS records that support this functionality can point to only asingle pool. In a multi-pool environment, this "primary" pool will have to redirect users to their correct home pool.This is an overhead on the primary pool. The Lync Director is used to offload this redirection functionality. TheDirector does not home any users itself but instead redirects the user to their correct pool home. The requirementfor the Lync Director is therefore for multi-pool environments with high user numbers.
Once the user has been redirected to their correct pool, the Lync Director plays no further role in communicationsbetween the client and the pool server.
Specify the Connect and Presence services to use a Lync Director1. On the BEMS host, stop the BlackBerry Connect service and the BlackBerry Presence service.2. Complete the following actions:
Task Steps
Update the BlackBerry Connectconfiguration file
a. On the BEMS host, navigate to the GoodConnectServer.exe.configfile. By default, the GoodConnectServer.exe.config file is locatedin <drive>:\Program Files\BlackBerry\BlackBerryEnterprise Mobility Server\Good Connect.
b. In a text editor, open the GoodConnectServer.exe.config file.
Update the BlackBerry Presenceconfiguration file
a. On the BEMS host, navigate to theLyncPresenceProviderService.exe.config file. By default, theLyncPresenceProviderService.exe.config file is located in<drive>:\Program Files\BlackBerry\BlackBerryEnterprise Mobility Server\Good Presence.
b. In a text editor, open the LyncPresenceProviderService.exe.configfile.
3. Locate the LYNC_SERVER key and update the value with the FQDN of the Director pool that you want to use.4. On the BEMS host, start the Good Technology Connect service and Good Technology Presence service.
| Updating the Connect and Presence services using Lync Director | 77
Managing RepositoriesBEMS has the following repository storage providers:
Storagerepository Description
File Share A secure directory on an enterprise file server containing shared files and sub-directorieswhich can be remotely accessed.
SharePoint A secure web server containing shared files which are accessed via the Internet.
Box A secure cloud storage account furnished by box.com containing shared files which can beaccessed via the Internet.
CMIS-based Content Management Interoperability Services (CMIS) is an open standard that allowsdifferent content management systems to inter-operate over the Internet.
A repository is further categorized in the Docs service by who added and defined.
Storagerepository Description
Admin-defined Storage provider sites added and maintained by BEMS administrators to which individualusers and user groups are granted access.
User-defined Sites added by individual end users from their mobile devices to which you, asthe BEMS administrator, may rescind and reinstate mobile-based access in accordancewith your enterprise IT acceptable-use policies.
Configuring repositoriesThe Repository configuration page has the following three tabs that you can configure:
Tabs Description
Admin defined Allows you to create and manage repositories, add and remove users and user groups,and assign users and user groups file access and use permissions.
User defined Allows you to add and remove users and user groups, enable and disable user and usergroup the ability to create user-defined repositories, and grant and rescind permissionsto perform a range of file-related actions on their user-defined repositories.
Users Allows you to search for a user in a Microsoft Active Directory domain to view therepositories permitted by path or override, and who defined the share (for example,admin or user).
| Managing Repositories | 78
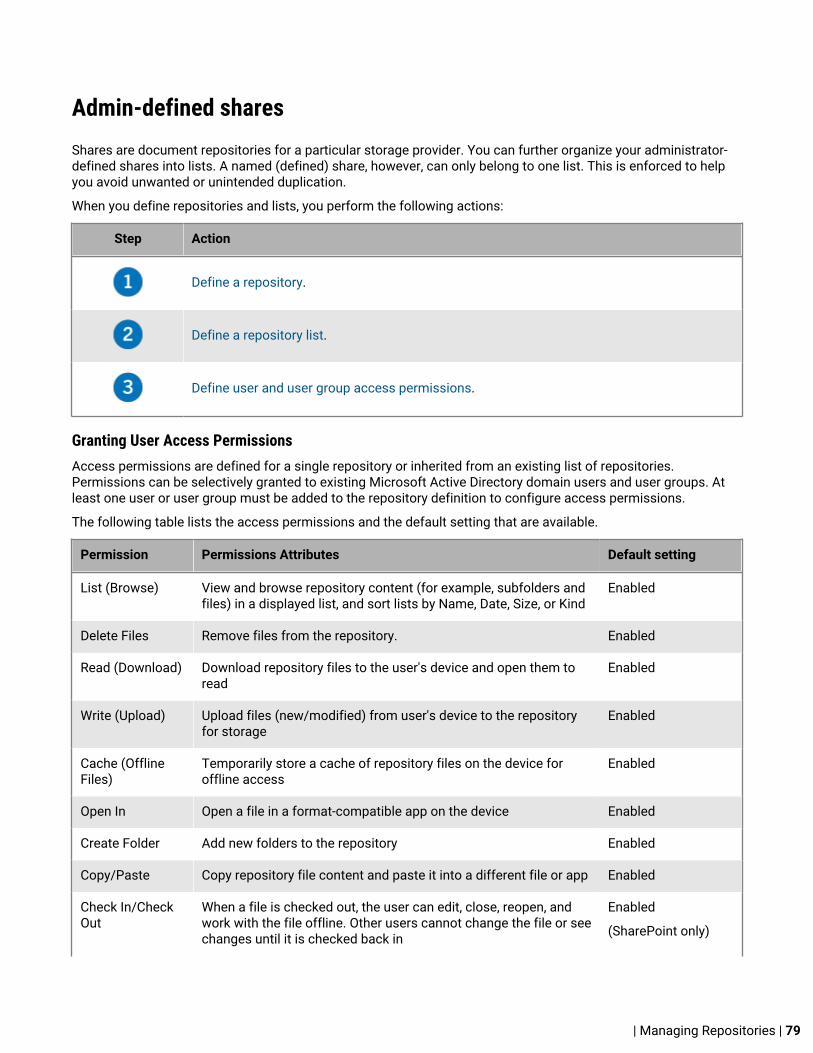
Admin-defined shares Shares are document repositories for a particular storage provider. You can further organize your administrator-defined shares into lists. A named (defined) share, however, can only belong to one list. This is enforced to helpyou avoid unwanted or unintended duplication.
When you define repositories and lists, you perform the following actions:
Step Action
Define a repository.
Define a repository list.
Define user and user group access permissions.
Granting User Access PermissionsAccess permissions are defined for a single repository or inherited from an existing list of repositories.Permissions can be selectively granted to existing Microsoft Active Directory domain users and user groups. Atleast one user or user group must be added to the repository definition to configure access permissions.
The following table lists the access permissions and the default setting that are available.
Permission Permissions Attributes Default setting
List (Browse) View and browse repository content (for example, subfolders andfiles) in a displayed list, and sort lists by Name, Date, Size, or Kind
Enabled
Delete Files Remove files from the repository. Enabled
Read (Download) Download repository files to the user's device and open them toread
Enabled
Write (Upload) Upload files (new/modified) from user's device to the repositoryfor storage
Enabled
Cache (OfflineFiles)
Temporarily store a cache of repository files on the device foroffline access
Enabled
Open In Open a file in a format-compatible app on the device Enabled
Create Folder Add new folders to the repository Enabled
Copy/Paste Copy repository file content and paste it into a different file or app Enabled
Check In/CheckOut
When a file is checked out, the user can edit, close, reopen, andwork with the file offline. Other users cannot change the file or seechanges until it is checked back in
Enabled
(SharePoint only)
| Managing Repositories | 79
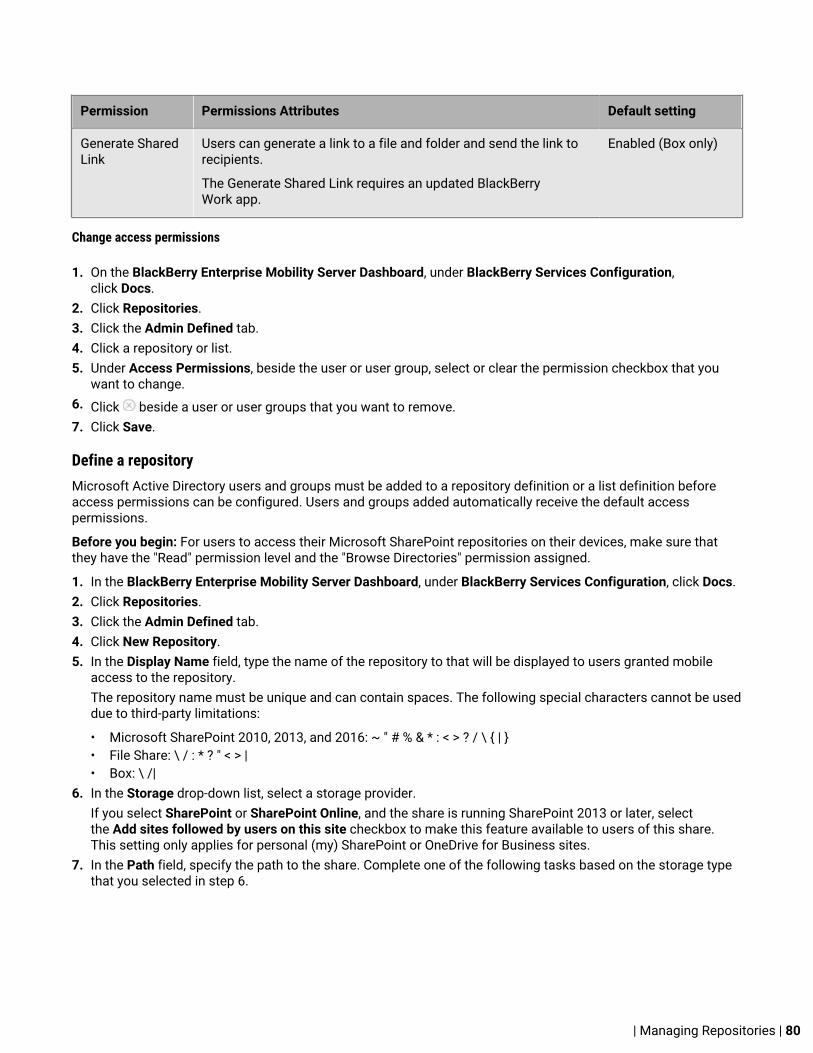
Permission Permissions Attributes Default setting
Generate SharedLink
Users can generate a link to a file and folder and send the link torecipients.
The Generate Shared Link requires an updated BlackBerryWork app.
Enabled (Box only)
Change access permissions
1. On the BlackBerry Enterprise Mobility Server Dashboard, under BlackBerry Services Configuration,click Docs.
2. Click Repositories.3. Click the Admin Defined tab.4. Click a repository or list. 5. Under Access Permissions, beside the user or user group, select or clear the permission checkbox that you
want to change.6. Click beside a user or user groups that you want to remove. 7. Click Save.
Define a repositoryMicrosoft Active Directory users and groups must be added to a repository definition or a list definition beforeaccess permissions can be configured. Users and groups added automatically receive the default accesspermissions.
Before you begin: For users to access their Microsoft SharePoint repositories on their devices, make sure thatthey have the "Read" permission level and the "Browse Directories" permission assigned.
1. In the BlackBerry Enterprise Mobility Server Dashboard, under BlackBerry Services Configuration, click Docs. 2. Click Repositories.3. Click the Admin Defined tab.4. Click New Repository.5. In the Display Name field, type the name of the repository to that will be displayed to users granted mobile
access to the repository.The repository name must be unique and can contain spaces. The following special characters cannot be useddue to third-party limitations:
• Microsoft SharePoint 2010, 2013, and 2016: ~ " # % & * : < > ? / \ { | }• File Share: \ / : * ? " < > |• Box: \ /|
6. In the Storage drop-down list, select a storage provider. If you select SharePoint or SharePoint Online, and the share is running SharePoint 2013 or later, selectthe Add sites followed by users on this site checkbox to make this feature available to users of this share.This setting only applies for personal (my) SharePoint or OneDrive for Business sites.
7. In the Path field, specify the path to the share. Complete one of the following tasks based on the storage typethat you selected in step 6.
| Managing Repositories | 80
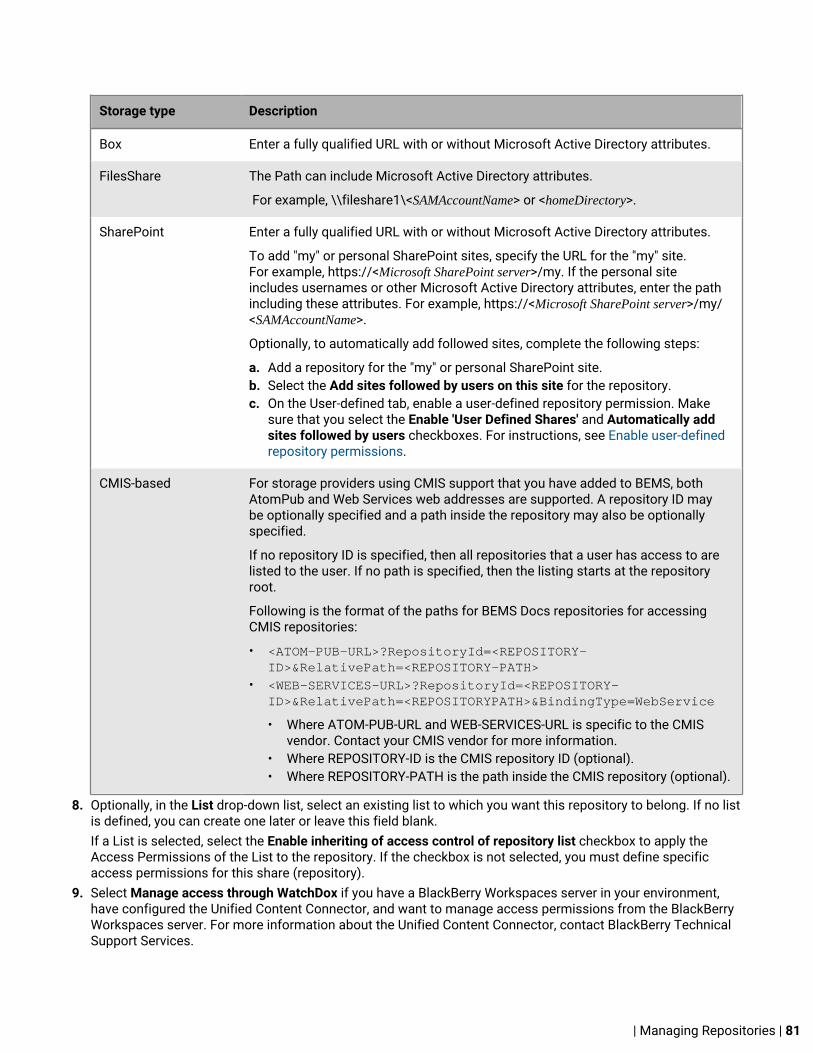
Storage type Description
Box Enter a fully qualified URL with or without Microsoft Active Directory attributes.
FilesShare The Path can include Microsoft Active Directory attributes.
For example, \\fileshare1\<SAMAccountName> or <homeDirectory>.
SharePoint Enter a fully qualified URL with or without Microsoft Active Directory attributes.
To add "my" or personal SharePoint sites, specify the URL for the "my" site.For example, https://<Microsoft SharePoint server>/my. If the personal siteincludes usernames or other Microsoft Active Directory attributes, enter the pathincluding these attributes. For example, https://<Microsoft SharePoint server>/my/<SAMAccountName>.
Optionally, to automatically add followed sites, complete the following steps:
a. Add a repository for the "my" or personal SharePoint site.b. Select the Add sites followed by users on this site for the repository. c. On the User-defined tab, enable a user-defined repository permission. Make
sure that you select the Enable 'User Defined Shares' and Automatically addsites followed by users checkboxes. For instructions, see Enable user-definedrepository permissions.
CMIS-based For storage providers using CMIS support that you have added to BEMS, bothAtomPub and Web Services web addresses are supported. A repository ID maybe optionally specified and a path inside the repository may also be optionallyspecified.
If no repository ID is specified, then all repositories that a user has access to arelisted to the user. If no path is specified, then the listing starts at the repositoryroot.
Following is the format of the paths for BEMS Docs repositories for accessingCMIS repositories:
• <ATOM-PUB-URL>?RepositoryId=<REPOSITORY-ID>&RelativePath=<REPOSITORY-PATH>
• <WEB-SERVICES-URL>?RepositoryId=<REPOSITORY-ID>&RelativePath=<REPOSITORYPATH>&BindingType=WebService
• Where ATOM-PUB-URL and WEB-SERVICES-URL is specific to the CMISvendor. Contact your CMIS vendor for more information.
• Where REPOSITORY-ID is the CMIS repository ID (optional).• Where REPOSITORY-PATH is the path inside the CMIS repository (optional).
8. Optionally, in the List drop-down list, select an existing list to which you want this repository to belong. If no listis defined, you can create one later or leave this field blank.If a List is selected, select the Enable inheriting of access control of repository list checkbox to apply theAccess Permissions of the List to the repository. If the checkbox is not selected, you must define specificaccess permissions for this share (repository).
9. Select Manage access through WatchDox if you have a BlackBerry Workspaces server in your environment,have configured the Unified Content Connector, and want to manage access permissions from the BlackBerryWorkspaces server. For more information about the Unified Content Connector, contact BlackBerry TechnicalSupport Services.
| Managing Repositories | 81

10.In the Access Permissions section, click Add Users/Groups.11.In the Search In field, enter a new domain or keep the default domain.12.Select Users or Groups.13.In the Search for Users in Active Directory field, type a full or partial search string. Click Search.14.In the search results, select one or more entries. 15.Optionally, select the Use Different Credentials and enter a username and password to configure a different
Username and Password for accessing this repository by these users.16.Click Add. 17.Click Save.
Change a repository1. In the BlackBerry Enterprise Mobility Server Dashboard, under BlackBerry Services Configuration, click Docs.2. Click Repositories.3. Click the Admin Defined tab.4. Click a repository you want to change.5. Make the required changes.6. Click Save.
Define a repository listUse Lists to assign users to multiple repositories and to organize your repositories by common characteristics.This allows you to batch-configure user access permissions. Included repositories can inherit the configured useraccess permissions of the list or maintain permissions independent of the list.
Microsoft Active Directory users and groups must be added to a repository definition or a list definition beforeaccess permissions can be configured. Users and groups added automatically receive the default accesspermissions.
1. In the BlackBerry Enterprise Mobility Server Dashboard, under BlackBerry Services Configuration, click Docs. 2. Click Repositories.3. Click the Admin Defined tab.4. Click New List.5. In the Display Name, enter the name that will be displayed to authorized users on their mobile devices. 6. In the Select Repositories to include field, select the defined repositories to include. 7. Select Manage access through WatchDox if you have a BlackBerry Workspaces server in your environment,
have configured the Unified Content Connector, and want to manage access permissions from the BlackBerryWorkspaces server. For more information about the Unified Content Connector, contact BlackBerry TechnicalSupport Services.
8. Click Save.
After you finish:
If you don't use a BlackBerry Workspaces server in your environment, complete the following tasks:
1. Add new users and groups to the list definition. 2. Grant user access permissions.
| Managing Repositories | 82
Add users and user groups to repositories and list definitionsMicrosoft Active Directory users and groups must be added to a repository definition or a list definition beforeaccess permissions can be configured. Users and groups added automatically receive the default accesspermissions.
1. In the BlackBerry Enterprise Mobility Server Dashboard, under BlackBerry Services Configuration, click Docs.2. Click Repositories.3. On the Repositories Configuration page, click the Admin Defined tab.4. Click a repository or list.5. Under Access Permissions, click Add Users/Groups.6. In the Search In field, enter a new domain or keep the default domain.7. Select Users or Groups.8. In the Search for Users in Active Directory field, type a full or partial search string. Click Search.9. In the search results, select one or more entries.10.Optionally, select the Use Different Credentials checkbox and enter a username and password to configure a
different username and password for accessing this repository by these users.11.Click Add.
After you finish: Grant user and user groups access permissions.
Allow user-defined repositoriesYou can allow users to define their own "named" data sources on admin-defined repositories for which they havealready been granted permission.
When you allow users to define their own repositories, you perform the following actions:
1. Enable user-defined repository permissions2. Change user access permissions
Enable user-defined repository permissionsBefore you begin: For users to access their Microsoft SharePoint repositories on their devices, make sure thatthey have the "Read" permission level and the "Browse Directories" permission assigned.
1. In the BlackBerry Enterprise Mobility Server Dashboard, under BlackBerry Services Configuration, click Docs. 2. Click Repositories.3. Click the User Defined tab.4. Select the Enable 'User Defined Shares' checkbox to allow your mobile users to define their own data sources.5. Optionally, select the Automatically add sites followed by users checkbox for authorized Microsoft
SharePoint repositories with the required MySite plugin enabled.To automatically add followed sites, complete the following steps:
a. On the Admin-defined tab, add a repository for the "my" or personal SharePoint site. For instructions,see Define a repository
b. Select the Add sites followed by users on this site for the repository. c. On the User-defined tab, make sure that you select the Enable 'User Defined Shares' and Automatically add
sites followed by users checkboxes.6. Under Storages section, select one or more storages.
At least one storage option must be selected or the entire user-defined option is disabled.
| Managing Repositories | 83
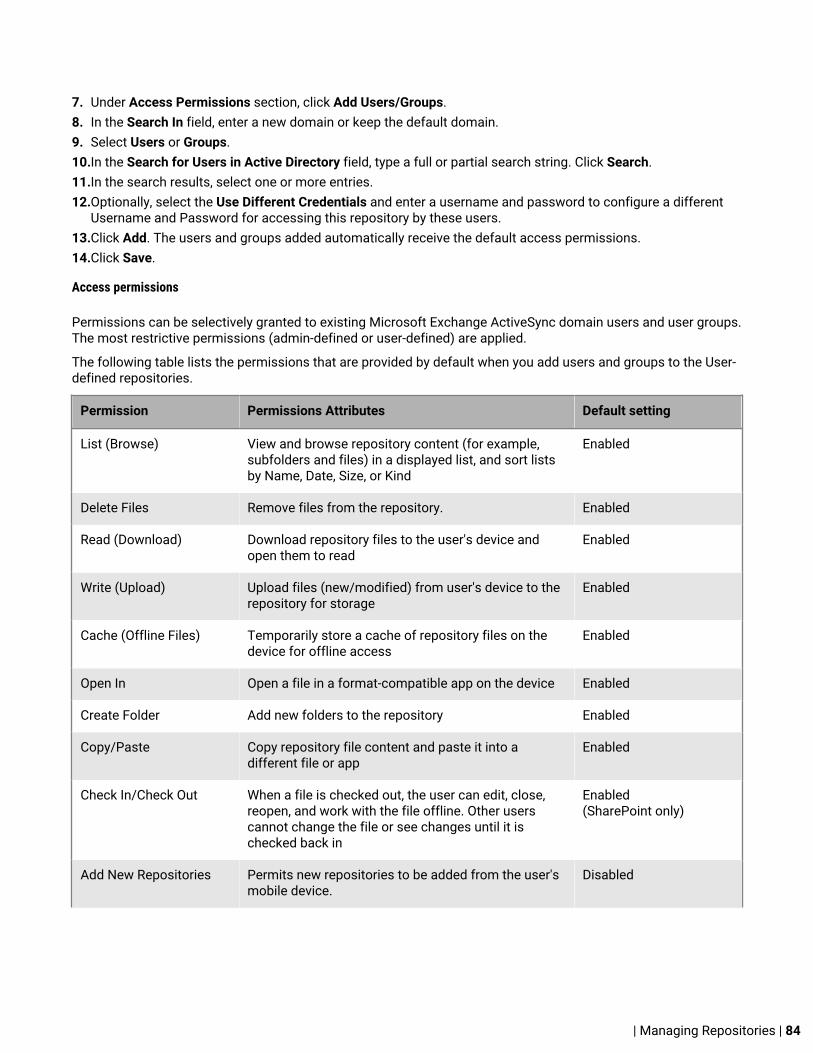
7. Under Access Permissions section, click Add Users/Groups.8. In the Search In field, enter a new domain or keep the default domain.9. Select Users or Groups.10.In the Search for Users in Active Directory field, type a full or partial search string. Click Search.11.In the search results, select one or more entries. 12.Optionally, select the Use Different Credentials and enter a username and password to configure a different
Username and Password for accessing this repository by these users.13.Click Add. The users and groups added automatically receive the default access permissions. 14.Click Save.
Access permissions
Permissions can be selectively granted to existing Microsoft Exchange ActiveSync domain users and user groups.The most restrictive permissions (admin-defined or user-defined) are applied.
The following table lists the permissions that are provided by default when you add users and groups to the User-defined repositories.
Permission Permissions Attributes Default setting
List (Browse) View and browse repository content (for example,subfolders and files) in a displayed list, and sort listsby Name, Date, Size, or Kind
Enabled
Delete Files Remove files from the repository. Enabled
Read (Download) Download repository files to the user's device andopen them to read
Enabled
Write (Upload) Upload files (new/modified) from user's device to therepository for storage
Enabled
Cache (Offline Files) Temporarily store a cache of repository files on thedevice for offline access
Enabled
Open In Open a file in a format-compatible app on the device Enabled
Create Folder Add new folders to the repository Enabled
Copy/Paste Copy repository file content and paste it into adifferent file or app
Enabled
Check In/Check Out When a file is checked out, the user can edit, close,reopen, and work with the file offline. Other userscannot change the file or see changes until it ischecked back in
Enabled(SharePoint only)
Add New Repositories Permits new repositories to be added from the user'smobile device.
Disabled
| Managing Repositories | 84

Permission Permissions Attributes Default setting
Generate Shared Link Users can generate a link to a file and folder and sendthe link to recipients.
The Generate Shared Link requires anupdated BlackBerry Work app.
Enabled (Box only)
Change user access permissions1. On the BlackBerry Enterprise Mobility Server Dashboard, under BlackBerry Services Configuration, click Docs.2. Click Repositories.3. Click the User Defined tab.4. Under Access Permissions, beside the user or user group, select or clear the permission checkbox that you
want to change.5. Click beside a user or user groups that you want to remove.6. Click Save.
View user repository rightsIn some scenarios, you may need to search for a particular user to review which repositories are configuredfor their access, as well as the specific permissions granted. For example, when a user is one member of aMicrosoft Active Directory group configured for repositories and is not listed individually in your admin-definedor user-defined repository configurations and you want to consider making specific changes to the user's accesspermissions.
1. In the BlackBerry Enterprise Mobility Server Dashboard, under BlackBerry Services Configuration, click Docs.2. Click Repositories.3. Click the Users tab.4. In the Search Users field, begin typing the user's Microsoft Active Directory account name. If you don't see
the user you want, extend or narrow the search string or click Switch Domains to search a different MicrosoftActive Directory domain.
5. Click the user name. The Defined by column specifies if the repository is admin-defined or user-defined.6. Click the name of the repository or on the row to view the user's access permissions.7. Optionally, in the Override Path for this user field, enter an override path.
Enable users to access Box repository using a custom Box emailaddressOn the Home screen of the computer hosting BEMS, complete one of the following actions:
| Managing Repositories | 85
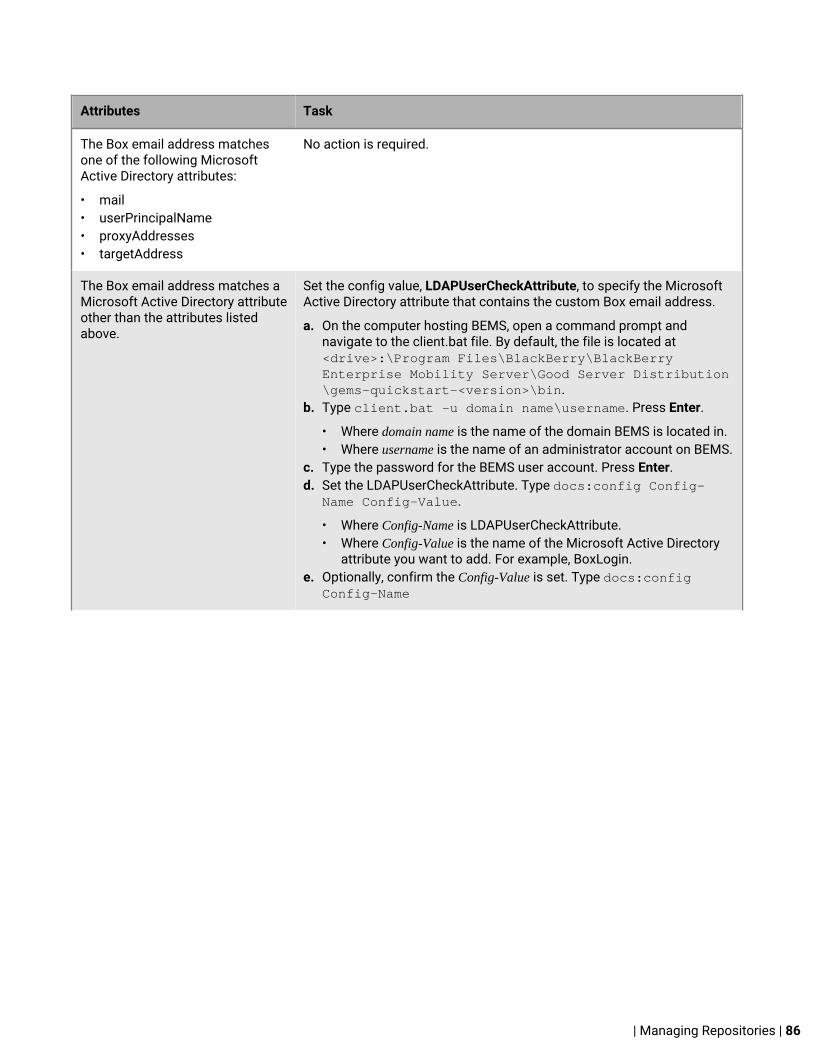
Attributes Task
The Box email address matchesone of the following MicrosoftActive Directory attributes:
• mail• userPrincipalName• proxyAddresses• targetAddress
No action is required.
The Box email address matches aMicrosoft Active Directory attributeother than the attributes listedabove.
Set the config value, LDAPUserCheckAttribute, to specify the MicrosoftActive Directory attribute that contains the custom Box email address.
a. On the computer hosting BEMS, open a command prompt andnavigate to the client.bat file. By default, the file is located at<drive>:\Program Files\BlackBerry\BlackBerryEnterprise Mobility Server\Good Server Distribution\gems-quickstart-<version>\bin.
b. Type client.bat -u domain name\username. Press Enter.
• Where domain name is the name of the domain BEMS is located in.• Where username is the name of an administrator account on BEMS.
c. Type the password for the BEMS user account. Press Enter.d. Set the LDAPUserCheckAttribute. Type docs:config Config-
Name Config-Value.
• Where Config-Name is LDAPUserCheckAttribute.• Where Config-Value is the name of the Microsoft Active Directory
attribute you want to add. For example, BoxLogin.e. Optionally, confirm the Config-Value is set. Type docs:config
Config-Name
| Managing Repositories | 86

Attributes Task
The Box email address doesnot match any Microsoft ActiveDirectory attribute.
Complete one of the following tasks:
• Add an attribute to contain the Box email address and use theprevious configuration. See the instructions above.
• Enable the EnablePersonalBoxAccess config value to allow users touse personal Box email addresses without adding an attribute.
Warning: If you use this method to allow users to usecustom Box email addresses to access Box, users can copydocuments from your organization's network to their privateBox accounts.
a. On the computer hosting BEMS, open a command promptand navigate to the client.bat file. By default, the file islocated at <drive>:\Program Files\BlackBerry\BlackBerry Enterprise Mobility Server\GoodServer Distribution\gems-quickstart-<version>\bin.
b. Type client.bat -u domain name\username. Press Enter.c. Type the password for the BEMS administrator account. Press
Enter.d. Set the EnablePersonalBoxAccess to 1 to enable the attribute.
Type docs:config EnablePersonalBoxAccess 1.e. Optionally, confirm EnablePersonalBoxAccess is enabled. Type
docs:config EnablePersonalBoxAccess.
Using the Docs Self-Service web consoleSimilar to the method for adding user-defined repositories on and from the device (see "Add a new data source"in the respective BlackBerry Work User Guide for iOS or Android), authorized users can login to a Docs Self-Service web console from a browser on their office workstation or laptop to add user-defined File Share, Box,and SharePoint repositories. The self-service console is included in your BEMS installation and automaticallyconfigured with the Docs service in the BEMS Dashboard.
The web address is http://<bems_fqdn>:<port>/docsconsole. Contact your BEMS/BlackBerry Work administratorfor the specific web address in your environment.
Log in to the Docs Self-Service web console1. In your computer browser, open a browser and navigate to the Docs Self-Service console at http://
<bems_fqdn>:<port>/docsconsole.2. On the login webpage, type your username, password, and domain name.3. Click Add Repository to define a new data source.4. In the Display Name field, type a display name. This name is displayed in repository lists in the console and on
your device.5. In the Storage Type field, select a storage type. For example, File Share, SharePoint, or Box (iOS).6. In the Path field, enter the path.7. Click Save.
| Managing Repositories | 87

Remove a user-defined repository using Docs Self-Service
Before you begin: One or more user-defined repositories.
1. In your computer browser, open a browser and navigate to the Docs Self-Service console at http://<bems_fqdn>:<port>/docsconsole.
2. On the login webpage, type your username, password, and domain name.3. Click beside the repository you want to remove.
| Managing Repositories | 88
Add a CMIS storage serviceBEMS is installed with support for a number of storage service providers: FileShare, SharePoint, and Box. You canalso add storage services that utilize the Content Management Interoperability Services (CMIS) protocol, an openstandard that allows different content management systems to inter-operate over the Internet.
1. In the BlackBerry Enterprise Mobility Server Dashboard, under BlackBerry Services Configuration, click Docs. 2. Click Storages. A list of storage providers is displayed. 3. Click New Storage. 4. In the Storage name field, type a name for the storage.5. In the Storage provider drop-down list, select an authentication provider.6. To make the storage available on user devices, select the select the Enable Storage checkbox.
Note: It may take up to an hour or a restart of the apps for storage changes to take effect on user devices.It may take up to five minutes for the changes to take effect on the server. Enabling and disabling storageproviders on this page affects what storage resources are visible at any given time for users, but has no suchimpact on the server.
After you finish: Add repositories in the storage provider. For instructions, see Managing Repositories
| Add a CMIS storage service | 89
Enable modern authentication for the SharePoint storageserviceYou can also enable modern authentication for the SharePoint storage service when you have MicrosoftSharePoint configured in your environment.
1. In the BlackBerry Enterprise Mobility Server Dashboard, under BlackBerry Services Configuration, click Docs. 2. Click Storages. 3. Click the storage name SharePoint Online.4. Click the Authentication Provider drop-down list and click Modern.5. Complete the following fields. For more information on obtaining the Application ID and Application Key,
see Obtain an Azure app ID for the Connect, Presence, and Docs service. For information on obtaining theClient ID, see Obtain an Azure app ID for BlackBerry Work.
• Tenant name/ID• Application ID• Application Key• Client ID
6. To make the storage available on user devices, select the select the Enable Storage checkbox.
Note: It may take up to an hour or a restart of the apps for storage changes to take effect on users' devices.It may take up to five minutes for the changes to take effect on the server. Enabling and disabling storageproviders on this page affects what storage resources are visible at any given time for users, but it has no suchimpact on the server.
After you finish: Add repositories in the storage added. For instructions, see Managing Repositories
| Enable modern authentication for the SharePoint storage service | 90

Windows Folder Redirection (Native)This feature gives administrators the ability to redirect the path of a folder to a new location, which can be onthe local computer or a directory on a network file share. Users can work with documents on a server as if thedocuments were based on a local drive. The documents in the folder are available to the user from any computeron the network.
Folder Redirection is located under Windows Settings in the console tree when you edit a domain-based GroupPolicy using the Group Policy Management Console (GPMC). The path is <Group Policy Object Name>\User Configuration\Policies\Windows Settings\Folder Redirection.
Offline File technology (turned on by default) gives users access to the folder even when they are not connectedto the network, and is especially useful on laptops and mobile devices. Offline folders do not, however, workout of the box with Samba network drives. See Offline Folders (Native) for details. Otherwise, Windows FolderRedirection can be enabled for any of the predefined folders in the Group Policy Management Editor.
In Windows Server 2008, a total of 13 different folders can be redirected.
• AppData (Roaming)• Desktop• Start Menu• Documents• Pictures• Music• Favorites• Contacts• Downloads• Links• Saved Games• Searches• Videos
As an administrator, you must create the root folder for the destination location. This folder can be created on alocal or remote machine (NAS).
Note: All members of the group who have Windows Folder Redirection enabled must have full access to the rootfolder.
Enable folder redirection and configure accessWhen you enable folder redirection the user’s folder will have exclusive user permissions. Other users cannot seethe files. The user can update, add new, and delete files. When the user connects to the corporate network, thefiles are automatically synchronized with the redirected location.
If modifications are made on the file in both locations at the same time, an alert is issued, and the user isresponsible for resolving the conflict; for example, keep the source, keep the destination, or keep both files).
If a user uploads a file through a mobile app directly to the share, the file is visible on the local computer in theDocuments folder. Moreover, when the Docs service is configured with “User Private Shares” pointing to theredirected root folder—for example, C:\RedirectShare\— users can automatically use their own folders inside themobile app from the “Home Directory” on their phone or tablet.
Note: Users with their home folder defined in Microsoft Active Directory, Folder Redirection works when theredirection path is the same as the user’s home folder in Microsoft Active Directory.
| Windows Folder Redirection (Native) | 91

1. Create a root folder (for example, RedirectShare) for the redirect destination.2. In the Group Policy Management Editor, select a specific folder (for example, Documents) and add one or
more rules to determine which users and user groups can redirect the selected folder to the root folder.3. Set an environment variable %USERNAME% to the path [Root]\<username>\Documents\.
| Windows Folder Redirection (Native) | 92
Local Folder Synchronization – Offline Folders (Native)Users who work remotely on content creation and save files locally for offline access, can now access thesefiles on-the-go from their mobile devices without having to open their local machine. The Docs service providesauthorized users access to their Home Directory hosted on network-attached storage (NAS) shares and exposedthrough Microsoft Active Directory. This synchronization feature, synching folders on the user’s remote laptop ordesktop with their home directory, is only available on local machines running Microsoft Windows.
When you select a network file or folder to make it available offline, Windows automatically creates a copy of thatfile or folder on your computer. Thereafter, any time you reconnect to the network folder, Windows synchronizesthese files with those in the network folder. You can also synchronize them manually any time you want. Aspointed out above, this feature does not work out of the box with a Samba network drive, and workarounds are notcurrently supported by Microsoft. Otherwise, the feature can be enabled from Windows Explorer and used for anyshared folder as pictured.
Now that the shared folder is available offline, it can be used offline. Users can even make a shortcut to theshared folder on their desktop for convenience. When working offline and changes are made to offline files ina network folder, Windows automatically synchronizes the changes the next time you connect to that networkfolder. You can also manually synchronize changes by clicking the Sync Center tool .
Additionally, there are more advanced synchronization scheduling controls available in the Windows Sync Center.
If the user is working offline while someone else changes a file in a shared network folder, Windows synchronizesthose changes with the offline file on the local computer the next time it connects to that network folder. If asynchronization conflict occurs, for example, changes were made to both the network and offline versions of thefile between syncups, Windows prompts the user to confirm which change takes precedence.
Files that were cached automatically are removed on a least-recently used basis once the maximum cache sizeis reached. Files cached manually are never removed from the local cache. When the total cache size limit isreached and all files that were cached automatically have already been removed, files cannot be made availableoffline until you specify a new limit or delete files from the local cache by using the Offline Files control panelapplet.
The default size limit for the Offline Files cache is 25-percent of the total disk space of the drive where the cacheis located. The cache size can be configured through the Group Policy by setting the limit on disk space used byOffline Files—go to Computer Configuration > Policies > Administrative Templates > Network > Offline Files—oneach client separately.
Synchronization takes place a few minutes after the user logs in and connects/opens a shared network foldercontaining offline files and is schedule- or event-based. However, this must still be enabled manually by eachuser. Even so, through the Group Policy editor, the domain administrator can set various synchronization triggers;e.g., On Logon, On Logoff, Sync Interval, etc.
these settings are available in User Configuration\Administrative Templates\Network\Offline Files and inComputer Configuration\Administrative Templates\Network\Offline Files in the Group Policy Object Editor snap-in. For more information about policy settings, see the Explain tab on the Properties page of each policy.
Folder Redirection and Offline Folders, provide the following advantages compared to a proprietary laptop/desktop agent furnished by Good:
• IT does not have to manage and deploy another desktop agent• Microsoft Folder Redirection is integrated with GPO and manages conflicts• Existing compliance tools and processes govern the data.
Once the files are synchronized to the “Home Directory,” IT administrators can make use of the Docs servicefeature in which Microsoft Active Directory attributes can be specified in the path to expose the user’s “HomeDirectory” to the BlackBerry Work app running on provisioned mobile devices. It is also important to remember
| Local Folder Synchronization – Offline Folders (Native) | 93

that for users who have their home folder defined in Microsoft Active Directory, Folder Redirection works when thefolder redirection path is the same as the user’s home folder in Microsoft Active Directory.
| Local Folder Synchronization – Offline Folders (Native) | 94

Configuring support for Microsoft SharePointOnline and Microsoft OneDrive for BusinessMicrosoft SharePoint Online locations can be added as repositories in the Docs service just like an on-premise Microsoft SharePoint site to support both admin-defined and user-defined data sources. This is also truefor Microsoft OneDrive for Business.
Microsoft SharePoint Online provides the following ways for users to authenticate andperform SharePoint operations:
• Using on-premises Microsoft Active Directory
• DirSync with Password Hash: Users and their passwords on Microsoft Active Directory are synchronizedwith Microsoft Office 365. Users are presented with a login page where they can enter their credentials toaccess Microsoft SharePoint Online.
• Active Directory Federation Service (ADFS): ADFS serves as a Secure Token Service. Behind the scenes (inbackground), users are redirected to ADFS for authentication and are issued security tokens that are thenused by Microsoft SharePoint Online to sign in. Microsoft SharePoint Online users do not need to entercredentials when accessing from the corporate network, which typically enables sign sign-on scenarios.
• Using modern authentication
• Enable modern authentication in the BEMS Dashboard.
These authentication mechanisms are supported by the Docs service and all preparations take place on theserver side exclusively. No device changes are required to use the on-premises Active Directory. The followingprerequisites are required for users to authenticate to Microsoft SharePoint Online:
• For users to authenticate to Microsoft SharePoint Online using Microsoft Active Directory, MicrosoftSharePoint Online is deployed in your environment based on DirSync with Password Hash or ADFS authentication mechanisms.
• For users to authenticate to Microsoft SharePoint Online using modern authentication, Microsoft SharePointOnline is deployed in your environment and enabled for modern authentication in the BEMS Dashboard.
Configure Microsoft SharePoint Online and Microsoft OneDrive forBusinessFor instructions on enabling modern authentication for Microsoft SharePoint Online, see Enable modernauthentication for the SharePoint storage service.
1. In the BlackBerry Enterprise Mobility Server Dashboard, under BlackBerry Services Configuration, click Docs. 2. Click Settings.3. In the SharePoint Online section, in the SharePoint Online Domain field, type the FQDN for your
primary Microsoft SharePoint Online domain. Then, separated by a comma, type your FQDNfor Microsoft OneDrive for Business. For example, goodshare.sharepoint.com,goodshare-my.sharepoint.com.
4. Click Save. 5. Restart Good Technology Common Services.6. Click Repositories.7. Click New Repository.8. In the Display Name field, type a name for the repository,9. In the Storage Type drop-down list, click SharePoint.
| Configuring support for Microsoft SharePoint Online and Microsoft OneDrive for Business | 95

10.In the Path field, type path for your primary Microsoft SharePoint Online site from Step 211.Click Save.12.Optionally, click New Repository for Microsoft OneDrive for Business and repeat steps 8 to 11 using the path
for the Microsoft OneDrive for Business. You can use the username wild card in the web address. For example, https://goodshare-my-sharepoint.com/personal<username>_goodshare_us.
You can lookup the path web address by logging in to theMicrosoft SharePoint Online website and clickthe Microsoft OneDrive option. Copy the web address into the Path field.
13.Click Save. Both repositories are listed in the repository list.
| Configuring support for Microsoft SharePoint Online and Microsoft OneDrive for Business | 96
Microsoft SharePoint Online authentication setupThe following instructions do not apply when you configure Microsoft SharePoint Online using ModernAuthentication. For Kerberos constrained delegation (KCD), which allows for single sign-on credential-less accessto network resources from devices, only Active Directory Federation Service (ADFS) authentication to MicrosoftSharePoint Online is supported.
Note: Configure delegation using the BEMS service account (for example, BEMSAdmin). When adding Kerberosdelegation constraints for Docs service users, add the ADFS server HTTP service. Do not add MicrosoftSharePoint Online servers for delegation here.
For non-KCD configurations, where users enter their credentials on the device, both DirSync with Password Hashand ADFS authentication mechanisms to Microsoft SharePoint Online are supported. No extra authentication-related steps are required to use this configuration.
ADFS version and location
ADFS 2.0 is recommended. You can install ADFS on either Microsoft Windows 2008 R2 and MicrosoftWindows 2012. The ADFS server is automatically identified by the Docs service based on theMicrosoft SharePointOnline location and does not need to be specified.
ADFS HTTPS certificate
If your ADFS server uses a self-signed certificate for HTTPS communication, the certificate must be added as atrusted CA on the computer hosting BEMS.
To add the certificate, navigate to the Microsoft IIS Manager on the computer hosting ADFS, then go to ServerCertificates and export the certificate to a file. On the computer hosting BEMS, import this certificate into thetrusted CA list.
Once you deploy Microsoft SharePoint Online, you’re ready to configure the Docs service for your MicrosoftSharePoint Online users.
Troubleshooting Microsoft SharePoint Issues
BlackBerry Work Docs fails to find a Microsoft SharePoint view by name
Possible cause
Maximum HTTP URL length is set to short.
Possible solution
Increase the maxUrlLength setting.
1. In Microsoft IIS, under site or server, open Configuration Editor.2. In the drop-down at the top, expand system.web and select httpRuntime.3. Change the maxUrlLength property to 2048. By default, the maxUrlLength is 260 characters.
| Microsoft SharePoint Online authentication setup | 97

Configuring Microsoft Office Web Apps server for Docsservice supportMicrosoft Office Web Apps (OWAS) is an Office server product from Microsoft that delivers browser-basedversions of Microsoft Word, Microsoft PowerPoint, Microsoft Excel, and Microsoft OneNote. A single MicrosoftOffice Web Apps server farm can support Docs service users who access Office files through MicrosoftSharePoint and File Shares. The new stand-alone deployment model means that you can manage updates to yourMicrosoft Office Web Apps server farm independently of other Office Server products that are deployed in yourorganization.
Supported file typesDocs support for Microsoft Office Web Apps (OWAS) gives your users the ability to view and edit Officedocuments and convert them to PDF format in BlackBerry Work and other BlackBerry Dynamics-powered appsthat use the Docs service. This is all done within the secure BlackBerry Dynamics container. The BlackBerryWork Docs component is used to browse and select the files. BlackBerry Access is used to view and edit thedocuments.
The following table lists the supported file types for Microsoft Word.
File format View Edit
Open XML (.docx)√
√
iPad only
Binary (.doc) √ —
Macro (.docm)√
—
Macrosdon't work
Templates (.dotm, .dotx) √ —
Other file formats
(.dot, .mht, .mhtml, htm, .html, .odt, .rtf, .txt, .xml, .wps, .wpd)— —
The following table lists the supported file types for Microsoft Excel.
File format View Edit
Open XML (.xlsx) √ √
Binary (.xlsb) √ √
Binary (.xls) — —
| Configuring Microsoft Office Web Apps server for Docs service support | 98
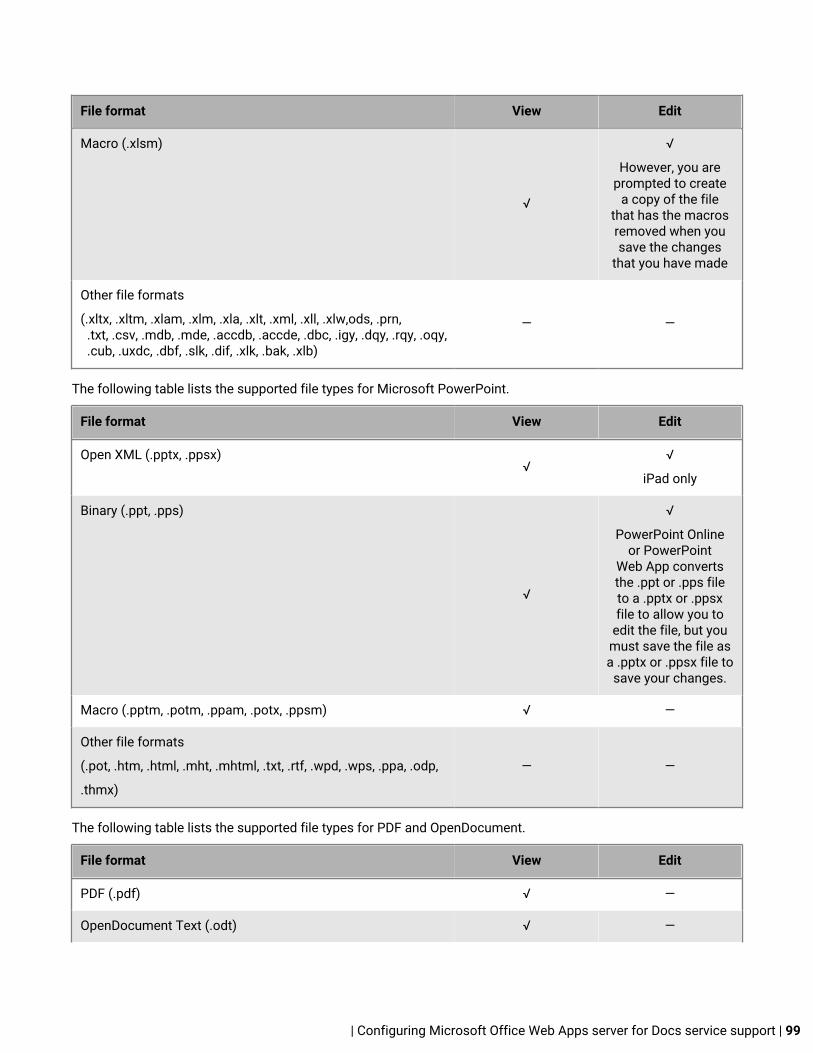
File format View Edit
Macro (.xlsm)
√
√
However, you areprompted to create
a copy of the filethat has the macrosremoved when yousave the changes
that you have made
Other file formats
(.xltx, .xltm, .xlam, .xlm, .xla, .xlt, .xml, .xll, .xlw,ods, .prn, .txt, .csv, .mdb, .mde, .accdb, .accde, .dbc, .igy, .dqy, .rqy, .oqy, .cub, .uxdc, .dbf, .slk, .dif, .xlk, .bak, .xlb)
— —
The following table lists the supported file types for Microsoft PowerPoint.
File format View Edit
Open XML (.pptx, .ppsx)√
√
iPad only
Binary (.ppt, .pps)
√
√
PowerPoint Onlineor PowerPoint
Web App convertsthe .ppt or .pps fileto a .pptx or .ppsxfile to allow you to
edit the file, but youmust save the file asa .pptx or .ppsx file to
save your changes.
Macro (.pptm, .potm, .ppam, .potx, .ppsm) √ —
Other file formats
(.pot, .htm, .html, .mht, .mhtml, .txt, .rtf, .wpd, .wps, .ppa, .odp,
.thmx)
— —
The following table lists the supported file types for PDF and OpenDocument.
File format View Edit
PDF (.pdf) √ —
OpenDocument Text (.odt) √ —
| Configuring Microsoft Office Web Apps server for Docs service support | 99

File format View Edit
OpenDocument Spreadsheet (.ods) √ √
OpenDocument Presentation (.odp) √ √
For more information on the file types supported with Microsoft Office Web Apps,visit support.microsoft.com and read article 2028380.
Supported files and storage typesDocuments in a supported file format can reside on any of the following storage types:
• File Shares• Microsoft SharePoint 2007, Microsoft SharePoint 2010, Microsoft SharePoint 2013, and Microsoft
SharePoint 2016• Microsoft SharePoint Online
Supported devices
• iOS devices
• iPad: view and edit• iPhone: view only
• Android devices
• Phones: view only• Tablets: view only
Configure the Docs service for Microsoft Office Web Apps accessBefore you begin:
• A Microsoft Office Web Apps server is installed and configured in your environment.• Add a registry key to enable strong cryptography on the Office Online Server. If this key is not added to the
registry, users can't view or edit Microsoft Office Web Apps files in BlackBerry Access and the Office OnlineServer log files log the error message Could not create SSL/TLS secure channel. For instructions, see theKnown issues section of the BEMS Release Notes content.
1. In the BlackBerry Enterprise Mobility Server Dashboard, under BlackBerry Services Configuration, click Docs.2. Click Settings.3. Under Office Web App Server, in the Office Web App Server URL field, type the web address of the Microsoft
Office Web Apps server. 4. Click Save.5. On the Office Web App Server server, in the Windows folder, copy Microsoft.CobaltCore.dll file. By default, the
file is located in <drive>:\Windows\Microsoft.Net\assembly\GAC_MSIL\Microsoft.CobaltCore\.
6. On the BEMS, browser to and paste the file into the lib folder at <drive>:\Program Files\BlackBerry\BlackBerry Enterprise Mobility Server\Good Server Distribution\gems-quickstart-<version>\lib.
7. Restart the Good Technology Common Services. 8. On BEMS, export the SSL certificate to a file.
| Configuring Microsoft Office Web Apps server for Docs service support | 100
a) In the BlackBerry Enterprise Mobility Server Dashboard, under BEMS System Settings, click SSLCertificate.
b) Click Download SSL Certificate. By default, the BemsCert.cer file is saved to the Downloads folder.9. On the Office Web App Server server, add the SSL certificate to the Trusted Root CA of the computer account.
a) Open the Microsoft Management Console.b) Click File > Add/Remove Snap-in.c) In the Available snap-ins column, click Certificates > Add.d) Select Computer account. Click Next. e) Select Local Computer. Click Finish.f) Click OK.g) In the Microsoft Management Console, expand Certificates (Local Computer).h) Right-click Trusted Root Certificate Authorities. Select All Tasks.i) Click Import.j) In the Certificate Import Wizard, click Next.k) Browse to the SSL certificate file you exported in step 8.
10.Obtain the Microsoft Office Web Apps server SSL certificate.11.Add the Microsoft Office Web Apps server SSL certificate to BEMS. For instructions, see Importing CA
Certificates for BEMS.12.Repeat steps 8 to 11 for each BEMS server in your environment.
| Configuring Microsoft Office Web Apps server for Docs service support | 101
Configuring resource based Kerberos constraineddelegation for the Docs serviceYou can configure the Docs service to use resource based Kerberos constrained delegation (KCD) to accessresources, such as Microsoft SharePoint servers and File Share servers, and remove the requirement for usersto provide their network credentials to access resources within the domain, and between domains and forests.When you configure resource based KCD for your Docs service, the resource authorizes the service accountsthat can delegate against the resource. If you need to enable KCD in your environment, it is recommended youenable resource based KCD, if your environment meets the minimum requirements. This is also recommended inenvironments that do not use multiple domains or forests. If your environment does not meet the requirementsfor resource based KCD, you can configure Kerberos constrained delegation (KCD).
Configuring the Docs service with resource based KCD allows users to access resources in the same domain orbetween domains and forests.
When you configure resource based Kerberos constrained delegation, you perform the following actions:
1. Configure resource based Kerberos constrained delegation2. Optionally, Verify the delegation is configured correctly3. Turn on resource based Kerberos constrained delegation
Configure resource based Kerberos constrained delegationYou can configure the Docs service with resource based Kerberos constrained delegation (KCD) to allows usersto access resources in the same domain and between domains and forests.
Before you begin:
• All BEMS instances in your environment are hosted on a computer that is running Windows 2012 or later.• Each domain in your environment has one or more Domain Controllers on a computer that is running Windows
2012 or later.• The BEMS service account is a member of the local Administrators group and has the Act as part of the
Operating System privilege.• If you are configuring resource based KCD for Microsoft SharePoint, make sure that Microsoft SharePoint
server uses Integrated Windows Authentication – Negotiate (Kerberos) for the authentication provider.• You identified the file share servers and Microsoft SharePoint servers that the Docs service requires access to.
1. On the Domain Controller or another computer in your environment, open Windows PowerShell (run asadministrator) and set up delegation.a) Import the ServerManager module. Type Import-Module ServerManager. Press Enter.b) Install the Microsoft Active Directory module for Windows PowerShell and the Microsoft Active Directory
Services. Type Add-WindowsFeature RSAT-AD-PowerShell. Press Enter.c) Import the Microsoft Active Directory module. Type import-module activedirectory. Press Enter.
2. Find the application pool identity for the Microsoft SharePoint servers in your environment. The applicationpool identity is located in the Microsoft Internet Information Services (IIS) Manager, on the Application Poolsscreen.
3. If the Microsoft SharePoint web application is running on a non-default port (the default port is 80 and 443) oris not running under the network service, create SPNs. Complete one or more of the following tasks:
Note: If you have multiple Microsoft SharePoint web applications, you must create an SPN for each webapplication that is available in the scenarios below.
| Configuring resource based Kerberos constrained delegation for the Docs service | 102
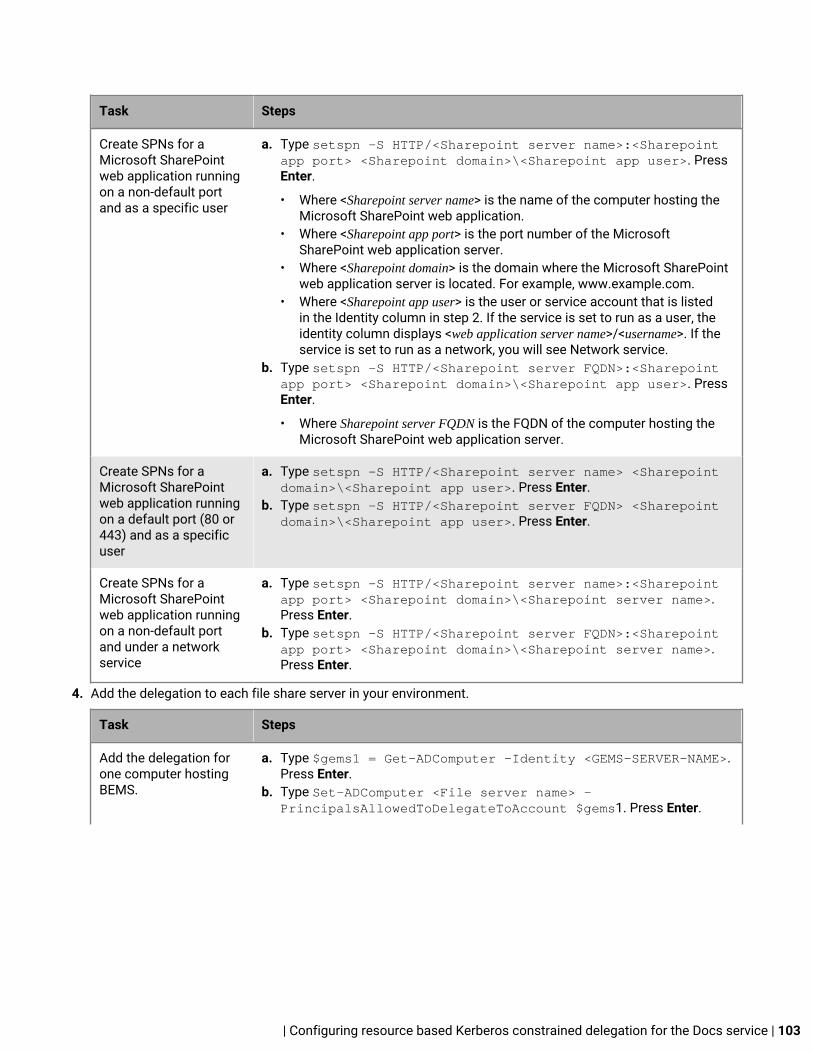
Task Steps
Create SPNs for aMicrosoft SharePointweb application runningon a non-default portand as a specific user
a. Type setspn -S HTTP/<Sharepoint server name>:<Sharepointapp port> <Sharepoint domain>\<Sharepoint app user>. PressEnter.
• Where <Sharepoint server name> is the name of the computer hosting theMicrosoft SharePoint web application.
• Where <Sharepoint app port> is the port number of the MicrosoftSharePoint web application server.
• Where <Sharepoint domain> is the domain where the Microsoft SharePointweb application server is located. For example, www.example.com.
• Where <Sharepoint app user> is the user or service account that is listedin the Identity column in step 2. If the service is set to run as a user, theidentity column displays <web application server name>/<username>. If theservice is set to run as a network, you will see Network service.
b. Type setspn -S HTTP/<Sharepoint server FQDN>:<Sharepointapp port> <Sharepoint domain>\<Sharepoint app user>. PressEnter.
• Where Sharepoint server FQDN is the FQDN of the computer hosting theMicrosoft SharePoint web application server.
Create SPNs for aMicrosoft SharePointweb application runningon a default port (80 or443) and as a specificuser
a. Type setspn -S HTTP/<Sharepoint server name> <Sharepointdomain>\<Sharepoint app user>. Press Enter.
b. Type setspn -S HTTP/<Sharepoint server FQDN> <Sharepointdomain>\<Sharepoint app user>. Press Enter.
Create SPNs for aMicrosoft SharePointweb application runningon a non-default portand under a networkservice
a. Type setspn -S HTTP/<Sharepoint server name>:<Sharepointapp port> <Sharepoint domain>\<Sharepoint server name>.Press Enter.
b. Type setspn -S HTTP/<Sharepoint server FQDN>:<Sharepointapp port> <Sharepoint domain>\<Sharepoint server name>.Press Enter.
4. Add the delegation to each file share server in your environment.
Task Steps
Add the delegation forone computer hostingBEMS.
a. Type $gems1 = Get-ADComputer -Identity <GEMS-SERVER-NAME>.Press Enter.
b. Type Set-ADComputer <File server name> -PrincipalsAllowedToDelegateToAccount $gems1. Press Enter.
| Configuring resource based Kerberos constrained delegation for the Docs service | 103
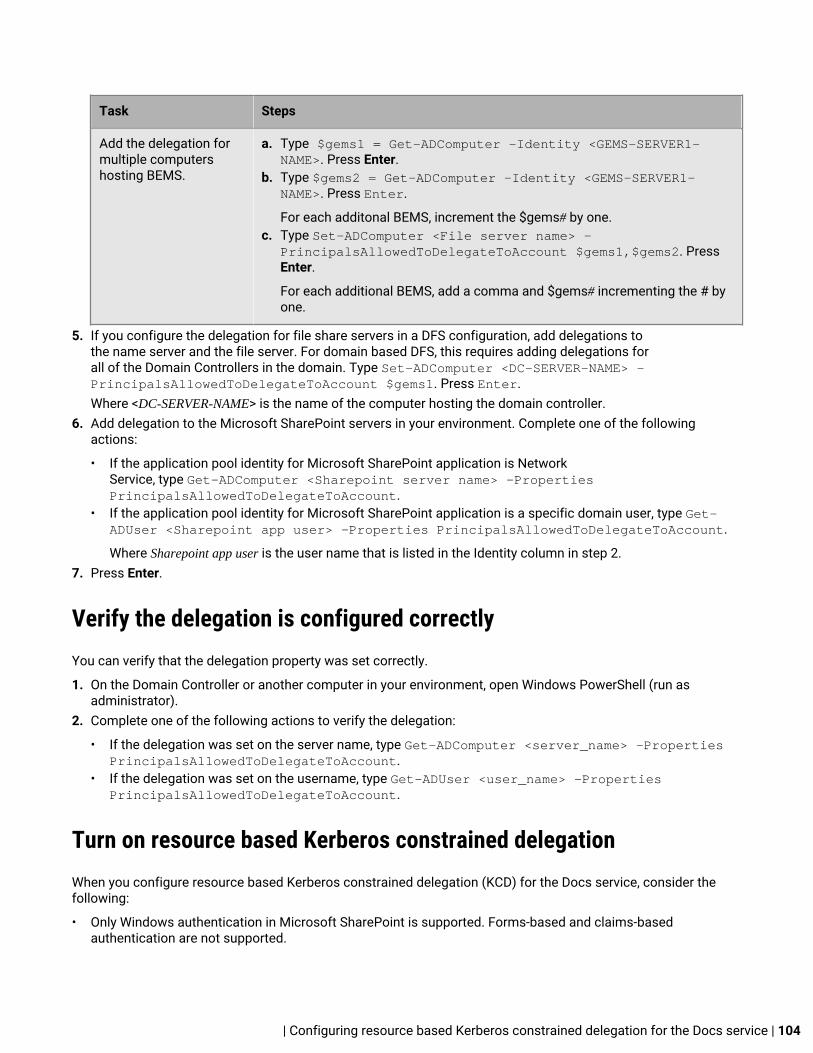
Task Steps
Add the delegation formultiple computershosting BEMS.
a. Type $gems1 = Get-ADComputer -Identity <GEMS-SERVER1-NAME>. Press Enter.
b. Type $gems2 = Get-ADComputer -Identity <GEMS-SERVER1-NAME>. Press Enter.
For each additonal BEMS, increment the $gems# by one.c. Type Set-ADComputer <File server name> -
PrincipalsAllowedToDelegateToAccount $gems1,$gems2. PressEnter.
For each additional BEMS, add a comma and $gems# incrementing the # byone.
5. If you configure the delegation for file share servers in a DFS configuration, add delegations tothe name server and the file server. For domain based DFS, this requires adding delegations forall of the Domain Controllers in the domain. Type Set-ADComputer <DC-SERVER-NAME> -PrincipalsAllowedToDelegateToAccount $gems1. Press Enter.Where <DC-SERVER-NAME> is the name of the computer hosting the domain controller.
6. Add delegation to the Microsoft SharePoint servers in your environment. Complete one of the followingactions:
• If the application pool identity for Microsoft SharePoint application is NetworkService, type Get-ADComputer <Sharepoint server name> -PropertiesPrincipalsAllowedToDelegateToAccount.
• If the application pool identity for Microsoft SharePoint application is a specific domain user, type Get-ADUser <Sharepoint app user> -Properties PrincipalsAllowedToDelegateToAccount.
Where Sharepoint app user is the user name that is listed in the Identity column in step 2.7. Press Enter.
Verify the delegation is configured correctlyYou can verify that the delegation property was set correctly.
1. On the Domain Controller or another computer in your environment, open Windows PowerShell (run asadministrator).
2. Complete one of the following actions to verify the delegation:
• If the delegation was set on the server name, type Get-ADComputer <server_name> -PropertiesPrincipalsAllowedToDelegateToAccount.
• If the delegation was set on the username, type Get-ADUser <user_name> -PropertiesPrincipalsAllowedToDelegateToAccount.
Turn on resource based Kerberos constrained delegationWhen you configure resource based Kerberos constrained delegation (KCD) for the Docs service, consider thefollowing:
• Only Windows authentication in Microsoft SharePoint is supported. Forms-based and claims-basedauthentication are not supported.
| Configuring resource based Kerberos constrained delegation for the Docs service | 104

• IP addresses are not allowed in the Microsoft SharePoint URLs and File Share paths that you configure inBEMS.
1. In the BlackBerry Enterprise Mobility Server Dashboard, under BlackBerry Services Configuration, click Docs.2. Click Settings.3. In the Kerberos Contrained Delegation section, select the Enable Kerberos Constrained Delegation checkbox.4. Restart the Good Technology Common Services.5. On the computer hosting the BEMS-Docs service, grant the Act as part of the operating system privilege to the
BEMS server account (for example, GoodAdmin).a) Run the Local Security Policy administrative tool.b) In the left pane, expand Local Policies.c) Click User Rights Agreement.d) Configure the service account for the Act as part of the operating system permission.
6. Click OK.
Remove resource based Kerberos constrained delegation1. Open the Windows PowerShell (run as administrator).2. Complete one of the following tasks:
• To remove the delegation from a server, type Set-ADComputer <server_name> -PrincipalsAllowedToDelegateToAccount $null.
If you have multiple file share or Microsoft SharePoint servers in your environment, complete this step foreach server.
• To remove the delegation from a user, type Set-ADUser <user_name> -PrincipalsAllowedToDelegateToAccount $null.
If you use different usernames for the Microsoft SharePoint and file share servers, complete this step foreach username.
3. Press Enter.
| Configuring resource based Kerberos constrained delegation for the Docs service | 105
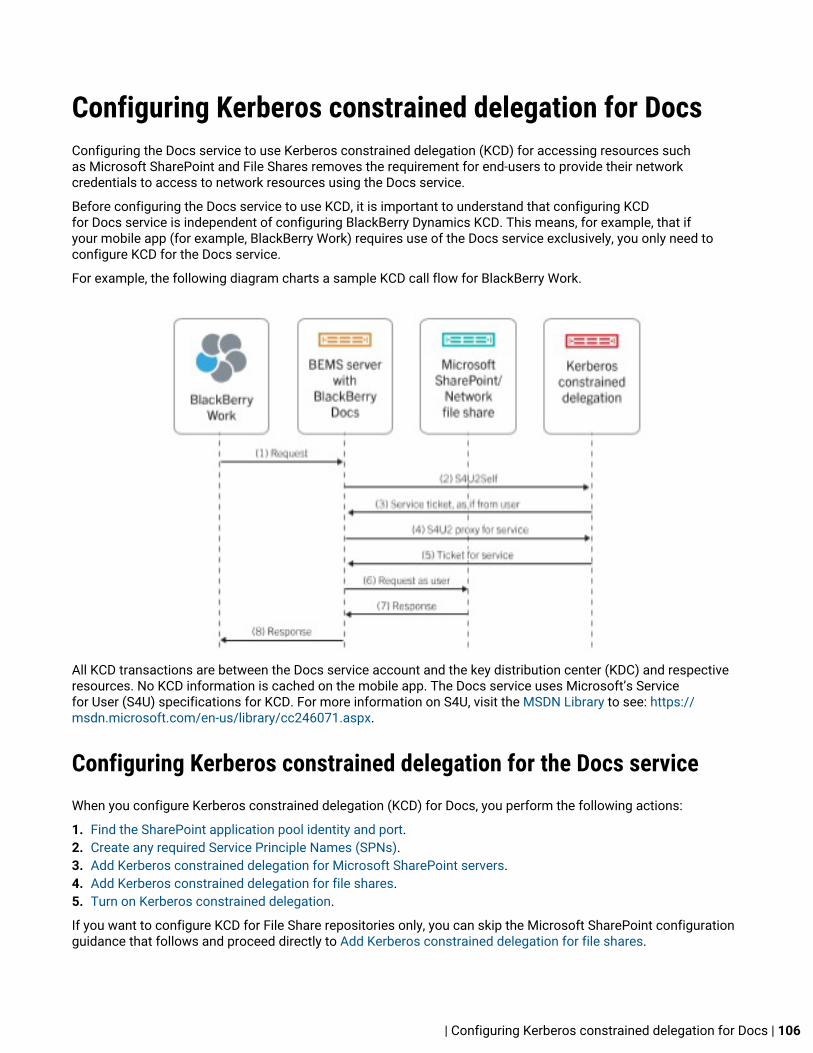
Configuring Kerberos constrained delegation for DocsConfiguring the Docs service to use Kerberos constrained delegation (KCD) for accessing resources suchas Microsoft SharePoint and File Shares removes the requirement for end-users to provide their networkcredentials to access to network resources using the Docs service.
Before configuring the Docs service to use KCD, it is important to understand that configuring KCDfor Docs service is independent of configuring BlackBerry Dynamics KCD. This means, for example, that ifyour mobile app (for example, BlackBerry Work) requires use of the Docs service exclusively, you only need toconfigure KCD for the Docs service.
For example, the following diagram charts a sample KCD call flow for BlackBerry Work.
All KCD transactions are between the Docs service account and the key distribution center (KDC) and respectiveresources. No KCD information is cached on the mobile app. The Docs service uses Microsoft’s Servicefor User (S4U) specifications for KCD. For more information on S4U, visit the MSDN Library to see: https://msdn.microsoft.com/en-us/library/cc246071.aspx.
Configuring Kerberos constrained delegation for the Docs serviceWhen you configure Kerberos constrained delegation (KCD) for Docs, you perform the following actions:
1. Find the SharePoint application pool identity and port.2. Create any required Service Principle Names (SPNs).3. Add Kerberos constrained delegation for Microsoft SharePoint servers.4. Add Kerberos constrained delegation for file shares.5. Turn on Kerberos constrained delegation.
If you want to configure KCD for File Share repositories only, you can skip the Microsoft SharePoint configurationguidance that follows and proceed directly to Add Kerberos constrained delegation for file shares.
| Configuring Kerberos constrained delegation for Docs | 106
Find the SharePoint application pool identity and portBefore you begin: Make sure that you create a list of web applications that are going to be shared through theDocs service.
1. Open Windows Internet Information Services (IIS) Manager.Make sure that you record any additional port numbers that are assigned if a web application was extended tocreate alternate access mappings.
2. Find the Application Pool identity in the Application Pools list view or in SharePoint Central Administration >Security > Configure service accounts.In most instances, for Kerberos constrained deleagtion (KCD) to work properly, the application pool identityuser must be the same for all application pools whose applications will be accessed by the Docs service. Thismeans you cannot have different application pools running under different users.
3. In SharePoint Central Administration, on the Web Applications tab, find the port for each of the webapplications listed. Look in the Alternate Access Mappings view as necessary.
4. In the Sharepoint Central Administration, open the Application Management, choose the web applicationand click Authentication Providers in the ribbon bar. Make sure that the authentication type for each webapplication is set to Windows and that Negotiate (Kerberos) is enabled under IIS Authentication Settings.In certain scenarios, switching to Negotiate (Kerberos) might require enabling Kernel-mode authentication inIIS for the corresponding IIS site. For more information, visit the MSDN Library to see Service Principal Name(SPN) checklist for Kerberos authentication with IIS 7.0/7.5.
Create Service Principal NamesCreate a Service Principle Name (SPN) for each web application that needs to be shared as follows:
setspn –S HTTP/SPHOST:PORT <domain>\AppPoolUsersetspn –S HTTP/SPHOST.FQDN:PORT <domain>\AppPoolUsersetspn –S HTTP/SPHOST <domain>\AppPoolUsersetspn –S HTTP/SPHOST.FQDN <domain>\AppPoolUser
If the port is a default port, such as 80 or 443, omit the commands that include port above.
Note: Some of the lines only require a host name while others require a fully qualified host name. If theapplication pool identity is for a built-in user such as Network Service, then specify the host name as shown belowinstead of <domain>\AppPoolUser.
setspn –S HTTP/SPHOST:PORT <domain>\SPHOSTsetspn –S HTTP/SPHOST.FQDN:PORT <domain>\SPHOSTsetspn –S HTTP/SPHOST <domain>\SPHOSTsetspn –S HTTP/SPHOST.FQDN <domain>\SPHOST
Note: If you use SSL, the SPN must refer to HTTP instead of HTTPS.
Add Kerberos constrained delegation in Microsoft Active Directory for Microsoft SharePointNote:
There is a limit of 1300 services that can be delegated to one account.
If you want to configure Kerberos contrained delegation (KCD) for File Share repositories only, do not completethis task.
1. Open Microsoft Active Directory Users and Computers.2. In your domain, click Users.3. Right-click the BEMS service account. For example BEMSAdmin. Click Properties.
| Configuring Kerberos constrained delegation for Docs | 107
4. In the Microsoft Active Directory account properties, on the Delegation tab, select the following options:
• Trust this user for delegation to specified services only• Use any authentication protocol
5. Click Add.6. Click Users or Computers.7. In the Enter the object names to select field, type one of the following:
• If the SharePoint web application is running under a domain user account, type the SharePoint ApplicationPool identity username.
• If SharePoint web application is running under the Network Service account, type the Microsoft SharePointserver name.
8. Click OK.9. In the Add Services dialog box, select the HTTP service that corresponds to the SharePoint web applications
running under the account specified in step 7.10.Click OK.11.Repeat Steps 4–9 for each application pool identity user and each Web Application identified.
Add Kerberos constrained delegation for file sharesThe main difference between sharing files in File Share repositories, compared to sharing apps (for example,Microsoft SharePoint), is that here the delegation is to the computer hosting the BEMS instance account and notto the Docsservice process user, BEMSAdmin.
1. Open Microsoft Active Directory Users and Computers.2. In your domain, click Computers.3. Right-click the BEMS computer entry. Click Properties.4. Click the Delegation tab.5. In the Microsoft Active Directory account properties, on the Delegation tab, select the following options:
• Trust this user for delegation to specified services only• Use any authentication protocol
6. Click Add, select Users or Computers, type in the name of the server whose file share needs access and clickOK.
7. In the list of services, click cifs. Click OK.8. Repeat Step 3 to 6 for each server that has file shares needing access.9. Restart the BEMS server. Since Kerberos tokens are cached, restarting the BEMS server is the only way to
make sure all delegation changes are received on the machines.
Turn on Kerberos constrained delegationWhen you configure Kerberos constrained delegation (KCD) for the Docs service, consider the following:
• Only Windows authentication in Microsoft SharePoint is supported. Forms-based and claims-basedauthentication are not supported.
• IP addresses are not allowed in the Microsoft SharePoint URLs and File Share paths that you configure inBEMS.
1. In the BlackBerry Enterprise Mobility Server Dashboard, under BlackBerry Services Configuration, click Docs.2. Click Settings.3. In the Kerberos Contrained Delegation section, select the Enable Kerberos Constrained Delegation checkbox.4. Restart the Good Technology Common Services.
| Configuring Kerberos constrained delegation for Docs | 108

5. On the computer hosting the BEMS-Docs service, grant the Act as part of the operating system privilege to theBEMS server account (for example, GoodAdmin).a) Run the Local Security Policy administrative tool.b) In the left pane, expand Local Policies.c) Click User Rights Agreement.d) Configure the service account for the Act as part of the operating system permission.
6. Click OK.
| Configuring Kerberos constrained delegation for Docs | 109

Configuring BlackBerry Dynamics LauncherThe BlackBerry Dynamics Launcher is a UI component that is accessed in BlackBerry Dynamics apps with theBlackBerry Dynamics Launcher button. The BlackBerry Dynamics Launcher is a library module with numerousfunctions, currently comprising of the following. The BlackBerry Dynamics Launcher creates a placeholderlocation for app settings.
• The user's name, photo, presence, and status• A list of BlackBerry Dynamics-powered apps and modules installed on the device.• Quick create options to easily compose an email, create a note, schedule a calendar event, or add a contact,
regardless of which app is currently open.
To provide this rich user experience, the BlackBerry Dynamics Launcher library requires BEMS server-side servicesto:
• Synchronize policy-based sections (modules) between applications. For example, when Docs is enabledin BlackBerry Work, the Docs icon is enabled in the BlackBerry Dynamics Launcher, even when it is openedoutside of BlackBerry Work in apps like BlackBerry Access or BlackBerry Connect.
• Fetch company directory information about the user to display the correct name and picture.• Fetch presence information for the user and display the appropriate status (available, busy, away, do not
disturb) and the user's presence message.
The required server-side services for the BlackBerry Dynamics Launcher comprise of the following:
• Presence (service id = com.good.gdservice.enterprise.presence)• BlackBerry Directory Lookup (service id = com.good.gdservice.enterprise.directory)• BlackBerry Follow-Me Store (service id = com.good.gdservice.enterprise.followme)
The client entitlement app to use these services is Good Enterprise Services (AppID =com.good.gdserviceentitlement.enterprise).
BlackBerry Dynamics clients, like the BlackBerry Work app, check the server list for available BEMS instanceshosting these services. This means the list must be populated with at least one computer that hosts BEMS toenable Good Enterprise Services. In addition, the Good Enterprise Services entitlement app must be added to atleast one App Group in BlackBerry UEM like "All users".
Configuring Good Enterprise Services in BlackBerry UEMWhen you configure Good Enterprise Services in BlackBerry UEM, you perform the following actions:
1. Verify the Good Enterprise Services app is available in BlackBerry UEM.2. Add BEMS to the Good Enterprise Services entitlement app.3. Add the Good Enterprise Services entitlement app to users. You can use one or more of the following options.
For instructions, see the BlackBerry UEM Administration content.
• Apply the app directly by completing one of the following tasks:
• Assign the entitlement app to a user group• Assign the entitlement app to a user account
• Assign the entitlement app to an app group. Then complete one of the following tasks:
• Assign the app group to a user group• Assign the app group to a user account
| Configuring BlackBerry Dynamics Launcher | 110
Verify that Good Enterprise Services are available in BlackBerry UEM1. Log in to the BlackBerry UEM console.2. On the menu bar, click Apps.3. Search for Good Enterprise Services.
Add the BEMS instance to the Good Enterprise Services and BlackBerry Work entitlement appYou must add the BEMS instance to the Good Enterprise Services entitlement app to allow users to use theservices. You must also add the BEMS instance to allow users to receive email notifications. If the BEMS instanceis not added to the BlackBerry Work entitlement app, users receive email messages, but do not receive thenotifications when the email messages are received. For more information about configuring your environmentto support BlackBerry Dynamics apps, making the apps available to users, and configuring the app settings, seethe BlackBerry Work, Tasks, and Notes administration content.
1. On the menu bar, click Policies and Profiles.2. Click Networks and connections > BlackBerry Dynamics connectivity.3.
Click to create a new connectivity profile or click the Default connectivity profile to edit it.4.
In the Additional servers section, click .5. Complete one of the following tasks:
Task Steps
Route all traffic Select the Route all traffic checkbox to specify whether all BlackBerryDynamics app data is routed through the BlackBerry Proxy. For moreinformation about the BlackBerry Dynamics connectivity profilesettings, see the BlackBerry UEM Administration content.
Add the BEMS instance to theAdditional servers
a.In the Additional servers section, click .
b. In the Server field, specify the FQDN of the BlackBerry EnterpriseMobility Server.
c. In the Port field, specify the port for the BlackBerry EnterpriseMobility Server. By default, the port number is 8443.
d. In the Primary BlackBerry Proxy cluster drop-down list, select thename of the BlackBerry Proxy cluster that you want to set as theprimary cluster.
e. If necessary, in the Secondary BlackBerry Proxy cluster drop-downlist, select the name of the BlackBerry Proxy cluster that you wantto set as the secondary cluster.
6. Click Save.7. Add the BEMS instance to the Good Enterprise Services entitlement app.
a)In the App servers section, click .
b) Click Add.c) Search for and select Good Enterprise Services.d) Click Save.e)
In the App servers for Good Enterprise Services, click .f) In the Server field, specify the FQDN of the BlackBerry Enterprise Mobility Server.
| Configuring BlackBerry Dynamics Launcher | 111

g) In the Port field, specify the port of the BlackBerry Proxy cluster that is used to access the BlackBerryEnterprise Mobility Server.
h) In the Priority drop-down list, select the priority of the BlackBerry Proxy cluster that must be used to reachthe domain.
i) If necessary, in the Secondary BlackBerry Proxy cluster drop-down list, select the name of the BlackBerryProxy cluster that you want to set as the secondary cluster.
j) Click Save.8. Add the BEMS instance to the BlackBerry Work entitlement app.
a)In the App servers section, click .
b) Click Add.c) Search for and select BlackBerry Work.d) Click Save.e)
In the App servers for BlackBerry Work, click .f) In the Server field, specify the FQDN of the BlackBerry Enterprise Mobility Server.g) In the Port field, specify the port of the BlackBerry Proxy cluster that is used to access the BlackBerry
Enterprise Mobility Server.h) In the Priority drop-down list, select the priority of the BlackBerry Proxy cluster that must be used to reach
the domain.i) If necessary, in the Secondary BlackBerry Proxy cluster drop-down list, select the name of the BlackBerry
Proxy cluster that you want to set as the secondary cluster.j) Click Save.
9. To save the updates to the existing profile, click Save.10.To save the settings and add the new profile, click Add.
Setting a customized icon for the BlackBerry Dynamics LauncherYou can specify a default customized icon for the BlackBerry Dynamics Launcher on users' devices. When youspecify a customized icon, the icon replaces the BlackBerry Dynamics icon for all users managed by the BEMSinstance.
When you specify a customized icon, make sure that the file meets the following requirements:
• Less than 500kb.• Named using the following format: <file name>_<device_type>_<resolution>.png. For example, Icon_iOS_2x.png.
Where resolution is the supported resolution for the device. For example:
• Android devices: dpi, mdpi, hdpi, and xdpi• iOS devices: 1x, 2x, 3x, and so on
• Saved as a .png format
Specify a customized icon for the BlackBerry Dynamics LauncherBEMS allows you to specify a custom icon for users in your environment. When you add custom icons, BEMSverifies the validity of the uploaded images. For more information about customized icon requirements, seeSetting a customized icon for the BlackBerry Dynamics Launcher.
1. In the BlackBerry Enterprise Mobility Server Dashboard, under BlackBerry System Settings, click LauncherBranding.
2. Select the Show customized icon in launcher checkbox.
| Configuring BlackBerry Dynamics Launcher | 112

3. Click the Device drop-down list, and select the device for which you want to specify the launcher icon. Bydefault, Android is selected.
4. Under Icon, click Choose File.5. Navigate to the icon file location. Click the file and then click Open.6. Click Save.7. Repeat steps steps 4 to 6 for each customized Android icon file resolution.8. Complete steps 3 to 7 for customized iOS device icon files.
Remove a customized icon for the BlackBerry Dynamics LauncherBefore you begin: You can choose to remove a customized icon you specified for the BlackBerry DynamicsLauncher. If you remove all of the customized icon files, the default Launcher icon is used on the client devices forthe Launcher app.
1. In the BlackBerry Enterprise Mobility Server Dashboard, under BlackBerry System Settings, click LauncherBranding.
2. Click Delete beside the icon you want to remove.3. Click Save.
| Configuring BlackBerry Dynamics Launcher | 113
MonitoringYou can monitor the status of BEMS and users using the following montioring tools
• BEMS Lookout tool• Java Management Extensions (JMX)-compliant monitoring tools
Monitoring the status of BEMS and users using the BEMS LookouttoolYou can use the BEMS Lookout tool to view the status of the BEMS node and scan the logs for informationincluding the following:
• The state of devices and users.• Notification success and failure• The notifications received by a user during a specified time range
You can also use monitoring probes to report on the health metrics for the Push Notifications service. Forexample, number of successful and failed push notifications. You can run the Lookout tool on log files you savedlocally in a folder or on a shared drive. The analysis tool is included in your BEMS 2.4 or later installation packageand supports analyzing logs from BEMS 2.1.5 or later.
Install the BEMS Lookout toolBefore you begin: Install Python 2.7 on the computer that you use to analyse the BEMS logs. You can download itfrom Python 2.7 at www.python.org/downloads.
1. Update the PATH system variable.a) On the computer that you use to run the Lookout tool, right-click Computer or This PC. Click Properties.b) Click Advanced system settings.c) Click the Advanced tab.d) Click Environment Variables.e) In the System variables list, click Path. Click Edit.f) In the Variable value field, add ;C:\Python27;C:\Python27\Scripts.g) Click OK. Click OK again.
2. Optionally, enable BEMS monitoring tools.a) On the computer that hosts BEMS, open the Apache Karaf Web Console. Open a browser window and
navigate to https://<BEMS instance hostname>:8443/system/console/configMgr.b) Scroll to and click Good Technology Probe Query Servlet.c) In the default realm field, type gems-ad.d) In the default role field, type admin.e) Click Save.f) Verify the monitoring probes are successfully enabled. In a browser navigate to https://<BEMS
FQDN>:8443/monitor. Review the monitor content. If you are prompted to download the monitor.json file,download it to review the content. To view the data provided by each monitoring probe, see Monitoringprobes.
3. On the computer that hosts BEMS, navigate to the BEMS Lookout tool. By default, the BEMS Lookout toolis located in the BEMS installation folder at <drive>:\GoodEnterpriseMobilityServer<version>\GoodEnterpriseMobilityServer\bems-lookout.
| Monitoring | 114
4. Extract the bems-lookout<version>tools.zip file.5. Double-click setup.bat to install the python libraries on the computer.6. In a text editor, open Config.cfg.
• ServerBaseUrls: Optionally, specify the BEMS https web addresses you want to connect to and include inyour analysis. If you want to run the Lookout tool on multiple BEMS instances, separate the instances usinga comma, no space.
• MonitorCredentials: If you configured ServerBaseURLs, you must include the user credentials specifiedduring BEMS monitoring setup. For example, gemsadmin:<password>.
• ServerLogDirectories: Specify the location of the logs for each computer that hosts a BEMS instance inthe BEMS cluster. You must include the BEMS instance name and location of the log files. For example,if the log files for BEMS1 are available on a network share and BEMS2 are located in C:\blackberry, andyou analyze the logs on BEMS2 you specify <bemshost1>:\\<bemshost1>\<bemslogs share>,<bemshost2>:C:\blackberry\bemslogs.
Note: You can list the BEMS log locations in any order.• DataDir: Create a folder to where the processed data is saved. For example, create a folder called 'bem-
lookout-data'. Update the DataDir property to DataDir=C:\blackberry\bems-lookout-data.• LogSyncIntervalSec: Optionally, specify the interval time, in seconds, that the analysis tool scans the log
directory for new logs. By default, the LogSyncIntervalSec is set to onetime. If logs are not available, youcan set the LogSyncIntervalSec=none to only view the user state.
• MaxLogScanAgeDays: Optionally, specify the oldest date that you want to synchronize the logs. By default,the MaxLogScanAgeDays is 14 days.
7. Save the Config.cfg file.
After you finish:
• Optionally, enable monitoring probes to view additional information for the the health of your BEMS server andusers
• Run the BEMS Lookout tool to analyze the BEMS logs.
Monitoring probesThe following table describes the monitoring probes you can use to view additonal information for the the healthof your BEMS server and users. You can use monitoring probes to view information for a BEMS instance locally orfrom a remote computer.
Note: To use monitoring probes in your environment, you must enable them. For instructions, see Install theBEMS Lookout tool
Probe name cURL Command Output description
PushNotificationCounter
Type curl -k -i -X GET \ -H"Content-Type:application/json" \ -H "Authorization:BasicZG9tYWluXHVzZXI6cGFzc3dvcmQ="\ 'https://<BEMS instancename> :8443/monitor/push.notifications'
SuccessfulPushes
This probe specifies the number of pushnotifications, per push notification type(for example, APNS, GNP, and GCM)that have the instance sent for userssupported by this instance.
You want to see the number increaseover short intervals of time. If it stopsrising then BEMS is not sending anypush notifications.
| Monitoring | 115

Probe name cURL Command Output description
Total user count Type curl -k -i -X GET \ -H"Content-Type:application/json" \ -H "Authorization:BasicZG9tYWluXHVzZXI6cGFzc3dvcmQ=" \'https://<BEMS instance name>:8443/monitor/mail.users/UsersCount'
UsersCount
This probe specifies the total numberof users across the BEMS cluster whichsuccessfully registered a device and aresuccessfully auto discovered by BEMS.The UsersCount does not reflect thenumber of devices receiving pushnotifications.
Stale user count type curl -k -i -X GET \ -H"Content-Type:application/json" \ -H "Authorization:BasicZG9tYWluXHVzZXI6cGFzc3dvcmQ=" \'https://<BEMS instance name>:8443/monitor/mail.users/StaleUsersCount'
StaleUsersCount
This probe specifies the total numberof users across the BEMS cluster whichsuccessfully registered a device, but forwhich BEMS is no longer sending pushnotifications because the device hasn'tregistered in the past 72 hours.
EWS user count Type curl -k -i -X GET \ -H"Content-Type:application/json" \ -H "Authorization:BasicZG9tYWluXHVzZXI6cGFzc3dvcmQ=" \'https://<BEMS instance name>:8443/monitor/mail.ewslistener/EWSUserStats'
EWSConnectedUserCount
This probe specifies the number ofusers on the Microsoft ExchangeWeb Services instance, forwhich BEMS connects to the MicrosoftExchange Server, and is attemptingto monitor the users' mailboxes. ThisEWSConnectedUserCount reflectsthe number of users most likelyto be receiving push notificationsunless BEMS is experiencing errorswith its Microsoft Exchange WebServices connections to the MicrosoftExchange Server.
The EWSConnectedUserCount shouldbe equal across all Microsoft ExchangeWeb Services instances in a cluster. Ifthis count drops to 0 then the MicrosoftExchange Web Services instance is notservicing any user mailboxes.
Run the BEMS Lookout tool
Before you begin:
• Install Python 2.7 on the computer that you use to analyse the BEMS logs. You can download it from Python2.7 at www.python.org/downloads.
• Install the BEMS Lookout tool.
1. On the computer that you installed the BEMS Lookout tool, navigate to the bems-lookout-<version>.toolsfolder. By default, the folder is located at: <drive>:\Downloads\GoodEnterpriseMobilityServer.<version>\GoodEnterpriseMobilityServer\bems-lookout\bems-lookout-<version>.tools-all\bems-lookout-<version>.tools
| Monitoring | 116
2. Start the log analysis, double-click start.bat. The BEMS Lookout tool writes the log files it generates to theDataDir parameter that you specified when you installed the BEMS Lookout tool.
After you finish: The BEMS Lookout tool log analysis results are saved to a database in the DataDir folder. Toview the analysis results, open a browser and go to http://localhost:5000.
Monitoring the status of Push Notifications using JMX-compliantmonitoring toolsYou can now use Java Management Extensions (JMX)-compliant monitoring tools to monitor the Mail (PushNotifications). JMX is a Java Standard which is compatible with many tool suites including JConsole which isdistributed with every JDK installation. You can view the status of the BEMS node on Push Notifications statisticsincluding the following:
• The state of devices and users. • Notification success and failure• The time of the last notification received • The state of the BEMS infrastructure, such as processing time and response to database requests
Monitoring attributesThe following table describes the statistics that you can use to monitor the health of BEMS server and users usingthe monitoring tool.
Statistic Description
RelayStats <notification type>RelayStats
This attribute specifies the number of push notifications for each pushnotification type (for example, APNS, GNP, and FCM). If this numberstops rising, then BEMS is not sending any push notifications.
The numbers should increase over short intervals.
EWSStats EWSConnectedUserCount
This attribute specifies the number of users on the Microsoft ExchangeWeb Services instance that BEMS uses to connect to the MicrosoftExchange Server so that it can monitor the users' mailboxes. Thisattribute reflects the number of users most likely to be receiving pushnotifications unless BEMS is experiencing errors with its MicrosoftExchange Web Services connections to the Microsoft Exchange Server.
The EWSConnectedUserCount should be equal across all MicrosoftExchange Web Services instances in a cluster. If this count drops to 0,then the Microsoft Exchange Web Services instance is not servicing anyuser mailboxes.
| Monitoring | 117
Statistic Description
UserStats UsersCount
This attribute specifies the total number of users acrossthe BEMS cluster which successfully registered a device and aresuccessfully autodiscovered by BEMS. The UsersCount does not reflectthe number of devices receiving push notifications.
StaleUsersCount
This attribute specifies the total number of users acrossthe BEMS cluster that BEMS is no longer sending push notifications tobecause the devices that were registered previously haven't registered inthe past 72 hours.
HealthStats HealthStats
This attribute specifies the overall health of the BEMS status, includinghealth of consumer threads, producer threads, ActiveMQ, and access tothe database.
ClientAPIStats ClientAPIStats
This attribute identifies generic problems with the BEMS service bymonitoring the average and maximum processing time of requeststo the BEMS database. This statistic is for the last minute only. Forexample, if the LookupUser is {Min:10, Max:90000, Average:50000,Count:26}, it means that BEMS received 26 LookupUser requests in thelast minute and the average duration is 50,000 milliseconds.
DatabaseStats DatabaseStats
This attribute can identify common failure points forthe BEMS Infrastructure. This attribute monitors statistics such asthe average, maximum, minimum, and number of requests to BEMS ifthe NumOfRequests is 25, it means BEMS received 25 databaserequests in the last minute. If the database stops, the processing timedisplays Infinity.
AutodiscoverStats EAS
This attribute specifies the total number of successful or failed ActiveDirectory requests for EAS client requests.
EWS
This attribute specifies the total number of successful or failed ActiveDirectory requests for all EWS requests and client requests.
Tests
This attribute specifies the total number of successful or failed ActiveDirectory requests for both EWS and EAS tests.
| Monitoring | 118

View the Push Notifications statistics using the JMX toolBefore you begin: Verify that Java SE is installed on the computer that hosts the BEMS Mail (Push Notifications)service.
1. On the computer that hosts the Push Notifications service, open the jconsole app. By default, the app islocated in <drive>:\Program Files\Java\jdk1.8.0_<version>\bin.
2. In the Remote Process field, enter the <hostname>:<port>. To obtain the hostname and port number, completethe following steps:a) On the Apache Karaf Web Console, open a browser window and navigate to https://<BEMS instance
hostname>:8443/system/console/configMgr.b) Scroll to and click Apache Karaf JMX Management.c) Copy the RMI Registry Host and RMI Registry Port.
3. Click Connect.4. Click Insecure connection.5. In the Java Monitoring & Management Console, click the MBeans tab.6. Do any of the following:
View Statistics Steps
View statistics about the FCM, GCM, APNS, andAPNS push notifications.
Click com.good.gcs.notifications > instance >RelayStats > Attributes.
View statistics about users on the MicrosoftExchange Web Services instance.
Click com.good.gcs.pushnotify > instance >EWSStats > Attributes.
View statistics about users in the BEMS cluster thathave registered a device.
Click com.good.gcs.pushnotify > instance >UserStats > Attributes.
View the overall health of BEMS. Click com.good.gcs.core.health > instance >HealthStats > Attributes.
View the client API status statistics for the previousminute for requests received by BEMS .
Click com.good.gcs.clientapi > instance > ClientAPI Status > Attributes.
View the average, maximum, minimum, and numberof requests to the BEMS database.
Click com.good.gcs.database > instance >DatabaseStats > Attributes.
View statistics for EAS and EWS Autodiscover andadministrator functions.
Click com.good.gcs.pushnotify > instance >AutodiscoverStats.
| Monitoring | 119
Appendix A: Understandingthe BEMS-Connect configuration fileConfiguration settings can be manually updated in the BEMS Connect configuration file(GoodConnectServer.exe.config) located in <drive>\Program Files\BlackBerry\BlackBerryEnterprise Mobility Server\Good Connect. However, best practice for updating the file should usethe BEMS admin console.
Note: After updating the configuration parameters, you must restart the BEMS machine for the changes to takeeffect.
Parameter name Required Description Default setting
ACK_TIME_WAIT
—
Time (in milliseconds) thatthe BlackBerry Connect server waitsfor acknowledgment from client fora message received before sendingmessage failed to deliver.
90 000
ACTIVE_DIRECTORY_CACHE
_REFRESH_SECS
√
The number of secondsthe BlackBerry Connect serverwaits before synchronizing withthe Microsoft Active Directory (anyvalue smaller than 7200 isdisregarded in favor of 7200seconds).
86,400 (24hours)
ACTIVE_DIRECTORY_SEARCH
_RESULT_MAX √The upper limit on the number ofhits from a search of the companydirectory.
50
AD_USERS_SOURCE
—
Parameter indicates ifthe Connect service should connectto Microsoft Active Directory GlobalCatalog servers or use thedistinguished name to a local DomainController for loading SIP-enabledusers. This value can be “GC” or“LDAP”. By default, the value is LDAPif the value is empty.
AD_USERS_SOURCE_DOMAIN√
If userssourceis GC
The Active Directory Domain inthe Global Catalog to query. Thisvalue can be the distinguishedname of the domain or the fullyqualified domain name; forexample, DC=EXAMPLE,DC=COM orEXAMPLE.COM, respectively.
APN_BADGE√
Determines whether or not to usethe badge graphic for Apple pushnotifications.
True
| Appendix A: Understanding the BEMS-Connect configuration file | 120
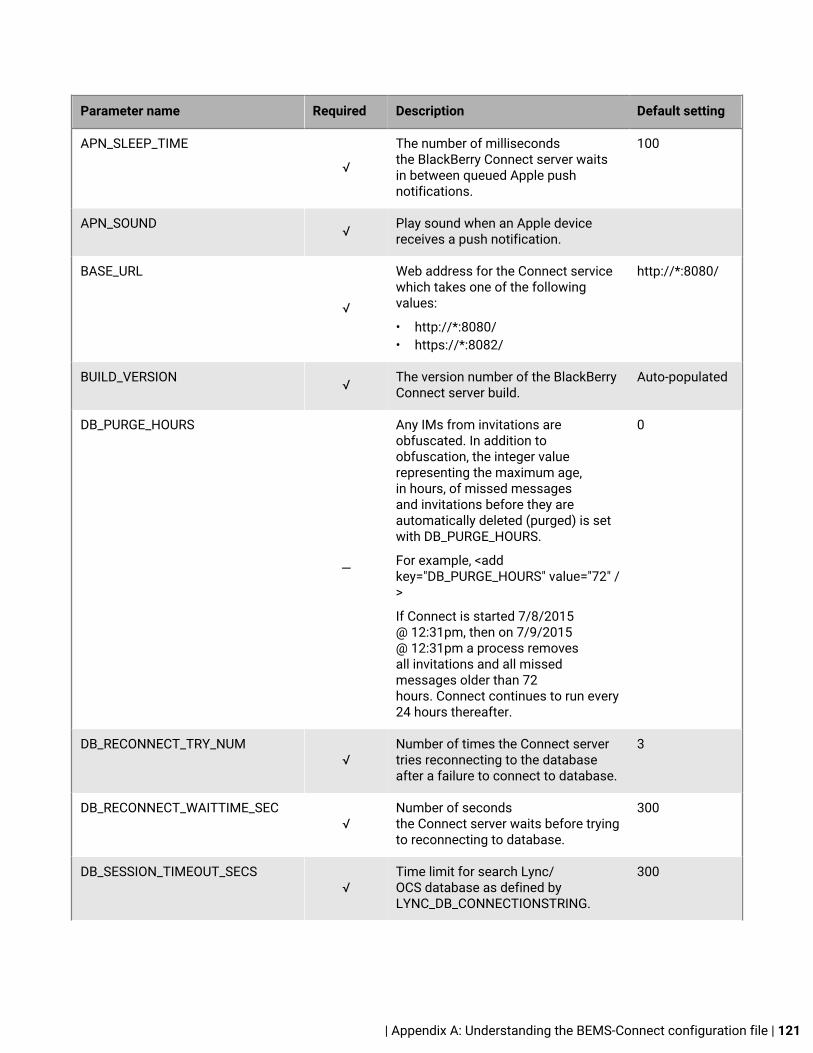
Parameter name Required Description Default setting
APN_SLEEP_TIME
√
The number of millisecondsthe BlackBerry Connect server waitsin between queued Apple pushnotifications.
100
APN_SOUND √ Play sound when an Apple devicereceives a push notification.
BASE_URL
√
Web address for the Connect servicewhich takes one of the followingvalues:
• http://*:8080/• https://*:8082/
http://*:8080/
BUILD_VERSION √ The version number of the BlackBerryConnect server build.
Auto-populated
DB_PURGE_HOURS
—
Any IMs from invitations areobfuscated. In addition toobfuscation, the integer valuerepresenting the maximum age,in hours, of missed messagesand invitations before they areautomatically deleted (purged) is setwith DB_PURGE_HOURS.
For example, <addkey="DB_PURGE_HOURS" value="72" />
If Connect is started 7/8/2015@ 12:31pm, then on 7/9/2015@ 12:31pm a process removesall invitations and all missedmessages older than 72hours. Connect continues to run every24 hours thereafter.
0
DB_RECONNECT_TRY_NUM√
Number of times the Connect servertries reconnecting to the databaseafter a failure to connect to database.
3
DB_RECONNECT_WAITTIME_SEC√
Number of secondsthe Connect server waits before tryingto reconnecting to database.
300
DB_SESSION_TIMEOUT_SECS√
Time limit for search Lync/OCS database as defined byLYNC_DB_CONNECTIONSTRING.
300
| Appendix A: Understanding the BEMS-Connect configuration file | 121
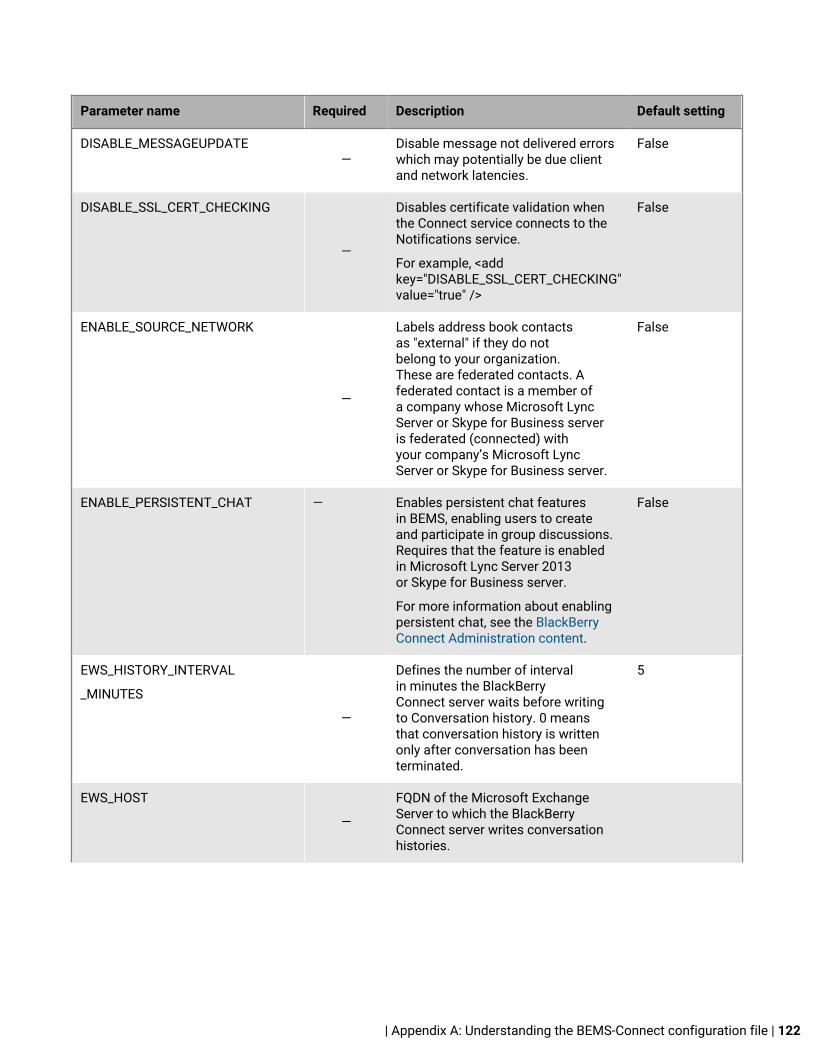
Parameter name Required Description Default setting
DISABLE_MESSAGEUPDATE—
Disable message not delivered errorswhich may potentially be due clientand network latencies.
False
DISABLE_SSL_CERT_CHECKING
—
Disables certificate validation whenthe Connect service connects to theNotifications service.
For example, <addkey="DISABLE_SSL_CERT_CHECKING"value="true" />
False
ENABLE_SOURCE_NETWORK
—
Labels address book contactsas "external" if they do notbelong to your organization.These are federated contacts. Afederated contact is a member ofa company whose Microsoft LyncServer or Skype for Business serveris federated (connected) withyour company’s Microsoft LyncServer or Skype for Business server.
False
ENABLE_PERSISTENT_CHAT — Enables persistent chat featuresin BEMS, enabling users to createand participate in group discussions.Requires that the feature is enabledin Microsoft Lync Server 2013or Skype for Business server.
For more information about enablingpersistent chat, see the BlackBerryConnect Administration content.
False
EWS_HISTORY_INTERVAL
_MINUTES
—
Defines the number of intervalin minutes the BlackBerryConnect server waits before writingto Conversation history. 0 meansthat conversation history is writtenonly after conversation has beenterminated.
5
EWS_HOST
—
FQDN of the Microsoft ExchangeServer to which the BlackBerryConnect server writes conversationhistories.
| Appendix A: Understanding the BEMS-Connect configuration file | 122
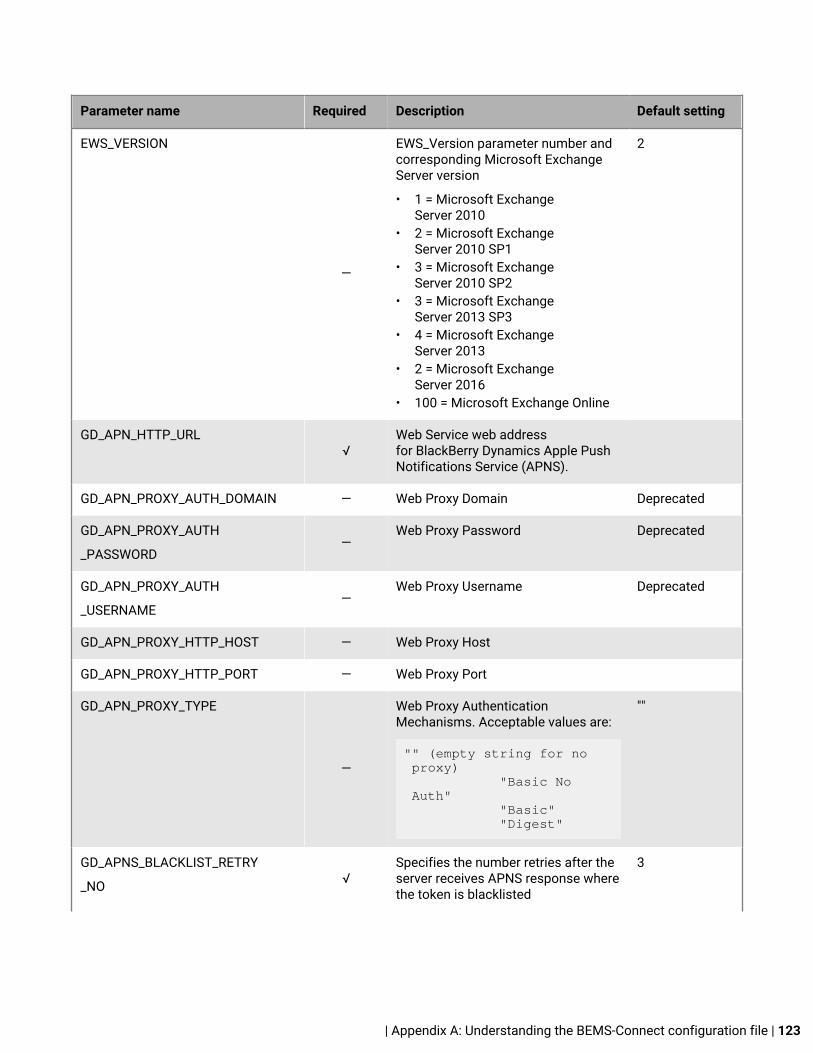
Parameter name Required Description Default setting
EWS_VERSION
—
EWS_Version parameter number andcorresponding Microsoft ExchangeServer version
• 1 = Microsoft ExchangeServer 2010
• 2 = Microsoft ExchangeServer 2010 SP1
• 3 = Microsoft ExchangeServer 2010 SP2
• 3 = Microsoft ExchangeServer 2013 SP3
• 4 = Microsoft ExchangeServer 2013
• 2 = Microsoft ExchangeServer 2016
• 100 = Microsoft Exchange Online
2
GD_APN_HTTP_URL√
Web Service web addressfor BlackBerry Dynamics Apple PushNotifications Service (APNS).
GD_APN_PROXY_AUTH_DOMAIN — Web Proxy Domain Deprecated
GD_APN_PROXY_AUTH
_PASSWORD—
Web Proxy Password Deprecated
GD_APN_PROXY_AUTH
_USERNAME—
Web Proxy Username Deprecated
GD_APN_PROXY_HTTP_HOST — Web Proxy Host
GD_APN_PROXY_HTTP_PORT — Web Proxy Port
GD_APN_PROXY_TYPE
—
Web Proxy AuthenticationMechanisms. Acceptable values are:
"" (empty string for no proxy) "Basic No Auth" "Basic" "Digest"
""
GD_APNS_BLACKLIST_RETRY
_NO √Specifies the number retries after theserver receives APNS response wherethe token is blacklisted
3
| Appendix A: Understanding the BEMS-Connect configuration file | 123
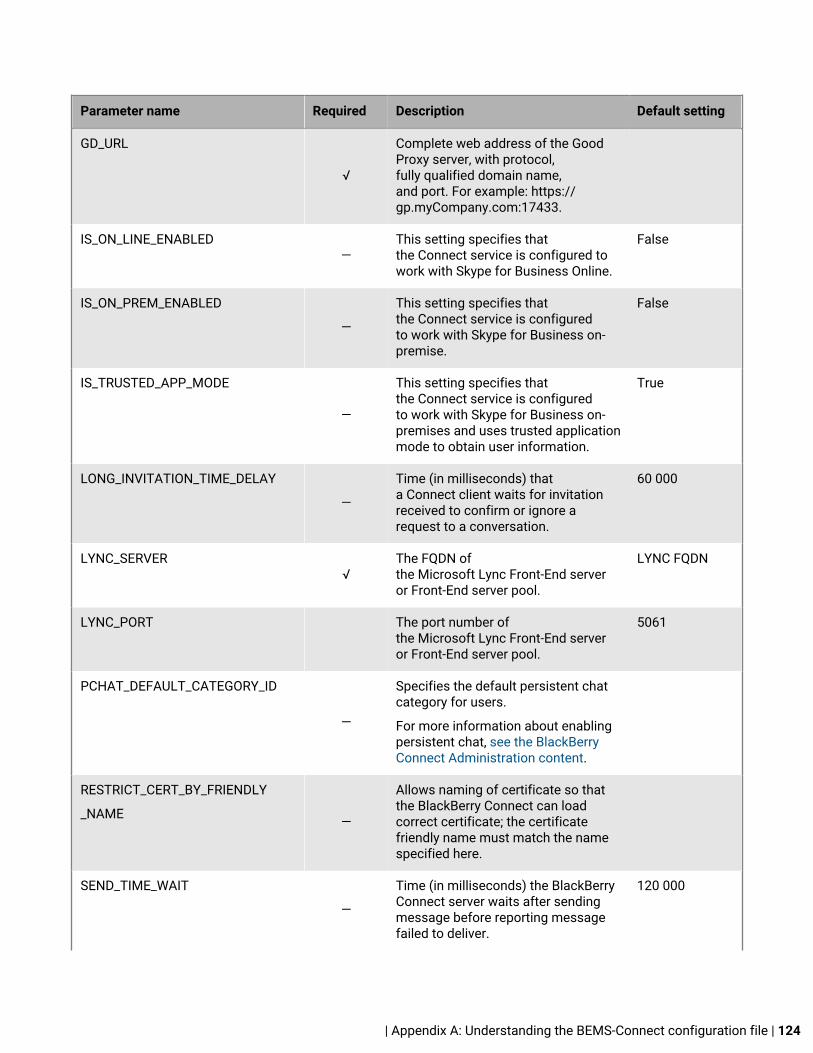
Parameter name Required Description Default setting
GD_URL
√
Complete web address of the GoodProxy server, with protocol,fully qualified domain name,and port. For example: https://gp.myCompany.com:17433.
IS_ON_LINE_ENABLED—
This setting specifies thatthe Connect service is configured towork with Skype for Business Online.
False
IS_ON_PREM_ENABLED
—
This setting specifies thatthe Connect service is configuredto work with Skype for Business on-premise.
False
IS_TRUSTED_APP_MODE
—
This setting specifies thatthe Connect service is configuredto work with Skype for Business on-premises and uses trusted applicationmode to obtain user information.
True
LONG_INVITATION_TIME_DELAY
—
Time (in milliseconds) thata Connect client waits for invitationreceived to confirm or ignore arequest to a conversation.
60 000
LYNC_SERVER√
The FQDN ofthe Microsoft Lync Front-End serveror Front-End server pool.
LYNC FQDN
LYNC_PORT The port number ofthe Microsoft Lync Front-End serveror Front-End server pool.
5061
PCHAT_DEFAULT_CATEGORY_ID
—
Specifies the default persistent chatcategory for users.
For more information about enablingpersistent chat, see the BlackBerryConnect Administration content.
RESTRICT_CERT_BY_FRIENDLY
_NAME —
Allows naming of certificate so thatthe BlackBerry Connect can loadcorrect certificate; the certificatefriendly name must match the namespecified here.
SEND_TIME_WAIT
—
Time (in milliseconds) the BlackBerryConnect server waits after sendingmessage before reporting messagefailed to deliver.
120 000
| Appendix A: Understanding the BEMS-Connect configuration file | 124

Parameter name Required Description Default setting
SESSION_TIMEOUT_SECS
√
The number of seconds a client isallowed to remain idle
Note: The minimumSESSION_TIMEOUT_SECS is 600,even if you put in 60 seconds or 1second. This was done to mitigatestress related race conditions.
86,400 (24hours)
UCMA_APPLICATION_NAME
√
Name of application as definedthrough the installation provisioningprocess.
Generatedduringapplicationprovisioning
UCMA_APPLICATION_PORT√
The fixed port used by the BlackBerryConnect server to receive messagesfrom the enterprise IM server.
49555
UCMA_GRUU
√
GRUU = Globally Routable User-AgentURI that uniquely defines the SessionInitiation Protocol (SIP) URI for theapplication.
Generatedduringapplicationprovisioning
| Appendix A: Understanding the BEMS-Connect configuration file | 125
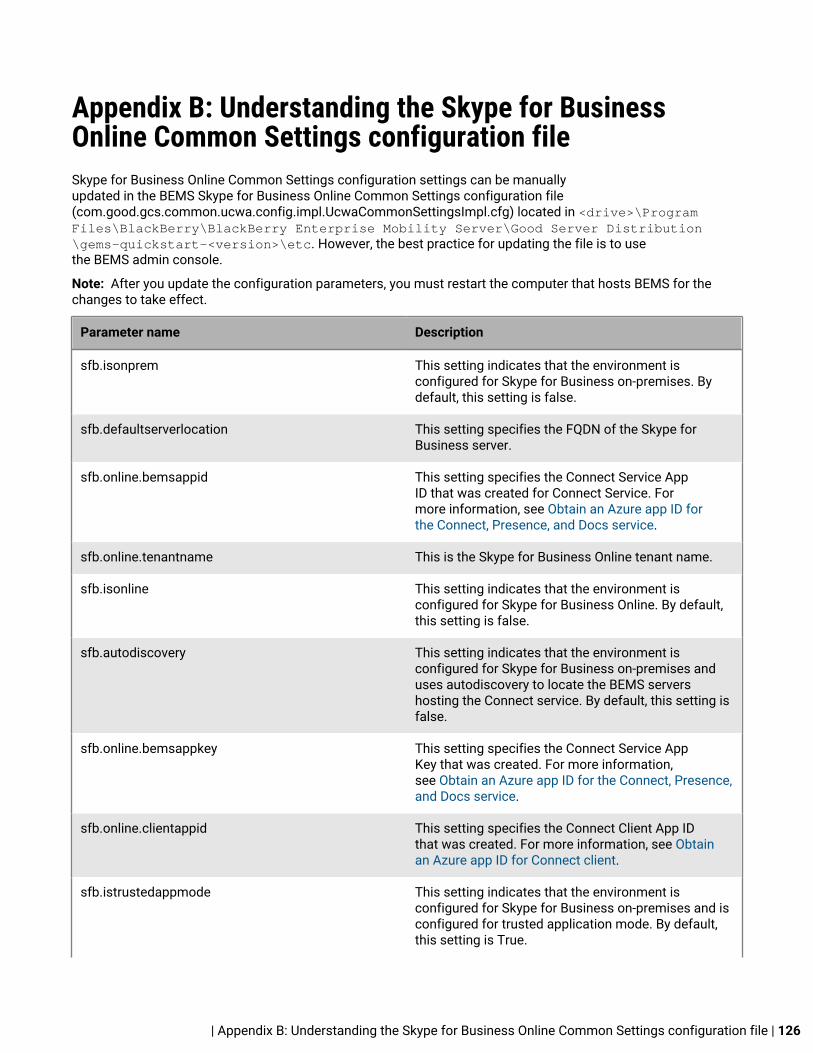
Appendix B: Understanding the Skype for BusinessOnline Common Settings configuration fileSkype for Business Online Common Settings configuration settings can be manuallyupdated in the BEMS Skype for Business Online Common Settings configuration file(com.good.gcs.common.ucwa.config.impl.UcwaCommonSettingsImpl.cfg) located in <drive>\ProgramFiles\BlackBerry\BlackBerry Enterprise Mobility Server\Good Server Distribution\gems-quickstart-<version>\etc. However, the best practice for updating the file is to usethe BEMS admin console.
Note: After you update the configuration parameters, you must restart the computer that hosts BEMS for thechanges to take effect.
Parameter name Description
sfb.isonprem This setting indicates that the environment isconfigured for Skype for Business on-premises. Bydefault, this setting is false.
sfb.defaultserverlocation This setting specifies the FQDN of the Skype forBusiness server.
sfb.online.bemsappid This setting specifies the Connect Service AppID that was created for Connect Service. Formore information, see Obtain an Azure app ID forthe Connect, Presence, and Docs service.
sfb.online.tenantname This is the Skype for Business Online tenant name.
sfb.isonline This setting indicates that the environment isconfigured for Skype for Business Online. By default,this setting is false.
sfb.autodiscovery This setting indicates that the environment isconfigured for Skype for Business on-premises anduses autodiscovery to locate the BEMS servershosting the Connect service. By default, this setting isfalse.
sfb.online.bemsappkey This setting specifies the Connect Service AppKey that was created. For more information,see Obtain an Azure app ID for the Connect, Presence,and Docs service.
sfb.online.clientappid This setting specifies the Connect Client App IDthat was created. For more information, see Obtainan Azure app ID for Connect client.
sfb.istrustedappmode This setting indicates that the environment isconfigured for Skype for Business on-premises and isconfigured for trusted application mode. By default,this setting is True.
| Appendix B: Understanding the Skype for Business Online Common Settings configuration file | 126
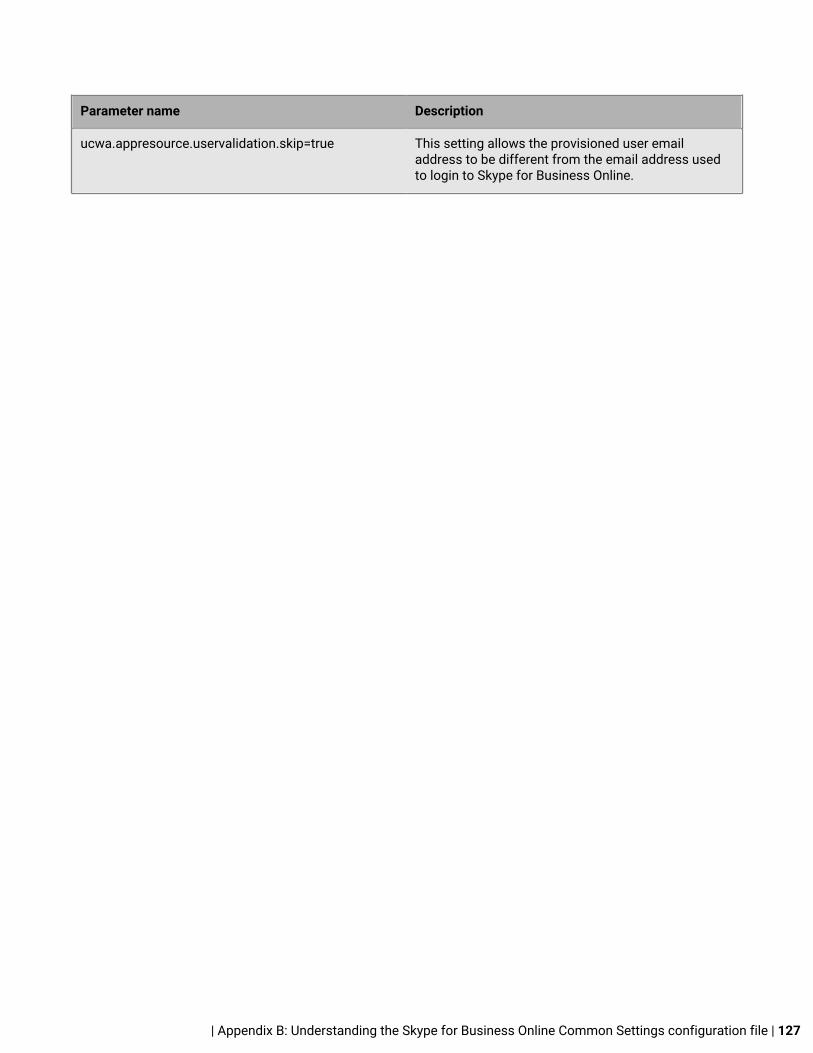
Parameter name Description
ucwa.appresource.uservalidation.skip=true This setting allows the provisioned user emailaddress to be different from the email address usedto login to Skype for Business Online.
| Appendix B: Understanding the Skype for Business Online Common Settings configuration file | 127

Appendix C: Java Memory SettingsThe Java settings for BEMS are located in the GoodServerDistribution-wrapper.conf file. By default, this file islocated in the following location:
• In a new BEMS installation: C:\Program Files\BlackBerry\BlackBerry EnterpriseMobility Server\Good Server Distribution\gems-quickstart-<version>\etc\GoodServerDistribution-wrapper.conf
• In an environment upgraded from GEMS to BEMS: C:\Program Files\Good Technology\GoodEnterprise Mobility Server\Good Server Distribution\gems-quickstart-version>\etc\GoodServerDistribution-wrapper.conf
You can review or modify the default Java settings used by BEMS. However, in general, you won't need to makechanges to the following initial memory allocation settings:
• # Initial Java Heap Size (in MB)
wrapper.java.initmemory=2048
• # Maximum Java Heap Size (in MB)
wrapper.java.maxmemory=4096
| Appendix C: Java Memory Settings | 128
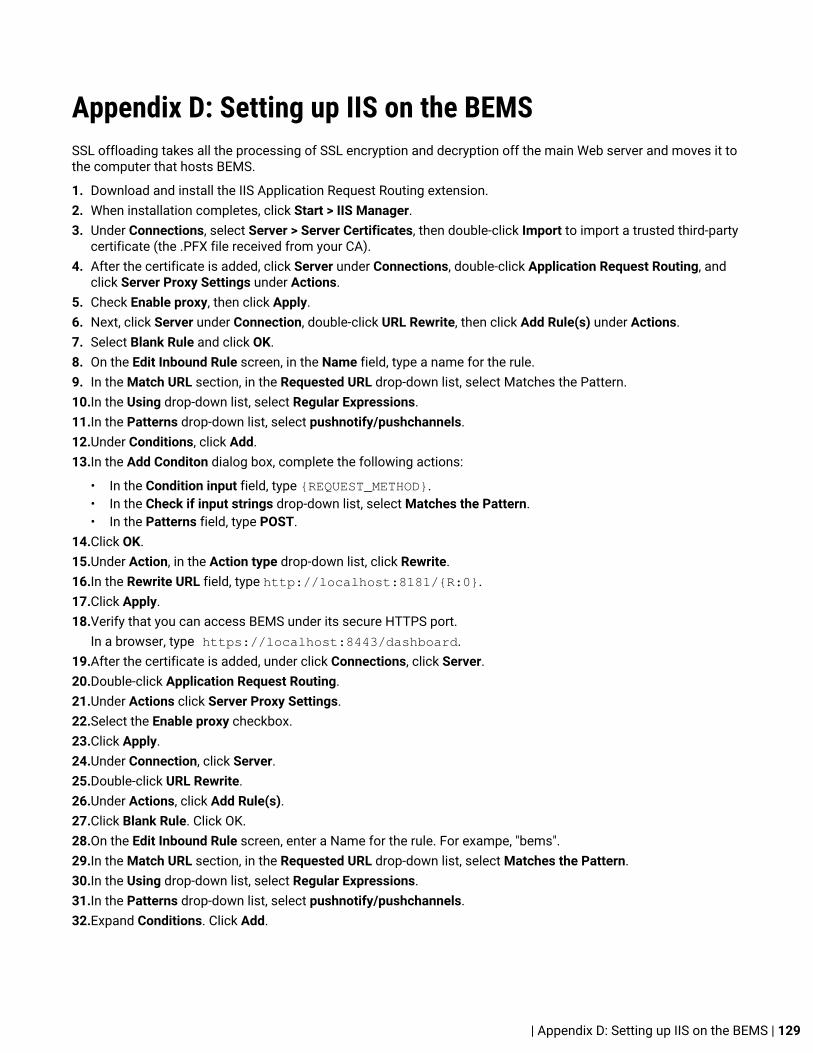
Appendix D: Setting up IIS on the BEMSSSL offloading takes all the processing of SSL encryption and decryption off the main Web server and moves it tothe computer that hosts BEMS.
1. Download and install the IIS Application Request Routing extension.2. When installation completes, click Start > IIS Manager.3. Under Connections, select Server > Server Certificates, then double-click Import to import a trusted third-party
certificate (the .PFX file received from your CA).4. After the certificate is added, click Server under Connections, double-click Application Request Routing, and
click Server Proxy Settings under Actions.5. Check Enable proxy, then click Apply.6. Next, click Server under Connection, double-click URL Rewrite, then click Add Rule(s) under Actions.7. Select Blank Rule and click OK.8. On the Edit Inbound Rule screen, in the Name field, type a name for the rule.9. In the Match URL section, in the Requested URL drop-down list, select Matches the Pattern.10.In the Using drop-down list, select Regular Expressions.11.In the Patterns drop-down list, select pushnotify/pushchannels.12.Under Conditions, click Add.13.In the Add Conditon dialog box, complete the following actions:
• In the Condition input field, type {REQUEST_METHOD}.• In the Check if input strings drop-down list, select Matches the Pattern.• In the Patterns field, type POST.
14.Click OK.15.Under Action, in the Action type drop-down list, click Rewrite.16.In the Rewrite URL field, type http://localhost:8181/{R:0}.17.Click Apply.18.Verify that you can access BEMS under its secure HTTPS port.
In a browser, type https://localhost:8443/dashboard.19.After the certificate is added, under click Connections, click Server.20.Double-click Application Request Routing.21.Under Actions click Server Proxy Settings.22.Select the Enable proxy checkbox.23.Click Apply.24.Under Connection, click Server.25.Double-click URL Rewrite.26.Under Actions, click Add Rule(s).27.Click Blank Rule. Click OK.28.On the Edit Inbound Rule screen, enter a Name for the rule. For exampe, "bems".29.In the Match URL section, in the Requested URL drop-down list, select Matches the Pattern.30.In the Using drop-down list, select Regular Expressions.31.In the Patterns drop-down list, select pushnotify/pushchannels.32.Expand Conditions. Click Add.
| Appendix D: Setting up IIS on the BEMS | 129
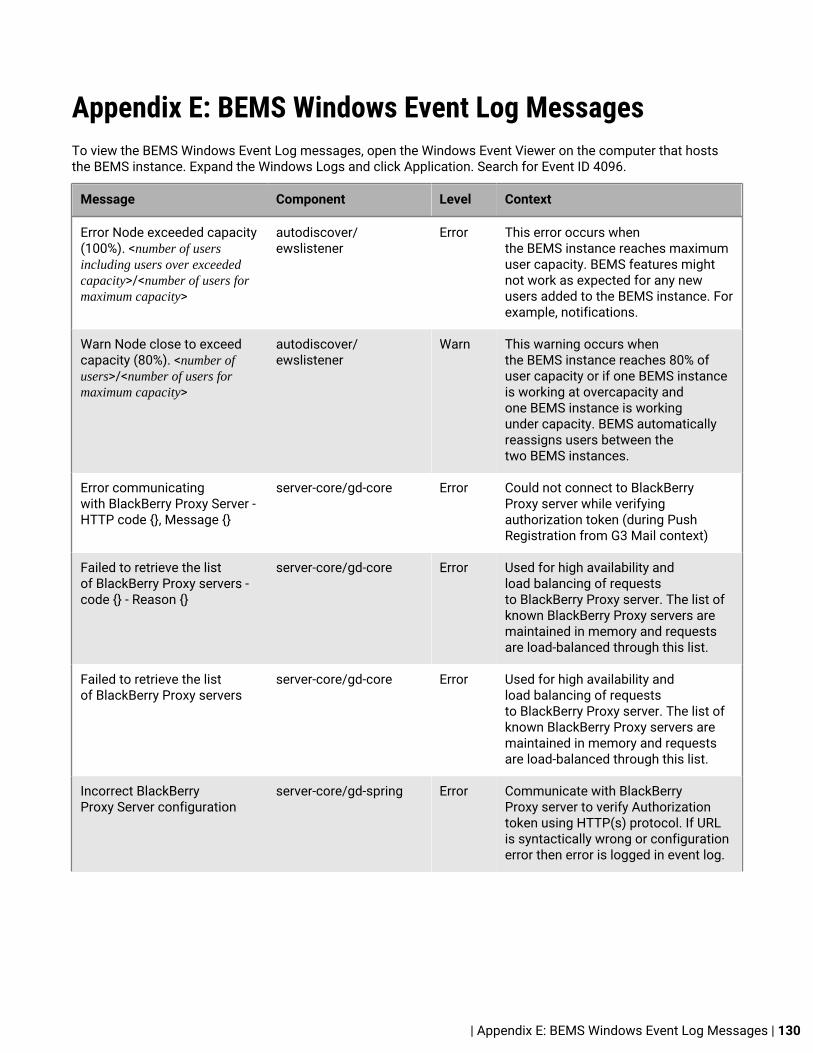
Appendix E: BEMS Windows Event Log MessagesTo view the BEMS Windows Event Log messages, open the Windows Event Viewer on the computer that hoststhe BEMS instance. Expand the Windows Logs and click Application. Search for Event ID 4096.
Message Component Level Context
Error Node exceeded capacity(100%). <number of usersincluding users over exceededcapacity>/<number of users formaximum capacity>
autodiscover/ewslistener
Error This error occurs whenthe BEMS instance reaches maximumuser capacity. BEMS features mightnot work as expected for any newusers added to the BEMS instance. Forexample, notifications.
Warn Node close to exceedcapacity (80%). <number ofusers>/<number of users formaximum capacity>
autodiscover/ewslistener
Warn This warning occurs whenthe BEMS instance reaches 80% ofuser capacity or if one BEMS instanceis working at overcapacity andone BEMS instance is workingunder capacity. BEMS automaticallyreassigns users between thetwo BEMS instances.
Error communicatingwith BlackBerry Proxy Server -HTTP code {}, Message {}
server-core/gd-core Error Could not connect to BlackBerryProxy server while verifyingauthorization token (during PushRegistration from G3 Mail context)
Failed to retrieve the listof BlackBerry Proxy servers -code {} - Reason {}
server-core/gd-core Error Used for high availability andload balancing of requeststo BlackBerry Proxy server. The list ofknown BlackBerry Proxy servers aremaintained in memory and requestsare load-balanced through this list.
Failed to retrieve the listof BlackBerry Proxy servers
server-core/gd-core Error Used for high availability andload balancing of requeststo BlackBerry Proxy server. The list ofknown BlackBerry Proxy servers aremaintained in memory and requestsare load-balanced through this list.
Incorrect BlackBerryProxy Server configuration
server-core/gd-spring Error Communicate with BlackBerryProxy server to verify Authorizationtoken using HTTP(s) protocol. If URLis syntactically wrong or configurationerror then error is logged in event log.
| Appendix E: BEMS Windows Event Log Messages | 130
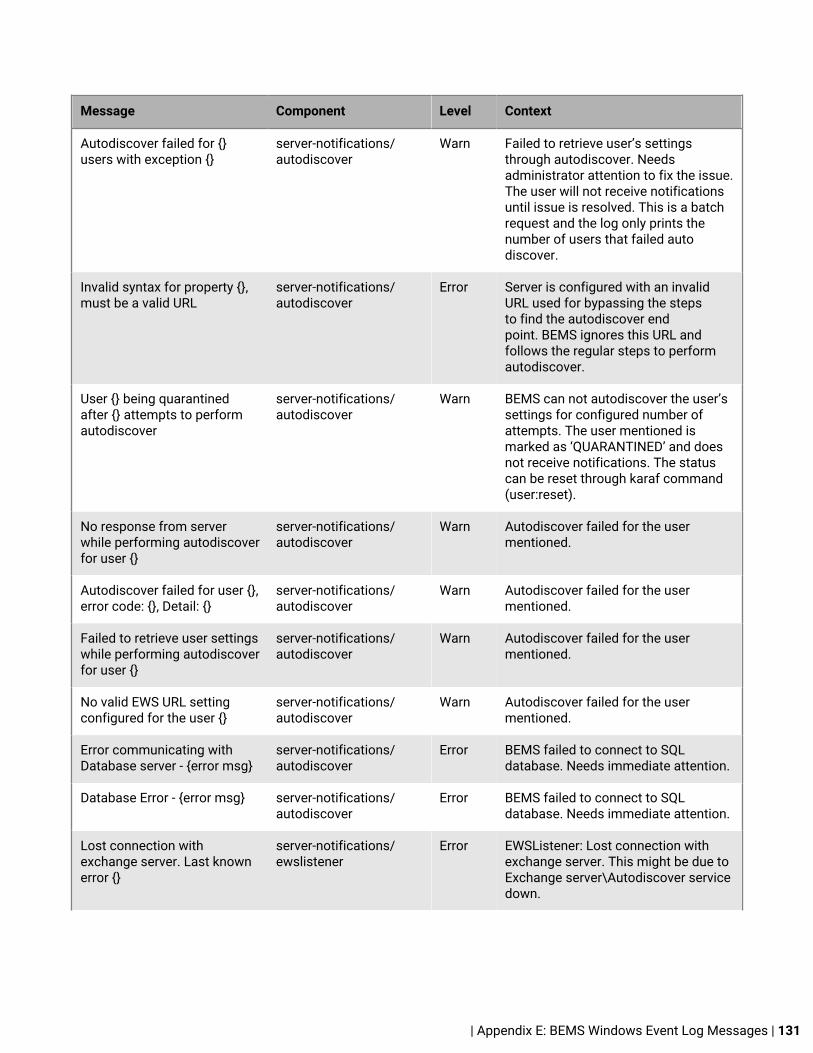
Message Component Level Context
Autodiscover failed for {}users with exception {}
server-notifications/autodiscover
Warn Failed to retrieve user’s settingsthrough autodiscover. Needsadministrator attention to fix the issue.The user will not receive notificationsuntil issue is resolved. This is a batchrequest and the log only prints thenumber of users that failed autodiscover.
Invalid syntax for property {},must be a valid URL
server-notifications/autodiscover
Error Server is configured with an invalidURL used for bypassing the stepsto find the autodiscover endpoint. BEMS ignores this URL andfollows the regular steps to performautodiscover.
User {} being quarantinedafter {} attempts to performautodiscover
server-notifications/autodiscover
Warn BEMS can not autodiscover the user’ssettings for configured number ofattempts. The user mentioned ismarked as ‘QUARANTINED’ and doesnot receive notifications. The statuscan be reset through karaf command(user:reset).
No response from serverwhile performing autodiscoverfor user {}
server-notifications/autodiscover
Warn Autodiscover failed for the usermentioned.
Autodiscover failed for user {},error code: {}, Detail: {}
server-notifications/autodiscover
Warn Autodiscover failed for the usermentioned.
Failed to retrieve user settingswhile performing autodiscoverfor user {}
server-notifications/autodiscover
Warn Autodiscover failed for the usermentioned.
No valid EWS URL settingconfigured for the user {}
server-notifications/autodiscover
Warn Autodiscover failed for the usermentioned.
Error communicating withDatabase server - {error msg}
server-notifications/autodiscover
Error BEMS failed to connect to SQLdatabase. Needs immediate attention.
Database Error - {error msg} server-notifications/autodiscover
Error BEMS failed to connect to SQLdatabase. Needs immediate attention.
Lost connection withexchange server. Last knownerror {}
server-notifications/ewslistener
Error EWSListener: Lost connection withexchange server. This might be due toExchange server\Autodiscover servicedown.
| Appendix E: BEMS Windows Event Log Messages | 131
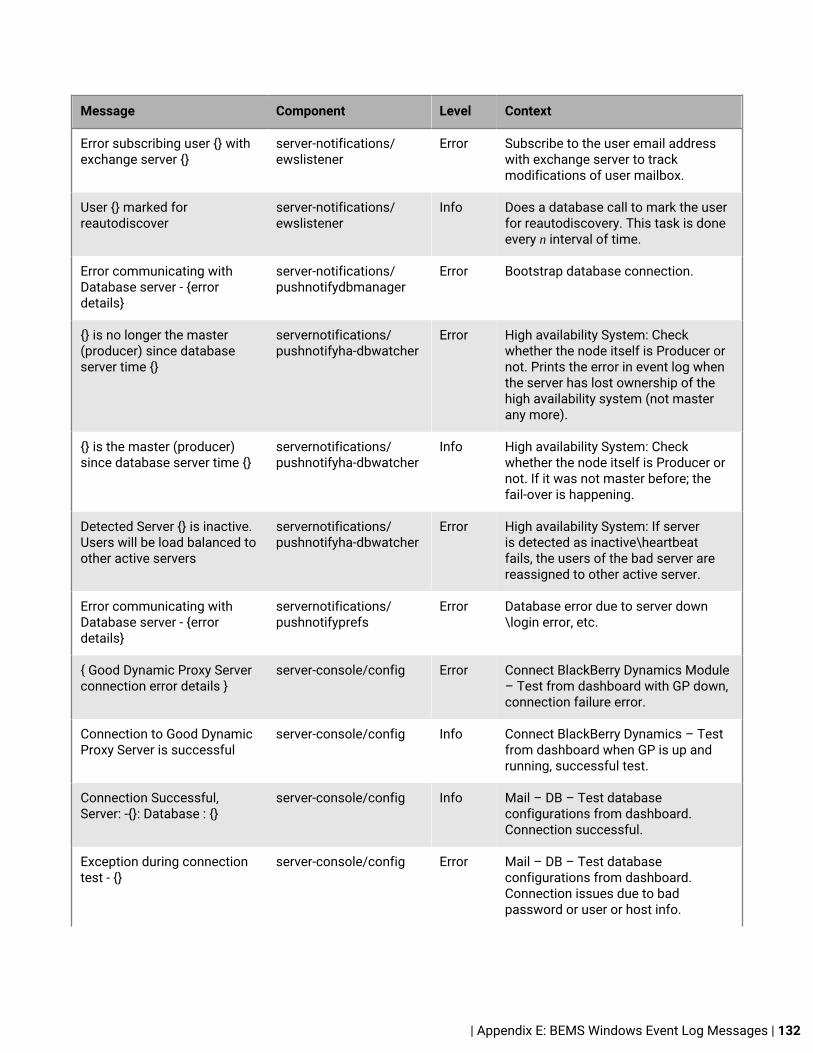
Message Component Level Context
Error subscribing user {} withexchange server {}
server-notifications/ewslistener
Error Subscribe to the user email addresswith exchange server to trackmodifications of user mailbox.
User {} marked forreautodiscover
server-notifications/ewslistener
Info Does a database call to mark the userfor reautodiscovery. This task is doneevery n interval of time.
Error communicating withDatabase server - {errordetails}
server-notifications/pushnotifydbmanager
Error Bootstrap database connection.
{} is no longer the master(producer) since databaseserver time {}
servernotifications/pushnotifyha-dbwatcher
Error High availability System: Checkwhether the node itself is Producer ornot. Prints the error in event log whenthe server has lost ownership of thehigh availability system (not masterany more).
{} is the master (producer)since database server time {}
servernotifications/pushnotifyha-dbwatcher
Info High availability System: Checkwhether the node itself is Producer ornot. If it was not master before; thefail-over is happening.
Detected Server {} is inactive.Users will be load balanced toother active servers
servernotifications/pushnotifyha-dbwatcher
Error High availability System: If serveris detected as inactive\heartbeatfails, the users of the bad server arereassigned to other active server.
Error communicating withDatabase server - {errordetails}
servernotifications/pushnotifyprefs
Error Database error due to server down\login error, etc.
{ Good Dynamic Proxy Serverconnection error details }
server-console/config Error Connect BlackBerry Dynamics Module– Test from dashboard with GP down,connection failure error.
Connection to Good DynamicProxy Server is successful
server-console/config Info Connect BlackBerry Dynamics – Testfrom dashboard when GP is up andrunning, successful test.
Connection Successful,Server: -{}: Database : {}
server-console/config Info Mail – DB – Test databaseconfigurations from dashboard.Connection successful.
Exception during connectiontest - {}
server-console/config Error Mail – DB – Test databaseconfigurations from dashboard.Connection issues due to badpassword or user or host info.
| Appendix E: BEMS Windows Event Log Messages | 132
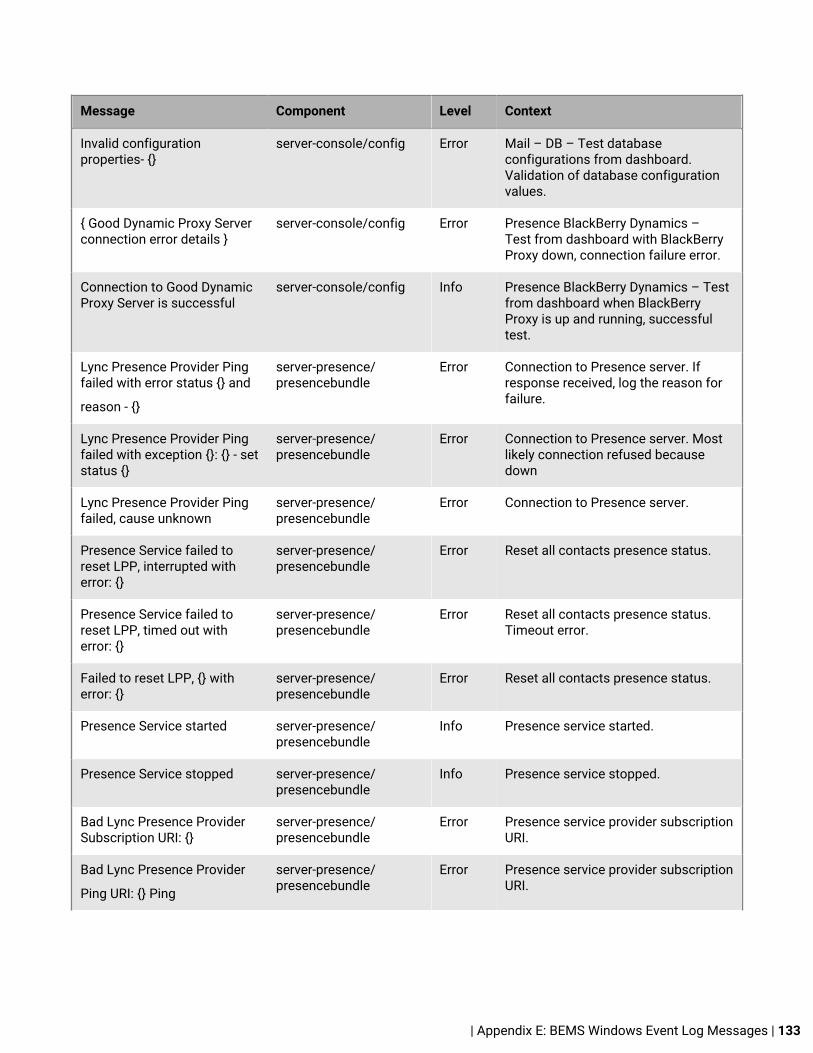
Message Component Level Context
Invalid configurationproperties- {}
server-console/config Error Mail – DB – Test databaseconfigurations from dashboard.Validation of database configurationvalues.
{ Good Dynamic Proxy Serverconnection error details }
server-console/config Error Presence BlackBerry Dynamics –Test from dashboard with BlackBerryProxy down, connection failure error.
Connection to Good DynamicProxy Server is successful
server-console/config Info Presence BlackBerry Dynamics – Testfrom dashboard when BlackBerryProxy is up and running, successfultest.
Lync Presence Provider Pingfailed with error status {} and
reason - {}
server-presence/presencebundle
Error Connection to Presence server. Ifresponse received, log the reason forfailure.
Lync Presence Provider Pingfailed with exception {}: {} - setstatus {}
server-presence/presencebundle
Error Connection to Presence server. Mostlikely connection refused becausedown
Lync Presence Provider Pingfailed, cause unknown
server-presence/presencebundle
Error Connection to Presence server.
Presence Service failed toreset LPP, interrupted witherror: {}
server-presence/presencebundle
Error Reset all contacts presence status.
Presence Service failed toreset LPP, timed out witherror: {}
server-presence/presencebundle
Error Reset all contacts presence status.Timeout error.
Failed to reset LPP, {} witherror: {}
server-presence/presencebundle
Error Reset all contacts presence status.
Presence Service started server-presence/presencebundle
Info Presence service started.
Presence Service stopped server-presence/presencebundle
Info Presence service stopped.
Bad Lync Presence ProviderSubscription URI: {}
server-presence/presencebundle
Error Presence service provider subscriptionURI.
Bad Lync Presence Provider
Ping URI: {} Ping
server-presence/presencebundle
Error Presence service provider subscriptionURI.
| Appendix E: BEMS Windows Event Log Messages | 133
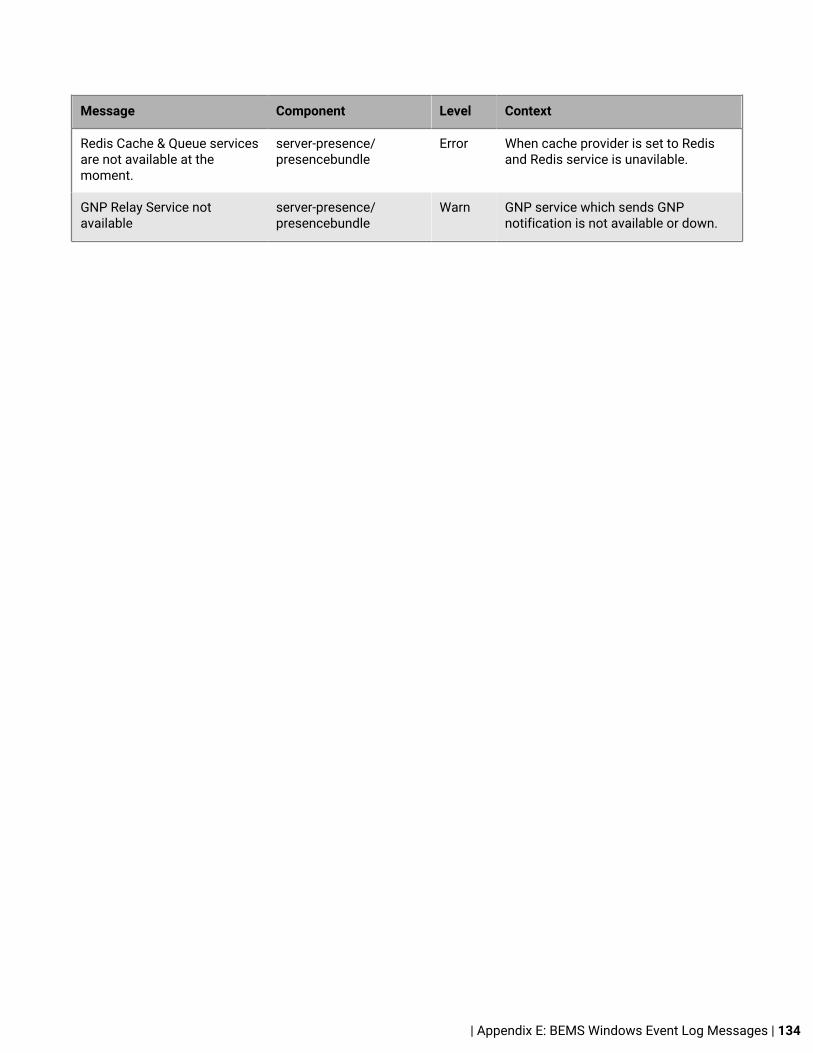
Message Component Level Context
Redis Cache & Queue servicesare not available at themoment.
server-presence/presencebundle
Error When cache provider is set to Redisand Redis service is unavilable.
GNP Relay Service notavailable
server-presence/presencebundle
Warn GNP service which sends GNPnotification is not available or down.
| Appendix E: BEMS Windows Event Log Messages | 134
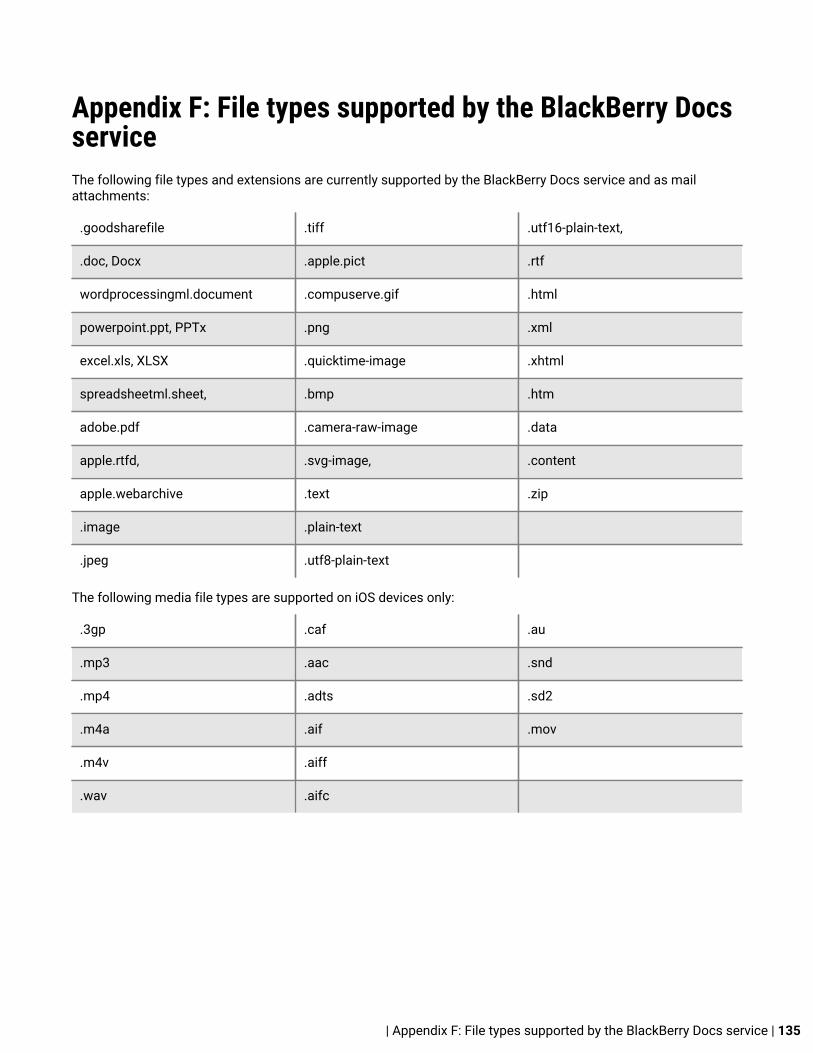
Appendix F: File types supported by the BlackBerry DocsserviceThe following file types and extensions are currently supported by the BlackBerry Docs service and as mailattachments:
.goodsharefile .tiff .utf16-plain-text,
.doc, Docx .apple.pict .rtf
wordprocessingml.document .compuserve.gif .html
powerpoint.ppt, PPTx .png .xml
excel.xls, XLSX .quicktime-image .xhtml
spreadsheetml.sheet, .bmp .htm
adobe.pdf .camera-raw-image .data
apple.rtfd, .svg-image, .content
apple.webarchive .text .zip
.image .plain-text
.jpeg .utf8-plain-text
The following media file types are supported on iOS devices only:
.3gp .caf .au
.mp3 .aac .snd
.mp4 .adts .sd2
.m4a .aif .mov
.m4v .aiff
.wav .aifc
| Appendix F: File types supported by the BlackBerry Docs service | 135
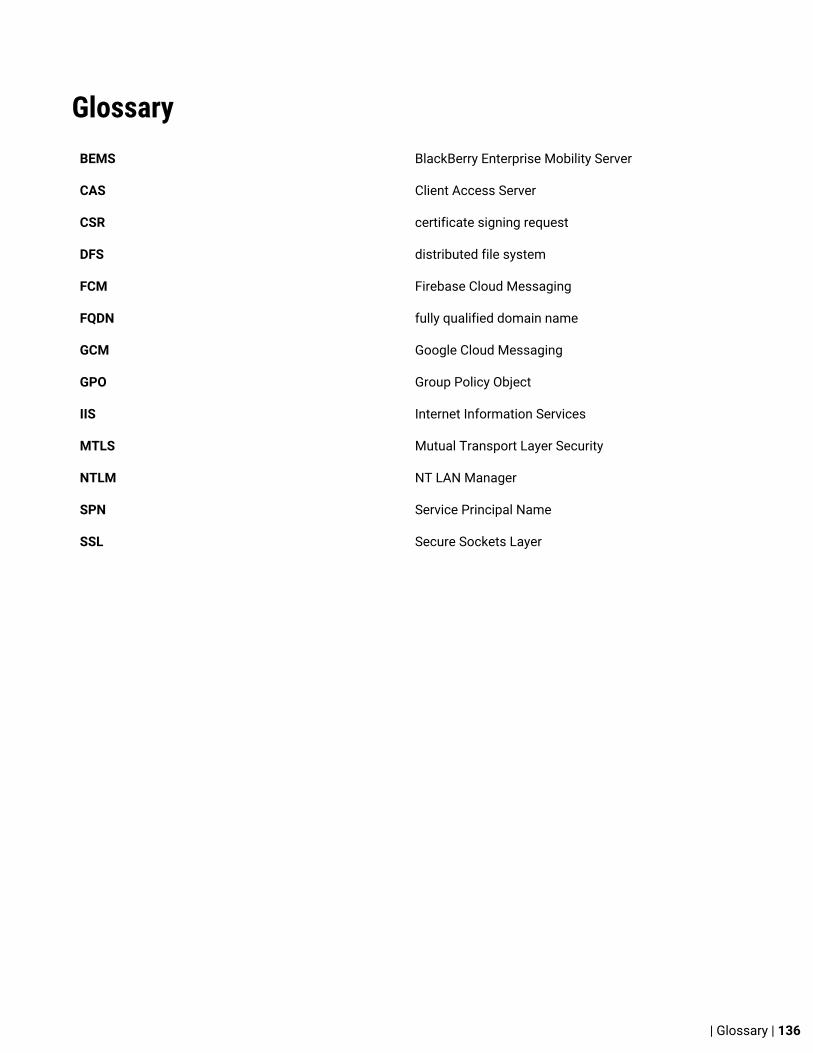
GlossaryBEMS BlackBerry Enterprise Mobility Server
CAS Client Access Server
CSR certificate signing request
DFS distributed file system
FCM Firebase Cloud Messaging
FQDN fully qualified domain name
GCM Google Cloud Messaging
GPO Group Policy Object
IIS Internet Information Services
MTLS Mutual Transport Layer Security
NTLM NT LAN Manager
SPN Service Principal Name
SSL Secure Sockets Layer
| Glossary | 136
Legal notice©2019 BlackBerry Limited. Trademarks, including but not limited to BLACKBERRY, BBM, BES, EMBLEM Design,ATHOC, MOVIRTU and SECUSMART are the trademarks or registered trademarks of BlackBerry Limited, itssubsidiaries and/or affiliates, used under license, and the exclusive rights to such trademarks are expresslyreserved. All other trademarks are the property of their respective owners.
Apache is a trademark of The Apache Software Foundation. Apple, iPad, and iPhone are trademarks of AppleInc.Box is including without limitation, either a trademark, service mark or registered trademark of Box, Inc.Cisco Jabber is a trademark of Cisco Systems, Inc. and/or its affiliates in the United States and certain othercountries. Google, Android, Firebaseand Google Chrome are trademarks of Google Inc. iOS is a trademark ofCisco Systems, Inc. and/or its affiliates in the U.S. and certain other countries. iOS® is used under license byApple Inc. Java is a trademark of Oracle and/or its affiliates. Microsoft, Active Directory, ActiveSync, Excel,Internet Explorer, Lync, Office 365, Outlook, PowerPoint, SharePoint, Skype, SQL Server, and Windows Server areeither registered trademarks or trademarks of Microsoft Corporation in the United States and/or other countries.All other trademarks are the property of their respective owners.
This documentation including all documentation incorporated by reference herein such as documentationprovided or made available on the BlackBerry website provided or made accessible "AS IS" and "AS AVAILABLE"and without condition, endorsement, guarantee, representation, or warranty of any kind by BlackBerry Limited andits affiliated companies ("BlackBerry") and BlackBerry assumes no responsibility for any typographical, technical,or other inaccuracies, errors, or omissions in this documentation. In order to protect BlackBerry proprietary andconfidential information and/or trade secrets, this documentation may describe some aspects of BlackBerrytechnology in generalized terms. BlackBerry reserves the right to periodically change information that is containedin this documentation; however, BlackBerry makes no commitment to provide any such changes, updates,enhancements, or other additions to this documentation to you in a timely manner or at all.
This documentation might contain references to third-party sources of information, hardware or software,products or services including components and content such as content protected by copyright and/or third-party websites (collectively the "Third Party Products and Services"). BlackBerry does not control, and is notresponsible for, any Third Party Products and Services including, without limitation the content, accuracy,copyright compliance, compatibility, performance, trustworthiness, legality, decency, links, or any other aspectof Third Party Products and Services. The inclusion of a reference to Third Party Products and Services in thisdocumentation does not imply endorsement by BlackBerry of the Third Party Products and Services or the thirdparty in any way.
EXCEPT TO THE EXTENT SPECIFICALLY PROHIBITED BY APPLICABLE LAW IN YOUR JURISDICTION, ALLCONDITIONS, ENDORSEMENTS, GUARANTEES, REPRESENTATIONS, OR WARRANTIES OF ANY KIND, EXPRESSOR IMPLIED, INCLUDING WITHOUT LIMITATION, ANY CONDITIONS, ENDORSEMENTS, GUARANTEES,REPRESENTATIONS OR WARRANTIES OF DURABILITY, FITNESS FOR A PARTICULAR PURPOSE OR USE,MERCHANTABILITY, MERCHANTABLE QUALITY, NON-INFRINGEMENT, SATISFACTORY QUALITY, OR TITLE, ORARISING FROM A STATUTE OR CUSTOM OR A COURSE OF DEALING OR USAGE OF TRADE, OR RELATED TO THEDOCUMENTATION OR ITS USE, OR PERFORMANCE OR NON-PERFORMANCE OF ANY SOFTWARE, HARDWARE,SERVICE, OR ANY THIRD PARTY PRODUCTS AND SERVICES REFERENCED HEREIN, ARE HEREBY EXCLUDED.YOU MAY ALSO HAVE OTHER RIGHTS THAT VARY BY STATE OR PROVINCE. SOME JURISDICTIONS MAYNOT ALLOW THE EXCLUSION OR LIMITATION OF IMPLIED WARRANTIES AND CONDITIONS. TO THE EXTENTPERMITTED BY LAW, ANY IMPLIED WARRANTIES OR CONDITIONS RELATING TO THE DOCUMENTATION TOTHE EXTENT THEY CANNOT BE EXCLUDED AS SET OUT ABOVE, BUT CAN BE LIMITED, ARE HEREBY LIMITED TONINETY (90) DAYS FROM THE DATE YOU FIRST ACQUIRED THE DOCUMENTATION OR THE ITEM THAT IS THESUBJECT OF THE CLAIM.
TO THE MAXIMUM EXTENT PERMITTED BY APPLICABLE LAW IN YOUR JURISDICTION, IN NO EVENT SHALLBLACKBERRY BE LIABLE FOR ANY TYPE OF DAMAGES RELATED TO THIS DOCUMENTATION OR ITS USE,OR PERFORMANCE OR NON-PERFORMANCE OF ANY SOFTWARE, HARDWARE, SERVICE, OR ANY THIRDPARTY PRODUCTS AND SERVICES REFERENCED HEREIN INCLUDING WITHOUT LIMITATION ANY OF THE
| Legal notice | 137
FOLLOWING DAMAGES: DIRECT, CONSEQUENTIAL, EXEMPLARY, INCIDENTAL, INDIRECT, SPECIAL, PUNITIVE,OR AGGRAVATED DAMAGES, DAMAGES FOR LOSS OF PROFITS OR REVENUES, FAILURE TO REALIZE ANYEXPECTED SAVINGS, BUSINESS INTERRUPTION, LOSS OF BUSINESS INFORMATION, LOSS OF BUSINESSOPPORTUNITY, OR CORRUPTION OR LOSS OF DATA, FAILURES TO TRANSMIT OR RECEIVE ANY DATA,PROBLEMS ASSOCIATED WITH ANY APPLICATIONS USED IN CONJUNCTION WITH BLACKBERRY PRODUCTS ORSERVICES, DOWNTIME COSTS, LOSS OF THE USE OF BLACKBERRY PRODUCTS OR SERVICES OR ANY PORTIONTHEREOF OR OF ANY AIRTIME SERVICES, COST OF SUBSTITUTE GOODS, COSTS OF COVER, FACILITIES ORSERVICES, COST OF CAPITAL, OR OTHER SIMILAR PECUNIARY LOSSES, WHETHER OR NOT SUCH DAMAGESWERE FORESEEN OR UNFORESEEN, AND EVEN IF BLACKBERRY HAS BEEN ADVISED OF THE POSSIBILITY OFSUCH DAMAGES.
TO THE MAXIMUM EXTENT PERMITTED BY APPLICABLE LAW IN YOUR JURISDICTION, BLACKBERRY SHALLHAVE NO OTHER OBLIGATION, DUTY, OR LIABILITY WHATSOEVER IN CONTRACT, TORT, OR OTHERWISE TOYOU INCLUDING ANY LIABILITY FOR NEGLIGENCE OR STRICT LIABILITY.
THE LIMITATIONS, EXCLUSIONS, AND DISCLAIMERS HEREIN SHALL APPLY: (A) IRRESPECTIVE OF THE NATUREOF THE CAUSE OF ACTION, DEMAND, OR ACTION BY YOU INCLUDING BUT NOT LIMITED TO BREACH OFCONTRACT, NEGLIGENCE, TORT, STRICT LIABILITY OR ANY OTHER LEGAL THEORY AND SHALL SURVIVE AFUNDAMENTAL BREACH OR BREACHES OR THE FAILURE OF THE ESSENTIAL PURPOSE OF THIS AGREEMENTOR OF ANY REMEDY CONTAINED HEREIN; AND (B) TO BLACKBERRY AND ITS AFFILIATED COMPANIES, THEIRSUCCESSORS, ASSIGNS, AGENTS, SUPPLIERS (INCLUDING AIRTIME SERVICE PROVIDERS), AUTHORIZEDBLACKBERRY DISTRIBUTORS (ALSO INCLUDING AIRTIME SERVICE PROVIDERS) AND THEIR RESPECTIVEDIRECTORS, EMPLOYEES, AND INDEPENDENT CONTRACTORS.
IN ADDITION TO THE LIMITATIONS AND EXCLUSIONS SET OUT ABOVE, IN NO EVENT SHALL ANY DIRECTOR,EMPLOYEE, AGENT, DISTRIBUTOR, SUPPLIER, INDEPENDENT CONTRACTOR OF BLACKBERRY OR ANYAFFILIATES OF BLACKBERRY HAVE ANY LIABILITY ARISING FROM OR RELATED TO THE DOCUMENTATION.
Prior to subscribing for, installing, or using any Third Party Products and Services, it is your responsibility toensure that your airtime service provider has agreed to support all of their features. Some airtime serviceproviders might not offer Internet browsing functionality with a subscription to the BlackBerry® Internet Service.Check with your service provider for availability, roaming arrangements, service plans and features. Installationor use of Third Party Products and Services with BlackBerry's products and services may require one or morepatent, trademark, copyright, or other licenses in order to avoid infringement or violation of third party rights. Youare solely responsible for determining whether to use Third Party Products and Services and if any third partylicenses are required to do so. If required you are responsible for acquiring them. You should not install or useThird Party Products and Services until all necessary licenses have been acquired. Any Third Party Products andServices that are provided with BlackBerry's products and services are provided as a convenience to you and areprovided "AS IS" with no express or implied conditions, endorsements, guarantees, representations, or warrantiesof any kind by BlackBerry and BlackBerry assumes no liability whatsoever, in relation thereto. Your use of ThirdParty Products and Services shall be governed by and subject to you agreeing to the terms of separate licensesand other agreements applicable thereto with third parties, except to the extent expressly covered by a license orother agreement with BlackBerry.
The terms of use of any BlackBerry product or service are set out in a separate license or other agreement withBlackBerry applicable thereto. NOTHING IN THIS DOCUMENTATION IS INTENDED TO SUPERSEDE ANY EXPRESSWRITTEN AGREEMENTS OR WARRANTIES PROVIDED BY BLACKBERRY FOR PORTIONS OF ANY BLACKBERRYPRODUCT OR SERVICE OTHER THAN THIS DOCUMENTATION.
BlackBerry Enterprise Software incorporates certain third-party software. The license and copyright informationassociated with this software is available at http://worldwide.blackberry.com/legal/thirdpartysoftware.jsp.
BlackBerry Limited2200 University Avenue EastWaterloo, Ontario
| Legal notice | 138

Canada N2K 0A7
BlackBerry UK Limited200 Bath RoadSlough, Berkshire SL1 3XEUnited Kingdom
Published in Canada
| Legal notice | 139