episode 6: the secrets of rocks (cardiff) - nhm.ac.uk · dippy on tour – resources for ages...
TRANSCRIPT

Dippy on Tour – Resources for ages 7–11 Episode 6: The secrets of rocks (Cardiff) 68
Episode 6: The secrets of rocks (Cardiff)Natural History Adventurers’ mission
Pupils will discover the secrets of rocks – useful knowledge for Future Scientists.
Episode journey
Working in groups children will create fossils and locate them chronologically within layers of ‘rock’ before swapping with another group to excavate the secrets within their rock formation. Children will learn how rocks and fossils are formed and be introduced to some prehistoric life forms.
Curriculum learning outcomes
• children will learn how rocks and fossils are formed and how they are laid down in different strata (layers of rock)
• children will understand how palaeontologists excavate
• children will learn the chronology of some prehistoric life forms
Challenge synopsis
The introductory postcard explains how a single rock can hold incredible secrets. Children will focus on how fossils form in rocks, before creating their own fossil models. Pupils will then excavate each other’s fossils, building their palaeontology skills as Future Scientists.
Possible additional activities
• Children create museum-style fossil exhibitions in their classrooms.
• Children create a chart of the periods of prehistory when different creatures lived on Earth.
• Older children might learn to use the scientific names for sections of geological time, such as the Jurassic.
• Children draw or paint scenes from when the creature they have written about was alive.
• Take the children out on a ‘rock walk’ to find rocks in the environment. This might include pebbles in a flowerbed or field, different rock types are used as building materials or gravestones etc. Children can try to identify the rocks and discuss what properties make them useful. This could lead to a discussion about natural building materials compared to human-made materials, such as brick, cement and concrete.
Activities
Not all activities will be relevant for all classes. The activities were developed to be broken up and used over a period of time and as is suitable for your particular class.
• Before beginning your lesson, find a pebble or piece of rock outside. You will show this when you read the introductory postcard.
• Read the introductory postcard provided and show your class the stone you discovered outside.
• Read lesson script 1, showing children images 1, 2 and 3 to introduce them to the secrets of rocks. Elicit what the children know or remember about how rocks are formed, using the glossary as required.
• Read lesson script 2 to pupils and discover how much they know or remember about the formation of fossils.
• Expand on what the children have remembered by explaining or watching some short video clips online. lesson script 2 links to a useful bitesize BBC film about fossil formation www.bbc.co.uk/guides/z2ym2p3#zgm94j6. (If the children have not studied fossils before then more time might be needed to teach this.) Ensure children understand the difference between igneous, sedimentary and metamorphic rock and understand how fossils are formed. Ask the children, from what they know, what types of rock might fossils be found in.
• Read lesson script 3, informing pupils that they are going to create their own models of fossils.
• Divide the class in half into Team 1 and Team 2. Then divide each team into groups of three or four. There needs to be an equal number of groups (though not necessarily children) in each team.
• Discuss the sizes that their fossils might be in reality. Explain that these fossil models will be miniature replicas (children’s models need to be no larger than 4cm x 4cm x 2cm). Alternatively they could choose to model part of a creature, such as a tooth or part of a shell. If so, they must make sure they include enough of the creature for it to be identified later.
• Hand the groups pieces of paper with details of what fossil they will replicate. It would be most effective if these were kept secret. Half the class (Team 1) will make fossils using pupil resources 1A, 1B and 1C and Team 2 will make fossils using pupil resources 2A, 2B and 2C. Each group of three or four should have all three fossils. Models are best made in self-hardening clay but other modelling material or careful line drawings or watercolours, carefully cut out and placed onto card or cardboard would also work.

Dippy on Tour – Resources for ages 7–11 Episode 6: The secrets of rocks (Cardiff) 69
• When the models are made and dry, read lesson script 4 to the class and explain that they are going to create a model of the layers of rock their fossils might have been found in.
• Show the children the layer chart (pupil resource 3) and distribute two copies to each group. Explain how these differ, as fossil creatures were alive on Earth at different times, give the creature’s age in millions of years and mention that they became extinct or evolved into different creatures over millions of years. For example, the trilobite was not alive at the same time as Tyrannosaurus rex.
• Explain that rocks form in layers called strata (singular stratum) and that these are formed at different times and that these layers might have different colours and textures. Explain that different rock layers would have been laid down during the prehistoric periods on the chart, but for simplicity, they are going to create different layers of ‘rock’ and put their replica fossils in the correct layer for the geological period that they lived in.
• Give each group a plastic box (an ice cream carton would be ideal or a classroom tray would also work), materials for their strata (this could be sand, earth, sawdust, dried peas, lentils etc) and two blank photocopied charts (pupil resource 3). As they create the strata for the period that their fossil would have lived in, they should place their replica fossil in that stratum and cover it up. They should fill in on their chart (pupil resource 3) what fossil replicas they placed in what stratum.
• Read lesson script 5 and inform the children that they are going to practise being palaeontologists, who find fossils in rocks. Redistribute the boxes so that each group gets one made by the other team. Ask them to carefully excavate the layers (spoons and dry paintbrushes would be useful) and to see what layers have fossils in them. Explain how palaeontologists have to work carefully to keep the layers clear and to not damage any buried specimens. When they find something buried, they should carefully excavate it, clean it and mark where they found it on the second chart (pupil resource 3). Bins, boxes or bags would be useful for the children to put the used layering materials in.
• Gather the children and read them lesson script 6 and look at image 4. This shows pictures of how their fossils might have looked when they were alive. Where would the creatures have lived? How might they have died? How would they have become fossilised? Make sure children realise that some of the creatures lived in water and others may have been on a beach or in a forest when they died.
• Tell the children that they are going to choose a creature (it doesn’t have to be the one they made a model of) and write its story. The story will be in three parts: first the creature’s last day covering how and where it died, then how it became fossilised and finally how millions of years later someone found its fossilised remains.
• Share the stories or display them with the models.
• Send confirmation to Dippy’s team at [email protected] with the subject line Rocks. This triggers an automated reply acknowledging receipt.
Resources required
Provided in the Natural History Museum package:
• introductory postcard
• glossary
• lesson scripts 1–6
• images 1–4
• pupil resources 1A–C, 2A–C, 3 and 4
• link to BBC Bitesize film on fossil formation: www.bbc.co.uk/guides/z2ym2p3#zgm94j6
Provided by school:
• a piece of rock or an interesting pebble found outside
• materials for making fossil replicas (self-hardening clay or modelling material)
• plastic boxes, spoons and paintbrushes
• materials for replicating different rock strata (this could be sand, soil, dry rice, lentils, sawdust, dried peas etc)
• photocopying for charts and pictures
English Key Stage 2 curriculum areas covered by Episode 6
The initial discussion and activities meet the following curriculum areas:
Year 3 Science: Rocks Pupils should be taught to:
• describe in simple terms how fossils are formed when things that have lived are trapped within rock
Art and design • become proficient in drawing, painting, sculpture and other
art, craft and design techniques
Dippy on Tour – Resources for ages 7–11 Episode 6: The secrets of rocks (Cardiff) 70
English: Writing – composition Lower Key Stage 2: Pupils should be taught to:
• plan their writing by:
• discussing writing similar to that which they are planning to write in order to understand and learn from its structure, vocabulary and grammar
• discussing and recording ideas
• draft and write by:
• composing and rehearsing sentences orally, progressively building a varied and rich vocabulary and an increasing range of sentence structures
English: Writing – composition Upper Key Stage 2: Pupils should be taught to:
• plan their writing by:
• identifying the audience for and purpose of the writing, selecting the appropriate form and using other similar writing as models for their own
• noting and developing initial ideas, drawing on reading and research where necessary
Northern Irish curriculum areas covered by Episode 6 (Key Stages 1 and 2)
The world around us (Key Stage 2): PlacePupils should be enabled to explore:
• how place influences the nature of life
• ways in which people, plants and animals depend on the features and materials in places and how they adapt to their environment
• features of, and variations in places, including physical, human, climatic, vegetation and animal life
• change over time in places
The Arts (Key Stage 1): Art and designPupils should be enabled to:
• experiment with a range of media, materials, tools and processes such as: drawing, painting, printmaking, malleable materials, textiles and three-dimensional construction
The Arts (Key Stage 2): Art and designPupils should be enabled to:
• collect, examine and select resource material to use in the development of ideas
• develop their understanding of the visual elements of colour, tone, line, shape, form, space, texture and pattern to communicate their ideas
• use a range of media, materials, tools and processes such as: drawing, painting, printmaking, malleable materials, textiles and three-dimensional construction, selecting which is appropriate in order to realise personal ideas and intentions
Dippy on Tour – Resources for ages 7–11 Episode 6: The secrets of rocks (Cardiff) 71
Scottish curriculum areas covered by Episode 6 (First and Second)
Sciences: Planet EarthBiodiversity and interdependenceI can identify and classify examples of living things, past and present, to help me appreciate their diversity. I can relate physical and behavioural characteristics to their survival or extinction. SCN 2-01a
Art and designI can create and present work using the visual elements of line, shape, form, colour, tone, pattern and texture. EXA 1-03a
I can create and present work that shows developing skill in using the visual elements and concepts. EXA 2-03a
Welsh Key Stage 2 curriculum areas covered by Episode 6
Science at Key Stage 2Activities should foster curiosity and creativity and be interesting, enjoyable, relevant and challenging for the learner. They should enable learners to initiate, explore and share ideas, and extend, refine and apply their skills, knowledge and understanding in new situations. They should allow time for thinking, peer discussion and reflection.
RangeThe sustainable EarthPupils should use and develop their skills, knowledge and understanding by comparing the Earth with other planets, investigating materials around them and considering the importance of recycling.
4 the properties of materials relating to their uses
5. how some materials are formed or produced
Art and designSkillsInvestigatingPupils should be given opportunities to:
1. select and record from:
• observation • experience • memory • imagination
2. investigate:
• the natural environment • the made environment • the world of imagination using a variety of materials
MakingPupils should be given opportunities to:
1. explore, experiment with and apply the elements of the visual, tactile and sensory language of art, craft and design
2. design and make:
• two-dimensional images • three-dimensional objects and artefacts using a range of
various materials for a variety of purposes
RangeMakingPupils should design and make both imaginatively and expressively:
• objects • artefacts • images
They should use a variety of:
• tools and equipment • materials, e.g. paints, pencils, crayons, pastels, charcoal,
inks, resistant materials, clays, sustainable materials, textiles, digital-based media etc
• processes, e.g. drawing, painting, printing, multimedia, craft processes, three-dimensional processes, digital-based processes etc
They should have opportunities to work as:
• individuals • group members
EnglishStrand: WritingOrganising ideas and informationMeaning, purposes, readers
Writing accuratelyLanguage
Grammar
Punctuation
Spelling
Handwriting
Dippy on Tour – Resources for ages 7–11 Episode 6: The secrets of rocks (Cardiff) 72
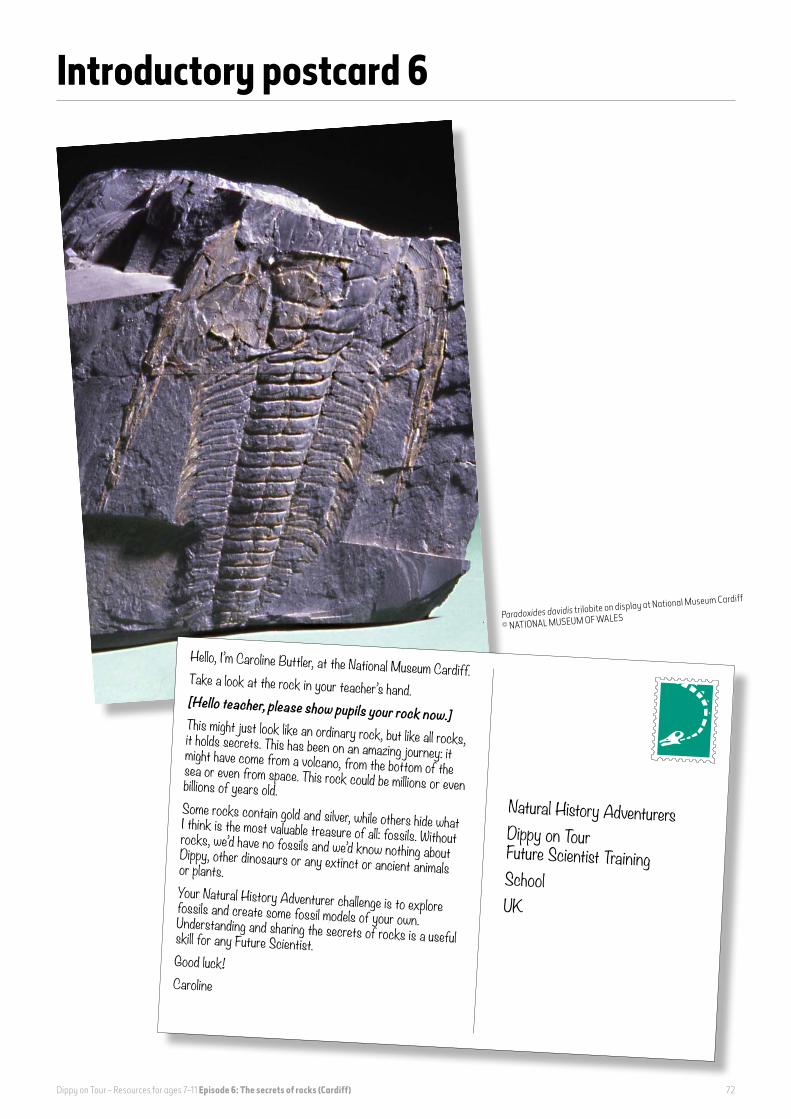
Introductory postcard 6
Hello, I’m Caroline Buttler, at the National Museum Cardiff.Take a look at the rock in your teacher’s hand. [Hello teacher, please show pupils your rock now.] This might just look like an ordinary rock, but like all rocks, it holds secrets. This has been on an amazing journey: it might have come from a volcano, from the bottom of the sea or even from space. This rock could be millions or even billions of years old.
Some rocks contain gold and silver, while others hide what I think is the most valuable treasure of all: fossils. Without rocks, we’d have no fossils and we’d know nothing about Dippy, other dinosaurs or any extinct or ancient animals or plants.Your Natural History Adventurer challenge is to explore fossils and create some fossil models of your own. Understanding and sharing the secrets of rocks is a useful skill for any Future Scientist.
Good luck!Caroline
Paradoxides davidis trilobite on display at National Museum Cardiff
© NATIONAL MUSEUM OF WALES
Natural History AdventurersDippy on Tour Future Scientist TrainingSchoolUK

Dippy on Tour – Resources for ages 7–11 Episode 6: The secrets of rocks (Cardiff) 73
Lesson script 1 • Rocks are storytellers. When we study rocks they tell us the story of our planet. Some rocks even take us
back to when Earth had only just formed. Here is a picture of the oldest rocks in the UK, found in north west Scotland and the western isles. This ancient Lewisian gneiss is almost 3,000 million years old.
Hello teacher, please show image 1 now.
• Rocks are space adventurers. Some rocks crash into Earth after travelling through space. We call these rocks meteorites. Most scientists believe that a giant meteorite was the reason almost all the dinosaurs went extinct. Some scientists also believe that life began on Earth after tiny organisms travelled here through space inside meteorites. This would mean that we are all aliens! Here’s a picture of the Barringer Crater, a huge hole in Arizona (USA) that was made when a meteorite weighing 300,000 tonnes (the same as 50,000 African elephants) and travelling at 42,000 kilometres per hour (130 times faster than a Ferrari) smashed into Earth. Have a look at that picture now.
Hello teacher, please show image 2 now.
• Rocks contain fossils. Almost everything we know about the history of life on Earth has come from studying fossils found in rocks. The creature on the postcard is a trilobite called Paradoxides davidis that lived in the sea over 500 million years ago. By looking at fossils we know a lot about their lives. Trilobites had jointed legs and walked on the sea bed and many could see with a sophisticated pair of eyes. Trilobites are common fossils and this is one of hundreds of different types of trilobites we have found. Without fossils, we’d know nothing whatsoever about trilobites because they went extinct 252 million years ago, long before the dinosaurs appeared on Earth! You could think of each fossil as a postcard sent forward in time from plants and animals living long ago. Here’s a picture showing a fossil trilobite, and how we think it might have looked when it was alive.
Hello teacher, please show image 3 now.
Now that you know a little more about rocks, your next challenge is to take part in the Future Scientist Fossil Training Programme, where you will make some fossil models of your own.
Hello teacher, please turn to lesson script 2 when you are ready.

Dippy on Tour – Resources for ages 7–11 Episode 6: The secrets of rocks (Cardiff) 74
Lesson script 2We’re going to make our own fossils. But first, do you have any ideas about how fossils are formed? Please discuss this with your teacher now.
Hello teacher, please have that discussion now.
You had some brilliant ideas. Here’s how scientists talk about fossils.
Fossils are the preserved remains of living things. There are three main types of fossil.
1) Hard body parts, such as bones or shells, can be covered in layers of sediment and slowly turn to rock as they are replaced with minerals.
2) Impressions left by living things, such as dinosaur footprints on a muddy beach, can be preserved when covered in layers of sediment and slowly turned to rock. Sediment is the name used to describe tiny particles of sand and mud that can be moved by rivers, sea and wind. The mud left behind when a puddle on a pavement dries up is an example of sediment. When layers of sediment form and are compressed they can eventually form sedimentary rock.
3) Dead animals and plants can be preserved in amber (tree sap or resin that has become hard) and also in ice, peat bogs (a wet, spongy sort of field) and tar pits (a pit filled with sticky, black tar, a little like the tarmac on our roads).
To help you understand how the first type of fossils is made watch this BBC film. www.bbc.co.uk/guides/z2ym2p3#zgm94j6
Now you’re ready to create some fossil models of your own!
Hello teacher, please move to lesson script 3 now.

Dippy on Tour – Resources for ages 7–11 Episode 6: The secrets of rocks (Cardiff) 75
Lesson script 3A real fossil takes many years to form – unfortunately, we don’t have time to wait around for that to happen. Instead, we’re going to make our own models. Your teacher has collected some materials to create your fossil models.
This challenge has three steps.
Step 1: Before you start making your fossil models, we need to split the class in half, right down the middle. If possible, try to make a gap between the two sides. The side on the left will be Team 1 and the side on the right is Team 2.
Hello teacher, please split your class now.
Step 2: Now work with your teacher to get into groups of three or four. There should be the same number of groups in both Team 1 and Team 2.
Hello teacher, please help children into groups now.
Step 3: Now, here’s the sneaky bit: your teacher will give each group three fossils of extinct creatures. Groups in Team 1 will receive different fossils to groups in Team 2, and you need to keep your animals secret from the other team. For example, if Team 1 received a fossil of a mammoth, they wouldn’t tell Team 2, and if Team 2 received a fossil of a Diplodocus, they wouldn’t tell Team 1.
Hello teacher, please hand out the images of the three animals to each group now. These are pupil resources 1A, 1B and 1C for Team 1 and pupil resources 2A, 2B and 2C for Team 2. You may wish to keep the illustrations of the living animals to reveal at the end.
Keeping your fossil creature as secret as possible, please now make your fossil models using the materials your teacher has provided. When your fossil models are ready, the next challenge is to bury them.
Hi teacher, please turn to lesson script 4 when you’re ready for burying.

Dippy on Tour – Resources for ages 7–11 Episode 6: The secrets of rocks (Cardiff) 76
Lesson script 4Step 1: Burying fossil modelsUse the containers to create different layers to bury your fossil models in. These layers will represent the layers of rock in Earth’s crust – although they will be made from very different things. Each group will get a picture showing the four layers you’ll make inside your container.
Hello teacher, please hand out one copy of pupil resource 3 to each group.
Compare the ages of your group’s creatures with the ages of the four layers on your sheet. Work out what fossil needs to be buried in what layer. To help you remember all this, you can write the name of the creature onto the correct layer on the sheet. Then you can place your fossil models into your containers, building the layers as you go. Remember that your oldest fossil will be the first to go into the container.
Step 2: Model fossil swap shopNow that you have buried your fossils in the correct layers, it’s time to swap! Each group in Team 1 needs to swap their container with a group in Team 2. Once you have swapped, you’re ready to begin excavating and identifying the fossils.
Hello teacher, please turn to lesson script 5 when you’re ready to excavate.
Dippy on Tour – Resources for ages 7–11 Episode 6: The secrets of rocks (Cardiff) 77
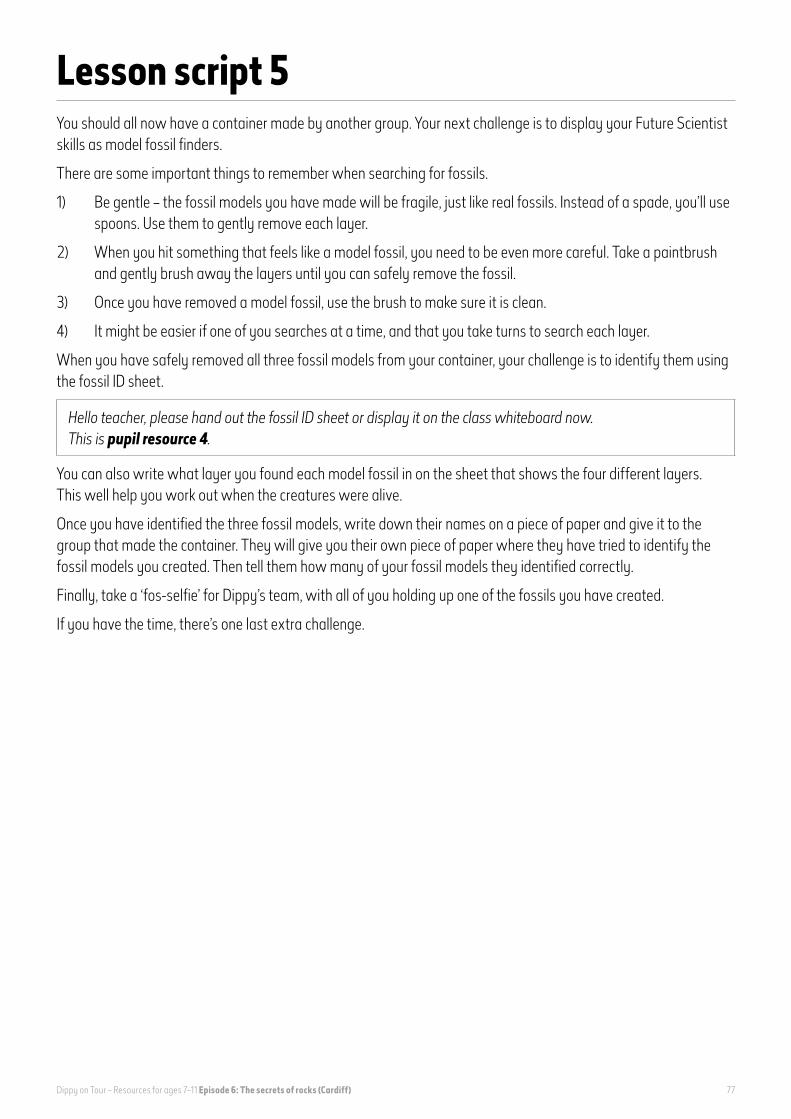
Lesson script 5You should all now have a container made by another group. Your next challenge is to display your Future Scientist skills as model fossil finders.
There are some important things to remember when searching for fossils.
1) Be gentle – the fossil models you have made will be fragile, just like real fossils. Instead of a spade, you’ll use spoons. Use them to gently remove each layer.
2) When you hit something that feels like a model fossil, you need to be even more careful. Take a paintbrush and gently brush away the layers until you can safely remove the fossil.
3) Once you have removed a model fossil, use the brush to make sure it is clean.
4) It might be easier if one of you searches at a time, and that you take turns to search each layer.
When you have safely removed all three fossil models from your container, your challenge is to identify them using the fossil ID sheet.
Hello teacher, please hand out the fossil ID sheet or display it on the class whiteboard now. This is pupil resource 4.
You can also write what layer you found each model fossil in on the sheet that shows the four different layers. This well help you work out when the creatures were alive.
Once you have identified the three fossil models, write down their names on a piece of paper and give it to the group that made the container. They will give you their own piece of paper where they have tried to identify the fossil models you created. Then tell them how many of your fossil models they identified correctly.
Finally, take a ‘fos-selfie’ for Dippy’s team, with all of you holding up one of the fossils you have created.
If you have the time, there’s one last extra challenge.

Dippy on Tour – Resources for ages 7–11 Episode 6: The secrets of rocks (Cardiff) 78
Lesson script 6After all of your model fossil exploration, you should have a pretty good idea about how your creatures look as fossils. It’s time to see how they looked when they were alive. Here’s a sheet with images of how all the animals used to look.
Hello teacher, please share image 4 with pupils now, either on the whiteboard or by handing out sheets.
Take a moment now to look at each of the six animals and discuss how and where they lived.
Hello teacher, please discuss that now.
These creatures are all very different, but they have one thing in common: they are now extinct and we only know about them from fossils. This is the reason palaeontologists love rocks so much – fossils show us that the story of life doesn’t end when a creature dies.
Now choose one of these six animals and write a story about it. This will be a rather strange sort of story because it will begin with your hero, the animal, dying. You could call your story ‘The End Is Only the Beginning’ or come up with your own title for your story.
You can tell your story in any way you like, but there must be three parts to it.
Part 1: The last dayIn this part of your story you need to tell us about the last day of your creature’s life, explaining how and where it died.
Part 2: The transformationIn this part of the story you need to tell us how the creature became a fossil. Think about the three different types of fossils and where your creature lived.
Part 3: The discoveryThis is where Natural History Adventurers come in: tell the story of how the fossil of your creature was discovered and who discovered it. Perhaps you can research some famous palaeontologists, such as Mary Anning, or you can invent one of your own. Remember that fossils aren’t only discovered by scientists digging down – they’re also revealed on the surface when rocks are worn away by a process we call weathering.
Good luck, and remember to email your stories and your ‘fos-selfie’ to [email protected] with the subject line Rocks. This triggers an automated reply acknowledging receipt.

Dippy on Tour – Resources for ages 7–11 Episode 6: The secrets of rocks (Cardiff) 79
Image 1
When we study rocks they tell us the story of our planet. Some rocks even take us back to when Earth had only just formed. Here is a picture of the oldest rocks in the UK, found in north west Scotland and the western isles. This ancient Lewisian gneiss is almost 3,000 million years old.
CC BY-SA 4.0 © Daniel Burgess

Dippy on Tour – Resources for ages 7–11 Episode 6: The secrets of rocks (Cardiff) 80
Image 2
Here’s a picture of the Barringer Crater, a huge hole in Arizona (USA) that was made when a meteorite weighing 300,000 tonnes (the same as 50,000 African elephants) and travelling at 42,000 kilometres per hour (130 times faster than a Ferrari) smashed into Earth. Have a look at that picture now.
USGS/D. Roddy via Wikimedia Commons
Dippy on Tour – Resources for ages 7–11 Episode 6: The secrets of rocks (Cardiff) 81
Image 3
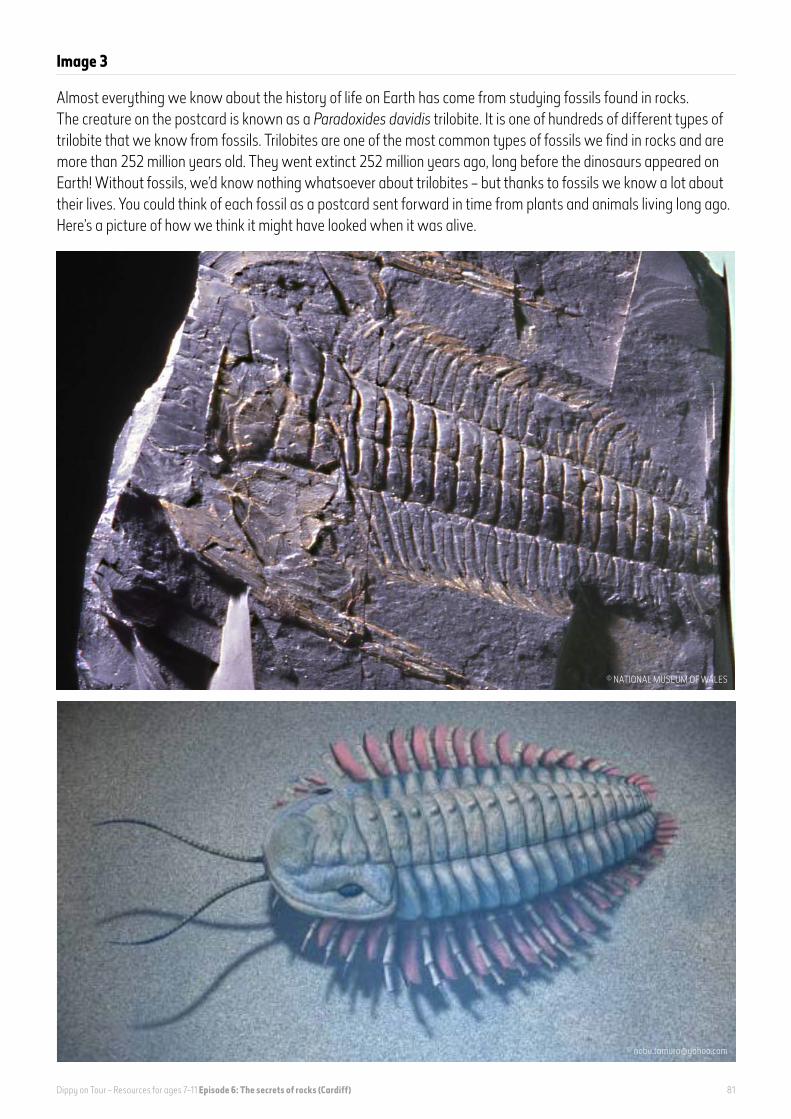
Almost everything we know about the history of life on Earth has come from studying fossils found in rocks. The creature on the postcard is known as a Paradoxides davidis trilobite. It is one of hundreds of different types of trilobite that we know from fossils. Trilobites are one of the most common types of fossils we find in rocks and are more than 252 million years old. They went extinct 252 million years ago, long before the dinosaurs appeared on Earth! Without fossils, we’d know nothing whatsoever about trilobites – but thanks to fossils we know a lot about their lives. You could think of each fossil as a postcard sent forward in time from plants and animals living long ago. Here’s a picture of how we think it might have looked when it was alive.
© NATIONAL MUSEUM OF WALES

Dippy on Tour – Resources for ages 7–11 Episode 6: The secrets of rocks (Cardiff) 82
Pupil resource 1A
Here is an image of a trilobite fossil for you to base your model fossil on. Remember – try not to let anyone from Team 2 see what your fossil is.
© The Trustees of the Natural History Museum, London. All rights reserved.

Dippy on Tour – Resources for ages 7–11 Episode 6: The secrets of rocks (Cardiff) 83
Pupil resource 1B
This is an image of an ichthyosaur fossil for you to base your model fossil on. Remember – try not to let anyone from Team 2 see what your fossil is.
Ichthyosaurs first appeared 248 Million years ago
© The Trustees of the Natural History Museum, London. All rights reserved.

Dippy on Tour – Resources for ages 7–11 Episode 6: The secrets of rocks (Cardiff) 84
Pupil resource 1B: Illustration of how we think an ichthyosaur might have looked
© The Trustees of the Natural History Museum, London. All rights reserved.
Dippy on Tour – Resources for ages 7–11 Episode 6: The secrets of rocks (Cardiff) 85
Pupil resource 1C
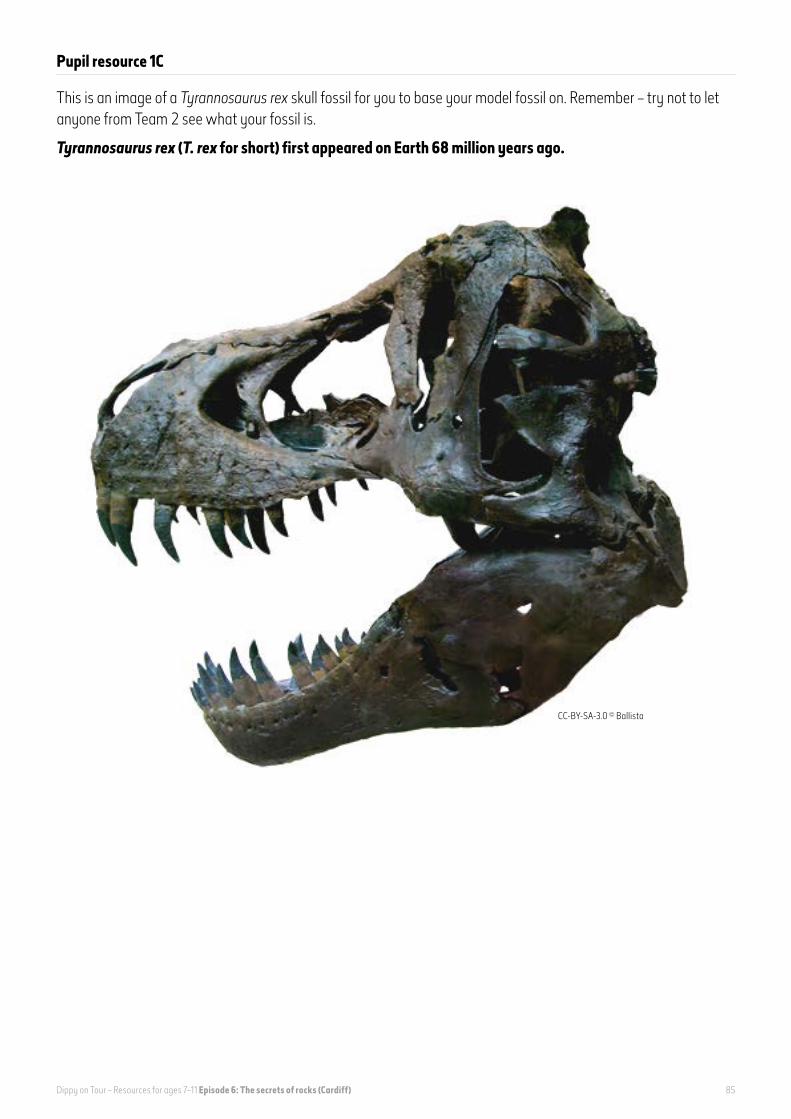
This is an image of a Tyrannosaurus rex skull fossil for you to base your model fossil on. Remember – try not to let anyone from Team 2 see what your fossil is.
Tyrannosaurus rex (T. rex for short) first appeared on Earth 68 million years ago.
CC-BY-SA-3.0 © Ballista

Dippy on Tour – Resources for ages 7–11 Episode 6: The secrets of rocks (Cardiff) 86
Pupil resource 1C: Illustration of how we think Tyrannosaurus Rex might have looked
© The Trustees of the Natural History Museum, London. All rights reserved.
Dippy on Tour – Resources for ages 7–11 Episode 6: The secrets of rocks (Cardiff) 87
Pupil resource 2A
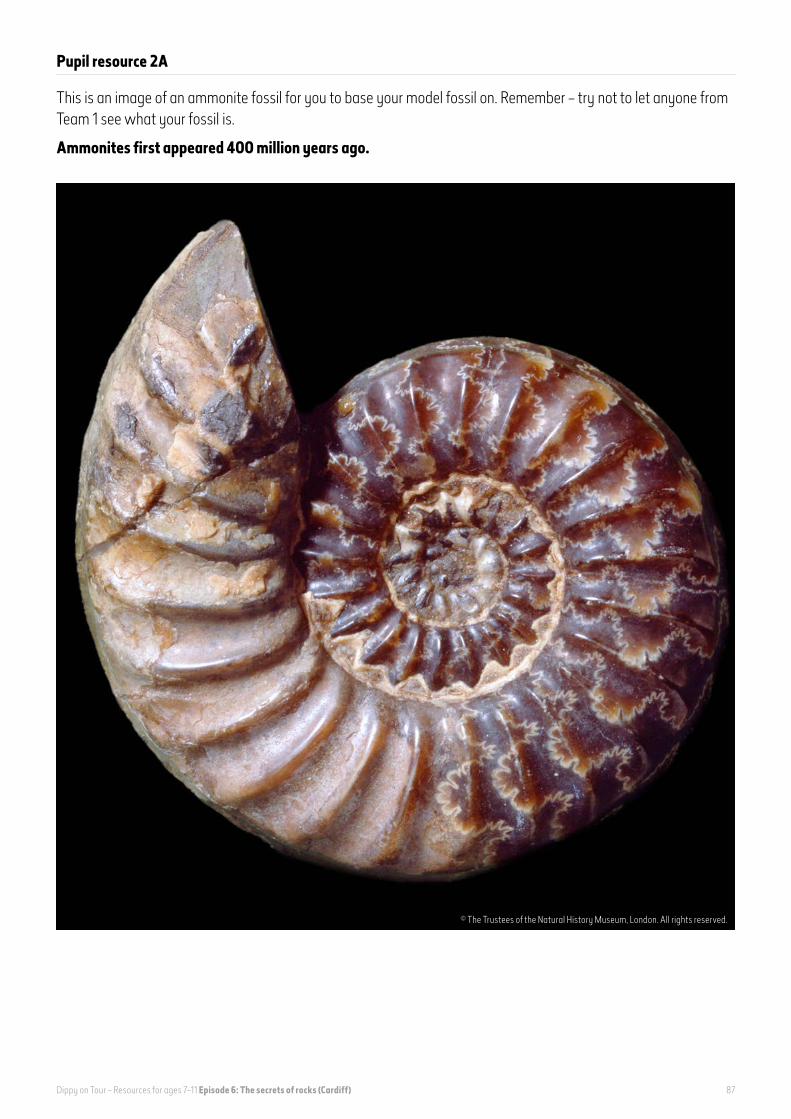
This is an image of an ammonite fossil for you to base your model fossil on. Remember – try not to let anyone from Team 1 see what your fossil is.
Ammonites first appeared 400 million years ago.
© The Trustees of the Natural History Museum, London. All rights reserved.

Dippy on Tour – Resources for ages 7–11 Episode 6: The secrets of rocks (Cardiff) 88
Pupil resource 2B
This is an image of a pterosaur fossil for you to base your model fossil on. Remember – try not to let anyone from Team 1 see what your fossil is!
Pterosaurs first appeared 228 million years ago.
© The Trustees of the Natural History Museum, London. All rights reserved.
Dippy on Tour – Resources for ages 7–11 Episode 6: The secrets of rocks (Cardiff) 89
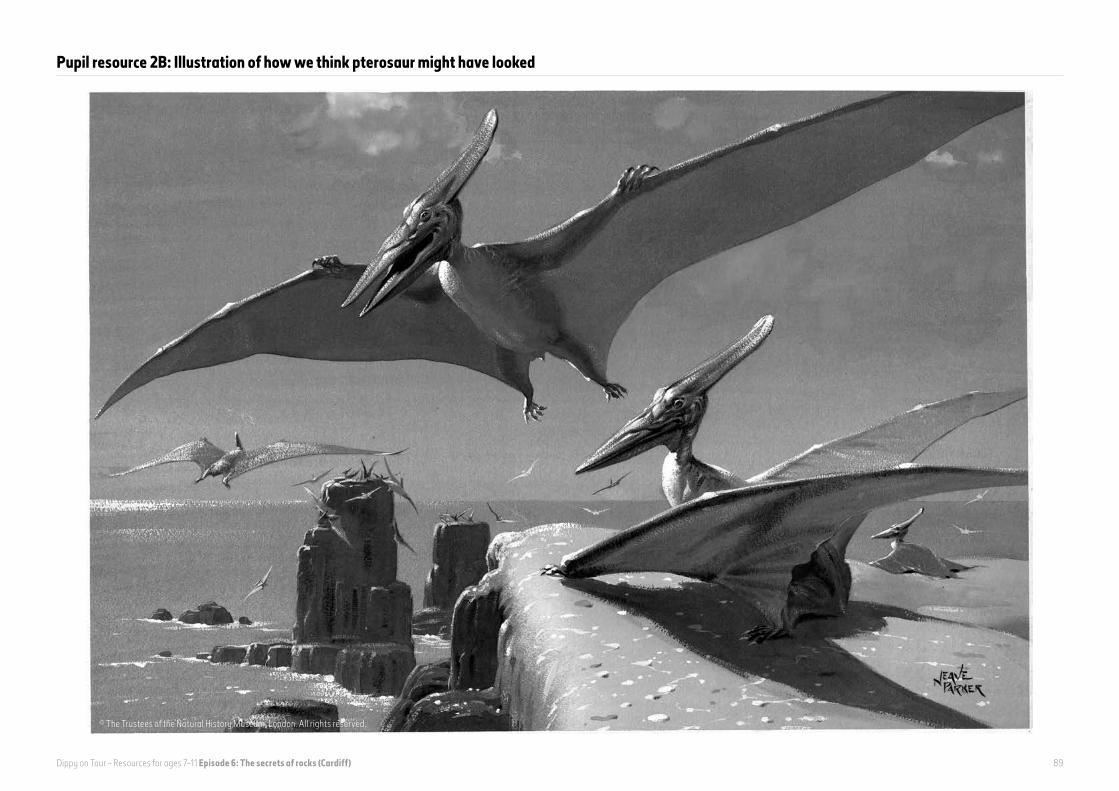
Pupil resource 2B: Illustration of how we think pterosaur might have looked
© The Trustees of the Natural History Museum, London. All rights reserved.
Dippy on Tour – Resources for ages 7–11 Episode 6: The secrets of rocks (Cardiff) 90
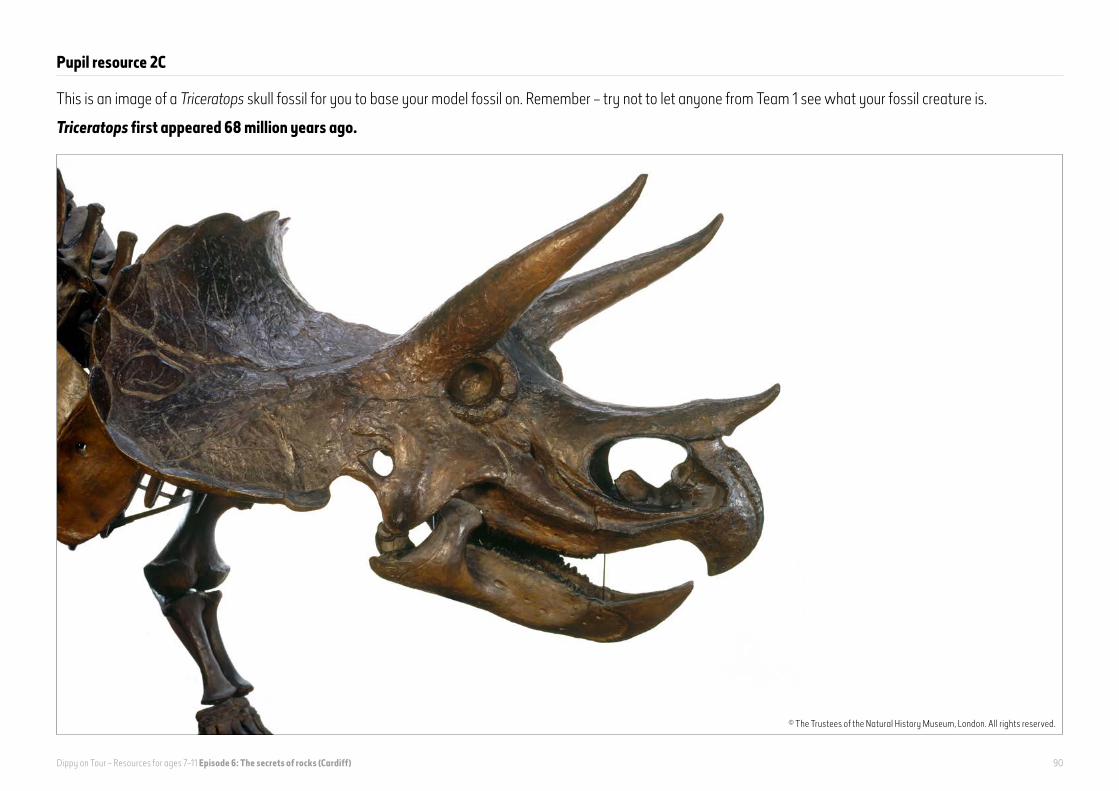
Pupil resource 2C
This is an image of a Triceratops skull fossil for you to base your model fossil on. Remember – try not to let anyone from Team 1 see what your fossil creature is.
Triceratops first appeared 68 million years ago.
© The Trustees of the Natural History Museum, London. All rights reserved.
Dippy on Tour – Resources for ages 7–11 Episode 6: The secrets of rocks (Cardiff) 91
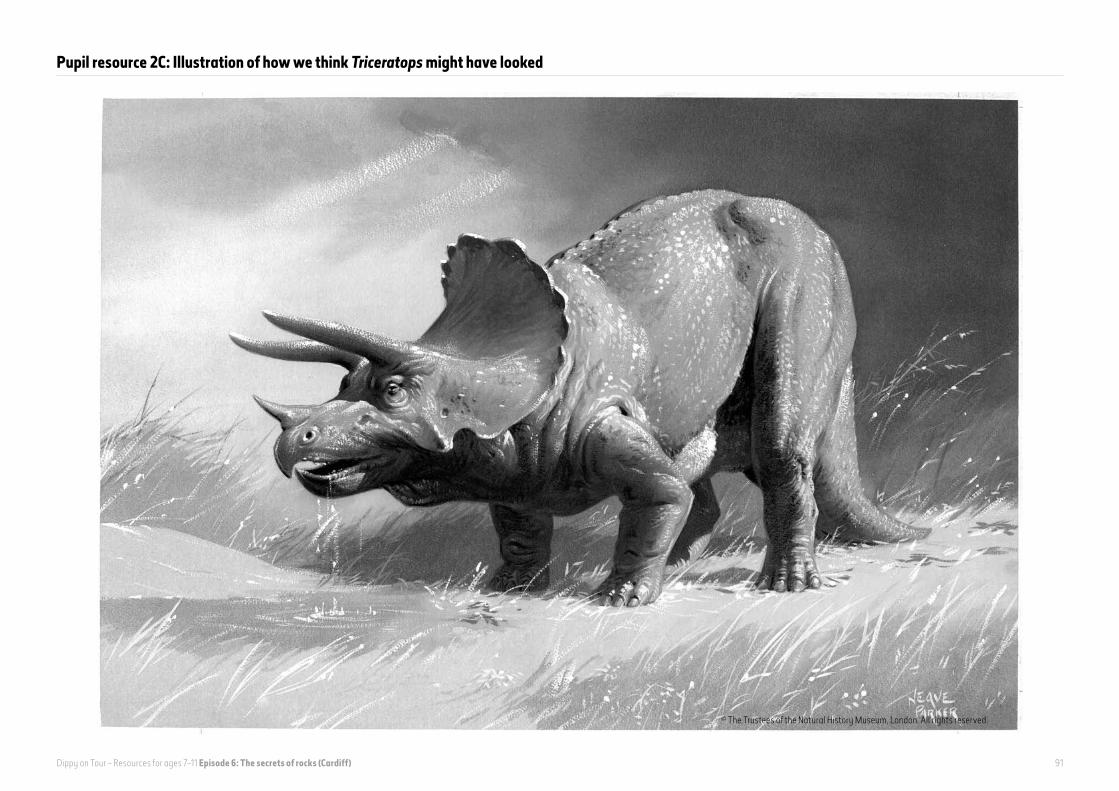
Pupil resource 2C: Illustration of how we think Triceratops might have looked
© The Trustees of the Natural History Museum, London. All rights reserved.
Dippy on Tour – Resources for ages 7–11 Episode 6: The secrets of rocks (Cardiff) 92
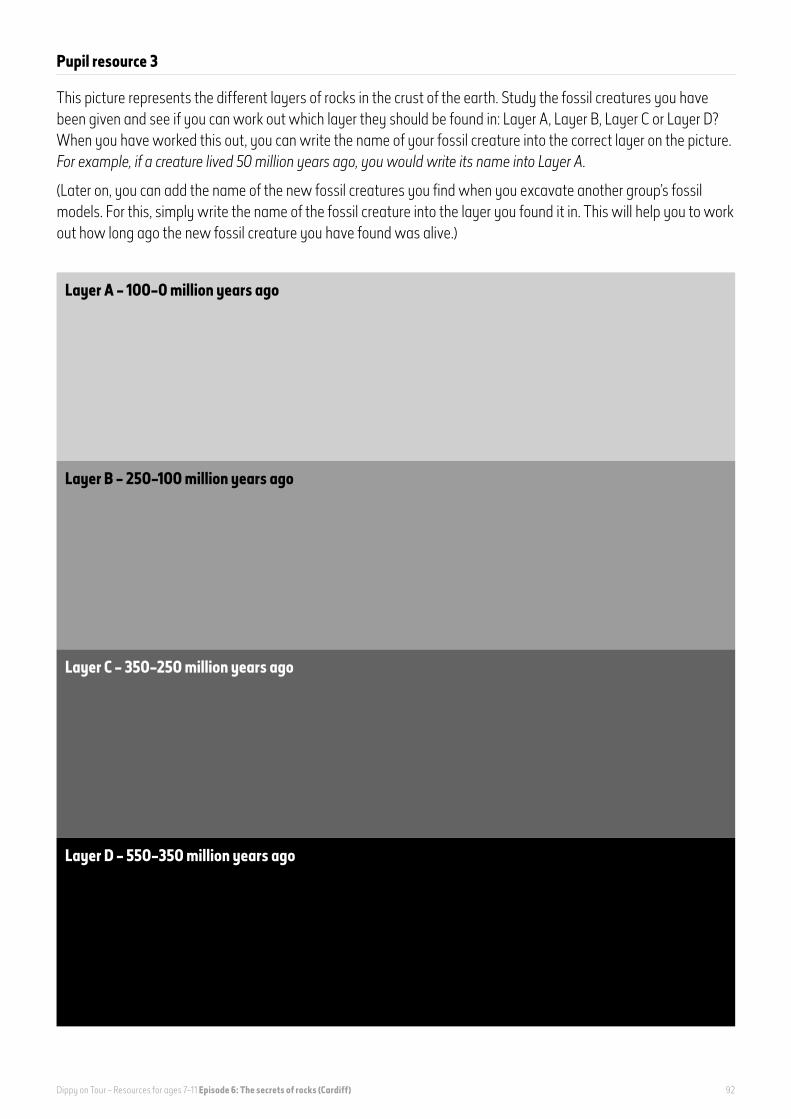
Pupil resource 3
This picture represents the different layers of rocks in the crust of the earth. Study the fossil creatures you have been given and see if you can work out which layer they should be found in: Layer A, Layer B, Layer C or Layer D? When you have worked this out, you can write the name of your fossil creature into the correct layer on the picture. For example, if a creature lived 50 million years ago, you would write its name into Layer A.
(Later on, you can add the name of the new fossil creatures you find when you excavate another group’s fossil models. For this, simply write the name of the fossil creature into the layer you found it in. This will help you to work out how long ago the new fossil creature you have found was alive.)
Layer A – 100–0 million years ago
Layer B – 250–100 million years ago
Layer C – 350–250 million years ago
Layer D – 550–350 million years ago
Dippy on Tour – Resources for ages 7–11 Episode 6: The secrets of rocks (Cardiff) 93
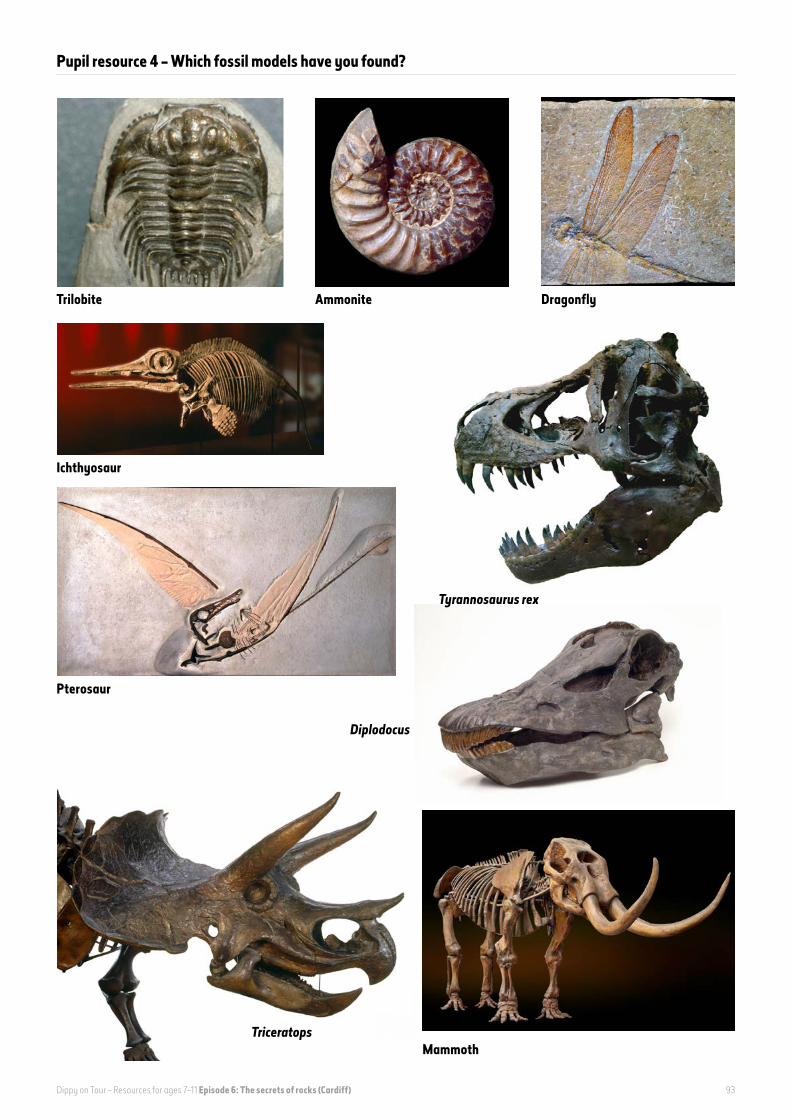
Pupil resource 4 – Which fossil models have you found?
Trilobite Ammonite Dragonfly
Ichthyosaur
Pterosaur
Tyrannosaurus rex
Diplodocus
TriceratopsMammoth

Dippy on Tour – Resources for ages 7–11 Episode 6: The secrets of rocks (Cardiff) 94
Episode 6 glossaryTrilobite A hard-shelled creature that appeared more than 520 million years ago in Earth’s ancient seas. Trilobites went extinct before the first dinosaurs appeared. The Paradoxides davidis trilobite was named in 1862 by the well-known palaeontologist J W Salter in the rocks of Porth-y-Rhaw, Wales. At more than 50 centimetres in length, it is one of the largest trilobites ever found.
Palaeontologist A scientist who studies fossils.
Excavate To remove soil carefully from an area in order to find buried remains in the ground.
Igneous rock Rock that is formed when magma or lava from volcanoes cools and becomes solid. Granite, pumice and basalt are examples of igneous rock.
Metamorphic rock Rock that has been changed under the influence of heat or pressure. This generally happens deep in our planet’s core. Examples are marble, which is formed from limestone, and slate, which is formed from shale.
Sedimentary rock Rock that has formed through the deposition and solidification of sediment, especially sediment transported by water (rivers, lakes and oceans), ice (glaciers) and wind. Sedimentary rocks are often deposited in layers, and frequently contain fossils. Limestone and shale are common sedimentary rocks.
Sediment Solid fragmented material – such as sand, silt, gravel or the remains of living things – transported and deposited by water, wind or ice to form layers on Earth’s surface. Over time sediment can become sedimentary rock.
Fossil The remains or impression of an ancient plant or animal embedded and preserved in rock. Fossils can be the actual remains of a once living thing, such as bones, shells or seeds, or even traces of past events such as dinosaur footprints.
Meteorite A piece of rock or metal that has fallen to Earth from outer space as a meteor. More than 90 per cent of meteorites are made of rock while the remainder consist wholly or partly of iron and nickel.
Stratum (plural strata) A layer of sedimentary rock, each generally consisting of one kind of matter representing continuous deposition.
Organism A living thing, such as an animal, plant or microbe.
Amber Tree sap or resin that has become hard and fossilised.
Peat bog A bog is a wetland that accumulates peat, a deposit of dead plant material, often formed from moss.
Tar pit A pit filled with thick, sticky, black tar, a little like the tarmac on our roads. Like coal and oil, tar is a naturally occurring substance that forms from the remains of dead plants.
Minerals A mineral is a substance such as quartz, halite or calcite that is formed naturally in rocks and inside the planet. Minerals are also found in small quantities in food and drink.
Extinct No longer existing, died out.
Ammonite An extinct sea creature often found as a fossil. Ammonites lived between 400 and 66 million years ago and had a thick shell, similar to that of snails today.
Pterosaur A flying reptile that lived between 230 and 66 million years ago.
Ichthyosaur A reptile that lived in ancient seas between 251 and 94 million years ago.
Dragonfly Brightly coloured insects with long, thin bodies and two sets of wings. Fossils of very large dragonfly ancestors are found from 325 million years ago.
Triceratops A large, four-legged, plant-eating dinosaur that lived between 66 and 68 million years ago. It had a huge head with two large horns, a smaller horn on its beaked snout and a bony frill above its neck.
Dippy on Tour – Resources for ages 7–11 Episode 6: The secrets of rocks (Cardiff) 95
Tyrannosaurus rex A large, meat-eating dinosaur that walked on two legs. Tyrannosaurus was alive between 68 and 66 million years ago. It had enormous knife-like teeth.
Sabre-toothed tiger A large, extinct, meat-eating mammal, related to modern cats. It had long, curved upper canine teeth.
Mammal A warm-blooded animal that has hair or fur. Most mammals give birth to live young that are fed on milk produced by the female.
Erosion/eroded The process by which soil and rock particles are worn away and moved elsewhere by wind, water or ice.
Erosion usually occurs alongside weathering.
Weathering The breakdown of rocks at the planet’s surface, by the action of rainwater, temperature extremes and biological activity. It does not involve the removal of rock material.
There are three types of weathering: physical, chemical and biological.
Weathering usually occurs alongside erosion.