experion automated electrophoresis system - bio-rad · bio-rad technical support for help and...
TRANSCRIPT
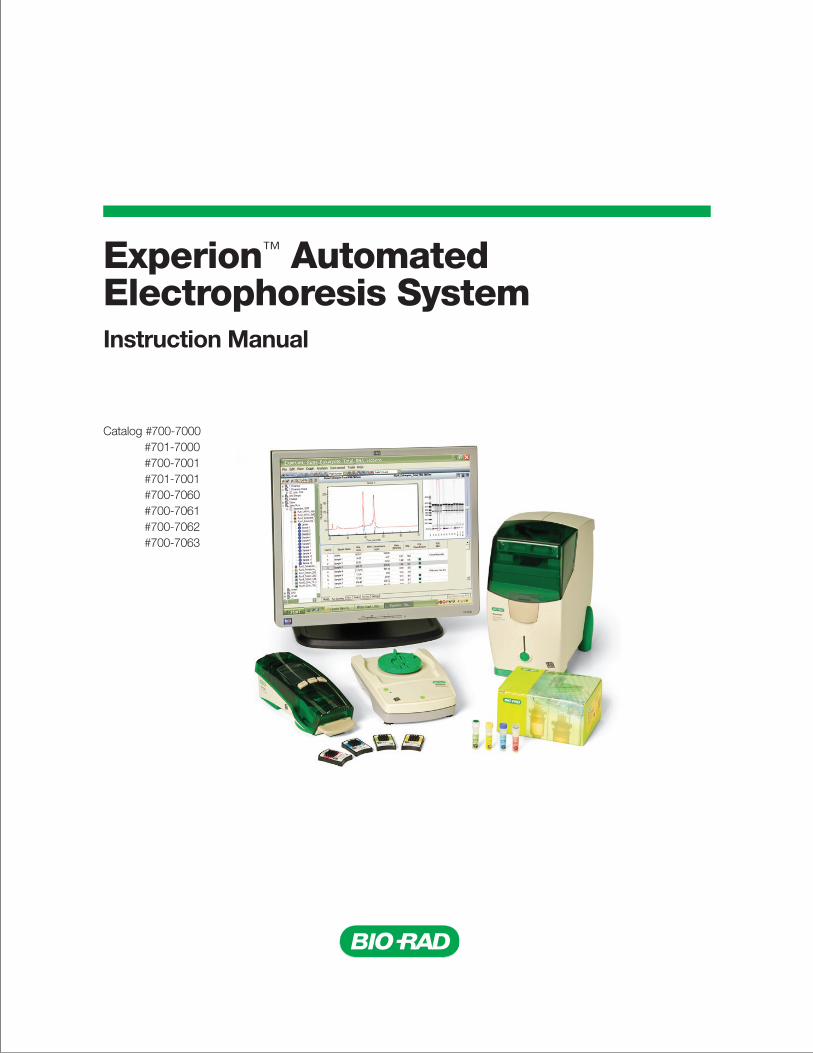
Experion™ Automated Electrophoresis SystemInstruction Manual
Catalog #700-7000 #701-7000 #700-7001 #701-7001 #700-7060 #700-7061 #700-7062 #700-7063

Bio-Rad Technical Support
For help and advice regarding products from the Experion™ automated electrophoresis system, please contact the Bio-Rad
Technical Support department, which in the United States is open Monday–Friday, 5:00 AM–5:00 PM, Pacific Time.
Phone: 1-800-4BIORAD (1-800-424-6723)
Fax: 1-510-741-5802
Email: [email protected] (for U.S. and international customers)
Online technical support and worldwide contact information are available at consult.bio-rad.com.
Legal Notices
No part of this publication may be reproduced or transmitted in any form or by any means, electronic or mechanical, including
photocopy, recording, or any information storage or retrieval system, without permission in writing from Bio-Rad Laboratories.
Bio-Rad reserves the right to modify its products and services at any time. This user guide is subject to change without notice.
Although prepared to ensure accuracy, Bio-Rad assumes no liability for errors, or for any damages resulting from the application
or use of this information.
Dell and Optiplex are trademarks of Dell Inc. Corporation. Microsoft, Windows, and Windows Vista are trademarks of Microsoft
Corporation. RiboGreen is a trademark of Invitrogen Corporation.
The dyes used in Experion kits are made by Molecular Probes, Inc. and are for research use only.
LabChip and the LabChip logo are trademarks of Caliper Life Sciences, Inc. Bio-Rad Laboratories, Inc. is
licensed by Caliper Life Sciences, Inc. to sell products using the LabChip technology for research use only.
These products are licensed under U.S. patents 5,863,753; 5,658,751; 5,436,134; and 5,582,977, and pending
patent applications, and related foreign patents, for internal research and development use only in detecting,
quantitating, and sizing macromolecules, in combination with microfluidics, where internal research and development use
expressly excludes the use of this product for providing medical, diagnostic, or any other testing, analysis, or screening services,
or providing clinical information or clinical analysis, in any event in return for compensation by an unrelated party.
Copyright © 2010 Bio-Rad Laboratories, Inc.
Contents
Chapter 1: Experion™ Automated Electrophoresis System . . . . . . . . . . . . . . . . . . . . . . . . . . . . . . . . 1
1.1 System Overview . . . . . . . . . . . . . . . . . . . . . . . . . . . . . . . . . . . . . . . . . . . . . . . . . . . . . . . . . . . . 2
1.2 System Components . . . . . . . . . . . . . . . . . . . . . . . . . . . . . . . . . . . . . . . . . . . . . . . . . . . . . . . . . 3
1.2.1 Electrophoresis Station . . . . . . . . . . . . . . . . . . . . . . . . . . . . . . . . . . . . . . . . . . . . . . . . . . . . . 3
1.2.2 Priming Station . . . . . . . . . . . . . . . . . . . . . . . . . . . . . . . . . . . . . . . . . . . . . . . . . . . . . . . . . . . 3
1.2.3 Vortex Station . . . . . . . . . . . . . . . . . . . . . . . . . . . . . . . . . . . . . . . . . . . . . . . . . . . . . . . . . . . . 4
1.2.4 Microfluidic Chips . . . . . . . . . . . . . . . . . . . . . . . . . . . . . . . . . . . . . . . . . . . . . . . . . . . . . . . . . 4
1.2.5 Analysis Kits: Microfluidic Chips and Reagents . . . . . . . . . . . . . . . . . . . . . . . . . . . . . . . . . . . 4
1.2.6 Experion Software . . . . . . . . . . . . . . . . . . . . . . . . . . . . . . . . . . . . . . . . . . . . . . . . . . . . . . . . 5
1.3 Experion Workflow . . . . . . . . . . . . . . . . . . . . . . . . . . . . . . . . . . . . . . . . . . . . . . . . . . . . . . . . . . . 5
1.4 Experion Video Tutorials . . . . . . . . . . . . . . . . . . . . . . . . . . . . . . . . . . . . . . . . . . . . . . . . . . . . . . . 6
Chapter 2: Setting Up the Experion System . . . . . . . . . . . . . . . . . . . . . . . . . . . . . . . . . . . . . . . . . . . 7
2.1 Unpacking System Components. . . . . . . . . . . . . . . . . . . . . . . . . . . . . . . . . . . . . . . . . . . . . . . . . 8
2.2 Component Setup and Operation . . . . . . . . . . . . . . . . . . . . . . . . . . . . . . . . . . . . . . . . . . . . . . . . 8
2.2.1 Priming Station . . . . . . . . . . . . . . . . . . . . . . . . . . . . . . . . . . . . . . . . . . . . . . . . . . . . . . . . . . . 8
2.2.2 Vortex Station . . . . . . . . . . . . . . . . . . . . . . . . . . . . . . . . . . . . . . . . . . . . . . . . . . . . . . . . . . . . 9
2.2.3 Computer (PC) . . . . . . . . . . . . . . . . . . . . . . . . . . . . . . . . . . . . . . . . . . . . . . . . . . . . . . . . . . 10
2.2.4 Software . . . . . . . . . . . . . . . . . . . . . . . . . . . . . . . . . . . . . . . . . . . . . . . . . . . . . . . . . . . . . . 10
2.2.5 Electrophoresis Station . . . . . . . . . . . . . . . . . . . . . . . . . . . . . . . . . . . . . . . . . . . . . . . . . . . . 10
2.3 First-Time Use of the Experion System . . . . . . . . . . . . . . . . . . . . . . . . . . . . . . . . . . . . . . . . . . . 11
Chapter 3: Care and Maintenance . . . . . . . . . . . . . . . . . . . . . . . . . . . . . . . . . . . . . . . . . . . . . . . . . . 13
3.1 Electrophoresis Station . . . . . . . . . . . . . . . . . . . . . . . . . . . . . . . . . . . . . . . . . . . . . . . . . . . . . . . 14
3.1.1 Cleaning the Electrophoresis Station. . . . . . . . . . . . . . . . . . . . . . . . . . . . . . . . . . . . . . . . . . 14
3.1.2 Cleaning the Electrodes . . . . . . . . . . . . . . . . . . . . . . . . . . . . . . . . . . . . . . . . . . . . . . . . . . . 14
3.1.3 Replacing the Electrode Manifold . . . . . . . . . . . . . . . . . . . . . . . . . . . . . . . . . . . . . . . . . . . . 17
3.2 Priming Station . . . . . . . . . . . . . . . . . . . . . . . . . . . . . . . . . . . . . . . . . . . . . . . . . . . . . . . . . . . . . 17
3.3 Vortex Station . . . . . . . . . . . . . . . . . . . . . . . . . . . . . . . . . . . . . . . . . . . . . . . . . . . . . . . . . . . . . . 18

Chapter 4: Troubleshooting . . . . . . . . . . . . . . . . . . . . . . . . . . . . . . . . . . . . . . . . . . . . . . . . . . . . . . . 19
4.1 Electrophoresis Station . . . . . . . . . . . . . . . . . . . . . . . . . . . . . . . . . . . . . . . . . . . . . . . . . . . . . . . 20
4.2 Priming Station . . . . . . . . . . . . . . . . . . . . . . . . . . . . . . . . . . . . . . . . . . . . . . . . . . . . . . . . . . . . . 21
4.3 Vortex Station . . . . . . . . . . . . . . . . . . . . . . . . . . . . . . . . . . . . . . . . . . . . . . . . . . . . . . . . . . . . . . 22
4.4 Software Errors . . . . . . . . . . . . . . . . . . . . . . . . . . . . . . . . . . . . . . . . . . . . . . . . . . . . . . . . . . . . . 22
4.5 Diagnostic Tests of the Electrophoresis Station . . . . . . . . . . . . . . . . . . . . . . . . . . . . . . . . . . . . 26
4.5.1 System Diagnostic Tests . . . . . . . . . . . . . . . . . . . . . . . . . . . . . . . . . . . . . . . . . . . . . . . . . . 26
4.5.2 Current Test . . . . . . . . . . . . . . . . . . . . . . . . . . . . . . . . . . . . . . . . . . . . . . . . . . . . . . . . . . . . 26
4.5.3 Conductivity Test . . . . . . . . . . . . . . . . . . . . . . . . . . . . . . . . . . . . . . . . . . . . . . . . . . . . . . . . 27
4.5.4 Focus Test . . . . . . . . . . . . . . . . . . . . . . . . . . . . . . . . . . . . . . . . . . . . . . . . . . . . . . . . . . . . . 27
Appendices . . . . . . . . . . . . . . . . . . . . . . . . . . . . . . . . . . . . . . . . . . . . . . . . . . . . . . . . . . . . . . . . . . . . 29
Appendix A: Safety Notices . . . . . . . . . . . . . . . . . . . . . . . . . . . . . . . . . . . . . . . . . . . . . . . . . . . . . . . 30
Appendix B: System Specifications . . . . . . . . . . . . . . . . . . . . . . . . . . . . . . . . . . . . . . . . . . . . . . . . . 32
Appendix C: Bibliography. . . . . . . . . . . . . . . . . . . . . . . . . . . . . . . . . . . . . . . . . . . . . . . . . . . . . . . . . 34
Appendix D: Ordering Information . . . . . . . . . . . . . . . . . . . . . . . . . . . . . . . . . . . . . . . . . . . . . . . . . . 35
Experion™ Automated Electrophoresis System1
1

2 Technical Support: 1-800-4BIORAD • 1-800-424-6723 • www.bio-rad.com
1.1 System OverviewThe Experion automated electrophoresis system (Figure 1.1) employs LabChip microfluidic technology to automate protein and nucleic acid electrophoresis. It integrates separation, detection, and data analysis within a single platform. Using much smaller sample and reagent quantities than standard analysis methods, the Experion system accomplishes analysis in a single 30–40 minute, automated step.
The Experion system is used for the following applications:
n Protein analysis — quantitation and size determination (sizing) of protein samples useful for quality control, protein purity and stability analysis, protocol optimization, and evaluation of recombinant protein expression
n RNA analysis — evaluation of RNA integrity and concentration. The system automatically generates the RNA quality indicator (RQI), a quantitative integrity assessment, in addition to visual electropherogram data, ribosomal RNA ratios, and concentration data. This makes Experion RNA asays useful upstream of applications such as real-time quantitative PCR (qPCR), microarray analysis, sequencing, and reverse-transcription qPCR (RT-qPCR)
n DNA analysis — quantitation and sizing of restriction digests, amplified DNA, microsatellites, and amplified fragment length polymorphisms (AFLPs)
For details about how the Experion system performs these analyses, refer to the instruction manuals for each analysis kit.
Fig . 1 .1 . The Experion system . The system includes the following components: 1) automated electrophoresis station, 2) priming station, 3) vortex station used for nucleic acid analysis only, 4) system operation and data analysis tools (software), and 5) analysis kits, which include the (a) chips and (b) reagents for protein (Pro260 kit), standard-sensitivity RNA (StdSens kit), high-sensitivity RNA (HighSens kit), and DNA (DNA 1K and 12K kits) analyses.
Experion Automated Electrophoresis System
4
1
23
5a5b
Technical Support: 1-800-4BIORAD • 1-800-424-6723 • www.bio-rad.com 3
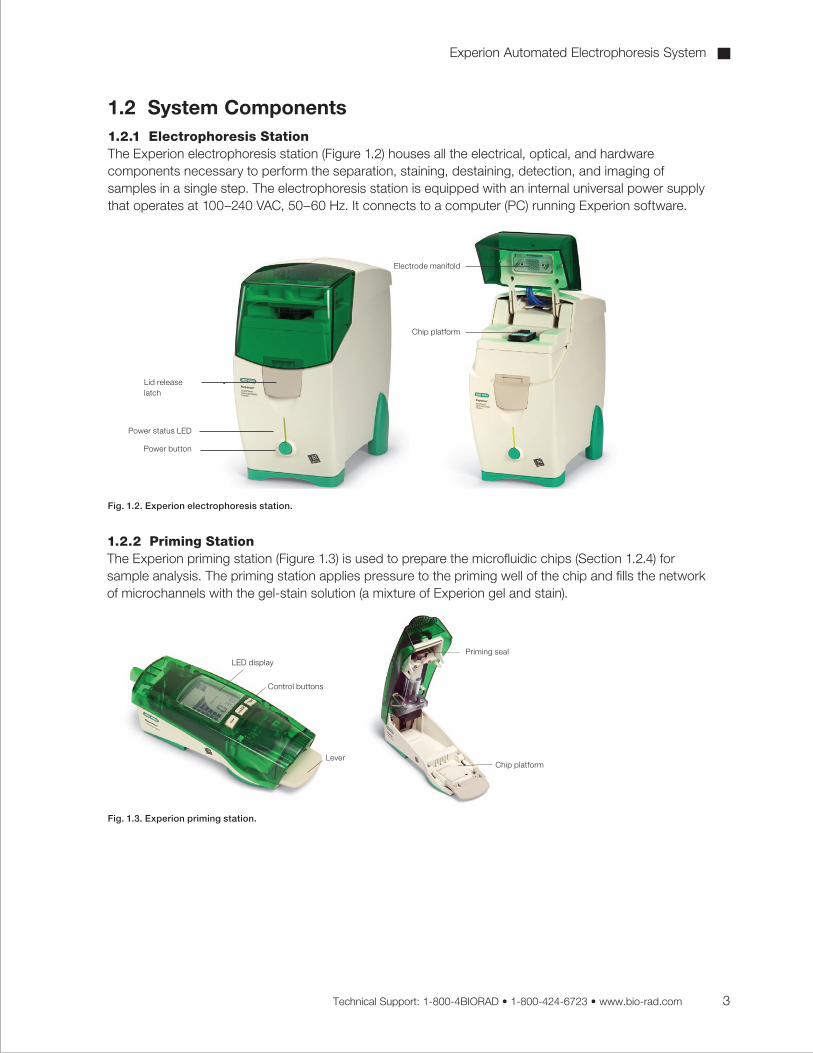
1.2 System Components1.2.1 Electrophoresis StationThe Experion electrophoresis station (Figure 1.2) houses all the electrical, optical, and hardware components necessary to perform the separation, staining, destaining, detection, and imaging of samples in a single step. The electrophoresis station is equipped with an internal universal power supply that operates at 100–240 VAC, 50–60 Hz. It connects to a computer (PC) running Experion software.
Fig . 1 .2 . Experion electrophoresis station .
1.2.2 Priming StationThe Experion priming station (Figure 1.3) is used to prepare the microfluidic chips (Section 1.2.4) for sample analysis. The priming station applies pressure to the priming well of the chip and fills the network of microchannels with the gel-stain solution (a mixture of Experion gel and stain).
Experion Automated Electrophoresis System
Lid release latch
Power status LED
Power button
Electrode manifold
Chip platform
Fig . 1 .3 . Experion priming station .
Control buttons
LeverChip platform
Priming sealLED display

4 Technical Support: 1-800-4BIORAD • 1-800-424-6723 • www.bio-rad.com
Vortex adapter
Power button
Mix button
Fig . 1 .4 . Experion vortex station .
1.2.4 Microfluidic ChipsAt the center of the Experion system is the microfluidic chip in which sample separation occurs. Each chip contains a series of plastic wells bonded over a small glass plate. The glass plate is etched with a network of microchannels that connects with the base of the plastic wells. The microchannels are primed, or filled with a mixture of gel matrix and stain, before the samples are applied to the wells. Once a prepared chip is placed in the electrophoresis station and the lid is closed, 16 electrode pins contact the solutions in each well. The electrophoresis station directs the samples through the microchannels by controlling the voltages and currents that are applied. Different chips are used for each application (Figure 1.5).
Fig . 1 .5 . Experion microfluidic chips .
1.2.3 Vortex StationThe Experion vortex station (Figure 1.4) ensures complete mixing of RNA or DNA samples and loading buffers in the chip wells. The vortex adapter securely holds the chip during the 1 min vortex cycle. The vortex station is not required for protein analysis.
1.2.5 Analysis Kits: Microfluidic Chips and ReagentsExperion analysis kits contain the microfluidic chips and reagents required to perform protein, RNA, or DNA separation and analysis (Table 1.1).
n Experion Pro260 analysis kit — used to resolve and quantitate 10–260 kD proteins with sensitivity comparable to that of colloidal Coomassie Blue gel staining. The kit includes the Experion Pro260 ladder, a modified version of Bio-Rad’s Precision Plus Protein™ standards optimized for use on the system. The Experion Pro260 ladder contains 9 purified recombinant proteins of 10–260 kD for accurate sizing of samples analyzed on a chip. Each chip can separate up to 10 samples per analysis
Experion Automated Electrophoresis System
Technical Support: 1-800-4BIORAD • 1-800-424-6723 • www.bio-rad.com 5
n Experion RNA StdSens and RNA HighSens analysis kits — offer rapid single-step assessments of RNA quality and quantity and the ability to analyze 1–12 samples in approximately 30 min. Sample concentrations in nanogram (StdSens) or picogram (HighSens) amounts can be analyzed
n Experion DNA 1K and DNA 12K analysis kits — used for single-step sizing and quantitation of DNA fragments in up to 11 samples
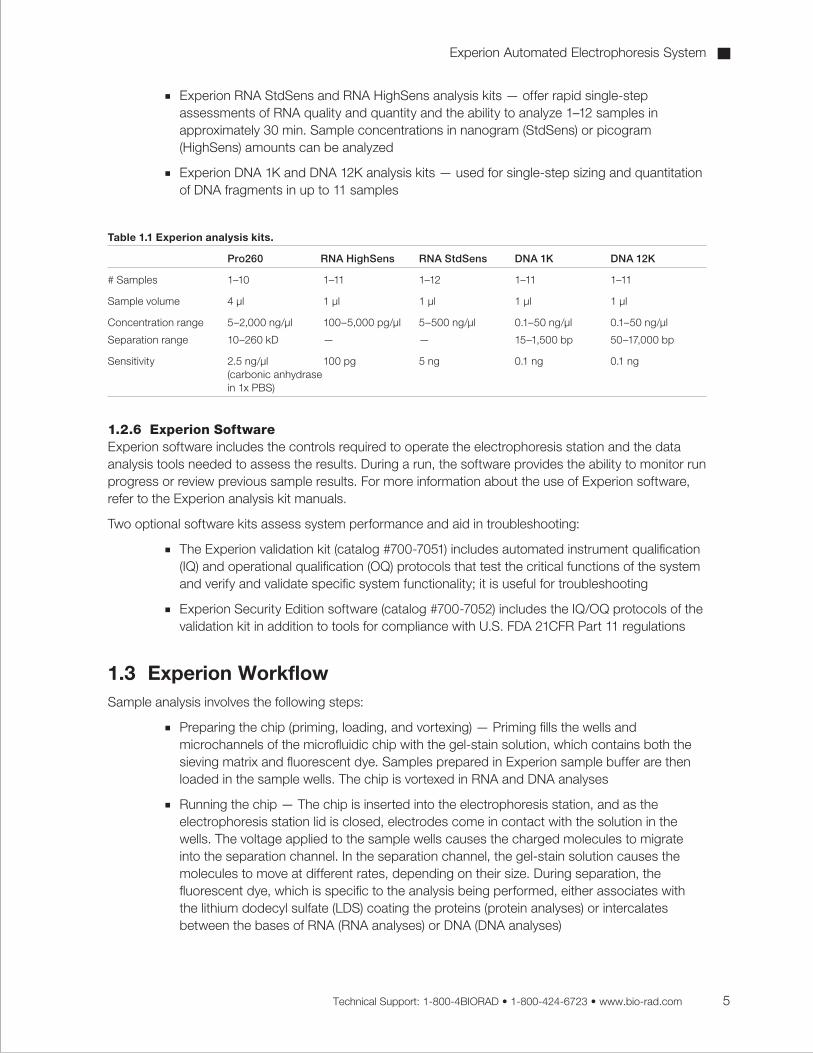
Table 1.1 Experion analysis kits.
Pro260 RNA HighSens RNA StdSens DNA 1K DNA 12K
# Samples 1–10 1–11 1–12 1–11 1–11
Sample volume 4 µl 1 µl 1 µl 1 µl 1 µl
Concentration range 5–2,000 ng/µl 100–5,000 pg/µl 5–500 ng/µl 0.1–50 ng/µl 0.1–50 ng/µl
Separation range 10–260 kD — — 15–1,500 bp 50–17,000 bp
Sensitivity 2.5 ng/µl 100 pg 5 ng 0.1 ng 0.1 ng (carbonic anhydrase in 1x PBS)
1.2.6 Experion SoftwareExperion software includes the controls required to operate the electrophoresis station and the data analysis tools needed to assess the results. During a run, the software provides the ability to monitor run progress or review previous sample results. For more information about the use of Experion software, refer to the Experion analysis kit manuals.
Two optional software kits assess system performance and aid in troubleshooting:
n The Experion validation kit (catalog #700-7051) includes automated instrument qualification (IQ) and operational qualification (OQ) protocols that test the critical functions of the system and verify and validate specific system functionality; it is useful for troubleshooting
n Experion Security Edition software (catalog #700-7052) includes the IQ/OQ protocols of the validation kit in addition to tools for compliance with U.S. FDA 21CFR Part 11 regulations
1.3 Experion WorkflowSample analysis involves the following steps:
n Preparing the chip (priming, loading, and vortexing) — Priming fills the wells and microchannels of the microfluidic chip with the gel-stain solution, which contains both the sieving matrix and fluorescent dye. Samples prepared in Experion sample buffer are then loaded in the sample wells. The chip is vortexed in RNA and DNA analyses
n Running the chip — The chip is inserted into the electrophoresis station, and as the electrophoresis station lid is closed, electrodes come in contact with the solution in the wells. The voltage applied to the sample wells causes the charged molecules to migrate into the separation channel. In the separation channel, the gel-stain solution causes the molecules to move at different rates, depending on their size. During separation, the fluorescent dye, which is specific to the analysis being performed, either associates with the lithium dodecyl sulfate (LDS) coating the proteins (protein analyses) or intercalates between the bases of RNA (RNA analyses) or DNA (DNA analyses)
Experion Automated Electrophoresis System

6 Technical Support: 1-800-4BIORAD • 1-800-424-6723 • www.bio-rad.com
n Detecting the molecules — As the molecules migrate toward the end of the separation channel, a laser excites the dye, causing it to fluoresce if it is bound to the protein-LDS micelle complexes or RNA/DNA fragments. A photodiode detects the fluorescence, and Experion software plots the fluorescence intensity as a function of time to produce an electropherogram. A virtual gel image is generated from the electropherogram data
n Data analysis — Once separation is complete, the software subtracts background noise, identifies and integrates peaks, and assigns their sizes and concentrations; the results of data analysis are automatically tabulated and presented in a table. Experion software displays all three forms of data simultaneously (Figure 1.6)
For detailed information on how the Experion automated electrophoresis system performs separation and analysis, refer to the instruction manuals for each analysis kit (available online at www.bio-rad.com, search term “Experion”).
1.4 Experion Video TutorialsFor additional information, view the video tutorials available online at www.bio-rad.com:
North America: Home > Life Science Research > Support > Tutorials > Electrophoresis and Blotting > Experion System Training
Other: Home > Life Science Research > Electrophoresis > Automated Electrophoresis > Experion Training Videos
Experion Automated Electrophoresis System
Fig . 1 .6 . Experion software display . The results of an Experion Pro260 analysis are shown.
Electropherogram
Virtual gel
Results table

Setting Up the Experion™ System2
7

2.1 Unpacking System ComponentsThe Experion system components are:
n Electrophoresis station, power cord, USB2 cable, and instruction manual
n Priming station, power adapter, power cord, and 2 extra priming seals
n Experion software CD-ROM
n Vortex station (for DNA and RNA analysis)
n Experion starter kit (either Pro260 or RNA StdSens, included with catalog #701-7000 or #701-7001)
When removing the contents from each shipping box, carefully lift the electrophoresis station by grasping the underside of the unit (between the green rubber feet) and the top of the unit. Open the lid of the electrophoresis station and remove the shipping pin (as indicated on the yellow label; save the shipping pin for use in future shipments). Remove the instruments from the protective plastic bags and inspect them for any external damage. If any part is missing or damaged, contact Bio-Rad immediately.
Store the starter kit components at the temperatures indicated in the instruction manual.
2.2 Component Setup and OperationSetup involves the following steps:
n Connect the vortex and priming stations to an electrical outlet
n Connect and configure the computer and install Experion software
n Connect the Experion electrophoresis station to a power outlet and to the computer (USB connection)
2.2.1 Priming StationThe priming station is equipped with a power supply that operates at 100–240 VAC, 50–60 Hz. Connect one end of the power adapter cable to the priming station and the other end to a grounded AC outlet rated 10 A/100–240 V (Figure 2.1).
The priming station automatically powers up when the cable connections are made. There is no power switch.
8 Technical Support: 1-800-4BIORAD • 1-800-424-6723 • www.bio-rad.com
Fig . 2 .1 . Experion priming station power connection (left) and priming station display (right) .
Experion Automated Electrophoresis System

Technical Support: 1-800-4BIORAD • 1-800-424-6723 • www.bio-rad.com 9
When placing a chip on the priming station, match the alignment arrow on the chip with the alignment arrow on the chip platform (Figure 2.2). Alignment posts on the underside of the chip (next to the glass) match holes in the chip platform to ensure correct positioning of the chips in the priming station.
The priming station uses time and pressure settings optimized for each different chip type (Figure 2.1). Use the alphanumeric priming codes on the chip (Figure 2.2).
Fig . 2 .2 . Experion priming station alignment arrows (left) and chip priming code (right) .
Alignment arrows
Alphanumeric priming code
2.2.2 Vortex StationThe vortex station is used only for RNA and DNA applications. In these applications, sample and loading buffer are loaded directly into the wells of the chips to minimize sample volume requirements. The vortex cycle mixes the samples and buffers thoroughly before the chip is placed into the electrophoresis station.
Connect one end of the power cable to the vortex station and the other end to a grounded AC outlet. Press the green Power button on the front of the vortex station to power it on.
To place a loaded chip onto the vortex station, slide the chip under the prongs of the vortex adapter, ensuring the chip is inserted all the way until it is seated inside the chip indentation (Figure 2.3). The chip fits securely in the adapter.
Fig . 2 .3 . Experion vortex station . Left, inserting the chip. Right, chip on the vortex adapter.
To start the vortex step, press the Mix button. After 1 min, the vortex station stops and three beeps indicate the end of the cycle. Remove the chip by depressing the tab on the adaptor area at the bottom of the chip and sliding the chip out (Figure 2.4).
Experion Automated Electrophoresis System

10 Technical Support: 1-800-4BIORAD • 1-800-424-6723 • www.bio-rad.com
To ensure proper communication between electrophoresis station and software, always power on the electrophoresis station before launching the software.
2.2.3 Computer (PC)Depending on the system configuration ordered, your shipment may or may not include a PC. Connect the PC directly to a power outlet and power it on.
If using your own PC, ensure it meets the following specifications:
n Operating system Windows XP (service pack 3) or Windows Vista (service pack 1)
n Processor 3 GHz or higher
n Memory 1 GB RAM or greater
n Free disk space 80 GB or greater
2.2.4 Software Insert the Experion software CD-ROM and follow the prompts to install Experion software on the PC. The installation program places an application icon on your desktop and creates a folder named Experion under Programs in the Windows Start menu.
After installation, reboot your computer and confirm that Experion software has been installed. Do not, however, launch the software.
Fig . 2 .4 . Removing the chip from the Experion vortex station .
2.2.5 Electrophoresis StationThe electrophoresis station is equipped with a universal power supply to operate at 100–240 VAC, 50–60 Hz. Connect the electrophoresis station to an outlet and to your PC:
1. Place the electrophoresis station near the PC, on a sturdy surface and away from direct light and all other potential sources of extreme heat. Place it where it will not be subjected to vibrations or other movement.
2. Connect one end of the power cable to the electrophoresis station and the other end to a grounded AC outlet rated 10 A/100–240 V (Figure 2.5).
3. Connect the electrophoresis station to the PC using the USB2 cable (Figure 2.5).
4. Power on the Experion electrophoresis station by pushing the green button on the front of the station (Figure 2.6). The green LED above the green button illuminates, indicating the unit is on. Use the Hardware Wizard to install the driver for the electrophoresis station onto the PC.
Experion Automated Electrophoresis System

Register your Experion system to ensure you receive important updates on software, tech notes, and manuals. Upon installation, a dialog provides registration instructions.
Technical Support: 1-800-4BIORAD • 1-800-424-6723 • www.bio-rad.com 11
Fig . 2 .5 . Connecting the electrophoresis station . Left, power connection. Right, USB2 connection.
Fig . 2 .6 . Powering on the electrophoresis station.
If the LED does not light, the unit is not receiving power (refer to Chapter 4, Troubleshooting). During a run, a blinking LED indicates that a chip is loaded and analysis is in progress. Do not open the lid while the LED is blinking (opening the lid aborts the run).
2.3 First-Time Use of the Experion System1. Clean the electrodes using Experion electrode cleaner and the deep cleaning procedure described in
Section 3.1.2 (also in the Help section of Experion software, search term “electrodes”).
2. Power on the computer and then power on the electrophoresis station.
3. Launch Experion software. Confirm that the electrophoresis station and computer are communicating properly. A green dot with the last four digits of the electrophoresis station serial number should appear in the lower right corner of the user interface.
4. Familiarize yourself with the assay protocol and pipetting techniques by using the Experion Pro260 or Experion RNA StdSens starter kit. For additional information, view the video tutorials (see Section 1.4, Experion Video Tutorials).
Experion Automated Electrophoresis System

12
Experion Automated Electrophoresis System

Care and Maintenance3
13
3.1 Electrophoresis Station3.1.1 Cleaning the Electrophoresis StationClean the electrode manifold after every analysis (see Section 3.1.2, Cleaning the Electrodes, Method 2: Routine Cleaning). For RNA analyses, perform the deep cleaning procedure on a regular basis (for example, monthly) and whenever contamination is suspected.
Do not leave the cleaning chip in the electrophoresis station overnight.
There is no need to manually dry the electrodes after cleaning.
Never place objects other than chips on the chip platform beneath the electrode manifold.
Never place equipment in water or other liquids; ensure that no liquid is spilled onto or into the electrophoresis station.
Keep the lid closed when the electrophoresis station is not in use.
Clean the outside of the electrophoresis station using a soft, lint-free cloth and deionized water.
To avoid electrical shock, never open the housing.
Refer servicing to qualified personnel only.
3.1.2 Cleaning the ElectrodesTwo cleaning methods ensure the best results from the Experion electrophoresis station:
n Method 1 — deep-cleaning procedure; applies electrode cleaner directly to electrode pins using lint-free foam swabs
n Method 2 — routine procedure; uses cleaning chips and is performed before or after every run
Method 1: Deep Cleaning
This manual procedure applies Experion electrode cleaner directly to the 16 platinum pins in the electrode manifold (Figure 3.1). Perform this procedure:
n Prior to first use of the Experion electrophoresis station
n Between a protein and RNA or DNA analysis, and between a DNA and RNA analysis
n Any other time RNase contamination is suspected or any contamination (for example, salt deposits or other precipitates) is visible on the electrodes
n If a chip has been left in the electrophoresis station for an extended period of time (for example, overnight)
Perform this procedure with the electrode manifold in place (installed in the electrophoresis station). Depp cleaning requires the following supplies:
n Experion electrode cleaner (catalog #700-7252)
n Experion DEPC-treated water (catalog #700-7253)
n Lint-free cleaning swabs (catalog #700-7264)
14 Technical Support: 1-800-4BIORAD • 1-800-424-6723 • www.bio-rad.com
Keep the chip platform completely dry during this procedure. Cover the chip platform with plastic wrap and a paper towel or foil to protect it from liquid (Figure 3.2).
Experion Automated Electrophoresis System
Technical Support: 1-800-4BIORAD • 1-800-424-6723 • www.bio-rad.com 15
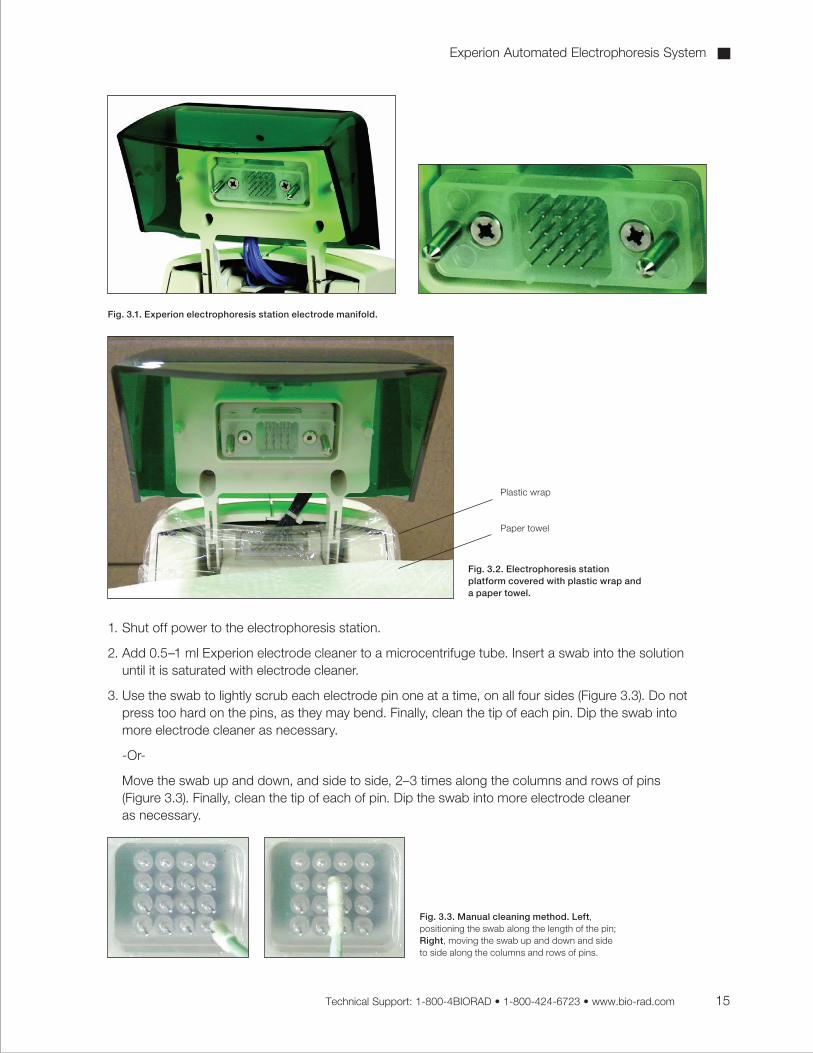
Fig . 3 .1 . Experion electrophoresis station electrode manifold .
Fig . 3 .2 . Electrophoresis station platform covered with plastic wrap and a paper towel .
1. Shut off power to the electrophoresis station.
2. Add 0.5–1 ml Experion electrode cleaner to a microcentrifuge tube. Insert a swab into the solution until it is saturated with electrode cleaner.
3. Use the swab to lightly scrub each electrode pin one at a time, on all four sides (Figure 3.3). Do not press too hard on the pins, as they may bend. Finally, clean the tip of each pin. Dip the swab into more electrode cleaner as necessary.
-Or-
Move the swab up and down, and side to side, 2–3 times along the columns and rows of pins (Figure 3.3). Finally, clean the tip of each of pin. Dip the swab into more electrode cleaner as necessary.
Fig . 3 .3 . Manual cleaning method . Left, positioning the swab along the length of the pin; Right, moving the swab up and down and side to side along the columns and rows of pins.
Experion Automated Electrophoresis System
Plastic wrap
Paper towel

16 Technical Support: 1-800-4BIORAD • 1-800-424-6723 • www.bio-rad.com
4. Repeat steps 2 and 3 twice, each time with a fresh swab soaked in DEPC-treated water.
5. Fill a cleaning chip with 800 μl DEPC-treated water, and place the chip in the electrophoresis station for 5 min.
6. Remove the chip and allow the pins to dry by leaving the lid open for 5–10 min.
Method 2: Routine Cleaning (After Each Run)
Clean the electrode manifold in the Experion electrophoresis station after each run using the following procedures. Such routine cleaning is essential for maintaining the electrophoresis station and preventing buildup and cross-contamination.
The type of cleaning procedure you will need to use depends on the types of samples being analyzed:
n Routine cleaning for protein and DNA analysis involves a single rinse step with water after each run
n Routine cleaning for RNA analysis involves 2 types of cleaning: 1) a two-step process performed daily before running chips and 2) rinsing the electrodes with DEPC-treated water after each run
Each box of chips contains 1 (protein, DNA) or 2 (RNA) reusable cleaning chips to be used for routine cleaning. Never store the cleaning chip inside the electrophoresis station. Store the empty cleaning chip covered to keep the wells clean.
Routine Cleaning — Protein and DNA Analysis
Use this procedure to clean the electrode manifold in the Experion electrophoresis station immediately after each run.
1. Fill a cleaning chip with 800 µl deionized water (0.2 µm filtered; use DNase-free water for DNA analysis). Gently tap the side of the cleaning chip to remove any trapped bubbles from the wells.
2. Place the cleaning chip on the chip platform of the electrophoresis station. Then close the lid and leave it closed for 1 min.
3. Open the lid, remove the cleaning chip, and allow the electrodes to dry for 1 min. Close the lid.
4. Replace the water in the cleaning chip after each use to avoid contamination. For storage, remove the water from the cleaning chip and store the chip in a clean location.
Routine Cleaning — RNA Analysis
This procedure involves two protocols: a two-step process that is performed before RNA analysis (for example, at the beginning of a work day) and a rinse step performed following each RNA analysis. It uses two cleaning chips: one with DEPC-treated water, and the other with Experion electrode cleaner. Experion electrode cleaner removes RNases from the electrode, and the water rinse removes traces of the cleaner from the electrodes to prevent it from affecting the analysis.
If the cleaning chips are being used for the first time, wash them with electrode cleaner to remove any RNase contamination:
1. Fill the two cleaning chips with 800 μl Experion electrode cleaner. Let sit for 5 min and then remove the electrode cleaner.
2. Rinse the chips by adding 800 μl DEPC-treated water and letting it sit for 1 min. Repeat this step four more times.
3. Label the cleaning chips: dedicate one for DEPC-treated water and the other for electrode cleaner.
Experion Automated Electrophoresis System

Technical Support: 1-800-4BIORAD • 1-800-424-6723 • www.bio-rad.com 17
Routine Cleaning Before RNA Analysis
Use this protocol, for example, at the start of a workday.
1. Fill one cleaning chip with 800 µl Experion electrode cleaner and another with 800 μl DEPC-treated water. Gently tap the side of the chips to remove any trapped bubbles from the wells.
2. Place the cleaning chip with electrode cleaner on the chip platform, close the lid of the electrophoresis station, and leave it closed for 2 min.
3. Replace the electrode cleaner chip with the chip containing the DEPC-treated water, close the lid, and leave the chip in the electrophoresis station for 5 min to rinse the electrodes.
4. Replace the DEPC-treated water in the DEPC-treated water chip, and repeat the rinse step for 1 min.
5. Open the lid, remove the DEPC-treated water chip, allow the electrodes to dry for 1 min, and then close the lid again.
6. Replace the water and electrode cleaner in the cleaning chips after each use to avoid contamination. For storage, remove the water or electrode cleaner from each cleaning chip and store the chips in a clean location.
Routine Cleaning After Each RNA Analysis
1. Fill the cleaning chip labeled DEPC with 800 µl DEPC-treated water. Gently tap the side of the cleaning chip to remove any trapped bubbles from the wells.
2. Place the cleaning chip on the chip platform, close the lid of the electrophoresis station, and leave it closed for 1 min.
3. Open the lid, remove the cleaning chip, allow the electrodes to dry for 1 min, and then close the lid.
4. Replace the water in the cleaning chip after use to avoid contamination. For storage, remove the water from the cleaning chip and store the chip in a clean location.
3.1.3 Replacing the Electrode ManifoldIf the electrode pins become damaged, contact Bio-Rad Technical Support to replace the entire electrode manifold.
3.2 Priming StationPeriodically wipe the priming station clean using a soft, lint-free cloth and deionized water. Replace the priming seal (catalog #700-7031) once a year or as needed (for example, if the seal becomes clogged with gel, which may occur if the priming station is opened before priming is complete) to maintain optimal performance. Display of the Check Seal message on the LCD indicates the priming seal may need to be replaced.
To replace the priming seal (catalog #700-7031):
1. Wearing gloves to keep the seal clean, open the priming station, pull the priming seal tab forward to remove it (Figure 3.4). Hold the tab as close as possible to the seal.
2. Position the new priming seal so the tab is located to the right, and insert the seal into the hole. Use your thumb to push the seal back into position.
3. Reset the priming station by unplugging it for a few sec and then reconnecting the power cord.
The cylindrical portion of the seal has a ridge on one side that fits into a cutout in the opening of the priming station. If the ridge and cutout are not lined up properly, the seal may be difficult to insert.
Experion Automated Electrophoresis System

18 Technical Support: 1-800-4BIORAD • 1-800-424-6723 • www.bio-rad.com
Fig . 3 .4 . Pulling the priming seal tab.
3.3 Vortex StationTo clean the vortex station, unplug it from its power source and clean carefully with a damp cloth and water. Do not clean with acetone or other organic liquids, except alcohol. In extreme cases, mild alcohols (10% ethanol, for example) may be used. Dry thoroughly.
Experion Automated Electrophoresis System
Troubleshooting4This chapter contains troubleshooting information for the Experion™ system hardware components and general software error codes. For detailed troubleshooting advice specific to an Experion analysis kit, refer to the analysis kit instruction manual.
19

4.1 Electrophoresis StationError Probable Cause Recommended Action
Green LED on the front panel is not illuminated
There is no power to the electrophoresis station
Check the connections to the PC and to the power outlet
Confirm that the power button is depressed, or in the “on” position
Experion icon on the software screen is grayed-out
There is no communication between the computer and the electrophoresis station
Check the connections to the PC, then reboot the PC. Power on the electrophoresis station before launching Experion software
IV check failure(Experion software)
One or more wells are not filled correctly, and the electrodes are not immersed
Fill all sample wells of the chip with blank or replicate samples
Ensure pipets are properly calibrated
Air bubbles are interfering with the electrical contact in one or more of the wells
Stop the run, remove the chip, and use a clean pipet tip to remove the sample and apply a new aliquot
When pipetting, insert the tip vertically and to the bottom of the well. Dispense the liquid slowly. Do not expel air at the end of the pipetting step. Dispense only to the first stop on the pipet. Positive (reverse) pipetting may also be used
An electrode is loose or disconnected Perform a conductivity test with the cleaning chip or conductivity chip from the Experion validation kit (catalog #700-7051). Add 850 µl water to the chip, place the chip in the electrophoresis station, and close the lid. In Experion software, select Tools > Diagnose Instrument and in the Instrument Diagnostics dialog, select Conductivity
If the station passes the test, focus on the sources of error above. If it fails, contact Technical Support with the results
The chip is not primed properly Repeat the analysis using a new chip
Unreliable runs: the electrophoresis station aborts a run or generates variable data
The computer power saver options are causing the runs to abort (this is a problem only with Experion software prior to version 3.0)
Upgrade to the newest version of Experion software
Confirm that all power saver and/or power options are turned off before starting the assay. Do not let the computer “sleep” during a run. If the computer goes to sleep, the run will abort
Sample preparation procedures are inconsistent
Use the same reagents and follow the same procedures for each sample and each run. Do not modify the protocol to compensate for sample concentration or variability
Use calibrated pipets
Check that reagents and chips have not expired
The chip is not primed properly Repeat the analysis using a new chip
An incompatible sample buffer was used Ensure that the buffer used to solubilize samples falls within the buffer compatibility guidelines for the assay (see the assay instruction manual for details)
20 Technical Support: 1-800-4BIORAD • 1-800-424-6723 • www.bio-rad.com
Experion Automated Electrophoresis System
Technical Support: 1-800-4BIORAD • 1-800-424-6723 • www.bio-rad.com 21
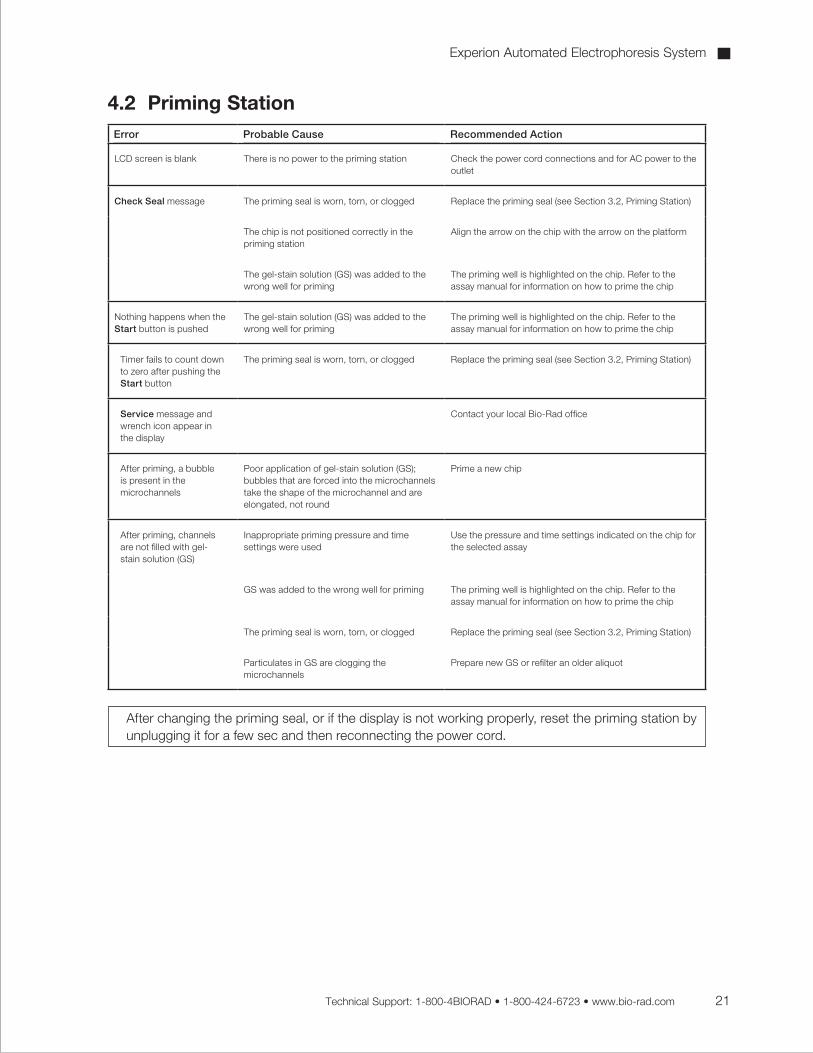
4.2 Priming StationError Probable Cause Recommended Action
LCD screen is blank There is no power to the priming station Check the power cord connections and for AC power to the outlet
Check Seal message The priming seal is worn, torn, or clogged Replace the priming seal (see Section 3.2, Priming Station)
The chip is not positioned correctly in the priming station
Align the arrow on the chip with the arrow on the platform
The gel-stain solution (GS) was added to the wrong well for priming
The priming well is highlighted on the chip. Refer to the assay manual for information on how to prime the chip
Nothing happens when the Start button is pushed
The gel-stain solution (GS) was added to the wrong well for priming
The priming well is highlighted on the chip. Refer to the assay manual for information on how to prime the chip
Timer fails to count down to zero after pushing the Start button
The priming seal is worn, torn, or clogged Replace the priming seal (see Section 3.2, Priming Station)
Service message and wrench icon appear in the display
Contact your local Bio-Rad office
After priming, a bubble is present in the microchannels
Poor application of gel-stain solution (GS); bubbles that are forced into the microchannels take the shape of the microchannel and are elongated, not round
Prime a new chip
After priming, channels are not filled with gel-stain solution (GS)
Inappropriate priming pressure and time settings were used
Use the pressure and time settings indicated on the chip for the selected assay
GS was added to the wrong well for priming The priming well is highlighted on the chip. Refer to the assay manual for information on how to prime the chip
The priming seal is worn, torn, or clogged Replace the priming seal (see Section 3.2, Priming Station)
Particulates in GS are clogging the microchannels
Prepare new GS or refilter an older aliquot
After changing the priming seal, or if the display is not working properly, reset the priming station by unplugging it for a few sec and then reconnecting the power cord.
Experion Automated Electrophoresis System

4.3 Vortex StationError Probable Cause Recommended Action
No movement or sound There is no power to the vortex station Check the power cord connections and for AC power to the outlet
Unplug the power cord and check both fuses
If all of the above are fine, contact Bio-Rad Technical Support
Vortex adapter is damaged or does not move but motor makes some noise, or if solution splashes out of chip wells after vortexing
Contact Bio-Rad Technical Support
4.4 Software ErrorsError Code Message Probable Cause Recommended Action
50001 Login failed The username and/or password is invalid
Log in again using a valid username and password
50004 Failed to create the data file folder
Log in as a Windows Administrator and reinstall Experion software
50005 Failed to create the packet file folder
Log in as a Windows Administrator and reinstall Experion software
50006 Cannot start a run because the electrophoresis station is in use
Wait for a run to complete before starting a new run
50007 Failed to locate the electrophoresis station selected
Confirm the electrophoresis station and PC are connected and try again
50008 Failed to open the assay selected Restart the computer and try again
Reinstall Experion software
50009 Cannot find the script for the assay selected
Reboot the computer and run the assay again; if the problem persists, reinstall Experion software
50011 The selected assay cannot be run on this electrophoresis station
The software is in simulation mode; an assay cannot be run on a simulation electrophoresis station
Deselect simulation mode to run the assay. Select Tools > Options > Advanced and then deselect Instrument Simulation Mode
50013 Failed to create the data file Check permissions to write to the data folder
50015 Failed to locate the run selected The run information appears in the tree view, but the data file is missing
Import the data file again by browsing to the data file location
50016 No assay selected Select an assay, then start the run
50017 Unexpected error occurred in the application. Please check the log file for details
Take the action indicated in the system log file
22 Technical Support: 1-800-4BIORAD • 1-800-424-6723 • www.bio-rad.com
Experion Automated Electrophoresis System
Technical Support: 1-800-4BIORAD • 1-800-424-6723 • www.bio-rad.com 23
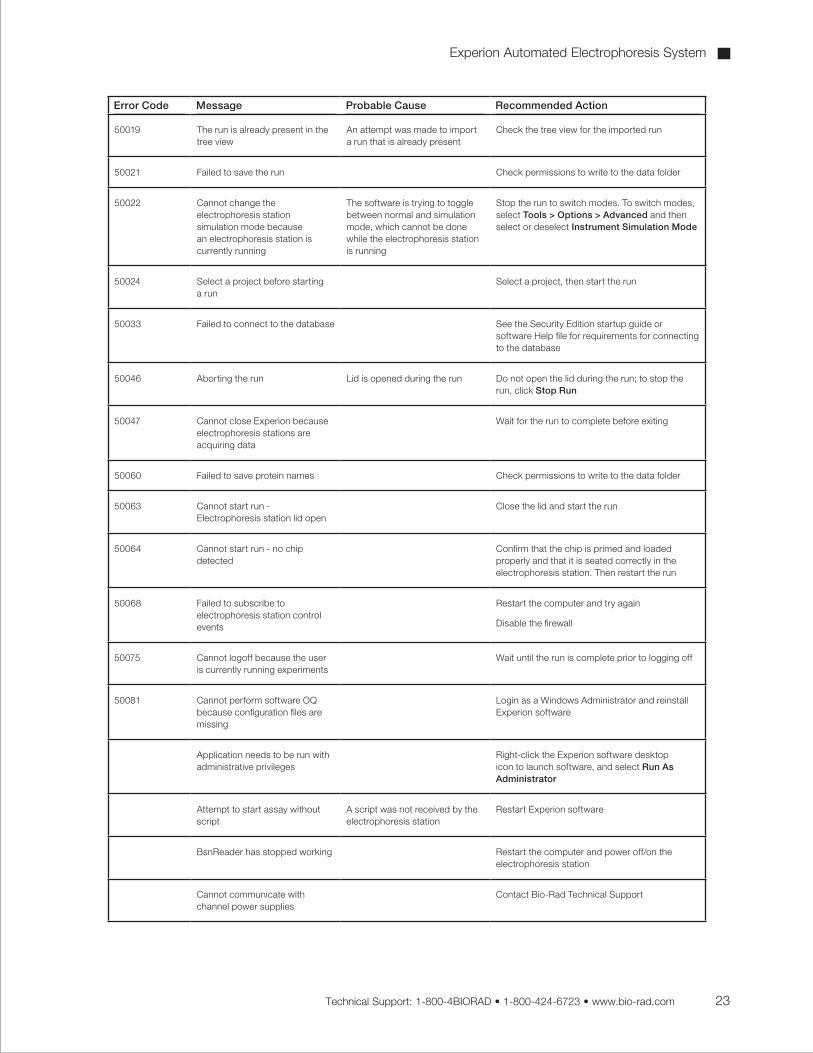
Error Code Message Probable Cause Recommended Action
50019 The run is already present in the tree view
An attempt was made to import a run that is already present
Check the tree view for the imported run
50021 Failed to save the run Check permissions to write to the data folder
50022 Cannot change the electrophoresis station simulation mode because an electrophoresis station is currently running
The software is trying to toggle between normal and simulation mode, which cannot be done while the electrophoresis station is running
Stop the run to switch modes. To switch modes, select Tools > Options > Advanced and then select or deselect Instrument Simulation Mode
50024 Select a project before starting a run
Select a project, then start the run
50033 Failed to connect to the database See the Security Edition startup guide or software Help file for requirements for connecting to the database
50046 Aborting the run Lid is opened during the run Do not open the lid during the run; to stop the run, click Stop Run
50047 Cannot close Experion because electrophoresis stations are acquiring data
Wait for the run to complete before exiting
50060 Failed to save protein names Check permissions to write to the data folder
50063 Cannot start run - Electrophoresis station lid open
Close the lid and start the run
50064 Cannot start run - no chip detected
Confirm that the chip is primed and loaded properly and that it is seated correctly in the electrophoresis station. Then restart the run
50068 Failed to subscribe to electrophoresis station control events
Restart the computer and try again
Disable the firewall
50075 Cannot logoff because the user is currently running experiments
Wait until the run is complete prior to logging off
50081 Cannot perform software OQ because configuration files are missing
Login as a Windows Administrator and reinstall Experion software
Application needs to be run with administrative privileges
Right-click the Experion software desktop icon to launch software, and select Run As Administrator
Attempt to start assay without script
A script was not received by the electrophoresis station
Restart Experion software
BsnReader has stopped working Restart the computer and power off/on the electrophoresis station
Cannot communicate with channel power supplies
Contact Bio-Rad Technical Support
Experion Automated Electrophoresis System

Error Code Message Probable Cause Recommended Action
Database at <path> could not be attached
The database file is missing or corrupted
Restore from backup or recreate by reinstalling software
Database server is not available or not found
Restart the computer and try again. If the problem persists, update Windows via Windows update and then uninstall Experion software (see Uninstalling Experion 3.0 XP in the software Help file). Reinstall Experion software
Did not receive a proper response to a command
The PC and electrophoresis station are not synchronized
Exit the application and reboot the PC
Power off/on the electrophoresis station and restart the software. Power on the electrophoresis station before launching Experion software
If the problem persists and data are affected, contact Bio-Rad Technical Support
Failed to add user < LoginName> to Windows ‘Experion’ Group
Insufficient permissions See the Security Mode section of the software Help file
Failed to add Windows ‘Experion’ Group
Insufficient permissions See Launching the application for the first time for Vista or XP in the software Help file
Failed to add Windows ‘Experion’ group access to Experion Database
Insufficient permissions See the Security Mode section in the software Help file
Restart the computer and try again. If the problem persists, update Windows via Windows update and then uninstall Experion software (see Uninstalling Experion 3.0 XP in the software Help file). Reinstall Experion software
Failed to add Windows ‘Experion’ Group - Windows Logon User must be a Windows Administrator
Insufficient permissions See Launching the application for the first time for VISTA or XP in the software Help file
Failed when checking if Experion Database is attached.
Insufficient permissions See the Security Mode section of the software Help file
Restart the computer and try again
Update Windows via Windows update and then uninstall and reinstall Experion software (see Uninstalling Experion 3.0 XP in the software Help file)
Focus Motors and Limit Switches failed
Contact Bio-Rad Technical Support
Installation rolls back Corrupt Setup.exe file Install the software using a different Setup.exe file (contact Technical Support for help)
Antivirus software blocking installation
Disconnect the computer from the Internet to minimize the chance for virus attack, stop antivirus software, and try again
Bad conditions (for example, corrupted registry, malfunctioning components, etc.) in the operating system
Ask your IT department to check the integrity of the operating system
24 Technical Support: 1-800-4BIORAD • 1-800-424-6723 • www.bio-rad.com
Experion Automated Electrophoresis System

Technical Support: 1-800-4BIORAD • 1-800-424-6723 • www.bio-rad.com 25
Error Code Message Probable Cause Recommended Action
Installation rolls back (continued) Conflict with installed software or between installation demands and current system configuration
Ask your IT department for assistance
Install Experion software on a computer that has only basic software installed
Invalid characters in name: <Name> were found and removed. Valid characters are: alphanumeric, <, >, [, ] and spaces
The DNA name contains invalid characters
Enter a valid name
Power-on Self Test Error: Current Read Error found on Supply
Contact Bio-Rad Technical Support
Power-on Self Test Error: Voltage Read Error found on Supply
Contact Bio-Rad Technical Support
Script Calibration error in Channel
Contact Bio-Rad Technical Support
Select an electrophoresis station before starting a run
Select an electrophoresis station, then start the run
Self Calibration error in Channel Contact Bio-Rad Technical Support
There is an instance of Experion application running on this machine. Please close it to continue the installation
An attempt was made to install/upgrade Experion software while the software was running
Close the running application and click OK to proceed with installation
The molecular weight m.nn ± d.dd overlaps with Protein: ID = <id> <Name> m.nn ± d.dd
Search criteria overlap, resulting in a single peak being identified with two names, which is not permitted
Redefine the molecular weight so there is no overlap; <ID> and <Name> are populated with the entry with which the size overlaps
This run file is either being used by another user or has a read-only access. Continue opening in read-only mode?
User does not have write permission for the file
Deselect the read-only flag in the run file properties
Log in as an Administrator to access the file
Add Experion group access to the data folder. Deselect Use simple file sharing under Control Panel > Folder options > View to enable the Security tab
UAC is ON which requires application to be run with administrative privileges
(This error is specific to the Vista operating system)
Right-click the Experion software desktop icon and select Run As Administrator
Unexpected error in establishing database connection
Restart the computer and try again
If the problem persists, update Windows via Windows update and then uninstall Experion software (see Uninstalling Experion 3.0 XP in the software Help file). Reinstall Experion software
USB Buffer Overflow Communication error between the PC and the electrophoresis station
Exit Experion software and power off the electrophoresis station. Power the electrophoresis station back on and then launch Experion software
Always power on the electrophoresis station before launching Experion software
Experion Automated Electrophoresis System

26 Technical Support: 1-800-4BIORAD • 1-800-424-6723 • www.bio-rad.com
4.5 Diagnostic Tests of the Electrophoresis StationExperion software features a set of programmed diagnostic tests used to check various aspects of electrophoresis station performance. The Experion validation kit (catalog #700-7051) or Security Edition software (catalog #700-7052) are required to execute some of these tests. If the electrophoresis station fails, repeat it for confirmation. If it fails twice, contact Bio-Rad Technical Support for assistance.
These tests are also executed by the IQ/OQ protocols as part of the Validation menu, which allows you to print a hard copy of the pass/fail report.
4.5.1 System Diagnostic TestsPerform these tests to perform functional analyses of various aspects of the system.
1. Under Tools > Diagnose Instrument, click Systems and select all of the following the diagnostic tests:
n Communications — reports the rate of data transfer (bytes/sec) between the electrophoresis station and the application
n Electronics — performs all startup electronic board tests for the electrophoresis station
n Fan — verifies the fan is running
n Heater Plate — verifies that the heater achieves a set temperature within an acceptable time window (not before 30 sec and not after 5 min of the start of the command)
n Lid Sensor — verifies the operation of the lid sensor
2. Click Start. Results appear in the Test Results field as pass or fail. If a test fails, record the explanation and contact Technical Support.
4.5.2 Current TestPerform this test to determine whether current is leaking between the electrode pins. This test requires use of the leakage current chip included in the Experion validation kit.
1. Under Tools > Diagnose Instrument, click Current. The Instrument Diagnostics window appears.
2. Follow the instructions in the Instructions field. Check the instruction after you complete the command. When all instructions are checked, the Start button is enabled.
3. Click Start. A 10 min countdown timer appears. Results appear in the Results field.
Experion Automated Electrophoresis System
Technical Support: 1-800-4BIORAD • 1-800-424-6723 • www.bio-rad.com 27
4.5.3 Conductivity TestPerform this test, which uses the conductivity chip from the validation kit filled with water, to verify the regulation of the current by the power supplies. Two different measurements are made (current and voltage) for each electrode pin.
1. Under Tools > Diagnose Instrument, click Conductivity. The Instrument Diagnostics window appears.
2. Follow the instructions in the Instructions field. Check the instruction after you complete the command. When all instructions are checked, the Start button is enabled.
3. Click Start. A progress bar indicates the time remaining. Results appear in the Results field.
4.5.4 Focus TestPerform this test, which requires the Experion validation kit, to verify the performance of the optics and related electronics. It checks for correct operation of the limit switches, the existence of a good fluorescence signal peak, laser %CV, background signal, and background noise.
1. Under Tools > Diagnose Instrument, click Focus. The Instrument Diagnostics window appears.
2. In the Step tab, follow the instructions in the Instructions field, checking them off as you proceed:
a. Record the horizontal offset (O/S) and signal level factor (INT, located on the back of the focusing chip).
b. Enter those values under the Focus Chip Values tab.
3. When all instructions are checked, the Start button is enabled in the Step tab. Click Start. A progress bar indicates the time remaining. Results appear in the Results field.
Experion Automated Electrophoresis System

28
Experion Automated Electrophoresis System

AppendicesA
29
30 Technical Support: 1-800-4BIORAD • 1-800-424-6723 • www.bio-rad.com
Appendix A: Safety NoticesGeneral Use InformationAlways connect the Experion™ automated electrophoresis station, priming station, and vortex station to a grounded AC outlet rated 10 A/100–240 V using the AC power cord provided.
Never remove the outer casing of the electrophoresis station or other system components. Doing so voids the manufacturer warranty. The only user-serviceable part of the Experion system is the priming seal gasket of the priming station. If you suspect other parts need service, call your local Bio-Rad office.
The electrophoresis station is intended for laboratory use only . Do not use the equipment except as intended.
Do not operate the Experion system in extreme humidity (>90%) or where condensation can short the internal electrical circuitry.
Periodically inspect Experion electrophoresis stations for obvious damage that might affect normal operation.
Do not operate after the equipment malfunctions or if it has been damaged in any manner.
Return the electrophoresis station to Bio-Rad for service or examination, repair, or electrical or mechanical adjustment.
When using electrical equipment, basic safety precautions should always be followed to reduce the risk of fire, electric shock, and personal injury. To reduce the risk of electric shock, do not immerse the electrophoresis, priming, or vortex station in water or other liquid.
Electrophoresis Station Safety NoticeThe Bio-Rad Experion electrophoresis station is designed and certified to meet EN 61010-1 and IEC 61010-1 safety standards. EN 61010-1- and IEC 61010-1-certified products are safe to use when operated in accordance with the instruction manual. This equipment should not be modified in any way. Alteration of these electrophoresis stations will:
n Void the manufacturer’s warranty
n Void the EN 61010-1 and IEC 61010-1 safety certification
n Create a potential safety hazard
Bio-Rad Laboratories is not responsible for any injury or damage caused by the use of this system for purposes other than those for which it is intended, or by modifications of the components not performed by Bio-Rad Laboratories or an authorized agent.
These products conform to the “Class A” standards for electromagnetic emissions intended for laboratory equipment applications. It is possible that emissions from these products may interfere with some sensitive appliances when placed nearby or in the same circuit as those appliances. The user should be aware of this potential and take appropriate measures to avoid interference.
The vortex station is built in accordance with electrical requirements for measurement, control, and laboratory by IEC 61010-1; UL 61010-1 (U.S.), CAN/CSA C22.2 No. 61010-1 (Canada), Régles de sécurité pour appareils électriques de mesurage, de régulation, et de laboratoire; Partie 1: Prescriptions générales (CEI 1010-1, France), DIN EN 61010-1 class VDE 0411 (Germany).
Experion Automated Electrophoresis System

Technical Support: 1-800-4BIORAD • 1-800-424-6723 • www.bio-rad.com 31
Laser Safety NoticeUse of controls, adjustments or performance of procedures other than those specified in this instruction manual may result in access to hazardous laser light. Do not attempt to remove any parts of the housing. The electrophoresis station is to be serviced only by the factory. Opening the housing of the electrophoresis station voids the warranty.
The electrophoresis station is a laser product that is classified as Class 1 under 21CFR chapter 11, subchapter J, and under EN 60825-1. It presents no laser hazard to the user.
Experion Automated Electrophoresis System

32 Technical Support: 1-800-4BIORAD • 1-800-424-6723 • www.bio-rad.com
Appendix B: System SpecificationsElectrophoresis StationMaterial
Casing ABS, polycarbonate (gray)
Lid Polycarbonate (translucent green)
Open latch Polycarbonate (khaki)
Rubber feet Thermoplastic rubber
Power button ABS, polycarbonate (green)
Technical
Power supply 100–240 VAC, 50/60 Hz, 31 VA
Power indicator LED
Electrode wires 90% Platinum, 10% iridium alloy, 0.5 mm diameter
Laser Photo diode, 635 nm excitation
Laser Safety Class 1 product (nonhazardous)
Detector Photoemission, 685 nm emission
Voltage limit 2,200 V (when multiple channels are driven)
Operating conditions 15–40°C, 0–90% humidity
Safety conformances
U.S. IEC 61010-1, EN 61010-1:2001, and UL 61010-1
Canada CAN/CSA C22.2 No. 61010-1
EMC compliance EN 61326: Class A
Computer connection USB2 cable
Weight 4.58 kg (10 lb 1 oz)
Dimensions 15 x 31 x 29 cm
Priming StationMaterial
Base casing Glass-filled polycarbonate (gray)
Lid Polycarbonate (translucent green)
Open latch Polycarbonate (khaki)
Rubber feet Thermoplastic rubber
Priming seal Silicone rubber
Experion Automated Electrophoresis System
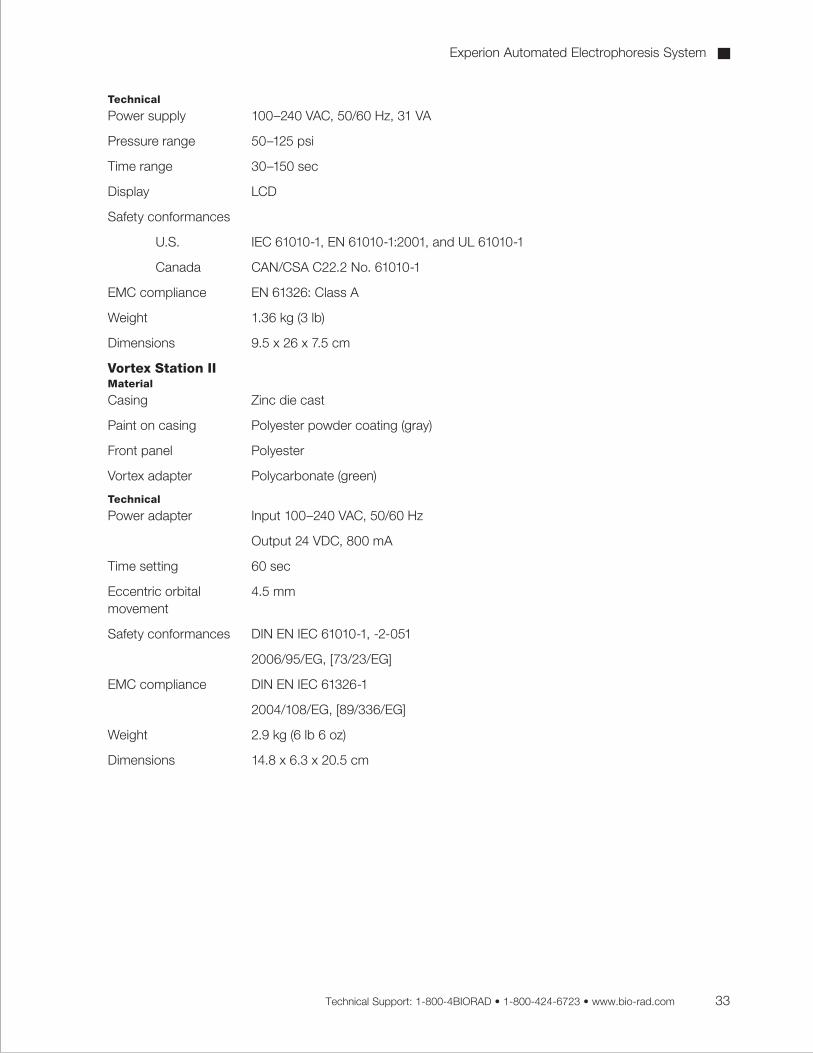
Technical Support: 1-800-4BIORAD • 1-800-424-6723 • www.bio-rad.com 33
Technical
Power supply 100–240 VAC, 50/60 Hz, 31 VA
Pressure range 50–125 psi
Time range 30–150 sec
Display LCD
Safety conformances
U.S. IEC 61010-1, EN 61010-1:2001, and UL 61010-1
Canada CAN/CSA C22.2 No. 61010-1
EMC compliance EN 61326: Class A
Weight 1.36 kg (3 lb)
Dimensions 9.5 x 26 x 7.5 cm
Vortex Station IIMaterial
Casing Zinc die cast
Paint on casing Polyester powder coating (gray)
Front panel Polyester
Vortex adapter Polycarbonate (green)
Technical
Power adapter Input 100–240 VAC, 50/60 Hz
Output 24 VDC, 800 mA
Time setting 60 sec
Eccentric orbital 4.5 mm movement
Safety conformances DIN EN IEC 61010-1, -2-051
2006/95/EG, [73/23/EG]
EMC compliance DIN EN IEC 61326-1
2004/108/EG, [89/336/EG]
Weight 2.9 kg (6 lb 6 oz)
Dimensions 14.8 x 6.3 x 20.5 cm
Experion Automated Electrophoresis System

34 Technical Support: 1-800-4BIORAD • 1-800-424-6723 • www.bio-rad.com
Appendix C: BibliographyVisit us on the Web at www.bio-rad.com (search term “Experion”) for a list of technical literature and to download copies of all current documents.
Bulletin TitleGeneral5285 Bio-Rad Applies Microfluidics to Automate Gel Electrophoresis
Protein Applications5299 Performance Comparison of the Experion™ Automated Electrophoresis System and
SDS-PAGE for Protein Analysis
5302 Performance Comparison of the Experion Automated Electrophoresis System and a Competing Automated System for Protein Analysis
5328 Experion Automated Electrophoresis System and the Experion Pro260 Analysis Kit: Accurate and Reproducible Protein Sizing and Quantitation in the Presence of High Salt Concentrations
5423 Protein Quantitation: A Comparative Analysis Using the Experion Automated Electrophoresis System, Bradford and Modified Lowry Assays, and SDS-PAGE
5784 Comparison of Protein Quantitation Methods Using the Experion Automated Electrophoresis System
5355 Rapid Screening of Mini Rotofor® Fractions Using the Experion Automated Electrophoresis System
5506 Monitoring Development of Chromatographic Methods with the Experion Automated Electrophoresis System
5453 Application of the Experion Automated Electrophoresis System to Glycoprotein Visualization and Analysis
5501 Rapid, Efficient Purification and Evaluation of His-Tagged Proteins
5514 Automated Purification of a His-Tagged Protein with the Profinia™ Protein Purification System: Comparison with Another Low-Pressure Chromatography System
3176 Monitoring the Expression, Purification, and Processing of GST-Tagged Proteins Using the Experion Automated Electrophoresis System
RNA/DNA Applications5286 Performance Comparison of the Experion Automated Electrophoresis System and a
Competing Automated System for RNA Analysis
5859 A Practical Approach to RT-qPCR — Publishing Data That Conform to the MIQE Guidelines
5315 Using the Experion Automated Electrophoresis System to Assess RNA Quality and Quantity in siRNA-Induced Gene Silencing Experiments
5420 Experion RNA Quantitation Methods: A Comparative Analysis Using the Experion Automated Electrophoresis System, RiboGreen Reagent, and Ultraviolet Spectroscopy
5452 Effect of RNA Degradation on Data Quality in Quantitative PCR and Microarray Experiments
5761 Development and Validation of RQI: An RNA Quality Indicator for the Experion Automated Electrophoresis System
Experion Automated Electrophoresis System
Technical Support: 1-800-4BIORAD • 1-800-424-6723 • www.bio-rad.com 35
Appendix D: Ordering Information Catalog # DescriptionExperion Automated Electrophoresis Systems
700-7000 Experion System, 100–240 V, for protein analysis, includes electrophoresis station, priming station, software, USB2 cable
701-7000 Experion System, 100–240 V, for protein analysis, includes electrophoresis station, priming station, software, USB2 cable, Experion Pro260 starter kit
700-7001 Experion System, 100–240 V, for RNA and DNA analysis, includes electrophoresis station, priming station, vortex station, software, USB2 cable
701-7001 Experion System, 100–240 V, for RNA and DNA analyses, includes electrophoresis station, priming station, vortex station, software, USB2 cable, Experion RNA StdSens starter kit
Experion Automated Electrophoresis Systems With Computers
700-7060 Experion System with Dell Computer and Monitor, 100–240 V, for protein analysis, includes electrophoresis station, priming station, Dell Optiplex computer, monitor, software, USB2 cable
700-7061 Experion System with Dell Computer, 100–240 V, for protein analysis (without monitor)
700-7062 Experion System with Dell Computer and Monitor, 100–240 V, for RNA and DNA analysis, includes electrophoresis station, priming station, vortex station, Dell Optiplex computer, monitor, software, USB2 cable
700-7063 Experion System with Dell Computer, 100–240 V, for RNA and DNA analysis (without monitor)
Experion Automated Electrophoresis Station
700-7010 Experion Electrophoresis Station, 100–240 V, includes USB2 cable
700-7022 Experion USB2 Cable with Ferrite, replacement
Experion Priming Station
700-7030 Experion Priming Station, 100–240 V, includes 2 priming seals
700-7031 Experion Priming Seals, replacement, provide air seal on top of priming well, 2
Experion Vortex Station
700-7043 Experion Vortex Station II, 100–240 V, for preparing Experion RNA/DNA chips
Experion Software
700-7050 Experion Software, system operation and standard data analysis tools, includes software CD-ROM
700-7051 Experion Validation Kit, includes 3 test chips, qualification procedures, dongle for PC
700-7052 Experion Software, Security Edition, standard and 21 CFR Part 11 compliance data analysis tools, 3 test chips, qualification procedures, dongle for PC
Experion Automated Electrophoresis System

36 Technical Support: 1-800-4BIORAD • 1-800-424-6723 • www.bio-rad.com
Experion Analysis Kits
700-7101 Experion Pro260 Analysis Kit for 10 Chips, includes 10 Pro260 chips, 1 cleaning chip, 3 x 520 μl Pro260 gel, 45 μl Pro260 stain, 60 μl Pro260 ladder (10–260 kD), 400 μl Pro260 sample buffer, 3 spin filters
700-7103 Experion RNA StdSens Analysis Kit for 10 Chips, includes 10 RNA StdSens chips, 2 cleaning chips, 1,250 μl RNA gel, 20 μl RNA StdSens stain, 20 μl RNA ladder, 900 μl RNA StdSens loading buffer, 2 spin filters
700-7105 Experion RNA HighSens Analysis Kit for 10 Chips, includes 10 RNA HighSens chips, 2 cleaning chips, 1,250 μl RNA gel, 20 μl RNA HighSens stain, 20 μl RNA ladder, 900 μl RNA HighSens loading buffer, 100 μl RNA sensitivity enhancer, 2 spin filters
700-7107 Experion DNA 1K Analysis Kit for 10 Chips, includes 10 DNA chips, 1 cleaning chip, 3 x 250 μl DNA 1K gel, 40 μl DNA 1K stain, 20 μl DNA 1K ladder, 750 μl DNA 1K loading buffer, 3 spin filters
700-7108 Experion DNA 12K Analysis Kit for 10 Chips, includes 10 DNA chips, 1 cleaning chip, 650 μl DNA 12K gel, 40 μl DNA 12K stain, 20 μl DNA 12K ladder, 750 μl DNA 12K loading buffer, 3 spin filters
Additional Chips and Reagents
700-7151 Experion Pro260 Chips, 10, plus 1 cleaning chip
700-7152 Experion Pro260 Reagents and Supplies for 10 Chips, includes 3 x 520 μl Pro260 gel, 45 μl Pro260 stain, 60 μl Pro260 ladder (10–260 kD), 400 μl Pro260 sample buffer, 3 spin filters
700-7153 Experion RNA StdSens Chips, 10, plus 2 cleaning chips
700-7154 Experion RNA StdSens Reagents and Supplies for 10 Chips, includes 1,250 μl RNA gel, 20 μl RNA StdSens stain, 20 μl RNA ladder, 900 μl RNA StdSens loading buffer, 2 spin filters
700-7155 Experion RNA HighSens Chips, 10, plus 2 cleaning chips
700-7156 Experion RNA HighSens Reagents and Supplies for 10 Chips, includes 1,250 μl RNA gel, 20 μl RNA HighSens stain, 20 μl RNA ladder, 900 μl RNA HighSens loading buffer, 100 μl RNA sensitivity enhancer, 2 spin filters
700-7163 Experion DNA Chips, 10, for DNA 1K and 12K analyses, plus 1 cleaning chip
700-7164 Experion DNA 1K Reagents and Supplies for 10 Chips, includes 3 x 250 μl DNA 1K gel, 40 μl DNA 1K stain, 20 μl DNA 1K ladder, 750 μl DNA 1K loading buffer, 3 spin filters
700-7165 Experion DNA 12K Reagents and Supplies for 10 Chips, includes 650 μl DNA 12K gel, 40 μl DNA 12K stain, 20 μl DNA 12K ladder, 750 μl DNA 12K loading buffer, 3 spin filters
Experion Automated Electrophoresis System
Technical Support: 1-800-4BIORAD • 1-800-424-6723 • www.bio-rad.com 37
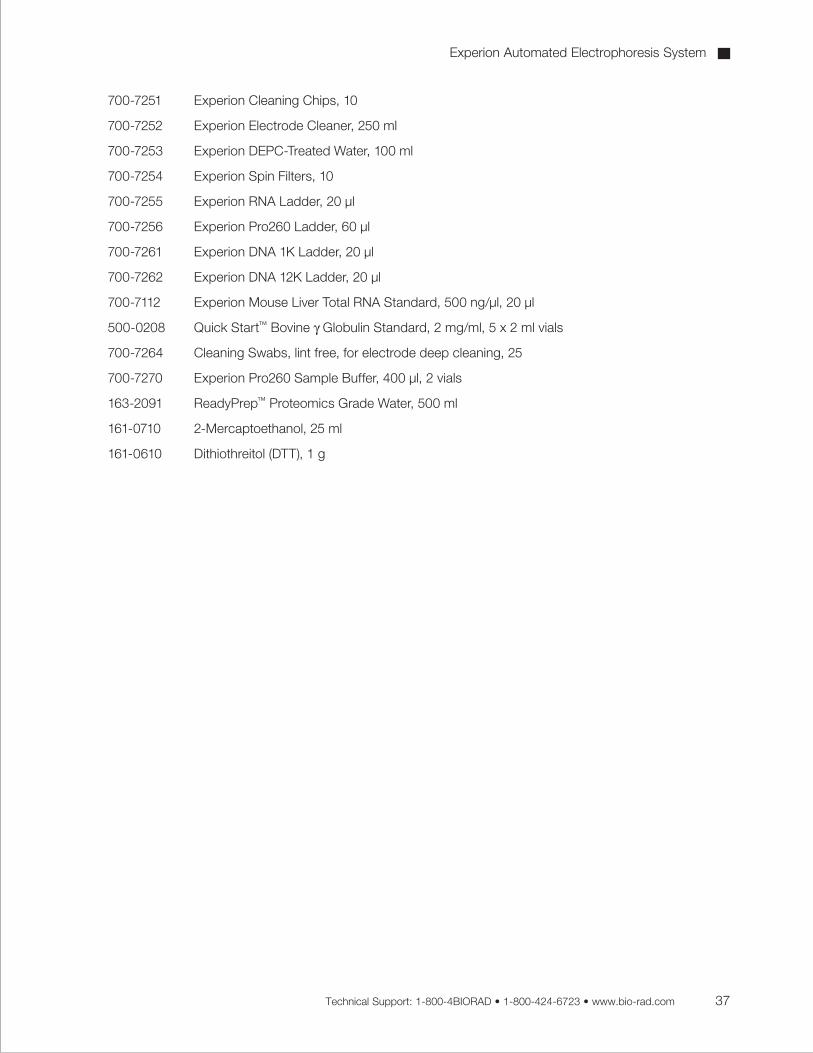
700-7251 Experion Cleaning Chips, 10
700-7252 Experion Electrode Cleaner, 250 ml
700-7253 Experion DEPC-Treated Water, 100 ml
700-7254 Experion Spin Filters, 10
700-7255 Experion RNA Ladder, 20 μl
700-7256 Experion Pro260 Ladder, 60 μl
700-7261 Experion DNA 1K Ladder, 20 μl
700-7262 Experion DNA 12K Ladder, 20 μl
700-7112 Experion Mouse Liver Total RNA Standard, 500 ng/μl, 20 μl
500-0208 Quick Start™ Bovine g Globulin Standard, 2 mg/ml, 5 x 2 ml vials
700-7264 Cleaning Swabs, lint free, for electrode deep cleaning, 25
700-7270 Experion Pro260 Sample Buffer, 400 μl, 2 vials
163-2091 ReadyPrep™ Proteomics Grade Water, 500 ml
161-0710 2-Mercaptoethanol, 25 ml
161-0610 Dithiothreitol (DTT), 1 g
Experion Automated Electrophoresis System

38
Experion Automated Electrophoresis System

39
Experion Automated Electrophoresis System

Life ScienceGroup
Bio-Rad Laboratories, Inc.
Web site www.bio-rad.com USA 800 424 6723 Australia 61 2 9914 2800 Austria 01 877 89 01 Belgium 09 385 55 11 Brazil 55 31 3689 6600 Canada 905 364 3435 China 86 20 8732 2339 Czech Republic 420 241 430 532 Denmark 44 52 10 00 Finland 09 804 22 00 France 01 47 95 69 65 Germany 089 31 884 0 Greece 30 210 777 4396 Hong Kong 852 2789 3300 Hungary 36 1 459 6100 India 91 124 4029300 Israel 03 963 6050 Italy 39 02 216091 Japan 03 6361 7000 Korea 82 2 3473 4460 Mexico 52 555 488 7670 The Netherlands 0318 540666 New Zealand 0508 805 500 Norway 23 38 41 30 Poland 48 22 331 99 99 Portugal 351 21 472 7700 Russia 7 495 721 14 04 Singapore 65 6415 3188 South Africa 27 861 246 723 Spain 34 91 590 5200 Sweden 08 555 12700 Switzerland 061 717 95 55 Taiwan 886 2 2578 7189 United Kingdom 020 8328 2000
Bulletin 10001312 Rev C US/EG 1110 Sig 1109