falling leaves just kisses - robert kaufman
TRANSCRIPT

Just KissesDesigned by Robert Kaufman Fabricswww.robertkaufman.com
Featuring
FALLING LEAVES
For questions about this pattern, please email [email protected].
Finished quilt measures: 82” x 98”

page 2
Fabric and Supplies Needed
Color Fabric Name/SKU Yardage
SRKM-16040-163 SPICE
SRKM-16044-191 AUTUMN
SRKM-16046-163 SPICE
SRKM-16041-2 BLACK
SRKM-16046-133 GOLD
SRKM-16046-16 BROWN
*includes binding
SRKM-16044-2 BLACK
SRKM-16046-196 HARVEST
SRKM-16042-15 IVORY
SRKM-16046-7 GREEN
SRKM-16040-191 AUTUMN
SRKM-16043-7 GREEN
SRKM-16043-268 NATURE
SRKM-16046-43 LEAF
SRKM-16040-268 NATURE
SRKM-16043-133 GOLD
SRKM-16040-179 RUST
Color Fabric Name/SKU Yardage
Fabric amounts based on yardage that is 44” wide.
A
B
C
D
E
F
G
H
I
J
K
L
M
N
O
P
Q
2-3/8 yards
3/8 yard
1/3 yard
1/2 yard
1/2 yard
1/2 yard
3/8 yard
3/8 yard
1/3 yard
1/2 yard
1/2 yard
1/2 yard
3/8 yard
3/4 yard
1-3/8 yard
1-5/8 yard
1/4 yard
Fabric and Supplies Needed
Copyright 2016, Robert KaufmanFor individual use only - Not for resale
You will also need:7-1/2 yards for backing

page 3
- Read through all of the instructions before beginning.- All of the seam allowances are 1/4” unless otherwise noted.- Press seam allowances open unless otherwise noted. - Width of fabric (WOF) is equal to at least 44” wide.- Right sides together has been abbreviated to RST.- Remember to measure twice and cut once!
From Fabric A, cut:seven 4-1/2” x WOF strips. Subcut:• twenty 4-1/2” squares• twenty 4-1/2” x 8-1/2” rectanglesfi ve 4-7/8” x WOF strips. Subcut:• forty 4-7/8” squares. Cut each square in half once along a diagonal. These will be referred
to as the small triangles.two 7-7/8” x WOF strips. Subcut:• ten 7-7/8” squares. Cut each square in half along both diagonals. These will be
referred to as the large triangles.
From each of Fabrics B and H, cut:two 4-1/2” x WOF strips. Subcut:• ten 4-1/2” squares
From each of Fabrics C and I, cut:two 4-1/2” x WOF strips. Subcut:• ten of Template 1
From each of Fabrics D and J, cut:three 4-1/2” x WOF strips. Subcut:• ten of Template 2
From each of Fabrics E, F, K and L, cut:three 4-1/2” x WOF strips. Subcut:• ten of Template 3
From each of Fabrics G and M, cut:• ten of Template 4
From Fabric N, cut:eight 2-1/2” x WOF strips. Sew together in pairs, end-to-end, then trim to yield:• two 2-1/2” x 80-1/2” side inner borders• two 2-1/2” x 64-1/2” top/bottom inner borders
Notes Before You Begin
Cutting Instructions

page 4
From Fabric O, cut:eighteen 2-1/2” x WOF strips. Set aside ten strips for binding. From the remaining strips:• Sew together in pairs, end-to-end, then trim to yield: - two 2-1/2” x 84-1/2” side middle borders - two 2-1/2” x 72-1/2” top/bottom middle borders
From Fabric P, cut:eight 5-1/2” x WOF strips. Sew together in pairs, end-to-end, then trim to yield: - two 5-1/2” x 88-1/2” side outer borders - two 5-1/2” x 72-1/2” top/bottom outer borders
From Fabric Q, cut:four 5-1/2” squares
There are two fabric combinations used in this quilt, which will be referred to as Style A (green) and Style B (orange). Separate the cut pieces into stacks for each color/style: Style A = All of the B-G fabrics and half of the Fabric A piecesStyle B = All of the H-M fabrics and half of the Fabric A pieces
To sew an A Block:
Step 1: Sew a Fabric A square to a Fabric B square. Press toward the darker fabric.
Assemble the Blocks
Step 2: Sew a Fabric A small triangle to the ends of the Template 1, 2 and 3 pieces as illustrated.
Template 1
Template 2

page 5
Press toward the triangles, trimming off the dog ears.
Step 3: Sew a Fabric A large triangle to either side of a Template 4 piece, as illustrated.
Press toward the darker fabric.
Template 3
Template 3
Step 5: Repeat this process using the Style B pieces to make ten B Blocks.
Step 4: Arrange a Fabric A rectangle and one unit each from Steps 1-3 to form one block. Sew together as illustrated.
Repeat to make ten Style A Blocks.

page 6
Step 8: Sew the 80-1/2” inner borders to the sides of the quilt center, pressing toward the borders. Sew the 64-1/2” inner borders to the top/bottom of the quilt center, pressing toward the borders.
Step 9: Sew the 84-1/2” middle borders to the sides of the quilt center, pressing toward the borders. Sew the 72-1/2” middle borders to the top/bottom of the quilt center, pressing toward the borders.
Step 10: Sew the 5-1/2” squares to either end of the 72-1/2” Fabric P strips. Press toward the borders. Sew the 88-1/2” outer borders to the sides of the quilt. Press toward the borders. Sew the remaining border pieces (with corner squares) to the top and bottom of the quilt. Press the seams toward the quilt center.
Your quilt is now complete! Baste, quilt, bind and enjoy!
Assemble the Borders

page 7
Templates
1” box for scale
FALL
ING
LEA
VES
TEM
PLA
TE 1
Cut
: te
n fro
m F
abric
C.
ten
from
Fab
ric I.
FALL
ING
LEA
VES
TEM
PLA
TE 4
Cut
: te
n fro
m F
abric
G.
t
en fr
om F
abric
M.

page 8
FALLITE
Cut: ten f ten f
Tape the two pieces of Template 2 together along the red line.
1” box for scale
ALLING LEAVESTEMPLATE 2
ten from Fabric D. ten from Fabric J.
page 9
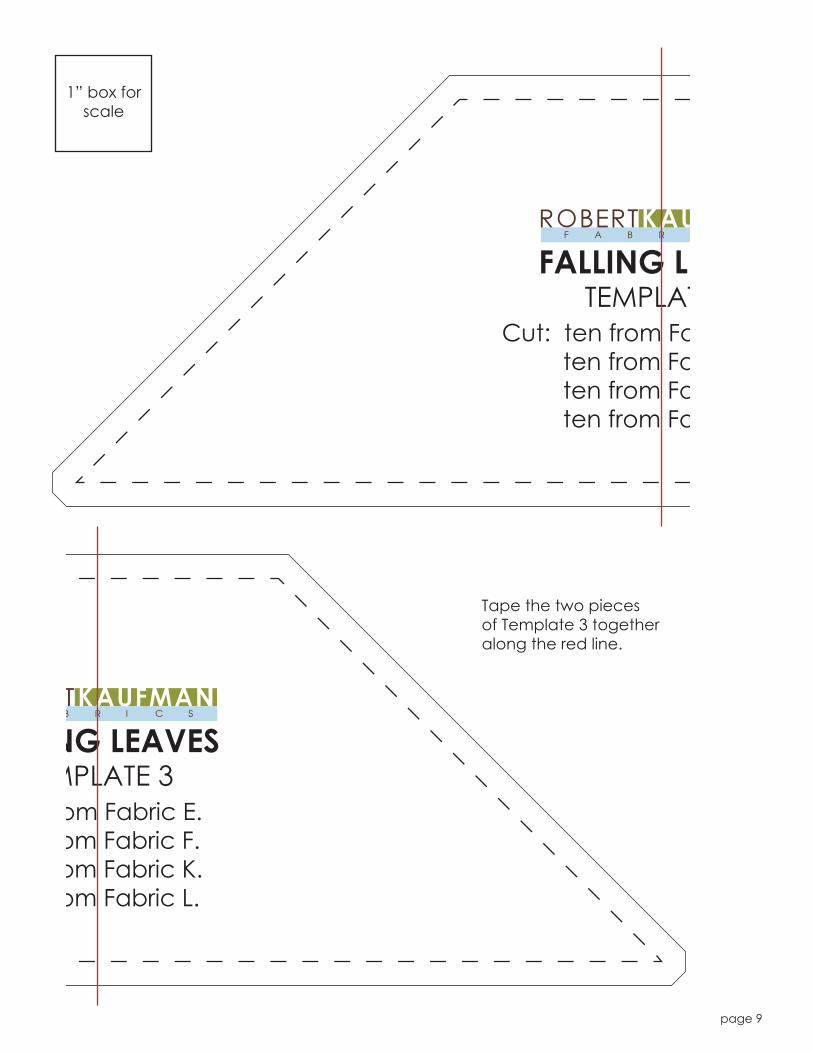
Tape the two pieces of Template 3 together along the red line.
1” box for scale
FALLING LTEMPLAT
Cut: ten from Fa ten from Fa ten from Fa ten from Fa
NG LEAVESMPLATE 3om Fabric E.om Fabric F.om Fabric K.om Fabric L.