featuring la vish collection by - art gallery...
TRANSCRIPT

f r e e p a t t e r n
f e a t u r i n g L a V I S H C O L L E C T I O N B Y K a t a r I n a r O C C e L L a

LAH-16800Mother's garden light
LAH-26800Mother's garden rich
LAH-16807pretty disty dreaM
LAH-26806flowered Medley
LAH-16801sunprint orchid
LAH-26801sunprint fern
LAH-16808bejeweled seal ink
LAH-26808bejeweled seal teal
LAH-16802 aged strokes Matte
LAH-26802aged strokes gloss
LAH-16809petal picking dense
LAH-26809petal picking danity
LAH-16803blossoM swale depth
LAH-26803blossoM swale calM
LAH-16810gentle draft Moon
LAH-26810gentle draft sunrise
LAH-16804seeds of dhalia
LAH-26805dots tile fresco
LAH-16812flowerful dandle-panel
© 2015 Courtesy of Art Gallery Quilts LLC. All Rights Reserved.
Op
UL
en
t
F A B R I C S D E S I G N E D B Y K A T A R I N A R O C C E L L A
Q U I L T D E S I G N E D B Y K A T A R I N A R O C C E L L A
LU
SH
LAH-26811trellis plaid fresh
ar tga l le ry fabr ics.com
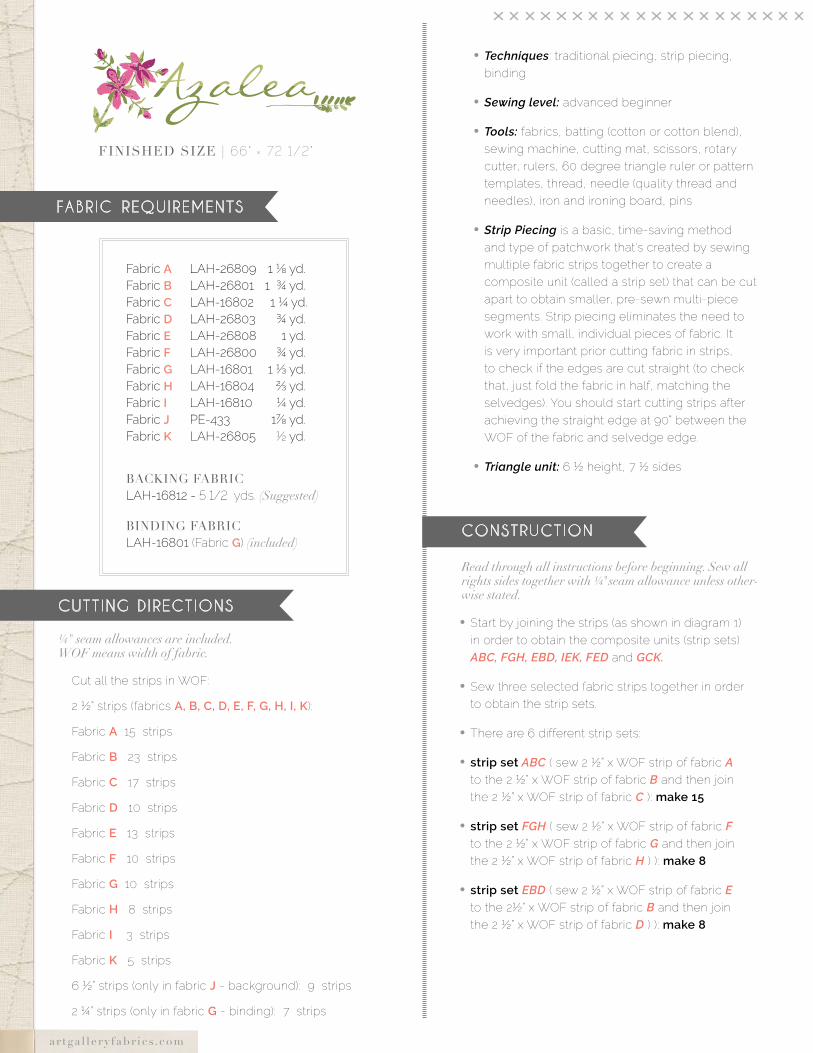
FINISHED SIZE | 66" × 72 1/2"
faBr IC reQUIreMentS
CUtt Ing d IreCt IOnS
BACKING FABRIC LAH-16812 - 5 1/2 yds. (Suggested)
BINDING FABRIC LAH-16801 (fabric G) (included)
Fabric A LAH-26809 1⅛yd.Fabric B LAH-26801 1¾yd.Fabric C LAH-168021¼yd.Fabric D LAH-26803 ¾yd.Fabric E LAH-26808 1yd.Fabric F LAH-26800 ¾yd.Fabric G LAH-16801 1⅓yd.Fabric H LAH-16804 ⅔yd.Fabric I LAH-16810 ¼yd.Fabric J PE-433 1⅞yd.Fabric K LAH-26805 ½yd.
¼" seam allowances are included.WOF means width of fabric.
COnStrUCt IOn
Read through all instructions before beginning. Sew all rights sides together with ¼"seam allowance unless other-wise stated.
•Start by joining the strips (as shown in diagram 1) in order to obtain the composite units (strip sets) ABC, FGH, EBD, IEK, FED and GCK.
•Sew three selected fabric strips together in order to obtain the strip sets.
•There are 6 different strip sets:
•strip set ABC ( sew 2 ½” x WOF strip of fabric A to the 2 ½” x WOF strip of fabric B and then join the 2 ½” x WOF strip of fabric C ): make 15
•strip set FGH ( sew 2 ½” x WOF strip of fabric F to the 2 ½” x WOF strip of fabric G and then join the 2 ½” x WOF strip of fabric H ) ): make 8
•strip set EBD ( sew 2 ½” x WOF strip of fabric E to the 2½” x WOF strip of fabric B and then join the 2 ½” x WOF strip of fabric D ) ): make 8
Cut all the strips in WOF:
2 ½” strips (fabrics A, B, C, D, E, F, G, H, I, K):
fabric A 15 strips
fabric B 23 strips
fabric C 17 strips
fabric D 10 strips
fabric E 13 strips
fabric F 10 strips
fabric G 10 strips
fabric H 8 strips
fabric I 3 strips
fabric K 5 strips
6 ½” strips (only in fabric J - background): 9 strips
2 ¼” strips (only in fabric G - binding): 7 strips
•Techniques: traditional piecing, strip piecing, binding
•Sewing level: advanced beginner
•Tools: fabrics, batting (cotton or cotton blend), sewing machine, cutting mat, scissors, rotary cutter, rulers, 60 degree triangle ruler or pattern templates, thread, needle (quality thread and needles), iron and ironing board, pins
•Strip Piecing is a basic, time-saving method and type of patchwork that's created by sewing multiple fabric strips together to create a composite unit (called a strip set) that can be cut apart to obtain smaller, pre-sewn multi-piece segments. Strip piecing eliminates the need to work with small, individual pieces of fabric. It is very important prior cutting fabric in strips, to check if the edges are cut straight (to check that, just fold the fabric in half, matching the selvedges). You should start cutting strips after achieving the straight edge at 90° between the WOF of the fabric and selvedge edge.
•Triangle unit: 6 ½ height, 7 ½ sides

ar tga l le ry fabr ics.com
•Cutting the triangles:
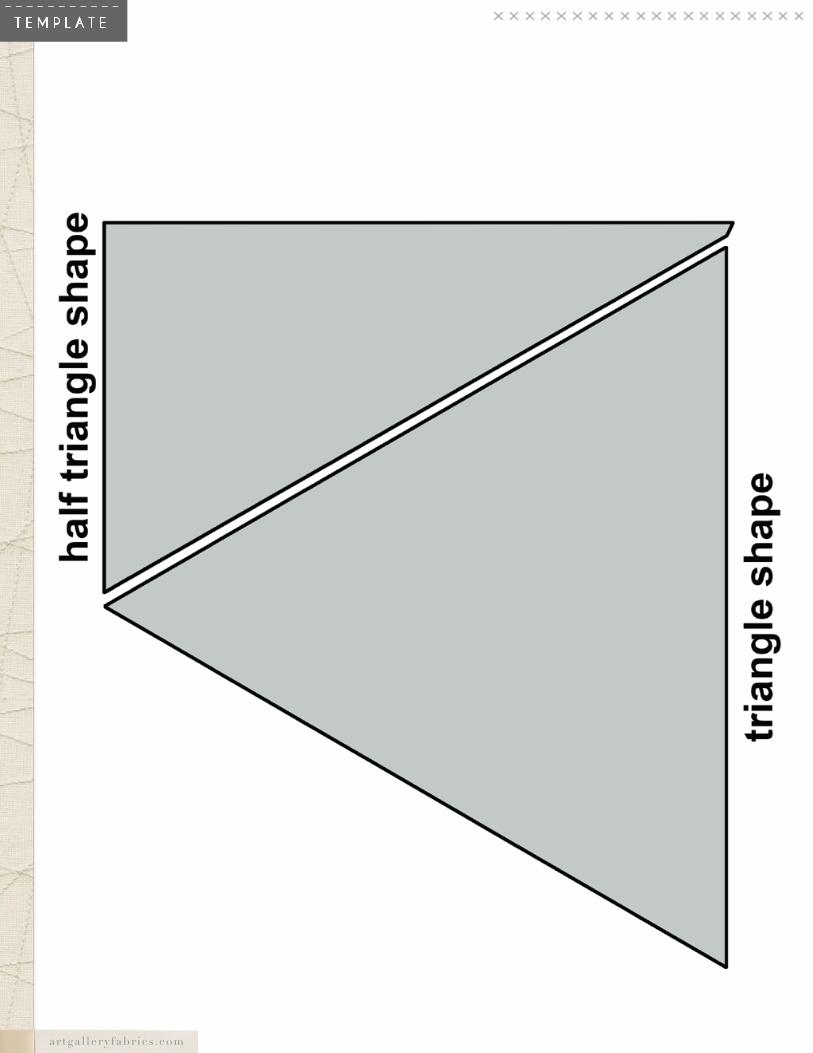
•NOTE: you will be using only ONE orientation of triangles cut from each strip-set (see gray triangle on the diagram), since only that one has the correct color order. You can use the leftover triangles for another creative project..
•After sewing all the strip sets, line up the 60° side on your ruler (if you don’t have the ruler you can use the provided triangle shape). Make the first cut to obtain the proper angle. Measure (width of the cut is 7 ½”) and cut entire strip set in order to obtain 60 degrees triangles. You can obtain five triangles from each strip set. While cutting, be sure to handle the fabric in order to avoid stretching on the bias edges.
•Triangles ABC – make 72
•Triangles FGH – make 36
•Triangles EBD – make 36
•Triangles IEK – make 12
•Triangles FED – make 6
•Triangles GCK – make 6
DIAGRAM 1
DIAGRAM 2
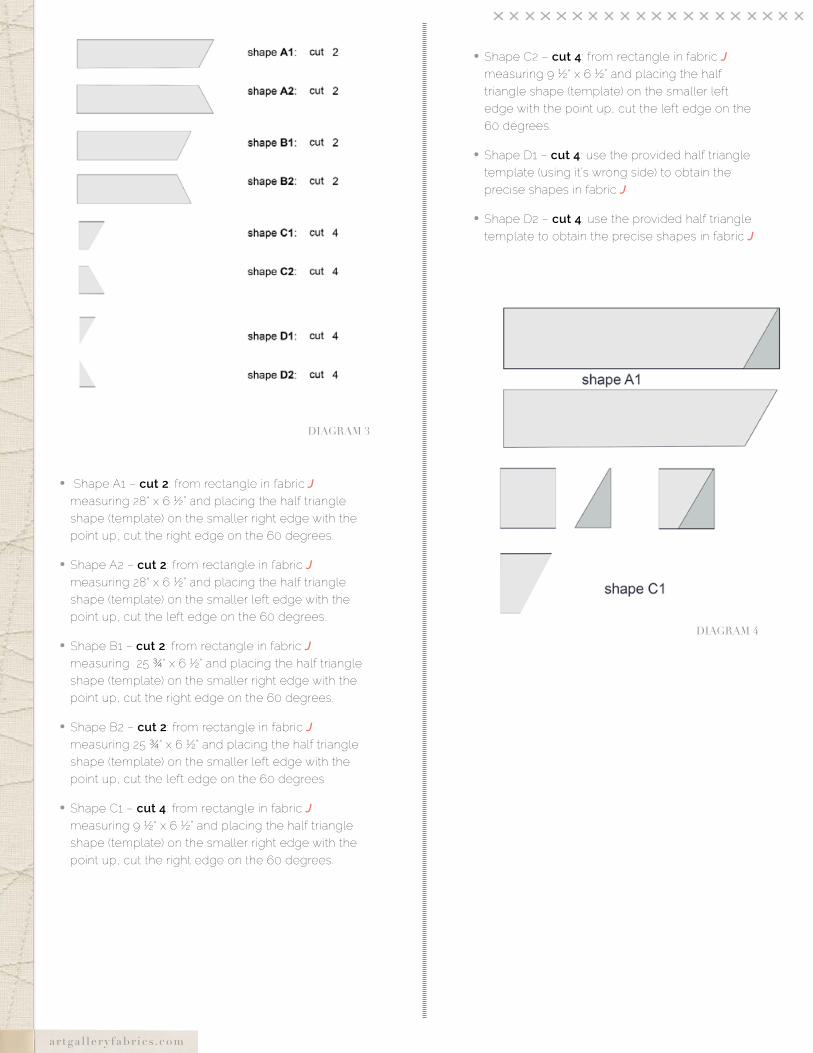
•In order to cut these shapes, cut the rectangles first of fabric J and then using the template shapes or 60 degree ruler, cut the needed shapes.
•IMPORTANT: Please note that the rectangle shapes dimensions that are provided here for the lateral A1-C2 shapes includes 2” allowances (means that you shouldn’t be afraid that some eventual not precise piecing will have the consequences once the rows are all sewn together) but if you don’t want any lateral leftovers to be cut after all the rows are joined, please diminish the provided rectangle fabric shapes for 2” each).
•For the D1 and D2 shapes - use the provided half triangle templates to obtain the precise shapes.
•You will have some leftovers from each strip set, so you will be able to create great cushions with them, or you can use them somewhere on the quilt backing.
•Now that you have all the triangles cut, you need to start sewing them together in rows in order shown in the diagram. This is a very important step in order to perfectly match the seam allowances.
•Cut the lateral shapes (all in fabric J):
•If you are cutting these shapes from a solid fabric (that has the same front and back-like AGF pure elements), you may consider not making the mirror looking shapes, but only double the A1, B1, C1 and D1 shapes and then turning them to the wrong side to obtain the correct mirror looking shapes ( A2, B2, C2 and D2 ).
•strip set IEK ( sew 2 ½” x WOF strip of fabric I to the 2 ½” x WOF strip of fabric E and then join the 2 ½” x WOF strip of fabric K ) ): make 3
•strip set FED ( sew 2 ½” x WOF strip of fabric F to the 2 ½” x WOF strip of fabric E and then join the 2 ½” x WOF strip of fabric D ) ): make 2
•strip set GCK ( sew 2 ½” x WOF strip of fabric G to the 2 ½” x WOF strip of fabric C and then join the 2 ½” x WOF strip of fabric K ) ): make 2
•Press seams open rather than to one side. Pressing the seams open eliminates bulk and makes it easier to match the seams.
ar tga l le ry fabr ics.com
• Shape A1 – cut 2: from rectangle in fabric J measuring 28“ x 6 ½” and placing the half triangle shape (template) on the smaller right edge with the point up, cut the right edge on the 60 degrees.
•Shape A2 – cut 2: from rectangle in fabric J measuring 28“ x 6 ½” and placing the half triangle shape (template) on the smaller left edge with the point up, cut the left edge on the 60 degrees.
•Shape B1 – cut 2: from rectangle in fabric J measuring 25 ¾“ x 6 ½” and placing the half triangle shape (template) on the smaller right edge with the point up, cut the right edge on the 60 degrees.
•Shape B2 – cut 2: from rectangle in fabric J measuring 25 ¾“ x 6 ½” and placing the half triangle shape (template) on the smaller left edge with the point up, cut the left edge on the 60 degrees
•Shape C1 – cut 4: from rectangle in fabric J measuring 9 ½“ x 6 ½” and placing the half triangle shape (template) on the smaller right edge with the point up, cut the right edge on the 60 degrees.
•Shape C2 – cut 4: from rectangle in fabric J measuring 9 ½“ x 6 ½” and placing the half triangle shape (template) on the smaller left edge with the point up, cut the left edge on the 60 degrees.
•Shape D1 – cut 4: use the provided half triangle template (using it’s wrong side) to obtain the precise shapes in fabric J
•Shape D2 – cut 4: use the provided half triangle template to obtain the precise shapes in fabric J
DIAGRAM 3
DIAGRAM 4

ar tga l le ry fabr ics.com
•Press seams. Start pining the composed rows horizontally going from the center of the quilt (matching all the central triangles first) to the outside edges (instead of sewing from the edge to the edge, as we have some lateral leftovers) in order to obtain the top. Press seams. Respecting the 90 degrees corners, cut off the lateral leftovers (rows 4, 5, 8 and 9 will be your guides for cutting as they involve most piecing and they contain the smallest: D1 and D2 shapes - half triangles).
aSSeMBL Ing tHe tOp
Sew all rights sides together with ¼"seam allowance. Press open.
•All sewing is right sides together with ¼ seam allowance, unless noted otherwise.
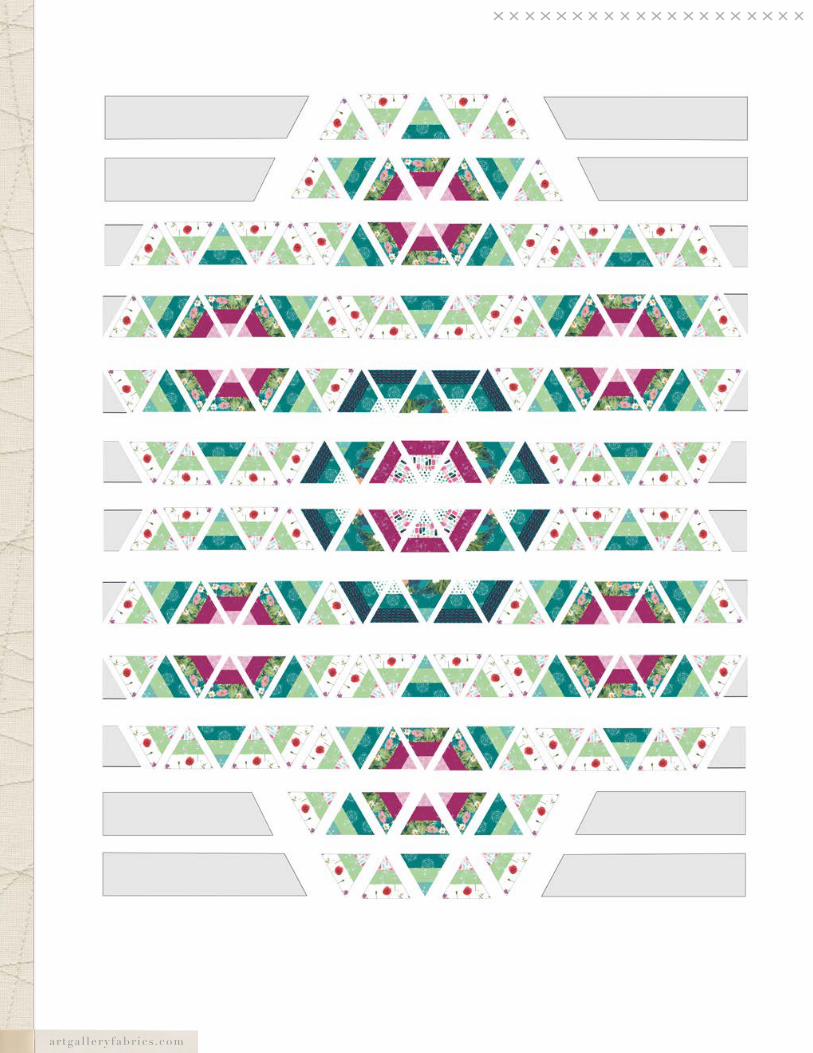
•Arrange the triangles together in rows, looking at the diagram for the right placement, as you will need to turn some triangles on 60 degrees in order to obtain correct placement. Place triangles in alternating order, one triangle pointing down the other pointing up. Continue to sew the row, ending with one of the needed A1-D4 shapes, depending on the row.
•You will have 12 rows of triangles ending with the appropriate A1-D2 shapes placed on each end toward the border. Note that there are 6 different rows, but each row is doubled in order to compose 12 horizontal rows, where (for example row 1 and 12, row 2 and row 11 an so on) two rows are matching going from the horizontal borders until the center of this figure.
•1st row: A1 + ABC + ABC + EBD + ABC + ABC + A2
•2nd row: B1 + ABC + EBD + FGH + FGH + FGH + EBD + ABC + B2
•3rd row: C1 + ABC + ABC + EBD + ABC + ABC + ABC + EBD + FGH + FGH + FGH + EBD + ABC + ABC + ABC + EBD + ABC + ABC + C2
•4th row: D1 + ABC + EBD + FGH + FGH + FGH + EBD + ABC + ABC + ABC + EBD + ABC + ABC + ABC + EBD + FGH + FGH + FGH + EBD + ABC + D2
• D2 + ABC + EBD + FGH + FGH + FGH + EBD + ABC + IEK + IEK + FED + IED + IED + ABC + EBD + FGH + FGH + FGH + EBD + ABC + D1
• C2 + ABC + ABC + EBD + ABC + ABC + IEK + FED + GCK + GCK + GCK + FED + IEK + ABC + ABC + EBD + ABC + ABC + C1 of each of the rows 1- 6 in order to obtain also rows 7-12. Rotate the rows 7-12 in 180 degrees direction from the first six rows, in order to obtain the symmetrical figure.

ar tga l le ry fabr ics.com
Assembling the Rows
ar tga l le ry fabr ics.com
ar tga l le ry fabr ics.com
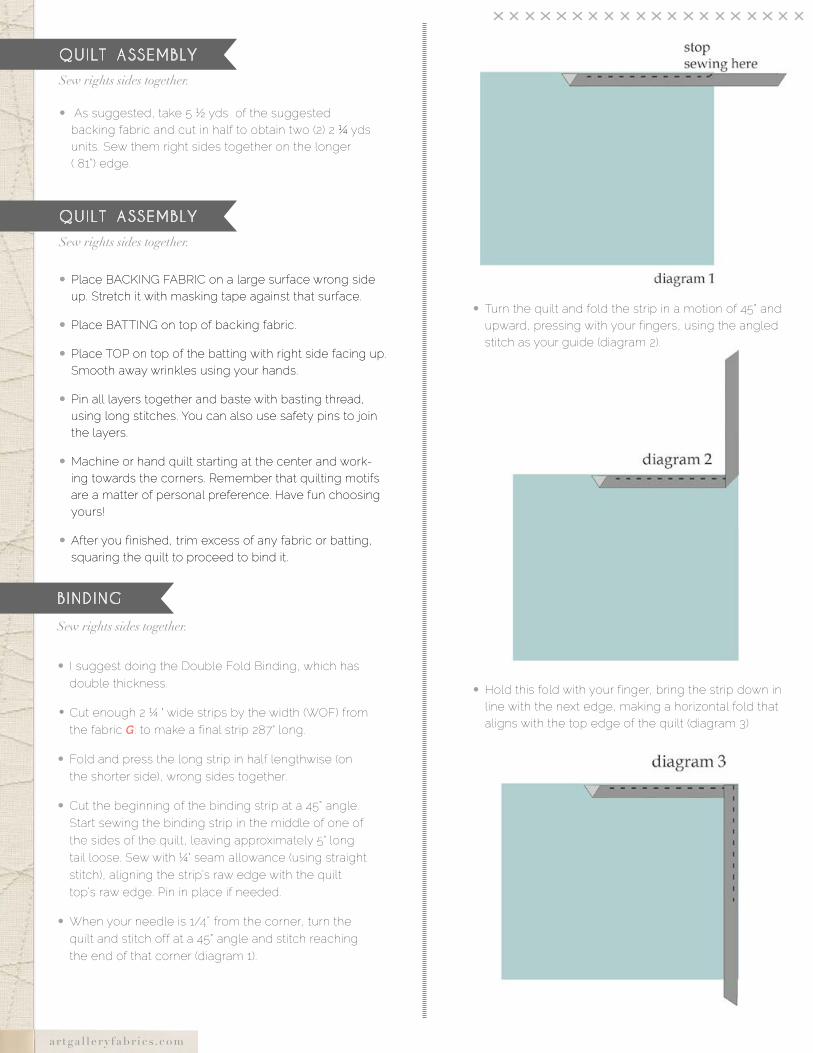
QUILt aSSeMBLy
QUILt aSSeMBLy
Sew rights sides together.
Sew rights sides together.
•Place BACKING FABRIC on a large surface wrong side up. Stretch it with masking tape against that surface.
•Place BATTING on top of backing fabric.
•Place TOP on top of the batting with right side facing up. Smooth away wrinkles using your hands.
•Pin all layers together and baste with basting thread, using long stitches. You can also use safety pins to join the layers.
•Machine or hand quilt starting at the center and work-ing towards the corners. Remember that quilting motifs are a matter of personal preference. Have fun choosing yours!
•After you finished, trim excess of any fabric or batting, squaring the quilt to proceed to bind it.
B Ind Ing
Sew rights sides together.
• I suggest doing the Double Fold Binding, which has double thickness.
•Cut enough 2 ¼ " wide strips by the width (WOF) from the fabric G: to make a final strip 287" long.
• Fold and press the long strip in half lengthwise (on the shorter side), wrong sides together.
•Cut the beginning of the binding strip at a 45° angle. Start sewing the binding strip in the middle of one of the sides of the quilt, leaving approximately 5" long tail loose. Sew with ¼" seam allowance (using straight stitch), aligning the strip’s raw edge with the quilt top’s raw edge. Pin in place if needed.
•When your needle is 1/4˝ from the corner, turn the quilt and stitch off at a 45° angle and stitch reaching the end of that corner (diagram 1).
• Turn the quilt and fold the strip in a motion of 45° and upward, pressing with your fingers, using the angled stitch as your guide (diagram 2).
•Hold this fold with your finger, bring the strip down in line with the next edge, making a horizontal fold that aligns with the top edge of the quilt (diagram 3)
• As suggested, take 5 ½ yds of the suggested backing fabric and cut in half to obtain two (2) 2 ¼ yds units. Sew them right sides together on the longer ( 81”) edge.

ar tga l le ry fabr ics.com
• Start sewing at ¼" of the border, stitching all the lay-ers. Do the same in the four corners of the quilt.
•When approaching the starting point, stop stitching at least 10˝ from where you started, leaving another tail, at least 6” long. There will be a gap between the stitched bindings. Unfold the ending binding and align it nicely with the quilt edge. Open the ending strip toward the quilt, right sides together and place the beginning of the binding strip that is cut at 45° in-side the open part of the ending binding strip. Using a pencil or a pin, mark the line on the ending binding strip where the begging piece lays (diagram 4).
•Mark another parallel line to the first one, precisely ½ “ distant, so that it can be lined and sewn perfectly with the other end, using 1/4 seam allowance. Pin and sew the ends, right sides together (diagram 5).
NOTE: While all possible care has been taken to ensure the accuracy of this pattern, We are not responsible for printing errors or the way in which individual work varies.Please read instructions carefully before starting the construction of this quilt. If desired, wash and iron your fabrics before starting to cut.
ar tga l le ry fabr ics.com
© 2016 Courtesy of Art Gallery Quilts LLC. All Rights Reserved.
ar tga l le ry fabr ics.com
t e M p L a t e