field gear field gear - united states antarctic program · pdf fileusap continental field...
TRANSCRIPT

36 USAP Continental Field Manual
FIELD
GEA
R
Field Gear

37USAP Continental Field Manual
FIELD GEARSheltersField teams should become experienced in erecting the tents they are issued before they deploy to the field. The tents should be set up in McMurdo and their condition double-checked. Tents should have a solid anchor for every guy line, and these should be checked daily to ensure they are tensioned. Loose guy lines make the tent more prone to wind damage, and they make catastrophic failures in a storm more likely. “Hard” knots should be avoided. Instead, use taut-line hitches or trucker’s hitches for guy lines, as they are easy to undo. Field team members should practice and become familiar with these knots before deploying.
Erecting Tents at Deep-Field Snow Camps
Establishing Wind DirectionThe most important factor in the set-up process is securely anchor-ing the tent so it can withstand high winds. Field teams should first determine the prevailing wind direction, which can be done by ob-serving patterns in the snow. Long rows of drifts (sastrugi) in, for example, a north-south orientation will indicate that the prevailing wind is either from the north or south. Look for etching at the ends. If the prevailing wind is from the south, the snow at the southern end of the sastrugi will be etched. Orient the tent with the main door opening downwind but at a 45-degree angle to the prevailing wind. This will help prevent drifting that blocks the door.
Anchoring the TentThe best method for anchoring a tent is determined by snow condi-tions. If the snow surface is hard-packed, hammer in long stakes or sections of bamboo, angled slightly away from the tent, and attach guy lines to these. If the snow is soft, bury a long stake or piece of bamboo (“dead man”) in a slot perpendicular to the angle of pull, with a guy line attached at the mid-point. The guy line runs in a straight line from the dead man to the tent, via a slot cut in the snow. The dead man should not be buried too close to the tent or it will be pulled upward when the line is tensioned. In very soft snow, the dead-man anchor should be buried two feet deep or more.
Snow WallsSnow walls, which are constructed with blocks cut from the snow, shelter tents from wind. If it is a windy day or if the camp is at a windy

38 USAP Continental Field Manual
FIELD
GEA
RDeadman snow picket anchor

39USAP Continental Field Manual
FIELD GEARSnow fluke and ice screw anchors

40 USAP Continental Field Manual
FIELD
GEA
RSnow bollard and snow picket anchors

41USAP Continental Field Manual
FIELD GEARlocation, field teams may need to construct walls before attempting to set up a tent. Ideally, blocks are cut with a saw in hard-packed snow, but a shovel or ice ax may work. Since snow conditions can change over a small area, probe the snow to see if there is an area harder than others. If only soft snow conditions exist, the snow can be packed down with boots to see if it hardens (sinters) after an hour or more.
Erecting Tents on Sea Ice and Blue Ice GlaciersIf the snow on the ice is deep enough, anchor the tent as described above. Otherwise, clear off any snow and anchor the tent to the ice with ice screws. Team members may also drill V-threads (two holes that intersect to form a V-shaped channel), then use an ice screw or ice drill to feed a guy line through the channel, and attach the line to the tent.
Erecting Tents in the McMurdo Dry ValleysIt is important that field teams adhere to environmental regulations for site selection and camp set-up in the Dry Valleys. Team mem-bers should consult with the environmental department before de-parting for the field. Most commonly visited Dry Valley areas have pre-determined camping locations.Large boulders can provide a wind break, and large rocks or stacks of rocks can be tied off as anchors. If the field team is using metal stakes for anchors, it may take several minutes to sledge hammer each one into the frozen soil. If the team intends to move camp, members should take extra anchors, as it may be difficult to remove some from the frozen soil.
Emergency SheltersIf a tent is lost, the first and most important order of business is to arrange for protection from the wind, as this will increase the odds of survival. The quickest emergency shelter to construct in snow is a trench. Dig a three-foot-deep, shoulder-width trench in the snow, making it long enough for a person to lie down, with extra room for gear. Cover the trench with a tarp, and anchor the tarp with snow blocks, bamboo stakes, shovels, sleds, or other equipment. Snow blocks or slabs may also be used to cover the trench opening. A trench can accom-modate two people if the bottom is excavated to form a bell shape. However, the surface opening should remain shoulder wide.

42 USAP Continental Field Manual
FIELD
GEA
ROther emergency snow shelters are snow mounds (Qunizhee huts), snow caves, and igloos. Keep in mind that ventilation is critical if a stove is to be operated in any snow shelter.On sea ice or on a blue-ice glacier, a wind break can be created by re-positioning snowmobiles and sleds.
Stoves and HeatersThe Berg Field Center (BFC) issues propane and white-gas cooking stoves to field parties. The construction department maintains the heaters in semi-permanent field camps and sea-ice huts. This guide provides information on stove and heater safety, basic operation, and troubleshooting. Contact construction or BFC personnel for as-sistance or further guidance.
Stove SafetyLiquid-fuel stoves are potentially hazardous due to the flammability of the fuels and the toxicity of the carbon monoxide they produce. Therefore, it is important for field personnel using a stove to follow these safety measures:
• Test all stoves before field deployment.• Do not use stoves without adequate ventilation.• Do not release fuel-tank pressure near an open flame.• Use extreme caution when refueling. Skin contact with
super-cooled fuel can cause instant frostbite.• Check for leaks before every use.• Release pressure in the fuel tank before packing and stor-
ing.• Pack stoves and fuel away from food.• Do not cook in mountain tents, except in emergencies.• Preheat the stove outside the tent.• Insulate the base of the stove so it won’t melt through the
tent floor.Residues of evaporated gasoline are combustible. Designate a pair of gloves for fueling operations and don’t use them near stoves. Should a person’s clothing become ignited, stop, drop, and roll to extinguish flames.
Carbon Monoxide RisksCarbon monoxide (CO) is a colorless, odorless, tasteless, and toxic gas produced by the incomplete combustion of carbon compounds,

43USAP Continental Field Manual
FIELD GEARincluding the fossil fuels used in heaters and stoves. Dangerous amounts of CO can accumulate when fuel does not burn properly and/or when an area is poorly ventilated. Both of these situations can occur when someone is cooking in or heating a tent. CO displaces oxygen in the bloodstream, starving the heart, brain, and other vital organs. People are even more susceptible to CO poi-soning at altitude.
Carbon Monoxide is DangerousThere have been several cases of CO poisoning in Antarctic field camps from improper stove use. This is completely avoidable. The best way to prevent CO poisoning is by ensuring any structure in which cooking is taking place is well ventilated. Because CO has no color, taste, or smell, it is better to be safe than sorry. In short:
• ALWAYS ventilate the tent. • NEVER cook in or heat a tent without leaving a door
or window cracked. • Be especially vigilant if sleeping in a heated structure. • VENTILATE, VENTILATE, VENTILATE!
Also, field teams must use a CO detector (issued from the BFC) when cooking, but the detector should not be attached directly to the stove. The detectors are not fool-proof, so all team members should remain vigilant of CO risks and symptoms. For information on the signs, symptoms, and treatment of CO poisoning, consult the First Aid section of this manual, or contact the medical department.
MSR® WhisperLite™ StoveAssembling the Stove
• Fill the MSR® fuel bottle to within two inches of cap.• Screw the pump snugly into the fuel bottle.• Pump the plunger 15 to 20 times for a full bottle. Additional
strokes will be necessary if the bottle is not full.• Insert the fuel line through the hole in the heat reflector.• Rotate the stove legs into the slots in the flame reflector.• Insert the end of the fuel line into the fuel-tube bushing on
the pump. Lubricate the end of the fuel line with lip balm, and be extremely gentle when inserting.
• Snap the catch arm securely into the slot on the pump body.

44 USAP Continental Field Manual
FIELD
GEA
ROperating the StovePriming:
• To preheat the stove, the priming flame must contact the generator tube.
• Open the control valve until fuel flows through the jet and fills the priming cup ½ full.
• Close the control valve.• Light the priming cup or wick.• Place a windscreen around the stove.
Lighting:• As the priming flame diminishes, slowly open the control
valve.• If the stove goes out, wait for the stove to cool and re-
prime it.• If the stove burns with a yellow, erratic flame but the prim-
ing cup is still burning, turn the control valve off and prime longer.
Cooking:• The stove should burn with a steady blue flame.• To simmer, operate the stove with low pressure in the fuel
bottle.• Note that there is a delay between control valve turns and
changes in flame intensity.Shutting Off the Stove:
• Turn the control valve off.• Wait for the stove to cool before disassembling.• To depressurize the fuel bottle, move away from heat,
sparks, or flame. Turn the stove assembly upside down and open the control valve. Pressure will be eliminated through the jet.
Safety Tips• Do not use these stoves in mountain tents. • Ensure the stove assembly has no fuel leaks.• Securely lock the catch and ensure the stove is properly
assembled.• Clear the area of flammables and spilled fuel.• Do not open the control valve more than three full turns.
45USAP Continental Field Manual
FIELD GEAR
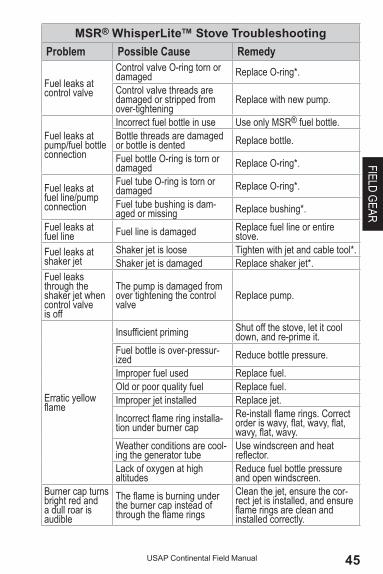
MSR® WhisperLite™ Stove TroubleshootingProblem Possible Cause Remedy
Fuel leaks at control valve
Control valve O-ring torn or damaged Replace O-ring*.Control valve threads are damaged or stripped from over-tightening
Replace with new pump.
Fuel leaks at pump/fuel bottle connection
Incorrect fuel bottle in use Use only MSR® fuel bottle.Bottle threads are damaged or bottle is dented Replace bottle.Fuel bottle O-ring is torn or damaged Replace O-ring*.
Fuel leaks at fuel line/pump connection
Fuel tube O-ring is torn or damaged Replace O-ring*.Fuel tube bushing is dam-aged or missing Replace bushing*.
Fuel leaks at fuel line Fuel line is damaged Replace fuel line or entire
stove.Fuel leaks at shaker jet
Shaker jet is loose Tighten with jet and cable tool*.Shaker jet is damaged Replace shaker jet*.
Fuel leaks through the shaker jet when control valve is off
The pump is damaged from over tightening the control valve
Replace pump.
Erratic yellow flame
Insufficientpriming Shut off the stove, let it cool down, and re-prime it.
Fuel bottle is over-pressur-ized Reduce bottle pressure.Improper fuel used Replace fuel.Old or poor quality fuel Replace fuel.Improper jet installed Replace jet.Incorrectflameringinstalla-tion under burner cap
Re-installflamerings.Correctorderiswavy,flat,wavy,flat,wavy,flat,wavy.
Weather conditions are cool-ing the generator tube
Use windscreen and heat reflector.
Lack of oxygen at high altitudes
Reduce fuel bottle pressure and open windscreen.
Burner cap turns bright red and a dull roar is audible
Theflameisburningunderthe burner cap instead of throughtheflamerings
Clean the jet, ensure the cor-rect jet is installed, and ensure flameringsarecleanandinstalled correctly.

46 USAP Continental Field Manual
FIELD
GEA
R
Reduced perfor-mance;diminishing flame,slowboil
Insufficientpressureinfuelbottle
Pump plunger as required to increase pressure.
Obstructions in jet and/or fuel line Remove obstructions.Incorrect jet installed for fuel type Install correct jet.
Pump not pres-surizing
Dry leather pump cup Lubricate or replace pump cup.Dirt in check-valve assembly Clean check-valve assembly.
* Stove and pump replacement parts available in the repair kit.
Coleman® Gas Stove Operating the StoveFilling the Tank:
• Close the valve and unscrew the tank cap. Do this care-fully if the tank has pressure inside.
• Use a fuel funnel (with filter) to fill the tank. Use white gas only.
• Wipe off any spilled fuel and replace the cap. Caution: Never open the tank around an open flame! Never remove the cap while the stove is running!Pressurizing the Tank:
• Close the cap and ensure the generator valve is closed. • Turn the pump plunger handle to the left to open. • Place a thumb over the small hole in the handle and pump
35 to 50 times. • Turn the plunger handle to the right to tighten. • Put the stove handle into the opening on the side, insert
the generator into the mixing chamber, and place the tank in hanger brackets.
Lighting the Stove:• Close the auxiliary burner valve.• Turn the fuel-valve lever to the up position.• Hold a match above the main burner and open the fuel-
flow valve wide.• Let the stove burn for one minute with fuel-valve lever up.• When the flame is blue, turn the valve lever down.
Note: Add more pressure if needed, but hold the tank firmly. If the flame does not burn fully, open and close the valve to clean the tip. After the main burner is lit, the auxiliary burner can be lit by opening

47USAP Continental Field Manual
FIELD GEARthe valve on the left side of the stove. If there are problems, refer to the “Troubleshooting Guide” included with the stove.Shutting Off the Stove:
• Put the fuel-valve lever in the up position and let the stove burn for one minute to reduce carbon deposits.
• Turn off the valve. The flame will burn for a few minutes until the gas in the generator is gone. When the flame is out, let the stove cool before packing it away.
Coleman® Gas Stove TipsMost problems associated with Coleman® stoves occur in extremely cold temperatures. This stove was not designed for use in sub-zero temperatures, and measures must be taken to enhance its perfor-mance:
• Use white gas only. Always use clean, filtered gas. • Do not overfill the tank, as this impedes performance. • The pump mechanism becomes impaired as temperatures
drop. Keep the pump plunger oiled. Also, the rubber or leather pump cup sometimes dries out. It is essential to keep it oiled and pliable.
• In temperatures below -6°C, the stove generator must be preheated to ensure the fuel vaporizes. Apply priming paste along the generator and above the burner. Light it with a match. Allow at least three minutes of burning to ensure the stove is sufficiently preheated. When the flame burns down, make sure the lever is up and open the valve. The burner should light from the paste.
• Keep the stove and tank clean. Grease deposits can flame up. Line the inside of the stove with foil for easy cleaning.
Note: Place the stove where it can be thrown out of the tent in an emergency. Keep a small fire extinguisher nearby.Coleman® Gas Stove TroubleshootingIf fuel vaporization does not occur, liquid gas collects in the manifold assembly and a strong, blue flame cannot be achieved. The stove will sputter and spark, and the flame will be orange and sooty. If this occurs, shut the stove down and allow it to cool off completely. Remove the tank assembly and clean fuel from the manifold and burners with absorbent pads provided in the spill kit (the small, black nylon bag). Replace the tank assembly and repeat the lighting pro-cess.To access the control valve assembly (behind the knobs and under the burners) for troubleshooting:

48 USAP Continental Field Manual
FIELD
GEA
R• Unscrew the burners• Turn the stove over and unscrew the nuts on the bot-
tom. It should be possible to push the burner assembly up and release the retaining ring that holds the burner to the metal tray. Alternatively, spread the retaining rings to release the burner assembly.
• Remove the metal tray for access to the burner and con-trol valve assemblies.
Coleman® Gas Stove TroubleshootingProblem Possible Cause Remedy
No pressure
Cracks, dryness, creases, or tears in pump
Remove and inspect pump; replace if necessary and oil.
Leaking tank lid gasket Check gasket; replace if necessary.
Afloodedpumpcylinderindicates a faulty pump valve Replace pump valve.
Broken seal at valve assem-bly and tank junction
Tighten by one rotation, if pos-sible; replace seal if necessary.
Loose generator Tighten.
Loses pressure too fast
The tank will lose pressure the longer it sits without periodic pumping
If pressure is lost soon after pumping, check all joints and gaskets.
Leaky cap and gasket Replace if necessary.
Yellowflame
Bad or dirty generator Clean or replace.
ManifoldassemblyisfloodedTurn stove off, cool, remove tank assembly, and wipe out excess fuel.
Bad fuel Drain and replace with new fuel.
Orangeflame(on older stove withflamerings)
Corrosiononflamerings
Removeflameringsasonawhite gas stove. Lightly use steel wool or a nylon brush to remove corrosion from each ringandimproveflamequality.
Flame at gen-erator/manifold assembly
Tip of generator is loose Tighten.
Poorgasflowtoburner
Clogged generator Clean or replace generator.Cleaning needle is non-functional or bent
Check the needle and replace if necessary.

49USAP Continental Field Manual
FIELD GEAR
Weakflame
Generator too cold Preheat generator.Bad or dirty generator Clean or replace generator.Pressure too low Increase pressure.
ManifoldassemblyisfloodedTurn stove off, cool, remove tank assembly, and wipe out excess fuel.
Contaminated fuel Replace fuel.
Control valve nut too loose
Remove the metal tray (see above). There is a small nut where the copper tube meets the control valve assembly. Try tightening(orfirstlooseningthen re-tightening) this nut. This often works on new stoves that burn poorly.
Flaring
Loose gas tip Tighten gas tip (at end of generator).
Flooded burner Shut down stove and dry it outExcessive pressure in tank Reduce pressure.Insufficientpriming Shut down stove and re-prime.Premature switch to “on” positionoffuelflowswitch
Refrainfromopeningfuelflowswitch too early.
Contaminated fuel Replace fuel.
Grease in stoveClean grease out of stove. Line the bottom of the stove with foil and change when dirty.
Coleman® Propane Stove Note: Propane cylinders should only be stored outside of a tent. Use a long propane hose though an opening in the tent door or window to connect the cylinder to the stove.Setting up the Stove
• Press on latch to open the lid.• Position the wind baffles.• Insert wire clips into slots.• Close both burner valves firmly. • Remove the regulator from storage under the grate.• Attach the regulator, hand tight, to hose or propane bottle. • Inspect the gasket on the stove connection before attach-
ing the regulator.• Screw the regulator hand-tight onto the stove.

50 USAP Continental Field Manual
FIELD
GEA
ROperating the StoveLighting Electronic Ignition Stoves
• Open the burner valve and rotate the igniter knob several times until the burner lights.
• Use a match to light the burner if the igniter fails. Lighting Standard Ignition Stoves
• Hold a lighted match near the burner and open the valve. • Adjust the flame with burner valves.
Shutting the Stove Off• Close the burner valves firmly.
Storing the Stove• Remove the propane cylinder or hose.• Unscrew the regulator from the stove and store it under
the cooking grate.
Preway® Diesel (AN-8) Heater These heaters are installed in the McMurdo Dry Valleys.
Lighting the Heater• Make sure the Preway® is level. This is very important! If it
is not level, it will not burn correctly.• Make sure the outside fuel valve at the tank is open and
the breather tube is open to prevent “air lock.” If there is no breather tube, loosen the upper bung cap.
• Open the valve behind the Preway®.• Take a small piece of toilet paper, wrap it around the end
of a wire, and place a small amount of burn paste on it.• Push the safety lever down on the carburetor.• Open the valve knob on the carburetor to “3” (the halfway
position).• Allow a small amount of fuel (about two tablespoons) to
puddle in the bottom of the burn chamber.• Shut off the valve knob on the carburetor.• Light the fuel in the burn chamber with the tissue on a
wire, removing it once the fuel is lit. • Allow the fuel to burn until the flame is nearly out. This
preheats the chamber.• Open the valve knob on the carburetor to “3” again and
push down the safety lever.

51USAP Continental Field Manual
FIELD GEAR• Adjust heat as desired. Typically these heaters burn poorly
and will soot excessively on either “1” (too low) or “6” (too high), reducing performance and requiring frequent cleaning. Stick with settings “2” through “5.” For reference, a properly burning heater doesn’t require cleaning more than once every couple of months.
Shutting Off the HeaterClose all valves and lift the safety lever on the carburetor.
Things Not To Do with a Preway®:• Do not leave burned tissue in the chamber, and do not
throw any other combustibles in the burn chamber. Yes, they will burn (partially), but the heater will soon stop working and be full of partially burnt ashes. The Preway® is not an incinerator.
• At start-up, do not turn the stove up to a high number immediately. Let the heater warm up first on “3” or it will make frightening “woofing” sounds.
• Don’t leave the burn chamber door open longer than nec-essary when the heater is burning. It interferes with proper drafting by letting too much air in.
• NEVER wire down the safety lever on the carburetor. If it needs to be “held down” for operation, there is an internal problem that needs to be addressed. Wiring down the lever poses two risks: 1) flooding the heater with too much fuel (creating a mess), or 2) flooding the structure with the full contents of the fuel barrel (even bigger mess).
Empire® Vented Propane Heater These heaters are installed in sea ice huts.
Starting the Heater• Turn on propane at the tank by turning the knob all the
way to the left.• Open the combustion air vents on the wall.• Open the valve behind the stove (the handle in line with
the tube to the stove).• Set the heat dial (numbered 1-7) to “1.”• Remove the front panel of the stove by lifting the bottom
out and then up.• Remove the pilot-light sight glass.

52 USAP Continental Field Manual
FIELD
GEA
R• Push and hold down the control knob; turn from “off” past
“ign” to “pilot.”• Light the pilot with a match; don’t bother with the piezo
igniter.• Hold the control knob down in “pilot” position for one min-
ute after lighting.• Let the control knob pop up and move it to the “on” posi-
tion.• Replace the sight glass and front panel of stove.• Adjust heat dial as desired.
Shutting Off the Heater• Set heat dial to “1” and control knob to “pilot.”• Close combustion air vents.
Note: The pilot light should be left on at all times unless the tank is being changed or the hut is being moved. Be sure and turn off the propane at the tank if moving the hut.
SledsThe Berg Field Center (BFC) issues several types of sleds that can be towed behind a snowmobile or pulled with a rope by someone skiing or walking. Each field team should consult with BFC staff to determine which sled type matches the team’s requirements.
Loading and Securing CargoFollowing are illustrations showing how to distribute the cargo load on a Nansen sled. The same principles apply to the other sleds. Load the sled with heaviest items on the bottom. Place small items in sled bags. The survival bag should be placed at the top of the load, along with anything the team members might need during the day. Rock boxes (18” L x 12” H x 12” D wooden boxes) make conve-nient containers for fieldwork and can be loaded with both samples and gear. Rock-box platforms are available if the team anticipates hauling a large number of boxes.It is best to transport fuel drums on drum cradles for stability.
• Nansen sleds can haul two drums side to side.• Siglin® ultra high molecular weight (UHMW) sleds can
also accommodate two drums side to side.• Komatik sleds can carry up to five drums side by side.
Secure the finished load tightly with cord, cargo straps, or bungee
53USAP Continental Field Manual
FIELD GEARcords. Banana sleds have fabric cargo covers attached along the sides. The fabric folds over the cargo and is tied down. Siglin UHMW sleds have side ropes for lashing down gear.Avoid using hard knots when rigging loads for travel. Use taut-line hitches or trucker’s hitches instead, as they are easy to undo if it becomes necessary to re-tension a cord. Be sure to check all lash-ings periodically and every time the team stops for any reason. At the same time, inspect the snowmobile, tow plate, ropes, and sled for any developing structural issues. Re-tighten the lashings if they have become loose. It is prudent to bring extra lashing supplies into the field.
Pulling Sleds with a SnowmobileWith ideal surface conditions, a tail wind, and light loads, a snow-mobile may achieve seven miles per gallon (mpg). Soft snow condi-tions, heavy loads, and strong head winds significantly reduce fuel efficiency. Mileage can drop to as low as two to three mpg. In good conditions, a snowmobile may be able to pull up to 2,000 pounds. Soft snow and a head wind will reduce that substantially. It is impor-tant for field teams to keep these things in mind when planning loads and fuel consumption.Snowmobile operators pulling a sled should adhere to the following rules:
• Attach sleds equipped with rigid tongues directly to snow-mobiles. Other sleds attach with a tow rope.
• Before driving, rock sleds back and forth to break the run-ners and bottom free of the ice.
• Drive slowly. Driving fast over uneven terrain may cause a sled to tip over, which can damage not only the sled and cargo, but the snowmobile as well.
• Drive even more slowly if pulling passengers. Everyone must wear a snowmobile helmet, including those riding on the sled.
• Maintain situational awareness and regularly look back to ensure everything is riding securely, especially passen-gers.
• Stop gradually so the sled doesn’t run into the back of the snowmobile.

54 USAP Continental Field Manual
FIELD
GEA
R
Nansen sled weight distribution example

55USAP Continental Field Manual
FIELD GEAR
Nansen sled load example
56 USAP Continental Field Manual
FIELD
GEA
RSnowmobiles, Generators, and Renewable Energy Power SystemsThe Mechanical Equipment Center (MEC) provides training in the operation and maintenance of equipment to science team members before they deploy to the field. General operation and troubleshoot-ing guidance is provided here as a reference. Contact the MEC for assistance or further guidance, if required.
Snowmobile Operation
Operational Guidelines• All riders and passengers must wear a helmet! This
includes people pulled on a sled behind a snowmobile.• Each operator is responsible for checking a machine
before each use. • Ensure the correct fuel is used. Snowmobiles have two-
stroke engines that require gasoline (mogas) pre-mixed with lubricating oil. The mixture ratio is 50:1 (12 ounces of oil per five gallons of mogas).
• To avoid over-working the electric starter, the pull starter should be used when the engine is cold.
• A snowmobile’s center of gravity is just in front and toward the bottom of the fuel tank. Operators must shift body weight for turning and as needed for the load, the terrain, and the snow and ice conditions.
• Be mindful of track tension. In general, if the track is slapping against the frame tunnel while the snowmobile is in motion, it is too loose. Adjustments to both tension and alignment are made via long bolts at the end of the suspension.
• Watch for loose trailing straps and ropes, as these can get tangled in the tracks and around axles.
• Never shift the transmission unless the snowmobile is stopped. Shift gently. If gears will not engage, turn off the engine, shift gears, and restart. Abusive shifting can cause drive-train problems that are not repairable in the field.
• Park snowmobiles so they face into the prevailing wind, and always cover them. This reduces the likelihood of snow fouling the points and accumulating under the cowling.

57USAP Continental Field Manual
FIELD GEARPreventative Maintenance
Daily• Check operation of the snowmobile. • Check the suspension, particularly when operating on ice.
Look for broken suspension components.Weekly• Check for loose mounting bolts on bogie wheels, skis
(particularly the two bolts through the springs), rear sus-pension, and steering. A small suspension problem can rapidly become serious (e.g., slashed tracks, broken bogie mounts).
Loading, Towing, and DrivingLoading
• Maintain a low center of gravity.• Place survival packs on the front to help maintain ski con-
tact on hills.• Keep straps tied down; ensure there are no loose ends.• Place frequently used items where they are easy to ac-
cess.Towing a Sled
• Sleds may be towed with rigid tongues or ropes, depend-ing on the circumstances. Rigid tongues are preferable.
• Check the hitch mechanisms on both snowmobile and sled for proper operation.
• Cover the load to protect it from track spray, if necessary.• Check load tie-downs for tightness and security shortly
into each trip.• Check both the sled and the load frequently for problems.
Driving• Whenever possible, drive on a proven trail or a hard sur-
face.• If driving in powdery snow and the snowmobile begins to
bog down, head in the straightest line possible for firmer or packed snow; sharp turns will compound the problem; maintain the throttle.
• If the machine slows and reaching firmer snow appears impossible: STOP! DO NOT CONTINUE SPINNING THE TRACK! – Tip the snowmobile on its side (in both directions, if nec-
essary), clear snow from the track, and pack the snow under the track.

58 USAP Continental Field Manual
FIELD
GEA
R– Dig a ramp out of the hole and attempt to ease the ma-
chine out of the hole, with other people pushing. Or use a tow rope and have another snowmobile pull the stuck one out.
Caution: If a stuck machine does not come out quickly when towing it, stop towing and dig more. Continual tow-ing wears drive belts prematurely and can cause them to break. It can also damage engine parts.
Driver CommunicationHand signs for group travel on snowmobiles
Hand Sign MeaningNo sign “Not ready to depart”Hand on head “OK, ready to depart”Arm waving above head “Problem - Assistance required”Leftarminair,elbowatrightanglewithfist “Stop” or “Stopping”Arm outstretched, palm down, patting down “Slow down” or “Slowing down”Arm outstretched, palm up, pushing up “Speed up” or “Speeding up”
Troubleshooting
Fuel Flow ProblemsSymptoms: The engine cranks but it won’t run; no fuel is present in the line from the pump to the carburetor; the engine may run briefly after priming.Diagnosis and Cure:
1. Check the fuel level in the tank.2. Pry the fuel line off the carburetor, pressurize the fuel tank
(i.e., seal and blow into the vent line) to see if fuel flows out the end of fuel line. Crank the engine to see if fuel pulses out the end of fuel line.
3. If fuel flows adequately and pumps adequately, the prob-lem may have been small ice crystals in the fuel pump valves. Pressurizing the tank dislodged them, solving the problem. Replace the line and continue operation.
4. If fuel flows when the tank is pressurized but does not pump, the problem is in the fuel pump. First, disconnect the vacuum pulsation line from the center of the fuel pump to the engine crankcase. Blow through the line. If it is blocked, clean ice out of the line with wire. Check the nipples on the pump and crankcase for obstructions. If

59USAP Continental Field Manual
FIELD GEARthe vacuum line is operational but fuel still does not pump, replace the pump or remove it and thaw it.
5. If fuel will neither flow nor pump, then either the line or the fuel filter is clogged. Clean the line or replace the filter.
6. If the tank is under vacuum pressure when the cap is open, check the vent line for obstructions or pinches. Oc-casionally the vent hose will rub on the exhaust and melt. Make sure the tank is venting properly.
7. If all of the above is tried and still no fuel flows, check the line for cracks or holes. Look for any obvious fuel deposits (i.e., discolored snow) in the engine compartment. Repair or replace the line.
Starter/Cranking ProblemsSymptoms: Engine cranks slowly or not at all when key is turned.Diagnosis and Cure:
1. Usually this problem indicates a dead battery. If that is the case, the engine must be pull-started. Once the engine is running, the battery should begin to recharge, unless it is shorted or the rectifier is faulty. The battery can also be charged with an AC charger, if one is available.
2. If the battery is fine, check the in-line fuse (30 amp) in the red wire near the starter or see if the red-green wire has slipped off the terminal on the starter solenoid. Finally, the starter itself may be faulty.
Spark ProblemsSymptoms: The engine cranks but it won’t start. Fuel is present in the line between the fuel tank and carburetor.Diagnosis and Cure:
1. Remove both spark plugs. Push the spare plugs into the wire caps, ground the metal plug bodies to the metal en-gine housing, and crank the engine. If a spark can be seen at the electrodes of the spare plugs, the problem may be that the installed plugs were fouled with excessive fuel, ice, or a piece of carbon. Install the new plugs or clean and re-install the old ones. Note: When the engine is cold, it may be hard to see the spark in direct sunlight.
2. If a spark is not present, the problem is in the electrical system. First, check the kill switches and all electrical con-nectors. If they are in the correct position and operational, the solution to the problem depends on the engine type.a. 503/550: These models have an electronic ignition, so

60 USAP Continental Field Manual
FIELD
GEA
Rthe problem is probably the igniter box. Replace the igniter box.
b. Other engines: The problem may be a bad coil or a shorted wire.
Power ProblemsSymptoms: The snowmobile runs but it lacks power.Diagnosis and Cure:
1. If engine seems to be running fine, but the snowmobile has trouble with uphill starts, the problem may be with the clutch-driven pulley. Remove the cowling and see where the belt is riding on the pulley. It should be along the outer edge of the driven pulley when the snowmobile is at rest. If the belt is instead slotted down between the driven-pulley halves, check for ice in the drive and driven pulley. Shift the transmission into neutral and rev the engine slowly until the belt works its way to the outer edge.
2. If the engine has very low power or dies when revved, remove the carburetor and check for ice. If ice is present, thaw out the carburetor and reinstall it. If the engine is weak and runs rough, but the carburetor is ice free, the problem may be a bad spark in one cylinder. Follow the procedures outlined in Spark Problems.
3. The problem may be altitude. If hill-climbing performance is weak and the problem isn’t the belt or an iced-up carbu-retor, check the spark plug color. Chocolate brown is cor-rect; gray or white too lean; and black signifies a mixture that is too rich. For altitudes up to 4,000 feet, decrease jet size by one increment from the standard setting (i.e., 290 to 280). From 4,000 feet to 8,000 feet, decrease it by two increments. From 8,000 feet to 11,000 feet, decrease it by four. Remember to enrich the mix when returning to lower altitudes.
Honda Generator Operation
Generator Safety• Place the generator on a firm, level surface. If the genera-
tor is tilted or turned over, fuel may spill or the generator may become contaminated with soil or water.
• To prevent a fire hazard and provide adequate ventilation, keep the generator at least three feet away from tents or other equipment during operation. Do not place flammable objects close to the generator.

61USAP Continental Field Manual
FIELD GEAR• Know how to stop the generator quickly. Know how to
operate all the controls. • Do not let the generator get wet, and do not operate it with
wet hands. The generator is a potential source of electrical shock if misused.
• Gasoline is extremely flammable and is explosive under certain conditions. Do not smoke or allow flames or sparks where gasoline is stored or where the generator is refu-eled. Refuel it in a well-ventilated area, with the engine stopped.
• The engine muffler becomes very hot during operation and remains hot for a while after stopping the engine. Be careful not to touch the muffler or engine until the genera-tor has cooled down. Let the engine cool before storing the generator indoors.
Pre-Operation Check1. Check and add fuel (mogas), if necessary.2. Check and add engine oil (0W30), if necessary. Check the
oil level every time fuel is added.3. Check the air cleaner element to ensure it is clean and
free of ice and snow. It should feel oily.
Starting the Engine1. Make sure the AC circuit breaker is in the “off” position. It
may be hard to start the generator if a load is connected. 2. Turn the fuel valve to the “on” position. 3. Pull the choke rod, or lever, to the closed position. Note:
Do not use the choke if the engine is warm. 4. If the generator is so equipped, make sure the auto-throt-
tle switch is off.5. Move the engine switch to the “on” position. 6. Pull the starter grip slowly until resistance is felt, then pull
briskly. Note: Do not allow the starter grip to snap back. Return it slowly by hand.
7. Once the generator has started, push the choke rod, or twist the choke lever, to the open position as the engine warms up.
8. Allow the engine to warm up for three to five minutes; do not apply a load during this time.
9. Once the generator is warm, turn on a breaker or plug in a load.

62 USAP Continental Field Manual
FIELD
GEA
RStopping the Engine
1. Turn off the breaker or unplug the load.2. Allow the generator to run unloaded for two minutes to
cool down. 3. Turn off the engine switch. 4. Turn off the fuel supply.
TroubleshootingSymptom: The engine will not start.Diagnosis and Cure:
1. Check that the engine switch is on.2. Check to see if the oil-alert lamp flashes when the starter
is pulled. If it does, add oil.3. Ensure all loads are disconnected from the AC recep-
tacles.4. Check to see if there is a spark at the spark plug. Ground
the side of the electrode to the engine and pull the recoil starter to see if a spark jumps the gap. If there is no spark, replace the spark plug.
5. Check to see if gasoline is reaching the carburetor. Place a suitable container under the carburetor and loosen the drain screw. Fuel should flow freely. If it does not, check the fuel valve on the tank.
Symptom: The engine starts but stops immediately.Diagnosis and Cure:
1. Check the oil level. If it is low, fill the oil reservoir to the top of the dipstick.
2. Restart the engine.Symptom: There is no electricity at the receptacles.Diagnosis and Cure:
1. Check to see if the AC circuit breaker is on.2. Check the appliance or equipment plugged into the gen-
erator for defects.
Mini-Portable Field Power SystemsThe Mini-Portable Field Power System (MFPS) is a portable, self-contained solar power supply that can be disconnected and disas-sembled quickly for transportation. The unit is composed of three components: a weatherproof box, a solar panel stand, and an out-put cable. The input and output cables connect to the battery box

63USAP Continental Field Manual
FIELD GEARvia sturdy, screw-on, weatherproof connectors. The system is fully grounded, and all wiring and electrical components are rated to -40° C. Maximum output is 300 watts AC or 80 watts DC.Directions:
1. Open the box and inspect the unit for damage or loose wires. Correct as necessary.
2. Decide on the configuration of the solar panels. They can be mounted on top of the box with four 1/4 X 20 bolts, they can stand independently and be tied down, or they can be spread out to face the sun for maximum input. However they are configured, ensure the panels are secure in case of wind gusts.
3. Connect the three-pin solar plug to the three-pin recep-tacle.
4. Connect the five-pin extension cord to the five-pin recep-tacle.
5. Turn the 40-amp breaker to “on” and turn the switch on the far side of the inverter to “on.” AC power will now be avail-able.
When battery power is low, the AC and DC outputs will disconnect. The power will not return until battery voltage reaches 12.2 volts DC. Disconnect loads and let the system recharge. Recharge time from 80% discharge is approximately three days in the sun. Keep in mind there is rarely full sun in Antarctica for three days in a row.