fieldgeniussetting to post-process data with...
TRANSCRIPT

1
FieldGenius settingto Post-Process data withEZSurvTM
2012 - Training documents / Setting a Rover using a VRS (network)
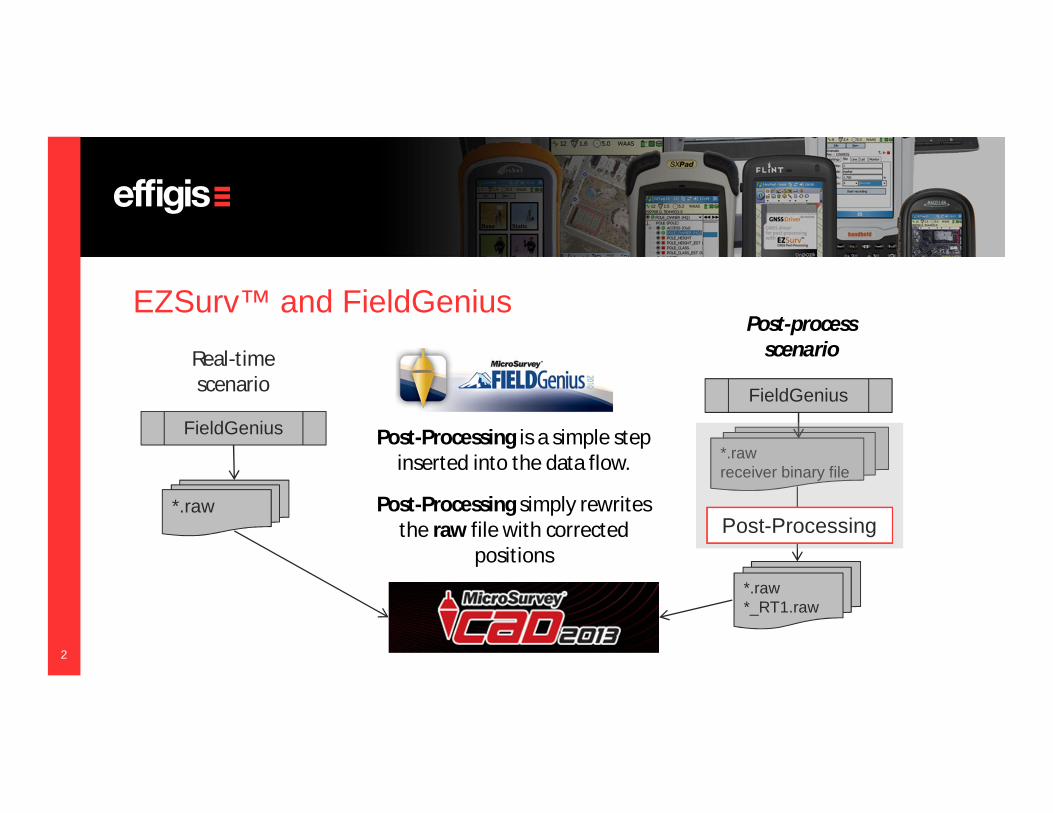
EZSurv™ and FieldGenius
FieldGenius
*.rawreceiver binary file
*.raw*_RT1.raw
FieldGenius
*.raw
Real-time scenario
Post-process scenario
Post-Processing is a simple step inserted into the data flow.
Post-Processing simply rewrites the raw file with corrected
positionsPost-Processing
2

This tutorial explains how to use FieldGenius to Post-Process GNSS data using EZSurv™ Post-
Processing software
More specifically, it explains how to use it to set a rover to be used with a VRS (network) or
simply to be used in Post-Processing
3

4
Project Setup (1/2)
Start FieldGenius Project Manager
To open an existing project, use the “Open” button after selecting the appropriate project
To create a new project, select the «New Project» button. If you choose to create a new project, you’ll have to enter a project name in the next window.
(not shown here). After entering the name or opening an existing project, you’ll be brought to the “Project Review” window.
This window let you review the parameters associated to the existing project or the new project (RTK_ROVin this example).
Click continue, then you will end up in the Unit Setting Windows
New project File

5
Project Setup (2/2)
Unit Setting WindowsSet your distance, and angle unit
Define a coordinate system
Select or edit a mapping system
Add Predefined or custom coordinate system

6
Setting Rover receiver (1/7)
Go Back to the Map View – Select Setting
Select GPS Rover
If there is any receiver configured, you will have to add one (2), or edit an existing one (3). These profiles are associated to a specific instrument.
If you always use the same receiver as a rover, you could simply create an instrument profile for it and re-use the same one over and over again.
If you have to edit a profile, you will end up to the “GPS Profile” window.
From here there is 5 possible settings

7
Setting Rover receiver (2/7)
Setting Model and communication
Make: Select the receiverbrand
Model: Select the model of the GNSS receiver you’re using.
Port: Select the communication medium. If you are using a wired communication, select the appropriate COM port and parameters. “Bluetooth Search” lets you search and pair with bluetooth devices in range of your pocket PC.
Create Tolerance«profile»
Observations: Number of epoch to record for a point.Solution: Minimum solution type to record a position (if you want to post-process your data, always use «AUTONOMOUS», then if you have an RTK position it will record it, if you lose RTK it will still record it to be post-processed.Elevation: Required elevation mask.PDOP: Minimum PDOP to consider an epoch as validSatellites Computed: Minimum number of satellite to consider an epoch as valid (5 is good)StdDev Horizontal: Minimum horizontal standard deviation to consider an a epoch as valid (always put a high number if you want to post process your data)StdDev Vertical: Minimum vertical standard deviation to consider an a epoch as valid (always put a high number if you want to post process your data) Please do not use the “Post Process” tolerances (check the note on the image).
You can edit the 3 Tolerance «profile» to fit your needs (and edit their Name). During a survey you can switch from one to another to fit your need.
8
Setting Rover receiver (3/7)
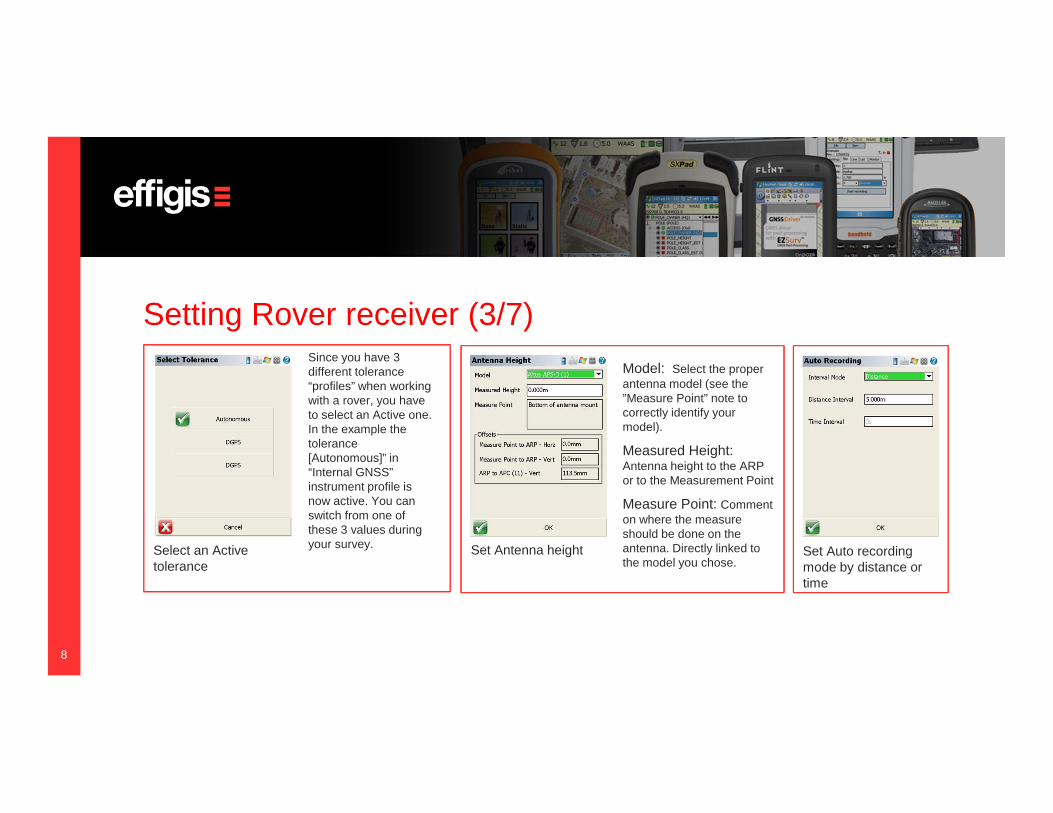
Select an Active tolerance
Since you have 3 different tolerance “profiles” when working with a rover, you have to select an Active one. In the example the tolerance [Autonomous]” in “Internal GNSS” instrument profile is now active. You can switch from one of these 3 values during your survey. Set Antenna height
Model: Select the proper antenna model (see the ”Measure Point” note to correctly identify your model).
Measured Height: Antenna height to the ARP or to the Measurement Point
Measure Point: Comment on where the measure should be done on the antenna. Directly linked to the model you chose.
Set Auto recording mode by distance or time

9
Setting Rover receiver (4/7)
Click YesGo back in the Instrument Selection screen and click Connect
Set GNSS raw data logging – Click OK
Logging Name: GNSS File name (for the rover) to be recorded on the receiver SD card. (“ROVER” in this example).
Logging rate: for a rover is locked at 1 second. This is a direct impact of the “OnPOZTagging” option checked earlier.
Start Logging: Start the raw GNSS data logging. Be sure to press this button before pressing “OK” to get out of this window.

10
Corrections settings -Close
Link Device: To do RTK you will need to correctly identify which type of device you are working with and select it here. If you use your receiver to connect on the internet, choose “GSM Module”; if the SIM card is in the data collector, please select “Data Collector Internet”. In the example above, I have selected “GSM Module”. To configure my link device, press on “Setup”. You will get the “Mobile Settings” window that allows to enter the information about ISP (called “Network Options”) and the Base that is going to transmit the corrections (called “Data Source”). Press OK when done. You will be brought back to the “Link Configure” window.
Link Communication: When selecting certain “Link Device” (“Data Collector Internet” for example), the “Link Communication” settings will be editable. You will then be able to enter all the information required for a proper connection to the device selected (refer to the FieldGenius manual).
Data format: Options that allows you to set the format of your GNSS correction to be received. Also lets you pick a station ID, useful when doing local RTK.
Setting Rover receiver (5/7)
Mobile Setting Windows
When finished, press “Connect”. FieldGenius will then apply the parameters you have entered and try to connect to the base station. If everything is correctly entered, it will bring you to the Map View windows. If some settings are wrong, a prompt whit “initialization
failed” will show up. Please review your parameters and try again.

11
Back to Map View to set OnPOZ Tagging –Click on
Click on setting Click on Option Select OnPOZtagging on click OKBack to Map View
Setting Rover receiver (6/7)This option is critical to post-process with EZSurv™.
It allows to do PPK (or replay your RTK run in post-mission).
If it is not check You cannot post-process your *.RAW FieldGeniusproject file with EZSurv™
12
Setting Rover receiver (7/7)
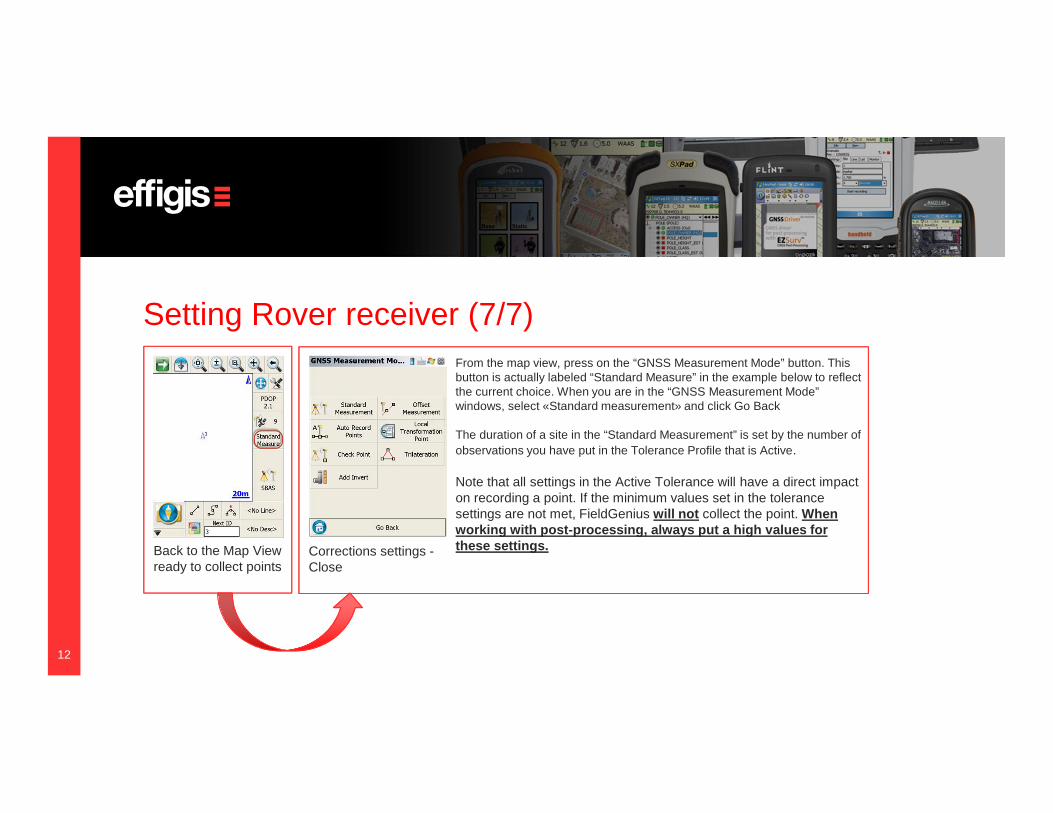
Back to the Map View ready to collect points
Corrections settings -Close
From the map view, press on the “GNSS Measurement Mode” button. This button is actually labeled “Standard Measure” in the example below to reflect the current choice. When you are in the “GNSS Measurement Mode” windows, select «Standard measurement» and click Go Back
The duration of a site in the “Standard Measurement” is set by the number of observations you have put in the Tolerance Profile that is Active.
Note that all settings in the Active Tolerance will have a direct impact on recording a point. If the minimum values set in the tolerance settings are not met, FieldGenius will not collect the point. When working with post-processing, always put a high values for these settings.

13
Your rover is now configured, it is receiving corrections (or not, if you are working purely in Post-Processing) and it is recording raw data.
You can now collect as much points as you want. These points will all be recorded in the same *.RAW file as the one used to start the Base.
You can change your Active Tolerance to accommodate your needs while doing a survey. In open area, when working in the radio range, you can use a Tolerance that
accepts only RTK point. Whereas, in some other areas, you can select an Autonomous Tolerance in order to still work while the radio is down and post-process
these positions
Some steps described in this tutorial will not have to be done every time, once set, they can be reused time after time
14
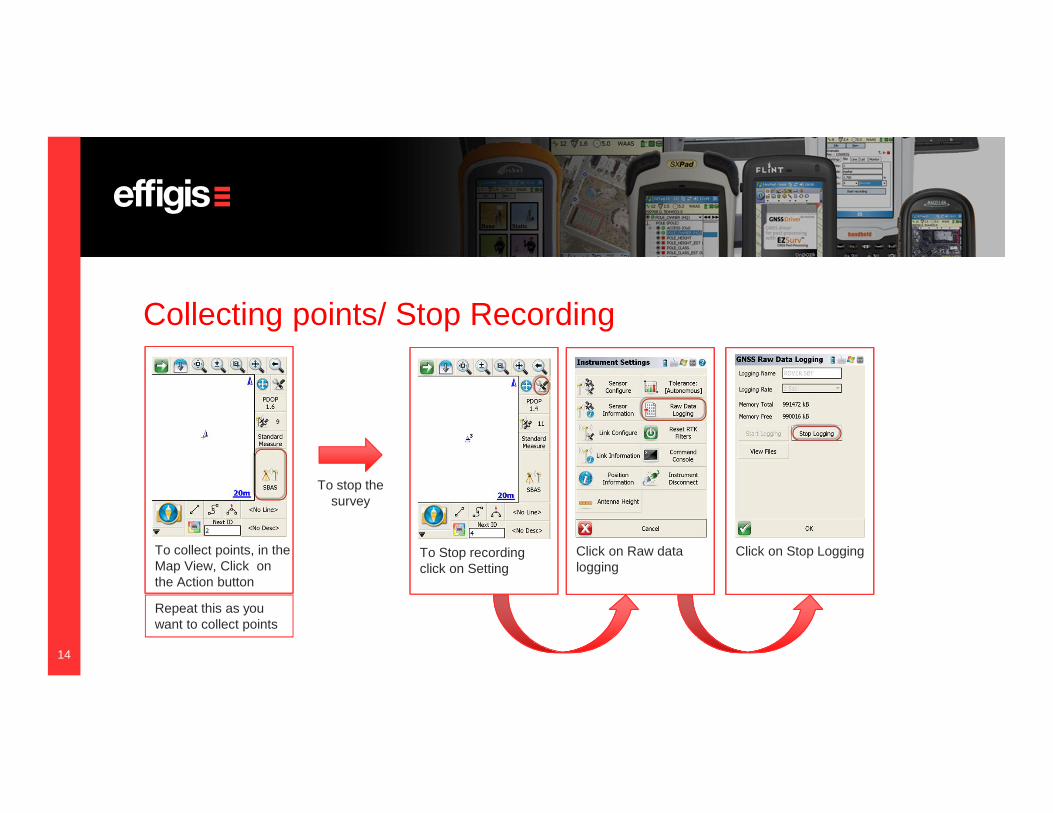
To collect points, in the Map View, Click on the Action button
To Stop recording click on Setting
Click on Raw data logging
Click on Stop Logging
Collecting points/ Stop Recording
Repeat this as you want to collect points
To stop the survey

15
From the Map View, click on button
Exit FieldGenius
Click on Exit Click Yes

16
Data Files that you should get on you r PC after file transfer.
Data Files
File from the data collector.Simply import this file in EZSurv™ for post-processing (and select the proper Base Station provider)
Receiver binary file from the Rover receiver SD card
