flexistim, tens,ems,ift, mic
DESCRIPTION
electrotherapyTRANSCRIPT

Instructions For Use
Flexistim
READ INSTRUCTIONS CAREFULLY BEFORE USE
flexistim instructions final.indd 1 27/11/2014 12:06

FOREWORDRead this User Manual carefully before you start using your Flexistim unit.The manufacturer strongly recommends carefully reading of the “Warnings and Cautions” and Chapters of this User Manual.
1 INTRODUCTION 12 WARNINGS AND CAUTIONS 23 HOW TENS WORKS 54 EMS: WHAT IT IS AND HOW IT WORKS 6 4.1 Mode of operation 7 4.2 Treatment time and treatment interval 7 4.3 Choosing the right strength 85 TENS and EMS STIMULATION PARAMETERS: 8 5.1 Pulse Waveform 8 5.2 Pulse Frequency 9 5.3 Pulse Width 9 5.4 Pulse Intensity 10 5.5 WORK 10 5.6 REST 10 5.7 RAMP 106 IFT: WHAT IT IS AND HOW IT WORKS 117 MICROCURRENT 128 KEYPAD AND DISPLAY 139 CONTENTS OF THE PACK 1810 HOW TO ASSEMBLE YOUR UNIT 1911 OPERATION 22 11.1 Turn on the Device 22 11.2 Select Mode 22 11.3 Select a Programme 22 11.4 Set Treatment Timer 23 11.5 Attach the Electrode Pads 23 11.6 Adjust the Intensity 24 11.7 Skip Function 24
12 ADJUSTING MANUAL PROGRAMMES 25 12.1 TENS 25 12.2 EMS 26 12.3 IFT 27 12.4 MICROCURRENT 2713 LOCK AND UNLOCK YOUR OWN PROGRAMME 2814 MEMORY MODE 2815 PROGRAMMES 29 15.1 TENS PROGRAMMES 29 15.2 EMS PROGRAMMES 31 15.3 IFT PROGRAMMES 34 15.3.1 CHOOSING SETTINGS 34 15.4 MICROCURRENT PROGRAMMES 35 15.4.1 CHOOSING SETTINGS 35 15.4.2 HOW LONG SHOULD EACH SESSION LAST? 36 15.4.3 FOLLOW-UP 36 15.4.4 PROBLEMS 3616 ELECTRODE PAD PLACEMENT 37 16.1 Electrode Pad Placement for TENS 37 16.2 Electrode Pad Placement for EMS 39 16.3 Electrode Pad Placement for IFT 44 16.4 Electrode Pad Placement for Microcurrent 4617 FURTHER CLINICAL INFORMATION AND TREATMENT PROTOCOLS 4718 CARE OF ELECTRODES 4719 CHARGING THE BATTERY 4820 TROUBLESHOOTING 5021 CLEANING 5122 CONSUMABLES AND SERVICING 5123 WARRANTY 5224 DISPOSAL OF WASTE ELECTRICAL AND ELECTRONIC PRODUCTS (WEEE) 5225 SPECIFICATIONS 5326 STANDARD SYMBOLS 5527 EMC PRECAUTIONS 55
flexistim instructions final.indd 2-3 27/11/2014 12:06

1. INTRODUCTIONINTENDED USEThe Flexistim combines the treatment capabilities of a TENS device, an EMS or NMES device, a MIC stimulator, and an IFT stimulator all in one unit.TENS stands for Transcutaneous Electrical Nerve Stimulation. The TENS settings are used to provide symptomatic pain relief for chronic, acute or post-operative pain.EMS stands for Electrical Muscular Stimulation. The EMS settings are used to provide a muscular training for localised regeneration and muscular hypertrophy.MIC stands for MicroCurrent Stimulation. The MIC settings are used to provide symptomatic pain relief for chronic, acute or post-operative pain, and the DC setting is used for wound healing.IFT stands for Interferential Stimulation. The IFT settings are indicated for symptomatic relief of chronic intractable pain.The Flexistim is intended for use in both the Hospital and Home Healthcare Environments.
FLEXISTIM FEATURESFlexistim includes many of the features of a professional desk-top unit in a compact, portable, battery operated device.1. Multiple Functions10 TENS programmes, 27 EMS programmes, 4 IFT Programmes, 4 Microcurrent Programmes and 6 user defined programmes enabling you to experiment and save your favourite settings - unrivalled performance for a product of this size and price.2. Output99mA TENS and EMS60mA Peak to Peak pure sinusoidal carrier wave with constant energy (modified constant current) control and 40mA safety override for home use.700μA Microcurrent with DC option.3. MemoryFlexistim allows you to save and recall a particular programme setting and has a Usage Timer to record the time it has been used.
1 2
4. Power SupplyRemoveable, rechargeable Li-ion battery, with option of operation through external mains power adaptor.
2. WARNING AND CAUTIONSContraindications:1. Do not use this device on patients who have a cardiac pacemaker, implanted
defibrillator, or other implanted electronic devices, because this may cause electric shock, burns, electrical interference, or death.
2. Do not use this device on patients whose pain syndromes are undiagnosed.
Warnings: 1. Do not apply stimulation over the neck or mouth because this could cause severe
muscle spasms resulting in closure of the airway, difficulty in breathing, or adverse effects on heart rhythm or blood pressure.
2. Do not apply stimulation across the chest, because IFT currents penetrate deep into the tissue and the introduction of electrical current into the chest may cause rhythm disturbances to the patient’s heart, which could be lethal.
3. Do not apply stimulation over the pregnant uterus.4. Do not apply stimulation, other than microcurrent, over open wounds or rashes,
or over swollen, red, infected, or inflamed areas or skin eruptions (e.g. phlebitis, thrombophlebitis, varicose veins).
5. Do not apply stimulation over, or in proximity to, cancerous lesions.6. Do not apply stimulation in the presence of electronic monitoring equipment (e.g.
cardiac monitors, ECG alarms), which may not operate properly when the electrical stimulation device is in use.
7. Do not apply stimulation when in the bath or shower.8. Do not apply stimulation while driving, operating machinery, or during any activity in
which electrical stimulation can put the patient at risk of injury.9. Consult with your physician before using this device, because the device may cause
lethal rhythm disturbances to the heart in susceptible individuals.
flexistim instructions final.indd 4-5 27/11/2014 12:06

General Warnings:1. Do not immerse any part of the unit in water2. Do not place the unit close to excessive heat.3. Do not use any electrodes which are less than 50mm X 50mm.4. Use only the specified battery: 1x 3.7volt rechargeable lithium battery. The use of any
other battery could damage the unit.5. Remove battery if unit is not used for a long period of time.6. Do not use the unit while asleep.7. Do not put the lead wire on, or wrapped around the neck.8. Use this device only with the leads, electrodes and accessories recommended by the
manufacturer. Use of other parts materials supplied by the manufacturer can degrade minimum safety and invalidate the warranty.
9. After inserting plugs into both CH1 and CH2 sockets, please do not remove the plugs when the unit is working. Ensure that the unit is switched OFF before removing the plugs.
10. Keep the unit away from sources of high magnetic fields such as TV’S, microwave ovens and hi-fi speakers, as these may affect the LCD screen.
11. Keep the device away from a fireplace or radiant heater, as the heat may affect the device.
12. Keep the device away from nebulizer or steam kettle, as the moisture may affect the device.
13. Keep the device away from sunlight, as long-term exposure to sunlight may affect the rubber causing it to become less elastic and crack.
14. Keep the device away from lint and dust, as long-term exposure to lint or dust may affect the sockets or cause the battery connector to develop a bad contact.
15. Temperature & Relative Humidity of storage: -20°C–+40°C, 8%--70% R.H.16. Temperature & Relative Humidity of transportation: -20°C–+40°C, 8%--70% R.H.
3 4
10. Apply stimulation only to normal, intact, clean, healthy skin.11. Using the device directly over metallic implants could cause the currents to focus
over a small area, causing tissue burns. If you have metal implants, do not place the pads near, or across the implant, and adjust the intensity with care.
Precautions:1. Since the effects of stimulation of the brain are unknown, stimulation should not be
applied across the head and electrodes should not be placed on opposite sides of the head, unless you are in Microcurrent mode.
2. The safety of electrical stimulation during pregnancy has not been established.3. Some patients may experience skin irritation or hypersensitivity due to the electrical
stimulation or electrical conductive medium (gel).4. Patients with suspected or diagnosed heart disease should follow precautions
recommended by their physicians.5. Patients with suspected or diagnosed epilepsy should follow precautions recommended
by their physicians.6. Use caution when the patient has a tendency to bleed internally, such as following an
injury or fracture.7. Use caution following recent surgical procedures when stimulation may disrupt the
patient’s healing process.8. Use caution if stimulation is applied over areas of skin with less than normal sensitivity.9. Keep this device out of the reach of children.
Adverse Reactions:• Patients may experience skin irritation and burns beneath the stimulation electrodes
applied to the skin.• Patients may experience headache and other painful sensations during or following the
application of electrical stimulation near the eyes and to the head and face.• Patients should stop using the device and should consult with their physicians if they
experience adverse reactions from the device.
flexistim instructions final.indd 6-7 27/11/2014 12:06

5 6
3. HOW TENS WORKSTENS stands for Transcutaneous Electrical Nerve Stimulation. TENS stimulates your body’s own natural defences against pain. It is totally safe and has been used successfully by thousands of pain sufferers.TENS sends a gentle stimulation through the skin which works in TWO ways:Pain GateStimulating the sensory nerves, which carry touch and temperature signals. These nerves go to the same connections in the spine as the nerves carrying pain. A strong sensory signal will block the pain signal travelling up the spine to the brain. This is known as closing the “Pain Gate” and takes effect quite quickly after the unit is switched on. You can use TENS several times a day, for as long as you like.Endorphin ReleaseAt low frequency settings, and slightly stronger output, TENS drives the motor nerves to produce a small repetitive muscle contraction. This is seen by the brain as exercise and this promotes release of Endorphins – your body’s own natural pain killer. The relief builds up and normally takes about 40 minutes to reach a maximum level which can last for hours after the machine is switched off.By using TENS you can expect to achieve a significant reduction in pain if not complete pain relief.Side EffectsThere are no known side effects to TENS use and long-term TENS use is not harmful.Positioning the electrodes for TENSThe TENS effect is confined to the nerves entering a single vertebra in the spine. To be effective, you therefore need to stimulate a sensory nerve entering the spine at the same level as the nerve carrying the pain. For this reason electrodes are usually first placed where the greatest pain is felt. Nerves follow the curve of the ribs and spiral around the limbs, so you will need to try different positions until you find the best for you. Try moving the electrodes short distances to establish the positions that are most effective for you.TENS is clinically tested and approved for many applications including:• Back pain and lumbar and cervical spine problems
• Joint pain (e.g. knee joint, hip joint, shoulder)• Neuralgia • Headaches • Women’s period pains• Pain after injuries to musculoskeletal system• Pain with circulatory problems• Chronic pain through various causes
4. EMS: WHAT IT IS AND HOW IT WORKSEMS stands for Electrical Muscle Stimulation and is a widespread and generally recognised method which has been used for years in sports and rehabilitation medicine. In the sports and fitness field, one of the uses of EMS is as a supplement to conventional muscle training, in order to increase the efficiency of muscle groups and adapt physical proportions to the desired aesthetic results.EMS has two main applications. Firstly, a targeted strengthening of musculature can be produced (Activating application) and secondly a relaxing, resting effect can also be achieved (Relaxing application).EMS successfully rebuilds and tones muscles.Different levels of muscle contraction are achieved by sending electrical impulses of various types, depending on the programme selected, into the body. These muscle contractions retrain the muscles, increase their effectiveness and improve their condition. This is beneficial where muscles - for whatever reason - have not been in regular use and have lost condition (muscle atrophy). For sports, the benefit is to increase the effect of training and enhance performance.Typical uses are:• Muscle training to improve endurance performance• Muscle training to support the strengthening of certain muscles or muscle groups in
order to achieve desired changes to body proportions• Sports training, covering - warm-up, strength, speed, power, resistance, endurance
and recovery• Rehabilitation in relation to sports injuryThe effect on muscle tone of electrical stimulation (EMS) is generally only noticeable after regularly repeated application. Electrical stimulation does not replace regular exercising of the muscle, but is able to reasonably supplement it.
flexistim instructions final.indd 8-9 27/11/2014 12:06

WORK WORKREST
PERIODIC TIME PULSE WIDE
MONOPHASE PULSES
INTE
NSI
TY
PULS
EIN
TEN
SITY
RAMP
RAMP
BIPHASIC PULSES
WORK WORKREST
PERIODIC TIME PULSE WIDE
MONOPHASE PULSES
INTE
NSI
TY
PULS
EIN
TEN
SITY
RAMP
RAMP
BIPHASIC PULSES
7 8
Muscle wastage: EMS is used in the treatment of medical conditions involving muscle wastage including: Neuromuscular facilitation - Muscle re-education - Muscle training - Prevention/slowing of atrophy/hypotrophy - Preventing postoperative muscle weakness - Reduction of spasticity - Maintaining or increasing range of motion - Training of partial peripheral nerve damage with signs of re-innervation - Treatment of scoliosis.
4.1 Mode of operationEMS uses external electrical impulses that act through the skin to stimulate the nerves supplying a specific muscle group.The muscle reacts in different ways depending on the strength of current and duration and frequency of the electrical impulse.Muscles are made up of two different types of fibre:- Red fibre is slower contracting and aerobic working.- White fibre is faster acting and capable of anaerobic working.The proportions of red and white fibres depend on the way the muscle is used.Fibre can be converted from one type to the other, depending on the signals it receives. This is known as the Trophic effect.Different frequencies have different effects: Low (1-10 Hz) frequencies coupled with long impulse times have a purifying and relaxing effect through individual contractions, whereby the circulation in the treated muscle is simultaneously improved and removal of metabolic end products is supported (lymphatic drainage). The oxygen supply to the muscle is improved.In contrast, medium (20-50 Hz) frequencies can put a high level of strain on the muscle, thus promoting the muscular structure.Very high frequencies (60-90 Hz) can be used to promote muscle definition and bulk.The body maps at the back of this guide show pad positioning in order to stimulate specific muscle groups.
4.2 Treatment time and treatment intervalTreatment by EMS can vary between 15–60 minutes stimulation twice a week to treatment several times per day.
4.3 Choosing the right strengthThe object of EMS treatment is to produce powerful muscle contractions.The strength of the current should be increased to about three times the level at which you can first feel the tingling, or to as high as you can stand without causing pain. You will probably feel that electrical contraction is being more powerful than a voluntary contraction, because the current also stimulates your sensory nerves. The signals have a pain-relieving effect.You may find the sensation uncomfortable to start with, therefore you may not get up to therapeutic strength at the start of treatment. The strength can be increased during the course of the treatment, as you become accustomed to the sensation. Voluntary muscular activity is more effective than stimulation, and it may improve progress if you combine voluntary contraction with stimulation.The powerful muscle contractions caused by electrical stimulation give rise to training aches, which usually disappear within a week.After treatment tingling sensations may continue or your skin may feel numb, this is normal.
5. TENS and EMS STIMULATION PARAMETERS:The effect of electrical stimulation on the body depends on the following current settings:
5.1 Pulse Waveform
This describes the time function of the excitation current which may be either monophasic or biphasic.With monophasic pulse trains, the current flows in one direction. With biphasic pulses, the excitation current alternates its direction.
flexistim instructions final.indd 10-11 27/11/2014 12:06

WORK WORKREST
PERIODIC TIME PULSE WIDE
MONOPHASE PULSES
INTE
NSIT
Y
PULS
EIN
TENS
ITY
RAMP
RAMP
BIPHASIC PULSES
9 10
Frequency indicates the number of individual pulses per second, and is indicated in Hz (Hertz = pulses per second). It can be calculated by working out the inverse value of the periodic time.Different types of muscle fibres react preferentially to different frequencies:Slow-response fibres tend to react to lower pulse frequencies up to 15Hz, while fast-response fibres only respond to frequencies over approx. 35Hz.With pulses of approx.45~70Hz, there is permanent tension in the muscle (tetany) combined with premature muscle fatigue. Higher pulse frequencies can therefore preferably be used for elasticity and maximum strength training.
For TENS:A frequency of 110 Hz is good at blocking pain signals.A low frequency of 4 or 10 Hz allows for the release of endorphins, the body’s natural morphine-like substances.5.3 Pulse WidthPulse width is used to indicate the duration of an individual pulse in microseconds (millionths of a second). Pulse width also determines the penetration depth of the current. In general a greater muscle mass requires a greater pulse width. A higher pulse width is also more likely to activate pain nerves, so there is a fine balance between maximum muscle stimulation and tolerable sensation.EMS 50-400 depending on frequencyTENS 50 to 250 μS.
The Flexistim uses only biphasic pulse trains, as they reduce the strain on the muscle, leading to less muscle fatigue as well as safer application and reduce the risk of skin irritation under the electrode.
5.2 Pulse Frequency
WORK WORKREST
PERIODIC TIME PULSE WIDE
MONOPHASE PULSES
INTE
NSI
TY
PULS
EIN
TEN
SITY
RAMP
RAMP
BIPHASIC PULSES
WORK WORKREST
PERIODIC TIME PULSE WIDE
MONOPHASE PULSES
INTE
NSI
TY
PULS
EIN
TEN
SITY
RAMP
RAMP
BIPHASIC PULSES
5.4 Pulse IntensitySetting the degree of intensity is dependent on the subjective feeling of each individual user and is determined by a number of parameters such as application site, skin circulation, skin thickness as well as quality of electrode contact. The actual setting should be effective but should never produce any unpleasant sensation such as pain at the site of application.In TENS programmes, while a slight tingling sensation indicates sufficient stimulation energy, any setting which leads to pain must be avoided.In EMS programmes, the intensity needs to be as high as possible for maximum benefit – so set just below the pain threshold.With prolonged application, you may need to increase intensity as nerves get used to the stimulation and become less sensitive (known as accommodation).
5.5 WORK is the time in seconds that muscle is stimulated (not including Ramp time).The Flexistim offers a range of work periods from 1-40 sec.
5.6 REST is the time in seconds at zero strength in between stimulation.
The Flexistim offers a range of rest periods from 1-40 sec. The EMS programmes use an active rest - low frequency pulses help to clear metabolites in-between work periods.
WORK WORKREST
PERIODIC TIME PULSE WIDE
MONOPHASE PULSES
INTE
NSI
TY
PULS
EIN
TEN
SITY
RAMP
RAMP
BIPHASIC PULSES
5.7 RAMP is the time in seconds taken to move up and down between zero and the set stimulation strength. The Flexistim has a fixed ramp time of 1.5 up and 0.75 down.
flexistim instructions final.indd 12-13 27/11/2014 12:06

6. IFT: WHAT IT IS AND HOW IT WORKSMany users will be familiar with TENS, which delivers intermittent pulses to stimulate surface nerves and block the pain signal. Unlike TENS, Interferential Therapy delivers a continuous stimulation deep into the affected tissue.IFT achieves this deep penetration by using a 4000Hz carrier wave to overcome the skin impedance. TENS signals travel around the top 1cm of the skin surface. IFT signals travel almost directly between the electrodes.Interferential Therapy uses two medium frequency 4000Hz currents that ‘interfere’ with each other to produce a beat frequency that the body recognises as a low frequency energy source.
Unlike TENS, which delivers intermittent pulses to stimulate surface nerves and block the pain signal, IFT delivers continuous stimulation deep into the affected tissue. In addition to providing pain relief by the same mechanism that TENS uses, most physiotherapists consider that IFT’s major role is to accelerate the inflammatory or healing rate.IFT is believed to work by stimulating parasympathetic nerve fibres to give increased blood flow and oedema reduction and by passing currents across cell membranes; these currents vary depending upon the tissue involved. By using particular frequencies in the range, different systems within the body can be stimulated or used to increase the blood supply, which in turn hastens the healing rate. IFT is used to treat almost any condition where inflammation is a problem. For example, sports injuries; arthritic conditions; bruising and swellings, back pain, osteo-arthritis, rheumatoid arthritis, muscular pain.Many practitioners use a “Sweep” treatment which uses constantly changing interference pulse frequency. Practical clinical experience suggests therapeutic benefits for these sweeps in addition to those of conventional nerve stimulation.
11 12
7. MICROCURRENTMicroCurrent Stimulation (MIC) is a type of therapy where very low current is sent into the cells of the body. MIC is a very faint current that is so small it is measured in millionths of an amp (microamps). Human cells generate a current that is in the micro amp range which is why some can’t feel it - the current is so low it doesn’t stimulate the sensory nerves.MIC is a physiological electric modality that increases ATP (energy) production in the cells of your body. This dramatically increases the tissue’s healing rate. The immediate response to the correct MIC frequency suggests that other mechanisms are involved as well. The exact effects or changes in the tissue can be noticeable; scars can suddenly soften; trigger points often become less painful when the “correct” frequency is applied. In many situations the changes can be long lasting and even permanent in some cases.Microcurrent has been shown to give very effective pain relief. In patient surveys over 90% of patients reported significant improvement.The results of MIC can be seen after only a minute or so of treatment in most people.
The range of this beat frequency in the Flexistim is 1 to 160Hz
10Hz
12Hz
flexistim instructions final.indd 14-15 27/11/2014 12:06

13 14
8. KEYPAD AND DISPLAY Mode Selection KeyPress this key to select the therapy Mode:
TENSEMS I, II and III (small, medium and large muscles)IFTMicrocurrent
When a programme is running, this key also acts a PAUSE button. The PAUSE symbol II will be displayed and the programme timer will stop. Pressing again resumes the programme and the intensity gradually returns to the set value.
Programme SelectionPress the “Prog” key to select the programme you require (see section 15)
Parameter Menu SelectionPress these keys to select the following parameters one by one:
TENS Preset Mode (P1-P10) :Treatment Timer (min)
TENS Manual Mode (P11-P12) :FREQUENCY (Hz)PULSE WIDTH (μs)Treatment Timer (min)
EMS Preset Mode (P1-P09) :Treatment Timer (min)
EMS Manual Mode (P10-P11) :FREQUENCY (Hz)PULSE WIDTH (μs)SYNCHRONOUS/ALTERNATING - SYNCH/ALT in displayWORK TIME (sec)REST TIME (sec)RAMP UP/DOWN TIME (sec)Treatment Timer (min)
ON/OFF
Channel 1 Intensity mA
Lock Work/Rest/Ramp Setting
Channel 2 Intensity mA
Lead Fault
Pause
FrequencyMode
Pulse Width
Programme
Battery State
Warning
Timer
Keys:ON/OFF Key (On top of unit)This key switches the unit on or off.Press once for 2 sec and the unit is on, the LCD display located at the front of the unit will light up.There will be no feeling from either lead at this point as the intensity always starts at zero. Press this key again and the unit will switch off.
flexistim instructions final.indd 16-17 27/11/2014 12:07

Check electrode pad position. If you are certain that the pads are positioned safely, press the SKIP key to override.
The triangle will stop flashing and intensity can be increased to 60mA.
SKIP keyThe EMS programmes have three phases: Warm/ Train/ Cool.You can jump to the next phase by pressing the Skip key.
In IF MODE, use this key to override limit and set intensity at > 40mA.
15 16
IFT ModeIFT Preset (P1-P3)Treatment Timer (min)IFT Manual (P4)FREQUENCY (Hz) (P1-P3)Treatment Timer (min)Microcurrent Mode:Preset (P1, P2 and P4)Manual (P3)WAVEFORM - Const /Square/RampFREQUENCY (Hz)PULSE WIDTH mSTreatment Timer (min)
Parameter Adjustment ControlsPress these keys to increase or decrease the value of the parameter which you have selected with the MENU keys.
Intensity ControlsPress the keys on the left to adjust the intensity in Ch1 and on the right to adjust the intensity in Ch2
IF MODE:I.F. signals penetrate deep into the tissue. Positioning pads across the chest or head could be dangerous - see section 16.3.
For your safety, when intensity reaches 40mA, the warning triangle flashes and intensity cannot be increased.
Manual Programme LockWhen “Manual” is showing, you can protect the manual settings by pressing and holding this key for 3 seconds.The key symbol will flash and you will be unable to change the manual settings.Press and hold for 3 seconds to unlock programme.
Lead Fault DetectorIn TENS and EMS modes, when one or both of the electrodes are not placed firmly on the skin, or the leads are not properly connected and the intensity is >10, the output level goes immediately to zero and a lead fault icon flashes.
Automatic keypad lockThere is an automatic keypad lock if no button is used for 10 seconds.Key symbol appears.Press the Intensity Down button for either channel to unlock.
flexistim instructions final.indd 18-19 27/11/2014 12:07

17
Treatment TimerWhen the Treatment Timer has been set, it begins to count down in minutes and the time remaining is displayed on the LCD. When it reaches zero, the device automatically shuts off.
MemoryThere is a usage memory for each Mode.Pressing the MODE and CH1▼ button together for 3 seconds enters Memory.The Usage time will be accumulatively recorded when the output level is above zero. The accumulative treatment time in minutes is displayed.Press the same keys again to return back to the previous normal display.Pressing CH2▼ key and MODE key together for 3 seconds will clear the treatment time to zero.
Power SupplyThe Flexistim may be operated from the re-chargeable battery, or directly from the power adaptor. When the adaptor is plugged in to the Flexistim, the internal battery is automatically disconnected. The battery cannot be charged while in the unit, only in the charging cradle supplied.The rechargeable battery will give about 1 hours use at 50% intensity in IFT Mode, and much longer in other Modes.If you need to make more than one treatment you may either:a) Purchase and recharge additional batteriesb) Connect to mains power using the mains adaptor
18
9. CONTENTS OF THE PACKYour Flexistim pack should contain the following:1 × Flexistim Unit2 × Leads4 × Self-Adhesive Electrodes with Connectors (Size: 50mm×50mm)1 × 3.7V Rechargeable Lithium Battery (BL-6F)1 × AC Power Cord1 × Battery Charging Cradle
OTHER FEATURES1. The LCD is backlit. To save energy the back light will switch off if the keypad is not
used for 30 secs. Pressing any key will re-activate it.2. When the unit is turned on, if you do not press any of the keys, or intensity is set to
zero, for > 5 mins it will automatically shut off.3. When you turn the unit on, it will automatically enter the mode that you used last.4. When you change Programme, the output level will reset to zero immediately.5. When the battery is low, the battery icon will flash indicating that the batteries should
be recharged.
WARNING: The power adaptor supplied has special medical grade isolation. Use of any mains adaptor other than the one supplied with the device could compromise electrical safety.
flexistim instructions final.indd 20-21 27/11/2014 12:07

Insert the battery Replace the battery cover
19
10. HOW TO ASSEMBLE YOUR UNITYour Flexistim has been designed to be simple and easy to use. Assembly of the Flexistim unit is very simple and requires only five steps.
STEP 1: BATTERYSlide belt clip down to access battery cover.Remove the battery cover and insert the battery (as shown on the diagram) inside the battery compartment. Replace the battery cover.
NOTE: Fully charge battery before initial use. See “Charging the Battery” on page 48.
CAUTION:There is a risk of explosion if the battery is fitted incorrectly. Replace only with the correct 3.7 volt lithium battery. Do not dispose of the battery in a fire and keep it out of reach of children. The battery must be removed from the unit if unit is not used for a long period of time.
STEP 2: LEADSIf only using one lead, insert into one socket. If using two leads, insert into both sockets.A: Insert the lead wiresB: Turn the plug on the lead wire 90° to lock it between the main body and handle of the unit. This prevents accidental disconnection during treatment.
STEP 4: PLACEMENT OF ELECTRODESEnsure wherever you intend to place the electrodes, the skin is clean and thoroughly dry. Remove the electrodes from the clear plastic shield and position on your body as required.
20
STEP 3: ELECTRODESRemove electrodes from the bag and connect to the leads.
flexistim instructions final.indd 22-23 27/11/2014 12:07

Life of the Electrodes:The electrodes are water based and can dry out if left outside of the PVC storage bag.If the electrodes lose their adhesive quality in this way, it is possible to reactivate their adhesiveness by applying a fine spray of water.Replace the electrodes when they stop sticking well. This can affect the efficiency of the unit and may lead to skin irritation.
21
STEP 5: READINGRead sections 11 to 16 and decide how to use the unit for the treatment.
NOTE: AFTER USEAlways ensure that the unit is switched OFF before removing the electrodes. After use, return the electrodes to the clear plastic shields and seal them in the PVC bag. There is no need to separate the lead wires from the electrodes.
11. OPERATIONAfter assembling and connecting the device:
11.1 Turn on the devicePress ON/OFF KEY.LCD displays when the device is on. The LCD is backlit. To save energy the back light will switch off if the keypad is not used for 30 seconds. Pressing any key will re-activate it.Always switch the device off before removing electrodes from the skin.
11.2 Select ModeUse MODE key to select:
TENSEMS I, II, and III (small, medium and large muscles)IFTMicrocurrent
When a programme is running the MODE key acts as a PAUSE button.The PAUSE symbol II is displayed and the Timer stops. When you press again to resume the programme, the intensity slowly increases to the set level.
11.3 Select a ProgrammeUse Programme Selection Key to choose a desirable program(See section 15 Programmes)The output intensity resets to zero when you change a treatment program.
22
flexistim instructions final.indd 24-25 27/11/2014 12:07

11.7 Skip Function
The EMS programmes have three phases:
• Warm
• Train
• Cool
You can jump to the next phase by pressing the SKIP key.
11.6 Adjust the IntensityUse the left hand keys to adjust the intensity in the left hand lead (Ch1) and the right hand keys to adjust the intensity in the right hand lead (Ch2).
In IFT MODE both channels are linked and there is only one intensity adjustment. You can adjust a desired intensity by pressing either of the intensity controls.
For your safety, when intensity reaches 40mA, the warning triangle flashes and intensity cannot be increased.
Check electrode pad position. If you are certain that the pads are positioned safely - not through the chest, head or neck - press the SKIP key to override.
The triangle will stop flashing and intensity can be increased to 60mA.
11.4 Set Treatment TimerThe Treatment Timer defaults to Continuous (C) for some TENS programmes and a safe standard treatment time for others. If you wish to adjust the Treatment Timer proceed as follows;
To set a Treatment Time, Press either of the Parameter Selection keys: MENU +/-
The Timer symbol will flash
Use the Parameter Adjustment Controls +/- to select your desired treatment period ranging from 1 to 90 minutes.
Press any intensity key or wait 10 seconds to return to the main screen
The Treatment Timer starts counting as soon as you increase the intensity above zero.
At this point, the display begins to count down from its preset value.
When the preset treatment period is elapsed, the device switches off its output.
11.5 Attach the Electrode Pads
Attach the leads as shown in section 10 and position the electrode pads as shown in section 16.
23 24
Automatic keypad lockThere is an automatic keypad lock if no button is used for 10 seconds.Key symbol appears.Press the Intensity Down button for either channel to unlock.
flexistim instructions final.indd 26-27 27/11/2014 12:07

12.2 EMSPress MODE button until EMS I, II, or III selected.I, II and III are for small, medium, and large muscles and use different Pulse Width settingsP1 appearsPress PROG to Select P10 or 11 MANUALPress MENU +: Hz flashesMenu steps:
FREQUENCY (Hz)PULSE WIDTH (μs)SYNCHRONOUS/ALTERNATING(SYNCH/ALT in display)WORK TIME (sec)REST TIME (sec)RAMP UP/DOWN TIME (sec)Treatment Timer (min)
Press +/- to adjust the settingPress MENU +/- to save and advance to next Parameter.A warning triangle will be displayed when the Rest period is less than Rest Time = Work Time X (Work Hz-16.66)/16.66 seconds. You will not be able to increase the intensity above zero. When setting the Rest time, you can over-ride this by pressing the LOCK key , but be aware that using settings outside of this ratio may cause muscle fatigue. The triangle will continue to flash while you are outside recommended settings.When using ALTERNATING, ensure that the “Ramp Up Time”, “Work Time”, and “Ramp Down Time” equals “Rest Time”. The will appear on your screen if this formula is not followed in EMS manual mode.If the warning triangle appears at any other time, see “Troubleshooting”.Adjust intensity above zero to start an EMS programme.The EMS programmes have three phases: Warm / Train / Cool. You can jump to the next phase by pressing the SKIP key.
12. ADJUSTING MANUAL PROGRAMMESPress PROG to select one of the manual programmesPress MENU+ key to cycle through the available parameters (see list below)Use the Parameter Adjustment controls to select the required value, then press MENU+ or MENU- to move to the next parameter.
12.1 TENSPress MODE button until TENS is selectedP1 appears
Press PROG to Select P11 MANUALPress MENU+: Hz flashesMenu steps:
FREQUENCY (Hz)PULSE WIDTH (μs)Treatment Timer (min)
Press +/- to adjust ParameterPress MENU +/- to save and advance to next Parameter.Press any intensity button or wait 10 sec to exit setting menu.
25 26
flexistim instructions final.indd 28-29 27/11/2014 12:07

Menu steps:FREQUENCY (Hz)PULSE WIDTH mS (milliseconds)WAVEFORM - SQUARE/SAW/DC
Treatment Timer (min)Press +/- to adjust the setting.
13. LOCK AND UNLOCK YOUR OWN PROGRAMMETo lock a programme, first adjust the intensity to zero, then press & hold the LOCK key for 3 seconds. When you turn on the device again, this programme will load automatically. 3 seconds is a long time, but you will want to avoid accidental activation of this key.To unlock the programme, reduce the intensity to zero, then press and hold LOCK key for 2 seconds.
14. MEMORY MODEOnce you set intensity >5 in TENS and EMS and >0 in IF and Micro, the Usage Timer automatically and accumulatively counts your total usage up to 999 hours 59 minutes.There is a memory for each MODE.To enter MEMORY and view the Usage Timer, set intensity to zero, select the MODE, then press & hold the PROG and CH1▼ keys for 3 seconds.The number at bottom left shows the number HOURS, and at bottom right the number of MINUTES.The number at the top left shows the numbers of uses.
Press the same keys to return back to the previous normal display.To reset the Usage Timer to zero, press the CH2▼ key and PROG key together for 3 seconds.
12.3 IFTPress MODE button until IFT is selected.P1 appearsPress PROG to Select P4 MANUALPress MENU +: Hz flashes,Menu steps:
FREQUENCY (Hz)Treatment Timer (min)
Press +/- to adjust the settingPress MENU +/- to save and advance to next Parameter.Adjust intensity above zero to start the programme.In IFT MODE both channels are linked and there is only one intensity adjustment. You can adjust a desired intensity by pressing either of the intensity controls.For your safety, when intensity reaches 40mA, the warning triangle flashes and intensity cannot be increased.
Check electrode pad position. If you are certain that the pads are positioned safely, press the SKIP key to override. The triangle will stop flashing and intensity can be increased to 60mA.
12.4 MICROCURRENTPress MODE button until MICRO is selected.P1 appearsPress PROG to Select P3 MANUALPress MENU +: Hz flashes
27 28
Uses
HoursMinutes
flexistim instructions final.indd 30-31 27/11/2014 12:07

15. PROGRAMMES15.1 TENS PROGRAMMES
Using the TENS ProgrammesYour nervous system is different to everyone else’s. Only you know how the stimulation feels for you. The best way to use TENS is to try the programmes, and see which ones work best for you. There are some general guidelines:
Programmes with high frequency (Pain Gate)Programmes 1, 2, 3, 8, 9,10These programmes use the Pain Gate to block the signals travelling along the pain nerves.
Prog Hz Pulse width Mode Time EFFECT Pain Gate Endorphin Release
1 110 50 Const C PRESET PG
2 80 150 Const C PRESET PG
3 110 200 Const C PRESET PG
4 2 250 Const 30 PRESET ER
5 4 200 Const 30 PRESET ER
6 100 150 Burst 30 PRESET PG+ER
7 150 200 Burst 30 PRESET PG+ER
8 10/100 250 PFM C PRESET PG+ER
9 2/120 200/100 FM C PRESET PG +ER
10 2/100 200/150 Han 30 PRESET PG+ER
11 2-150 50-300 Const 5-90/C MANUAL
12 2-150 50-300 Burst 2Hz 5-90/C MANUAL
29
The sensation will fade after 5 or 10 minutes. Keep increasing the intensity so that you can always feel the stimulation clearly.You can use these programmes as long as you like. The pain relief may wear off after a few hours. In which case, you can take a break and try again later.Programmes 8 and 9 keep changing the sensation, which some users find will extend the effective pain relief.Programme 1 is the gentlest stimulation. If you have not used TENS before, start with this until you are comfortable with the feeling.Programmes 2 and 3 are similar to 1, but feel stronger and deeper.
Programmes with low frequency (Endorphin release) elementsProgrammmes 4, 5, 6, 7, 12These programmes encourage production of your natural endorphins by inducing very small, repetitive muscle twitches. All but programmes 4 & 5 combine this with a higher frequency to combine the pain relief mechanisms, but may be a little less comfortable.To be effective, you need to keep the intensity high enough to induce small muscle movements. This limits the time you can use these programmes - if you use them for more than about 40 minutes, you may have aching muscles later.
30
flexistim instructions final.indd 32-33 27/11/2014 12:07

15.2 EMS PROGRAMMESProg Work Active Rest Total Freq Hz Pulse width uS Sec Amp % Hz uS Time s Amp % time I II III mins
31
All EMS programmes include a WARM Up, TRAIN, and COOL Down phase.During the TRAIN phase stimulation alternates between Work - when the muscles are contracted - and Active Rest, with low frequency stimulation to promote metabolite clearance and delay fatigue.
Each Work contraction starts and finishes with a gradual change in intensity - called a Ramp1. All preset TRAIN phases have Ramp up 1.5s, Ramp Down 0.75s2. All WARM phases are 6Hz at same PW as Work phase3. All COOL phases are 3Hz at same PW as Work phase4. All Active Rest phases have Ramp up 0.5s, Ramp down 0.5s5. All Active Rest phases are at 4 Hz, 200uS6. Press SKIP key to move to next phase
Manual Settings:1. All WARM phases are 6Hz at same PW as set Work PW2. All COOL phases are 3Hz at same PW as set Work PWAt first use of a Manual programme the default values are shown.The Warning triangle is displayed if Rest period is less than Rest Time=Work Time X (WorkHz-16.66)/16.66 seconds.This is because muscle fibres can only activate a limited number of times a minute (about 1000) without becoming fatigued.
Using the EMS ProgrammesEMS can be used for a wide range of sports and medical applications, and the application can get very complicated. The Flexistim programmes have been designed to simplify this as much as possible. You can use the manual programmes if you want to modify the settings, or to experiment with completely different ones. Here are some of the ways you can use the programmes:Programme 1 Muscle CalmingAims to relax the muscles as much as possible. Encourages production of the body’s natural endorphins to promote pain relief, and improves the blood circulation which supplies oxygen to the muscle.
32
1 PRESET Warm 6 200 280 340 300 100 5 Train 10 200 280 340 9 80 4 200 2 50 41 Cool 3 200 280 340 600 70 102 PRESET Warm 6 200 280 340 120 100 2 Train 22 200 280 340 7 80 4 200 11 70 18 Cool 3 200 280 340 180 70 3 3 PRESET Warm 6 200 280 340 120 100 2 Train 25 200 280 340 7 80 4 200 11 50 21 Cool 3 200 280 340 180 70 3 4 PRESET Warm 6 200 280 340 120 100 2 Train 40 200 280 340 7 80 4 200 11 50 18 Cool 3 200 280 340 180 70 3 5 PRESET Warm 6 200 280 340 120 100 2 Train 55 200 280 340 5 80 4 235 11 50 27 Cool 3 200 280 340 180 70 3 6 PRESET Warm 5 200 280 340 300 100 5 Train 60 200 280 340 4 80 5 20 10 50 41 Cool 3 200 280 340 600 70 10 7 PRESET Warm 5 200 280 340 300 100 5 Train 65 200 280 340 4 80 4 200 11 25 20 Cool 3 200 280 340 600 70 10 8 PRESET Warm 6 200 280 340 120 100 Train 75 200 280 340 4 80 4 200 14 50 25 Cool 3 200 280 340 180 70 9 PRESET Warm 5 200 280 340 300 100 Train 100 200 280 340 6 80 4 200 36 25 28 Cool 3 200 280 340 600 70 10 MANUAL Warm 6 200 280 340 120 100 Train 10-120 100-350 1-30 80 1-60* 1-90 Cool 3 200 280 340 180 7010 DEFAULT 35 280 5 9 2011 MANUAL Warm 6 200 280 340 120 100 Train 10-120 100-350 1-30 80 1-60* 1-90 Cool 3 200 280 340 180 7011 DEFAULT 50 300 5
flexistim instructions final.indd 34-35 27/11/2014 12:07

Programme 2 Resume Training 1To promote growth of the slow twitch fibres. This builds muscle strength and helps reduce muscle atrophy, keeping muscles ready for when you want to resume training. Used for all type of sports.Programme 3 Resume Training 2Progress from 2 as tolerance increases.Programme 4 Resistance 1Improving and increasing the capacity to develop very high level of muscle force over a long period of time. Improving the efficacy of the oxygen consumption at the muscle level and the capacity to withstand toxin build up, such as lactic acid. Used for sports activities that require very high levels of prolonged muscle activity: Rowing, Cycling, Middle distance running.Programme 5 Resistance 2Improving oxygen consumption at muscular level and increasing the capacity to withstand build up of toxins. Used with sports activities requiring prolonged and high levels of muscle force: Cycling, Rowing, Middle distance running.Alternative application: Lipolysis. Increasing the circulation, and modifying the metabolism of the lipocytes. Helps stimulate the subcutaneous deposits of fat. Helps to reduce or eliminate the - Orange Peel effect of the skin surface.Programme 6 Maximum Muscle ContractionTo increase muscle bulk and volume and to improve muscle force. Searching for muscular hypertrophy.Programme 7 Muscle Toning 1Strengthening the muscles, improving blood circulation and capillary bed density. Ideal for applying to the Thigh, Legs, Bottom and Abdomen.Programme 8 Muscle Toning 2Similar to 7, but adding bulk in preference to endurance.Programme 9 Force OutputAnaerobic activity - increasing the muscle capacity to a level of instantaneous maximum muscle force, changing muscle force into explosive action. Used for all activities requiring maximum muscle output in a very short space of time, such as Judo, short distance sprinting, throwing the discus or shot-put.
33
15.3 IFT PROGRAMMESProgramme table:P1 2-10Hz Sweep over 6sP2 2-100 Hz sweep over 6sP3 80-150 Hz sweep over 6sP4 The pulse frequency varies from -30% to +60% of the set pulse frequency
over 6 secs. The transition is ramping (triangular wave function).
In IFT MODE both channels are linked and there is only one intensity adjustment. You can adjust a desired intensity by pressing either of the intensity controls.For your safety, when intensity reaches 40mA, the warning triangle flashes and intensity cannot be increased.Check electrode pad position. If you are certain that the pads are positioned safely, press the SKIP key to override. The triangle will stop flashing and intensity can be increased to 60mA.
15.3.1 CHOOSING SETTINGSIFT works in the same way a TENs, but penetrates much deeper into the body. So you can use IFT with the same settings as the TENS programmes.Many therapists believe, however, that IFT has additional effects, and can be used to reduce swelling and muscle tension. One of the leading textbooks says:2Hz Around this frequency the metencephalins are stimulated which will result in
short term pain relief.10Hz This frequency has a beneficial effect on the immune system and tends to
make patients wakeful yet relaxed.130Hz This frequency stimulates the production of endorphins and results in longer
term pain relief and some local anaesthesia.1-100Hz This frequency sweep will increase the inflammatory rate.45-90Hz This frequency sweep will depress the sympathetic nervous system so
allowing increased activity of the parasympathetic system and increase the blood supply.
See the Flexistim page on www.tenscare.co.uk for some published clinical protocols for IFT.
34
flexistim instructions final.indd 36-37 27/11/2014 12:07

15.4 MICROCURRENT PROGRAMMES
Prog Waveform Hz PW mS Treatment default mins1 Square 0.5 998 202 Saw 30 10 203 Manual 0.5-50 10-998 204 DC / / 20 max 99uA Ch1 only
Frequency: 0.5Hz 1Hz 1.5Hz 2Hz 3Hz 4Hz 5Hz to 50HzPulse Width: 0.01-1 SECOND = 10-999 mSManual settings:
- Frequency: 0.5Hz 1Hz 1.5Hz 2Hz 3Hz 4Hz 5Hz to 50Hz- Pulse Width: 0.01-1 SECOND = 10-999 mS
In Programmes 1, 2 & 3: PW≤ 1/2xFrequencyTreatment Time: 20 mins defaultIntensity: 0-700uA in 10uA steps (Chen: Less than 750uA promotes ATP)
15.4.1 CHOOSING SETTINGSFor most conditions, use a low frequency 1-10 Hz, starting at 0.5Hz in programme P1.A higher frequency up to 100 Hz may give faster results when treating inflammatory problems (e.g. arthritis, tendonitis, etc.).However, you should always follow this up with a short treatment at low frequency.Set the current intensity level at the highest comfortable position. This is usually 500 to 600 μA, which most people can barely feel.If you have a very sensitive condition like neuralgia, you can start with a very low current - unlike TENS there is no lower threshold.
PREPARING FOR MICROCURRENT TREATMENTTo gain the best results make sure that you are in a relaxed position for the treatment. Make sure you do not have tense muscles.
35
15.4.2 HOW LONG SHOULD EACH SESSION LAST?Start with 10 minutes, then pause to re-evaluate your pain. Stop treatment when the pain is completely gone or when there is no further improvement. This could take an hour or more. However, continuing to treat after the pain has gone may cause it to return. More is not necessarily better when using microcurrent to relieve pain.
15.4.3 FOLLOW-UPAlthough results will usually be seen immediately, in some people the effects will be delayed, continuing to improve from several hours to over a day or two after the treatment. In others, it may take several treatments before you start to see noticeable improvement. The effects of microcurrent therapy are cumulative.Use daily for 1-2 weeks, then switch to every other day.
15.4.4 PROBLEMSWhile microcurrent therapy can provide a noticeable improvement on more than 90% of users, it will not work for everyone. Where there appear to be no effects, try the following:
1) Increase your fluid intake. If you are dehydrated you may not respond well.2) Some people who have had a significant exposure to strong electrical current may
be poor candidates for microcurrent therapy. If you have had a severe electric shock in the past, or have used TENS for a long time, microcurrent may not work as quickly for you. You may need prolonged treatment to gain results.
3) Microcurrent electrical therapy works through very small electrical flows in the body. These can be affected by earlier surgical scars and traumatic injuries some distance from the present pain. It is possible to clear the body of these “blocks”. Try covering the scar with the electrodes or, on larger scars, putting one electrode at each end, and treating for 10 minutes four days in a row. As this treatment “unblocks” your body’s electrical flow, you may feel increased energy and the pain may also temporarily increase. After treating the scar, allow time to treat the painful area as well.
4) Try using a lower current setting of 100 μA for longer - an hour or more.See the Flexistim page on www.tenscare.co.uk for some published references for Microcurrent.
36
flexistim instructions final.indd 38-39 27/11/2014 12:07

16. ELECTRODE PAD PLACEMENTEnsure that intensity is zero before connecting electrodes.Insert connection lead(s) into the sockets below the handle.Rotate the body of the plug to lock the lead in place. Plug the lead pins into the sockets in the pad pigtails.To avoid damage, remember to rotate the plug to unlock it before removing the lead.Only pull the lead by holding the body of the plug.
16.1 Electrode Pad Placement for TENSThe placement of electrodes is one of the most important parameters in achieving effective pain relief using TENS. You may need to try various positions before you find the most effective positioning. There are several positioning methods:
Across the painful areaThis is the simplest method. Placing one pad over, or slightly further away from the spine than, the source of the pain. Place the other pad closer to the spine so that the stimulation travels through the area of pain
DermatomesTENS only works at the level of one vertebra of the spine. The nerves carrying pain and the TENS stimulation into each vertebra cover an area of the body called a Dermatome. Each nerve root serves a known area of the skin. You can stimulate the sensory nerves anywhere in this area to reduce the transmission in the pain nerves. The nerves wrap around the trunk and limbs in a spiral, so the dermatomes can give you a better idea of where to place the pads. You can download a dermatome diagram from our website www.tenscare.co.uk.
Trigger or Acupuncture PointsYou can use low frequency TENS to stimulate therapy points. Accurately locating these points can be difficult, so you may want to seek professional advice.
37
Example TENS Electrode Pad Positions
Low Back Pain SciaticaNeck and Shoulder Tension
Shoulder Pain Elbow PainKnee Pain
Ankle Pain Leg PainWrist Pain
Where only two pads are shown on the arm, shoulder, and leg, use the other two pads either on the opposite limb or place all four pads on the same limb in a square pattern with each pad being about 4 inches apart.
38
flexistim instructions final.indd 40-41 27/11/2014 12:07

16.2 Electrode Pad Placement for EMSElectrode placement for electrical muscle stimulation is very important for obtaining the best results. Place two electrodes over the bulk of the muscle, with one electrode over the muscle’s motor point. The motor point is the area on the skin that is located closest to the motor nerve’s entry into the muscle - about 1/3 of the way down the muscle from the spine. Here it is easiest to trigger a contraction by electrical stimulation. Experiment by moving the electrode across the skin until you locate the point over the muscle that gives the cleanest contraction.
Large muscle groups may require stimulation with two channels, that is, four electrodes simultaneously.
The electrode pads must always be used in pairs,so that the signal can flow in a circuit.
NOTE: Always check unit is OFF before attaching or removing pads.
When exercising smaller muscles, take care to adjust the intensity slowly as the motor nerves may be more sensitive.
Example EMS Electrode Pad Positions
Eye careWe all are familiar with it. The ever-increasing set of little wrinkles around the eyes. Atfirst, they’re accepted as laugh-lines and seen as a symbol of maturity. But, when theeyes also start to swell up, deep wrinkles plough their way through the skin and puffylids appear, the time has come to do something about it.You can use Programme 7 to stimulate the muscles around the eyes. You will notice the
39
muscles working straight away from the slight twitching. The activation of the muscles stimulates the circulation. This relaxing skin care also contributes to an increase in well-being, making you appear more awake and content.
Use small 25mm round electrodes. In order to prevent triggering unpleasant sensations, you should increase the current strength very carefully.
• Do not attach electrodes from one side of the head to the other• Do not attach electrodes to the front of the neck
40
flexistim instructions final.indd 42-43 27/11/2014 12:07

Stomach / HipsMuscle training and fighting the fatThe stomach, that tiresome subject - you can’t wish it away.Weight reduction is usually the magic word. Weight reduction is effectively aided by training the stomach muscles. With Flexistim you can single out muscles for direct stimulation.The stomach contains several different individual muscles.The central stomach muscle is responsible for giving you a slim stomach and a good upper body posture.
BottomThe bottom is equipped with a very strong set of muscles.Unfortunately, unwanted fat and cellulite zones are often to be found in this area and are very difficult to combat. Muscular training is one way of improving shape. The picture shows the possible electrode positions for building muscles.
41
Upper ArmsOur upper arms often have little shape and flabby, coarse skin. The cause is usually a lack of movement and muscular work. The Flexistim can be used to carry out muscle training.In this case too, it is all about stimulation of the circulation of blood. You have the option of treating the front side or the reverse side of both upper arms depending on where the need is greatest.
42
flexistim instructions final.indd 44-45 27/11/2014 12:07

Legs - Thighs and CalvesIt is usually a lack of trained muscles in the legs which disturbs us most, particularly in conjunction with areas of cellulite in the thigh area. Targeted muscle training for the front and back of the thigh and calves is very simple to perform.
43
16.3 Electrode Pad Placement for IFTThe diagrams on the following pages shows how pads can be placed in various body areas.They all follow the same principles.The interferential electrical signal is created by the interaction of the signals from all four pads (i.e. between the pads of each channel). So the pads need to applied in positions so that the signals from each channel cross over the point to be treated.The two channels add and subtract to create an interference pattern. In theory this looks like the cross shaped diagram. In real tissue the pattern is difficult to predict and you may need to adjust the pad positions until you can sense the stimulation in the correct area.
44
Chest and ShouldersBuilding chest muscle affects posture and movement in the upper body as a whole.
flexistim instructions final.indd 46-47 27/11/2014 12:07

Elbow Knee
Alternative knee setting
Neck
Shoulder Lower Back Constipation in Children
45
16.4 Electrode Pad Placement for MicrocurrentPad positioning is NOT like TENS and is closer to Interferential.The pads should be placed so that a straight line between them passes through the problem area. This is different to TENS, where the aim is to stimulate the correct sensory and motor nerves.Since the body is three dimensional, this often means going from front to back, and side to side. The four alternatives for headache below show how many possibilities there are:
There is no single correct placement, and the best position may vary from day to day.
WARNING: Positions 1 & 4 on the head must NOT be used in other MODES
One position for treatment of arm pain:
Microcurrent seems to work better if you also treat the OPPOSITE side of the body to where the pain is felt (with the second pair of pads). Also try connecting both sides of the body by placing one pad at the site of the pain, and the other on the opposite side (i.e. left hand to right hand), for 10 mins.
46
L1 L1L2 L2L1
L1L2
L2
L1
L1L2
L2
L1
L1L2
L2L1
L1L2
L2
L1 L1
L2
L2
L1
L1L2
L2
flexistim instructions final.indd 48-49 27/11/2014 12:07

17. FURTHER CLINICAL INFORMATION AND TREATMENT PROTOCOLSFor further information and clinical references go to www.tenscare.co.uk and look on the Flexistim product page.
18. CARE OF ELECTRODESThe electrodes that are supplied with your Flexistim are self-adhesive and can be used several times. Skin must be allowed to breathe, so the electrodes should be removed periodically. When not in use, the electrodes should be placed onto the clear plastic shield.The condition of the electrodes has a direct effect on conductivity, and therefore the effectiveness of the treatment. When the electrodes start to lose their adhesive quality, it is possible to reactivate their adhesiveness by applying a fine spray of water to the gel side of the electrode. In time, this technique will not work, the gel will not reactivate and new electrodes should be used.
GENERAL PAD ADVICE• The electrode pads supplied are reusable but are for single patient use.• In order to obtain the best conductivity through the pads always ensure that they are in
good condition and tacky.• Before use make sure your skin is clean and dry.• Peel the electrode pads from their protective plastic shield by holding and lifting one
corner of the pad and pulling. Do not pull on the pigtail wire of the pad.• After use always replace the pads on the plastic liner and replace in the re-sealable
plastic bag.• If the pads dry out then it is best to buy a replacement pack of electrodes. In an
emergency it may be possible to restore some of the tackiness of the pad by adding a tiny drop of water on each pad and spreading around. If too much water is added the pads will become too soft then it is suggested in order to try to re-establish some adhesiveness to place them sticky side up in a refrigerator for a few hours.
47
• In very hot weather the gel on the pads may become soft. In such cases place the pads, still on their plastic liners and in their bag, into a fridge until they return to their normal condition.
WARNINGSDo not use any electrodes less than 50mm X 50mm. However 25mm x 25mm electrodes can be used for the microcurrent treatmentAllergic reactions to the self-adhesive electrodes can occur even though they are hypoallergenic.• Do not apply to broken skin.• Do not apply electrodes to areas with less than normal sensitivity. This could lead to
setting intensities at higher levels than intended.
19. CHARGING THE BATTERYThe Flexistim is powered by a type BL-6F rechargeable Li-ion battery.The battery cannot be charged while it is in the unit. A separate charging cradle and power adaptor are included in the kit.The battery should need charging about once a week unless you are using IF, in which case the battery may only last about one hour.A battery state indicator on the screen shows how much charge is in the battery. When it gets low, this will start to flash.NB: Remove the battery from your Flexistim if the unit is unlikely to be used for a long period.When the battery is charged, the indicator light on the cradle will change from red to green.For a replacement battery, contact Tenscare or your local distributor.Use only the power adaptor and charging cradle supplied.
48
flexistim instructions final.indd 50-51 27/11/2014 12:07
The Flexistim can also be operated directly from the charger. Just plug it directly into the socket in the side of the unit. This automatically disconnects the battery.
USE OF OTHER CHARGERS COULD BE HAZARDOUS AND WILL NEGATE THE GUARANTEE
WarningThere is a risk of smoke, fire, or rupture if the battery is not used according to the following guidelines:• Do not disassemble the battery• Do not short-circuit the battery• Do not incinerate or heat the battery• Do not use or leave battery near a fire, stove or heated place (more than 80°C)• Do not immerse the battery in water or sea water, or get it wet• Do not charge battery nearby the fire or in strong sunlight• Only use the charger provided and observe charging instructions
DisposalAlways dispose of batteries responsibly according to local government guidelines.
49
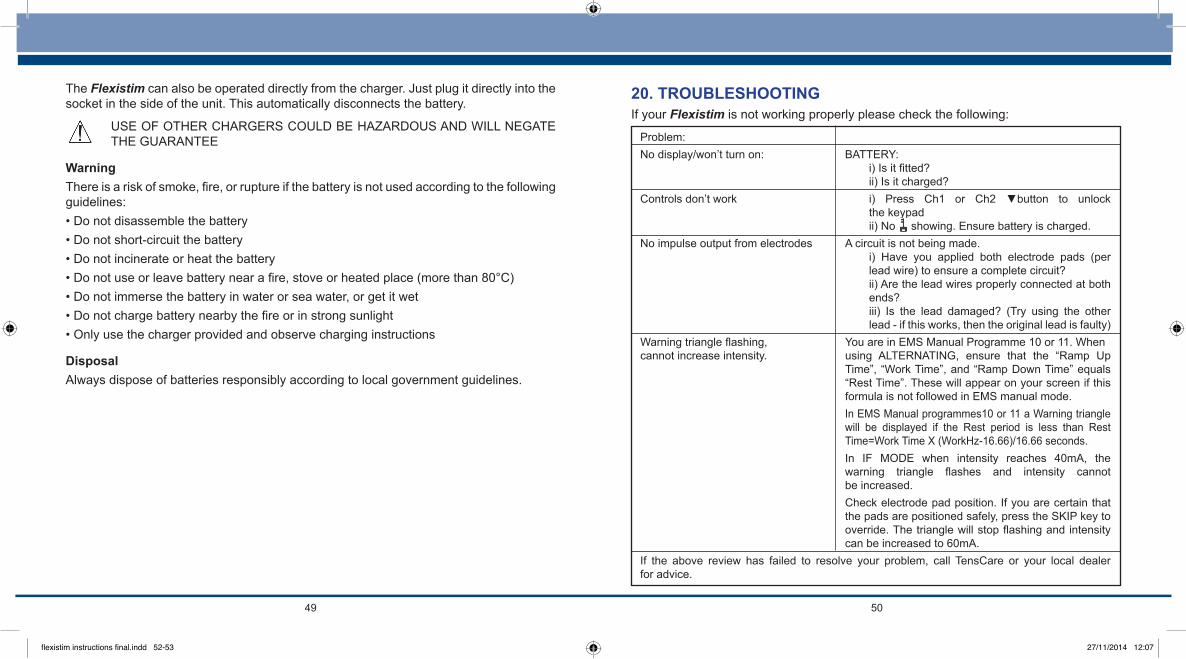
20. TROUBLESHOOTINGIf your Flexistim is not working properly please check the following:
Problem:No display/won’t turn on: BATTERY: i) Is it fitted? ii) Is it charged?Controls don’t work i) Press Ch1 or Ch2 ▼button to unlock
the keypad ii) No showing. Ensure battery is charged.No impulse output from electrodes A circuit is not being made. i) Have you applied both electrode pads (per
lead wire) to ensure a complete circuit? ii) Are the lead wires properly connected at both
ends? iii) Is the lead damaged? (Try using the other
lead - if this works, then the original lead is faulty)Warning triangle flashing, You are in EMS Manual Programme 10 or 11. Whencannot increase intensity. using ALTERNATING, ensure that the “Ramp Up
Time”, “Work Time”, and “Ramp Down Time” equals “Rest Time”. These will appear on your screen if this formula is not followed in EMS manual mode.
In EMS Manual programmes10 or 11 a Warning triangle will be displayed if the Rest period is less than Rest Time=Work Time X (WorkHz-16.66)/16.66 seconds.
In IF MODE when intensity reaches 40mA, the warning triangle flashes and intensity cannot be increased.
Check electrode pad position. If you are certain that the pads are positioned safely, press the SKIP key to override. The triangle will stop flashing and intensity can be increased to 60mA.
If the above review has failed to resolve your problem, call TensCare or your local dealer for advice.
50
flexistim instructions final.indd 52-53 27/11/2014 12:07

21. CLEANING• Clean your device before use.• Remove the battery from the device every time when you clean the device.• The case and lead wires can be cleaned by wiping with a damp cloth and a solution of
mild soap and water. Wipe dry.• Do not immerse your Flexistim in water.• Do not use any other cleaning solution than soap and water.
22. CONSUMABLES AND SERVICINGOriginal AccessoryThe unit must be used only with the original accessories, supplied by the manufacturer.Replacement electrode pads, new batteries and lead wires are available from your supplier or distributor (see back cover for contact details), by mail order from TensCare, by telephone using a credit or debit card, or through our website.PART NUMBER:L-ST2 Replacement lead 1.25mE-CM5050 Electrode pads 50x50mm for external use. Pack of 4B-BL6F Li-Ion battery type BL-6F 3.7V 1100mAhX-ST2CR Charging CradleX-FLEXIPA Power adaptorApart from these items, there are no user-serviceable parts or calibration.• Maintenance and all repairs should only be carried out by an authorised agency. The
manufacturer will not be held responsible for the results of maintenance or repairs by unauthorised persons.
• The user must not attempt any repairs to the device or accessories. Please contact the retailer for repair.
• Opening of the equipment by unauthorised agencies is not allowed and will terminate any claim to warranty.
• Check the unit before each use for signs of wear and/or damage. Replace worn items as required.
51
23. WARRANTYIn addition to your statutory rights, the manufacturer agrees that if any defect in materials or workmanship appears in this product within two years after the original date of consumer purchase, it will repair or at its option, replace the product in question free of charge. This applies only if the product has been used for domestic purposes and has not been damaged through misuse, accident or neglect and has not been modified or repaired by anyone other than the manufacturer or its authorised agents.If a defect appears, please make sure that the unit is being used in accordance with the instructions, if so, return it with this warranty and the proof of purchase to your nearest Flexistim dealer. Note: only our authorised service agents should carry out repairs of the Flexistim units.Exclusions: The batteries, lead wires and electrode pads are not considered covered by this warranty.The supplier will make available on request circuit diagrams, component part lists, descriptions, calibration instructions, or other information which will assist the user’s appropriately qualified technical personnel to repair those parts of equipment which are designated by the manufacturer as repairable.
24. DISPOSAL OF WASTE ELECTRICAL AND ELECTRONIC PRODUCTS (WEEE)One of the provisions of the European Directive 2002 / 96 / CE is that anything electrical or electronic should not be treated as domestic waste and simply thrown away. New products are now being marked with the symbol to remind you. Your local council or retailer will be able to tell you where your nearest facility is. The collection facilities will send items for treatment, recovery and recycling, so by using them you’ll help to save resources and minimise the effects on the environment.
52
flexistim instructions final.indd 54-55 27/11/2014 12:07

25. SPECIFICATIONSTENS & EMS:Output: 99 mA zero to peak Constant current 500-1500 Ohm, Constant voltage > 1500 OhmMax Pulse Energy Total output limited to 25uC per pulseChannels Dual ChannelWaveform Asymmetrical rectangular bi-phasicTENS 2-150 Hz in steps of 1, 50-250 μS in steps of 10Modes Burst/ContinuousEMS 10-120 Hz, 50-400μS in steps of 10Ramp Up/Down Time 0-8s, in steps of 1sWork Time 1-30s, in steps of 1sRest Time 1-60s, in steps of 1sModes: Synchronous (S) Alternating (A)
IFT:Intensity 60 steps, 0-60mA peak to peak at 500 Ohm loadCarrier Frequency 4000Hz fixed(CH1)Modulating Frequency 4004-4160Hz, in steps of 4Hz(CH2)Pulse Width 125μsMode 4 poleWaveform Symmetrical balanced sine waveTreatment Timer Continuous, 1-90 mins
MICROCURRENT:Frequency 0.5Hz 1Hz 1.5Hz 2Hz 3Hz 4Hz 5Hz to 50HzPulse Width 10-999 mSWaveforms A continuous, B square unipolar, C sawtooth unipolarTreatment Time 20 mins defaultIntensity 0-700uA in 10uA steps
53
GENERALOutput Plugs Fully shielded: touch proofDimensions 61×123×22mm (exclude belt clip)Weight 160g (with battery)Power Supply BL-6F Li-Ion battery 3.7V 1100mAh Mains adaptor (Class II, IEC60601-1) with charging cradle Input 100-240V Output DC 5V 1000mASafety Classification Type BF Designed for continuous use IP22EnvironmentalOperating Specifications Humidity: 20 to 93% RH Temperature range: 0 to 40C Atmospheric Pressure: 700hPa to 1060hPaStorage and Humidity: 10 to 93% RHTransport Specifications Temperature range: -20 to 70C Atmospheric Pressure: 700hPa to 1060hPaTypical Operation Time No less than 1 week (@50%AMP, 4 hours per day, in TENS/EMS/MIC Mode) No less than 1 hour (@50%AMP, in IFC Mode)Expected Service Life No less than 5 years
54
flexistim instructions final.indd 56-57 27/11/2014 12:07

26. STANDARD SYMBOLS
Type BF Applied part
Attention, consult accompanying document
Complies with WEEE regulations
CE marking
Manufacturer
The first number 2: Protected against access to hazardous parts with a finger, and the jointed test finger of 12 mm Ф, 80 mm length, shall have adequate clearance from hazardous parts, and protected against solid foreign objects of 12.5 mm Ф and greater.
The second number: Protected against vertically falling water drops when enclosure is tilted up to 15º. Vertically falling drops shall have no harmful effects when the enclosure is tilted at any angle up to 15’’ on either side of the vertical.
27. EMC PRECAUTIONSWireless communications equipment such as wireless home network devices, mobile phones, cordless telephones and their base stations, walkie-talkies can affect this equipment and should be kept at least a distance d = 3,3 m away from the equipment.(Note: As indicated in Table 6 of IEC 60601-1-2:2007 for ME EQUIPMENT, a typical cell phone with a maximum output power of 2 W yields d = 3,3 m at an IMMUNITY LEVEL of 3 V/m).
IP22
55
EC Declaration of Conformity
TensCare Ltd hereby declare that an examination of the production quality assurance system has been carried out following the requirements of the UK national legislation according to Annex V of the Directive 93/42/EEC on medical devices. We certify that the production quality system conforms with the relevant provisions of the aforementioned legislation, and the result entitles the organisation to use the CE 0473 marking on this product.
56
flexistim instructions final.indd 58-59 27/11/2014 12:07

TensCare Ltd, 9 Blenheim Road,Epsom, Surrey KT19 9BE, UK
Tel: +44(0) 1372 723434www.tenscare.co.uk
Distributed by:
Pub No.: I-FLEX-UK Version 1.0 09/14
Manufactured by:
flexistim instructions final.indd 60 27/11/2014 12:07