fujitsu software serverview infrastructure manager … esxi 5.x - - - - ... emulex onecommand...
TRANSCRIPT

Copyright 2017 FUJITSU LIMITED 1 / 43
CA92344-1764-02
August 2017
FUJITSU LIMITED
To manage an OS by using ServerView Infrastructure Manager V2.1 (hereinafter referred to as
“ISM 2.1”), set up on the OS side is required. This document provides the required information
for the settings.
For the details and abbreviations used within this document, refer to the manuals below.
・FUJITSU Software ServerView Infrastructure Manager V2.1 User’s Manual
・FUJITSU Software ServerView Infrastructure Manager V2.1 Glossary
FUJITSU Software
ServerView Infrastructure Manager V2.1
Settings for Monitoring Target OS and
Cloud Management Software
Copyright 2017 FUJITSU LIMITED 2 / 43
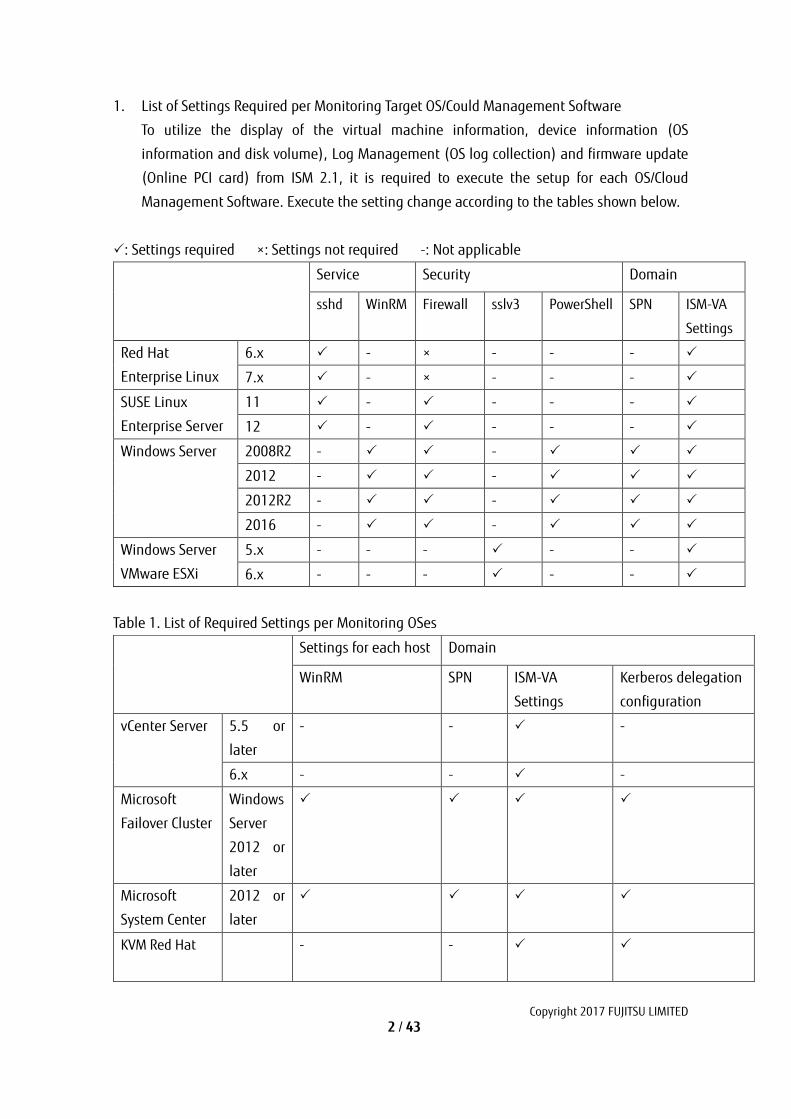
1. List of Settings Required per Monitoring Target OS/Could Management Software
To utilize the display of the virtual machine information, device information (OS
information and disk volume), Log Management (OS log collection) and firmware update
(Online PCI card) from ISM 2.1, it is required to execute the setup for each OS/Cloud
Management Software. Execute the setting change according to the tables shown below.
: Settings required ×: Settings not required -: Not applicable
Table 1. List of Required Settings per Monitoring OSes
Service Security Domain
sshd WinRM Firewall sslv3 PowerShell SPN ISM-VA
Settings
Red Hat
Enterprise Linux
6.x - × - - -
7.x - × - - -
SUSE Linux
Enterprise Server
11 - - - -
12 - - - -
Windows Server 2008R2 - -
2012 - -
2012R2 - -
2016 - -
Windows Server
VMware ESXi
5.x - - - - -
6.x - - - - -
Settings for each host Domain
WinRM SPN ISM-VA
Settings
Kerberos delegation
configuration
vCenter Server 5.5 or
later
- - -
6.x - - -
Microsoft
Failover Cluster
Windows
Server
2012 or
later
Microsoft
System Center
2012 or
later
KVM Red Hat - -
Copyright 2017 FUJITSU LIMITED 3 / 43
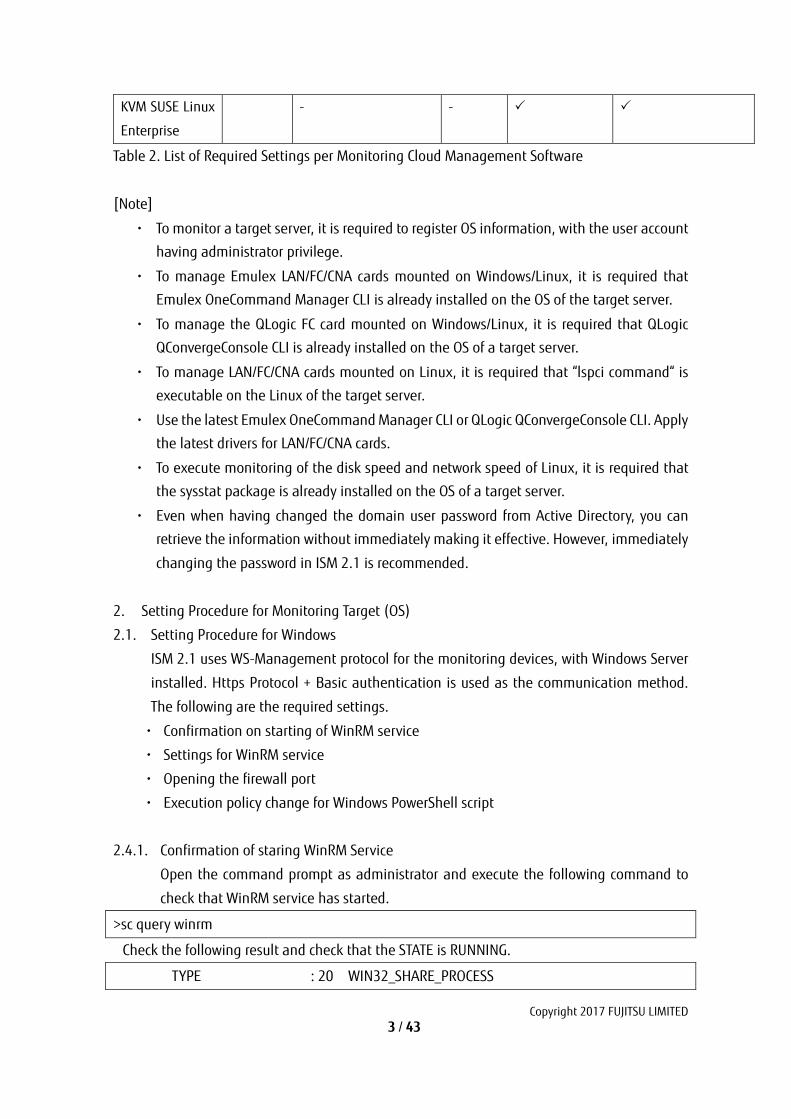
Table 2. List of Required Settings per Monitoring Cloud Management Software
[Note]
・ To monitor a target server, it is required to register OS information, with the user account
having administrator privilege.
・ To manage Emulex LAN/FC/CNA cards mounted on Windows/Linux, it is required that
Emulex OneCommand Manager CLI is already installed on the OS of the target server.
・ To manage the QLogic FC card mounted on Windows/Linux, it is required that QLogic
QConvergeConsole CLI is already installed on the OS of a target server.
・ To manage LAN/FC/CNA cards mounted on Linux, it is required that “lspci command“ is
executable on the Linux of the target server.
・ Use the latest Emulex OneCommand Manager CLI or QLogic QConvergeConsole CLI. Apply
the latest drivers for LAN/FC/CNA cards.
・ To execute monitoring of the disk speed and network speed of Linux, it is required that
the sysstat package is already installed on the OS of a target server.
・ Even when having changed the domain user password from Active Directory, you can
retrieve the information without immediately making it effective. However, immediately
changing the password in ISM 2.1 is recommended.
2. Setting Procedure for Monitoring Target (OS)
2.1. Setting Procedure for Windows
ISM 2.1 uses WS-Management protocol for the monitoring devices, with Windows Server
installed. Https Protocol + Basic authentication is used as the communication method.
The following are the required settings.
・ Confirmation on starting of WinRM service
・ Settings for WinRM service
・ Opening the firewall port
・ Execution policy change for Windows PowerShell script
2.4.1. Confirmation of staring WinRM Service
Open the command prompt as administrator and execute the following command to
check that WinRM service has started.
>sc query winrm
Check the following result and check that the STATE is RUNNING.
TYPE : 20 WIN32_SHARE_PROCESS
KVM SUSE Linux
Enterprise
- -
Copyright 2017 FUJITSU LIMITED 4 / 43
STATE : 4 RUNNING
(STOPPABLE, NOT_PAUSABLE, ACCEPTS_SHUTDOWN)
WIN32_EXIT_CODE : 0 (0x0)
SERVICE_EXIT_CODE : 0 (0x0)
CHECKPOINT : 0x0
WAIT_HINT : 0x0
Execute the following command to start WinRM service if the WinRM service has not started.
>sc start winrm
[Note]
In some cases, WinRM service does not start automatically depending on the conditions. It is
required to change the settings so that WinRM service can be auto-started (auto) or delayed-
auto-started (delayed-auto).
The following is an example of the automatic start setting.
>sc config winrm start=auto
2.4.2. Settings for WinRM Service
Settings for WinRM Service
Since Basic authentication is not allowed in the initial settings (refer to 1-1), the settings
to allow Basic authentication is required.
Since https communication is used, communication with Basic authentication is
encrypted.
Open the command prompt as administrator and execute the following command.
>winrm quickconfig
In cases where the following message is displayed, although WinRM service is running, remote
access permission is not yet set. Therefore, proceed to the following steps. The settings are
already complete if the message “WinRM service already runs on this computer” is displayed.
In this case, proceed to “(2) Settings for Https Communication.”
After entering “y”, press the [Enter] key.
WinRM service is already running on this machine.
WinRM is not set up to allow remote access to this machine for management.
The following changes must be made:
Configure LocalAccountTokenFilterPolicy to grant administrative rights remotely to local users.
Make these changes [y/n]? y
The following message is shown.
WinRM has been updated for remote management.
Copyright 2017 FUJITSU LIMITED 5 / 43
Configured LocalAccountTokenFilterPolicy to grant administrative rights remotely to local users.
(1-1) Allowing Basic Authentication
Execute the following command.
>winrm set winrm/config/service/Auth@{Basic="true"}
(1-2) Additional Setting Item (Windows Server 2008R2)
Execute the following command to increase the numerical value of
MaxConcurrentOperationsPerUser depending on the type and the number of cards,
if the OS of a target server is Windows Server 2008 R2.
Execute the following command.
>winrm set winrm/config/Service @{MaxConcurrentOperationsPerUser="numerical value"}
Ex. In the case where the above value is set as 1500(1500 is recommended because 1500 is set
by default in Windows Server 2012/2012R2.)
>winrm set winrm/config/Service @{MaxConcurrentOperationsPerUser="1500"}
Settings for Https Communication
To establish https communication, certificate setup is required.
(2-1) Preparation of Required Tools
Two tools are required for creating a certificate. You can create the certificate without
depending on the execution conditions.
・.NET Framework 4.5 (Download site)
https://www.microsoft.com/en-us/download/details.aspx?id=30653
・Windows Software Development Kit (Download site)
https://developer.microsoft.com/en-us/windows/downloads/windows-10-sdk
[Note]
The Windows Software Development Kit of the above URL is supported in Windows 7 SP1 or
Windows 8.1 and Windows Server 2012 R2 or Windows Server 2016. When installing OS of
other than mentioned, install the appropriate Windows Software Development Kit.
Windows Software Development Kit includes two tools required for creating the certificate.
Certificate creation tool (makecert.exe)
https://msdn.microsoft.com/en-us/library/bfsktky3(v=vs.80).aspx
Personal information exchange file creation tool (pvk2pfx.exe)
https://msdn.microsoft.com/en-us/library/windows/hardware/ff550672(v=vs.85).aspx
Creating Certificate
Use the certificate creation tool and personal information exchange file creation tool
to create the following three files.

Copyright 2017 FUJITSU LIMITED 6 / 43
・CER file (Certificate)
・PVK file (Private key file)
・PFX file (Service certificate)
For more detailed procedure of certificate creation, refer to the following URL.
https://msdn.microsoft.com/en-us/library/ff699202.aspx
Creating a Certificate and Private Key Files
In order to create the certificate and private key files, it is required to execute
commands suitable for the conditions of a target server.
The following is a command example where the server name of the target server is set
as “192.168.10.10” and the effective period of the certificate is set to March 30th, 2017.
>makecert.exe -r -pe -n "CN=192.168.10.10" -e 03/30/2017 -eku 1.3.6.1.5.5.7.3.1 -ss My
-sr localMachine -sky exchange <certificate file name.cer> -sv <private key file name.pvk>
For detailed settings on the certificate configuration, refer to the following URL.
https://technet.microsoft.com/en-us/library/ms186362(v=sql.105).aspx
Creating a Service Certificate
Execute the following command.
>pvk2pfx.exe -pvk <private key file name.pvk> -spc <certificate file name.cer> -pfx <service
certificate file name.pfx>
Registering Certificate and Service Certificate
Open the Certificate Snap-In and register the certificate created above in steps (4) and
(5).
1. Execute mmc. exe on the target server.
2. From [File] >, select [Add and Remove Snap-In].
3. From [Available Snap-in], select “Certificate” to [Add].
4. Select “Computer Account” > [Next] > [Finish] in sequence.
5. Select [OK].
Registering SSL certificate
1. Register <certificate file name.cer> with Trusted Root Certification Authority.
From [Console Root] > [Certificates (Local Computer)] >, and right-click on [Trusted
Root Certificate Authority]. From [ALL Tasks] > [Import], select <certificate file
name.cer> file, and finish Certificate Import Wizard.
2. Confirm if <certificate file name.cer> is successfully registered with [Trusted Root
Copyright 2017 FUJITSU LIMITED 7 / 43
Certificate Authority].
Select [Console Root] > [Certificate (Local Computer)] > [Trusted Root Certificate
Authority] > [Certificate] in sequence and confirm if “Issued to“ and “Issued by” are the
server names specified as CN, and “Authentication Purpose” is specified as “Server
Authentication.”
3. Register <service certificate file name.pfx> in ‘personal’.
From [Console Root] > [Certificate (Local Computer)] >, right-click on [Personal]. From
[All Tasks] > [Import], select<service certificate file name.pfx>, and finish Certificate
Import Wizard.
4. Confirm if <service certificate file name.pfx> is successfully registered with [Personal].
From [Console Root] > [Certificate (Local Computer)] > select [Personal] in sequence
and confirm if “Issued to” and “Issued by” are the server name specified as CN, and
“Authentication Purpose“ is specified as “Server Authentication.”
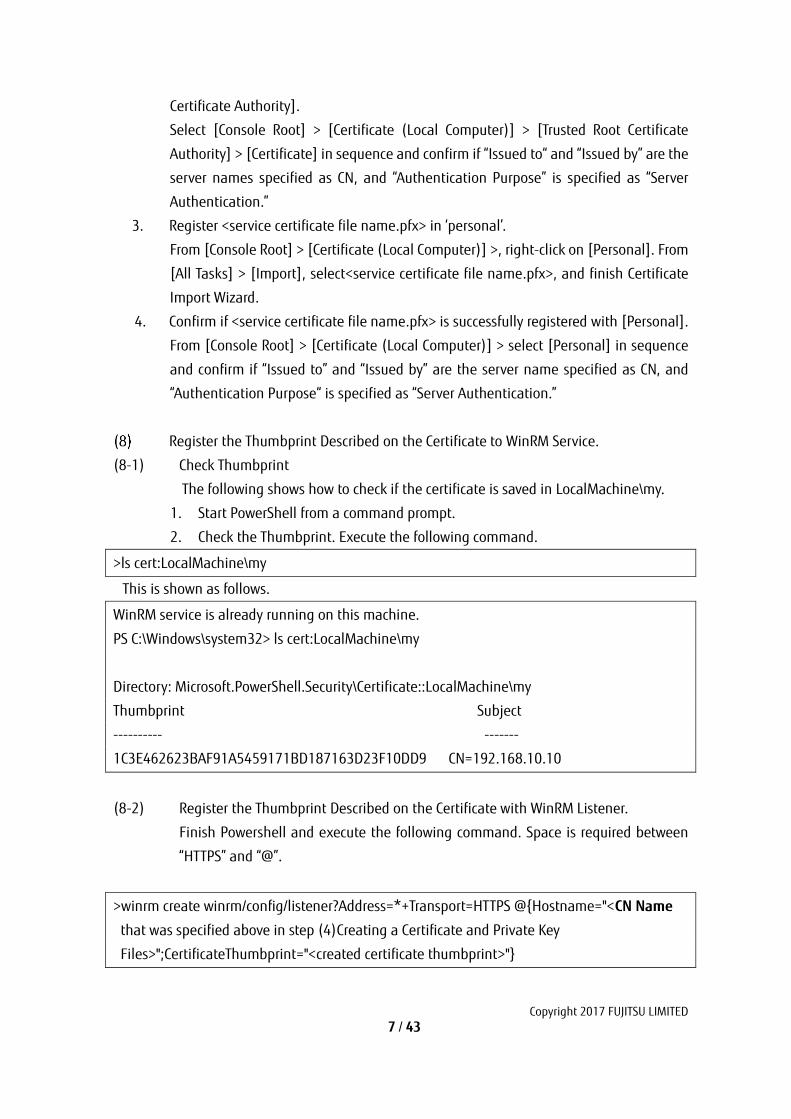
Register the Thumbprint Described on the Certificate to WinRM Service.
(8-1) Check Thumbprint
The following shows how to check if the certificate is saved in LocalMachine\my.
1. Start PowerShell from a command prompt.
2. Check the Thumbprint. Execute the following command.
>ls cert:LocalMachine\my
This is shown as follows.
WinRM service is already running on this machine.
PS C:\Windows\system32> ls cert:LocalMachine\my
Directory: Microsoft.PowerShell.Security\Certificate::LocalMachine\my
Thumbprint Subject
---------- -------
1C3E462623BAF91A5459171BD187163D23F10DD9 CN=192.168.10.10
(8-2) Register the Thumbprint Described on the Certificate with WinRM Listener.
Finish Powershell and execute the following command. Space is required between
“HTTPS” and “@”.
>winrm create winrm/config/listener?Address=*+Transport=HTTPS @{Hostname="<CN Name
that was specified above in step (4)Creating a Certificate and Private Key
Files>";CertificateThumbprint="<created certificate thumbprint>"}
Copyright 2017 FUJITSU LIMITED 8 / 43
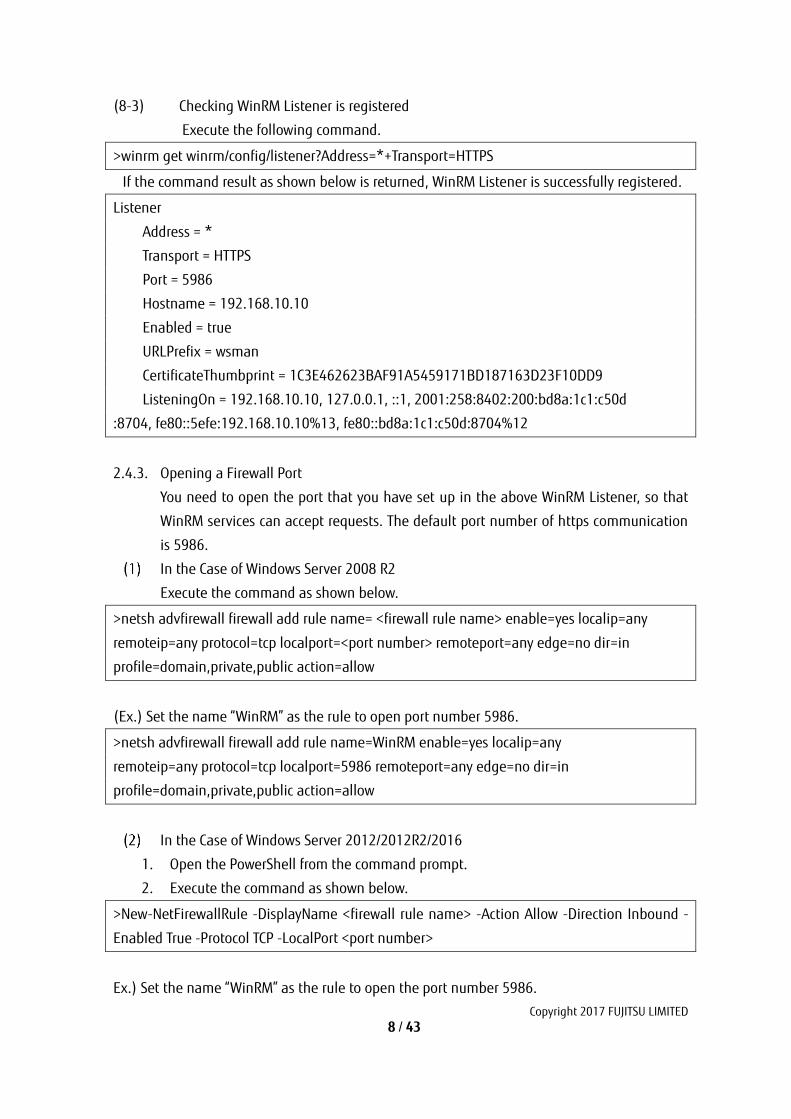
(8-3) Checking WinRM Listener is registered
Execute the following command.
>winrm get winrm/config/listener?Address=*+Transport=HTTPS
If the command result as shown below is returned, WinRM Listener is successfully registered.
Listener
Address = *
Transport = HTTPS
Port = 5986
Hostname = 192.168.10.10
Enabled = true
URLPrefix = wsman
CertificateThumbprint = 1C3E462623BAF91A5459171BD187163D23F10DD9
ListeningOn = 192.168.10.10, 127.0.0.1, ::1, 2001:258:8402:200:bd8a:1c1:c50d
:8704, fe80::5efe:192.168.10.10%13, fe80::bd8a:1c1:c50d:8704%12
2.4.3. Opening a Firewall Port
You need to open the port that you have set up in the above WinRM Listener, so that
WinRM services can accept requests. The default port number of https communication
is 5986.
In the Case of Windows Server 2008 R2
Execute the command as shown below.
>netsh advfirewall firewall add rule name= <firewall rule name> enable=yes localip=any
remoteip=any protocol=tcp localport=<port number> remoteport=any edge=no dir=in
profile=domain,private,public action=allow
(Ex.) Set the name “WinRM” as the rule to open port number 5986.
>netsh advfirewall firewall add rule name=WinRM enable=yes localip=any
remoteip=any protocol=tcp localport=5986 remoteport=any edge=no dir=in
profile=domain,private,public action=allow
In the Case of Windows Server 2012/2012R2/2016
1. Open the PowerShell from the command prompt.
2. Execute the command as shown below.
>New-NetFirewallRule -DisplayName <firewall rule name> -Action Allow -Direction Inbound -
Enabled True -Protocol TCP -LocalPort <port number>
Ex.) Set the name “WinRM” as the rule to open the port number 5986.
Copyright 2017 FUJITSU LIMITED 9 / 43
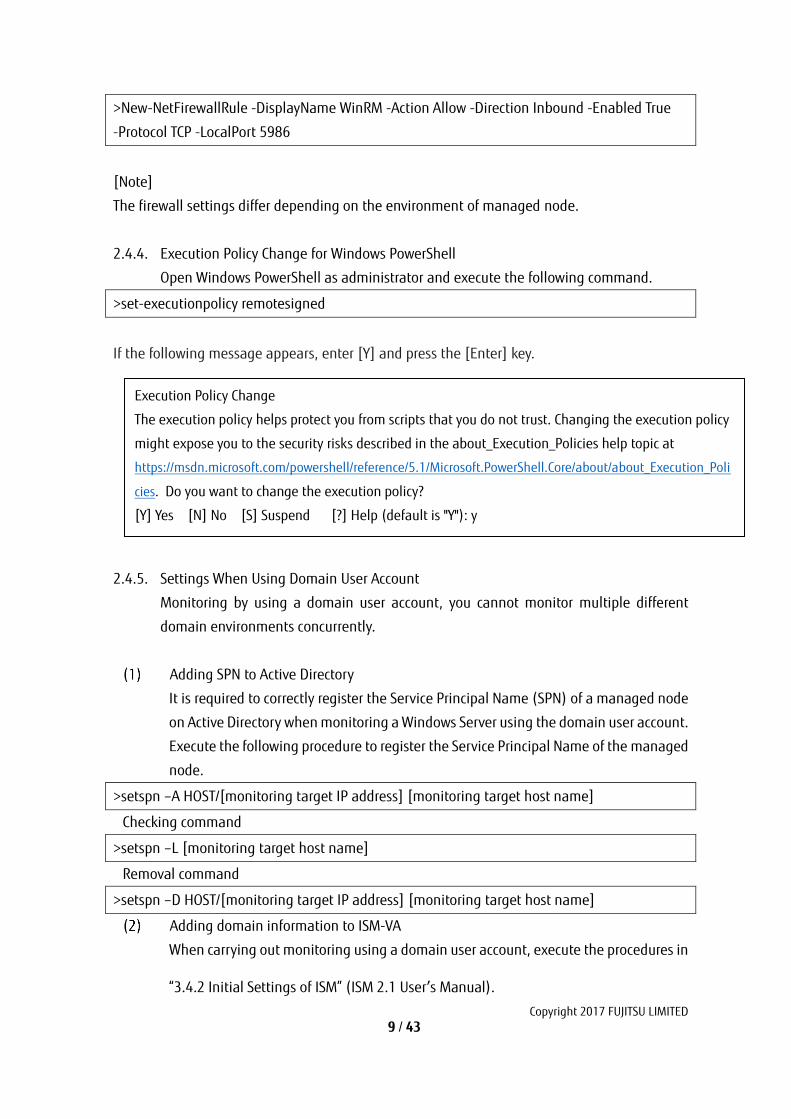
>New-NetFirewallRule -DisplayName WinRM -Action Allow -Direction Inbound -Enabled True
-Protocol TCP -LocalPort 5986
[Note]
The firewall settings differ depending on the environment of managed node.
2.4.4. Execution Policy Change for Windows PowerShell
Open Windows PowerShell as administrator and execute the following command.
>set-executionpolicy remotesigned
If the following message appears, enter [Y] and press the [Enter] key.
2.4.5. Settings When Using Domain User Account
Monitoring by using a domain user account, you cannot monitor multiple different
domain environments concurrently.
Adding SPN to Active Directory
It is required to correctly register the Service Principal Name (SPN) of a managed node
on Active Directory when monitoring a Windows Server using the domain user account.
Execute the following procedure to register the Service Principal Name of the managed
node.
>setspn –A HOST/[monitoring target IP address] [monitoring target host name]
Checking command
>setspn –L [monitoring target host name]
Removal command
>setspn –D HOST/[monitoring target IP address] [monitoring target host name]
Adding domain information to ISM-VA
When carrying out monitoring using a domain user account, execute the procedures in
“3.4.2 Initial Settings of ISM” (ISM 2.1 User’s Manual).
Execution Policy Change
The execution policy helps protect you from scripts that you do not trust. Changing the execution policy
might expose you to the security risks described in the about_Execution_Policies help topic at
https://msdn.microsoft.com/powershell/reference/5.1/Microsoft.PowerShell.Core/about/about_Execution_Poli
cies. Do you want to change the execution policy?
[Y] Yes [N] No [S] Suspend [?] Help (default is "Y"): y
Copyright 2017 FUJITSU LIMITED 10 / 43
Adding DNS information to ISM-VA
When carrying out monitoring using the domain user account, execute the procedures
in “ISM2.1_ User’s Manual (4.9 Network Settings Add DNS server)” to register the DNS
server on ISM-VA.
2.2. Setting Procedure for Red Hat Enterprise Linux
ISM 2.1 communicates with the target servers with Red Hat Enterprise Linux installed, by
using ssh (Secure Shell service). The following settings are required.
・Starting ssh service
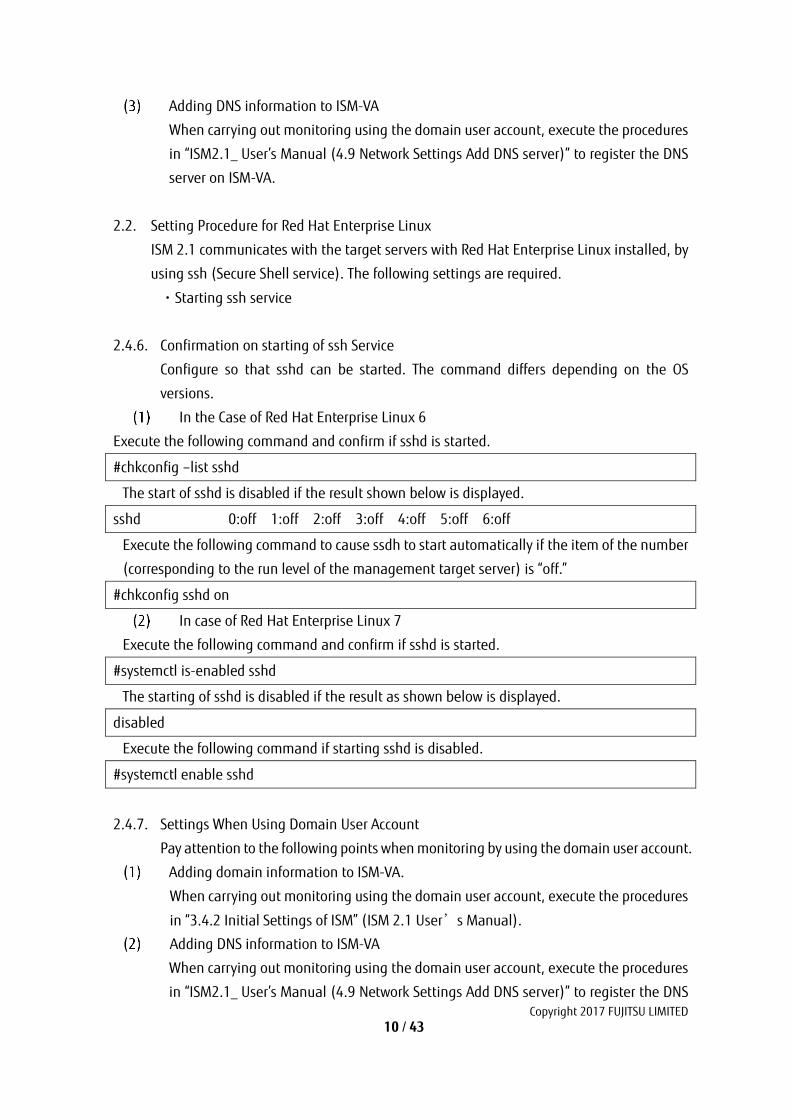
2.4.6. Confirmation on starting of ssh Service
Configure so that sshd can be started. The command differs depending on the OS
versions.
In the Case of Red Hat Enterprise Linux 6
Execute the following command and confirm if sshd is started.
#chkconfig –list sshd
The start of sshd is disabled if the result shown below is displayed.
sshd 0:off 1:off 2:off 3:off 4:off 5:off 6:off
Execute the following command to cause ssdh to start automatically if the item of the number
(corresponding to the run level of the management target server) is “off.”
#chkconfig sshd on
In case of Red Hat Enterprise Linux 7
Execute the following command and confirm if sshd is started.
#systemctl is-enabled sshd
The starting of sshd is disabled if the result as shown below is displayed.
disabled
Execute the following command if starting sshd is disabled.
#systemctl enable sshd
2.4.7. Settings When Using Domain User Account
Pay attention to the following points when monitoring by using the domain user account.
Adding domain information to ISM-VA.
When carrying out monitoring using the domain user account, execute the procedures
in “3.4.2 Initial Settings of ISM” (ISM 2.1 User’s Manual).
Adding DNS information to ISM-VA
When carrying out monitoring using the domain user account, execute the procedures
in “ISM2.1_ User’s Manual (4.9 Network Settings Add DNS server)” to register the DNS
Copyright 2017 FUJITSU LIMITED 11 / 43
server on ISM-VA.
Restriction on domain user account name
Also pay attention to the restriction on the user names of Linux when you use the
domain user name, registered on Active Directory, for Linux.
<Representative examples unavailable for Linux user names>
Uppercase letters, numeric characters at the beginning, and symbols, such as dot (.)
Restriction when collecting Emulex card information
Use “hbacmd” to collect the card information for the devices on which the card provided
by Avago/Emulex is mounted.
When collecting the card information with the domain user account, provide the
administrator privilege to “hbacmdan”.
For details, refer to “OneCommandManager Command Line Interface User Manual“.
Restriction when collecting QLogic card information
You cannot retrieve the information about the devices on which the card provided by
QLogic is mounted, by using the domain user account. Register the root user from Edit
OS Information screen to retrieve the information.
Restriction when collecting ServerView logs
You cannot collect ServerView logs by using the domain user account. Register the root
user from Edit OS Information screen to collect the information.
Restriction when updating firmware
You cannot execute online firmware update by using the domain user account. Register
the root user from Edit OS Information screen to execute firmware update.
2.4.8. Settings When Using Normal User Account
Pay attention to the following points when monitoring by using a normal user account
aside from the root user account.
Settings for Sudo Command
The applicable user account is required to change the settings for monitoring target
servers to enable the sudo command with the login password of the normal user account.
The following is a setting example of how to enable the sudo command with the login
password of user1.
1. Edit /etc/sudoers file.
# visudo
Copyright 2017 FUJITSU LIMITED 12 / 43
:
#Defaults targetpw ・・・Comment out
root ALL=(ALL) ALL
user1 ALL=(ALL) ALL ・・・Add user1
:
2. Log in to the monitoring target server with ssh using user1. If the password for user1 is asked
when executing the sudo command, the setting is completed.
Settings for Environment Variable
After logging in to the monitoring target server with ssh using the applicable account, confirm
that the prompt strings meet the following conditions. If the following conditions are met, do
not change the settings for prompt strings. Prompt strings can be changed by changing the
value of environment variable P1, which enables the user to change the prompt strings.
・ Directed to home directory upon login.
・ ’~’ is included in the prompt strings upon login.
・ ’$’ or ‘#’ is included after ‘ ~’ in the prompt strings upon login.
Example: [user1@localhost ~]$
Example of parameter of environment variable PS1)
[user1@localhost ~]$ echo $PS1
2.4.9. Settings for the Account Used for Monitoring
Settings for “.bashrc”
Open “.bashrc” file in the home directory of an applicable account. Create the file if
there is no “.bashrc” file.
#vi ~/.bashrc
Add the paths of “/sbin”, “/usr/sbin” and “/usr/loca/sbin” to “.bashrc” file.
PATH=$PATH:/sbin
PATH=$PATH:/usr/sbin
PATH=$PATH:/usr/local/sbin
Settings for Environment Variable
To execute the Log Collection function of ServerView, it is required to set the environment
Copyright 2017 FUJITSU LIMITED 13 / 43
variable PS1 of the applicable account. To set the environment variable PS1, refer to the
section “2.2.3 Settings When Using Normal User Account, (2) Settings for Environment
Variable."
2.3. Setting Procedure for SUSE Linux Enterprise Server
In ISM 2.1, SUSE Linux Enterprise Server communicates with the installed target servers
using ssh (Secure Shell Service). The following are required settings.
・Confirm that ssh service is started
・Open a Firewall Port
2.4.10. Confirmation on starting of Ssh Service
The start of sshd is disabled by default in SUSE Linux Enterprise Server.
Make settings so that sshd can be started. The command differs depending on OS
versions.
SUSE Linux Enterprise Server 11
Execute the following command and confirm if sshd is started.
#chkconfig –list sshd
The start of sshd is disabled if the result is shown as follows.
sshd 0:off 1:off 2:off 3:off 4:off 5:off 6:off
Execute the following command so that sshd can be started automatically if the item of the
number (corresponding to the run level of the target server) is “off.”
#chkconfig sshd on
SUSE Linux Enterprise Server 12
Execute the following command and confirm if sshd is started.
#systemctl is-enabled sshd
The start of sshd is disabled if the result is as shown below.
disabled
Execute the following command if the start of sshd is disabled.
#systemctl enable sshd
2.4.11. Opening the Firewall Port
The firewall of SUSE Linux Enterprise Server closes its ssh port by default. It is required
to allow ssh communication within the firewall settings.
The firewall settings differ depending on the conditions of the target servers. The
example as shown below is the firewall settings in which YaST is used.
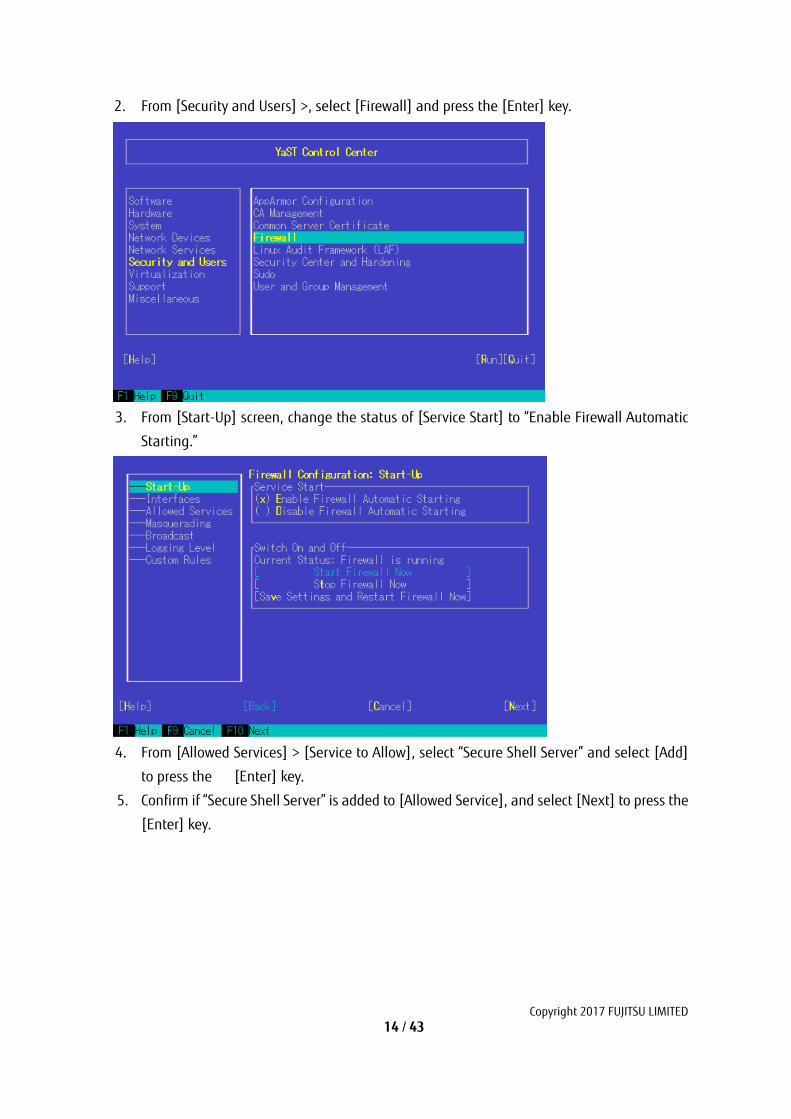
1. Execute the following command to show YaST Control Center.
#yast
Copyright 2017 FUJITSU LIMITED 14 / 43
2. From [Security and Users] >, select [Firewall] and press the [Enter] key.
3. From [Start-Up] screen, change the status of [Service Start] to “Enable Firewall Automatic
Starting.”
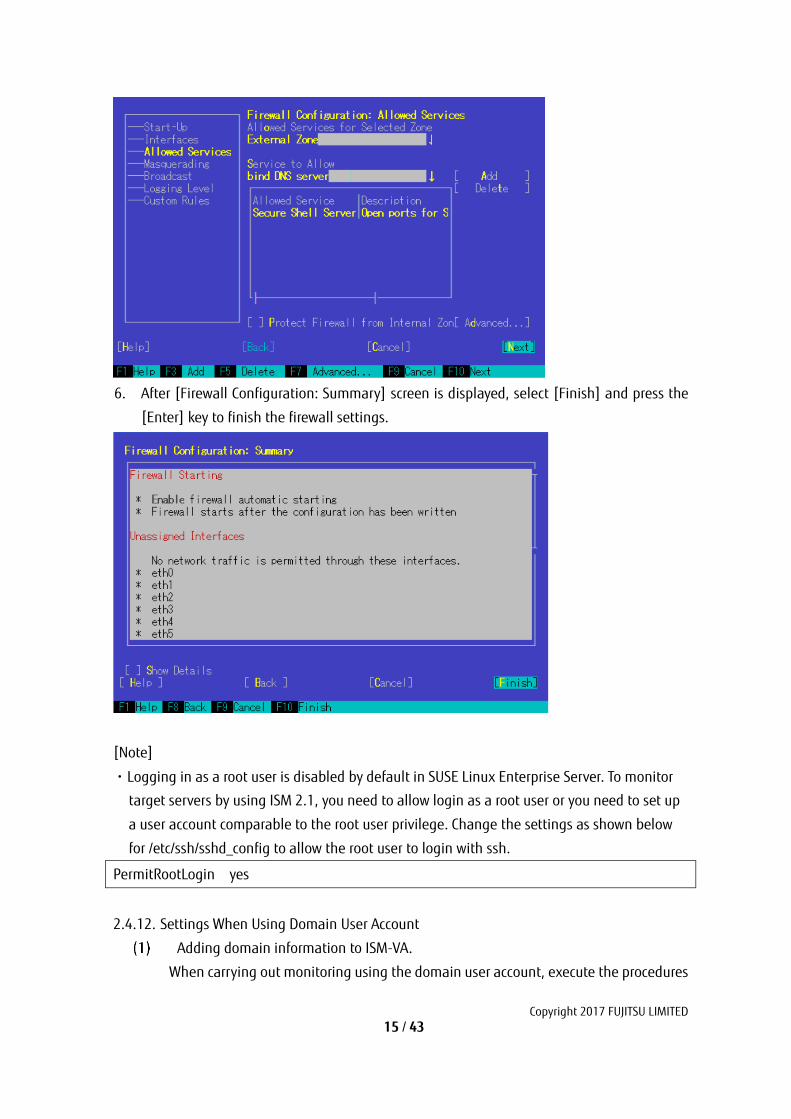
4. From [Allowed Services] > [Service to Allow], select “Secure Shell Server” and select [Add]
to press the [Enter] key.
5. Confirm if “Secure Shell Server” is added to [Allowed Service], and select [Next] to press the
[Enter] key.
Copyright 2017 FUJITSU LIMITED 15 / 43
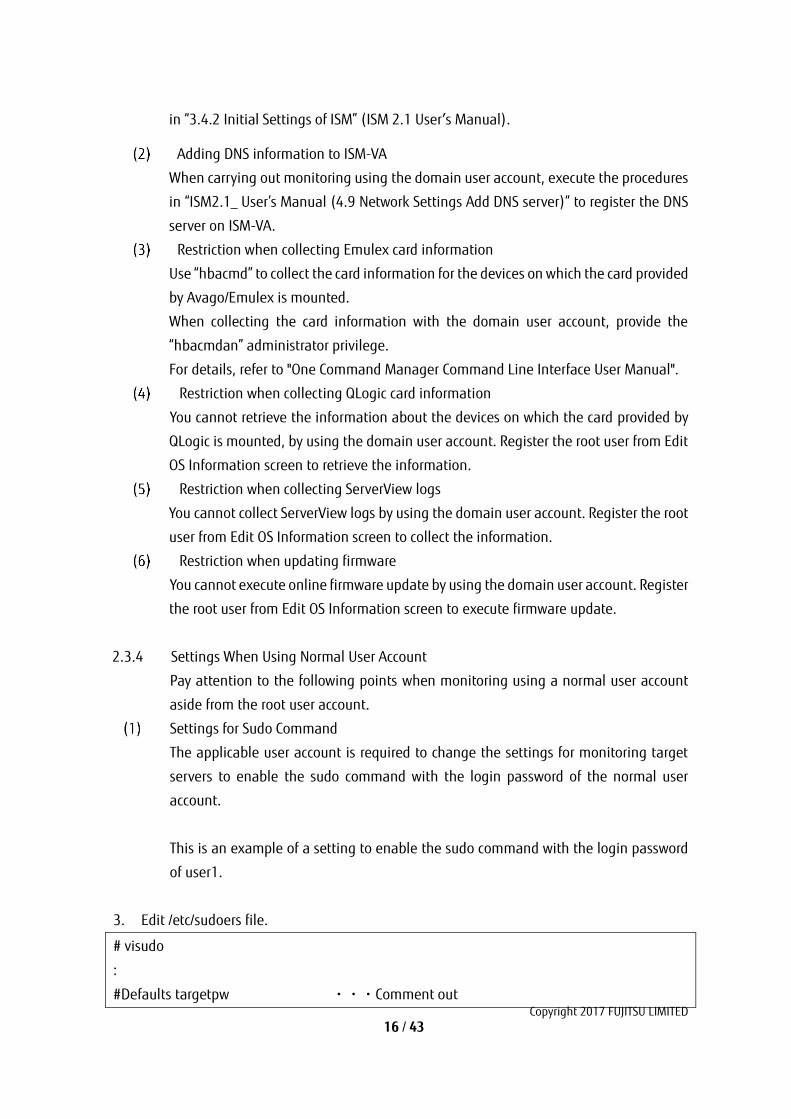
6. After [Firewall Configuration: Summary] screen is displayed, select [Finish] and press the
[Enter] key to finish the firewall settings.
[Note]
・Logging in as a root user is disabled by default in SUSE Linux Enterprise Server. To monitor
target servers by using ISM 2.1, you need to allow login as a root user or you need to set up
a user account comparable to the root user privilege. Change the settings as shown below
for /etc/ssh/sshd_config to allow the root user to login with ssh.
PermitRootLogin yes
2.4.12. Settings When Using Domain User Account
Adding domain information to ISM-VA.
When carrying out monitoring using the domain user account, execute the procedures
Copyright 2017 FUJITSU LIMITED 16 / 43
in “3.4.2 Initial Settings of ISM” (ISM 2.1 User’s Manual).
Adding DNS information to ISM-VA
When carrying out monitoring using the domain user account, execute the procedures
in “ISM2.1_ User’s Manual (4.9 Network Settings Add DNS server)” to register the DNS
server on ISM-VA.
Restriction when collecting Emulex card information
Use “hbacmd” to collect the card information for the devices on which the card provided
by Avago/Emulex is mounted.
When collecting the card information with the domain user account, provide the
“hbacmdan” administrator privilege.
For details, refer to "One Command Manager Command Line Interface User Manual".
Restriction when collecting QLogic card information
You cannot retrieve the information about the devices on which the card provided by
QLogic is mounted, by using the domain user account. Register the root user from Edit
OS Information screen to retrieve the information.
Restriction when collecting ServerView logs
You cannot collect ServerView logs by using the domain user account. Register the root
user from Edit OS Information screen to collect the information.
Restriction when updating firmware
You cannot execute online firmware update by using the domain user account. Register
the root user from Edit OS Information screen to execute firmware update.
2.3.4 Settings When Using Normal User Account
Pay attention to the following points when monitoring using a normal user account
aside from the root user account.
Settings for Sudo Command
The applicable user account is required to change the settings for monitoring target
servers to enable the sudo command with the login password of the normal user
account.
This is an example of a setting to enable the sudo command with the login password
of user1.
3. Edit /etc/sudoers file.
# visudo
:
#Defaults targetpw ・・・Comment out
Copyright 2017 FUJITSU LIMITED 17 / 43
root ALL=(ALL) ALL
user1 ALL=(ALL) ALL ・・・Add user1
:
4. Log in to the monitoring target server with ssh using user1. If the password for user1 is
asked for when executing the sudo command, the setting is completed.
Settings for Environment Variable
After logging in to the monitoring target server with ssh using the applicable account,
confirm that the prompt strings meet the following conditions. If the following
conditions are met, do not change the settings for prompt strings. Prompt strings can be
changed by changing the value of environment variable P1, which enables the user to
change the prompt strings.
・ Directed to home directory upon login.
・ ’~’ is included in the prompt strings upon login.
・ ’$’ or ‘#’ is included after ‘ ~’ in the prompt strings upon login
Example: [user1@localhost ~]$
Example of parameter of environment variable PS1)
[user1@localhost ~]$ echo $PS1
2.3.5 Setting the Account for Monitoring
Settings for “.bashrc”
Open the “.bashrc” file in the home directory of the applicable account. Create a file if
there is no “.bashrc” file.
#vi ~/.bashrc
Add the paths of “/sbin”, “/usr/sbin” and “/usr/loca/sbin” to “.bashrc” file.
PATH=$PATH:/sbin
PATH=$PATH:/usr/sbin
PATH=$PATH:/usr/local/sbin
Settings for Environment Variable
To execute the Log Collection function of ServerView, it is required to set the
environment variable PS1 of applicable account. To set the environment variable PS1,
Copyright 2017 FUJITSU LIMITED 18 / 43
refer to the section “2.3.4 Settings When Using Normal User Account, (2) Settings for
Environment Variable.
2.4. Setting Procedure for VMware ESXi
ISM 2.1 communicates with target servers with VMware ESXi installed, by using vSphere
API/CIM protocol. The following are the required settings.
・Enabling support for SSLv3 in VMware ESXi
2.4.13. Enabling Support for SSLv3 in Mware ESXi 5.5 and VMware ESXi 6.0
Starting Ssh Service
These settings are not required if ssh service is already running.
1. Log in to VMware ESXi on the target server with vSphere Client.
2. From [Configuration] tab, select [Security Profile] > [Properties] of Services.
3. Select “SSH” > [Options].
4. From ”Service Commands”, select [Start] to start ssh service > [OK].
[Note]
When enabling ssh for VMware ESXi, the following message to be displayed on vSphere Client.
Configuration Issues
SSH for the host has been enabled.
Enabling SSLv3 for CIM server
The support for SSLv3 is disabled for CIM server (port 5989). Edit the sfcb.cfgfile to
enable SSLv3.
1. Log in to the target server with VMware ESXi installed, as administrator, via ssh.
2. Use challenge-response authentication to log in.
3. Edit the /etc/sfcb/sfcb.cfg file to add this statement to enable SSLv3.
enableSSLv3: true
Restart sfcbd-watchdog. Execute the following command.
#/etc/init.d/sfcbd-watchdog restart
[Note]
If the security patch (ESXi550-201501101-SG) is not applied to the releases previous to vSphere
ESXi 5.5 Update 2, POODLE security vulnerability may occur. Be sure to apply the security patch
before you enable SSLv3.
・VMware Security Patching Guidelines for ESXi and ESX (2020972)
https://kb.vmware.com/selfservice/microsites/search.do?language=en_US&cmd=displayKC&ext
ernalId=2020972
・VMware ESXi 5.5, Patch ESXi550-201501101-SG: Updates esx-base (2099273)
Copyright 2017 FUJITSU LIMITED 19 / 43
https://kb.vmware.com/selfservice/microsites/search.do?language=en_US&cmd=displayKC&ext
ernalId=2099273
Stopping ssh Service
1. Log in to VMware ESXi on the target server with vSphere Client.
2. From [Configuration] tab, select [Security Profile] > [Properties] of Services.
3. Select [SSH] > [Options].
4. From “Service Commands”, select [Stop] to stop ssh service > [OK].
2.4.14. Enabling Support for SSLv3 in VMware ESXi 6.5
Starting ssh Service
These settings are not required if ssh service is already running.
1. Log in to VMware ESXi on the target server with vSphere Client.
Use a Web browser to access https://<IP address of ESXi>/ui/.
2. Select [Host] > [Management] to open ESxi management screen.
3. Select [Service] > [SSH] from the list.
4. Select [Start].
[Note]
When enabling ssh for VMware ESXi, the following message to be displayed on VMware Host
Client.
Ssh is enabled on this host. You should disable ssh unless it is necessary for administrative
purposes.
Enabling SSLv3 for CIM server
The support for SSLv3 is disabled for CIM server (port 5989). Edit the sfcb.cfg file to
enable SSLv3.
1. Log in to the target server with administrator privilege which installed ssh of VMware
ESXi.
2. Use challenge-response authentication to log in.
3. Edit the /etc/sfcb/sfcb.cfg file to add this statement to enable SSLv3.
enableSSLv3: true
Restart sfcbd-watchdog. Execute the following command.
#/etc/init.d/sfcbd-watchdog restart
Stopping ssh Service
1. Log in to VMware ESXi on the target server with VMware Host Client.
Use a Web browser to access https://<IP address of ESXi>/ui/.
Copyright 2017 FUJITSU LIMITED 20 / 43
2. Select [Host] > [Management] to open ESxi management screen.
3. Select [Service] tab > [SSH] from the list.
4. Select [Start].
2.4.15. Settings When Using Domain User Account
Adding domain information to ISM-VA
When carrying out monitoring using a domain user account, execute the procedures in
“3.4.2 Initial Settings of ISM” (ISM 2.1 User’s Manual).
Adding DNS information to ISM-VA
When carrying out monitoring using the domain user account, execute the procedures
in “ISM2.1_ User’s Manual (4.9 Network Settings Add DNS server)” to register the DNS
server on ISM-VA.
3. Setting Procedure for Monitoring Target (Cloud Management Software)
3.1. Setting Procedure for vCenter Server
3.1.1 Adding DNS information to ISM-VA
When carrying out monitoring under the condition where an ESXi host with FQDN is
registered on vCenter, execute the procedures in “ISM2.1_ User’s Manual (4.9 Network
Settings Add DNS server)” to register the DNS server on ISM-VA.
3.1.2 Settings When Using Domain User Account
Settings for Respective Hosts Registered on vCenter Server
To retrieve the information from vCenter Server, it is required that the settings for
respective hosts registered on vCenter Server are already completed. Refer to “2.4.
Setting Procedure for VMware ESXi” to execute the settings for respective hosts.
Adding domain information to ISM-VA
When carrying out monitoring using the domain user account, execute the procedures
in “3.4.2 Initial Settings of ISM” (ISM 2.1 User’s Manual).
Adding DNS information to ISM-VA
When carrying out monitoring using the domain user account, execute the procedures
in “ISM2.1_ User’s Manual (4.9 Network Settings Add DNS server)” to register the DNS
server on ISM-VA.
3.2. Setting Procedure for Microsoft Failover Cluster
3.1.3 Settings When Using Domain User Account.
Settings for when using the domain user account
Copyright 2017 FUJITSU LIMITED 21 / 43
Setting WinRM for Respective Hosts Configuring Cluster
To retrieve the information from Microsoft Failover Cluster, it is required that the
settings for respective hosts that configure a cluster are already completed. Refer to
“2.1. Setting Procedure for Windows” to execute the settings for respective hosts.
Adding SPN to Active Directory
It is required to correctly register the Service Principal Name (SPN) of a managed node
on Active Directory when monitoring a Windows Server using the domain user account.
Execute the following procedure to register the Service Principal Name of the managed
node.
>setspn –A HOST/[monitoring target cluster IP] [monitoring target cluster name]
Checking Command
>setspn –L [monitoring target cluster name]
Adding domain information to ISM-VA
When carrying out monitoring using the domain user account, execute the procedures
in “3.4.2 Initial Settings of ISM” (ISM 2.1 User’s Manual).
Adding DNS information to ISM-VA
When carrying out monitoring using the domain user account, execute the procedures
in “ISM2.1_ User’s Manual (4.9 Network Settings; Add DNS server)” to register the DNS
server on ISM-VA.
Kerberos delegation configuration for Active Directory
1. Log on to the Active Directory server.
2. Open Server Manager.
3. From [Tool] button, select [Active Directory Users and Computers].
4. Expand the domain, then expand [Computers] folder.
5. Right-click the cluster node name on the right-side window, then select [Properties].
6. From [General] tab, confirm if [Trust computer for delegation to any service (Kerberos
only)] checkbox is checked.
7. Select [OK] and repeatedly perform the above steps 3 and 4 for all the cluster nodes.
3.3. Setting Procedure for Microsoft System Center
Refer to "2.1 Setting Procedure for Windows" of this document to execute the settings
for the respective hosts and virtual machines with Microsoft System Center installed.
3.4. Setting Procedures for KVM
3.4.1. Setting Procedure for KVM Red Hat Enterprise Linux (Using Domain User)
In order to obtain the KVM information, set the SSSD service with the managed node.
Copyright 2017 FUJITSU LIMITED 22 / 43
The required packages are displayed below.
・ krb5-workstation
・ samba
・ samba-client
・ samba-common
・ sssd
In the following, make the settings from the terminal as a root user.
Editing “/etc/hosts”
Open the “/etc/hosts” file.
# vi /etc/hosts
・ Add the following.
・ IP address and host name of the KVM server to be the managed node
・ IP address of ISM-VA
Example:
192.168.30.222 rhel73.win2016.local rhel73
192.168.30.228
[Note]
This setting is not reflected in the local host name (on the local host). However, if it is not made,
executing the command to join Active Directory as described further below will result in an error.
Editing “/etc/krb5.conf”
Open the “/etc/krb5.conf” file.
# vi /etc/krb5.conf
・ Make the settings of default_realm in the [libdefaults] section to the domain name in uppercase
letters.
Example:
[libdefaults]
dns_lookup_realm = true
dns_lookup_kdc = true
ticket_lifetime = 24h
renew_lifetime = 7d
forwardable = true
default_realm = WIN2016.LOCAL
・ Make the settings in the [realms] section.
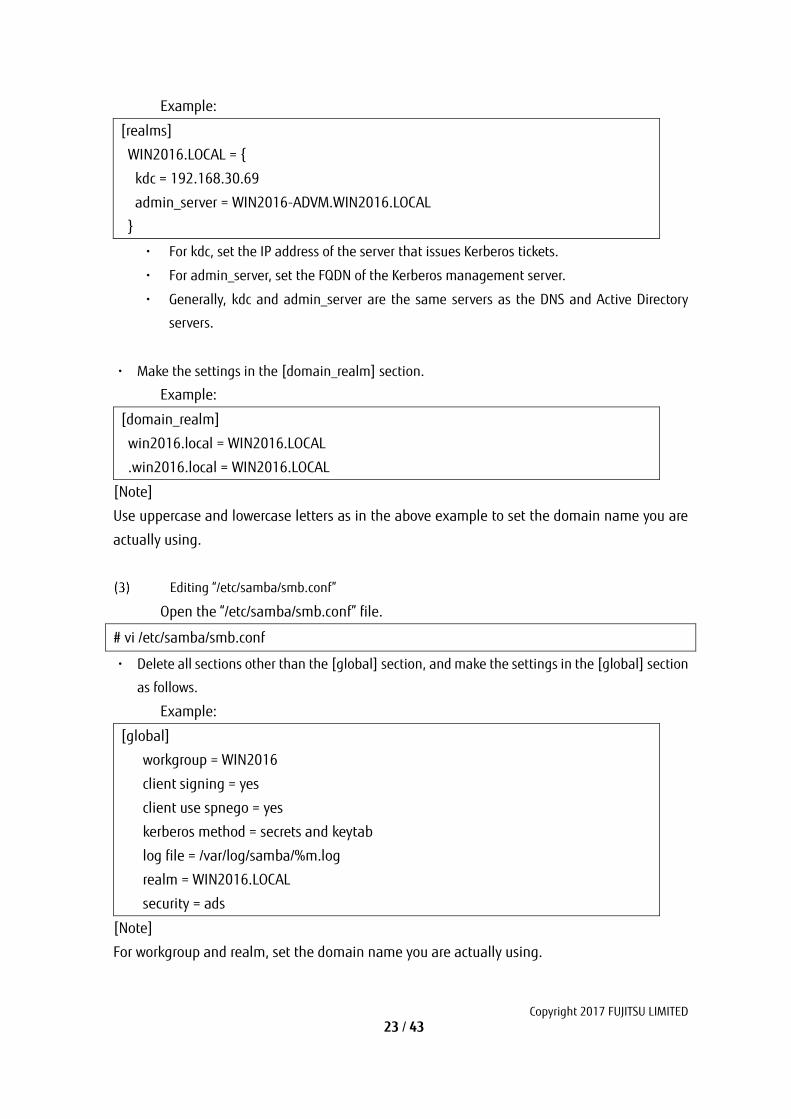
Copyright 2017 FUJITSU LIMITED 23 / 43
Example:
[realms]
WIN2016.LOCAL = {
kdc = 192.168.30.69
admin_server = WIN2016-ADVM.WIN2016.LOCAL
}
・ For kdc, set the IP address of the server that issues Kerberos tickets.
・ For admin_server, set the FQDN of the Kerberos management server.
・ Generally, kdc and admin_server are the same servers as the DNS and Active Directory
servers.
・ Make the settings in the [domain_realm] section.
Example:
[domain_realm]
win2016.local = WIN2016.LOCAL
.win2016.local = WIN2016.LOCAL
[Note]
Use uppercase and lowercase letters as in the above example to set the domain name you are
actually using.
Editing “/etc/samba/smb.conf”
Open the “/etc/samba/smb.conf” file.
# vi /etc/samba/smb.conf
・ Delete all sections other than the [global] section, and make the settings in the [global] section
as follows.
Example:
[global]
workgroup = WIN2016
client signing = yes
client use spnego = yes
kerberos method = secrets and keytab
log file = /var/log/samba/%m.log
realm = WIN2016.LOCAL
security = ads
[Note]
For workgroup and realm, set the domain name you are actually using.
Copyright 2017 FUJITSU LIMITED 24 / 43
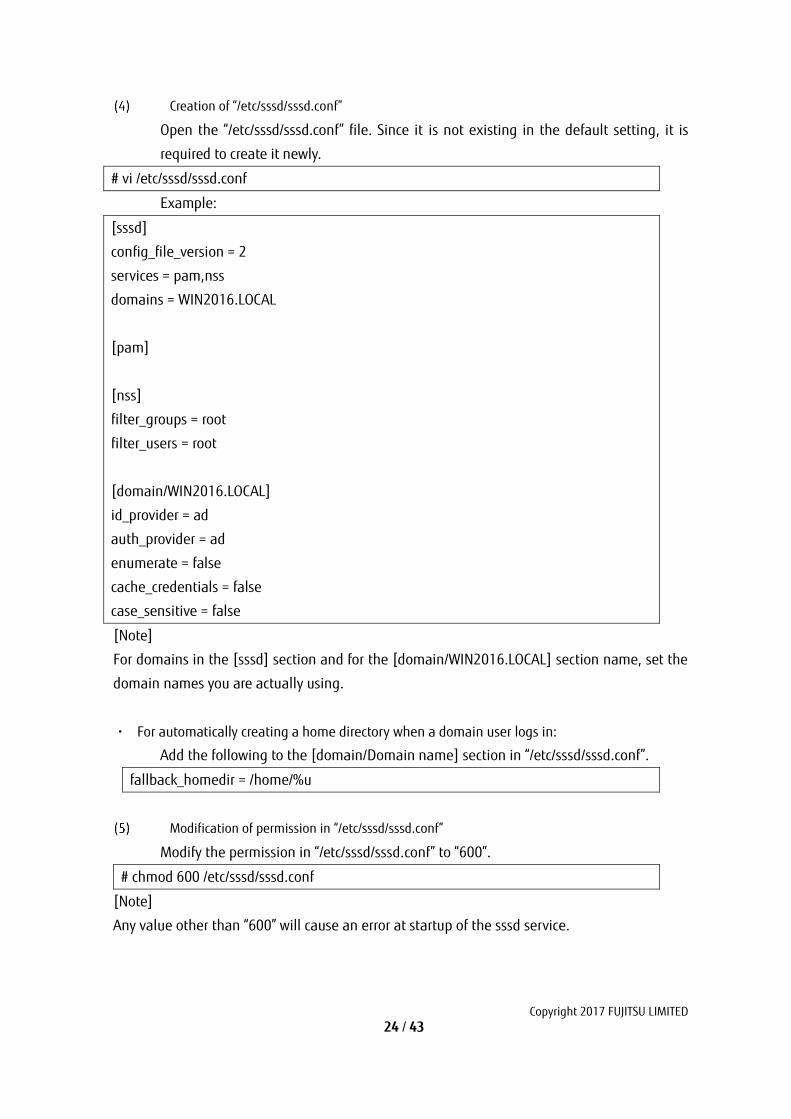
Creation of “/etc/sssd/sssd.conf”
Open the “/etc/sssd/sssd.conf” file. Since it is not existing in the default setting, it is
required to create it newly.
# vi /etc/sssd/sssd.conf
Example:
[sssd]
config_file_version = 2
services = pam,nss
domains = WIN2016.LOCAL
[pam]
[nss]
filter_groups = root
filter_users = root
[domain/WIN2016.LOCAL]
id_provider = ad
auth_provider = ad
enumerate = false
cache_credentials = false
case_sensitive = false
[Note]
For domains in the [sssd] section and for the [domain/WIN2016.LOCAL] section name, set the
domain names you are actually using.
・ For automatically creating a home directory when a domain user logs in:
Add the following to the [domain/Domain name] section in “/etc/sssd/sssd.conf”.
fallback_homedir = /home/%u
Modification of permission in “/etc/sssd/sssd.conf”
Modify the permission in “/etc/sssd/sssd.conf” to “600”.
# chmod 600 /etc/sssd/sssd.conf
[Note]
Any value other than “600” will cause an error at startup of the sssd service.

Copyright 2017 FUJITSU LIMITED 25 / 43
Setting of local host name (on the local host)
Set the local host name (on the local host) with the following command:
# hostnamectl set-hostname FQDN of host
Example:
# hostnamectl set-hostname rhel73.win2016.local
[Note]
This is the host name setting on the local host. It is not reflected to the host name on the network.
Make sure that the FQDN of the host matches the one you set in Step (1).
IP address setting of DNS server
Use the following command to set the IP address of the DNS server and restart the
interface:
# nmcli connection modify Interface name ipv4.dns "IP address of DNS server"
# systemctl restart NetworkManager
- Execute the following command to look up the interface name:
# ifconfig (Red Hat Enterprise Linux 6 or earlier)
# ip addr (Red Hat Enterprise Linux 7 or later)
- Execute the following command to check the settings:
# host Kerberos management server name
Example:
# host WIN2016-ADVM.WIN2016.LOCAL
If the output includes the IP address, the settings are correct.
Getting permission to obtain a Kerberos ticket
Execute the following command to get permission to obtain a Kerberos ticket:
# kinit Administrator
When asked for the password, enter the password for the domain administrator user
“Administrator”.
・ Execute the following command to check the settings:
# klist
If the domain information is output, the settings are correct.
If there is any failure, check “/etc/krb5.conf”.
Joining Active Directory
Use the following command to join Active Directory:

Copyright 2017 FUJITSU LIMITED 26 / 43
# net ads join -U Administrator
When asked for the password, enter the password for the domain administrator user
“Administrator”.
Execute the following command to check the settings:
# net ads info
If the server (shown as “LDAP server”) and domain information is output, the settings
are correct.
If there is any failure, check the host name setting and the settings in
“/etc/samba/smb.conf”. Alternatively, refer to the “Login no longer available after
changing host name” section further below.
System authentication settings
Execute the following command to set the system authentication (authorization for
target managed node).
This command automatically updates all related setup files.
・ To not automatically create a home directory for the domain user:
# authconfig --enablesssd --enablesssdauth --enablelocauthorize --update
・ For automatically creating a home directory for the domain user:
Make the settings under “For automatically creating a home directory when a domain
user logs in” when you edit “/etc/sssd/sssd.conf” in above Step (4) in advance, and then
execute the following command:
# authconfig --enablesssd --enablesssdauth --enablelocauthorize --enablemkhomedir
--update
Startup of SSSD (System Security Services Daemon) service
Execute the following commands to start up the SSSD service:
# systemctl enable sssd
# systemctl start sssd
Execute the following command to check that the service has started:
# systemctl status sssd
If it is running normally, the settings are correct.
If there is any failure, check the contents of “/etc/sssd/sssd.conf” and the file permissions.
Copyright 2017 FUJITSU LIMITED 27 / 43
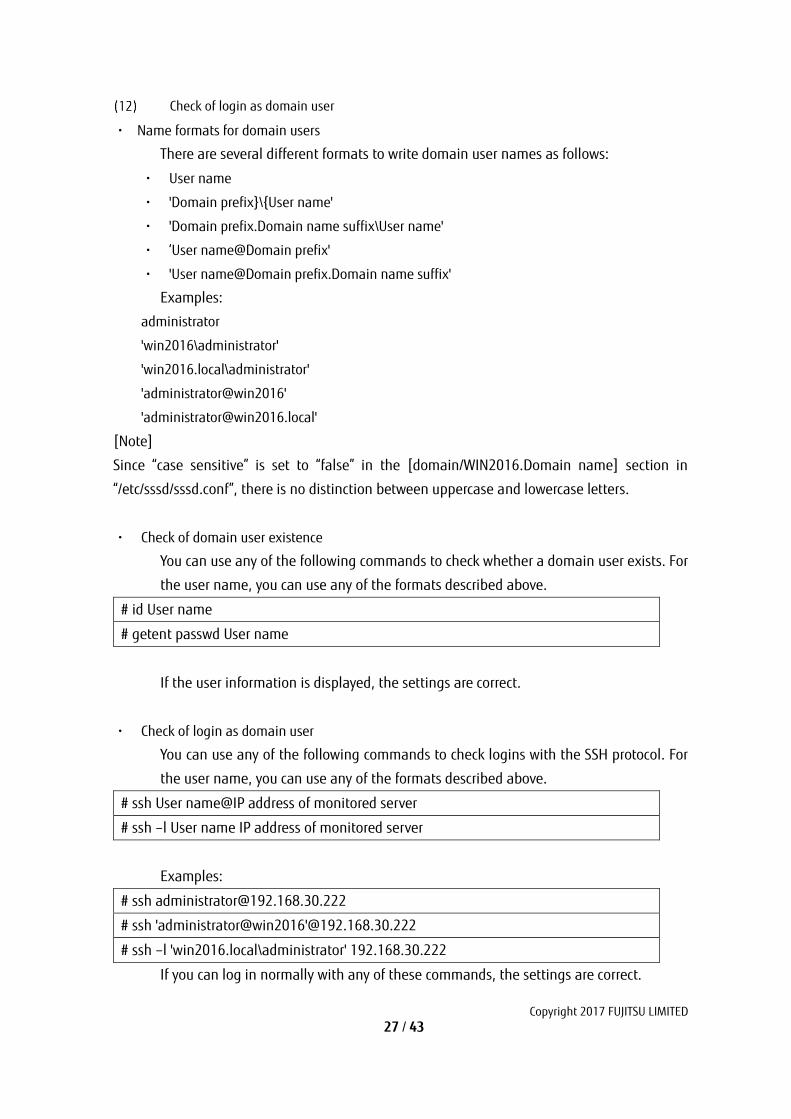
Check of login as domain user
・ Name formats for domain users
There are several different formats to write domain user names as follows:
・ User name
・ 'Domain prefix}\{User name'
・ 'Domain prefix.Domain name suffix\User name'
・ ‘User name@Domain prefix'
・ 'User name@Domain prefix.Domain name suffix'
Examples:
administrator
'win2016\administrator'
'win2016.local\administrator'
'administrator@win2016'
[Note]
Since “case sensitive” is set to “false” in the [domain/WIN2016.Domain name] section in
“/etc/sssd/sssd.conf”, there is no distinction between uppercase and lowercase letters.
・ Check of domain user existence
You can use any of the following commands to check whether a domain user exists. For
the user name, you can use any of the formats described above.
# id User name
# getent passwd User name
If the user information is displayed, the settings are correct.
・ Check of login as domain user
You can use any of the following commands to check logins with the SSH protocol. For
the user name, you can use any of the formats described above.
# ssh User name@IP address of monitored server
# ssh –l User name IP address of monitored server
Examples:
# ssh [email protected]
# ssh 'administrator@win2016'@192.168.30.222
# ssh –l 'win2016.local\administrator' 192.168.30.222
If you can log in normally with any of these commands, the settings are correct.
Copyright 2017 FUJITSU LIMITED 28 / 43
Settings for the Domain User
Follow the procedures in "3.4.3 Settings when using General User Accounts" and make the
settings for the domain user.
・ Troubleshooting
・ When login is no longer available after changing host name
If you changed a host name both on the local host and on the network, execute the
following two commands:
# net ads join -U Administrator
# systemctl restart sssd
If the login still fails, the previous settings may be existing in “/etc/krb5.keytab”, so it is
required to delete “/etc/krb5.keytab” with the following command first, then execute the
above commands:
# rm /etc/krb5.keytab
Adding domain information to ISM-VA
Execute the settings of “ISM 2.1 User's Manual” – “3.4.2 Initial Settings of ISM.”
Adding DNS information to ISM-VA
Register DNS servers in ISM-VA by executing the settings of “ISM 2.1 User's Manual” –
“4.9 Network Settings – Add DNS server.”
3.4.2. Setting Procedure for KVM SUSE Linux Enterprise Server (Using Domain User)
In order to obtain the KVM information, set the SSSD service with the managed node.
Make the following settings by either using the yast command on the terminal or by
using YaST on the GUI menu. The following procedure uses the yast command.
Startup of yast command
Execute the following command as a root user from your terminal:
# yast
To select items in yast, use combinations of the arrow and tab keys.
Host name and DNS settings
1. Select System -> Network Settings, and then press the [Enter] key.
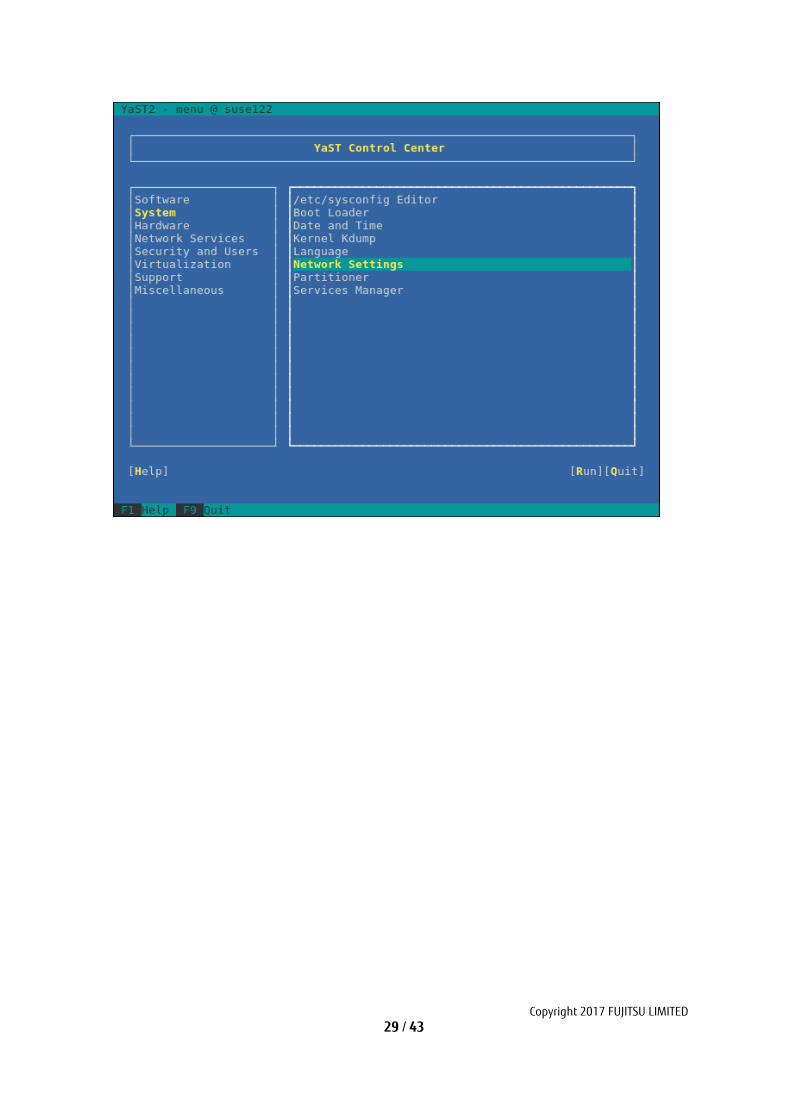
Copyright 2017 FUJITSU LIMITED 29 / 43
Copyright 2017 FUJITSU LIMITED 30 / 43
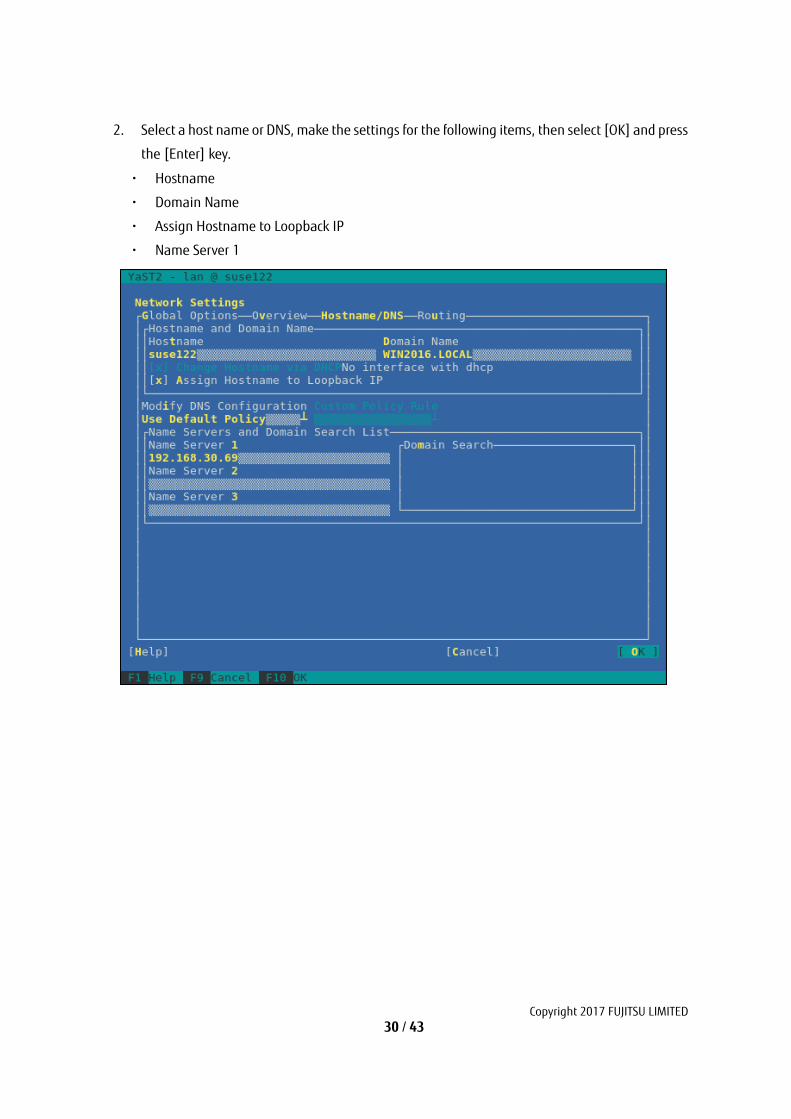
2. Select a host name or DNS, make the settings for the following items, then select [OK] and press
the [Enter] key.
・ Hostname
・ Domain Name
・ Assign Hostname to Loopback IP
・ Name Server 1
Copyright 2017 FUJITSU LIMITED 31 / 43
SSSD service settings
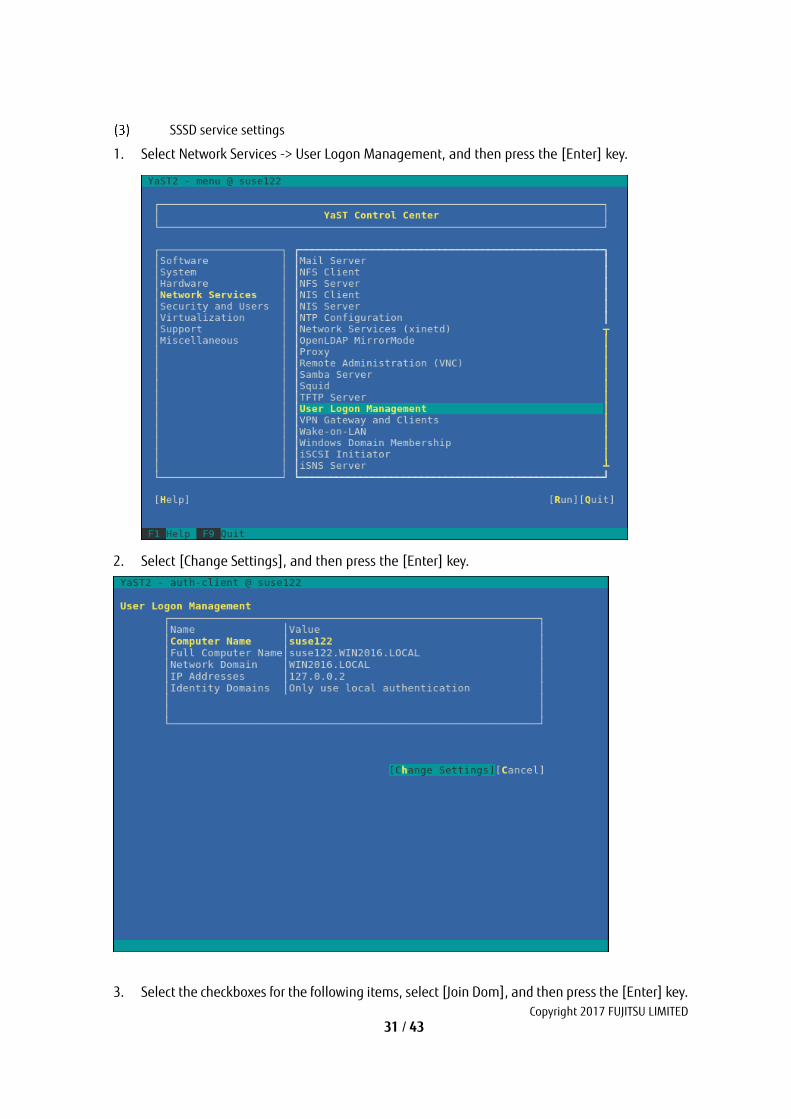
1. Select Network Services -> User Logon Management, and then press the [Enter] key.
2. Select [Change Settings], and then press the [Enter] key.
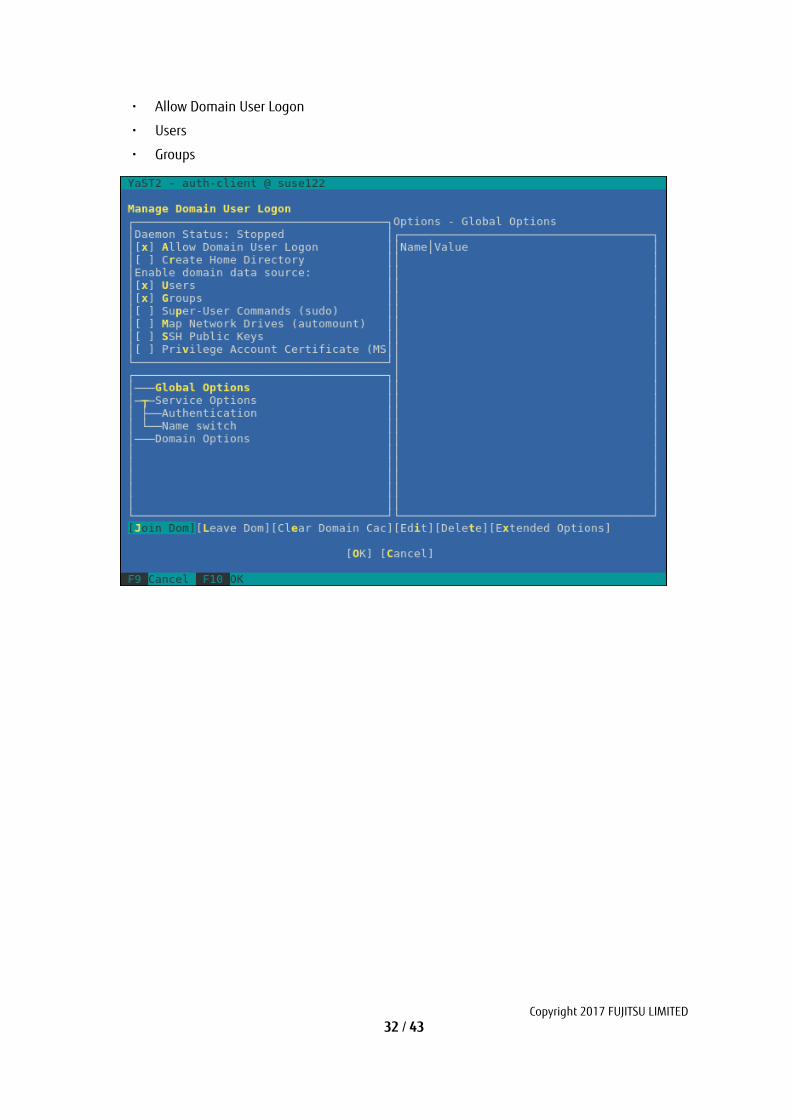
3. Select the checkboxes for the following items, select [Join Dom], and then press the [Enter] key.
Copyright 2017 FUJITSU LIMITED 32 / 43
・ Allow Domain User Logon
・ Users
・ Groups
Copyright 2017 FUJITSU LIMITED 33 / 43
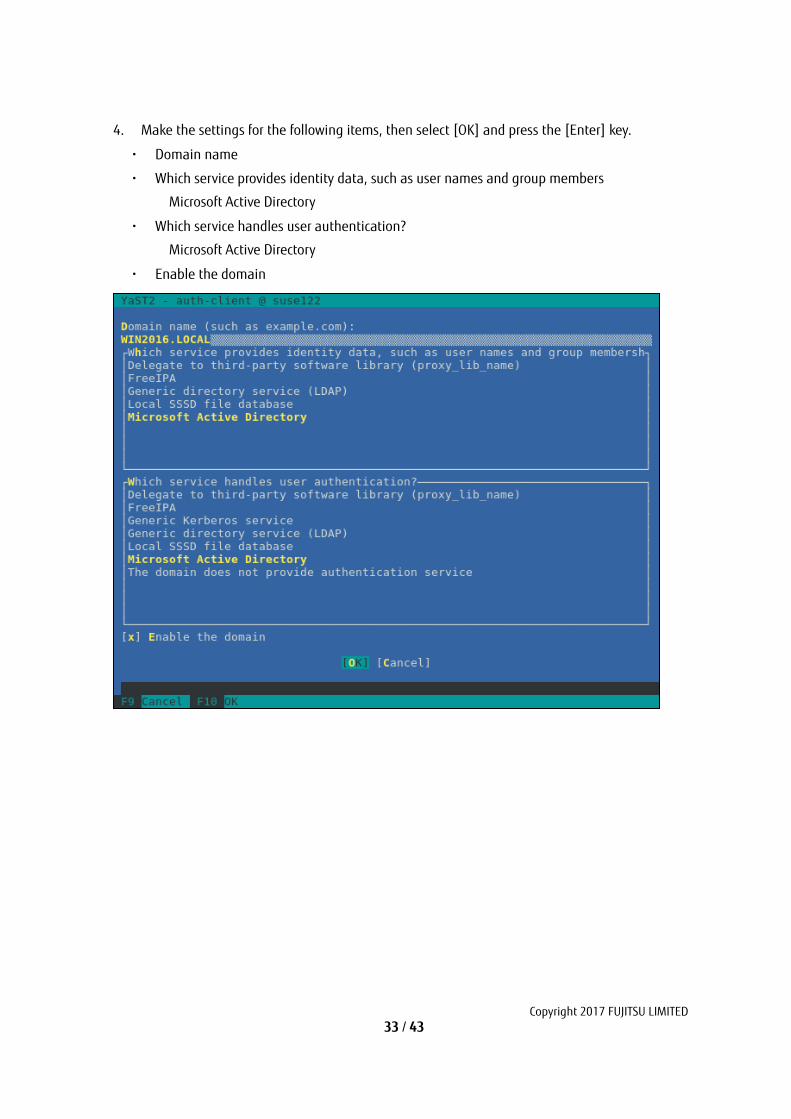
4. Make the settings for the following items, then select [OK] and press the [Enter] key.
・ Domain name
・ Which service provides identity data, such as user names and group members
Microsoft Active Directory
・ Which service handles user authentication?
Microsoft Active Directory
・ Enable the domain
Copyright 2017 FUJITSU LIMITED 34 / 43
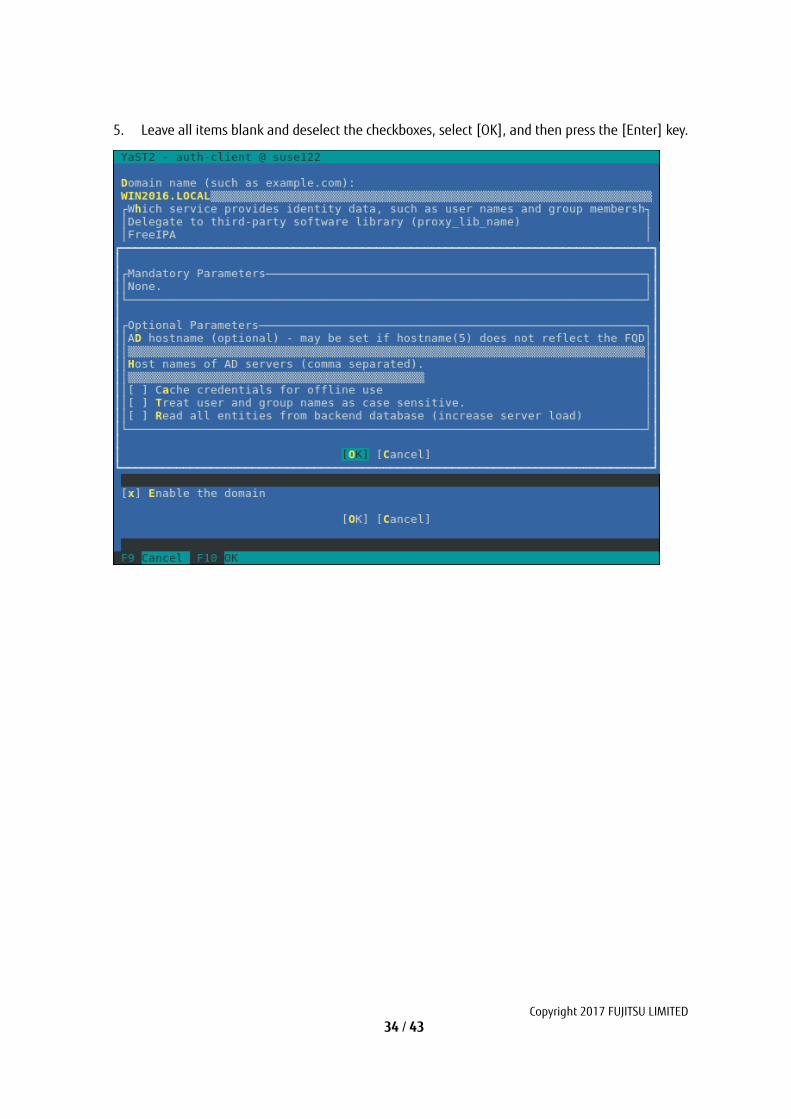
5. Leave all items blank and deselect the checkboxes, select [OK], and then press the [Enter] key.
Copyright 2017 FUJITSU LIMITED 35 / 43
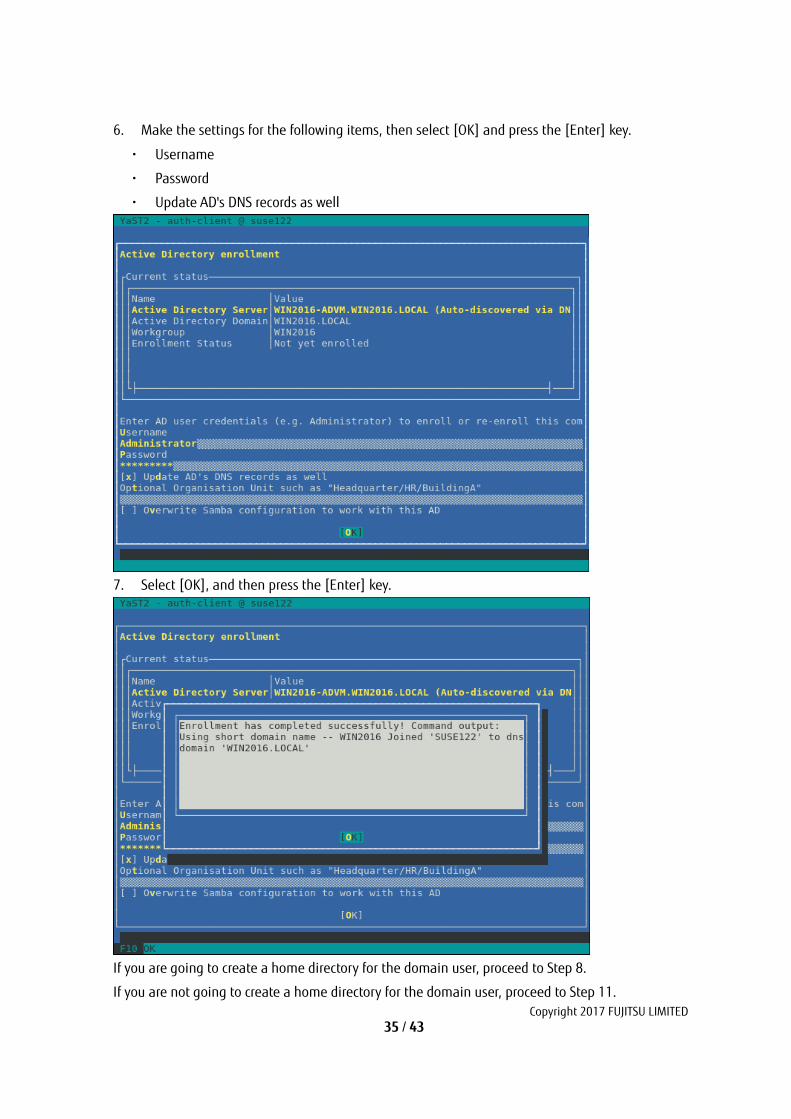
6. Make the settings for the following items, then select [OK] and press the [Enter] key.
・ Username
・ Password
・ Update AD's DNS records as well
7. Select [OK], and then press the [Enter] key.
If you are going to create a home directory for the domain user, proceed to Step 8.
If you are not going to create a home directory for the domain user, proceed to Step 11.
Copyright 2017 FUJITSU LIMITED 36 / 43
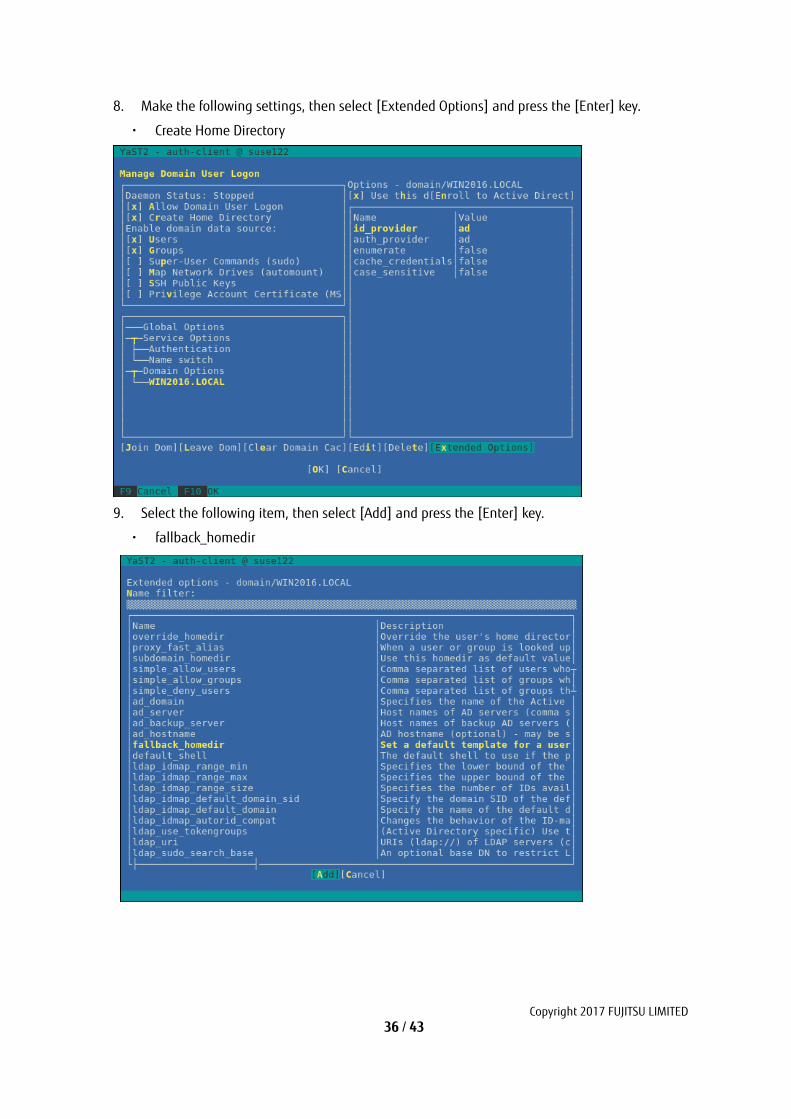
8. Make the following settings, then select [Extended Options] and press the [Enter] key.
・ Create Home Directory
9. Select the following item, then select [Add] and press the [Enter] key.
・ fallback_homedir
Copyright 2017 FUJITSU LIMITED 37 / 43
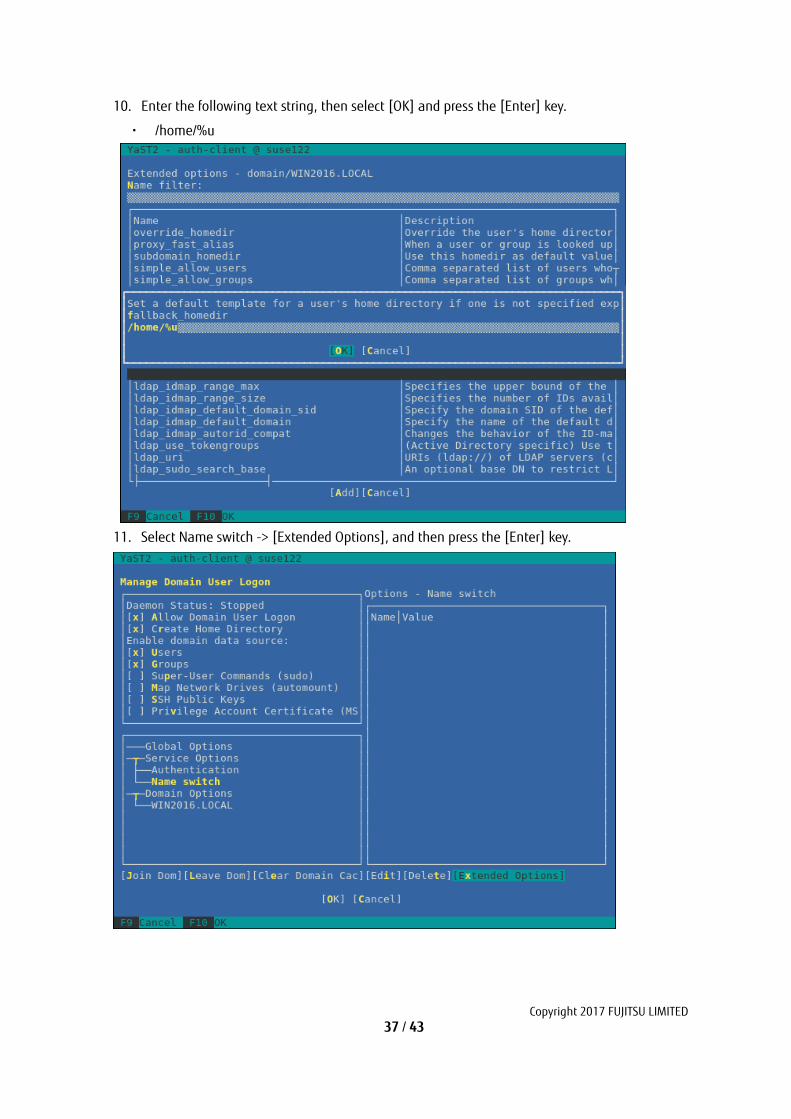
10. Enter the following text string, then select [OK] and press the [Enter] key.
・ /home/%u
11. Select Name switch -> [Extended Options], and then press the [Enter] key.
Copyright 2017 FUJITSU LIMITED 38 / 43
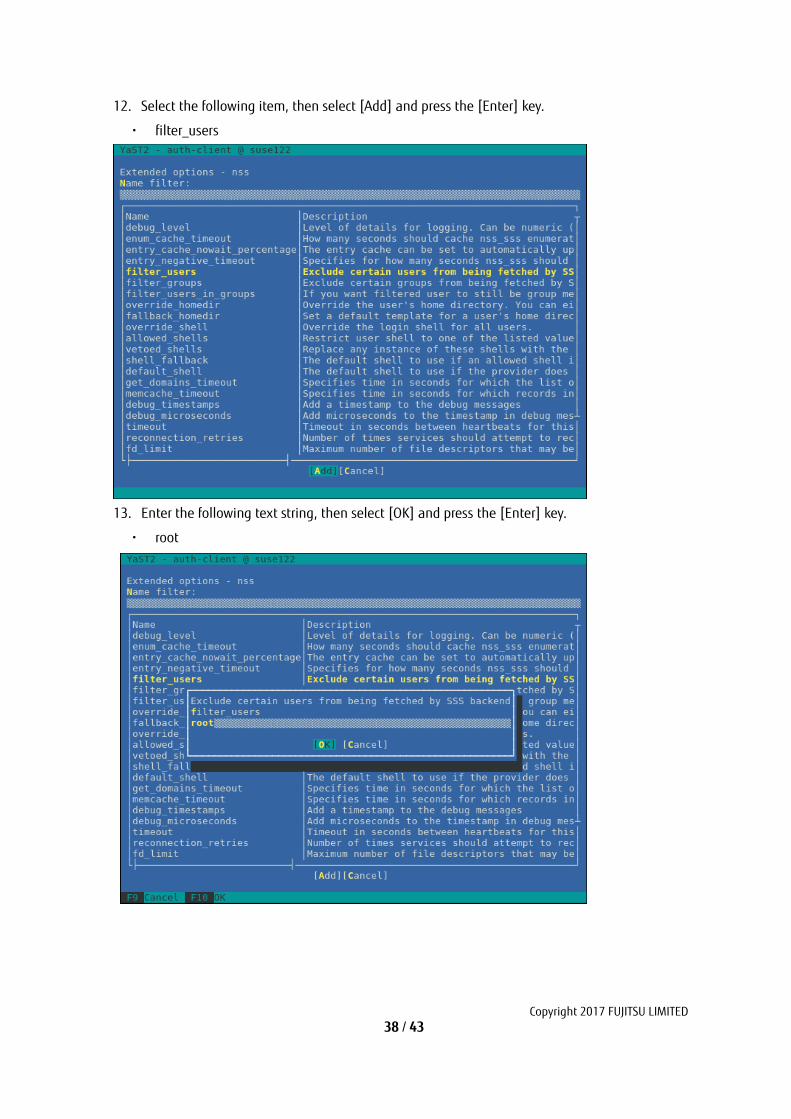
12. Select the following item, then select [Add] and press the [Enter] key.
・ filter_users
13. Enter the following text string, then select [OK] and press the [Enter] key.
・ root
Copyright 2017 FUJITSU LIMITED 39 / 43
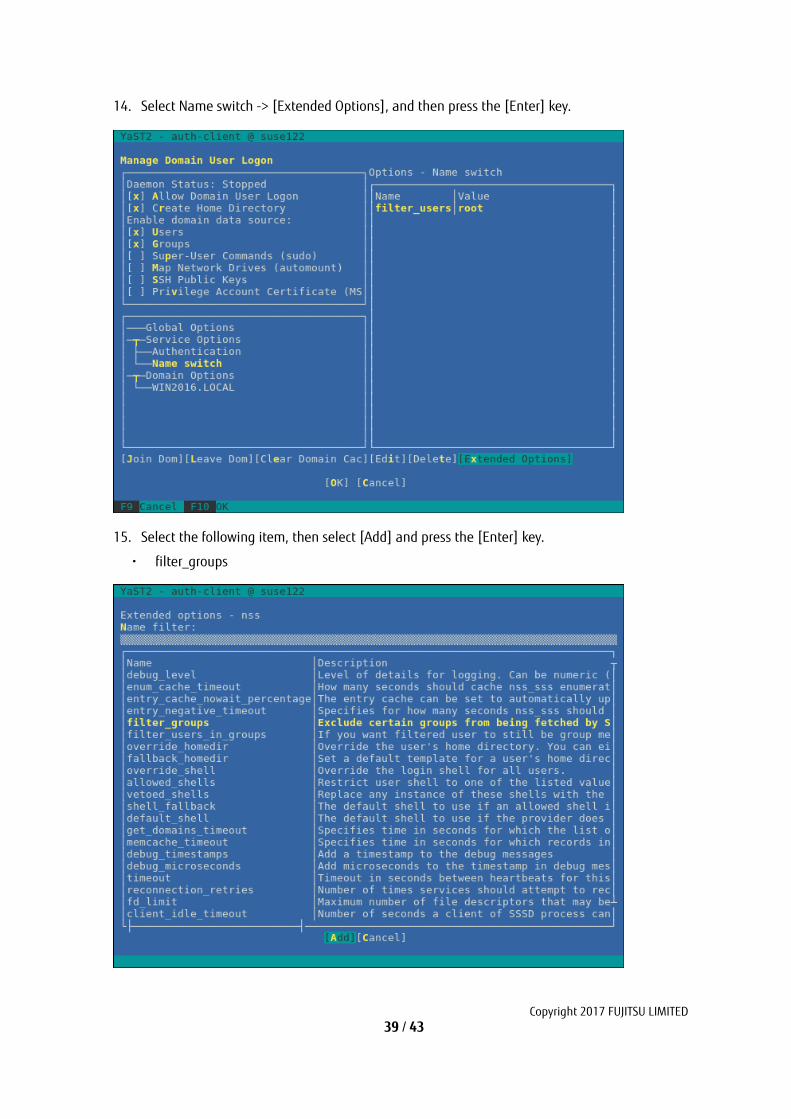
14. Select Name switch -> [Extended Options], and then press the [Enter] key.
15. Select the following item, then select [Add] and press the [Enter] key.
・ filter_groups
Copyright 2017 FUJITSU LIMITED 40 / 43
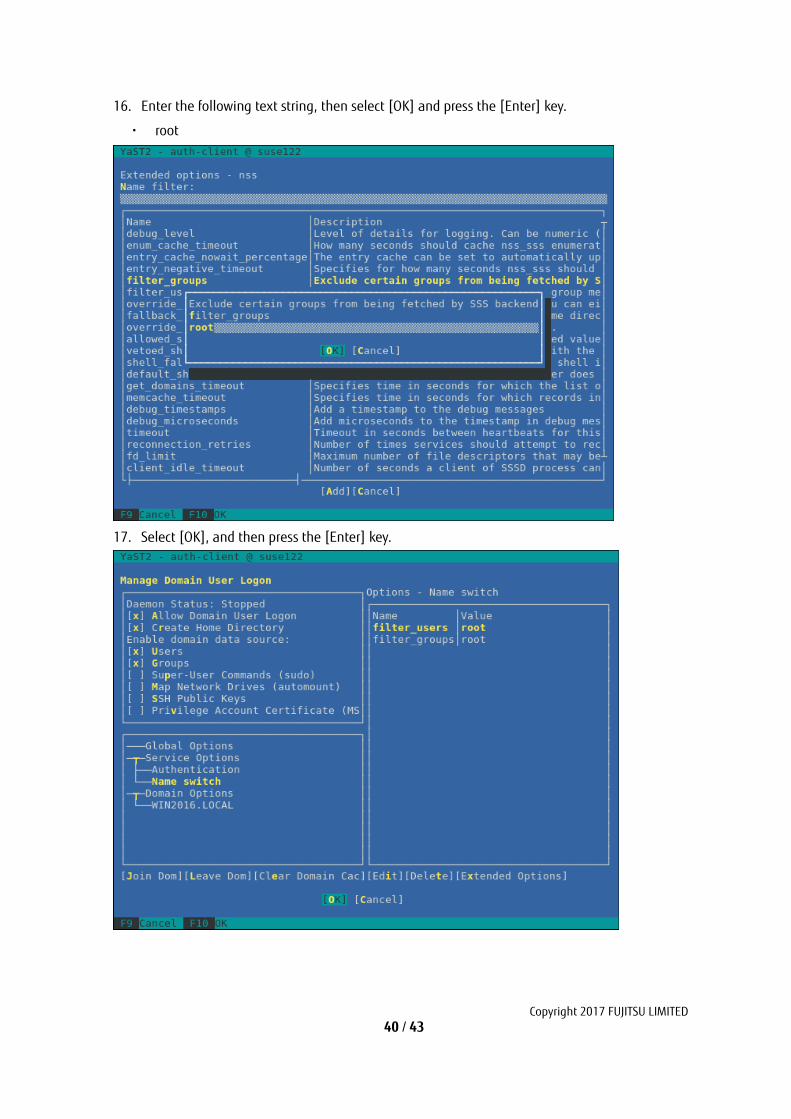
16. Enter the following text string, then select [OK] and press the [Enter] key.
・ root
17. Select [OK], and then press the [Enter] key.
Copyright 2017 FUJITSU LIMITED 41 / 43
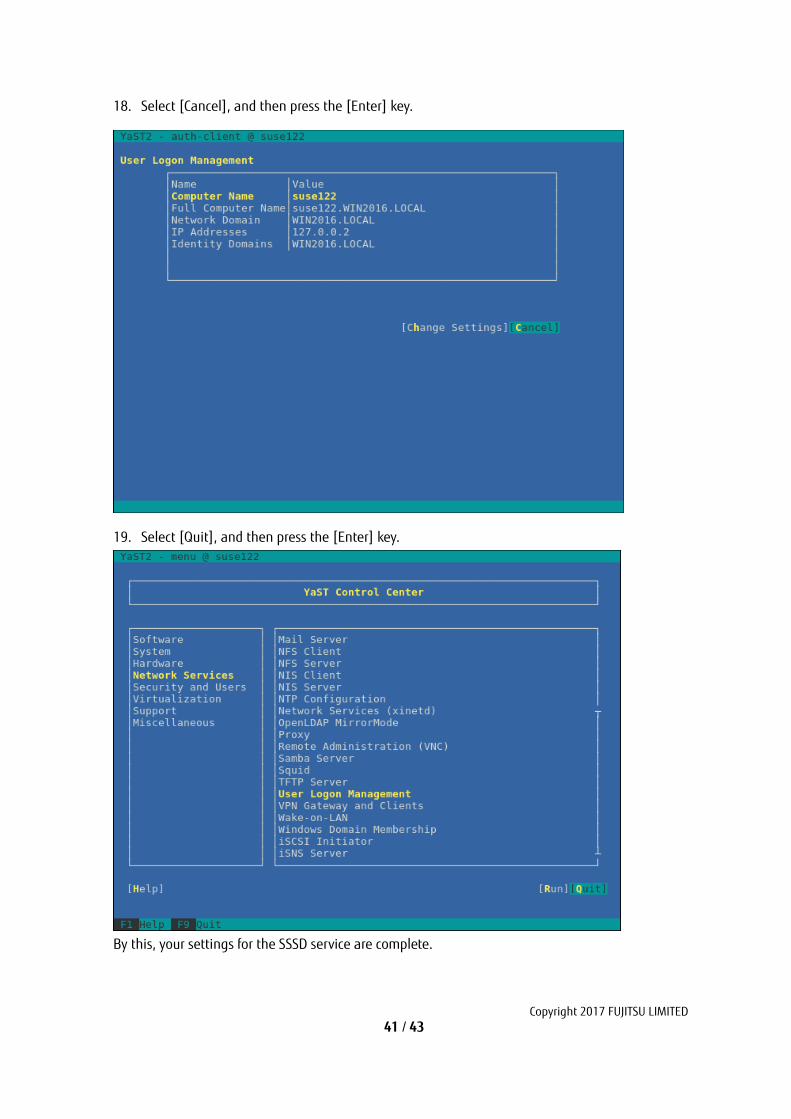
18. Select [Cancel], and then press the [Enter] key.
19. Select [Quit], and then press the [Enter] key.
By this, your settings for the SSSD service are complete.
Copyright 2017 FUJITSU LIMITED 42 / 43
Check of login as domain user
・ Name formats for domain users
There are several different formats to write domain user names as follows:
・ User name
・ 'Domain prefix\User name'
・ 'Domain prefix.Domain name suffix\User name'
・ ‘User name@Domain prefix'
・ 'User name@Domain prefix.Domain name suffix'
Examples:
administrator
'win2016\administrator'
'win2016.local\administrator'
'administrator@win2016'
[Note]
Since “case sensitive” is set to “false” in the optional domain settings, there is no distinction
between uppercase and lowercase letters.
・ Check of login as domain user
You can use any of the following commands to check logins with the SSH protocol. For
the user name, you can use any of the formats described above.
# ssh User name@IP address of monitored server
# ssh –l User name IP address of monitored server
Examples:
# ssh [email protected]
# ssh 'administrator@win2016'@192.168.30.222
# ssh –l 'win2016.local\administrator' 192.168.30.222
If you can log in normally with any of these procedures, the settings are correct.
Settings for the Domain User
Follow the procedures in "3.4.3 Settings when using General User Accounts" and make the
settings for the domain user.
Adding domain information to ISM-VA
Execute the settings of “ISM 2.1 User's Manual” – “3.4.2 Initial Settings of ISM.”
Copyright 2017 FUJITSU LIMITED 43 / 43
Adding DNS information to ISM-VA
Register DNS servers in ISM-VA by Executing the settings of “ISM 2.1 User's Manual” –
“4.9 Network Settings – Adding DNS Servers.”
3.4.3. Settings when using General User Accounts
In principle, KVM information can only be obtained by root users.
In order to let users other than root users (including domain users) retrieve KVM
information, it is required to add those users to the “libvirt” group on the managed Linux
server.
・ To add a user to the “libvirt” group, execute the following command as a root user:
# gpasswd -a User name libvirt
[Note] Set the user name using only lowercase letters.
・ To remove a user from the “libvirt” group, execute the following command as a root user:
# gpasswd -d User name libvirt
[Note]
You can also use the above commands to add and remove domain users.