geometer's sketchpademp.byui.edu/youngbergj/pdf/gsp1.pdf · geometer's sketchpad...
TRANSCRIPT
GEOMETER'S SKETCHPADASSIGNMENT #1 (Youngberg)
When you first open GSP, you will see some icons down the left side, which are your Tools. The following listgives a summary of the tools:
The Selection Arrow Tool allows you to select and translate (click and drag) objects.
The Point Tool constructs points (move into the sketch area and click).
The Compass Tool constructs circles (click for the center, then drag to construct the circle)
The Straightedge Tool constructs segments, rays or lines. With the cursor on the icon, if you click and hold the mouse down,you will see other choices: Segment (no arrow ends), Ray (arrow at one end), or Line (arrows at both ends). Move out tohighlight the one you want.
The Text Tool allows you to label objects in your sketch (by clicking on the object you wish to label and then double clickingthe label if you wish to change it) and to add text to your document (by double clicking somewhere in your sketch).
The Custom Tool allows you to create tools of your own.
Experiment with the tools for a few minutes to get a feel for them. Draw circles, polygons, and points. Drawsegments using the segment tool. Label segments and change the labels. Try adding a line of text to yourdocument. When you feel comfortable with the tools, then begin problem 1 below.
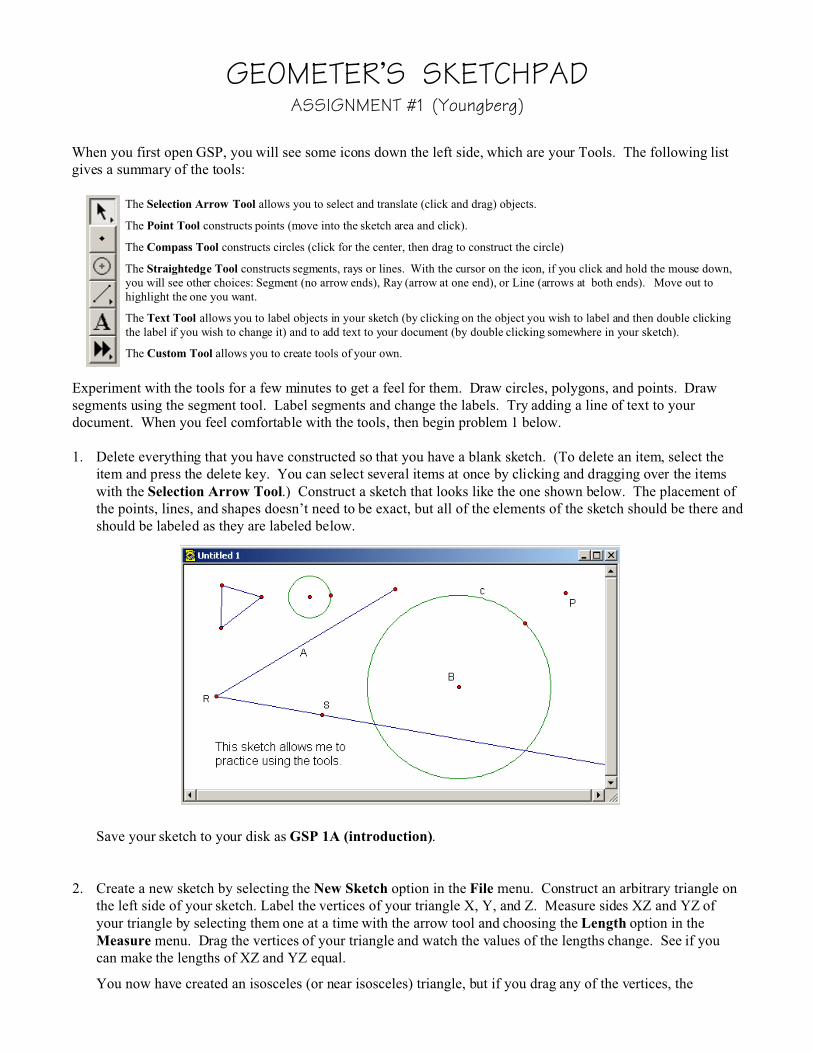
1. Delete everything that you have constructed so that you have a blank sketch. (To delete an item, select theitem and press the delete key. You can select several items at once by clicking and dragging over the itemswith the Selection Arrow Tool.) Construct a sketch that looks like the one shown below. The placement ofthe points, lines, and shapes doesn’t need to be exact, but all of the elements of the sketch should be there andshould be labeled as they are labeled below.
Save your sketch to your disk as GSP 1A (introduction).
2. Create a new sketch by selecting the New Sketch option in the File menu. Construct an arbitrary triangle onthe left side of your sketch. Label the vertices of your triangle X, Y, and Z. Measure sides XZ and YZ ofyour triangle by selecting them one at a time with the arrow tool and choosing the Length option in theMeasure menu. Drag the vertices of your triangle and watch the values of the lengths change. See if youcan make the lengths of XZ and YZ equal.
You now have created an isosceles (or near isosceles) triangle, but if you drag any of the vertices, the

equality of sides disappears (try it); the property of being isosceles is not built into your construction.
Let’s construct an isosceles triangle so that the property of being isosceles is built into the construction.Construct a circle on the right side of your sketch. Put two points on the circle (in addition to the point thatdetermines the size of the circle). Label the center of the circle A and the two points C and D. (Label thepoint that determines the size of the circle B.) Finally, construct segments AC, AD, and DC, to form atriangle ACD.
Create a text box at the bottom of your sketch (by double clicking with the text tool) and answer thefollowing questions in the text box:
1. Is this an isosceles triangle? How do you know?
2. What happens to your triangle as you move C and D around the circle? Does it remain an isoscelestriangle?
3. What happens to your triangle when you change the size of the circle (by dragging the point B)? Does it remain an isosceles triangle no matter how B is dragged?
Make the sketch more colorful by carrying out the following steps: Select the three vertices of the triangle, A,C and D, so that all three are highlighted. In the Construct menu, choose Triangle Interior. While theinterior of the triangle is still selected, go to the Display menu and choose Color. Move the cursor out intothe color palette and choose any color you like.
In order to make our sketch less cluttered and focus attention on the triangle, we would like to hide the circle.To see why we do not want to delete the circle, try it. Select the circle and press the Delete key on yourkeyboard. Disaster! Fortunately, GSP has a great capacity to allow us to undo mistakes. Go up to the EditMenu and choose Undo Delete Circle, which should restore things to the way they were. Instead of deletingthe circle, select it again. Go to the Display menu and choose Hide. Now the circle is no longer visible-- it isnot displayed, but it is still part of the sketch. Notice that the point controlling the size of the circle (point B)is still visible, and can still be used to change the size of the triangle, as can the vertex A. (Dragging C or Dchanges the angle of opening between the two congruent sides of the triangle because C and D are stillmoving around the now hidden circle).
Your resulting sketch should look something like this (with a text box below to answer the questions):
Save your sketch to your disk as GSP 1B (isosceles).