getting to know the workspace - university of...
TRANSCRIPT

31Lesson 2, Getting to Know the Workspace
What you’ll learn in this lesson:
• Opening a fi le using Mini Bridge
• Using Photoshop tools
• Saving workspaces
• Navigating your image area
Lesson 2
In this lesson, you’ll learn how to use the Adobe Photoshop CS6 work area effi ciently. You will also discover how to open a document using Adobe Bridge, how to use the Tools panel, and how to easily navigate through images.
Starting upAdobe Photoshop is an image-editing program that can open an image captured by a
scanner or digital camera, or downloaded from the Web. It can also open captured video
images and vector illustrations. In addition, you can create new documents in Photoshop,
including vector graphics, which are scalable image fi les (for example, the images can be
enlarged or reduced in size with no loss of clarity).
Before starting, make sure that your tools and panels are consistent by resetting your
preferences. See “Resetting Adobe Photoshop CS6 preferences” in the Starting up section
of this book.
Getting to Know the Workspace
PSCS6_03Pass.indb 31PSCS6_03Pass.indb 31 5/8/12 10:11 AM5/8/12 10:11 AM

2 Starting up
Adobe Photoshop CS6 Digital Classroom32
You will work with several fi les from the ps02lessons folder in this lesson. Make sure that
you have loaded the pslessons folder onto your hard drive from the supplied DVD. See
“Loading lesson fi les” in the Starting up section of this book.
See Lesson 2 in action!
Use the accompanying video to gain a better understanding of how to use some of the features
shown in this lesson. You can fi nd the video tutorial for this lesson on the included DVD.
Opening an existing document in Mini Bridge
Mini Bridge works like the stand-alone Adobe Bridge application, but resides in
Photoshop. You can access Mini Bridge by using the File menu, or by selecting Window >
Extensions > Mini Bridge.
1 Launch Adobe Photoshop CS6 and choose File > Browse in Mini Bridge or Window
> Extensions > Mini Bridge; Mini Bridge appears as a panel across the bottom of the
workspace. If a message displays indicating that you must launch Bridge CS6, press
Launch Bridge.
Even though you will be instructed to use Adobe Bridge throughout the lessons in
this book, you can also choose to use Mini Bridge.
2 Click on Favorites and select your User Name from the drop-down menu in the
navigation pod on the left side of Mini Bridge. You now see personal folders that you
can navigate to, such as Desktop, Documents, and Pictures.
3 Double-click on Desktop to see the folders on your desktop appear in the Navigation
pod, including the pslessons folder that you downloaded or dragged to the desktop
from the DVD. If you do not see your folder on the Desktop, verify that you didn’t
save your folder to the Desktop of another User.
Select your user name to see the desktop folder, if it is not immediately visible.
2
PSCS6_03Pass.indb 32PSCS6_03Pass.indb 32 5/8/12 10:11 AM5/8/12 10:11 AM

2
33Lesson 2, Getting to Know the Workspace
Starting up
4 Double-click the pslessons folder to reveal the contents, and then click ps02lessons.
The Mini Bridge now displays three images of an antique car in the folder.
Use Mini Bridge to locate your lesson fi les.
5 Locate and double-click to open the fi le named ps0201_done.psd. An image of an
antique car appears. This is the fi nished project. You may keep it open as you work or
close it once you have examined the fi le.
The completed lesson fi le.
As you practice with the fi les throughout this book, you will fi nd that you are
instructed to save a work fi le immediately after opening the original fi le.
6 Open the fi le named ps0201.psd, which is the starting fi le used for this lesson. Choose
File > Save As to open the Save as dialog box.
7 Navigate to the ps02lessons folder. In the File name textbox, type ps0201_work, and
choose Photoshop from the Format drop-down menu. Click Save.
PSCS6_03Pass.indb 33PSCS6_03Pass.indb 33 5/8/12 10:11 AM5/8/12 10:11 AM

2 Discovering the Tools panel
Adobe Photoshop CS6 Digital Classroom34
Discovering the Tools panelWhen you start Photoshop, the Tools panel appears docked on the left side of the screen—
by default it is not a fl oating Tools panel, as it was in earlier versions of Photoshop. There
are four main groups of tools, separated by functionality on the Tools panel: selection,
cropping, and measuring; retouching and painting; drawing and type; and navigation. At
the bottom of the Tools panel you fi nd Set foreground color and Set background color, as
well as Quick Mask.
A B C D E
A. Selection, cropping, and measuring tools. B. Retouching and painting tools. C. Drawing and type tools. D. Navigation tools.E. Foreground/Background and Quick Mask.
Selection, Cropping, and Measuring Tools
ICON TOOL NAME USE
Move (V) Moves selections or layers.
Marquee (M) Makes rectangular, elliptical, single row, and single column selections.
Lasso (L) Makes freehand, polygonal (straight-edged), and magnetic selections.
Quick Selection (W) Make selections by painting.
Crop (C) Crops an image.
Eyedropper (I) Samples pixels.
PSCS6_03Pass.indb 34PSCS6_03Pass.indb 34 5/8/12 10:11 AM5/8/12 10:11 AM

2
35Lesson 2, Getting to Know the Workspace
Discovering the Tools panel
Retouching and Painting Tools
ICON TOOL NAME USE
Spot Healing (J) Removes imperfections.
Brush (B) Paints the foreground color.
Clone Stamp (S) Paints with a sample of the image.
History Brush (Y) Paints with the selected state or snapshot.
Eraser (E) Erases pixels—or reverts to a saved history state.
Gradient (G) Creates a gradient.
Blur (no shortcut) Blurs pixels.
Dodge (O) Lightens pixels in an image.
You can create a fl oating Tools panel by clicking on the gray title bar at the top of the Tools panel
and then dragging it to a new location. You can dock it again by dragging it back to the left side
of the workspace; release when you see the blue vertical bar appear.
Drawing and Type Tools
ICON TOOL NAME USE
Pen (P) Draws a vector path.
Horizontal Type (T) Creates a type layer.
Path Selection (A) Allows you to manipulate a path.
Rectangle (U) Draws vector shapes.
Navigation Tools
ICON TOOL NAME USE
Hand (H) Navigates the page.
Zoom (Z) Increases and decreases the relative size of the view.
Can’t tell the tools apart? You can view tooltips that reveal a tool’s name and keyboard shortcut
by positioning your cursor over the tool.
PSCS6_03Pass.indb 35PSCS6_03Pass.indb 35 5/8/12 10:11 AM5/8/12 10:11 AM
2 Discovering the Tools panel
Adobe Photoshop CS6 Digital Classroom36
The Tools panel is in a space-saving, one-column format. Click on the double arrows in
the gray title bar area above the Tools panel to bring the Tools panel into the two-column
view. Click on the double arrows again to bring the Tools panel back to the default,
single-column view. Keep the Tools panel set to whichever format works best for you.
Accessing tools and their options
With the selection of most tools comes the opportunity to change options. In this exercise,
you will have the opportunity to use the new-and-improved Brush tool and change its
options to become even more powerful.
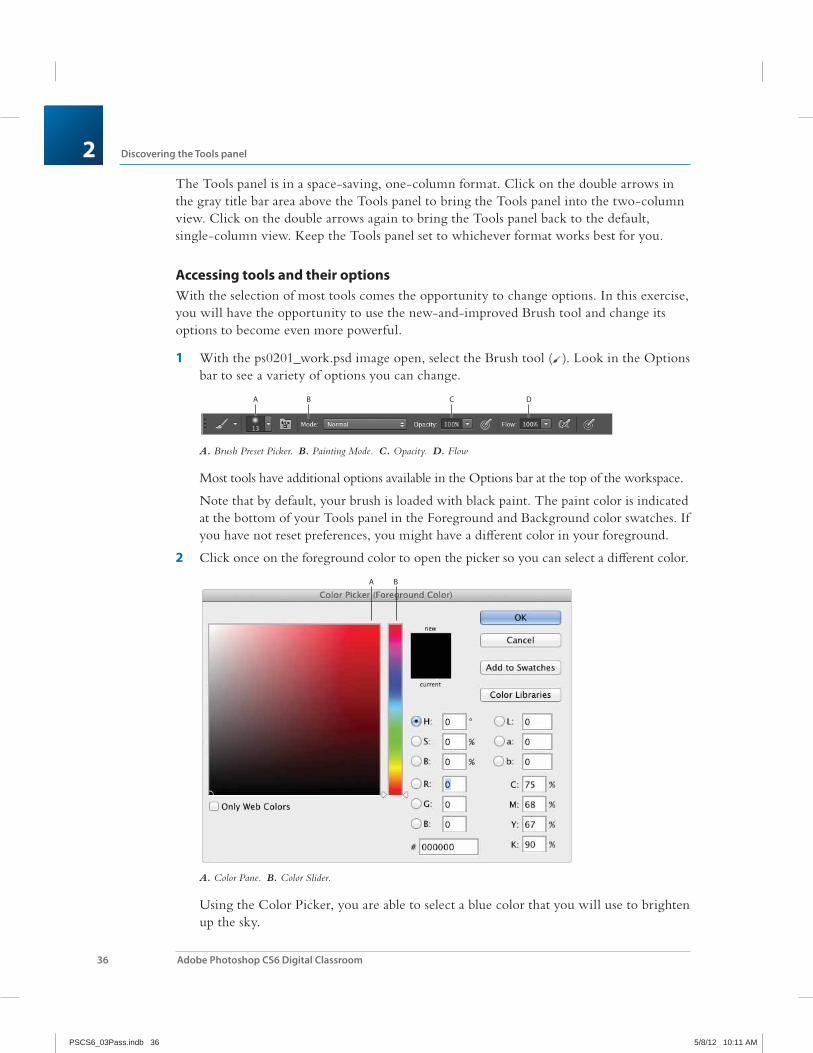
1 With the ps0201_work.psd image open, select the Brush tool ( ). Look in the Options
bar to see a variety of options you can change.
A B C D
A. Brush Preset Picker. B. Painting Mode. C. Opacity. D. Flow
Most tools have additional options available in the Options bar at the top of the workspace.
Note that by default, your brush is loaded with black paint. The paint color is indicated
at the bottom of your Tools panel in the Foreground and Background color swatches. If
you have not reset preferences, you might have a diff erent color in your foreground.
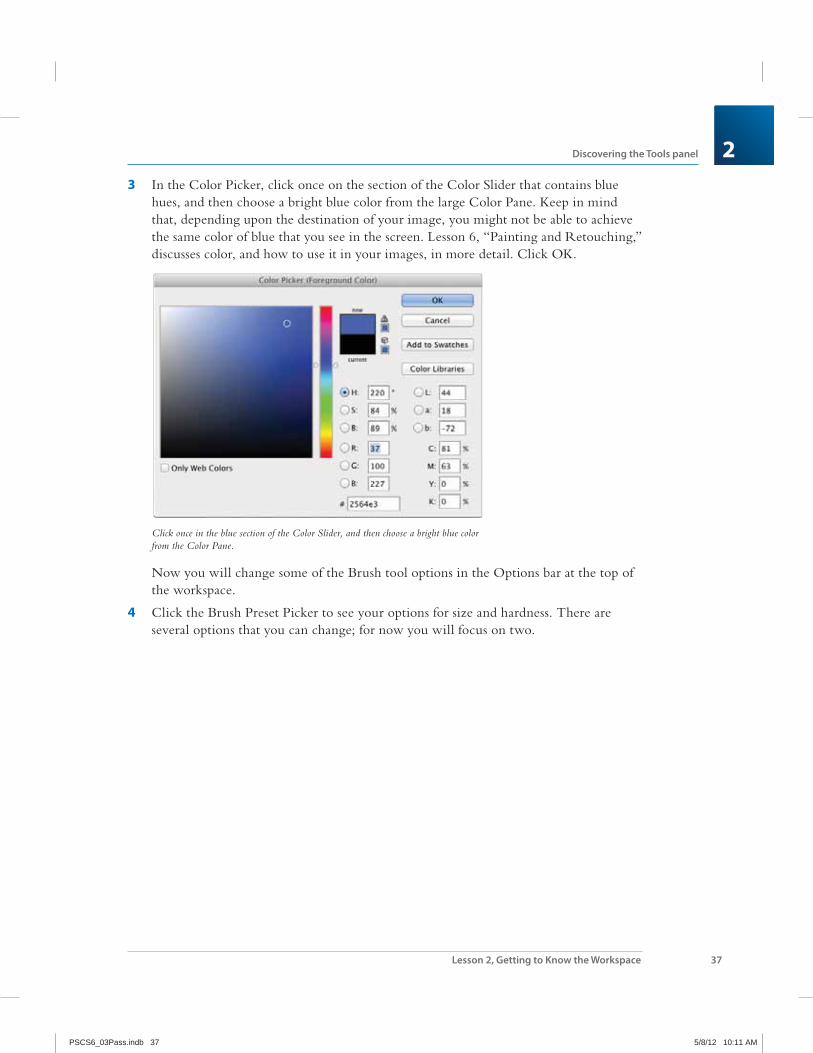
2 Click once on the foreground color to open the picker so you can select a diff erent color.
A B
A. Color Pane. B. Color Slider.
Using the Color Picker, you are able to select a blue color that you will use to brighten
up the sky.
PSCS6_03Pass.indb 36PSCS6_03Pass.indb 36 5/8/12 10:11 AM5/8/12 10:11 AM
2
37Lesson 2, Getting to Know the Workspace
Discovering the Tools panel
3 In the Color Picker, click once on the section of the Color Slider that contains blue
hues, and then choose a bright blue color from the large Color Pane. Keep in mind
that, depending upon the destination of your image, you might not be able to achieve
the same color of blue that you see in the screen. Lesson 6, “Painting and Retouching,”
discusses color, and how to use it in your images, in more detail. Click OK.
Click once in the blue section of the Color Slider, and then choose a bright blue color from the Color Pane.
Now you will change some of the Brush tool options in the Options bar at the top of
the workspace.
4 Click the Brush Preset Picker to see your options for size and hardness. There are
several options that you can change; for now you will focus on two.
PSCS6_03Pass.indb 37PSCS6_03Pass.indb 37 5/8/12 10:11 AM5/8/12 10:11 AM

2 Discovering the Tools panel
Adobe Photoshop CS6 Digital Classroom38
5 Click and drag the size slider, which controls the size of the brush, to the right until
you reach approximately 100 px. If the Hardness slider, which controls the hardness or
softness of the brush, is not all the way to the left at 0%, slide it to the left now. This is
now a large soft brush that will blend well at the edges of the strokes
In the next step, you will paint and then undo it. This is to help you understand the
concept of blending and how it can make a diff erence when you paint.
Change the brush size and hardness.
6 Click and drag anywhere in the image one time to create a brush stroke across your
image. Note that you have created a large opaque streak.
7 Choose Edit > Undo Brush Tool, or use the keyboard shortcut Ctrl+Z (Windows) or
Command+Z (Mac OS) to undo the paint streak.
8 Now click and hold the Painting Mode drop-down menu; you see a list of options
that allow you to change how your paint interacts with the image underneath. Select
Color from the bottom of the list.
Select the paint blending mode named Color.
PSCS6_03Pass.indb 38PSCS6_03Pass.indb 38 5/8/12 10:11 AM5/8/12 10:11 AM

2
39Lesson 2, Getting to Know the Workspace
Discovering the Tools panel
9 Click the arrow to the right of the Opacity option to see the slider. Click and drag the
Opacity slider to the left until it reaches approximately 20%.
10 Now click and drag to paint in the upper-right corner of the image. You see that the
result is quite diff erent and you are brightening the sky.
Click and drag to paint blue in the upper-right corner of the image.
11 Notice that you can build up the color by releasing the paint brush and painting over
the same area. If you make a mistake, choose Edit > Undo, or Ctrl+Z (Windows) or
Command+Z (Mac OS) to undo.
To go back multiple steps, choose Edit > Step Backward, or use the keyboard shortcut
Ctrl+Alt+Z (Windows) or Command+Option+Z (Mac OS)
12 Choose File > Save. Keep this fi le open for the next part of this lesson.
PSCS6_03Pass.indb 39PSCS6_03Pass.indb 39 5/8/12 10:11 AM5/8/12 10:11 AM

2 Using panels
Adobe Photoshop CS6 Digital Classroom40
Using panelsMuch of the functionality in Photoshop resides in the panels, so you will learn to navigate
them and quickly fi nd the ones you need. In this section, you will learn how to resize,
expand, and convert panels to icons and then back to panels again. You will also learn how
to save your favorite workspaces so you don’t have to set them up every time you work on
a new project.
1 Choose Window > Workspace > Reset Essentials to put the panels back to their
default locations.
The default panel locations.
PSCS6_03Pass.indb 40PSCS6_03Pass.indb 40 5/8/12 10:11 AM5/8/12 10:11 AM

2
41Lesson 2, Getting to Know the Workspace
Using panels
Putting the panel system to use
Photoshop has a default setting for all the panels: it’s what you see when you initially
launch Photoshop. There are many panels, and not all of them are needed for all projects.
This is the reason Photoshop has defi ned workspaces, which can help you streamline your
workfl ow. There are many prebuilt workspaces available under the Window > Workspace
menu; you pick the one that helps you fi nd the features you need for the task at hand.
You can select diff erent workspaces that help you fi nd features depending upon the task at hand.
At this point, you have just reset the Essentials workspace. Test diff erent workspaces by
selecting Painting, and then Photography from the Window > Workspace menu. Once
you have seen how panels can be collapsed and others made visible, return to Window >
Workspace > Essentials.
Keep in mind that all these panels are accessible at all times from the Windows > Workspace menu.
PSCS6_03Pass.indb 41PSCS6_03Pass.indb 41 5/8/12 10:11 AM5/8/12 10:11 AM

2 Using panels
Adobe Photoshop CS6 Digital Classroom42
To open panels that are not visible, choose the Window menu. If there is a check mark to the
left of the panel listed, it means that the panel is already open. Photoshop CS6 can determine
whether a panel is hidden behind another; panels that are hidden this way will not be marked
as open, so you can select it in the Window menu to bring the hidden panel forward.
1 Select the Brush tool ( ).
2 Click the Swatches tab that is hidden behind the Color panel in the docking area to
the right.
Click the Swatches tab to bring it forward.
3 Click the color called Pure Red Orange in the Swatches panel. Notice that when you
cross over a color, a Tooltip appears. You can also select Small List from the Swatches
panel menu ( ) in the upper-right corner.
Choose to view the Swatches panel as a list.
PSCS6_03Pass.indb 42PSCS6_03Pass.indb 42 5/8/12 10:11 AM5/8/12 10:11 AM
2
43Lesson 2, Getting to Know the Workspace
Using panels
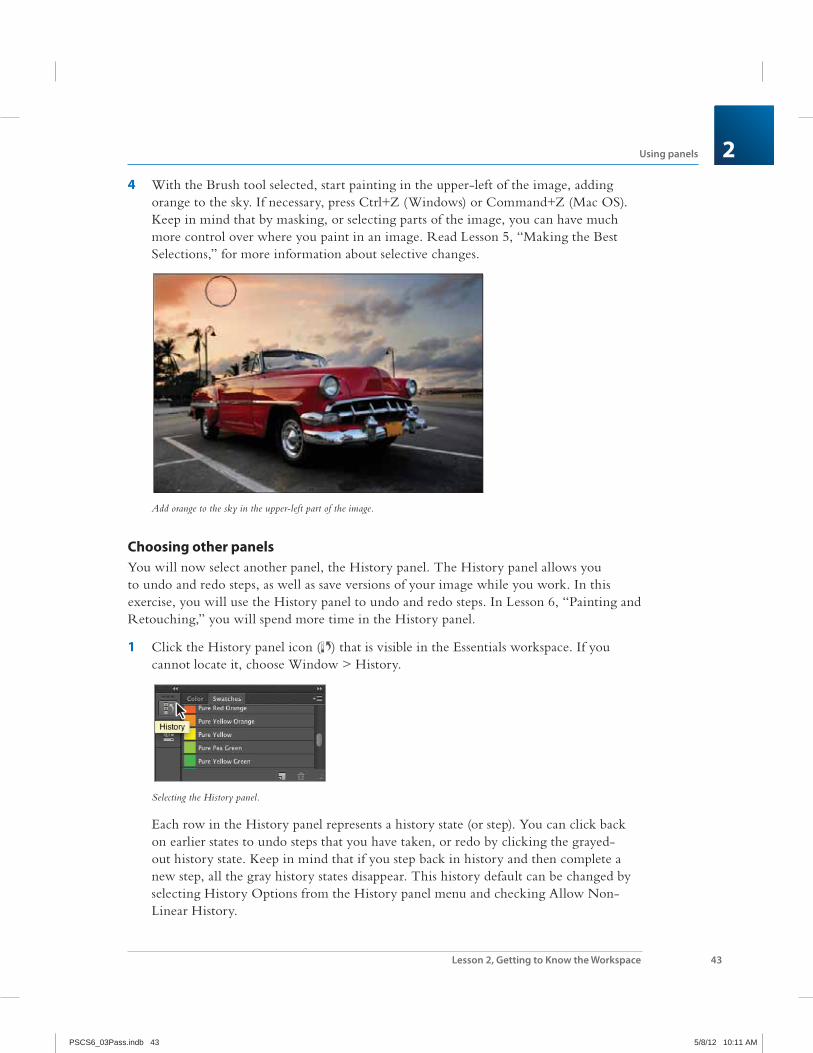
4 With the Brush tool selected, start painting in the upper-left of the image, adding
orange to the sky. If necessary, press Ctrl+Z (Windows) or Command+Z (Mac OS).
Keep in mind that by masking, or selecting parts of the image, you can have much
more control over where you paint in an image. Read Lesson 5, “Making the Best
Selections,” for more information about selective changes.
Add orange to the sky in the upper-left part of the image.
Choosing other panels
You will now select another panel, the History panel. The History panel allows you
to undo and redo steps, as well as save versions of your image while you work. In this
exercise, you will use the History panel to undo and redo steps. In Lesson 6, “Painting and
Retouching,” you will spend more time in the History panel.
1 Click the History panel icon ( ) that is visible in the Essentials workspace. If you
cannot locate it, choose Window > History.
Selecting the History panel.
Each row in the History panel represents a history state (or step). You can click back
on earlier states to undo steps that you have taken, or redo by clicking the grayed-
out history state. Keep in mind that if you step back in history and then complete a
new step, all the gray history states disappear. This history default can be changed by
selecting History Options from the History panel menu and checking Allow Non-
Linear History.
PSCS6_03Pass.indb 43PSCS6_03Pass.indb 43 5/8/12 10:11 AM5/8/12 10:11 AM

2 Using panels
Adobe Photoshop CS6 Digital Classroom44
2 Click back on the various history states to see how your steps are undone. Click
forward again to see your steps redone.
Undoing a step in the History panel.
Expanding and collapsing your panels
To better manage your space, you can collapse and expand your panels. You can do this
automatically with a preconfi gured workspace, or you can choose to expand only the
panels you want to see.
1 You might fi nd that you need to reset your workspace to bring it back to its original
confi guration. If this is necessary, choose Window > Workspace > Reset Essentials.
2 Collapse groups of panels by double-clicking the dark gray bar (title bar) at the top of
the panels. Double-click the dark gray bar again to expand them.
Collapse the panel by double-clicking on the title bar.
You can also collapse a panel by clicking the double-arrows in the upper-right of the panel.
PSCS6_03Pass.indb 44PSCS6_03Pass.indb 44 5/8/12 10:11 AM5/8/12 10:11 AM

2
45Lesson 2, Getting to Know the Workspace
Using panels
3 If the History panel is no longer open, click the icon for the History panel. Click the
double-arrow in the upper-right to collapse that panel back to an icon.
You can collapse a panel by clicking the double-arrows.
Customizing your panels
A panel group is made up of two or more panels that are stacked on top of each other. To
view the other panels in a group, select the name on the tab of the panel. You will now
learn to organize your panels according to your preferences.
1 If the Swatches panel is not forward, select the tab that reads Swatches; the Swatches
tab is brought forward.
2 Now, select the Color tab to bring the Color panel to the front of the panel group.
3 Click the tab of the Color panel, drag it away from the panel group and into the image
area, and then release the mouse—you have just removed a panel from a panel group
and the docking area. Rearranging panels can help you keep frequently used panels
together in one area.
The Color panel as it is dragged away from a panel group.
PSCS6_03Pass.indb 45PSCS6_03Pass.indb 45 5/8/12 10:11 AM5/8/12 10:11 AM

2 Using panels
Adobe Photoshop CS6 Digital Classroom46
4 Click the tab area at the top of the Swatches panel and drag it over the Color panel. As
soon as you see an outline around the Color panel, release the mouse. You have now
made a panel group.
The Swatches panel dragged into the Color panel, creating a new panel group.
You’ll now save a custom workspace. Saving a workspace is a good idea if you have
production processes that often use the same panels. Saving workspaces is also helpful
if you are in a situation where multiple users are sharing Photoshop on one computer.
5 Select Window > Workspace > New Workspace; the New Workspace dialog box
appears.
6 In the Name textbox box, type First Workspace, and then click Save.
Name your new workspace.
7 Whenever you want to reload a workspace, whether it’s one that you created or one
that comes standard with Photoshop, select Window > Workspace and select the
desired workspace from the list.
PSCS6_03Pass.indb 46PSCS6_03Pass.indb 46 5/8/12 10:11 AM5/8/12 10:11 AM

2
47Lesson 2, Getting to Know the Workspace
Using panels
Hidden tools
Some of the tools in the Tools panel display a small triangle at the bottom-right corner;
this indicates that there are additional tools hidden under the tool.
1 Click and hold on the Brush tool to see the hidden Pencil, Color Replacement and
Mixer Brush tools. You can also access the hidden tools by right clicking (Windows)
or Ctrl+clicking (Mac OS)
Selecting a hidden tool.
2 Select the Mixer Brush tool ( ) and release. The Color Mixer tool is now the visible
tool, and the options in the Options bar have been changed.
The Mixer Brush simulates realistic painting techniques, such as mixing colors on the
canvas, combining colors on a brush, or varying paint wetness across a stroke.
You will now change the foreground color by selecting Set the foreground color in
the Tools panel.
3 Click once on the foreground color at the bottom of the Tools panel; the Color Picker
appears.
4 Position your cursor on the Color Slider (hue) to the right of the Color Pane and click
and drag it up until shades of orange appear in the Color Pane.
PSCS6_03Pass.indb 47PSCS6_03Pass.indb 47 5/8/12 10:11 AM5/8/12 10:11 AM

2 Using panels
Adobe Photoshop CS6 Digital Classroom48
5 Click once in the Color Pane to select an orange color. Any orange color will do for this
exercise, but you can also type a value into the text fi elds for a more accurate selection.
In this example, a color with the RGB value of R: 236, G: 169, B: 24 was selected.
Select an orange color from the Color Picker.
6 Click on the Brush Preset picker button in the Options bar and set the following
attributes for the Mixer Brush tool.
Size: 175 px (This indicates the size of the brush, in this example a very large brush is
indicated.)
Hardness: 20% (A value of 100% would be a hard-edged brush.)
Leave all other settings at their defaults.
Changing the Mixer Brush tool.
There are many options for the Mixer Brush, but for this example, you will use a preset
that will adjust all the settings to give you a smooth blended result in your image.
PSCS6_03Pass.indb 48PSCS6_03Pass.indb 48 5/8/12 10:11 AM5/8/12 10:11 AM

2
49Lesson 2, Getting to Know the Workspace
Using panels
7 Click once on Useful mixer brush combinations drop-down menu and select the
Moist, Light Mix preset.
Change the Useful mixer brush combination to Moist, Light Mix.
8 Press Ctrl+0 (zero) (Windows) or Command+0 (zero) (Mac OS.) This is the keyboard
shortcut for Fit on Screen, and it assures that you see the entire image area.
9 With the Mixer Brush tool still selected, start painting in the upper-left area of
your image to create a shade of orange blending in from the corner. Repeat this for
all four corners in the image. If you want to repaint, press Ctrl+Z (Windows) or
Command+Z (Mac OS) to revert to the previous image and try again.
An orange tint is blended into the corners for an artistic eff ect.
10 Choose File > Save, or use the keyboard shortcut Ctrl+S (Windows), or Command+S
(Mac OS) to save your fi le.
PSCS6_03Pass.indb 49PSCS6_03Pass.indb 49 5/8/12 10:11 AM5/8/12 10:11 AM
2 Navigating the image area
Adobe Photoshop CS6 Digital Classroom50
Navigating the image areaTo work most effi ciently in Photoshop, you’ll want to know how to zoom (magnify) in
and out of your image. Changing the zoom level allows you to select and paint accurately
and helps you see details that you might otherwise have overlooked. The zoom function
has a range from a single pixel up to a 3200 percent enlargement, which gives you a lot of
fl exibility in terms of viewing your images.
You’ll start by using the View menu to reduce and enlarge the document view, and end by
fi tting the entire document on your screen.
1 Choose View > Zoom In to enlarge the display of ps0201_work.psd.
2 Press Ctrl+plus sign (Windows) or Command+plus sign (Mac OS) to zoom in again.
This is the keyboard shortcut for the Zoom In command that you accessed previously
from the View menu.
3 Press Ctrl+minus sign (Windows) or Command+minus sign (Mac OS) to zoom out.
This is the keyboard shortcut for View > Zoom Out.
Now you will fi t the entire image on the screen.
4 Choose View > Fit on Screen, or use the keyboard shortcut Ctrl+0 (zero) (Windows)
or Command+0 (zero) (Mac OS), to fi t the document to the screen.
5 You can also display artwork at the size it will print by choosing View > Print Size.
Using the Zoom tool
When you use the Zoom tool ( ), each click increases the view size to the next preset
percentage, and centers the display of the image around the location in the image that you
clicked on. By holding the Alt (Windows) or Option (Mac OS) key down (with the Zoom
tool selected), you can zoom out of an image, decreasing the percentage and making the
image view smaller. The magnifying glass cursor is empty when the image has reached
either its maximum magnifi cation level of 3,200 percent or the minimum size of one
pixel.
1 Choose View > Fit on Screen.
2 Select the Zoom tool, and click two times on the license plate to zoom in. You can
also use key modifi ers to change the behavior of the Zoom tool.
3 Press Alt (Windows) or Option (Mac OS) while clicking with the Zoom tool to zoom out.
You can accurately zoom into the exact region of an image by clicking and dragging
a marquee around that area in your image. To do this, you must disable a new Zoom
tool option.
PSCS6_03Pass.indb 50PSCS6_03Pass.indb 50 5/8/12 10:11 AM5/8/12 10:11 AM

2
51Lesson 2, Getting to Know the Workspace
Navigating the image area
4 Uncheck the Scrubby Zoom checkbox in the Zoom tool’s Option bar to disable this
feature. The Scrubby Zoom feature allows you to click and drag to zoom immediately.
In this example, you need a more predictable zoom area.
Disable the Scrubby Zoom in the Zoom tool’s Option bar.
5 With the Zoom tool still selected, hold down the mouse and click and drag from the
top left of car’s grill to the lower-right of the bumper. You are creating a rectangular
marquee selection around the front of the car. Once you release the mouse, the area
that was included in the marquee is now enlarged to fi ll the document window.
Drag a marquee over the front of the car.
6 Double-click the Zoom tool in the Tools panel to return to a 100 percent view.
Because the Zoom tool is used so often, it would be tiresome to continually have to
change from the Zoom tool back to the tool you were using. Read on to see how you
can activate the Zoom tool at any time without deselecting your current tool.
7 Select the Move tool ( ) at the very top of the Tools panel.
8 Hold down Ctrl+spacebar (Windows) or Command+spacebar (Mac OS). Note that
on the Mac OS you must hold down spacebar before the Command key, otherwise
you trigger Spotlight; the Move tool is temporarily converted into the Zoom In tool.
While still holding down Ctrl/Command+spacebar, click and drag over the front of
the car again, then release. Note that although you have changed the zoom level, the
Move tool is still active.
You can zoom out by holding down Alt+spacebar (Windows) or Option+spacebar (Mac OS).
9 Choose View > Fit on Screen.
PSCS6_03Pass.indb 51PSCS6_03Pass.indb 51 5/8/12 10:11 AM5/8/12 10:11 AM

2 Navigating the image area
Adobe Photoshop CS6 Digital Classroom52
Using the Hand tool
The Hand tool allows you to move or pan around the document. It is a lot like pushing a
piece of paper around on your desk.
1 Select the Zoom tool ( ), then click and drag on an area surrounding the front of the car.
2 Select the Hand tool ( ), then click and drag to the right to push the picture to the
right. Notice that when the Hand tool is active, four view buttons appear in the
Options bar (at the top of the work area) that allow you to change your current view
to Actual Pixels, Fit Screen, Fill Screen, and Print Size.
3 Select the Zoom tool and hold the spacebar. Notice that the cursor turns into the
Hand tool. Click and drag left to view the front of the car again. By holding down the
spacebar, you can access the Hand tool without deselecting the current tool.
4 Double-click the Hand tool in the Tools panel to fi t the entire image on your screen.
This is the same as using Ctrl+0 (zero) (Windows) or Command+0 (zero) (Mac OS).
NAVIGATION
SHORTCUTS WINDOWS MAC OS
Zoom In Ctrl+plus sign Ctrl+spacebar Command+plus sign Command+spacebar
Zoom Out Ctrl+minus sign Alt+spacebar Command+minus sign Option+spacebar
Turn Zoom In tool into Zoom Out tool
Alt Option
Fit on Screen Ctrl+0 (zero) or double-click the Hand tool
Command+0 (zero) or double-click the Hand tool
Hand tool (except when Type tool is selected)
Press spacebar Press spacebar
PSCS6_03Pass.indb 52PSCS6_03Pass.indb 52 5/8/12 10:11 AM5/8/12 10:11 AM

2
53Lesson 2, Getting to Know the Workspace
Navigating the image area
Tabbed windows
In Photoshop, you have control over how your windows appear in the workspace. You can
work with fl oating image windows, or choose to tab your windows across the top of the
workspace. In this section, you fi nd out how to use the new tabbed workspace.
1 If the Mini Bridge is not visible, choose File > Browse in Mini Bridge. In the
Navigation pod, double-click on the image named ps0202.psd to open it in Photoshop.
2 The image is displayed as a separate tab within Photoshop, allowing you to click on
the tab to switch between active images.
Multiple open images appear as tabs at the top of the screen.
3 Click on the ps0202.psd tab and then click and drag the tab away from its tabbed
position and release the mouse button. The image second window is now fl oating.
4 Click the title bar of the fl oating window and drag upward until your cursor is next to
the tab of the other image. When you see a blue bar appear, release the mouse button.
The image is now back to being a tabbed window. You can stop a window from
tabbing accidently by holding down the Ctrl (Windows) or Command (Mac OS) key
while dragging the fl oating window.
If you would prefer not to take advantage of the tabbed window feature, you can
choose Edit > Preferences (Windows) or Photoshop > Preferences (Mac OS), then
choose Interface. In the Panels & Documents section, uncheck Open Documents as
Tabs and press OK.
To quickly move all fl oating windows back to tabbed windows, choose Window > Arrange >
Consolidate All to Tabs.
PSCS6_03Pass.indb 53PSCS6_03Pass.indb 53 5/8/12 10:11 AM5/8/12 10:11 AM
2 Navigating the image area
Adobe Photoshop CS6 Digital Classroom54
Maximizing productivity with screen modes
Now that you can zoom in and out of your document, as well as reposition it in your image
window, it’s time to learn how to take advantage of screen modes. You have a choice of
three screen modes in which to work. Most users start and stay in the default—Standard
Screen mode—unless they accidentally end up in another. Screen modes control how much
space your current image occupies on your screen, and whether you can see other Photoshop
documents as well. The Standard Screen mode is the default screen mode when you open
Photoshop for the fi rst time. It displays an image on a neutral gray background for easy and
accurate viewing of color without distractions, and also provides a fl exible work area for
dealing with panels.
1 Click on the tab of the ps0201_work.psd image to make that image active.
2 Press the Tab key; the Tools panel and other panels disappear, creating much more
workspace. Press the Tab key again to bring the Tools panel and other panels back.
3 Press Shift+Tab to hide the panel docking area while keeping the rest of the panels
visible. Press Shift+Tab to bring the hidden panels back. Both the Tools panel and the
panel docking area should now be visible.
As you position your cursor over various tools, you see a letter to the right of the tool name in
the tooltip. This letter is the keyboard shortcut that you can use to access that tool. You could, in
fact, work with the Tools panel closed and still have access to all the tools via your keyboard.
You will hide the panels once more so that you can take advantage of a hidden feature
in Photoshop CS6.
4 Press the Tab key to hide the panels. Then position your cursor over the thin gray
strip where the Tools panel had been, and pause. The Tools panel reappears. Note
that the Tools panel appears only while your cursor is in the Tools panel area, and it
disappears if you move your cursor out of that area. Try this with the panel docking
area to the right of the screen, and watch as that also appears and disappears as your
cursor moves over the gray border off to the right.
By changing the screen modes, you can locate over-extended anchor points and select
more accurately up to the edge of your image. Changing modes can also help you
present your image to clients in a clean workspace.
PSCS6_03Pass.indb 54PSCS6_03Pass.indb 54 5/8/12 10:11 AM5/8/12 10:11 AM

2
55Lesson 2, Getting to Know the Workspace
Navigating the image area
5 Press the Tab key again to display all the panels.
6 Press F to cycle to the next screen mode, which is Full Screen Mode With Menu
Bar. This view surrounds the image out to the edge of the work area with a neutral
gray (even behind the docking area) and displays only one image at a time, without
tabs, and centered within the work area. You can access additional open images by
choosing the image name from the bottom of the Window menu.
You can also change your screen mode by selecting View > Screen Mode.
7 Notice that the gray background area (pasteboard) now extends to fi ll your entire
screen, and your image is centered within that area. One of the benefi ts of working in
this mode is that it provides more area when working on images.
The Full Screen mode with Menu bar.
PSCS6_03Pass.indb 55PSCS6_03Pass.indb 55 5/8/12 10:11 AM5/8/12 10:11 AM
2 Navigating the image area
Adobe Photoshop CS6 Digital Classroom56
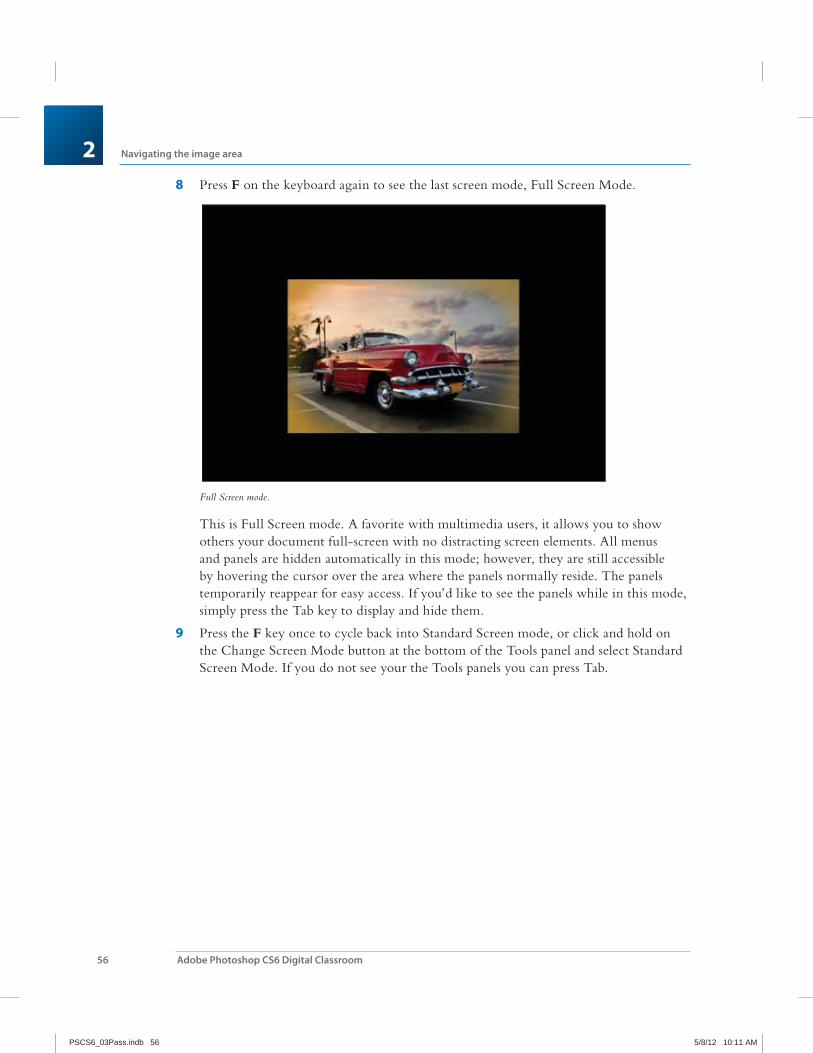
8 Press F on the keyboard again to see the last screen mode, Full Screen Mode.
Full Screen mode.
This is Full Screen mode. A favorite with multimedia users, it allows you to show
others your document full-screen with no distracting screen elements. All menus
and panels are hidden automatically in this mode; however, they are still accessible
by hovering the cursor over the area where the panels normally reside. The panels
temporarily reappear for easy access. If you’d like to see the panels while in this mode,
simply press the Tab key to display and hide them.
9 Press the F key once to cycle back into Standard Screen mode, or click and hold on
the Change Screen Mode button at the bottom of the Tools panel and select Standard
Screen Mode. If you do not see your the Tools panels you can press Tab.
PSCS6_03Pass.indb 56PSCS6_03Pass.indb 56 5/8/12 10:11 AM5/8/12 10:11 AM

2
57Lesson 2, Getting to Know the Workspace
Review
Self studyChoose File > Browse to access a practice fi le in your ps02lessons folder. You can double-
click on ps0202.psd to explore workspaces further.
1 Using Window > Arrange you can arrange several open document windows in
diff erent ways. Explore the diff erent views that Photoshop provides by choosing
various image arrangements.
2 Click on the tabs of various panels and practice clicking and dragging panels from
one group to another. You can put your panels back in order when you are fi nished
experimenting by selecting Window > Workspace > Essentials, or Reset Essentials.
3 Use the Window menu to open the Info, Histogram, and Layers panels, and then
save a new workspace called Color Correction. These panels are covered in Lesson 7,
“Creating a Good Image.”
4 Take a look at some of the pre-built workspaces Photoshop has already provided for
you. They will change the panel locations, and some will highlight things in the menu
that are relevant to each workspace. For instance, by selecting New in CS6, you see
the new panels and new features highlighted in the menus.
Review
Questions
1 What is the Full Screen mode?
2 Name two ways to fi t your image to the screen.
3 What happens in the Essentials workspace when you exit one panel and select another?
4 How do you save a workspace?
Answers
1 The Full Screen mode displays a document window on a black background and hides
all interface elements from view.
2 You can fi t your image to the screen by using the View menu, or by double-clicking
the Hand tool, right-clicking while you have the Zoom or Hand tool selected, or by
pressing Ctrl+0 (zero) (Windows) or Command+0 (zero) (Mac OS).
3 When you leave one panel to select another, the initial panel returns to its original
location in the docking area.
4 You can save your own workspace by selecting Window > Workspace > New
Workspace.
PSCS6_03Pass.indb 57PSCS6_03Pass.indb 57 5/8/12 10:11 AM5/8/12 10:11 AM