gravityzone quick start guide
TRANSCRIPT
ENTERPRISEENTERPRISE
BITDEFENDERGRAVITYZONEQuick Start Guide ››
Bitdefender GravityZoneQuick Start Guide
Publication date 2013.11.07
Copyright© 2013 Bitdefender
Legal Notice
All rights reserved. No part of this book may be reproduced or transmitted in any form or by any means, electronicor mechanical, including photocopying, recording, or by any information storage and retrieval system, without writtenpermission from an authorized representative of Bitdefender. The inclusion of brief quotations in reviews may bepossible only with the mention of the quoted source. The content can not be modified in any way.
Warning and Disclaimer. This product and its documentation are protected by copyright. The information in thisdocument is provided on an “as is” basis, without warranty. Although every precaution has been taken in thepreparation of this document, the authors will not have any liability to any person or entity with respect to any lossor damage caused or alleged to be caused directly or indirectly by the information contained in this work.
This book contains links to third-party Websites that are not under the control of Bitdefender, therefore Bitdefenderis not responsible for the content of any linked site. If you access a third-party website listed in this document, youwill do so at your own risk. Bitdefender provides these links only as a convenience, and the inclusion of the link doesnot imply that Bitdefender endorses or accepts any responsibility for the content of the third-party site.
Trademarks. Trademark namesmay appear in this book. All registered and unregistered trademarks in this documentare the sole property of their respective owners, and are respectfully acknowledged.
ENTERPRISE BITDEFENDER GRAVITYZONE

89504E470D0A1A0A0000000D494844520000002000000020010300000049B4E8B7000000017352474200AECE1CE900000006504C5445FFFFFF00000055C2D37E0000009A4944415408D76370FB7BCF85E1BDE2321706DE847DDF185A5B5858189454BBAA18EAFFEFBFCF90FFF7DF3F0630F8CCA42DC9A0C014A7CC30E58C763FC3751EAFC50C0C4E40C5F5F54075E5E7ECE743D4ED0A4ECC62B831977D06C365F5E3090C13AE262932743330CE60F80F52575DBFFC3644DDEB695EDB19AC4D2EB533342D5BB198C1E5E9AA030C960C01EC4075FFFF31FC2FFFF51DAC0C00A09339A3914312FC0000000049454E44AE4260827A3431793A70666765303133406F316771337333617133652E70307A
ENTERPRISE BITDEFENDER GRAVITYZONE
Table of Contents
1. About GravityZone . . . . . . . . . . . . . . . . . . . . . . . . . . . . . . . . . . . . . . . . . . . . . . . . . . . . . . . . . . . . . . . . 1
2. System Requirements . . . . . . . . . . . . . . . . . . . . . . . . . . . . . . . . . . . . . . . . . . . . . . . . . . . . . . . . . . . . 32.1. GravityZone Appliance Requirements . . . . . . . . . . . . . . . . . . . . . . . . . . . . . . . . . . . . . . . . . . . . . . . 3
2.1.1. Hardware Requirements . . . . . . . . . . . . . . . . . . . . . . . . . . . . . . . . . . . . . . . . . . . . . . . . . . . . . . . 32.1.2. Internet Connection . . . . . . . . . . . . . . . . . . . . . . . . . . . . . . . . . . . . . . . . . . . . . . . . . . . . . . . . . . . 32.1.3. Control Center Web Console Requirements . . . . . . . . . . . . . . . . . . . . . . . . . . . . . . . . . . . . . . 3
2.2. Security for Endpoints Requirements . . . . . . . . . . . . . . . . . . . . . . . . . . . . . . . . . . . . . . . . . . . . . . . . 42.2.1. Supported Operating Systems . . . . . . . . . . . . . . . . . . . . . . . . . . . . . . . . . . . . . . . . . . . . . . . . . 42.2.2. Hardware Requirements . . . . . . . . . . . . . . . . . . . . . . . . . . . . . . . . . . . . . . . . . . . . . . . . . . . . . . . 52.2.3. Supported Browsers . . . . . . . . . . . . . . . . . . . . . . . . . . . . . . . . . . . . . . . . . . . . . . . . . . . . . . . . . . 5
2.3. Security for Virtualized Environments Requirements . . . . . . . . . . . . . . . . . . . . . . . . . . . . . . . . . . . 52.3.1. Supported Virtualization Platforms . . . . . . . . . . . . . . . . . . . . . . . . . . . . . . . . . . . . . . . . . . . . . . 62.3.2. Supported Virtualization Management Tools . . . . . . . . . . . . . . . . . . . . . . . . . . . . . . . . . . . . . 62.3.3. Security Server Requirements . . . . . . . . . . . . . . . . . . . . . . . . . . . . . . . . . . . . . . . . . . . . . . . . . . 72.3.4. Supported Guest Operating Systems . . . . . . . . . . . . . . . . . . . . . . . . . . . . . . . . . . . . . . . . . . . 82.3.5. Bitdefender Tools Requirements and Footprint . . . . . . . . . . . . . . . . . . . . . . . . . . . . . . . . . . . 8
2.4. Security for Mobile Devices Requirements . . . . . . . . . . . . . . . . . . . . . . . . . . . . . . . . . . . . . . . . . . . 92.4.1. Supported Platforms . . . . . . . . . . . . . . . . . . . . . . . . . . . . . . . . . . . . . . . . . . . . . . . . . . . . . . . . . . 92.4.2. Connectivity Requirements . . . . . . . . . . . . . . . . . . . . . . . . . . . . . . . . . . . . . . . . . . . . . . . . . . . . 92.4.3. Push Notifications . . . . . . . . . . . . . . . . . . . . . . . . . . . . . . . . . . . . . . . . . . . . . . . . . . . . . . . . . . . . 92.4.4. iOS Management Certificates . . . . . . . . . . . . . . . . . . . . . . . . . . . . . . . . . . . . . . . . . . . . . . . . . 10
2.5. GravityZone Communication Ports . . . . . . . . . . . . . . . . . . . . . . . . . . . . . . . . . . . . . . . . . . . . . . . . 10
3. GravityZone Installation and Setup . . . . . . . . . . . . . . . . . . . . . . . . . . . . . . . . . . . . . . . . . . . . . . 113.1. Prepare for Installation . . . . . . . . . . . . . . . . . . . . . . . . . . . . . . . . . . . . . . . . . . . . . . . . . . . . . . . . . . . 113.2. Deploy and Set Up GravityZone Appliance . . . . . . . . . . . . . . . . . . . . . . . . . . . . . . . . . . . . . . . . . . 12
3.2.1. Configure Appliance Hostname (DNS) . . . . . . . . . . . . . . . . . . . . . . . . . . . . . . . . . . . . . . . . . . 123.2.2. Configure Network Settings . . . . . . . . . . . . . . . . . . . . . . . . . . . . . . . . . . . . . . . . . . . . . . . . . . . 133.2.3. Configure Proxy Settings . . . . . . . . . . . . . . . . . . . . . . . . . . . . . . . . . . . . . . . . . . . . . . . . . . . . . 133.2.4. Install GravityZone Roles . . . . . . . . . . . . . . . . . . . . . . . . . . . . . . . . . . . . . . . . . . . . . . . . . . . . . 13
3.3. Control Center Initial Setup . . . . . . . . . . . . . . . . . . . . . . . . . . . . . . . . . . . . . . . . . . . . . . . . . . . . . . . 143.4. Enter License Keys . . . . . . . . . . . . . . . . . . . . . . . . . . . . . . . . . . . . . . . . . . . . . . . . . . . . . . . . . . . . . . 153.5. Configure Control Center Settings . . . . . . . . . . . . . . . . . . . . . . . . . . . . . . . . . . . . . . . . . . . . . . . . . 153.6. Add Control Center Users . . . . . . . . . . . . . . . . . . . . . . . . . . . . . . . . . . . . . . . . . . . . . . . . . . . . . . . . 19
4. Getting Started . . . . . . . . . . . . . . . . . . . . . . . . . . . . . . . . . . . . . . . . . . . . . . . . . . . . . . . . . . . . . . . . . . 224.1. Types of Users in Control Center . . . . . . . . . . . . . . . . . . . . . . . . . . . . . . . . . . . . . . . . . . . . . . . . . . 224.2. Connecting to GravityZone Control Center . . . . . . . . . . . . . . . . . . . . . . . . . . . . . . . . . . . . . . . . . . 224.3. Control Center at a Glance . . . . . . . . . . . . . . . . . . . . . . . . . . . . . . . . . . . . . . . . . . . . . . . . . . . . . . . . 23
4.3.1. GravityZone Console Overview . . . . . . . . . . . . . . . . . . . . . . . . . . . . . . . . . . . . . . . . . . . . . . . . 234.3.2. Table Data . . . . . . . . . . . . . . . . . . . . . . . . . . . . . . . . . . . . . . . . . . . . . . . . . . . . . . . . . . . . . . . . . . 244.3.3. Action Toolbars . . . . . . . . . . . . . . . . . . . . . . . . . . . . . . . . . . . . . . . . . . . . . . . . . . . . . . . . . . . . . 25
iv
ENTERPRISE BITDEFENDER GRAVITYZONE
4.3.4. Contextual Menu . . . . . . . . . . . . . . . . . . . . . . . . . . . . . . . . . . . . . . . . . . . . . . . . . . . . . . . . . . . . 254.3.5. Service Selector . . . . . . . . . . . . . . . . . . . . . . . . . . . . . . . . . . . . . . . . . . . . . . . . . . . . . . . . . . . . . 26
4.4. Applying Security Policies . . . . . . . . . . . . . . . . . . . . . . . . . . . . . . . . . . . . . . . . . . . . . . . . . . . . . . . . 264.4.1. Creating and Configuring Policies . . . . . . . . . . . . . . . . . . . . . . . . . . . . . . . . . . . . . . . . . . . . . 264.4.2. Assigning and Applying Policies . . . . . . . . . . . . . . . . . . . . . . . . . . . . . . . . . . . . . . . . . . . . . . . 27
4.5. Using Tasks . . . . . . . . . . . . . . . . . . . . . . . . . . . . . . . . . . . . . . . . . . . . . . . . . . . . . . . . . . . . . . . . . . . . . 284.6. Monitoring and Reporting . . . . . . . . . . . . . . . . . . . . . . . . . . . . . . . . . . . . . . . . . . . . . . . . . . . . . . . . . 28
4.6.1. Using the Dashboard . . . . . . . . . . . . . . . . . . . . . . . . . . . . . . . . . . . . . . . . . . . . . . . . . . . . . . . . 294.6.2. Working with Reports . . . . . . . . . . . . . . . . . . . . . . . . . . . . . . . . . . . . . . . . . . . . . . . . . . . . . . . . 30
5. Install Security Services . . . . . . . . . . . . . . . . . . . . . . . . . . . . . . . . . . . . . . . . . . . . . . . . . . . . . . . . . 325.1. Installing Security for Endpoints . . . . . . . . . . . . . . . . . . . . . . . . . . . . . . . . . . . . . . . . . . . . . . . . . . . 32
5.1.1. Preparing for Installation . . . . . . . . . . . . . . . . . . . . . . . . . . . . . . . . . . . . . . . . . . . . . . . . . . . . . 325.1.2. Using Installation Packages . . . . . . . . . . . . . . . . . . . . . . . . . . . . . . . . . . . . . . . . . . . . . . . . . . . 345.1.3. Using Remote Installation Tasks . . . . . . . . . . . . . . . . . . . . . . . . . . . . . . . . . . . . . . . . . . . . . . . 37
5.2. Installing Security for Virtualized Environments . . . . . . . . . . . . . . . . . . . . . . . . . . . . . . . . . . . . . . 395.2.1. Connect to vCenter Server . . . . . . . . . . . . . . . . . . . . . . . . . . . . . . . . . . . . . . . . . . . . . . . . . . . 405.2.2. Install Security Server on Hosts . . . . . . . . . . . . . . . . . . . . . . . . . . . . . . . . . . . . . . . . . . . . . . . 405.2.3. Install Bitdefender Tools on Virtual Machines . . . . . . . . . . . . . . . . . . . . . . . . . . . . . . . . . . . . 44
5.3. Installing Security for Mobile Devices . . . . . . . . . . . . . . . . . . . . . . . . . . . . . . . . . . . . . . . . . . . . . . 485.3.1. Configure External Address for Communication Server . . . . . . . . . . . . . . . . . . . . . . . . . . . 485.3.2. Create and Organize Custom Users . . . . . . . . . . . . . . . . . . . . . . . . . . . . . . . . . . . . . . . . . . . . 495.3.3. Add Devices to Users . . . . . . . . . . . . . . . . . . . . . . . . . . . . . . . . . . . . . . . . . . . . . . . . . . . . . . . . 505.3.4. Install GravityZone Mobile Client on Devices . . . . . . . . . . . . . . . . . . . . . . . . . . . . . . . . . . . . 50
6. Getting Help . . . . . . . . . . . . . . . . . . . . . . . . . . . . . . . . . . . . . . . . . . . . . . . . . . . . . . . . . . . . . . . . . . . . . 52
v
ENTERPRISE BITDEFENDER GRAVITYZONE
1. About GravityZoneBitdefender has applied over a decade of security expertise and innovation for creating ahighly scalable and integrated security management platform based on its new GravityArchitecture. The new Enterprise Security solutions form a “Gravity Zone” capable ofprotecting from hundreds to millions of endpoints on-demand with a private cloud hostedwithin the organization’s premises, or in public cloud hosted either by Bitdefender or aService Provider.
The solution provides full visibility into organization’s overall security posture, global securitythreats, and control over its Security services that protect virtual or physical desktops, serversand mobile devices. All Bitdefender’s Enterprise Security solutions are managed within theGravity Zone and a single console that provides control, reporting, and alerting services forvarious roles within the organization.
GravityZone includes the following components:
• Control Center• Security for Endpoints• Security for Virtualized Environments• Security for Mobile Devices
Control CenterA web-based dashboard and unified management console that provides full visibility intoorganization’s overall security posture, global security threats, and control over its securityservices that protects virtual or physical desktops, servers and mobile devices. Powered bya Gravity Architecture, Control Center is capable of addressing the needs of even the largestorganizations.
Control Center integrates with the existing system management and monitoring systems tomake it simple to automatically apply protection to unmanaged desktops, servers or mobiledevices that appear on the Microsoft Active Directory, VMware vCenter or Citrix XenServer.
Security for EndpointsProtects unobtrusively any number of Windows desktops, laptops and servers by usingnumber-one-ranked antimalware technology combined with firewall, intrusion detection,web access control and filtering, sensitive data protection and application control. Employeeproductivity is ensured with low resource consumption, optimized system scanning andautomated security that requires no end-user interaction.
About GravityZone 1
ENTERPRISE BITDEFENDER GRAVITYZONE

Security for Virtualized EnvironmentsSecurity for Virtualized Environments is the first all-encompassing security solution forvirtualized datacenters, protecting virtualized servers and desktops on Windows and Linuxsystems. Powered by cutting edge security technologies from Bitdefender, SVE has beenspecifically architected to meet the unique requirements of dynamic virtualized datacenterstoday.
Security for Mobile DevicesManages and controls iPhone, iPad and Android devices with a unified enterprise-grademanagement that keeps the device safe with real-time scanning and enforces organization’ssecurity policies on any number of devices to lock screen, require authentication, encryptremovable media, locate lost devices and deny non-compliant or jailbroken devices accessingcorporate services.
About GravityZone 2
ENTERPRISE BITDEFENDER GRAVITYZONE
2. System RequirementsAll of the GravityZone solutions are installed and managed via Control Center.
2.1. GravityZone Appliance RequirementsGravityZone is delivered as a virtual appliance. The GravityZone appliance is available in thefollowing formats:
• OVA (compatible with VMware vSphere, View)• XVA (compatible with Citrix XenServer, XenDesktop, VDI-in-a-Box)• VHD (compatible with Microsoft Hyper-V)• OVF (compatible with Red Hat Enterprise Virtualization)*• OVF (compatible with Kernel-based Virtual Machine or KVM)*• RAW (compatible with Oracle VM)*
*OVF and RAW packages are archived in tar.bz2 format.
Support for other formats and virtualization platforms may be provided on request.
2.1.1. Hardware RequirementsDeploy the GravityZone appliance with the following minimum hardware configuration:
• CPU: 4 vCPU with 2 GHz each• Minimum RAM memory: 6 GB• 40 GB of free hard-disk space
The aforementioned hardware configuration is suitable for environments consisting of up to50 computers, 50 virtual machines running on VMware infrastructure, 50 virtual machinesrunning on Citrix XenServer infrastructure, 50 Active Directory users, 50 Android devicesand 50 iOS devices.
2.1.2. Internet ConnectionThe GravityZone appliance requires Internet access.
2.1.3. Control Center Web Console RequirementsTo access the Control Center web console, the following are required:
• Internet Explorer 9+, Mozilla Firefox 14+, Google Chrome 15+, Safari 5+• Recommended screen resolution: 1280x800 or higher
System Requirements 3
ENTERPRISE BITDEFENDER GRAVITYZONE
• The computer you connect from must have network connectivity to the Control Centerappliance.
WarningControl Center will not work / display properly in Internet Explorer 9+ with the CompatibilityView feature enabled, which is equivalent with using an unsupported browser version.
2.2. Security for Endpoints Requirements
2.2.1. Supported Operating SystemsSecurity for Endpoints currently protects the following operating systems:
Workstation operating systems:• Windows 8.1• Windows 8• Windows 7• Windows Vista with Service Pack 1• Windows XP with Service Pack 3
Tablet and embedded operating systems*:• Windows Embedded Standard 7• Windows Embedded Compact 7• Windows Embedded POSReady 7• Windows Embedded Enterprise 7• Windows Embedded POSReady 2009• Windows Embedded Standard 2009• Windows XP Embedded with Service Pack 2• Windows XP Tablet PC Edition
*Specific operating systemmodules must be installed for Security for Endpoints to work.
Server operating systems:• Windows Server 2012 R2• Windows Server 2012• Windows Small Business Server (SBS) 2011• Windows Small Business Server (SBS) 2008• Windows Server 2008 R2• Windows Server 2008• Windows Small Business Server (SBS) 2003• Windows Server 2003 R2• Windows Server 2003 with Service Pack 1• Windows Home Server
System Requirements 4
ENTERPRISE BITDEFENDER GRAVITYZONE
2.2.2. Hardware Requirements• Intel® Pentium compatible processor:
Workstation Operating Systems– 1 GHz or faster for Microsoft Windows XP SP3, Windows XP SP2 64 bit andWindows
7 Enterprise (32 and 64 bit)– 2 GHz or faster for Microsoft Windows Vista SP1 or higher (32 and 64 bit), Microsoft
Windows 7 (32 and 64 bit), Microsoft Windows 7 SP1 (32 and 64bit), Windows 8– 800 MHZ or faster for Microsoft Windows Embedded Standard 7 SP1, Microsoft
Windows POSReady 7, Microsoft Windows POSReady 2009, Microsoft WindowsEmbedded Standard 2009, Microsoft Windows XP Embedded with Service Pack 2,Microsoft Windows XP Tablet PC Edition
Server Operating Systems– Minimum: 2.4 GHz single-core CPU– Recommended: 1.86 GHz or faster Intel Xeon multi-core CPU
• Free RAM memory:– 512 MB minimum– 1 GB recommended
• HDD space:
– 1.5 GB of free hard-disk space
NoteAt least 6 GB free disk space is required for entities with Endpoint Security Relayrole, as they will store all updates and installation packages.
2.2.3. Supported BrowsersEndpoint browser security is verified to be working with the following browsers:
• Internet Explorer 8+• Mozilla Firefox 8+• Google Chrome 15+• Safari 4+
2.3. Security for Virtualized EnvironmentsRequirementsSecurity for Virtualized Environments is delivered within a security virtual appliance calledSecurity Server. Security Server is running on a hardened Linux Server distribution (2.6kernel) and is managed by Control Center.
System Requirements 5
ENTERPRISE BITDEFENDER GRAVITYZONE
2.3.1. Supported Virtualization PlatformsSecurity for Virtualized Environments provides out-of-the-box support for the followingvirtualization platforms:
• VMware vSphere 5.1, 5.0, 4.1 with VMware vCenter Server 5.1, 5.0, 4.1• VMware View 5.1, 5.0• Citrix XenServer 6.0, 5.6 or 5.5 (including Xen Hypervisor)• Citrix XenDesktop 5.5 or 5.0 (including Xen Hypervisor)• Citrix VDI-in-a-Box 5.x• Microsoft Hyper-V Server 2008 R2 or Windows 2008 R2 (including Hyper-V Hypervisor)• Microsoft Hyper-V Server 2012 or Windows 2012 Server (including Hyper-V Hypervisor)
NoteSupport for other virtualization platforms may be provided on request.
Integration with VMware vShield Endpoint Requirements
• ESXi 5.1, 5.0 (build 474610 or higher), 4.1 (build 433742 or higher)• vCenter Server 5.1, 5.0, 4.1• vShield Manager 5.1, 5.0• vShield Endpoint installed by vShield Manager on the host/hosts protected by Security
for Virtualized Environments• VMware Tools 8.6.0 build 446312 or higher installed on the protected virtual machines
in the complete mode or with the vShield Endpoint driver selected under VMCI in custommode.
ImportantIt is recommended that you keep all VMware products updated with the latest patch.
If you are using ESXi 5.0, it is highly recommended to apply VMware ESXi 5.0 PatchESXi500-201204401-BG: Updates tools-light, which solves critical issues in the vShieldEndpoint guest drivers. The patch updates VMware Tools to version 8.6.5 build 652272.
If you are using ESXi 4.1 P3, you must obtain the updated VMware Tools version and installit in the virtual machines. For more information, refer to this KB article.
2.3.2. Supported Virtualization Management ToolsControl Center currently integrates with the following virtualization management tools:
• VMware vCenter Server• Citrix XenServer
To set up integration, you must provide the username and password of an administrator.
System Requirements 6
ENTERPRISE BITDEFENDER GRAVITYZONE
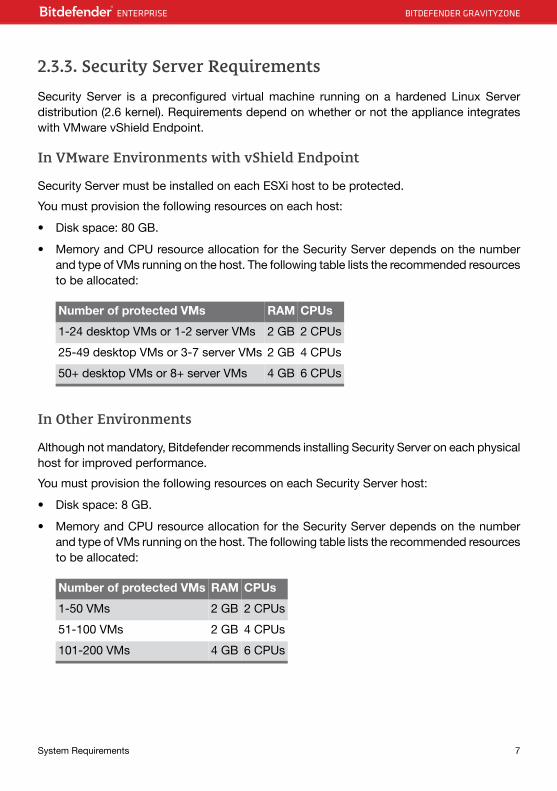
2.3.3. Security Server RequirementsSecurity Server is a preconfigured virtual machine running on a hardened Linux Serverdistribution (2.6 kernel). Requirements depend on whether or not the appliance integrateswith VMware vShield Endpoint.
In VMware Environments with vShield Endpoint
Security Server must be installed on each ESXi host to be protected.
You must provision the following resources on each host:
• Disk space: 80 GB.
• Memory and CPU resource allocation for the Security Server depends on the numberand type of VMs running on the host. The following table lists the recommended resourcesto be allocated:
CPUsRAMNumber of protected VMs
2 CPUs2 GB1-24 desktop VMs or 1-2 server VMs
4 CPUs2 GB25-49 desktop VMs or 3-7 server VMs
6 CPUs4 GB50+ desktop VMs or 8+ server VMs
In Other Environments
Although not mandatory, Bitdefender recommends installing Security Server on each physicalhost for improved performance.
You must provision the following resources on each Security Server host:
• Disk space: 8 GB.
• Memory and CPU resource allocation for the Security Server depends on the numberand type of VMs running on the host. The following table lists the recommended resourcesto be allocated:
CPUsRAMNumber of protected VMs
2 CPUs2 GB1-50 VMs
4 CPUs2 GB51-100 VMs
6 CPUs4 GB101-200 VMs
System Requirements 7
ENTERPRISE BITDEFENDER GRAVITYZONE
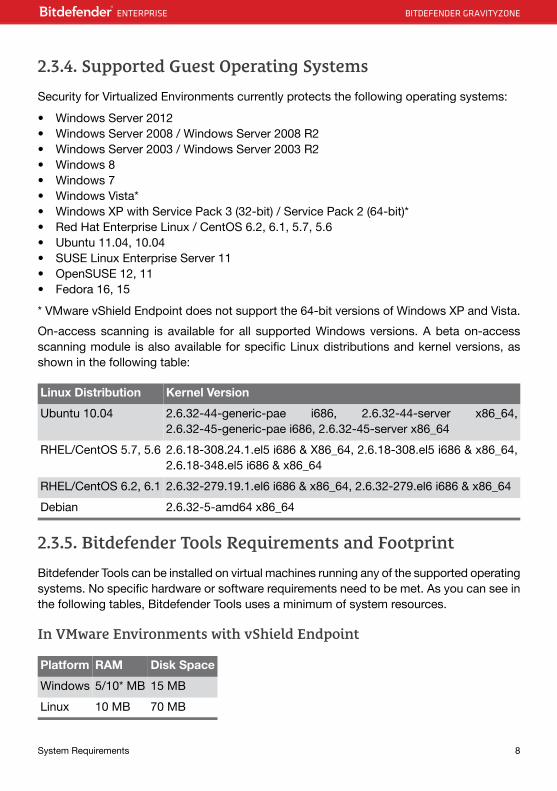
2.3.4. Supported Guest Operating SystemsSecurity for Virtualized Environments currently protects the following operating systems:
• Windows Server 2012• Windows Server 2008 / Windows Server 2008 R2• Windows Server 2003 / Windows Server 2003 R2• Windows 8• Windows 7• Windows Vista*• Windows XP with Service Pack 3 (32-bit) / Service Pack 2 (64-bit)*• Red Hat Enterprise Linux / CentOS 6.2, 6.1, 5.7, 5.6• Ubuntu 11.04, 10.04• SUSE Linux Enterprise Server 11• OpenSUSE 12, 11• Fedora 16, 15
* VMware vShield Endpoint does not support the 64-bit versions of Windows XP and Vista.
On-access scanning is available for all supported Windows versions. A beta on-accessscanning module is also available for specific Linux distributions and kernel versions, asshown in the following table:
Kernel VersionLinux Distribution
2.6.32-44-generic-pae i686, 2.6.32-44-server x86_64,2.6.32-45-generic-pae i686, 2.6.32-45-server x86_64
Ubuntu 10.04
2.6.18-308.24.1.el5 i686 & X86_64, 2.6.18-308.el5 i686 & x86_64,2.6.18-348.el5 i686 & x86_64
RHEL/CentOS 5.7, 5.6
2.6.32-279.19.1.el6 i686 & x86_64, 2.6.32-279.el6 i686 & x86_64RHEL/CentOS 6.2, 6.1
2.6.32-5-amd64 x86_64Debian
2.3.5. Bitdefender Tools Requirements and FootprintBitdefender Tools can be installed on virtual machines running any of the supported operatingsystems. No specific hardware or software requirements need to be met. As you can see inthe following tables, Bitdefender Tools uses a minimum of system resources.
In VMware Environments with vShield Endpoint
Disk SpaceRAMPlatform
15 MB5/10* MBWindows
70 MB10 MBLinux
System Requirements 8
ENTERPRISE BITDEFENDER GRAVITYZONE
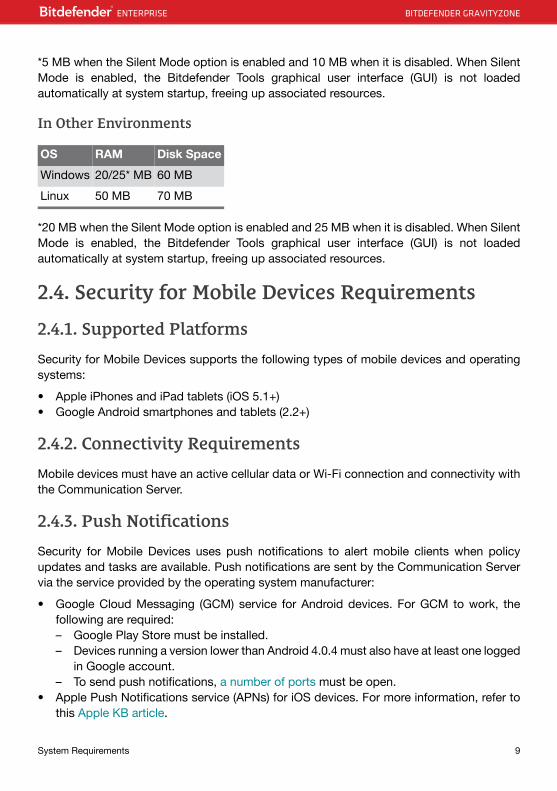
*5 MB when the Silent Mode option is enabled and 10 MB when it is disabled. When SilentMode is enabled, the Bitdefender Tools graphical user interface (GUI) is not loadedautomatically at system startup, freeing up associated resources.
In Other Environments
Disk SpaceRAMOS
60 MB20/25* MBWindows
70 MB50 MBLinux
*20 MB when the Silent Mode option is enabled and 25 MB when it is disabled. When SilentMode is enabled, the Bitdefender Tools graphical user interface (GUI) is not loadedautomatically at system startup, freeing up associated resources.
2.4. Security for Mobile Devices Requirements
2.4.1. Supported PlatformsSecurity for Mobile Devices supports the following types of mobile devices and operatingsystems:
• Apple iPhones and iPad tablets (iOS 5.1+)• Google Android smartphones and tablets (2.2+)
2.4.2. Connectivity RequirementsMobile devices must have an active cellular data or Wi-Fi connection and connectivity withthe Communication Server.
2.4.3. Push NotificationsSecurity for Mobile Devices uses push notifications to alert mobile clients when policyupdates and tasks are available. Push notifications are sent by the Communication Servervia the service provided by the operating system manufacturer:
• Google Cloud Messaging (GCM) service for Android devices. For GCM to work, thefollowing are required:– Google Play Store must be installed.– Devices running a version lower than Android 4.0.4 must also have at least one logged
in Google account.– To send push notifications, a number of ports must be open.
• Apple Push Notifications service (APNs) for iOS devices. For more information, refer tothis Apple KB article.
System Requirements 9
ENTERPRISE BITDEFENDER GRAVITYZONE
To learn more about GravityZone Mobile Device Management workflow, please refer to thisKB article.
2.4.4. iOS Management CertificatesTo set up the infrastructure for iOS mobile device management, you must provide a numberof security certificates.
For more information, refer to “Configure Control Center Settings” (p. 15).
2.5. GravityZone Communication PortsThe following table provides information on the ports used by the GravityZone components:
UsagePort
Port used to access the Control Center web console.80 (HTTP) / 443 (HTTPS)
Port used by client/agent software to connect to theCommunication Server.
8080 (HTTP) / 8443(HTTPS)
Update Server port7074 (HTTP)
Default port used by the Communication Server and ControlCenter to access the Database.
27017
Ports used by the Bitdefender Tools agent to connect to SecurityServer.
7081 / 7083 (SSL)
Communication port between the Bitdefender Tools agent forLinux and Security Server in VMware environments with vShieldEndpoint.
48651
Communication port between the hypervisor (vmkernel) andSecurity Server in VMware environments with vShield Endpoint.
48652
Google CloudMessaging (GCM) ports. TheCommunication Serveruses GCM to send push notifications to managed Androiddevices.
5228, 5229, 5230
Apple Push Notification service (APNs) ports. Ports 2195 and2196 are used by the Communication Server to communicate
2195, 2196, 5223
with the APNs servers. Port 5223 is used bymanaged iOS devicesto communicate with the APNs servers over Wi-Fi in specificconditions. For more information, refer to this Apple KB article.
User Datagram Protocol (UDP) port used by GravityZoneappliances for time synchronization with the NTP server.
123 (UDP)
System Requirements 10
ENTERPRISE BITDEFENDER GRAVITYZONE
3. GravityZone Installation and SetupTo make sure installation goes smoothly, follow these steps:
1. Prepare for installation.
2. Deploy and set up the GravityZone virtual appliance.
3. Connect to Control Center and setup the first user account.
4. Enter your license keys.
5. Configure Control Center settings.
6. Add Control Center users.
3.1. Prepare for InstallationFor installation, you need a GravityZone virtual appliance image. After you deploy and setup the GravityZone appliance, you can remotely install or download the necessary installationpackages for all other security services components from the Control Center web interface.
The GravityZone appliance image is available in several different formats, compatible withthe main virtualization platforms. You can obtain the download links by registering for a trialon the Bitdefender Enterprise website.
For installation and initial setup, you must have the following at hand:
• DNS names or fixed IP addresses (either by static configuration or via a DHCP reservation)for the GravityZone appliances
• Username and password of a domain administrator
• vCenter Server, vShield Manager, XenServer details (hostname or IP address,communication port, administrator username and password)
• License key for each GravityZone security service (check the trial registration or purchaseemail)
• Outgoing mail server settings
• If needed, proxy server settings
• Security certificates
Additional prerequisites must be met in order to install services.
GravityZone Installation and Setup 11
ENTERPRISE BITDEFENDER GRAVITYZONE
3.2. Deploy and Set Up GravityZone ApplianceThe GravityZone appliance can run one, several or all of the following roles:
• Database Server• Update Server• Web Console• Communication Server
A GravityZone deployment requires running one instance of each role. Consequently,depending on how you prefer to distribute the GravityZone roles, you will deploy one to fourGravityZone appliances. The Database Server role is the first to be installed. In a scenariowith multiple GravityZone appliances, you will install the Database Server role on the firstappliance and configure all other appliances to connect to the existing database instance.
To deploy and set up the GravityZone appliance:
1. Import the GravityZone virtual appliance image in your virtualized environment.
2. Power on the appliance.
3. From your virtualizationmanagement tool, access the console interface of the GravityZoneappliance.
4. Configure the password for the built-in bdadmin system administrator.
5. Press Enter to continue to the configuration interface.
6. Using the configuration interface, set up the appliance as follows:a. Assign the appliance a DNS name.b. Configure the network settings.c. If needed, configure the proxy settings.d. Install GravityZone roles.
The GravityZone appliance has a basic configuration interface. Use the arrow keys andthe Tab key to navigate through menus and options. Press Enter to select a specificoption.
3.2.1. Configure Appliance Hostname (DNS)Communication with the GravityZone roles is performed using the IP address or DNS nameof the appliance they are installed on. By default, the GravityZone components communicateusing IP addresses. If you want to enable communication via DNS names, youmust configureGravityZone appliances with a DNS name and make sure it correctly resolves to theconfigured IP address of the appliance.
To assign the appliance a DNS name:
1. From the main menu, select Configure Appliance Hostname (DNS).
2. Select Configure appliance hostname (DNS).
GravityZone Installation and Setup 12
ENTERPRISE BITDEFENDER GRAVITYZONE
3. Enter the DNS name.
4. Select OK to save the changes.
5. Select Show appliance hostname (DNS) to make sure the DNS name has been correctlyconfigured.
3.2.2. Configure Network SettingsYou can configure the appliance to automatically obtain network settings from the DHCPserver or you can manually configure network settings. If you choose to use DHCP, youmust configure the DHCP Server to reserve a specific IP address for the appliance.
To configure the network settings:
1. From the main menu, select Configure Network Settings.
2. Select the network interface.
3. Select the configuration method:
• Configure network settings manually. You must specify the IP address, networkmask, gateway address and DNS server addresses.
• Obtain network settings automatically via DHCP. Use this option only if you haveconfigured the DHCP Server to reserve a specific IP address for the appliance.
4. You can check current IP configuration details or link status by selecting the correspondingoptions.
3.2.3. Configure Proxy SettingsIf the appliance connects to the Internet through a proxy server, you must configure theproxy settings.
To configure the proxy settings:
1. From the main menu, select Configure Proxy Settings.
2. Select Configure proxy settings.
3. Enter the proxy server address.
4. Select OK to save the changes.
3.2.4. Install GravityZone RolesTo install the GravityZone roles:
1. From the main menu, select Install/Modify Roles.
2. Select Add or remove roles.
3. Press Enter to continue.
GravityZone Installation and Setup 13
ENTERPRISE BITDEFENDER GRAVITYZONE
4. Proceed according to the current situation:
• If this is the initial GravityZone appliance deployment, press the space bar and thenEnter to install the Database Server role. You must confirm your choice by pressingEnter again and then wait for the installation to complete.
• If you have already deployed another appliance with the Database Server role, chooseCancel and return to the main menu. You must then choose Configure DatabaseAddress and enter the address of the database server.
Use the following syntax: http://<IP/Hostname>:<Port>. The default databaseport is 27017.
5. Install the other roles by choosing Add or remove roles from the Install/Modify Rolesmenu and then the roles to install. Press the space bar to select a role and Enter toproceed. You must confirm your choice by pressing Enter again and then wait for theinstallation to complete.
NoteEach role is normally installed within a few minutes. During installation, required files aredownloaded from the Internet. Consequently, the installation takes more time if the Internetconnection is slow. If the installation hangs, redeploy the appliance.
3.3. Control Center Initial SetupAfter deploying and setting up the GravityZone appliance, you must access the ControlCenter web interface and configure your company administrator account.
NoteFor more information on Control Center users, refer to “Types of Users in Control Center”(p. 22).
1. In the address bar of your web browser, enter the IP address or the DNS hostname ofthe Control Center appliance (using the https:// prefix). A configuration wizard willappear.
2. You must first register your GravityZone deployment to a Bitdefender account. Providethe username and password of your Bitdefender account. If you do not have a Bitdefenderaccount yet, click the corresponding link to create one.
Click Next to continue.
3. Provide the license keys required for validating the purchased GravityZone securityservices. Check the trial registration or purchase email to find your license keys. Enter
the license key in the Key field and click the Add button. Wait until the license key isvalidated. You can also view the security service and the expiry date for each licensekey in the corresponding columns.
GravityZone Installation and Setup 14
ENTERPRISE BITDEFENDER GRAVITYZONE
NoteDuring the initial setup, at least one valid license key must be provided to start usingGravityZone. You can afterwards add more license keys or modify the existing ones. Formore information, refer to “Enter License Keys” (p. 15)
Click Next to continue.
4. Specify the required details for your company administrator account: username, emailaddress and a password. Password must contain at least one upper case character, atleast one lower case character and at least one digit or special character.
5. Click Create Account.
The company administrator account will be created and you will automatically log on withthe new account to GravityZone Control Center.
3.4. Enter License KeysThe GravityZone security services are licensed and sold separately. Each GravityZonesecurity service requires a valid license key. At least one valid license key must be providedfor using GravityZone.
Control Center is provided for free with any GravityZone security service.
Check the trial registration or purchase email to find your license keys.
To view existing license information and enter your license keys:
1. Connect and log in to the Control Center web interface using an account with managecompany right.
2. Go to the License page.
3. You can view the existing license keys, status, expiry dates and usage count.
To change the license key for a service, enter it in the Key field and click the Addbutton. The provided license key is added to the list, invalidating at the same time theexisting key.
3.5. Configure Control Center SettingsTo configure the necessary Control Center settings:
1. Connect and log in to the Control Center web interface using a company administratoraccount.
2. Go to the Configuration page.
• Select the Mail Server tab.
To enable Control Center to send emails, select theMail Server Settings check boxand configure the required settings:
GravityZone Installation and Setup 15
ENTERPRISE BITDEFENDER GRAVITYZONE
– Mail server (SMTP). Enter the IP address or hostname of the mail server that isgoing to send the emails.
– Port. Enter the port used to connect to the mail server.
– Encryption type. If the mail server requires an encrypted connection, choose theappropriate type from the menu (SSL/TLS or STARTTLS).
– From email. Enter the email address that you want to appear in the From fieldof the email (sender's email address).
– Use authentication. Select this check box if the mail server requiresauthentication. You must specify a valid username / email address and password.
Click Save to save the changes.
• Select the Proxy Settings tab.
If your company connects to the Internet through a proxy server, select Use ProxySettings and configure the required settings:
– Address - type in the IP address of the proxy server.
– Port - type in the port used to connect to the proxy server.
– Username - type in a user name recognized by the proxy.
– Password - type in the valid password of the previously specified user.
Click Save to save the changes.
• Select the Miscellaneous tab to configure the following general preferences:
– Concurrent deployments. Administrators can remotely deploy securitycomponents by running installation tasks. Use this option to specify the maximumnumber of simultaneous deployments that can be performed at a time.
For example, if the maximum number of concurrent deployments is set to 10 anda remote client installation task is assigned to 100 computers, Control Center willinitially send 10 installation packages through the network. In this case, the clientinstallation is performed simultaneously on a maximum number of 10 computers,all the other sub-tasks being in pending state. As soon as a sub-task is done,another installation package is sent, and so on.
– NTP Server Settings. The NTP server is used to synchronize time between allGravityZone appliances. A default NTP server address is provided, which you canchange in the NTP Server Address field.
NoteFor the GravityZone appliances to communicate with the NTP Server, 123 (UDP)port must be open.
Click Save to save the changes.
GravityZone Installation and Setup 16
ENTERPRISE BITDEFENDER GRAVITYZONE
• Under theActive Directory tab, select Synchronizewith Active Directory to integrateand synchronize Control Center with an Active Directory domain. You must specifythe following:– Synchronization interval (in hours)– Active Directory domain name (including the domain extension)– Username and password of a domain administrator
Click Save to save the changes.
Wait a few seconds until Control Center synchronizes with the Active Directory fromthe specified domain. When done, check the Synchronization Status field for moredetails.
• Under the Virtualization tab, you can configure Control Center integration withvirtualization management tools. Control Center can currently integrate with VMwarevCenter Server and Citrix XenServer.– Integrating with vCenter Server.
You can integrate Control Center with one or multiple vCenter Server systems.
NotevCenter Server systems in Linked Mode must be added separately to ControlCenter.
To set up integration with a vCenter Server:
a. Click the Add button at the right side of the table and choose vCenterServer from the menu. A configuration window will appear.
b. Specify the vCenter Server details.• Name of the vCenter Server system in Control Center• Hostname or IP address of the vCenter Server system• vCenter Server port (default 443)
c. Specify the details of the vShield Manager system integrated with the vCenterServer (if any).• Hostname or IP address of the vShield Manager system• vShield Manager port (default 443)
NoteIf you do not use VMware vShield Endpoint in your environment, leave thecorresponding fields blank.
d. Specify the credentials to be used to authenticate with the vCenter Server.You can choose to use the credentials provided for integration with ActiveDirectory or a different set of credentials. The user whose credentials youprovide must have root level administrator permission on the vCenter Server.
e. Click Save.
GravityZone Installation and Setup 17
ENTERPRISE BITDEFENDER GRAVITYZONE
– Integrating with XenServer.
You can integrate Control Center with one or multiple XenServer systems.
To set up integration with a XenServer:
a. Click the Add button at the right side of the table and choose XenServerfrom the menu. A configuration window will appear.
b. Specify the XenServer details.• Name of the XenServer system in Control Center• Hostname or IP address of the XenServer system• XenServer port (default 443)
c. Specify the credentials to be used to authenticate with the XenServer. You canchoose to use the credentials provided for integration with Active Directory ora different set of credentials.
d. Click Save.
• Select the Certificates tab.
Obtain and upload all necessary security certificates. Except for the Control Centercertificate, all other security certificates are exclusively required for iOS mobile devicemanagement.
– Control Center Security. To avoid browser security warnings, add an SSLcertificate signed by your company or by an external Certificate Authority (CA).
– Communication Server. The Communication Server certificate is used to securecommunication between the Communication Server and iOSmobile devices. ThisSSL certificate can be signed either by your company or by an external CertificateAuthority. The certificate common name must match exactly the domain name orIP address used by mobile clients to connect to the Communication Server. Thisis configured as the external MDM address in the configuration interface of theGravityZone appliance console.
– AppleMDMPush. The Apple MDMPush certificate is required by Apple to ensuresecure communication between the Communication Server and the Apple PushNotifications service (APNs) servers when sending push notifications. Follow thesteps Control Center from the Add Apple MDM Push Certificate page to easilyobtain and import your Apple MDM Push certificate.
– iOSMDM Identity and Profile Signing. The iOSMDM Identity and Profile Signingcertificate is used by the Communication Server to sign identity certificates andconfiguration profiles sent to mobile devices. It must be an Intermediate orEnd-Entity certificate, signed either by your company or by an external CertificateAuthority.
GravityZone Installation and Setup 18
ENTERPRISE BITDEFENDER GRAVITYZONE
– iOS MDM Trust Chain. The iOS MDM Trust Chain must include all intermediatecertificates up to the root certificate of your company or to the intermediatecertificate issued by the external Certificate Authority.
3. Point to Configuration menu and select Update.
• Under the Product Update tab, download or update all necessary installationpackages.
• Under the Update Server tab, you can configure the Bitdefender update settings.Update settings apply to all GravityZone products and components and for bothproduct and signature updates.
• Go to the Infrastructure tab for a quick overview of the installed GravityZoneappliances and the roles they are running.
3.6. Add Control Center UsersYou can create the first GravityZone user account during the initial Control Center setup,after deploying the GravityZone appliance. The initial Control Center user account hascompany administrator role, with full rights over Control Center configuration and networkmanagement. From this account you can create all the other user accounts required for themanagement of your company's network.
User accounts are managed from the Accounts page in Control Center.
NoteAll users with Manage Users right have access to the Accounts page.
To add a Control Center user:
1. Connect and log in to the Control Center web interface using the company administratoraccount.
2. Go to the Accounts page.
3. Click the Add button at the right side of the table. A configuration page is displayed.
4. Under the Details section, specify the user details. You can either create a custom useror add a user from Active Directory (provided Active Directory integration is configured).Choose the desired option from the Type menu.
• When creating a custom user, you must specify a username and the user's full nameand email address. You must also set the user password. Password must contain atleast one upper case character, at least one lower case character and at least onedigit or special character.
• When adding a user from Active Directory, user details are imported from ActiveDirectory and synchronized regularly according to the settings made inConfiguration
GravityZone Installation and Setup 19
ENTERPRISE BITDEFENDER GRAVITYZONE
> Active Directory page. The user will log in to Control Center using the ActiveDirectory user password.
NoteClick the Force Resync button to can manually synchronize with Active Directoryand update Control Center with any new changes.
NoteIf the mail server settings are configured, Control Center automatically sends the useran email with the login details.
5. Under the Settings and Privileges section, configure the following:
• Timezone. Choose from the menu the timezone of the account. The console willdisplay time information according to the selected timezone.
• Language. Choose from the menu the console display language.
• Role. Select one role defining the user's rights:
Company AdministratorCompany Administrator accounts offer full access to Control Center configurationand management features of the GravityZone security services.
AdministratorAdministrator accounts offer access to GravityZone security servicesmanagement, monitoring and reporting features (install the security services,create user accounts, create reports, edit the dashboard). Administrators cannotview or change the Control Center configuration settings.
ReporterReporter accounts offer access only to the monitoring and reporting features.Reporters cannot view or change the network or security configuration.
CustomReporter accounts offer access only to the monitoring and reporting features.
• Target. In the table, select the services and groups the user will have access to. Youcan restrict access to a specific GravityZone security service or to specific areas ofthe network.
ImportantWhenever you set up a new integration with another vCenter Server or XenServersystem, remember to also review and update access privileges for existing users.
• Rights. Each predefined user role has a certain configuration of rights. However, foreach user role, you can change the user rights according to your needs. In this case,the user role changes to Custom.
GravityZone Installation and Setup 20
ENTERPRISE BITDEFENDER GRAVITYZONE
• Click Next.
• Select the network groups the user will have access to for each available securityservice. You can restrict the user access to a certain GravityZone security service orto specific areas of the network.
Click Next to configure the user access for each available security service.
ImportantWhenever you make changes to your network structure, or when setting up a newintegration with another vCenter Server or XenServer system, remember to alsoreview and update access privileges for existing users.
6. Click Save to add the user.
You must define at least one global administrator with privileges over the entire GravityZonedeployment (all services and all groups). Once you have created the global administrator,log out and log in using this user to perform the network security management tasks.
GravityZone Installation and Setup 21
ENTERPRISE BITDEFENDER GRAVITYZONE
4. Getting StartedBitdefender GravityZone solutions can be configured and managed via a centralizedmanagement platform named Control Center. Control Center has a web-based interface,which you can access by means of username and password.
4.1. Types of Users in Control CenterControl Center includes several predefined user account roles. Each predefined role grantsthe user with specific rights over Control Center.
The privileges of each user account can be restricted to a certain GravityZone securityservice or to specific areas of the network.
Company AdministratorUsers with company administrator role have full privileges over the Control Centersettings and network security settings, including:• Integration with Active Directory• Integration with virtualization management tools (vCenter Server, XenServer)• Mail server settings• Update settings for GravityZone components and installation packages• Security certificates management• License key management• User management• Network Security Management (client installation, policies, tasks, quarantine)• Reports management
AdministratorAdministrator accounts offer full access to all GravityZone security services managementfeatures, including user management. Administrators cannot view or change the ControlCenter settings.
ReporterReporter users offer access only to the monitoring and reporting features. Reporterscannot view or change the network or security configuration.
4.2. Connecting to GravityZone Control CenterPrerequisites:
• Internet Explorer 9+, Mozilla Firefox 14+, Google Chrome 15+, Safari 5+• Recommended screen resolution: 1024x768 or higher
Getting Started 22
ENTERPRISE BITDEFENDER GRAVITYZONE
• The computer you connect from must have network connectivity to the Control Centerappliance.
To connect to GravityZone Control Center:
1. In the address bar of your web browser, enter the IP address or the DNS hostname ofthe Control Center appliance (using the https:// prefix).
2. Enter your user name and password.
3. Click Login.
NoteIf you have forgotten your password, use the password recovery link to receive a newpassword. You must provide the email address of your account.
4.3. Control Center at a GlanceControl Center is organized so as to allow easy access to all the features. Use the menu barin the upper area to navigate through the console. Available features depend on the type ofuser accessing the console.
4.3.1. GravityZone Console OverviewUsers with company administrator role have full privileges over the Control Centerconfiguration and network security settings, while users with administrator role have accessto network security features, including users management. According to their role,GravityZone administrators can access the following sections from the menu bar:
DashboardView easy-to-read charts providing key security information concerning your network.
NetworkInstall protection, apply policies to manage security settings, run tasks remotely andcreate quick reports.
PoliciesCreate and manage security policies.
ReportsGet security reports concerning the managed clients.
QuarantineRemotely manage quarantined files.
AccountsManage the access to Control Center for other company employees.
Getting Started 23
ENTERPRISE BITDEFENDER GRAVITYZONE
NoteThis menu is available only to users with Manage Users right.
LogsCheck the user activity log.
ConfigurationConfigure Control Center settings, such as mail server, integration with Active Directoryor virtualization environments and security certificates.
NoteThis menu is available only to users with Manage Solution right.
Additionally, at the right side of the menu bar, the Notifications icon provides easy accessto notification messages and also to the Notifications page.
By pointing to the username in the upper-right corner of the console, the following optionsare available:
• My Account. Click this option to manage your user account details and preferences.
• Credentials Manager. Click this option to add andmanage the authentication credentialsrequired for remote installation tasks.
• Logout. Click this option to log out of your account.
On the lower-right corner of the console, the following links are available:
• Help and Support. Click this button to find help and support information.
• Help Mode. Click this button to enable a help feature providing expandable tooltipsboxes placed on Control Center items. You will easily find out useful information regardingthe Control Center features.
• Feedback. Click this button to display a form allowing you to edit and send your feedbackmessages regarding your experience with GravityZone.
4.3.2. Table DataTables are frequently used throughout the console to organize data into an easy-to-useformat. There are several ways of working with table data:
• Navigate through table pages• Search for specific entries• Sort data• Refresh table data
Getting Started 24
ENTERPRISE BITDEFENDER GRAVITYZONE
Navigating through Pages
Tables with more than 10 entries span on several pages. By default, only 10 entries aredisplayed per page. To move through the pages, use the navigation buttons at the bottomof the table. You can change the number of entries displayed on a page by selecting adifferent option from the menu next to the navigation buttons.
Searching for Specific Entries
To easily find specific entries, use the search boxes available below the column headers.
Enter the search term in the corresponding field. Matching items are displayed in the tableas you type. To reset the table contents, clear the search fields.
Sorting Data
To sort data by a specific column, click the column header. Click the column header againto revert the sorting order.
Refreshing Table Data
To make sure the console displays the latest information, click the Refresh button in thebottom-left corner of the table.
4.3.3. Action ToolbarsIn Control Center, action toolbars allow you to perform specific operations pertaining to thesection you are in. Each toolbar consists of a set of icons that is usually placed to the rightside of the table. For example, the action toolbar in theReports section allows you to performthe following actions:
• Create a new report.
• Download reports generated by a scheduled report.
• Delete a scheduled report.
4.3.4. Contextual MenuThe action toolbar commands are also accessible from the contextual menu. Right-click theControl Center section you are currently using and select the command that you need fromthe available list.
Getting Started 25
ENTERPRISE BITDEFENDER GRAVITYZONE
4.3.5. Service SelectorAs administrator or reporter, you can manage the Control Center services one at a time.Select the service you want to work with from the services menu in the upper-right cornerof the page.
NoteThe services menu is available only in the pages where it makes sense to filter data by servicetype.
The services menu contains the following options:
• Computers (Security for Endpoints)
• Virtual Machines (Security for Virtualized Environments)
• Mobile Devices (Security for Mobile Devices)
NoteYou will see only the services you have permissions to view, permissions granted to you bythe administrator who added your user to Control Center.
4.4. Applying Security PoliciesOnce installed, the Bitdefender protection can be configured and managed from ControlCenter using security policies. A policy specifies the security settings to be applied on targetnetwork inventory objects (computers, virtual machines or mobile devices).
Immediately after installation, clients are assigned a default policy, which is preconfiguredwith the recommended protection settings. You can change protection settings as needed,and also configure additional protection features, by creating and assigning customizedpolicies.
4.4.1. Creating and Configuring PoliciesEach GravityZone security service has a unique policy template containing the securitysettings for the specific type of protected network objects. You must create at least onecustomized policy for each type of network objects.
To create and configure a new policy:
1. Go to the Policies page.
2. From the menu in the upper-right corner of the page, choose the type of network objects(computers, virtual machines or mobile devices).
3. Click the Add button at the right side of the table.
Getting Started 26
ENTERPRISE BITDEFENDER GRAVITYZONE
4. Enter a suggestive name for the policy. When choosing a name, consider the purposeand target of the policy.
5. Next, configure the policy settings. Default security settings are recommended for mostsituations.
6. Click Save. The new policy is listed in the Policies table.
Once you have created all the necessary policies, you can start assigning them to networkobjects.
4.4.2. Assigning and Applying PoliciesBy default, all managed clients inherit the policy from their parent. You can change thedefault policy at the top-level group or configure different policies for specific groups bychanging the inheritance options.
To assign and apply a policy:
1. Go to the Network page.
2. From the menu in the upper-right corner of the page, choose the type of network objects(computers, virtual machines or mobile devices).
3. Browse for and select the specific network objects or groups you want to assign thepolicy to. You can only select objects from the same parent group.
4. Click the Policy button at the right side of the table. The Policy Assignment windowis displayed. Under the Status tab, you can check the current policy assignments forselected items.
NoteThe Policy button is unavailable if you have directly selected an unmanaged networkobject (not applicable to groups).
5. Go to the Options tab to change the current policy assignments.
6. Select the desired Inheritance option to configure policy assignment:
• Use current policy. Select this option if you want selected items to continue usingtheir current policy.
• Inherit from above. Select this option if you want to apply to each selected item thecurrent policy of its parent.
• Don't inherit and assign the following policy template. Select this option if youwant to apply a specific policy to selected items. In this case, you can select to forceinheritance of the selected policy on the subgroups of the selected items.
7. Click Ok to save changes and apply new protection settings on the target clients.
Getting Started 27
ENTERPRISE BITDEFENDER GRAVITYZONE
Policies are pushed to target clients immediately after changing the policy assignments orafter modifying the policy settings. Settings should be applied on clients in less than a minute(provided they are online). If a client is not online, settings will be applied as soon as it getsback online.
4.5. Using TasksControl Center offers a number of administrative tasks that you can run remotely on networkobjects (computers, virtual machines or mobile devices). Tasks are related to the GravityZonesecurity services and differ based on the type of network object.
For example, you can run a remote scan on managed clients. The scan task is available forall types of network objects.
To create and run a remote scan task:
1. Go to the Network page.
2. From the menu in the upper-right corner of the page, choose the type of network objects(computers, virtual machines or mobile devices).
3. Browse for and select the specific network objects or groups on which to run the task.You can only select objects from the same parent group.
4. Click the Tasks button at the right side of the table and choose Scan from the menu.The Scan Task window is displayed.
5. Configure scan settings as needed.
6. Click Save. The task will start running immediately on online clients. If a client is offline,the task will run as soon as it gets back online.
You can view and manage the task on the Network > Tasks page.
• To check execution progress on target clients, click the link in the Progress column.
• Once the task is done, you can click the icon in the Report column to view a detailedtask report.
4.6. Monitoring and ReportingControl Center includes powerful monitoring and reporting features. The main GravityZonemonitoring tool is the Control Center dashboard.
• Dashboard• Reports
Getting Started 28
ENTERPRISE BITDEFENDER GRAVITYZONE
4.6.1. Using the DashboardThe Control Center dashboard is a customizable visual display providing a quick securityoverview of all protected network objects (computers, virtual machines or mobile devices).
The dashboard consists of portlets. Dashboard portlets display various security informationusing easy-to-read charts, thus allowing you to quickly identify any issues that might requireyour attention. Each dashboard portlet includes a detailed report in the background,accessible with just one click on the chart.
Control Center comes with 12 predefined dashboard portlets, four for each GravityZonesecurity service. Dashboard portlets are displayed in groups of four, a slider at the bottomof the page allowing navigation between groups.
The dashboard is easy to configure based on individual preferences. You can edit portletsettings, add additional portlets, remove or rearrange existing portlets.
Editing Portlet Settings
Some portlets offer status information, while other report on security events in the last period.
You can check and configure the reporting period of a portlet by clicking the Edit Portleticon on its title bar.
Creating Custom Portlets
You can create additional portlets to obtain the information you need. The maximum numberof portlets is 36.
To create a custom portlet:
1. Go to the Dashboard page.
2. Click the Add Portlet button at the right side of the dashboard. The portletconfiguration window is displayed.
3. Under the Details tab, configure the portlet details:• Type of network objects• Type of background report• Suggestive portlet name• Update interval
4. Under the Targets tab, select the network objects and groups to include.
5. Click Save.
Getting Started 29
ENTERPRISE BITDEFENDER GRAVITYZONE
Removing a Portlet
You can easily remove any portlet by clicking the Remove icon on its title bar. Once youremove a portlet, you can no longer recover it. However, you can create another portlet withthe exact same settings.
Rearranging Dashboard Portlets
You can rearrange dashboard portlets to better suit your needs.
To rearrange portlets:
1. Go to the Dashboard page.
2. Click the Rearrange Portlets button at the right side of the dashboard. The portletmap window is displayed.
3. Drag and drop each portlet to the desired position.
4. Click Save.
4.6.2. Working with ReportsControl Center allows you to create and view centralized reports on the security status ofthe managed clients. The reports can be used for multiple purposes, such as:
• Monitoring and ensuring compliance with the organization's security policies.
• Checking and assessing the network security status.
• Identifying network security issues, threats and vulnerabilities.
• Monitoring security incidents and malware activity.
• Providing upper management with easy-to-interpret data on network security.
Several different report types are available for each GravityZone security service so that youcan easily get the information you need. The information is presented as easy-to-read piecharts, tables and graphics, allowing you to quickly check the network security status andidentify security issues.
Creating a Report
To create a scheduled report or to view an instant report:
1. Go to the Reports page.
2. From the menu in the upper-right corner of the page, choose the type of network objects(computers, virtual machines or mobile devices).
3. Click the Add button at the right side of the table. The report configuration page isdisplayed.
Getting Started 30
ENTERPRISE BITDEFENDER GRAVITYZONE
4. Select the desired report type from the menu.
5. Enter a suggestive name for the report. When choosing a name, consider the report typeand target, and possibly the report options.
6. Configure the report target. Click Change target and choose the network objects orgroups to be included in the report.
7. Configure report recurrence (schedule). You can choose to create the report immediately,daily, weekly (on a specific day of the week) or monthly (on a specific day of the month).
NoteScheduled reports are generated on the due date immediately after 00.00 UTC (defaulttimezone of the GravityZone appliance).
8. Configure the report options.a. For most report types, when you create an immediate report, you must specify the
reporting period. The report will only include data from the selected time period.b. Several report types provide filtering options to help you easily find the information
you are interested in. Use the filtering options to obtain only the desired information.For example, for an Update Status report you can choose to view only the list ofclients that have updated (or, on the contrary, that have not updated) in the selectedtime period.
c. To send the report by email, select the corresponding option. You must specify theemail addresses of the intended recipients.
9. Click Generate/Save to create an instant/scheduled report.
• If you have chosen to create an instant report, it will be displayed on a separate page.The time required for reports to be created may vary depending on the number ofmanaged clients. Please wait for the requested report to be created. You can downloador email the report if you want to keep a copy.
• If you have chosen to create a scheduled report, it will be displayed on the Reportspage. You can edit or delete the scheduled report at any time.
Getting Started 31
ENTERPRISE BITDEFENDER GRAVITYZONE

5. Install Security ServicesTo protect your network with Bitdefender, you must install the GravityZone security services.To install the GravityZone security services, you need a Control Center user with administratorprivileges over all services and over the entire network. You also need administrator accessto the network objects (computers, virtual machines, mobile devices).
The following table shows the type of network objects each service is designed to protect:
Network ObjectsService
Computers (workstations, laptops and servers) runningon Microsoft Windows
Security for Endpoints
Virtual machines running on Microsoft Windows orLinux, under any virtualization platform
Security for VirtualizedEnvironments
iPhone, iPad and Android devicesSecurity for Mobile Devices
5.1. Installing Security for EndpointsSecurity for Endpoints is intended for workstations, laptops and servers running onMicrosoft®Windows. To protect your physical computers with Security for Endpoints, you must installEndpoint Security (the client software) on each of them. Endpoint Security manages protectionon the local computer. It also communicates with Control Center to receive the administrator'scommands and to send the results of its actions.
You can install Endpoint Security on computers by running installation packages locally orby running installation tasks remotely from Control Center.
It is very important to carefully read and follow the instructions to prepare for installation.
5.1.1. Preparing for InstallationBefore you start:
1. Make sure the computers meet the minimum system requirements. For some computers,you may need to install the latest operating system service pack available or free up diskspace. Compile a list of computers that do not meet the necessary requirements so thatyou can exclude them from management.
2. Uninstall (not just disable) any existing antimalware, firewall or Internet security softwarefrom computers. Running Endpoint Security simultaneously with other security softwareon a computer may affect their operation and cause major problems with the system.
Install Security Services 32
ENTERPRISE BITDEFENDER GRAVITYZONE
Many of the security programs Endpoint Security is incompatible with are automaticallydetected and removed at installation time. The mechanism is the same as the one usedin Cloud Security for Endpoints by Bitdefender. To learn more and to check the list ofdetected security software, refer to this KB article.
ImportantNo need to worry aboutWindows security features (Windows Defender, Windows Firewall),as they will be turned off automatically before installation is initiated.
3. The installation requires administrative privileges. Make sure you have the necessarycredentials at hand for all computers.
4. Computers must have network connectivity to the Control Center appliance.
Network Discovery Requirements
Besides integration with Active Directory, Security for Endpoints also includes an automaticnetwork discovery mechanism intended to detect workgroup computers.
Security for Endpoints relies on the Microsoft Computer Browser service to performnetwork discovery. The Computer Browser service is a networking technology used byWindows-based computers to maintain updated lists of domains, workgroups, and thecomputers within them and to supply these lists to client computers upon request. Computersdetected in the network by the Computer Browser service can be viewed by running the netview command in a command prompt window.
To enable network discovery, you must have Endpoint Security already installed on at leastone computer in the network. This computer will be used to scan the network.
In order to successfully discover all the computers (servers and workstations) that will bemanaged from Control Center, the following are required:
• Computers must be joined in a workgroup or domain and connected via an IPv4 localnetwork. Computer Browser service does not work over IPv6 networks.
• Several computers in each LAN group (workgroup or domain) must be running theComputer Browser service. Primary Domain Controllers must also run the service.
• NetBIOS over TCP/IP (NetBT) must be enabled on computers. Local firewall must allowNetBT traffic.
• File sharing must be enabled on computers. Local firewall must allow file sharing.
• A Windows Internet Name Service (WINS) infrastructure must be set up and workingproperly.
• For Windows Vista and later, network discovery must be turned on (Control Panel >Network and Sharing Center > Change Advanced Sharing Settings).
To be able to turn on this feature, the following services must first be started:– DNS Client
Install Security Services 33
ENTERPRISE BITDEFENDER GRAVITYZONE
– Function Discovery Resource Publication– SSDP Discovery– UPnP Device Host
• In environments with multiple domains, it is recommended to set up trust relationshipsbetween domains so that computers can access browse lists from other domains.
Computers from which Endpoint Security queries the Computer Browser service must beable to resolve NetBIOS names.
NoteThe network discovery mechanism works for all supported operating systems, includingWindows Embedded versions, provided the requirements are met.
Remote Installation Requirements
For remote installation to work:
• Each target computer must have the admin$ administrative share enabled. Configureeach Windows XP workstation that is part of a workgroup, or of a different domain thanthe Control Center appliance, NOT to use simple file sharing.
• Temporarily turn off User Account Control on all computers running Windows operatingsystems that include this security feature (Windows Vista, Windows 7, Windows Server2008 etc.). If the computers are in a domain, you can use a group policy to turn off UserAccount Control remotely.
• Disable or shutdown firewall protection on computers. If the computers are in a domain,you can use a group policy to turn off Windows Firewall remotely.
5.1.2. Using Installation PackagesOne way to install Endpoint Security on a computer is to locally run an installation package.
You can create and manage installation packages according to your needs in the Network> Packages page.
You can download installation packages both as a downloader application and full installationkits for 32bit and 64bit operating systems.
NoteThe downloader first downloads the full installation kit from the Control Center applianceand then starts the installation. It is small in size and it can be run both on 32-bit and 64-bitsystems (which makes it easy to distribute).The full installation kits are bigger in size and they have to be run on the correspondingoperating system type.
Install Security Services 34
ENTERPRISE BITDEFENDER GRAVITYZONE
Creating Endpoint Security Installation Packages
When you create an installation package, you can configure its settings according to yourneeds (for example: endpoint role, protection modules to be installed or uninstall password).
To create a Endpoint Security installation package:
1. Connect and log in to Control Center using your administrator account.
2. Go to the Network > Packages page.
3. Click the Add button at the right side of the table and choose Endpoint Security fromthe menu. A configuration window will appear.
4. Enter a suggestive name and description for the installation package you want to create.
5. Select the target computer role:
• Endpoint. Select this option if you want the client to communicate directly with theGravityZone appliance.
• Endpoint Security Relay. Endpoint Security Relay is a special role which installs anupdate server on the target machine along with Endpoint Security, that can be usedto update all the other clients in the network, lowering the bandwidth usage betweenthe client machines and the GravityZone appliance. If you install an Endpoint SecurityRelay in your network, all the managed computers will communicate with theGravityZone appliance through the endpoint with Endpoint Security Relay role.
6. Select the protection modules you want to install.
7. From the Language field, select the desired language for the client's interface.
8. Select Scan before install if you want to make sure the computers are clean beforeinstalling the Endpoint Security on them. An on-the cloud quick scan will be performedon the corresponding computers before starting the installation.
9. Endpoint Security is installed in the default installation directory on the selectedcomputers. Select Use custom installation path if you want to install the EndpointSecurity in a different location. In this case, enter the desired path in the correspondingfield. Use Windows conventions when entering the path (for example, D:\folder). Ifthe specified folder does not exist, it will be created during the installation.
10. During the silent installation, the computer is scanned for malware. Sometimes, a systemrestart may be needed to complete malware removal.
Select Automatically reboot (if needed) to make sure detected malware is completelyremoved before installation. Otherwise, installation may fail.
11. If you want to, you can set a password to prevent users from removing protection. SelectSet uninstall password and enter the desired password in the corresponding fields.
12. Click Next.
Install Security Services 35
ENTERPRISE BITDEFENDER GRAVITYZONE
13. Depending on the installation package role (Endpoint or Endpoint Security Relay), choosethe entity to which the target computers will periodically connect to update the client:
• GravityZone Appliance, available for both roles. You can also configure theCommunication Server and local update addresses in the following fields, if required.
To change the local update address, use one of these syntaxes:– update_server_ip:port– update_server_name:port
NoteThe update address configured here is used temporarily after installation. As soonas a policy is applied to the client, the update location is changed according to policysettings. To make sure the client continues to update from the same update address,configure it accordingly in the policy settings.
• Endpoint Security Relay, available for installation packages with Endpoint role. Inthis case, all endpoints with Endpoint Security Relay role detected in your networkwill be available in the table displayed below. Select the Endpoint Security Relay thatyou want to use for client updates.
14. Click Save.
You can find the new installation package in the list of packages.
Downloading Installation Packages
To download Endpoint Security installation packages:
1. Connect and log in to Control Center using your administrator account.
2. Go to the Network > Packages page.
3. Select the Endpoint Security installation package that you want to download.
4. Click the Download button at the right side of the table and select the type of installeryou want to use (downloader application or full installation kit).
5. Save the file to your computer.
Running Installation Packages
For installation to work, the installation package must be run using administrator privilegesor under an administrator account.
1. Download or copy the installation file to the target computer or to a network shareaccessible from that computer.
2. Run the installation package.
3. Follow the on-screen instructions.
Install Security Services 36
ENTERPRISE BITDEFENDER GRAVITYZONE
Once Endpoint Security has been installed, the computer will show up as managed in ControlCenter (Network page) within a few minutes.
5.1.3. Using Remote Installation TasksControl Center allows you to remotely install Endpoint Security on Active Directory computersand on other computers detected in the network by using installation tasks.
Security for Endpoints includes an automatic network discovery mechanism that allowsdetecting computers that are not in Active Directory. To enable network discovery, you musthave Endpoint Security already installed on at least one computer in the network. Thiscomputer will be used to scan the network. Detected computers are displayed as unmanagedcomputers in the Network page, Computers section, under Custom Groups. ControlCenter automatically removes Active Directory computers from the detected computers list.
NoteFor network discovery and remote installation to work, a number of requirements must bemet. To learn more, refer to “Preparing for Installation” (p. 32).Once Endpoint Security is installed on a computer, it may take a few minutes for the rest ofthe network computers to become visible in the Control Center.
To run a remote installation task:
1. Go to the Network page.
2. Choose Computers from the service selector.
3. Select the desired group from the left-side pane. All computers from the selected groupare displayed in the right-side pane table.
4. Apply filters to display unmanaged computers only. Click the Filters button and selectthe following options:Unmanaged from the Security category and All items recursivelyfrom the Depth category.
5. Select the computers on which you want to install protection.
6. Click the Tasks button at the right-side of the table and choose Install client. TheInstall Client wizard is displayed.
7. Configure the installation options:
• Select the role you want the client to have:
– Endpoint. Select this option if you want the client to communicate directly withthe GravityZone appliance.
– Endpoint Security Relay. Endpoint Security Relay is a special role which installsan update server on the target machine along with Endpoint Security, that can beused to update all the other clients in the network, lowering the bandwidth usagebetween the client machines and the GravityZone appliance. If you install an
Install Security Services 37
ENTERPRISE BITDEFENDER GRAVITYZONE
Endpoint Security Relay in your network, all the managed computers willcommunicate with the GravityZone appliance through the endpoint with EndpointSecurity Relay role.
• Select the protection modules you want to install. Please note that only antimalwareprotection is available for server operating systems.
• From the Language field, select the desired language for the client's interface.
• Select Scan before install if you want to make sure the computers are clean beforeinstalling the Endpoint Security on them. An on-the cloud quick scan will be performedon the corresponding computers before starting the installation.
• Endpoint Security is installed in the default installation directory on the selectedcomputers. Select Use custom installation path if you want to install the EndpointSecurity in a different location. In this case, enter the desired path in the correspondingfield. Use Windows conventions when entering the path (for example, D:\folder).If the specified folder does not exist, it will be created during the installation.
• During the silent installation, the computer is scanned for malware. Sometimes, asystem restart may be needed to complete malware removal.
SelectAutomatically reboot (if needed) to make sure detectedmalware is completelyremoved before installation. Otherwise, installation may fail.
• If you want to, you can set a password to prevent users from removing protection.Select Set uninstall password and enter the desired password in the correspondingfields.
• If you want to send the client installation task to computers outside Active Directory,click Additional Targets section and enter the corresponding IPs in theHostname/IPfield. Press Enter after each input. You can add as many IPs as you need.
• Click Next.
• Depending on the client role (Endpoint or Endpoint Security Relay), choose the entitythrough which the clients will communicate:
– GravityZone Appliance, available for both roles. You can also configure theCommunication Server and local update addresses in the following fields, ifrequired.
To change the local update address, use one of these syntaxes:• update_server_ip:port• update_server_name:port
NoteThe update address configured here is used temporarily after installation. Assoon as a policy is applied to the client, the update location is changed accordingto policy settings. To make sure the client continues to update from the sameupdate address, configure it accordingly in the policy settings.
Install Security Services 38
ENTERPRISE BITDEFENDER GRAVITYZONE

– Endpoint Security Relay, available for clients with Endpoint role. In this case, allendpoints with Endpoint Security Relay role detected in your network will beavailable in the table displayed below. Select the Endpoint Security Relay that youwant to use for client updates.
8. Click Next.
9. Under the Credentials Manager section, specify the administrative credentials requiredfor remote authentication on selected endpoints.
You can add the required credentials by entering the user and password of the targetoperating system
NoteA warning message is displayed as long as you have not selected yet an account. Thisstep is mandatory to remotely install the Endpoint Security on computers.
If you have not already defined the credentials in the Credentials manager, add therequired administrator accounts as follows:
a. Enter the user name and password of an administrator account for each targetoperating system in the corresponding fields. Optionally, you can add a descriptionthat will help you identify each account more easily. If computers are in a domain, itsuffices to enter the credentials of the domain administrator. UseWindows conventionswhen entering the name of a domain user account (for example, domain\user [email protected]).
NoteSpecified credentials are automatically saved to your Credentials Manager so thatyou do not have to enter them the next time.
b. Click the Add button. The new account is created.
c. Select the check box corresponding to the account you want to use.
10. Click Save. A confirmation message will appear.
You can view and manage the task on the Network > Tasks page.
5.2. Installing Security for Virtualized EnvironmentsSecurity for Virtualized Environments helps you protect Windows and Linux virtual machines,running under any virtualization platform, using technologies designed specifically forvirtualized environments. For comprehensive information on supported infrastructures andrequirements, refer to “Security for Virtualized Environments Requirements” (p. 5).
Before you start, you must provide the credentials to connect to the existing vCenter Serverinfrastructure.
Install Security Services 39
ENTERPRISE BITDEFENDER GRAVITYZONE
To install Security for Virtualized Environments:
1. Install Security Server on hosts.
2. Install Bitdefender Tools on virtual machines.
5.2.1. Connect to vCenter ServerIn order to have access to the virtualized infrastructure integrated with Control Center, youmust provide your user credentials for each vCenter Server system available. Control Centeruses your credentials to connect to the virtualized infrastructure, displaying only resourcesyou have access to (as defined in vCenter Server).
To specify the credentials to connect to the vCenter Server systems:
1. Point to your username in the upper-right corner of the page and choose CredentialsManager.
2. Go to the Virtual Environment tab.
3. Specify the necessary authentication credentials.
a. Select a server from the corresponding menu.
NoteIf the menu is unavailable, either no integration has been configured yet or allnecessary credentials have already been configured.
b. Enter your username and password and a suggestive description.
c. Click the Add button. The new set of credentials is displayed in the table.
NoteIf you have not specified your authentication credentials, you will be required to enter themwhen you try to browse the inventory of any vCenter Server system. Once you enter yourcredentials, they are saved to your Credentials Manager so that you do not need to enterthem the next time.
5.2.2. Install Security Server on HostsSecurity Server is a dedicated virtual machine that deduplicates and centralizes most of theantimalware functionality of antimalware clients, acting as a scan server.
You must install Security Server on hosts as follows:
• In VMware environments with vShield Endpoint, you must install the purpose-builtappliance on each host to be protected. All virtual machines on a host are automaticallyconnected via vShield Endpoint to the Security Server instance installed on that host.
Install Security Services 40
ENTERPRISE BITDEFENDER GRAVITYZONE
• In all other environments, you must install Security Server on one or more hosts so asto accommodate the number of virtual machines to be protected. You must considerthe number of protected virtual machines, resources available for Security Server onhosts, as well as network connectivity between Security Server and protected virtualmachines. The Bitdefender Tools installed on virtual machines connects to SecurityServer over TCP/IP, using details configured at installation or via a policy.
If Control Center is integrated with vCenter Server and XenServer, you can automaticallydeploy Security Server on hosts from Control Center. You can also download Security Serverpackages for standalone installation from Control Center.
NoteFor VMware environments with vShield Endpoint, you can deploy Security Server on hostsexclusively via installation tasks.
Using Remote Installation Tasks
Control Center allows you to remotely install Security Server on visible hosts by usinginstallation tasks.
To install Security Server remotely on one or several hosts:
1. Go to the Network page.
2. From the menu in the upper-right corner of the page, select Virtual Machines.
3. Browse the VMware or Citrix inventory and select the check boxes corresponding to thedesired hosts or containers (vCenter Server, XenServer or datacenter). For a fast selection,you can directly select the root container (VMware Inventory or Citrix Inventory). You willbe able to select hosts individually from the installation wizard.
NoteYou cannot select hosts from different folders.
4. Click the Tasks button at the right side of the table and choose Install Security Serverfrom the menu. The Security Server Installation window is displayed.
5. Select the hosts on which you want to install the Security Server instances.
6. Choose the configuration settings you want to use.
ImportantUsing common settings while deployingmultiple Security Server instances simultaneouslyrequires the hosts to share the same storage, have their IP addresses assigned by aDHCP server and be part of the same network.
7. Click Next.
Install Security Services 41
ENTERPRISE BITDEFENDER GRAVITYZONE
8. Provide the corresponding VMware vShield credentials for each vCenter machine.
9. Select the container in which you want to include the Security Server from the DeployContainer menu.
10. Select the destination storage.
11. Choose the disk provisioning type. It is recommended to deploy the appliance usingthick disk provisioning.
ImportantIf you use thin disk provisioning and the disk space in the datastore runs out, the SecurityServer will freeze and, consequently, the host will remain unprotected.
12. Configure the memory and CPU resource allocation based on the VM consolidation ratioon the host. Choose Low,Medium orHigh to load the recommended resource allocationsettings or Manual to configure resource allocation manually.
13. Set the timezone of the appliance.
14. Optionally, you can choose to set an administrative password for the Security Serverconsole. Setting an administrative password overrides the default root password ("sve").
15. Select the network configuration type for the Bitdefender network. The IP address of theSecurity Server must not change in time, as it is used by Linux agents for communication.
If you choose DHCP, make sure to configure the DHCP server to reserve an IP addressfor the appliance.
If you choose static, you must enter the IP address, subnet mask, gateway and DNSinformation.
16. Select the vShield network and enter the vShield credentials. Default label for the vShieldnetwork is vmservice-vshield-pg.
17. Click Save.
You can view and manage the task on the Network > Tasks page.
Using Installation Packages
In all virtualized environments that are not integrated with Control Center, you must installSecurity Server on hosts manually, using an installation package. The Security Server packageis available for download from Control Center in several different formats, compatible withthe main virtualization platforms.
Downloading Installation Packages
To download Security Server installation packages:
1. Go to the Network > Packages page.
Install Security Services 42
ENTERPRISE BITDEFENDER GRAVITYZONE
2. Select the Security Server package.
3. Click the Download button at the right side of the table and choose the package typefrom the menu.
4. Save the selected package to the desired location.
Deploying Installation Packages
Once you have the installation package, deploy it to the host using your preferred virtualmachine deployment tool.
After deployment, set up the Security Server as follows:
1. Access the appliance console from your virtualization management tool (for example,vSphere Client). Alternatively, you can connect to the appliance via SSH.
2. Log in using the default credentials.• User name: root• Password: sve
3. Run the sva-setup command.
4. Configure the appliance with DHCP/static network settings.
If you have created an IP reservation for the appliance on the DHCP server, skip thisconfiguration by pressing Enter. If you configure with static network settings follow thesesteps:
a. Type Y and press Enter to continue.
b. Enter the network settings: IP address, network mask, gateway, DNS servers.
c. Type Y and press Enter to save the changes.
5. Configure the Security Console IP: enter the GravityZone Control Center IP address.
6. Configure the Communication Server IP address. Since the communication server roleruns on Control Center virtual machine, you must enter the following:
• The IP address or hostname Control Center virtual machine.
• Port number 8443, using the following format: https://GravityZone-IP:8443.
7. Configure Update Server address. Since the local update server runs on the ControlCenter machine, you must enter the IP address or hostname of that machine.
8. Configure the Update Server port: 7074.
NoteIf you are connected to the appliance via a SSH client, changing the network settings willimmediately terminate your session.
Install Security Services 43
ENTERPRISE BITDEFENDER GRAVITYZONE
5.2.3. Install Bitdefender Tools on Virtual MachinesBitdefender Tools is the component to be installed on the virtual machines you want toprotect.
In VMware vSphere environments, Security for Virtualized Environments can integrate withVMware vShield Endpoint to provide agentless protection for Windows virtual machines. Allvirtual machines on a host are automatically connected via vShield Endpoint to the SecurityServer instance installed on that host. Optionally, you can deploy the Bitdefender Tools onWindows virtual machines to take advantage of the additional functionality it provides.
• Allows you to run Memory and Process Scan tasks on the machine.• Informs the user about the detected infections and actions taken on them.
Preparing for Installation
Before you start:
1. Make sure the virtual machines run a supported guest operating system. For some virtualmachines, you may need to install the latest operating system service pack available.
2. Uninstall (not just disable) any existing antimalware software from the virtual machines.Running other security software simultaneously with Security for Virtualized Environmentsmay affect their operation and cause major problems with the system.
3. The installation requires administrative privileges. Make sure you have the necessarycredentials at hand for all virtual machines.
4. Virtual machines must have network connectivity to the Control Center appliance.
Using Remote Installation Tasks
In environments integrated with Control Center, you can remotely install Bitdefender Toolson virtual machines by using installation tasks. Remote installation relies on VMware Toolsin VMware environments and, respectively, on Windows administrative shares and SSH inCitrix XenServer environments.
NoteFor remote installation to work, a number of requirements must be met. To learn more, referto “Preparing for Installation” (p. 44).
To run a remote installation task:
1. Go to the Network page.
2. Choose Virtual Machines from the service selector.
3. Select the desired group from the left-side pane. All virtual machines from the selectedgroup are displayed in the right-side pane table.
Install Security Services 44
ENTERPRISE BITDEFENDER GRAVITYZONE
4. Apply filters to display unmanaged virtual machines only. Click the Filters button andselect the following options: Unmanaged from the Security category and All itemsrecursively from the Depth category.
5. Select the check boxes corresponding to the virtual machines on which you want toinstall protection.
6. Click the Tasks button at the right-side of the table and choose Install client. TheBitdefender Tools Installation wizard is displayed.
7. Configure the appropriate settings for your environment.
8. Under Security Server Assignation, select the Security Server that will manage theselected virtual machines. Choose the Security Server from the Security Server list, then
click the Add button at the right side of the table.
When several Security Server machines are available, you can set their priority using thearrow buttons available at the right side of the table.
9. Click Next.
10. Under the Credentials Manager section, specify the administrative credentials requiredfor remote authentication on selected virtual machines.
NoteA warning message is displayed as long as you have not selected an administratoraccount yet. This step is mandatory to remotely install the Bitdefender Tools on virtualmachines.
If you have not already defined the credentials in the Credentials manager, add therequired administrator accounts as follows:
a. Enter the user name and password of an administrator account for each of the selectedvirtual machines in the corresponding fields. Optionally, you can add a descriptionthat will help you identify each account more easily.
• If virtual machines are in a domain, it suffices to enter the credentials of the domainadministrator. Use Windows conventions when entering the name of a domainuser account (for example, domain\user or [email protected]).
• For Linux virtual machines, you must provide the credentials of the root account.
NoteSpecified credentials are automatically saved to your Credentials Manager so thatyou do not have to enter them the next time.
b. Click the Add button. The new account credentials are added.
c. Select the check box corresponding to the accounts you want to use.
11. Click Save. A confirmation message will appear.
Install Security Services 45
ENTERPRISE BITDEFENDER GRAVITYZONE
You can view and manage the task in the Network > Tasks page.
Using Installation Packages
In all virtualized environments that are not integrated with Control Center, you must installBitdefender Tools on virtual machines manually, using an installation package. A defaultinstallation package is available for download from Control Center (as a downloaderapplication for Windows and as an installation script for Linux). You can also create additionalcustom packages as needed.
Creating Bitdefender Tools Installation Packages
You can create custom installation packages if you want to configure the installation settings(for example, uninstall password or modules to install).
To create a custom Bitdefender Tools installation package:
1. Connect and log in to Control Center using your administrator account.
2. Go to the Network > Packages page.
3. Click the Add button at the right side of the table and choose Bitdefender Tools fromthe menu. A configuration window will appear.
4. Enter a suggestive name and description for the installation package you want to create.
5. Configure settings as needed.
6. Select the Security Server that will be used for scanning the virtual machines:
a. Click the Security Server field. The list of detected Security Servers is displayed.
b. Select an entity.
c. Click the Add button at the right side of the table.
The Security Server is added to the list. All target virtual machines will be scannedby the specified Security Server.
d. Follow the same steps to add several Security Servers, if available. In this case, youcan configure their priority using the up and down arrows available at the right sideof each entity.
e. To delete one entity from the list, click the corresponding Delete button at the rightside of the table.
7. Click Save.
You can find the new custom installation package in the list of packages.
Downloading Installation Packages
To download Bitdefender Tools installation packages:
Install Security Services 46
ENTERPRISE BITDEFENDER GRAVITYZONE
1. Connect and log in to Control Center using your administrator account.
2. Go to the Network > Packages page.
3. Select the check box corresponding to the default or a custom Bitdefender Toolsinstallation package.
4. Click the Download button at the right side of the table and choose the type ofinstallation package.
5. Save the file to your computer.
Running Installation Packages
For installation to work, the installation package must be run using administrator privilegesor under an administrator account.
• To manually install Bitdefender Tools on a Windows virtual machine:
1. Download or copy the installation file to the target virtual machine or to a networkshare accessible from that machine.
2. Run the installation package.
3. Follow the on-screen instructions.
• To manually install Bitdefender Tools on a Linux virtual machine:
1. Download or copy the installation file to the target virtual machine or to a networkshare accessible from that machine. The downloaded file is named installer.
2. Grant execute permission to current user on the installer file.
$ chmod u+x installer
3. Run installer as root. The script downloads the full installation package from theControl Center appliance and then starts the installation.
$ sudo ./installer
Installation will normally complete in less than a minute. Once Bitdefender Tools has beeninstalled, the virtual machine will show up as managed in Control Center (Network page)within a few minutes.
Install Security Services 47
ENTERPRISE BITDEFENDER GRAVITYZONE
5.3. Installing Security for Mobile DevicesSecurity for Mobile Devices is a mobile device management solution designed for iPhone,iPad and Android devices. For a complete list of supported operating system versions, checkthe system requirements.
Security for Mobile Devices is managed in Control Center by adding mobile devices tospecific users and then installing the GravityZone Mobile Client application on devices. Youcan add mobile devices to existing Active Directory users or you can create custom usersto add the devices to.
Before you start, make sure to configure a public (external) address for the CommunicationServer.
To install Security for Mobile Devices:
1. If you do not have integration with Active Directory, you must create users for mobiledevice owners.
2. Add devices to users.
3. Install GravityZone Mobile Client on devices and activate it.
5.3.1. Configure External Address for Communication ServerIn the default GravityZone setup, mobile devices can be managed only when they are directlyconnected to the corporate network (via Wi-Fi or VPN). This happens because when enrollingmobile devices they are configured to connect to the local address of the CommunicationServer appliance.
To be able to manage mobile devices over the Internet, no matter where they are located,you must configure the Communication Server with a publicly reachable address.
To be able to managemobile devices when they are not connected to the company network,the following options are available:
• Configure port forwarding on the corporate gateway for the appliance running theCommunication Server role.
• Add an additional network adapter to the appliance running the Communication Serverrole and assign it a public IP address.
In both cases, you must configure the Communication Server with the external address tobe used for mobile device management:
1. Access the appliance console from your virtualization management tool (for example,vSphere Client).
2. From the main menu, select Configure Communication Server.
3. Select Configure MDM Server external address.
Install Security Services 48
ENTERPRISE BITDEFENDER GRAVITYZONE
4. Enter the external address.
Use the following syntax: https://<IP/Domain>:<Port>.
• If you use port forwarding, you must enter the public IP address or domain name andthe port open on the gateway.
• If you use a public address for the Communication Server, you must enter the publicIP address or domain name and the Communication Server port. The default port is8443.
5. Select OK to save the changes.
5.3.2. Create and Organize Custom UsersIn non-Active Directory situations, you must first create custom users in order to have amean to identify the owners of mobile devices. Specified mobile device users are not linkedin any way with Active Directory or with other users defined in Control Center.
Creating Custom Users
To create a custom user:
1. Go to the Network page.
2. From the menu in the upper-right corner of the page, choose Mobile Devices.
3. In the left-side pane, select Custom Groups.
4. Click the Add User icon on the action toolbar. A configuration window will appear.
5. Specify the required user details:• A suggestive username (for example, the user's full name)• User's email address
ImportantMake sure to provide a valid email address. The user will be sent the installationinstructions by email when you add a device.
6. Click OK.
Organizing Custom Users
To organize custom users:
1. Create custom groups.
a. Select Custom Groups in the left-side pane and click the Add Group icon on theaction toolbar (above the pane).
Install Security Services 49
ENTERPRISE BITDEFENDER GRAVITYZONE
b. Enter a suggestive name for the group and click OK. The new group is displayedunder Custom Groups.
2. Move custom users into appropriate custom groups.
a. Select users in the right-side pane.
b. Drag and drop the selection over the desired group in the left-side pane.
5.3.3. Add Devices to UsersYou can only add one device to one specific user at a time.
To add a device to a user:
1. Go to the Network page.
2. From the menu in the upper-right corner of the page, choose Mobile Devices.
3. Search the user in the Active Directory folders or in Custom Groups.
4. Click the Add Device icon on the action toolbar. A configuration window will appear.
5. Enter a suggestive name for the device.
6. Select the device ownership type (Enterprise or Personal).
7. Click OK. The user is immediately sent an email with the installation instructions and theactivation details to be configured on the device. The activation details include theactivation token and the communication server address (and corresponding QR code).
NoteYou can view the activation details of a device at any time by clicking its name in ControlCenter.
NoteYou can also add mobile devices to a selection of users and groups. In this case, theconfiguration window will allow defining the devices ownership only. Mobile devicescreated by multiple selection will be given by default a generic name. As soon as a deviceis enrolled, its name will automatically change, including the corresponding manufacturerand model labels.
5.3.4. Install GravityZone Mobile Client on DevicesThe GravityZone Mobile Client application is exclusively distributed via Apple App Store andGoogle Play.
To install GravityZone Mobile Client on a device:
1. Search for the application on the official app store.• Google Play link• Apple App Store link
Install Security Services 50
ENTERPRISE BITDEFENDER GRAVITYZONE
2. Download and install the application on the device.
3. Start the application and make the required configuration:
a. On Android devices, tap Activate to enable GravityZone Mobile Client as deviceadministrator. Read carefully the provided information.
b. Enter the activation token and the communication server address or, alternatively,scan the QR code received by email.
c. Tap Activate.
d. On iOS devices, you are prompted to install theMDMprofile. If your device is passwordprotected, you will be asked to provide it. Follow the on-screen instructions tocomplete profile installation.
Install Security Services 51
ENTERPRISE BITDEFENDER GRAVITYZONE
6. Getting HelpTo find additional help resources or to get help from Bitdefender:
• Click the Help and Support link in the upper-right corner of Control Center.
• Go to our online Support Center.
To open a support ticket, go here and fill in the form.
Getting Help 52
ENTERPRISE BITDEFENDER GRAVITYZONE