growing microgreens - paynecountymastergardeners.org · microgreens are little seedlings of edible...
TRANSCRIPT

Growing Microgreens


What are micro-greens?
Microgreens are little seedlings of edible
plants that are often used to add color
and flavor to meals. They're much smaller
than regular greens, even "baby" greens,
and have grown in popularity, especial-
ly in fine dining circles.
The term "microgreen" isn't specific to any
one plant. Common microgreens include
radish, cabbage, mustard, parsley, beet
leaves, celery, and cilantro. Microgreens
often have good nutrition—although peo-
ple don't often eat them in large quanti-
ties, they're still high in vitamins and miner-
als. In fact, they have a much higher con-
centration of nutrients compared to fully
mature plants.

Why grow microgreens?
Why not? They offer fresh flavor, a fresh tender
crunch and excellent nutrient density. Micro-
greens contain much higher concentrations of
vitamins than fully grown versions of the same
plants. These power house veggies contain near-
ly 40% more nutrients then their mature counter-
parts. Studies have shown microgreens are
packed with vitamin C, E, K, lutein, and Beta-
carotene.
While there are no studies yet that look at micro-
green consumption in humans, one laboratory
study showed that overweight mice fed a high-
fat diet in combination with red cabbage micro-
greens had lower LDL-cholesterol (the bad kind)
and didn't gain as much weight as mice fed high
-fat diets alone or with mature red cabbage.
Of course, it's a long stretch from animal studies
to humans, but it makes sense that microgreens
from plants high in healthful phytochemicals,
such as those found in red cabbage, could have
similar health benefits.

Basic supply list:
• shallow growing pans with small holes in
the bottom
• shallow pans (slightly larger than the
growing pan works best)
• sterile soilless mix
• seeds
• unadorned paper towels
• light source (sunny window or grow light)
• sharp scissors
Let’s get started
In the beginning……..
Start by filling the growing pan with about ¾ to 1
inch of damp soilless mix, smooth and level be-
fore planting. Sprinkle your seeds over the top of
filled pan generously. Seed density should be
thick enough to cover the mix but not too thick
to inhibit air flow (think single layer of seeds).
Cover the growing pan
with a damp paper
towel and place in the
larger pan before gen-
tly water from the top,
making sure the soil is
wet yet not soggy. Wait
a couple of days be-
fore checking, as most
seeds will take 7 to 14
days to germinate. It is important to note that
you will want to continue to gently water the
seeds through the paper towel.
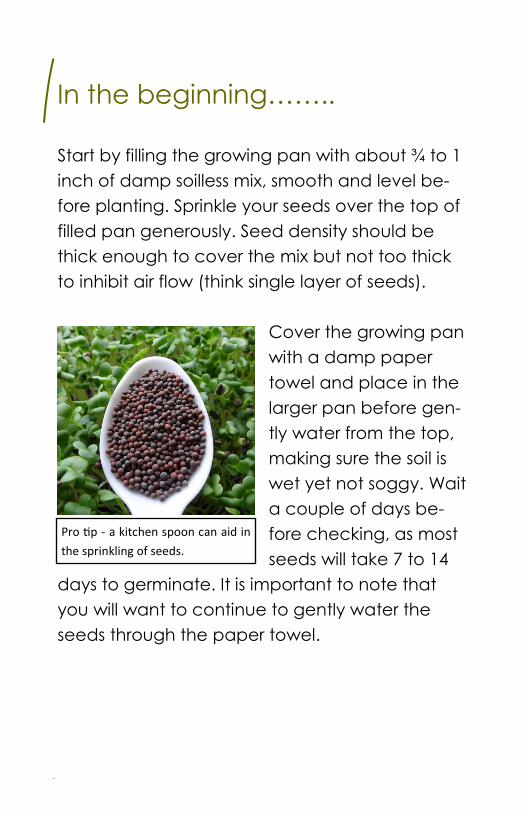
Pro tip - a kitchen spoon can aid in
the sprinkling of seeds.

Not just seeds anymore
Once the seeds begin to germinate, remove the
paper towel from the top and place pans in a
good light source. From this point forward it is im-
portant to water the sprouts from the bottom by
only adding water to the bottom pan. The idea is
to keep the soilless mixture moist and not soggy.
If the seedlings become
leggy and start to lose
their deep green color
this is an indicator that
they are not getting
enough light.
‘Leggy’ seedlings typically have
stretched skinny stems and
look fragile.

Harvest time!
When seedlings have grown to approxi-
mately 2 inches and have put on their first
true leaves, it’s time to harvest. Some
people find that they prefer to harvest
the greens even before they have their
true leaves depending on the variety of
plant.
Harvest by gently grabbing small handfuls
and cutting with sharp scissors, about 1
inch or less from the bottom leaf is pre-
ferred.

Place in a plastic bag or container and store in
refrigerator for future use. If you feel the need to
wash them before eating do it right before you
serve them. Unwashed they should stay fresh in
refrigerator for at least a week.
Suggested uses include: salads, scrambled eggs,
cottage cheese, sandwiches, or yogurt. Let your
culinary imagination go wild.

Broccoli, vitamins A, C, K, & E, manganese, phosphorus, vita
min B1, potassium to mention a few nutrients
Cabbages, Vitamins C, K, and E, beta-carotenes, and iron
Red cabbage, strong broccoli (brassica) flavor
Kale, antioxidants, fiber, Vitamins A,C, and K, iron, and
copper
Red Russian, strong broccoli flavor, nutty and rich
Kohlrabi, antioxidants, fiber, Vitamins A,C, and
B-complex, calcium, potassium and copper
Purple Vienna, A strong broccoli and cabbage flavor
Mustard, antioxidants, fiber, Vitamins A,C, E, and K
Mizuna, mild mustard flavor
Radish, Vitamins A, B, C, E, & K, folic acid, niacin, potassium,
iron, phosphorus, calcium, magnesium, zinc,
carotenes.
China rose, spicy & floral with a hint of sweetness
Diakon, fresh and spicy
Basils, vitamins A, C, K, and B6, folate, calcium, iron,
magnesium, phosphorus, potassium, zinc,
copper and manganese.
Genovese, intense basil flavor
Lemon, spicy lemon flavor
Cilantro, fragrant mix of parsley and citrus
Salad burnet, mild cucumber flavor
Easy to grow veggies &
herbs:

Seed companies: Johnny’s selected seeds True leaf market Books of interest: “Microgreens, a guide to growing nutrient-packed greens”, by Eric Franks & Jasmine Richardson “Microgreens, how to grow nature’s own super food” by Fionna Hill
Sources:

Information prepared and
presented by Jacqui Savage
of Jacqui’s Herbs Naturally.
Like us on Facebook!