guidelines for scanning projects - se blueprint
TRANSCRIPT

0
Public Works and Services
Guidelines for Scanning Projects
Records Management Section August 11, 2010

1
Table of Contents Introduction .................................................................................................................................................. 3
Purpose ..................................................................................................................................................... 3
What is Scanning? ..................................................................................................................................... 3
Advantages of Scanning ........................................................................................................................ 3
Disadvantages of Scanning ................................................................................................................... 3
How this Document is Organized .............................................................................................................. 4
Definitions ................................................................................................................................................. 4
Supporting Information ............................................................................................................................ 4
Project Planning ............................................................................................................................................ 5
Importance of Planning ............................................................................................................................. 5
Writing the Project Plan ............................................................................................................................ 6
Responsibility and Authority ..................................................................................................................... 7
Document Preparation ................................................................................................................................. 7
When to Prepare Documents ................................................................................................................... 7
How to Prepare Documents ...................................................................................................................... 7
Photocopying ........................................................................................................................................ 9
Document Batching ............................................................................................................................... 9
Potential Problems .................................................................................................................................. 10
Scanning the Documents ............................................................................................................................ 11
Pre-Scanning Decisions ........................................................................................................................... 11
Checking the Scanner .............................................................................................................................. 13
Test Scan Log ....................................................................................................................................... 13
Scanning .................................................................................................................................................. 14
Post-Scanning Operations ....................................................................................................................... 14
Post Scanning Log ............................................................................................................................... 15
Quality Control ............................................................................................................................................ 15
Performing Quality Control ..................................................................................................................... 15
Selecting Sample Size .............................................................................................................................. 16
Adjusting the Sampling Plan ............................................................................................................... 20

2
Rejecting Scanned Images ...................................................................................................................... 24
Documentation ....................................................................................................................................... 24
Retention and Disposition .......................................................................................................................... 24
Procedures for Disposing of Original Source Records and Scanned Images .......................................... 25
Disposal of Records where Scanned Images are kept as a Backup..................................................... 25
Disposal of Records where the Scanned Images are replacing the Original ....................................... 26
Exceptions to Destroying Original Source Records ............................................................................. 27
Appendix A – Life expectancy of recording media...................................................................................... 28
Appendix B – Sample Project Plan .............................................................................................................. 31
Appendix C – Sample Test Scan Log ............................................................................................................ 33
Appendix D – Sample Post Scanning Log .................................................................................................... 34
Appendix E – Sample Quality Control Score Sheet ..................................................................................... 35
Appendix F – Sample Quality Control Log ................................................................................................... 35

3
Introduction
Purpose The purpose of this document is to provide guidance to departments on digitally imaging paper or
microfilm records. Use of these guidelines will bring imaging projects into compliance with national and
international standards. Individual projects may need to implement more stringent requirements than
those defined within these guidelines.
What is Scanning? Scanning is a process by which a document (primarily paper, although any medium can be used) is
converted from a human-readable format to a computer-readable digital image file. These images can
be stored on variety of media in various forms.
Advantages of Scanning
Ability to use very high-density storage media.
Shorter retrieval time than hard copy when the images are well indexed.
Multiple users and access levels are possible.
Ease of information dissemination.
Ease of use of imaged copies of records in vital records and disaster recovery plans.
Legal uses. Organizations that need to retrieve information efficiently during discovery and
litigation may find that using imaged records can assist in the effort.
Ease of making copies of the imaged records.
Digital images don't lose quality from generation to generation. Well made copies and
derivatives can be as good as the original images.
Disadvantages of Scanning
Digital images are not human-readable without computer equipment.
Significant equipment costs, including hardware and software.
Potential for hardware and software obsolescence. Generally, systems change every 18
months to 5 years, software changes every 2-3 years, and the life expectancy of storage
media is relatively short.
Different types of scanners must be used to scan text, oversize items, photographic prints,
slides, and other formats.
Digital quality control, image capture, and indexing are complex and time-consuming
processes requiring training and constant vigilance.

4
Retention and dispositions must be addressed.
How this Document is Organized This document has two parts. The first part briefly discusses project planning in the context of planning a
scanning project. The second part goes into the details of what must be done to successfully scan
documents. The sections that make up the second part of the document discuss document preparation,
the scanning of the documents, quality control, and retention and disposition of records. Throughout
the document, we identify decisions that must be made while you develop your project plan. We
recommend that you read this entire document before beginning to write your project plan.
Definitions Batch – a collection of one or more documents that will be scanned together as a unit and saved
as a single file.
Document – one or more sheets of paper or frames of microfilm that contains information.
File – an entity of data available to computer system users (including the system itself and its
application programs) that is capable of being manipulated as a single unit (for example, moved
from one file directory to another).
Group – a defined set of documents that will be scanned. A single group of documents may
contain many batches. For example, a group may consist of all of the documents scanned during
a single day, all of the documents that belong to a certain class, or all of the documents that
share a certain characteristic. Groups are defined for the purposes of project planning and
quality control.
Image – the electronic digital representation produced as a result of the scanning of an original
document, or a representation of that data on a computer screen or on a hardcopy printout. A
single image represents one page of a document
Scanner – a device that electronically captures data from a document in a raster pattern, and
that creates a digital file of the image of that document.
Scanning – The process of electronically capturing an image of a document and storing it as a
digital file.
Supporting Information ANSI/AIIM MS44-R1993, Recommended Practice for Quality Control of Image Scanners
ANSI/AIIM MS52-1991, Recommended Practice for the Requirements and Characteristics of
Documents Intended for Optical Scanning
ANSI/AIIM TR34-1996, Sampling Procedures for Inspection by Attributes of Images in Electronic
Image Management (EIM) and Micrographics Systems

5
ANSI/ARMA 16-2007, The Digital Records Conversion Process: Program Planning, Requirements,
Procedures
CAN/CGSB-72.34, Electronic Records as Documentary Evidence
ISO/TR 15801, Electronic Imaging – Information Stored Electronically – Recommendations for
Trustworthiness and Reliability
Project Planning It is very important to have a plan before you begin any project. Without a plan, a project tends to either
expand in scope to the point where it becomes a never-ending job or it fizzles out and dies because the
motivation to complete it has disappeared. Allowing projects to expand uncontrollably or to die
incomplete is a waste of time and money.
Importance of Planning Project planning is particularly important when it comes to document conversion projects. Scanning
original paper documents or microfilm with the intention of replacing the original with the scanned
images raises a number of issues. A good project plan will address these issues.
First, there are the legal issues that surround document conversion. Images of original documents are
generally accepted in place of paper records in legal proceedings. However, they may be rejected as
evidence if the electronic records system that stores the records does not have integrity or if the image
cannot be proven to be reliable. Assessments of the integrity of the system and the reliability of the
image are based on the procedures used to create, store, and maintain the images.
Next, there are issues of storage and security. Images must be stored on the appropriate medium. How
you choose to store the images depends on the access, retention, and security requirements that you
have for the images.
Images that are used frequently need to be easily accessible. Save images on shared network
drives for greatest ease of access. However, before deciding to store images on a shared
network drive, it is important to remember that GNWT departments pay for the storage space
that they use on the GNWT network. Image files are large and may take up an unacceptable
portion of a department’s network space. It may be more appropriate to store image files on
CDs or DVDs rather than on the network.
Images that need to be retained for long periods of time need to be stored on media that does
not degrade quickly and be in a file format that is unlikely to become obsolete in the short term.
See Appendix A for more information on the longevity of digital media. Data conversion and
migration projects may be necessary at some point in the future, for one of several reasons:
o The medium used to store the images may begin to degrade causing a loss of data.

6
o The storage medium may become obsolete and hardware for reading it will not be
available in the future.
o The file format used to store the image may become obsolete and software will not be
available to read it.
Images that cannot be made widely available due to security concerns should be stored in
locations where access restrictions can be implemented.
If images are going to be imported into an information system for access and retrieval purposes,
documentation must be kept showing how the system has been maintained over time.
Backup copies of the images need to be made and maintained in addition to the master set of
images. There are two reasons for having backups: one is to provide a backup in case the master
image is damaged or destroyed, and the other is to provide a comparison if it is necessary to
show that the master image has not been altered.
Writing the Project Plan A project plan usually contains the following components:
Mission Statement or Purpose Statement – a short explanation of the purpose of the project.
Goals and Objectives – Goals are general statements about what the project should achieve.
Objectives describe the steps needed to reach a goal. Objectives also identify the criteria that
will be used to show that a goal has been reached.
Scope – The scope sets the limits for the project. It describes what will be included in the project
and, if necessary, what will be excluded from the project.
Assumptions, Constraints, and Risks – Describe any assumptions that have been used to make
decisions about the project. Describe any constraints, or limits, that could affect the project.
Describe any risks associated with the project.
Deliverables – A list of the products that the project will produce.
Tasks – A detailed list of the tasks that need to be done in order to finish the project. These
tasks should be listed in the order in which they are done. The tasks can also be shown as a
Work Breakdown Structure.
Timeline – A set of dates or deadlines for starting and finishing each task. Timelines can be
shown as a simple list of dates that is set against teach task or it can be set up in something as
complicated as a GANTT or PERT chart.
Resources – A list of the people, equipment, supplies, and funds needed to complete the
project.

7
A sample project plan may be seen in Appendix B.
Responsibility and Authority Careful consideration needs to be given to providing proper authority and responsibility to the scanning
project. The project itself must be authorized by senior management. Senior management may then
delegate authority and responsibility to the employees who supervise the project, carry out the
scanning, perform data entry, perform quality control, and provide information security. Any changes to
the scanning project need to be authorized. Once the scanning project is completed, someone must be
assigned responsibility for managing and maintaining the image files over the life span of the records.
It is important to note that different people must be given responsibility for scanning images and
performing quality control on those images. The person who is responsible for quality control must also
have the authority to reject groups of records and order them to be rescanned. If original source records
are going to be destroyed after the scanning project is completed, the person responsible for quality
control must have the authority to validate that the images were properly scanned. The project
supervisor must have the authority to certify that the project was carried out in accordance with the
project plan.
Document Preparation Document preparation is the first stage of a scanning project and is probably the longest stage in the
project. Proper preparation of documents ensures that all records are scanned and that scanning is done
as quickly as possible. The following section discusses the steps that must be taken to prepare original
source documents for scanning. It does not address prepping microfilm as there is very little preparation
required for microfilm and microfiche.
When to Prepare Documents It is best to prepare all documents in batches before they are going to be scanned. While it is possible to
prepare each document at the same time that scanning occurs, this slows down the scanning process
considerably. It is also not feasible if records are being scanned in an off-site location or if the scanning is
being contracted out.
You should also keep in mind that the people doing the scanning may not be familiar with the material.
The more well organized it is before it is given to the scanner, the better the resulting scans will be.
How to Prepare Documents List each document or file as you prepare it. As you box the prepared documents in anticipation
of sending them to the scanner, make a list of the documents or files that have been placed in
the box. Number each box and record the box numbers on the file/document lists. Keep a copy
of the list for tracking purposes.
Remove all clips, brads, staples, and other fasteners from folders and from multi-page
documents. Use an appropriate tool to prevent tearing or otherwise damaging the documents.

8
Carefully unfold and flatten documents to eliminate creases and wrinkles.
Check every document in every folder or other file unit to make certain that all documents are
available or accounted for and that they are in their proper sequence.
Check the numerical sequence and the order of all pages in multi page documents and note all
omissions; note missing parts of pages, stains, tears, or obliterations that affect the text of any
document; and note all other irregularities that affect the archival character and legibility of the
material.
Tape torn documents using non-yellowing, matte finish tape. For single sided documents, place
the tape on the back side of the document so that it does not obscure the document.
Remove sticky notes and flags, unless they contain important information. If sticky notes and
flags must be retained because they contain important information, tape them to the document
or onto a separate sheet of paper so that they do not obscure the main document.
Tape small documents onto 8 ½ x 11” sheets of white paper. Tape the top and the bottom of the
small document, keeping them at least 1.5 cm away from the edge of the larger piece of paper.
This may not be necessary if you are scanning a large quantity of uniform sized small
documents, such as a form.
Photocopy torn, brittle, faint, or thin papers. Use the reduction feature on a photocopier to
reduce oversized documents.
Identify illegible documents and remove them for separate processing.
Identify documents to be enhanced by using special scanning techniques. If special processing
techniques are required, these should be clearly explained in instructions to the scanner.
Verify that all papers are facing the same direction and are right side up so that they are easy to
feed.
Transcribe hard to read handwritten documents and place the transcription behind the
handwritten document. The transcription should indicate that it transcribes the preceding
document.
Sort documents into batches based on common criteria, such as the file number, retention, and
disposition. Wherever possible, keep all pages the same size. Place a batch header at the
beginning of each batch.
Insert dividers or separator pages in between documents or batches of documents to indicate
where each scanned file should start and stop.
9
Photocopying
Where the source documents are photocopied prior to scanning, the procedures used should be
documented. Photocopying of documents prior to the scanning process should be done if:
The documents may be damaged by scanning, such as already damaged or delicate papers.
The documents have substantial contrast or density variations over the area of the original and
photocopying may improve the quality of the image.
The documents contain paper or ink colours that do not produce legible scanned images.
The documents are too large to be scanned as a single full-sized image.
Photocopies should be examined to ensure that there is no significant loss of information before they
are scanned. Additional quality control procedures should be adopted to ensure that there is no
significant loss of detail in the scanned images of photocopied original documents. In the case were
photo-reductions are made, checks should be made to ensure that there is no significant loss of detail in
the scanned images compared to the original caused. If multiple images are captured, these should be
overlapped to ensure that there is no significant loss of information at the edges between adjoining
images.
If a photocopy is scanned, it should be clear to a user of the image that they are looking at a photocopy.
It should also be clear whether the photocopy was made from the source document during document
preparation or whether the source document was itself a photocopy. This may be done during
document preparation by stamping or marking the document as a photocopy or an original photocopy
or by electronically marking the image as having been captured from a photocopy.
Document Batching
It was noted above that documents should be batched together for scanning. This should be done in
order to make it easier to manage the documents and to make it easier to sample the records during
quality control. Documents should be batched by similar classification, retention and disposition dates.
Choose a batch size that is not too large to be easily managed but not so small that performing quality
control on the batches would be inefficient.
Batches should have a unique identifier for retrieval purposes. This identifier is also used as the file title
for the saved images. The identifier should be kept consistent from batch to batch. Some possible
identifiers include a range of numbers for the material being covered or the date that the image was
captured. We suggest the following format: Batch name – date of scanning – batch number. This
format would appear as “Batch Name – YYYYMMDD - nn”1 or “Disposition Files – 20100205 - 05.”
A batch header sheet should precede the documents in each batch. The batch headers have several
purposes. One use is to identify each batch, usually by indicating the department that owns the
1 YYYYMMDD = year month day

10
documents and by giving the batch a name or other identifier. Another use for the batch header sheet is
to tell the person operating the scanner where each batch of documents starts and ends. Usually, you
would save all of the pages in a batch into a single file, although it is possible to split a batch into several
files. Finally, the batch header sheet is used to document the procedures that should be followed for
scanning each batch. The batch header sheet may include a checklist of tasks that must be completed
when preparing and scanning the batch. The person who performs each task is required to verify the
task was completed without errors.
Potential Problems Some documents do not scan well and may require special care while doing document preparation.
Here is a list of things to look out for:
Non-standard paper sizes – Scanning is most efficient if all of the documents in a batch are the
same size because they can be put through an automatic document feeder. If different sized
pages are mixed in a batch, each page will have to be scanned individually on a flatbed scanner.
Non-standard text orientation – Standard text is oriented so that the text runs parallel to the
short sides of the piece of paper. If text is oriented so that it runs parallel to the long sides of
the paper it may be necessary to rotate the images after they have been scanned. It may be
more difficult to run OCR (optical character recognition) software on these documents.
Coloured paper – When scanning in black and white, coloured papers may appear as black to
the scanner. Scanner settings may need to be adjusted so that the scanner can distinguish the
text from the background colour. Run a test scan of coloured documents before scanning a
batch. Paper with watermarks and high gloss paper may also be problematic. The scanner can
sometimes see watermarks and the watermarks may obscure the resulting image. High gloss
paper may reflect too much light back to the scanner and obscure thin lines.
Ink colour – Some scanners have difficulty recognizing certain ink colours when scanning in
black and white. Dark coloured inks are easier for a scanner to read than light coloured inks.
Colour combinations – Some colour combinations may not be readable by the scanner when
scanning in black and white.
Smoothness, texture, and finish – Three problems can be caused by rough paper. The first is
that the texture of the paper causes the image to appear broken. The second is that the texture
of the paper may be picked up by the scanner and reproduced in the image. The third is that
rough papers may cause the document feeder mechanism to jam.
Show-through – Show-through occurs when printing on one side of a page bleeds through onto
the other side of a page. The scanner may pick up both images, obscuring the text. It may be
necessary to adjust scanner settings to reduce its sensitivity.
11
Thickness of paper – Extremely heavy or light paper may not feed properly through an
automatic document feeder. These types of papers should either be photocopied and a scan
made of the photocopy or they should be scanned by placing each page individually on a
flatbed scanner.
Image contrast – High contrast pictures scan more easily than images that have a low level of
contrast. It may be necessary to adjust scanner settings in order to scan a picture. However,
some detail may still be lost by the scanner.
Dot matrix – Older documents printed on a dot matrix printer may not scan properly because
the text has a broken appearance. Some OCR software may not recognized images of dot matrix
documents.
Character size, style, and weight – Text smaller than 8 point font may not be legible in a
scanned image. Serif fonts and highly stylized fonts may not scan legibly. Text with very thin
lines may not scan legibly.
Negative images – If the document contains light text on a dark background the scanner may
have difficulty reproducing the image as scanners are optimized for dark text on a light
background.
Margins – Information that is close to the edge of a page (within 6 mm or ¼ inch) may be lost
because some scanners do not read to the edge of the page or because the page is not aligned
on the scanner.
Bar codes – Bar codes may not be reproduced at a fidelity that allows them to be read by a
barcode scanner. This is not significant if the purpose of the barcode is to provide the scanner
with a document number for indexing or document separation purposes.
Photographs and images – Colour, halftone, and continuous tone photographs and images may
not reproduce well, particularly in black and white scanning.
Backgrounds – Text printed on a background image, crosshatching, or shading may not
reproduce well as the scanner may have difficulty distinguishing the text from the background.
Scanning the Documents After the documents have been prepared they can be taken to the scanner. Scanning the documents is
not as simple as just running the documents through the scanner. There are a number of decisions that
have to be made before and during scanning. Some of these decisions should be made during the
project planning phase.
Pre-Scanning Decisions A number of decisions must be made before you begin scanning documents. First, you need to decide
on the file format that you will use for saving the images. There are a number of options to choose from

12
including PDF, TIFF (.tif), and JPEG (.jpg). PDF (portable document format) and TIFF (tagged image file
format) are both formats that can be used for multi-page documents. The PDF format has been released
as an open standard and has become an international standard published by the International
Organization for Standardization (ISO). There is also a “flavour” of PDF called PDF/A, which allows for
the visual appearance of images to be retained over time, regardless of the tools and systems used to
create, store, and render (reproduce) the images. TIFF is also available in the public domain. JPEG (Joint
Photographic Experts Group) is an open source file format used for digital photographic images. It is also
an ISO standard. Open source file formats are preferred because they are stable. Open source file
formats are also publicly available so that it will be possible to write programs to read them even after
hardware and software changes.
The next thing that you need to decide is where to store the scanned images. As was mentioned
previously, images that are used frequently should be easily accessible. While it may seem logical to
save the images on a shared network drive, image files are large and may take up too much space. Other
options for storing and saving image files include storing them on DVDs or CDs and keeping them in the
hands of a custodian. A listing should be created when the documents are scanned to indicate which
images are on which disk. This list could be saved on the shared network so that users of the images can
see what is available and know who to contact to obtain an image.
As mentioned previously in the discussion of batching, scanned images require names or titles, or a
unique identifier. Decisions on how to title the files should be made before any scanning is done. We
suggest the following format: Batch name – date of scanning – batch number. This format would appear
as “Batch Name – YYYYMMDD - nn”2 or “Disposition Files – 20090909 - 05.”
Scanned images may also be imported into an information system that stores and manages the images.
If images are going to be imported into an information system, someone will have to perform data entry
to index each image while a second person spot-checks the entries to make sure that they have been
filled out correctly. At minimum, the information system should capture the following data:
Date created
Format
Unique identifier for the image
Official title of the image
Creator – this is usually the organization that originated the document rather than a person
Indexing is very important because the indexing information is used to search for and retrieve the
scanned images. When indexing information is lost, the stored information may also be lost. Indexing
may be done manually, or it may be performed automatically using computer software. Automatic
2 YYYYMMDDhhmm = year month day
13
indexing requires the use of OCR technology. It is best used to create a keyword index. Manual indexing
is more time consuming because someone has to review each image and index it. Manual indexing
allows for the assignment of classification numbers and subjects to the images. If possible, a
combination of manual and automatic indexing is ideal.
Checking the Scanner In order to ensure that good quality images are made, the scanner must be checked before and
periodically during the scanning project. By regularly monitoring the performance of the scanner you
can identify reoccurring problems and a possible need for repair before the equipment breaks down and
causes delays to your project.
Before the scanning project begins, assemble a set of test documents to run through the scanner. The
test set should be representative of the documents that are going to be scanned. For microfilm or
microfiche, this may be a set of images off of a roll or fiche chosen at random. For paper documents, the
test set should include documents that have the same characteristics as the documents that are going to
be scanned. For paper documents, the test set should also include a test chart.3 Test charts are also
available for microfilm.
Scan the test set and save the scan as your quality reference. Print the scanned images and save the
printouts for comparison purposes. Test scans should be run at pre-determined intervals during the
project. At minimum, a test scan should be run before and after the settings on the scanner are
changed. Ideally, a test scan should be run before and after each batch. We recommend running a test
at the beginning and end of every shift. The reason for testing at the beginning of a shift is to make sure
that the images about to be scanned are of sufficiently high quality and to make any adjustments to the
settings that are necessary. The reason for scanning at the end of a shift is to make sure that the scanner
is continuing to work as it was set up.
To run a test scan, set up the scanner with the settings that will be used to scan the next batch of
documents. Scan the test documents using these settings. Scan the documents using the same
procedures that you would use for the next batch of documents. Save the scanned images in a
temporary folder. Examine the test scans on screen and compare them to the quality reference. Then
print the test scans and compare the printouts to the quality reference set of printouts. If the printouts
are not satisfactory, print the quality reference images again and compare the new printouts to the test
scans. This will rule out problems with the printer. If there are no problems with the printer, then the
scanner should be checked for problems or the settings for the scanner adjusted to improve image
quality.
Test Scan Log
Each test run must be entered on a log. If a test scan indicates that there are equipment problems, then
the test scan printouts should be saved with the log. Write the date and time of the test and the settings
3 The Records Management Section has test charts for use with the Multimedia/Vital Records Storage Room
scanner.
14
used for the scan on the back of the printout. Save this test for the scanner repair technician. See
Appendix C for an example of a Test Scan Log.
Scanning Scan documents according to the instructions provided for using the scanning equipment. Make sure
that each page is scanned. This may be done by logging each document or batch before it goes into the
scanner and then comparing page counts with the resulting scanned images. It may be useful to mark
each page after it has been scanned so that the scanned pages do not get mixed up with pages that are
still to be scanned.
Before placing documents in the scanner, check for single-sided versus double-sided documents. If there
is a mix of single and double-sided documents, set the scanner for duplex scanning. Images of blank
pages may be removed later. If you are using a flatbed scanner and placing each document by hand,
check both sides of a page before moving onto the next page.
When you have finished scanning a batch of documents, return them to their original box in the same
order in which they were originally packed. It is important to maintain the original order of the
documents in case they have to be rescanned at a later date. Mark on the box that it has been scanned
and the date of scanning.
Post-Scanning Operations After a batch has been scanned, the person operating the scanner should quickly check the scanned
images. The person should check for two things:
1. That all pages were scanned.
2. That all pages have the correct orientation.
3. That all pages are legible.
To verify that all of the pages were scanned, check the count of the number of pages in the scanned
batch. Then compare it to the number of pages in the original set of documents. The two numbers
should match.
Images that are oriented the wrong way may be rotated using the scanning software or another
program.
Two things may be done to address legibility issues with any images. The first thing that may be done is
to make adjustments to the image using the scanner software or another program. The most common
adjustments that may be made are deskew (straighten), despeckle (remove black spots on the image),
black boarder removal, and adjustments to brightness and contrast. These adjustments must be used
with care as there is a risk of altering the original image. In particular, the despeckle function in the
imaging software may mistake a punctuation mark for noise on the image, and remove a decimal point.
This could change the value of numbers. For example, $10.95 could become $1095. Carefully compare

15
the scanned document to the original after making any adjustments to make sure that the meaning of
the document has not been changed.
The second thing that can be done to address legibility issues is to rescan the page that is illegible. To do
this, make adjustments to the scanner to bring the image into focus. Then place the page in the scanner.
Scan the page and save it as a new file. Using the scanner software or another program, insert the new
page into the document in place of the illegible document.
Post Scanning Log
Modifications to scanned images after they have been scanned should be entered in a log. The reason
for this is that making modifications to electronic documents may affect the admissibility of the records
in the event of an audit or a legal action. The log provides evidence that images were modified only at
the time of scanning and that the modifications were done in order to improve legibility and not to
modify the contents of the document. An example of a Post Scanning Log is found in Appendix D.
Quality Control Quality control is vital to the success of any scanning project. If quality checks are not performed on the
scanned documents the result may be images that are unusable. Quality control is also needed to
ensure that any indexes and metadata collected about the images is correct.
Quality control should be done either while a scanning project is underway or immediately after
scanning is completed. It must be done while the original source documents are still available so that
they may be rescanned if necessary.
Performing Quality Control Ideally, quality control will be performed at periodic intervals while the documents are being scanned.
To test for quality, take a random sample of the documents and check to see if they are satisfactory.
Sampling procedures will be discussed below. Then, review each image in the quality sample either on
screen or on a printed version. If the images are mostly going to be viewed by the users on screen, then
check the quality on screen. If the images are mostly going to be printed before they are used, then
check the quality using a printout.
The following chart indicates what you should look for while performing quality control.4 Class A
indicates that there is a major concern, while Class B indicates that there is a minor concern.
Electronic Image Attributes Class A Class B
Size of image relative to the original (measured horizontally and vertically) X
4 Chart taken from ANSI/AIIM TR34-1996, Sampling Procedures for Inspection by Attributes of Images in Electronic
Image Management (EIM) and Micrographics Systems.

16
Electronic Image Attributes Class A Class B
Adequate contrast
For text there should be a high contrast ratio between the text and the background
For grey scale images the contrast should represent the original image
X
X
Adequate brightness (more of a monitor problem) X
Colour dropout (dropout of specific colours from a test target) X
Poor thresholding (dropped low contrast features, dark background obscuring foreground) X
Image skew on page X
Incorrect image orientation on page X
Speckle or noise in the background of the image X
Character dropout (a missing character) X
Legibility of small characters or features (poor focus) X
Separation of black from white features (bar chart may be required) X
Scan line drop out (missing scan lines, single or multiple, across the image, either white or
black)
X
Repeated scan lines on successive images X
Repeated pixel on successive images (consistent noise or spot on each image at the same
location)
X
Borders not cropped X
Missing portion of edge of image X
Before checking a quality sample, prepare a score sheet for each attribute that you are checking. Score
each attribute as either yes or no. Yes means that it does have a particular problem while no means
that it does not. If an image has any one of the attributes then it fails the quality control test. For each
quality sample, keep track of how many documents fail the Class A tests and how many fail the Class B
tests. A sample score sheet can be seen in Appendix E.
Selecting Sample Size For almost all scanning projects the number of images scanned is too large to check each image
individually. Consequently, quality control is performed on a random sample of the total number of
images. Because you will not be checking every image, there will be a number of images that have errors
on them even after quality control has been performed. The goal is to keep the number of poor images

17
to a reasonably small number, while recognizing that the closer that you get to zero errors, the larger
the sample size that you must check. This introduces two risks to the project. One is the risk that you will
reject a group of records that could have been accepted. The second is that you will accept a group of
records that should have been rejected. If this risk is unacceptable due to the critical nature of the
documents, then a 100 percent inspection (inspection of every image) is required and an adequate
amount of time and personnel must be assigned to the task.
Before selecting the sample size, you must first determine what percentage of images in the sample set
can have either Class A or Class B errors. Generally, you would only accept a very small percentage of
images that have Class A errors and a slightly larger percentage that have Class B errors. For example,
you could decide that for Class A records you will accept an error rate of 0.1 percent and for Class B
records you will accept an error rate of 1.0 percent.
Once you have determined what percentage of error is acceptable, you have to determine the sample
size.5 To do this, first determine the size of the total number of documents from which the sample is to
be taken. For example, Public Works and Services has a scanning project. They have determined that
they can scan approximately 583 images per hour. Assuming that scanning will take place for six hours
per day, they will be able to scan approximately 3,498 images per day, or approximately 17,490 images
per week. If they are performing quality control daily – meaning that they are checking the previous
day’s output of images – then their sample will be taken from a group of approximately 3,498 images all
taken the previous day. If they are performing quality control on a weekly basis, then their sample will
be taken from a group of approximately 17,490 images taken over the previous five days.
Look at the following chart and find the code letter that corresponds with the size of the group of
images that you will be checking.
Group size Code Letter
2 to 8 A
9 to 15 B
16 to 25 C
26 to 50 D
51 to 90 E
91 to 150 F
5 The following instructions are based on the instructions provided in section 12 of ANSI/AIIM TR34-1996, Sampling
Procedures for Inspection by Attributes of Images in Electronic Image Management (EIM) and Micrographics
Systems, which are based on ISO 2859-1 (1996 edition), Sampling procedures for inspection by attributes -- Part 1:
Sampling schemes indexed by acceptance quality limit (AQL) for lot-by-lot inspection. They use Inspection Level II.

18
151 to 280 G
281 to 500 H
501 to 1,200 J
1,201 to 3,200 K
3,201 to 10,000 L
10,001 to 35,000 M
35,001 to 150,000 N
150,001 to 500,000 P
500,001 and over Q
In our example, if PWS performs quality control daily, they will pick the letter L. If they perform quality
control weekly, then they will pick the letter M.
Next, look up the sampling plans for your letter on the chart on the next page.
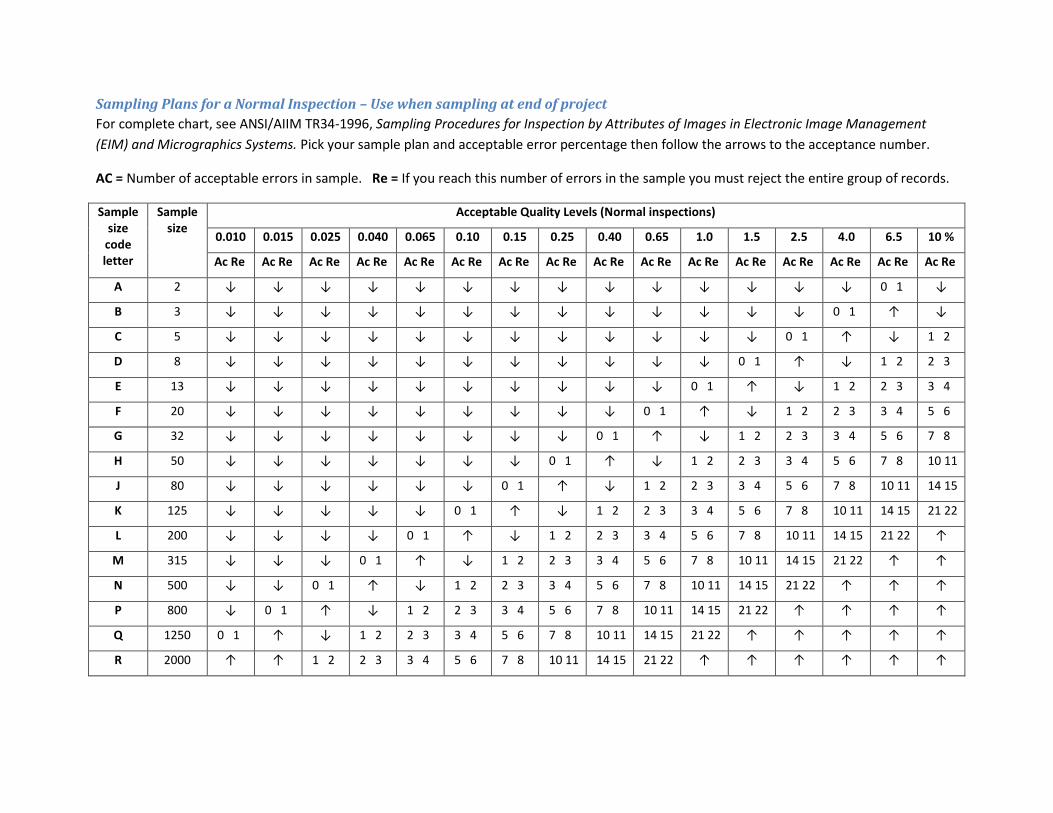
Sampling Plans for a Normal Inspection – Use when sampling at end of project
For complete chart, see ANSI/AIIM TR34-1996, Sampling Procedures for Inspection by Attributes of Images in Electronic Image Management
(EIM) and Micrographics Systems. Pick your sample plan and acceptable error percentage then follow the arrows to the acceptance number.
AC = Number of acceptable errors in sample. Re = If you reach this number of errors in the sample you must reject the entire group of records.
Sample size
code letter
Sample size
Acceptable Quality Levels (Normal inspections)
0.010 0.015 0.025 0.040 0.065 0.10 0.15 0.25 0.40 0.65 1.0 1.5 2.5 4.0 6.5 10 %
Ac Re Ac Re Ac Re Ac Re Ac Re Ac Re Ac Re Ac Re Ac Re Ac Re Ac Re Ac Re Ac Re Ac Re Ac Re Ac Re
A 2 ↓ ↓ ↓ ↓ ↓ ↓ ↓ ↓ ↓ ↓ ↓ ↓ ↓ ↓ 0 1 ↓
B 3 ↓ ↓ ↓ ↓ ↓ ↓ ↓ ↓ ↓ ↓ ↓ ↓ ↓ 0 1 ↑ ↓
C 5 ↓ ↓ ↓ ↓ ↓ ↓ ↓ ↓ ↓ ↓ ↓ ↓ 0 1 ↑ ↓ 1 2
D 8 ↓ ↓ ↓ ↓ ↓ ↓ ↓ ↓ ↓ ↓ ↓ 0 1 ↑ ↓ 1 2 2 3
E 13 ↓ ↓ ↓ ↓ ↓ ↓ ↓ ↓ ↓ ↓ 0 1 ↑ ↓ 1 2 2 3 3 4
F 20 ↓ ↓ ↓ ↓ ↓ ↓ ↓ ↓ ↓ 0 1 ↑ ↓ 1 2 2 3 3 4 5 6
G 32 ↓ ↓ ↓ ↓ ↓ ↓ ↓ ↓ 0 1 ↑ ↓ 1 2 2 3 3 4 5 6 7 8
H 50 ↓ ↓ ↓ ↓ ↓ ↓ ↓ 0 1 ↑ ↓ 1 2 2 3 3 4 5 6 7 8 10 11
J 80 ↓ ↓ ↓ ↓ ↓ ↓ 0 1 ↑ ↓ 1 2 2 3 3 4 5 6 7 8 10 11 14 15
K 125 ↓ ↓ ↓ ↓ ↓ 0 1 ↑ ↓ 1 2 2 3 3 4 5 6 7 8 10 11 14 15 21 22
L 200 ↓ ↓ ↓ ↓ 0 1 ↑ ↓ 1 2 2 3 3 4 5 6 7 8 10 11 14 15 21 22 ↑
M 315 ↓ ↓ ↓ 0 1 ↑ ↓ 1 2 2 3 3 4 5 6 7 8 10 11 14 15 21 22 ↑ ↑
N 500 ↓ ↓ 0 1 ↑ ↓ 1 2 2 3 3 4 5 6 7 8 10 11 14 15 21 22 ↑ ↑ ↑
P 800 ↓ 0 1 ↑ ↓ 1 2 2 3 3 4 5 6 7 8 10 11 14 15 21 22 ↑ ↑ ↑ ↑
Q 1250 0 1 ↑ ↓ 1 2 2 3 3 4 5 6 7 8 10 11 14 15 21 22 ↑ ↑ ↑ ↑ ↑
R 2000 ↑ ↑ 1 2 2 3 3 4 5 6 7 8 10 11 14 15 21 22 ↑ ↑ ↑ ↑ ↑ ↑

20
In our example, if PWS is performing quality control every day, they will look up the letter L on the
Sampling Plan. This gives them a sample size of 200 images. Next, if they read across the chart and
follow the arrows, they will find that to have a 0.1 percent error rate on Class A errors, they will have to
find zero or no Class A errors. If there is one Class A error, they will have to reject all of the images
scanned that day. For Class B errors, they will find that to have a 1.0 percent error rate they would
accept up to five errors in the sample but they would reject all of the images scanned that day if they
found six or more errors.
In our second example, if PWS is performing quality control once a week, they will look up the letter M.
This gives them a sample size of 315 images. If they read across the chart and follow the arrows, they
will find that to have a 0.1 percent error rate on Class A errors, they would have to find no more than
one Class A errors. If there are two or more Class A errors, they will have to reject all of the images
scanned that day. For Class B errors, they will find that to have a 1.0 percent error rate on Class B errors
they would accept up to seven errors in the sample but they would reject all of the images scanned that
week if they found eight or more errors.
Sample
Size Code
Letter
Sample
Size
Acceptable Quality Levels (Normal Inspections)
0.10 0.15 0.25 0.40 0.65 1.0
Ac Re Ac Re Ac Re Ac Re Ac Re Ac Re
K 125 0 1 ↑ ↓ 1 2 2 3 3 4
L 200 ↑ ↓ 1 2 2 3 3 4 5 6
M 315 ↓ 1 2 2 3 3 4 5 6 7 8
N 500 1 2 2 3 3 4 5 6 7 8 10 11
The above example allows for a very low error rate and may be appropriate to highly sensitive
documents. For the majority of records a higher error rate may be acceptable, such as 1 percent for
Class A errors and 4 percent for Class B errors.
Adjusting the Sampling Plan
Follow a normal inspection plan, such as the one outlined above, when you first begin performing
quality control. Over time, however, you may find it necessary to adjust the sampling plan. Initiate a
Sample size for daily
quality control
Class A acceptance levels
- daily quality control
Class B acceptance levels
- daily quality control
Sample size for
weekly quality control
Class A acceptance levels
- weekly quality control
Class B acceptance levels
- weekly quality control

21
tightened sampling plan if you find that you are rejecting a large number of groups of records. Initiate a
reduced sampling plan if you are rejecting few groups of records. In order to maintain quality, only
switch from a normal to a tightened or reduced sampling plan according to a set of rules. The rules are
described in the table below.
Switching Procedures Rules
From normal to tightened When normal inspection is being carried out, tightened inspections
shall be put into place when two out of five, or fewer, consecutive
groups of images have been rejected on original inspection (ignoring
resubmitted images). For example, if the first group is rejected, the
second, third, and fourth are accepted, and the fifth group is rejected,
then you should switch to a tightened inspection plan.
From tightened to normal When tightened inspection is being carried out, normal inspection shall
be reverted to when five consecutive groups of images have been
considered acceptable on original inspection
From normal to reduced Reduced inspection is an optional procedure that all parties should
approve prior to its use. If approved, when normal inspection is being
carried out, reduced inspection may be put into operation provided
that all of the following conditions are satisfied:
When the acceptance number is 0 or 1, the preceding 15
groups of images have been submitted to normal inspection
and all have been accepted on original inspection; or
When the acceptance number is 2 or more, the preceding 10
groups of images have been submitted to normal inspection
and all would have been accepted on original inspection if the
acceptable quality level had been one step higher.
From reduced to normal When reduced inspection is being carried out, normal inspection shall
be reverted to if a group of records is rejected on original inspection.
The following tables describe the sampling plans for tightened and reduced inspections.

Sampling Plans for a Tightened Inspection
For complete chart, see ANSI/AIIM TR34-1996, Sampling Procedures for Inspection by Attributes of Images in Electronic Image Management
(EIM) and Micrographics Systems. Pick your sample plan and acceptable error percentage then follow the arrows to the acceptance number.
AC = Number of acceptable errors in sample. Re = If you reach this number of errors in the sample you must reject the entire group of records.
Sample size
code letter
Sample size
Acceptable Quality Levels (Normal inspections)
0.010 0.015 0.025 0.040 0.065 0.10 0.15 0.25 0.40 0.65 1.0 1.5 2.5 4.0 6.5 10 %
Ac Re Ac Re Ac Re Ac Re Ac Re Ac Re Ac Re Ac Re Ac Re Ac Re Ac Re Ac Re Ac Re Ac Re Ac Re Ac Re
A 2 ↓ ↓ ↓ ↓ ↓ ↓ ↓ ↓ ↓ ↓ ↓ ↓ ↓ ↓ ↓ ↓
B 3 ↓ ↓ ↓ ↓ ↓ ↓ ↓ ↓ ↓ ↓ ↓ ↓ ↓ ↓ 0 1 ↓
C 15 ↓ ↓ ↓ ↓ ↓ ↓ ↓ ↓ ↓ ↓ ↓ ↓ ↓ 0 1 ↑ ↓
D 8 ↓ ↓ ↓ ↓ ↓ ↓ ↓ ↓ ↓ ↓ ↓ ↓ 0 1 ↑ ↓ 1 2
E 13 ↓ ↓ ↓ ↓ ↓ ↓ ↓ ↓ ↓ ↓ ↓ 0 1 ↑ ↓ 1 2 2 3
F 20 ↓ ↓ ↓ ↓ ↓ ↓ ↓ ↓ ↓ ↓ 0 1 ↑ ↓ 1 2 2 3 3 4
G 32 ↓ ↓ ↓ ↓ ↓ ↓ ↓ ↓ ↓ 0 1 ↑ ↓ 1 2 2 3 3 4 5 6
H 50 ↓ ↓ ↓ ↓ ↓ ↓ ↓ ↓ 0 1 ↑ ↓ 1 2 2 3 3 4 5 6 8 9
J 80 ↓ ↓ ↓ ↓ ↓ ↓ ↓ 0 1 ↑ ↓ 1 2 2 3 3 4 5 6 8 9 12 13
K 125 ↓ ↓ ↓ ↓ ↓ ↓ 0 1 ↑ ↓ 1 2 2 3 3 4 5 6 8 9 12 13 18 19
L 200 ↓ ↓ ↓ ↓ ↓ 0 1 ↑ ↓ 1 2 2 3 3 4 5 6 8 9 12 13 18 19 ↑
M 315 ↓ ↓ ↓ ↓ 0 1 ↑ ↓ 1 2 2 3 3 4 5 6 8 9 12 13 18 19 ↑ ↑
N 500 ↓ ↓ ↓ 0 1 ↑ ↓ 1 2 2 3 3 4 5 6 8 9 12 13 18 19 ↑ ↑ ↑
P 800 ↓ ↓ 0 1 ↑ ↓ 1 2 2 3 3 4 5 6 8 9 12 13 18 19 ↑ ↑ ↑ ↑
Q 1250 ↓ 0 1 ↑ ↓ 1 2 2 3 3 4 5 6 8 9 12 13 18 19 ↑ ↑ ↑ ↑ ↑
R 2000 0 1 ↑ ↓ 1 2 2 3 3 4 5 6 8 9 12 13 18 19 ↑ ↑ ↑ ↑ ↑ ↑
S 3150 1 2
Sampling Plans for a Reduced Inspection
For complete chart, see ANSI/AIIM TR34-1996, Sampling Procedures for Inspection by Attributes of Images in Electronic Image Management
(EIM) and Micrographics Systems. Pick your sample plan and acceptable error percentage then follow the arrows to the acceptance number.
AC = Number of acceptable errors in sample. Re = If you reach this number of errors in the sample you must reject the entire group of records.
Sample size
code letter
Sample size
Acceptable Quality Levels (Normal inspections)
0.010 0.015 0.025 0.040 0.065 0.10 0.15 0.25 0.40 0.65 1.0 1.5 2.5 4.0 6.5 10 %
Ac Re Ac Re Ac Re Ac Re Ac Re Ac Re Ac Re Ac Re Ac Re Ac Re Ac Re Ac Re Ac Re Ac Re Ac Re Ac Re
A 2 ↓ ↓ ↓ ↓ ↓ ↓ ↓ ↓ ↓ ↓ ↓ ↓ ↓ ↓ 0 1 ↓
B 2 ↓ ↓ ↓ ↓ ↓ ↓ ↓ ↓ ↓ ↓ ↓ ↓ ↓ 0 1 ↑ ↓
C 2 ↓ ↓ ↓ ↓ ↓ ↓ ↓ ↓ ↓ ↓ ↓ ↓ 0 1 ↑ ↓ ↓
D 3 ↓ ↓ ↓ ↓ ↓ ↓ ↓ ↓ ↓ ↓ ↓ 0 1 ↑ ↓ ↓ 1 2
E 5 ↓ ↓ ↓ ↓ ↓ ↓ ↓ ↓ ↓ ↓ 0 1 ↑ ↓ ↓ 1 2 2 3
F 8 ↓ ↓ ↓ ↓ ↓ ↓ ↓ ↓ ↓ 0 1 ↑ ↓ ↓ 1 2 2 3 3 4
G 13 ↓ ↓ ↓ ↓ ↓ ↓ ↓ ↓ 0 1 ↑ ↓ ↓ 1 2 2 3 3 4 4 5
H 20 ↓ ↓ ↓ ↓ ↓ ↓ ↓ 0 1 ↑ ↓ ↓ 1 2 2 3 3 4 4 5 6 7
J 32 ↓ ↓ ↓ ↓ ↓ ↓ 0 1 ↑ ↓ ↓ 1 2 2 3 3 4 4 5 6 7 8 9
K 50 ↓ ↓ ↓ ↓ ↓ 0 1 ↑ ↓ ↓ 1 2 2 3 3 4 4 5 6 7 8 9 10 11
L 80 ↓ ↓ ↓ ↓ 0 1 ↑ ↓ ↓ 1 2 2 3 3 4 4 5 6 7 8 9 10 11 ↑
M 125 ↓ ↓ ↓ 0 1 ↑ ↓ ↓ 1 2 2 3 3 4 4 5 6 7 8 9 10 11 ↑ ↑
N 200 ↓ ↓ 0 1 ↑ ↓ ↓ 1 2 2 3 3 4 4 5 6 7 8 9 10 11 ↑ ↑ ↑
P 315 ↓ 0 1 ↑ ↓ ↓ 1 2 2 3 3 4 4 5 6 7 8 9 10 11 ↑ ↑ ↑ ↑
Q 500 0 1 ↑ ↑ ↓ 1 2 2 3 3 4 4 5 6 7 8 9 10 11 ↑ ↑ ↑ ↑ ↑
R 800 ↑ ↑ ↑ 1 2 2 3 3 4 4 5 6 7 8 9 10 11 ↑ ↑ ↑ ↑ ↑ ↑

24
Rejecting Scanned Images If the sample that you are reviewing fails the quality control inspection, it must be returned to the
person doing the scanning and the original documents must be re-scanned. Make sure that you explain
to the person doing the scanning why the original images failed so that he or she can correct the
problems when the documents are rescanned.
Save the rescanned images separately from the original set of scanned images. Give unique identifiers or
file names to the rescanned images to distinguish them from the rejected images. For example, if a
batch was originally named “Disposition Files – 20090909 – 05,” the rescanned batch could be called
“Disposition Files – 20090909 – 05r”. The R at the end of the file name indicates that this image was
rescanned.
The rescanned images must be submitted to a quality control review when they are received from the
person doing the scanning. This review does not count towards a decision to adjust the sampling plans.
A group of documents may have to be rescanned several times before it passes the quality control test.
Documentation Information about the quality control process should be captured in several places. The project plan or a
separate quality control plan should identify who is doing the scanning and who is doing the quality
control evaluations. The person who scans the records cannot perform quality control on them. The plan
should also indicate if the sampling plans can be adjusted and who approves the changes. The plans
should indicate if a single quality control sample will be taken of all of the images after everything has
been scanned or if quality control will occur while scanning is ongoing. The plans should also document
the percentage of Class A and Class B errors that are allowable.
As noted above, a score sheet should be kept for each sample of records. This score sheet is used to
document any errors identified in the sample. It is used to determine if a group of documents needs to
be rescanned and to justify that decision.
A log should be kept to document each sampling exercise and note any changes to sampling plans. An
example of a Quality Control Log is in Appendix F.
Letters or memos should be used to authorize changes from a normal to a reduced sampling plan.
A letter or certificate should be issued upon completion of all quality control activities confirming that
the scanned images comply with the quality control plan. The purpose of this certificate is to validate
the scanned images.
Retention and Disposition There are many reasons why a department may wish to scan their documents and keep them in an
electronic format. They may be using the scanned images as a backup to their vital paper records, while
maintaining the paper records as a master record. They may be using the scanned images as a

25
preservation technique or as a way to provide easier access to records with the intention of retaining
the scanned images and disposing of the originals. Regardless of the purpose of the scanned images,
they are records and both they and their original source records must be scheduled according to an
approved records disposition authority.
Reason for Scanning Retention and Disposition Considerations
Scanned images are a backup to vital paper
or microfilm records. Original source
records are kept as master records along
with the scanned images.
The paper original records are the master records
and should be classified and scheduled in ARCS or
ORCS. The scanned images are backup copies and
should be disposed of according to the appropriate
copy file retention in ARCS or ORCS when they are
no longer required as a backup to the original.
Scanned images are replacing original
source records for access or preservation
purposes. Original source records will not be
kept.
The retention schedules in ARCS and ORCS must
authorize the conversion of records to a new
medium and the destruction of the original record.
This may require an amendment to the Records
Disposition Authorities. Original source records are
scheduled for destruction.
Procedures for Disposing of Original Source Records and Scanned Images As noted above, original records and scanned images may only be disposed of in accordance with an
approved records disposition authority, such as ARCS or ORCS. Disposition must comply with the
Archives Act, the Records Scheduling Policy, and with Public Works and Services’ disposition procedures.
Disposal of Records where Scanned Images are kept as a Backup
If the original source records are kept as a master record and the scanned images are maintained as a
backup, the following procedures apply:
1. For original master records
a. When the original master records have reached the end of their life cycle, the
department prepares box inventory forms listing the records to be disposed of.
b. The Director or Regional Superintendent authorizes the disposition and the Records
Coordinator forwards the disposition package to the Records Analysts at Public Works
and Services.
c. The records are disposed of according to normal disposition procedures.
2. For backup scanned images
26
a. When the scanned images reach the end of their life cycle, the department prepares a
listing of the images that are to be disposed of. The listing should connect the scanned
images to the appropriate ARCS/ORCS classification number and retention schedule.
b. The Director or Regional Superintendent authorizes the disposition. The authorization
letter should indicate that the scanned images were backup copies maintained for vital
records protection purposes and that the original records are being scheduled and
disposed of as master records according to ARCS or ORCS.
c. The Records Coordinator reviews the disposition package and forwards it to the Records
Analysts at Public Works and Services.
d. The Records Analyst agrees to the disposal of the records.
i. If the images are stored on a network shared drive the Records Analyst provides
authorization to the department to delete the records. The Records Coordinator
notifies the Records Analyst when the images have been deleted.
ii. If the images are stored on a removable storage medium, such as a CD or DVD,
the Records Coordinator and Records Analyst will arrange to have the images
transferred to the records centre for disposal by shredding.
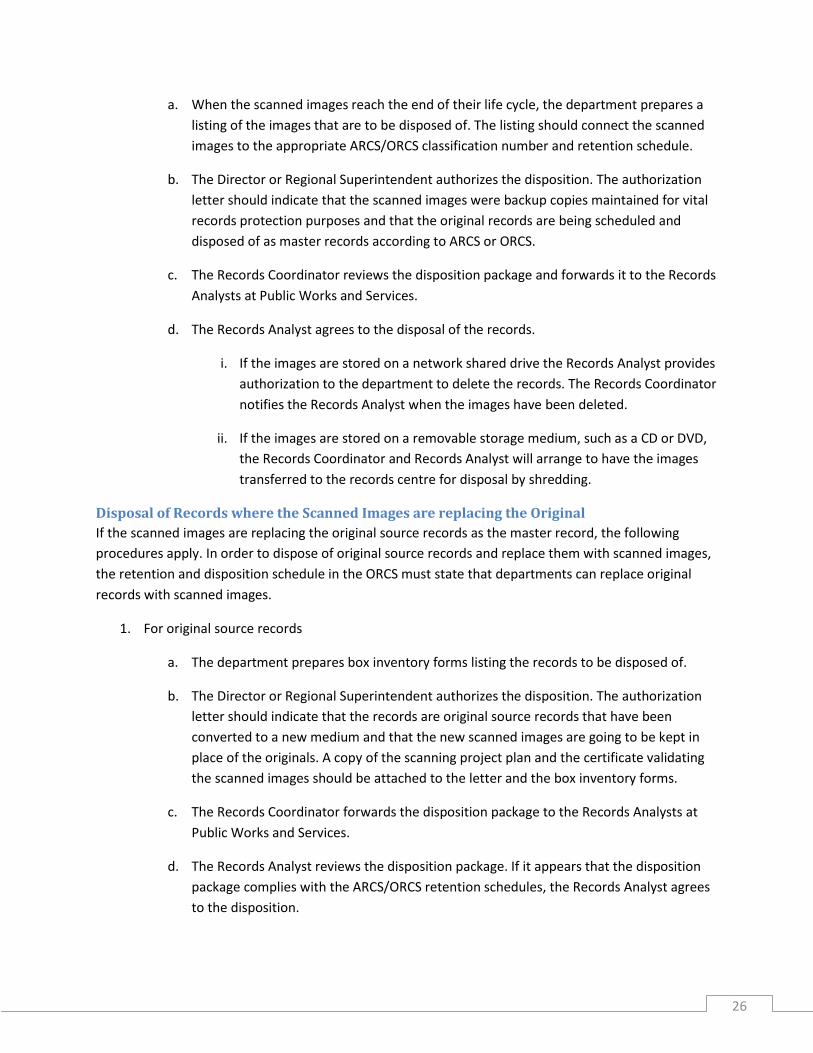
Disposal of Records where the Scanned Images are replacing the Original
If the scanned images are replacing the original source records as the master record, the following
procedures apply. In order to dispose of original source records and replace them with scanned images,
the retention and disposition schedule in the ORCS must state that departments can replace original
records with scanned images.
1. For original source records
a. The department prepares box inventory forms listing the records to be disposed of.
b. The Director or Regional Superintendent authorizes the disposition. The authorization
letter should indicate that the records are original source records that have been
converted to a new medium and that the new scanned images are going to be kept in
place of the originals. A copy of the scanning project plan and the certificate validating
the scanned images should be attached to the letter and the box inventory forms.
c. The Records Coordinator forwards the disposition package to the Records Analysts at
Public Works and Services.
d. The Records Analyst reviews the disposition package. If it appears that the disposition
package complies with the ARCS/ORCS retention schedules, the Records Analyst agrees
to the disposition.

27
e. The Records Coordinator and Records Analyst arrange to have the records transferred
to the records centre for destruction.
2. For scanned images
a. When the scanned images reach the end of their life cycle, the department prepares a
listing of the images that are to be disposed of. The listing should connect the scanned
images to the appropriate ARCS/ORCS classification number and retention schedule.
b. The Director or Regional Superintendent authorizes the disposition. The authorization
letter should indicate that the scanned images are original records and are being
scheduled and disposed of as master records according to ARCS or ORCS.
c. The Records Coordinator reviews the disposition package and forwards it to the Records
Analysts at Public Works and Services.
d. The Records Analyst agrees to the disposal of the records.
i. If the images are stored on a network shared drive the Records Analyst provides
authorization to the department to delete the records. The Records Coordinator
notifies the Records Analyst when the images have been deleted.
ii. If the images are stored on a removable storage medium, such as a CD or DVD,
the Records Coordinator and Records Analyst will arrange to have the images
transferred to the records centre for disposal by shredding.
Exceptions to Destroying Original Source Records
There are some situations where it is not advisable to destroy original source records, even though the
intent is to replace them with a verified scanned image. Original source records should not be destroyed
if:
A legible image cannot be made.
Where fraud has been identified or litigation is ongoing and affects the records.
Where an Access to Information and Protection of Privacy request has been made for the
records.
Where original signatures are significant or have high value, such as with a contract or
agreement. In this case, a legal opinion on whether or not the records can be destroyed should
be obtained before the records are submitted for disposal.

Appendix A – Life expectancy of recording media6 Recording media used to store digital information has a limited life span in comparison to paper. There are two threats to digital media: 1) that
the recording medium will degrade before the information on it loses its usefulness; and 2) that the recording technology will become obsolete
before the information on it loses its usefulness. The length of time that it takes for digital recording media to degrade varies depending on a
number of factors. For maximum data protection, digital media that stores long term records should be replaced (i.e. the data copied to a new
medium) roughly every 10 years.
Media Type Description Longevity Required Storage Conditions
Flexible
Magnetic Disks
(Floppy Disks)
A flexible magnetic disk housed in a
rigid or semi-rigid casing. Several
formats were available. Now obsolete
Up to 5 years Do not open casing or touch disk
Labels should only be applied in the label area of the disk
Write-protect switch should be set immediately after writing
For short term storage store between 10 and 51.5°C and at 20-80% humidity
For long term storage store between 18 and 22°C and at 35-45% humidity
Magnetic Tape One of several formats that comprises
a magnetic recording layer on a
flexible, usually polyethylene, tape.
Usually found in reels (one spool) or
cassettes (two spools)
High capacity formats such as Digital
Linear Tape (DTL) and linear Tape Open
(LTO) are considered the most stable
and long-lasting, and have a life span of
30 years.
Do not open cassettes
Do not touch tape surface
Labels should only be placed on the label area of the container
Cassettes should be retensioned annually
Write-protect switch on cassettes
6 Information based on The National Archives (United Kingdom), Digital Preservation Guidance Note 3: Care, Handling, and Storage of Removable Media.

should be set immediately after writing
For short term storage store between 16 and 32°C and at 20-80% humidity
For long term storage store between 18 and 22°C and at 35-45% humidity (LTO format is 16 and 32°C and at 20-80% humidity)
Optical Disks One of several formats of rigid disks
that are comprised of a reflective layer
and a recording layer that is read using
a laser. The most common types are
Read-only compact disk (CD or CD-
ROM), Recordable CD (CD-R),
Rewritable CD (CD-RW), Read only
Digital Versatile Disk (DVD or DVD-
ROM), Recordable DVD (DVD-R and
DVD+R), Rewritable DVD (DVD-RAM,
DVD-RW, DVD+RW), and High
Definition DVD or Blu-Ray.
CD-Rs that use a gold reflective layer
and phthalocyanine-based dyes have
the greatest lifespan. Manufacturers
claim life spans of up to 100 years
using accelerated aging tests. CD-RW
formats are not recommended for long
term storage.
DVDs are similar to CDs and the same
recommendations apply.
Manufacturers claim life spans of up to
200 years
Do not touch recording area
Adhesive labels should never be used
Disks may be marked on upper surface with water soluble permanent ink
For short term storage store between 5 and 45°C and at 20-80% humidity
For short term storage store between 10 and 50°C and at 10-80% humidity
For long term storage store between 18 and 22°C and at 35-45% humidity
Solid State
Media (Flash)
A non-volatile, solid state memory
commonly used in laptops, digital
cameras, and USB memory sticks.
Degrades and becomes unstable with
repeated use. Manufacturers claim life
spans of up to 10 years.
Gold contacts on media should not be touched
Labels should only be placed on the label area of the casing
For short term storage store between 10 and 50°C and at 20-80% humidity

For long term storage store between 18 and 22°C and at 35-45% humidity

31
Appendix B – Sample Project Plan
Purpose Statement
The purpose of this project is to image the Records Management Unit’s Disposition Files and import
them into a document management system. These records have a very long retention period and
conversion to another medium is recommended for ease of retrieval and preservation purposes.
Goals and Objectives
The goal is to fully digitize the information that the Records Management Unit has regarding the
disposition of boxes so that they are fully indexed and may be easily searched for and retrieved.
The project has the following objectives:
To prepare digital images of disposition files.
To import the digital images into a document management system.
Scope
The project will include all disposition files created prior to January 2006, the transfer forms in the old
disposition binders, and transfer forms from the old transfer binders where the transfers were partially
disposed of. Disposition files created after January 2006 have been fully captured in the document
management system.
Assumptions, Constraints, and Risks
This plan assumes that scanning will be performed in Public Works and Services’ Multimedia/Vital
Records Storage Room. It also assumes that the relevant ORCS can be amended to allow conversion of
the records to a digital format and the disposal of the original records. Finally, it assumes that a casual
employee can be hired to perform the scanning and index them in the document management system.
It also assumes that a full time employees can be made available to prepare the documents and perform
quality control.
The project may be constrained by the availability of the Multimedia/Vital Records Storage Room. It may
also be constrained by how quickly an ORCS amendment may be made and approved. It may also be
constrained by the availability of staff for the project.
The risk of not performing the project is that the original paper records will continue to degrade and
over time will become too brittle to handle. There is a small risk that the resulting images will not be of
high enough quality to be useable.
Deliverables
Prepared documents for scanning.
Scanned images.
Indexed images imported into a document management system.

32
Tasks
Scanning Project
Document
Preparation
Scan documents Perform Quality
Control on
Sample
Importation and
Indexing
Prepare
Disposition Files
Prepare
Disposition
Binders
Prepare Transfer
Binders
Retrieve
Disposition Files
from Storage
Remove
documents from
folders
Prepare
documents
Fill out batch
header
Pack header and
documents in box
Remove
documents from
binders
Fill out batch
header
Pack header and
documents into
box
Review transfer
lists
Find transfers
that have
disposed of boxes
Remove
documents from
binders
Fill out batch
header
Pack header and
documents into
box
Import images
into System
Fill out profile
form for each
image
Perform quality
control on profile
forms

33
Timeline
Timelines are based on an estimate of the total number of documents to be prepared and time and
motion studies to determine how long it takes to prepare a box of records for scanning. A 15 percent
contingency has been built into the schedule.
Task Sept 2010 Oct 2010 Nov 2010 Dec 2010 Jan 2011 Feb 2011
Document Preparation
Scanning
Quality Control
Importation and Indexing
Resources
One Records Management employee to prepare documents.
One Casual employee to scan documents and index them in the document management system.
One Records Management employee to perform quality control
Workstation for casual
Multimedia/Vital Records Storage Room
Office supplies
75 new records boxes
Appendix C – Sample Test Scan Log Date Time Initials Settings Results Comments
2010/02/05 16:00 TBH 7 50 90 Ok Disposition files
2010/02/06 09:10 JR 12 50 95 Too Dark Disposition files
2010/02/06 09:30 JR 8 49 92 OK Transfer sheets
2010/02/06 11:55 JR 8 49 92 OK Transfer sheets

34
Appendix D – Sample Post Scanning Log Date Time Initials Batch Name/File Name Problem With
Image
Resolution
2010/02/05 14:15 TBH Disposition Files –
2010/02/05 – 25
Pages 3, 4, 5, and
6 illegible
Rescanned
pages and
inserted into
document
2010/02/05 14:15 TBH Disposition Files –
2010/02/05 – 25
Several pages in
portrait instead
of landscape
orientation
Rotated pages
to landscape
orientation
2010/02/05 15:40 TBH Disposition Files –
2010/02/05 – 28
Page 15 too dark Adjusted
image
brightness
2010/02/05 15:52 TBH Disposition Files –
2010/02/05 – 29
Page 2 too faint Adjusted
image contrast

35
Appendix E – Sample Quality Control Score Sheet Quality Control Score Sheet
Date:2010/02/06 Initials: JR
Quality control performed on: Images filmed on 2010/02/05 by TBH
Class A – Major Problems Class B – Minor Problems
Ima
ge
Nu
mb
er
Siz
e o
f Im
ag
e
Ch
ara
cte
r d
rop
ou
t
Ille
gib
le s
ma
ll
cha
ract
ers
Po
or
bla
ck/
w
hit
e s
ep
ara
tio
n
Sca
n l
ine
dro
p
ou
t
Re
pe
ate
d s
can
li
ne
s
Mis
sin
g p
ort
ion
o
f e
dg
e o
f im
ag
e
Ina
de
qu
ate
C
on
tra
st
Ina
de
qu
ate
B
rig
htn
ess
Co
lou
r d
rop
ou
t
Po
or
Th
resh
old
ing
Ima
ge
Sk
ew
Inco
rre
ct
ori
en
tati
on
Sp
eck
le o
r n
ois
e
on
im
ag
e
Re
pe
ate
d P
ixe
ls
Bo
rde
rs n
ot
cro
pp
ed
1 X X X
9 X
10 X X
17 X X
Appendix F – Sample Quality Control Log Date Initials Image Group Comments
2010/02/05 JR Group 1 - Images scanned on 2010/02/04 OK
2010/02/08 JR Group 2 - Images scanned on 2010/02/05 Failed. Sent for rescanning.
2010/02/09 JR Group 3 - Images scanned on 2010/02/08 OK
2010/02/10 JR Group 4 - Images scanned on 2010/02/09 OK
2010/02/11 JR Group 5 - Images scanned on 2010/02/10 Failed. Sent for rescanning
2010/02/11 JR Switch to tightened sampling plan because 2 out
of 4 sequential samples failed.
2010/02/12 JR Group 6 - Images scanned on 2010/02/11 OK
2010/02/13 JR Group 2 Rescan - Rescans of images
scanned on 2010/02/05 – images
rescanned on 2010/02/12
OK