hp laserjet 5l printer
TRANSCRIPT
’

HP LaserJet 5L Printer
User’s Manual
© Copyright Hewlett-PackardCompany 1995
All Rights Reserved.Reproduction, adaptation, ortranslation without prior writtenpermission is prohibited, exceptas allowed under the copyrightlaws.
Publication numberC3941-90901
First edition, October 1995
WarrantyThe information contained inthis document is subject tochange without notice.
Hewlett-Packard makes nowarranty of any kind withregard to this material,including, but not limited to,the implied warranties ofmerchantability and fitness fora particular purpose.
Hewlett-Packard shall not beliable for errors contained hereinor for incidental or consequentialdamage in connection with thefurnishing, performance, or useof this material.
Trademark CreditsHP LaserJet, Hewlett-Packard,Bi-Tronics, PCL, ResolutionEnhancement, and EconoMode,are trademarks ofHewlett-Packard Company.
Centronics is a U.S. registeredtrademark of Centronics DataComputer Corporation.
CompuServe® is a U.S.trademark of CompuServe, Inc.
Lotus®1-2-3® are U.S. registeredtrademarks of LotusDevelopment Corporation.
MS-DOS® is a registeredtrademark of MicrosoftCorporation.
Windows is a trademark of theMicrosoft Corporation.
WordPerfect is a copyright ofWordPerfect Corporation.
Hewlett-Packard Company11311 Chinden BoulevardBoise, Idaho 83714
Contents
1 Setting Up the PrinterStep 1. Printer Parts and Locations (1 of 2) . . . . . . . . . . . . 1-2Step 2. Install the Toner Cartridge . . . . . . . . . . . . . . . . . 1-4Step 3. Attach a Parallel Cable . . . . . . . . . . . . . . . . . . . 1-5Step 4. Attach the Power Cord . . . . . . . . . . . . . . . . . . . 1-6Step 5. Attach Label to the Paper Input Bin . . . . . . . . . . . . 1-7Step 6. Load Paper into Printer . . . . . . . . . . . . . . . . . . . 1-8Step 7. Install Printer Software . . . . . . . . . . . . . . . . . . . 1-9
2 Using your Printer SoftwareSoftware Instructions for Windows Users . . . . . . . . . . . . . 2-1
Printer Settings . . . . . . . . . . . . . . . . . . . . . . . . . . 2-1Status Window . . . . . . . . . . . . . . . . . . . . . . . . . . 2-3
Software Instructions for DOS Users . . . . . . . . . . . . . . . 2-4Remote Control Panel . . . . . . . . . . . . . . . . . . . . . . 2-4Status Monitor . . . . . . . . . . . . . . . . . . . . . . . . . . 2-5
Font Information . . . . . . . . . . . . . . . . . . . . . . . . . . 2-6Installed Fonts . . . . . . . . . . . . . . . . . . . . . . . . . . 2-6Default Font . . . . . . . . . . . . . . . . . . . . . . . . . . . 2-6
3 Using the Front PanelFront Panel Light Status . . . . . . . . . . . . . . . . . . . . . . . 3-1Front Panel Button Usage . . . . . . . . . . . . . . . . . . . . . . 3-5
4 PrintingPreparing for Printing . . . . . . . . . . . . . . . . . . . . . . . . 4-1
Purchasing Paper . . . . . . . . . . . . . . . . . . . . . . . . . 4-1Selecting Media Sizes . . . . . . . . . . . . . . . . . . . . . . 4-2Selecting the Paper Path . . . . . . . . . . . . . . . . . . . . . 4-3Loading the Paper Input Bin . . . . . . . . . . . . . . . . . . . 4-4Adding Paper . . . . . . . . . . . . . . . . . . . . . . . . . . . 4-4Using the Single Sheet Input Slot . . . . . . . . . . . . . . . . 4-5
Printing Tasks . . . . . . . . . . . . . . . . . . . . . . . . . . . . 4-6Pausing Printing Between Pages with Manual Feed . . . . . . . 4-6Stopping a Print Job . . . . . . . . . . . . . . . . . . . . . . . 4-6Printing Letterhead . . . . . . . . . . . . . . . . . . . . . . . 4-7Printing Envelopes . . . . . . . . . . . . . . . . . . . . . . . . 4-8Printing on Both Sides of Media (Duplexing) . . . . . . . . . . 4-9
Printing Other Special Media . . . . . . . . . . . . . . . . . . . 4-10Tips for Printing Custom Sizes . . . . . . . . . . . . . . . . . 4-10Tips for Printing Transparencies . . . . . . . . . . . . . . . . 4-10Tips for Printing Labels . . . . . . . . . . . . . . . . . . . . 4-10
EN Contents-1
5 Printer Maintenance and AccessoriesConserving Electricity . . . . . . . . . . . . . . . . . . . . . . . 5-1Managing Toner Cartridges . . . . . . . . . . . . . . . . . . . . . 5-1
Expected Toner Life . . . . . . . . . . . . . . . . . . . . . . . 5-1Extending Toner Life by using EconoMode . . . . . . . . . . . 5-1Extending Toner Life by Redistributing the Toner . . . . . . . 5-2Toner Cartridge Warranty . . . . . . . . . . . . . . . . . . . . 5-2Recycling Used Toner Cartridges . . . . . . . . . . . . . . . . 5-2
Cleaning Your Printer . . . . . . . . . . . . . . . . . . . . . . . . 5-3Accessories/Supplies Information . . . . . . . . . . . . . . . . . 5-4
6 Troubleshooting and Problem SolvingPrinting a Self Test Page . . . . . . . . . . . . . . . . . . . . . . 6-1Resetting the Printer . . . . . . . . . . . . . . . . . . . . . . . . 6-2Clearing Paper Jams . . . . . . . . . . . . . . . . . . . . . . . . 6-3
Paper Jam: Input Area . . . . . . . . . . . . . . . . . . . . . . 6-3Paper Jam: Output Area . . . . . . . . . . . . . . . . . . . . . 6-4Paper Jam: No Paper Taken . . . . . . . . . . . . . . . . . . . 6-5
Solving Printer Problems . . . . . . . . . . . . . . . . . . . . . . 6-6Solving Font Problems . . . . . . . . . . . . . . . . . . . . . . . 6-8Solving Print Quality Problems . . . . . . . . . . . . . . . . . . . 6-9
7 Warranty and License InformationWarranty . . . . . . . . . . . . . . . . . . . . . . . . . . . . . . 7-1HP Software Product License . . . . . . . . . . . . . . . . . . . . 7-7Worldwide Sales and Service Offices . . . . . . . . . . . . . . . 7-8
A Printer Specifications
B Print Media Specifications
C Parallel Cable Specifications and Attachments
D Memory Installation (DRAM)
E PCL Printer Commands
Index
Contents-2 EN
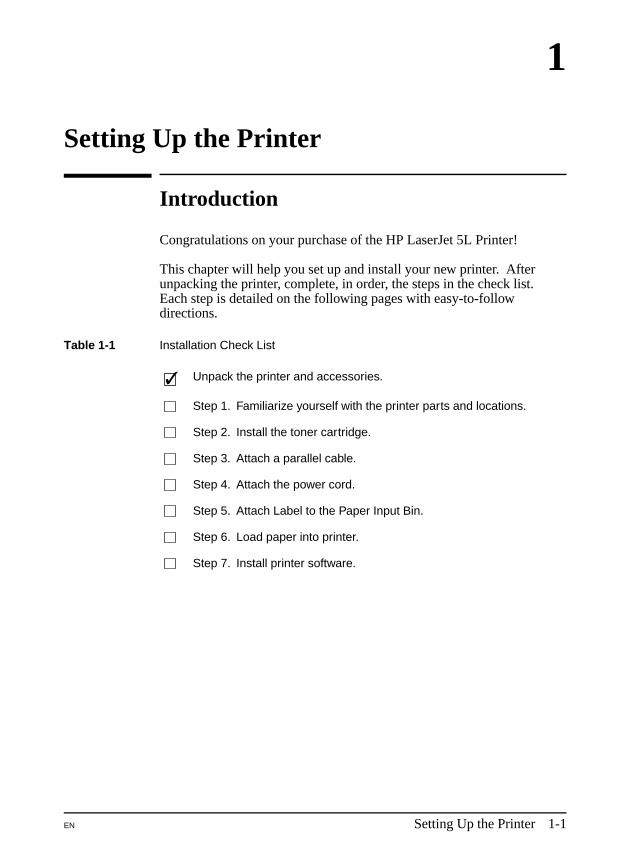
1
Setting Up the Printer
Introduction
Congratulations on your purchase of the HP LaserJet 5L Printer!
This chapter will help you set up and install your new printer. Afterunpacking the printer, complete, in order, the steps in the check list.Each step is detailed on the following pages with easy-to-followdirections.
Unpack the printer and accessories.
Step 1. Familiarize yourself with the printer parts and locations.
Step 2. Install the toner cartridge.
Step 3. Attach a parallel cable.
Step 4. Attach the power cord.
Step 5. Attach Label to the Paper Input Bin.
Step 6. Load paper into printer.
Step 7. Install printer software.
Table 1-1 Installation Check List
EN Setting Up the Printer 1-1
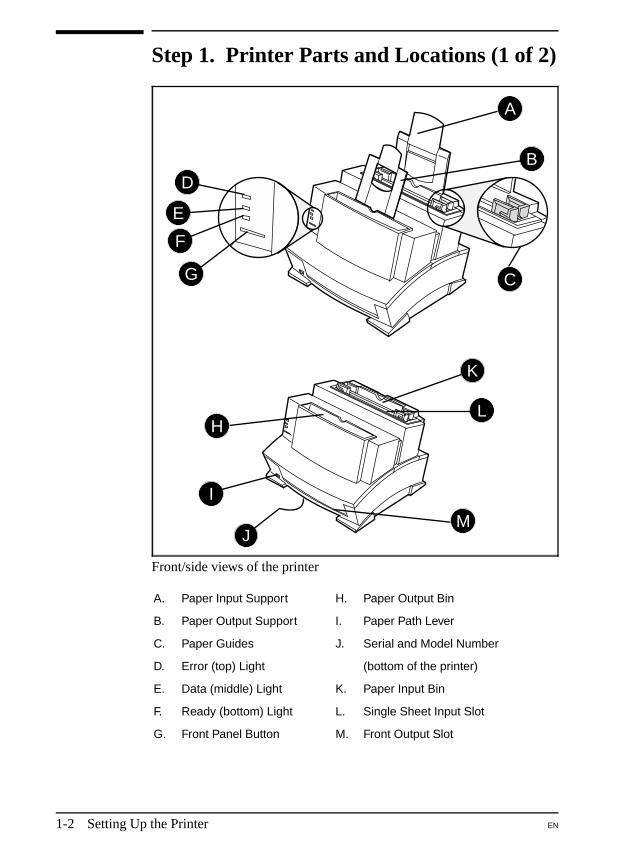
Step 1. Printer Parts and Locations (1 of 2)
Front/side views of the printer
A. Paper Input Support H. Paper Output Bin
B. Paper Output Support I. Paper Path Lever
C. Paper Guides J. Serial and Model Number
D. Error (top) Light (bottom of the printer)
E. Data (middle) Light K. Paper Input Bin
F. Ready (bottom) Light L. Single Sheet Input Slot
G. Front Panel Button M. Front Output Slot
K
L
M
A
BD
E
F
G
I
C
J
H
1-2 Setting Up the Printer EN
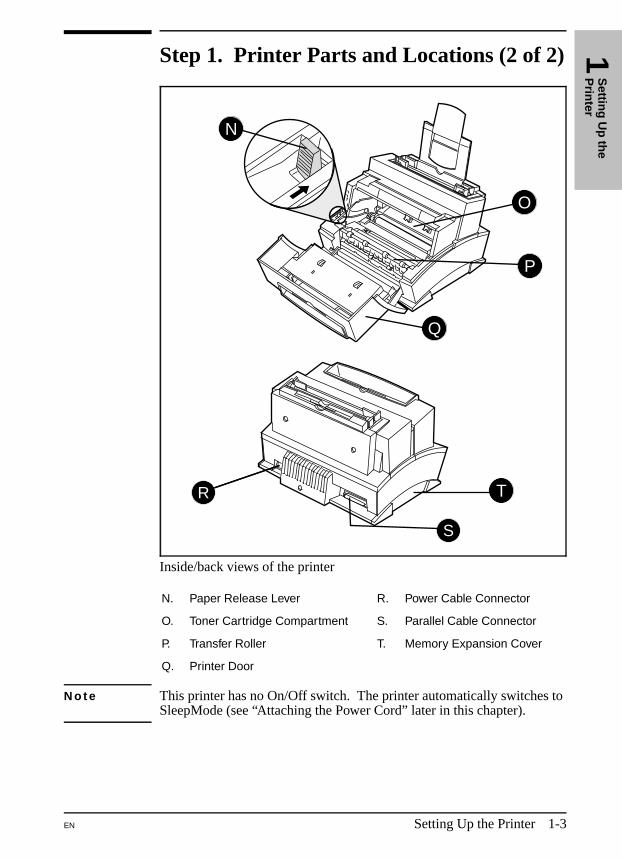
Step 1. Printer Parts and Locations (2 of 2)
Inside/back views of the printer
N. Paper Release Lever R. Power Cable Connector
O. Toner Cartridge Compartment S. Parallel Cable Connector
P. Transfer Roller T. Memory Expansion Cover
Q. Printer Door
N o t e This printer has no On/Off switch. The printer automatically switches toSleepMode (see “Attaching the Power Cord” later in this chapter).
N
O
P
Q
T
S
R
1S
etting
Up
the
Prin
ter
EN Setting Up the Printer 1-3
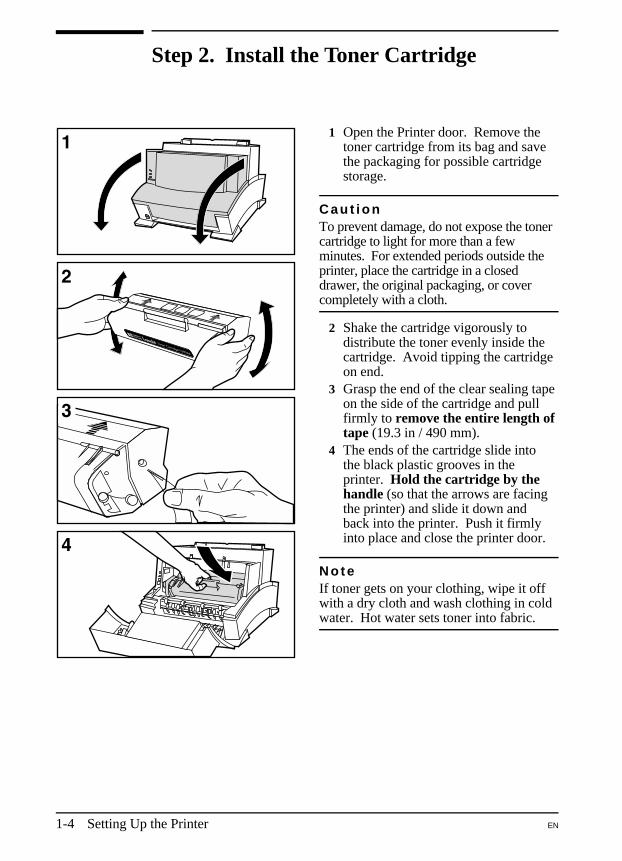
Step 2. Install the Toner Cartridge
1 Open the Printer door. Remove thetoner cartridge from its bag and savethe packaging for possible cartridgestorage.
C a u t i o nTo prevent damage, do not expose the tonercartridge to light for more than a fewminutes. For extended periods outside theprinter, place the cartridge in a closeddrawer, the original packaging, or covercompletely with a cloth.
2 Shake the cartridge vigorously todistribute the toner evenly inside thecartridge. Avoid tipping the cartridgeon end.
3 Grasp the end of the clear sealing tapeon the side of the cartridge and pullfirmly to remove the entire length oftape (19.3 in / 490 mm).
4 The ends of the cartridge slide intothe black plastic grooves in theprinter. Hold the cartridge by thehandle (so that the arrows are facingthe printer) and slide it down andback into the printer. Push it firmlyinto place and close the printer door.
N o t eIf toner gets on your clothing, wipe it offwith a dry cloth and wash clothing in coldwater. Hot water sets toner into fabric.
1-4 Setting Up the Printer EN
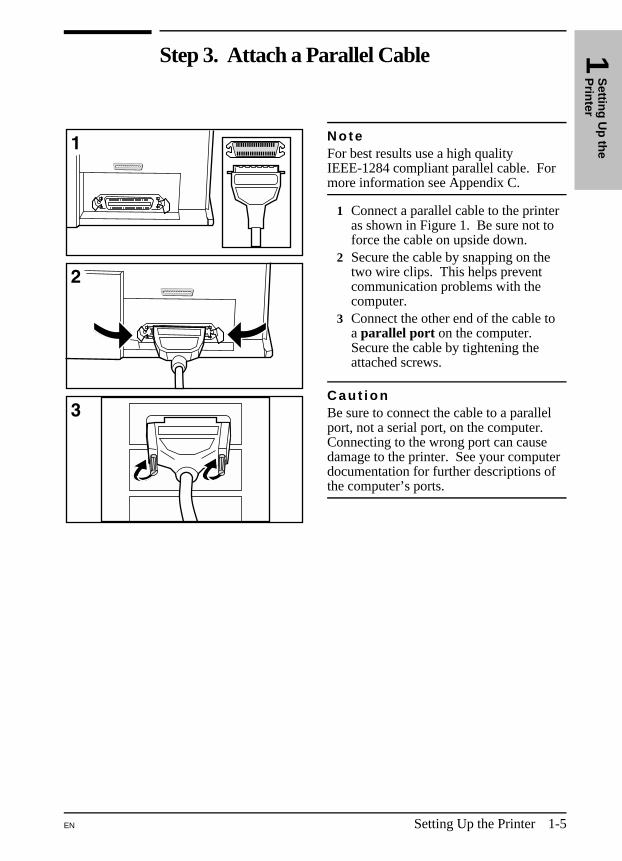
Step 3. Attach a Parallel Cable
N o t eFor best results use a high quality IEEE-1284 compliant parallel cable. Formore information see Appendix C.
1 Connect a parallel cable to the printeras shown in Figure 1. Be sure not toforce the cable on upside down.
2 Secure the cable by snapping on thetwo wire clips. This helps preventcommunication problems with thecomputer.
3 Connect the other end of the cable toa parallel port on the computer.Secure the cable by tightening theattached screws.
C a u t i o nBe sure to connect the cable to a parallelport, not a serial port, on the computer.Connecting to the wrong port can causedamage to the printer. See your computerdocumentation for further descriptions ofthe computer’s ports.
1S
etting
Up
the
Prin
ter
EN Setting Up the Printer 1-5
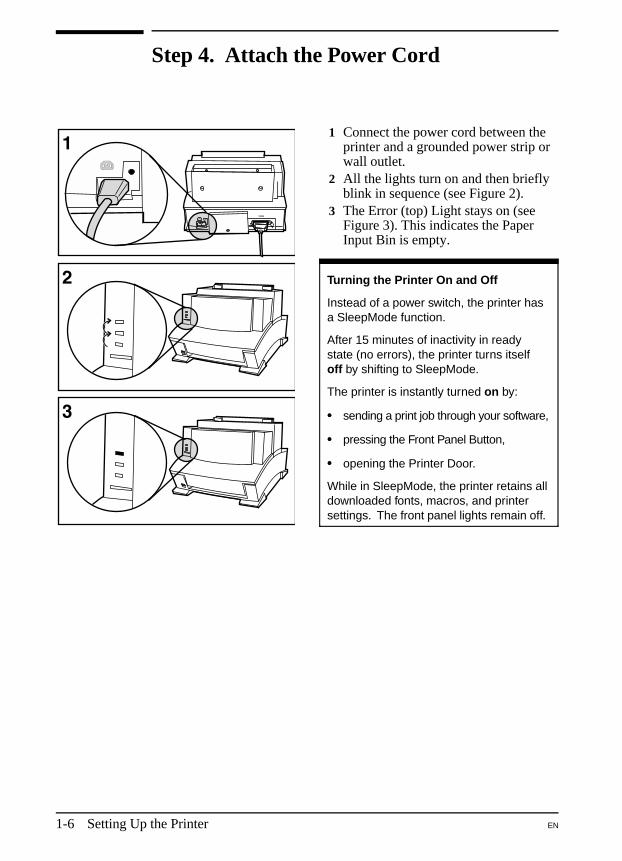
Step 4. Attach the Power Cord
1 Connect the power cord between theprinter and a grounded power strip orwall outlet.
2 All the lights turn on and then brieflyblink in sequence (see Figure 2).
3 The Error (top) Light stays on (seeFigure 3). This indicates the PaperInput Bin is empty.
Turning the Printer On and Off
Instead of a power switch, the printer hasa SleepMode function.
After 15 minutes of inactivity in readystate (no errors), the printer turns itselfoff by shifting to SleepMode.
The printer is instantly turned on by:
•• sending a print job through your software,
•• pressing the Front Panel Button,
•• opening the Printer Door.
While in SleepMode, the printer retains alldownloaded fonts, macros, and printersettings. The front panel lights remain off.
1-6 Setting Up the Printer EN
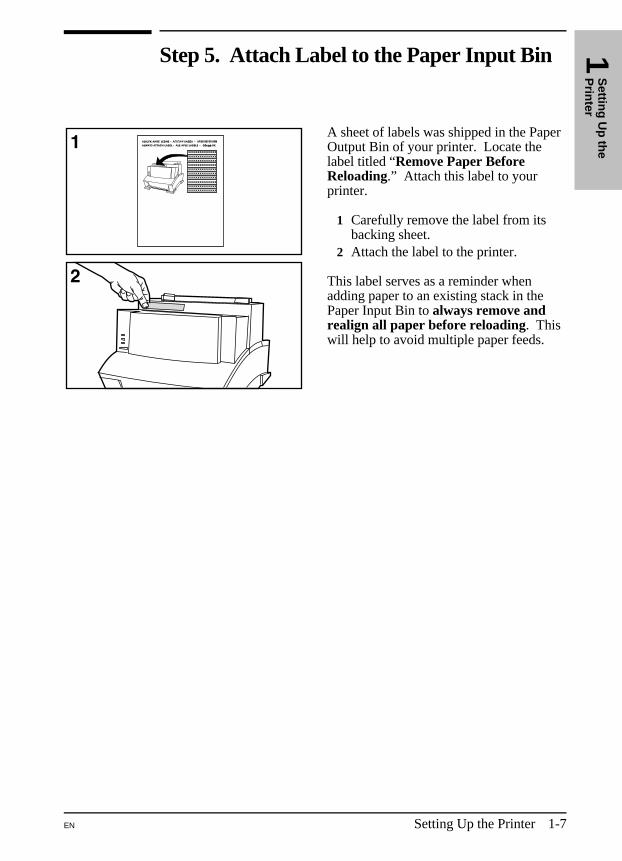
Step 5. Attach Label to the Paper Input Bin
A sheet of labels was shipped in the PaperOutput Bin of your printer. Locate thelabel titled “Remove Paper BeforeReloading.” Attach this label to yourprinter.
1 Carefully remove the label from itsbacking sheet.
2 Attach the label to the printer.
This label serves as a reminder whenadding paper to an existing stack in thePaper Input Bin to always remove andrealign all paper before reloading. Thiswill help to avoid multiple paper feeds.
ΑΠ ΠΛΨ ΛΑΒΕΛΘδκφγϕ ϑΚ
1S
etting
Up
the
Prin
ter
EN Setting Up the Printer 1-7
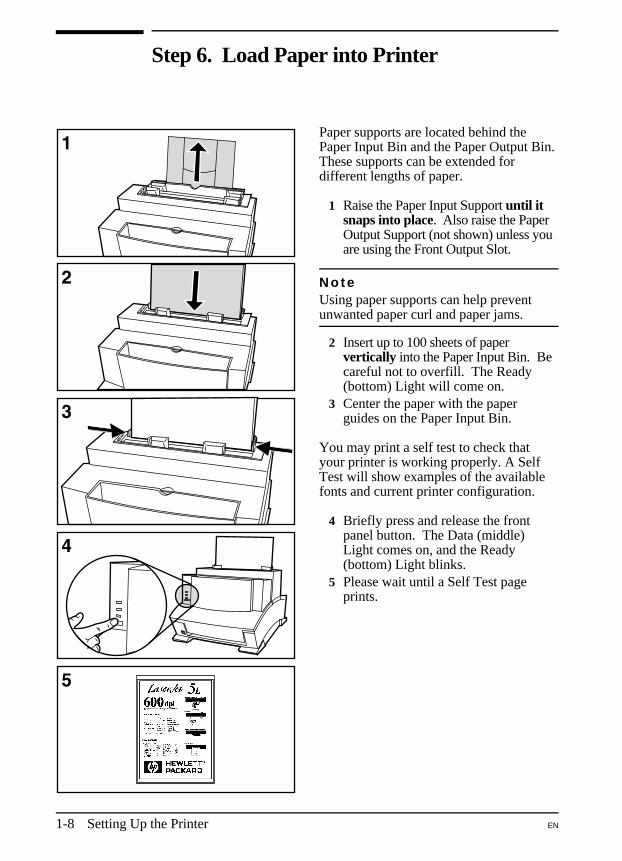
Step 6. Load Paper into Printer
Paper supports are located behind thePaper Input Bin and the Paper Output Bin.These supports can be extended fordifferent lengths of paper.
1 Raise the Paper Input Support until itsnaps into place. Also raise the PaperOutput Support (not shown) unless youare using the Front Output Slot.
N o t eUsing paper supports can help preventunwanted paper curl and paper jams.
2 Insert up to 100 sheets of papervertically into the Paper Input Bin. Becareful not to overfill. The Ready(bottom) Light will come on.
3 Center the paper with the paperguides on the Paper Input Bin.
You may print a self test to check thatyour printer is working properly. A SelfTest will show examples of the availablefonts and current printer configuration.
4 Briefly press and release the frontpanel button. The Data (middle)Light comes on, and the Ready(bottom) Light blinks.
5 Please wait until a Self Test pageprints.
1-8 Setting Up the Printer EN
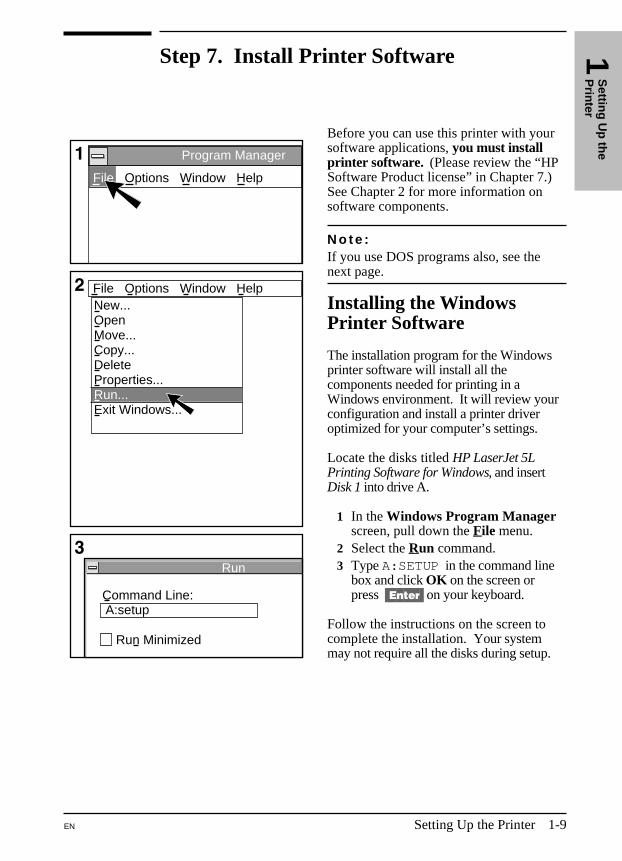
Step 7. Install Printer Software
Before you can use this printer with yoursoftware applications,you must installprinter software. (Please review the “HPSoftware Product license” in Chapter 7.)See Chapter 2 for more information onsoftware components.
N o t e :If you use DOS programs also, see thenext page.
Installing the WindowsPrinter Software
The installation program for the Windowsprinter software will install all thecomponents needed for printing in aWindows environment. It will review yourconfiguration and install a printer driveroptimized for your computer’s settings.
Locate the disks titledHP LaserJet 5LPrinting Software for Windows, and insertDisk 1into drive A.
1 In theWindows Program Managerscreen, pull down theFile menu.
2 Select theRun command.3 TypeA:SETUP in the command line
box and clickOK on the screen orpress[Enter] on your keyboard.
Follow the instructions on the screen tocomplete the installation. Yoursystemmay not require all the disks during setup.
Options Window HelpFile
Command Line:
Run
A:setup
Run Minimized
Options Window HelpFile
Program Manager
New...OpenMove...Copy...DeleteProperties...
Exit Windows...Run...
1S
ettingU
pthe
Printer
EN Setting Up the Printer 1-9
Installing the DOS Printer Software
Each DOS software application requires a separate printer driver. Thisinstallation program will install printer drivers and utilities for thefollowing DOS applications:• WordPerfect (versions 5.1 and 6.0)• Lotus 1-2-3 (versions 3.1 and 3.4)
See Chapter 2 for more information on DOS printer software.
Installing the supplied DOS printer software
1 Locate the disk titledHP LaserJet 5L DOS Utilities and DOS PrinterDrivers, Disk 1and insert it into your drive.
2 At the DOS prompt typeA:SETUP and press the[Enter] key on yourkeyboard.
3 Follow the instructions on the screen.
N o t e Generally any changes made to the printer settings (through the RemoteControl Panel- see Chapter 2) are lost when the printer is unplugged or reset.If you choose theOption to Update Default Printer Settingsduringinstallation, your printer settings will be saved in a file containing printerdefaults (C:\HPLJUTIL\DEFAULT.PJL). This file will be automatically sentto your printer each time you turn on (or reset) your computer. You will notneed to manually change the settings again in the Remote Control Panel. Thisoption will add a line to your AUTOEXEC.BAT file during installation. Ifyou do not desire this option select “No” when prompted.
To obtain printer drivers for additional DOS applications:• Check your software’s installation disks to see if they include support
for the HP LaserJet 5L printer.• Order an updated driver from your software vendor.
N o t e While you are waiting to receive a driver for the HP LaserJet 5L printer,you can substitute a driver for a similar HP LaserJet printer. Thesesubstitute drivers will allow you to use your HP LaserJet 5L printer, butmay not support all of the printer’s features.
1-10 Setting Up the Printer EN
2
Using your Printer Software
Introduction
This chapter will familiarize you with the printer software. It is dividedinto two categories:•• Software instructions for Windows users.•• Software instructions for DOS users.
Software Instructions for Windows Users
Make sure that the “HP LaserJet 5L Printing Software for Windows”software has been installed (see Chapter 1). This includes a Windowsprinter driver and Status Window.
Printer Settings
Most Windows software applications allow you to make changes to theprinter settings. This includes settings that determine how a print joblooks, such as page size, paper orientation, and margins. Settingschanged in the software application will usually override settings madein the printer driver.
The printer driver includes many of the settings mentioned above (incase your software application does not include them). It also includesall settings that determine how your printer will operate, such as printermemory settings, resolution, density, and draft printing. The printerdriver can be accessed in your software application through thePrint Setup or Print commands.
EN Using your Printer Software 2-1
N o t e Most Windows applications will override settings you specify in theprinter driver. Change all printer settings available in the softwareapplication first, and any remaining settings with the printer driver.
Each printer driver includes comprehensive screen help that is specificto the driver’s settings and options. Use these helps to obtain detailedinformation and instructions on various printing tasks.
The driver help includes information on the following printer settings:
• Number of copies • Adjusting print quality • Printer Resolution
• EconoMode • Toner Density • Resolution Enhancement
• Restoring to defaultsettings
• Advanced GraphicSettings
Windows Hint: Accessing Driver Help
You can access your help screens while in your printer driver by selecting“Help” at the bottom of your printer driver window. If you are not in theprinter driver you can still access the help screens:
1. In the Windows Program Manager find and select the icon labeledHP LaserJet 5L Printer.
2. Find and select the icon labeled HP 5L Driver Help.
2-2 Using your Printer Software EN
Status Window
The Status Window displays a pop-up message on your computer’s screeneach time the printer status changes. The Status Window will report anyproblem, error condition, or other status message directly to your computerscreen (when the printer is connected directly to the parallel port).
The Status Window includes comprehensive screen helps. Use these helpsto obtain detailed information and instructions on the Status Window.
Windows Hint: Accessing the Status Window
1. In the Windows Program Manager find and select the icon labeledHP LaserJet 5L Printer.
2. Find and select the icon labeled Status Window.
2U
sing
you
rP
rinter S
oftw
are
EN Using your Printer Software 2-3
Software Instructions for DOS Users
If you installed the “HP LaserJet 5L DOS Utilities and DOS PrinterDrivers” software (see Chapter 1), you have the Remote Control Paneland the Status Monitor printer utilities on your computer.
Remote Control Panel
The Remote Control Panel, or RCP, enables you to change printersettings if your DOS software application does not support the printerfeature you want to use.
N o t e Some DOS applications, such as WordPerfect for DOS, may overridesettings you specify from the RCP. Change all desired settings availablein the software first, and any remaining settings with the RCP.
If you chose theOption to Update Default Printer Settingsduringinstallation (see Chapter 1), a file containing printer defaults(C:/HPLJUTIL/DEFAULT.PJL) is automatically sent to your printereach time you turn on (or reset) your computer. You can make changesto your printer settings through the Remote Control Panel and save themto this file. This will save you from having to update your printersettings each time you turn your system back on.
The RCP allows you to access the following features:
• Copies • Lines per page • Orientation
• Paper Size • Typeface • Symbol Set
• Manual Feed • Resolution • I/O buffering
• Pitch • EconoMode • Density
• Auto Continue • Page Protection • Self Test Page
• Resolution Enhancement Technology (REt)
To start the RCP from DOS follow these steps:
1 Make sure that the Remote Control Panel is in your path statement. Youcan check your path by typingPATHand pressing[Enter]. If theRemote Control Panel directory is not in your path, you will have tochange to the default directoryC:\HPLJUTIL to start the program.
2 At the DOS prompt typeRCPand press[Enter].
For help information, selectHelp.
2-4 Using your Printer Software EN
Status Monitor
The Status Monitor displays a message on your computer’s screen eachtime the printer’s status changes. The Status Monitor will report anyproblem, error condition, or other status message directly to your printerscreen (when the printer is connected directly to the parallel port).
N o t e The Status Monitor will only work when the printer is connected to thecomputer with a high quality IEEE-1284 compliant parallel cable. Formore information see Appendix C.
To access the Status Monitor follow these steps:
1 Make sure that the Status Monitor is located in your path statement.You can check your path by typingPATHand pressing[Enter]. If theStatus Monitor directory is not in your path, you will have to change tothe default directoryC:\HPLJUTIL to start the program.
2 At the DOS prompt typeSTATand then press[Enter].
For help information, click onHelp.
2U
singyour
Printer
Softw
are
EN Using your Printer Software 2-5
Font Information
Installed Fonts
You can check your printer’s installed fonts by printing a self test. Theinternal font listing (26 typefaces) is found in the left column, in themiddle of the self test page. Any downloaded fonts are printed on asecond page.
To Print a Self Test:
1 Make sure that the Ready (bottom) Light is on and other lights are off.If necessary, wake up the printer by pressing the Front Panel Button.
2 Briefly press and release the Front Panel Button. The Data (middle)Light comes on, the Ready (bottom) Light blinks, and the self test pageprints.
N o t e Resetting or unplugging the printer, or changing its resolution causesany downloaded fonts to be removed from the printer memory.
Default Font
The factory default font is 10 pitch Courier using the PC-8 symbol set.The printer uses this font as a default unless you select a different fontthrough the Remote Control Panel. See the help section in the RemoteControl Panel for specific instructions on selecting the default font andsymbol set.
N o t e Most DOS software applications will override the default font.However, if font selection is not an option in your software, the defaultfont will be used. If you are using Windows applications, your fonts arealways selected through your software.
2-6 Using your Printer Software EN
3
Using the Front Panel
Front Panel Light Status
The Front Panel consists of one button and three status lights.
ERROR (Yellow)
DATA (Green)
READY (Green)
The lights can be in only one of the following states:
OFF ON Blinking
Ready
If the Ready (bottom) Light is on steadily, the printer is ready to print.
Action: No action is necessary. Pressing the button will print a self test page.
EN Using the Front Panel 3-1
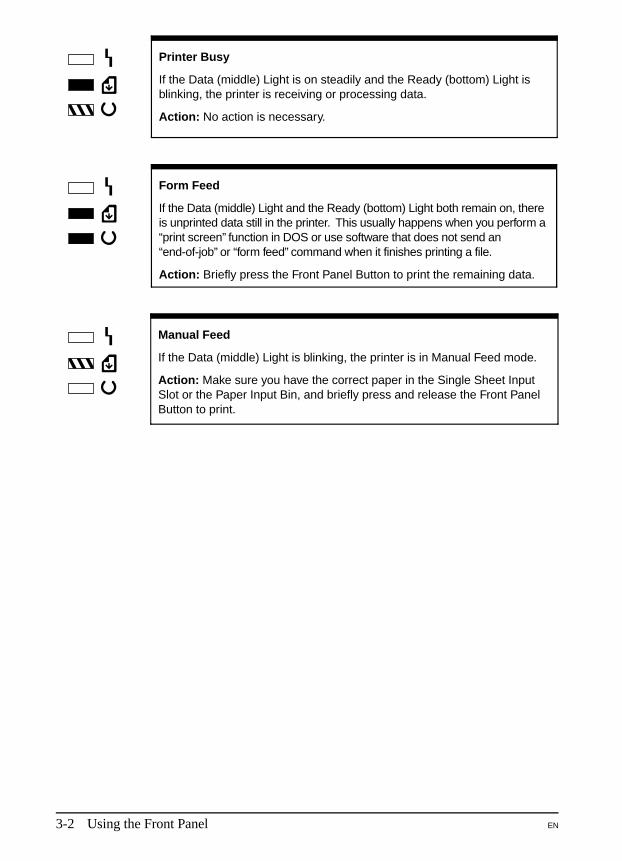
Printer Busy
If the Data (middle) Light is on steadily and the Ready (bottom) Light isblinking, the printer is receiving or processing data.
Action: No action is necessary.
Form Feed
If the Data (middle) Light and the Ready (bottom) Light both remain on, thereis unprinted data still in the printer. This usually happens when you perform a“print screen” function in DOS or use software that does not send an“end-of-job” or “form feed” command when it finishes printing a file.
Action: Briefly press the Front Panel Button to print the remaining data.
Manual Feed
If the Data (middle) Light is blinking, the printer is in Manual Feed mode.
Action: Make sure you have the correct paper in the Single Sheet InputSlot or the Paper Input Bin, and briefly press and release the Front PanelButton to print.
3-2 Using the Front Panel EN
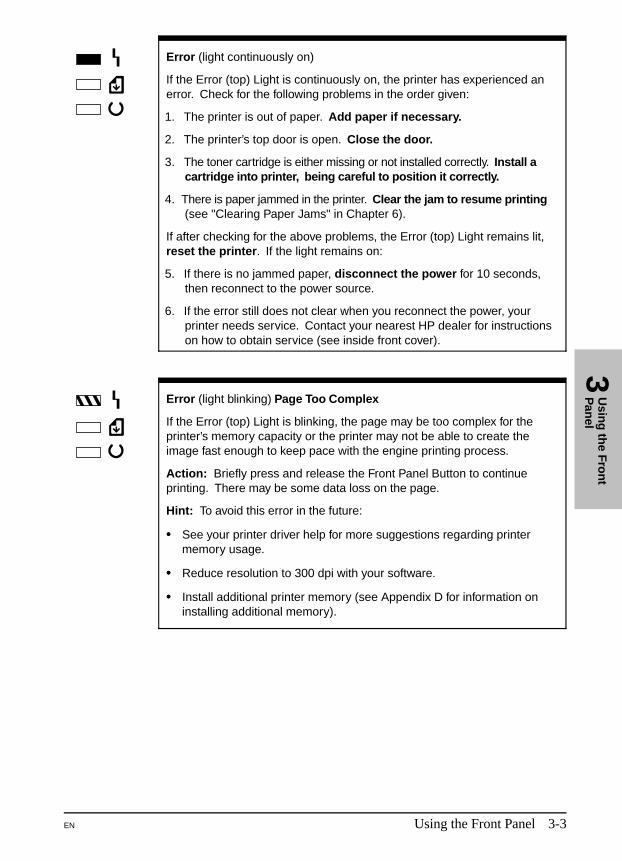
Error (light continuously on)
If the Error (top) Light is continuously on, the printer has experienced anerror. Check for the following problems in the order given:
1. The printer is out of paper. Add paper if necessary.
2. The printer’s top door is open. Close the door.
3. The toner cartridge is either missing or not installed correctly. Install acartridge into printer, being careful to position it correctly.
4. There is paper jammed in the printer. Clear the jam to resume printing(see "Clearing Paper Jams" in Chapter 6).
If after checking for the above problems, the Error (top) Light remains lit,reset the printer. If the light remains on:
5. If there is no jammed paper, disconnect the power for 10 seconds,then reconnect to the power source.
6. If the error still does not clear when you reconnect the power, yourprinter needs service. Contact your nearest HP dealer for instructionson how to obtain service (see inside front cover).
Error (light blinking) Page Too Complex
If the Error (top) Light is blinking, the page may be too complex for theprinter’s memory capacity or the printer may not be able to create theimage fast enough to keep pace with the engine printing process.
Action: Briefly press and release the Front Panel Button to continueprinting. There may be some data loss on the page.
Hint: To avoid this error in the future:
•• See your printer driver help for more suggestions regarding printermemory usage.
•• Reduce resolution to 300 dpi with your software.
•• Install additional printer memory (see Appendix D for information oninstalling additional memory).
3U
sing
the F
ron
tP
anel
EN Using the Front Panel 3-3
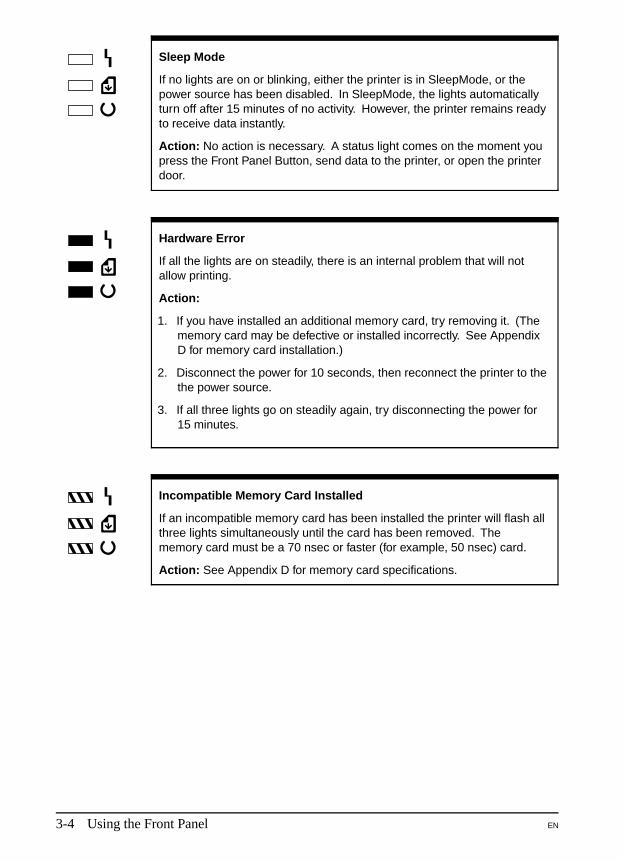
Sleep Mode
If no lights are on or blinking, either the printer is in SleepMode, or thepower source has been disabled. In SleepMode, the lights automaticallyturn off after 15 minutes of no activity. However, the printer remains readyto receive data instantly.
Action: No action is necessary. A status light comes on the moment youpress the Front Panel Button, send data to the printer, or open the printerdoor.
Hardware Error
If all the lights are on steadily, there is an internal problem that will notallow printing.
Action:
1. If you have installed an additional memory card, try removing it. (Thememory card may be defective or installed incorrectly. See AppendixD for memory card installation.)
2. Disconnect the power for 10 seconds, then reconnect the printer to thethe power source.
3. If all three lights go on steadily again, try disconnecting the power for15 minutes.
Incompatible Memory Card Installed
If an incompatible memory card has been installed the printer will flash allthree lights simultaneously until the card has been removed. Thememory card must be a 70 nsec or faster (for example, 50 nsec) card.
Action: See Appendix D for memory card specifications.
3-4 Using the Front Panel EN
Front Panel Button Usage
The Front Panel Button can be used to accomplish the following tasks:
Wake Up If the printer is in SleepMode (all the status lights are offwhile the printer is plugged in to a power source) theprinter will wake up to a ready state when the button isbriefly pushed and released.
Self Test Make sure that the Ready (bottom) Light is on and otherlights are off. If necessary, wake up the printer.
Briefly press and release the button. The Data (middle)Light comes on, the Ready (bottom) Light blinks, andthe self test page prints.
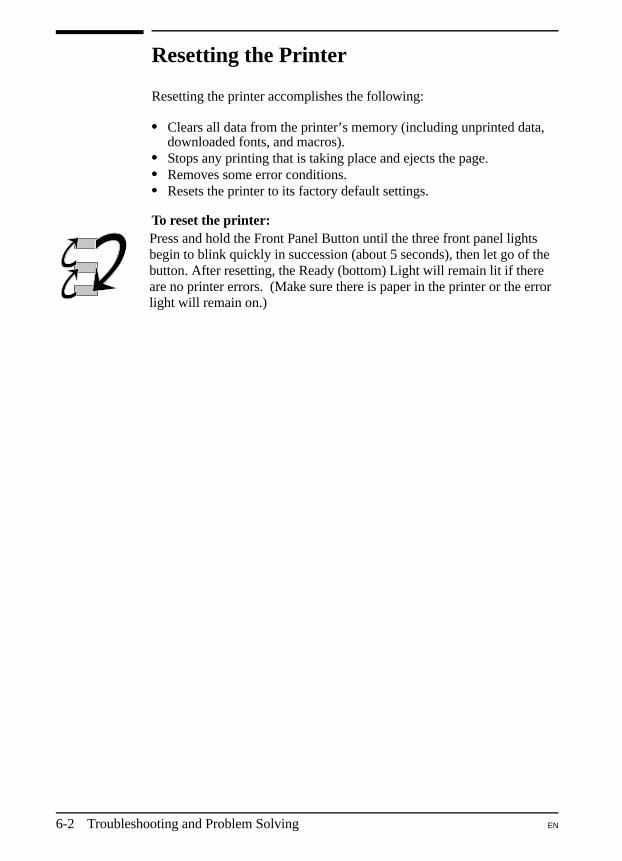
Printer Reset Press and hold the button until the three front panellights begin to blink quickly in succession (about 5seconds), then let go of the button.
After resetting, the Ready (bottom) Light will remain lit ifthere are no printer errors. (Make sure there is paper inthe printer or the error light will remain on.) The resetwill return the printer to the factory default values (anydownloaded fonts will be removed from memory).
Resume(from ManualFeed)
If the software application is set to Manual Feed, brieflypress and release the button to print each page.
Continue(from memoryerror)
If the printer has stopped printing because a page is toocomplex, press and release the button to continue. Seesuggestions on “Error: Page Too Complex” earlier in thischapter.
Form Feed If the Data (middle) Light and the Ready (bottom) Lightboth remain on, there is unprinted data still in the printer.This usually happens when you perform a “print screen”function in DOS or use software that does not send an“end-of-job” or “form feed” command when it finishesprinting a file. Briefly press and release the button toprint the remaining data.
3U
sing
the F
ron
tP
anel
EN Using the Front Panel 3-5

3-6 Using the Front Panel EN

4
Printing
Preparing for Printing
Purchasing Paper
HP LaserJet printers produce documents of excellent print quality. Youcan print on a variety of print media, including paper, envelopes, labels,and overhead transparencies. Properties such as weight, grain, andmoisture content are important factors affecting printer performance andoutput quality.
N o t e To achieve the best possible print quality use only high quality,copier-grade paper. See Appendix B for more detailed paperspecifications.
N o t e Always test a sample of the paper you selected before purchasinglarge quantities. Your paper supplier should understand therequirements specified in the HP LaserJet Printer Family PaperSpecifications Guide (HP part number 5002-1801). You may want toorder this guide for your purchasing agent through HP Parts DirectOrdering, (800) 538-8787. Outside the U.S., see the tables in“Worldwide HP Sales and Service Offices,” in Chapter 7.
Hewlett-Packard neither warrants nor recommends the use of aparticular brand of print media. Media properties are subject to changeby the manufacturer and HP has no control over these changes.
EN Printing 4-1
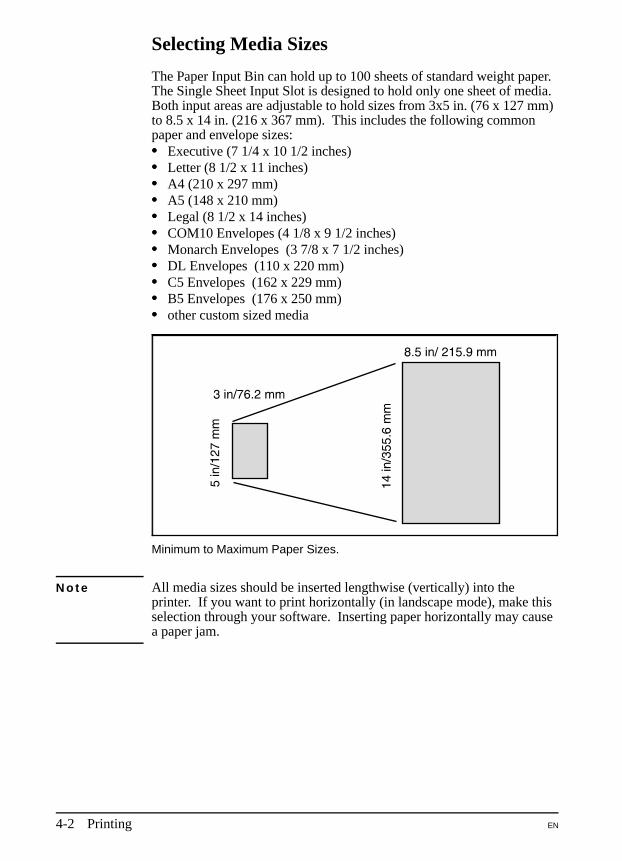
Selecting Media Sizes
The Paper Input Bin can hold up to 100 sheets of standard weight paper.The Single Sheet Input Slot is designed to hold only one sheet of media.Both input areas are adjustable to hold sizes from 3x5 in. (76 x 127 mm)to 8.5 x 14 in. (216 x 367 mm). This includes the following commonpaper and envelope sizes:•• Executive (7 1/4 x 10 1/2 inches)•• Letter (8 1/2 x 11 inches)•• A4 (210 x 297 mm)•• A5 (148 x 210 mm)•• Legal (8 1/2 x 14 inches)•• COM10 Envelopes (4 1/8 x 9 1/2 inches)•• Monarch Envelopes (3 7/8 x 7 1/2 inches)•• DL Envelopes (110 x 220 mm)•• C5 Envelopes (162 x 229 mm)•• B5 Envelopes (176 x 250 mm)•• other custom sized media
Minimum to Maximum Paper Sizes.
N o t e All media sizes should be inserted lengthwise (vertically) into theprinter. If you want to print horizontally (in landscape mode), make thisselection through your software. Inserting paper horizontally may causea paper jam.
4-2 Printing EN
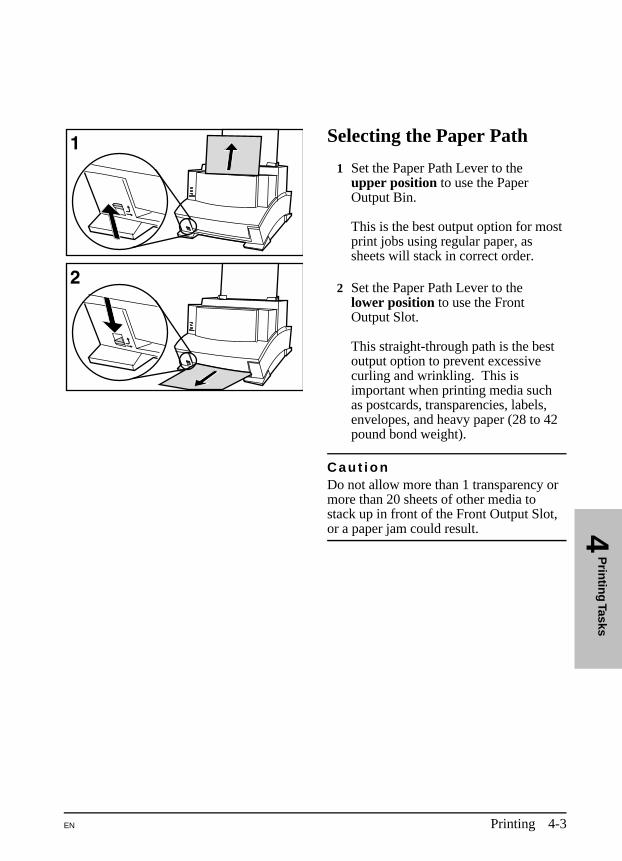
Selecting the Paper Path
1 Set the Paper Path Lever to theupper position to use the PaperOutput Bin.
This is the best output option for mostprint jobs using regular paper, assheets will stack in correct order.
2 Set the Paper Path Lever to thelower position to use the FrontOutput Slot.
This straight-through path is the bestoutput option to prevent excessivecurling and wrinkling. This isimportant when printing media suchas postcards, transparencies, labels,envelopes, and heavy paper (28 to 42pound bond weight).
C a u t i o nDo not allow more than 1 transparency ormore than 20 sheets of other media tostack up in front of the Front Output Slot,or a paper jam could result. 4
Prin
ting
Tasks
EN Printing 4-3
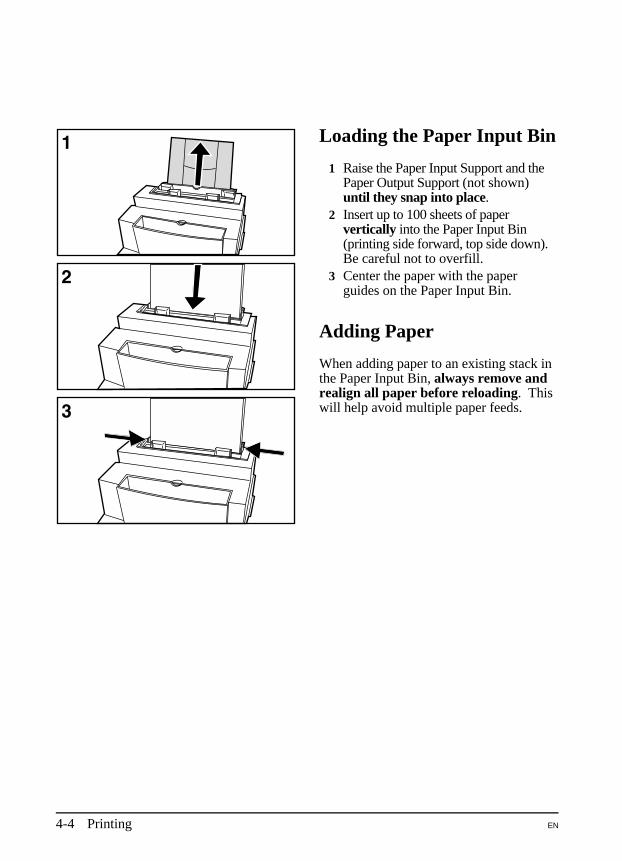
Loading the Paper Input Bin
1 Raise the Paper Input Support and thePaper Output Support (not shown)until they snap into place.
2 Insert up to 100 sheets of papervertically into the Paper Input Bin(printing side forward, top side down).Be careful not to overfill.
3 Center the paper with the paperguides on the Paper Input Bin.
Adding Paper
When adding paper to an existing stack inthe Paper Input Bin, always remove andrealign all paper before reloading. Thiswill help avoid multiple paper feeds.
4-4 Printing EN
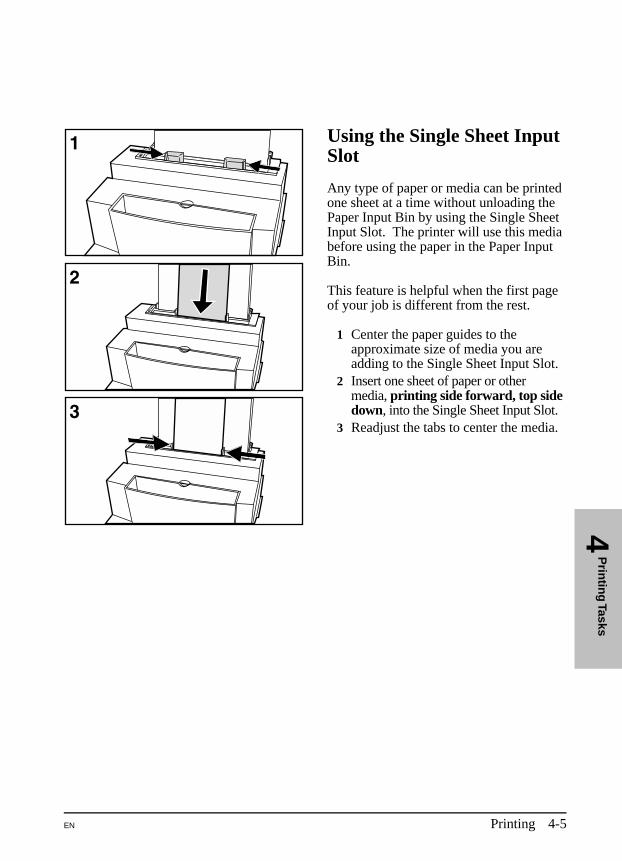
Using the Single Sheet InputSlot
Any type of paper or media can be printedone sheet at a time without unloading thePaper Input Bin by using the Single SheetInput Slot. The printer will use this mediabefore using the paper in the Paper InputBin.
This feature is helpful when the first pageof your job is different from the rest.
1 Center the paper guides to theapproximate size of media you areadding to the Single Sheet Input Slot.
2 Insert one sheet of paper or othermedia, printing side forward, top sidedown, into the Single Sheet Input Slot.
3 Readjust the tabs to center the media.
4P
rintin
g Tasks
EN Printing 4-5
Printing Tasks
Pausing Printing Between Pages with Manual Feed
On some occasions you may want the printer to pause, allowing you toload special media. For instance, if you are printing several copies of aletter with the first page on letterhead, you can set the printer to pauseeach time before it prints the first page. This allows you to load a sheetof letterhead into the Single Sheet Input Slot for each copy of the letter.The printer will resume when you press the Front Panel Button.
It is also possible to set the printer to pause between each sheet in a printjob. Simply press the Front Panel Button to print each page.
Set up the Manual Feed option through your software to pause printing.
1 In your software’s printer setup menu or bin/tray selection, select theManual Feed mode.
2 From your software, print the document.3 The Data (middle) Light will blink when the page is ready to print,
indicating the printer is paused and waiting.4 After inserting the correct media, briefly press and release the Front
Panel Button to print the page.
Stopping a Print Job
If the file you send to the printer is only one or two pages long, you canstop the print job by resetting the printer (you will lose any downloadedfonts).
If you are printing a large file:•• Remove the paper from the Paper Input Tray, except for any sheet
that is currently being fed into the printer.•• Stop and delete the print job through your software.•• Reset the printer (you will lose any downloaded fonts and the printer
will return to factory setting defaults).
4-6 Printing EN
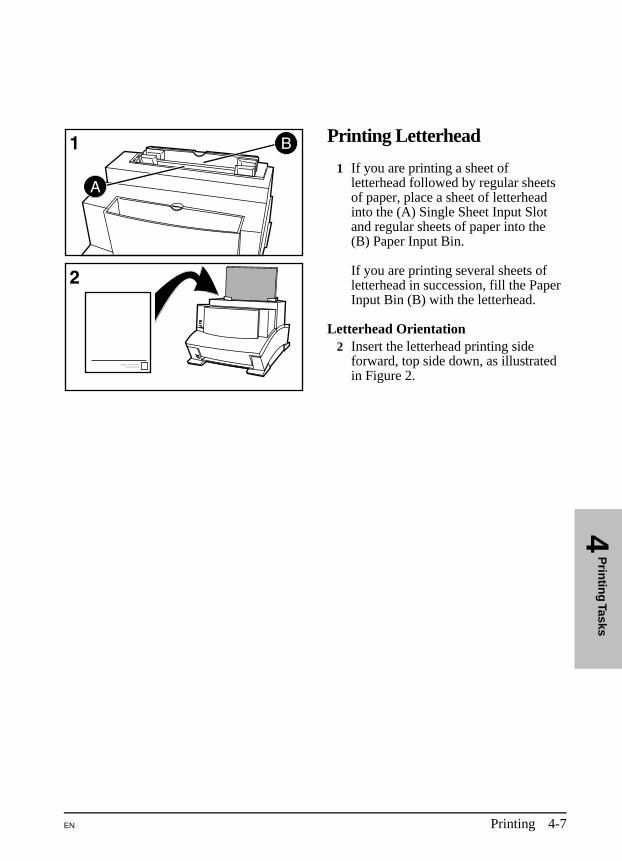
Printing Letterhead
1 If you are printing a sheet ofletterhead followed by regular sheetsof paper, place a sheet of letterheadinto the (A) Single Sheet Input Slotand regular sheets of paper into the(B) Paper Input Bin.
If you are printing several sheets ofletterhead in succession, fill the PaperInput Bin (B) with the letterhead.
Letterhead Orientation2 Insert the letterhead printing side
forward, top side down, as illustratedin Figure 2.
4P
rintin
g Tasks
EN Printing 4-7
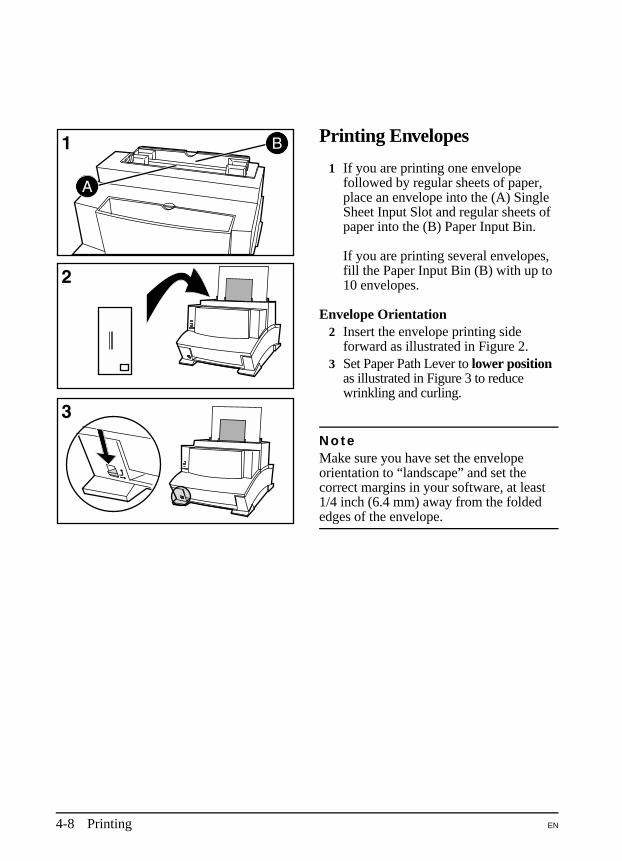
Printing Envelopes
1 If you are printing one envelopefollowed by regular sheets of paper,place an envelope into the (A) SingleSheet Input Slot and regular sheets ofpaper into the (B) Paper Input Bin.
If you are printing several envelopes,fill the Paper Input Bin (B) with up to10 envelopes.
Envelope Orientation 2 Insert the envelope printing side
forward as illustrated in Figure 2.3 Set Paper Path Lever to lower position
as illustrated in Figure 3 to reducewrinkling and curling.
N o t eMake sure you have set the envelopeorientation to “landscape” and set thecorrect margins in your software, at least1/4 inch (6.4 mm) away from the foldededges of the envelope.
4-8 Printing EN
Printing on Both Sides of Media (Duplexing)
Printing on both sides of media may present a performance differencefrom normal printing but will not damage the printer. When the secondside is being printed you may experience a higher frequency of the papernot feeding, paper jams and multi-feeds. The print quality may bedifferent on the second side of the media.
1 Print the first side of the media as you normally would. Some softwareapplications include “odd pages” and “even pages” printing (or otheroptions that are useful when duplex printing). Experiment with yoursoftware application and consult your software user’s manual.
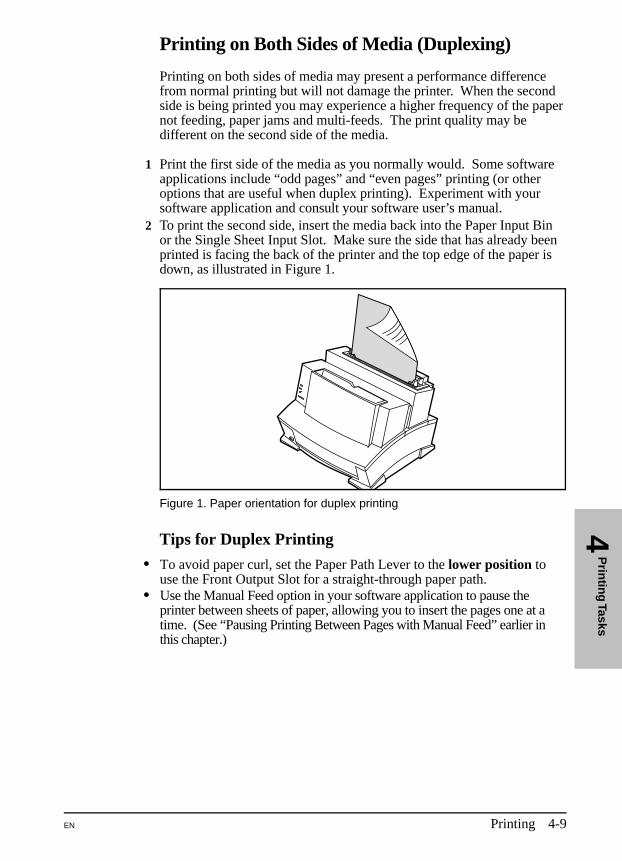
2 To print the second side, insert the media back into the Paper Input Binor the Single Sheet Input Slot. Make sure the side that has already beenprinted is facing the back of the printer and the top edge of the paper isdown, as illustrated in Figure 1.
Figure 1. Paper orientation for duplex printing
Tips for Duplex Printing
•• To avoid paper curl, set the Paper Path Lever to the lower position touse the Front Output Slot for a straight-through paper path.
•• Use the Manual Feed option in your software application to pause theprinter between sheets of paper, allowing you to insert the pages one at atime. (See “Pausing Printing Between Pages with Manual Feed” earlier inthis chapter.)
4P
rintin
g Tasks
EN Printing 4-9
Printing Other Special Media
Only use media designated for use with laser printers. See Appendix Bfor detailed specifications.
1 To avoid paper curl, set the Paper Path Lever to the lower position touse the Front Output Slot for a straight-through paper path. This isimportant when printing media such as postcards, transparencies, labels,envelopes, and heavy paper (28 to 42 pound bond weight).
2 Center the sliding tabs to the approximate size of media you are using.3 Insert the media printing side forward, top side down, into the Single
Sheet Input Slot or the Paper Input Bin.4 Readjust the tabs to center the media. 5 Set correct margins, paper size, and orientation from your software.
Tips for Printing Custom Sizes
•• Set margins at least 1/4 inch (6.4 mm) away from the edges of themedia.
•• Do not print on media smaller than 3 inches wide (76.2 mm) or 5inches tall (127 mm).
•• Always insert media lengthwise (vertically) into the printer. If youwant to print in landscape mode, make this selection through yoursoftware. Inserting paper horizontally may cause a paper jam.
Tips for Printing Transparencies
•• To avoid transparency curl, remove the transparency as it comes outof the printer and set it on a flat surface to cool.
Tips for Printing Labels
•• Do not use labels that are separating from the backing sheet or thatare wrinkled or damaged in any way.
•• Do not use label sheets with the backing sheet exposed, such as labelswith any spaces between them.
•• Do not feed a sheet of labels through your printer more than once.
4-10 Printing EN
5
Printer Maintenance and Accessories
Conserving Electricity
After 15 minutes of inactivity, the printer will automatically shift to apowered down state called SleepMode (this function is not customeradjustable).
During SleepMode the printer consumes very little electricity (6 watts).This is approximately the same amount as a VCR while not in use.
Managing Toner Cartridges
Expected Toner Life
The life of your toner cartridge depends on the amount of toner used ineach print job. A page of graphics will use more toner than a page oftext. For instance, when you print a typical business letter with about5% page coverage, you can expect a toner cartridge life ofapproximately 2,500 pages.
Extending Toner Life by using EconoMode
You can extend the life of your toner cartridge by using EconoMode.EconoMode uses approximately 50% less toner than normal printing.The printed image is much lighter, and is adequate for printing drafts orproofs. You can set the EconoMode option through your printer driver(refer to the help screens in the printer driver for more information).
EN Printer Maintenance and Accessories 5-1

Extending Toner Life by Redistributing the Toner
Areas of faded print are often an indicator that the toner cartridge is nearthe end of its toner life. You can temporarily re-establish print qualityby redistributing the remaining toner in the cartridge. (This is typicallysuccessful one time only.)
1 Open the printer’s door and remove the toner cartridge.2 Gently shake the cartridge to redistribute the toner evenly inside the
cartridge. Avoid tipping the cartridge on end.3 Reinsert the toner cartridge and close the door.
Toner Cartridge Warranty
The HP C3906A toner cartridge is warranted against defects in materialsand workmanship for 90 days from the purchase date. During this warrantyperiod, HP will replace any cartridge that proves to be defective.
Place the defective cartridge in the original packaging, or the packagingfrom a replacement cartridge. Be sure to seal the bag. Use the internalpackaging to hold the cartridge in place. Please include in the box:•• Your name and address.•• The supplier’s name and address.•• A print sample from the defective cartridge.•• A brief explanation as to why you are returning the cartridge.
Return the cartridge to the place of purchase. They will exchange thedefective cartridge for an new one and forward the old cartridge to HP.
Recycling Used Toner Cartridges
In order to reduce waste, Hewlett-Packard has adopted a recyclingprogram for used toner cartridges. Plastics and other materials arerecycled. Cartridge components that do not wear out are reused. HP paysthe shipping costs from the user to the recycling plant. For each cartridgereturned, HP donates one U.S. dollar to be shared by the NatureConservancy and the National Wildlife Federation. To join this recyclingeffort, follow the instructions inside the toner cartridge box.
5-2 Printer Maintenance and Accessories EN
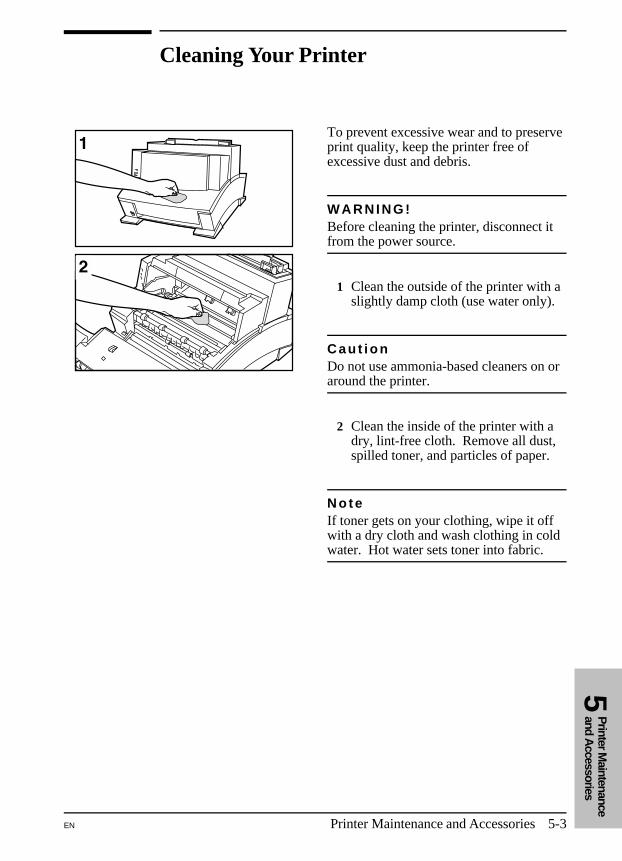
Cleaning Your Printer
To prevent excessive wear and to preserveprint quality, keep the printer free ofexcessive dust and debris.
W A R N I N G !Before cleaning the printer, disconnect itfrom the power source.
1 Clean the outside of the printer with aslightly damp cloth (use water only).
C a u t i o nDo not use ammonia-based cleaners on oraround the printer.
2 Clean the inside of the printer with adry, lint-free cloth. Remove all dust,spilled toner, and particles of paper.
N o t eIf toner gets on your clothing, wipe it offwith a dry cloth and wash clothing in coldwater. Hot water sets toner into fabric.
5P
rinter Maintenance
and Accessories
EN Printer Maintenance and Accessories 5-3
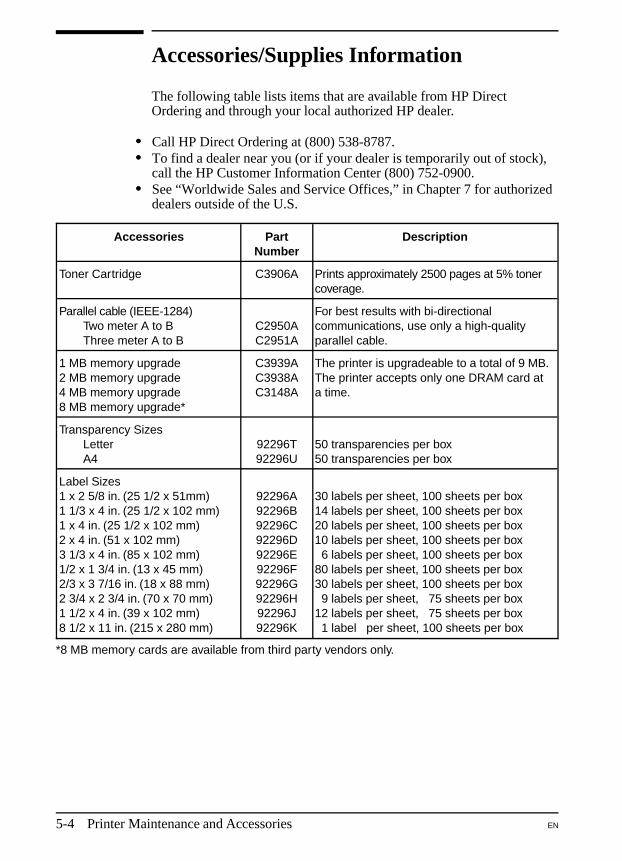
Accessories/Supplies Information
The following table lists items that are available from HP DirectOrdering and through your local authorized HP dealer.
•• Call HP Direct Ordering at (800) 538-8787.•• To find a dealer near you (or if your dealer is temporarily out of stock),
call the HP Customer Information Center (800) 752-0900.•• See “Worldwide Sales and Service Offices,” in Chapter 7 for authorized
dealers outside of the U.S.
Accessories PartNumber
Description
Toner Cartridge C3906A Prints approximately 2500 pages at 5% tonercoverage.
Parallel cable (IEEE-1284)Two meter A to BThree meter A to B
C2950AC2951A
For best results with bi-directionalcommunications, use only a high-qualityparallel cable.
1 MB memory upgrade2 MB memory upgrade4 MB memory upgrade8 MB memory upgrade*
C3939AC3938AC3148A
The printer is upgradeable to a total of 9 MB.The printer accepts only one DRAM card ata time.
Transparency SizesLetterA4
92296T92296U
50 transparencies per box50 transparencies per box
Label Sizes1 x 2 5/8 in. (25 1/2 x 51mm)1 1/3 x 4 in. (25 1/2 x 102 mm)1 x 4 in. (25 1/2 x 102 mm)2 x 4 in. (51 x 102 mm)3 1/3 x 4 in. (85 x 102 mm)1/2 x 1 3/4 in. (13 x 45 mm)2/3 x 3 7/16 in. (18 x 88 mm)2 3/4 x 2 3/4 in. (70 x 70 mm)1 1/2 x 4 in. (39 x 102 mm)8 1/2 x 11 in. (215 x 280 mm)
92296A92296B92296C92296D92296E92296F92296G92296H92296J92296K
30 labels per sheet, 100 sheets per box14 labels per sheet, 100 sheets per box20 labels per sheet, 100 sheets per box10 labels per sheet, 100 sheets per box 6 labels per sheet, 100 sheets per box80 labels per sheet, 100 sheets per box30 labels per sheet, 100 sheets per box 9 labels per sheet, 75 sheets per box12 labels per sheet, 75 sheets per box 1 label per sheet, 100 sheets per box
*8 MB memory cards are available from third party vendors only.
5-4 Printer Maintenance and Accessories EN
6
Troubleshooting and Problem Solving
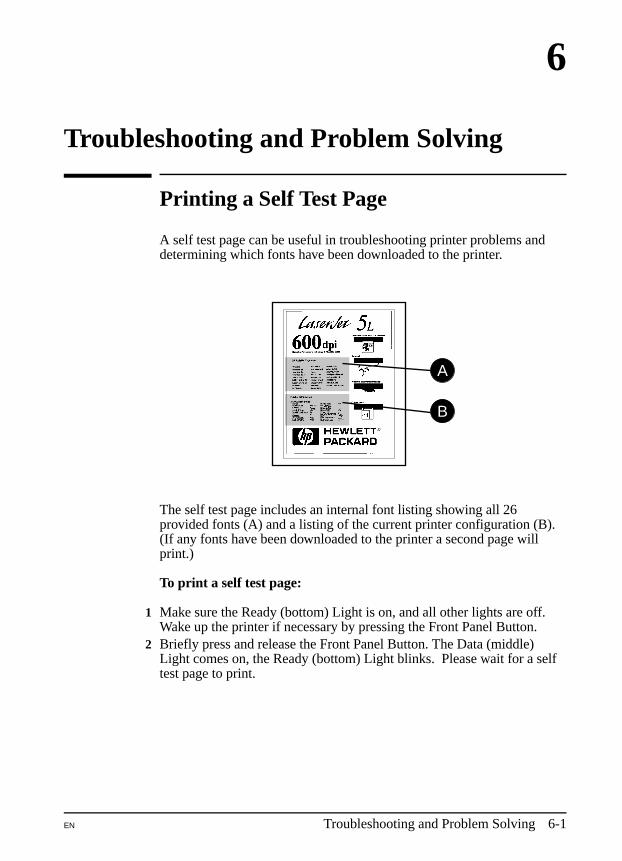
Printing a Self Test Page
A self test page can be useful in troubleshooting printer problems anddetermining which fonts have been downloaded to the printer.
The self test page includes an internal font listing showing all 26provided fonts (A) and a listing of the current printer configuration (B).(If any fonts have been downloaded to the printer a second page willprint.)
To print a self test page:
1 Make sure the Ready (bottom) Light is on, and all other lights are off.Wake up the printer if necessary by pressing the Front Panel Button.
2 Briefly press and release the Front Panel Button. The Data (middle)Light comes on, the Ready (bottom) Light blinks. Please wait for a selftest page to print.
A
B
EN Troubleshooting and Problem Solving 6-1
Resetting the Printer
Resetting the printer accomplishes the following:
•• Clears all data from the printer’s memory (including unprinted data,downloaded fonts, and macros).
•• Stops any printing that is taking place and ejects the page.•• Removes some error conditions.•• Resets the printer to its factory default settings.
To reset the printer:Press and hold the Front Panel Button until the three front panel lightsbegin to blink quickly in succession (about 5 seconds), then let go of thebutton. After resetting, the Ready (bottom) Light will remain lit if thereare no printer errors. (Make sure there is paper in the printer or the errorlight will remain on.)
6-2 Troubleshooting and Problem Solving EN

Clearing Paper Jams
Occasionally paper can become jammedduring a print job. Some of the causesinclude:
•• Loading paper improperly.•• Opening the Printer Door or adjusting
the Paper Path Lever while printing.•• Printing on paper that doesn’t meet
HP specifications.•• Using paper that is smaller than 3 x 5
in. (76.2 x 127mm).
Paper Jam: Input Area
1 Open the Printer Door.2 Remove the toner cartridge, and
protect it from light while you workon the printer.
3 If only a small portion of the paper hasgone into the printer, use both hands tocarefully pull the jammed paperstraight up from the Paper Input Bin.
4 If you can reach the paper as shownin Figure 4, carefully pull the paperforward.
C a u t i o nDo not touch the transfer roller (A), it candamage the print quality of your printer.
After removing all sheets and/orfragments of paper, replace the tonercartridge, and close the door. If youremoved the paper from the Paper InputBin, reinstall it. The printer should returnto a Ready state.
A
6Troubleshootingand P
roblem S
olving
EN Troubleshooting and Problem Solving 6-3
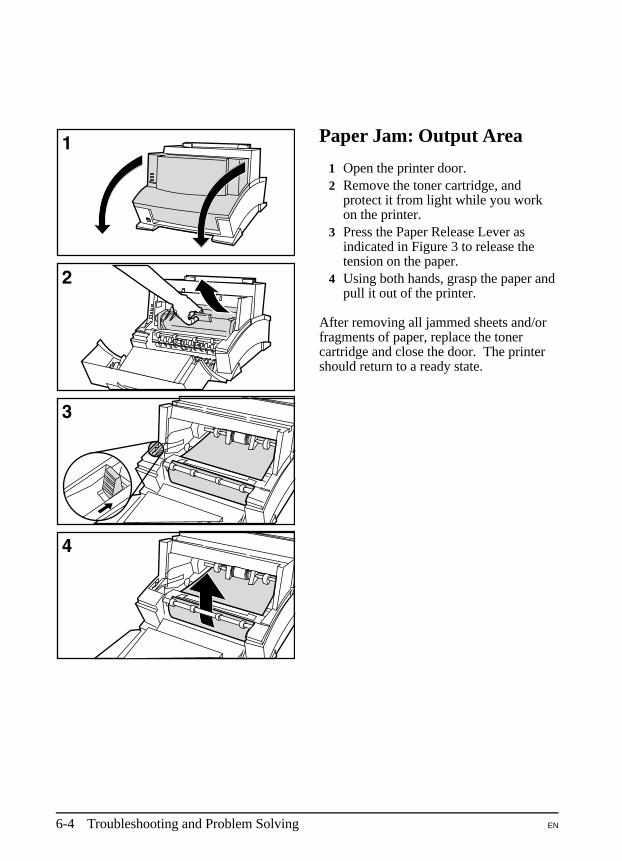
Paper Jam: Output Area
1 Open the printer door.2 Remove the toner cartridge, and
protect it from light while you workon the printer.
3 Press the Paper Release Lever asindicated in Figure 3 to release thetension on the paper.
4 Using both hands, grasp the paper andpull it out of the printer.
After removing all jammed sheets and/orfragments of paper, replace the tonercartridge and close the door. The printershould return to a ready state.
6-4 Troubleshooting and Problem Solving EN
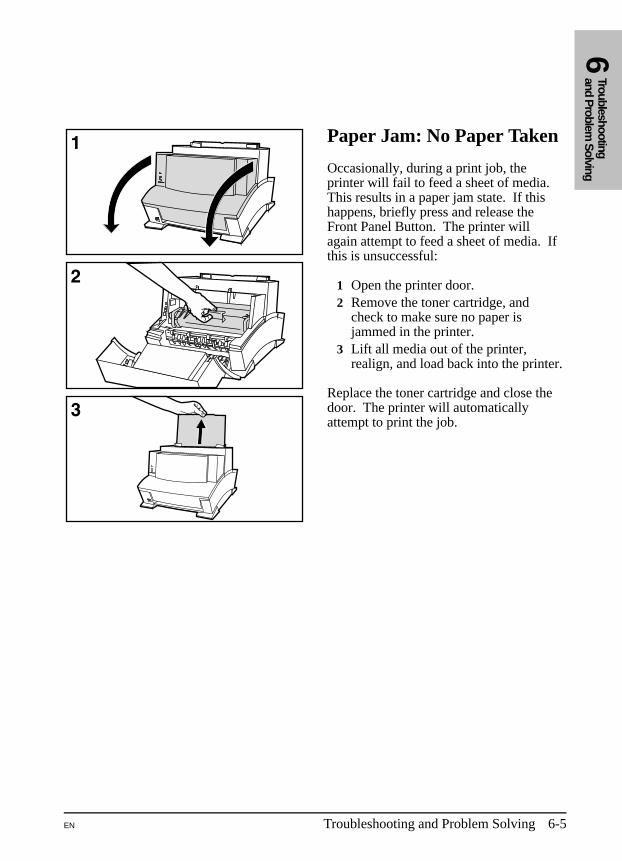
Paper Jam: No Paper Taken
Occasionally, during a print job, theprinter will fail to feed a sheet of media.This results in a paper jam state. If thishappens, briefly press and release theFront Panel Button. The printer willagain attempt to feed a sheet of media. Ifthis is unsuccessful:
1 Open the printer door.2 Remove the toner cartridge, and
check to make sure no paper isjammed in the printer.
3 Lift all media out of the printer,realign, and load back into the printer.
Replace the toner cartridge and close thedoor. The printer will automaticallyattempt to print the job.
6Troubleshootingand P
roblem S
olving
EN Troubleshooting and Problem Solving 6-5
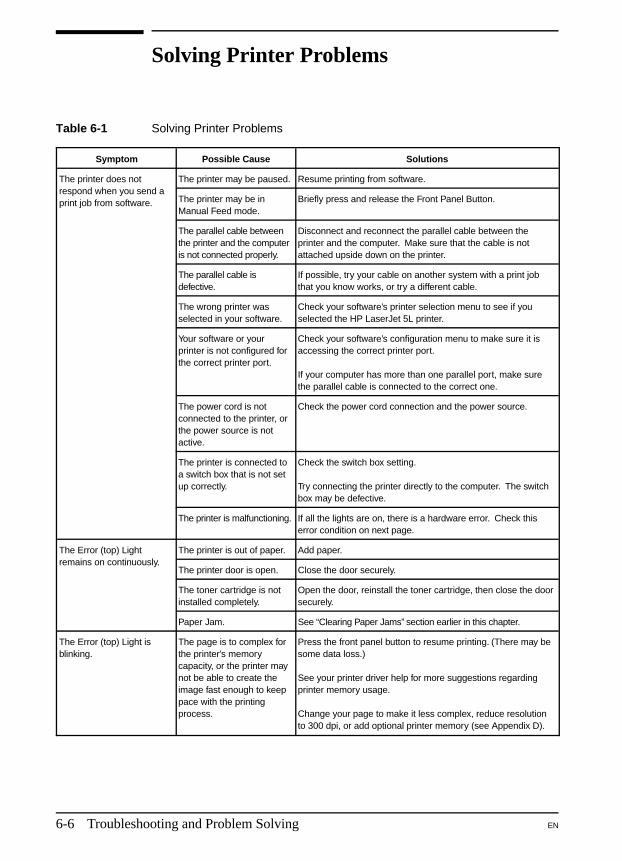
Solving Printer Problems
Symptom Possible Cause Solutions
The printer does notrespond when you send aprint job from software.
The printer may be paused. Resume printing from software.
The printer may be inManual Feed mode.
Briefly press and release the Front Panel Button.
The parallel cable betweenthe printer and the computeris not connected properly.
Disconnect and reconnect the parallel cable between theprinter and the computer. Make sure that the cable is notattached upside down on the printer.
The parallel cable isdefective.
If possible, try your cable on another system with a print jobthat you know works, or try a different cable.
The wrong printer wasselected in your software.
Check your software’s printer selection menu to see if youselected the HP LaserJet 5L printer.
Your software or yourprinter is not configured forthe correct printer port.
Check your software’s configuration menu to make sure it isaccessing the correct printer port.
If your computer has more than one parallel port, make surethe parallel cable is connected to the correct one.
The power cord is notconnected to the printer, orthe power source is notactive.
Check the power cord connection and the power source.
The printer is connected toa switch box that is not setup correctly.
Check the switch box setting.
Try connecting the printer directly to the computer. The switchbox may be defective.
The printer is malfunctioning. If all the lights are on, there is a hardware error. Check thiserror condition on next page.
The Error (top) Lightremains on continuously.
The printer is out of paper. Add paper.
The printer door is open. Close the door securely.
The toner cartridge is notinstalled completely.
Open the door, reinstall the toner cartridge, then close the doorsecurely.
Paper Jam. See “Clearing Paper Jams” section earlier in this chapter.
The Error (top) Light isblinking.
The page is to complex forthe printer’s memorycapacity, or the printer maynot be able to create theimage fast enough to keeppace with the printingprocess.
Press the front panel button to resume printing. (There may besome data loss.)
See your printer driver help for more suggestions regardingprinter memory usage.
Change your page to make it less complex, reduce resolutionto 300 dpi, or add optional printer memory (see Appendix D).
Table 6-1 Solving Printer Problems
6-6 Troubleshooting and Problem Solving EN
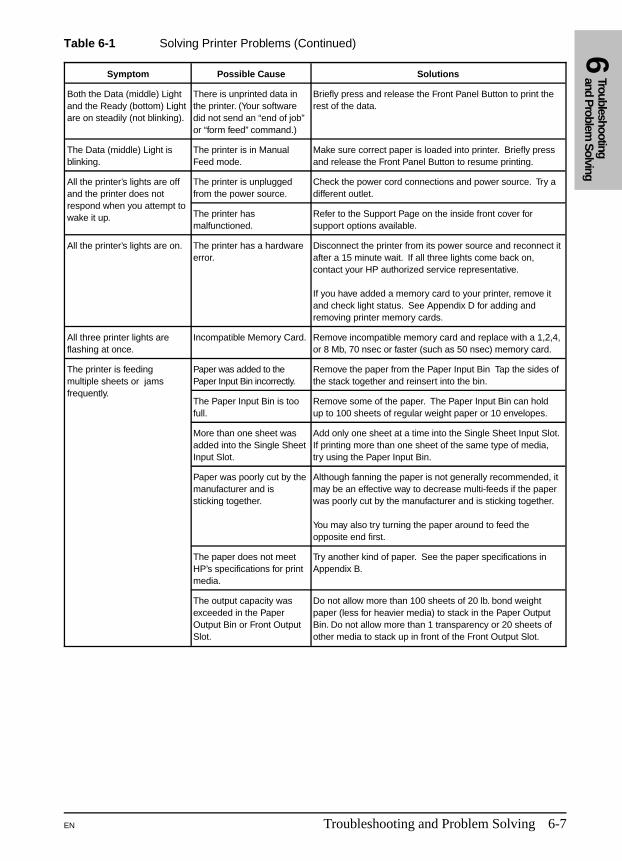
Symptom Possible Cause Solutions
Both the Data (middle) Lightand the Ready (bottom) Lightare on steadily (not blinking).
There is unprinted data inthe printer. (Your softwaredid not send an “end of job”or “form feed” command.)
Briefly press and release the Front Panel Button to print therest of the data.
The Data (middle) Light isblinking.
The printer is in ManualFeed mode.
Make sure correct paper is loaded into printer. Briefly pressand release the Front Panel Button to resume printing.
All the printer’s lights are offand the printer does notrespond when you attempt towake it up.
The printer is unpluggedfrom the power source.
Check the power cord connections and power source. Try adifferent outlet.
The printer hasmalfunctioned.
Refer to the Support Page on the inside front cover forsupport options available.
All the printer’s lights are on. The printer has a hardwareerror.
Disconnect the printer from its power source and reconnect itafter a 15 minute wait. If all three lights come back on,contact your HP authorized service representative.
If you have added a memory card to your printer, remove itand check light status. See Appendix D for adding andremoving printer memory cards.
All three printer lights areflashing at once.
Incompatible Memory Card. Remove incompatible memory card and replace with a 1,2,4,or 8 Mb, 70 nsec or faster (such as 50 nsec) memory card.
The printer is feedingmultiple sheets or jamsfrequently.
Paper was added to thePaper Input Bin incorrectly.
Remove the paper from the Paper Input Bin Tap the sides ofthe stack together and reinsert into the bin.
The Paper Input Bin is toofull.
Remove some of the paper. The Paper Input Bin can holdup to 100 sheets of regular weight paper or 10 envelopes.
More than one sheet wasadded into the Single SheetInput Slot.
Add only one sheet at a time into the Single Sheet Input Slot.If printing more than one sheet of the same type of media,try using the Paper Input Bin.
Paper was poorly cut by themanufacturer and issticking together.
Although fanning the paper is not generally recommended, itmay be an effective way to decrease multi-feeds if the paperwas poorly cut by the manufacturer and is sticking together.
You may also try turning the paper around to feed theopposite end first.
The paper does not meetHP’s specifications for printmedia.
Try another kind of paper. See the paper specifications inAppendix B.
The output capacity wasexceeded in the PaperOutput Bin or Front OutputSlot.
Do not allow more than 100 sheets of 20 lb. bond weightpaper (less for heavier media) to stack in the Paper OutputBin. Do not allow more than 1 transparency or 20 sheets ofother media to stack up in front of the Front Output Slot.
Table 6-1 Solving Printer Problems (Continued) 6Troubleshootingand P
roblem S
olving
EN Troubleshooting and Problem Solving 6-7
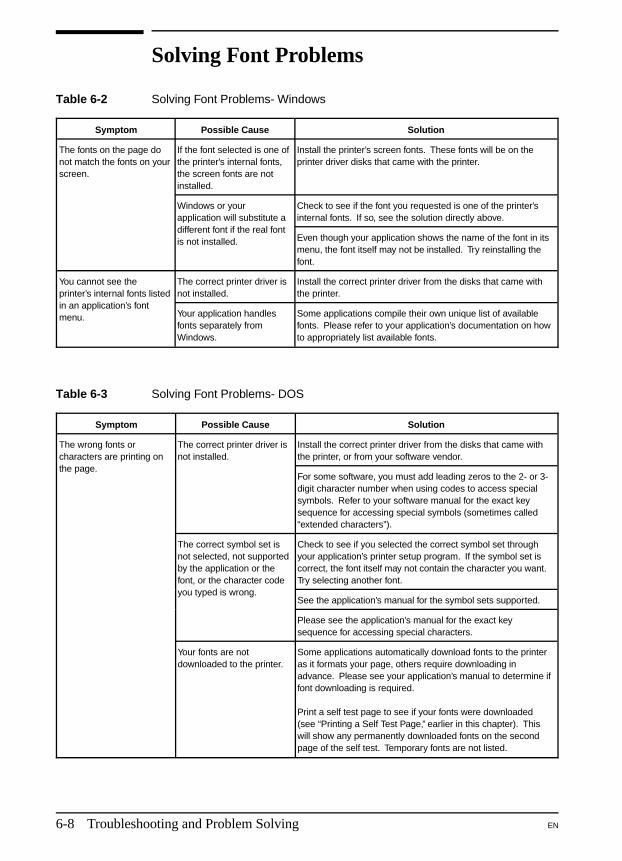
Solving Font Problems
Symptom Possible Cause Solution
The fonts on the page donot match the fonts on yourscreen.
If the font selected is one ofthe printer’s internal fonts,the screen fonts are notinstalled.
Install the printer’s screen fonts. These fonts will be on theprinter driver disks that came with the printer.
Windows or yourapplication will substitute adifferent font if the real fontis not installed.
Check to see if the font you requested is one of the printer’sinternal fonts. If so, see the solution directly above.
Even though your application shows the name of the font in itsmenu, the font itself may not be installed. Try reinstalling thefont.
You cannot see theprinter’s internal fonts listedin an application’s fontmenu.
The correct printer driver isnot installed.
Install the correct printer driver from the disks that came withthe printer.
Your application handlesfonts separately fromWindows.
Some applications compile their own unique list of availablefonts. Please refer to your application’s documentation on howto appropriately list available fonts.
Table 6-2 Solving Font Problems- Windows
Symptom Possible Cause Solution
The wrong fonts orcharacters are printing onthe page.
The correct printer driver isnot installed.
Install the correct printer driver from the disks that came withthe printer, or from your software vendor.
For some software, you must add leading zeros to the 2- or 3-digit character number when using codes to access specialsymbols. Refer to your software manual for the exact keysequence for accessing special symbols (sometimes called“extended characters”).
The correct symbol set isnot selected, not supportedby the application or thefont, or the character codeyou typed is wrong.
Check to see if you selected the correct symbol set throughyour application’s printer setup program. If the symbol set iscorrect, the font itself may not contain the character you want.Try selecting another font.
See the application’s manual for the symbol sets supported.
Please see the application’s manual for the exact keysequence for accessing special characters.
Your fonts are notdownloaded to the printer.
Some applications automatically download fonts to the printeras it formats your page, others require downloading inadvance. Please see your application’s manual to determine iffont downloading is required.
Print a self test page to see if your fonts were downloaded(see “Printing a Self Test Page,” earlier in this chapter). Thiswill show any permanently downloaded fonts on the secondpage of the self test. Temporary fonts are not listed.
Table 6-3 Solving Font Problems- DOS
6-8 Troubleshooting and Problem Solving EN
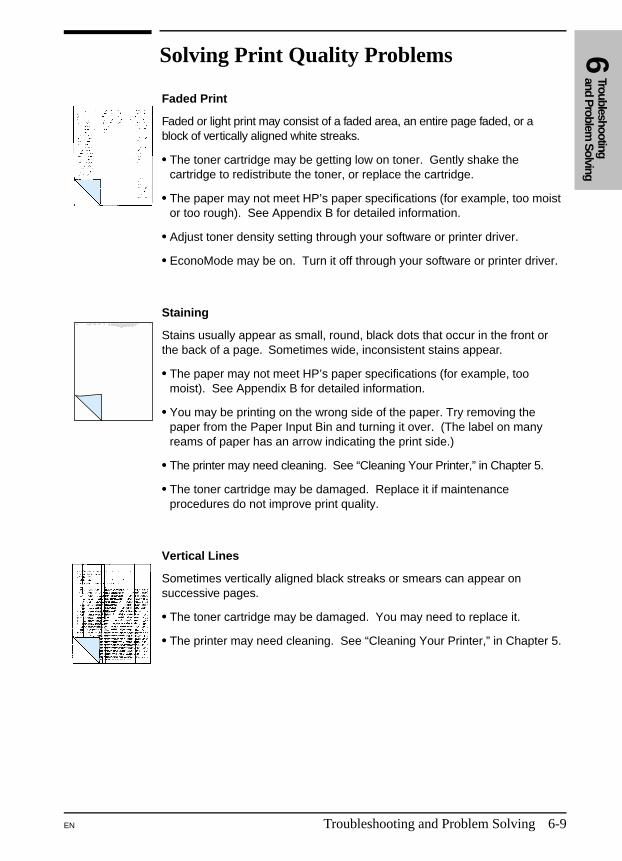
Solving Print Quality Problems
Faded Print
Faded or light print may consist of a faded area, an entire page faded, or ablock of vertically aligned white streaks.
•• The toner cartridge may be getting low on toner. Gently shake thecartridge to redistribute the toner, or replace the cartridge.
•• The paper may not meet HP’s paper specifications (for example, too moistor too rough). See Appendix B for detailed information.
•• Adjust toner density setting through your software or printer driver.
•• EconoMode may be on. Turn it off through your software or printer driver.
Staining
Stains usually appear as small, round, black dots that occur in the front orthe back of a page. Sometimes wide, inconsistent stains appear.
•• The paper may not meet HP’s paper specifications (for example, toomoist). See Appendix B for detailed information.
•• You may be printing on the wrong side of the paper. Try removing thepaper from the Paper Input Bin and turning it over. (The label on manyreams of paper has an arrow indicating the print side.)
•• The printer may need cleaning. See “Cleaning Your Printer,” in Chapter 5.
•• The toner cartridge may be damaged. Replace it if maintenanceprocedures do not improve print quality.
Vertical Lines
Sometimes vertically aligned black streaks or smears can appear onsuccessive pages.
•• The toner cartridge may be damaged. You may need to replace it.
•• The printer may need cleaning. See “Cleaning Your Printer,” in Chapter 5.
6Troubleshootingand P
roblem S
olving
EN Troubleshooting and Problem Solving 6-9
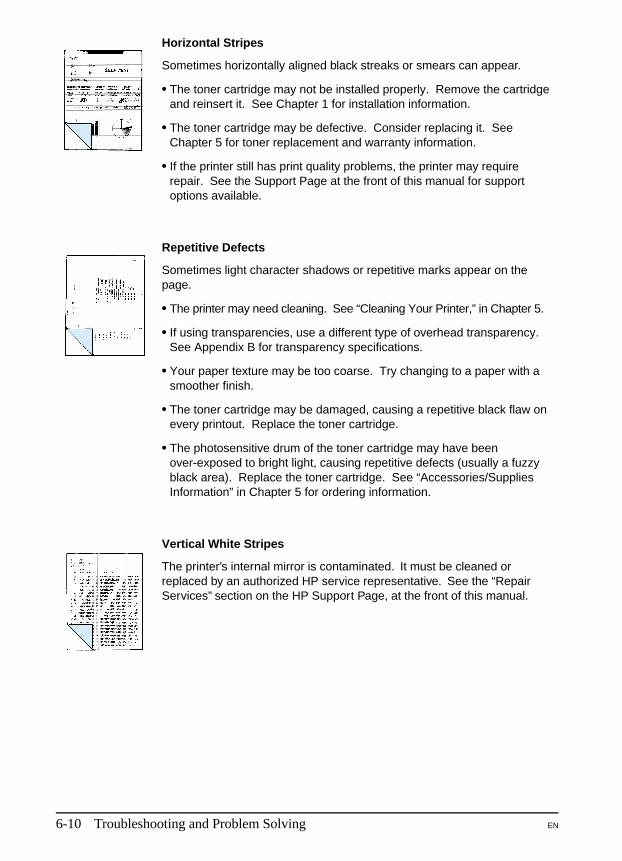
Horizontal Stripes
Sometimes horizontally aligned black streaks or smears can appear.
•• The toner cartridge may not be installed properly. Remove the cartridgeand reinsert it. See Chapter 1 for installation information.
•• The toner cartridge may be defective. Consider replacing it. SeeChapter 5 for toner replacement and warranty information.
•• If the printer still has print quality problems, the printer may requirerepair. See the Support Page at the front of this manual for supportoptions available.
Repetitive Defects
Sometimes light character shadows or repetitive marks appear on thepage.
•• The printer may need cleaning. See “Cleaning Your Printer,” in Chapter 5.
•• If using transparencies, use a different type of overhead transparency.See Appendix B for transparency specifications.
•• Your paper texture may be too coarse. Try changing to a paper with asmoother finish.
•• The toner cartridge may be damaged, causing a repetitive black flaw onevery printout. Replace the toner cartridge.
•• The photosensitive drum of the toner cartridge may have beenover-exposed to bright light, causing repetitive defects (usually a fuzzyblack area). Replace the toner cartridge. See “Accessories/SuppliesInformation” in Chapter 5 for ordering information.
Vertical White Stripes
The printer’s internal mirror is contaminated. It must be cleaned orreplaced by an authorized HP service representative. See the “RepairServices” section on the HP Support Page, at the front of this manual.
6-10 Troubleshooting and Problem Solving EN
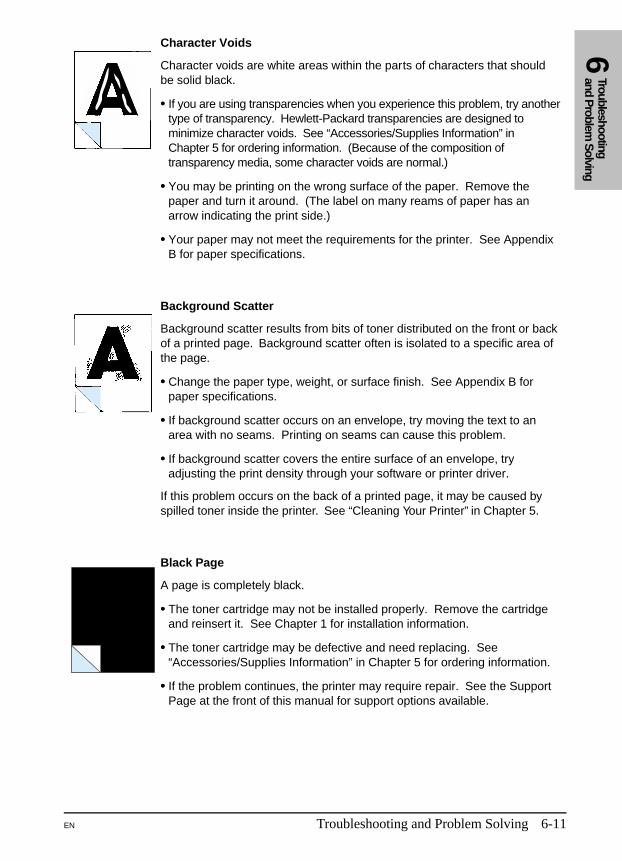
Character Voids
Character voids are white areas within the parts of characters that shouldbe solid black.
•• If you are using transparencies when you experience this problem, try anothertype of transparency. Hewlett-Packard transparencies are designed tominimize character voids. See “Accessories/Supplies Information” inChapter 5 for ordering information. (Because of the composition oftransparency media, some character voids are normal.)
•• You may be printing on the wrong surface of the paper. Remove thepaper and turn it around. (The label on many reams of paper has anarrow indicating the print side.)
•• Your paper may not meet the requirements for the printer. See AppendixB for paper specifications.
Background Scatter
Background scatter results from bits of toner distributed on the front or backof a printed page. Background scatter often is isolated to a specific area ofthe page.
•• Change the paper type, weight, or surface finish. See Appendix B forpaper specifications.
•• If background scatter occurs on an envelope, try moving the text to anarea with no seams. Printing on seams can cause this problem.
•• If background scatter covers the entire surface of an envelope, tryadjusting the print density through your software or printer driver.
If this problem occurs on the back of a printed page, it may be caused byspilled toner inside the printer. See “Cleaning Your Printer” in Chapter 5.
Black Page
A page is completely black.
•• The toner cartridge may not be installed properly. Remove the cartridgeand reinsert it. See Chapter 1 for installation information.
•• The toner cartridge may be defective and need replacing. See“Accessories/Supplies Information” in Chapter 5 for ordering information.
•• If the problem continues, the printer may require repair. See the SupportPage at the front of this manual for support options available.
6Troubleshootingand P
roblem S
olving
EN Troubleshooting and Problem Solving 6-11
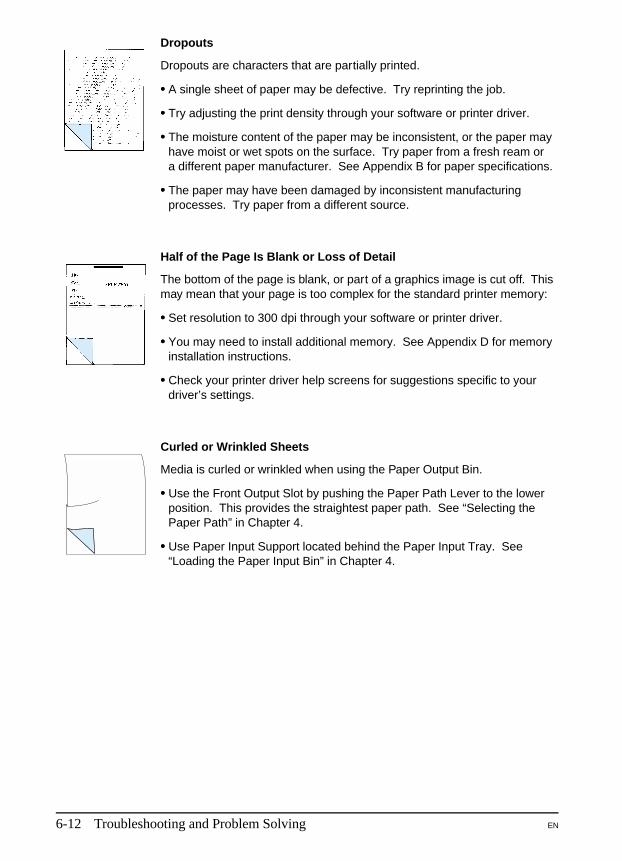
Dropouts
Dropouts are characters that are partially printed.
•• A single sheet of paper may be defective. Try reprinting the job.
•• Try adjusting the print density through your software or printer driver.
•• The moisture content of the paper may be inconsistent, or the paper mayhave moist or wet spots on the surface. Try paper from a fresh ream ora different paper manufacturer. See Appendix B for paper specifications.
•• The paper may have been damaged by inconsistent manufacturingprocesses. Try paper from a different source.
Half of the Page Is Blank or Loss of Detail
The bottom of the page is blank, or part of a graphics image is cut off. Thismay mean that your page is too complex for the standard printer memory:
•• Set resolution to 300 dpi through your software or printer driver.
•• You may need to install additional memory. See Appendix D for memoryinstallation instructions.
•• Check your printer driver help screens for suggestions specific to yourdriver’s settings.
Curled or Wrinkled Sheets
Media is curled or wrinkled when using the Paper Output Bin.
•• Use the Front Output Slot by pushing the Paper Path Lever to the lowerposition. This provides the straightest paper path. See “Selecting thePaper Path” in Chapter 4.
•• Use Paper Input Support located behind the Paper Input Tray. See“Loading the Paper Input Bin” in Chapter 4.
6-12 Troubleshooting and Problem Solving EN
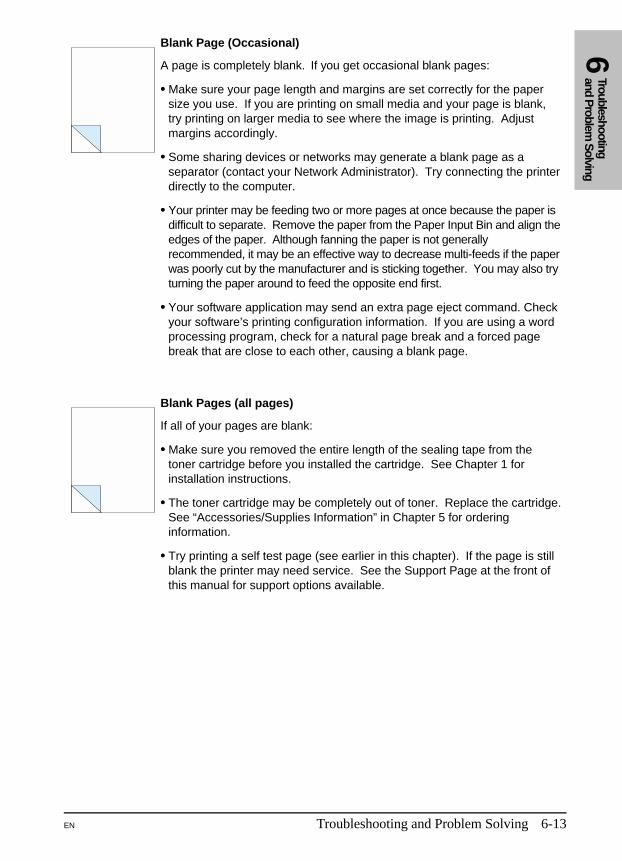
Blank Page (Occasional)
A page is completely blank. If you get occasional blank pages:
•• Make sure your page length and margins are set correctly for the papersize you use. If you are printing on small media and your page is blank,try printing on larger media to see where the image is printing. Adjustmargins accordingly.
•• Some sharing devices or networks may generate a blank page as aseparator (contact your Network Administrator). Try connecting the printerdirectly to the computer.
•• Your printer may be feeding two or more pages at once because the paper isdifficult to separate. Remove the paper from the Paper Input Bin and align theedges of the paper. Although fanning the paper is not generallyrecommended, it may be an effective way to decrease multi-feeds if the paperwas poorly cut by the manufacturer and is sticking together. You may also tryturning the paper around to feed the opposite end first.
•• Your software application may send an extra page eject command. Checkyour software’s printing configuration information. If you are using a wordprocessing program, check for a natural page break and a forced pagebreak that are close to each other, causing a blank page.
Blank Pages (all pages)
If all of your pages are blank:
•• Make sure you removed the entire length of the sealing tape from thetoner cartridge before you installed the cartridge. See Chapter 1 forinstallation instructions.
•• The toner cartridge may be completely out of toner. Replace the cartridge.See “Accessories/Supplies Information” in Chapter 5 for orderinginformation.
•• Try printing a self test page (see earlier in this chapter). If the page is stillblank the printer may need service. See the Support Page at the front ofthis manual for support options available.
6Troubleshootingand P
roblem S
olving
EN Troubleshooting and Problem Solving 6-13

6-14 Troubleshooting and Problem Solving EN
7
Warranty and License Information
Warranty
This warranty gives you specific legal rights. You may also have otherrights, which may vary from area to area.
Hewlett-Packard warrants its computer hardware products againstdefects in materials and workmanship for a period of one year from thedate of purchase by the end user.
During the warranty period, Hewlett-Packard will, at its option, eitherrepair or replace hardware products that prove to be defective.
Should Hewlett-Packard be unable to repair or replace the productwithin a reasonable amount of time, a refund of the purchase price maybe made upon return of the product. To have your printer serviced byHewlett-Packard, you must make arrangements to have it serviced in thecountry/region of purchase.
EN Warranty and License Information 7-1
Warranty Exclusions
The warranty on your HP LaserJet printer shall not apply to defects ordamage resulting from:
•• Improper or inadequate maintenance by customer.•• Customer-supplied software or interfacing. •• Unauthorized modification or misuse.•• Operation outside of the environmental specifications for the product.•• Operation of nonsupported printing media.•• Duty cycle abuse (see later explanation).•• Operating the printer from a mechanical switchbox without a
designated surge protector.•• Improper site preparation and maintenance.•• Use of non-HP toner cartridges (see explanation) or DRAM (JEIDA)
memory cards.
The use of non-Hewlett-Packard toner cartridges does not affect eitherthe warranty or any maintenance contract purchased fromHewlett-Packard. However, if an HP LaserJet printer failure or printerdamage is found to be directly attributable to the use of any non-HPproduct, the repair will not be covered under the warranty or HPmaintenance contract. Hewlett-Packard cannot recommend use ofnon-HP toner cartridges, either new or remanufactured, because they arenot HP products and Hewlett-Packard cannot influence or control theirquality.
Operation of the printer beyond the limit of its duty cycle (printing morethan the equivalent of 2,500 single-sided pages per month) shall bedeemed printer abuse and all repairs thereafter will be billed on a timeand materials basis.
If you are using a mechanical switchbox, ensure that it is equipped witha surge protector. Damage to your printer could occur from the use ofunprotected mechanical switchboxes.
The warranty period begins either on the date of delivery or, where thepurchase price includes installation by Hewlett-Packard, on the date ofinstallation.
7-2 Warranty and License Information EN

Warranty Limitations
The warranty set forth above is exclusive and no other warranty, whetherwritten or oral, is expressed or implied. Hewlett-Packard specificallydisclaims the implied warranties of merchantability and fitness for aparticular purpose.
Some areas do not allow limitations on how long an implied warrantylasts, so the preceding limitation or exclusion may not apply to you.However, any implied warranty of merchantability or fitness is limitedto the one-year duration of this written warranty.
In no event will Hewlett-Packard or its suppliers be liable to you for anyconsequential or incidental damages, including any lost profits or lostsavings, or for any claim by any party, even if a representative of HP orits suppliers has been advised of the possibility of such damages.
Some areas, states, or provinces do not allow the exclusion or limitationof incidental or consequential damages, so the preceding limitation orexclusion may not apply to you.
Voltage Conversions
HP LaserJet printers are manufactured to different specifications fordifferent countries/regions. Because of these differences, HP does notrecommend transporting products sold within the United States toanother country/region.
In addition to the 115-220 voltage environment concerns, the country/region of final destination may have different import and exportrestrictions, power frequencies, and regulatory requirements.
N o t e The HP LaserJet family printers must be serviced by an authorizedrepair depot or reseller within the country/region where the printer wasoriginally purchased.
Because of the different specifications and warranty coveragelimitations, Hewlett-Packard does not offer a conversion, or support theconversion, of U.S. version HP LaserJet family printers for foreign use.We advise those customers planning to transport equipment outside theUnited States to purchase the products in the country/region of final destination.
7W
arranty
Info
rmatio
n
EN Warranty and License Information 7-3
Service and Support During the Warranty Period
If your hardware should fail during the warranty period, see the SupportPage at the front of this manual for support options available.
When sending equipment to an HP Customer Service Center orservice-authorized HP dealer, follow the repackaging guidelines in thischapter. We recommend insuring the equipment for shipment. Alsoinclude a copy of your proof of purchase.
C a u t i o n Shipping damage as a result of inadequate packaging is the customer’sresponsibility. Use the original packing materials whenever possible.
For telephone assistance about using your printer within the one-yearwarranty period, see the tables in “Worldwide HP Sales and ServiceOffices,” later in this chapter.
Service and Support After the Warranty Period
If your hardware fails after the warranty period and you have an HPMaintenance Agreement, request service as specified in the agreement.If you do not have an HP Maintenance Agreement, contact aservice-authorized HP dealer or an HP Customer Service Center toobtain service (see the tables in “Worldwide HP Sales and ServiceOffices,” later in this chapter).
When sending equipment to an HP Customer Service Center or aservice-authorized HP dealer, follow the repackaging guidelines later inthis chapter. Hewlett-Packard recommends insuring the equipment forshipment.
7-4 Warranty and License Information EN
Returning Your Printer
Repackaging Guidelines
•• Remove and retain the toner cartridge. If you have installedoptional memory, remove that also.
•• If possible, print a self test page before you power off the printer andsend it with the printer.
•• Include the completed copy of the Service Information Form. (Seenext page.) Note on the form which items were returned.
•• Use the original shipping container and packing materials if possible.•• Include print samples that illustrate the problems you are having, if
applicable.•• Include 5 sheets of the paper or other media you are having trouble
printing, if possible.
Service Information Form
Please photocopy and complete the Service Information Form on thenext page when requesting service from an HP Customer Service Centeror a service-authorized HP Dealer. This form must be shipped with yourequipment. Service cannot begin until we have this information.
Be sure that you follow the procedures for troubleshooting in Chapter 6before returning the printer.
7W
arranty
Info
rmatio
n
EN Warranty and License Information 7-5
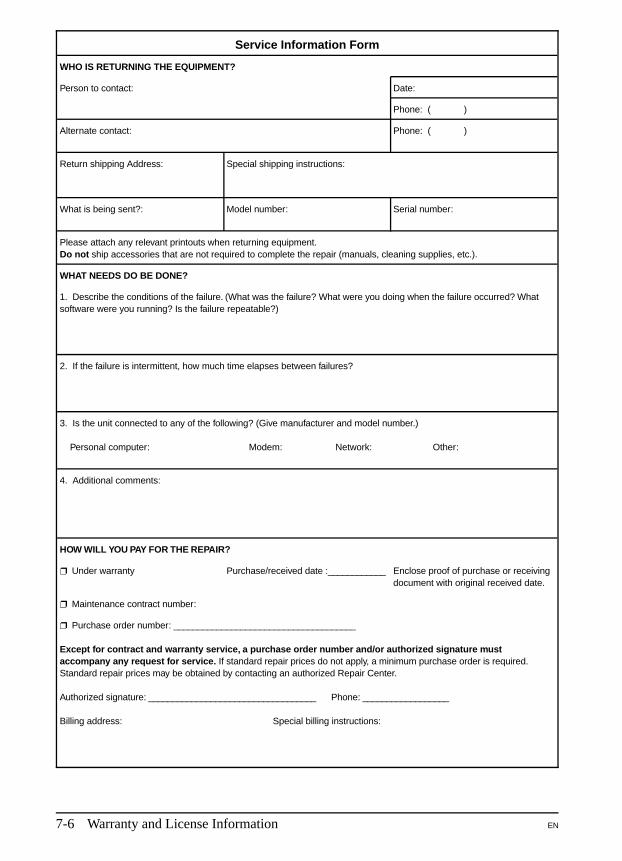
Service Information Form
WHO IS RETURNING THE EQUIPMENT?
Person to contact: Date:
Phone: ( )
Alternate contact: Phone: ( )
Return shipping Address: Special shipping instructions:
What is being sent?: Model number: Serial number:
Please attach any relevant printouts when returning equipment.Do not ship accessories that are not required to complete the repair (manuals, cleaning supplies, etc.).
WHAT NEEDS DO BE DONE?
1. Describe the conditions of the failure. (What was the failure? What were you doing when the failure occurred? Whatsoftware were you running? Is the failure repeatable?)
2. If the failure is intermittent, how much time elapses between failures?
3. Is the unit connected to any of the following? (Give manufacturer and model number.)
Personal computer: Modem: Network: Other:
4. Additional comments:
HOW WILL YOU PAY FOR THE REPAIR?
❐ Under warranty Purchase/received date :____________ Enclose proof of purchase or receivingdocument with original received date.
❐ Maintenance contract number:
❐ Purchase order number: ______________________________________
Except for contract and warranty service, a purchase order number and/or authorized signature mustaccompany any request for service. If standard repair prices do not apply, a minimum purchase order is required.Standard repair prices may be obtained by contacting an authorized Repair Center.
Authorized signature: ___________________________________ Phone: __________________
Billing address: Special billing instructions:
7-6 Warranty and License Information EN
HP Software Product License
IMPORTANT: Please read this License carefully before using the HP LaserJet 5L Printer Software. The right touse this Software is granted only if the Customer agrees to the terms of this License. If you do not agree to theterms of this License, you may return the unused software for a refund. HOWEVER, USE OF THIS SOFTWAREINDICATES YOUR ACCEPTANCE OF THESE TERMS AND CONDITIONS.
In return for the payment of the applicable one time license fee(s), HP grants you a license to use one copy of theSoftware subject to the following terms and conditions. No title or ownership of the Software is conferred with thislicense.
1. The Software may be used on one HP LaserJet printer.
2. The Software may not be copied except for archival purposes or for backup, error identification, orreplacement of defective media. All authorized copies must bear the copyright notice on or in the original.
3. The Software may not be disassembled, decompiled, decrypted, or reverse engineered unless HP’s priorwritten consent is either obtained or not required by law. Upon request, the user will provide HP withreasonably detailed information regarding any disassembly, decompilation, decryption, or reverseengineering.
4. Any third party supplier of the Software is a third party beneficiary of this License and may protect its rightsin the Software against violations of this License.
5. HP reserves the right to terminate this License upon breach. In the event of termination at HP’s election, allcopies of the Software must be returned to HP or destroyed.
6. This License and the Software product may be transferred to a third party, provided the third party agrees toall the terms of this License and that no copies of the Software are retained by the transferring party.
7. Use, duplication, or disclosure by the U.S. Government is subject to restrictions as set forth in subparagraph(c) (1) (ii) of the Rights in Technical Data and Computer Software clause on DFARS 252.227-7013.Hewlett-Packard Company, 3000 Hanover Street, Palo Alto, CA 94304 U.S. A. Rights for non-DOD U. S.Government Departments and Agencies are as set forth in FAR 52.227-19 (c) (1,2).
8. No title or ownership of the Software is conferred with this License.
9. The Software may not be exported in violation of U. S. Export Administration regulations.
10. You are expressly notified that Adobe Systems Incorporated, a California corporation located at 1585Charleston Road, Mountain View, California 94039-7900 (“Adobe”) is a third-party beneficiary to thisLicense.
7W
arranty
Info
rmatio
n
EN Warranty and License Information 7-7

Worldwide Sales and Service Offices
To locate HP-Authorized Dealers, go to http://www.hp.com/support.
7-8 Warranty and License Information EN
A
Printer Specifications
Printer Specifications
Environmental SpecificationsOperating Environment (Printer plugged into an AC outlet)
Temperature: 10° C to 32.5° C (50° F to 90.5° F)Humidity: 20-80% (no condensation)
Storage Environment (Printer unplugged from the AC outlet)Temperature: 0° C to 40° C (32° F to 104° F)Humidity: 10-80% (no condensation)
Noise Level During printing: 5.5 Bels Sound Power Level (per ISO 9296)During Standby and SleepMode: silent
Electrical SpecificationsPower Requirements 100/120 v (+/-10%), 127 v nom, 50/60 Hz (+/- 2 Hz)
220 v (+/-10%), 50/60 Hz (+/- 2 Hz)240 v (+/-10%), 50 Hz (+/- 2 Hz)
Power Consumption During printing 100 W (average)During standby or SleepMode 6 W
Minimum Recommended Circuit Capacity 3.5 Amps @ 120 volts, 1.8 Amps @ 220 volts
Physical SpecificationsDimensions Width Depth Storage Height Operating height (letter height)
13.2 in. (336 mm)12.3 in. (312 mm)9.0 in. (228 mm)14.6 in. (371 mm)
Weight (cartridge installed) 15.7 lbs (7.1 kg)
Print speed 4 pages per minute.
Paper Input Bin capacity Load up to 100 sheets of regular weight paper, or up to 10 envelopes.
Paper Output Bin capacity The Paper Output Bin holds up to 100 sheets.
Front Output Slot capacity Stack 1 transparency or up to 20 sheets of other media in front of the FrontOutput Slot.
Minimum paper size 3 in x 5 in (76.2 mm. x 127 mm.)
Maximum paper size 8.5 x 14 in. (215.9 x 355.6 mm.)
Base memory 2 megabytes of ROM and 1 megabyte of RAM.
Upgradable Memory Expansion One slot available for a 1, 2, 4, or 8 MByte, 70 nsec or faster, 5 V JEIDA card.
Print Resolution 600 dots per inch (dpi).
Duty cycle 2500 single-sided pages per month.
Printer Specifications A-1
Regulatory Information
FCC Regulations
This equipment has been tested and found to comply with the limits for a Class B digital device,pursuant to Part 15 of the FCC rules. These limits are designed to provide reasonable protectionagainst harmful interference in a residential installation. This equipment generates, uses, and canradiate radio frequency energy and, if not installed and used in accordance with the instructions,may cause harmful interference to radio communications; however, there is no guarantee thatinterference will not occur in a particular installation. If this equipment does cause harmfulinterference to radio or television reception, which can be determined by turning the equipment offand on, the user is encouraged to try to correct the interference by one or more of the of thefollowing measures: reorient or relocate receiving antenna, increase separation between equipmentand receiver, connect equipment to an outlet on a circuit different from that to which the receiver isconnected, and/or consult your dealer or an experienced radio/TV technician.
Any changes or modifications not expressly approved by Hewlett-Packard could void the user’sauthority to operate this equipment. Use of a shielded printer cable is required to complywithin the Class B limits of Part 15 of the FCC rules.
VCCI Statement (Japan)
The VCCI statement, similar to the FCC regulations, is required in Japan.
Canadian DOC Regulations
Complies with Canadian EMC Class B requirements.Conforme à la classe B des normes canadiennes de compatibilité électromagnétiques. <<CEM>>
Ozone Emission
The HP LaserJet 5L printer does not use high-voltage corona wires in the electrophotographicprocess, and therefore, generates no measurable ozone gas (O3). This printer instead uses chargingrollers in the toner cartridge and in the print engine.
A-2 Printer Specifications
Laser Safety Statement
The Center for Devices and Radiological Health (CDRH) of the U.S. Food and DrugAdministration has implemented regulations for laser products manufactured since August 1, 1976.Compliance is mandatory for products marketed in the United States. This printer is certified as a“Class 1” laser product under the U.S. Department of Health and Human Services (DHHS)Radiation Performance Standard according to the Radiation Control for Health and Safety Act of1968. Since radiation emitted inside this printer is completely confined within protective housingsand external covers, the laser beam cannot escape during any phase of normal user operation.
W A R N I N G ! Never operate or service the printer with the protective cover removed from the Laser/ScannerAssembly. The reflected beam, although invisible, can damage your eyes.
Laser Statement for Finland
LASERTURVALLISUUS
LUOKAN 1 LASERLAITEKLASS 1 LASER APPARAT
HP LaserJet 5L laserkirjoitin on kyttjn kannalta turvallinen luokan 1 laserlaite. Normaalissa kyt"ss kirjoittimensuojakotelointi est lasersteen psyn laitteen ulkopuolelle.
Kirjoittimen on hyvksynyt Suomessa laserturvallisuuden osalta Shk"tarkastuskeskus. Laitteen turvallisuusluokka onmritetty valtioneuvoston pt"ksen N:o 472/1985 ja standardin EN 60825 (1991) mukaisesti.
VAROITUS !Laitteen kyttminen muulla kuin kytt"ohjeessa mainitulla tavalla saattaa altistaa kyttjn turvallisuusluokan 1 ylittvllenkymtt"mlle lasersteilylle.
VARNING !Om apparaten anvnds p annat stt n i bruksanvisning specificerats, kan anvndaren utsttas f"r osynlig laserstrlning,som “verskrider grnsen f”r laserklass 1.
HUOLTOHP LaserJet 5L -kirjoittimen sisll ei ole kyttjn huollettavissa olevia kohteita. Laitteen saa avata ja huoltaa ainoastaansen huoltamiseen koulutettu henkil". Tllaiseksi huoltotoimenpiteeksi ei katsota vriainekasetin vaihtamista,paperiradan puhdistusta tai muita kyttjn ksikirjassa lueteltuja, kyttjn tehtvksi tarkoitettuja yllpitotoimia, jotka voidaansuorittaa ilman erikoisty"kaluja.
VARO !Mikli kirjoittimen suojakotelo avataan, olet alttiina nkymtt"mlle lasersteilylle laitteen ollessa toiminnassa. l katso steeseen.
VARNING !Om laserprinterns skyddsh"lje “ppnas d apparaten r i funktion, utsttas anvndaren f”r osynlig laserstrlning. Betrakta ej strlen.
Tiedot laitteessa kytettvn laserdiodin steilyominaisuuksista:
Aallonpituus 770-795 nmTeho 5 mWLuokan 3B laser
AP
rinter
Sp
ecification
s
Printer Specifications A-3
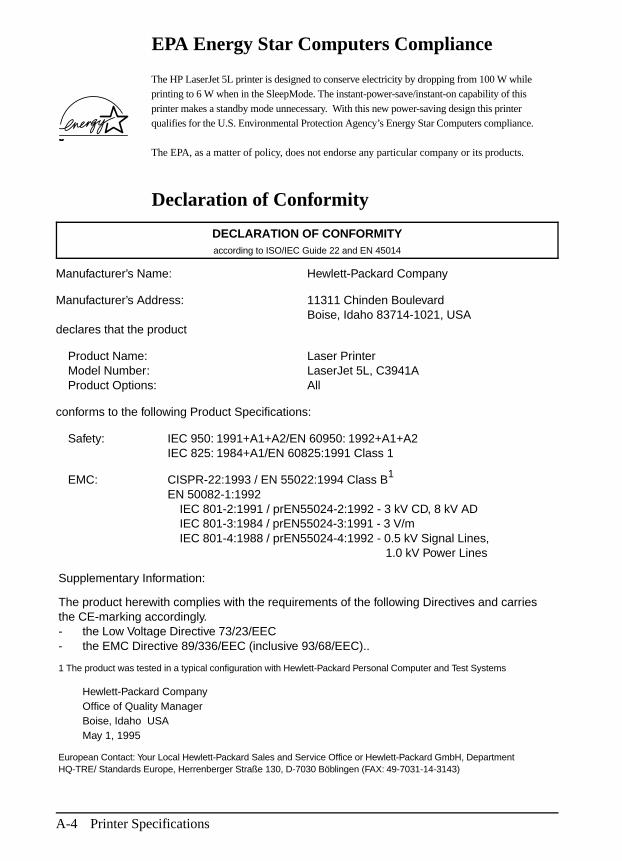
EPA Energy Star Computers Compliance
The HP LaserJet 5L printer is designed to conserve electricity by dropping from 100 W whileprinting to 6 W when in the SleepMode. The instant-power-save/instant-on capability of thisprinter makes a standby mode unnecessary. With this new power-saving design this printerqualifies for the U.S. Environmental Protection Agency’s Energy Star Computers compliance.
The EPA, as a matter of policy, does not endorse any particular company or its products.
Declaration of Conformity
DECLARATION OF CONFORMITYaccording to ISO/IEC Guide 22 and EN 45014
Manufacturer’s Name: Hewlett-Packard Company
Manufacturer’s Address:
declares that the product
11311 Chinden BoulevardBoise, Idaho 83714-1021, USA
Product Name: Model Number: Product Options:
Laser PrinterLaserJet 5L, C3941AAll
conforms to the following Product Specifications:
Safety: IEC 950: 1991+A1+A2/EN 60950: 1992+A1+A2IEC 825: 1984+A1/EN 60825:1991 Class 1
EMC: CISPR-22:1993 / EN 55022:1994 Class B1
EN 50082-1:1992 IEC 801-2:1991 / prEN55024-2:1992 - 3 kV CD, 8 kV AD IEC 801-3:1984 / prEN55024-3:1991 - 3 V/m IEC 801-4:1988 / prEN55024-4:1992 - 0.5 kV Signal Lines,
1.0 kV Power Lines
Supplementary Information:
The product herewith complies with the requirements of the following Directives and carriesthe CE-marking accordingly. - the Low Voltage Directive 73/23/EEC - the EMC Directive 89/336/EEC (inclusive 93/68/EEC)..
1 The product was tested in a typical configuration with Hewlett-Packard Personal Computer and Test Systems
Hewlett-Packard CompanyOffice of Quality ManagerBoise, Idaho USAMay 1, 1995
European Contact: Your Local Hewlett-Packard Sales and Service Office or Hewlett-Packard GmbH, DepartmentHQ-TRE/ Standards Europe, Herrenberger Straße 130, D-7030 Böblingen (FAX: 49-7031-14-3143)
A-4 Printer Specifications
B
Print Media Specifications
Paper Specifications
To achieve the best possible print quality and avoid paper jams, followthese guidelines for selecting and storing paper:
•• Always test a sample of the paper you selected before purchasing largequantities.
•• Use only high quality, copier grade paper. Avoid paper with embossedlettering, perforations, or texture that is too smooth or too rough.
•• Colored paper should be of the same high quality as white photocopypaper. The pigments must withstand the printer’s fusing temperatureof 392° F (200° C) for 0.1 second without deterioration. Do not usepaper with a colored coating that was added after the paper wasproduced.
•• Pre-printed forms must be printed with non-flammable, heat-resistantinks that do not melt, vaporize, or release hazardous emissions whensubject to the printer’s approximately 392° F (200° C) fusingtemperature for 0.1 second.
•• Store paper in its ream wrapper until ready to use. Place cartons onpallets or shelves, not on the floor. Do not place heavy objects on top ofthe paper, whether it is packaged or unpackaged. Keep it away frommoisture, or other conditions that can cause it to wrinkle or curl.
•• During storage, moisture-proof wrap (any plastic container or bag)should be used to prevent dust and moisture from contaminating yourpaper.
N o t e It is possible that print media can meet all of the general specificationslisted in this appendix and still not print satisfactorily because of theprinting environment or other variables over which Hewlett-Packard hasno control.
EN Print Media Specifications B-1
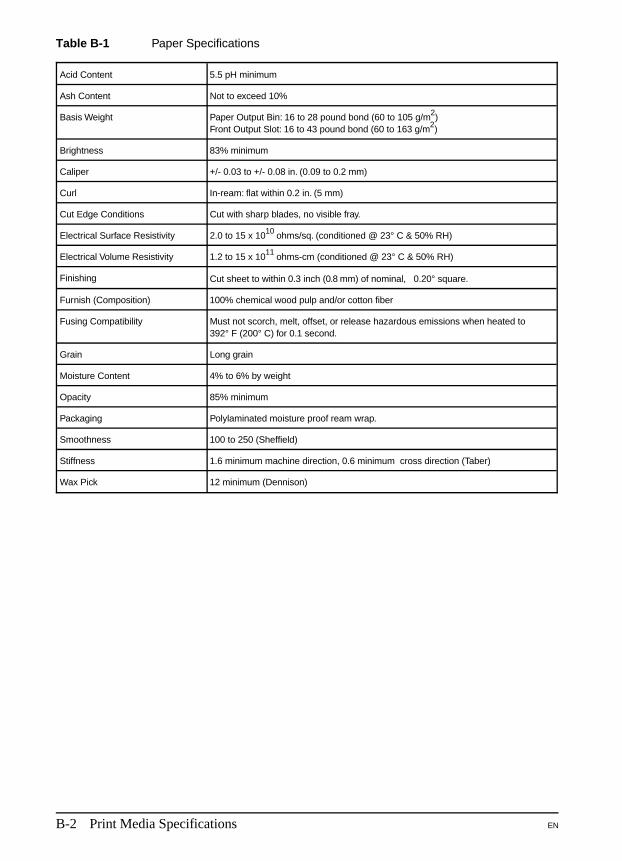
Acid Content 5.5 pH minimum
Ash Content Not to exceed 10%
Basis Weight Paper Output Bin: 16 to 28 pound bond (60 to 105 g/m2)Front Output Slot: 16 to 43 pound bond (60 to 163 g/m2)
Brightness 83% minimum
Caliper +/- 0.03 to +/- 0.08 in. (0.09 to 0.2 mm)
Curl In-ream: flat within 0.2 in. (5 mm)
Cut Edge Conditions Cut with sharp blades, no visible fray.
Electrical Surface Resistivity 2.0 to 15 x 1010 ohms/sq. (conditioned @ 23° C & 50% RH)
Electrical Volume Resistivity 1.2 to 15 x 1011 ohms-cm (conditioned @ 23° C & 50% RH)
Finishing Cut sheet to within 0.3 inch (0.8 mm) of nominal, 0.20° square.
Furnish (Composition) 100% chemical wood pulp and/or cotton fiber
Fusing Compatibility Must not scorch, melt, offset, or release hazardous emissions when heated to392° F (200° C) for 0.1 second.
Grain Long grain
Moisture Content 4% to 6% by weight
Opacity 85% minimum
Packaging Polylaminated moisture proof ream wrap.
Smoothness 100 to 250 (Sheffield)
Stiffness 1.6 minimum machine direction, 0.6 minimum cross direction (Taber)
Wax Pick 12 minimum (Dennison)
Table B-1 Paper Specifications
B-2 Print Media Specifications EN
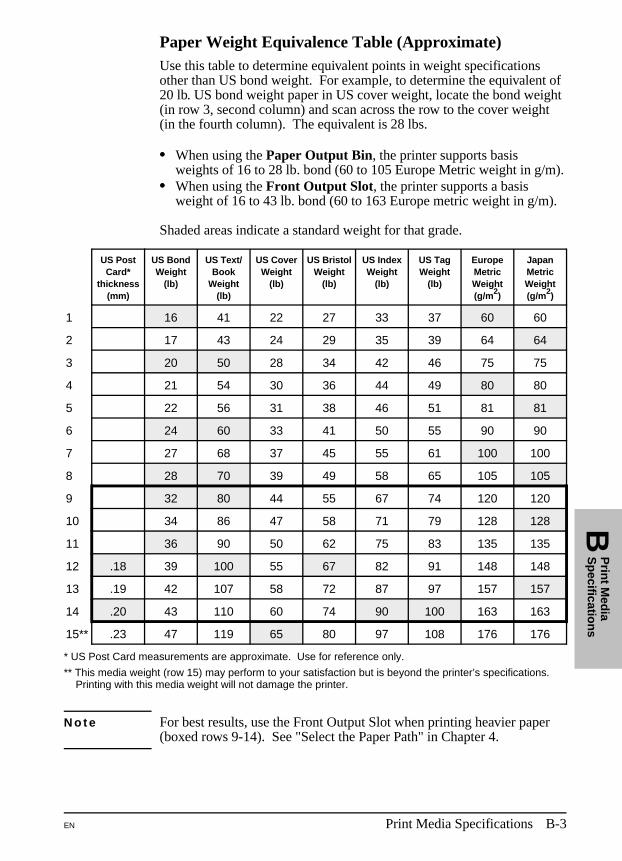
Paper Weight Equivalence Table (Approximate)Use this table to determine equivalent points in weight specificationsother than US bond weight. For example, to determine the equivalent of20 lb. US bond weight paper in US cover weight, locate the bond weight(in row 3, second column) and scan across the row to the cover weight(in the fourth column). The equivalent is 28 lbs.
•• When using the Paper Output Bin, the printer supports basisweights of 16 to 28 lb. bond (60 to 105 Europe Metric weight in g/m).
•• When using the Front Output Slot, the printer supports a basisweight of 16 to 43 lb. bond (60 to 163 Europe metric weight in g/m).
Shaded areas indicate a standard weight for that grade.
US PostCard*
thickness(mm)
US BondWeight
(lb)
US Text/Book
Weight(lb)
US CoverWeight
(lb)
US BristolWeight
(lb)
US IndexWeight
(lb)
US TagWeight
(lb)
EuropeMetricWeight(g/m2)
JapanMetricWeight(g/m2)
1 16 41 22 27 33 37 60 60
2 17 43 24 29 35 39 64 64
3 20 50 28 34 42 46 75 75
4 21 54 30 36 44 49 80 80
5 22 56 31 38 46 51 81 81
6 24 60 33 41 50 55 90 90
7 27 68 37 45 55 61 100 100
8 28 70 39 49 58 65 105 105
9 32 80 44 55 67 74 120 120
10 34 86 47 58 71 79 128 128
11 36 90 50 62 75 83 135 135
12 .18 39 100 55 67 82 91 148 148
13 .19 42 107 58 72 87 97 157 157
14 .20 43 110 60 74 90 100 163 163
15** .23 47 119 65 80 97 108 176 176
* US Post Card measurements are approximate. Use for reference only.
** This media weight (row 15) may perform to your satisfaction but is beyond the printer’s specifications. Printing with this media weight will not damage the printer.
N o t e For best results, use the Front Output Slot when printing heavier paper(boxed rows 9-14). See "Select the Paper Path" in Chapter 4.
BP
rint M
edia
Sp
ecification
s
EN Print Media Specifications B-3
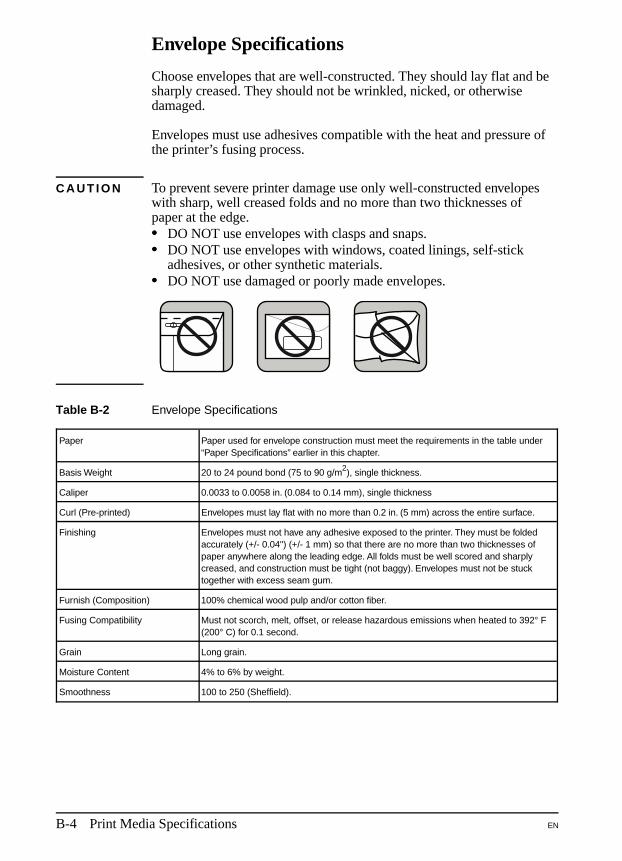
Envelope Specifications
Choose envelopes that are well-constructed. They should lay flat and besharply creased. They should not be wrinkled, nicked, or otherwisedamaged.
Envelopes must use adhesives compatible with the heat and pressure ofthe printer’s fusing process.
C A U T I O N To prevent severe printer damage use only well-constructed envelopeswith sharp, well creased folds and no more than two thicknesses ofpaper at the edge.•• DO NOT use envelopes with clasps and snaps.•• DO NOT use envelopes with windows, coated linings, self-stick
adhesives, or other synthetic materials.•• DO NOT use damaged or poorly made envelopes.
Paper Paper used for envelope construction must meet the requirements in the table under“Paper Specifications” earlier in this chapter.
Basis Weight 20 to 24 pound bond (75 to 90 g/m2), single thickness.
Caliper 0.0033 to 0.0058 in. (0.084 to 0.14 mm), single thickness
Curl (Pre-printed) Envelopes must lay flat with no more than 0.2 in. (5 mm) across the entire surface.
Finishing Envelopes must not have any adhesive exposed to the printer. They must be foldedaccurately (+/- 0.04") (+/- 1 mm) so that there are no more than two thicknesses ofpaper anywhere along the leading edge. All folds must be well scored and sharplycreased, and construction must be tight (not baggy). Envelopes must not be stucktogether with excess seam gum.
Furnish (Composition) 100% chemical wood pulp and/or cotton fiber.
Fusing Compatibility Must not scorch, melt, offset, or release hazardous emissions when heated to 392° F(200° C) for 0.1 second.
Grain Long grain.
Moisture Content 4% to 6% by weight.
Smoothness 100 to 250 (Sheffield).
Table B-2 Envelope Specifications
B-4 Print Media Specifications EN
Adhesive Label Specifications
Use the following guidelines when selecting labels:
•• The top sheet (printing surface) must be of copier quality and providegood toner adhesion.
•• The carrier sheet must be compatible with the temperatures andpressure of the fusing process, and must be coated for easy release ofthe top sheet.
•• The adhesive must be stable at the 392° F (200° C) temperatureencountered for 0.1 second in the printer’s fusing process, and mustnot produce emissions that exceed exposure levels or threshold limitsestablished by OSHA and other safety agencies. Adhesives must notcome into direct contact with any part of the printer.
•• Labels should be arranged on the carrier sheet so that any exposedspaces run lengthwise down the sheet. Using label stock with spacesbetween the horizontal rows of labels can result in labels peeling offduring printing, causing serious jamming and possible printer damage.
C A U T I O N Hewlett-Packard does not recommend removing any labels from thecarrier sheet and then printing on the remaining labels.
Adhesive Must not be on any external surfaces of the label before, during, or after printing.Label construction and die-cutting must not allow labels to peel off during transport,printing, or fusing.
Caliper Must not exceed 0.007 in. (0.19 mm).
Curl In ream: flat within 0.2 in. (5 mm).
Electrical Surface Resistivity 2.0 to 15 x 1010 ohm per square.
Electrical Volume Resistivity 1.2 to 15 x 1011 ohm-cm.
Finishing Precision Cut sheet within +/- 0.03 in. (+/- 0.8 mm) of nominal and 0.20° square.
Fusing Compatibility All adhesives, carrier sheets, top sheets, and other materials used in labelconstruction must be compatible with the heat and pressure of the fusing process.Materials must not discolor, melt, offset, or release hazardous emissions whenheated to 392° F (200° C) for 0.1 second.
Packaging Moisture-proof wrap to preserve properties.
Shelf Life One year, maximum, stored at 72° F (22° C) and 50% R.H.
Table B-3 Adhesive Label Specifications
BP
rint M
edia
Sp
ecification
s
EN Print Media Specifications B-5
Transparency Specifications
Overhead transparencies used in HP LaserJet printers must be able towithstand the high temperature of 392° F (200° C) for 0.1 secondencountered in the printer’s fusing process.
Caliper 0.0039 to 0.0043 in. (0.10 to 0.11 mm).
Cutting Angle 900 +/-0.20.
Electrical Surface Resistivity 2.0 to 15 x 1010 ohm per square.
Electrical Volume Resistivity 1.2 to 15 x 1011 ohm-cm.
Finishing +/−0.03 in. (+/-0.8 mm).
Fusing Compatibility All materials of the overhead transparency must be compatible with the heat andpressure of the fusing process. Materials must not discolor, melt, offset material, orrelease hazardous emissions when heated to 392° F (200° C) for 0.1 second.
Table B-4 Transparency Specifications
B-6 Print Media Specifications EN
C
Parallel Cable Specifications and Attachments
Parallel Cable
Many printing problems are caused by poor quality cables. To ensurebest quality performance use an IEEE-1284 compliant parallel cablebetween the printer and computer. Only IEEE-1284 cables support allof the advanced printing capabilities, like bi-directional communication.These cables will be clearly marked with “IEEE-1284.”
Your can purchase a two-meter cable (part number C2950A) or athree-meter cable (part number C2951A) directly from Hewlett-Packardor from an authorized HP dealer•• Call HP Direct ordering at (800) 538-8787.•• To find a dealer near you (or if your dealer is temporarily out of
stock), call the HP Customer Information Center (800) 752-0900.•• See "Worldwide Sales and Service Offices," in Chapter 7 for
authorized dealers outside of the U.S.
EN Parallel Cable Specifications and Attachments C-1
Configuring the Printer Port
To prevent communication timeout errors, you may need to add aMODE statement to your computer’s AUTOEXEC.BAT file. (Somecomputers already have the correct MODE statement in theirAUTOEXEC.BAT files.) To add a MODE statement, you can use anyDOS editor, or any word processing program that edits ASCII text files.
For MS-DOS versions 4.0 and later, add this command:
MODE LPT1:,,B
For earlier versions of MS-DOS, add this command:
MODE LPT1:,,P
N o t e The above examples assume that you are using printer port LPT1. If youare using LPT2, LPT3, or LPT4, replace LPT1 in the examples abovewith the appropriate printer port name.
Networks and Switch Boxes
The printer’s status read back feature requires a direct connectionbetween the printer and the computer.
Most devices connected between the printer and the host computerprevent the printer from sending data back to the computer.
If you use a mechanical switch box, follow these guidelines:
•• Do not switch while the printer is printing or receiving data (when thethe Ready (bottom) light is blinking).
•• Do not switch to a host computer that is OFF, and then switch thatcomputer ON. The computer can appear to be sending data. If theError (top) Light is blinking, reset the printer.
•• Use a surge protector.
C-2 Parallel Cable Specifications and Attachments EN
D
Memory Installation (DRAM)
Introduction
It is easy to add more memory to your printer. Your HP LaserJet printeris capable of accepting one 70 nsec or faster (such as 50 nsec), 5 V,DRAM memory card meeting JEIDA specifications rated at 1, 2, 4, and8 MBytes. It is not compatible with PCMCIA memory cards or SIMMmemory.
Hewlett-Packard offers 1, 2, and 4-MByte DRAM memory cards. See"Accessories/Supplies Information" in Chapter 5 for orderinginformation.
N o t e Some printer drivers may require you to make an adjustment to thememory setting after installing or removing a memory card. If yourprinter driver includes an adjustable memory setting, change the settingto reflect the new memory total.
EN Memory Installation (DRAM) D-1
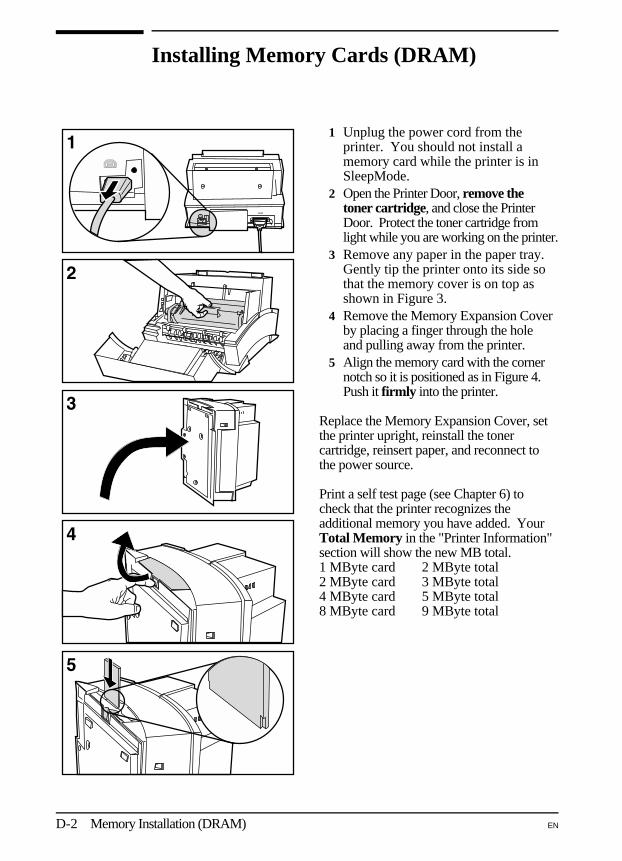
Installing Memory Cards (DRAM)
1 Unplug the power cord from theprinter. You should not install amemory card while the printer is inSleepMode.
2 Open the Printer Door, remove thetoner cartridge, and close the PrinterDoor. Protect the toner cartridge fromlight while you are working on the printer.
3 Remove any paper in the paper tray.Gently tip the printer onto its side sothat the memory cover is on top asshown in Figure 3.
4 Remove the Memory Expansion Coverby placing a finger through the holeand pulling away from the printer.
5 Align the memory card with the cornernotch so it is positioned as in Figure 4.Push it firmly into the printer.
Replace the Memory Expansion Cover, setthe printer upright, reinstall the tonercartridge, reinsert paper, and reconnect tothe power source.
Print a self test page (see Chapter 6) tocheck that the printer recognizes theadditional memory you have added. YourTotal Memory in the "Printer Information"section will show the new MB total.1 MByte card 2 MByte total2 MByte card 3 MByte total4 MByte card 5 MByte total8 MByte card 9 MByte total
D-2 Memory Installation (DRAM) EN
E
PCL Printer Commands
Introduction
Most software applications do not require you to enter printercommands. However some DOS software, including older versions ofLotus 1-2-3, and Dbase require set up strings to tell the printer whichtasks to perform or which fonts to use.
This appendix is not intended to provide a complete set of printercommands. An in-depth Technical Reference manual set may bepurchased separately.
•• Call HP Direct Ordering at (800) 538-8787.•• See "Worldwide Sales and Service Offices," in Chapter 7 for
authorized dealers outside of the U.S.
Please consult your software application manual (look up "printercommands" in the index) or consult your software support to identify thecorrect escape character and location for your application.
EN PCL Printer Commands E-1
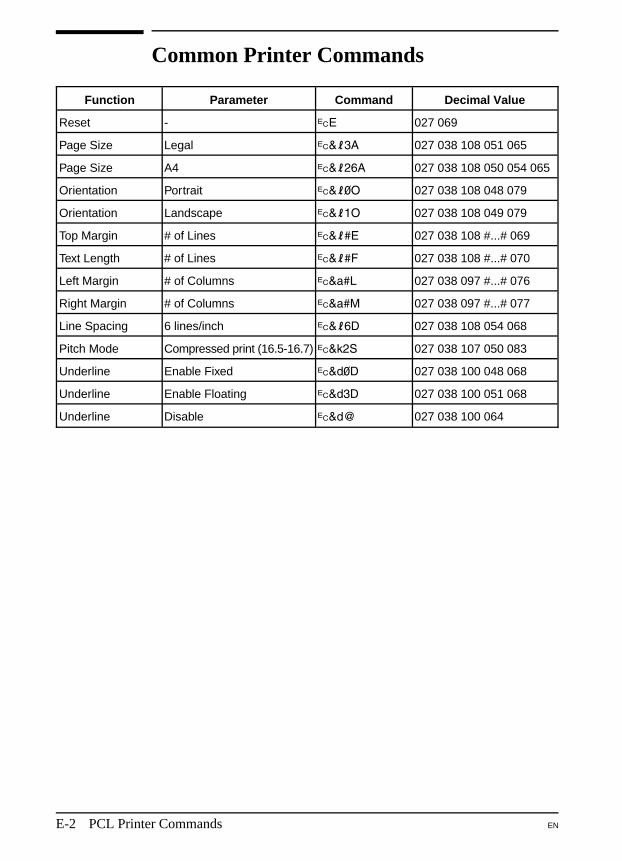
Common Printer Commands
Function Parameter Command Decimal Value
Reset - ?E 027 069
Page Size Legal ?&l3A 027 038 108 051 065
Page Size A4 ?&l26A 027 038 108 050 054 065
Orientation Portrait ?&l0O 027 038 108 048 079
Orientation Landscape ?&l1O 027 038 108 049 079
Top Margin # of Lines ?&l#E 027 038 108 #...# 069
Text Length # of Lines ?&l#F 027 038 108 #...# 070
Left Margin # of Columns ?&a#L 027 038 097 #...# 076
Right Margin # of Columns ?&a#M 027 038 097 #...# 077
Line Spacing 6 lines/inch ?&l6D 027 038 108 054 068
Pitch Mode Compressed print (16.5-16.7) ?&k2S 027 038 107 050 083
Underline Enable Fixed ?&d0D 027 038 100 048 068
Underline Enable Floating ?&d3D 027 038 100 051 068
Underline Disable ?&d@ 027 038 100 064
E-2 PCL Printer Commands EN
Index
AA4 paper size 4-2A5 paper size 4-2accessing driver help 2-2accessories/supplies
information 5-4adding paper 4-4adhesive labels
specifications B-5adjusting print quality 2-2advanced graphic settings 2-2assistance, customer 7-4attaching
paper input bin label 1-7parallel cable 1-5power cord 1-6
BB5 envelopes 4-2background scatter 6-11base memory A-1black page 6-11blank page
all pages 6-13occasional 6-13
button, front panel 3-5
CC5 envelopes 4-2cable
parallel 1-5power 1-6
calling Hewlett-Packard 7-4Canadian DOC regulations A-2canceling a print job 4-6changing printer settings
in Windows 2-1character voids 6-11circuit capacity A-1cleaning your printer 5-3colored paper B-1common printer commands E-2configuring printer port C-2connecting
parallel cable 1-5power cord 1-6
conservingelectricity 5-1toner 5-1
copies 2-2custom sized media 4-2customer support 7-4
Ddata light 3-1declaration of conformity A-4default font 2-6default settings 2-2density 2-2dimensions A-1DL envelopes 4-2DOS printer commands E-1 -
E-2DOS printer drivers
installing 1-10ordering additional 1-10
DOS software instructions 2-4dots per inch A-1double sided printing 4-9dpi A-1driver helps
for Windows 2-2dropouts 6-12duplex printing 4-9duty cycle A-1
EEconoMode 2-2, 5-1electrical specifications A-1, A-4emissions
radiation A-3energy use A-4envelope
orientation 4-8printing 4-8sizes 4-2
envelope specifications B-4environmental specifications A-1EPA energy star computers
compliance A-4error light 3-1escape commands E-2executive paper size 4-2
Ffaded print 6-9FCC regulations A-2features A-1font
default 2-6font problems
troubleshooting table 6-8fonts
checking installed 2-6forms
pre-printed B-1front output slot
location 1-2
front panel 3-1 - 3-6light status 3-1 - 3-6
front panel button usage 3-5
Ggraphic settings 2-2guides, paper 1-8, 4-4
Hhalf page blank 6-12heat-resistant inks B-1Hewlett-Packard
telephone numbers 7-4horizontal stripes 6-10HP Customer Information
Center 5-4HP Direct Ordering 5-4
IIEEE-1284 parallel cable C-1inks
heat resistant B-1installation check list 1-1installed fonts 2-6installing
DOS printer driver 1-10memory cards D-2printer drivers 1-9 - 1-10printer software 1-9 - 1-10toner cartridge 1-4
interference A-2interupt print job 4-6
Llabel
attaching 1-7labels
specifications B-5tips for printing 4-10
laser safety A-3laser safety statement A-3legal sized paper 4-2letter paper size 4-2letterhead
orientation 4-7printing 4-7
license, software 7-7light status
error- light blinking 3-3error- light continuously on
3-3form feed 3-2hardware error 3-4incompatible memory card
installed 3-4printer busy 3-2printer pause 3-2ready 3-1sleepmode 3-4
Ind
ex
EN Index-1
lightsstatus meanings 3-1 - 3-6
loadingpaper input bin 1-8, 4-4single sheet input slot 4-5
loss of detail 6-12Lotus 1-2-3
printer drivers 1-10
Mmanual feed (pause printing) 4-6maximum paper size 4-2media
special 4-10media sizes 4-2memory
base A-1expansion A-1
memory cards (DRAM)installation D-2
memory expansion A-1memory expansion cover
location 1-3memory installation D-1 - D-2minimum paper size 4-2monarch envelopes 4-2
Nnetworks C-2noise level A-1number of copies 2-2
Ooperating environment A-1overhead transparency
specifications B-6ozone emission A-2
Ppage too complex 3-3paper
adding 4-4centering 1-8, 4-4colored B-1loading 1-8, 4-4purchasing 4-1selecting B-1sizes 4-2storing B-1
paper bin supports 1-8, 4-4paper capacity A-1paper curl
preventing 1-8paper guides 1-8, 4-4 - 4-5
location 1-2paper input bin 4-4
location 1-2paper input bin label 1-7paper input support 4-4
location 1-2paper jams 6-3
causes 6-3input area 6-3no paper taken 6-5output area 6-4preventing 1-8
paper output binlocation 1-2
paper output support 4-4location 1-2
paper path leverlocation 1-2lower position 4-3upper position 4-3
paper path selection 4-3paper release lever
location 1-3paper specifications B-1 - B-2
colored paper B-1pre-printed forms B-1
paper weightequivalence table B-3
parallel cable 1-5attaching 1-5connecting to printer 1-5specifications C-1 - C-2
parallel cable connectorlocation 1-3
parallel port 1-5parts and locations 1-2 - 1-3pausing printing between pages
4-6PCL printer commands E-1 -
E-2phone numbers 7-4power
surge protection 7-2power cable connector
location 1-3power consumption A-1power cord 1-6power on/off 1-6power requirements A-1pre-printed forms B-1
ink specifications B-1precautions A-3preparing for printing 4-1print
resolution A-1print media
paper quality B-1 - B-6print media specifications
envelope quality B-4label quality B-5paper quality B-1transparency quality B-6
print quality adjusting 2-2print quality problems 6-9
all blank pages 6-13background scatter 6-11black page 6-11blank page 6-13character voids 6-11dropouts 6-12faded print 6-9half blank page 6-12horizontal stripes 6-10loss of detail 6-12repetitive defects 6-10staining 6-9
vertical lines 6-9vertical white stripes 6-10
print resolution A-1print speed A-1printer
dimensions A-1features A-1on\off 1-6parts and locations 1-2 - 1-3reset 6-2resolution 2-2service after warranty period
7-4setup 1-1 - 1-10solving problems 6-6troubleshooting table 6-6warranty 7-1warranty exclusions 7-2warranty limitations 7-3weight A-1
printer commands E-2printer door, location 1-3printer drivers
for DOS applications 1-10for Windows applications 1-9installing 1-9Lotus 1-2-3 1-10substituting 1-10WordPerfect 1-10
printer maintenance 5-1 - 5-4printer operation problems 6-6printer port
configuring C-2printer settings
changing in Windows 2-1printer software
explanation of 2-1 - 2-6installing 1-9remote control panel 2-4status monitor 2-5status window 2-3
printer specifications A-1 - A-4printer status
error- light continuously on3-3
error: light blinking 3-3form feed 3-2hardware error 3-4incompatible memory card
installed 3-4printer busy 3-2printer pause 3-2ready 3-1sleepmode 3-4
printing 4-1 - 4-10custom sizes 4-10energy use during A-4labels 4-10letterhead 4-7on both sides of media 4-9self test page 6-1special media 4-10stopping 4-6transparencies 4-10
Ind
ex
Index-2 EN
printing envelopes 4-8printing tasks 4-6product support 7-4purchasing paper 4-1pysical specifications A-1
Rradio interference A-2ready light 3-1recycling
toner cartridges 5-2regulatory information A-2remote control panel 2-4repackaging guidelines 7-5repetitive defects 6-10resetting the printer 6-2resolution 2-2resolution enhancement 2-2restoring
default settings 2-2returning your printer 7-5
Ssafety precautions A-3saving toner 5-1self test page 6-1service
after warranty period 7-4service information form 7-5 -
7-6setting up the printer 1-1 - 1-10single sheet input bin
location 1-2single sheet input slot 4-5single sheet input slot, location
1-2SleepMode 1-6, 5-1sliding paper guides 1-8, 4-4software
product license 7-7software instructions
for DOS users 2-4for Windows users 2-1
solvingprint quality problems 6-9
staining 6-9status monitor 2-5status window 2-3stopping a print job 4-6storage environment A-1supplies/accessories information
5-4support, customer 7-4surge protection 7-2surge protector
required on switch boxes C-2switch box C-2symbol set 2-6
Ttelevision interference A-2toner
density 2-2toner cartridge
cleaning spills 1-4expected toner life 5-1
exposing to light 1-4extending toner life 5-1installing 1-4non-HP, use of 7-2recycling 5-2redistributing the toner 5-2removing sealing tape 1-4returning 5-2warranty 5-2
transfer roller 6-3location 1-3
transparenciesspecifications B-6tips for printing 4-10
troubleshootingDOS font problems 6-8print quality problems 6-9printer problems 6-6Windows font problems 6-8
troubleshooting and problemsolving 6-1 - 6-14
two-sided printing 4-9
Uupgradable memory A-1
VVCCI statement- Japan A-2vertical lines 6-9vertical white stripes 6-10voltage conversions 7-3
Wwarranty
exclusions 7-2limitations 7-3service after expiration 7-4start date 7-2voltage conversions 7-3
warranty 7-1weight A-1Windows printer driver 1-9Word Perfect
printer drivers 1-10worldwide sales and service
offices 7-8
Ind
ex
EN Index-3

Ind
ex
Index-4 EN