installation instructions - kohler · slide the new bath into position to verify the drain location...
TRANSCRIPT

BEFORE YOU BEGINBEFORE YOU BEGIN
�
�
�
�
�
�
�
�
�
�
Please read these instructions carefully to
familiarize yourself with the required tools, materials,
and installation sequences. Follow the sections that
pertain to your particular installation. This will help
you avoid costly mistakes. In addition to proper
installation, read all operating and safety instructions.
All information is based on the latest product
information available at the time of publication.
Kohler China Ltd. reserves the right to make
changes in product characteristics, packaging, or
availability at any time without notice.
We recommend this bath for drop-in or 3-wall alcove
installations.
This bath must be installed to an adequately
supported, level subfloor.
These instructions contain important care, cleaning,
and warranty information-please leave these
instructions for the consumer.
CAUTION: Risk of personal injury. Cast iron
baths are very heavy. Get help lifting and moving
the bath.
PRODUCT REQUIREMENTS
A.
�
�
�
A. Summary Of Key Requirements
Observe all local plumbing codes.
Install this bath on an adequately supported, level
subfloor. When replacing an existing bath, check
floor under bath for damage and repair as needed.
�
�
� Provide properly dimensioned framing.
B. Product Inspection
Uncrate and inspect bath for damage. Leave allmaterials in the crate during construction to preventdamage.
B.
1
� , 2006
Copyright Kohler China Ltd., 2006C1058765-T01-A
368 201419
REPOS
INSTALLATION INSTRUCTIONS
ENAMELED CAST IRON BATHK-18200T/K-18200T-GRK-18201T/K-18201T-GR

2
ROUGHING-INROUGHING-IN
UNIT: mm:
K-18200T/K-18200T-GR
Specifications
Cut-out Dimensions 1562mm 712mm
Drain
Weight
K-17295T-CP
119kg
K-17295T-CP
119
1562 712
1600
750
450
75
120
295
460
20
K-8597T-CPGripRail K-8597T-CP
1058765-T01-A
Water Capacity to Bottom of Overflow 176L
Water Capacity to Edge of Rim 252L
( ) 176
( ) 252

Notes
Fixture dimensions are nominal and conform to
tolerances by ANSI standard (A112.19.1).
ANSI (A112.19.1)
Specifications
Cut-out Dimensions 1662mm 762mm
Drain
Weight
K-17295T-CP
128kg
K-17295T-CP
128
1662 762
K-18201T/K-18201T-GR
3
1700
800
450
75
120
295
460
20
K-8597T-CPGripRail K-8597T-CP
1058765-T01-A
Water Capacity to Bottom of Overflow 206L
Water Capacity to Edge of Rim 289L
( ) 206
( ) 289

INSTALLATION REQUIREMENTSINSTALLATION REQUIREMENTS
B.B. Clearance Requirements
Check the rough-in and room dimensions to provide
adequate available space for the bath unit.
4
A.Rcommended Tools And Materlals
�
�
�
�
�
�
�
�
�
�
�
Silicone SealantMeasuring tapePencilPlumber puttySquareSafe glassesPipe wrenchPhilips ScrewdriverLevel
Conventional Woodworking tools and materialsDrop cloth
Plus:
A.
�
�
�
�
�
�
�
�
�
�
�
SITE REQUIREMENTSSITE REQUIREMENTS
A. Old Bath Removal (if necessary)
Disconnect the drain at the trap. Remove the old wall
material. Slip boards under the old bath feet to protect
the floor, and slide the old bath out of the recess as
illustrated.
A.
Old BathFloor Protection Board
B. Subfloor Preparation
Check the flooring under the bath, and make repairs as
needed. Make sure the subfloor is level.
C. Plumbing Preparation
Position the plumbing according to rough-in dimensions.
Cap the supplies and check for leaks.
B.
C.
1058765-T01-A

5
BEFORE INSTALLING UNITBEFORE INSTALLING UNIT
A.
2
4 1
2 3
�
�
�
�
�
�
A. The following installation practicesto avoid any potential
damage to the enamel finish.must be followed
WARNING: Failure to follow the manufacturer'srecommended installation method may result indamage to the enamel surface.
Do not use sharp objects or metal tools whenhandling the bath, especially around the rim area.Use a clear protective plastic film over tub rim aswell as the bottom of tub to safeguard from dirt andsilicone during the installation process.For correct installation, bath rim should not come indirect contact with the walls and/or horizontalsurfaces to avoid transmission of noise and vibrationas well as potential cracks in the enamel finish.The necessary gap between bath rim and the wall is2 mm horizontally and 4 mm vertically. Refer tofigures 1, 2, and 3 below.Before placing setting-in the bath, apply a sanitaryquality silicone filler on all surfaces to come incontact with the bath rim.Set the bath in its correct position.
�
�
�
�
�
�
B. Partially Install Bath Drain
� Install the drain on the bath according to the drain
manufactuer's instructions.
B.
�
4
Silicone Filler
Tiling
Bath
Wall
Fig.11
UNIT: mm:
4
Silicone Filler
Tiling
Wall
Bath
Fig.22
2
4
Wall
Silicone Filler
Bath
Fig.33
1058765-T01-A

6
INSTALL THE BATHINSTALL THE BATH
A. Through the Floor Drain Bath
Installation
1 . Slide the new bath into position to verify the drain
location and the stud fit. Cut a minimum 152 305
mm hole in the floor for the drain connection.
)
A.
1 .
152
305mm
)
2 . Use 25~30 Kg dry cement and sand mix. Add water
to make a paste mortar. Remove the tub. Cover the
installation area with the mortar starting from the
middle of the tub as shown. The height of the mortar
should reach the bottom of the tub.
DO NOT CLOG THE DRAIN HOLE.
. Place the tub onto the mortar. Insert the drain
tailpiece into the trap.
. Make sure that the bottom of the tub is pressed into
mortar in order to secure the tub. Insert two wood
wedges under the tub to support the weight of the
tub until the mortar hardens. (Wedges will remain in
the mortar.) Frequently check the level of the tub.
. 25~30
.
.
NOTE:
)
3)
4)
2)
3)
4)
Level
Paste Mortar
Wood WedgeMiddle of BathDrain Hole
1058765-T01-A
7
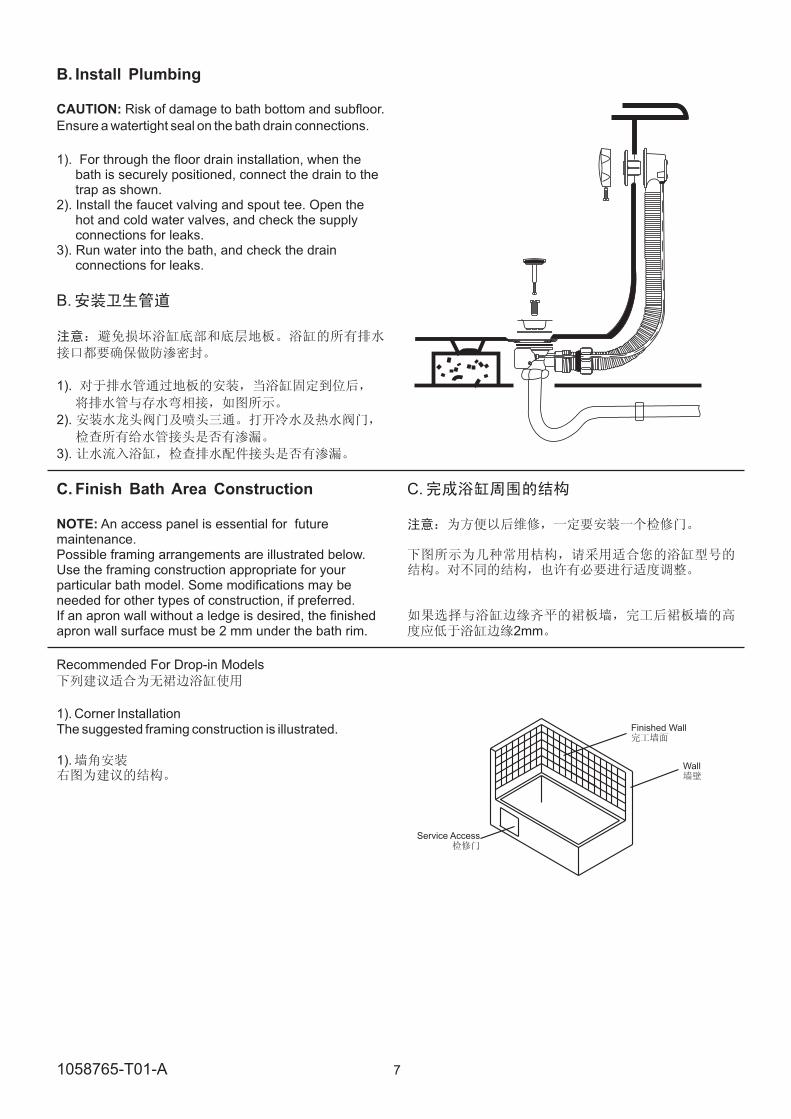
B. Install Plumbing
CAUTION: Risk of damage to bath bottom and subfloor.
Ensure a watertight seal on the bath drain connections.
1 . For through the floor drain installation, when thebath is securely positioned, connect the drain to thetrap as shown.
2). Install the faucet valving and spout tee. Open thehot and cold water valves, and check the supplyconnections for leaks.
. Run water into the bath, and check the drainconnections for leaks.
)
3)
1).
2).
3).
B.
C.
2mm
C. Finish Bath Area Construction
NOTE: An access panel is essential for futuremaintenance.Possible framing arrangements are illustrated below.Use the framing construction appropriate for yourparticular bath model. Some modifications may beneeded for other types of construction, if preferred.If an apron wall without a ledge is desired, the finishedapron wall surface must be 2 mm under the bath rim.
1). Corner InstallationThe suggested framing construction is illustrated.
1).
Finished Wall
Wall
Service Access
Recommended For Drop-in Models
1058765-T01-A

2). Recess InstallationThe suggested framing construction is illustrated.
2).
Finished Wall
Wall
Service Access
3). Peninsular InstallationThe suggested framing construction is illustrated.
3).
Finished Wall
Wall
Service Access
8
Finished Tiled Wall
Paste Mortar
Brick or Concrete Wall
Bath
Silicone Filler
COMPLETE FINISH WALLCOMPLETE FINISH WALL
CAUTION: Risk of product damage. Do not support the
weight of the bath by the rim.
Install the ceramic or marble tiles. Seal the joints
between the bath rim and the finished tiled wall using
silicone sealant. RTV (Room Temperature Vulcanizing)
sealant is recommended.
1058765-T01-A

9
CARE AND CLEANINGCARE AND CLEANING
When cleaning up after installation, do not use abrasivecleansers, as they may scratch and dull the bathsurface. Use warm water and a liquid detergent toclean the surface.Remove stubborn stains, paint, or tar with turpentine orpaint thinner. Do not allow cleaners containingpetroleum distillates to to remain in contact with anybath surface for long periods of time.Remove plaster by carefully scraping with a wood edge.Do not use metal scrapers, wire brushes, or other metaltools. Use a powder type detergent on a damp cloth toprovide mild abrasive action to any residual plaster.Clean the outside surface of your vitreous chinaproduct with mild soap and warm water. Wipe the entiresurface completely dry with a clean, soft cloth.If the surface of your vitreous china product becomesexcessively dirty, you can use a general purposecleaner such as: Fantastik Lysol FoamingDisinfectant, Dow Bathroom Cleaner Liquid, ScrubFree Soap Scum Remover, Soft Scrub Spic andSpan, or Mr. Clean .
IMPORTANT CONSUMER INFORMATIONIMPORTANT CONSUMER INFORMATION
Safeguard ASME/ANSIA112.19.1M
pH 3 8 ()
�
�
�
Housekeeping Responsibilities
�
�
�
The Safeguard slip resistant surface on this bathtubmeets or exceeds the requirements of ASME/ANSI forslip resistance.
DANGER!! Improper maintenance or cleansers maypermanently remove the slip resistantsurface on Kohler bathtubs.
NOTICE: All housekeeping and maintenanceemployees must be trained in the propercleaning of Kohler bathtubs. Post a copy ofthis notice in a readily-visible location.
DO NOT use steel wool, wire brushes, metal scrapersor abrasive sponge pads to clean a Kohlerbath tub.
DO NOT use buffing machines on the slip resistantsurface.
DO NOT use high alkaline or strong acid cleansers.DO NOT use abrasive cleansers.
Use only non-abrasive cleansers and a soft nylonbrush to clean the slip resistant surface.When using commercial cleansers, use cleanserswith a pH of between three and eight.Follow cleanser manufacturer instructions verycarefully.
1058765-T01-A

LIMITED ONE-YEAR WARRANTYLIMITED ONE-YEAR WARRANTY
()
( )
13819
200021
Plumbing Fixtures and Fittings LimitedOne-year Warranty
Kohler plumbing fixtures and fittings are warranted tobe free of manufacturing defects.
This product is warranted for one year from date ofpurchase. Kohler China will be responsible for anyproblems caused by manufacturing defects providedwith the invoice. Kohler China will, at its election, repair,replace or make appropriate adjustment where KohlerChina inspection discloses any such defects occurringin normal usage within one year after purchase.
Implied warranties including that of merchantability andfitness for a particular purpose are expressly limited induration to the duration of this warranty, Kohler Chinadisclaims any liability for special, incidental orconsequential damages. Damages to the productcaused by misuse, abuse and installation that is not inaccordance with the owner's manual are not coveredby this warranty.
To obtain quick warranty service, please contact yourdealer, or write to Kohler China. (Original sales receiptmust be provided as the proof of purchase.)
Kohler China Investment Company Ltd.Central Customer Service Center19/F, Shanghai Square, 138 Huai HaiRoad, Luwan District, Shanghai, PRCZip Code: 200021
This is our exclusive written warranty.
101058765-T01-A