lee feder tuning a fender twin reverb - university of illinois · 2006-01-20 · lee feder physics...
TRANSCRIPT

Tuning a Fender Twin Reverb

Lee Feder
Physics 498 POM Professor Steve Errede
12 May 2005
Introduction
Before the Physics 498 POM project, circuitry had always interested me. I
thoroughly enjoyed Physics 112: Electricity and Magnetism . However, I faced some
initial problems in choosing one project for the entire semester. My primary goal for the
project was to learn about electronic circuits, vacuum tubes, and their respective effects
on sound. However, choosing a specific project was easier in principle than in practice.
The first difficult was a “use” constraint; I do not play electric guitar and do not use my
electronic keyboard sufficiently to warrant the construction of either an external
amplifier or a sound modulation device. The second and perhaps more important
constraint was money; I have none. Therefore, even if I had been interested in
constructing an amplifier for myself, I could not have afforded the parts.
At this point I turned to my much more musically inclined brother Aaron.
Owner of at least three guitar amplifiers, several guitars, a Fender Rhodes, an electric
bass, and several microphones, I imagined that he would always find a use for an
additional amplifier. Plus, I could charge him for all the parts; this way I get the
knowledge and experience, and he gets a top notch amplifier. Unfortunately, he too
lacked the immediate resources to bankroll a several hundred dollar amp. His counter-
offer though greatly intrigued me given both the scope of the project and the history of
the class and Professor Errede. Aaron asked if I could refurbish his 1977 Fender Twin
Reverb.
Fender Twin Reverb serial number F114553 began life as a CBS-designed
recalcitrant amplifier. Upon procuring it in mid-2004, my brother had Ben Juday
rebuild it to “black face” specifications, those from the Fender golden age in 1963. After
the reconstruction of June 2004, the amplifier sounded fine for several months.

However, in late 2004 it began to distort heavily and, in the scientific words of my
brother, it “just didn’t sound right.” He also asked that I install an overdrive circuit
which would allow, with the flip of a switch, to push the regular clean “Fender sound”
over the limit of the tubes and clip the signal to give a more harsh rock 'n roll tone.
With really only one specific charge, the overdrive circuit, and a much more important
yet vague one, I rolled the Twin into the lab to tap the knowledge of the class to clean
up the sound and install the overdrive circuit.
Overdrive

The first and perhaps easiest of the goal I had was to install the overdrive circuit.
The circuit is a relatively easy modification of the existing wiring and since my brother’s
amp already had an unused switch from the no-longer-functioning CBS-designed
master volume control, there was not even any installation necessary. As shown in the
pictures in Appendix 1, the circuit consists of shorting out the capacitor on the second
gain stage of the vibrato channel. This has two positive byproducts: the first is that
since the two cathodes of the second gain stages of both the normal and vibrato
channels are tied together, shorting out the capacitor (switch in) allows the guitarist to
use reverb on the normal channel; the second is that with the switch pulled out, there is
a high gain option allowing for the amp to distort slightly on command; with the switch
pushed in, the tone is softer and cleaner, but features less gain.
Figure 1

The reverb, when used through the normal channel, is also affected by the
volume level on the vibrato channel. As seen in Figures 1-3, the lower the volume is

Figure 2
Figure 3

attenuated on the vibrato channel, the more closely the frequency response of the
second channel (the bottom curve) tracks that of the normal channel. This increased
tracking corresponds to a more traditional mapping of the reverb onto the normal
channel. As the volume control is increased from effectively 0 (Figure 1) to near the top
(Figures 2 and 3), the amp loses the high harmonics making the reverb sound darker.
The graphs at the top of each picture show that the second “hump” of the bottom curve
shifts further and further left as the vibrato volume increases from 50% (Figure 2) to
95% (Figure 3).
The utility of the extra gain can easily be seen in the schematics and graphs on
the following pages. The first set (Figure 4) shows the functioning of the preamp stage
as Leo Fender designed it: the capacitor (here it is 1000µF to enhance the effects on the
graphs but on the amp is really 25 µF) is wired in parallel with the 1.5K resistor (In the
amp this is 820 K because there are two preamp tubes forcing current through the
resistor and since Ohm’s Law V=IR is linear, if there is twice the current the resistance
should decrease by a factor of 2 in order to keep the voltage drop constant;
820~1/2*1500=750. These numerical changes due not alter the effect, but only obviate it
for the sake of argument and demonstration.). The gain of V4, the preamp tube in
question, according to the original design is a hefty gain of 84.53/1.679=~50. The ratio
compares the input voltage on the grid to the final output voltage; both are root mean
square alternating current voltages (VACRMS). As the Voltage v. Time graph shows,
there is moderate clipping on the upper part of the sine wave. Instead of rounding off
evenly or even coming to a moderate point, the top of each wave crest is chopped off
and even has some visible transients. This, were we to subject it to Fourier analysis,
would show the addition of harmonics not present in the original pure 1 kHz sinusoidal
input wave coming off the simulate function generator. Finally, the Voltage v.
Frequency graph shows a rapid drop off as frequency increases. While most of this
occurs well beyond the audible range, it nonetheless happens and serves as a point of
comparison.

Figure 5 shows the amp under normal operation with the volume control set at
the same level, with the same input signal, but with the switch effectively pulled out. In
this case the capacitor is disengaged and so has no bearing on the input signal. As a
result, the gain is significantly decreased. Here the gain is 48.54/1.667=~30, using the
same computation as before. As a result, there is no clipping; the first graph shows a
balanced sinusoidal curve with no chopped crests or troughs and no transients.

Figure 4

Figure 5
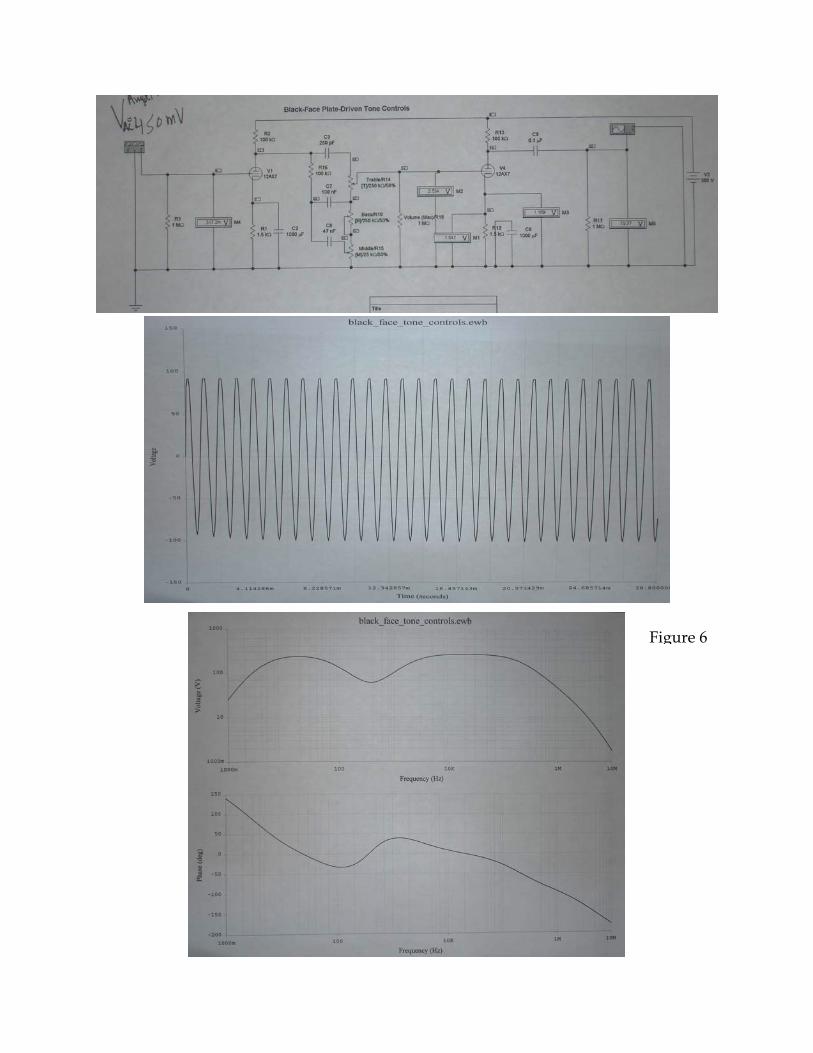
Figure 6

Additionally, because the capacitor is no longer connected, the high frequencies have a
greater presence, brightening up the sound. The bottom graph in Figure 5 shows that
not only do the ultra high frequencies not drop off as quickly as in Figure 4’s graph, but
the lower frequencies have less gain as well. In the real amplifier, this effect would
migrate down to the more audible range. Since the resistor and capacitor basically form
a high pass filter to ground, the capacitor in Figure 4 permits all the high frequencies to
escape from the signal path while retaining the lower ones. Since the capacitor modeled
here is 40 times that of the real one, the RC constant for the filter will be 40 times what it
is in the real amplifier.
The difference between Figures 5 and 6 has to do with the input signal strength.
In both 4 and 5 the input signal was 300 mV whereas in 6 the input signal is 50% more,
450 mV. In both 5 and 6, the capacitor is effectively removed; since this reduces the
gain of the stage, the tube effectively has more “head room” to accommodate a stronger
signal. As shown in the V vs. T graph, there is moderate clipping with this stronger
input despite the disconnected capacitor. While the gain is still less than with the
capacitor (70.77/2.534=~27), the amp can still distort. This fact emphasizes that, for
instance, a guitar player could suddenly switch from a mellow to hard playing style
and, if the switch is pushed in, the amp would not distort terribly, but rather would
accommodate the increased signal strength (i.e. turning up the volume on a guitar).
There would only be the limited distortion manifest in a lower strength signal in Figure
4. Additionally, this configuration features the stronger top end, giving the amp a
brighter sound.
The extra headroom of the modification results not only from disconnecting the
capacitor, but also from liberating the cathode from a fixed potential and allowing it to
track the input signal. Because the grid is biased negative with respect to the cathode, it
affects the flow of electrons from it. This allows not only the modulation necessary in
an amplification circuit, but also, if the cathode is not held fixed to one potential, a
flexible “window” of amplification. As the signal on the grid rises and falls, the
cathode’s potential rises and falls as well. While the two do not move in a 1:1 ratio, the

movement of the cathode increases the range in which the grid can travel from its
steady state potential before clipping occurs. As seen in Figures 4 and 6, slight clipping
occurs. Since the voltage into the grid as well as the voltage across the capacitor are AC
and therefore RMS measurements, they must be converted by multiplying by a factor of
√(2). Thus, the threshold for the cathode in Figure 4 is √(2)*345.2 µV+1.554 V=1.554 V.
Since this voltage is below the grid voltage of 1.679*√(2)=2.37 V the signal is cut off
because the grid potential exceeds that of the cathode, that of the resistor plus that of
the AC voltage drop across the capacitor, at the top of each signal crest. At this point
the grid effectively turns around the electrons escaping from the cathode, thus
preventing the signal from reaching the plate and continuing. In Figure 6, the numbers
are similar, but as the graph of voltage versus time shows the clipping is barely present:
√(2)*1.169+1.55= 2.63 V. The grid voltage is 1.857 *√(2)=2.63. This comparison
manifests one of the most appreciated property of tubes: instead of cutting off sharply
as transistors do, the peak more “softly.” Figure 6 shows that even though the grid at
best matches the cathode voltage, there is still a tiny bit of clipping, which may be
desirable, depending on the listener. Both of these calculations contrast sharply with
those from Figure 5. The total cathode voltage is √(2)*.8016+1.534=2.67 V while the total
grid voltage is √(2)*1.697=2.40 V. Here the grid is safely below the cathode at all times
and so the tube does not clip or distort significantly enough to show up on the graph.
While in theory the effect is rather pronounced and obvious, the difference in
gain is hardly a case of 30 vs. 50 in the real amp. For some undiscoverable reason, the
Fender Twin does not distort quite as much as other amps with this modification nor is
there a significant drop in gain when pushing in the switch. Although the effect should
be stronger both according to theory and the numbers from Electronics Workbench, this
project, if nothing else, has been an exercise in differentiating between theory and
reality. However, the reverb works beautifully through the normal channel, as it
theoretically should. Overall, though, the overdrive circuit seems successful, albeit as
an alternative reverb option circuit instead a true overdrive one.
Cleaning Up the Sound

Once the overdrive circuit was installed, I turned to cleaning up the overall
sound of the amplifier. According to the theory of tube operation, a filament drawing
6.3 volts off an alternative secondary winding on the power transformer heats the
cathode in the tube. Due to the property of thermionic emission of electrons, electrons
escape from the cathode. In vacuum tubes, the positive potential plate attracts the
negative electrons, creating a current that, by confounding convention, flows from the
plate to the cathode. Between the two is the grid, which modulates the electron flow
and inputs the signal to be amplified. By modulating the flow of electrons, the grid
allows the plate to transmit an amplified signal to the output of the circuit. In beam
tetrode power tubes, like the 6LBGC’s in the Fender Twin Reverb, there is a fourth
filament in the tube that increases the gain (or amplification power) of the tube as well
as decreases the capacitance between the positive plate and negative cathode. This
fourth element is called the screen and is held fixed slightly below the steady state
voltage of the plate. There are also “guides” that help prevent secondary emission of
electrons by the grid and focus the electron flow from the cathode to the plate.
As a natural consequence of design and implementation limits, when tubes are
forced to draw too much current because the grid signal is too strong, the tubes “clip.”
This clipping results from the tube trying to pull too much current off the cathode.
Since the cathode cannot supply enough power, the input signal loses the peaks and
valleys of the sinusoidal signal, resulting in the addition of harmonics not present in the
original signal. This property not only provides the warm sound so adored by users of
tube amplifiers when at low and moderate gain, but also results in distortion when at
high gain. This clipping is like that theoretically supplied by the overdrive circuit and
creates a “dirty” tone. This was exactly one of the problems during normal use cited by
my brother.
In order to limit the amount of current drawn by the power tubes, some
amplifiers, including this Twin, feature adjustable biasing. When properly biased,
6L6GC tubes should be driven with around 20 mA of current. Adjusting the bias is
obtained by turning a potentiometer, or “pot;” rotation in one direction increases the

resistance of the pot and thereby decrease current while turning it in the opposite
direction decreases resistance and increases current. This tendency follows Ohm’s Law:
V=IR. Although in practice the input voltage is not perfectly constant as shown in
Table 2 (all Tables found in Appendix 2), the change in bias voltage was not sufficient to
make impossible proper biasing of the tubes.
Table 1 shows that the initial bias of the four Sovtek 6L6GC power tubes was
slightly high. These measurement were carried out across the 1Ω resistors connected to
the tubes. Once again, according to Ohm’s Law this resistance makes the voltage equal
to the current, facilitating measurement using a digital multimeter. After some minor
adjustment to the biasing pot, we achieved proper biasing current. Although ideally
the four power tubes would run at the same current, this is an unrealistic expectation of
four used power tubes, especially since we do not know their origin or age. The
maximum variation of 1.7 mA, however, was well within the acceptable range
according to Professor Errede.
As the bias currents show, vacuum tubes are not all exactly the same in their
internal resistance. For example, Tube 1 decreased in current by 4.5 mA while Tube 4
decreased by 4.3 mA. This would violate Ohm’s Law if internal resistance were
constant. It also manifests some of the inherent non-linearity of tubes: Tube one
decreased in current by 18.3% while Tube 4 decreased by only 16.5%. Table 2 also
shows that the relatively significant changes in biasing current barely affect other
relevant voltages within the amplifier. Specifically, the voltage off the main secondary
winding of the input transformer, which distributes the bulk of the voltage to the power
supply and therefore the circuit of the amplifier, changed by less than 1/6 of 1%. The
changes in the bias voltage (-Vbias) and the B+ voltage (VB+), measured after the power
supply, were similarly negligible.
After ensuring that the tubes were not running “hot”, drawing too much
current, we examined the voltages around the choke transformer. The choke, combined
with the diodes in the power supply, are used to smooth out the current flow and
convert the alternating current wall power into the direct current necessary for most of

the amplification circuitry. As Tables 3 and 4 show, the choke voltage, along with the
plate and screen voltages are all 439 V. According to the original schematic, the plates
should have the same voltage as the choke since they draw from the same power source
with no interruptions. The screen, used to decrease the capacitance between the grid
and the plate as well as increase the gain of the tube, should have a slightly lower
potential, but as shown in Table 4 the drop due to the 470Ω resistors was too small to
affect a 400+ voltage. Both the screen and plate voltage, though, are well within 20% of
the specified potentials on the schematic of 458 V and 460 V, respectively.
Besides examining the voltages on the power tubes, we measured the plate, grid,
and cathode potential of the auxiliary tubes. While the power tubes, which amplify the
final signal, would clearly have a greater effect on the sound of the amp, a damaged,
worn out, or misbehaving preamp tube could easily provide distortion. This fact
became even more manifest at the end of the project when, for comparison purposes,
we switched out one of the Sovtek preamp tubes and replaced it with a new Groove
Tubes 12AX7-M; the increase in clarity throughout the range of the guitar was
incredible, especially given the relatively easy fix. Comparing the values in Table 5
with the limits on the schematic, all except for the tremolo are well within the specified
potential. Since the tremolo only acts as an oscillator, the slightly high values on the
plate should have no effect on the final sound unless tremolo is applied.
After all the measurements, the final conclusions were that there was no serious
internal damage to the amplifier. Any remaining distortion would come from a myriad
of sources, including issues internal to the tubes. First, the tubes could be worn and
most likely were at least to some degree. The swapping of one of the preamp tubes for
the recommended Groove Tubes showed that new tubes would definitely clean up the
sound. This improvement would either result from replacing the worn existing tubes or
improving the inherent quality of the installed tubes. This second point becomes
increasingly important with respect to the power tubes. Since my brother had no
information on the prior use of either set of power tubes he owns, we had no way of
knowing either the wear on them or their rating. Power tubes are rated on a scale from

1-10 with the rating being an inherent quality in the production. A 10 tube produces an
extremely clean sound while a 1 creates a very distorted tone.
Once we took all the measurements, we reassembled the amp to make a
qualitative analysis. At low volumes, the amp sounded nice, with a clear, clean tone
throughout the frequency range. However, at high volumes it distorted terribly and the
bass was entirely muddy. Because the distortion was so bad, we had to investigate non-
ciurcuit causes of distortion.
Other Factors
The first conclusion Professor Errede made was that the speakers in the cabinet
were of “low quality,” to put it nicely. After investigating, it turned out that the
speakers were some of, if not the, worst Fender ever shipped with an amp. As soon as
possible we pulled the speakers from the cabinet and replaced them with a pair of
Eminence speakers from the Professor. While not top-of-the-line speakers, these still
represented a major improvement. Installing them proved easy, once the old speakers,
the glue attaching the gasket to the baffle board, and the torn gasket were all scraped
clean and made level. Without this painstaking attention to detail, the speakers will not
seat properly on the baffle board and could be damaged during playing. Once
installed, we retested the amp and found major improvements in the high and low end
clarity. While some distortion at maximum volume remained in the bass region, the
tone sounded much more clean and listeners could finally hear the “clean Fender tone”
that my brother felt had disappeared from the amp. The new speakers, which featured
a large voice coil and magnet to improve frequency response, combined with soldered
connections between the plug and two sets of speaker terminals, replaced what had
clearly been the weakest link in the chain (see pictures, Appendix 1).
After resolving the speaker issues, we turned to a myriad of issues that arise
whenever working with vintage equipment. First, all the tone and volume pots were so
dirty that adjusting them with the amp on resulted in crackling and noise from the amp.
In order to remove that crackling, Professor Errede simply sprayed them heavily with
pot cleaner. While this does little to remove constant distortion, it fundamentally

improves the real world operation of the amp. Second, both the power and standby
switches had as much lateral movement as vertical travel. While also not necessarily a
major cause of distortion, dirt on the contacts or infirm soldering can create distortion,
according to Professor Errede’s experience, and the lateral movement could pose a
major safety risk.
Perhaps the most important change we made involved the tube sockets. At the
end of the semester we were preparing to compare the backup set of Svetlana 6L6GC
power tubes with the already-installed Sovteks. However, as soon as we switched the
tubes, there was a moderately loud hum. The hum remained even when we replaced
the tubes with the original Sovteks. It seemed to be 60 Hz noise, so we switched off the
amp to investigate for blown capacitors or resistors. Were one of the electrolytic
capacitors to pop, the amount of ripple traveling throughout the amplifier circuit would
greatly increase. The capacitors, combined with the diodes and choke, work to limit the
oscillations of the wall power, so this was a logical first step. However, no resistors,
capacitors, or tubes appeared to have burned out. After several frantic measurements,
Professor Errede discovered that the pin sockets on the power tubes were
unconscionably corroded (see pictures, Appendix 1). While one of the tube sockets had
clearly been replaced last June by Ben Juday, the others were still original and looked as
though someone had kept the amp in a high-humidity environment. Despite over an
hour of cleaning, it became obvious that for both safety and performance reasons, the
sockets would have to be replaced. Unfortunately, this was not something I could do
since it required several intricate solders in tight space. Many thanks to Professor
Errede for performing this painful fix. With new tube sockets and the Sovtek 6L6GC’s
rebiased, the amp sounded slightly cleaner, with no hum, and performed much louder
as well. The final biasing data are shown in Table 6.
Conclusion
Given the inauspicious beginnings of this project, the indecision, the lack of
funds, the lack of overt problems initially, it turned out to be a fascinating and very
difficult endeavor. Drawing on the lecture materials and the supplemental readings in

class, I learned not only about the functioning of my brother’s amplifier, but also the
fundamental principles of vacuum tubes, thermionic emission of electrons,
amplification circuits, transformers, capacitors, RC circuits, and countless other specific
facets of electronics that can only be learned during a hands-on project such as this.
Although the lack of overdrive distortion remains a mild disappointment, my brother
seems very satisfied with the sound of his amp. He currently is considering upgrading
the speakers to an even higher fidelity pair that can better handle the amps newfound
power. Additionally, replacing the preamp and power tubes with new or new old stock
ones would greatly improve clarity and perhaps even power.
Perhaps the single most important thing I learned from this project was that
“everything affects everything else.” While clearly replacing the preamp tubes would
have cleaned up the tone at the beginning, the speakers would have remained a weak
point, limiting clarity, as would the corroded pins. The power and standby switches
would have been at least a safety issue and the pots would have created noise with
every adjustment. There is no one part of an electric circuit that can be said to “not
matter at all.” This reinforces the principle set forth at the inception of the class in
January. The class was to be not merely another physics or electronics class, but one
that helped bridge the chasm between the theory and reality, that taught how to
distinguish “between the forest and the trees.” Music is perhaps the best medium for
manifesting that for all science can predict, there are some parts of humanity and nature
that defy theory and remain either too complex or too vague to analyze piecemeal.
Music and sound are both very real concepts that have very quantitative aspects, but
there has yet to be a definitive or overarching theory that explains why certain people
perceive a sound one way or find one type of music pleasing. Once again, thanks to
Professor Errede for his patience, knowledge, and much needed help and counsel.

References Barbour, Eric. “EL34–History and Comparisons.” www.vacuumtube.com. Barbour, Eric. “How a Vacuum Tube Works.” www.svetlana.com/docs/tubeworks.html Barbour, Eric. “KT88 and 6550: The Power Kings.” www.vacuumtube.com. Barbour, Eric. “6L6 Forever.” www.vacuumtube.com. Barbour, Eric. “The Cool Sound of Tubes.” IEEE Spectrum. August 1998 (24-35). Coxwell, Paul. “Vacuum-Tube Basics.” Popular Electronics. October 1993 (53-63, 94). Errede, Steve. “Diodes and Diode Circuits.” Lecture Notes. Errede, Steve. “Thermionic Emission of Electrons.” Lecture Notes. Errede, Steve. “Triode Voltage Amplifier.” Lecture Notes. Schematic Heaven. (Fender schematics).

Appendix 1: Pictures
Above: The amp on its custom-built amp stand.
Left: The old master volume switch and the capacitor, both used for overdrive circuit are circled in red in this picture of the wiring of the amp. Below: Pictures of the replacement 1997 Eminence speakers. Compare the magnet and voice coil with those

Counter-clockwise from top right: Notice the smaller voice coil in the original speakers; the smaller magnet on the original Fender speakers; the biasing pot; the damaged pins on one of the old power tube sockets–look closely for corrosion and signs of abuse; a curious fellow performs an investigation of his own.

Table 2
Table 1
Appendix 2: Tables/Data
Initial Bias (mA) Final Bias (mA) Tube 1 24.6 20.1 Tube 2 25.9 21.2 Tube 3 25.1 20.7 Tube 4 26.1 21.8
Screen (VDC) Plate (VDC) 470Ω Res. (VDC) Tube 1 439 439 .26 Tube 2 439 439 .25 Tube 3 439 439 .29 Tube 4 439 439 .24
Initial Voltages Final Voltages Vmain secondary 658 VACRMS 659 VACRMS VB+ (Operating) 438 VDC 440 VDC -VBias (Operating) -46.9 VDC -48.9 VDC
Choke (B in Schematic) 439 VDC 1KΩ Res. (C) 427 VDC 4.7KΩ Res. (D) 392.5 VDC
Tube A/B Plate (VDC) Grid (VDC) Cathode (VDC) Normal A 262.5 0 1.88 B 273.0 0 2.086 Vibrato A 271.2 0 1.867 B 261.5 0 2.091 Reverb Driver A 433 .015 8.24 B-Tied to A N/A N/A N/A Mixer Preamp A 278.5 0 1.905 Reverb Recovery B 270.5 0 1.905 Tremolo A 428 -53.4 0 B 378.8 -53.5 .006 Phase Inverter A 236.2 100 101.9 B 227.6 100 101.9
Tube 1 20 mA
Tube 2 21 mA
Tube 3 20 mA
Tube 4 20 mA
VB+ 441 VDC
-VBias -49.5 VDC
Table 3
Table 4
Table 5
Table 6

Appendix 3: Schematics
Above: The original schematic from CBS. Below: The much simpler and much more relevant 1963 “Black Face” schematic. The area circled contains the components
difi d b th d i i it