lightcamera - pyronix
TRANSCRIPT

LIGHTCAMERA USER GUIDE
Document SAP: 102028109-01

ii LIGHTCAMERA USER GUIDE

iiiLIGHTCAMERA USER GUIDE
CONTENTSCamera Overview 4
Side view 4Front view 4
ProControl+ Main Screen 5Sharing the Device 5Camera Live Stream Control Overview 6Features 7
Activate sirens 7Flood light activation 7Image quality 7Two way talk 8Zoom 9Snapshot 9Record stream 10
View snapshots and recordings 10Pause stream 10Alarm output 11Flip view 11
Settings Overview 11Advanced Settings Configuration 12
Light settings 12Adjust brightness 12Light linkage 12
Notifications 13Enabling and disabling notifications 13Push notification scheduling 13Draw motion detection area 15Motion detection sensitivity 15LightCamera sound mode 16
Network signal 16Storage status 16
Initialising memory card 16Device version 17Image and video encryption 17
Maintenance 17Cleaning 17
FAQs 18
CAMERA DETAILS
Serial number
Verfication code
Please note: If the verification code is lost, it cannot be changed or retrieved.
Affix spare camera details
sticker here

4 LIGHTCAMERA USER GUIDE
CAMERA OVERVIEWSIDE VIEW
Flood lights
MicroSD card and reset button(behind closed door)
PIR sensor
Camera details sticker(serial number and veri�cation code)
Light-CAM/wht
SN: E43178523
Verification Code: RFDWSA
Input: 110-240V~, 50/60Hz, 0.39A, 40W
Made in China
10/2020
FRONT VIEW
Flood lights
Camera lens
Infrared lightMicrophone
PIR sensor

5LIGHTCAMERA USER GUIDE
PROCONTROL+ MAIN SCREEN
Playback
Change view
Search
Add device
Share camera
Camera settings
ProControl+ home screen
View alarm system and camera notifications
View pictures and video clips, account settings and options
SHARING THE DEVICE
Step 1
Click the share icon.
Step 2
Select ‘Add Recipient’.
Step 3
Enter either the telephone number or the email address of the recipient.
Step 4
Choose to add another recipient or proceed by tapping ‘Next’.
Step 5
Select the permissions and the details then tap ‘Finish’.
Please note: Some features such as manually activating the flood lights and siren are not available for secondary users (have had the camera shared to them). The same login details must be used by multiple users to gain access to these features.

6 LIGHTCAMERA USER GUIDE
CAMERA LIVE STREAM CONTROL OVERVIEW
Activate siren and flood lights
Flood light control
Image quality selection
Two way talk
Zoom
Snapshot
Record
Pause stream
Alarm output (not available on the LightCamera)
Image flip

7LIGHTCAMERA USER GUIDE
FEATURESACTIVATE SIRENS
The LightCamera has a loud siren built in which can be triggered via the smart device application.
To activate the siren, tap the icon pictured on the left. When activated, the symbol will turn red.
To switch the siren off, press the red icon (pictured left) and the siren will silence. Once deactivated, the icon will turn back white.
FLOOD LIGHT ACTIVATION
The two flood lights on the LightCamera have a maximum brightness level of 2500 lumens and can be manually switched on if required.
Tap the light icon (pictured left) to switch on the two flood lights. The icon will turn red when the lights are on.
To extinguish the lights, tap the red icon pictured left. The icon will go back white when the lights have switched off.
IMAGE QUALITY
The quality of the live stream can be changed on the LightCamera. The options are Standard, HD and Ultra HD.
Please note: The higher the image quality, the more data it will use when live streaming and will take up more space when saving recordings to the memory card (if inserted).
To change the image quality, click the icon pictured left and a drop down menu will appear.
Ultra HD
This option is a full high definition resolution of 1920 × 1080px and will use the most data and bandwidth to stream and record.
HD
With a resolution of 1280 x 720px, this option uses less data and bandwidth than Ultra HD (but more than standard) whilst maintaining a clear image.
Standard
This is lowest resolution option with a resolution of 720 × 480px, and therefore uses the least data and bandwidth when live streaming.

8 LIGHTCAMERA USER GUIDE
TWO WAY TALK
The LightCamera has an inbuilt speaker and microphone allowing for two way talk. This allows a conversation between a person at the LightCamera and someone communicating to them through the smart device application.
To start the two way talk feature, press the microphone icon (pictured left).
Step 1
Tap the microphone to start two way talk.
Step 2
The smart device application will now connect to the camera.
Step 3
Push and hold the red microphone button to talk and release to listen.
To end the two way talk connection, press the symbol in the top right corner of the microphone box.

9LIGHTCAMERA USER GUIDE
ZOOM
To zoom in on the image, click the icon pictured left. Every time the icon is tapped, the zoom ratio will change and move to the next one in the cycle before returning to the standard view.
Zoom view options
Normal view 2.0x zoom 4.0x zoom 8.0x zoom
SNAPSHOT
Tap the camera icon (pictured left) to take a snapshot of the current image.
When a snapshot is taken, a thumbnail of the image taken will be in the bottom left corner of the image.
This thumbnail will vanish after approximately 3 seconds.
If the image is clicked, it will open up the folder containing all the saved images and clips.
To view any of the images or clips, tap the desired thumbnail.
To return to live view, select the ‹ icon in the top left corner.

10 LIGHTCAMERA USER GUIDE
RECORD STREAM
Tap the white recorder icon (pictured left) to start recording the live stream.
Whilst recording, the recorder icon will turn red. Tap to stop recording and the icon will return to it’s white variant.
When a stream has finished recording, a thumbnail of the video will be in the bottom left corner of the image.
This thumbnail will vanish after approximately 3 seconds.
If the thumbnail is clicked, it will open up the folder containing all the saved images and clips.
To view any of the images or clips, tap the desired thumbnail.
To return to live view, select the ‹ icon in the top left corner.
VIEW SNAPSHOTS AND RECORDINGS
Snapshots/images and recordings can also be accessed by selecting from the main screen and selecting ‘Pictures and Videos’.
PAUSE STREAM
To pause the stream, tap the pause icon (pictured left).
Whilst the stream is paused, the icon will become a ‘play’ icon (pictured left). This will resume the live stream.
Whilst paused, the ‘play icon’ will also appear in a circle in the centre of the stream image window. This can also be
tapped to return to the live feed.

11LIGHTCAMERA USER GUIDE
ALARM OUTPUT
This function is not supported by the LightCamera.
FLIP VIEW
Tap the mirror icon (pictured left) to flip the live stream 180°. Tap again to return the stream to the original position.
SETTINGS OVERVIEWTime zone
Configures the time zone so the hours are adjusted based on your location.
DST (Daylight Saving Time)
DST adjusts the time +/- 1 hour in accordance with countries observing this practise.
Date format
Alters how the date is displayed on live feeds, snapshots, recordings etc.
Light settings
Adjusts the settings of the flood lights such as brightness and activation zones.
Notification
Configures event and push notifications as well as detection areas that trigger notifications.
Microphone
Enables and disables the use of the LightCamera’s on-board microphone.
Network signal
Displays the strength of the signal between the LightCamera and the wireless router.
Configure network
This is used to re-connect the LightCamera to the wireless network or connect the LightCamera to a new network.
Storage status
Initialises the MicroSD memory cards to use with the device.
Device version
Displays the firmware version the camera is currently operating on.
Image and video encryption
If enabled, this requires anyone who the camera is shared with to enter the password when they first attempt to view the stream.
IR light
Enables and disables the infrared light at night. If enabled, the images are clear, black and white images. If disabled, the image is in colour but with more image noise.

12 LIGHTCAMERA USER GUIDE
ADVANCED SETTINGS CONFIGURATIONLIGHT SETTINGS
ADJUST BRIGHTNESS
Step 1
Select ‘Adjust Brightness’.
Step 2
Use the slider to adjust how bright the flood lights are when activated.
Step 3
Select the ‹ icon in the top left corner to return to the previous menu.
LIGHT LINKAGE
Step 1
If the light linkage slider is disabled, enable it by tapping the slider then tap the ‘Light Linkage Area Settings’.
Step 2
This screen shows the current detection zone which will trigger the flood lights to illuminate.
Step 3
The detection area can be edited by tapping the zones. Blue areas are still active.
Step 4
Once the detection area is finalised, click ‘save’.
Please note: This section defines the area that causes the PIR sensor to trigger the flood lights.

13LIGHTCAMERA USER GUIDE
NOTIFICATIONS
ENABLING AND DISABLING NOTIFICATIONS
To enable notifications, tap the slider at the top of the screen.
Decide and select whether to receive events and push notifications...
...or just enable events without push notifications.
Receive events and push notifications
When the video analytics determines movement, the app will store an event as well as alerting the user with a push notification along with an alert tone on the smart device.
Receive events but not push notifications
When the video analytics determines movement, the app will store an event but there will be no push notification alert or an alert tone on the smart device.
Please note: For push notifications and audible alerts to be delivered on the smart device, they must be enabled in the notification settings of the smart device.
PUSH NOTIFICATION SCHEDULING
This feature allows the user to tailor when push notifications are received by creating a weekly cycle.
In line with the configured schedule, the app will automatically turn the notifications slider on and off to enable and disable notifications being delivered.
Each schedule is created daily on a weekly cycle. In order to create a schedule that goes throughout the night, you must create a morning schedule and an evening/night schedule timer.
For example, to start at 8 in the evening and finish at 8 in the morning, two timers must be set. One at 20:00 till 11:59 and one at 00:00 whilst 08:00.
Please note: The time frames (shown in blue) scheduled will be the periods when notifications will be delivered.
14 LIGHTCAMERA USER GUIDE
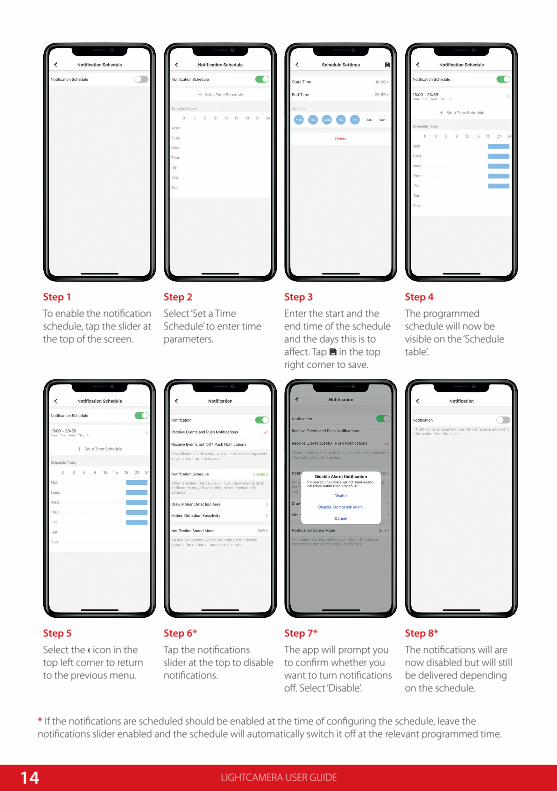
Step 1
To enable the notification schedule, tap the slider at the top of the screen.
Step 2
Select ‘Set a Time Schedule’ to enter time parameters.
Step 3
Enter the start and the end time of the schedule and the days this is to affect. Tap in the top right corner to save.
Step 4
The programmed schedule will now be visible on the ‘Schedule table’.
Step 5
Select the ‹ icon in the top left corner to return to the previous menu.
Step 6*
Tap the notifications slider at the top to disable notifications.
Step 7*
The app will prompt you to confirm whether you want to turn notifications off. Select ‘Disable’.
Step 8*
The notifications will are now disabled but will still be delivered depending on the schedule.
* If the notifications are scheduled should be enabled at the time of configuring the schedule, leave the notifications slider enabled and the schedule will automatically switch it off at the relevant programmed time.

15LIGHTCAMERA USER GUIDE
DRAW MOTION DETECTION AREA
Video analytics
The LightCamera utilises video analysis and can apply this technology to determine movement in the scene it is viewing. The scene is divided into segments creating smaller scenes within the overall image. The camera analyses each segment and if there is movement, it can be programmed to trigger an action
It is important to manually adjust this feature correctly as each segment that detects movement will trigger a notification. If this feature is not configured correctly it can result in an excess of notifications.
For example, active segments in areas where car headlights can trigger them should be avoided.
The draw motion detection area feature allows the user to select exactly which areas of view will trigger notifications and events.
The red squares are the segments that will trigger events and the empty squares are the inactive segments.
Tap the squares to alter them between active and inactive segments.
Once the grid has been finalised, tap the tick to save.
Please note: It is important that this is tested and configured correctly. It is also recommended that the active squares are spaced out in chequerboard pattern.
MOTION DETECTION SENSITIVITY
Low sensitivity
Requires a larger object such as a person to trigger the camera.
Medium sensitivity
The device will trigger a little easier and can be triggered by pets.
High sensitivity
The device is very sensitive and can be triggered easily.
Please note: It is recommended that this is tested thoroughly to prevent being overwhelmed with event and push notifications.

16 LIGHTCAMERA USER GUIDE
LIGHTCAMERA SOUND MODE
Sound volume
Choose between the three volume levels of:
• Intensive• Soft• MuteLight
Tap the slider to toggle whether the device’s flood light comes on when the LightCamera is triggered.
Please note: Enabling the ‘Light’ option links the flood light activation to the cameras motion. If the camera is triggered at night and the device illuminates, this may attract insects such as moths which in turn may trigger the camera further.
NETWORK SIGNAL
Excellent Good Fair Weak> -50dBm -50 to -60 dBm -61 to -70 dBm < -71dBm
The signal strength between the LightCamera and the router is displayed in dBm (decibel-milliwatts). As it is displayed in negative numbers, bear in mind that -30dBm is a stronger signal than -60dBm.
Please note: Typically, the LightCamera will work in the ‘Fair’ category, however we recommend that the LightCamera is only installed in either ‘Excellent’ or ‘Good’ locations.
STORAGE STATUS
INITIALISING MEMORY CARD
Before the MicroSD card can be used, it needs to be initialised.
Step 1
Select ‘Memory Card’.
Step 2
Tap ‘Initialise’.
Step 3
Wait for the camera to format the card. When it reaches 100%, initialisation is complete.
Please note: In order to record video on the devices, they must be fitted with a Class 10, U1 MicroSDHC card. This is important for the camera to be able to record correctly at HD to full HD. The maximum size for an SDHC card is 128GB.

17LIGHTCAMERA USER GUIDE
DEVICE VERSION
As well as displaying the firmware that the LightCamera is currently operating on, this option will also display if there is a new version of firmware for the device. To update,
just tap this option and the device will update the firmware ‘over-the-air’.
IMAGE AND VIDEO ENCRYPTION
To add extra protection to cameras that are shared with others, ‘Image and Video Encryption’ can be enabled.
To enable, click the slider and a confirmation message will appear. Click ‘OK’ to proceed.
The password required is the verification code, which can be found on the sticker affixed to the LightCamera. An example of this is ‘RFDWSA’ (shown to the right).
Enter the verification code and tap ‘Save’.
When this camera is now shared with other devices such as other smart device application users or NVRs, this verification code will need to be entered the first time that device tries to connect.
Subsequently to it being entered, this device will not require it to be entered again.
Light-CAM/whtSN: E43178523
Verification Code: RFDWSAInput: 110-240V~, 50/60Hz, 0.39A, 40WMade in China10/2020
Please note: This factory verification code can’t be changed.
MAINTENANCECLEANING
Do
Even on low sensitivity, small objects when close to the device can trigger alarms. With this in mind, it is important to check around the device to make sure there are no cobwebs or other insect dwellings.
It is important that the device is cleaned often with a damp soft cloth, ideally a microfibre cloth.
Make sure when cleaning to check for gritty deposits before wiping as this could potentially scratch the lens surface.
Do not
Do not use aerosol sprays, solvents, or abrasives, as they may contain chemicals which can damage plastics and/or affect the performance of the product.
Under no circumstances should the internals of the device be cleaned as this can damage the electronics.
The PIR lens and camera lens should not be touched with anything else but a cloth as it can damage/scratch the lens or leave fingerprints. This can in turn lead to an increase in false alarms or have the inverse affect and make the device fail to detect correctly.

18 LIGHTCAMERA USER GUIDE
FAQSWhy do I get multiple notifications when it is raining?Please check the ‘Motion Detection Sensitivity’ settings, these need to be on low. If they are, the notifications will continue as the technology being used is Video Motion Detection (VMD). You should also try reducing the active segments in ‘Draw Motion Detection Area’.“Draw motion detection area” on page 15“Motion detection sensitivity” on page 15
How do I turn off notifications?Select ‘Notifications’ within the app and the slider to disable.“Enabling and disabling notifications” on page 13
How do I turn on the notifications?Select ‘Notifications’ within the app and the slider to enable.“Enabling and disabling notifications” on page 13
Can the camera be added to a NVR or DVR?Yes, the camera can be added to a Pyronix/Hikvision NVR. It can also be added to a Pyronix/Hikvision DVR if the DVR has IP video channels available.
Can the camera be used for video verification?Yes, the camera can be set up for video verification and linked with a Pyronix outdoor detector such as the XDL12TT-AM for a more accurate detection configuration.Click here for video verification PyronixSay web page
How do the flood lights trigger?The lights are activated by the PIR sensor.“Camera Overview” on page 4“Light linkage” on page 12
Why is the image sometimes black and white at night?The image is black and white because the infrared (IR) function is enabled and has turned on.“IR light” on page 11
Why is the image sometimes in colour at night?If the IR Light is disabled, the image will remain in colour.
If enabled, you can still sometimes view a colour picture. This is because the flood lights have activated, producing enough light so that the infrared is not needed. Therefore the IR switches off and the picture appears in colour.“IR light” on page 11
What SD card is required?The camera must be fitted with a Class 10, U1 MicroSDHC card with a maximum capacity of 128GB.“Initialising memory card” on page 16
How can I find out what my verification code is?The verification code can be found on the sticker located on the side of the camera. It may also be found on the contents page of this booklet if it has been copied over or if the spare sticker has been affixed.“Camera details” on page iii“Camera Overview” on page 4
What is the lowest signal strength (dBm) the camera requires to operate?It is advised that -80dBm is the lowest signal strength to install at. Even though at a lower reading an image may stream, wireless signals fluctuate and there is a high risk of encountering issues.“Network signal” on page 16
Can you change the amount of time the flood lights are on once they have been triggered?There is no option to change the period of time the lights stay on when activated.“Light linkage” on page 12

19LIGHTCAMERA USER GUIDE
Should I have the IR light setting enabled?It is recommended that the IR setting is enabled. When enabled, the images are clear, black and white images. If disabled, the image is in colour but with more image noise.“IR light” on page 11
How do I view and save playback?When connected to the camera and viewing live stream:
• Select the three dots in the top right corner.• Select playback • Choose a time.• Select the white recorder icon; which will turn red whilst recording.• Tap the red recorder icon to stop the recording. • This will now save in the pictures and videos option in ‘More’ on the app’s main screen. From here you can save, play, delete, and share the clip.“ProControl+ Main Screen” on page 5“Record stream” on page 10
Can you disable the flood lights temporally coming on when there is motion? No, the flood lights can only be enabled or disabled.“Light linkage” on page 12
I have lost the verification code, can it be retrieved?If the sticker on the camera has been damaged and the verification code has been lost, please refer to the section at the bottom of the contents page. If the verification code has not been copied over or the sticker has not been affixed next to this section, there is no way to retrieve the code.“Camera details” on page iii“Camera Overview” on page 4
